

Page 1

Page 2

eNOTE User Guide
INTRODUCTION
Thank you for your purchase of the eNOTE. This guide will detail the way to make best use of this
product. You must read this guide carefully prior to using the product to prevent damage to yourself or
your eNOTE, Please kindly store this guide for future reference.
Information in this guide has been carefully checked for accuracy and is subject to change without
notice.
No part of this manual may be reproduced, stored in a retrieval system, or transmitted, in any form or
by any means, electronic, mechanical, photocopy, recording, or otherwise, without prior written
permission.
2
Page 3
FCC Information to User
3
Page 4

eNOTE User Guide
Contents
INTRODUCTION......................................................................................................... 2
FCC Information to User ............................................................................................ 3
Contents........................................................................................................................4
Chapter 1 Getting Started........................................................................................ 6
1 Using of the Battery Pack ............................................................................7
Installation of the Battery Pack.................................................................. 7
Replacement of the Battery Pack ............................................................. 8
2 Connecting of the AC Adapter..................................................................... 9
Connect the AC Adaptor............................................................................. 9
Conditions of Power Supply ...................................................................... 9
Removal of the AC Adapter .....................................................................10
3 Power ON/OFF............................................................................................ 11
Power ON................................................................................................... 11
Power OFF ................................................................................................. 11
4 Power Saving Mode.................................................................................... 13
Standby mode............................................................................................ 13
Sleep Mode ................................................................................................ 13
Set up the Property of Power Option ..................................................... 14
Chapter 2 Basic Operations.................................................................................. 18
1 A Glance at Your eNOTE ........................................................................... 19
Front ............................................................................................................ 19
Right Side................................................................................................... 20
Left Side...................................................................................................... 21
Downside ....................................................................................................21
2 How to Use Touch Pad............................................................................... 23
Move the Mouse Cursor........................................................................... 23
Click............................................................................................................. 23
3 How to Use the Keyboard.......................................................................... 25
Key features and operations of the Keyboard...................................... 25
Names and Functions of the Keyboard ................................................. 26
4 Volume Function.......................................................................................... 31
Volume Adjustment ...................................................................................31
Volume Balance Adjustment.................................................................... 32
5 How to Use the Web Camera.................................................................... 34
4
Page 5

Use the Web Camera ............................................................................... 34
Chapter 3 System Extension.................................................................................37
1 How to Use WLAN ...................................................................................... 38
Description of WLAN ................................................................................38
Specification of WLAN.............................................................................. 38
Connecting WLAN.....................................................................................38
Disconnecting WLAN................................................................................ 41
2 How to Use Bluetooth................................................................................. 42
Description of Bluetooth........................................................................... 42
Specification of Bluetooth.........................................................................42
Connecting Bluetooth ...............................................................................42
Disconnecting Bluetooth .......................................................................... 43
3 How to Use a USB Device......................................................................... 45
Description of USB.................................................................................... 45
Specification of USB ................................................................................. 45
Connection of USB ................................................................................... 45
Removal of USB ........................................................................................ 45
4 How to Use a Memory Card ...................................................................... 47
Usable Memory Card................................................................................ 47
Inserting a Memory Card ......................................................................... 47
Removing the Memory Card ...................................................................47
5 How to Use VGA D-Sub 15 Port............................................................... 49
Chapter 4 Caring for Your eNOTE ....................................................................... 50
1 Caring for Your eNOTE .............................................................................. 51
Important Safety Instructions................................................................... 51
Cleaning Your eNOTE ..............................................................................52
Maintaining the LCD Quality.................................................................... 52
Maintaining Your Hard Disk ..................................................................... 53
Battery Care Guidelines........................................................................... 53
When You Travel .......................................................................................54
Chapter 5 Technical Support................................................................................. 55
1 Technical Support........................................................................................ 56
Appendix A Spec sheet for eNOTE ................................................................... 57
Appendix B Startup of BIOS Setup.................................................................... 59
5
Page 6

eNOTE User Guide
Chapter 1 Getting Started
This chapter describes the way to install battery pack and AC adapter or how to make best use of the
Power Saving Mode will be illustrated in this section.
1 Using of the Battery Pack
2 Connecting of the AC Adapter
3 Power ON/OFF
4 Power Saving Mode
6
Page 7
1 Using of the Battery Pack
Your eNOTE can be powered by the supplied AC adapter or by a charged battery pack. The battery
pack will be charged automatically when the AC adaptor is connected.
Note
You should use the AC adapter whenever it is possible, relying on the battery pack only when AC
power is unavailable. Since the battery pack is expendable equipment, continuous use will shorten
its life and usable time.
Before you use your eNOTE, install and recharge the battery pack first. The rechargeable Li-Ion battery
pack allows you to operate the eNOTE without an external power source. When you connect the AC power
adapter, the battery immediately starts to recharge. For maximum battery performance, fully discharge the
battery before recharging it the first time. To do so, unplug the AC adapter, turn off power management
features, and turn on the system. Once the battery is fully discharged, plug in the AC adapter and recharge
the battery.
If you do not discharge the battery completely, it fails to accept a full recharge.
Attention
Li-Ion battery is vulnerable, do not charge it with other power adapter, or it may cause fire or
explosion.
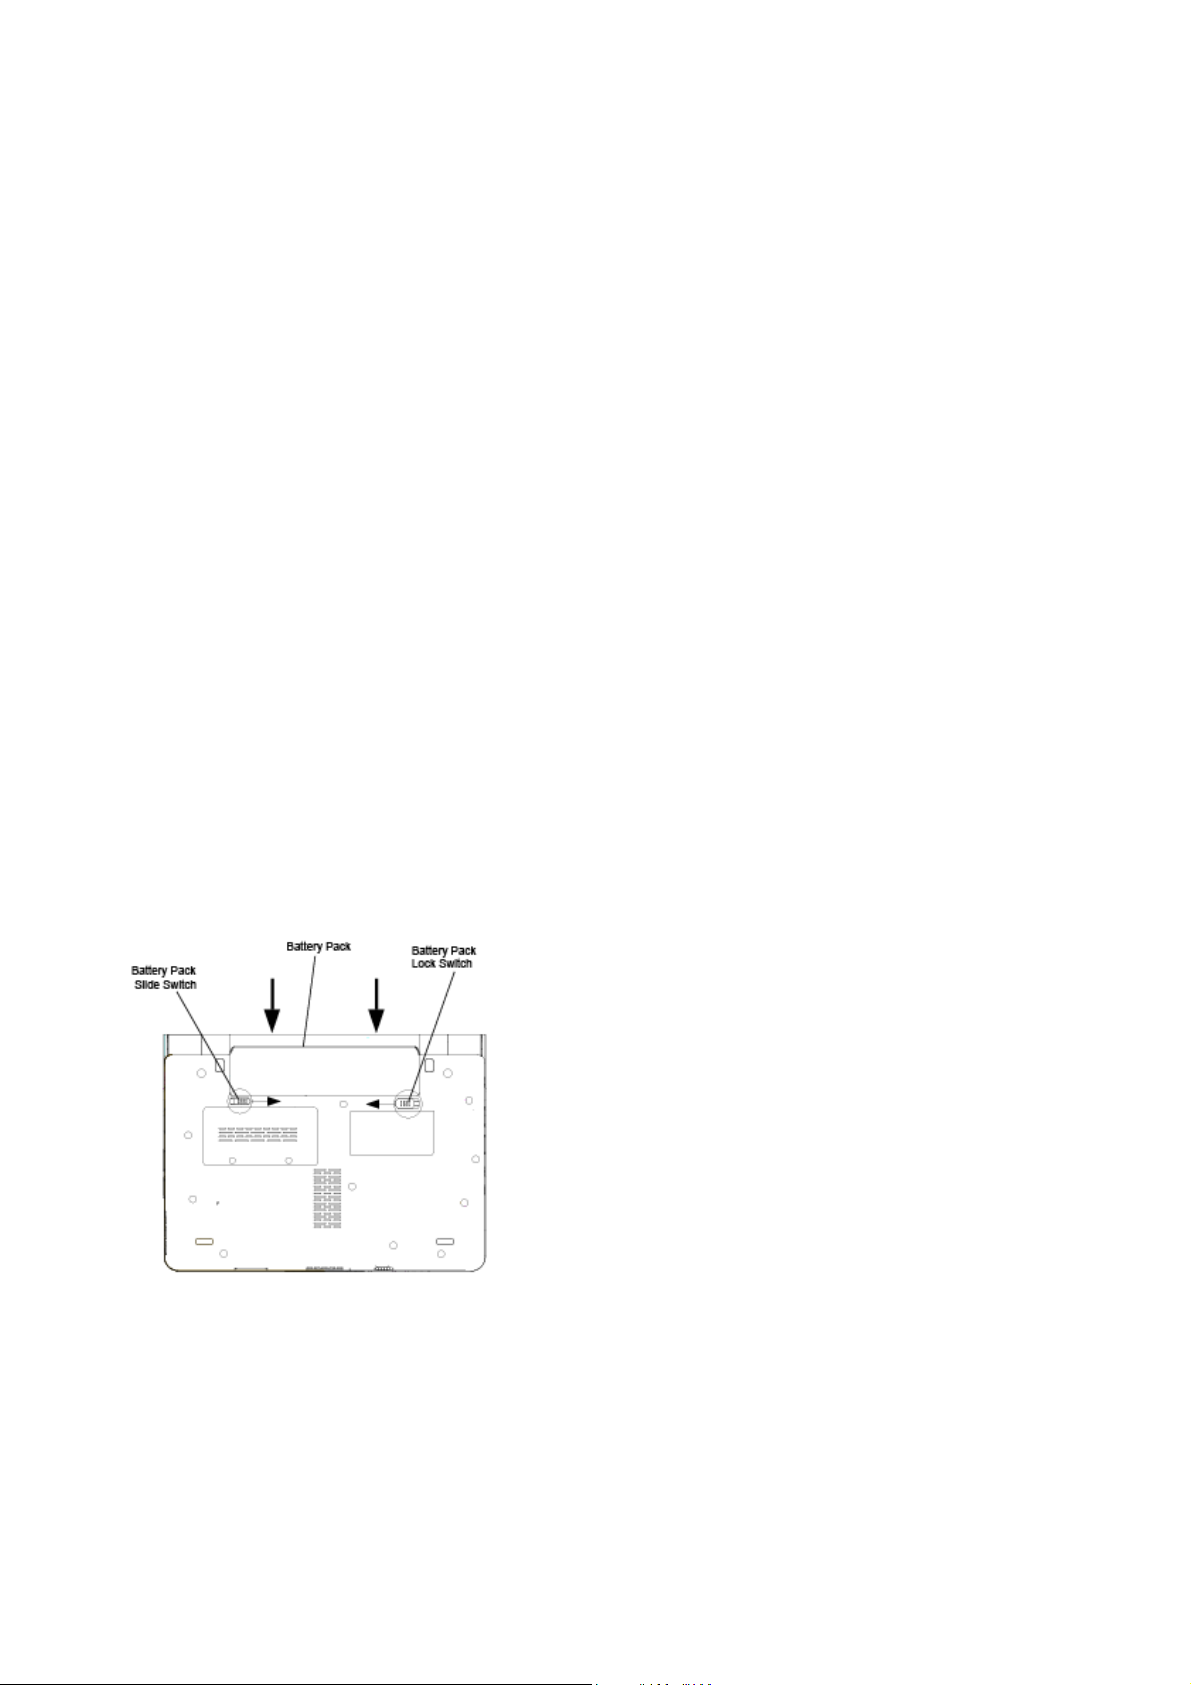
Installation of the Battery Pack
1 Turn the eNOTE upside down
2 Slide the battery pack for installation in the direction of the arrow. Slide it towards the battery
pack slot until the slide switch clicks into place.
3 Slide the battery pack lock switch to the end of the left side. Make sure the battery pack is
7
Page 8
eNOTE User Guide
securely locked.
Replacement of the Battery Pack
When your eNOTE estimates that the battery only has enough charge to continue for a few minutes, it
will alert you with a battery low warning. If you are consuming a lot of power by using the audio system,
and the hard disk drives, your eNOTE might run out of charge much sooner than you expect. You
should always respond to the battery low indication by connecting to AC power or turning off your
eNOTE, or suspending your eNOTE to disk. If you do not do so, the eNOTE will automatically
suspend to disk and turn off. The contents of the memory will store in the hard disk drive. You will be
unable to restart the eNOTE until you have connected to the AC adapter or installed a charged battery.
Please refer to the below illustration for replacing of the battery pack.
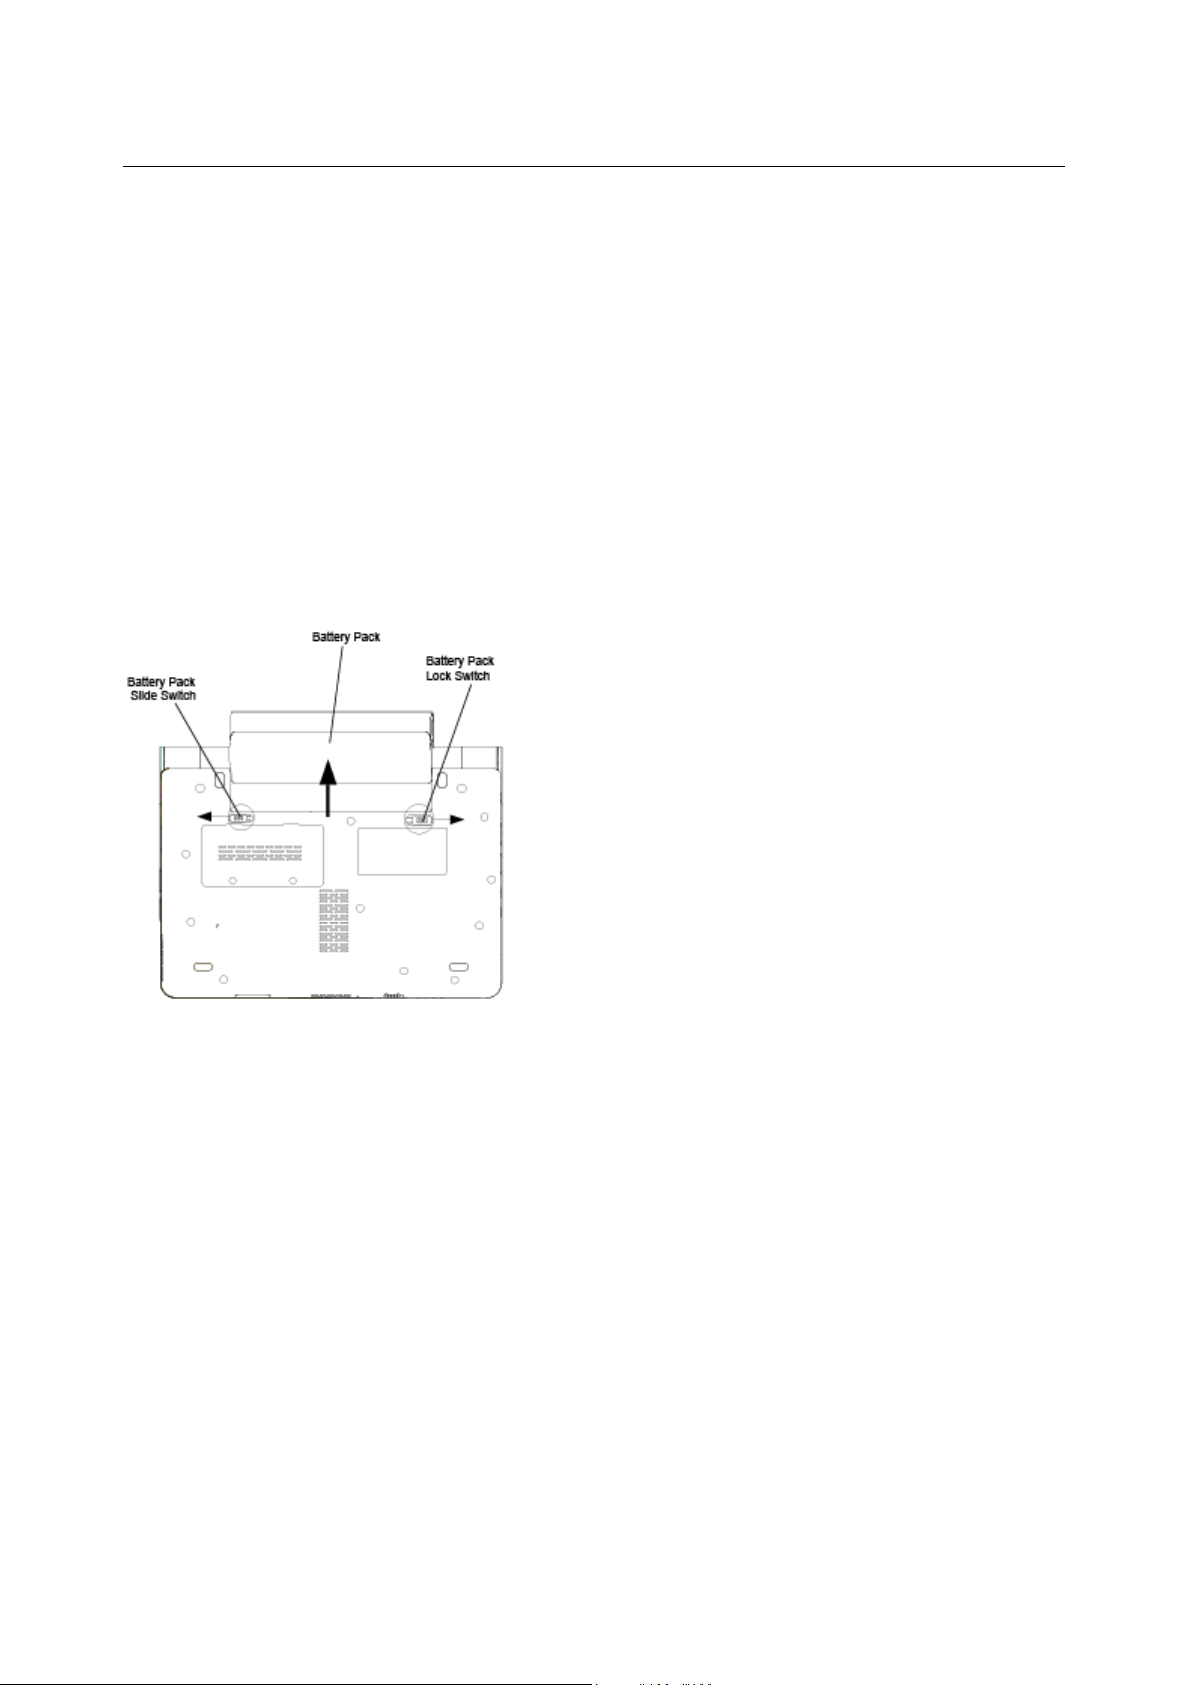
1 Switch off the power of the machine.
2 Turn the machine upside down.
3 Slide the battery pack lock switch to the end of the right side.
4 Remove the battery pack by sliding the battery pack slide switch to the end of the left side.
5 To install the battery pack to the machine ,please refer to previous section on “Installation of the
Battery Pack”.
8
Page 9
2 Connecting of the AC Adapter
The AC adapter provides external power source to your eNOTE and charges the internal battery pack
at the same time.
Connect the AC Adaptor
Caution
Never use another AC Adaptor and power cord that is not supplied with this product for this
machine; otherwise, it may result in not only breakdown but also ignition or fire.
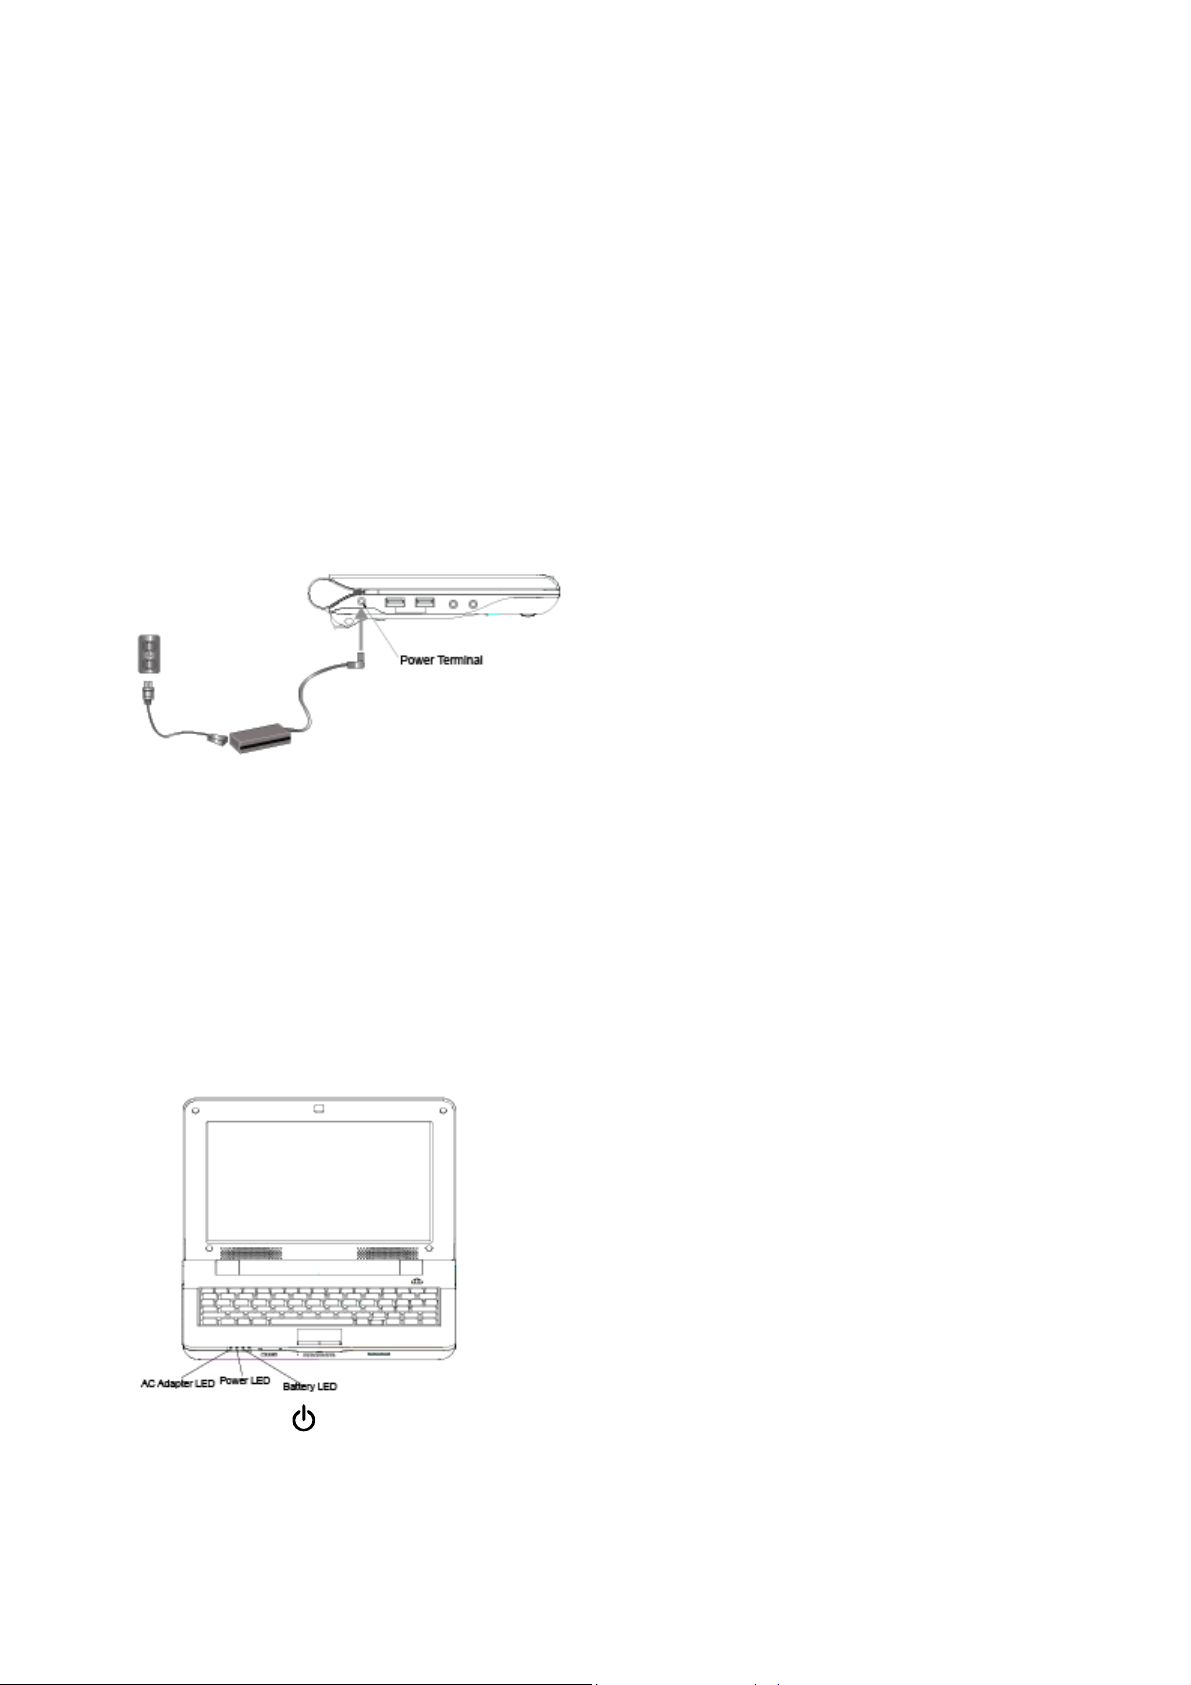
1 Insert the head of the AC Adaptor into the power terminal of this machine.
2 Connect the power cord to the AC Adaptor.
3 Insert the plug of the power cord into the power socket.
Conditions of Power Supply
Confirm the power LED, AC adapter LED and the battery LED for the condition of the power of this
machine.
Power LED ( )
LED On: This indicates the power of the machine is switched on.
LED Blinking: This indicates it is under standby condition.
LED Off: This indicates the power of this machine is switched off or goes into the sleep state.
9
Page 10

eNOTE User Guide
AC Adapter LED( )
LED On: This indicates the machine is being powered by the AC adapter.
LED Off: This indicates the power of the machine
powered by the battery pack.
Battery LED(
LED On: This indicates the machine is being powered by the battery pack with the AC adapter
disconnected.
LED Blinking:
adapter
LED Off:
AC adapter with the battery pack disconnected. This also indicates the battery pack is fully
charged with the AC adapter connected.
connected.
This indicates that the power of this machine is switched off or is being powered by the
)
Blinking slowly indicates that the battery pack is being charged with the AC
is switched off, or the machine is being
Removal of the AC Adapter
When the battery pack is charged, you can use this machine without the AC adapter. For this, you can
remove the plug of the power cord from the power socket and then remove the AC adapter head
the power terminal of this machine.
CAUTION
Always hold the plug when disconnecting the power cord. Pulling the power cord out of the
from
socket
in an inappropriate manner may cause internal damage of the machine or fire.
10
Page 11
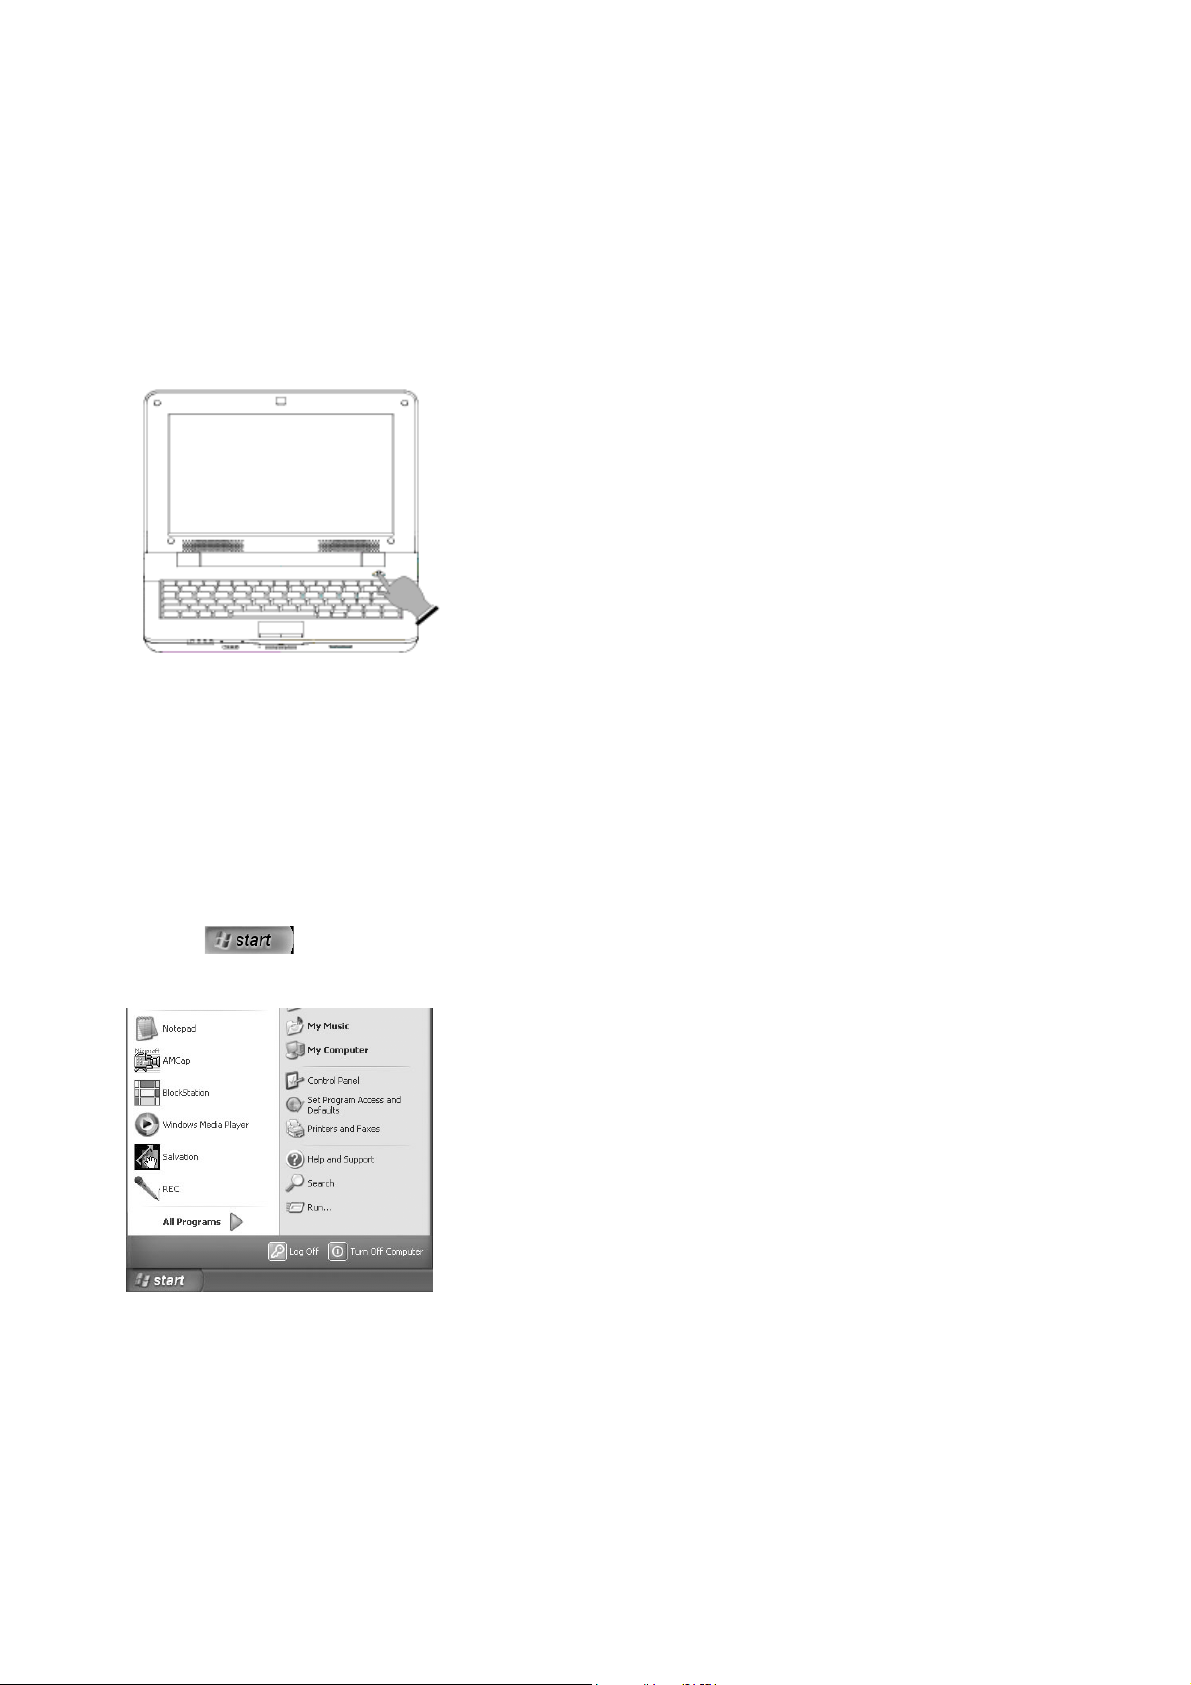
3 Power ON/OFF
This section will introduce how to switch on/off the power of this machine.
Power ON
1 Unfold the display
2 Press the power switch.
The Power will be switched on. After that, the power LED will be light up.
Power OFF
Be sure to switch off the power by using the Windows shutdown menu.
1 Click button.
The menu will be shown.
2
Click “Turn Off Computer”.
The screen of “Turn Off Computer” will be shown.
11
Page 12

eNOTE User Guide
3
Click “Turn Off”.
The power will soon be switched off.
If you can’t switch off the power
If the mouse cursor cannot move, the keyboard input fails to work, and there is no response when you
click wherever on the screen, slide the power switch of the machine and wait for over 4 seconds to
force the shutdown. In this case, please re-switch on the power by sliding the power switch after
waiting for a while and then follow the steps above to switch off the power.
12
Page 13
4 Power Saving Mode
This section will illustrate the power saving function of this machine - standby mode and sleep mode.
Standby mode
Standby mode is a function used to conserve energy consumed by the display and hard disk. The
status before entering standby mode can be saved. By operating the power switch, the machine will
return to the status before entering standby mode. Power saving mode serves as a convenient
function to save power while the machine is left without operation.
1 Click button.
The menu will be shown.
2
Click “Turn Off Computer”.
The screen of “Turn off Computer” will be shown.
3 Click “Standby”
It will soon enter standby mode.
The power LED (
) will blink in standby mode.
4 Slide the power switch
It will return to the original state from standby mode.
Sleep Mode
Once sleep mode starts, the applications and data you are processing will be saved in the hard disk
13
Page 14
eNOTE User Guide
with the power switched off. By using this convenient function, you can resume your processed work
next time when you switch on the power.
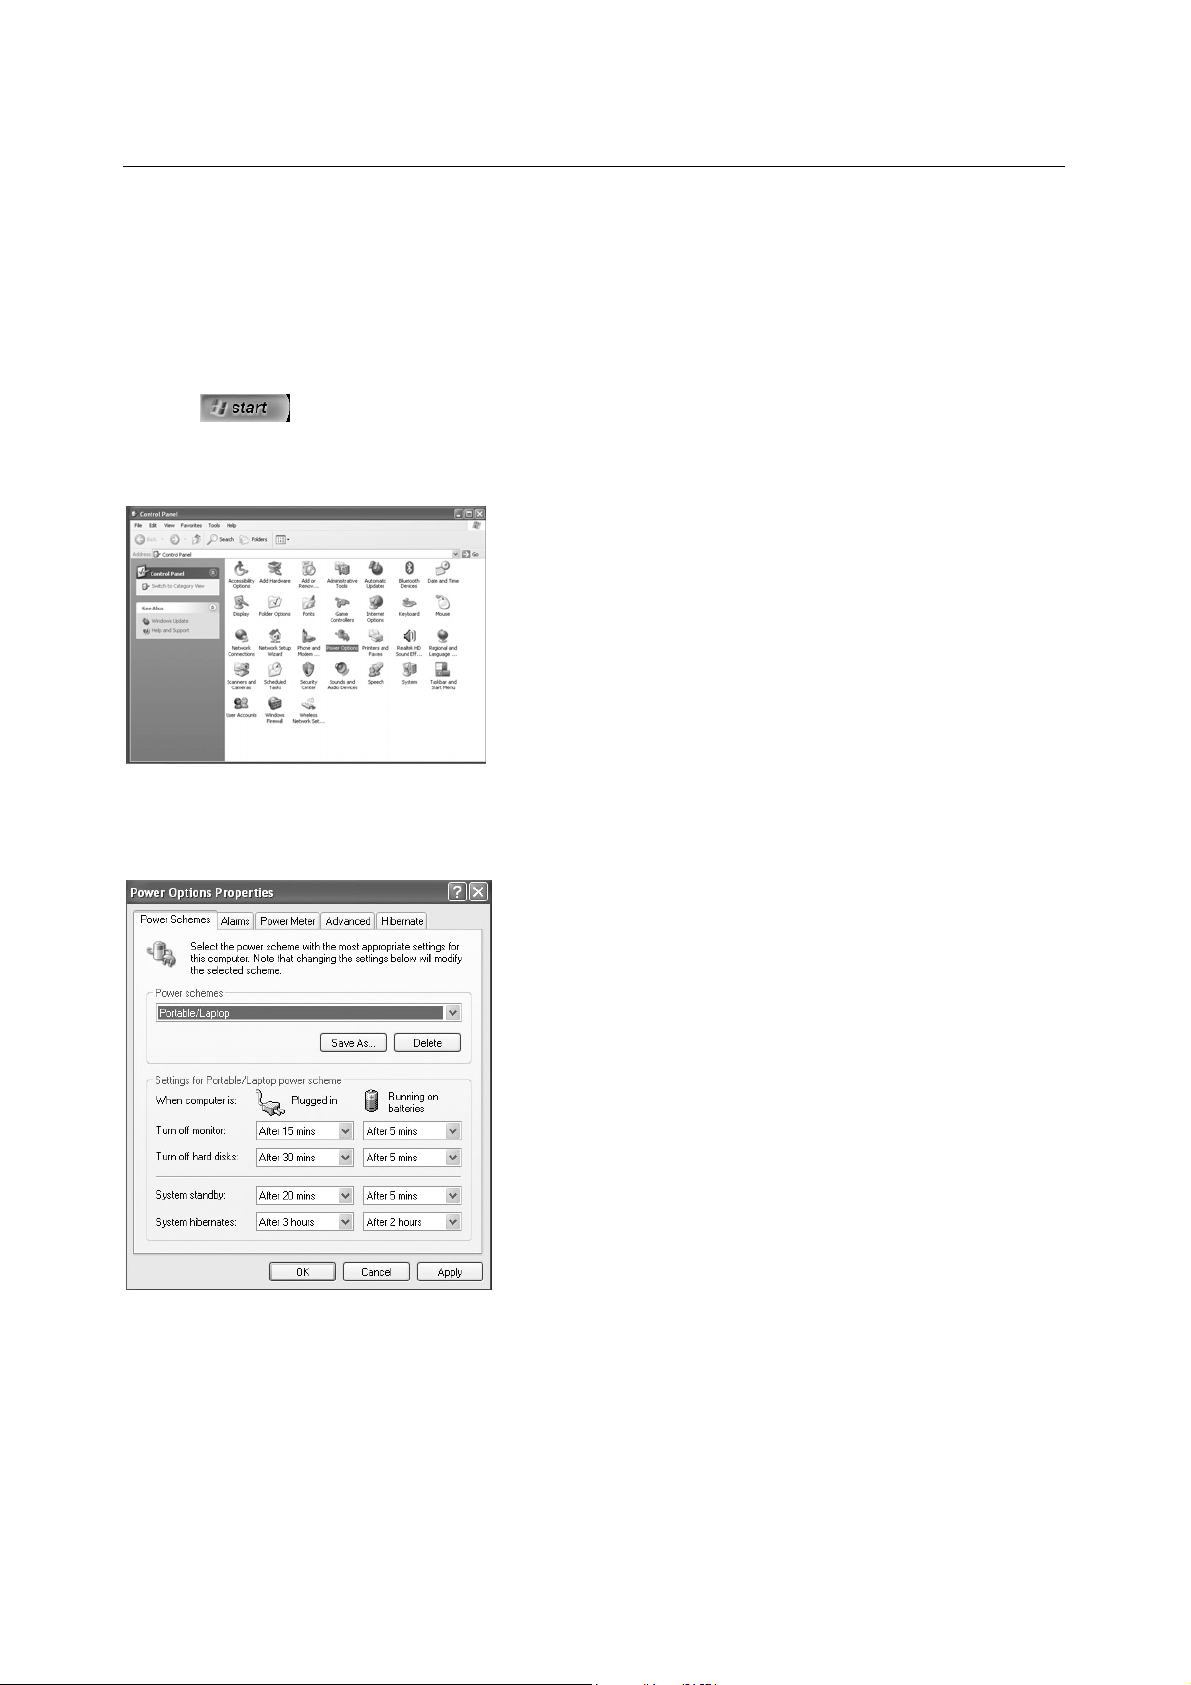
Set up the Property of Power Option
The power options properties allow you to set up the automatic start of standby mode and sleep
functions.
1 Click button. Select “Control Panel” from the displayed menu. The screen of “Control
Panel” will be displayed.
2 Double-click the icon of the power options.
The dialogue box for “Power Options Properties” will be displayed.
3 Open each tab of the dialogue of “Power Options Properties” and set up each power saving
function.
“Power Schemes” tab
The “Power Schemes” tab allows you to set up the automatic start time for standby mode.
14
Page 15
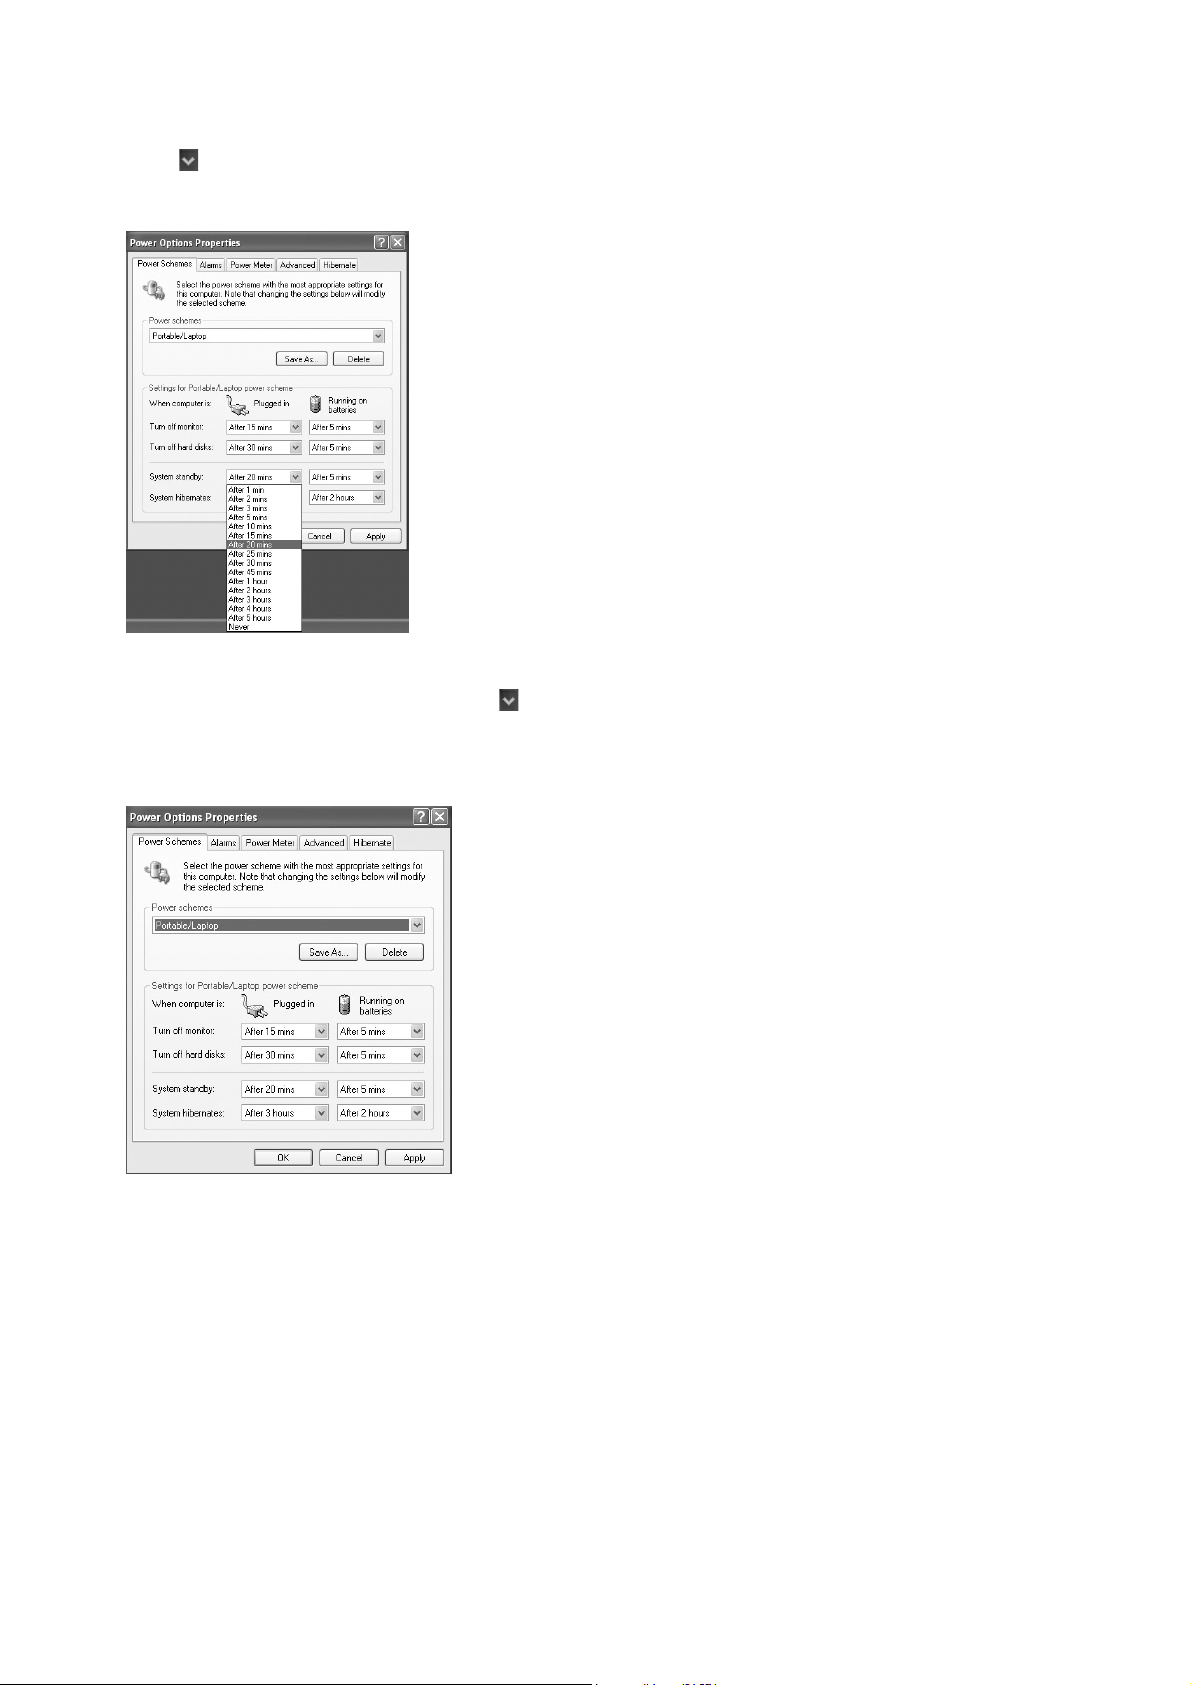
Click button of “System standby.” Select from the displayed drop down menu how much lapse time
it will take to enter into standby mode automatically when you use the AC adapter or the battery pack.
When you use “Hibernate” tab to enable the hibernate function, the item “System hibernates” will be
added to the “Power Schemes” tab. Click
menu how many hours later you will enter hibernate mode automatically when you use the AC adapter
or the battery pack.
button of “System hibernates.” Set up on the displayed
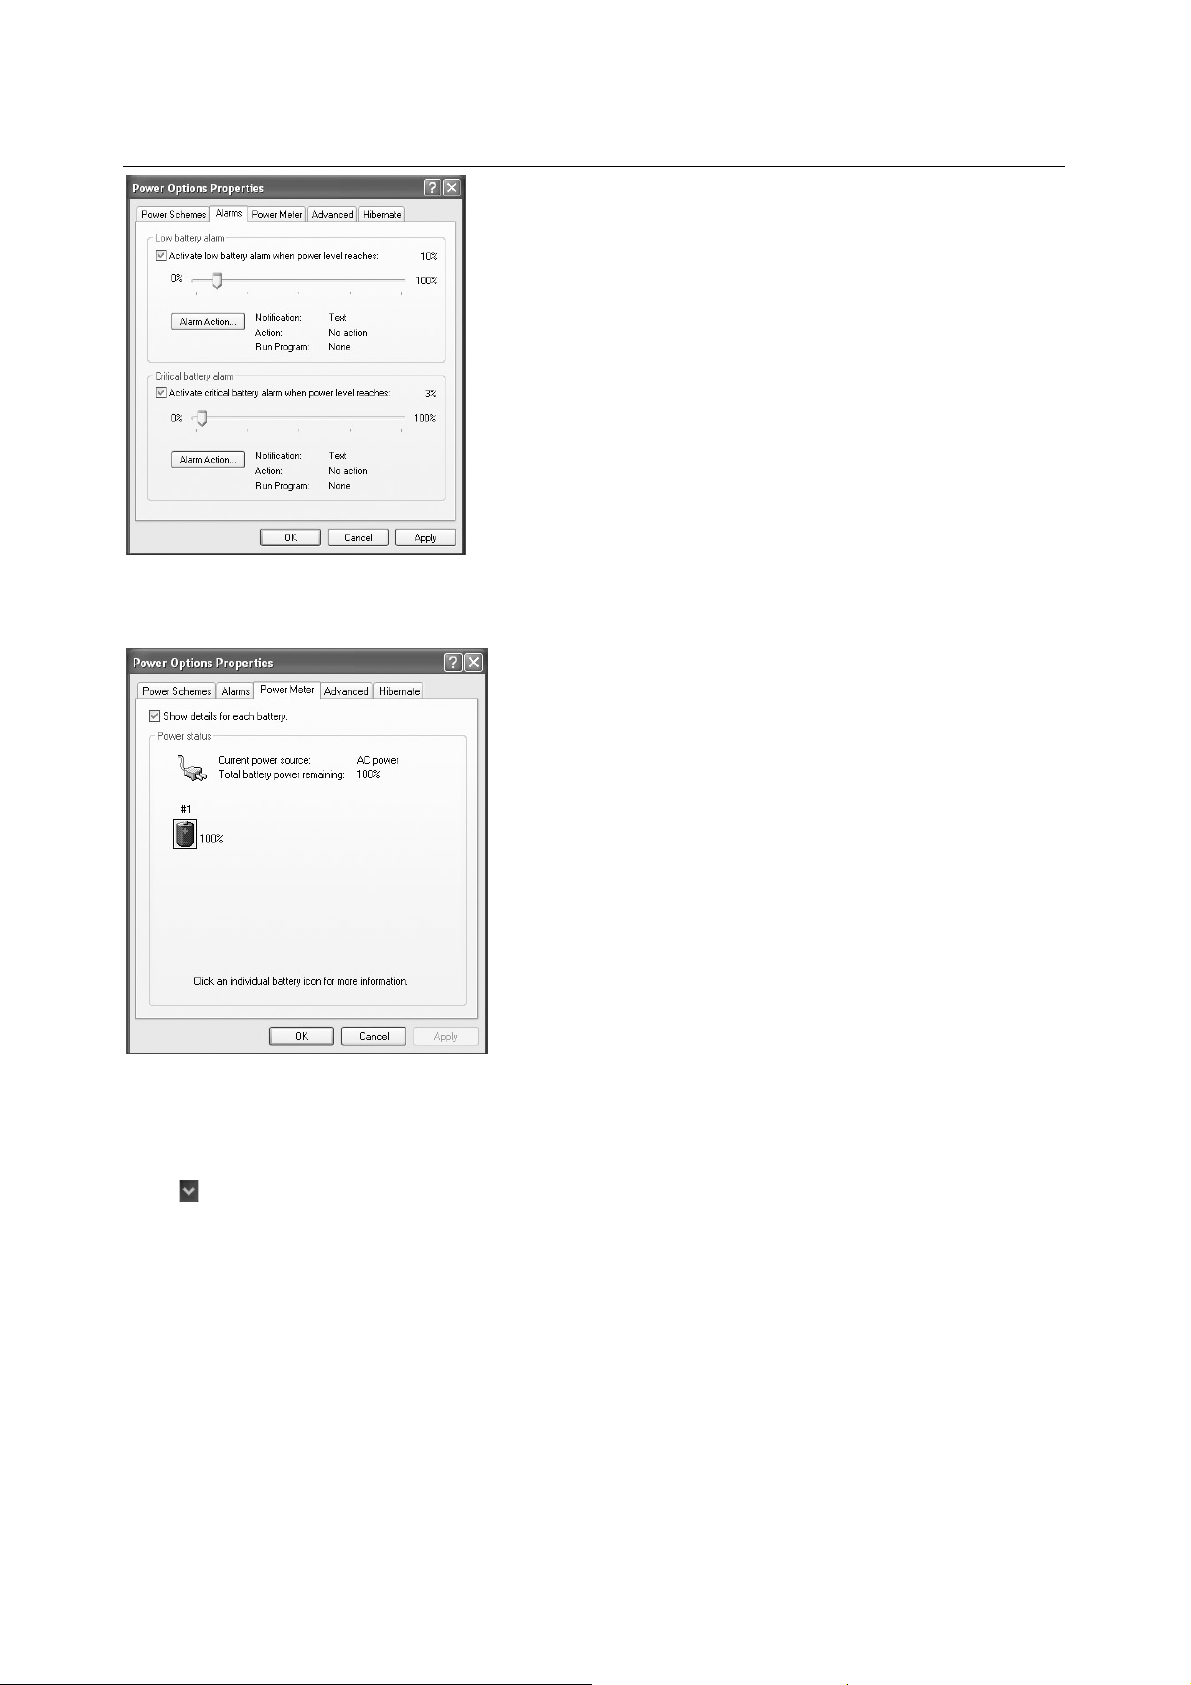
“Alarms” tab
In the “Alarms” tab, you can set up the alarm to inform you about the battery meter and the alarm
warnings.
15
Page 16
eNOTE User Guide
“Power Meter” tab
The “Power Meter” tab allows you to confirm the residual power of the battery pack.
“Advanced” Tab
The “Advanced” tab allows you to enter standby mode and sleep mode when you close the display,
switch off the power, or press the Sleep button.
Click
the power button on my computer,” and “When I press the sleep button on my computer.” Select each
option from the displayed menu.
16
button for “When I close the lid of my portable computer” (closing the display), “When I press
Page 17
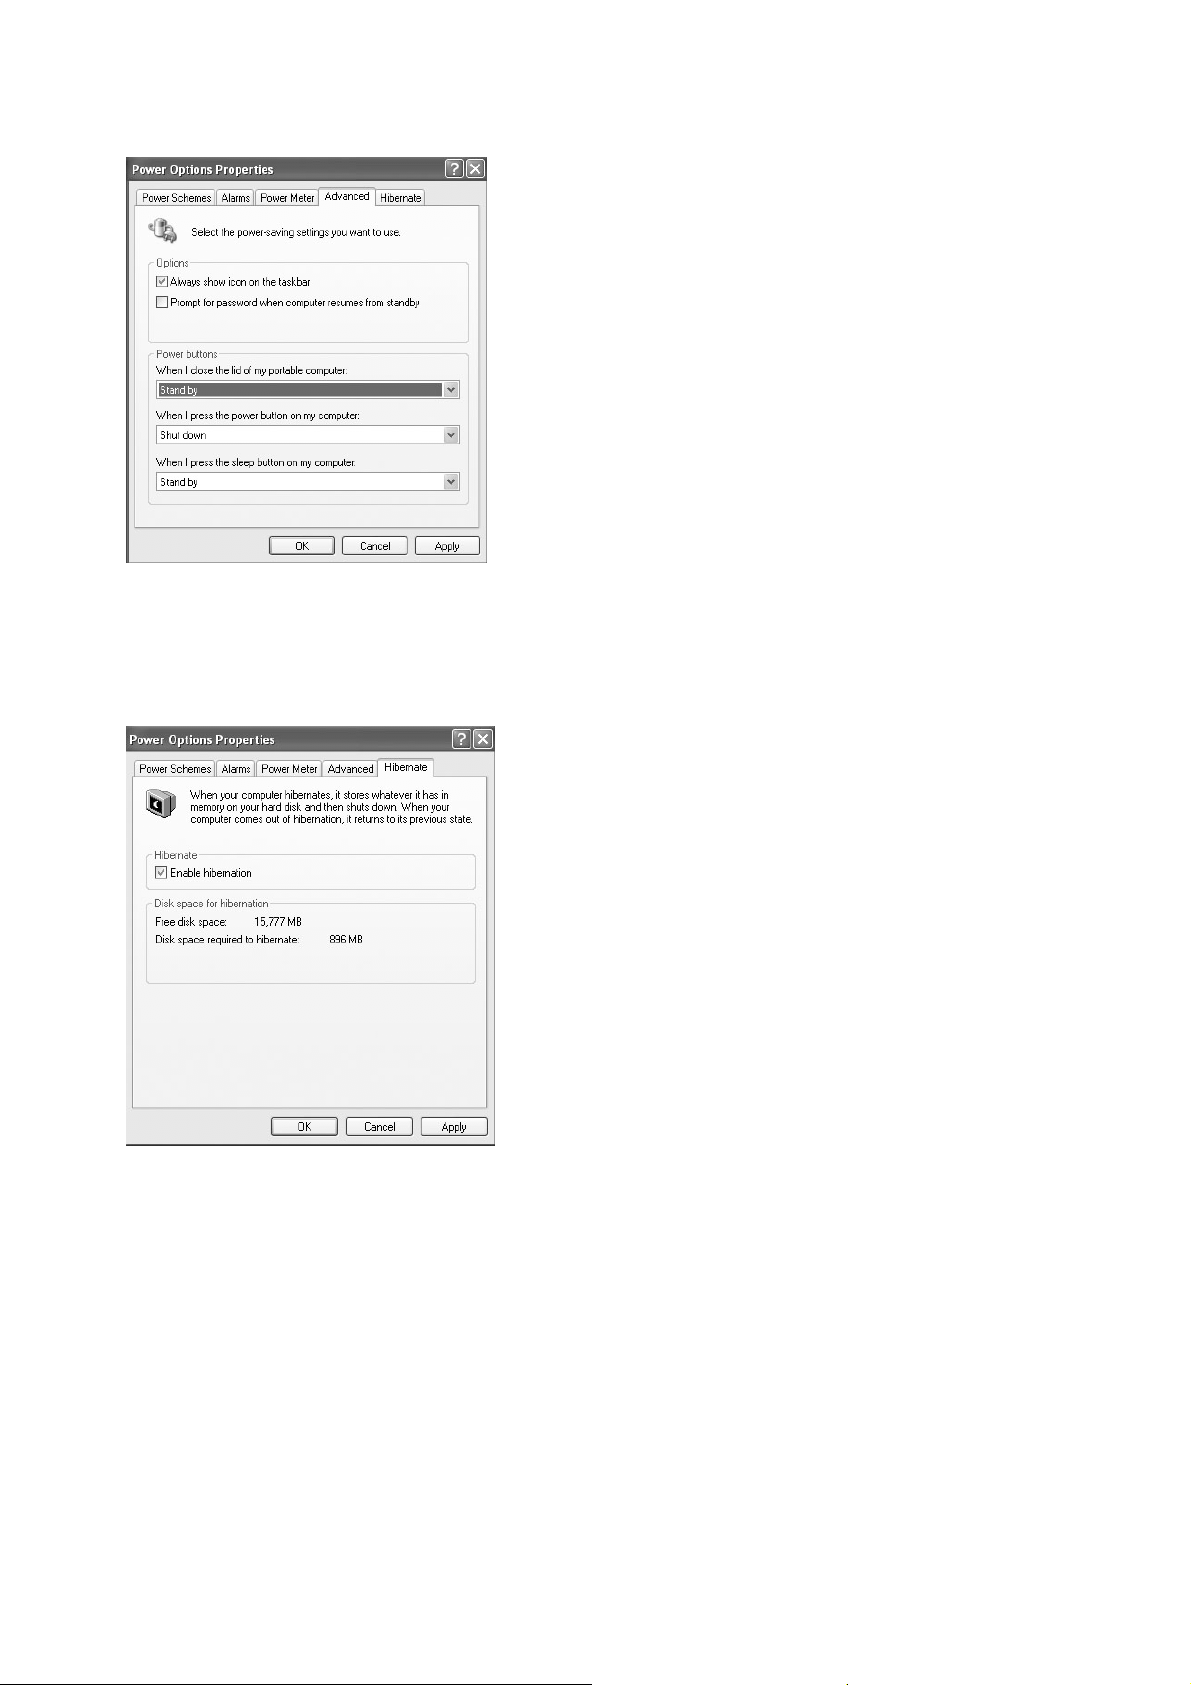
“Hibernate” tab
The “Hibernate” tab allows you to enable the hibernation function. Check “Enable hibernation” and
click the “Apply” button.
close the display or press the power switch.
In “Advanced” tab, you can set up the hibernation mode options when you
17
Page 18

eNOTE User Guide
Chapter 2 Basic Operations
This chapter will detail the names of each part of this machine, the operations of touch pad and
keyboard, and the basic knowledge that you have to know in advance for using this machine.
1 A Glance at Your eNOTE
2 How to Use Touch Pad
3 How to Use the Keyboard
4 Volume Function
5 How to Use the Web Camera
18
Page 19

1 A Glance at Your eNOTE
The following sections are dedicated to the features and operations of your notebook computer.
Front
1 LCD
○
The eNOTE comes with a color LCD that you can adjust for a comfortable viewing position. The LCD
is 8.9” TFT color LCD with 1024x 600 resolution panels.
3 Built-in Stereo Speaker
○2○
Integrated mini stereo speaker provides sound and audio output for your multimedia presentations or
listening pleasure.
4Power Switch
○
Switches the eNOTE power on and off, or resumes whenever it is in Standby mode.
5 Touch Pad
○
This allows you to move the cursor on the screen and offers you the same function of the mouse.
6Status LED
○
This informs you about the status of each function, and offers you the same function of
right-clicking/left-clicking of the mouse.
7 2 in 1 Media Slot
○
19
Page 20

eNOTE User Guide
This is used to insert a memory card.
8 Wireless Switch
○
This is used to switch between wireless LAN on and off
9Vent
○
This is used to exhaust the heat inside the computer.
10 Keyboard
○
This allows you to type or run the applications.
11 W e b C a m era
○
The webcam can be used as a communication device that transmits instant image through network for
conference.
Right Side
1Vent
○
This is used to exhaust the heat inside the computer.
2 USB 2.0 Port
○
This allows you to connect to various USB supported devices.
3 LAN Port
○
This is used to connect to LAN, or connect with LAN cable when you use ADSL for internet
connection.
4 VGA D_Sub 15 Port
○
This allows you to connect to an external display.
5 Kensington Security Slot
○
This slot allows you to install the burglarproof Kensington lock for computer.
20
Page 21

6Web Camera
○
The webcam can be used as a communication device that transmits instant image through network for
conference.
Left Side
1 Power Terminal
○
This is used to connect to the supplied AC adapter.
2 USB 2.0 Port
○
This allows you to connect to various USB supported devices.
3 Microphone Input Jack
○
This allows you to connect a microphone for sound recording/audio input.
4 Headphone Jack
○
This is used to connect stereo headphones for audio output.
5Web Camera
○
The webcam can be used as a communication device that transmits instant image through network for
conference.
Downside
21
Page 22

eNOTE User Guide
1 Battery Pack
○
This serves as the main power of this notebook when AC adapter cannot be used.
2 Battery Pack Lock Switch
○
Lock the battery pack in place.
3 Battery Pack Slide Switch
○
This switch allows you to slide the battery pack when you intend to remove it.
4 Memory Cover
○
This is used to hide the memory. Remove it when you intend to install or replace the memory.
22
Page 23

2 How to Use Touch Pad
The touch pad allows you to operate the mouse cursor, activate any icon and move the icon. The
following demonstrates how to use the touch pad.
Move the Mouse Cursor
Touch the pad above the touch pad with your finger to move the mouse cursor displayed on the screen.
You may move your finger in any direction when it touches the pad, and control the mouse cursor by
moving your finger in any direction.
Click
Move the mouse cursor on an icon and activate the icon with a “click.” The types of click are described
as follows.
Left-click
You may select an icon by left-clicking. Press the left button once for left-click.
You may also tap on the pad once for left-click.
Right-click
You may confirm the content of an icon by right-clicking to show the menu. Press the right button
once for right-click.
Double-click
You may activate an icon by double-clicking. Presses the left buttons twice for double-click.
You may also tap on the pad twice for double-click.
Drag
You may move the icon to any desired position by dragging it. For dragging, move the mouse
23
Page 24

eNOTE User Guide
cursor to any position with the left button of touch pad being pressed.
24
Page 25

3 How to Use the Keyboard
Your eNOTE is equipped with an 80 keys keyboard that provides all the functionality of a full-sized 101
or 102-key keyboard. Aside from the standard typewriter-layout keyboard of your eNOTE, there are a
number of extra features and function controls on the built-in keyboard.
Key features and operations of the Keyboard
1. Function Keys 2. Control Keys
3. Windows Start Menu Key 4. Control Keys
5. Windows Shortcut Key 6. Cursor Control Keys
Key features and operations are described below:
• Function Keys
Function keys are application-driven, like F1 through F12 can be found on the keyboard.
These keys work together with the Fn key to activate special functions. Some keys
(printed in blue on keypad) are preprogrammed with dual functions.
• Control keys — Ctrl, Alt, Fn, and Shift are controls used in conjunction with other keys
to change their functions. To use control keys, press and hold the control key while
pressing another key. For example, "Press Ctrl-V" means to hold down the Ctrl key and
type the letter V. Key combinations work especially to the application you are running.
• Windows keys
Use the following two keys to facilitate your work:
➟ Start Menu key
Displays the Start menu.
25
Page 26

eNOTE User Guide
➟ Shortcut/Application key
Provides quick access to shortcut menus. This key acts like a right mouse button.
• Cursor Control keys
Cursor control keys let you position the cursor on the screen where you want. In the
screen, the cursor is a blinking underline, block, or vertical bar depending on the
application. The cursor indicates where the next text typed is inserted.
• Typewriter keys
Typewriter keys (also called alphanumeric keys) are used to enter text and characters.
Keys with blue print on them behave differently when combined with control keys.
Names and Functions of the Keyboard
BASIC KEYBOARD FUNCTIONS
Keypad Function Description
This allows you to confirm a command. You
may also use it to start a new line when
typing.
Switches display between LCD, CRT, or
+
+
LCD and CRT simultaneously.
<Ins> key. Known as the Insert key. Press
this key to toggle the keyboard data entry
from insert to type over mode.
<Fn> + <PrtSc> key. Known as the Print
Screen key. Press this key to map the whole
screen to share memory for your specific
usage.
<Del> key. Known as the Delete key. Press
26
this key to delete the character to the right of
the cursor, or delete marked texts or items.
<Pause> key. Press this key to temporarily
halt execution of a command. Pressing any
other key to resume execution of a
command.
Page 27

Keypad Function Description
<Backspace> key. Press this key to delete
the character to the left of the cursor.
<Shift> key. Press this key in combination
with alphabet letters to produce uppercase
letters in typing. Use this key in combination
with those two-character keys (found on the
second row of the keyboard) to produce the
upper marked keys. Also used in most
application program in combination with
other keys to execute a certain command.
<Tab> key. Press this key to move the
cursor to the next tab stop on the right. This
key works much the same as in ordinary
typewriter.
<Ctrl> key. Known as the Control key. Used
in most application program in combination
with other keys to execute a certain
CURSOR CONTROL KEYS
+
+
command.
<Alt> key. Known as the Alternate key. Used
in most application program in combination
with other keys to execute a certain
command.
<Fn> + <Num Lock> key. Activates the
embedded 15-key numeric keypad. The
keys are color coded blue.
<Caps Lock> key. Used in most application
program to always activate uppercase
alphabet characters.
<Fn> + <Scroll Lock> key. Used in most
application program to scroll the screen
without having to move the cursor.
Keypad Function Description
27
Page 28

eNOTE User Guide
Keypad Function Description
Up arrow key. Moves the cursor up one line
SCREEN CONTROL KEYS
Keypad Function Description
+
at a time.
Down arrow key. Moves the cursor down
one line at a time.
Left arrow key. Moves the cursor to the left
one space at a time.
Right arrow key. Moves the cursor to the
right one space at a time.
<Fn> + <Home> key. Moves the
cursor to the beginning of a screen
or line.
<Fn> + <PgUp> key. Moves the
WINDOWS HOT KEYS
Keypad Function Description
+
cursor up one screen at a time
<Fn> + <PgDn> key. Moves the
+
cursor down one screen at a time
<Fn> + <End> key. Moves the
+
cursor to the end of a screen or line.
<Start> key. Pulls up the Windows Start
menu.
28
Page 29

Keypad Function Description
<Right Click> key. Performs a mouse
right-click function for Windows system.
SPECIAL FUNCTION KEYS
The eNOTE has special system function keys that activate key serving dual functions. When pressed in
conjunction with the <Fn> key, these keys set specific system parameters and are sometimes referred to
as "hot keys".
Keypad Function Description
Switches display between LCD, CRT,
+
+
+
+
+
+
or LCD and CRT simultaneously.
Decreases the brightness of LCD
display incrementally.
Increases the brightness of LCD
display incrementally.
Switches the machine to sleep mode.
This allows you to switch between the
front web camera and the back web
camera.
Decreases the audio volume of the
eNOTE incrementally.
Increases the audio volume of the
+
+
eNOTE incrementally.
This allows you turn on/off the silent
mode
29
Page 30

eNOTE User Guide
Keypad Function Description
This allows you to turn on/off the
+
+
function of Wi-Fi.
This allows you to turn on/off the
function of Bluetooth.
30
Page 31

4 Volume Function
This machine features built-in audio capabilities. The stereo speakers built into this machine will produce
high-fidelity audio when you activate the audio function. In addition, you may set up audio adjustments.
Volume Adjustment
This allows you to adjust the sound volume from the stereo speakers built in this machine.
1 Click the speaker icon on the Windows task bar.
The menu for volume adjustment will be displayed.
2 Move the slider displayed on the “Volume” box.
You may increase the volume by dragging up the slider
the slider.
or decrease the volume by dropping down
3 Tick the “Mute” box when you want the sound to be inaudible.
The sound from the built-in stereo speakers will be inaudible.
Note
Follow the next steps when there is no speaker icon on the task bar.
1 Select “Start” button——〉“Control Panel” ——〉“Sound and Audio Device”.
2 Select the “Volume” tab from the displayed window.
3 Tick “Place volume icon in the task bar” inside the “Device
4 Click “Apply” button.
5 Click “OK” button.
31
Page 32

eNOTE User Guide
Volume Balance Adjustment
You may adjust the left and right audio balance for the built-in stereo speakers.
1 Right-click the icon of the speaker on the task bar.
The menu will be displayed.
2 Select “Open Volume Control” on the menu.
The “Volume Control” window will be displayed.
32
Page 33

3 Adjust the slider in the “Balance” box inside the“Volume Control” box.
The volume of the left speaker will be increased when you slide it to the left; the volume of the right
speaker will be increased when you slide it to the right.
33
Page 34

eNOTE User Guide
5 How to Use the Web Camera
This machine is installed with two lens USB 2.0 web camera. The following demonstrates how to use
the web camera.
Use the Web Camera
1 Double click the icon AMcap on the desktop.
2 The targeted image or pictures will be soon shown as below.
3 You can setup settings before capturing or snap shooting pictures, such as, Set Capture File,
Audio Input Mixer Properties. Set Frame Rate. For detailed information, please refer to below
pictures.
34
Page 35

4 After setting up, you can start capture or snapshot. Fn+F4 allows you to switch between the
front web camera and the back web camera.
35
Page 36

eNOTE User Guide
5 Still images or motion pictures recorded with Web Cam are saved in “My pictures” folder.
36
Page 37

Chapter 3 System Extension
This chapter will illustrate how to extend the system of this machine by connecting and inserting other
devices to it.
1 How to Use WLAN
2 How to Use Bluetooth
3 How to Use a USB Device
4 How to Use a Memory Card
5 Connection of an External Display
37
Page 38

eNOTE User Guide
1 How to Use WLAN
Description of WLAN
Wireless LAN lets user connect to the LAN environment without using any wire to traditional RJ-45 jack.
User can enjoy the wireless connection within the range of Access Point (AP) of LAN.
Access Point (AP) is the wireless transmission and receiving device, it generally connects to the
server of a LAN environment or act as a LAN hub with wireless connection. Access point can be set in
an office environment, airport, major railway station, etc. that depends on the construction of each
country. In most case, you probably can use it at office, please consult with the network department of
your company for more details.
Specification of WLAN
This eNOTE integrates built-in 802.11 b/g wireless LAN module. IEEE 802.11b standard supports 11
Mbps wireless connection speed. However, IEEE 802.11g supports 54Mbps wireless connection
speed, and is backward compatible with the slower 802.11b. Wireless LAN module is similar to LAN
module. You need to install software driver before using it.
Connecting WLAN
Followings are the two ways to connect to the wireless LAN.
Automatic connection
How to automatically recognize and connect to the Wireless LAN network.
Move the front-mounted wireless switch to ON and press FN+F9 keys a few times.
1
2 Click the icon “Wireless Network Connection” on the task bar.
The “Wireless Network Connection” dialogue will be displayed and the wireless networks near this
machine
38
will be shown automatically.
Page 39

3 Select the wireless network you intend to connect, and click “Connect” button.
The “Wireless Network Connection” dialogue will be shown.
4 Fill in the “Network key” box and “confirm network key” and then click “Connect” button.
Connect to the wireless LAN.
Manual connection
The following describes the manual settings for the wireless LAN and how to connect to it.
1 Move the front-mounted wireless switch to ON and press FN+F9 keys a few times.
2 Click the icon “Wireless Network Connection” on the task bar.
The “Wireless Network Connection” dialogue will be displayed and the wireless networks near this
machine
will be shown automatically.
39
Page 40

eNOTE User Guide
3 Click “Set up a wireless network for a home or small office”
The “Wireless Network Setup Wizard” window will be displayed.
4 Click “Next” button.
5 Fill any name in the “Network name (SSID)” box and click “Next” button.
40
Page 41

6 Select which way to establish your wireless network and click “Next” button.
7 Click “Finish” button.
The setup of wireless LAN finishes.
Disconnecting WLAN
1 press FN+F9 keys a few times and front-mounted wireless switch to OFF.
41
Page 42

eNOTE User Guide
2 How to Use Bluetooth
This section will illustrate the basic knowledge of Bluetooth and how to connect.
Description of Bluetooth
Bluetooth allows you to exchange audio files and data without using cables for Bluetooth-supported
computers, MP3 players, mobile phones and headset. Bluetooth works within the range of 2.4GHz,
and communicates in a comparatively small range within a radius of 10-100 meters. Bluetooth
functions can be used in the range within a radius of 10 meters.
establish the connection by confirming the connected device by pairing and entering the same
passkey mutually.
For the use of Bluetooth functions,
Specification of Bluetooth
This machine supports the standard specification “Bluetooth 2.0+EDR”.
Connecting Bluetooth
1 Double click the Bluetooth icon on the task bar.
2 Click the red ball in the center of the window.
Any nearby Bluetooth-supported devices that are in pairing mode will be searched.
The below will illustrate how to use the connected headphone.
3 Click the icon of connected headphone.
The icon of the user profile will be framed and highlighted, and the “Enter Bluetooth Passkey” dialogue
will be displayed.
42
Page 43

4 Enter the passkey for the “Passkey” box. Then click OK.
5 Click the icon of the profile you want to use.
When the connection is established, there will be a line that connects the red ball to the icon of the
headphone.
Disconnecting Bluetooth
The following illustrates how to disconnect the Bluetooth device.
43
Page 44

eNOTE User Guide
1 Right-click the icon of the headphone. Select “Disconnect” on the menu.
2 Click “Yes” to disconnect the Bluetooth device.
Notice
Please do not disconnect Bluetooth when you are using it to send and receive data. Otherwise the
data may be damaged.
44
Page 45

3 How to Use a USB Device
Description of USB
USB is a specification to connect peripheral devices. USB features the ability to quickly disconnect
from the USB port even with the computer switched on and to power additional peripheral devices. It
will also feature a function called “plug and play”, which has been set up automatically, to recognize
the device if the driver is supported by Windows.
Specification of USB
There are two types of specification of USB -“USB1.1” and “USB2.0”. The difference between them is
the transfer speed. The highest speed of USB1.1 is 12Mbps; and that of USB2.0 is 480Mbps.
USB ports on this machine support USB2.0. However, when the peripheral device only supports
USB1.1, the transferring speed will become that of USB1.1.
All the
Connection of USB
The following describes how to connect USB devices to this machine.
Connect the peripheral device to the USB2.0 port on this machine with the USB cable.
device will be recognized automatically and become usable.
The peripheral
Removal of USB
1 Click on the task bar.
A menu will be shown to inform you that you can remove the peripheral device.
45
Page 46

eNOTE User Guide
2 Click the menu
A message will be displayed to inform you that the hardware can now be safely removed from the
computer.
3 Remove the USB cable from the USB2.0 port on this machine.
46
Page 47

4 How to Use a Memory Card
You may use a memory card - a small-sized memory device - for this machine. This section will
illustrate what kind of memory card you can use and how to connect.
Usable Memory Card
You may use the following types of memory card for this machine.
• SD Memory Card
• MMC
Note
There is a hold switch on the memory card other than MMC. Locking the hold switch will
prevent you from reading and writing the data. Please refer to the user’s guide of each memory
card for the hold switch.
Inserting a Memory Card
To insert a memory card into the slot, please pay more attention whenever insert the memory card into the
slot with the correct side.
You should position the copper connector at the bottom side. All of these cards should be located at the
center of the slots in inserting.
Only one correct side can be accepted for the 2 in 1 card slot. If you cannot insert the card into the 2 in 1
slot or you had inserted the card but it is not recognized by the computer, please remove the card and
insert it again. To prevent the damage made both on card and the slot, never forced an entry into the slot
with incorrect side.
Removing the Memory Card
The following describes how to remove a memory card.
Confirm that you are not using the memory card.
Click
A menu will be displayed to inform you to remove your memory card.
on the task bar.
47
Page 48

eNOTE User Guide
Click the menu.
A message will be displayed to inform you that the hardware can now be safely removed from
the computer.
Remove your memory card.
48
Page 49

5 How to Use VGA D-Sub 15 Port
Your eNOTE has a VGA D-Sub 15port for supporting any external CRT or LCD color monitor. You need a
display signal cable (usually provided with the monitor). One end of the cable must have a 15-pin
connector for the system. All you have to do is plug the cable from the monitor into the left of the system
with a VGA D-Sub 15 Socket.
To connect an external monitor:
Turn off your computer and make sure the monitor power switch is turned off.
The eNOTE must be powered off or suspended while the monitor is being connected. Although you can
connect the external Monitor without power off the eNOTE and the external monitor, however, it is harmful
to both devices and it shortens the life of these devices.
Connect the connector cable of the monitor to the DVI port at the left of your eNOTE. If
connector cable is VGA port, please make sure with using the DVI-VGA Adapter (not included
in shipment). Secure the cable connection with the screws provided.
Most monitors use a VGA cable to connect to a PC. In this case, you can connect the VGA cable from the
monitor to the VGA D-Sub 15 Socket on the right of your eNOTE via a VGA D-Sub 15 Adapter (not
included in shipment). Or you can connect directly to the monitor with VGA D-Sub 15 socket.
To connect an external monitor:
1. Connect the monitor power cable and plug it into a properly grounded wall outlet.
2. Turn on the power of the monitor.
3. Turn on your eNOTE. Both the LCD panel and the monitor screen will show the display.
Your computer is set at default to run at simultaneous display mode.
4. If you only want to show the display on the external monitor and shut off the LCD display,
you can use the <Fn> + <Esc> hot-key to switch display type between LCD and external
monitor. Keep pressing the hot-key until you get the display to external monitor only.
49
Page 50

eNOTE User Guide
Chapter 4 Caring for Your eNOTE
This chapter will illustrate the ways to care for your eNOTE.
1 Caring for Your eNOTE
50
Page 51

1 Caring for Your eNOTE
Your eNOTE is the latest features in ultra-mobile personal computing and multimedia technology. If
properly cared for and maintained, the performance and reliability of the eNOTE can be greatly prolonged.
Important Safety Instructions
This section gives you detailed information about how to maintain a safe working environment while using
the eNOTE. You can maintain its condition and performance by following these guidelines. Please read it
carefully to ensure maximum safety.
• Before cleaning the eNOTE, make sure it is disconnected from any external power
supplies (i.e. AC adapter, car adapter and so on).
• When cleaning, do not use liquid or sprayed detergent for cleaning. Instead, use
moisture sheet or a cloth for cleaning.
• The socket-outlet shall be installed near the eNOTE and shall be easily accessible.
• Please keep the eNOTE from humidity.
• Lay the eNOTE on a reliable surface when installing. A drop or fall may cause injury.
• The openings on the enclosure are for air convection hence the eNOTE can be protected
from overheating. DO NOT COVER THE OPENINGS.
• Be careful of using power supply. The eNOTE has specific power requirements.
• Use only a power adapter approved for use with this eNOTE.
• The power adapter may have a 2-prong plug. This is an important safety feature. A
compatible outlet is required. If it is not available, find a qualified electrician to install one.
• While unplugging the power cord, disconnect it by the plug head, not by its wire.
• Make sure the socket and any extension cords you may use can support the total current
load of all the connected devices.
• Though your AC adapter is suitable for universal international voltage, it still requires a
stable and continual power supply. Make sure the voltage of the power source when
connect the eNOTE to the power outlet. If you are unsure of your local power
specifications, consult your dealer or local power company.
• Place the power cord in such a way that people can not step on it. Do not place anything
over the power cord.
• All cautions and warnings on the eNOTE should be-noted.
51
Page 52

eNOTE User Guide
• If the eNOTE is not in use for a long time, disconnect it from mains to avoid possible
damage by transient over-voltage.
• Never pour any liquid into openings as this may cause fire or electrical shock.
• Never open the body of eNOTE. For safety reason, the eNOTE should only be opened by
qualified service personnel.
• If one of the following situations arises, have the eNOTE checked by service personnel:
➟ The power cord or plug is damaged.
➟ Liquid has penetrated into the eNOTE.
➟ The eNOTE has been exposed to moisture.
➟ The eNOTE has not worked well or you can not get it work according to user’s
manual.
➟ The eNOTE has dropped and damaged.
➟ The eNOTE has obvious sign of breakage.
• Do not leave this eNOTE in an environment unconditioned. Storage temperature above
60ºC (140ºF) may damage the eNOTE.
• An approved power cord has to be used for the eNOTE power supply. For a rated
current up to 6A and an equipment weight more than 3 kg, a power cord not lighter than
2
H05VV-F, 2G, 0.75mm
• To avoid any damage happened to the internal device, you should first disconnect the AC
adapter and remove the battery pack from the eNOTE when replacing any internal device.
The sound pressure level at the operator's position according to IEC 60704-1 is equal or less than
70dB(A).
, has to be used.
Cleaning Your eNOTE
When it is necessary to clean the plastic case and keyboard, use a soft, lint-free cloth, slightly dampened
with a mild detergent solution or use the contents of any commercially available eNOTE cleaning kit.
Never use alcohol, petroleum-based solvents, or harsh detergents to clean the eNOTE. Also never spray
any liquids directly on the eNOTE case, keyboard, or screen. If the liquid-crystal display (LCD) screen has
become smeared or dusty, clean the screen by first applying a mild glass cleaner to a soft, clean, lint-free
cloth, and gently wipe the glass. Never apply liquids directly on the screen surface. Moreover, do not use
paper towels to clean the display screen. Paper can scratch the display screen matte.
Maintaining the LCD Quality
52
Page 53

When it comes to screen problems, heat plays a significant role. After a typical working session, users
routinely close the eNOTE the cover. The display surface - no matter what type it is - and the
components inside the eNOTE radiate heat; when you close the cover, you trap the heat against the
screen. To help prolong the life of your eNOTE, leave the cover open for ten minutes while the heat
disperses.
You should also enable the power management of your eNOTE to turn off the LCD power and display
when the system is inactive for some time. Adding a screen saver also helps prolong the life of your
eNOTE screen.
Follow the safety guidelines mentioned earlier and how to clean your eNOTE.
Maintaining Your Hard Disk
Losing your data has the same consequences as a system break down. Users must make it a habit of
doing hard disk maintenance every week or so. Here is some maintenance you could do:
• Always back up your data files from your hard disk.
• Install the virus detecting program to monitor virus that could tamper your files.
• Use SCANDISK occasionally to correct any errors found in the directory and File
Allocation Table. This will also free up space from any unused sectors.
• Never move or raise the eNOTE while the hard disk is being accessed, most especially
don't jar the hard disk as this may cause a hard disk crash.
• Use hard disk maintenance programs like Disk Defragmenter of Windows. These
reorganize your hard disk by eliminating fragmentation and improving your hard disk
access time.
• Install a system password in your eNOTE so others won't be able to use the hard disk.
Battery Care Guidelines
The battery pack furnished with the eNOTE requires reasonable care and handling to ensure efficient
operation and maximum life. There is a risk of fire and chemical burn if the battery pack is handled
improperly.
To ensure that the battery pack endures normal life cycle, always observe the following precautions when
handling the battery pack:
• Handle batteries carefully. Do not try to disassemble, crush, puncture, open, drop,
mutilate, short external contacts, disposed of in water or fire, or expose it to temperatures
higher than 60 C.
• Recharge batteries only as described in this manual and only in ventilated areas. Never
use an external charger other than the one supplied with your eNOTE.
53
Page 54

eNOTE User Guide
• Do not leave batteries in hot locations for more than a day or two.
• Do not leave your battery in your eNOTE for longer than 1 month without plugging in the
power adapter.
• Do not leave battery in storage for more than 2 months without recharging it to prevent
over discharge. Over discharge will hurt the battery
• Dispose dead battery properly to protect the environment. The batteries contain
hazardous chemicals and should not be thrown out with household or office trash.
• You should always discharge your battery before recharging it on either of these two
conditions: first, this is the first time you start to use your battery; second, you had not
charge the battery for more than 2 months.
When You Travel
For safety and convenience when traveling, please follow these instructions:
• Back up all needed files on your hard disk before traveling.
• Recharge your battery overnight to ensure full battery power before you leave.
• Don't forget to bring along the AC adapter and extra battery pack.
• Try to bring backup software as well.
• Check the voltage rating and the outlet type of your destination. If the power cord of the
adapter is different, then you need to purchase a suitable one. Consult your dealer.
• Carry your e-NOTE in its carrying case or in a briefcase. Never check-in the e-NOTE as a
luggage.
• Remember to apply those power saving features and techniques to save battery power.
54
Page 55

Chapter 5 Technical Support
This chapter will provide information on Technical support.
1 Technical Support
55
Page 56

eNOTE User Guide
1 Technical Support
56
Page 57

Appendix A Spec sheet for eNOTE
PROCESSOR UNIT
• VIA Nano Series CPU 1MB integrated L2 cache for the processor
• VIA C7
TM
–M ULV Processor 1.6 GHz CPU 128KB integrated L2 cache for the processor
SYSTEM MEMORY
• 1GB DDRII Memory
LCD DISPLAY
• 8.9" WXGA (16:10) Color TFT LCD, 1024 x 600
• Maximum 262K colors on LCD display at 1024 x 600 resolution for 8.9" LCD
VGA SYSTEM
• Integrated VIA VX800 graphic engine
• Simultaneous LCD and external monitor (CRT) display
• Maximum 262K colors on LCD display at 1024 x 600 resolution for 8.9" LCD
• Maximum 16 million colors on external monitor or projector at 1600*1200 resolution
(Non-Interlaced)
STORAGE
80GB (or above ) 2.5” SATA HDD.
AUDIO SYSTEM
• Full-duplex 16-bit stereo speaker with wavetable support
• H/W Audio Sound Blaster 16 compatible
• Built-in dual speakers
• Audio input jacks for microphone (MIC)
• Audio output jack for external speaker or headphone (Line-Out)
• Sound volume adjust by K/B Hot-Keys
57
Page 58

eNOTE User Guide
TOUCHPAD
Integrated Touchpad pointing device with 2 click buttons
KEYBOARD
• Full-sized 80-keys keyboard, inverted T-cursor keys, 10 hot keys, 12 function keys, and
embedded numeric keypad
• Provides international language keyboard
DUAL-CAMERA
CCD Camera 2.0M+0.3M PXL with Dual-head.
I/O PORTS
• 1 x D-sub VGA port
• 3 x Universal Serial Bus (USB 2.0)
• 1 x LAN port
WIRELESS DEVICES
IEEE 802.11b/g+ Bluetooth.
AC/DC POWER SUPPLY ADAPTER
Universal auto-switching (100V~240V) 65W adapter, 19 Volt
BATTERY
• Rechargeable 4 Cells Li-ion battery pack with Smart Battery function
• Approximately 3.5 Hours (for Battery Mark) Battery Life
WEIGHT AND DIMENSION
• 240 x 175 x 36.2 mm or 9.4" x 6.9" x 1.4" (W x D x H)
58
•
Approximately 1.1Kg or 2.5 lbs
Page 59

Appendix B Startup of BIOS Setup
“BIOS setup” is used for the setting of the basic hardware of the machine. Normally, it is not
necessary to change the setting.
Attention
Please do not conduct BIOS setup unless it is necessary. As for conducting BIOS setup, please
perform it after confirming the setting contents.When settings are done incorrectly, the machine may
cease to function.
The procedures of starting BIOS setup are as follows.
1 Switch off the power of the machine.
2 Turn on the power of the machine, and press “Delete” key while our logo screen is being
displayed.
BIOS setup will start after a while.
59
Page 60

 Loading...