

Page 1

IDEXX SNAPshot Dx*
Analyzer
Operator’s Guide
i
Page 2

Information in this document is subject to change without notice. Companies, names, and data used in
examples are fictitious unless otherwise noted. No part of this document may be reproduced or transmitted
in any form or by any means, electronic, mechanical, or otherwise, for any purpose, without the express
written permission of IDEXX Laboratories. IDEXX Laboratories may have patents or pending patent
applications, trademarks, copyrights, or other intellectual or industrial property rights covering this document
or subject matter in this document. The furnishing of this document does not give a license to these property
rights except as expressly provided in any written license agreement from IDEXX Laboratories.
© 2017 IDEXX Laboratories, Inc. All rights reserved. • 06-0002404-03
*IDEXX VetLab, SNAPshot Dx, Catalyst, SNAP, SNAP cPL, SNAP fPL, 4Dx, VetStat, and IDEXX SmartService are
trademarks or registered trademarks of IDEXX Laboratories, Inc. in the United States and/or other countries.
Lysodren is a registered trademark of Bristol-Myers Squibb Company. All other product and company names
and logos are trademarks of their respective holders.
Proprietary Rights Notice
Page 3

Contents
Preface ....................................................................................................................................................v
Safety Precautions ....................................................................................................................................... v
International Symbol Descriptions .............................................................................................................. vi
Other Symbols ........................................................................................................................................... vii
A Getting Started .............................................................................................................................. A-1
Introduction .............................................................................................................................................. A-1
SNAPshot Dx Analyzer Components....................................................................................................... A-2
Installing the SNAPshot Dx Analyzer ....................................................................................................... A-2
Powering On the Analyzer ....................................................................................................................... A-4
Shutting Down the Analyzer..................................................................................................................... A-4
Connecting/Disconnecting the Power Cord ............................................................................................ A-4
Printing Test Results................................................................................................................................. A-4
B Using the SNAPshot Dx* Analyzer ...............................................................................................B-1
Overview .................................................................................................................................................. B-1
Using the Touch Screen ...........................................................................................................................B-1
Loading a SNAP* Test ............................................................................................................................. B-1
Running a SNAP* Test ............................................................................................................................B-1
Viewing Test Results ...............................................................................................................................B-2
C SNAP* Test Procedures ................................................................................................................C-1
Overview ..................................................................................................................................................C-1
SNAP* Total T4.........................................................................................................................................C-2
SNAP* Cortisol ........................................................................................................................................C-5
SNAP* Bile Acids .....................................................................................................................................C-9
SNAP* fPL*............................................................................................................................................C-11
SNAP* cPL* ...........................................................................................................................................C-12
SNAP* 4Dx* Plus ...................................................................................................................................C-13
SNAP* FIV/FeLV Combo .......................................................................................................................C-14
SNAP* Heartworm RT ...........................................................................................................................C-15
SNAP* Feline proBNP ...........................................................................................................................C-16
D Modifying the Settings on the Analyzer .......................................................................................D-1
Overview ..................................................................................................................................................D-1
Changing the Language/Local Settings ..................................................................................................D-1
Adjusting the Volume of the Analyzer ......................................................................................................D-2
Deleting a Patient from the Pending or In Process List ...........................................................................D-2
iii
Page 4

E Sample Preparation and Storage ................................................................................................. E-1
Overview .................................................................................................................................................. E-1
IDEXX Quality Sample Preparation .......................................................................................................... E-2
Sample Collection Order ......................................................................................................................... E-3
Centrifuged Sample Inspection ............................................................................................................... E-3
Sample Storage ....................................................................................................................................... E-4
F Maintenance .................................................................................................................................. F-1
Overview .................................................................................................................................................. F-1
Upgrading the Software........................................................................................................................... F-1
Cleaning the Case ................................................................................................................................... F-1
Cleaning the SNAP Ports ......................................................................................................................... F-1
Cleaning the Screen ................................................................................................................................ F-1
Cleaning the Incubator Wells ................................................................................................................... F-1
Calibration ................................................................................................................................................ F-1
G Troubleshooting ............................................................................................................................G-1
Differences in Results ..............................................................................................................................G-1
Wrong SNAP* Device Removed .............................................................................................................G-1
Touch Screen Not Responsive ................................................................................................................G-1
SNAP Bar Code Cannot Be Read ...........................................................................................................G-1
Viewing the Event Log .............................................................................................................................G-2
Other Problems with Your Analyzer .........................................................................................................G-2
Sending Your Analyzer to IDEXX .............................................................................................................G-3
Frequently Asked Questions ...................................................................................................................G-3
H Appendices ...................................................................................................................................H-1
Technical Specifications .......................................................................................................................... H-1
IDEXX Technical Support Contact Information ........................................................................................ H-2
iv
Page 5

Preface
Safety Precautions
• The IDEXX SNAPshot Dx* Analyzer contains no user-serviceable components. DO NOT
disassemble. Call IDEXX Technical Support for any service issues.
• Do not insert anything in the SNAP* ports except devices approved for use with the SNAPshot
Dx Analyzer.
• Do not insert anything in the incubator wells except for the plastic sample tubes provided in
the SNAP test kits.
• DO NOT stack other equipment or containers on top of the analyzer.
• Keep analyzer away from sources of heat or flames.
• DO NOT place or operate the analyzer near x-ray equipment, photocopiers, or other devices
that generate static or magnetic fields.
• PROTECT your equipment from damp conditions or wet weather.
• Take care not to spill water or other fluids on the analyzer.
• DO NOT use any of the following liquids, abrasives, or aerosol sprays on or near the analyzer,
as they may damage the outer case and may influence the results:
– Organic solvents
– Ammonia-based cleaners
– Ink markers
– Sprays containing volatile liquids
– Insecticides
– Disinfectant
– Polish
– Room freshener
• Line voltage for the SNAPshot Dx Analyzer power supply is 100–240 V AC, 50–60 Hz.
Be sure to plug all equipment into properly grounded electrical outlets.
• Use only the power cable supplied.
• Disconnect the power cable from the AC power outlet:
– If the power cable becomes frayed or otherwise damaged.
– If anything is spilled onto the equipment.
– If your equipment is exposed to excessive moisture.
– If your equipment is dropped or the case has been damaged.
– If you suspect that your analyzer needs service or repair.
– Whenever you clean the case.
• If the equipment is used in a manner other than specified, the protection provided by the
equipment may be impaired.
v
Page 6
Preface
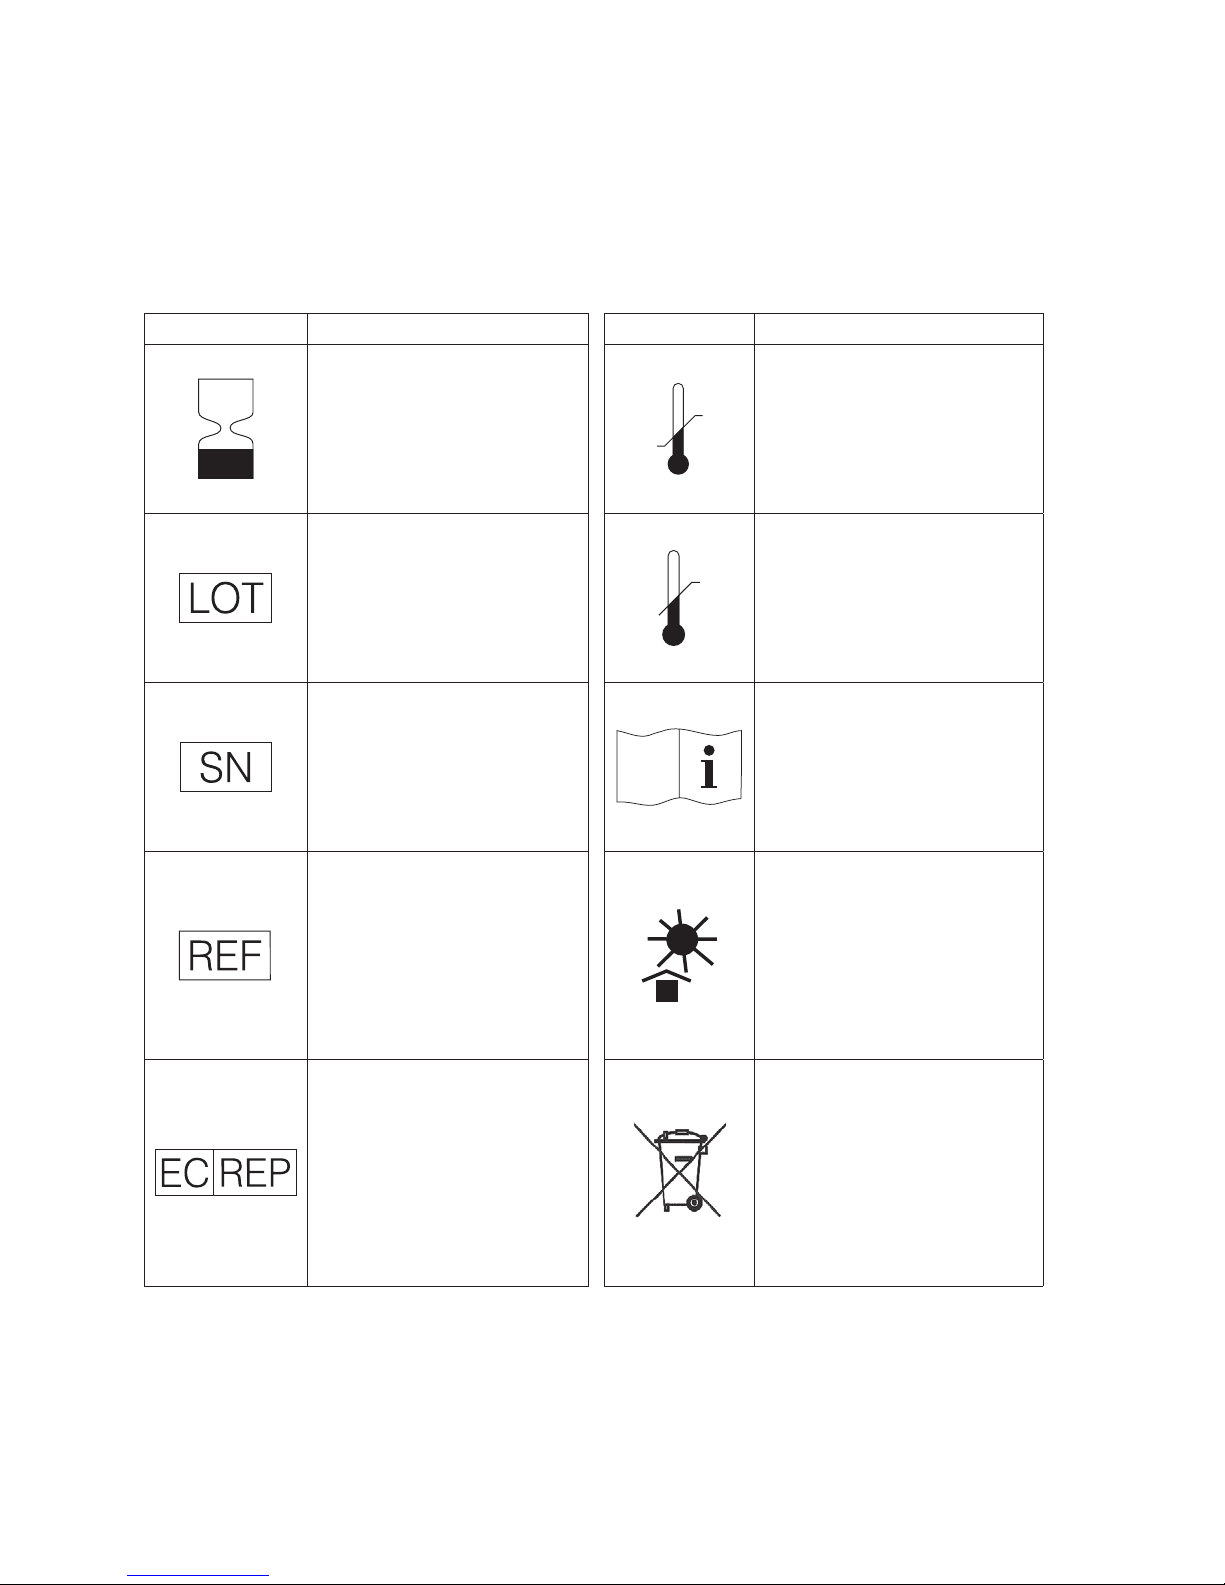
International Symbol Descriptions
International symbols are often used on packaging to provide a pictorial representation of particular
information related to the product (such as expiration date, temperature limitations, batch code,
etc.). IDEXX Laboratories has adopted the use of international symbols on our analyzers, product
boxes, labels, inserts, and manuals in an effort to provide our users with
easy-to-read information.
Symbol Description Symbol Description
Use by
A utiliser avant
Verwendbar bis
Usare entro
Usar antes de
使用期限
Batch Code (Lot)
Code de lot (Lot)
Chargenbezeichnung (Partie)
Codice del lotto (partita)
Código de lote (Lote)
ロット 番 号
Serial Number
Numéro de série
Seriennummer
Numero di serie
Número de serie
シリアル番号
Catalog Number
Numéro catalogue
Bestellnummer
Numero di catalogo
Número de catálogo
製品番号
Authorized Representative in the
European Community
Représentant agréé pour la C.E.E.
Autorisierte EG-Vertretung
Rappresentante autorizzato nella
Comunitá Europea
Representante autorizado en la
Comunidad Europea
EC内の正規販売代理店
Temperature limitation
Température limite
Zulässiger Temperaturbereich
Temperatura limite
Limitación de temperatura
保存温度(下限)
Upper limit of temperature
Limite supérieure de température
Temperaturobergrenze
Limite superiore di temperatura
Limite superior de temperatura
保存温度(上限)
Consult instructions for use
Consulter la notice d’utilisation
Gebrauchsanweisung beachten
Consultare le istruzioni per l’uso
Consultar las instrucciones de uso
取扱説明書をご参照ください。
Keep away from sunlight
Conserver à l’abri de la lumière
Vor direkter Sonneneinstrahlung
schützen
Mantener alejado de la luz solar
Tenere lontano dalla luce diretta del
sole
遮光してください。
WEEE Directive 2002/96/EC
Directive 2002/96/CE (DEEE)
WEEE-Richtlinie 2002/96/EG
Directiva 2002/96/CE RAEE
Direttiva RAEE 2002/96/CE
廃電気電子機器指令(WEEE Directive
2002/96/EC)
vi
Page 7
2
Preface
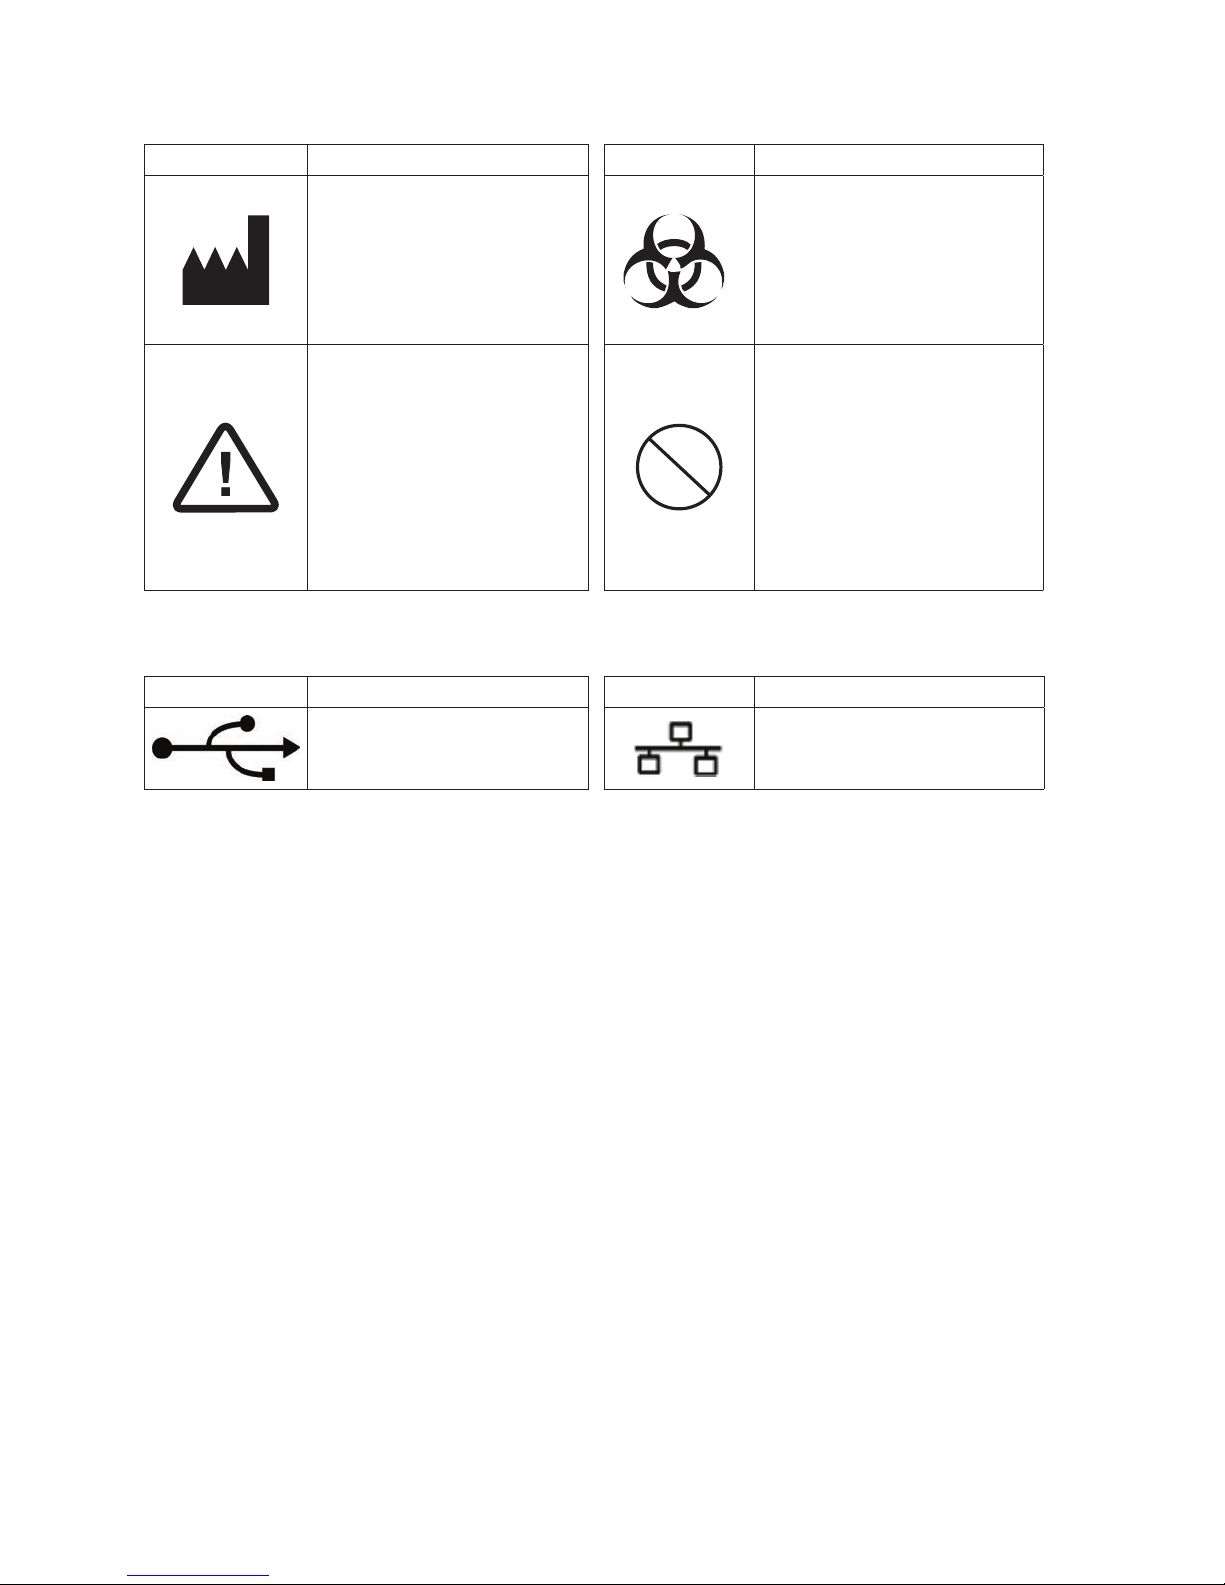
Symbol Description Symbol Description
Manufacturer
Fabricant
Hersteller
Ditta produttrice
Fabricante
製造元
Caution, consult accompanying
documents
Attention, consulter les documents
joints
Achtung, Begleitdokumente beachten
Attenzione, consultare la
documentazione allegata
Precaución, consultar la
documentación adjunta
注意、添付文書をご参照ください。
Biological Risks
Risques biologiques
Biogefährlich
Rischi biologici
Riesgos biológicos
生物学的リスク
Do Not Reuse
Usage unique
Nicht wiederverwenden
No reutilizarw
Non riutilizzare
再利用しないでください。
Other Symbols
Symbol Description Symbol Description
USB symbol Ethernet/network symbol
vii
Page 8
A Getting Started
Introduction
The IDEXX SNAPshot Dx* Analyzer is an assay reader designed for use with certain IDEXX SNAP*
consumables, such as SNAP* Total T4 and SNAP* 4Dx* Plus Tests. By using the SNAPshot Dx
Analyzer, you can keep a record of your patient’s SNAP test history as well as add tests to an
existing patient’s record.
The analyzer’s touch-screen interface provides easy-to-follow instructions to help you navigate the
system, specify testing information, and more.
The SNAPshot Dx Analyzer is for veterinary use only.
IDEXX VetLab* Station Connectivity
The SNAPshot Dx Analyzer is part of the IDEXX VetLab* suite of analyzers, all of which connect
to the IDEXX VetLab Station (IDEXX’s laboratory information management system). Connecting
multiple analyzers to the IDEXX VetLab Station allows you to view a comprehensive picture of
your patient’s health, with the ability to view test results from multiple analyzers on a single report,
determine disease progression with parameter-trending capabilities, and more.
By connecting the SNAPshot Dx Analyzer to the IDEXX VetLab Station, you can:
• Automatically review patients’ prior results on every printout for easy comparison.
• Improve client communications with illustrated diagnostic or treatment progress printouts.
• Link to expert descriptions and common causes of abnormal values.
• Print information to help explain the significance of results to your clients.
• Allow new staff to train independently.
• View educational on-screen guides and videos, such as how to properly prepare a plasma
sample.
• Learn proper protocols and tips for best techniques.
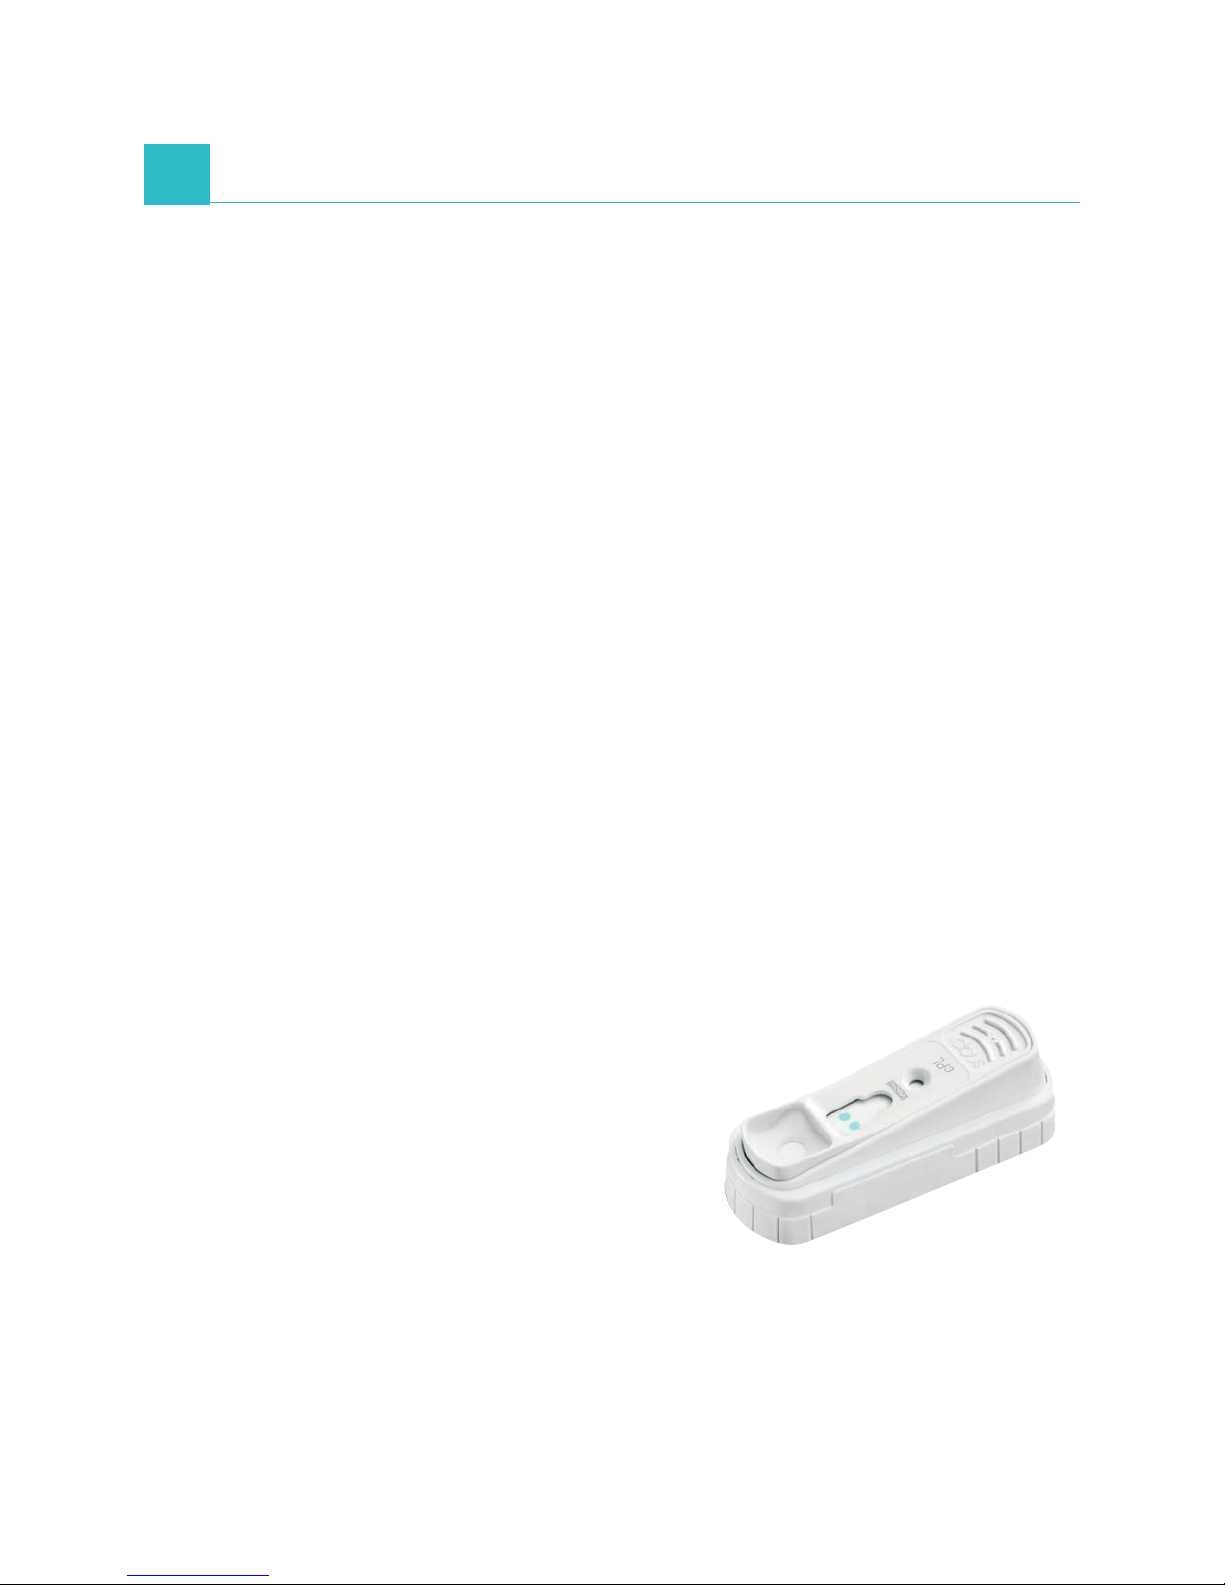
How It Works
The SNAPshot Dx Analyzer is a digital imaging system
that records and interprets the colorimetric response
of enzymes immobilized on the surface of a SNAP test.
During operation, the analyzer records digital images of
each SNAP device and uses test-specific algorithms to
calculate the results. All SNAP tests that are loaded into
the SNAPshot Dx Analyzer must have a bar code on the
top of the device so that the analyzer can confirm the
SNAP test type.
A-1
Page 9
Getting Started
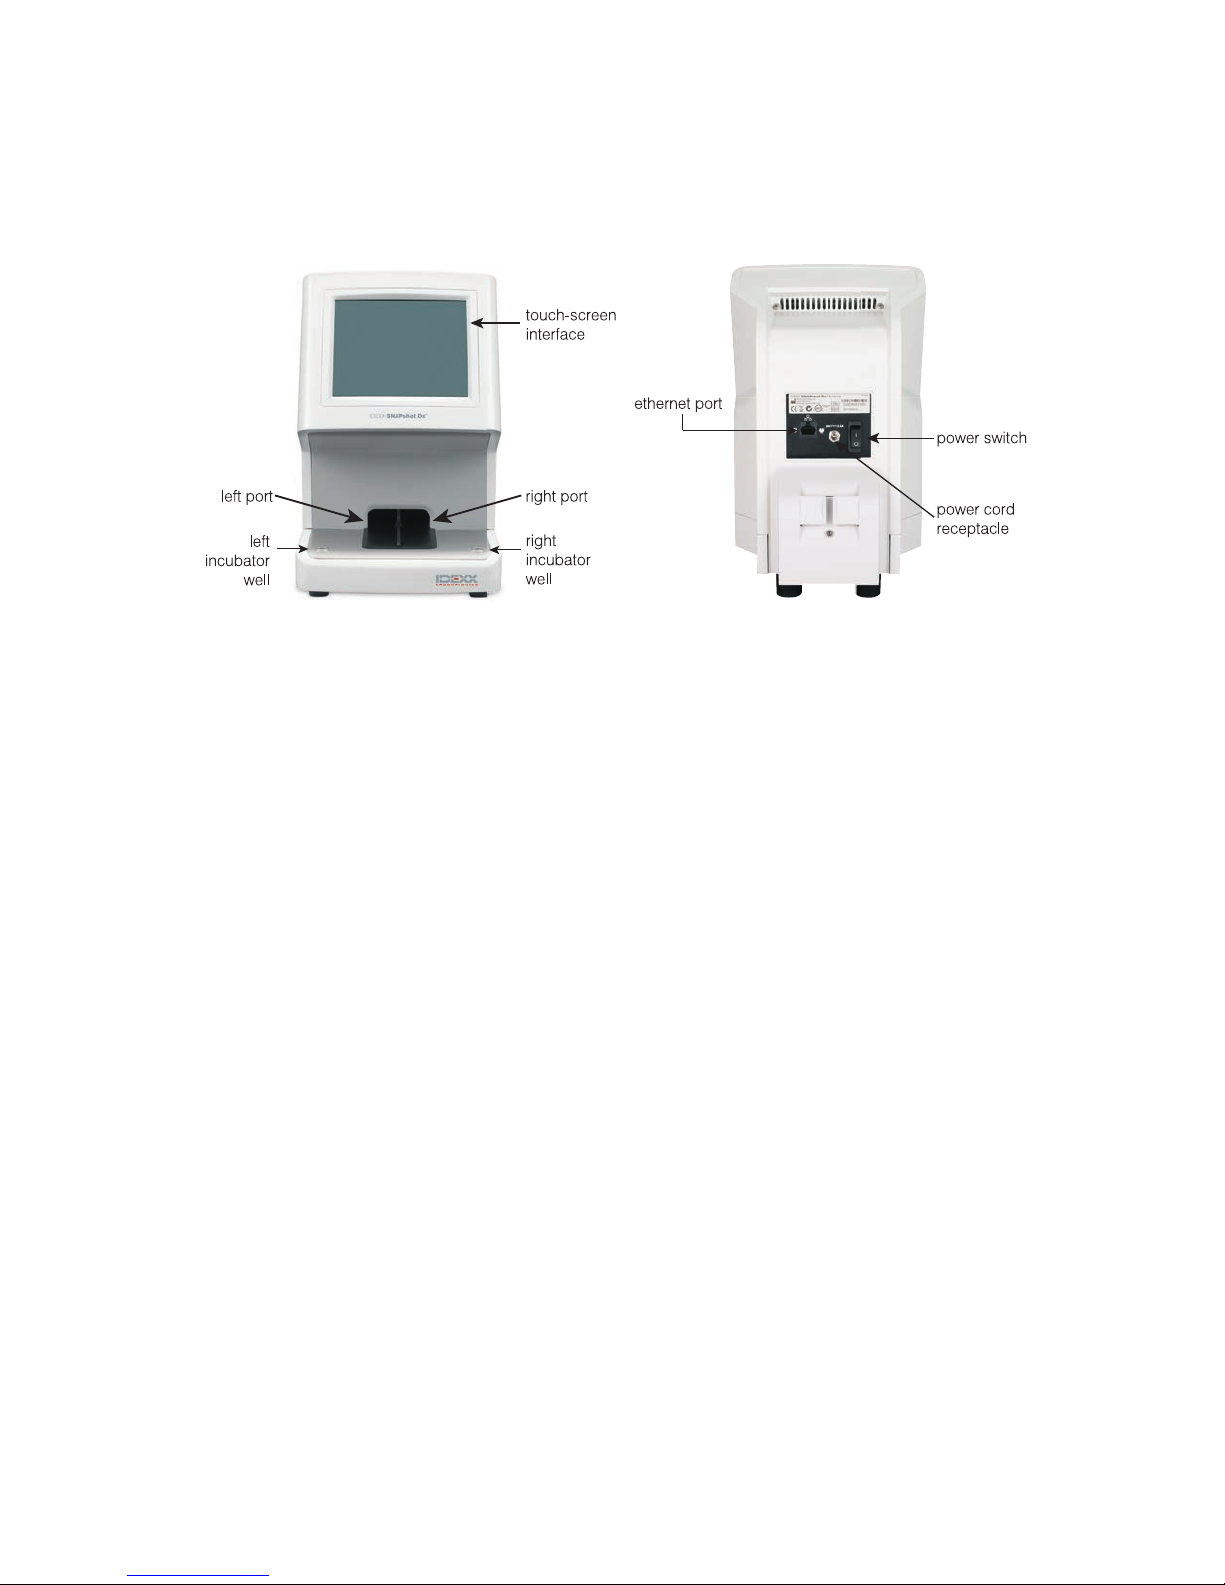
SNAPshot Dx Analyzer Components
Installing the SNAPshot Dx Analyzer
The SNAPshot Dx Analyzer must be connected to the IDEXX VetLab Station (to be used in
conjunction with the IDEXX VetLab suite of analyzers).
To Install the SNAPshot Dx Analyzer
1. Before you unpack the analyzer, choose an optimum location for the analyzer. The analyzer
should be placed on a level surface with at least 4 inches (10 cm) of clearance above
the analyzer. The area underneath the analyzer should remain clean and clear. Choose a
well-ventilated area away from obvious sources of heat, direct sunlight, cold, humidity, or
vibrations. For optimum results, room temperature should be 19°C–27°C
(66°F–81°F) and relative humidity should be 30%–85%.
2. Unpack the analyzer using the following steps:
a. Remove the analyzer, power supply, and Ethernet cable from the box and then from the
bag.
b. Position the analyzer so the power switch can be accessed and the analyzer can be
unplugged.
3. Connect the power cord using the following steps:
a. Plug the round power connector into the receptacle on the back of the analyzer.
b. Plug the power cord into a wall outlet or power strip.
Note: Do not power on the analyzer at this time.
To Install the IDEXX VetLab Station Connectivity Router
Note: If you already have a network router connected directly to the IDEXX VetLab Station computer,
you can skip this section and move to the “To Connect the SNAPshot Dx Analyzer to the IDEXX
VetLab Station” section on page A-3.
A-2
Page 10

Getting Started
1. Connect the AC power adapter to the power port on the back of the network router supplied
2. Plug the AC power adapter into an electrical outlet.
3. Connect one end of the Ethernet cable (provided with the router) into any available port on the
4. Connect the other end of the Ethernet cable (from step 3)
by IDEXX Laboratories.
router.
IMPORTANT: Do not connect the IDEXX VetLab Station directly to the Internet port on
the router.
into the IDEXX VetLab Station computer’s Ethernet port, which
is located near the center panel on the back of
the computer.
Note: If this Ethernet port on the IDEXX VetLab Station
computer is currently being used to connect the IDEXX VetStat*
Electrolyte and Blood Gas Analyzer (red Ethernet cable) to
your IDEXX VetLab Station, disconnect the red Ethernet cable.
Ethernet port on the back panel of the
IDEXX VetLab Station computer’s CPU
Then complete step 4 above. The “To Reconnect the VetStat
Analyzer” section, found at the bottom of this page, explains
how to reconnect the VetStat analyzer after the router is
installed.
To Connect the SNAPshot Dx Analyzer to the IDEXX VetLab Station
1. Connect the Ethernet cable provided with the SNAPshot Dx Analyzer to the next available port
on the back of the router.
IMPORTANT: Do not connect the SNAPshot Dx Analyzer directly to the Internet port
on the router.
2. Connect the other end of the Ethernet cable (from Step 1) to the Ethernet port on the back of
the SNAPshot Dx Analyzer.
3. Power on the IDEXX VetLab Station. Once the IDEXX VetLab Station is at its Home screen,
power on the SNAPshot Dx Analyzer. Once both systems have completed their initialization
process, the IDEXX VetLab Station will establish connectivity with the SNAPshot Dx Analyzer.
When the SNAPshot Dx icon appears on the IDEXX VetLab Station Home screen, your
connections are complete.
Note: If the SNAPshot Dx icon does not appear on the IDEXX VetLab Station Home screen
within 3 minutes, contact IDEXX Technical Support for assistance.
To Reconnect the VetStat* Analyzer
IMPORTANT: The direct connection between the VetStat analyzer and the IDEXX VetLab Station
uses a standard Ethernet cable with a light purple cross-over adapter. This light purple cross-over
adapter, which is located on one end of the cable, must be removed before connecting the
Ethernet cable to the router.
1. Ensure the light purple cross-over adapter has been removed from the VetStat Ethernet cable.
2. Connect one end of the VetStat Ethernet cable to the VetStat analyzer and the other end to the
next available port on the router.
IMPORTANT: Do not connect the VetStat analyzer directly to the Internet port on the
router.
3. On the VetStat Home screen, tap System Manager and then tap Setup.
4. Use the alphanumeric keypad to enter the setup password, 207, and tap OK.
A-3
Page 11

Getting Started
5. From the Setup screen, tap Hardware and then tap the Ethernet tab.
6. Select Dynamic as the network setting and then tap OK to save the change.
7. Turn off the VetStat analyzer by toggling the power switch to OFF. Then, turn on the analyzer.
After the VetStat analyzer returns to the Home screen, the VetStat icon will appear at the
bottom of the IDEXX VetLab Station Home screen.
Note: If the VetStat icon does not appear on the IDEXX VetLab Station Home screen within 3
minutes, contact IDEXX Technical Support for assistance.
Powering On the Analyzer
To turn on the analyzer, press the power switch on the back of the analyzer. The analyzer will take
several minutes to warm up. It is ready for use when the Home screen appears.
Shutting Down the Analyzer
To Shut Down the SNAPshot Dx Analyzer
1. Tap Tools.
2. Tap Shutdown and then tap Ye s to confirm that you want to shut down the analyzer.
3. When the analyzer indicates it is okay to do so, press the power switch on the back of the
analyzer to power the analyzer off.
Important: If you need to unplug the analyzer, ensure you disconnect the power cord from
the wall outlet/power strip BEFORE you disconnect it from the analyzer.
Connecting/Disconnecting the Power Cord
It is important that you follow these instructions carefully as improper connection/disconnection
could result in the hazard of an electrical shock.
To Connect the Power Cord
1. Ensure the analyzer is powered off.
2. Plug the round power connector into the receptacle on the back of the analyzer.
3. Plug the power cord into a wall outlet or power strip.
4. Press the power switch on the back of the analyzer to the on (I) position.
To Disconnect the Power Cord
1. Shut down the analyzer (see “Shutting Down the Analyzer” above).
2. Press the power switch on the back of the analyzer to the off (O) position.
3. Unplug the power cord from the wall outlet or power strip.
4. Unplug the round connector from the receptacle on the back of the analyzer.
Printing Test Results
The SNAPshot Dx Analyzer is connected to the IDEXX VetLab Station. Therefore, you print your
SNAPshot Dx Analyzer test results using the print settings on the IDEXX VetLab Station (compatible
printer required). For more information on printing while connected to the IDEXX VetLab Station, see
the IDEXX VetLab Station Operator’s Guide.
A-4
Page 12

B Using the SNAPshot Dx* Analyzer
Overview
The SNAPshot Dx Analyzer is controlled via a touch-screen monitor on the front of the analyzer and
by the IDEXX VetLab* Station.
Using the Touch Screen
To get the best results when using the touch screen:
• Do not rest your hand on the touch screen. The screen is sensitive to touch; pressure from
your hand prevents the touch screen from functioning properly.
• Tap the screen firmly.
• Never tap the touch screen with a sharp or abrasive object.
The touch screen is on whenever the analyzer is on.
Loading a SNAP* Test
The proper way to load a SNAP test device into the analyzer is horizontally, sample well end first. Do
not insert the SNAP device into the SNAPshot Dx Analyzer until the SNAPshot Dx Analyzer is ready
to process the device.
Important: Do not remove a SNAP test from the analyzer during analysis—removing the device
prematurely may result in loss of the run. Analysis is complete when the patient’s name is moved
from the In Process list to the Results list.
Running a SNAP* Test
For detailed instructions on running a specific SNAP test, see the “SNAP Test Procedures” chapter
in this guide.
IMPORTANT: Do not load a SNAP device until prompted by the analyzer.
To Run a SNAP Test
1. Enter the patient information on the IDEXX VetLab Station (for more information, see the
“Analyzing Samples” chapter of the IDEXX VetLab Station Operator’s Guide).
2. Once the patient’s name appears in the Pending list on the SNAPshot Dx Home screen, tap
the patient’s name and then tap Select.
3. Follow the on-screen instructions for preparing, incubating (SNAP Total T4 and Cortisol only),
and loading the SNAP test.
When analysis is complete, the patient’s name moves from the In Process list to the Results
list (you may also receive a “New Results” alert message and/or hear a beep on the IDEXX
VetLab Station, depending on the option(s) you selected in the New Results Alert tab on the
IDEXX VetLab Station’s Settings screen). You can then remove the SNAP device from the
analyzer by gently pushing the SNAP device until you hear a click. The device will slide out of
the port.
B-1
Page 13

Using the SNAPshot Dx* Analyzer
Viewing Test Results
To View the Test Results on the SNAPshot Dx Analyzer
1. Tap the Results list.
2. Tap the patient whose test results you want to view.
Note: If you do not see the patient’s name in the Results list, tap the page up and page
down arrows to view additional patient names.
3. Tap View Results to display the Test Results screen.
To View the Test Results on the IDEXX VetLab Station
See the IDEXX VetLab Station Operator’s Guide for detailed instructions on viewing test results.
B-2
Page 14

C SNAP* Test Procedures
Overview
This chapter includes detailed information for each of the SNAP tests that the SNAPshot Dx*
Analyzer supports. You can use the information in this section to:
• Read a description of each SNAP test.
• Learn how to prepare each test for analysis (the process varies by test type).
For more information about SNAP test diagnosis, management, and interpretations, visit idexx.com.
C-1
Page 15

SNAP Test Procedures
SNAP* Total T
Test Description
An enzyme-linked immunosorbent assay (ELISA) for the quantitative measurement of total T4
(thyroxine) in canine, feline, and equine patients. With a SNAP Total T4 Test, you can assess thyroid
function, provide comprehensive one-visit screening for feline hyperthyroidism, presumptive
hyperthyroidism and canine or equine hypothyroidism, as well as monitor response to treatment and
adjust dosages immediately.
Preparing and Running a SNAP Total T4 Test
Important: Allow the SNAP Total T4 Test to equilibrate in its sealed foil package at room temperature
for at least 15 minutes. Do not heat. It is not necessary to equilibrate the conjugate solution at room
temperature.
1. Enter the patient information on the IDEXX VetLab* Station (for more information, see the
“Analyzing Samples” chapter of the IDEXX VetLab Station Operator’s Guide).
2. Once the patient’s name appears in the Pending list on the SNAPshot Dx Home screen, tap the
patient’s name and then tap Select. The Identify Sample screen appears.
3. Select Total T4 as the SNAP Test Type.
4. Select the applicable sample type.
Note: Plasma from the Catalyst* whole blood separator may be used.
5. Tap Next.
6. If you are running a diluted sample, tap the Dilution or arrows to specify the parts diluent
(see the “Total T4 Dilution Guidelines” section on page C-3).
Note: T4 dilutions have not been validated for equine samples.
Important: Before performing a dilution, always run an undiluted patient sample first.
Samples should only be diluted when the undiluted sample result is >7.0 μg/dL (90.1 nmol/L).
7. Tap Next and follow the on-screen instructions to properly prepare the sample.
a. Use the purple handheld pipette to transfer 65 μL of sample into a disposable sample tube.
b. Use the 300-μL pipette to transfer 300 μL of conjugate into the same sample tube.
c. Cap the sample tube and gently invert it 4–5 times to mix.
d. Place the sample tube into an available incubator well.
e. Tap to start the incubation timer that corresponds to the well you selected (left or right).
8. When incubation is complete (the patient information in the Pending list changes from
“Incubating” to “Ready,” the text turns red, and the analyzer beeps), tap to select the patient in
the Pending list.
9. Tap Next and follow the on-screen instructions to properly prepare the SNAP test:
a. Place the device on a horizontal surface.
b. Add the entire contents of the sample tube to the sample well, being careful not to
c. When color FIRST appears in the activation circle, press the activator firmly until it is
4
The incubation timer displays with the patient information in the Pending list on the Home
screen (the timer counts down in 10-second intervals).
splash the contents outside of the sample well. The sample will flow across the result
window, reaching the activation circle in 30–60 seconds. Some sample may remain in
the sample well.
flush with the device body.
C-2
Page 16

SNAP Test Procedures
10. Insert the SNAP device into the SNAPshot Dx Analyzer immediately. The SNAPshot Dx
Analyzer automatically begins to process the patient sample and the Home screen displays.
The patient’s name moves from the Pending list to the In Process list.
When analysis is complete, the patient’s name will move from the In Process list to the Results
list (you may also receive a “New Results” alert message and/or hear a beep on the IDEXX
VetLab Station, depending on the option(s) you selected in the New Results Alert tab on the
IDEXX VetLab Station’s Settings screen). You can then remove the SNAP device from the
analyzer by gently pushing the SNAP device until you hear a click. The device will slide out of
the port.
Total T4 Dilution Guidelines
The SNAPshot Dx Analyzer allows you to dilute canine and feline Total T4 samples that initially report
>7.0 μg/dL (90.1 nmol/L). Total T4 dilutions have not been validated on equine samples.
To Ensure that You Receive the Most Accurate Results
• Only perform a dilution when the undiluted sample result is >7.0 μg/dL (90.1 nmol/L).
• Use the lowest dilution factor possible.
• Use only normal saline as the diluent.
Note: Conjugate volume remains at 300 μL even if you are running a diluted sample.
Preparing a 1:2 Dilution (1 part sample, 1 part saline)
1. Using the purple handheld pipette, dispense 65 μL of sample (serum or plasma) into a
disposable sample tube (e.g., a disposable tube from the SNAP Total T4 Test Kit).
2. Using the purple handheld pipette, add 65 μL of normal saline to the tube.
3. Cap the tube and gently invert 4–5 times to mix the sample and saline.
4. Using the purple handheld pipette, aspirate 65 μL of the diluted sample and run the SNAP
Total T4 Test as normal.
Note: When prompted, select 1 in the Dilution drop-down list.
Preparing a 1:4 Dilution (1 part sample, 3 parts saline)
Important: A 1:4 dilution is only recommended if the result of a 1:2 diluted sample is
>14.0 μg/dL (180.2 nmol/L).
1. Using the purple handheld pipette, dispense 65 μL of sample (serum or plasma) into a
disposable sample tube (e.g., a disposable tube from the SNAP Total T4 Test Kit).
2. Using the purple handheld pipette, add 65 μL of normal saline to the tube 3 times.
3. Cap the tube and gently invert 4–5 times to mix the sample and saline.
4. Using the purple handheld pipette, aspirate 65 μL of the sample/saline combination and
dispense it into a new disposable sample tube.
5. Using the diluted sample, prepare and run the SNAP Total T
Note: When prompted, select 3 in the Dilution drop-down list.
Test as normal.
4
C-3
Page 17

SNAP Test Procedures
Interpreting Test Results
The recommendations below are intended to provide general guidance only. As with any diagnosis,
you should use clinical discretion with each patient based on a complete evaluation of the patient,
including history, physical examination, and complete laboratory profile.
Species Results
Canine
Feline
Equine <1.0 Low <13 Low
†
‡
U.S. Units (µg/dL) S.I. Units (nmol/L)
<1.0 Low <13 Low
1.0–2.0 Low Normal 13–26 Low Normal
1.0–4.0 Normal 13–51 Normal
>4.0 High >51 High
2.1–5.4 Therapeutic 27–69 Therapeutic
<0.8 Subnormal <10 Subnormal
0.8–4.7 Normal 10–60 Normal
2.3–4.7 Gray zone in old or
symptomatic cats
>4.7 Consistent with
hyperthyroidism
1.0–3.8 Normal 13–49 Normal
>3.8 High >49 High
30–60 Gray zone in old or
symptomatic cats
>60 Consistent with
hyperthyroidism
†
Canine Screening
• Dogs with a low total T
• Dogs with T
• In dogs with low or low normal T
endogenous thyroid-stimulating hormone (TSH) and possibly thyroglobulin autoantibodies (TgAA) to aid in
confirming hypothyroidism.
Hypothyroidism Therapeutic Monitoring
For dogs on thyroid supplement, acceptable 4–6-hour post-pill T
the reference range or slightly above.
‡
Feline Screening
Cats with consistent clinical signs and total T
early hyperthyroidism or a concurrent nonthyroidal illness (NTI). In these cases, consider a free T
suppression test or radionuclide thyroid imaging to aid in confirming the diagnosis.
Hyperthyroidism Therapeutic Monitoring
Following treatment with methimazole, T
reference range.
4
results in the low normal range may be hypothyroid.
4
(T4) and evidence of nonthyroidal illness (NTI) should have their NTI addressed.
4
results and with consistent clinical signs, consider free T4 (fT4) and
4
values will generally fall in the upper end of
4
(T4) values in the borderline high range (gray zone) may have
4
(fT4), a T3
4
values will generally fall within the lower to midportion of the
C-4
Page 18

SNAP Test Procedures
SNAP* Cortisol
Test Description
An enzyme-linked immunosorbent assay (ELISA) for the quantitative measurement of cortisol in
canine patients. With the SNAP Cortisol Test (when used in conjunction with accepted protocols
for ACTH stimulation and low-dose dexamethasone suppression tests), you can screen for
Addison’s disease and Cushing’s syndrome. You can also monitor response to treatment and make
adjustments to medications for patients diagnosed with Cushing’s syndrome.
Important: DO NOT use the SNAP Cortisol Test if the patient has received:
• Dexamethasone (doses >0.1 mg/kg) in the last 7 days.
OR
• Prednisone or other corticosteriods in the past 4 weeks.
Preparing and Running a SNAP Cortisol Test
Important: Allow the SNAP Cortisol Test to equilibrate in its sealed foil package at room temperature
for at least 10 minutes. Do not heat. It is not necessary to equilibrate the conjugate solution at room
temperature.
1. Enter the patient information on the IDEXX VetLab Station (for more information, see the
“Analyzing Samples” chapter of the IDEXX VetLab Station Operator’s Guide).
2. Once the patient’s name appears in the Pending list on the SNAPshot Dx Home screen, tap the
patient’s name and then tap Select. The Identify Sample screen appears.
3. Select Cortisol as the SNAP Test Type (the sample type is chosen automatically).
4. Tap Next.
5. In the Protocol drop-down list, tap ACTH Stim, LDDST, or HDDST.
Note: Take care not to exceed 0.1 mg/kg of dexamethasone.
6. In the Protocol Step drop-down list, tap the applicable protocol step. The options that are
available vary based on the Protocol option that was selected in step 6.
7. Tap Next and follow the on-screen instructions to properly prepare the sample.
a. Using the appropriate handheld pipette (provided in the SNAPshot Dx sample prep kit),
transfer the sample and conjugate into a disposable sample tube (see volumes below).
Protocol/Protocol Step
Baseline Cortisol
Dexamethasone Suppression
Cortisol (low- or high-dose) 100 µL Gray 300 µL
ACTH Stim Cortisol: Cushing’s
Suspected 25 µL Blue 300 µL
ACTH Stim Cortisol: Addison’s
Suspected 100 µL Gray 300 µL
Sample
Volume
100 µL Gray 300 µL
Pipette
Color
Conjugate
Volume
Range
0.5–10.0 µg/dL
(13.8–276.0
nmol/L)
0.5–10.0 µg/dL
(13.8–276.0
nmol/L)
2.5–30.0 µg/dL
(69.0–828.0
nmol/L)
0.5–10.0 µg/dL
(13.8–276.0
nmol/L)
†
C-5
Page 19

SNAP Test Procedures
Protocol/Protocol Step
ACTH Stim Cortisol: Therapeutic
Monitoring 100 µL Gray 300 µL
Sample
Volume
Pipette
Color
Conjugate
Volume
Range
†
0.5–10.0 µg/dL
(13.8–276.0
nmol/L)
ACTH Stim Cortisol: Therapeutic
Monitoring >10 µg/dL 25 µL Blue 300 µL
2.5–30.0 µg/dL
(69.0–828.0
nmol/L)
†
“Range” refers to the test result range for a particular test’s protocol. When a test result falls outside of this
range, it will be reported as either “>” (greater than the upper limit) or “<” (less than the lower limit).
b. Cap the sample tube and gently invert it 4–5 times to mix.
c. Place the sample tube into an available incubator well.
d. Tap to start the incubation timer that corresponds to the well you selected (left or right).
The incubation timer displays with the patient information in the Pending list on the Home
screen (the timer counts down in 10-second intervals).
8. When incubation is complete (the patient information in the Pending list changes from
“Incubating” to “Ready,” the text turns red, and the analyzer beeps), tap to select the patient in
the Pending list.
9. Tap Next and follow the on-screen instructions to properly prepare the SNAP test:
a. Place the device on a horizontal surface.
b. Add the entire contents of the sample tube to the sample well, being careful not to
splash the contents outside of the sample well. The sample will flow across the result
window, reaching the activation circle in 30–60 seconds. Some sample may remain in
the sample well.
c. When color FIRST appears in the activation circle, press the activator firmly until it is
flush with the device body.
10. Insert the SNAP device into the SNAPshot Dx Analyzer immediately. The SNAPshot Dx
Analyzer automatically begins to process the patient sample and the Home screen displays.
The patient’s name moves from the Pending list to the In Process list.
When analysis is complete, the patient’s name will move from the In Process list to the Results
list (you may also receive a “New Results” alert message and/or hear a beep on the IDEXX
VetLab Station, depending on the option(s) you selected in the New Results Alert tab on the
IDEXX VetLab Station’s Settings screen). You can then remove the SNAP device from the
analyzer by gently pushing the SNAP device until you hear a click. The device will slide out of
the port.
Interpreting Test Results
The recommendations below are intended to provide general guidance only. In all cases, it is
important to exercise clinical judgement in interpreting cortisol results in the context of the patient’s
history, clinical signs, physical status, and other laboratory data.
Note: Dexamethasone (doses >0.1 mg/kg), prednisone, and other corticosteroids are expected to
artificially increase the reported result.
C-6
Page 20

SNAP Test Procedures
A. ACTH Stimulation Test
Pre-ACTH Interpretation
<2 μg/dL
(55.2 nmol/L)
2–6 μg/dL
(55.2–165.6
nmol/L)
>22 μg/dL
(607.2 nmol/L)
Post-ACTH Interpretation
<2 μg/dL
(55.2 nmol/L)
2–6 μg/dL
(55.2–165.6
nmol/L)
6–18 μg/dL
(165.6–496.8
nmol/L)
18–22 μg/dL
(496.8–607.2
nmol/L)
>22 μg/dL
(607.2 nmol/L)
Must evaluate in conjunction with post-ACTH result. If both
results are <2 μg/dL (55.2 nmol/L), results are consistent with
hypoadrenocorticism. Begin treatment with mineralocorticoid and/or
glucocorticoid as appropriate.
Normal
Consistent with Cushing’s syndrome; perform high-dose
dexamethasone suppression test.
Ideally, should be evaluated in conjunction with pre-ACTH result. If
both results are <2 μg/dL
hypoadrenocorticism. Begin treatment with mineralocorticoid and/or
glucocorticoid as appropriate.
Inconclusive
Normal
Equivocal; Cushing’s syndrome possible
Consistent with Cushing’s syndrome; perform high-dose
dexamethasone suppression test to discriminate between PDH and
ATH, ACTH level, and/or abdominal ultrasound.
(55.2 nmol/L), results are consistent with
B. Low-Dose Dexamethasone Suppression Test
4-Hour Cortisol Level 8-Hour Cortisol Level Interpretation
<1 μg/dL (27.6 nmol/L) <1 μg/dL (27.6 nmol/L) Normal
1–1.5 μg/dL
(27.6–41.4 nmol/L)
>1.5 μg/dL (41.4
nmol/L) and >50% of
baseline
<1.5 μg/dL (41.4
nmol/L) or <50% of
baseline
>1.5 μg/dL (41.4
nmol/L) and >50% of
baseline
1–1.5 μg/dL
(27.6–41.4 nmol/L)
>1.5 μg/dL (41.4
nmol/L) and >50% of
baseline
>1.5 μg/dL (41.4
nmol/L) and >50% of
baseline
>1.5 μg/dL (41.4
nmol/L) and <50% of
baseline
Inconclusive; consider repeating
in 6–8 weeks.
Consistent with Cushing’s
syndrome; perform high-dose
dexamethasone suppression test,
endogenous ACTH concentration
test, and/or abdominal ultrasound
to discriminate between PDH and
ATH.
Consistent with PDH
Consistent with PDH
C-7
Page 21

SNAP Test Procedures
C. High-Dose Dexamethasone Suppression Test
4-Hour Cortisol Level 8-Hour Cortisol Level Interpretation
<1.5 μg/dL (41.4
nmol/L) or <50% of
baseline
>1.5 μg/dL (41.4
nmol/L) and >50% of
baseline
<1.5 μg/dL (41.4
nmol/L) or <50% of
baseline
>1.5 μg/dL (41.4
nmol/L) and >50% of
baseline
D. Post-ACTH Stimulation Mitotane (Lysodren*) Monitoring
>1.5 μg/dL (41.4
nmol/L) and >50% of
baseline
<1.5 μg/dL (41.4
nmol/L) or <50% of
baseline
<1.5 μg/dL (41.4
nmol/L) or <50% of
baseline
>1.5 μg/dL (41.4
nmol/L) and >50% of
baseline
Consistent with PDH
Consistent with PDH
Consistent with PDH
Additional testing required to
differentiate PDH from ATH;
consider measuring plasma
ACTH levels and/or performing an
abdominal ultrasound.
Loading
Dose Interpretation
<1 μg/dL
(27.6 nmol/L)
1–5 μg/dL
(27.6–138.0
nmol/L)
>5 μg/dL
(138.0 nmol/L)
Note: 1 μg/dL = 27.6 nmol/L
Discontinue mitotane.
If dog is listless or ill,
administer maintenance
prednisone in tapering
dose for 2 weeks. If dog
is clinically healthy, do not
start prednisone, but start
low maintenance dose of
mitotane in 2 weeks.
Begin maintenance
mitotane dosing (25–50
mg/kg per week with food
in divided doses); repeat
ACTH stimulation test in
one month.
Continue mitotane
loading dose for 3–7
days; recheck 3–7 days;
observe for adverse
reaction.
Maintenance
Dose Interpretation
<1 μg/dL
(27.6 nmol/L)
1–5 μg/dL
(27.6–138.0
nmol/L)
>5 μg/dL
(138.0 nmol/L)
Discontinue mitotane.
If dog is listless or ill,
administer maintenance
prednisone in tapering
dose for 2 weeks. If dog
is clinically healthy, do not
start prednisone. Restart
mitotane maintenance
therapy in 2 weeks, but
reduce dose by 25%.
Maintain current dosage;
repeat ACTH stimulation
test every 3–4 months.
Increase weekly dose
or repeat loading dose
for 3–7 days; observe
for adverse reaction and
then increase weekly
maintenance dose.
C-8
Page 22

SNAP Test Procedures
SNAP* Bile Acids
Test Description
An enzyme-linked immunosorbent assay (ELISA) for the quantitative measurement of bile acids in
canine and feline patients. The SNAP Bile Acids Test may be used as an initial screen to establish
a baseline level for hepatic function or as a bile acids stimulation test where standard protocols are
adhered to. Abnormal results obtained from the SNAP Bile Acids Test indicate hepatic dysfunction
ranging from mild, as with nonspecific hepatopathy, to severe, as with portosystemic shunts. Bile
acids may also be useful for monitoring the effects of therapeutic drugs on hepatic function and
screening for occult liver dysfunction when enzyme levels are normal.
Preparing and Running a SNAP Bile Acids Test
Important: Allow the SNAP Bile Acids Test and conjugate solution to equilibrate at room
temperature for at least 30 minutes. Do not heat. Keep the SNAP test in its sealed foil package until
ready to use.
1. Enter the patient information on the IDEXX VetLab Station (for more information, see the
“Analyzing Samples” chapter of the IDEXX VetLab Station Operator’s Guide).
2. Once the patient’s name appears in the Pending list on the SNAPshot Dx Home screen, tap
the patient’s name and then tap Select. The Identify Sample screen appears.
3. Select Bile Acids as the SNAP Test Type.
4. Select the applicable sample type.
5. Tap Next.
6. In the Protocol drop-down list, tap Preprandial, Postprandial, or Other.
7. Tap Next and follow the on-screen instructions to properly prepare the sample.
a. Use the gray handheld pipette (provided in the SNAPshot Dx sample prep kit) to transfer
100 μL of sample into a disposable sample tube.
b. Use the 300-μL pipette to transfer 300 μL of conjugate into the same sample tube.
c. Cap the sample tube and gently invert it 4–5 times to mix.
8. Tap Next and follow the on-screen instructions to properly prepare the SNAP test:
a. Place the device on a horizontal surface.
b. Add the entire contents of the sample tube to the sample well, being careful not to
splash the contents outside of the sample well. The sample will flow across the result
window, reaching the activation circle in 30–60 seconds. Some sample may remain in
the sample well.
c. When color FIRST appears in the activation circle, press the activator firmly until it is
flush with the device body.
9. Insert the SNAP device into the SNAPshot Dx Analyzer immediately. The SNAPshot Dx
Analyzer automatically begins to process the patient sample and the Home screen displays.
The patient’s name moves from the Pending list to the In Process list.
When analysis is complete, the patient’s name will move from the In Process list to the Results
list (you may also receive a “New Results” alert message and/or hear a beep on the IDEXX
VetLab Station, depending on the option(s) you selected in the New Results Alert tab on the
IDEXX VetLab Station’s Settings screen). You can then remove the SNAP device from the
analyzer by gently pushing the SNAP device until you hear a click. The device will slide out of
the port.
C-9
Page 23

SNAP Test Procedures
Interpreting Test Results
The recommendations below are intended to provide general guidance only. In all cases, it is
important to exercise clinical judgement in interpreting bile acid results in the context of the patient’s
history, clinical signs, physical status, and other laboratory data.
<12 µmol/L
12–25 µmol/L
>25 µmol/L
Preprandial Result
Postprandial Result
<12 µmol/L 12–25 µmol/L >25 µmol/L
Normal; consistent
with sufficient
hepatic function
Retest at a later time
(days to weeks) if
liver dysfunction is
Consistent with
decreased hepatic
function
still suspected and
†
Consistent with
decreased hepatic
function
†
Consistent with
decreased hepatic
function
†
Retest at a later
time (days to
weeks) if liver
dysfunction is still
suspected and
patient is anicteric
Decreased hepatic
function possible
Retest at a later
time (days to
weeks) if liver
patient is anicteric
Retest at a later time
(days to weeks) if
liver dysfunction is
still suspected and
patient is anicteric
†
Retest at a later time
(days to weeks) if
liver dysfunction is
still suspected and
patient is anicteric
dysfunction is still
suspected and
patient is anicteric
†
Inadequate fast
possible
†
Preprandial values will occasionally exceed postprandial values. This is usually attributed to spontaneous gall bladder contraction or
preprandial specimen obtained prior to a sufficient fast. When preprandial values exceed the postprandial values, always check that preand postprandial samples are properly identified.
C-10
Page 24

SNAP Test Procedures
SNAP* fPL*
Test Description
The SNAP fPL Test is an in vitro test for the determination of pancreas-specific lipase levels in
feline serum.
Preparing and Running a SNAP fPL Test
Important: Allow all SNAP fPL test components to equilibrate at room temperature for at least
30 minutes. Do not heat.
1. Enter the patient information on the IDEXX VetLab Station (for more information, see the
“Analyzing Samples” chapter of the IDEXX VetLab Station Operator’s Guide).
2. Once the patient’s name appears in the Pending list on the SNAPshot Dx Home screen,
tap the patient’s name and then tap Select. The Identify Sample screen appears.
3. Select fPL as the SNAP Test Type (the sample type is selected automatically).
4. Tap Optional Prep Instructions if you would like to view on-screen sample preparation
instructions.
a. Hold the provided pipette vertically and dispense 3 drops of sample into a
b. Holding the bottle vertically, add 4 drops of conjugate to the sample tube.
c. Cap the sample tube and invert it 4–5 times to mix.
5. Tap Next and follow the on-screen instructions to properly prepare the SNAP test:
Note: Some samples may not flow to the activation circle within 60 seconds. In this case,
press the activator after the sample has flowed across the result window.
6. Insert the SNAP device into the SNAPshot Dx Analyzer immediately. The SNAPshot Dx
Analyzer automatically begins to process the patient sample and the Home screen
displays. The patient’s name moves from the Pending list to the In Process list.
When analysis is complete, the patient’s name will move from the In Process list to the
Results list (you may also receive a “New Results” alert message and/or hear a beep on
the IDEXX VetLab Station, depending on the option(s) you selected in the New Results
Alert tab on the IDEXX VetLab Station’s Settings screen). You can then remove the SNAP
device from the analyzer by gently pushing the SNAP device until you hear a click. The
device will slide out of the port.
disposable sample tube.
a. Place the device on a horizontal surface.
b. Add the entire contents of the sample tube to the sample well, being careful not
to splash the contents outside of the sample well. The sample will flow across the
result window, reaching the activation circle in 30–60 seconds. Some sample may
remain in the sample well.
c. When color FIRST appears in the activation circle, press the activator firmly until it is
flush with the device body.
C-11
Page 25

SNAP Test Procedures
SNAP* cPL*
Test Description
The SNAP cPL Test is an in vitro test for the determination of pancreas-specific lipase levels in
canine serum.
Preparing and Running a SNAP cPL Test
Important: Allow all SNAP cPL test components to equilibrate at room temperature for at least 30
minutes. Do not heat.
1. Enter the patient information on the IDEXX VetLab Station (for more information, see the
“Analyzing Samples” chapter of the IDEXX VetLab Station Operator’s Guide).
2. Once the patient’s name appears in the Pending list on the SNAPshot Dx Home screen, tap
the patient’s name and then tap Select. The Identify Sample screen appears.
3. Select cPL as the SNAP Test Type (the sample type is selected automatically).
4. Tap Optional Prep Instructions if you would like to view on-screen sample preparation
instructions.
a. Hold the provided pipette vertically and dispense 3 drops of sample into a disposable
b. Holding the bottle vertically, add 4 drops of conjugate to the sample tube.
c. Cap the sample tube and invert it 4–5 times to mix.
5. Tap Next and follow the on-screen instructions to properly prepare the SNAP test:
a. Place the device on a horizontal surface.
b. Add the entire contents of the sample tube to the sample well, being careful not to
c. When color FIRST appears in the activation circle, press the activator firmly until it is
Note: Some samples may not flow to the activation circle within 60 seconds. In this case,
press the activator after the sample has flowed across the result window.
6. Insert the SNAP device into the SNAPshot Dx Analyzer immediately. The SNAPshot Dx
Analyzer automatically begins to process the patient sample and the Home screen displays.
The patient’s name moves from the Pending list to the In Process list.
When analysis is complete, the patient’s name will move from the In Process list to the Results
list (you may also receive a “New Results” alert message and/or hear a beep on the IDEXX
VetLab Station, depending on the option(s) you selected in the New Results Alert tab on the
IDEXX VetLab Station’s Settings screen). You can then remove the SNAP device from the
analyzer by gently pushing the SNAP device until you hear a click. The device will slide out of
the port.
sample tube.
splash the contents outside of the sample well. The sample will flow across the result
window, reaching the activation circle in 30–60 seconds. Some sample may remain in
the sample well.
flush with the device body.
C-12
Page 26

SNAP Test Procedures
SNAP* 4Dx* Plus
Test Description
The SNAP 4Dx Plus Test is an in vitro test for the detection of Dirofilaria immitis antigen, antibody
to Anaplasma phagocytophilum, antibody to Anaplasma platys, antibody to Borrelia burgdorferi,
antibody to Ehrlichia canis, and antibody to Ehrlichia ewingii in canine serum, plasma, or whole
blood.
Note:
Any color development in the sample spots on a SNAP 4Dx Plus Test indicates a positive test
result.
Preparing and Running a SNAP 4Dx Plus Test
Important: Allow all SNAP 4Dx Plus test components to equilibrate at room temperature for at least
30 minutes. Do not heat.
1. Enter the patient information on the IDEXX VetLab Station (for more information, see the
“Analyzing Samples” chapter of the IDEXX VetLab Station Operator’s Guide).
2. Once the patient’s name appears in the Pending list on the SNAPshot Dx Home screen, tap
the patient’s name and then tap Select. The Identify Sample screen appears.
3. Select 4Dx Plus as the SNAP Test Type.
4. Select the applicable sample type.
5. Tap Optional Prep Instructions if you would like to view on-screen sample preparation
instructions.
a. Hold the provided pipette vertically and dispense 3 drops of sample into a disposable
sample tube.
b. Holding the bottle vertically, add 4 drops of conjugate to the sample tube.
c. Cap the sample tube and invert it 4–5 times to mix.
6. Tap Next and follow the on-screen instructions to properly prepare the SNAP test:
a. Place the device on a horizontal surface.
b. Add the entire contents of the sample tube to the sample well, being careful not to
splash the contents outside of the sample well. The sample will flow across the result
window, reaching the activation circle in 30–60 seconds. Some sample may remain in
the sample well.
c. When color FIRST appears in the activation circle, press the activator firmly until it is
flush with the device body.
Note: Some samples may not flow to the activation circle within 60 seconds. In this case,
press the activator after the sample has flowed across the result window.
7. Insert the SNAP device into the SNAPshot Dx Analyzer immediately. The SNAPshot Dx
Analyzer automatically begins to process the patient sample and the Home screen displays.
The patient’s name moves from the Pending list to the In Process list.
When analysis is complete, the patient’s name will move from the In Process list to the Results
list (you may also receive a “New Results” alert message and/or hear a beep on the IDEXX
VetLab Station, depending on the option(s) you selected in the New Results Alert tab on the
IDEXX VetLab Station’s Settings screen). You can then remove the SNAP device from the
analyzer by gently pushing the SNAP device until you hear a click. The device will slide out of
the port.
C-13
Page 27

SNAP Test Procedures
SNAP* FIV/FeLV Combo
Test Description
The SNAP FIV/FeLV Combo Test is a rapid immunoassay for simultaneous detection of feline
leukemia virus (FeLV) antigen and antibody to feline immunodeficiency virus (FIV) in feline serum,
plasma or whole blood. The presence of FeLV p27 antigen is diagnostic for FeLV infection, and the
presence of specific antibodies to FIV indicates that a cat has been exposed to FIV and may have an
active FIV infection.
Note:
Any color development in the sample spots on a SNAP FIV/FeLV Combo Test indicates a
positive test result.
Preparing and Running the SNAP FIV/FeLV Combo Test
Important: Allow all SNAP FIV/FeLV Combo test components to equilibrate at room temperature for
at least 30 minutes. Do not heat.
1. Enter the patient information on the IDEXX VetLab Station (for more information, see the
“Analyzing Samples” chapter of the IDEXX VetLab Station Operator’s Guide).
2. Once the patient’s name appears in the Pending list on the SNAPshot Dx Home screen, tap
the patient’s name and then tap Select. The Identify Sample screen appears.
3. Select Combo FeLV/FIV as the SNAP Test Type.
4. Select the applicable sample type.
5. Tap Optional Prep Instructions if you would like to view on-screen sample preparation
instructions.
a. Hold the provided pipette vertically and dispense 3 drops of sample into a disposable
sample tube.
b. Holding the bottle vertically, add 4 drops of conjugate to the sample tube.
c. Cap the sample tube and invert it 4–5 times to mix.
6. Tap Next and follow the on-screen instructions to properly prepare the SNAP test:
a. Place the device on a horizontal surface.
b. Add the entire contents of the sample tube to the sample well, being careful not to
splash the contents outside of the sample well. The sample will flow across the result
window, reaching the activation circle in 30–60 seconds. Some sample may remain in
the sample well.
c. When color FIRST appears in the activation circle, press the activator firmly until it is
flush with the device body.
Note: Some samples may not flow to the activation circle within 60 seconds. In this case,
press the activator after the sample has flowed across the result window.
7. Insert the SNAP device into the SNAPshot Dx Analyzer immediately. The SNAPshot Dx
Analyzer automatically begins to process the patient sample and the Home screen displays.
The patient’s name moves from the Pending list to the In Process list.
When analysis is complete, the patient’s name will move from the In Process list to the Results
list (you may also receive a “New Results” alert message and/or hear a beep on the IDEXX
VetLab Station, depending on the option(s) you selected in the New Results Alert tab on the
IDEXX VetLab Station’s Settings screen). You can then remove the SNAP device from the
analyzer by gently pushing the SNAP device until you hear a click. The device will slide out of
the port.
C-14
Page 28

SNAP Test Procedures
SNAP* Heartworm RT
Test Description
The SNAP Heartworm RT Test is an in vitro diagnostic test for the semiquantitative detection of
Dirofilaria immitis (D. immitis) antigen in canine and feline whole blood, serum, or plasma.
IMPORTANT: SNAPshot Dx supports the SNAP Heartworm RT Test with canine samples only—tests
with feline samples must be read visually.
Note:
Any color development in the sample spots on a SNAP Heartworm RT indicates a positive test
result.
Preparing and Running the SNAP Heartworm RT Test
Important: Allow all SNAP Heartworm RT test components to equilibrate at room temperature for at
least 30 minutes. Do not heat.
1. Enter the patient information on the IDEXX VetLab Station (for more information, see the
“Analyzing Samples” chapter of the IDEXX VetLab Station Operator’s Guide).
2. Once the patient’s name appears in the Pending list on the SNAPshot Dx Home screen, tap
the patient’s name and then tap Select. The Identify Sample screen appears.
3. Select Heartworm RT as the SNAP Test Type.
4. Select the applicable sample type.
5. Tap Optional Prep Instructions if you would like to view on-screen sample preparation
instructions.
a. Hold the provided pipette vertically and dispense 3 drops of sample into a disposable
sample tube.
b. Holding the bottle vertically, add 4 drops of conjugate to the sample tube.
c. Cap the sample tube and invert it 4–5 times to mix.
6. Tap Next and follow the on-screen instructions to properly prepare the SNAP test:
a. Place the device on a horizontal surface.
b. Add the entire contents of the sample tube to the sample well, being careful not to
splash the contents outside of the sample well. The sample will flow across the result
window, reaching the activation circle in 30–60 seconds. Some sample may remain in
the sample well.
c. When color FIRST appears in the activation circle, press the activator firmly until it is
flush with the device body.
Note: Some samples may not flow to the activation circle within 60 seconds. In this case,
press the activator after the sample has flowed across the result window.
7. Insert the SNAP device into the SNAPshot Dx Analyzer immediately. The SNAPshot Dx
Analyzer automatically begins to process the patient sample and the Home screen displays.
The patient’s name moves from the Pending list to the In Process list.
When analysis is complete, the patient’s name will move from the In Process list to the Results
list (you may also receive a “New Results” alert message and/or hear a beep on the IDEXX
VetLab Station, depending on the option(s) you selected in the New Results Alert tab on the
IDEXX VetLab Station’s Settings screen). You can then remove the SNAP device from the
analyzer by gently pushing the SNAP device until you hear a click. The device will slide out of
the port.
C-15
Page 29

SNAP Test Procedures
SNAP* Feline proBNP
Test Description
The SNAP* Feline proBNP Test is a rapid immunoassay to assess the level of NTproBNP (N-terminal
pro-brain natriuretic peptide) in Feline serum or EDTA plasma samples. NTproBNP is released by
the myocardium in response to stress and stretch. A normal result indicates that moderate to severe
heart disease is unlikely at the time of testing. An abnormal result indicates increased stretch and
stress on the heart muscle. As NTproBNP levels may be increased in other conditions, such as
hyperthyroidism, hypertension or severe azotemia, an abnormal result should be evaluated in the
context of
laboratory profile
Note: If the color intensity of the sample spot is equal to or darker than the color intensity of the
reference spot, the NTproBNP level is abnormal
than the color intensity of the reference spot, the NTproBNP level is normal.
Preparing and Running the SNAP Feline proBNP Test
Important: Allow all SNAP Feline proBNP test components to equilibrate at room temperature for at
least 30 minutes. Do not heat.
1. Enter the patient information on the IDEXX VetLab Station (for more information, see the
2. Once the patient’s name appears in the Pending list on the SNAPshot Dx Home screen, tap
3. Select fBNP as the SNAP Test Type.
4. Select the applicable sample type.
5. Tap Optional Prep Instructions if you would like to view on-screen sample preparation
6. Tap Next and follow the on-screen instructions to properly prepare the SNAP test:
7. Insert the SNAP device into the SNAPshot Dx Analyzer immediately. The SNAPshot Dx
complete evaluation of the patient, including history, physical examination, and complete
.
“Analyzing Samples” chapter of the IDEXX VetLab Station Operator’s Guide).
the patient’s name and then tap Select. The Identify Sample screen appears.
instructions.
a. Hold the provided pipette vertically and dispense 3 drops of sample into a disposable
sample tube.
b. Holding the bottle vertically, add 5 drops of green conjugate to the sample tube.
c. Cap the sample tube and invert it 4–5 times to mix.
a. Place the device on a horizontal surface.
b. Add the entire contents of the sample tube to the sample well, being careful not to
splash the contents outside of the sample well. The sample will flow across the result
window, reaching the activation circle in 30–60 seconds. Some sample may remain in
the sample well.
c. When color FIRST appears in the activation circle, press the activator firmly until it is
flush with the device body.
Note: Some samples may not flow to the activation circle within 60 seconds. In this case,
press the activator after the sample has flowed across the result window.
Analyzer automatically begins to process the patient sample and the Home screen displays.
The patient’s name moves from the Pending list to the In Process list.
When analysis is complete, the patient’s name will move from the In Process list to the Results
list (you may also receive a “New Results” alert message and/or hear a beep on the IDEXX
VetLab Station, depending on the option(s) you selected in the New Results Alert tab on the
IDEXX VetLab Station’s Settings screen). You can then remove the SNAP device from the
analyzer by gently pushing the SNAP device until you hear a click. The device will slide out of
the port.
. If the color intensity of the sample spot is lighter
C-16
Page 30

D Modifying the Settings on the Analyzer
Overview
Some of the Settings and Tools screen features allow you to customize the analyzer, such as
selecting a time/date format and editing the In Process and Pending lists on the Home screen. This
chapter describes how to use those features.
Changing the Language/Local Settings
Tapping the Language/Local option on the Settings screen allows you to modify the analyzer’s
language, name format, unit system, time, and/or date.
Notes:
• This option is unavailable when the SNAPshot Dx* Analyzer is processing a sample run.
• The analyzer will prompt you to restart it whenever the language/local settings are changed.
You must restart the analyzer in order for the changes to take effect.
To Change the Language/Local Settings
1. Tap Settings on the SNAPshot Dx Home screen.
2. Tap Language/Local.
3. Select the desired language from the Language drop-down list. When a language is chosen,
the Unit System and Name Format default settings change.
4. If desired, select a different Name Format option (last name, first name or last name first
name).
5. If desired, select a different Unit System option (US, SI, or French SI).
6. Tap Next.
7. If desired, update the time settings:
a. Tap the arrows above or below the hour/minutes text boxes to increase or decrease the
hours/minutes incrementally.
b. Select the AM or PM option for your system time.
c. Select a time format (hh:mm in 12-hour format or hh:mm in 24-hour format).
8. If desired, update the date settings:
a. Select a date format (mm/dd/yyyy or dd/mm/yyyy). The left and right date fields
(above the date format options) vary depending on the date format you choose. For
example, if you choose the date format mm/dd/yyyy, the month field is the left-most
field, the day field is the middle field, and the year field is the right-most field. If you
choose dd/mm/yyyy, the day field is the left-most field, the month field is the middle
field, and the year field is the right-most field.
b. To change the month, tap the arrow above/below the current month selection to change
the month incrementally.
c. To change the day, tap the arrow above/below the day to increase/decrease the day
incrementally.
d. To change the year, tap the arrow above/below the year to increase/decrease the year
incrementally.
9. Tap Save. When prompted, tap Ye s to restart your analyzer and save the new settings.
D-1
Page 31

Modifying the Settings on the Analyzer
Adjusting the Volume of the Analyzer
The Sound feature on the Settings screen allows you to adjust the volume of the sounds the
analyzer emits.
Note: If you do not wish to hear any analyzer sounds, select the Mute check box.
To Adjust the Volume
1. Tap Settings on the SNAPshot Dx Home screen.
2. Tap Sound.
3. Tap the left arrow to decrease the volume or the right arrow to increase the volume. The
analyzer plays a sample of that particular volume upon each tap.
4. Tap Save.
Deleting a Patient from the Pending or In Process List
The Tools screen is available from the Home screen and provides options for editing the
Pending and In Process lists. You can edit these lists by deleting a patient from the list.
To Delete a Patient from the Pending List
1. Tap Tools.
2. Tap Edit Pending.
3. Tap to select the patient you want to remove from the Pending list.
4. Tap Delete in the Delete From Pending box.
To Delete a Patient from the In Process List
You can also delete a patient from the In Process list by selecting the patient in the In Process
list (on the SNAPshot Dx Home screen) and then tapping Stop Run in the Home screen’s center
display area.
1. Tap Tools.
2. Tap Edit In Process.
3. Tap to select the patient you want to remove from the In Process list.
4. Tap Delete in the Delete From In Process box.
5. Remove the SNAP device from the applicable port. If you accidentally remove the wrong
SNAP device, you will need to run a new SNAP Test for that patient.
Note: The IDEXX VetLab* Station displays the “New Results” alert even though no results exist for
the deleted patient run (this message only displays if you’ve selected to receive a message with new
results in the New Results Alert tab on the IDEXX VetLab Station’s Settings screen).
D-2
Page 32

E Sample Preparation and Storage
Overview
The quality of your reference laboratory and in-house testing results is impacted by the quality of
the sample you provide the lab/analyzer. Therefore, it is important that you always prepare samples
properly. This chapter provides instructions for preparing quality samples, the recommended order
of draw, and more.
See the table on pages E-2–E-4 for a list of the different sample types that each IDEXX VetLab*
analyzer is capable of running. The table provides the sample volume required for each sample type
as well as how to prepare the sample. It also lists the sample type and volume for each SNAP* test
type.
E-1
Page 33

Sample Preparation and Storage
IDEXX Quality Sample Preparation
Sample
Test
SNAP* Total T
Test 65 μL
4
Volume
Required
Serum
Plasma
Anticoagulated Whole
Blood
serum: allow to clot for 20 minutes
plasma: gently invert collection tube for 30
seconds
Note: Plasma recovered from a Catalyst*
lithium heparin whole blood separator may
be used.
Sample Preparation
Centrifuge
(time/speed)
serum/plasma: 120 seconds at
a minimum of 12,000 RCF
SNAP* Cortisol Test
SNAP* Bile Acids
Test
SNAP* fPL* Test 3 drops
SNAP* cPL* Test 3 drops
SNAP* 4Dx* Plus Test 3 drops
SNAP* FIV/FeLV
Combo Test
SNAP* Heartworm RT 3 drops
SNAP* Feline proBNP 3 drops
25 μL or
100 μL
100 μL
3 drops
serum: allow to clot for 20 minutes
serum: allow to clot for 20 minutes
serum: allow to clot for 20 minutes
serum: allow to clot for 20 minutes
serum: allow to clot for 20 minutes
plasma: gently invert collection tube for 30
seconds
whole blood: gently invert collection tube for
30 seconds
serum: allow to clot for 20 minutes
plasma: gently invert collection tube for 30
seconds
whole blood: gently invert collection tube for
30 seconds
serum: allow to clot for 20 minutes
plasma: gently invert collection tube for 30
seconds
whole blood: gently invert collection tube for
30 seconds
serum: allow to clot for 20 minutes
plasma: gently invert collection tube for 30
seconds
serum: 120 seconds at a
minimum of 12,000 RCF
serum: 120 seconds at a
minimum of 12,000 RCF
serum: 120 seconds at a
minimum of 12,000 RCF
serum: 120 seconds at a
minimum of 12,000 RCF
serum/plasma: 120 seconds at
a minimum of 12,000 RCF
whole blood: none
serum/plasma: 120 seconds at
a minimum of 12,000 RCF
whole blood: none
serum/plasma: 120 seconds at
a minimum of 12,000 RCF
whole blood: none
serum/plasma: 120 seconds at
a minimum of 12,000 RCF
E-2
Page 34

Sample Preparation and Storage
Sample Collection Order
In order to prevent coagulation and contamination, blood should be drawn into the collection tubes
in a specific order.
Note: While the following orders are recommended by the various tube manufacturers, always
follow your clinic’s protocol for order of draw.
Order for Evacuated Collection Tubes
The following is the recommended order of draw when using evacuated tubes:
1. Blood cultures
2. Citrate
Note: If drawing citrate first, it is important to draw and discard a small volume of blood
before dispensing the sample into a citrate tube.
3. Serum (with or without gel)
4. Plasma/lithium heparin (with or without gel)
5. EDTA
6. Fluoride
Order for Nonevacuated/Micro Collection Tubes
The following is the recommended order of draw when using nonevacuated/micro collection tubes:
1. Blood cultures
2. Citrate
Note: If drawing citrate first, it is important to draw and discard a small volume of blood
before dispensing the sample into a citrate tube.
3. EDTA
4. Plasma/lithium heparin (with or without gel)
5. Fluoride
6. Serum (with or without gel)
Centrifuged Sample Inspection
It is good practice to examine the sample carefully following centrifugation. If fibrin strands can be
seen in the sample, they may interfere with sample pipetting. It may be necessary to rim the serum/
plasma with a wooden stick, respin the sample, and proceed.
Various conditions, such as hemolysis, may affect results. You also want to modify your test panel
based on the following visual observations.
Hemolysis
Visual: Sample has a transparent reddish hue ranging from pale pink to deep red.
Indications: Damage to red cells during sample preparation or intravascular hemolysis.
Icterus
Visual: Plasma has a transparent yellow to opaque brown color.
Indications: Obstructive or toxic liver disease, intravascular hemolysis.
E-3
Page 35

Sample Preparation and Storage
Lipemia
Visual: Sample has a pale, milky appearance, possibly with floating fat globules.
Indications: Recent ingestion of a fatty meal or dysfunction in lipid metabolism.
Sample Storage
We recommend that you prepare and analyze samples immediately after collection for best results.
However if storage is necessary, follow these sample storage and testing guidelines.
• Serum, plasma, and anti-coagulated whole blood (e.g., EDTA, heparin) can be stored in the
refrigerator for up to one week (the storage temperature guidelines can be found in the SNAP
test package insert(s)).
• For longer storage, serum or plasma can be frozen (-20°C or colder) and then recentrifuged
before use.
Analysis of Stored Samples
For samples stored at 2°C–8°C (36°F–46°F) and at -18°C (0°F):
• Allow the samples to come to room temperature (18°C–25°C/64°F–77°F).
• Mix the samples gently, but thoroughly, by inversion. Do not shake.
• Centrifuge the samples to remove any fibrin particles that may have formed
during storage.
• Analyze the samples immediately after centrifugation.
E-4
Page 36

F Maintenance
Overview
To ensure optimum performance of your SNAPshot Dx* Analyzer, IDEXX recommends that you clean
the case, screen, and the SNAP* ports often.
Upgrading the Software
IDEXX will provide you, on a periodic basis and at no charge, updated instrument software that may
include new features. Be sure to read the software notes contained with each new release.
For detailed upgrading instructions, see the insert included with the upgrade disc.
Note: If you have IDEXX SmartService* Solutions enabled on your IDEXX VetLab* Station, software
upgrades will be sent to the SNAPshot Dx Analyzer automatically.
Cleaning the Case
Always disconnect the power cable before cleaning the analyzer.
Clean the outside of the analyzer with a damp, lint-free cloth. A mild liquid soap will remove grease.
Do not use any of the following near the analyzer: organic solvents, ammonia-based cleaners, ink
markers, sprays containing volatile liquids, insecticides, disinfectant, polish, or room freshener.
Care should be taken not to spill any samples, chemicals, cleaning agents, water, or other fluids on/
in the analyzer.
Cleaning the SNAP Ports
Dust and animal hair can lead to analyzer failures. Keep dust and animal hair from entering the
analyzer by keeping the SNAP insertion area clean and dust-free.
If anything is spilled in a port, wipe it immediately with a damp, lint-free cloth. Confine wiping and
cleaning of the ports to the bottom, side, and rear surfaces. If any fluid cannot be reached, call
IDEXX Technical Support for service.
Cleaning the Screen
If the screen gets dirty, apply an antistatic screen cleaning agent (NOT ammonia-based) to a clean
cloth or paper towel and wipe the screen. Do not spray the cleaner directly onto the screen as liquid
can run inside the case and damage electrical circuits. Take care not to scratch the screen.
Cleaning the Incubator Wells
The incubator wells can be cleaned with a damp, lint-free cloth.
Note: There are holes in the bottom of the incubator wells. If liquid is spilled inside of a well, you
may need to move your SNAPshot Dx Analyzer slightly to clean the counter underneath the analyzer.
Calibration
The SNAPshot Dx Analyzer requires no user intervention for calibration. It performs a self-check at the
beginning of each test as well as an automatic systems check each time the analyzer is powered on.
F-1
Page 37

G Troubleshooting
Differences in Results
Every commercial laboratory must establish its own species reference ranges for the equipment and
methodology used. Comparing results from different laboratories that may be using different
equipment or methods is imprecise at best. Any comparisons should be performed on the
same sample which has been “split,” stored under like conditions, and tested at approximately
the same time. Comparisons of values must take into account differences in the corresponding
reference ranges and technology.
If you receive results that are not what you expected for a particular patient, consider the following:
• Was the correct handheld pipette used (SNAP* Total T
correct volume of sample and conjugate aspirated?
• Was the sample incubated for 5 minutes? (SNAP* Total T
• Was the device activated as soon as the sample reached the activation circle?
• Are there any abnormalities on the SNAP* device (e.g., streaking or high background color)?
• For SNAP tests that can also be read visually (e.g., SNAP* 4Dx Plus), the SNAPshot Dx*
Analyzer was developed to read any color in the sample spots as positive, as outlined in the
product insert.
• Do other clinical findings support the results?
• What other tests or procedures might be used to confirm or reject this result?
All laboratory results should be interpreted in light of the case history, the clinical signs, and the
results of ancillary tests.
,
4
Cortisol and Bile Acids only) and the
4
and Cortisol only)
Wrong SNAP* Device Removed
If you remove the wrong SNAP device from a port on the analyzer, do not reinsert the SNAP device.
You must run a new SNAP test for that patient.
Touch Screen Not Responsive
If you notice a decline in the responsiveness of the touch screen, it may be because the analyzer
has not been shut down for a long period of time. Shut down the analyzer and then power on the
analyzer (for instructions, see page A-4). If you still do not notice an increase in responsiveness,
contact IDEXX Technical Support.
SNAP Bar Code Cannot Be Read
There is a small bar code located on top of all SNAP devices. When you place a SNAP device inside
of the SNAPshot Dx Analyzer, the analyzer reads that bar code.
When the analyzer cannot read the bar code, a SNAP Status Event dialog box appears on the
SNAPshot Dx Analyzer screen, prompting you to enter the bar code information manually or to
confirm the SNAP test.
G-1
Page 38

Troubleshooting
To Enter the Code Manually (SNAP Total T4, Cortisol, or Bile Acids only)
1. Select the SNAP test type from the drop-down list.
2. Use the keypad in the dialog box to enter the STD CURVE number found on the SNAP foil
bag.
Note: Tapping the Back button removes the last digit entered with the keypad.
3. Tap Start Run.
To Confirm the SNAP Test
When prompted, tap OK to confirm that you are running the SNAP test listed in the dialog box. The
SNAP test will continue processing normally.
OR
If you are unable to confirm that the SNAP test listed in the dialog box is the same SNAP test that
was inserted, tap Cancel and delete the run.
Viewing the Event Log
Any issues that the analyzer has experienced are recorded in the analyzer’s event log. These issues
are expressed as codes which are used by IDEXX Technical Support to diagnose problems with the
analyzer.
To View the Event Log
1. Tap Tools.
2. Tap Event Log. The analyzer’s software version, serial number, IVLS status, and IP address
are listed at the top of the screen. The date and time that each issue occurred are listed in the
center of the screen.
Other Problems with Your Analyzer
If you experience problems with your analyzer, ensure that the power connections are secure.
If the connections are secure and the problem persists, shut down (or power off) the analyzer and
then turn it back on. If the problem still persists, contact IDEXX Technical Support (see the “IDEXX
Technical Support Contact Information” section on page H-21 for the applicable phone number for
your region).
G-2
Page 39

Troubleshooting
Sending Your Analyzer to IDEXX
Before you send your analyzer to IDEXX, contact IDEXX Technical Support to arrange for a
replacement analyzer and to obtain a prepaid shipping label.
To Package Your Analyzer for Shipment
1. Gather the IDEXX SNAPshot Dx Analyzer packaging components.
2. Power off the analyzer (for more information, see “Shutting Down the Analyzer” on page A-4).
3. Disconnect the power and network cables from the back of the
analyzer.
4. Ensure the SNAP ports and incubator wells are empty.
5. Position the box on a waist-high surface next to the analyzer.
6. Ensure there is a cardboard tray in the bottom of the box, plastic
side up.
7. Cover the analyzer with the plastic bag.
8. Place the analyzer upright inside the box, centering it on the
cardboard tray.
Note: The front of the analyzer should be facing one of the sides
(short ends) of the box.
9. Place the upper cardboard insert inside the box so that the top of
the analyzer is exposed through the center hole (see graphic).
10. Place the small cardboard insert into the recessed area on the top of
the analyzer (see graphic).
11. Place a cardboard tray, plastic side down, inside the box.
12. Close the box and secure it with packing tape.
9
10
Frequently Asked Questions
Question Answer
Can I run two different SNAP tests at the
same time?
How do I run a SNAP test on the SNAPshot
Dx Analyzer?
Can I run a SNAP test on the bench and then
have the analyzer read the result after it has
finished developing?
Yes. The SNAPshot Dx Analyzer can process
two SNAP tests at the same time.
The SNAPshot Dx screen provides on-screen
instructions for using the analyzer. It is
important to follow these instructions and load
the SNAP test immediately after it has been
activated.
For more information, see chapter C in this
guide.
You must load the SNAP test into the analyzer
immediately after it has been activated.
Results may be impacted if there is a delay
in inserting the device after it has been
activated.
G-3
Page 40

Troubleshooting
Question Answer
How do I prepare samples for use on the
SNAPshot Dx Analyzer?
The SNAPshot Dx work flow includes detailed
sample preparation instructions that are
based on the test information you have
selected.
In addition to the on-screen instructions,
you can reference the SNAPshot Dx sample
preparation poster.
Can I run non-bar-coded SNAP tests on the
analyzer?
Only SNAP tests that have a bar code and
appear on the SNAPshot Dx test type menu
can be run on the analyzer.
We recommend that you work through your
non-bar-coded inventory using the visualread work flow and the IDEXX VetLab Station
feature for recording SNAP test results.
Do I still need to warm up the SNAP device
before I run it on the analyzer?
Yes, the SNAP device must be warmed up
according to the specifications recommended
in the product insert.
Is it critical to remove the sample tube from
the incubator well after exactly 5 minutes?
Yes, the tube needs to be removed
immediately. Results may be impacted if the
sample under or over incubates.
G-4
Page 41

H Appendices
Technical Specifications
Dimensions
Width: 8.1 inches (20.5 cm)
Depth: 11.4 inches (29 cm)
Height: 12.8 inches (32.5 cm)
Weight: 9.4 pounds (4.25 kg)
Power Supply
External power supply adapter, model XP Power PDM60US24
Input: 100–240 V AC, 50–60 Hz, 1500 mA
Output: 24 V DC, 2500 mA
Consumption
Operating: maximum 60 W, typical 44 W
System Description
Type: Digital Imaging System
Light source: LEDs
Wavelength: 640 nm
Operating Conditions
Operating Storage
Temperature 19°C–27°C
(66°F–81°F)
Relative Humidity 30%–85% 20%–85%
17°C–32°C (63°F–90°F)
H-1
Page 42

Appendices
IDEXX Technical Support Contact Information
IDEXX Sales Representative:
Telephone/Voice Mail:
United States: 1-800-248-2483
Australia: 1300 44 33 99
Austria: 43 (0)1 206 092 729
Belgium: 32 (0)27 00 64 38
Brazil: 0800-777-7027
Canada: 1-800-248-2483
China (PRC): 400-678-6682
Czech Republic: 420-239018034
Denmark: 45 (0) 43 31 04 39
Distributors: Distributors-EUSupport@idexx.com
Finland: 358 (0)9 7252 2253
France: 33 (0) 810 433 999
Germany: 49 (0)69 153 253 290
Ireland: 353 (0)1 562 1211
Luxembourg: 352 (0)34 20 80 87 22
Netherlands: 31 (0)70 700 7033
New Zealand: 0800 10 20 84
Norway: 47 24 05 51 10
Poland: 48 22 853 40 01
Russia: 7-4999-511-255
Singapore: 65 6807-6277
Slovakia: 421-268622417
South Korea: 080 7979 133
Spain: 34 932 672 660 or 34 916 376 317
Sweden: 46 (0)8 5198 9566
Switzerland: 41 (0)44 511 22 37
Taiwan: 0800 291 018
United Kingdom: 44 (0)20 3788 7508
Italy: 39 02 87 10 36 76
Japan: 0120-71-4921
Latin America: CAG-LAO2012@idexx.com
H-2
Page 43

 Loading...