

Page 1

SNAP Pro Analyzer
Operator’s Guide
Page 2

Proprietary rights notice
Information in this document is subject to change without notice. Companies, names, and
data used in examples are fictitious unless otherwise noted. No part of this document may be
reproduced or transmitted in any form or by any means, electronic, mechanical, or otherwise, for
any purpose, without the express written permission of IDEXX Laboratories. IDEXX Laboratories
may have patents or pending patent applications, trademarks, copyrights, or other intellectual or
industrial property rights covering this document or subject matter in this document. The furnishing
of this document does not give a license to these property rights except as expressly provided in
any written license agreement from IDEXX Laboratories.
© 2018 IDEXX Laboratories, Inc. All rights reserved. • 06-0002015-03
*IDEXX VetLab, SNAP Pro, SNAP, VetConnect, and SmartService are trademarks or registered
trademarks of IDEXX Laboratories, Inc. in the United States and/or other countries. All other product
and company names and logos are trademarks of their respective holders.
IDEXX Laboratories, Inc.
One IDEXX Drive
Westbrook, Maine 04092 USA
IDEXX Europe B.V.
P.O. Box 1334
NL-2130 EK Hoofddorp
2
Page 3

Contents
Getting Started ........................................................................................................................................4
Introduction ..................................................................................................................................................4
SNAP Pro Components ...............................................................................................................................4
Setting Up the SNAP Pro Analyzer ..............................................................................................................5
Interpreting the Status Light ........................................................................................................................6
Interpreting the SNAP Pro Icons ..................................................................................................................6
Powering the Analyzer On/Off .....................................................................................................................7
Charging the Analyzer .................................................................................................................................7
Using the SNAP Pro Analyzer ................................................................................................................8
Running a SNAP Test (When Connected to an IDEXX VetLab Station) ......................................................8
Running a SNAP Test (When NOT Connected to an IDEXX VetLab Station) ..............................................8
Confirming Results ......................................................................................................................................9
Viewing Test Results ...................................................................................................................................9
Modifying the Preferences ...................................................................................................................10
Changing the ProRead Settings ................................................................................................................10
Changing the Connection Settings ...........................................................................................................10
Viewing Past Notifications .........................................................................................................................10
Changing the Settings Preferences ...........................................................................................................10
Maintenance and Troubleshooting ......................................................................................................12
Upgrading the Software.............................................................................................................................12
Cleaning the Internal Components (To Be Performed Weekly or As Needed)..........................................12
Cleaning the Case and Screen (To Be Performed As Needed) ................................................................14
Replacing the Batteries .............................................................................................................................14
Troubleshooting .........................................................................................................................................15
Appendix ...............................................................................................................................................18
Technical Specifications ............................................................................................................................18
Safety Precautions .....................................................................................................................................19
3
Page 4
Getting Started
Introduction
The SNAP Pro* Analyzer helps you to increase efficiency and improve work flow:
• Automatically activate SNAP* tests and display results to streamline your work flow.
• Send SNAP test results to the patient record.
• Electronically capture SNAP test invoice charges to reduce lost revenue and improve profits.
• Display results and add them to the patient record instantly for customized, client-friendly
reports with IDEXX VetConnect* PLUS.
The SNAP Pro Analyzer is for veterinary use only.
IDEXX VetLab* Station Connectivity
The SNAP Pro Analyzer can be connected to the IDEXX VetLab* Station (the IDEXX laboratory
information management system). Connecting multiple analyzers to the IDEXX VetLab Station helps
you attain a comprehensive picture of your patient’s health, with the ability to view test results from
multiple analyzers on a single report, determine disease progression with
parameter-trending capabilities, and more.
By connecting the SNAP Pro Analyzer to the IDEXX VetLab Station, you can:
• Automatically review patients’ prior results on every printout for easy comparison.
• Improve client communications with illustrated diagnostic or treatment progress printouts.
• Link to expert descriptions and common causes of abnormal values.
• Print information to help explain the significance of results to your clients.
• Allow new staff to train independently.
• View educational on-screen guides and videos, such as how to properly prepare a plasma sample.
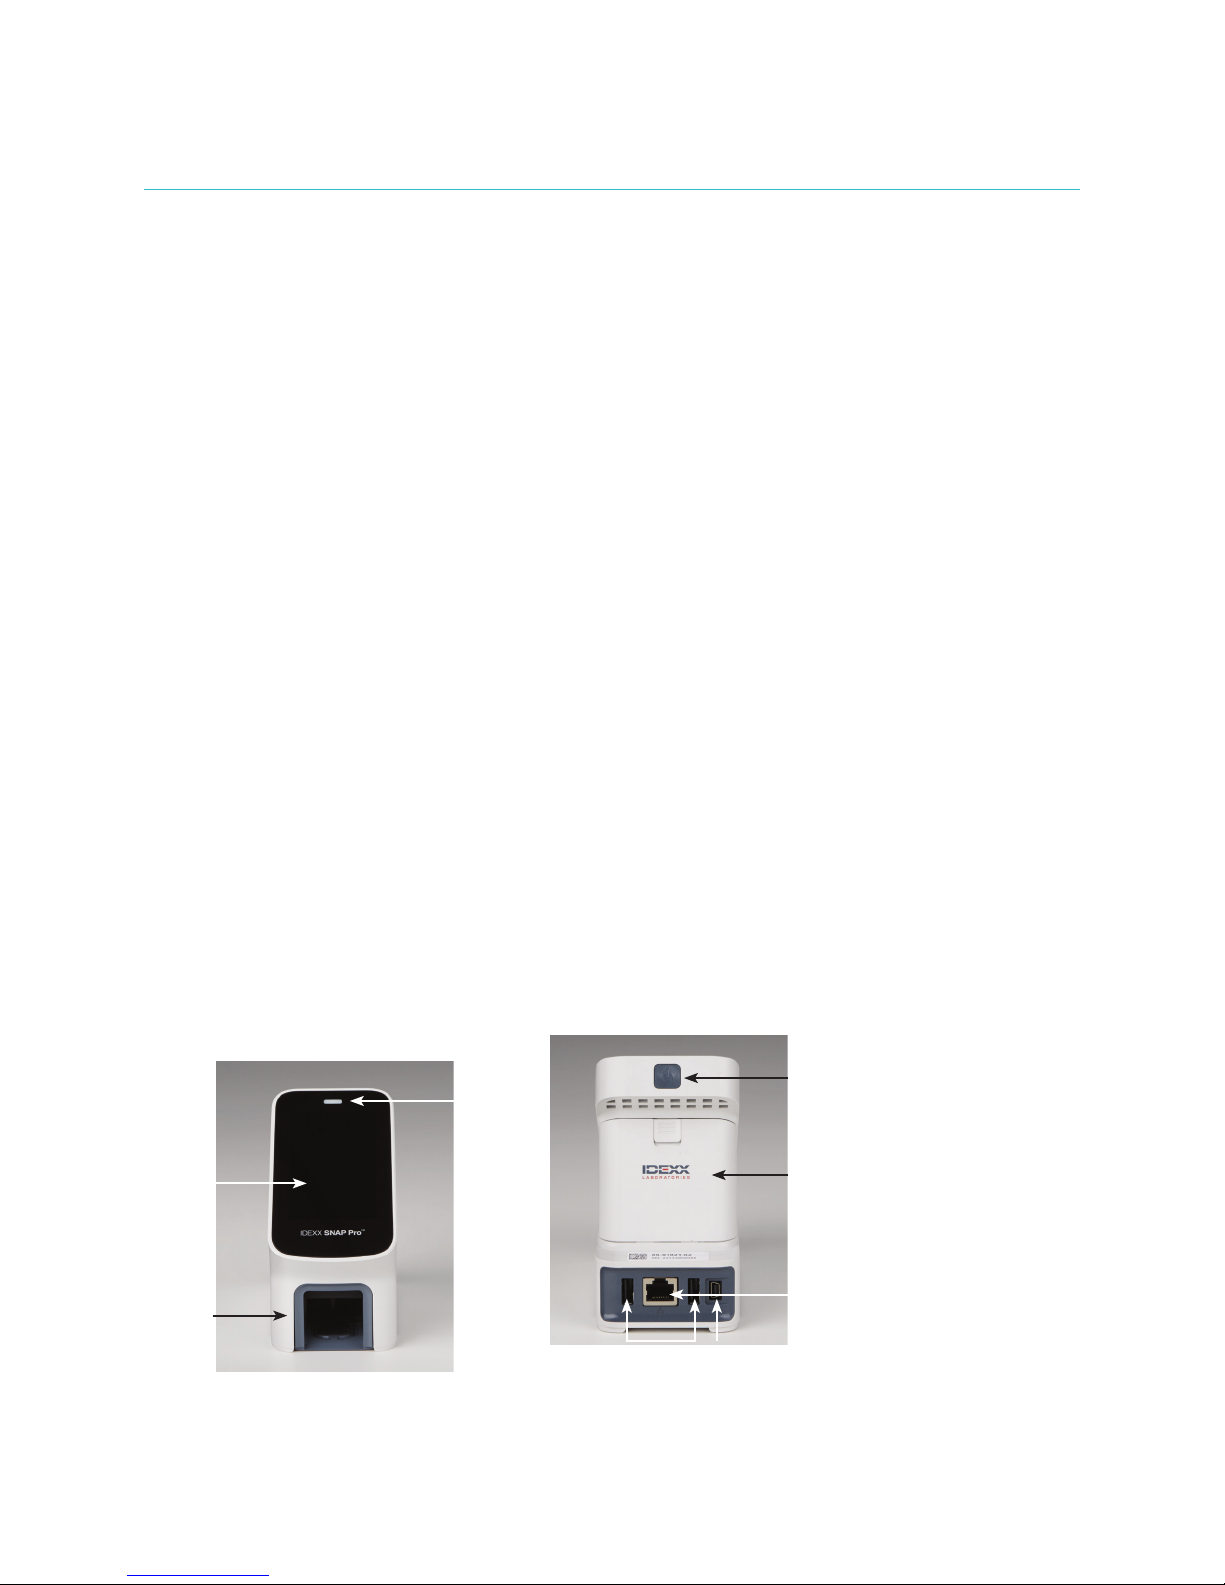
SNAP Pro Components
Touch screen
SNAP port
Power button
Status light
Battery
compartment
Ethernet port
USB ports
Power port
4
Page 5

Setting Up the SNAP Pro Analyzer
Note: The analyzer should be placed on a level surface in a well-ventilated area away from obvious
sources of heat, direct sunlight, cold, humidity, or vibrations. For optimum results, room temperature
should be at 15°C–30°C (59°F–86°F) and relative humidity should be at 30%–85%.
To Set Up the SNAP Pro Analyzer
IMPORTANT: If you are planning to wirelessly connect your analyzer to an IDEXX VetLab*
Station, you must set up the IDEXX VetLab* wireless router and confirm the wireless antenna
is enabled on the IDEXX VetLab Station (Settings > Advanced > Edit > Wireless Settings
> Enabled) before completing the steps below. For more information about setting up
the IDEXX VetLab wireless router, read its accompanying
documentation.
1. Open the battery compartment on the back of the SNAP
Pro* Analyzer and then place two batteries (provided),
negative end first, into the compartment.
IMPORTANT: Do not power on the SNAP Pro Analyzer
until you have completed steps 2 and 3.
2. Connect the appropriate adapter for your region to the
power cord using these steps:
Getting Started
a. Remove the protective insert while sliding the locking key towards the cord.
b. Insert the adapter top-side first and then snap into place.
3. Connect the power cord to the analyzer and an appropriate electrical outlet. The status light
should appear steady yellow.
Note: It will take up to 8 hours to fully charge the analyzer (the status light will turn green
when fully charged). The analyzer may be used while charging.
4. If you are planning to connect the analyzer wirelessly to an IDEXX VetLab Station, proceed to
step 5.
Note: Wireless router required.
OR
If you are connecting the analyzer to an IDEXX VetLab Station using a wired router, connect
the analyzer to a numbered port on the router using a CAT5 cable (provided).
5. Press the Power button at the top of the back of the SNAP Pro Analyzer to power it on. After the
startup screen, follow the on-screen instructions.
6. When prompted, do the following:
a. Select your language and then tap the Next
b. Select your location and then tap the Next
c. If you are connecting the analyzer to an IDEXX VetLab Station, tap Yes, select the
IDEXX network from the list, and then tap the Next
listed, tap the Refresh
icon.
icon.
icon.
icon. If the IDEXX network is not
OR
If you are not connecting the analyzer to an IDEXX VetLab Station, tap No and then tap
the Next
an IDEXX VetLab Station.
d. Select the desired date format, enter today’s date using the numeric keypad, and then
tap the Next
icon. When prompted, confirm that you are not connecting the analyzer to
icon.
5
Page 6
Getting Started
e. Select the desired time format, enter the current time using the numeric keypad, and
then tap the Next
f. If you want the analyzer to beep at the end of all runs or when there is an error, warning,
or other information displayed, select the Sound
to the desired options, and then select if you would like the sound to be Soft or Loud.
Then tap the Check Mark
OR
icon.
icon, select the check boxes next
icon.
If you do not want the analyzer to beep, select the Mute
Mark
Note: Critical errors will always beep.
g. When prompted, tap OK to restart the analyzer.
icon.
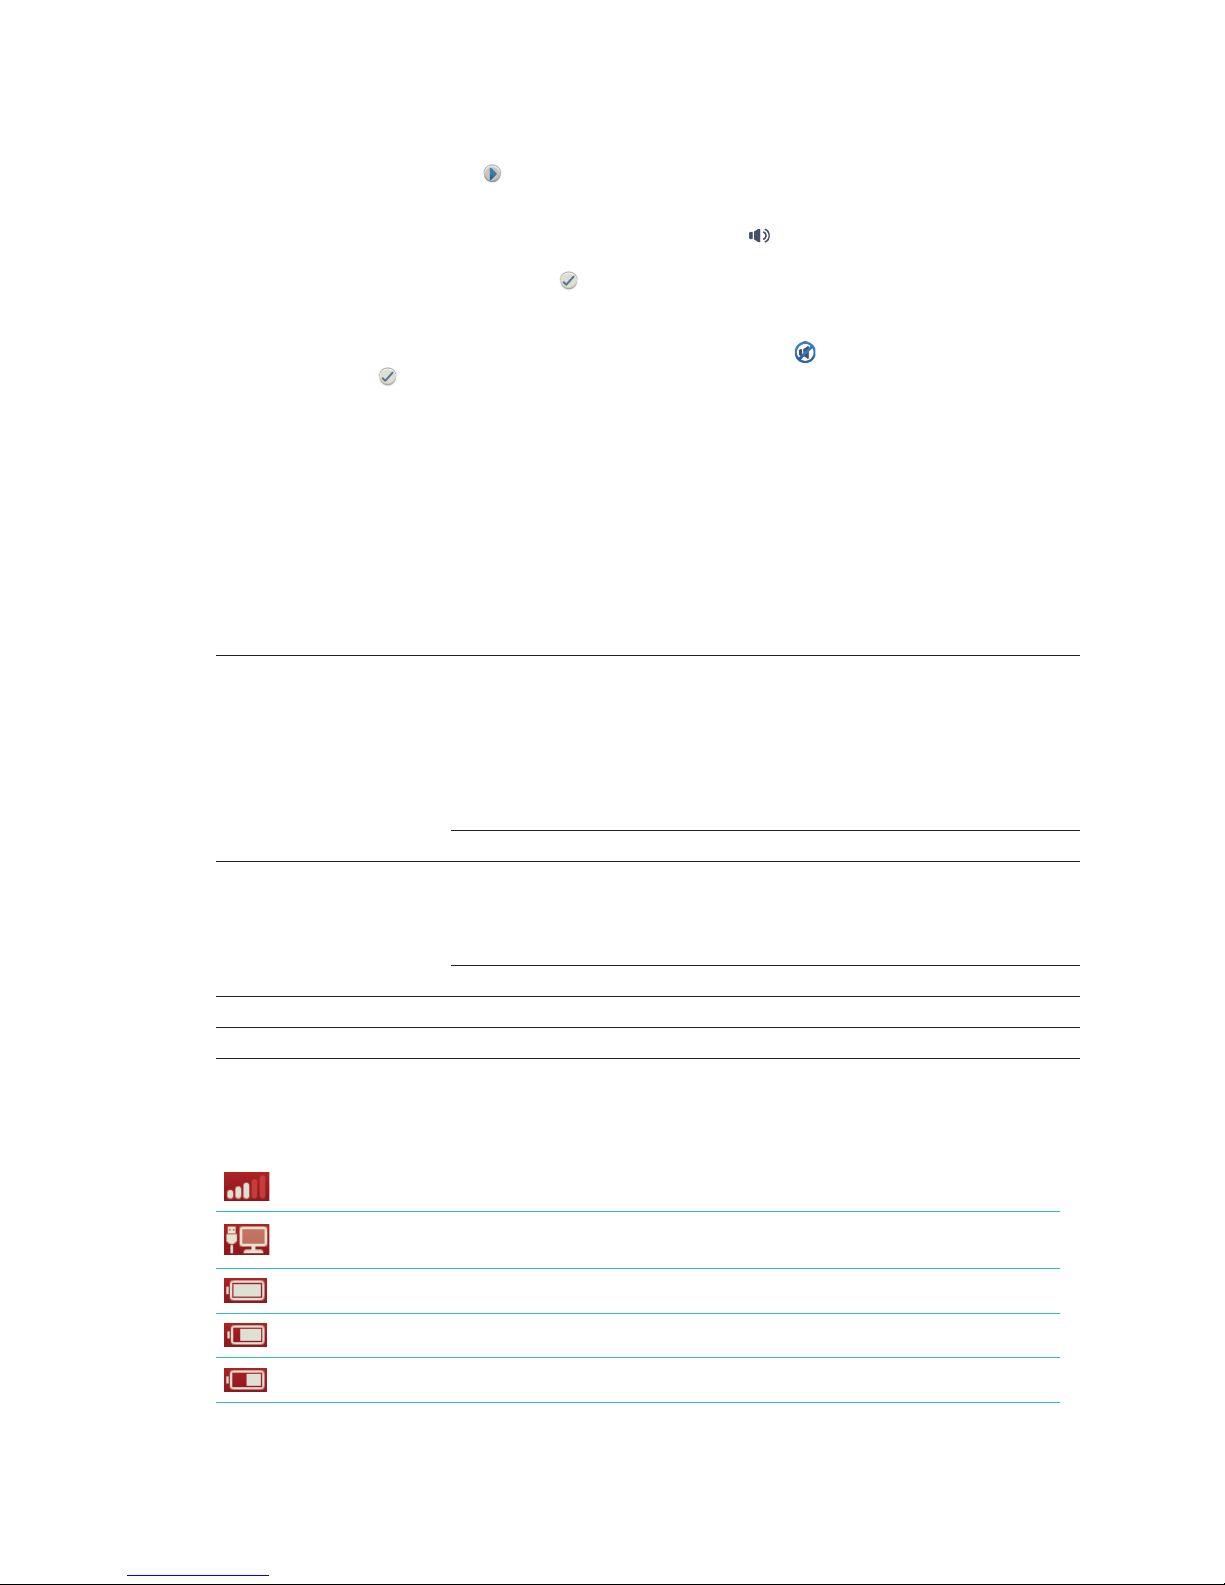
Interpreting the Status Light
The status light will change color and/or flash depending on the status of the analyzer and if the
analyzer is being used cordlessly or plugged into an electrical outlet (corded).
When the status light
appears... And is... The analyzer...
Green Solid Has interpreted that all results on the test are
Flashing, then solid Is powering up
Yellow Solid Is analyzing a SNAP test
Flashing Requires visual confirmation of the results
Blue Flashing Has interpreted at least one result as positive
Red Flashing Is experiencing an error/malfunction
icon and then tap the Check
negative
OR
Is ready for use
OR
Battery is full (when the analyzer is plugged in
and powered off)
OR
Battery is charging (when analyzer is powered
off and plugged in)
Interpreting the SNAP Pro Icons
Icon Description
Wireless signal status (5 gray bars = best signal; 5 red bars = no signal)
Connected and communicating with the IDEXX VetLab* Station via a wired
connection (red icon indicates the analyzer is offline)
Battery at 100% power
Battery at 75% power
Battery at 50% power
6
Page 7

Icon Description
Battery at 25% power
Battery critically low
Battery empty
Battery charging
Software upgrade is available (SmartService* Solutions customers only)
Warning notification (gray icon indicates the warning has been viewed and is
unresolved)
Error notification (gray icon indicates the error has been viewed and is unresolved)
Lost communication with IDEXX VetLab Station
Getting Started
Lost Wi-fi communication
Lost Ethernet connection
Powering the Analyzer On/Off
To Power the Analyzer On
Hold the power button until you hear a beep.
To Power the Analyzer Off
Hold the power button for 3 seconds and release when you hear a beep.
Charging the Analyzer
The analyzer will charge automatically when it is plugged into a power source. You can charge the
analyzer while it is powered on or off, but it will charge faster when the analyzer is powered off. It will
take approximately 8 hours to charge a completely expired battery when the analyzer is powered off
during the charging process.
To Charge the Analyzer
1. Plug the USB mini B end of the power cord into the power port on the back of the analyzer.
2. Plug the AC end of the power cord into an appropriate electrical outlet.
7
Page 8

Using the SNAP Pro Analyzer
Running a SNAP Test (When Connected to an IDEXX VetLab Station)
1. Tap Analyze Sample on the IDEXX VetLab* Station Home screen to enter the patient
information and start a run.
OR
If the IDEXX VetLab Station is integrated with a practice management system, proceed to
step 2 or select the patient from the Pending or Census list on the IDEXX VetLab Station
Home screen.
Note: Patients that appear in the Pending list on the IDEXX VetLab Station also appear on the
SNAP Pro Home screen.
OR
Enter the patient’s name and IDEXX VetLab Station client ID. When you have finished entering
the information, tap the Check Mark
2. Once the patient’s name appears in the list on the SNAP Pro Home screen, tap the patient’s
name and then tap the Check Mark
3. Prepare the SNAP* test, but do not activate the test.
icon and proceed to step 3.
icon.
4. Gently slide the SNAP test into the port at the bottom of the analyzer (well-end first) until it clicks
into position. The SNAP Pro* analyzer activates the test and then a countdown timer displays.
When analysis is complete, results are shown on the results screen and are sent to the IDEXX
VetLab Station automatically.
Tip: The color of the status light indicates the results of the run:
Green—all results are negative
Blue—at least one result is positive
Yellow—visual confirmation needed (use the instructions on the next page)
Running a SNAP Test (When NOT Connected to an IDEXX VetLab Station)
1. Tap New Patient on the SNAP Pro Home screen to enter the patient’s name and client ID.
When you have finished entering the information, tap the Check Mark
2. Prepare the SNAP test, but do not activate the test.
3. Slide the SNAP test into the port at the bottom of the analyzer well end first until it clicks into
position. The SNAP Pro analyzer activates the test and then a countdown timer displays. When
analysis is complete, results are shown on the results screen and are saved on the analyzer
automatically.
Tip: The color of the status light indicates the results of the run:
Green—all results are negative
icon.
Blue—at least one result is positive
Yellow—visual confirmation needed (use the instructions on the next page)
8
Page 9

Confirming Results
If there are very light spots or unexpected color development (such as debris or a blue tint) in the
results window, you may be prompted to confirm some or all of a test’s results. Results that need
to be confirmed are highlighted yellow.
1. If you believe the highlighted result is positive, tap the plus icon.
OR
If you believe the highlighted result to be negative, tap the minus icon.
2. When you have finished confirming the results, tap the Check Mark icon. The results will
then be saved on the analyzer and sent to the IDEXX VetLab Station (if applicable).
Using the SNAP Pro Analyzer
Note: To cancel the test and return to the Home screen, tap the Close icon
Viewing Test Results
The SNAP Pro Analyzer stores the last 100 results in reverse chronological order.
1. At the bottom of the Home screen, tap More and then tap Results. The most recent results
display at the top of the list.
2. Select the result that you want to view.
Note: If your analyzer is connected to an IDEXX VetLab Station, you can view, print, and trend the
results on the IDEXX VetLab Station or in VetConnect* PLUS.
.
9
Page 10

Modifying the Preferences
Changing the ProRead Settings
1. At the bottom of the Home screen, tap More and then tap ProRead.
2. Tap Yes if you want the analyzer to automatically read and save results.
OR
Tap No if you want to manually enter results on the results screen.
3. If you want to confirm results whenever very light spots are detected, select the Ask Me to
Interpret Very Light Spots check box.
4. Tap the Home
icon to return to the Home screen.
Changing the Connection Settings
1. At the bottom of the Home screen, tap More and then tap Connections.
2. Tap Yes if you want to connect the analyzer to an IDEXX VetLab* Station. Then, tap Change
Network and select the IDEXX network.
OR
Tap No if you do not want to connect the analyzer to an IDEXX VetLab Station.
3. Tap the Home
icon to return to the Home screen.
Viewing Past Notifications
1. At the bottom of the Home screen, tap More and then tap Notifications.
2. Select the check box next to the Critical Errors icon to view a list of all critical errors on the
ana l y ze r.
AND/OR
Select the check box next to the Alerts icon to view a list of all alerts on the analyzer.
AND/OR
Select the check box next to the Status icon to view the status of the analyzer.
3. Tap the Home
Changing the Settings Preferences
To Change the Sound Preferences
1. At the bottom of the Home screen, tap More, tap Settings, and then tap Sound.
2. Modify the sound preferences as desired.
3. Tap the Home
icon to return to the Home screen.
icon to return to the Home screen.
10
Page 11

Modifying the Preferences
To Change the Date Settings
1. At the bottom of the Home screen, tap More, tap Settings, and then tap Date.
2. If you want to change the date format, tap the current format (underneath the current date
display) and then select a new date format.
3. Use the numeric keypad to change the date, if necessary.
4. Tap the Home
icon to return to the Home screen.
To Change the Time Settings
1. At the bottom of the Home screen, tap More, tap Settings, and then tap Time.
2. If you want to change the time format, select a new format (underneath the current time
display).
3. Use the numeric keypad to change the time, if necessary.
4. Tap the Home
icon to return to the Home screen.
To Change the Language Settings
1. At the bottom of the Home screen, tap More, tap Settings, and then tap Language.
2. Select a new language.
3. Tap the Home
icon to return to the Home screen.
To Change the Location Settings
1. At the bottom of the Home screen, tap More, tap Settings, and then tap Location.
2. Select a new location.
3. Tap the Home
icon to return to the Home screen.
11
Page 12

Maintenance and Troubleshooting
Upgrading the Software
IDEXX will provide you, at no charge, updated analyzer software on a periodic basis. Be sure to
read the software notes sent with each new release.
The instructions for upgrading your software will vary depending on if the analyzer is connected to
an IDEXX VetLab* Station with SmartService* Solutions.
• If your analyzer is connected to an IDEXX VetLab Station with SmartService Solutions, you will
receive software upgrades electronically via the IDEXX VetLab Station Message Center. Be
sure to follow the detailed upgrade instructions provided with the upgrade message.
• If your analyzer is NOT connected to an IDEXX VetLab Station or is connected to an IDEXX
VetLab Station WITHOUT SmartService Solutions, IDEXX will mail you the updated software
for the analyzer. For detailed upgrading instructions, see the insert included with the upgrade
USB drive.
Cleaning the Internal Components (To Be Performed Weekly or As Needed)
IMPORTANT:
• DO NOT immerse or submerge the analyzer when cleaning.
• Always disconnect the power cable before cleaning the analyzer.
• Do not use any of the following near the analyzer: organic solvents, ammonia-based
cleaners, ink markers, sprays containing volatile liquids, insecticides, disinfectant, polish, or
room freshener. Care should be taken not to spill any samples, chemicals, cleaning agents,
water, or other fluids on/in the analyzer.
• When cleaning the outside of the analyzer, do not wipe the vents underneath the power
button or the USB/power/Ethernet ports.
1. Power off the analyzer and disconnect the
power and/or Ethernet cord.
2. On the bottom of the powered-off analyzer,
use a flat-tip screw driver or coin to turn
the 2 silver fasteners counterclockwise a
quarter turn.
12
Page 13

Maintenance and Troubleshooting
3. Remove the base from the analyzer. 4. Clean the entire base using a lint-free
wipe or cotton swab dampened with 70%
isopropyl alcohol, mild liquid soap and water,
or a 10% bleach solution.
activator
axle
lens
reflectors
5. Clean the 3 white reflectors, the axle, and the
activator using a new lint-free wipe or cotton
swab dampened with 70% isopropyl alcohol,
mild liquid soap and water, or a 10% bleach
solution. DO NOT clean the lens.
6. After the base has dried, reattach it to the
analyzer and ensure it is locked into place.
13
Page 14

Maintenance and Troubleshooting
7. Turn the silver fasteners clockwise a quarter
turn to lock the base into place.
8. Ensure the base and silver fasteners
are flush with the analyzer and locked
into place. Not locking the base and
fasteners properly can impact analyzer
performance.
Cleaning the Case and Screen (To Be Performed As Needed)
Clean the case and screen using a lint-free cloth dampened with 70% isopropyl alcohol, mild liquid
soap and water, or a 10% bleach solution. DO NOT wipe the vents underneath the power button or
the USB/power/Ethernet ports.
Replacing the Batteries
The analyzer uses two different types of batteries:
• Two 3.7 V DC, 2,600 mAh batteries
• One 3 V DC, 48 mAh button cell battery
Note: IDEXX recommends replacing all batteries at the same time. Contact IDEXX Laboratories to
obtain replacement batteries.
This symbol is placed in accordance with the European Union Directive 2002/96 on the
Waste Electrical and Electronic Equipment (the WEEE Directive). If disposed of within
the European Union, this product should be treated and recycled in accordance with
the laws of your jurisdiction implementing the WEEE Directive. For additional information,
visit idexx.com/weee.
To Replace the Two 3.7 V DC, 2,600 mAh Batteries
1. Power off and unplug the analyzer.
2. Open the battery compartment on the back of the analyzer by
pressing down on the latch on the top of the door.
3. Remove the two batteries from the compartment.
4. Insert two new batteries, negative end first, into the
compartment.
5. Close the battery compartment.
Note: It will take up to 8 hours to fully charge the analyzer (the
status light will turn green when fully charged). The analyzer may
be used while charging.
14
Page 15

Maintenance and Troubleshooting
To Replace the 3 V DC, 48 mAh Button Cell Battery
This battery is used to monitor the clock on the analyzer.
1. Power off and unplug the analyzer.
2. Open the battery compartment on the back of the analyzer by
pressing down on the latch on the top of the door. The button cell
battery is located on the inside of the battery compartment door.
3. Remove the button cell battery holder from the analyzer.
4. Remove the button cell battery from the holder.
5. Insert a new button cell battery in the holder, ensuring the negative
side of the battery is facing the window of the holder.
6. Replace the button cell battery holder so that the positive side is
facing the battery compartment door.
7. Close the battery compartment.
Troubleshooting
Having trouble with the SNAP Pro* Analyzer? First, ensure your software is up to date—
SNAP Pro upgrades include many behind-the-scenes improvements. We also recommend
rebooting the analyzer weekly. If your software is up to date and rebooting did not resolve
your issue, consult this section for more information.
3, 6
4, 5
The connection to the IDEXX VetLab Station isn’t working properly
You can troubleshoot this issue by looking at the icons on the analyzer:
• If the lost connection icon
VetLab* Station. To resolve the issue, reboot the analyzer.
• If the Ethernet icon is red
ensure both ends of the Ethernet cable are connected.
• If the wireless icon is red
resolve, move the analyzer closer to the IDEXX VetLab Station to reestablish connection to
the router.
appears, the analyzer has lost connection to the IDEXX
, the analyzer has lost connection to the router. To resolve,
, the analyzer cannot detect a Wi-Fi signal from the router. To
The analyzer failed to read the bar code on the SNAP test
This error can be caused by:
• Handwriting on the surface of the SNAP* test.
• Sample contaminating the surface of the SNAP test.
15
Page 16

The SNAP test is ejected during the run
This may happen if:
• The SNAP test was activated prior to
insertion.
• The SNAP test is manually held in place
during the run (see photo A).
• The analyzer base isn’t properly locked into
place—ensure the base is secure and that
both fasteners on the base are in the locked
position.
• The ejector arm is not seated properly—
ensure the arm is fully seated on the post (see circled area in photo B).
A B
The SNAP test does not eject after the run is complete
This may be because:
• The activator is stuck (see circled area in photo C), which may be
the result of low or no power. Ensure the analyzer is charged or
plugged in and then reboot the analyzer.
Maintenance and Troubleshooting
C
• The ejector arm is not seated properly—ensure the arm is fully
seated on the post.
The analyzer failed to detect adequate sample flow
If you receive this error, it may be because:
• The analyzer software is out of date—always upgrade the software when prompted.
• Improper sample preparation:
– An anticoagulant was not used with the whole blood sample.
– The pipette provided with the SNAP test was not used to properly measure the sample
drops.
– The test and conjugate may not have been brought to room temperature for 30 minutes
once taken out of storage.
• Insufficient sample volume in the sample well.
There is streaking/speckling/blue background on the results window
This can be the result of:
• Not cleaning the analyzer—it is recommended that you clean the internal components and
base of the analyzer weekly as dried blood falling on tests can creating streaking. For more
information, see Cleaning the SNAP Pro Analyzer at idexx.com/library.
• The SNAP test was activated too late—if the SNAP test was inserted after the sample
reached the test’s activation circle, streaking, speckling, and/or a blue background may
appear in the results window. Be sure to insert SNAP tests immediately after the sample/
conjugate is poured into the sample well.
• A contaminated result window.
16
Page 17

The analyzer doesn’t activate the test
This may be because:
• The analyzer base isn’t properly locked into place—ensure the
base is secure and that both fasteners on the base are in the locked
position.
• The batteries are in backwards or missing (see photo D showing
correct placement).
Maintenance and Troubleshooting
D
17
Page 18

Appendix
Technical Specifications
Power Supply Adapter
External USB power supply adapter
Input: 100–240 V AC, 47–63 Hz, 0.3 A
Output: 5 V DC, 1 A
Consumption
Operating: maximum 5 W
Batteries
Main Batteries Output: 3.7 V DC, 2,600 mAh
Chemistry: Lithium-ion
Type: Portable/18650
Rechargeable: Yes
Weight: 50.0 g
Appendix
Button Cell Battery Output: 3 V DC, 48 mAh
Chemistry: Lithium
Type: Portable/button cell/BR1225
Rechargable: No
Weight: 0.8 g
Operating Conditions
Operating Temperature 15°C–30°C (59°F–86°F)
18
Page 19

Safety Precautions
• The SNAP Pro Analyzer contains no user-serviceable components. DO NOT disassemble.
Call IDEXX Technical Support for any service issues.
• DO NOT insert anything in the SNAP* test port except SNAP tests approved for use with the
SNAP Pro* Analyzer.
• PROTECT the analyzer by keeping it away from sources of heat or flames.
• Use only the supplied power adapter.
• Use only IDEXX-supplied batteries.
– Dispose of used batteries only in accordance with your local ordinances. These
batteries contain lithium. Recycling is required in the European Union and is strongly
encouraged in all other countries.
• If the equipment is used in a manner other than specified, the protection provided by the
analyzer may be impaired.
• The SNAP Pro Analyzer should be placed on a flat surface during operation.
Notice: To satisfy Industry Canada (IC) radio frequency (RF) exposure requirements for mobile and
base station transmission analyzers, a separation distance of 20 cm or more should be maintained
between the antenna of this analyzer and persons during operation. To ensure compliance,
operation at closer than this distance is not recommended. The antenna(s) used for this transmitter
must not be colocated or operating in conjunction with any other antenna or transmitter.
Appendix
19
Page 20

 Loading...