

Page 1

SediVue Dx*
Urine Sediment Analyzer
Operator’s Guide
1
Page 2

Proprietary rights notice
Information in this document is subject to change without notice. Companies, names, and data used in
examples are fictitious unless otherwise noted. No part of this document may be reproduced or transmitted
in any form or by any means, electronic, mechanical, or otherwise, for any purpose, without the express
written permission of IDEXX Laboratories. IDEXX Laboratories may have patents or pending patent
applications, trademarks, copyrights, or other intellectual or industrial property rights covering this document
or subject matter in this document. The furnishing of this document does not give a license to these property
rights except as expressly provided in any written license agreement from IDEXX Laboratories.
© 2018 IDEXX Laboratories, Inc. All rights reserved. • 06-0005080-06
*SediVue Dx, SediVue, IDEXX VetLab, SmartService, and VetConnect are trademarks or registered trademarks
of IDEXX Laboratories, Inc. in the United States and/or other countries. All other product and company names
and logos are trademarks of their respective holders.
IDEXX Laboratories, Inc.
One IDEXX Drive
Westbrook, Maine 04092 USA
IDEXX Europe B.V.
P.O. Box 1334
NL-2130 EK Hoofddorp
2
Page 3

Contents
Getting started ........................................................................................................................................5
Welcome! .....................................................................................................................................................5
Introduction ..................................................................................................................................................5
SediVue Dx results .......................................................................................................................................6
SediVue Dx images .....................................................................................................................................7
Compatible species .....................................................................................................................................8
SediVue Dx components .............................................................................................................................8
SediVue Dx supplies ....................................................................................................................................9
Pay per Run .................................................................................................................................................9
Analyzer status ............................................................................................................................................9
Including physical/chemical urinalysis results with your
SediVue Dx results ...............................................................................................................................10
Running a sample on the analyzer ......................................................................................................11
Installing/replacing the cartridge sleeve ....................................................................................................11
Preparing samples ....................................................................................................................................12
Analyzing a sample ...................................................................................................................................12
Diluting samples ........................................................................................................................................13
Understanding your results .................................................................................................................14
Dilutions .....................................................................................................................................................14
Out of focus ...............................................................................................................................................15
Bacteria ......................................................................................................................................................15
Crystals ......................................................................................................................................................18
Urine protein:creatinine (UPC) ratio ..........................................................................................................18
Accessing results .................................................................................................................................19
Viewing and printing test results ...............................................................................................................19
Reviewing and selecting images ...............................................................................................................19
Adding comments to results .....................................................................................................................20
Printing images on the patient report ........................................................................................................20
Quality control ......................................................................................................................................22
Overview ....................................................................................................................................................22
Running quality control ..............................................................................................................................22
Maintenance .........................................................................................................................................23
Upgrading the software .............................................................................................................................23
Emptying the waste bin (as needed) .........................................................................................................23
Rebooting the analyzer (weekly) ...............................................................................................................23
Cleaning the fan filter (weekly)...................................................................................................................23
Cleaning the analyzer (monthly or as needed) .........................................................................................24
3
Page 4

Frequently asked questions .................................................................................................................27
Cartridge FAQs ..........................................................................................................................................27
Image FAQs ...............................................................................................................................................28
Miscellaneous troubleshooting FAQs ........................................................................................................28
QC FAQs ....................................................................................................................................................29
Pay per Run and auto replenishment FAQs ..............................................................................................29
Appendices ...........................................................................................................................................30
Preparing the installation site ....................................................................................................................30
Installing the SediVue Dx analyzer .............................................................................................................30
Technical specifications .............................................................................................................................31
Safety precautions .....................................................................................................................................31
International symbol descriptions ..............................................................................................................33
Other symbols ...........................................................................................................................................34
IDEXX technical support contact information ............................................................................................35
4
Page 5

Getting started
Welcome!
Congratulations on your recent purchase of the SediVue Dx* Urine Sediment Analyzer. The SediVue
Dx will seamlessly integrate with your IDEXX VetLab* ecosystem along with your other IDEXX
in-house analyzers, IDEXX VetLab* Station, VetConnect* PLUS, all IDEXX practice management
software, as well as multiple other leading practice management software.
The SediVue Dx analyzer uses propriety neural network algorithms and machine-learning
capabilities to identify and classify elements within urine sediment. Using SmartService* Solutions,
the SediVue Dx leverages the collective learnings of millions of patient images to guide confident
medical decisions to bring you unparalleled accuracy and reliability. Only with IDEXX can one
SediVue Dx customer benefit from the collective learning of all. Leveraging the images and neural
network algorithms is unique to IDEXX and is critical in advancing machine-learning capabilities so
we can identify the rarest of cases, enhance our offering, and expand our test menu.
Introduction
The SediVue Dx Urine Sediment Analyzer is a semiautomated urine microscopy system that
performs a urine sediment analysis from only 165 μL (4–5 drops) of fresh, uncentrifuged urine
in approximately 3 minutes. It uses a gentle, low-speed, on-board centrifuge for 30 seconds to
preserve the integrity of the sediment and takes 70 high resolution digital images (equivalent to 45
High Power Fields (HPF) of View) for every sample run. The SediVue Dx then leverages proprietary
cutting-edge convolutional neural network technology and machine learning to identify, classify,
and prioritize clinically significant formed elements within the sediment to increase the reliability,
speed, and accuracy of detecting renal and urinary tract abnormalities. The SediVue Dx provides
reproducible and sensitive analysis of the following sediment-forming particles in native urine
samples:
Blood cells Epithelial cells Bacteria Casts Crystals
• Red blood cells
(RBCs)
• White blood
cells ( WBCs)
• Squamous
• Nonsquamous
(e.g., transitional
cells, renal
tubular cells)
• Rods
• Cocci
• Hyaline
• Nonhyaline
(e.g., cellular
casts, granular
casts)
• Struvite
• Calcium oxalate
dihydrate
• Unclassified
(all other
crystals)
5
Page 6
SediVue Dx results
The SediVue Dx analyzer provides results in the following concentration levels:
Getting Started
Element
type
Blood
Cells
Element
type
Bacteria
Epithelial
Cells
Parameter Quantitative results
WBC
RBC
Parameter Semiquantitative results
Rods
Cocci
Squamous
Nonsquamous
Hyaline
Casts
Nonhyaline
(e.g., granular,
waxy)
Unclassified
(all other
crystals)
Crystals
Oxalate
Dihydrate
Struvites
†
Image tags not available.
<1/HPF Quantitative numerical result/HPF >50/HPF
None to
†
rare
None to
†
rare
None to
†
rare
None to
†
rare
Suspect presence
1–2/HPF 3–5/HPF 6–10/HPF >10/HPF
Suspect presence
1–5/HPF 6–20/HPF 21–50/HPF >50/HPFCalcium
†
†
Present
>1/LPF
†
The SediVue Dx analyzer is for veterinary use only.
None to Rare—For most sediment, this indicates the neural network detected fewer than
1 element/HPF (or LPF for casts). This generally means that the number found for a particular
formed element is below the reporting threshold and is typically not considered clinically significant
as published in the majority of veterinary textbooks and academic journals. Since the SediVue Dx is
analyzing 45 HPF, which is up to four times more material than the typical 10 HPF reviewed during
manual microscopy, there is a potential for finding a single (or very few) element(s) that would have
normally been reported as “none seen” by a veterinary or reference laboratory technician with the
manual method. For bacteria, none to rare indicates the neural network characterized the sample
as unlikely to contain bacteria.
Suspect Presence—The SediVue Dx recognizes some features or attributes of a particular
element (cocci, rods, casts, etc.); however, there may not be not enough features present to provide
a “present” message. Image review is strongly recommended for confirmation.
Present—There is a high confidence in the presence of the particular element reported (cocci,
rods).
6
Page 7
SediVue Dx images
The SediVue Dx Urine Sediment Analyzer takes 70 high-resolution digital images for every patient
run. These images are equivalent to 45 high-power fields of view using a 40x objective. Using a
proprietary neural network algorithm, each of the 70 images is scanned to identify, classify, and
count the formed elements. Each image is given a score based on the absence or presence of
formed elements and the clinical significance for each found. The images are then sorted, with
the highest scoring images displayed first and lowest scoring images displayed last. The top three
images are automatically retained by the SediVue Dx and transmitted to VetConnect* PLUS.
Image review
Similar to manual microscopy, the sample images should be reviewed with every sample run in
order to arrive at consensus of the results. This process can take as little as a few seconds. The
value in reviewing the images is to validate the numerical data provided and potentially supplement
the SediVue Dx analysis, if needed.
Image tags
Image tags are abbreviated labels for the reported parameters that appear on the formed elements
found in the sample. Image tags may not be available:
• If the image is out of focus or flagged for review.
Getting Started
• If the sample is from an unvalidated species or fluid.
• When the results are None to Rare or Suspect Presence (for casts).
• For bacteria results.
Image tags can be toggled on and off.
Convolutional neural network
SediVue Dx’s convolutional neural network is a proprietary pattern-recognition algorithm that works
similar to facial recognition software. The Neural Network leverages a veterinary-specific image
library that is used to train and grow the algorithm over time. It is what drives the identification,
classification, and count of each of the formed elements.
Bacteria; rods with white and red
blood cells
Bacteria; cocci with white blood
cells
Large struvite crystals
Ammonium biurate (thorn apple)
crystals
Hyaline cast Bilirubin crystal with
RBCs and WBCs
7
Page 8
Compatible species
The SediVue Dx analyzer has been validated on canine and feline urine samples.
Note: Urine from other species or other fluid types may be run on the analyzer; however, only
images will be included in the report.
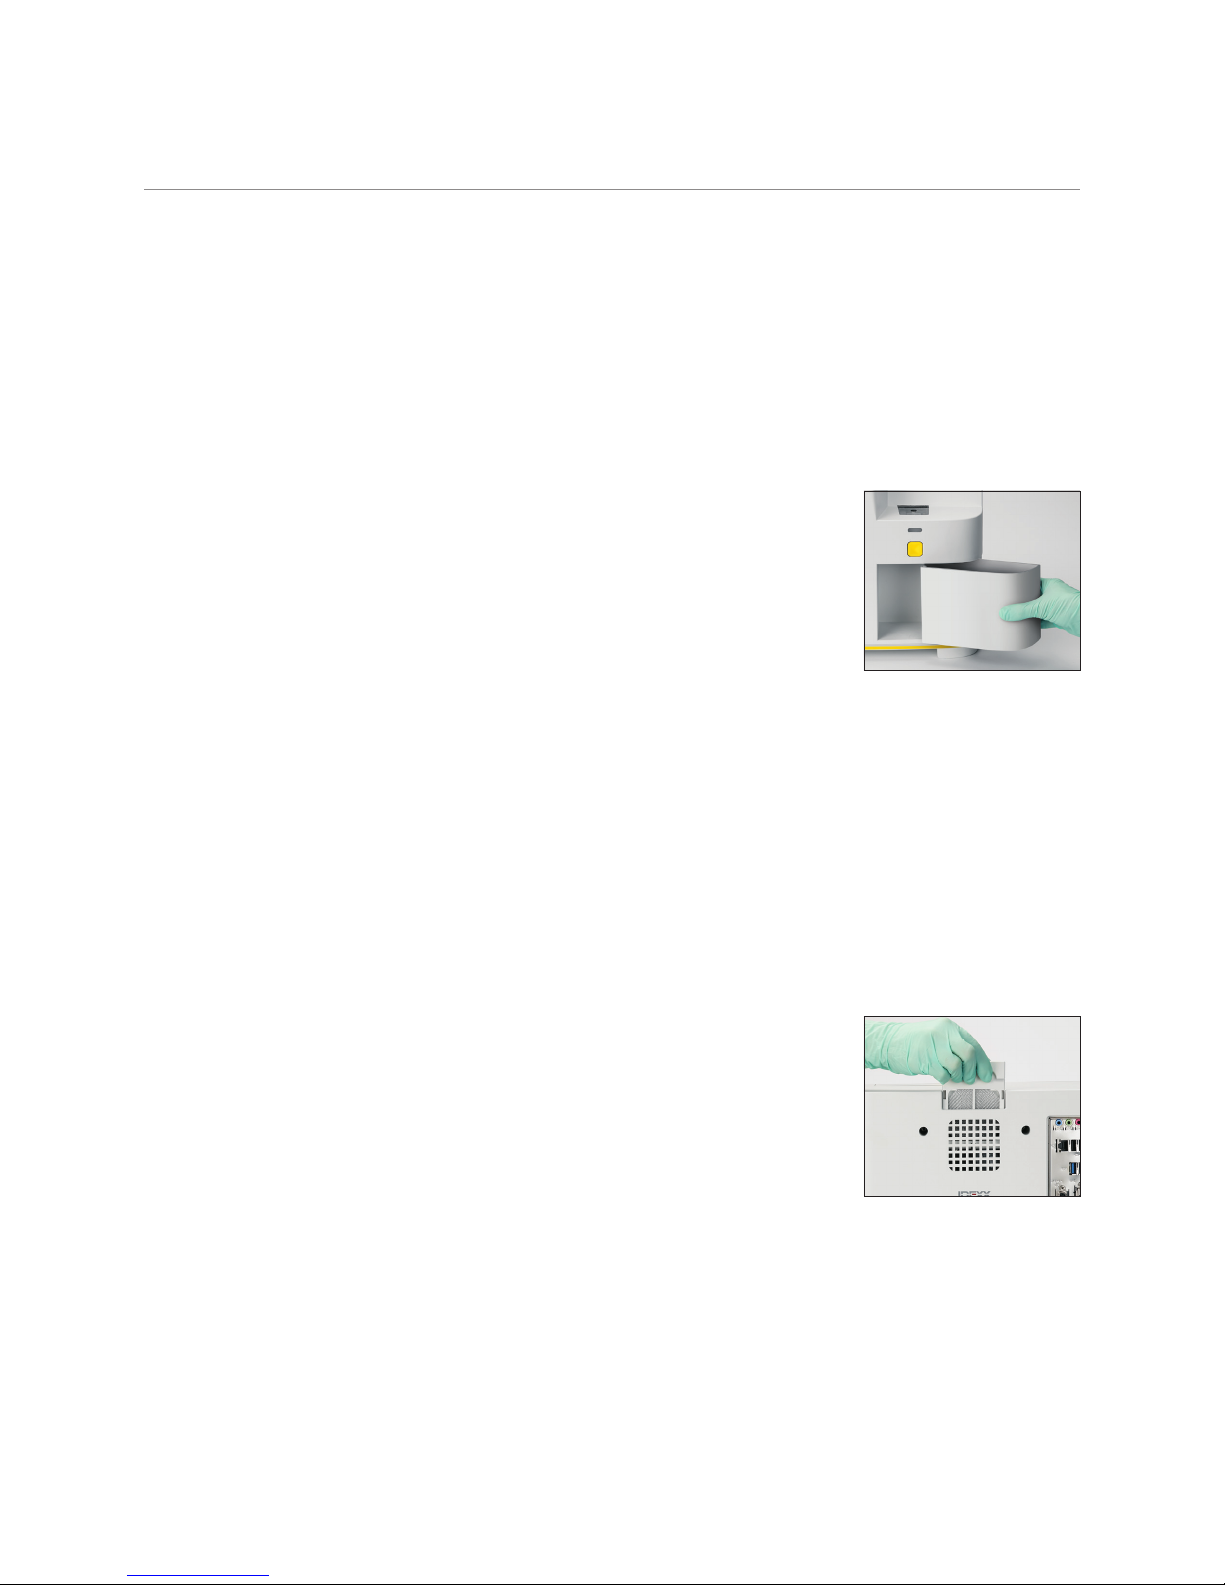
SediVue Dx components
Front of the analyzer
Getting Started
Status light
Start button
Inside of the analyzer
Sleeve lock
Optical stage
Pipetting window
Power button
Door access
Waste bin
Centrifuge shield
Cartridge holder
Drip tray
Optical
window
Track
Back of the analyzer
Fan filter
Ethernet port
Power port
8
Page 9

SediVue Dx supplies
IDEXX proactively monitors your usage of SediVue Dx supplies via your SmartService connection. You
can call IDEXX Technical Support to place an order or order them online.†
Supplies available:
• Cartridges
• Pipette tips
• QC fluid
†
†
†
• Syringe tips
• Cleaning supplies (alcohol prep pads and optical tissues)
†
Note: In North America, certain supplies will be sent automatically when your inventory is low.
Pay per Run
Pay per Run for the SediVue Dx Urine Sediment Analyzer is an innovative test billing and inventory
management system that increases cash flow by allowing you to bill your clients in advance of
paying for the sample analysis. Pay per Run works in conjunction with your SmartService* Solutions
connection to monitor patient runs on your SediVue Dx analyzer and bill for those runs on a monthly
basis:
Runs are invoiced on a monthly basis according to
your localized standard payment terms.
• The first patient run that provides semiquantitative
results and/or images in a 24-hour period
Getting Started
‡
• The first quality control (QC) run for each level of QC in
a 24-hour period
‡
For specific details on what runs are invoiced for your region, call IDEXX Technical Support.
Note: If your SmartService Solutions is accidentally disconnected, the data for any runs that
were completed (or supplies used) during the outage will be corrected once the connection is
reestablished.
Analyzer status
The light on the front of the SediVue Dx analyzer indicates the analyzer’s status.
Note: You can also view the analyzer status by viewing its icon on the IDEXX VetLab* Station Home
screen.
When light displays this
color...
Steady green Ready to process a sample.
Steady yellow Processing a sample.
Flashing yellow Waiting for you to inject sample in a cartridge in the pipetting
Flashing red Experiencing an issue or requires maintenance.
‡
The analyzer is...
window.
9
Page 10

Including physical/chemical urinalysis results with your
SediVue Dx results
The IDEXX VetLab Station includes a UA icon on the Select Instruments screen that allows
you to enter physical and chemical urinalysis results so that they can be included with your
SediVue Dx results for a comprehensive urinalysis.
By default, this icon displays in the patient’s job status area when the SediVue Dx icon is selected. If
you would like to modify the setting, follow these steps:
1. Tap the SediVue Dx icon on the IDEXX VetLab Station Home screen.
2. Tap Settings.
3. If you do not want to automatically include the UA icon with the SediVue Dx icon in the
patient’s job status area, clear the Automatically add UA physical record icon to
SediVue Dx runs check box.
OR
If you want to automatically include the UA icon with the SediVue Dx icon in the patient’s job
status area, select the Automatically add UA physical record icon to SediVue Dx runs
check box.
Getting Started
10
Page 11
Running a sample on the analyzer
Installing/replacing the cartridge sleeve
You’ll receive a message on the IDEXX VetLab* Station when the cartridge sleeve is almost empty.
You can choose to be reminded again after the next run or when the cartridge sleeve is empty.
1. Tap the SediVue Dx icon on the IDEXX VetLab
Station Home screen.
OR
Tap Replace Cartridges in the alert message.
2. Scan or enter the case-sensitive bar code located on
the plastic wrapping on the new cartridge sleeve.
Note: If the bar code is still not accepted, discard
the sleeve and try a new cartridge sleeve. If the
problem continues, or you need to adjust inventory,
call IDEXX Technical Support.
3. Tap Continue.
Note: If the Continue button is not enabled, not all of the bar code
characters have been entered.
2
5
4. Open the analyzer door.
5. Pinch the sleeve lock to release it and then pull the old cartridge
sleeve up to remove it.
6. With the product labeling on the new sleeve facing toward you,
push down on the sleeve until it locks into place and then remove
the tape from the bottom of the sleeve.
IMPORTANT: Do not remove the tape from the sleeve until it is
locked into place.
7. Close the analyzer door.
8. Tap OK to confirm that the loading process is complete.
Note: When handling cartridges, remember:
• Never touch unused cartridges—contamination may interfere with microscopic evaluation.
• Never refill a sleeve with dropped cartridges. Discard the sleeve and install a new cartridge
sleeve. Call IDEXX Technical Support to adjust your inventory quantity.
• Never manually remove cartridges from the cartridge sleeve.
6
11
Page 12
Running a Sample on the Analyzer
Preparing samples
Urine samples that are run on the SediVue Dx* analyzer can be obtained
via cystocentesis, catheterization, or free catch method. For best results,
analyze urine samples within 30 minutes of collection. Otherwise, store
the sample in the refrigerator for up to 2 hours.
Note: Storing urine samples in the refrigerator may introduce the in vitro
formation of crystals and crystalline debris.
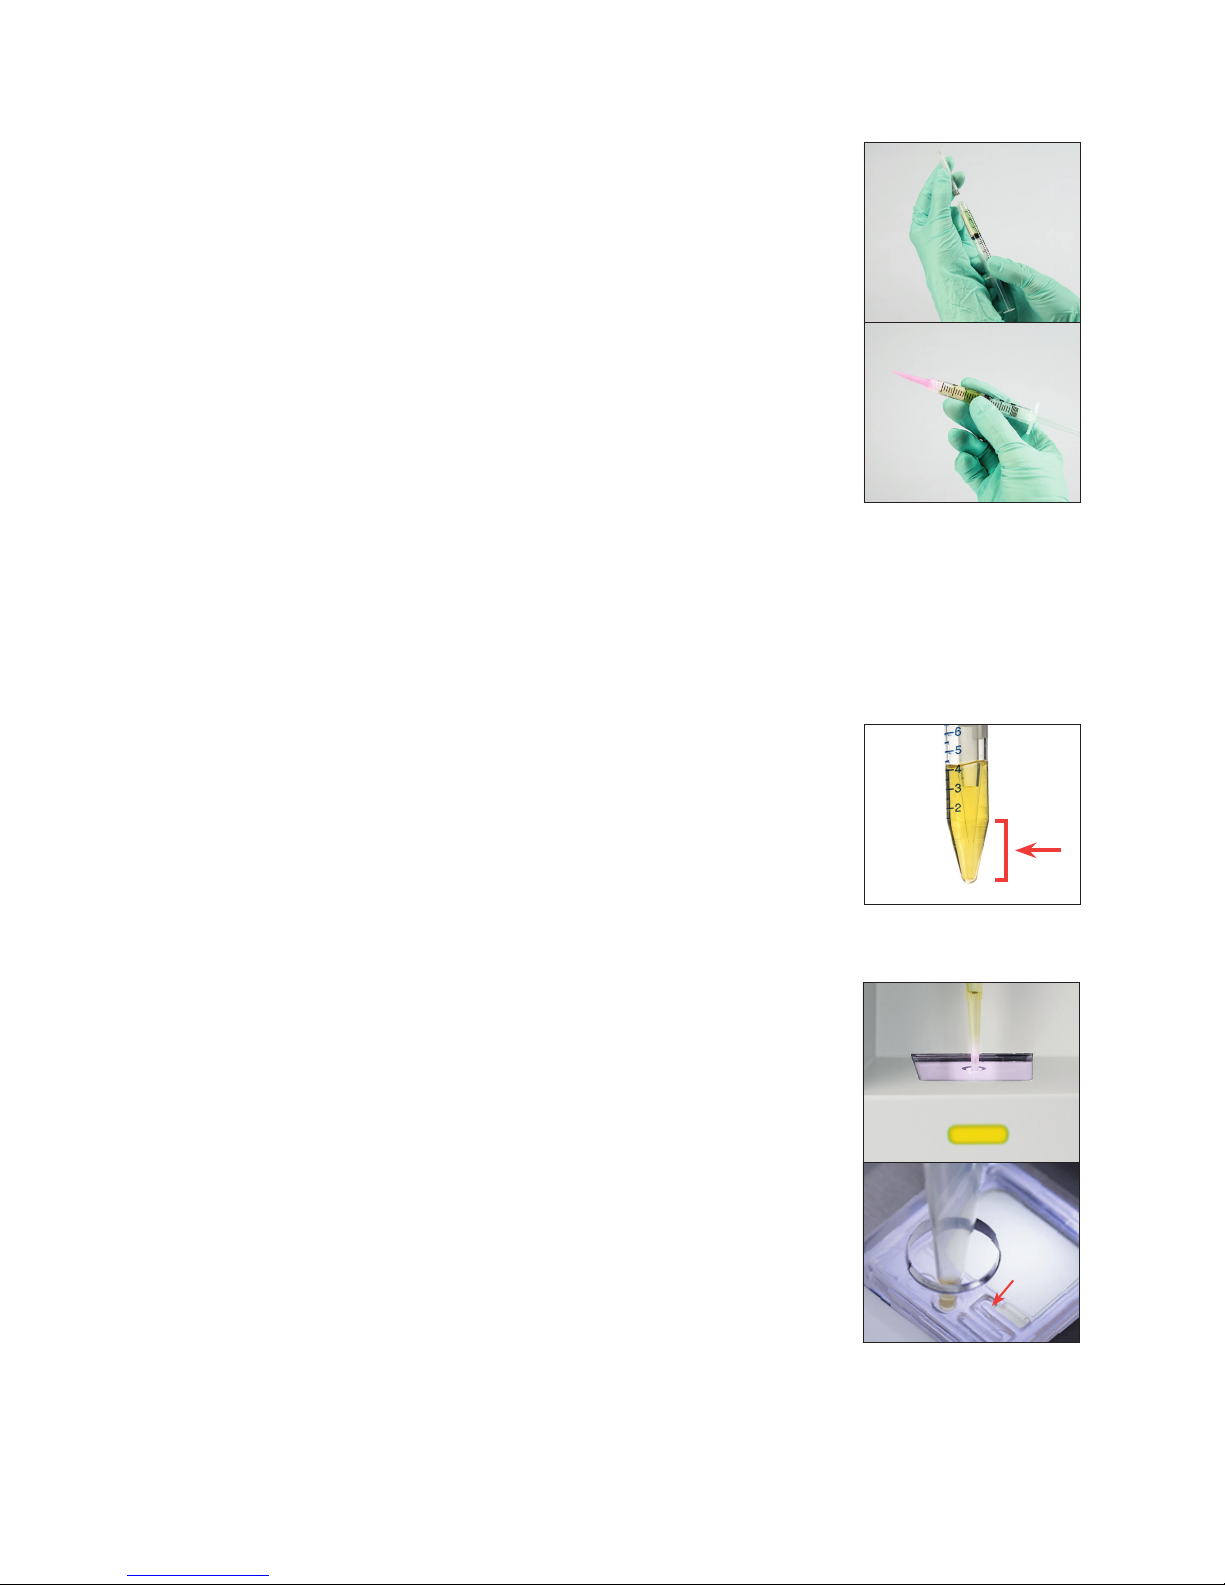
If the sample is in a syringe:
1. Ensure there is at least 0.5 mL of sample in a 1 mL–5 mL syringe.
2. Draw 0.5 mL of air into the syringe.
3. Replace the needle with a SediVue* syringe tip.
4. Gently invert the syringe 10 times to mix the sample.
5. Immediately after inversion, purge all of the air from the syringe and inject 165 μL of urine into
the cartridge fill port.
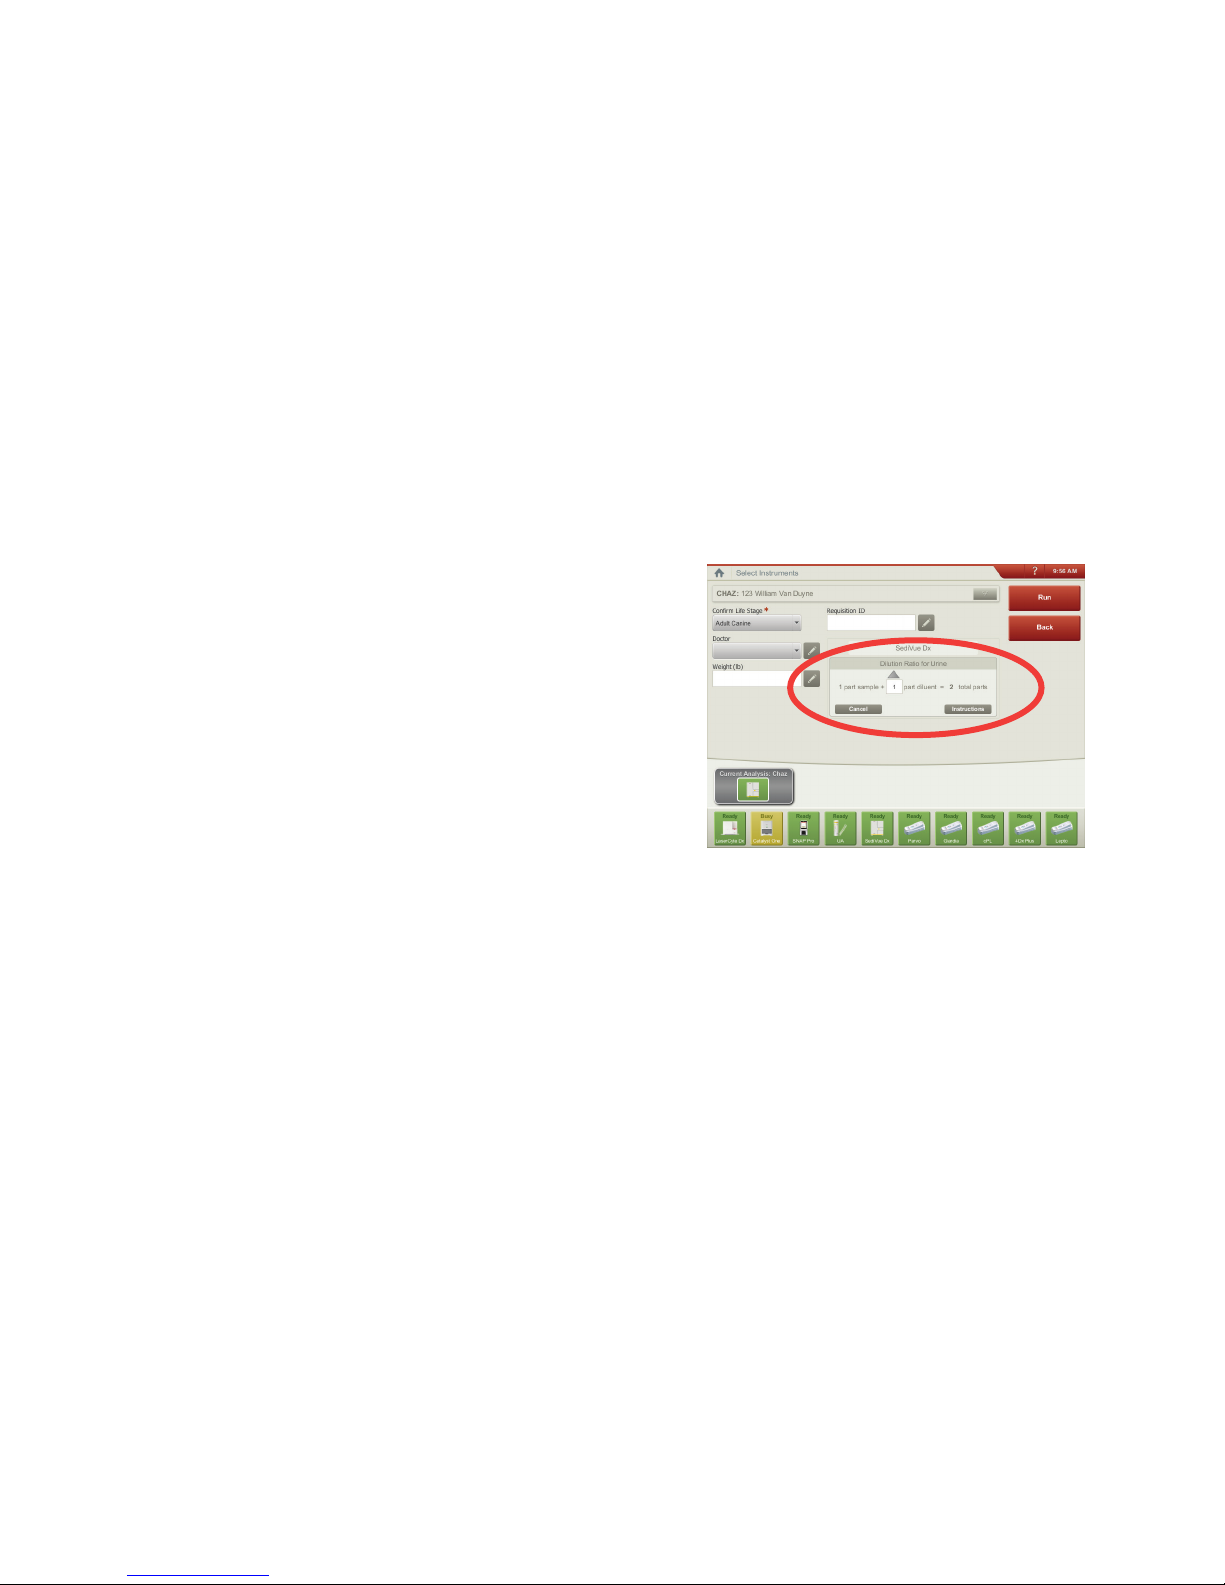
If the sample is in a container:
1. Cap the container and invert it 10 times to mix—a well-mixed sample is essential to obtaining
accurate results.
2. Immediately after inversion, use the SediVue* Pipette to aspirate
165 μL of sample from the bottom third of the container, ensuring
there are no bubbles in the sample, and immediately inject 165 μL
of urine into the cartridge fill port.
3
4
2
IMPORTANT: Crystals start to settle immediately after inversion.
Be sure to aspirate the sample from the bottom third of the
sample. Then remove excess urine on the outside of the tip with a
lint-free wipe.
Analyzing a sample
1. Initiate the sample run on the IDEXX VetLab Station (for more
information, see the IDEXX VetLab Station Operator’s Guide).
2. After you’ve confirmed the patient information on the Select
Instruments screen, select the SediVue Dx icon, select the fluid
type if it is not already listed, and then tap Run.
3. Once the analyzer has placed a cartridge in the pipetting window,
invert the sample 10 times and then immediately inject 165 μL of
urine into the cartridge fill port using either the SediVue Pipette or
a syringe with a SediVue Syringe Tip attached.
IMPORTANT—When injecting sample into the cartridge:
a. Use only IDEXX-supplied pipette tips and syringe tips.
They are made specifically for the SediVue Dx analyzer
and designed to reduce the risk of spills, leaks, and
inappropriately filling the cartridge.
b. Hold the pipette or syringe vertically to ensure the sample is injected only into the
cartridge. Make sure the pipette/syringe tip is firmly seated into the fill port on the
cartridge.
3
Stop
12
Page 13
c. Using light downward pressure, slowly and steadily fill the cartridge window to avoid air
bubbles. If using the pipette, only depress plunger to the first stop.
d. Ensure the sample fills the cartridge window but not the overflow channel. If the
cartridge is overfilled, complete the cleaning procedure on page 24 before pressing
the Start button.
e. Lift the pipette tip from the fill port before you release the plunger.
4. Press the Start button on the front of the analyzer. A progress bar displays next to the icon
in the patient’s job status area on the IDEXX VetLab Station Home screen, indicating the
percentage of the run that has completed.
Diluting samples
When urine samples are crowded with cells, bacteria, debris, or crystals, it may be helpful to dilute
the sample to spread the elements apart for easier identification and classification. To determine
whether a preanalysis or postanalysis dilution is recommended, see the “Dilutions” section on the
next page.
1. Initiate the sample run on the IDEXX VetLab
Station.
OR
If the patient has already been run once, select
the patient from the Recent Test Results list, tap
Add Test, and then tap the SediVue Dx icon.
Running a Sample on the Analyzer
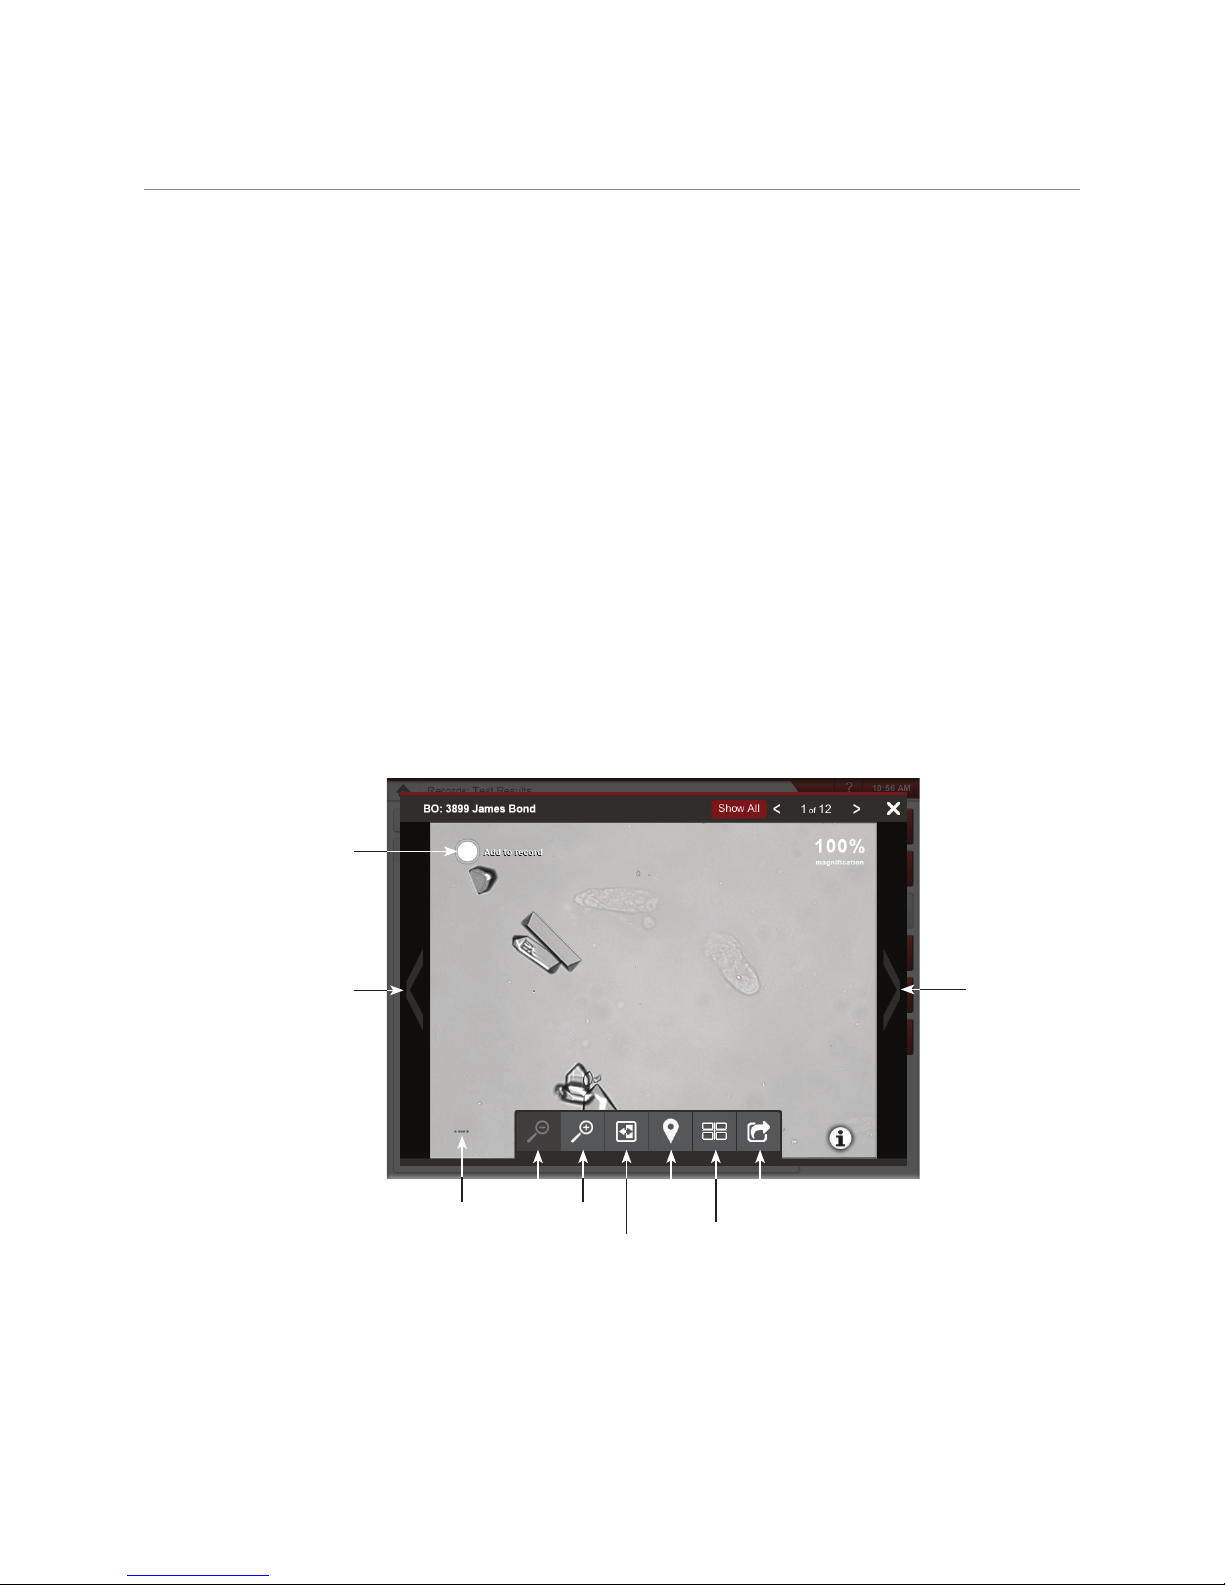
2. Tap Run Dilution.
3. Use the up/down arrows to specify the desired
dilution factor (total parts).
4. Tap Run or Append Results.
5. In a test tube, dispense 165 μL of the well-mixed
urine sample. Add the selected parts of 0.9%
normal saline and invert the sample 10 times to
mix.
6. IMPORTANT: Aspirate 165 μL from the bottom third of the diluted sample and then
immediately inject it into the cartridge fill port.
7. Press the Start button on the analyzer. The results will be adjusted by the dilution factor and
noted that the sample was diluted.
If the dilution does not yield semiquantitative results, repeat the process using a higher
dilution factor.
Note: Diluting a urine sample may affect the pH and osmolality of the sample and lead to changes
in cellular appearance and the presence of crystals.
Enter the dilution information in the center of
the Select Instruments screen.
13
Page 14

Understanding your results
In addition to determining results, the SediVue Dx* convolutional neural network verifies image and
result quality with each run. If the image quality cannot be verified or if confirmatory methods should
be considered, a message will appear at the bottom of your results indicating possible next steps.
Dilutions
When a urine sample is crowded and the edges of the elements overlap, the SediVue Dx
convolutional neural network may have difficulty discerning the elements from one another. Diluting
the urine sample will help spread the elements apart for easier identification and classification.
This section will help you identify when dilutions may be necessary both preanalysis and
postanalysis and provide you with insight to help reduce additional dilution work-flow steps.
Note: Diluting a urine sample may affect the pH and osmolality of the sample and lead to changes
in cellular appearance and the presence of crystals.
Preanalysis dilutions
There are times during the physical evaluation of the clarity and color of urine samples when it’s
obvious that samples will be crowded with cells, bacteria, debris, or crystals (e.g., gross hematuria).
This evaluation will aid in determining if a dilution should be considered preanalysis.
Use the guidelines below to determine if the sample should be diluted prior to running it on the
SediVue Dx analyzer.
Note: It’s always good practice to remove an aliquot of the original sample in case additional
testing is needed.
Very
cloudy
Opaque
Does the clarity of the
sample suggest high
amount of cells, bacteria,
crystals, or debris?
Does the color of the sample
suggest evidence of hematuria?
Red Dark red Brown
Consider a 1:5 dilution with 0.9% normal saline, remix the diluted sample, and rerun.
Postanalysis dilutions
When a “crowded” sample is run on the SediVue Dx analyzer, your semiquantitative results may be
suppressed and you will be prompted to consider a dilution. When this occurs, an image review is
essential to determine the appropriate next steps.
• If the images provide clinical insight, a simple annotation to the patient record may be applied
and you may be able to move on without a dilution.1
• If the images do not provide clinical insight, diluting the urine sample will help to spread
the elements apart for more accurate analysis. The dilution ratio will vary depending on
the severity of the crowding in the sample. Follow the guidelines below to determine if a
postanalysis dilution may be helpful.
14
Page 15

Understanding Your Results
Do the images provide clinical insight?
If you are prompted to consider a dilution but you can obtain clinical insight from the images, a
dilution is unnecessary.
Yes No
Image provides clinical insight
(bacteriuria and pyuria evident)
2
Slightly dense—some background
(obvious hematuria; bacteria may
be hidden)
Moderately dense—little
background (obvious hematuria;
other formed elements may be
hidden)
Extremely dense—no background
(overlapping cells make it
impossible to discern elements
without dilution)
No dilution required
Consider dilution:
1 part urine and 1 part saline3 (1:2)
Dilute:
1 part urine and 4 parts saline4 (1:5)
Dilute:
1 part urine and 9 parts saline4 (1:10)
Minimal crowding Extreme crowding
1
Dilution flags may also result from excessive bubbles and/or fibers from dirty optics.
2
Only the first run for each sample type for the same patient in a 24-hour period will be invoiced. Multiple runs from the same patient that include one or more dilutions and do
not provide semiquantitative results will not be invoiced.
3
It may be helpful to confirm bacteria with an air-dried, stained preparation (“dry prep”), rather than a dilution.
4
Higher concentrations of diluent will affect the pH and osmolality of the sample and lead to changes in cellular appearance and the presence of crystals.
Out of focus
When the Review images to confirm results message appears, the convolutional neural network
cannot verify the quality of focus in the images. This may occur when the sample does not have
enough sediment to confirm the quality of focus or if the images are out of focus. If this message
appears in several consecutive samples with sediment present, the optical window may require
cleaning.
Bacteria
Bacteria can be a challenge to distinguish from amorphous debris and crystalline material.
When the presence of bacteria is “suspect presence,” the SediVue Dx Urine Sediment Analyzer’s
convolutional neural network will suggest that you review the patient’s images for deeper clinical
insights.
In cases where bacteria cannot be visually confirmed in the images, a dry-slide sediment cytology
(“dry prep”) may be considered to differentiate bacteria from other debris or artifacts. If bacteria are
obvious in the images, or the result is “present,” a dry prep is not necessary, but you can follow up
with a culture and sensitivity (MIC) test if you want to further classify the bacteria as well as test for
sensitivity to certain antibiotics.
15
Page 16

Understanding Your Results
Bacteria (suspect presence)
When the Confirm with one of the following: image review, air-dried, stained cytological preparation
(“dry prep”), or urine culture message appears, bacteria may be present in the sample. The images
should be reviewed to determine if there is sufficient evidence of bacteriuria by identifying uniformly
sized structures or if the small structures are in the form of chains or doublets. If bacteria cannot be
visually confirmed in the images, prepare and review either an air-dried, stained cytological slide
and/or a urine culture due to likelihood of bacteria being found in the sample.
Bacteria possible
To perform a dry prep
Performing a dry prep is an extremely cost-effective means of confirming the presence or absence
of bacteria, of differentiating between cocci and short rods, and for characterizing various cellular
elements in the urine sample.
1. Label your slides appropriately.
2. Fill a centrifuge tube with well-mixed, fresh urine taken from the bottom of the sample tube.
3. Centrifuge the sample (and a balance
tube) on the Urine setting (or 400 g).
Note: If your centrifuge does not have
a Urine setting, refer to its operator’s
manual for centrifugation settings and
times.
4. After centrifugation, a concentrated pellet
of formed elements should be visible at
the bottom of the tube. Gently aspirate
the supernatant down to the pellet,
leaving an extremely small amount of
urine in which to resuspend the pellet.
Note: If the sample is extremely
hypocellular, it may be very difficult to see
the pellet.
Bacteria possible
6
7
Bacteria obvious
5. Lightly flick the bottom of the tube
multiple times with your finger to gently
resuspend the formed elements.
6. Using a new pipette, dispense a drop
of sample on a glass slide, similar to
preparing a blood film.
7. Place a clean glass spreader slide on
your labeled slide, at approximately
30°–40°, in front of the drop of urine.
8. Back the spreader slide into the drop
allowing the material to spread along the
edge of the spreader slide.
8
16
Page 17

Understanding Your Results
9. Move the spreader slide toward the end
of the specimen slide, keeping the two in
contact with each other.
10. In the middle of the slide, abruptly stop
spreading the urine sample and lift the
spreader slide straight up to form a line of
material.
11. Air dry thoroughly and then stain the slide
using your routine hematology/cytology
stain (e.g., Diff-Quik*).
Note: If there is very little sediment in
the sample, it is acceptable to heat-fix
the slide, but only when evaluating the
presence of bacteria.
12. Review microscopically.
9
10
Bacteria (present)
When the Consider urine culture and sensitivity message appears, bacteria is present in the sample.
When this occurs, consider a culture to confirm the bacteria are viable and to provide additional
evidence of bacteriuria.
Bacteria seen
Bacteria seen
17
Page 18

Crystals
Crystals can come in a variety of different shapes, sizes, and
presentations. Urine pH, specific gravity, sample preparation
and handling, and drugs can all play a part in crystal formation.
Crystals in small numbers (e.g., struvites) may be normal
for some dogs but others (e.g., cystine) may signify disease
processes. The following Smart Flags are designed to provide
further clinical insight into the presence of crystalluria.
Suspect crystalluria. Review images to confirm.
When the sum of all crystal types is ≥1/HPF but no specific
crystal parameter has met the minimum threshold of 1/HPF to be reported and tagged, then the
suspect crystalluria flag will be triggered. All crystal types will still be reported as “none to rare.”
Example: STR 0.3/HPF (None to Rare, no tags)
CRY 0.75/HPF (None to Rare, no tags)
------------
1.05/HPF => Suspect crystalluria flag
Understanding Your Results
Crystalline debris detected
Crystalline debris can be abundant and variable in size and
presentation in some samples. Due to background density, the
presence of large amounts of crystalline debris can affect the
identification of other formed elements in the sample.
This flag is displayed when crystalline debris has been
detected by the algorithm. The neural network algorithm has
been trained to exclude crystalline debris from the unclassified
crystal (CRY) category. When this flag is present, users will be
notified so they can be more discerning of the bacteria result
as very small particles of debris can resemble bacteria.
Urine protein:creatinine (UPC) ratio
When the Consider evaluation of urine protein:creatinine ratio message appears, the urine chemical
results indicate the presence of protein. A UPC ratio can be used to quantify protein loss in the
urine as it is unaffected by urine volume or concentration. It has been incorporated into the IRIS
Guidelines on Staging and Treatment of Chronic Kidney Disease (CKD) as an important monitoring
tool at all stages. A UPC should be performed after urinalysis with sediment examination. It is not
recommended for use if there is an “active sediment” as inflammatory conditions in the urinary tract
will increase protein and negate the usefulness of the ratio.
What if there is active sediment?
When active sediment is detected, the Recommend reevaluate proteinuria after resolution of active
sediment message appears.
First, resolve the infection. Once the sediment becomes inactive, consider running a UPC to
quantify protein loss.
18
Page 19
Accessing results
Viewing and printing test results
Analyzer results are automatically returned to the IDEXX VetLab* Station and recorded in the
appropriate patient’s record. The diagnostic results report is a comprehensive report of all the test
results specified in a laboratory request for that patient on a specific day.
Patient test results can be printed automatically each time a set of results is returned, or you can
manually print the results when needed.
For more information about how to view and print test results, see the IDEXX VetLab Station
Operator’s Guide.
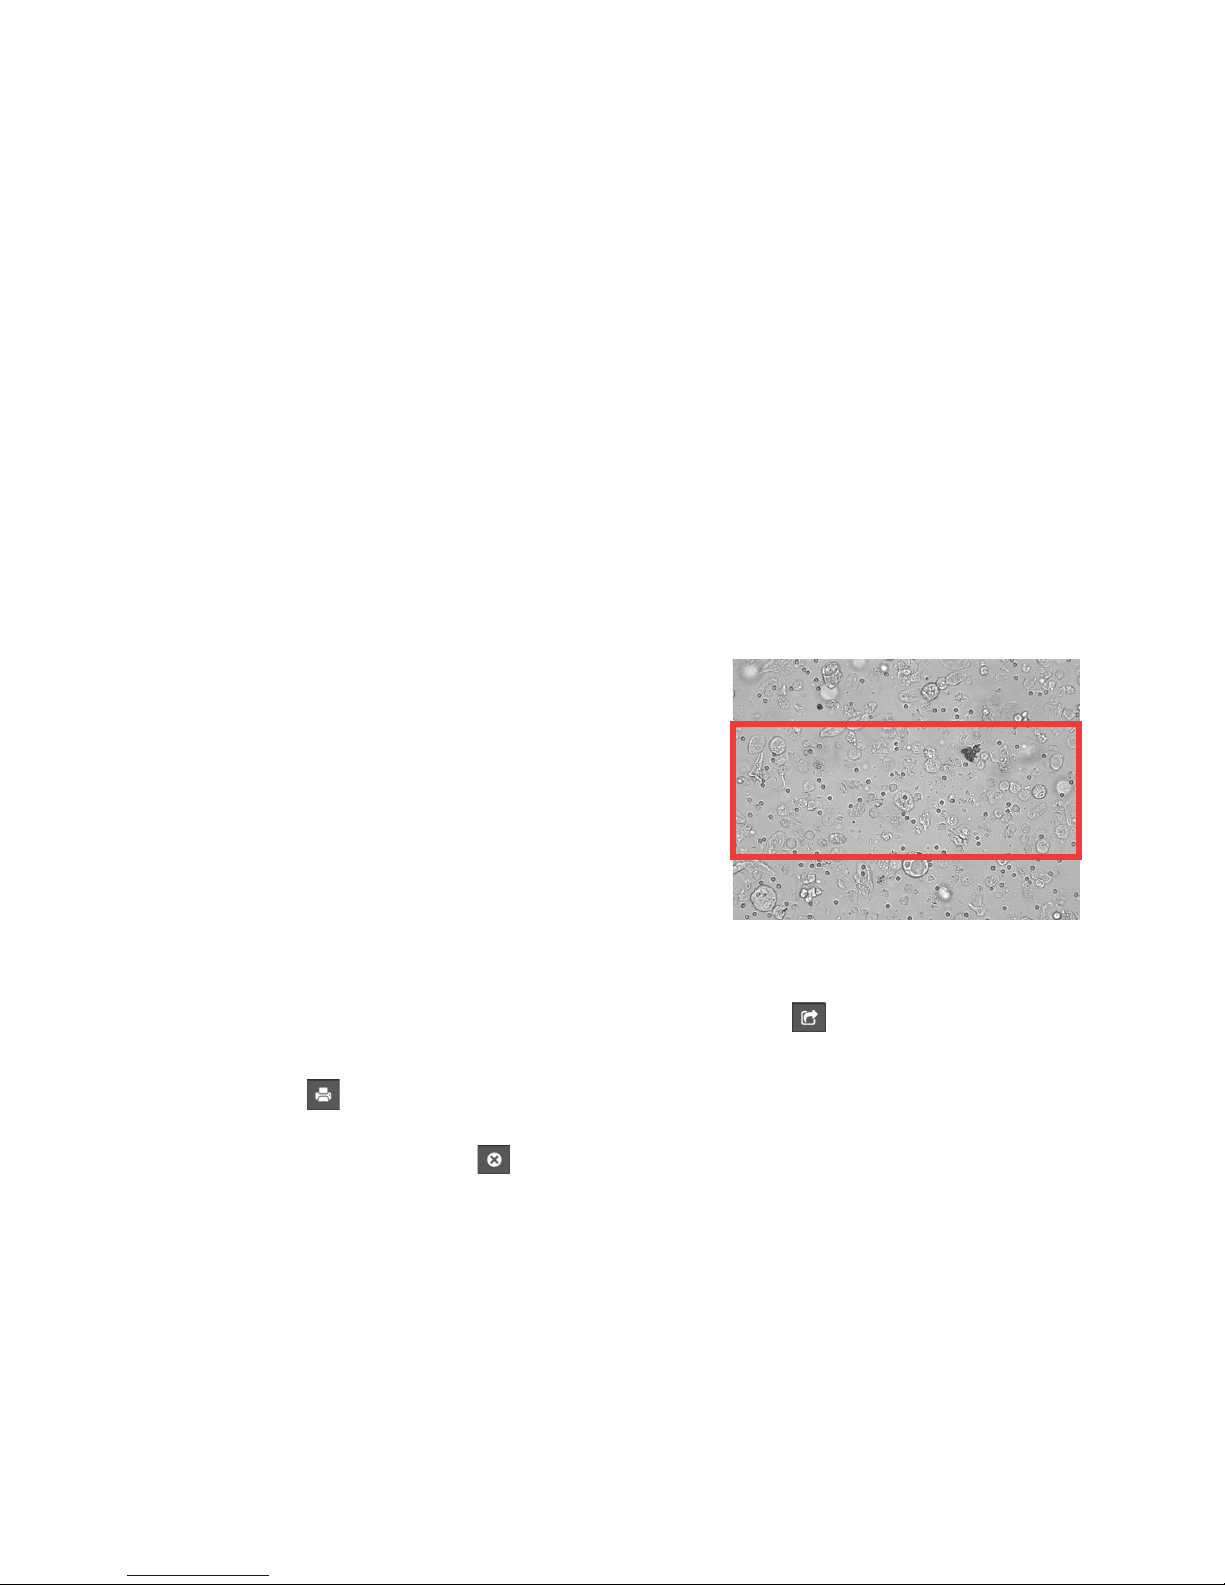
Reviewing and selecting images
By default, the first three images display alongside the results on the Records: Test Results
screen. You can use the View Images feature to add up to three additional images, change the
magnification of an image, and show image tags next to identified sediment.
Note: The View Images feature will display 12 of the 70 images captured during analysis. If
additional images are required to confirm results, tap Show All to view the remaining 58 images.
1. On the SediVue Dx tab of the Records: Test Results screen, tap View Images.
2. Tap the image that you want to view. Then you can:
Permanently
add image
to record
Scroll
through
images
Show/hide
image toolbar
Zoom out
Zoom in
Show/hide
image tags
Reverse
contrast
Add image to
patient report
View
thumbnails
IMPORTANT: Image tags will only appear on results that are above the “none to rare”
threshold and will not appear for any “suspect presence” or bacteria results.
Scroll
through
images
19
Page 20
3. To select which images should be permanently retained and displayed next to the results on
the Records: Test Results screen:
– In full-screen view, tap Add to Record in the upper-left corner of the image.
– In the thumbnail view, tap the circle in the upper-left corner of the image.
4. If you want to view another image, select it from the screen. Otherwise, tap the X in the upperright corner of the screen to return to the Records: Test Results screen.
Tip: You can also tap one of the three images on the Records: Test Results screen to view a larger
version of that image.
Adding comments to results
1. On the SediVue Dx tab of the Records: Test Results screen, tap Add Comments.
2. In the Comments area, enter the comments that you want to display in the Notes section
on the Records: Test Results screen and on the patient report (e.g., presence of bacteria
confirmed by image review).
3. Tap Save.
Printing images on the patient report
By default, the center portion of the highest priority image
prints automatically if there is any sediment identified in
the sample. You can override this setting or manually add
an image to the patient’s printed report as well as to the
PDF that’s sent to your compatible practice management
system.
Accessing Results
To add an image to the patient report:
1. On the SediVue Dx tab of the Records: Test Results
screen, tap View Images.
2. Tap the image that you want to view and then use
the image toolbar at the bottom of the screen to control the magnification, adjust the contrast,
display or hide image tags, and more.
3. Once the image appears as you want it to on the report, tap
4. Drag the crop box to the area of interest.
5. Tap
report to your compatible practice management software.
6. To close the viewer, tap
the upper-right corner to exit the View Images feature.
to generate the patient report with the image included and send a PDF version of the
in the toolbar on the bottom of the screen or tap the X button in
.
20
Page 21

Accessing Results
To modify the default image printing preferences:
1. Tap the SediVue Dx icon on the IDEXX VetLab Station Home screen.
2. Tap Settings.
3. If you want to include the highest priority SediVue Dx image on the printed report, in the
Printing Image on Report group box, select the Automatically include SediVue Dx image
on report check box. If you want to only include an image if sediment is present, select the
Only if sediment is present check box.
OR
If you do not want to include a SediVue Dx image on the printed report, clear the
Automatically include SediVue Dx image on report check box.
21
Page 22

Quality control
Overview
The purpose of quality control is to verify the integrity of your results and to verify that your analyzer
is functioning optimally. We recommend that you perform quality control once per month.
Running quality control
Note: Keep SediVue* QC in the refrigerator until the expiration date or at room temperature for up to
30 days. DO NOT freeze. If accidentally frozen, contaminated, or compromised, discard the vial and
call IDEXX Technical Support to reorder.
1. Tap the SediVue Dx icon on the IDEXX VetLab Station Home screen.
2. Tap Quality Control.
3. If the QC lot that you’re using is listed, select it and tap Run QC.
OR
4. If the QC lot that you’re using is NOT listed, follow these steps:
a. Tap Add QC Lot.
b. Scan or enter the L2 and L1 bar codes located on the QC insert.
c. Tap Next.
d. Select the lot number that you added.
e. Tap Run QC.
5. Gently invert the vial 10 times to ensure the cells at the bottom of the vial are completely
suspended.
6. Using the SediVue pipette, aspirate 165 μL of IDEXX SediVue* QC fluid and then inject it into
a cartridge in the pipetting window.
7. Press the Start button on the analyzer.
8. Repeat the above steps for the opposite QC vial (if you ran L1 first, run L2 second—or vice
versa).
9. Verify the results are in the target ranges and that the images are sharp and in focus.
22
Page 23
Maintenance
Upgrading the software
As new features and functionality are added to the SediVue Dx* analyzer, you will receive software
upgrades from IDEXX. These upgrades will be sent automatically to your IDEXX VetLab* Station
via your SmartService* Solutions connection. You’ll receive a message in the IDEXX VetLab Station
Message Center when an upgrade is available.
Emptying the waste bin (as needed)
It’s recommended that you empty the waste bin whenever a new
cartridge sleeve is loaded into the analyzer.
To empty the waste bin, pull it to remove it from the analyzer, dispose of
its contents, and then replace it in the analyzer.
Note: Do not remove the waste bin while a run is in progress as it will
cancel the run and discard the cartridge and sample.
Rebooting the analyzer (weekly)
IDEXX recommends that you reboot the analyzer weekly. For greater efficiencies, consider
rebooting the analyzer at the same time that you perform your weekly reboot of the IDEXX VetLab
Station.
1. Tap the SediVue Dx icon on the IDEXX VetLab Station Home screen.
2. Tap Turn Off SediVue Dx.
3. Confirm that you would like to restart the analyzer.
Cleaning the fan filter (weekly)
The fan filter should be cleaned once per week to prevent buildup that may elevate the internal
temperature of the analyzer.
1. Remove the fan filter.
2. Rinse the filter thoroughly with warm water.
3. Pat the filter dry.
4. Replace the filter.
2c
23
Page 24
Cleaning the analyzer (monthly or as needed)
To ensure the optimal performance of your SediVue Dx* Urine Sediment Analyzer, it’s
recommended that you clean the internal components of the analyzer on a monthly basis. If a
cartridge is overfilled or filled incorrectly, cleaning is also needed to prevent the excess
sample from contaminating the analyzer’s moving parts. Maintaining a clean analyzer will
reduce “cartridge movement” errors and maximize the analyzer’s performance.
To clean after a cartridge was overfilled or filled incorrectly
For best results, after you notice that the cartridge has been inappropriately filled, do not press the
Start button as this will drag urine into the internal components of the analyzer. Instead,
follow the instructions below.
Note: Already pressed the Start button? Use the instructions on the next page to clean the internal
components of the analyzer.
Maintenance
1. Open the analyzer door. Then,
with gloved hands, use an optical
tissue to absorb urine on top of
the cartridge.
Feed arm
Move arm
3. Using a new alcohol prep pad,
clean the feed arm (dispense
area), including the front of
the move arm. Then dry the
components with an optical tissue.
2. Remove and dispose of the
cartridge.
4. Close the analyzer door. Once
the SediVue Dx icon has a green,
“ready” status, tap the patient
icon on the IDEXX VetLab* Station
Home screen and tap Start Run.
A new cartridge is placed in the
pipetting window.
24
Page 25
Maintenance
To clean the internal components (monthly or more frequently, if needed)
Note: Do not open the analyzer door while a run is in progress as it will cancel the run and discard
the sample and cartridge.
IMPORTANT: Do not use any of the following near the analyzer: organic solvents, ammonia-based
cleaning products, ink markers, sprays containing volatile liquids, insecticides, disinfectants, polish,
or room fresheners.
1. Tap the SediVue Dx
icon on the IDEXX
VetLab Station Home
screen, tap Turn off
SediVue Dx, and
then tap Shutdown.
Pusher arm
4. Clean the left side
of the pusher arm 5
times with an alcohol
prep pad (ensuring
the right edge of
the track is cleaned
thoroughly), and then
dry it with an optical
tissue.
2. Open the analyzer
door and clean the
top and bottom of
the pipetting window
with an optical tissue
dampened with
warm water. Then
dry with a dry optical
tissue.
Pusher arm
Pusher lever
5. Press the pusher lever
to the left and repeat
step 4 on the right
side of the pusher
arm.
3. Remove the cartridge
holder, clean it with
an alcohol prep pad,
dry it with an optical
tissue, and then set it
aside.
Move arm
Optical
stage
Track
6a. Using a new alcohol
prep pad, clean the
optical stage and
track repeatedly to
remove all debris.
Then dry with an
optical tissue.
IMPORTANT: Do not
exert excess pressure
on the optical window.
25
Page 26

Optical
window
Maintenance
6b. Using a new alcohol
prep pad, clean the
optical window in a
circular motion (3–4
times) and then dry
it in a circular motion
with a clean optical
tissue.
Move arm
7. Remove the centrifuge shield, waste bin and drip tray. Then clean
them with warm water and dry them with an optical tissue.
8. Using a new alcohol
prep pad, clean the
move arm and then
dry it with an optical
tissue.
9. Return the waste bin,
drip tray, centrifuge
shield, and cartridge
holder to their
locations in the
ana l y ze r.
10. Close the analyzer
door. On the IDEXX
VetLab Station Home
screen, tap the
SediVue Dx icon
and then tap Turn
on SediVue Dx.
26
Page 27

Frequently asked questions
Cartridge FAQs
How do I remove a cartridge jam?
If you receive an error that a cartridge jam has occurred, it is likely because the cartridge pathway is
dirty. Open the analyzer door, remove the jammed cartridge, and then follow the monthly cleaning
instructions. If the jam impacted the delivery of results, rerun with a new sample and cartridge.
Cartridge jams do not impact result quality.
If you are unable to remove the cartridge, power off the analyzer to decrease the holding force of
the motors.
My cartridge counter is wrong—how do I fix it?
If the cartridge counter on the SediVue Dx Instruments screen is incorrect, you can:
• Keep using the system until it runs out of cartridges or until the counter reaches zero.
• Scan the bar code if you forgot to scan the bar code initially.
• Call IDEXX Technical Support for assistance.
I tried to scan the bar code on a new cartridge sleeve, but it is not accepting
it. What should I do?
Confirm the following:
• The correct bar code is being scanned (on the plastic wrapping on the sleeve).
• The CAPS lock is turned off on the on-screen keyboard.
• The bar code entered matches the bar code on the sleeve.
If the bar code is still not accepted, discard the sleeve with the bad bar code and try a new
cartridge sleeve. If the problem continues, or you need to adjust your inventory, call IDEXX
Technical Support.
My IDEXX VetLab Station says I have cartridges left, but the sleeve is
empty. What should I do?
Install a new cartridge sleeve to reset the counter. Cartridges are shipped for free, so discarded
cartridges will not result in lost revenue.
My IDEXX VetLab Station says I have no cartridges left, but the cartridge
sleeve still has cartridges. What should I do?
Install a new sleeve to reset the counter. Cartridges are shipped for free, so discarded cartridges
will not result in lost revenue.
27
Page 28

Image FAQs
Why do all of my images have the same spot/blemish on them?
If you see scratches or blotches that repeat on every image, some dust or dirt has probably
collected on the optical stage.
To clean the optical stage:
1. Power off the analyzer.
2. Open the analyzer door.
3. Remove the cartridge holder and clean it with an IDEXX-supported alcohol prep pad.
4. Using a new IDEXX-supported alcohol prep pad, clean the optical stage and then slide the
pad along the track repeatedly to remove all debris.
IMPORTANT: The optical stage should only be cleaned with new IDEXX-supported alcohol
prep pads and optical tissues.
5. Dry the components cleaned in steps 3–4 with a dry optical tissue.
6. Close the analyzer door and power on the analyzer.
Why do some of my images have a spot/blemish on them?
Spots and blemishes may be caused by bubbles in your sample. Ensure you’re following proper
sample preparation protocols (see “Preparing Samples” on page 9 for more information) and then
rerun the sample. If the problem persists after multiple runs with new samples, please contact
IDEXX Technical Support.
Frequently asked questions
Why are my images out of focus?
Images may appear out of focus if there are significant lipids in the sample or if the microscope
stage is dirty. If this occurs on only one sample, it is likely related to lipids. If it occurs on many
samples, please contact IDEXX Technical Support for assistance.
Miscellaneous troubleshooting FAQs
What do I do when I receive an alert?
When the analyzer experiences a problem, an alert message appears on the upper right side of the
IDEXX VetLab* Station title bar, the LED on the front panel of the SediVue Dx* analyzer flashes red,
and the SediVue Dx icon on the IDEXX VetLab Station Home screen appears with an Alert status.
To respond to an alert, do one of the following:
• Tap the SediVue Dx icon on the IDEXX VetLab Station Home screen.
• Tap the alert message in the title bar to display the alert message. Follow the instructions
displayed in the alert message.
How do I cancel a run that is already in process?
To cancel a run that is already in process, tap the SediVue Dx icon on the IDEXX VetLab Station
Home screen and then tap Cancel Run.
28
Page 29

What should I do if I get repeated messages about rerunning a sample
because it is complex or has lipid interference?
This message is generated when a significant number of images are either complex or have lipid
interference (which can affect the focus of the images). In most cases, diluting the sample will
resolve the issue. If you’re getting this alert repeatedly even after diluting the sample, it may be
because the analyzer requires cleaning. Clean the analyzer using the steps provided on page 20. If
the problem persists, please contact IDEXX Technical Support.
What if I need to make adjustments to my inventory of cartridges, pipette
tips, or QC fluid (e.g., due to loss, damage, or troubleshooting)?
Contact IDEXX Technical Support to make inventory adjustments.
What should I do if I receive multiple pusher arm errors?
This is generally due to a dirty cartridge path. Remove any jammed cartridges and clean according
to the monthly cleaning instructions.
QC FAQs
What should I do if my QC results are out of range?
If your quality control results are out of range:
Frequently asked questions
• Verify the QC materials are in-date.
• Confirm that you’ve been storing the QC materials correctly.
• Review the images to ensure they are in focus.
If the problem persists, remix the QC materials and run them again. If that still does not resolve the
problem, contact IDEXX Technical Support for assistance.
What should I do if I’ve accidentally frozen my QC?
Discard the QC material and call IDEXX to order more.
What should I do if my QC looks contaminated?
Contaminated QC material will appear cloudy and may have solid material that does not dissolve
when mixed. Discard the QC material and call IDEXX to order more.
What happens if I’ve accidentally left my QC out of the refrigerator?
The SediVue QC material is good for 30 days at room temperature. If the material looks clear, place
it back in the refrigerator. If contaminated, discard the QC material and call IDEXX to order more.
Pay per Run and Auto Replenishment FAQs
How does Pay per Run work?
The first run for each patient that provides results and/or images will be invoiced at the end of
the month, after you’ve already billed clients for the service. This way, you can eliminate up-front
inventory costs and minimize the risks of inventory management.
How does Auto Replenishment work?
For North America only—Your monthly usage is monitored through your SmartService Solutions
connection, so you’ll receive supplies when your inventory runs low.
29
Page 30

Appendices
Preparing the installation site
• Before unpacking, find a suitable space for the analyzer. Check the dimensions of the
analyzer and combine it with the needed workspace for sample handling to meet the
requirements.
• The analyzer should only be used indoors. Keep out of direct sunlight. Intense light can
interfere with the optical sensors.
• Make sure there is enough room behind the analyzer for easy connection and disconnection
of power supply, for the peripherals, and for the proper ventilation of the analyzer. The
recommended safety clearance is 10 centimeters (3.94 inches).
• Make sure you set up and operate the analyzer on a solid level surface in an environment
with fairly constant temperature and humidity. Do not operate the analyzer in temperatures
below 15°C (59°F) or above 40°C (104°F), or outside of the 20%–80% relative humidity level
(noncondensing) at 30°C (86°F). Do not expose the analyzer to strong light.
• Do not operate the analyzer in close proximity to sources of intense electromagnetic radiation
(such as unshielded intentional radio frequency (RF) sources). The analyzer is certified to
meet the electromagnetic compatibility (EMC) requirements of EN 61326-1:2007 and
EN 61236-2-6:2007.
• Do not set up and operate the analyzer in an environment with vibration sources, as these
vibrations could influence the results and/or cause instrument failure..
• Make sure the instrument is allowed to acclimatize to room temperature before use.
Installing the SediVue Dx analyzer
The SediVue Dx* analyzer works in conjunction with the IDEXX VetLab* Station.
1. Before you unpack the analyzer, choose an optimum location for the instrument. The analyzer
should be placed on a level surface in a well-ventilated area away from obvious sources of
heat, direct sunlight, cold, humidity, or vibrations.
IMPORTANT: Ensure proper ventilation. The analyzer’s cooling vents are in the back.
2. Connect the analyzer to a numbered port on the router using an Ethernet cable (provided).
Note: For more information about connecting your analyzer to the router, see the installation
instructions that accompanied your router.
3. Power on the SediVue Dx analyzer. Once the SediVue Dx icon displays on the IDEXX VetLab
Station Home screen, your connections are complete.
Note: If the SediVue Dx icon does not appear on the IDEXX VetLab Station Home screen
within 3 minutes, contact IDEXX Technical Support for assistance.
30
Page 31

Technical specifications
Sample volume: 165 μL
Database capacity: up to 1,000 samples
Interfaces: Ethernet
Dimensions
Width: 12.6 in. (320 mm)
Depth: 12.6 in. (320 mm)
Height: 13.2 in. (336 mm)
Weight: 32 lb (15 kg)
Power requirements
Input: 100–240 V AC
Line frequency: 50–60 Hz
Operating conditions
Indoor use only
Appendices
Ambient room temperature: 15°C–40°C (59°F–104°F)
Relative humidity: 20%–80% at 30°C (86°F), noncondensing
Altitude: Up to 2,000 meters above sea level
Safety precautions
IMPORTANT: If the equipment is used in a manner other than specified, the protection provided by
the equipment may be impaired.
The analyzer does not contain any user-serviceable components. DO NOT disassemble.
Line voltage for the SediVue Dx AC power cable is 100–240 V AC, 50–60 Hz. Be sure to plug all
equipment into properly grounded electrical outlets.
Use only the AC power cable supplied.
Disconnect the AC power cable from the wall outlet if the:
• AC power cable becomes frayed or otherwise damaged.
• AC power adapter is exposed to water or other liquids.
Electrical safety
Removing the covers of electronic equipment can cause electric shock, as there are high-voltage
parts inside.
Do not tamper with any of the electronics inside the analyzer.
Do not remove any analyzer cover other than those specified in this document.
To prevent fire or shock hazard, do not expose the analyzer to rain or moisture of any kind.
To prevent electric shock, never use an extension cord. Ensure all plugs and sockets are fully
inserted so that no parts of the plug prongs or blades are visible.
31
Page 32

Appendices
Installation, service, and repair must be performed by personnel authorized and trained by IDEXX
Laboratories only.
Line voltage for the SediVue Dx AC power cable is 100–240 V AC, 50–60 Hz. Be sure to plug all
equipment into properly grounded electrical outlets.
Use only the AC power cable supplied.
Disconnect the AC power cable from the wall outlet if the:
• AC power cable becomes frayed or otherwise damaged.
• AC power adapter is exposed to water or other liquids.
Care of the analyzer
Use powder-free latex or nitrile gloves when operating or cleaning the analyzer.
Keep analyzer away from sources of heat or flames.
PROTECT your equipment from damp conditions, wet weather, or liquid spills.
Take care not to spill water or other liquids on the unit.
DO NOT use solvents, ink markers, sprays containing volatile liquids, or polish on the analyzer as it
may damage the outer case.
Clean only with mild soap and a slightly moist cloth and only when the analyzer is not in use.
Biohazard precautions
All components of the analyzer may come into contact with urine and are therefore possible
sources of infection. Urine specimens should be handled at Biosafety Level 2.
Be sure to wear appropriate protective equipment, including but not limited to eye protection with
side shields, fluid-resistant lab coat, and approved lab gloves.
Operator qualification
Operators are required to have a sound knowledge of relevant guidelines and standards as well as
the information and procedures contained in this Operator’s Guide.
Follow good laboratory practices, especially when working with biohazardous material.
32
Page 33

International symbol descriptions
2
International symbols are often used on packaging to provide a pictorial representation of particular
information related to the product (such as expiration date, temperature limitations, batch code,
etc.). IDEXX Laboratories has adopted the use of international symbols on our analyzers, product
boxes, labels, inserts, and manuals in an effort to provide our users with easy-to-read information.
Appendices
Symbol Description Symbol
Use by
A utiliser avant
Verwendbar bis
Usare entro
Usar antes de
使用期限
Batch code (Lot)
Code de lot (Lot)
Chargenbezeichnung (Partie)
Codice del lotto (partita)
Código de lote (Lote)
ロット 番 号
Serial number
Numéro de série
Seriennummer
Numero di serie
Número de serie
シリアル番号
Catalog number
Numéro catalogue
Bestellnummer
Numero di catalogo
Número de catálogo
製品番号
Authorized Representative in the
European Community
Représentant agréé pour la C.E.E.
Autorisierte EG-Vertretung
Rappresentante autorizzato nella
Comunitá Europea
Representante autorizado en la
Comunidad Europea
EC 内の正規販売代 理店
Manufacturer
Fabricant
Hersteller
Ditta produttrice
Fabricante
製造元
Caution, consult accompanying
documents
Attention, consulter les documents
joints
Achtung, Begleitdokumente
beachten
Attenzione, consultare la
documentazione allegata
Precaución, consultar la
documentación adjunta
注意、添付文書をご参照ください。
Caution, hot surface
Attention, surface très chaude
Precaución, superficie caliente
Vorsicht, heiße Oberfläche
Attenzione, superficie rovente
高温注意
Description
Temperature limitation
Température limite
Zulässiger Temperaturbereich
Temperatura limite
Limitación de temperatura
保 存 温 度( 下 限 )
Upper limit of temperature
Limite supérieure de température
Temperaturobergrenze
Limite superiore di temperatura
Limite superior de temperatura
保 存 温 度( 上 限 )
Consult instructions for use
Consulter la notice d’utilisation
Gebrauchsanweisung beachten
Consultare le istruzioni per l’uso
Consultar las instrucciones de uso
取扱説明書をご参照ください。
Keep away from sunlight
Conserver à l’abri de la lumière
Vor direkter Sonneneinstrahlung
schützen
Mantener alejado de la luz solar
Tenere lontano dalla luce diretta del sole
遮光してください。
WEEE Directive 2002/96/EC
Directive 2002/96/CE (DEEE)
WEEE-Richtlinie 2002/96/EG
Directiva 2002/96/CE RAEE
Direttiva RAEE 2002/96/CE
廃電気電子機器指令(WEEE Directive
2002/96/EC)
Biological risks
Risques biologiques
Biogefährlich
Rischi biologici
Riesgos biológicos
生物 学的リスク
Do not reuse
Usage unique
Nicht wiederverwenden
No reutilizarw
Non riutilizzare
再利用しないでください。
Electrostatic-sensitive device
Appareil sensible aux charges
éléctrostatiques
Dispositivo sensible a descargas
electrostáticas
Gerät ist sensibel auf elektrostatische
Ladung
Dispositivo sensibile alle scariche
elettrostatiche
静電気の影響を受ける装置
33
Page 34

Appendices
Symbol Description Symbol
Keep dry
Conserver dans un endroit sec
Mantener seco
Vor Nässe schützen
Tenere al riparo dall’umidità
濡らさ ないこと 。
This side up
Haut
Este lado hacia arriba
Diese Seite nach oben
Alto
この面を上にする。
Other symbols
Symbol Description
Ethernet/Network symbol
Pinch point
Description
Fragile
Fragile
Frágil
Zerbrechlich
Fragile
取扱注意
Date of manufacture
Date de production
Fecha de producción
Herstelldatum
Data di produzione
製造 年月日:
34
Page 35

IDEXX technical support contact information
IDEXX Sales Representative:
Telephone/Voice Mail:
Appendices
United States: 1-800-248-2483
Australia: 1300 44 33 99
Austria: 43 (0)1 206 092 729
Belgium: 32 (0)27 00 64 38
Bra zil: 0800 -777-7027
Canada: 1-800-248-2483
China (PRC): 400-678-6682
Czech Republic: 420-239018034
Denmark: 45 (0) 43 31 04 39
Finland: 358 (0)9 7252 2253
France: 33 (0) 810 433 999
Germany: 49 (0)69 153 253 290
Ireland: 353 (0)1 562 1211
Italy: 39 02 87 10 36 76
Latin America: CAG-LAO2012@idexx.com
Luxembourg: 352 (0)34 20 80 87 22
Netherlands: 31 (0)70 700 7033
New Zealand: 0800 838 522
Norway: 47 24 05 51 10
Poland: 48 22 853 40 01
Russia: 7-4999-511-255
Singapore: 65 6807-6277
Slovakia: 421-268622417
South Korea: 080 7979 133
Spain: 34 932 672 660 or 34 916 376 317
Sweden: 46 (0)8 5198 9566
Switzerland: 41 (0)44 511 22 37
Taiwan: 0800 291 018
Japan: 012 0 -71-4921
United Kingdom: 44 (0)20 3788 7508
35
Page 36

 Loading...