

Page 1
ImageVue CR20
Digital Imaging System
Quick Reference Guide
Starting and stopping the system
To start the system:
1. To turn on the scanner, press the Standby switch on the scanner operation panel.
The Ready lamp illuminates.
2. Turn on the computer; the software starts automatically.
To shut down the system:
1. Tap
2. Tap OK to confirm. Both the computer and the scanner shut down.
Requesting an image capture
From the Cornerstone* software:
1. Set up invoice items to initiate the Image Request special action.
OR
From the Patient Clipboard*, open the patient record, right-click the patient’s name in the Patient List, and then
select Imaging > Image Request.
Requests are listed by patient in the ImageVue* CR20 RIS window.
2. Select the patient in the ImageVue CR20 RIS window, and then tap
3. In the Study window, tap to display the Shot Selection window. See “Capturing the images.”
From a non-Cornerstone practice management system:
1. Use the modality worklist feature to send the image request to the ImageVue CR20 software.
2. Follow steps 2–3 in the previous section.
From a standalone ImageVue CR20 system:
1. In the RIS window, tap to display the Patient Information window.
2. Enter a new patient record, and then tap . See “Capturing the images.”
in the upper right corner of the software window, and then select Shut Down.
.
Page 2
Capturing the images
1. Make sure the image request has been started (see the previous section).
2. In the Shot Selection window, select an anatomical region at the top, select one or more shots below,
and then tap OK or .
Tips:
• To replace a shot, tap it in the shot list, and then select the new shot.
• To delete a shot, tap it in the shot list and then tap
• To save the study for later, tap
3. In the Study window, highlight the first shot you want to take.
4. Position the cassette dark side up (barcode window down), and with the green mark on the left.
5. Position the patient facing left, and then capture the image.
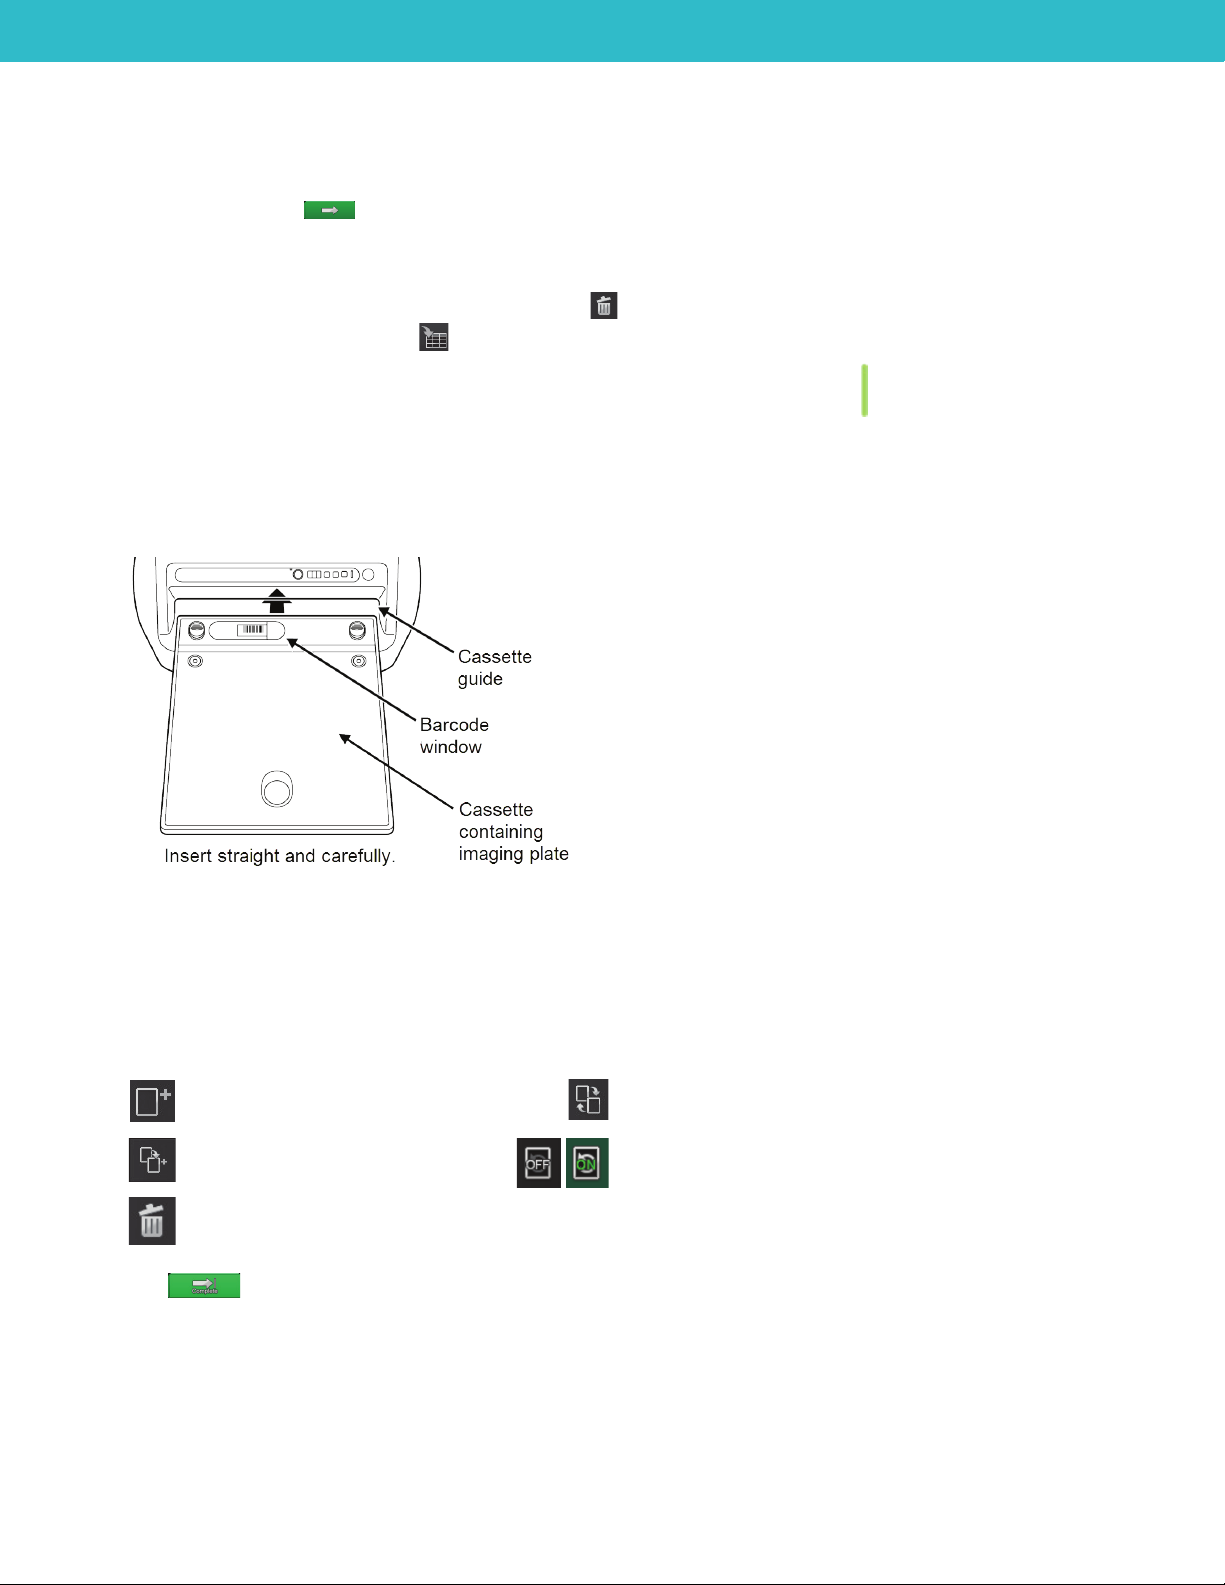
6. When the scanner Cassette Ready lamp is lit (green), turn the cassette over so the dark side is down (barcode
window is up), and then insert it into the scanner in alignment with the guide on the right. Be sure to remove any
exposure markers before inserting cassette.
.
.
7. When the image appears onscreen, add annotations or markers as needed, using the editing tools below
the image.
8. When the Cassette Removal lamp is blinking (blue), remove the cassette from the scanner.
9. Capture remaining radiographs.
IMPORTANT: Do not capture a radiograph while the scanner is reading an image.
Tip: Use these buttons to add or change shots in the capture list if needed:
Add more shots. Replace currently selected shot with a different shot.
Add another instance of the currently
selected shot.
Delete selected shot.
10. Tap to complete and save the study. The images are sent to the IDEXX-PACS* Imaging Software.
When On, you can take as many instances of the
currently selected shot as needed.
Tap again to turn Off, so you can take the next shot in
the list.
Page 3

Viewing and editing images in a completed study
(Recommended) View or edit images in the IDEXX-PACS or IDEXX Web PACS software:
• In the IDEXX-PACS software, search for the patient from the IDEXX-PACS Home window.
• If you use the Cornerstone software, open the image from the Cornerstone Patient Clipboard.
• If you subscribe to IDEXX Web PACS software, tap the icon in the lower right corner of the
ImageVue CR20 Study window. When VetConnect* PLUS opens, log on, and then select Imaging.
Your images may not be immediately visible; you can view them as soon as they are uploaded
to the cloud.
(Alternative) View or edit images in the ImageVue CR20 software:
1. From the RIS window, tap one of the study list buttons at the top, such as
Completed Studies.
2. In the Study List window, select the study you want, and then tap .
3. In the Study window, tap the thumbnail of the image you want to view.
4. Use the shortcut tools below the image to zoom or pan the image; use the QA tools on the
right to rotate, add markers, or crop an image (if the tools are not visible, tap ).
5. When done, tap to exit QA mode.
QA tools in ImageVue CR20 software
Order information
Displays the shot name and other options.
To reprocess an image that was captured using the wrong shot: Tap the 3 dots next to the
shot name, and then select the correct shot. The image is reprocessed using the new processing
parameters.
Image rotation/reversal
Tap to display image rotation and reversal tools.
Marker
Tap to display marker and free-text tools. Tap the numbered buttons at the top of the Marker palette
to see additional options.
To apply a marker or text, tap the option, and then tap the image.
To remove a marker or annotation, tap the marker or text box, and then tap .
Shadow-masking processing
Tap to display masking tools you can use to exclude white areas from the image.
Tap a tool and then tap the image. To adjust size/shape, drag the handles on each tool angle.
Exposure list
Tap to display a list of all images in the study.
Distribution setting
Tap to display a dialog box with options for printing or viewing image destinations.
Trimming
To crop the image, tap in the Study window, and then tap the Trimming tool.
Select the size and then tap the image.
Page 4

Cleaning the scanner, cassette, and imaging plate (IP)
Scanner
Perform these steps monthly:
• Vacuum the air vents on each side of the scanner regularly to remove dust and pet hair.
• Run the cleaning cycle: Remove the cassette, and then press the Standby switch and the Eraser button
simultaneously. Cleaning takes about 5 seconds.
Cassette
Wipe the exterior of the cassette as needed with a clean, dry cloth. Do not use a solvent.
Imaging plate (IP)
Erase each IP before you use it the first time each day:
1. Before inserting a cassette, press the Eraser button on the scanner. The green status light turns orange,
indicating erasure mode.
2. Insert the cassette; erasure begins automatically.
3. Remove the cassette when the Cassette Removal lamp blinks.
If images are streaked, clean the IP:
1. Press down the latches at the top of the cassette, tilt open the top,
and then remove the IP.
2. Using the towelettes provided with your system, wipe the IP surface
lightly, in the order shown (A, then B).
3. Return the IP to the cassette, with barcode visible in the window.
Troubleshooting
Buzzer sounds and LED displays an error code
• To cancel the error and stop the buzzer, press the Standby switch ; press the Standby switch again to release
the cassette.
• Level 500 error codes: No shot selected. Select the appropriate shot in the study window and reinsert the cassette.
• Level 300 error codes: Usually mean the cassette was not inserted correctly. Cancel the error, remove the cassette, and
then reinsert it. If the cassette cannot be unlocked, push the cassette toward the far right.
• Refer to the ImageVue CR20 Operator’s Guide PDF for a complete list of error codes and actions to take.
Excessive X-Ray lamp is illuminated and error code 480 is displayed
The IP has received an excessive radiation dose and is overexposed. Press the Standby switch to cancel the error,
and then press the Eraser button to erase the cassette. Erasure may take some time.
Streaks on the image
Clean the scanner and the IP as described above.
Tip: A white streak of about 5 mm (0.2 in.) may occur at the edge of the image, but this is not a defect.
For more information
Call IDEXX Diagnostic Imaging Customer Support at 1-877-433-9948.
Manufactured for IDEXX Laboratories, Inc.
One IDEXX Drive
Westbrook, ME 04092 USA
1-207-556-3000
idexx.com
Intended use: The IDEXX ImageVue* CR20 system is intended for veterinary use
only; it is not intended for human diagnostic use. For a detailed list of species and
settings, contact IDEXX Diagnostic Imaging Customer Support: 1-877-433-9948.
*Cornerstone, ImageVue, Patient Clipboard, and VetConnect are trademarks or registered
trademarks of IDEXX Laboratories, Inc. or its affiliates in the United States and/or other countries.
All other product and company names and logos are trademarks of their respective holders.
© 2016 IDEXX Laboratories, Inc. All rights reserved. • 06-0007652-00
 Loading...