

Page 1

IDEXX Catalyst One* Chemistry Analyzer
Operator’s Guide
Page 2

Information in this document is subject to change without notice. Companies, names and data used in
examples are fictitious unless otherwise noted. No part of this document may be reproduced or transmitted
in any form or by any means, electronic, mechanical or otherwise, for any purpose, without the express
written permission of IDEXX Laboratories. IDEXX Laboratories may have patents or pending patent
applications, trademarks, copyrights or other intellectual or industrial property rights covering this document
or subject matter in this document. The furnishing of this document does not give a license to these property
rights except as expressly provided in any written license agreement from IDEXX Laboratories.
© 2015 IDEXX Laboratories, Inc. All rights reserved. • 06-0001252-01
*IDEXX VetLab, Catalyst, Catalyst One, IDEXX VetTrol, SmartLink, IDEXX InterLink, IDEXX SmartService,
SNAP, and 4Dx are trademarks or registered trademarks of IDEXX Laboratories, Inc. in the United States
and/or other countries. All other product and company names and logos are trademarks of their respective
holders.
Proprietary Rights Notice
2
Page 3

Contents
Preface ....................................................................................................................................................5
Safety Precautions .......................................................................................................................................5
Performance Precaution ..............................................................................................................................5
Care of the Analyzer ....................................................................................................................................5
International Symbol Descriptions ...............................................................................................................6
Other Symbols .............................................................................................................................................7
Getting Started ........................................................................................................................................8
Introduction ..................................................................................................................................................8
Catalyst One Components ..........................................................................................................................9
Analyzer Status ..........................................................................................................................................10
Responding to an Alert ..............................................................................................................................11
Installing the Catalyst One Analyzer ..........................................................................................................11
Catalyst One Analyzer Consumables ........................................................................................................12
Compatible Species ..................................................................................................................................13
Using the Catalyst One* Analyzer ........................................................................................................14
Analyzing Samples ....................................................................................................................................14
Slide Handling ...........................................................................................................................................14
Diluting Samples ........................................................................................................................................14
Viewing and Printing Test Results .............................................................................................................16
Outside of Reportable Range Samples ....................................................................................................17
Modifying the Settings on the Analyzer ..............................................................................................18
Modifying the Sound Settings‡ ..................................................................................................................18
Entering Standby Mode .............................................................................................................................18
Exiting Standby Mode................................................................................................................................18
Sample Preparation and Storage ........................................................................................................19
Supported Sample Types for Catalyst* CLIPs and Slides.........................................................................19
Preparing Samples for Use on the Catalyst One Analyzer........................................................................20
Proper Sample Cup Volume ......................................................................................................................22
Sample Inspection After Centrifugation .....................................................................................................22
Sample Storage .........................................................................................................................................23
Quality Control ......................................................................................................................................24
Overview ....................................................................................................................................................24
Quality Control Materials ..........................................................................................................................24
Quality Control CLIPs and Slides ..............................................................................................................25
Preparing Control Fluid ..............................................................................................................................26
Running Quality Control .............................................................................................................................27
3
Page 4

Maintenance .........................................................................................................................................28
Overview ....................................................................................................................................................28
Upgrading the Software.............................................................................................................................28
Cleaning the Internal Components of the Analyzer ...................................................................................28
Cleaning the Outside of the Analyzer
and the Sample Drawer .......................................................................................................................29
Emptying the Waste Drawer ......................................................................................................................29
Appendices ...........................................................................................................................................30
Chemistry Descriptions .............................................................................................................................30
Medical Protocol Descriptions ...................................................................................................................51
Profile Selection .........................................................................................................................................56
Differences in Results ................................................................................................................................57
Technical Specifications ............................................................................................................................57
IDEXX Technical Support Contact Information ..........................................................................................58
4
Page 5

Preface
Safety Precautions
Note: If the equipment is used in a manner other than specified, the protection provided by the
equipment may be impaired.
The analyzer does not contain any user-serviceable components. DO NOT disassemble.
Line voltage for the Catalyst One AC power adapter is 100–240 V AC, 50–60 Hz. Be sure to plug all
equipment into properly grounded electrical outlets.
Use only the AC power adapter and AC power cable supplied.
Disconnect the AC power cable from the wall outlet if the:
• AC power cable or the DC power cord becomes frayed or otherwise damaged.
• AC power adapter is exposed to water or other liquids.
Performance Precaution
Do not use certain liquids, aerosols (such as canned air), solvents, ammonia, and other substances
on or near the analyzer which could influence results.
Care of the Analyzer
It is recommended that you do not stack other equipment or containers on top of the analyzer.
Keep analyzer away from sources of heat or flames.
PROTECT your equipment from damp conditions, wet weather, or liquid spills.
Take care not to spill water or other liquids on the unit.
DO NOT use solvents, ink markers, sprays containing volatile liquids, or polish on the analyzer as it
may damage the outer case. Clean only with a mild soap and slightly moist cloth and only when the
analyzer is not in use.
Clean only with a mild soap and slightly moist cloth and only when the analyzer is not in use.
5
Page 6
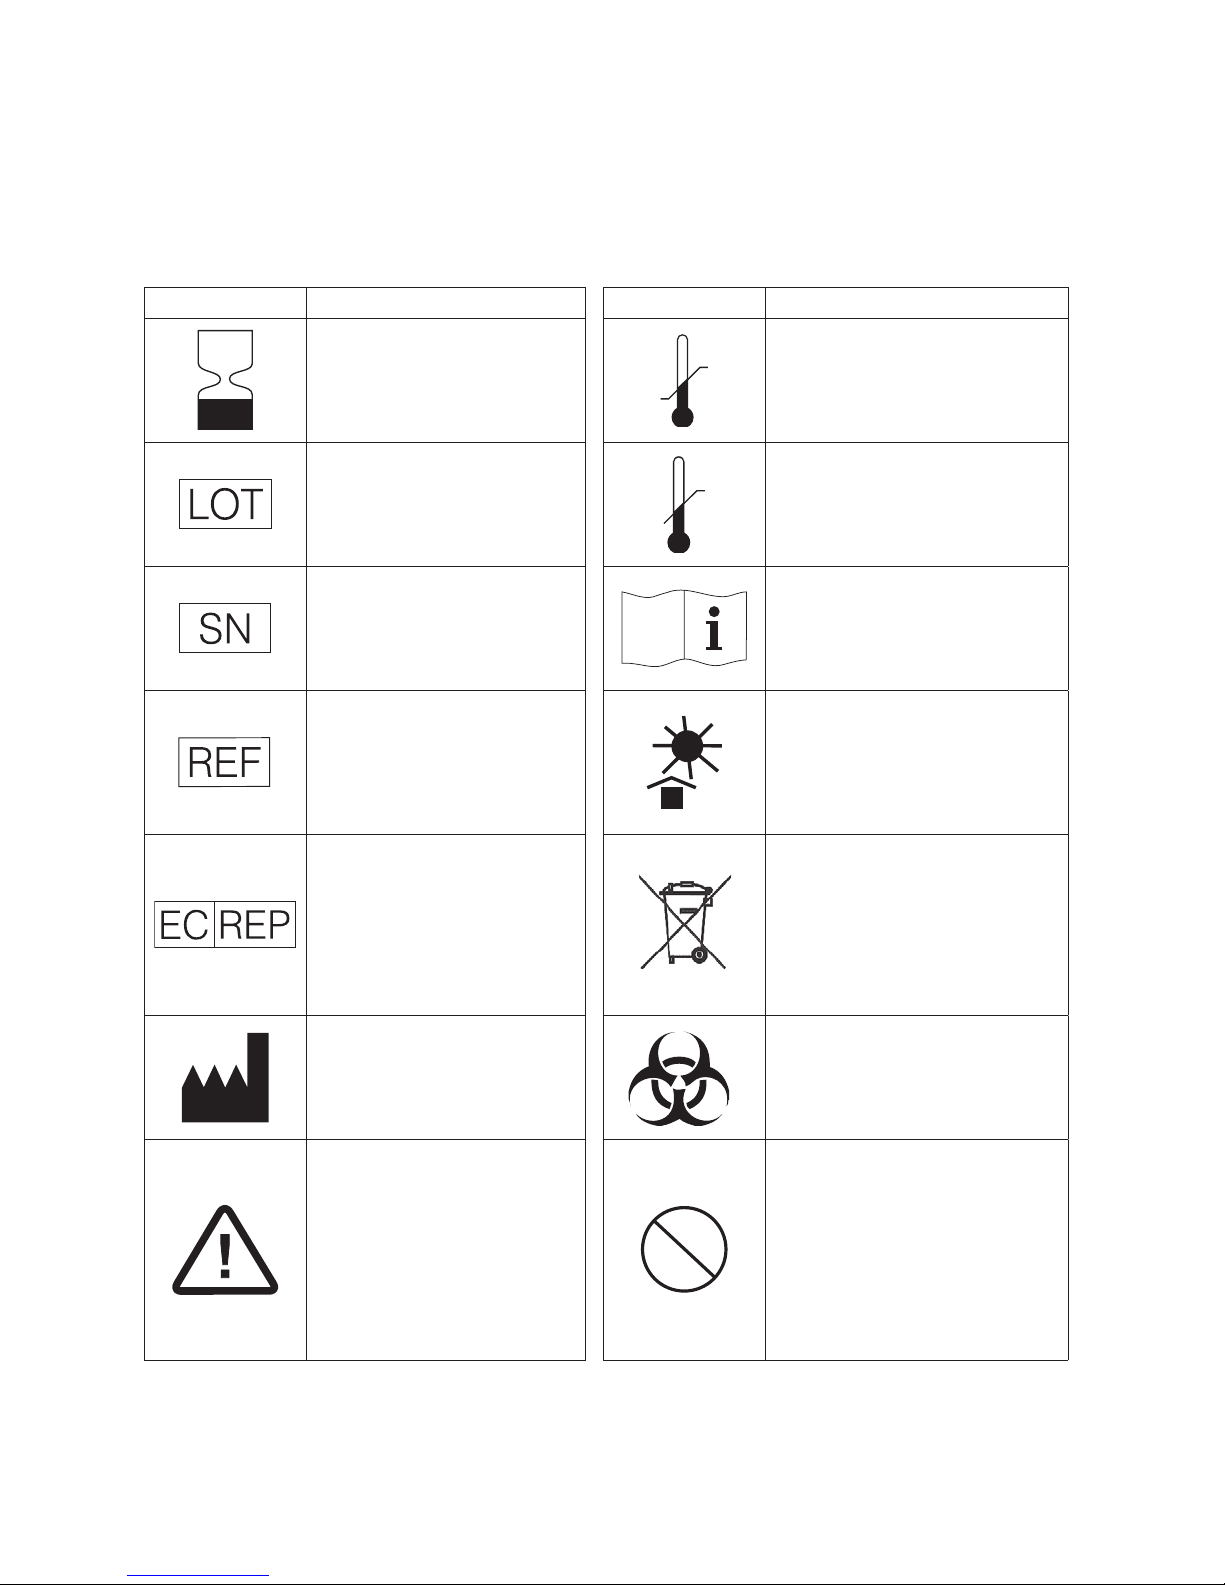
International Symbol Descriptions
2
International symbols are often used on packaging to provide a pictorial representation of particular
information related to the product (such as expiration date, temperature limitations, batch code,
etc.). IDEXX Laboratories has adopted the use of international symbols on our analyzers, product
boxes, labels, inserts, and manuals in an effort to provide our users with easy-to-read information.
Preface
Symbol Description Symbol
Use by
A utiliser avant
Verwendbar bis
Usare entro
Usar antes de
使用期限
Batch code (Lot)
Code de lot (Lot)
Chargenbezeichnung (Partie)
Codice del lotto (partita)
Código de lote (Lote)
ロット 番 号
Serial number
Numéro de série
Seriennummer
Numero di serie
Número de serie
シリアル番号
Catalog number
Numéro catalogue
Bestellnummer
Numero di catalogo
Número de catálogo
製品番号
Authorized Representative in the
European Community
Représentant agréé pour la C.E.E.
Autorisierte EG-Vertretung
Rappresentante autorizzato nella
Comunitá Europea
Representante autorizado en la
Comunidad Europea
EC 内の正規販売代 理店
Manufacturer
Fabricant
Hersteller
Ditta produttrice
Fabricante
製造元
Caution, consult accompanying
documents
Attention, consulter les documents
joints
Achtung, Begleitdokumente
beachten
Attenzione, consultare la
documentazione allegata
Precaución, consultar la
documentación adjunta
注意、添付文書をご参照ください。
Description
Temperature limitation
Température limite
Zulässiger Temperaturbereich
Temperatura limite
Limitación de temperatura
保 存 温 度( 下 限 )
Upper limit of temperature
Limite supérieure de température
Temperaturobergrenze
Limite superiore di temperatura
Limite superior de temperatura
保 存 温 度( 上 限 )
Consult instructions for use
Consulter la notice d’utilisation
Gebrauchsanweisung beachten
Consultare le istruzioni per l’uso
Consultar las instrucciones de uso
取扱説明書をご参照ください。
Keep away from sunlight
Conserver à l’abri de la lumière
Vor direkter Sonneneinstrahlung
schützen
Mantener alejado de la luz solar
Tenere lontano dalla luce diretta del sole
遮光してください。
WEEE Directive 2002/96/EC
Directive 2002/96/CE (DEEE)
WEEE-Richtlinie 2002/96/EG
Directiva 2002/96/CE RAEE
Direttiva RAEE 2002/96/CE
廃電気電子機器指令(WEEE Directive
2002/96/EC)
Biological risks
Risques biologiques
Biogefährlich
Rischi biologici
Riesgos biológicos
生物 学的リスク
Do not reuse
Usage unique
Nicht wiederverwenden
No reutilizarw
Non riutilizzare
再利用しないでください。
6
Page 7
Preface
Symbol Description Symbol
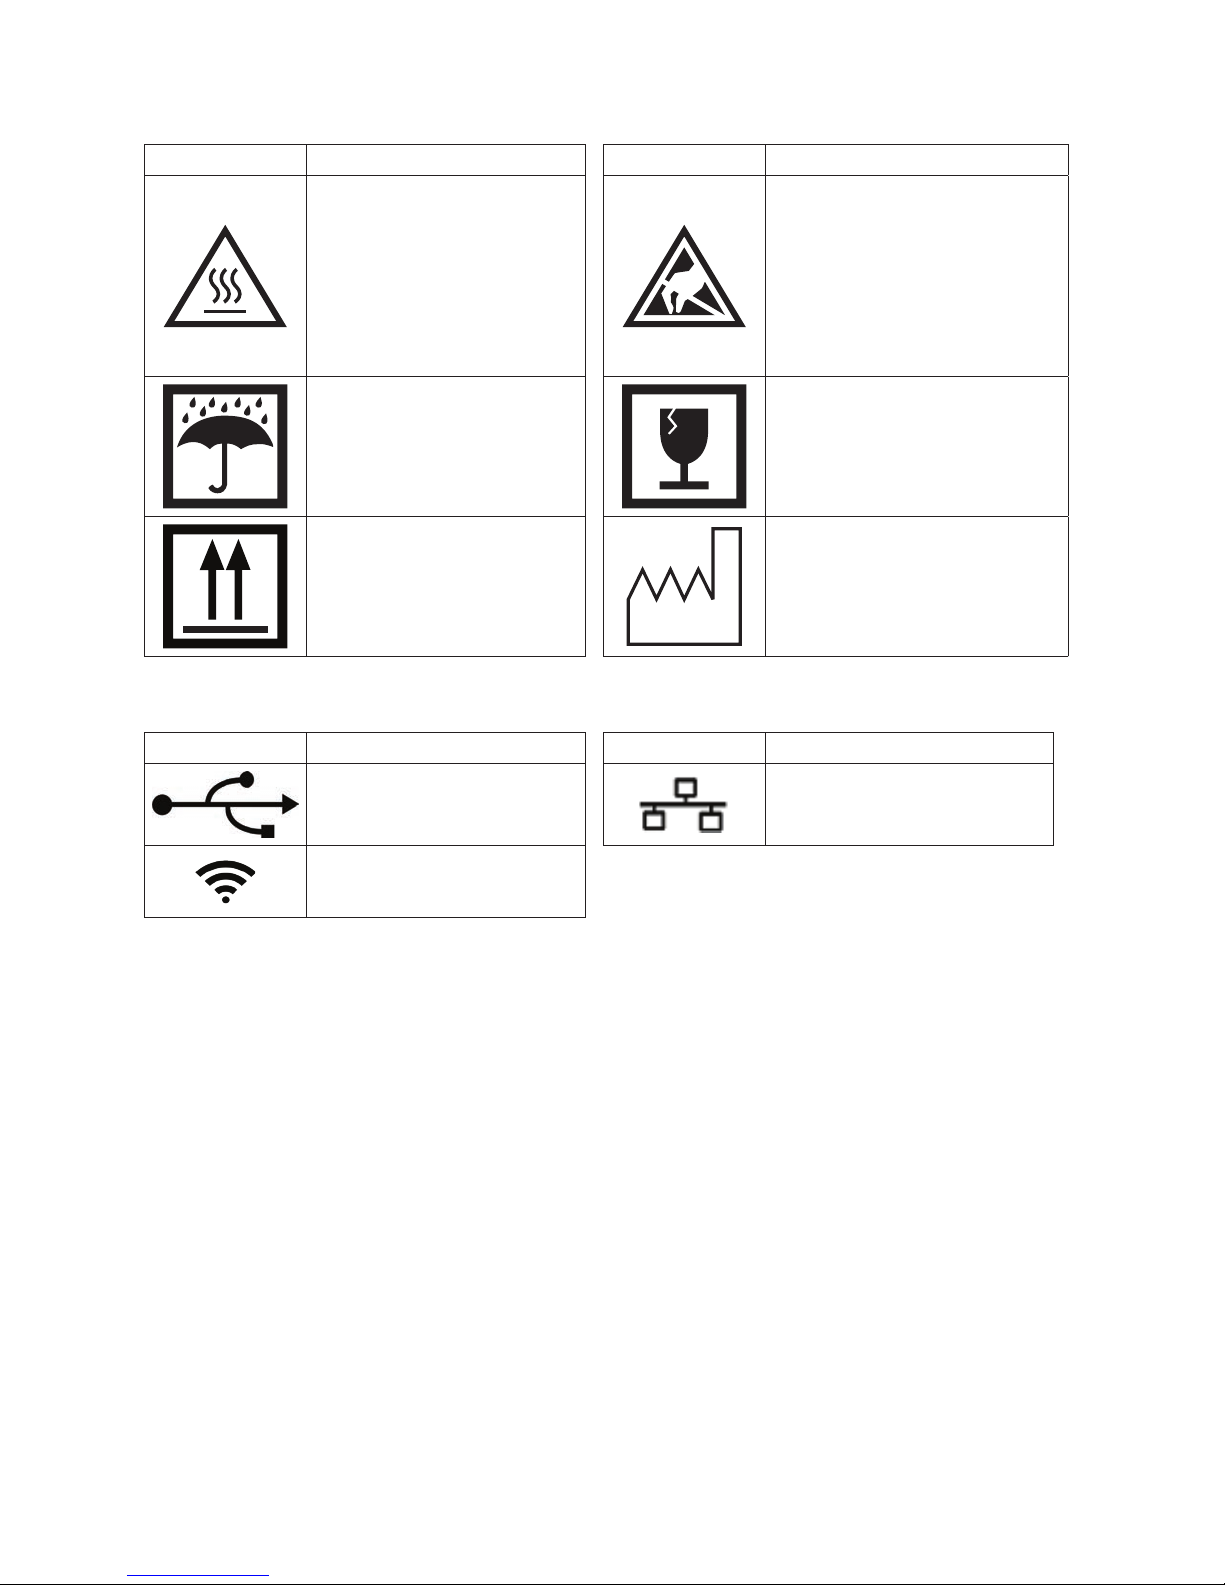
Caution, hot surface
Attention, surface très chaude
Precaución, superficie caliente
Vorsicht, heiße Oberfläche
Attenzione, superficie rovente
高温注意
Keep dry
Conserver dans un endroit sec
Mantener seco
Vor Nässe schützen
Tenere al riparo dall’umidità
濡らさ ないこと 。
This side up
Haut
Este lado hacia arriba
Diese Seite nach oben
Alto
この面を上にする。
Other Symbols
Description
Electrostatic-sensitive device
Appareil sensible aux charges
éléctrostatiques
Dispositivo sensible a descargas
electrostáticas
Gerät ist sensibel auf elektrostatische
Ladung
Dispositivo sensibile alle scariche
elettrostatiche
静電気の影響を受ける装置
Fragile
Fragile
Frágil
Zerbrechlich
Fragile
取扱注意
Date of manufacture
Date de production
Fecha de producción
Herstelldatum
Data di produzione
製造 年月日:
Symbol Description Symbol Description
USB symbol Ethernet/network symbol
Wireless symbol
‡
‡
Feature coming soon
7
Page 8

Getting Started
Introduction
Welcome to IDEXX’s next-generation chemistry analyzer—the Catalyst One* Chemistry Analyzer.
The Catalyst One analyzer’s flexible test menu allows you to monitor the health status of specific
organs, recheck values over time, customize profiles by adding single tests to CLIPs. You can even
run up to 25 tests on a single sample (for a complete list of the individual slides and CLIPs available,
see page 12).
The Catalyst One analyzer is for veterinary use only.
IDEXX VetLab* Station Connectivity
The Catalyst One analyzer is part of the IDEXX VetLab* suite of analyzers, all of which connect
to the IDEXX VetLab Station (IDEXX’s laboratory information management system). Connecting
multiple analyzers to the IDEXX VetLab Station helps you attain a comprehensive picture of your
patient’s health, with the ability to view test results from multiple analyzers on a single report,
determine disease progression with parameter-trending capabilities, and more.
By connecting the Catalyst One analyzer to the IDEXX VetLab Station, you can:
• Automatically review patients’ prior results on every printout for easy comparison.
• Improve client communications with illustrated diagnostic or treatment progress printouts.
• Link to expert descriptions and common causes of abnormal values.
• Print information to help explain the significance of results to your clients.
• Allow new staff to train independently.
• Learn proper protocols and tips for best techniques.
IDEXX Dry-Slide Technology
The Catalyst One analyzer uses dry-slide technology—the most accurate technology available for
in-house testing. Dry-slide technology uses layers to remove impurities for the most accurate results
from even compromised samples.
Patient sample is applied to
the top of the spreading layer
Spreading layer
Sample is distributed evenly
Filtering layer
Filters out substances that interfere with results
Reagent layer
Reagent reacts with sample
Indicator layer
Reacted sample collects for spectral analysis
Support layer
Optical interface
8
Page 9
How it Works
There are several important steps that the analyzer performs in order to present the results of
a sample. Once the slides and sample have been inserted into the analyzer, the Catalyst One
analyzer incubates the slides. Then, if using a Catalyst* whole blood separator, the plasma is
separated from a whole blood sample. The sample is then accurately dispensed onto the slides,
the analyzer measures the color development of the slide, and then all used materials are removed
from the analyzer.
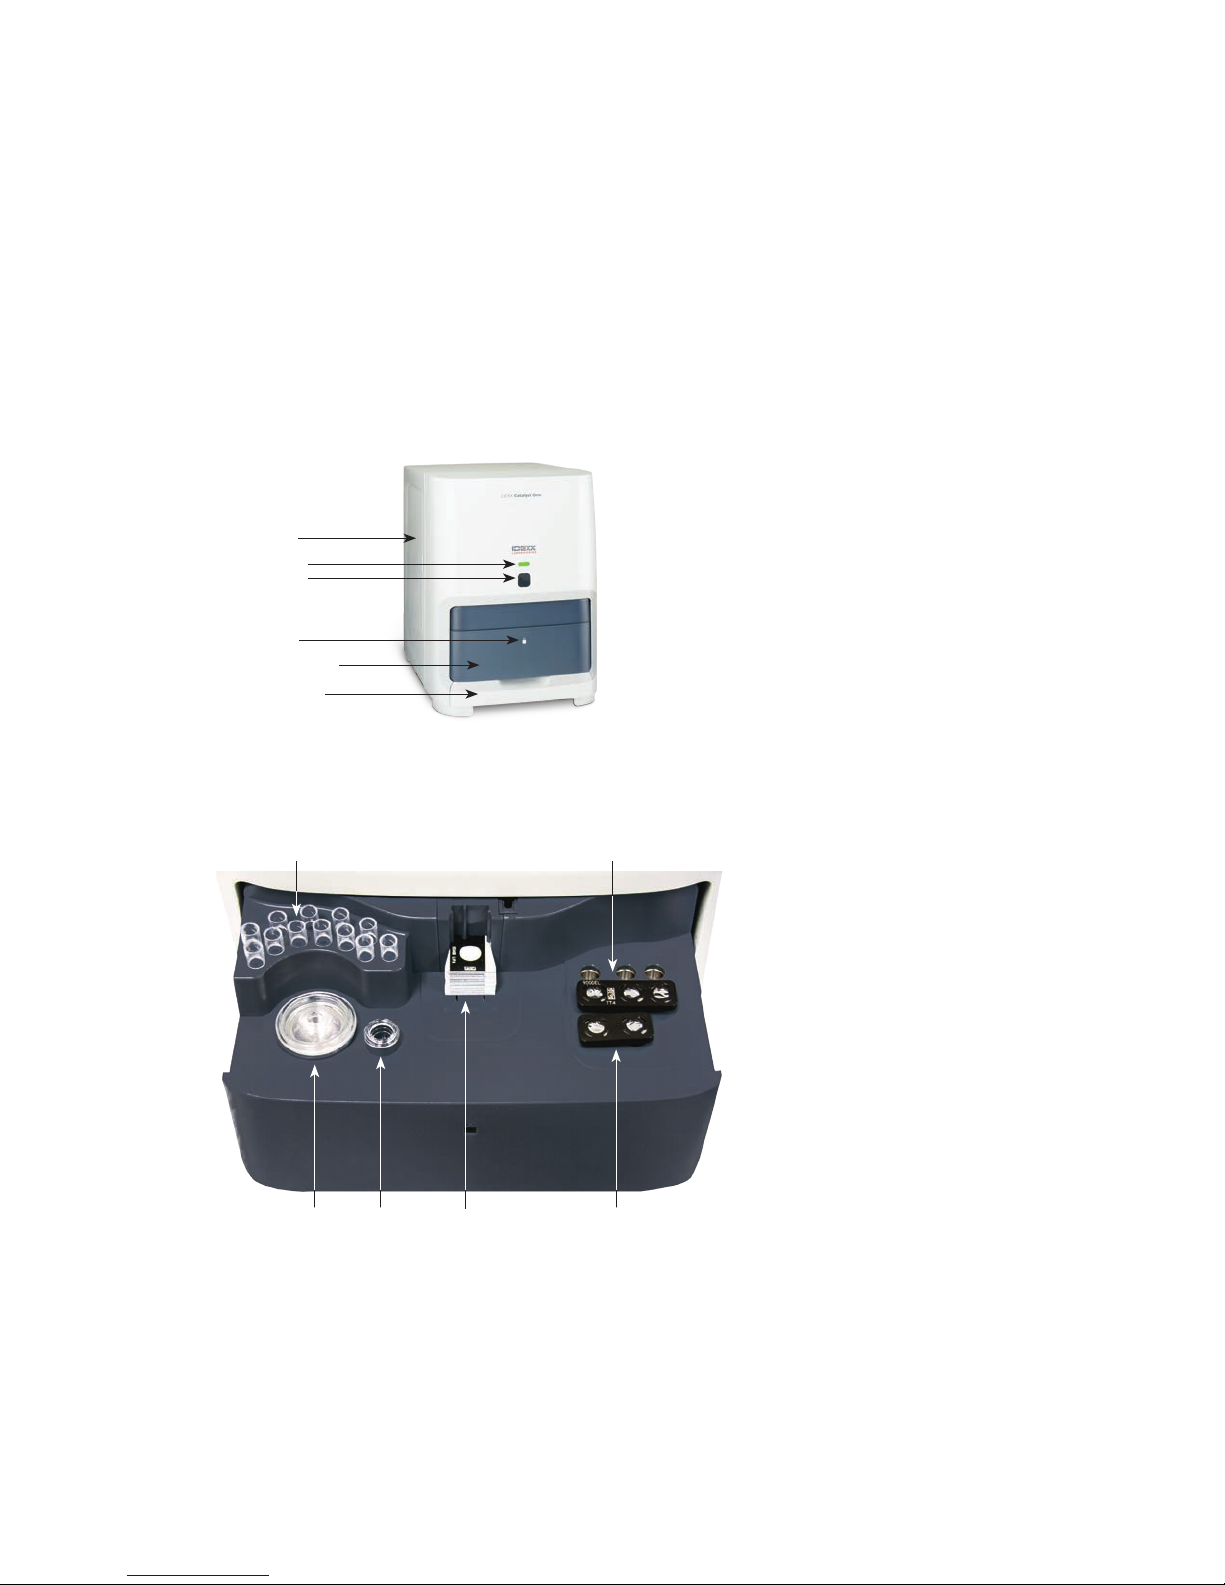
Catalyst One Components
Front of the Analyzer
Side door
Status LED
Start button
Lock light
Sample drawer
Waste drawer
Getting Started
Inside of the Sample Drawer
Note: This picture depicts where the sample cup and whole blood separator should be placed in
the sample drawer. Do not load a whole blood separator AND a sample cup for a single run.
Pipette tips
Whole blood
separator
Sample
cup
Slides/CLIPs Phenobarbital
Other reagent
consumables
(PHBR) reagent
consumable/automated
dilution cups
9
Page 10

Side of the Analyzer
Getting Started
Side door
Back of the Analyzer
Power port
Analyzer Status
The light-emitting diode (LED) indicator on the front panel of the Catalyst One analyzer indicates the
analyzer’s status.
Carousel cover
(shown closed)
Lever to raise
carousel cover
Ethernet port
Note: You can also view the analyzer status by viewing its icon on the IDEXX VetLab Station Home
screen.
LED Color Description
Green (steady) READY; analyzer is ready to process samples or perform
maintenance tasks
Green (pulse) STANDBY MODE
Yellow (steady) IN PROCESS; analyzer is processing a sample or performing
another activity
Yellow (pulse) Analyzer is waiting for the user to begin processing a sample after
receiving the patient information from the IDEXX VetLab Station
Red (flashing) ERROR; an error has occurred; review error or alert messages on
the IDEXX VetLab Station
10
Page 11

Responding to an Alert
When the analyzer experiences a problem, an alert message appears on the upper right side of the
IDEXX VetLab Station title bar, the LED on the front panel of the Catalyst One analyzer flashes red,
and the Catalyst One icon on the IDEXX VetLab Station Home screen appears with an Alert status.
To View an Alert
Do one of the following:
• Tap the Catalyst One icon on the IDEXX VetLab Station Home screen.
• Tap the alert message in the title bar to display the alert message. Follow the instructions
displayed in the alert message.
Installing the Catalyst One Analyzer
The Catalyst One analyzer works in conjunction with the IDEXX VetLab Station.
To Install the Catalyst One Analyzer
1. Before you unpack the analyzer, choose an optimum location for the instrument. The analyzer
should be placed on a level surface in a well-ventilated area away from obvious sources of
heat, direct sunlight, cold, humidity, or vibrations. For optimum results, room temperature
should be at 15°C–30°C (59°F–86°F) and relative humidity at 15%–75%.
Getting Started
IMPORTANT: Ensure proper ventilation. The analyzer’s cooling vents are in the base and the
back.
2. Connect the analyzer to the router:
– If you are planning to connect the device wirelessly to an IDEXX VetLab* Station,
proceed to step 3 (wireless-capable router required).
‡
OR
– If you are connecting the device to an IDEXX VetLab Station using a wired router,
connect the device to a numbered port on the router using an Ethernet cable
(provided).
Note: For more information about connecting your analyzer to the router, see the installation
instructions that accompanied your router.
3. Power on the Catalyst One analyzer. Once the Catalyst One icon displays on the IDEXX
VetLab Station Home screen, your connections are complete.
Note: If the Catalyst One icon does not appear on the IDEXX VetLab Station Home screen
within 3 minutes, contact IDEXX Technical Support for assistance.
‡
Feature coming soon
11
Page 12

Catalyst One Analyzer Consumables
The following consumables are available for use with the Catalyst One analyzer:
CLIPs, Panels, and Slides
Chemistry Abbreviation
Albumin ALB
Alkaline Phosphatase ALKP
Alanine Aminotransferase ALT
Amylase AMYL
Aspartate Aminotransferase AST
Blood Urea Nitrogen BUN
Calcium Ca
Cholesterol CHOL
Creatine Kinase CK
Creatinine CREA
Chloride Cl
Fructosamine FRU
Gamma-glutamyltransferase GGT
Glucose GLU
Potassium K
Lactate LAC
Lactate Dehydrogenase LDH
Lipase LIPA
Magnesium Mg
Sodium Na
Ammonia NH
Phenobarbital PHBR
Inorganic Phosphate PHOS
Total Bilirubin TBIL
Total Protein TP
Tot a l T
4
Triglycerides TRIG
Urine Creatinine UCRE
Urine Protein UPRO
Uric Acid URIC
TT
3
4
Getting Started
Chem 17 CLIP
Chem 15 CLIP
Chem 10 CLIP
Equine 15 CLIP
NSAID 6 CLIP
UPC Panel
Lyte 4 CLIP
QC CLIP
Individual Slides
12
Page 13

Compatible Species
Canine
Feline
Equine
Bovine (beef cattle, dairy cow) Llama Sheep
Avian (budgerigar, cockatoos
[grey cheek, Moluccan, umbrella],
cockatiel, canary, conure, macaw
[blue and gold, hyacinth, scarlet],
parrots [Amazon blue, Amazon
yellow, eclectus, African grey])
†
Species-specific intervals are available for these species. All other species are qualified as “other.”
†
†
†
Getting Started
Ferret Rabbit
Goat Rat
Lizard Sea Turtles
Monkey Snake
Mouse Tortoise
Pig
13
Page 14

Using the Catalyst One* Analyzer
Analyzing Samples
There are four different work flows that can be used to analyze a sample on the Catalyst One*
analyzer:
• Analyze Sample Button—Use this work flow if you do not have a practice management
system connected to your IDEXX VetLab* Station via IDEXX SmartLink* or IDEXX InterLink*
technology.
• Pending List or Census List—Use one of these work flows if you have a practice
management system connected to your IDEXX VetLab Station via IDEXX SmartLink or IDEXX
InterLink technology. Using this work flow will save you time because you do not need to
enter the client and patient information into the IDEXX VetLab Station (since it has already
been entered into your practice management system).
• Ready to Run Icon—Use this work flow if you initiated the sample run using one of the
other work flows, but the analyzer was busy at the time and the sample could not be run
immediately.
For more information on these work flows, see the IDEXX VetLab Station Operator’s Guide.
Slide Handling
The Catalyst One analyzer allows you to run up to 25 tests on a single sample. Before you begin,
please take note of the following:
• Frozen CLIPs/panels/slides can be run on the Catalyst One analyzer (no thawing required).
• Most CLIPs/slides should be loaded within 5 minutes of opening their foil packaging. The Lyte
4 CLIP should be loaded within 2 minutes of opening its foil packaging.
• If you are running a Lyte 4 CLIP, be sure to load it in the sample drawer before any other
CLIPs or slides.
Diluting Samples
Dilutions should only be performed when a test value is outside the reportable range or when the
sample contains interfering substances (e.g., medications) that cause a nonlinear or invalid result.
The Catalyst One analyzer supports automated dilutions (the analyzer mixes the sample and
diluent for you) and manual dilutions (you prepare the dilution outside of the analyzer). Select the
appropriate option on the Identify Sample screen.
Remember the following important notes when diluting samples for analysis on the Catalyst One
analyzer:
• Only dilute tests with results outside of the reportable range. Diluting tests with results in the
normal range may produce invalid results.
• All chemistries should be analyzed first on the undiluted sample. Some analytes, such as GGT
and total bilirubin, have low serum/plasma concentrations. These analytes may be diluted out
even with the lowest dilution. Dilute the remaining sample and analyze any chemistries that
were outside of the reportable range on the first analysis.
• Perform a dilution only when a test value is accompanied by a greater than symbol (>) or
dashes (---) on the patient report or when the analyzer informs you a dilution is necessary to
receive accurate results.
14
Page 15

• Use the proper diluent material for your sample type.
– For plasma and serum samples, use normal saline.
– IDEXX does not recommend manually diluting whole blood in a Catalyst* whole blood
separator—only dilute the separated plasma.
Using the Catalyst One* Analyzer
– For urine, use
• Use an accurate measuring device, such as a calibrated pipette or syringe.
• For best results, start with a 1:2 dilution (1 part sample to 1 part diluent)—do not exceed 10
parts diluent.
• Do not dilute samples that are undergoing ammonia, phenobarbital, fructosamine, total T
electrolyte testing.
• Do not dilute small samples to achieve a minimum sample volume. Such dilutions on normal
analyte concentration cannot be read accurately. When dilution is needed to determine some
analytes at very high concentration, the sample should be diluted manually.
• An automated dilution run will be canceled if:
– There is insufficient diluent/sample volume.
– There are too many slides in the run.
Catalyst* Urine P:C Diluent.
Minimum Sample Volume for Dilutions
The minimum sample volume varies based on the dilution factor and the number of slides that are
being diluted (see table below).
Parts Sample +
Parts Diluent =
Diluent Ratio
1 + 1 = 1:2 5 155 µ L 700 µL 300 µL
1 + 3 = 1:4 10 130 µL 700 µL 300 µL
1 + 5 = 1:6 10 130 µL 700 µL 300 µL
1 + 9 = 1:10 10 100 µL 700 µL 300 µL
Maximum
Number of
Slides per
Dilution
Minimum Sample Volume Diluent
Serum, Plasma,
or Urine
Whole Blood
Volume
4
, or
Preparing
To Prepare a 1:2 Dilution
1. Accurately measure the desired amount of sample to be diluted and gently transfer it to a
sample cup.
2. Accurately measure an equal amount of diluent and transfer it to the sample collected in step 1.
3. Thoroughly mix the sample and diluent.
4. Analyze the sample.
Manual Dilutions
15
Page 16

Using the Catalyst One* Analyzer
To Prepare Dilutions Greater Than 1:2
If additional dilutions beyond 1:2 are necessary, always begin with the original, undiluted sample.
Then, incrementally increase the parts diluent as indicated in the dilution chart (below).
Volumes are for example only. Parts Sample + Parts Diluent = Total Parts (Dilution Factor)
Parts Sample Parts Diluent Total Parts
(Dilution Factor)
1 (100 µL) 0 1 (undiluted sample)
1 (100 µL) 1 (100 µL) 2
1 (100 µL) 2 (200 µL) 3
1 (100 µL) 3 (300 µL) 4
1 (100 µL) 4 (400 µL) 5
1 (100 µL) 5 (500 µL) 6
1 (100 µL) 6 (600 µL) 7
1 (100 µL) 7 (700 µL) 8
1 (100 µL) 8 (800 µL) 9
1 (100 µL) 9 (900 µL) 10
1 (100 µL) 10 (1,000 µL) 11
Viewing and Printing Test Results
Analyzer results are automatically returned to the IDEXX VetLab Station and recorded in the
appropriate patient’s record. The diagnostic results report is a comprehensive report of all the test
results specified in a laboratory request for that patient on a specific day.
Patient test results can be printed automatically each time a set of results are returned or you can
manually print the results when needed.
For more information about how to view and print test results, see the IDEXX VetLab Station
Operator’s Guide.
16
Page 17

Outside of Reportable Range Samples
Occasionally a test value may be outside the analyzer’s reportable range capability. The test value
may be greater than (“>”) the reportable range, or interfering substances in the sample may be
causing a nonlinear or invalid result. See the following chart for reportable ranges on individual
chemistries. If a value is required, it will be necessary to dilute the sample and repeat the test.
Chemistry U.S. Units S.I. Units French Units
ALB 0.1– 6 .0 g/dL 1–60 g/L 1–60 g/L
ALKP 10–2,000 U/L 10–2,000 U/L 10–2,000 U/L
ALT 10–1,000 U/L 10–1,000 U/L 10–1,000 U/L
AMYL 5–2,500 U/L 5–2,500 U/L 5–2,500 U/L
AST 0–1,083 U/L 0–1,083 U/L 0–1,083 U/L
BUN/UREA 2 –13 0 mg/dL 0.6–46.4 mmol/L 0.034–2.730 g/L
Ca 1.0–16.0 mg/dL 0.25–4.00 mmol/L 10–160 mg/L
CHOL 6–520 mg/dL 0.16 –13.4 4 mmol/L 0.06–5.20 g/L
CK 10–2,036 U/L 10–2,036 U/L 10–2,036 U/L
Cl 50 –160 mmol/L 50–160 mmol/L 50–160 mmol/L
CREA 0.1–13.6 mg/dL 9 –1202 µmol/L 1.0–136.0 mg/L
FRU 100–1,000 µmol/L 100–1,000 µmol/L 100–1,000 µmol/L
GGT 0–952 U/L 0–952 U/L 0–952 U/L
GLU 10–686 mg/dL 0 . 5 6 – 38 .11 mmol/L 0.10–6.86 g/L
K 0.8–10 mmol/L 0.8 –10 mmol/L 0.8–10.0 mmol/L
LAC 0.50 –12.0 0 mmol/L 0.50 –12.0 0 mmol/L 0.50–12.00 mmol/L
LDH 50–2,800 U/L 50–2,800 U/L 50–2,800 U/L
LIPA 10–6,000 U/L 10–6,000 U/L 10–6,000 U/L
Mg 0.5 –5.2 mg/dL 0. 21 – 2.17 mmol/L 5.0 –52.0 mg/L
Na 85 –180 mmol/L 8 5 –18 0 mmol/L 85 –180 mmol/L
NH
3
†
PHBR
PHOS 0. 2 –16.1 mg/dL 0 . 06 –5 .19 mmol/L 2.00–161.00 mg/L
TBIL 0 .1–2 7. 9 mg/dL 2–477 µmol/L 1.0–279.0 mg/L
TP 0.5 –12.0 g/dL 5–120 g/L 5–120 g/L
TRIG 10– 375 mg/dL 0.11– 4. 23 mmol/L 0.10 –3 . 7 5 g/L
(canine) 0.5–10.0 µg/dL 6.43 –128.70 nmol/L 6.43 –128.70 nmol/L
TT
4
(feline) 0.5–20.0 µg/dL 6.4–257.4 nmol/L 6.4–257.4 nmol/L
TT
4
UCRE 6–350 mg/dL 0.06–3.50 g/L 0.06–3.50 g/L
UPRO 5–400 mg/dL 0.05–4.00 g/L 0.05–4.00 g/L
URIC 0.1 – 20 mg/dL 6–1,1 9 0 µmol/L 1–200 mg/L
†
1 µg/mL = 4.31 µmol/L
0–950 µmol/L 0–950 µmol/L 0–950 µmol/L
5–55 µg/mL 5–55 µg/mL 5–55 µg/mL
Using the Catalyst One* Analyzer
17
Page 18

Modifying the Settings on the Analyzer
Modifying the Sound Settings
The analyzer will beep when it encounters an alert. You can modify the Sound settings to turn the
sound off or adjust its volume.
1. Tap Instruments on the IDEXX VetLab Station Home screen.
2. Tap the Catalyst One side tab.
3. If you do not want the analyzer to make any sounds, tap Off in the Sound area.
OR
4. If you want the volume of the sound to be quiet, tap Low in the Sound area.
OR
5. If you want the volume of the sound to be loud, tap High in the Sound area.
Entering Standby Mode
You can modify the settings of the analyzer so that it enters Standby mode at a certain time each
day or put it in Standby mode immediately.
1. Tap Instruments on the IDEXX VetLab Station Home screen.
2. Tap the Catalyst One side tab.
3. If you do not want the analyzer to ever enter Standby mode, tap Never in the Standby area.
OR
‡
4. If you want the analyzer to enter Standby mode at a certain time each day, tap Daily in the
Standby area and then select the desired start time from the available drop-down list.
OR
5. If you want the analyzer to enter Standby mode immediately, tap Now in the Standby area.
Exiting Standby Mode
You can set the analyzer to exit Standby mode at a certain time each day or immediately.
1. Tap Instruments on the IDEXX VetLab Station Home screen.
2. Tap the Catalyst One side tab.
3. If you want the analyzer to exit Standby mode at a certain time each day, tap Daily in the Exit
Standby area and then select the desired start time from the available drop-down list.
OR
4. If you want the analyzer to exit Standby mode immediately, tap Now in the Exit Standby area.
‡
Feature coming soon
18
Page 19

Sample Preparation and Storage
Supported Sample Types for Catalyst* CLIPs and Slides
The following sample types can be used with Catalyst* CLIPs and slides:
CLIPs/Slides Abbreviation
Serum
Lithium
Heparin-Treated
Plasma
Fluoride/
Chem 17 CLIP N/A
Chem 15 CLIP N/A
Chem 10 CLIP N/A
Equine 15 CLIP N/A
NSAID 6 CLIP N/A
UPC Panel N/A
Lyte 4 CLIP N/A
Albumin ALB
Alkaline Phosphatase ALKP
Alanine Aminotransferase ALT
Amylase AMYL
Aspartate Aminotransferase AST
Blood Urea Nitrogen BUN/UREA
Calcium Ca
Cholesterol CHOL
Creatine Kinase CK
Creatinine CREA
Fructosamine (part number 99-0000131) FRU
Fructosamine (part number 99-0003341) FRU
Gamma-glutamyltransferase GGT
Glucose GLU
Lactate LAC
Lactate Dehydrogenase LDH
Lipase LIPA
Magnesium Mg
Ammonia NH
Phenobarbital PHBR
Inorganic Phosphate PHOS
Total Bilirubin TBIL
Total Protein TP
Tot a l T
4
Triglycerides TRIG
Uric Acid URIC
TT
3
4
Oxalate-Treated
Plasma
Untreated Whole
Blood (using the
Catalyst* Lithium
Whole Blood
Urine
Separator)
19
Page 20

Sample Preparation and Storage
Preparing Samples for Use on the Catalyst One Analyzer
You can run untreated whole blood, lithium heparinized whole blood, plasma, serum, and urine
samples on the Catalyst One analyzer.
IMPORTANT: Do not use EDTA or sodium heparin for chemistry analysis.
To Prepare an Untreated Whole Blood Sample
(Using a Lithium Heparin Whole Blood Separator)
1. Remove the green cap from the lithium heparin whole blood separator to prepare it for
sample collection.
2. Immediately after sample collection (to avoid clotting), dispense 0.6–0.8 cc of untreated (no
additive) whole blood into the lithium heparin whole blood separator using an untreated syringe
with the needle removed.
Tip: Use the fill line on the separator to ensure proper fill volume.
Note: Heparinized samples can be used in the lithium heparin whole blood separator except
when running feline AST, LDH, or CK. Double dosing may elevate the results for these assays in
feline samples.
3. Gently swirl (do not invert or shake) the whole blood separator at least 5 times to mix the
sample with the anticoagulant.
Caution: Ensure that the cap is removed before loading the separator into the
analyzer.
1
Fill to lowest line on
separator (0.7 cc [700 µL])
32
To Prepare a Plasma Sample
1. Use the appropriate tube and collection device.
2. Draw the sample gently and transfer if necessary.
Note: Be sure to use the correct blood-to-lithium heparin ratio.
3. Gently invert (do not shake) the sample for 30 seconds to mix.
4. Centrifuge the sample.
5. Use a transfer pipette (or a 300 µL pipette) to transfer the appropriate volume of sample to a
Catalyst sample cup (ensure there are no bubbles in the sample cup). The volume needed
varies depending on the number of slides being used in the run—for more information, see
“Proper Sample Cup Volume” on page 22.
2 3 4 5
20
Page 21

Sample Preparation and Storage
To Prepare a Serum Sample
1. Use the appropriate tube and collection device.
2. Draw the sample gently and transfer if necessary.
3. Let the sample clot for a minimum of 20 minutes.
4. Centrifuge the sample.
5. Use a transfer pipette (or a 300 µL pipette) to transfer the appropriate volume of sample to a
Catalyst sample cup (ensure there are no bubbles in the sample cup). The volume needed
varies depending on the number of slides being used in the run—for more information, see
“Proper Sample Cup Volume” on page 22.
2 3 4 5
To Prepare a Urine Sample
1. Obtain the sample through cystocentesis (recommended), catheter, or free-catch method.
2. Transfer the sample to a disposable sample tube.
3. Centrifuge the sample.
4. Use a transfer pipette (or a 300 µL pipette) to transfer the appropriate volume of supernatant
urine to a Catalyst sample cup (ensure there are no bubbles in the sample cup). The
volume needed varies depending on the number of slides being used in the run—for more
information, see “Proper Sample Cup Volume” on page 22.
2 3 4
21
Page 22

Proper Sample Cup Volume
The volume of plasma, serum, or urine sample required varies based on the number of slides being
used in the run:
Number of slides Sample cup fill volume (µL)
1 60
2 70
3 80
4 90
5 100
6 110
7 120
8 130
9 190
10 200
11 210
12 220
13 230
14 240
15 250
16 260
17 270
18 280
Sample Preparation and Storage
Sample Inspection After Centrifugation
It is good practice to examine the sample carefully following centrifugation in a centrifuge
and/or in the analyzer (by running a whole blood separator). If fibrin strands can be seen in the
sample, they may interfere with sample pipetting. It may be necessary to rim the serum/plasma with
a wooden stick, respin the sample, and proceed.
Various conditions, such as hemolysis, may affect results. You might also want to modify your test
panel based on the following visual observations. Refer to the “Chemistry Descriptions” section on
pages 30–51 for information about how each condition may affect specific chemistries.
Note: We recommend that after you have centrifuged a sample in a Catalyst whole blood separator
that you inspect the sample for the conditions listed above.
Hemolysis
Visual: Sample has a transparent reddish hue ranging from pale pink to deep red.
Indications: Damage to red blood cells during sample preparation or intravascular
hemolysis.
Icterus
Visual: Plasma has a transparent yellow to opaque brown color.
Indications: Obstructive or toxic liver disease, intravascular hemolysis.
22
Page 23

Lipemia
Visual: Sample has a pale, milky appearance, possibly with floating fat globules.
Indications: Recent ingestion of a fatty meal or dysfunction in lipid metabolism.
Sample Storage
We recommend that you prepare and analyze samples immediately after collection for best results.
However, if storage is necessary, follow these sample storage and testing guidelines.
Storing Serum/Plasma
For storage, the serum or plasma must be separated and removed immediately from the blood
cells. Do not attempt to pour off the sample.
• Using a transfer pipette, carefully transfer the serum or plasma to an untreated collection
tube, taking care not to draw up any white or red blood cells.
• Cap the tube tightly to avoid contamination and evaporation. Avoid frothing at any stage as
this damages the serum proteins.
If you cannot perform analysis within 4 hours of drawing and processing the sample, refrigerate it at
2°C–8°C (36°F–46°F). If you cannot perform analysis for more than 48 hours, you should freeze the
serum/plasma at -18°C (0°F).
Sample Preparation and Storage
Notes:
• For additional information on the effects of delays in removing serum or plasma from the
cells, see the “Chemistry Descriptions” section on pages 30–51.
• See the calcium (Ca), total bilirubin (TBIL), lactate dehydrogenase (LDH), ammonia (NH3),
electrolytes (Na, K, Cl), and glucose (GLU) chemistry descriptions for additional special
handling and storage requirements.
• IDEXX does not recommend freezing samples that will be used to run electrolytes.
Storing Whole Blood
Lithium heparinized whole blood samples should be analyzed immediately. Samples that are not
analyzed within 30 minutes should be placed in a tube to be separated and stored.
Important: Do not store whole blood samples in whole blood separators.
Storing Urine
Urine should be tested within 2 hours. Do not store urine in the refrigerator for more than
24 hours.
Analysis of Stored Samples
For samples stored at 2°C–8°C (36°F–46°F) and at -18°C (0°F):
• Allow the samples to come to room temperature (19°C–27°C/66°F–81°F).
• Mix the samples gently, but thoroughly, by inversion. Do not shake.
• Centrifuge the samples to remove any fibrin particles (or urine sediment) that may have
formed during storage.
• Analyze the samples immediately after centrifugation.
23
Page 24

Quality Control
Overview
The purpose of quality control (QC) is to verify the integrity of your slides and also to verify that your
Catalyst One* analyzer is functioning properly.
You should run a QC test:
• When the analyzer is first installed.
• After cleaning the internal components of the analyzer.
• If the analyzer has been moved.
• To verify system performance.
Quality Control Materials
IDEXX VetTrol* Control
In each box of IDEXX VetTrol* Control, there are four vials containing freeze-dried powder (dark
brown bottle marked “VetTrol Control”) and four vials containing diluent (lighter bottles marked
“Diluent for VetTrol”). The lot numbers for the diluent and the control are different and can be found
on the product packaging.
For more information about IDEXX VetTrol Control, see its package insert.
Storage
Control and diluent vials should be stored frozen (-18°C/0°F). Discard opened control vials
within 24 hours. Expired or unwanted material should be discarded with other clinical waste.
Note: Do not store in the freezer door; only in the main freezer compartment.
Stability and Handling
For most chemistries, IDEXX VetTrol Control can be used up to 24 hours after reconstitution
when it is stored in the refrigerator and equilibrated to room temperature before running (do not
leave at room temperature for more than 2 hours). For creatine kinase and ammonia values,
IDEXX VetTrol Control fluid should be used within 2 hours following reconstitution. Exposure to
light will affect total bilirubin and creatine kinase results. Ammonia concentration will increase
with time.
UPRO Control
In each box of UPRO Control, there are six vials containing the control fluid. The lot number can be
found on the product packaging.
Storage
Control fluid should be refrigerated (2°C–8°C/36°F–46°F). Discard at the expiration date.
Expired or unwanted material should be discarded with other clinical waste.
Stability and Handling
Use within 24 hours after opening (refrigerate when not in use).
24
Page 25

Quality Control
Advanced Control
In each box of Advanced Control, there is one vial containing the control fluid. The lot number can
be found on the product packaging.
Note: Each vial contains enough fluid for 2 runs, in the event a secondary run is necessary.
Storage
Store frozen until the expiration date, or store in the refrigerator for up to 5 days.
Stability and Handling
Once opened, Advanced Control cannot be stored and reused—discard remaining fluid after
use.
PHBR Control
In each box of PHBR Control, there are six vials containing the control fluid. The lot number can be
found on the product packaging.
Storage
Store frozen until the expiration date, or store in the refrigerator for up to 7 days.
Stability and Handling
Once thawed, PHBR Control cannot be stored and reused—discard remaining fluid after use.
Quality Control CLIPs and Slides
IDEXX recommends that you perform monthly quality control testing after you have cleaned
the internal components of your analyzer. The convenient Catalyst* QC CLIP contains all of the
chemistry slides needed to perform this task. It is also recommended that you perform a quality
control for electrolytes using the Catalyst* Lyte 4 CLIP.
Run the QC CLIP and the Lyte 4 CLIP
Use the convenient QC CLIP and the Lyte 4 CLIP in conjunction with the IDEXX VetTrol Control fluid
to perform quality control on your Catalyst One analyzer. It is recommended that you wait at least 30
minutes after running any slides before running the QC CLIP.
OR
Run Individual Slides
You can use individual slides to create your own QC panel and perform a quality control test
(one slide per group). If you want to use individual slides to run quality control, we recommend a
minimum of one slide from each of the groups below.
Group 1 NH
Group 2 AMYL
3
CHOL
GLU
LAC
LIPA
TBIL
TP
TRIG
25
Page 26

Group 3 ALB
CREA
Mg
PHOS
BUN/UREA
URIC
UCRE
Group 4 ALT
LDH
Group 5 ALKP
GGT
Group 6 AST
Ca
CK
UPRO (to be used with UPRO Control fluid only)
Preparing Control Fluid
The instructions for preparing control fluid vary depending on the type of control you are preparing.
Quality Control
To Prepare IDEXX VetTrol Control Fluid
1. Remove one diluent and one control vial from freezer. Allow 60–90 minutes for vials to
acclimate to room temperature.
2. Slowly invert the diluent vial several times to thoroughly mix the contents. Do not shake.
3. Gently tap the control vial on the counter several times to dislodge any material adhering to
the stopper.
4. Remove the seal and stopper from each vial just before adding the diluent to control. Do not
leave the vials open.
5. Transfer exactly 3.0 mL of diluent to the control vial, using a clean, dry, Class A volumetric
pipette or an equivalent automatic pipette. Discard the remaining diluent.
IMPORTANT: Measurement must be precise or results will be incorrect.
6. Replace the stopper on the control vial and hold it firmly in place. Gently invert the vial 6–10
times every 10 minutes for one hour (the use of a slow rocker is recommended). Do not
shake. Reconstitution, with occasional inversion, will take 45–60 minutes. Visually verify that
all freeze-dried material is dissolved before using.
7. Run quality control on the Catalyst One analyzer (see instructions below).
To Prepare UPRO Control Fluid
1. Take one vial of UPRO Control out of the refrigerator and gently invert it 6–10 times to mix
thoroughly.
2. Transfer 300 µL of UPRO Control into a Catalyst* sample cup (to be loaded in the sample
drawer).
3. Let the contents in the sample cups reach room temperature (approximately 10 minutes).
4. Run quality control on the analyzer.
26
Page 27

To Prepare Advanced Control Fluid
1. If the Advanced Control has been frozen, allow it to thaw for 30 minutes prior to use.
2. Invert the Advanced Control vial at least 5 times.
3. Transfer the contents of the Advanced Control vial to a Catalyst* sample cup.
4. Run quality control on the analyzer.
To Prepare PHBR Control Fluid
1. Take one vial of PHBR Control out of the freezer and allow it to reach room temperature
(approximately 60 minutes).
2. Once you have confirmed that there is no visible frozen material in the vial, gently invert it
6–10 times to mix thoroughly.
3. Transfer 300 µL of PHBR Control into a Catalyst* sample cup.
Note: You will need one PHBR slide wash and one PHBR slide for the quality control
procedure.
4. Run quality control on the analyzer.
Running Quality Control
Quality Control
To Run General Quality Control on the Catalyst One analyzer
1. Tap the Catalyst One icon on the IDEXX VetLab Station Home screen.
2. Tap Maintenance and then tap Quality Control.
3. Tap the quality control lot number you are using and then tap Run QC.
4. Follow the on-screen instructions for preparing and running quality control.
Notes:
• To view QC results at any time, tap Maintenance, tap Quality Control, tap View QC
Results, select the desired date that QC was run, and then tap View Results.
• To view the expected ranges for each chemistry in a QC lot, tap Maintenance, tap Quality
Control, select the desired QC lot, and then tap View QC Lot Information.
27
Page 28

Maintenance
Overview
In addition to performing monthly quality control checks on the Catalyst One* analyzer, it is
recommended that you:
• Clean the outside of the analyzer with a damp (not wet) lint-free cloth. A mild liquid soap will
remove grease.
• Clean the interior of the waste drawer with a lint-free cloth dampened with 70% isopropyl
alcohol.
• Upgrade the software promptly.
Upgrading the Software
As new features and functionality are added to the Catalyst One analyzer, you will receive software
upgrades from IDEXX. If you have IDEXX SmartService* Solutions, the upgrade will be sent via your
IDEXX VetLab* Station automatically. If you do not have IDEXX SmartService Solutions, you will
receive an upgrade disc in the mail. Be sure to read the software notes contained with each new
release.
Cleaning the Internal Components of the Analyzer
To ensure optimal performance of your analyzer, it is important that you clean the internal
components (incubator ring, optics window, and carousel) monthly and before performing quality
control.
It is recommended that you wear clean powder-free latex or nitrile gloves when cleaning the
internal components of the analyzer. Wearing these gloves helps to avoid smudges on the
components and ensures an effective cleaning.
IMPORTANT: Never use cleaning materials (such as alcohol cleaning wipes containing sodium
bicarbonate) that leave a residue once the alcohol/solvent evaporates.
To Clean the Internal Components
1. Tap the Catalyst One icon on the IDEXX VetLab Station Home screen.
2. Tap Maintenance, tap Clean, and follow these on-screen
instructions.
a. Open the side door on your analyzer.
b. Raise the carousel cover until the green lever magnetizes
itself to the inside of the analyzer.
c. Lift up on the carousel and remove it from the analyzer.
2b
2c
28
Page 29

Maintenance
d. Using an IDEXX-supported alcohol prep pad, wipe the
incubator ring and optics window in a counterclockwise
direction. Repeat this step at least three times using a new
alcohol prep pad for each wipe.
e. Clean the white reference tile using a new alcohol prep pad.
f. Using a dry optical tissue, dry the optics window and
reference tile, ensuring all signs of dampness have
evaporated from the cleaned components. If streaks or
smudges remain, repeat the cleaning process.
g. Replace the carousel inside of the analyzer, lower the
carousel cover and close the side door.
h. Tap Done.
Cleaning the Outside of the Analyzer
and the Sample Drawer
Clean the outside of the analyzer or sample drawer with a damp (not wet) lint-free cloth. A mild
liquid soap will remove grease. Do not use any of the following near the analyzer: organic solvents,
ammonia-based cleaning products, ink markers, sprays containing volatile liquids, insecticides,
disinfectant, polish, or room freshener.
Care should be taken not to spill any samples, chemicals, cleaning agents, water, or other fluids
on/in the analyzer.
2d
2e
Note: Dust and animal hair can lead to analyzer failures. Routinely dust off the analyzer with a
damp cloth and dust around its location. Do not block the cooling vents under the analyzer by
allowing paper, loose materials, or dust to accumulate.
WARNING: Never wipe the analyzer or its surroundings with ammonia-based cleaning products.
Avoid urine odors around analyzer. Ammonia in the atmosphere will falsely increase ammonia (NH3)
quality control and patient test results.
Emptying the Waste Drawer
It is essential that you empty the waste drawer after every run or when prompted. The analyzer will
not operate when the waste drawer is full. Pull the waste drawer to remove it from the analyzer.
29
Page 30

Appendices
Chemistry Descriptions
Serving veterinarians throughout the world, IDEXX Laboratories understands that medical content,
including interpretation of diagnostic results and medical protocols may vary from country to country.
A medical review board has approved the content presented in this document.
IDEXX has more than 40 reference laboratories worldwide employing over 100 veterinarians. If you
have any questions about the medical content or interpretation of results in this document, please
contact IDEXX Laboratories.
Introduction to Biochemical Profiling
By performing appropriate biochemical tests on quality samples, you can obtain information that,
when combined with patient history and clinical findings, should assist you in making an accurate
diagnosis. Appropriate biochemical tests are also essential for monitoring and prognostication
purposes once a diagnosis is achieved.
Single tests are helpful in particular circumstances, such as following the course of an identified
disease or for monitoring the effect of therapy. However, many individual chemistry tests give
information about different organ systems and should be used in combination with other tests
(panels or profiles) to help characterize disease.
Alanine Aminotransferase (ALT)
For practical purposes, the enzyme alanine aminotransferase is specific to the liver in dogs and
cats. It is found in the hepatocyte cytoplasm and may be released into the blood during both
reversible and irreversible (cell necrosis) changes.
Principal Reason for Performing the Test
To investigate hepatocellular injury in dogs and cats.
Note: This test is not useful in the detection of liver disease in ruminants, horses, and pigs as the
enzyme activity in the liver is very low. Even with severe liver disease in these species, the increase
in activity is minimal.
Most Common Abnormality Indicated by the Test
Hepatocellular injury.
Sample Type and Precautions
Remove plasma or serum promptly from the cells or clot. Hemolyzed specimens should not be
used because ALT contamination from red blood cells will occur. If plasma is being collected, use
only lithium heparinized samples.
Complementary Tests
Alanine aminotransferase activity is usually determined in conjunction with other tests of hepatic
function or damage.
30
Page 31

Appendices
Reaction Sequence
Albumin (ALB)
Albumin forms the largest fraction of the total serum protein in the healthy animal. It is synthesized
solely by the liver, has a relatively low molecular weight, and plays an important role in the transport
of endogenous and exogenous compounds by binding with those compounds. Albumin also plays
a major role related to osmoregulation.
Principal Reasons for Performing the Test
To investigate causes of hypoalbuminemia: protein-losing nephropathy, protein-losing enteropathy,
as well as hepatic insufficiency (decreased production) and decreased absorption due to
malabsorption (gastrointestinal disease) or malnutrition. In addition, it is helpful in characterizing
the degree of dehydration with increases in serum albumin concentrations, and it is commonly
decreased with active inflammatory disease (negative acute phase reactant).
The test should not be performed in isolation because of its lack of specificity.
Most Common Abnormalities Indicated by the Test
Decreased albumin—inflammatory disease, protein-losing nephropathy and enteropathy, and
decreased production (hepatic insufficiency).
Increased albumin—dehydration.
Sample Type and Precautions
Remove plasma or serum promptly from the cells or clot. Hemolysis may occur if the sample is not
handled properly. Although dry-slide technology minimizes the interfering effect of mild-to-moderate
hemolysis, marked hemolysis will cause an increased albumin value.
Complementary Tests
Albumin concentration is usually determined in conjunction with the measurement of total protein
and other tests of renal and hepatic function. When albumin is measured with total protein, the total
globulins will be calculated automatically and given with the results.
Reaction Sequence
Alkaline Phosphatase (ALKP)
The enzyme alkaline phosphatase is found in many body tissues. Highest levels are found in the
kidney cortex, small intestinal mucosa, and osteoblasts. The enzyme is also present in the liver
primarily located on the bile canalicular; thus an increase in ALKP may indicate cholestasis.
In cats and horses, the half-life of hepatic alkaline phosphatase is very short for ALKP and even
shorter for other natural tissue sources of ALKP due to rapid renal excretion/metabolism. Sensitivity
of the test in cats and horses is low. Since the nonhepatic sources of ALKP have relatively short
half-lives compared to the hepatic source, a mild-to-modest increase in ALKP in these species can
be a specific indicator of cholestasis.
31
Page 32

Appendices
Principal Reason for Performing the Test
As an indicator of hepatic and/or biliary disease.
Most Common Abnormality Indicated by the Test
Obstructive changes in the biliary system. A special consideration for interpreting ALKP changes in
the dog is required because there are “induced” forms of ALKP due to glucocorticoids and other
influences that are not associated with the natural tissue sources of ALKP. The nonhepatic sources
of ALKP (bone, intestinal, placental) in the dog will only rarely be measured as high as threefold
above the high end of the reference range because of their relative short half-lives compared to
the induced and hepatic forms of ALKP. With both the induced and hepatic source (cholestasis) of
ALKP, serum enzyme activities are commonly greater than the threefold increase; therefore, when a
greater than threefold increase is noted in ALKP in the dog, either cholestasis or induced enzyme is
suspected.
Sample Type and Precautions
Remove plasma or serum promptly from the cells or clot. If plasma is being collected, use
only lithium heparinized samples. Hemolyzed specimens should not be used because ALKP
contamination from red blood cells will increase results while hemoglobin decreases results. Above
normal total bilirubin levels may reduce ALKP results.
Complementary Tests
Alkaline phosphatase activity is usually determined in conjunction with other tests of hepatic
function and damage.
Reaction Sequence
Ammonia (NH3)
Ammonia is the catabolic product of protein digestion and is extremely toxic. It is converted rapidly
in the liver to urea, which is eliminated from the body by the kidneys.
Principal Reason for Performing the Test
To evaluate hepatic function.
Most Common Abnormality Indicated by the Test
Increased ammonia—decreased hepatic functional mass or hepatic vascular shunt.
Sample Type and Precautions
Use only lithium heparinized samples.
Blood should be processed and centrifuged immediately following collection; for this reason,
plasma is recommended as the sample of choice.
Ammonia measurements in either plasma or serum are significantly affected by environmental
factors and/or the passage of time. Minimal exposure of the sample to the air is essential.
All sample containers should be capped unless sample is being introduced or withdrawn. Do not
attempt to measure ammonia in hemolyzed samples. Contamination from the red blood cells will
invalidate the test.
32
Page 33

Appendices
Complementary Tests
Ammonia may be determined in isolation but more often in conjunction with other tests of hepatic
damage or dysfunction, such as pre- and postprandial bile acids.
Reaction Sequence
Amylase (AMYL)
This section should be read in conjunction with the Lipase (LIPA) section.
The main source of serum amylase is the pancreas, although pathology of the liver and small
intestine may result in significant elevations of this enzyme (above the reference range). Since
amylase is cleared by the kidneys, renal pathology may also result in elevation of amylase
independent of pancreatic disease.
Principal Reason for Performing the Test
As an indicator of pancreatic disease and potential acute pancreatitis.
Most Common Abnormality Indicated by the Test
Acute necrotizing pancreatitis.
Sample Type and Precautions
Remove plasma or serum promptly from the cells or clot. Hemolyzed specimens should not be
used. Do not use oxalate, citrate, or EDTA anticoagulants. If plasma is being collected, use only
lithium heparinized samples.
Blood samples should be taken within one day of the onset of symptoms that suggest acute
pancreatitis.
Complementary Tests
Amylase and lipase are usually determined in conjunction with one another. Evaluation of a
comprehensive chemistry profile that includes electrolytes is generally recommended because
of secondary effects of acute pancreatitis. Specific pancreatic lipase should be considered in
suspected cases of pancreatitis.
Reaction Sequence
Aspartate Aminotransferase (AST)
The enzyme aspartate aminotransferase is present in large amounts in multiple tissues of dogs,
cats, and many other animal species. Hepatocytes, cardiac muscle cells, and skeletal muscle cells
have relatively high concentrations of AST. It is found in the cytoplasm and mitochondria of the cells
and is released into the blood during cell injury. If no increase in ALT is seen in conjunction with an
increased AST in the dog and cat, cardiac or skeletal muscle cell injury is most likely. For increased
AST values with equine, bovine, and porcine samples, liver, cardiac, and skeletal muscle cell injury
must be considered.
Principal Reason for Performing the Test
To investigate damage to liver, cardiac, or skeletal muscle.
33
Page 34

Appendices
Most Common Abnormalities Indicated by the Test
Dogs and cats—cardiac or skeletal muscle injury when ALT is not increased; liver, cardiac, or
skeletal muscle injury if both ALT and AST are increased.
Horses, cows, and pigs —liver, cardiac, or skeletal muscle injury.
Sample Type and Precautions
Remove plasma or serum promptly from the cells or clot. Hemolyzed specimens should not be used
because AST contamination from red blood cells will occur. EDTA and fluoride/oxalate should not be
used as anticoagulants. If plasma is being collected, use only lithium heparinized samples.
Blood samples should be processed and centrifuged immediately after collection. Even slight
hemolysis can cause marked increases in activity because of high intracellular concentrations of
AST in red blood cells.
Complementary Tests
Aspartate aminotransferase activity is usually determined in conjunction with other tests of liver,
cardiac, or skeletal muscle function or damage.
Reaction Sequence
Blood Urea Nitrogen (BUN)
The catabolism of proteins results in the production of ammonia, which is extremely toxic. Ammonia
is converted to urea in the liver and eliminated from the body by glomerular filtration in the kidneys.
Principal Reason for Performing the Test
As an indicator of renal disease or pathologic conditions that result in bleeding into the
gastrointestinal tract.
Most Common Abnormalities Indicated by the Test
Increased urea—prerenal, postrenal and renal azotemia with decreased glomerular filtration rate;
high-protein diet or bleeding into the gastrointestinal tract.
Decreased urea —decreased protein intake; hepatic insufficiency; diuresis.
Sample Type and Precautions
Remove plasma or serum promptly from the cells or clot. If plasma is being collected, use only
lithium heparinized samples.
Blood should not be drawn for urea determination within 6 hours of a meal. Do not use sodium
fluoride or EDTA as anticoagulant. Samples that contain hemoglobin increase urea nitrogen.
34
Page 35

Appendices
Complementary Tests
Urea concentration should usually be determined in conjunction with measurements of creatinine,
inorganic phosphate, total protein, albumin, and a complete urinalysis. Urea concentration is
influenced by high-protein diet rather than creatinine.
Reaction Sequence
Calcium (Ca)
Calcium is an essential element that is involved in many body systems. These include the skeleton,
enzyme activation, muscle metabolism, blood coagulation, and osmoregulation. In the blood,
calcium exists in ionized and protein bound forms. Factors governing the total plasma, whole blood,
or serum concentration are complex and include interaction with other chemical moieties, proteins,
and hormones.
Calcium, phosphorus, and albumin metabolism are interdependent.
Principal Reason for Performing the Test
As an indicator of certain neoplasias, bone disease, parathyroid disease, eclampsia, and renal
disease.
Most Common Abnormalities Indicated by the Test
Increased calcium—hypercalcemia of malignancy (due to tumor release of PTH-like substances),
spurious.
Decreased calcium—potential renal failure with resultant hyperphosphatemia, dietary, spurious.
Sample Type and Precautions
Remove plasma or serum promptly from the cells or clot. If plasma is being collected, use only
lithium heparinized samples.
Centrifugation should take place quickly after the sample has been drawn. The sample should
not be exposed to the air for long periods. Glassware must be scrupulously cleaned to avoid
contamination by sources of calcium (e.g., detergents). Prolonged contact with the clot may lead to
lowered calcium values due to dilution by red blood cell water.
Do not use tubes containing fluoride, oxalate, citrate, or EDTA as these agents will cause significant
negative interference due to calcium chelation.
If analysis cannot be performed within 4 hours, the sample should be removed from the red blood
cells and refrigerated in a tightly stoppered container at 2°C–8°C (36°F–46°F) for short-term storage
(up to 24 hours). The sample should not be frozen. The sample must be allowed to reach room
temperature before analysis.
Complementary Tests
Calcium should be determined in conjunction with measurements of inorganic phosphate, albumin,
total protein, and glucose. Ionized calcium measurement will provide more specific information
related to the physiologic form of calcium.
Reaction Sequence
35
Page 36

Appendices
Chloride (Cl)
Chloride is the major anion, predominantly in the extracellular spaces, where it maintains cellular
integrity by influencing osmotic pressure. Chloride determination is significant in monitoring
acid-base balance and water balance.
Principal Reason for Performing the Test
Low chloride levels are usually found in severe vomiting or diarrhea, ulcerative colitis, severe
burns, heat exhaustion, fever, and acute infections. Elevated values are found in dehydration,
hyperventilation, anemia, and cardiac decompensation.
Most Common Abnormalities Indicated by the Test
Hyperchloremia—if elevated with sodium then the same cause of hypernatremia. Without a
concurrent increase in sodium: hyperchloremic acidosis: GI or renal loss of HCO3.
Hypochloremia (without related change in sodium)—upper GI tract loss (vomiting).
Sample Type and Precautions
Avoid hemolysis—sample should be run as soon as possible after serum or plasma is separated
from the cells or clot. If plasma is being collected, use only lithium heparinized samples.
Do not freeze samples for use with the Catalyst One analyzer.
Complementary Tests
Sodium, potassium, and chloride should always be assayed together to determine electrolyte
balance. If sodium, potassium, chloride, and bicarbonate are measured together, accurate
assessment of metabolic acid-base physiology is possible.
Reaction Sequence
Cholesterol (CHOL)
Serum cholesterol occurs predominantly at high concentration in the esterified form; the remainder
is in the free form. Cholesterol is synthesized in the liver and other tissues and is also absorbed
in the free form from the small intestine. It is esterified in the liver and is the precursor of steroid
hormones.
Cholesterol is broken down in the liver to bile acids and eliminated via the bile duct.
Principal Reason for Performing the Test
May be a marker for cholestasis or endocrine disease, such as hypothyroidism,
hyperadrenocorticism, diabetes mellitis, as well as nephrotic syndrome.
Most Common Abnormality Indicated by the Test
Increased cholesterol—hypothyroidism, postprandial, nephrotic syndrome.
Sample Type and Precautions
Remove plasma or serum promptly from the cells or clot. Blood should not be drawn within
12 hours of a meal. If plasma is being collected, use only lithium heparinized samples.
Complementary Tests
Cholesterol measurements should not be performed in isolation but as part of a profile of tests
to investigate endocrine, hepatic, and renal disease. If high cholesterol is found in the absence
of diabetes, hepatic, or renal disease, hypothyroidism may be present. This can be evaluated by
measuring thyroid function.
36
Page 37

Appendices
Reaction Sequence
Creatine Kinase (CK)
Creatine kinase is found at high activity only in the cytoplasm of cardiac and skeletal muscle. This
enzyme catalyzes the reversible phosphorylation of creatine by ATP to creatine phosphate and ADP.
Creatine phosphate is the major source of high-energy phosphate used in muscle contraction.
Principal Reason for Performing the Test
To identify injury to skeletal or cardiac muscle.
Most Common Abnormality Indicated by the Test
Skeletal muscle lesions attributable to trauma or vigorous exercise.
Sample Type and Precautions
Samples must be processed and centrifuged immediately after drawing blood. Blood samples
should be taken within 6 hours of a suspect lesion. It is important to determine that the patient
has not been exercised vigorously during the 12 hours prior to sampling. This may cause marked
increases in creatine kinase activity. Remove plasma or serum from the cells or clot. If plasma
is being collected, use only lithium heparinized samples. EDTA and fluoride/oxalate will reduce
creatine kinase results.
Complementary Tests
Creatine kinase determination provides a specific, sensitive indication of muscle cell damage.
Aspartate aminotransferase and lactate dehydrogenase activities may also be measured but are
less specific and show smaller corresponding increases when muscle damage is present.
Reaction Sequence
37
Page 38

Appendices
Creatinine (CREA)
Creatinine is a degradation product of creatine in muscle metabolism. The daily production of
creatinine is fairly constant and not influenced markedly by age, diet, exercise, or catabolism.
Creatinine is eliminated from the body by glomerular filtration and tubular secretion in the kidneys.
Principal Reasons for Performing the Test
As an indicator of renal disease and/or an index of glomerular filtration rate.
Most Common Abnormality Indicated by the Test
Increased creatinine—prerenal, postrenal, and renal azotemia.
Sample Type and Precautions
Remove plasma or serum promptly from the cells or clot. If plasma is being collected, use only
lithium heparinized samples.
Interfering substances, such as creatine, in a sample can affect the analyzer’s ability to accurately
provide creatinine results. When the analyzer detects such an interfering substance, dilution of the
sample may be required to obtain an accurate creatinine value.
Complementary Tests
A complete urinalysis with a refractometry specific gravity measurement is essential for proper
interpretation of increases in creatinine. Creatinine determinations should usually be performed
in conjunction with measurements of BUN, inorganic phosphate, total protein, and albumin. A
complete blood count (CBC) can sometimes demonstrate changes such as nonregenerative
anemia with chronic renal failure.
Reaction Sequence
Fructosamine (FRU)
Fructosamine is glycated albumin or other proteins. Its concentration is related to blood glucose
concentration during the preceding 2 to 3 weeks.
Principal Reason for Performing the Test
Measurement of fructosamine concentration as part of the routine evaluation of a diabetic patient
undergoing therapy. It provides information about the status of glycemic control during the 2–3
weeks prior to evaluation. In cats, fructosamine concentrations can be measured to identify
if a stress response or diabetes mellitus is the reason for high blood glucose concentrations.
In addition, during management of diabetes in both canine and feline patients, fructosamine
concentration is used to clarify discrepancies between the history and physical examination
findings and serial blood glucose concentration measurements and it is also used to assess the
effectiveness of therapy.
38
Page 39

Appendices
Most Common Abnormality Indicated by the Test
Increased fructosamine indicates lack of or inadequate glucose regulation due to diabetes mellitus.
Fructosamine concentrations increase with poor glycemic control and decrease when glycemic
control improves. Less common, a low fructosamine may indicate prolonged hypoglycemia.
Sample Type and Precautions
IMPORTANT: FRU is currently available in two different formulations and their supported sample
types vary:
Part Number Supported Sample Type(s)
99-0000131 Serum
99-0003341 Serum or lithium heparin-treated plasma
(you can use the plasma generated from a
Catalyst* Lithium Heparin Whole Blood Separator)
Note: Please refer to part number and labeling on the slide box for supported sample type
information.
It is important to separate the sample from the red blood cells as promptly as possible.
Serum is preferred for fructosamine testing as customer experience shows that it more consistently
provides good quality samples.
Examine the serum or plasma for hemolysis. Although IDEXX dry-slide technology dramatically
reduces the effect of this interfering substance, marked hemolysis can result in inaccurate
fructosamine results. Typically, marked hemolysis will lower the reported value on the Catalyst
analyzers.
Reaction Sequence
Gamma-glutamyltransferase (GGT)
The enzyme gamma-glutamyltransferase is membrane-bound. It is present in large quantities in the
kidney medulla and cortex and to a lesser extent in the small intestinal mucosa and bile ductular
epithelium.
Despite the high activity of gamma-glutamyltransferase in the kidney, renal disease does not result
in high enzyme activity in the serum sample. GGT in the kidney is primarily related to tubular lining
epithelial cells and the enzyme is localized to the apical portion of the cell. Pathologic changes in
these tubular epithelial cells result in loss of GGT directly into the urine. Measurement of GGT in the
urine can prove to be a sensitive indicator of tubular epithelial cell injury/nephrotoxicity.
Principal Reason for Performing the Test
As an indicator of cholestasis or gallbladder disease.
Most Common Abnormality Indicated by the Test
Increased GGT—cholestasis.
Sample Type and Precautions
Remove plasma or serum promptly from the cells or clot. If plasma is being collected, use
only lithium heparinized samples. Hemolyzed specimens should not be used. Do not use
fluoride/oxalate as an anticoagulant.
Complementary Tests
Serum gamma-glutamyltransferase activity is usually determined in conjunction with other tests of
hepatic function or damage.
39
Page 40

Appendices
Reaction Sequence
Glucose (GLU)
Glucose is the principal source of energy in monogastric mammals. The circulating concentration in
the healthy animal is maintained within narrow limits.
Principal Reason for Performing the Test
To investigate carbohydrate metabolism.
Most Common Abnormality Indicated by the Test
Increased glucose—diabetes mellitus; glucocorticoid influence; epinephrine influence.
Sample Type and Precautions
For glucose determinations, the animal should have been fasted for 5–8 hours before sampling.
Hemolysis may affect glucose results.
For plasma samples: Use only lithium heparinized samples. When blood is collected in
lithium heparin, it is important that the sample be centrifuged immediately after collection.
In this anticoagulant, glycolysis occurs quite rapidly in the presence of red blood cells
and the glucose concentration in the sample can diminish at up to 10% an hour at room
temperature. Remove plasma promptly from the red blood cells. Hemolyzed specimens
should not be used.
For serum samples: Do not centrifuge serum samples until clotting is complete. Samples
must be centrifuged completely. Remove serum promptly from the clot to avoid metabolism
of glucose by the cells. A maximum of 30 minutes between drawing and separation from
the clot is recommended. Hemolyzed specimens should not be used.
Complementary Tests
When the patient is a diagnosed diabetic, glucose tests may be performed in isolation. It is,
however, useful to perform other tests for renal and hepatic function and lipid metabolism to
monitor secondary effects of poorly controlled diabetes. Because stress in companion animals,
particularly cats, can significantly raise glucose above the reference range, a fructosamine level
should be considered in suspected cases of diabetes mellitus. A concurrent urinalysis should also
be performed to evaluate for the presence of glucose and ketones.
Reaction Sequence
Inorganic Phosphate (PHOS)
Phosphorus plays a major role as a metabolic intermediate and is a constituent of nucleic acids,
phospholipids, and nucleotides. Phosphates are also important components of buffering systems
within the body fluids. Phosphate and calcium are absorbed in the small intestine. Absorption is
influenced by the presence of other minerals, nutrients, vitamins, and intestinal pH. Calcium and
phosphorous metabolism are interdependent.
40
Page 41

Appendices
Principal Reason for Performing the Test
As a measure of glomerular filtration rate.
Most Common Abnormality Indicated by the Test
Increased inorganic phosphate—decreased glomerular filtration.
Sample Type and Precautions
Remove plasma or serum promptly from the cells or clot. If plasma is being collected, use only
lithium heparinized samples. Do not use oxalate, fluoride, citrate, or EDTA as anticoagulants. Blood
samples must be processed and centrifuged as soon as possible after collection as phosphates
are released quickly from the red blood cells. Hemolysis can result in marked increases in
phosphate concentration.
Complementary Tests
Inorganic phosphate determination should be performed in conjunction with measurements
of calcium, albumin, total protein, and glucose. If renal disease is suspected, BUN, creatinine,
albumin, total protein, and a complete urinalysis should also be determined.
Reaction Sequence
Lactate Dehydrogenase (LDH)
The enzyme lactate dehydrogenase is present in large amounts in all organs and tissues (including
red blood cells) of most animals. It is found in the cell cytoplasm and is released into the blood
during reversible and irreversible (necrosis) cell injury. The test is not a specific or sensitive indicator
of damage to any organ or tissue.
Note: The normal range of lactate dehydrogenase in the dog and cat is wide, as can be the
intra-animal variation from day to day. Consequently, small increases in activity due to minimal
organ damage are difficult to identify. The measurement of lactate dehydrogenase is a somewhat
traditional test whose diagnostic value is limited in practice.
Principal Reason for Performing the Test
To investigate damage to liver, cardiac or skeletal muscle.
Most Common Abnormality Indicated by the Test
Increased activity is usually associated with hepatic parenchymal lesions.
Sample Type and Precautions
Remove plasma or serum promptly from the cells or clot and analyze as soon as possible. If
plasma is being collected, use only lithium heparinized samples. Fluoride/oxalate and EDTA should
not be used as anticoagulants.
Hemolyzed specimens should not be used because LDH contamination from red blood cells will
occu r.
Complementary Tests
Lactate dehydrogenase activity is usually determined in conjunction with other tests of liver, cardiac,
or skeletal muscle function or damage.
41
Page 42

Appendices
Reaction Sequence
Lactate (LAC)
Lactate is produced by anaerobic metabolism of glucose and its concentration depends on relative
rates of production in muscle cells and erythrocytes and metabolism in the liver.
Principal Reason for Performing the Test
Elevated lactate levels usually are caused by overproduction or under metabolism. They result
from tissue hypoxia, diabetes mellitus, malignancies, ethanol or methanol ingestion, and metabolic
acidosis.
Most Common Abnormality Indicated by the Test
Hypoxia secondary to severe exercise, shock, hypovolemia, cardiac disease, pulmonary edema,
and seizures.
Sample Type and Precautions
Use lithium heparinized or Fl/oxalated samples. When using lithium heparinized samples, separate
the plasma from the red cells within 5 minutes of collection.
Complementary Tests
CBC, biochemical panel, complete urinalysis, and blood gas.
Reaction Sequence
Lipase (LIPA)
Lipase is secreted by the pancreas and to a lesser extent by the gastrointestinal mucosa. Lipase
is a relatively sensitive indicator of pancreatic pathology (as compared to amylase). Generally a
greater than threefold increase above the reference range is supportive of pancreatitis.
Principal Reason for Performing the Test
As an indicator of acute pancreatitis.
Most Common Abnormality Indicated by the Test
Acute pancreatitis.
Sample Type and Precautions
Blood samples should be taken within one day of the onset of symptoms suggesting acute
pancreatitis. Promptly remove plasma or serum from the cells or clot. If plasma is being collected,
use only lithium heparinized samples. Do not use oxalate/fluoride, citrate, or EDTA anticoagulants.
Lipemia and icterus may increase lipase results.
42
Page 43

Appendices
Complementary Tests
Lipase and amylase are usually determined in conjunction with tests of hepatic and pancreatic
function or damage. Canine and feline pancreas-specific lipase tests should be performed in
questionable cases.
Reaction Sequence
Magnesium (Mg)
Magnesium plays an important intracellular role in the activation of enzymes including those
responsible for many anabolic and catabolic processes. It is also involved in the formation
and destruction of acetylcholine, which governs the transmission of electrical impulses at the
neuromuscular junction. The adrenal, thyroid, and parathyroid glands appear to regulate serum
magnesium concentration.
Principal Reason for Performing the Test
The importance of measuring serum magnesium concentration in dogs and cats has not been fully
investigated. However, there have been reports of hypomagnesemia in dogs following the removal
of the parathyroid gland.
Most Common Abnormalities Indicated by the Test
Increased magnesium—decreased glomerular filtration.
Decreased magnesium —parathyroid gland removal.
Sample Type and Precautions
Blood samples should be centrifuged immediately after collection as magnesium is released from
hemolyzed erythrocytes and can give erroneously high magnesium results. Remove plasma or
serum promptly from the cells or clot. If plasma is being collected, use only lithium heparinized
samples. Do not use oxalate/citrate or EDTA as anticoagulants. Blood collection tubes preserved
with sodium fluoride cause lower results.
Complementary Tests
See tests listed under Endocrine Profile in the “Profile Selection” table on page 54.
43
Page 44

Appendices
Reaction Sequence
Phenobarbital (PHBR)
Phenobarbital is a commonly used drug used to treat seizures in a variety of species.
Phenobarbital levels should be evaluated during initial dosing and throughout treatment to ensure
that the blood levels are within the targeted therapeutic range.
Principal Reasons for Performing the Test
Phenobarbital is a controlled barbiturate medication that is used to treat veterinary patients that
have seizures. The dosage of phenobarbital needs to remain within a specific range to be effective.
If the level is <10 µg/mL, there may not be a sufficient level of phenobarbital to prevent seizures. If
the level >30 µg/mL in cats or >40 µg/mL in dogs, phenobarbital can be toxic and potentially life
threatening.
In most patients, steady state is achieved after 2–3 weeks of consistent dosing with phenobarbital.
Once steady state is achieved, timing of sample collection is not important in more than 90% of
patients. However, there can be variability of the phenobarbital half-life in a small percentage of
patients. Therefore, if toxicity is suspected, a peak sample (4–5 hours post-pill) may be helpful,
and if breakthrough seizures are occurring and inadequate dosing is suspected, a trough level
(collected immediately prior to the next dose) may be helpful.
Most Common Abnormalities Indicated by the Test
Over or under dosage of medication.
Sample Type and Precautions
Do not use separator tubes as contact with the gel may decrease levels.
Complementary Tests
CBC, full chemistry panel, urinalysis, bile acids (minimally 2 times per year)
Reaction Sequence
Potassium (K)
Potassium is the major cation of intracellular fluid, where it is the major buffer within the cell,
facilitates nerve conduction and muscle function, and helps maintain osmotic pressure. Abnormally
high or low potassium levels cause changes in muscle irritability, respiration, and myocardial
function.
44
Page 45

Appendices
Principal Reasons for Performing the Test
High potassium (hyperkalemia) is usually found in urinary obstruction, renal failure, metabolic or
respiratory acidosis, and hypoadrenocorticism as well as excessive hemolysis for horses, cattle,
cats, and some breeds of dogs. Decreased values (hypokalemia) usually follow excessive salt loss
through severe vomiting or diarrhea, inadequate intake, anorexia (especially cats), malabsorption,
and severe burns.
Most Common Abnormalities Indicated by the Test
Hyperkalemia—renal failure, postrenal obstruction.
Hypokalemia—excessive loss of potassium.
Sample Type and Precautions
Remove plasma or serum promptly from cells or clot. If plasma is being collected, use only lithium
heparinized samples. Avoid hemolysis.
Do not freeze samples for use with the Catalyst One analyzer.
Complementary Tests
Sodium, potassium, and chloride should always be assayed together to determine electrolyte
balance. The additional measurement of bicarbonate will allow accurate assessment of metabolic
acid-base physiology.
ACTH stimulation test for suspect cases of hypoadrenocorticism.
Reaction Sequence
Sodium (Na)
Sodium is the major cation of extracellular fluid, where it maintains osmotic pressure, acid-base
balance, and transmits nerve impulses. The body maintains total sodium content, and only slight
changes are found even under pathologic conditions.
Principal Reasons for Performing the Test
To evaluate electrolyte status in conjunction with potassium and chloride levels.
Low sodium (hyponatremia) is usually caused by a relative excess of body water. Reduced levels
may be due to low intake, loss through vomiting or diarrhea plus adequate water and inadequate
salt replacement, salt-losing nephropathy, osmotic diuresis, metabolic acidosis, and various
glandular conditions.
Elevated values (hypernatremia) usually follow water loss in excess of salt loss through profuse
sweating, severe vomiting or diarrhea, inadequate water intake, and dehydration of renal sodium
conservation in hyperaldosteronism.
Most Common Abnormality Indicated by the Test
Hypernatremia secondary to dehydration, gastrointestinal fluid loss (vomiting or diarrhea).
Sample Type and Precautions
Remove plasma or serum promptly from cells or clot. If plasma is collected, use only lithium
heparinized samples. Avoid hemolysis.
Do not freeze samples for use with the Catalyst One analyzer.
45
Page 46

Appendices
Complementary Tests
Sodium, potassium, and chloride should always be assayed together to determine electrolyte
balance. The additional measurement of bicarbonate will allow accurate assessment of metabolic
acid-base physiology.
Reaction Sequence
Total Bilirubin (TBIL)
Hemoglobin from degenerated erythrocytes is converted to bilirubin in the monocyte-macrophage
system. Free unconjugated bilirubin is transported to the liver bound to albumin, where it is
conjugated with glucuronic acid and eliminated in the bile. In obstructive liver disease, the
concentration of conjugated bilirubin in the blood increases.
During intravascular or extravascular hemolysis, very large numbers of erythrocytes may be
destroyed quickly and the conjugation mechanism in the liver may become overloaded so that
high concentrations of unconjugated bilirubin are found in the blood. If the loss of hemoglobin and
erythrocytes is very large, anoxia may occur. Hepatocyte dysfunction follows leading to cellular
swelling, which occludes the bile canaliculi preventing the elimination of conjugated bilirubin. A
concomitant rise in circulating conjugated bilirubin then occurs.
Principal Reason for Performing the Test
To detect hepatobiliary disease and excessive erythrocyte destruction.
Note: In healthy dogs and cats, the concentration of total bilirubin in the serum is very low. Visual
inspection of the sample will frequently indicate whether bilirubin determination is necessary (serum
and plasma only).
Most Common Abnormality Indicated by the Test
Increased bilirubin—cholestatic liver disease (conjugated bilirubin) and hepatic insufficiency
(unconjugated bilirubin), hemolytic disease (unconjugated and possible conjugated bilirubin), and
intrahepatic obstruction.
Sample Type and Precautions
Remove plasma or serum promptly from cells or clot. Samples should be analyzed immediately as
bilirubin degrades rapidly in light. If immediate analysis is impossible, the sample must be kept in
the dark and preferably at 4°C–8°C (36°F–40°F) in a refrigerator. Sample must be allowed to come
to room temperature before analysis. If plasma is collected, use only lithium heparinized samples.
It is critical that samples be properly centrifuged. Otherwise, leukocytes and platelets may remain
in suspension, even when red blood cells have been separated. Cellular material on the slide may
cause significant positive error. Also, hemoglobin increases total bilirubin results, so avoid even
moderately hemolyzed samples.
Complementary Tests
Total bilirubin should be determined with other tests of hepatic function or damage. Hematocrit
should also be performed to eliminate or confirm the presence of hemolytic disease. Determination
of urinary urobilinogen and bilirubin may also be useful.
Reaction Sequence
46
Page 47

Appendices
Total Protein (TP)
The serum total protein concentration comprises all the proteins found in the aqueous phase of the
blood. In healthy animals, albumin is the major single component. The remaining proteins are the
alpha, beta, and gamma globulins. The globulin concentration is determined by subtracting the
albumin from the total protein.
Principal Reason for Performing the Test
Total protein measurement may provide useful information when used in combination with tests
to investigate hepatic and renal function, the degree of hydration, protein-losing enteropathies,
or gammopathies. The test is nonspecific and, if performed in isolation, will be unlikely to provide
diagnostic information.
Most Common Abnormalities Indicated by the Test
Increased total protein—dehydration, inflammatory disease.
Decreased total protein—loss of proteins through blood loss and gastrointestinal loss, decreased
albumin associated with protein-losing nephropathy and enteropathy, and decreased albumin
associated with hepatic insufficiency and inflammatory disease.
Impaired renal and hepatic function, dehydration, and gastrointestinal lesions.
Sample Type and Precautions
Remove plasma or serum promptly from the cells or clot. If plasma is collected, use only lithium
heparinized samples. Moderate-to-marked hemolysis can result in false high total protein
concentration.
Results obtained from the analysis of plasma may be slightly higher than serum due to the
fibrinogen that remains in the plasma.
Complementary Tests
Total protein concentration is usually determined in conjunction with the measurement of albumin
and other tests of renal and hepatic function.
Reaction Sequence
Tota l T4 (TT4)
An enzyme-linked immunosorbent assay (ELISA) for the quantitative measurement of total T4
(thyroxine) in canine, feline, and equine patients. With a total T4 test, you can assess thyroid
function, provide comprehensive one-visit screening for feline hyperthyroidism, presumptive
canine or equine hypothyroidism, as well as monitor response to treatment and adjust dosages
immediately.
Principal Reason for Performing the Test
To screen, diagnose, and monitor thyroid disease. The measurement of total thyroxine helps
veterinary practitioners to assess thyroidal function by measuring the bound and unbound thyroxine
in the blood. Thyroxine is the principal hormone secreted by the thyroid gland and is critical to
metabolic processes.
Most Common Abnormality Indicated by the Test
Hyperthyroidism—an elevated TT4 is consistent with hyperthyroidism. Naturally occurring
hyperthyroidism is a common endocrine disorder in cats and rare in dogs.
47
Page 48

Appendices
Hypothyroidism—a decreased TT4 is consistent with but not necessarily definitively diagnostic of
hypothyroidism. Naturally occurring hypothyroidism is a common endocrine disorder in dogs and
rare in cats. Hypothyroidism can be seen in horses as well.
Nonthyroidal illness (NTI)—nonthyroidal illness can affect TT4 levels (and potentially other thyroid
tests as well). Nonthyroidal illness can lower TT4 levels, potentially into the hypothyroid range. The
more severe the nonthyroidal illness, the greater the potential impact on TT4 levels.
Sample Type and Precautions
For use with serum, plasma, and whole blood (when using the Catalyst Whole Blood Separator).
Remove plasma or serum promptly from the cells or clot. If plasma is being collected, use only
lithium heparinized samples. Hemolyzed samples should not be used. Do not use fluoride/oxalate
as an anticoagulant.
Complementary Tests
Total T
should be evaluated in conjunction with a comprehensive history, physical examination,
4
CBC, complete biochemical profile, and urinalysis to provide a comprehensive database of
information in the diagnosis or suspicion of thyroid disease.
In dogs with low or low normal T
results and with consistent clinical signs, evaluate free T4 (fT4) and
4
endogenous thyroid-stimulating hormone (TSH) and possibly thyroglobulin autoantibodies (TgAA)
to aid in confirming hypothyroidism.
Cats with consistent clinical signs and total T4 (TT4) values in the borderline high range (gray zone)
may have early hyperthyroidism or a concurrent nonthyroidal illness (NTI). In these cases, consider
a free T4 (fT4), a T3 suppression test or radionuclide thyroid imaging to aid in confirming the
diagnosis.
Triglycerides (TRIG)
Triglycerides are usually present in the diet of dogs and cats, especially when the animals are
fed table scraps. They are also synthesized in the liver, mainly from carbohydrates, to provide a
secondary energy source and are stored in fatty tissue. Their hydrolysis to mono- and diglyceride
glycerol and free fatty acids is catalyzed by pancreatic lipase.
Principal Reason for Performing the Test
To detect abnormalities in lipid metabolism.
Most Common Abnormality Indicated by the Test
Increased triglycerides—High-fat diet or abnormalities in fat metabolism.
Sample Type and Precautions
Blood should not be drawn within 12 hours of a meal.
Remove plasma or serum promptly from the cells or clot. If plasma is collected, use only lithium
heparinized samples. Grossly lipemic specimens probably have very high triglycerides and should
be diluted before analysis.
Complementary Tests
Triglycerides should not be measured in isolation. If the sample is turbid or milky, the test should be
determined in conjunction with measurements of cholesterol and glucose, and hepatic and renal
function tests. Also consider repeat sampling if the patient has not been fasted for 12 hours.
48
Page 49

Appendices
Reaction Sequence
Uric Acid (URIC)
Uric acid determinations are useful in avian patients and dalmatians in place of urea determinations.
In all dogs (except dalmatians) with diffuse hepatic disease, there is marked elevation of blood uric
acid above the normal levels of <1 mg/dL.
Principal Reason for Performing the Test
As an indicator of the severity of renal disease in avian populations (and dalmatians).
Most Common Abnormality Indicated by the Test
Increased uric acid—prerenal, postrenal, and renal azotemia associated with decreased glomerular
filtration rate.
Sample Type and Precautions
Remove plasma or serum promptly from the cells or clot. If plasma is collected, use only lithium
heparinized samples. Plasma collected from sodium fluoride, citrate, or EDTA preservative should
not be used.
Complementary Tests
Creatinine, UCRE/CREA, UPRO
Reaction Sequence
Urine Creatinine (UCRE)
Urine creatinine is determined so that the concentration of electrolytes filtered or lost through the
glomeruli or renal tubules, such as urinary protein or cortisol, can be quantitated, compared, and
expressed as ratios with diagnostic significance.
49
Page 50

Appendices
Principal Reason for Performing the Test
To be performed with urine protein in order to determine the urine protein:creatinine ratio (UPC).
Most Common Abnormality Indicated by the Test
Proteinuria indicating early renal disease, protein-losing nephropathy.
Sample Type and Precautions
Urine, preferably collected through cycstocentesis, collected in a clean container. An inactive
urinary sediment should be demonstrated and urinary tract infection (UTI) via culture and sensitivity
should be ruled out before performing, as UTI may mildly to moderately raise the UPC.
Complementary Tests
Complete urinalysis with culture and sensitivity. Serum chemistries, such as creatinine, BUN,
albumin, and globulin.
CBC
SNAP* 4Dx* Test
Storage Information
Handle and store urine samples in closed containers to avoid evaporation and contamination.
Samples may be stored at room temperature for up to 3 days (refrigeration preferred). Frozen
samples can be stored indefinitely.
Reaction Sequence
Urine Protein (UPRO)
Urinary protein is determined and compared to the concentration of creatinine in order to assess
the level of renal protein (glomeruli and tubular) loss to determine the urine protein:creatinine (UPC)
ratio.
Principal Reason for Performing the Test
To be performed with urine creatinine in order to determine the urine protein:creatinine (UPC) ratio.
Most Common Abnormality Indicated by the Test
Proteinuria indicating early renal failure, protein-losing nephropathy.
Sample Type and Precautions
Urine, preferably collected through cycstocentesis, collected in a clean container. An inactive
urinary sediment should be demonstrated and urinary tract infection (UTI) via culture and sensitivity
should be ruled out before performing as UTI may mildly to moderately raise the UPC.
50
Page 51

Complementary Tests
Complete urinalysis with culture and sensitivity. Serum chemistries such as creatinine, BUN,
albumin, and globulin.
CBC
SNAP 4Dx Test
Storage Information
Handle and store urine samples in closed containers to avoid evaporation and contamination.
Samples may be stored at room temperature for up to 4 hours. Refrigerated samples may be stored
up to 3 days. Do not freeze samples.
Do not use hemolyzed specimens as hemoglobin increases results significantly. Intact red blood
cells can be removed via centrifugation.
Reaction Sequence
Medical Protocol Descriptions
Appendices
Ammonia Protocol
Baseline ammonia levels should be assessed in animals with signs of hepatic encephalopathy
or in patients suspected of having portosystemic shunts (PSS). Ammonia tolerance tests may be
considered to evaluate for PSS where bile acids are not considered (for example, in Maltese).
Ammonia tolerance test: A baseline sample is drawn after the patient has been fasted for
12 hours. Ammonium chloride (0.1 g/kg) by mouth via stomach tube or gelatin capsules.
A second sample is drawn 30 minutes after ammonium chloride administration.
Note: Vomiting during the procedure will invalidate results.
Sample Requirements: 1 mL heparinized plasma, separated from RBCs. Do not use serum.
Storage/Stability: 48 hours—store plasma frozen
Interferences: Hemolysis, glucose levels over 600 mg/dL (33.33 mmol/L), high BUN values
Comments: Anticoagulated blood must be centrifuged immediately after collection. Separate
plasma and place it in a glass container (RTT). Freeze immediately and keep frozen if not running
sample immediately.
Note: Ammonia levels increase with time.
UPC Protocol
Principle Reason for Performing Test: To aid in the diagnosis of protein-losing nephropathies
such as glomerulonephritis and amyloidosis and as an early marker of chronic renal failure.
Includes: Urine protein (UPRO), urine creatinine (UCRE), protein:creatinine (UPC) ratio
Sample Requirements: 2 mL urine in a sterile container
Storage/Stability: 48 hours at 2°C–8°C (36°F–46°F)
Interferences: Gross hematuria, pyuria.
Complementary Tests: Complete urinalysis with culture and sensitivity. Serum chemistries such
as creatinine, BUN, albumin, globulin; CBC; SNAP* 4Dx* Test; and imaging studies.
51
Page 52

Appendices
Interpretation: Proteinuria requires proof of persistence and localization to prerenal, renal, or postrenal
origins. Prove persistence of proteinuria by repeating the UPC ratio at least three times, a minimum of 2
weeks apart.
• Prerenal proteinuria is possible when a CBC and a biochemical profile detect hemolysis,
hyperglobulinemia or evidence of muscle damage. Recommend investigation and
management for the underlying cause.
• Postrenal proteinuria is caused by urogenital tract diseases, hematuria, or pyuria. Repeat the
test with a cystocentesis sample or evaluate urine sediment for hemorrhage or inflammation.
Consider a urine culture. Recommend investigation and management for the underlying cause.
• Renal proteinuria: evaluate in the face of azotemia.
Nonazotemic, persistent, renal proteinuria (dogs and cats):
UPC <0.5 = within reference range
UPC 0.5–1.0 = questionable, repeat at appropriate range
UPC 1.0–2.0 = excessive proteinuria; recommend investigation for underlying systemic
diseases
UPC 2.0 = excessive proteinuria; recommend investigation for underlying systemic diseases
and medical management
Azotemic, persistent, renal proteinuria (dogs):
UPC <0.5 = warrant monitoring and investigation
UPC ≥0.5 = excessive proteinuria; recommend investigation for underlying systemic diseases
and medical management
Azotemic, persistent, renal proteinuria (cats):
UPC <0.4 = warrant monitoring and investigation
UPC ≥0.4 = excessive proteinuria; recommend investigation for underlying systemic diseases
and medical management
52
Page 53

Appendices
53
Page 54

Tota l T4 Protocols
Common clinical
signs in dogs
• Obesity
• Skin disease
• Lethargy
• Mental dullness
• Exercise/Cold intolerance
Canine hypothyroidism suspected
Initial database
• Total T
• CBC
• Chemistry with
• Complete urinalysis
4
electrolytes
Appendices
Low T
<1.0 µg/dL
(<13.0 nmol/L)
Address NTI
CBC = Complete blood count
Note: 1 µg/dL is equal to 12.87 nmol/L. A result
that falls within the low normal range of the assay
should be considered ambiguous.
with NTI
4
Low T4
<1.0 µg/dL
(<13.0 nmol/L)
±
Low fT
4
high TSH
± positive TgAA
Hypothyroidism likely
Clinical trial
+
fT
4
Low Normal T
1.0–2.0 µg/dL
(13.0–26.0 nmol/L)
TSH ± TgAA
Hypothyroidism unlikely
Repeat testing in 4–6 weeks if
hypothyroidism still suspected
4
Normal fT
negative TgAA
Normal T4
2.0–4.0 µg/dL
(26.0–51.0 nmol/L)
Hypothyroidism unlikely
and TSH
4
54
Page 55

Common clinical
signs in cats
• Weight loss
• Hyperactivity
• Polyphagia
• Palpable goiter
• Unkempt coat
Feline hyperthyroidism suspected
Initial database
• Total T
• CBC
• Chemistry with
• Complete urinalysis
4
electrolytes
Appendices
Low T
<0.8 µg/dL
(<10.0 nmol/L)
Euthyroid sick
or iatrogenic
†
If strong suspicion of hyperthyroidism still exists,
consider retesting in 4–6 weeks or a technetium scan.
CBC = Complete blood count
Note: 1 µg/dL is equal to 12.87 nmol/L. A result that
falls within the gray zone of the assay should be
considered ambiguous.
4
Normal T4
0.8–4.7 µg/dL
(10.0–30.0 nmol/L)
High T4
>4.7 µg/dL
(>60.0 nmol/L)
Normal T4 (gray zone)
2.3–4.7 µg/dL
(30.0–60.0 nmol/L)
Low or
normal fT
Hyperthyroidism unlikely
4
†
High fT
4
Hyperthyroidism likely
55
Page 56

Seizures
Young
preanesthetic
profile
Renal
disease is
suspected.
Acute
pancreatitis is
suspected.
The
investigation
of fat
metabolism
in hypo-
thyroidism,
ob es ity,
Hepatic
damage is
suspected.
Renal
profile
b
profile
or lipemic
samples.
Lipid profile Pancreatic
Hepatic
profile
b
Endocrine
disease is
suspected.
Results may
indicate
that specific
hormone tests
are required.
Endocrine
profile
a
Cardiac
disease is
suspected.
Cardiac
profile
Profile Selection
Gastrointestinal
diseases are
suspected.
As a general
precaution
for any
anesthetic
candidate.
A smaller
version of
the General/
Geriatric
profile.
Circumstances for the choice of the profile
A diagnosis
is not evident
on clinical
examination,
but one
or more
lesions are
Suggested CLIPs/profiles that will aid in the identification of abnormalities in tissues, organs, and metabolic systems in the most economical way are:
Gastrointestinal
profile
Chem 10
CLIP
Chem 15
CLIP
suspected.
Chem 17
CLIP
ALKP
ALT
ALB
AMYL
2+
AST
BUN/UREA
Ca
CHOL
CK
CREA
GGT
GLU
LDHLIPA
3
Mg2+NH
PHBRPHOS
TP
TBIL
TRIG
–
Cl
+
K
+
TT4Na
CK: Samples should be taken within 6 hours of a suspected lesion.
AMYL/L IPA: Samples should be taken within 1 day of the onset of pancreatitis symptoms.
UPC
a
b
56
Page 57

Differences in Results
With a Commercial Laboratory or Other Instrument
Reference ranges must be created for each analyte and each new instrument or method of
analysis. Every commercial laboratory must establish its own species reference ranges for the
equipment and methodology used. IDEXX is continually doing this work for you with every software
release.
Comparing results from different laboratories that may be using different equipment or methods
is imprecise at best. Any comparisons should be performed on the same sample that has been
“split,” stored under like conditions, and tested at approximately the same time. Compare each
result to the reference range stated by IDEXX or the commercial laboratory (as appropriate). Each
result should have the same relationship to its method’s reference range. For instance, a sample
giving a Catalyst One* result that is slightly below the Catalyst One analyzer’s normal range should
give a laboratory result slightly below the laboratory’s normal range.
Technical Specifications
Dimensions
Width: 10.0 inches
Appendices
Depth: 14.8 inches
Height: 14.0 inches
Weight: approximately 25 pounds
Power Supply
Input: 100–240 V AC, 50–60 Hz, 2 Amps
Power Supply Protection: IPX0
Rated: 24VDC, 6.25A
Input/Output Connections
There are two user-accessible Input/Output connections on the rear of the Catalyst One analyzer
(power connection and Ethernet port for connection to IDEXX VetLab* Station).
Operating Conditions
Indoor use only
Altitude: 2000 meters
Operating Storage
Temperature 15°C–30°C (59°F–86°F) 5°C–38°C (41°F–100°F)
Relative Humidity 15%–75% 20%–85%
57
Page 58

IDEXX Technical Support Contact Information
IDEXX Sales Representative:
Telephone/Voice Mail:
Appendices
United States
IDEXX Laboratories, Inc.
One IDEXX Drive
Westbrook, Maine 04092 USA
Toll-Free Technical Support ...... 1-800-248-2483
Main Telephone Number ........... 1-207-556-0300
Toll-Free Fax .............................. 1-800-248-3010
idexx.com
France
IDEXX Laboratories France
84 Rue Charles Michels
93200 Saint Denis
France
Toll-Free Technical Support ...... 00800 1234 3399
Telephone .................................. 0810 433 999
Fax .............................................. 00 800 1234 3333
idex x.fr
Germany
IDEXX GmbH
Mörikestraße 28/3
D-71636 Ludwigsburg
Germany
Toll-Free Technical Support .... 00800 1234 3399
Fax ............................................ 0800 6645627
idexx.de
Italy
IDEXX Laboratories Italia, S.r.l.
Via Guglielmo Silva, 36
20149 Mil ano
Italy
Toll-Free Technical Support ...... 800 - 9179 4 0
Telephone .................................. (39) 02 319 20 31
Fax .............................................. (39) 02 319 20 347
idexx.it
Spain
IDEX X Laboratorios, S.L.
c/ Plom, n° 2– 8, 3°
08038 Barcelona
Spain
Toll-Free Technical Support ...... 00800 1234 3399
Telephone .................................. (34) 932 672 660
Fax .............................................. 00800 1234 3333
idexx.es
United Kingdom
IDEX X Laboratories Ltd.
Riverside House, Riverside Walk
Windsor, Berkshire
SL4 1NA
United Kingdom
Toll-Free Technical Support ...... 00800 1234 3399
Telephone .................................. (44) 01753 838900
Fax .............................................. (44) 01753 838901
idexx.co.uk
Australia
IDEX X Laboratories Pty. Ltd.
Metro Centre
Unit 20, 30-46 South Street
Rydalmere, New South Wales 2116
Australia
Toll-Free Technical Support ...... 1300 44 33 99
Telephone .................................. (61) 2 9898 7300
Fax .............................................. (61) 2 9898 7302
idexx.com.au
Canada
IDEXX Laboratories Canada Corporation
C/O UPS
4071 North Service Rd
Burlington, ON L7L 4X6
Canada
Toll-Free Technical Support ...... 1-800-248-2483
Telephone .................................. 1-905-602-9499
Toll-Free Fax .............................. 1-800-248-3010
Fax .............................................. 1-905-602-6640
idexx.ca
Japan
IDEX X Laboratories KK
1-22-19, Izumi, Suginami-ku, Tokyo
168-0063 Japan
Toll-Free Technical Support ...... 0120-71- 4921
Telephone .................................. (81) 422 71 4921
Fax .............................................. (81) 422 71 4922
idexx.co.jp
Belgium/Netherlands
ID E X X L abora tori e s B.V.
Scorpius 60F
2132LR Hoofddorp, Netherlands
Telephone .................................. 023 5587001
idexx.nl
58
Page 59

Denmark
IDEXX Laboratories Denmark ApS
c/o Harbour House
Sundkrogsgade 21
2100 Copenhagen, Denmark
Telephone .................................. 80 34 76 18
idexx.dk
Finland
IDEX X Laboratories Oy
c/o Accounting Services Tilimatic Oy
Mannerheimintie 16 A 3
00100 Helsinki, Finland
Telephone .................................. 0800 98458
idexx.fi
Norway
IDEX X Laboratories Norge AS
c/o Corpnordic Norway AS v/Sunde
Bryggetorvet 1
0250 Oslo, Norway
Telephone .................................. 800310 26
idexx.no
Appendices
Sweden
IDEX X Laboratories Sverige AB
Box 16285
103 25 Stockholm, Sverige
Telephone .................................. 020 160 5890
idexx.se
Distributor
IDEX X Europe
Scorpius 60F
2132LR Hoofddorp, Netherlands
Telephone .................................. 00800 1234 3399
idexx.eu
59
 Loading...