

Software
für Antriebe
MCP-Process
Software
for
MCP-Process drives
Logiciel
pour moteurs
MCP-Process
ProgEdit
SOF 104
Anwendungsbeispiel:
Druckregelung
SOF 104
Application example:
pressure control
SOF 104
Exemple d'application:
contrôle de pression
MCP-Standard/Ismatec SA/01.06.99/CB/GP
English FrançaisDeutsch
Betriebsanleitung
Operating Manual
Mode d‘emploi
01.06.99 CB/GP
1

2
MCP-Standard/Ismatec SA/01.06.99/CB/GP

Inhaltsverzeichnis
Der Bildschirm 3
Contents
Program main window 3
Sommaire
Fenêtre principale du programme 3
Einleitung 5
ProgEdit installieren 5
Den Antrieb mit dem PC
verbinden 6
Die serielle Schnittstelle
einstellen 6
Das erste Programm
schreiben 6
Das Programm in den Antrieb
laden 7
Das Programm ausführen 7
Anhalten, weiterführen
zurücksetzen 7
Anwendungsbeispiel
- Druckregelung 8
Montage der
Druckregelungseinheit 9
Introduction 5
Installing ProgEdit 5
Connecting the drive
to the PC 6
Setting the serial
interface 6
Writing the first
program 6
Downloading the
program to the drive 7
Starting the program 7
Stopping, resuming
and resetting 7
Application example
- Pressure control 8
Mounting the pressure
control unit 9
Introduction 5
Installation de ProgEdit 5
Connexion de la pompe
au PC 6
Réglage de l’interface
sérielle 6
Rédaction du
premier programme 6
Téléchargement du programme
du PC sur le moteur 7
Lancement du programme 7
Arrêt, reprise et
nouveau réglage 7
Exemple d'application:
- contrôle de pression 8
Installation de l'unité de
contrôle de pression 9
MCP-Standard/Ismatec SA/01.06.99/CB/GP
Druckregelung 10
Gegen einen Filter pumpen 10
Funktion der MODE-Taste
während der Druckregelung 11
Die Hilfe benutzen 12
Demoprogramme 12
Befehle sortiert nach
- Menü 14
- Befehlsnamen 15
Pressure control 10
Pumping against a filter 10
MODE keys function
for pressure commands 11
Using the Online Help 12
Demonstration programs 12
Commands sorted according to
- the menu 14
- command names 15
Contrôler la pression 10
Pompage contre un filtre 10
Fonction de la touche MODE
pour les commandes relatives
à la pression 11
Utiliser l’aide »en ligne« 12
Programmes de démonstration 12
Commandes triées selon
- le menu 14
- les noms des commandes 15
3
몇
Sprachwechsel
Diese Software erlaubt Ihnen
zwischen den Sprachen Englisch
und Deutsch zu wechseln.
Wählen Sie
Options / Settings... / Language
oder
Extras / Einstellungen... / Sprache
몇
Changing the language
This software enables you to
switch the language from
German to English.
Choose
Extras / Einstellungen... / Sprache
or
Options / Settings... / Language
몇
Changement de langue
Ce logiciel est édité en anglais
ainsi qu’en allemand. Il est
possible de permuter entre les
deux langues.
12 3
4
Pour cela, choisissez:
Options / Settings... / Language
ou
Extras / Einstellungen... / Sprache
Toutes les indications de ce
mode d’emploi concernant les
commandes du logiciel sont
indiquées en anglais.
4
5
6
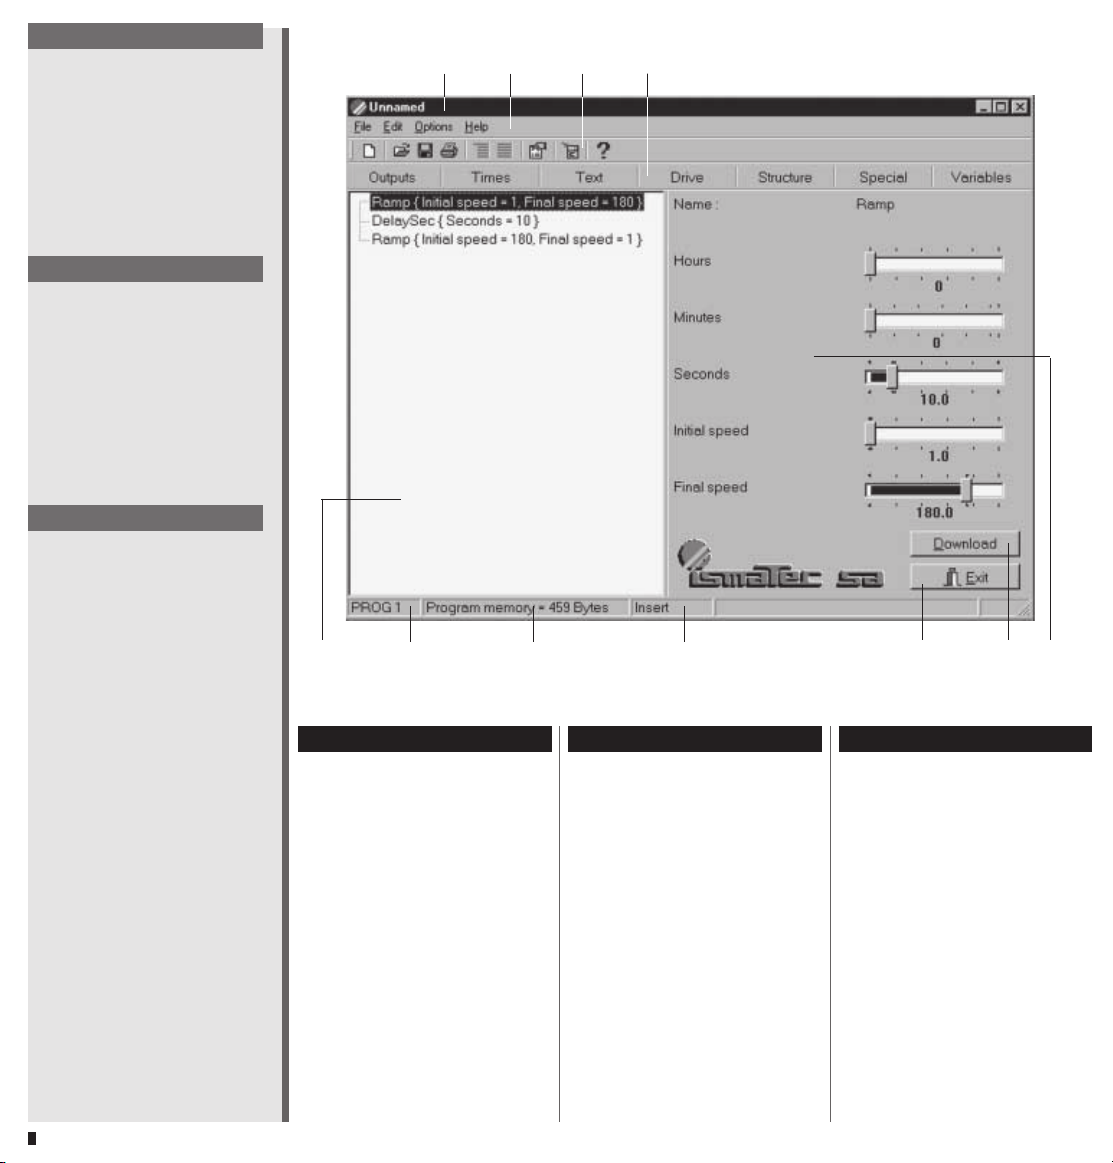
Der Bildschirm
1 Name des geladenen
Programms
2 Allgemeine Menüleiste
3 Symbolleiste
4 Befehlsleiste
5 Befehlsfenster
6 Nummer des Programm-
speichers im Antrieb
7 Freier Speicherplatz für das
Programm
8 Modus Einfügen/Anhängen
9 Schließen-Knopf
10 Download-Knopf
11 Parameterbereich
7 8 9 10 11
Program main window
1 Name of the loaded
program
2 Menu bar
3 Tool bar
4 Command bar
5 Command window
6 Number of the program
memory in the drive
7 Free memory for the
program
8 Mode Insert / Append
9 Exit button
10 Download button
Fenêtre du programme
1 Nom du programme chargé
2 Barre de menu
3 Barre des outils
4 Barre des commandes
5 Fenêtre des commandes
6 Numéro de la mémoire de
programme sur la pompe
7 Mémoire libre pour le
programme
8 Mode insérer / ajouter
9 Bouton de sortie
10 Bouton de téléchargement
11 Zone de paramètres
11 Parameter area
MCP-Standard/Ismatec SA/01.06.99/CB/GP

Einleitung
Mit der Software ProgEdit können Sie Befehlssequenzen (Programme) zusammenstellen und
diese in den Antrieb laden.
Der Antrieb MCP-Process verfügt
über 4 Programmspeicher. Jeder
Programmspeicher erlaubt dem
Anwender ein individuell zusammengestelltes Programm zu
speichern.
❖❖
❖
Der Antrieb führt die Program-
❖❖
me unabhängig vom PC aus
(stand-alone).
❖❖
❖
Die Programme können im PC
❖❖
gespeichert, wieder geöffnet und
ausgedruckt werden (Menü
»Datei«).
Introduction
The ProgEdit software enables the
user to write individual command
sequences (programs) and to
download them to the drive.
The drive MCP-Process offers
4 program memories, each one
enabling the user to store an
individual program.
❖❖
❖
The drive is capable of running
❖❖
these programs independently of
the PC (as a stand-alone unit).
❖❖
❖
In the PC the programs can be
❖❖
stored, reopened and printed
(»File« menu).
Introduction
Le logiciel ProgEdit vous permet
de programmer sur l’ordinateur
des séquences de pompage
définies individuellement et de
les télécharger sur un programme
mémoire du moteur de pompe.
Le moteur MCP-Process comporte 4 mémoires de programme,
chacune permettant à l’utilisateur
d’enregistrer un programme
individuel.
❖❖
❖
Les séquences du programme
❖❖
mémoire peuvent alors être
effectuées par le moteur indépendamment de l’ordinateur
(stand-alone).
❖❖
❖
Sur le PC, les programmes
❖❖
peuvent être enregistrés, ouverts
et imprimés
(menu fichiers »File«).
MCP-Standard/Ismatec SA/01.06.99/CB/GP
ProgEdit installieren
1. Starten Sie Windows
2. Schieben Sie die Diskette in
das Laufwerk.
3. Klicken Sie auf den Windowsknopf Start und wählen Sie
Ausführen.
4. Geben Sie a:SETUP ein und
klicken Sie den OK-Knopf.
5. Das Programm führt Sie durch
die Installation.
Installing ProgEdit
1. Start »Windows«
2. Insert the disk into the disk
drive
3. From the Windows Start
menu, choose Run
4. Type a:SETUP and click OK
5. The program will guide you
through the installation
process.
Installation de ProgEdit
1. Lancer »Windows«
2. Insérer la disquette dans le
lecteur correspondant
3. Sur le menu Start de
Windows, cliquer sur Run
4. Taper a:SETUP et cliquer sur le
bouton OK
5. Le programme vous guide
alors à travers tout le
processus d’installation.
5
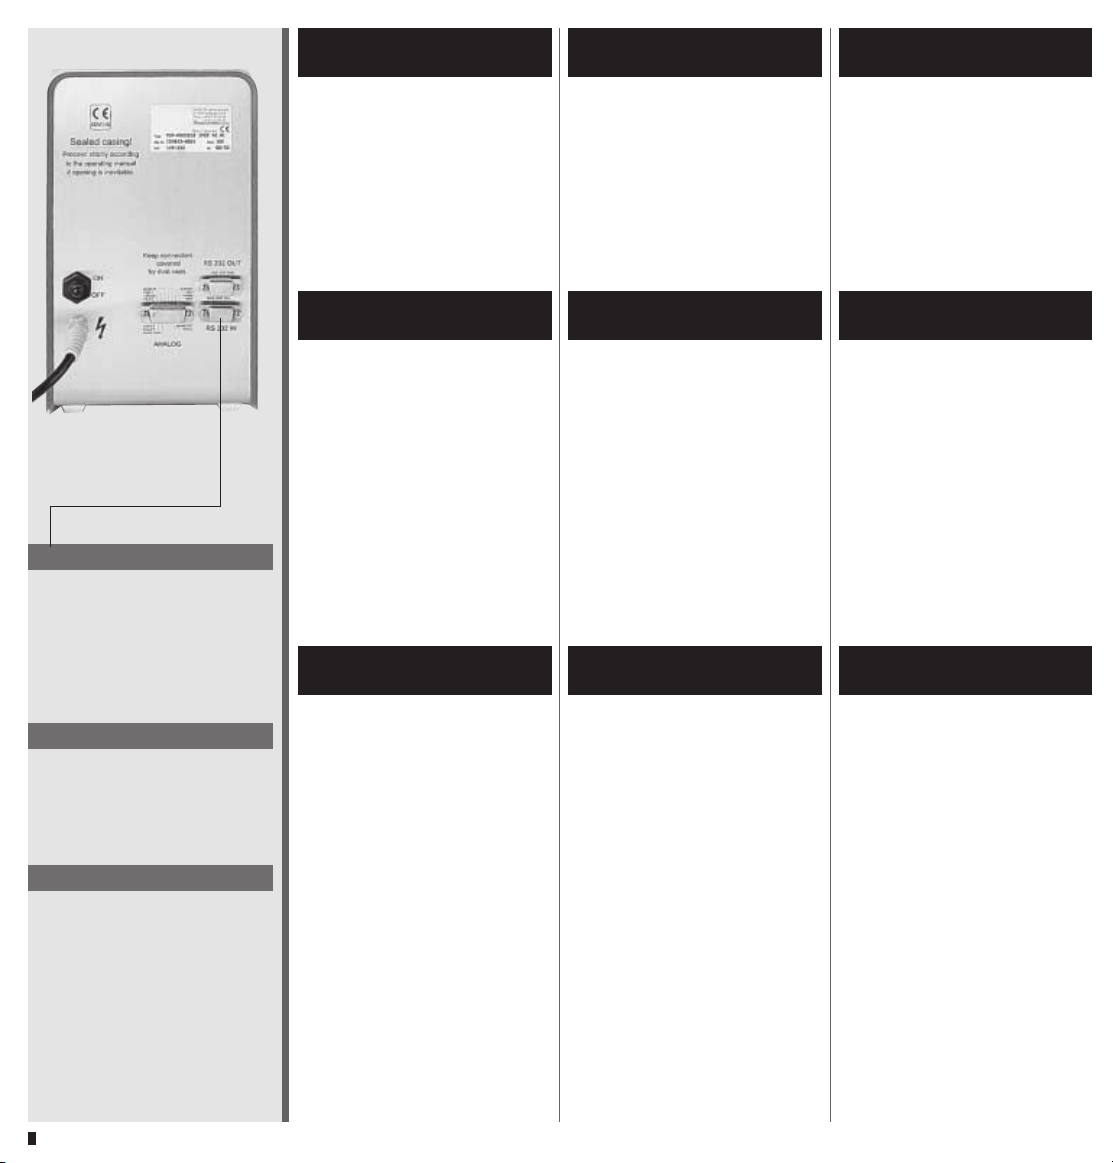
Den Antrieb mit dem PC
verbinden
Verbinden Sie eine serielle Schnittstelle mit dem Eingang RS232 an
der Rückwand der MCP-Process.
Benutzen Sie dazu das beiliegende
Verbindungskabel AG0013. Sollte
Ihr PC mit einem 25-poligen Stecker ausgerüstet sein, brauchen Sie
zusätzlich den Adapter XC0009.
Connecting the drive
to the PC
Connect a serial interface to the
RS232 input on the back of the
MCP-Process. Use the enclosed
connecting cable AG0013. If your
PC is equipped with a 25-pin
connector, you need an
additional adapter XC0009.
Connexion de la pompe
au PC
Connecter une interface sérielle à
la fiche RS232 sur l’arrière de la
pompe MCP-Process. Employez le
câble de connexion AG0013
joint. Si votre PC est équipé d’un
connecteur à 25 pins, vous aurez
besoin d’un adaptateur XC0009
supplémentaire.
몇
Hinweis
Für die Benutzung der RS232Schnittstelle unter IP-65
Bedingungen verweisen wir auf
Seite 51 in der Betriebsanleitung
zum Antrieb MCP-Process.
몇
Please note
For using the RS232- interface
under IP-65 conditions please refer
to page 51 in the Operating
Manual of the MCP-Process.
몇
Remarque
Pour l‘utilisation de l‘interface
RS232 sous des conditions IP-65:
veuillez vous réferer à la page 51
du mode d‘emploi du moteur
MCP-Process.
Die serielle Schnittstelle
einstellen
■
Starten Sie das Programm
ProgEdit.
■
Wählen Sie das Menü
Extras / Einstellungen.
Der Dialog »Einstellungen«
erscheint.
■
Klicken Sie auf die Schaltfläche
»Schnittstellen-Eigenschaften«.
■
Wählen Sie die mit Ihrem
Antrieb verbundene
Schnittstelle und bestätigen
Sie zweimal mit OK.
Beispiel:
Das erste Programm schreiben
■
Wählen Sie in ProgEdit den
Befehl Antrieb / Run/Stop.
In der Befehlsliste erscheint
Action{Start}.
■
Wählen Sie den Befehl
Zeiten / Delay Sekunden.
In der Befehlsliste erscheint
DelaySec{Sekunden=3}.
■
Wählen Sie den Befehl
Antrieb / Run/Stop.
Klicken Sie im Parameterbereich auf »Stop«.
In der Befehlsliste erscheint
Action{Stop}.
■
Sichern Sie das Programm mit
dem Menü Datei / Speichern.
Setting the serial
interface
■
Start ProgEdit.
■
Open the menu
Option / Settings.
The dialog »Settings« appears.
■
Click the button »Properties of
communication port«.
■
Select the interface your drive
is connected to and confirm by
pressing the OK button twice.
Example:
Writing the first program
■
In ProgEdit choose the
command Drive / Run/Stop.
In the command window
appears Action{Run}.
■
Select the command
Times / Delay Seconds.
DelaySec{Seconds=3} appears
in the command window.
■
Choose the command Drive /
Run/Stop. Click »Stop« in the
parameter area.
Action{Stop} appears in the
command window.
■
Save the program by using the
File menu.
Réglage de l’interface
sérielle
■
Lancer ProgEdit.
■
Ouvrir le menu
Option / Settings.
L’écran de dialogue »Settings«
(réglages) apparaît.
■
Cliquer sur le bouton »Properties of communication port«.
■
Sélectionner l’interface à laquelle votre pompe est
connectée et confirmer en
cliquant deux fois sur le
bouton OK.
Exemple: Rédaction du
premier programme
■
Dans ProgEdit, choisir la commande Drive / Run/Stop. Le
message Action{Run} apparaît
dans la fenêtre de commande.
■
Sélectionner la commande
Times / Delay Seconds. Le
message DelaySec{Seconds=3}
apparaît dans la fenêtre de
commande.
■
Sélectionner la commande
Drive / Run/Stop. Cliquer sur
»Stop« dans la zone des
paramètres. Le message
Action{Stop} apparaît dans la
fenêtre de commandes.
■
Sauvegarder le programme avec
le menu des fichiers »File«.
6
MCP-Standard/Ismatec SA/01.06.99/CB/GP

Das Programm in den Antrieb
laden
Stellen Sie sicher, dass die MCPProcess angeschlossen und
eingeschaltet ist.
Downloading the program
to the drive
Make sure the MCP-Process is
connected and switched on.
Téléchargement du programme
du PC sur la pompe
S’assurer que le moteur MCPProcess est bien connecté et
allumé.
1. Select the required program
1. Wählen Sie den gewünschten
memory (a).
Programm-Speicher (a).
2. Drücken Sie auf den Knopf
»Download« (b). Ihr Programm
wird nun in den Programmspei-
a
b
cher der MCP-Process geladen.
❖❖
❖
Ein bereits gespeichertes
❖❖
Programm wird dabei über-
2. Press the button »Download«
(b). Now your program is
downloaded to the selected
program memory of the drive.
❖❖
❖
A previously stored program
❖❖
is automatically overwritten.
schrieben.
1. Choisissez le programme
mémoire désiré (a).
2. Presser le bouton »Download«
(Téléchargement) (b). Votre
programme est désormais
téléchargé sur votre pompe.
❖❖
❖
Un programme préalable-
❖❖
ment enregistré sera automatiquement écrasé.
Das Programm ausführen
Bei Bedarf können Sie nun die
MCP-Process vom PC trennen.
❖❖
❖
Betätigen Sie die RUN/STOP
❖❖
Taste am Antrieb. Dieser führt
nun Ihr Programm aus.
❖❖
❖
Beispiel von Seite 6:
❖❖
Der Antrieb beginnt nun mit der
eingestellten Drehzahl zu laufen.
Gleichzeitig werden auf dem
Display die programmierten drei
Sekunden heruntergezählt. Danach stoppt der Antrieb. Das Programm ist nun beendet. Auf dem
Display erscheint wieder »Pro1«.
Anhalten, weiterführen,
zurücksetzen
Ein laufendes Programm können
Sie jederzeit mit der RUN/STOPTaste unterbrechen. Ein unterbrochenes Programm führen Sie
weiter, indem Sie erneut die
RUN/STOP-Taste betätigen.
Drücken Sie die Reset-Taste, um
ein unterbrochenes Programm
abzubrechen.
Starting the program
If required the MCP-Process can
now be disconnected from the
PC.
❖❖
Push the RUN/STOP key on the
❖
❖❖
drive. The pump now starts to
carry out the program.
❖❖
❖
Example of page 6:
❖❖
The drive starts at the pre-set
speed and runs whilst the
programmed time (3 seconds) is
counted down in the display.
Then the drive stops again. The
program is now terminated and
»Pro1« appears in the display.
Stopping, resuming and
resetting
A running program can be
interrupted any time by using the
RUN/STOP key. An interrupted
program can be resumed by
pushing the RUN/STOP key again.
Push the Reset button if you
want to terminate an
interrupted program.
Lancement du programme
Si nécessaire, le moteur MCPProcess peut maintenant être
déconnecté du PC.
❖❖
Presser la touche RUN/STOP
❖
❖❖
du moteur MCP-Process. Le
moteur commence maintenant
l’exécution du programme.
❖❖
❖
Exemple de la page 6: Le moteur
❖❖
commence à la vitesse préréglée et
fonctionne pendant que la durée
programmée (3 secondes) s’écoule
sur l’affichage. Ensuite, la pompe
s’arrête. Le programme est
maintenant terminé et le message
»Pro1« apparaît sur l’affichage.
Arrêt, reprise et
nouveau réglage
Un programme en cours peut
être interrompu en tout temps en
pressant la touche RUN/STOP. Un
programme interrompu peut être
repris en pressant à nouveau la
touche RUN/STOP.
Pour mettre fin à un programme
interrompu presser la touche
»Reset«.
MCP-Standard/Ismatec SA/01.06.99/CB/GP
7

Anwendungsbeispiel:
Druckregelung
Mittels Druckregelung gegen
einen Filter pumpen
Application example:
Pressure control
Pumping against a filter
using a pressure control
2
3
Exemple d'application:
Contrôle de pression
Pompage contre un filtre utilisant un contrôle de pression
1
8
7
54
6
Druckregelungseinheit
1 Warnleuchte mit
Drucksensorkabel
2 Befestigungsstange
3 Doppelmuffe
4 Führungsstange
5 Drucksensoraufnehmer
6 Reduziernippel
7 Schlauchtüllen (3 Größen)
inkl. Schlauchschelle
8 Drucksensor mit Kabel
Presssure control unit
1 Warning light
with sensor cable
2 Fastening rod
3 Double socket
4 Guiding rod
5 Adapter for pressure detector
6 Reducing fitting
7 Tube nipples (3 sizes)
incl. tube clamp
8 Pressure sensor with cable
Unité de contrôle de pression
1 Témoin lumineux
avec câble pour détecteur
2 Barre de fixation
3 Double raccord
4 Barre de guidage
5 Adaptateur pour détecteur
de pression
6 Raccord réducteur
7 Raccords à tuyaux (3 tailles),
y compris pince pour tuyaux
8 Détecteur de pression
avec câble
8
MCP-Standard/Ismatec SA/01.06.99/CB/GP

몇
Hinweis
Vor der Montage müssen alle
Gewinde am Drucksensor und
Drucksensoraufnehmer mit
PTFE-Band abgedichtet werden.
몇
Please note
Before mounting the pressure
control unit, wrap PTFE tape
around all threads of the
pressure sensor, tube nipples and
reducing fittings.
몇
Remarque
Avant l’installation, tous les pas
de vis sur le détecteur de
pression et sur les raccords de
réduction doivent être étanchés
avec de la bande PTFE.
Montage der
Druckregelungseinheit
Für die Montage empfehlen wir
folgendes Vorgehen:
1. Die Befestigungsstange (2) am
Pumpenkopf montieren
(anstelle der vorhandenen
Führungsachse mit Innensechskantkopf)
2. Führungsstange (4) in den
Drucksensoraufnehmer
einschrauben
3. Links und rechts je eine
passende Schlauchtülle (7)
(evtl. mit Reduziernippel) in
den Drucksensoraufnehmer (5)
einschrauben.
4. Drucksensor (8) auf Drucksensoraufnehmer (5)
montieren
❖❖
❖
Die Dichtfläche des Druck-
❖❖
sensors muss im montierten
Zustand auf dem Drucksensoraufnehmer anliegen!
5. Ganze Druckregelungseinheit
mittels Doppelmuffe an der
Befestigungsstange des
Pumpenkopfes montieren.
6. Drucksensorkabel an der
Analogschnittstelle
(Antriebrückwand) befestigen.
Mounting the pressure
control unit
We recommend you to proceed
as follows:
1. Mount the fastening rod (2) to
the pump-head (instead of the
mounted guiding axle with
hexagon head cap screw)
2. Screw the guiding rod (4) into
the adapter
3. Screw a suitable tube nipple
(7) into the left and right
thread of the adapter (5) (with
reducing fittings if necessary)
4. Mount the pressure sensor (8)
onto the adapter (5)
❖❖
❖
When mounted, the seal
❖❖
face of the pressure sensor
must sit close on the adapter.
5. Mount the complete pressure
control unit by means of the
double socket on the fastening
rod of the pump-head.
6. Connect the cable of the
pressure sensor to the analog
interface (on the back of the
drive).
Installation de l‘unité de
contrôle de pression
Pour l’installation, nous recommandons de procéder de la
manière suivante:
1. Monter la tige de fixation (2)
sur la tête de pompe (en lieu et
place de l’axe de guidage à tête
cylindrique à six pans creux).
2. Visser la tige de guidage (4) sur
l‘adaptateur pour détecteur de
pression
3. Visser à gauche et à droite un
raccord à tuyau adéquat (7)
(éventuellement avec un
raccord réducteur) sur
l‘adaptateur pour détecteur de
pression (5).
4. Monter le détecteur de pression (8) sur l‘adaptateur (5).
❖❖
La surface d‘étanchéité du
❖
❖❖
détecteur de pression une fois
installé doit se retrouver ajusté
sur le récepteur du détecteur
de pression.
5. Installer l’unité de contrôle de
la pression complète en
utilisant le double raccord sur la
barre de fixation de la tête de
pompe.
6. Raccorder le câble du détecteur
de pression à l’interface analogique (au dos de la pompe).
MCP-Standard/Ismatec SA/01.06.99/CB/GP
9

Druckregelung
Die Anweisung »Druckregelung«
hat zwei Varianten:
Pressure control
There are two »pressure control«
commands:
Contrôler la pression
Il existe deux commandes de
»contrôle de la pression«:
Die wirkliche Druckregelung
regelt auf einen Solldruck,
indem sie die Drehzahl verändert.
Die eingestellte Drehzahl gilt als
maximale Drehzahl, die nicht
überschritten wird, auch wenn
der Druck kleiner als der Sollwert
ist.
Die zweite Variante fördert mit
der eingestellten Drehzahl, solange der gemessene Druck kleiner ist als der eingestellte Druck.
Sobald der gemessene Druck den
Grenzwert überschreitet, wird
der nachfolgende Befehl
ausgeführt.
Gegen einen Filter pumpen
Eine typische Anwendung der
Druckregelung ist das Pumpen
gegen einen Filter.
The actual pressure control
functions according to a set-
point by changing the pump
speed. The set speed determines
the maximum speed which is not
exceeded even if the pressure is
lower than the set-point.
With the second version, the
drive delivers at the set speed
as long as the measured pressure
is smaller than the set pressure.
As soon as the measured
pressure exceeds the threshold
value the subsequent command
is carried out.
Pumping against a filter
A typical application for using
pressure control is pumping
against a filter.
Le contrôle effectif de la pression
fonctionne d’après une valeur de
consigne en changeant la vitesse
de la pompe. La vitesse réglée
détermine la vitesse maximale qui
n’est pas dépassée même si la
pression est inférieure à la valeur
de consigne.
Dans le deuxième cas de figure, la
pompe refoule à la vitesse
réglée aussi longtemps que la
pression mesurée est inférieure à
la pression réglée. Dès que la
pression mesurée dépasse la valeur
seuil, la commande suivante est
exécutée.
Pompage contre un filtre
Le pompage contre un filtre est
une application typique de l’usage
du contrôle de pression.
10
Solange der Filter neu ist, wird
mit einer konstanten Drehzahl
gefördert.
Sobald der Filter einen gewissen
Verstopfungsgrad erreicht hat,
blinkt eine Warnlampe und die
Drehzahl wird automatisch reduziert. Dies verhindert, dass ein
bestimmter Druck überschritten
wird, auch wenn der Filter nicht
sofort ausgewechselt werden
kann.
The drive works at a constant
speed as long as the filter is new.
As soon as the filter reaches a
certain degree of clogging a
warning light starts to blink and
the speed is automatically
reduced. This prevents the
pressure from exceeding a certain
level even if the filter cannot be
changed immediately.
La pompe fonctionne à une
vitesse constante aussi longtemps
que le filtre est neuf.
Dès que le filtre atteint un certain
niveau d’obstruction, un témoin
lumineux se met à clignoter et la
vitesse est automatiquement
réduite. Cela évite que la pression
ne dépasse un certain niveau
même si le filtre ne peut pas être
changé immédiatement.
MCP-Standard/Ismatec SA/01.06.99/CB/GP

Gegen einen Filter pumpen
Diese Anwendung kann im
Prinzip mit vier Anweisungen
programmiert werden (siehe
Anwendungsbeispiel Druckregelung, Seite 8):
Pumping against a filter
In principle this application can
be programmed with four
commands (see program example
pressure control, page 8):
Pompage contre un filtre
En principe, cette application
peut être programmée à l’aide de
quatre commandes (exemple
d'application: contrôle de
pression, page 8):
1. Sensor definieren
(I/O’s / Sensor definieren)
2. Die Anweisung mit dem Druck
als oberen Grenzwert
(I/O’s / Regelung).
3. Setzen des Ausgangs an dem
die Warnlampe angeschlossen
ist (I/O’s / Ausgang 1 Wert).
4. Die Anweisung Druckregelung
(I/O’s / Regelung).
Funktion der MODE-Taste
während der Druckregelung
Während der beiden Druckbefehle wird der Solldruck im
Display angezeigt. Dieser kann
während des Betriebes mit den
Pfeiltasten verändert werden.
Mit der MODE-Taste können Sie
weitere Informationen abfragen.
Dabei leuchtet jeweils neben der
LED »PROGRAM« eine weitere
LED auf.
Der Reihe nach erscheinen folgende Informationen:
1. Define detector
(I/O’s / Define sensor)
2. The command with the
pressure as upper threshold
value (I/O’s / Control)
3. Setting the output the
warning light is connected to
(Outputs / Output 1 value).
4. The command pressure control
(I/O’s / Control)
MODE key function
for pressure commands
During both ways of pressure
control the set pressure is
indicated in the display. During
operation it can be adjusted with
the arrow keys.
The user can retrieve more
information by using the MODE
key. Next to the »PROGRAM«
LED a second LED lights up.
The following information
appears in turn:
1. Définir le détecteur
(I/O’s / Define sensor)
2. La commande de la pression
en tant que valeur-seuil
maximale
(I/O’s / Control)
3. Réglage de la sortie à laquelle
le témoin lumineux est raccordé (Outputs / Output 1 value).
4. La commande pressure control
(côntrole de la pression)
(I/O’s / Control)
Fonction de la touche MODE pour
les commandes relatives à la pression
Durant les deux procédures de
côntrole de la pression, la
pression réglée est indiquée sur
l’affichage. En cours d’opération,
elle peut être réglée au moyen
des touches fléchées. L’utilisateur
obtiendra davantage d’informations en pressant la touche
MODE. A côté du témoin lumineux »PROGRAM«, un deuxième
témoin lumineux s’allume.
Les informations suivantes
apparaissent à tour de rôle:
MCP-Standard/Ismatec SA/01.06.99/CB/GP
LED Anzeige
PUMP rpm Drehzahl
PUMP flow rate Fließrate
TOTAL Gemessener
Druck
LED Display
PUMP rpm Speed
PUMP flow rate Flow rate
TOTAL Measured
pressure
LED Affichage
PUMP rpm Speed1)
PUMP flow rate Flow rate2)
TOTAL Measured3)
pressure
1
) vitesse
2
) Débit
3
) Pression mesurée
11

Die Online-Hilfe benutzen
In der Online-Hilfe sind alle
Befehle eingehend erklärt und
mit Beispielen illustriert.
Using the Online Help
In the Online Help all commands
are explained in details and
illustrated with examples.
Utiliser l’aide »en ligne«
L’aide »en ligne« vous explique
toutes les commandes en détail
en les illustrant avec de
nombreux exemples.
Demoprogramme
Laden Sie die beiliegenden
Demoprogramme und benutzen
Sie diese als Ausgangspunkt für
Ihre eigenen Programme.
Demonstration programs
Load the enclosed demonstration
programs and use them as
starting-point for your own
programs.
Programmes de démonstration
Chargez les programmes de
démonstration annexés et
utilisez-les comme point de
départ pour vos propres
programmes.
12
MCP-Standard/Ismatec SA/01.06.99/CB/GP

MCP-Standard/Ismatec SA/01.06.99/CB/GP
13

Befehle sortiert nach MENÜ / Commands sorted according to the menu / Commandes triées selon le menu
Menü Menüoption Befehlsname Beschreibung
Menu Menu option/Option de menu Commands/Commandes Description
I/O’s Ausgang 1 Wert Output1_Set Setzt den PWM-Ausgang 1
Output 1 value Output1_Set Sets the PWM output 1
Définit la sortie PWM 1
I/O’s Ausgang 2 Wert Output2_Set Setzt den PWM-Ausgang 2
Output 2 value Output2_Set Sets the PWM output 2
Définit la sortie PWM 2
I/O’s Ausgang Setzen/Zurücksetzen Output Magnetventil ein- und ausschalten
Output Set / Reset Output Switching a magnet valve on or off
Commuter une électrovanne sur 'on' ou 'off'
I/O’s Sensor definieren DefineSensor Sensor am Analogeingang definieren
Define sensor DefineSensor Defining detector on analog interface
Définition du détecteur sur une interface analogique
I/O’s Regelung SensorControl Regelung
Control SensorControl Control
Contrôle
I/O’s Regelung SensorControl Fördern, bis Genzwert erreicht ist
Control SensorControl Pumping till sensor threshold value is reached
Pompage jusqu'â ce que le détecteur atteigne la valeur-seuil
I/O’s Sensorwert einlesen ReadSensor Sensor in Variable einlesen
Read sensor value ReadSensor Reading a detector in a variable
Lire le détecteur dans une variable
I/O’s Sensorwert ausgeben SetSensorText Sensorwert ins Display schreiben
Display sensor value SetSensorText Writing a detector value in the display
Déterminer la valeur du détecteur sur l'affichage
I/O’s Sensorabhängige Drehzahl SetAnalogSpeed Drehzahl setzen (in Abhängigkeit des Sensoreinganges)
Sensor dependent rotation speed SetAnalogSpeed Setting the rotation speed (in reference to the sensor input)
Régler la vitesse (dépendant de l'entrée du détecteur)
Zeiten Pause Pause Pause
Times Pause Pause Pause
Pause
Zeiten Delay Stunden Delay Delay in Stunden, Minuten & Sekunden
Times Delay hours Delay Delay in hours, minutes and seconds
Retardement en heures, minutes et secondes
Zeiten Delay Sekunden DelaySec Delay in Sekunden
Times Delay seconds DelaySec Delay in seconds
Retardement en secondes
Text Text Text Text für Anzeige schreiben
Text Text Text Writing text for display
Rédaction du texte de l’affichage
Text Set Text SetText Anzeige schalten (Normal/Text)
Text Set text SetText Switching display (normal/text)
Commuter l’affichage (normal/texte)
Antrieb Dosieren Dispense Dosieren nach Zeit
Drive Dispensing Dispense Dispensing by time
Dosage selon le temps
Antrieb Dosieren Dispense Dosieren nach Volumen
Drive Dispensing Dispense Dispensing by volume
Dosage selon le volume
14
MCP-Standard/Ismatec SA/01.06.99/CB/GP

Befehle sortiert nach MENÜ / Befehle sortiert nach MENÜ / Commandes triées selon le menu
Menü Menüoption Befehlsname Beschreibung
Menu Menu option/Option de menu Commands/Commandes Description
Antrieb Dir Dir Drehrichtung setzen
Drive Dir Dir Setting rotation direction
Réglage du sens de rotation
Antrieb Run/Stop Action Antrieb starten oder stoppen
Drive Run/Stop Action Starting and stopping the drive
Lancer et arrêter le moteur
Antrieb Geschwindigkeit Setzen SetSpeed Drehzahl setzen
Drive Set speed SetSpeed Setting the rotation speed
Réglage de la vitesse
Antrieb Geschwindigkeit laden LoadSpeed Ursprüngliche Drehzahl wieder laden
Drive Load speed LoadSpeed Reloading the initial rotation speed
Charger à nouveau la vitesse initiale
Antrieb Drehzahl in Schleife anpassen SetCurrentSpeed Setzt Drehzahl (Erlaubt die Verstellung der Drehzahl durch den Benutzer)
Drive Adjusting speed within loop SetCurrentSpeed Setting the rotation speed (enables the user to adjust the rotation speed)
Charger la vitesse (permet de modifier la vitesse de rotation)
Struktur For - Schleife ForLoop For - Schleife
Structure For - loop ForLoop For - loop
Boucle pour
Struktur While - Schleife While While - Schleife
Structure While - loop While While - loop
Boucle pendant
Struktur If .. Then If..then If - Verzweigung
Structure If .. Then If..then If - branch
Boucle si - alors
Struktur if .. Then .. Else If..then..else If - then - else - Verzweigung
Structure if .. Then .. Else If..then..else If - then - else - branch
Boucle si - alors - sinon
Struktur Schleifenabbruch Break Eine Schleife verlassen
Structure Loop abortion Break Exit a loop
Sortir d‘une boucle
Struktur Programmabbruch Exit Das Programm verlassen
Structure Program abortion Exit Exit the program
Sortir du programme
Spezial Parameter editieren EditParam Parameter am Antrieb editieren
Special Editing a parameter EditParam Editing parameters on the drive
Editer les paramètres sur le moteur
Spezial Rampe Ramp Rampe der Drehzahl
Special Ramp Ramp Ramp of rotation speed
Rampe de vitesse
Spezial Protokoll SendString String über die RS232 schicken
Special Protocol SendString Sending a string over RS232 interface
Envoyer une chaîne par l’interface RS232
MCP-Standard/Ismatec SA/01.06.99/CB/GP
15

Befehle sortiert nach MENÜ / Befehle sortiert nach MENÜ / Commandes triées selon le menu
Menü Menüoption Befehlsname Beschreibung
Menu Menu option/Option de menu Commands/Commandes Description
Spezial Kommentar Comment Kommentar zum Programm
Special Comment Comment Comment on the program
Commentaires sur le programme
Spezial Graphischer Kommentar GraphicComment Grafik ins Programm einfügen
Special Graphical comment GraphicComment Inserting an image into the program
Insertion d’une image dans le programme
Variablen Initialisiert eine Variable SetVar Eine Variable initialisieren
Variables Initialize a variable SetVar Initializing a variable
Initialiser une variable
Variablen Inkrement IncVar Variable um 1 erhöhen
Variables Increment IncVar Increasing a variable by 1
Augmentation d’une variable d’un incrément 1
Variablen Dekrement DecVar Variable um 1 erniedrigen
Variables Decrement DecVar Decreasing a variable by 1
Diminution d’une variable d’un incrément 1
Variablen Variable anzeigen SetVarText Variable ins Display schreiben
Variables Display variable SetVarText Writing a variable in the display
Déterminer la valeur d'une variable sur l’affichage
16
MCP-Standard/Ismatec SA/01.06.99/CB/GP

Befehle sortiert nach Befehlsname / Commands sorted according to command names / Commandes triées en fonction de leurs noms
Befehlsname Beschreibung Menü Menüoption
Command(e)s Description Menu Menu options/Option de menu
Action Antrieb starten oder stoppen Antrieb Run/Stop
Action Starting and stopping the drive Drive Run/Stop
Lancer et arrêter le moteur
Break Eine Schleife verlassen Struktur Schleifenabbruch
Break Exit a loop Structure Loop abortion
Sortir d‘une boucle
Comment Kommentar zum Programm Spezial Kommentar
Comment Comment on the program Special Comment
Commentaires sur le programme
DecVar Variable um 1 erniedrigen Variablen Dekrement
DecVar Decreasing a variable by 1 Variables Decrement
Diminution d’une variable d’un incrément 1
DefineSensor Sensor am Analogeingang definieren I/O’s Sensor definieren
DefineSensor Defining detector on analog interface I/O’s Define sensor
Définition du détecteur sur une interface analogique
Delay Delay in Stunden, Minuten und Sekunden Zeiten Delay Stunden
Delay Delay in hours, minutes and seconds Times Delay hours
Retardement en heures, minutes et secondes
DelaySec Delay in Sekunden Zeiten Delay Sekunden
DelaySec Delay in seconds Times Delay seconds
Retardement en secondes
Dir Drehrichtung setzen Antrieb Dir
Dir Setting rotation direction Drive Dir
Régler le sens de rotation
Dispense Dosieren nach Zeit Antrieb Dosieren
Dispense Dispensing by time Drive Dispensing
Dosage selon le temps
Dispense Dosieren nach Volumen Antrieb Dosieren
Dispense Dispensing by volume Drive Dispensing
Dosage selon le volume
EditParam Parameter am Antrieb editieren Spezial Parameter editieren
EditParam Editing parameters on the drive Special Editing a parameter
Editer des paramètres sur le moteur
Exit Das Programm verlassen Struktur Programmabbruch
Exit Exit the program Structure Program abortion
Sortir du programme
ForLoop For - Schleife Struktur For - Schleife
ForLoop For - loop Structure For - loop
Boucle pour
GraphicComment Grafik ins Programm einfügen Spezial Graphischer Kommentar
GraphicComment Inserting an image into the program Special Graphical comment
Insertion d’une image dans le programme
If..then If - Verzweigung Struktur If .. Then
If..then If - branch Structure If .. Then
Boucle si - alors
If..then..else If - then - else - Verzweigung Struktur if .. Then .. Else
If..then..else If - then - else - branch Structure if .. Then .. Else
Boucle si - alors - sinon
MCP-Standard/Ismatec SA/01.06.99/CB/GP
17

Befehle sortiert nach Befehlsname / Commands sorted according to command names / Commandes triées en fonction de leurs noms
Befehlsname Beschreibung Menü Menüoption
Command(e)s Description Menu Menu options/Option de menu
IncVar Variable um 1 erhöhen Variablen Inkrement
IncVar Increasing a variable by 1 Variables Increment
Augmenter une variable d’un incrément 1
LoadSpeed Ursprüngliche Drehzahl wieder laden Antrieb Geschwindigkeit laden
LoadSpeed Reloading the initial rotation speed Drive Load speed
Charger à nouveau la vitesse initiale
Output Magnetventil ein- und ausschalten I/O’s Ausgang Setzen/Zurücksetzen
Output Switching a magnet valve on or off I/O’s Output Set / Reset
Commuter l’électrovanne sur on ou off
Output1_Set Setzt den PWM-Ausgang 1 I/O’s Ausgang 1 Wert
Output1_Set Sets the PWM output 1 I/O’s Output 1 value
Définir la sortie PWM 1
Output2_Set Setzt den PWM-Ausgang 2 I/O’s Ausgang 2 Wert
Output2_Set Sets the PWM output 2 I/O’s Output 2 value
Définir la sortie PWM 2
Pause Pause Zeiten Pause
Pause Pause Times Pause
Pause
Ramp Rampe der Drehzahl Spezial Rampe
Ramp Ramp of rotation speed Special Ramp
Rampe de vitesse
ReadSensor Sensor in Variable einlesen I/O’s Sensorwert einlesen
ReadSensor Reading a detector in a variable I/O’s Read sensor value
Lire le détecteur dans une variable
SendString String über die RS232 schicken Spezial Protokoll
SendString Sending a string over RS232 interface Special Protocol
Envoyer une chaîne par l’interface RS232
SensorControl Regelung I/O’s Regelung
SensorControl Control I/O’s Control
Contrôle
SensorControl Fördern, bis Genzwert erreicht ist I/O’s Regelung
SensorControl Pumping till sensor threshold value is reached I/O’s Control
Pompage jusqu’à ce que le détecteur atteigne la valeur-seuil
SetAnalogSpeed Drehzahl setzen (in Abhängigkeit des Sensoreinganges) I/O’s Sensorabhängige Drehzahl
SetAnalogSpeed Setting the rotation speed (in reference to the sensor input) I/O’s Sensor dependent rotation speed
Régler la vitesse (dépendant de l'entrée du détecteur)
SetCurrentSpeed Setzt Drehzahl (Erlaubt die Verstellung der Drehzahl durch den Benutzer) Antrieb Drehzahl in Schleife anpassen
SetCurrentSpeed Setting the rotation speed (enables the user to adjust the rotation speed) Drive Adjusting speed within loop
Charger la vitesse (permet de modifier la vitesse de rotation)
SetSensorText Sensorwert ins Display schreiben I/O’s Sensorwert ausgeben
SetSensorText Writing a detector value in the display I/O’s Display sensor value
Déterminer la valeur du détecteur sur l’affichage
18
MCP-Standard/Ismatec SA/01.06.99/CB/GP

Befehle sortiert nach Befehlsname / Commands sorted according to command names / Commandes triées en fonction de leurs noms
Befehlsname Beschreibung Menü Menüoption
Command(e)s Description Menu Menu options/Option de menu
SetSpeed Drehzahl setzen Antrieb Geschwindigkeit setzen
SetSpeed Setting the rotation speed Drive Set speed
Réglage de la vitesse
SetText Anzeige schalten (Normal/Text) Text Set Text
SetText Switching display (normal/text) Text Set text
Commuter l'affichage (normal/texte)
SetVar Eine Variable initialisieren Variablen Initialisiert eine Variable
SetVarText Writing a variable in the display Variables Display variable
Initialiser une variable
SetVarText Variable ins Display schreiben Variablen Variable anzeigen
Writing a variable in the display Variables Display variable
Déterminer la valeur d'une variable sur l’affichage
Text Text für Anzeige schreiben Text Text
Text Writing text for display Text Text
Rédaction du texte de l’affichage
While While - Schleife Struktur While - Schleife
While While - loop Structure While - loop
Boucle - Pendant
MCP-Standard/Ismatec SA/01.06.99/CB/GP
19

ISMATEC SA
Labortechnik - Analytik
A Unit of IDEX Corporation
Feldeggstrasse 6
CH-8152 Glattbrugg
Switzerland
Phone
+
41 (0)44 874 94 94
Fax
+
41 (0)44 810 52 92
sales.ismatec@idexcorp.com
www.ismatec.com
ISMATEC
Laboratoriumstechnik GmbH
A Unit of IDEX Corporation
Futtererstraße 16
D-97877 Wertheim-Mondfeld
Germany
Phone
+
49 (0) 93 77 / 92 03-0
+
Fax
49 (0) 93 77 / 13 88
office.ismatec@idexcorp.com
Ismatec
®
- Vertretung / Representative / Représentation
Ismatec® - Ihr kompetenter Ansprechpartner für anspruchsvolle
Pump- und Dosieraufgaben.
Ismatec® - Your competent partner for demanding metering and
dispensing applications.
20
Ismatec® - Votre partenaire compétent pour toutes les applications
de refoulement et de dosage exigeantes.
MCP-Standard/Ismatec SA/01.06.99/CB/GP
 Loading...