

Page 1

Digital Multi-service Data-capable Phone
i880 Phone Welcome Guide
@NNTN6994A@
NNTN6994A
Sprint
iDEN
Page 2

Page 3

Contents
Getting Started...........................................1
What’s in the Box? ............................................1
Removing the Battery Door...............................4
Locating Your SIM Card....................................5
Battery...............................................................5
Powering On and Off.........................................7
Activating Service..............................................8
Enabling Security ..............................................8
Phone Programming .........................................8
Finding Your Phone Number and Walkie-Talkie
Number.........................................................9
Nextel Worldwide
Customizing Features .......................................9
Phone Basics ..................................................10
Using the Memory Card ..................................14
Using the Audio Player....................................20
Using the Camera ...........................................20
Bluetooth
SIM Card Security...........................................21
Locking the Keypad.........................................25
®
Service...............................9
®
.......................................................21
Antenna...........................................................26
Accessories.....................................................26
®
Nextel
Customer Service ..............................27
Understanding Status Messages ....................27
Making Calls .............................................28
Phone Calls.....................................................28
®
Nextel
Walkie-Talkie Calls ............................28
Receiving Calls ...............................................29
Using Speakerphone.......................................30
Using Mute......................................................30
Making Emergency Phone Calls.....................30
Nextel® Voicemail.....................................32
Setting Up Your Voicemail Box.......................32
Receiving a Message......................................32
Accessing Voicemail From
the Message Center ...................................32
Sending Unanswered Calls to Voicemail ........33
Change Your Voicemail
Language to Spanish..................................33
i
Page 4

Wireless Data Services ........................... 34
Wireless Data Services...................................34
Accessing Wireless Data Services From Your
Phone .........................................................35
Navigation Keys ..............................................35
Guides and Demos..........................................36
Patent and Trademark Information ........ 37
Index ......................................................... 38
ii
Page 5

AgION AntimicrobialTM —
Built-in Protection for
Your Phone
Motorola has incorporated AgION antimicrobial
into the painted surfaces of your phone to help
provide protection against a broad range of product
damaging bacteria, mold, and mildew.
Motorola is the first wireless phone manufacturer to
incorporate AgION antimicrobial into the phone's
painted surfaces.
The antimicrobial technology is an example of
Motorola's pursuit for innovation and creativity to
produce the best quality wireless experience.
The antimicrobial technology in the paint on
Motorola iDEN
against product damage caused by microbes, but
does not extend such protection to the user.
Versatile in application, the EPA-registered AgION
additive is recommended for institutional,
commercial and consumer applications. AgION
antimicrobials are used in many settings including
hospitals, offices, schools and food processing
facilities. They can also be found in leading
footwear, fabrics, appliances, water coolers and
architectural hardware.
®
phones helps provide protection
Benefits of AgIONTM*
• AgION antimicrobial technology helps provide
protection against product damaging bacteria on
the painted surfaces of the phone.
• AgION antimicrobial is effective in protecting the
product against a broad spectrum of bacteria.
• AgION helps inhibit the ability of microbes to
grow and spread on the painted surfaces of the
phone.
• The active ingredient helps break down
enzymes in the microbe, inhibiting its ability to
reproduce and spread on the painted surfaces of
the phone.
• Studies have shown that surfaces with AgION
antimicrobial can reduce the amount of certain
product damaging bacteria by 99%.
• The AgION coating will protect the painted
surfaces of the product against product
damaging bacteria for the life of the product.
* The antimicrobial technology is applied only to the painted
surfaces of the Motorola iDEN phones, thereby providing
protection against damage to such surfaces caused by microbes,
but does not extend such protection to the end user.
iii
Page 6

Safety
• AgION antimicrobial protection is based on
silver, a safe, non-toxic additive to the phone
paint. Silver is widely used as an antimicrobial
agent in many environments and industries.
• AgION antimicrobial technology is safe to use.
Thorough testing has shown the additive to be
less toxic than table salt and less irritating than
talcum powder.
How It Works
• The technology continuously inhibits the growth
of product damaging bacteria on the phone's
painted surfaces.The active ingredient helps
break down enzymes in the microbe, inhibiting
its ability to reproduce and spread on the painted
surfaces on the phonee.
• The active ingredient in AgION is silver, in the
form of silver ions.
iv
Accreditation
• The AgION antimicrobial compound is
registered with the Environmental Protection
Agency (EPA) as a preservative and
bacteriostatic agent for use in the manufacturing
of polymers and plastics.
• NSF, FDA-listed
Page 7

Getting St arted
What’s in the Box?
Your i880 phone comes with:
• This Welcome Guide, with a tear-off Quick
Reference Card in English and Spanish
• A booklet containing safety information and your
warranty
• A Standard Lithium Ion (Li-Ion) Battery
• A rapid travel charger
• A holster
• A Subscriber Identity Module (SIM) card
• A memory card
• A CD containing the i880 User’s Guide
For more information on your i880 phone, refer to
the i880 User’s Guide CD.
To access the i880 User's Guide, insert the i880
User's Guide CD into your computer. Navigate to
the drive containing the CD to open the User
Guide’s file on the CD.
In order to read the i880 User's Guide on the CD,
you must have Adobe
computer. You can download Adobe® Reader for
free by going to http://www.adobe.com.
®
Reader installed on your
1
Page 8
Getting Started
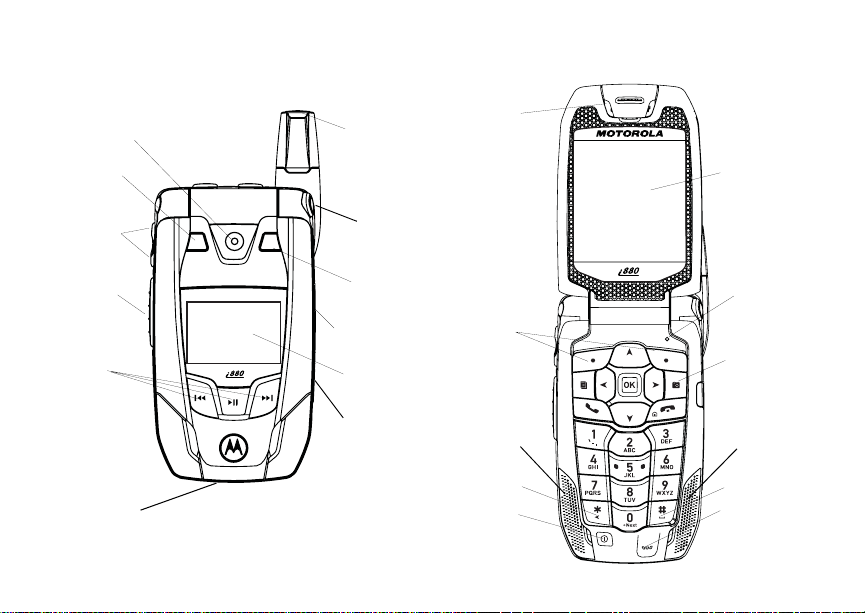
camera
lens
spotlight
volume
controls
Walkie-Talkie
button
audio player
keys
accessory
connector
2
retractable
antenna
flip open
button
mirror
stereo
headset jack
external
display
memory
card slot
earpiece
option keys
speaker
back key
power
button
internal
display
light sensor
camera key
speaker
space key
microphone
Page 9
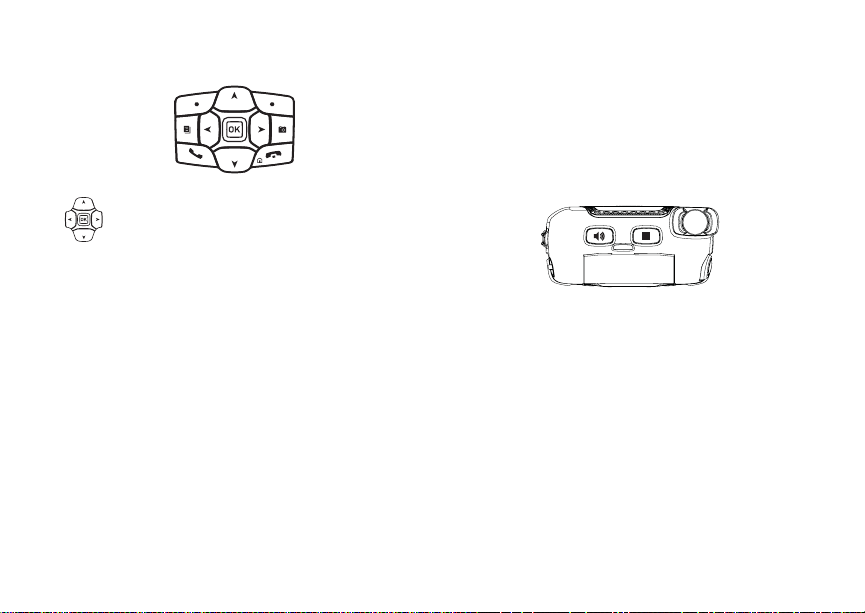
Navigation key — press the arrows to
scroll through menus and lists.
O OK key — selects highlighted item;
answers calls.
m Menu key — accesses context-sensitive
menus.
c Camera key — Accesses camera and
takes pictures.
A Option key — selects the option
appearing above it on the display.
Note: Throughout this User’s Guide,
the option keys will be
represented by A.
What’s in the Box?
s Send key — places and answers phone
calls.
e End key — ends phone calls; returns to
idle screen; when using Wireless Data
Services, returns to home page.
t Acts like s when the flip is closed; turns
Walkie-Talkie speaker on and off; used
with voice names and voice records.
. Acts like e when the flip is closed;
accesses recent calls; sends incoming
calls to voicemail.
3
Page 10
Getting Started
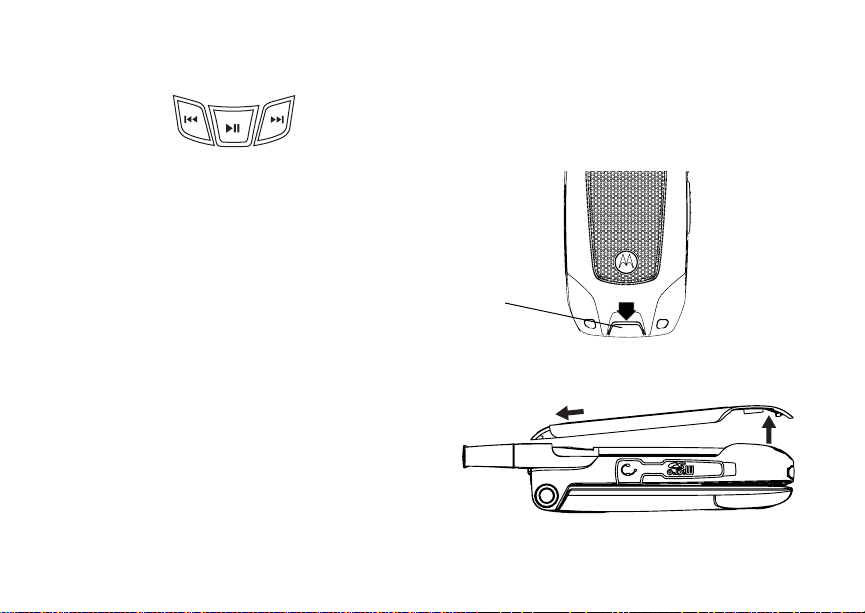
y Accesses the audio player when the flip is
closed; plays audio files; pauses audio
files.
z When an audio file is playing,
fast-forwards and skips to the next audio
file.
x When an audio file is playing, rewinds and
skips to the previous audio file.
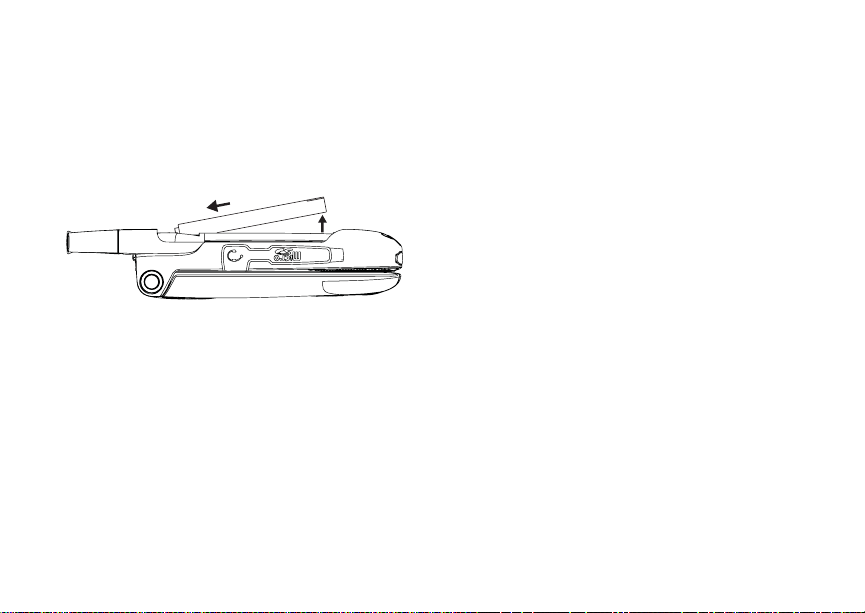
Removing the Battery Door
1 Make sure the phone is powered off. See
“Powering On and Off” on page 7.
2 Slide the release button back until it releases the
battery door.
release
button
To start using your i880 phone:
• Make sure your SIM card is in place.
• Charge the battery.
• Activate your service.
• Enable security.
4
3 Allow the battery door to pop up, slide it forward,
and remove it from the back of your phone.
Page 11

Locating Your SIM Card
Locating Your SIM Card
Your SIM (Subscriber Identity Module) card is a
small piece of plastic located in the SIM card
holder in the back of your phone, underneath the
battery.
SIM card
If there is no SIM card in your phone, contact
Nextel Customer Service at 1-800-639-6111.
If you want to use a SIM card other than the one
that is in your phone, please contact Nextel
Customer Service to verify that the SIM card you
want to use is compatible with your phone.
Battery
Inserting the Battery
Your phone comes with a Standard Li-Ion Battery.
1 Remove the battery door.
2 Insert the battery into the battery area. Press the
battery down to secure it.
3 Replace the battery door and press it gently until
you hear a click.
5
Page 12
Getting Started
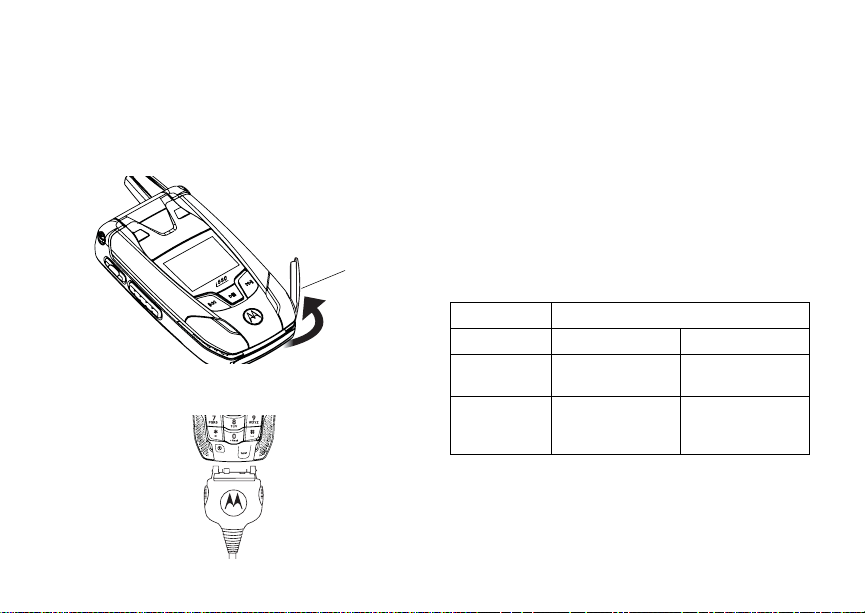
Charging the Battery
Your phone comes with a rapid travel charger.
1 Plug the charger into an electrical outlet.
2 Open the connector cover.
connector
cover
3 Plug the other end of the charger into the
accessory connector.
6
Charger Attached or Device Attached appears
on the display.
Tip: To remove the charger from the accessory
connector: Press the buttons on the sides
of the plug. Pull the plug straight out.
4 If you have purchased optional batteries or
chargers, see “Charging Times”.
Charging Times
Check your battery and charger type against the
grid below to determine appropriate charging
times.
Battery Charger
Rapid Standard
Standard
Li-Ion
High
Capacity
Li-Ion
For best results, charge the batteries within the
temperature range of 50°F to 104°F (10°C to
40°C).
Prolonged charging is not recommended.
2.5 hours 5 hours
3.5 hours 6 hours
Page 13
Powering On and Off
Removing the Battery
1 With the phone powered off, remove the battery
door.
2 Remove the battery by pushing it toward the
antenna and lifting it out.
Battery Use and Maintenance
• The Motorola iDEN Approved Lithium Ion
chargers provide optimum performance. Other
chargers may not fully charge the iDEN Lithium
Ion battery or may yield a reduced number of
lifetime charge cycles.
• Extreme temperatures degrade battery
performance. Do not store the battery where
temperatures exceed 140°F (60°C) or fall below
-4°F (-20°C).
• Lithium Ion batteries have a self discharge rate
and, without use, lose about 1% of their charge
per day.
• The battery capacity is degraded if the battery is
stored for long periods while fully charged. If
long term storage is required, store at half
capacity.
Powering On and Off
To power your phone on:
1 Open the flip.
Tip: Press the flip open button to open the flip
easily.
2 Press p.
As your phone connects to the network, you will
see a connecting message. When the idle screen
appears, the phone is ready to use.
To power your phone off:
1 Open the flip.
2 Press and hold p.
7
Page 14

Getting Started
Activating Service
The first time you power your phone on, your
service is activated.
A screen then appears prompting you to select Ok
to update your browser information, which enables
security. This screen will only appear during initial
activation.
Enabling Security
You must enable security the first time you power
on your phone or within 10 days of first activation of
your phone.
1 Press A under Ok.
2 You are prompted to enable security. Press A
under Yes. A series of screens followed by the
default homepage displays.
3 Press e to return to the idle screen.
8
Phone Programming
Within 24 hours of enabling security, you will
receive an alert notification containing your
Personal Telephone Number (PTN), Nextel
Customer Service number, Walkie-Talkie number,
and Talkgroups (if you subscribe to this service).
1 When you receive an alert notification saying
New Browser Message - Receive
Programming Info, press A under Goto.
2 You are prompted to accept changes to your
lists. Press A under Ok.
3 You are prompted again to accept changes to
your lists. Press A under Ok.
4 A confirmation screen displays. Press A under
Ok.
5 Press e to return to the idle screen.
Page 15

Finding Your Phone Number and Walkie-Talkie Number
Finding Your Phone Number
and Walkie-Talkie Number
My Info lets you view your phone number,
Walkie-Talkie number, and other phone
information.
1 Press m to access the main menu.
2 Scroll to My Info.
Note: You may need to press A under More to
display My Info.
3 Press O.
4 Scroll to see your information:
Line 1 and Line 2 are your phone numbers.
Direct Connect is your Walkie-Talkie number,
the number that others use to contact you using
®
Nextel
Walkie-Talkie service. These numbers
appear when you receive your alert notification
after enabling security on your phone.
Nextel Worldwide® Service
You can use your phone to make calls
internationally in select cities using other iDEN
networks by calling Nextel Customer Service to
activate international dialing on your account.
Countries in which you can use your phone include
Argentina, Brazil, Canada, Guam, Israel, Jordan,
Mexico, Peru, the Philippines, Singapore, and
South Korea*.
* Credit approval may be required. Other conditions may apply.
®
Customizing Features
You can control many features of your phone,
including the size of the text on the display, the way
you access main menu items, and the volume of
incoming sound, rings, and other tones.
9
Page 16

Getting Started
Phone Basics
Display
Any time your phone is powered on, the display
provides you with information and options.
The external display shows a shortened version of
the internal display. To see more information, open
the flip.
status icons
text area
menu icon
display options
The screen shown above is the idle screen. The
idle screen appears when your phone is on, but not
engaged in any activity.
10
Text Area
This area displays menus, messages, names,
phone numbers, and other information.
Display Options
Two display options appear at the bottom of most
screens. You select a display option by pressing
the option key below it.
Menus and Lists
Your phone’s features are arranged in menus,
submenus, and lists.
To access the items in a menu or list, scroll using
the navigation key at the top of your keypad. This
key lets you scroll up, down, left, or right. Holding
down the appropriate part of the navigation key
speeds up scrolling.
In this guide, this symbol > tells you to select a
menu or list item. For example, Settings >
Security means:
1 Scroll to Settings on the main menu.
2 Press O to see the Settings screen.
3 Scroll to Security.
4 Press O to see the Security screen.
Page 17

Phone Basics
OK Key
Pressing O:
• Selects the highlighted menu item or list item
• Sets options
• Confirms actions
• Places and answer calls
Menu Key
Many features provide context-sensitive menus
that let you access related features and actions.
This icon
menu is available. Press m to access the menu.
S appears any time a context-sensitive
Main Menu
All your phone’s features can be accessed through
the main menu. You can set the main menu to
appear as a list or as large icons.
Net Access Nextel Wireless
a
Java Apps Access Java applications
q
Settings Customize your phone.
b
Ring Tones Assign ring tones and turn
m
* Music Player Access the audio player.
m Media Center Access stored pictures,
C Camera Access camera and take
Data Services.
on your phone.
ringer off.
videos, and audio
recordings
pictures and videos.
11
Page 18

Getting Started
n Downloads Provides a catalog of ring
Bluetooth
B
My Info View personal phone
j
DirecTalk Launch Direct TalkSM.
M
Walkie-Talkie Access any Walkie-Talkie
S
VoiceRecord Record and play audio
c
GPS Find your approximate
l
Contacts Create, view, store, and
d
12
tones, wallpaper, games,
and Java applications that
you can download directly
to your phone. Items in this
catalog change frequently,
so check regularly for fresh
content.
®
Connect to a device with
Bluetooth.
information, including
phone number and
Walkie-Talkie number.
Access Setup and Help.
numbers and Groups on
your phone.
messages.
geographical location.
edit Contacts and Groups.
Messages Access messages.
e
Call Forward Set call forwarding options.
f
Datebook Schedule appointments.
o
Memo Store a number to access
g
Call Timers Phone usage information.
h
Recent Calls Lists recent calls.
i
Shortcuts Create shortcuts to
s
Profiles Groups of settings you
p
Call Alert Lists call alerts.
k
later.
screens.
apply together.
Quick Access to Main Menu Items
Each arrow in the navigation key and O can be
used to access a main menu item from the idle
screen. Each of these keys is assigned to a main
menu item when you receive your phone.
Page 19

Phone Basics
Status Icons
Status icons appear at the top of the display. Some
appear at all times. Others appear only when your
phone is engaged in certain activities or when you
have activated certain features.
abcd
efgd
o p q
r s
6 No Service — Your phone is
A
B
S Group In Use— Your phone is
C
Battery Strength — A fuller battery
indicates a greater charge.
Signal Strength — More bars next
to the antenna indicate a stronger
signal.
without service. You cannot make
or receive any type of call.
Phone In Use — Your phone is
active on a phone call.
Walkie-Talkie In Use — Your
phone is active on a Walkie-Talkie
call.
®
active on a Nextel
Walkie-Talkie call.
Talkgroup In Use — Your phone is
active on a Talkgroup call.
Group
B Bluetooth In Use — Your phone is
1 2
G L
I
J
using Bluetooth. If this icon is
blinking, your phone is in
discoverable mode. If this icon is
static, your phone is active in a
Bluetooth connection.
Active Phone Line — 1 indicates
phone line 1 is ready to make calls;
2 indicates phone line 2 is ready to
make calls.
Call Forward — Your phone is set
to forward calls.
H K
RM
Q
u
w xT
yz
ljik
mXnW
Ringer Off — Your phone is set to
not ring.
Speaker Off — Sets Walkie-Talkie
sound to come through the earpiece
rather than through the speaker.
Messages — You have one or
more messages.
T9 Text Input — You are using T9
Text Input to enter text.
13
Page 20

Getting Started
DE
9 Transmitters — Your phone is set
Y Z
N O
7 Hearing Aid — Your phone is set
5 Music Player — The audio player
43
c
U
14
Internet — You are ready to
browse the Internet or are browsing
the Internet using a secure
connection.
not to receive calls and other
transmissions.
Packet Data — You are ready to
transfer packet data or are
transferring packet data.
TTY — You are ready to use your
phone to make calls using a
teletypewriter device.
for use with a hearing aid and is
active on a phone call.
is active.
Voice Record — You have one or
more voice records stored.
USB Mass Storage — You are
using the USB mass storage
feature.
Using the Memory Card
Your i880 phone comes with a memory card.
When the memory card is in your phone, many
types of pictures, videos, and audio files stored on
the memory card can be viewed or played using
your phone's Media Center. Music files and
podcasts stored on the memory card can be played
using your phone's audio player.
When the memory card is in your phone, you can
save these media items to it:
• Pictures received in Walkie-Talkie calls
• Pictures and videos taken with your phone’s
camera
• Pictures, videos, and audio recordings received
via Bluetooth
• Pictures, videos, and audio recordings received
in MMS messages
You can use a memory card reader and adapter to
connect to your computer’s USB port and access
the memory card from your computer. This lets you
save files from your computer to your memory card
or save files from your memory card to your
computer.
Some files saved to a memory card from sources
other than your phone may not be accessible when
the memory card is in your phone.
Page 21

Using the Memory Card
To make sure the files you save to the memory
card using your computer can be accessed using
your phone, see “Ensuring Files on the Memory
Card Are Compatible With Your Phone” on page
17.
Inserting the Memory Card
1 Open the memory card slot cover.
2 Slide in the memory card. Push the memory
card into the slot until it clicks into place.
3 Close the memory card slot cover.
4 Your phone may prompt you to use the memory
card to store new media items, go to the
camera, go to the Media Center, or do nothing. If
you select Do Nothing, you will return to the idle
screen. Respond to the prompt now.
Formatting a New Card
The first time you insert a memory card in your
phone, you may be prompted to format the card.
Important: The Format Card option erases any data
saved to the memory card. It should
only be used if your phone prompts you
to format the memory card.
15
Page 22

Getting Started
To format a memory card:
From the main menu, select Settings >
Memory Card > Format Card.
Removing the Memory Card
Important: Do not remove the memory card before
1 From the main menu, select Settings >
Memory Card > Remove Card.
2 Open the memory card slot cover.
3 Push the memory card to release it from the slot.
16
selecting the Remove Card option.
Removing the memory card before
selecting the Remove Card option
could result in loss of data.
4 Pull out the memory card.
5 Close the memory card slot cover.
Note: If you select the Memory Card > Remove
Card option but do not remove the
memory card, you cannot use the memory
card until you remove it and insert it again.
Setting Your Phone’s Storage Preference
You can choose whether media items are saved to
your phone’s memory or to a memory card inserted
in your phone’s memory card slot.
Page 23

Using the Memory Card
To set the media storage option in Settings:
1 From the main menu, select Settings >
Memory Card > Store Media.
2 Select On Phone to set your phone to save
media items to the phone’s memory. -or-
Select Prefer On Card to set your phone to
save media items to the memory card if it is in
the phone. If no memory card is in the phone,
even if you choose Prefer On Card, the media
items are saved to your phone’s memory.
If you set the media storage option to save to your
phone’s memory, when you insert the memory
card your phone prompts you to switch to storing to
the memory card.
Ensuring Files on the Memory Card Are Compatible With Your Phone
When your memory card is connected to your
computer, your computer lets you save files to your
memory card in ways that may not allow you to
access these files when the memory card is in your
i880 phone.
To ensure the files you save to your memory card
are compatible with your i880 phone, use the folder
structure, file name rules, and formats described in
the following sections.
Folder Structure
The first time you insert the memory card into your
phone, your phone creates folders on the memory
card. When you save files from your computer to
the memory card, save each file to the appropriate
folder:
• The Music folder is for music files you will play
using the audio player. Files in this folder cannot
be accessed from the Media Center.
• The Podcast folder is for podcasts you will play
using the audio player. Files in this folder cannot
be accessed from the Media Center.
• The Audio folder is for audio files you will play
using the Media Center. Files in this folder
cannot be accessed from the audio player.
• The Image folder in for pictures you will view
using the Media Center.
• The Video folder is for videos you will play using
the Media Center.
Because your phone creates these folders the first
time the memory card is inserted, you should insert
the memory card into your phone at least once
before using it with your computer.
17
Page 24

Getting Started
File Name Rules
When naming files stored on the memory card, the
following rules apply:
• The file name can contain both ASCII and
Unicode characters.
• File names up to 32 characters long, including
the file extension, can be displayed by your
phone. File names up to 255 characters long,
including the file extension, can be read by your
phone. If a file name is more than 32 characters
long, but no more than 255 characters long, your
phone displays an abbreviated name for the file,
but does not change the name of the file on the
memory card.
Note: Only files with names no longer than 32
characters can be stored in your phone’s
memory. When you copy or move a file
with a longer name to your phone’s
memory, you are prompted to rename the
file.
• The file name must be in a language your phone
can display. To see which languages your phone
can display, select Settings > Display/Info >
Language. Your phone can display the
languages listed and other languages that use
the same alphabets.
18
File Formats
Audio Player
These file formats are compatible with your
phone’s audio player:
MP3 version MPEG-1, MPEG-2, MPEG-2.5.
ACC LC Bit Rates (kbits/sec)
AAC+ v1,
ACC+ v2
Bit Rates (kbits/sec)
32, 40, 48, 56, 64, 80, 96, 112,
128,160, 192, 224, 256, 320.
Sampling Rates (kHz)
8, 11.025, 12,16, 22.05, 24, 32,
44.1, 48.
32, 40, 48, 56, 64, 80, 96, 112,
128, 160, 192, 224, 256, 320.
Sampling Rates (kHz)
8, 11.025, 12,16, 22.05, 24, 32,
44.1, 48.
Bit Rates (kbits/sec)
32, 40, 48, 56, 80,96, 112, 128.
Sampling Rates (kHz)
8, 11.025, 12,16, 22.05, 24, 32,
44.1, 48.
Page 25

Using the Audio Player
Media Center
These types of video files are compatible with the
video playback capabilities of your phone’s Media
Center:
Video Formats M-JPEG, MPEG-4, H.263.
Audio Formats AMR-NB, AMR-WB.
Bit Rates
(kbits/sec)
Up to 128.
These types of audio files and picture files are
compatible with the Media Center:
File Type Task Formats
Audio Playback MIDI (FM-Midi, Type-0, 16
Picture View GIF (GIF89A and GIF87A),
Capture JPEG.
Polyphony, SP-Midi
compliant), WAV (8 kHz,
8-bit Mono PCM Canonical
Format), AMR, AU, MP3,
AAC, AAC+.
JPEG, WBMP, PNG.
Using the Audio Player
Your i880 phone includes an audio player that you
can use to play audio files stored on the memory
card inserted in your phone.
1 From the main menu, select Music Player.
2 Scroll to a folder.
Tip: The Songs folder contains all the audio files
on the memory card in a single list.
3 To play the first audio file in the folder, press A
under Play.
To pause a playing audio file, press A under
Pause or press O.
To resume playing a paused audio file, press A
under Play or press O.
19
Page 26

Getting Started
Using the Camera
The camera in your i880 phone takes pictures and
records videos.
Taking a Picture
1 From the main menu, select Camera. -or-
Press c.
2 If you want to adjust the zoom, spotlight, picture
quality, picture size, or a timer, set these options.
3 Aim the camera lens on the flip. Use the internal
display as the viewfinder.
4 When the image you want to capture is in view,
press c or press O or press A under Capture.
5 To save the picture, press c or press O. -or-
To discard the picture without saving it, press A
under Discard.
Recording a Video
1 From the main menu, select Camera. -or-
Press c.
2 Press m.
3 Select Record Video.
4 If you want to adjust lighting: Press m. Select
Spotlight. Select On or Off.
20
5 Aim the camera lens on the flip. Use the internal
display as the viewfinder.
6 If you want to zoom in or out, scroll up or down.
If you want to change the image size, scroll left
or right.
7 When you are ready to record, press and
release c, press and release O, or press and
release A under Record. Releasing the key
starts the recording.
8 If you want to end the video, press c or press A
under Stop.
9 To save the video, press c or press O. -or-
To view the video without saving it, press m and
select Review. -or-
To discard the video without saving it, press A
under Discard.
Bluetooth
Your i880 phone is a Bluetooth device. Bluetooth
devices create seamless voice and data
connections with other Bluetooth devices, such as
another Bluetooth phone, a Bluetooth pen,
headset, or desktop adapter. These connections
are made wirelessly. Refer to the i880 User’s
Guide CD for complete instructions on Bluetooth.
®
Page 27

SIM Card Security
SIM Card Security
Your SIM card stores all your Contacts and
protects your personal information. Since this
information is stored on your SIM card, not in your
phone, you can remove the information by
removing your SIM card.
Note: Except for making emergency calls, your
phone will not function without the SIM
card.
To prevent unauthorized use of your phone, your
SIM card is protected by a PIN that you enter each
time the phone is powered on. You can change the
PIN or turn off the requirement that it be entered.
Turning the PIN Requirement On and Off
When the SIM PIN requirement is off, your phone
can be used without entering a PIN.
Important: When the SIM PIN requirement is off,
When the SIM PIN requirement is on, you are
prompted to enter your PIN each time you power
on your phone.
the personal data on your SIM card is
not protected. Anyone can use your
phone and access your personal data.
Note: If a SIM PIN is required, your phone will
not function until the SIM PIN is entered,
except for making emergency calls.
1 From the main menu, select Settings >
Security > SIM PIN.
2 Select On or Off.
3 Enter the current SIM PIN.
Note: The default SIM PIN is 0000. Change your
PIN to prevent fraudulent use of the SIM
card (see “Changing the PIN”).
4 Press A under Ok.
Entering the PIN
1 When the Enter SIM PIN Code screen appears
after you power on your phone, enter your SIM
PIN.
2 Press A under Ok.
The message SIM Unlocked displays.
Important: If you enter your PIN incorrectly 3 times,
your SIM card is blocked. To unblock
your SIM card, you must contact Nextel
Customer Service. See “Unblocking the
PIN”.
21
Page 28

Getting Started
Changing the PIN
Note: The SIM PIN requirement must be turned
on in order to access this feature.
1 From the main menu, select Settings >
Security > Change Passwords > SIM PIN.
2 At the Enter Old SIM PIN screen, enter the
current SIM PIN.
3 Press A under Ok.
4 At the Enter New SIM PIN screen, enter the
new 4- to 8-digit SIM PIN.
5 Press A under Ok.
6 At the Re-enter New SIM PIN screen, re-enter
the new SIM PIN to confirm.
7 Press A under Ok.
Changed: SIM PIN displays.
Unblocking the PIN
If you enter your PIN incorrectly 3 times, your SIM
card is blocked. To unblock your SIM card, you
must contact Nextel Customer Service to get a PIN
Unblock Code (PUK).
22
Important: If you unsuccessfully enter the PUK
code 10 times, your SIM card is
permanently blocked and must be
replaced. If this happens, all data is
lost. You will get a message to contact
Nextel Customer Service. Except for
making emergency calls, your phone
will not function with a blocked SIM
card.
To unblock the PIN:
1 Press * # m 1.
2 At your Nextel Customer Service
representative’s request, provide the information
needed to give you a PUK code.
3 Select Unblock PIN.
4 Enter the PUK code.
5 Enter a new 4- to 8-digit SIM PIN.
6 Re-enter your SIM PIN.
Note: These steps must be performed in quick
succession.
If you entered the codes properly, SIM Unlocked
appears on the display.
Page 29

SIM Card Security
Inserting and Removing Your SIM Card
Important: Do not touch the gold-colored areas of
The SIM card is designed for optimal Contacts
storage and feature use. For Nextel SIM card
compatibility information, visit
www.nextel.com/sim.
Note: In some cases, Contacts and Groups may
If you remove your SIM card and use it with
another phone, or use another SIM card with your
phone, the following information is erased:
• The recent calls list
• Call forwarding settings
• Net alerts
• MMS messages
• Options set using the MMS Setup menu
• Information stored in Memo
your SIM card.
not be accessible if you move your SIM
card to another phone. Contacts and
Groups created with your i880 phone may
not be readable by an older iDEN
SIM-based phone.
• Pictures, video, and audio recordings accessible
through the Media Center that are saved in your
phone’s memory, except those that are forward
locked. (No items saved to the memory card are
erased.)
• 3 most recent GPS Enabled locations
• Voice records
• Voice names
• Datebook events
• Options set using the Personalize menu
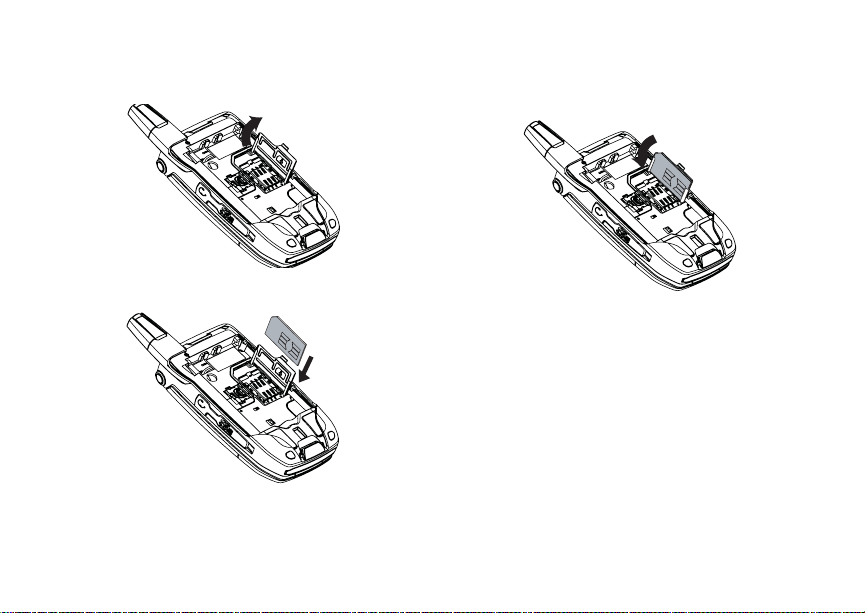
Inserting Your SIM Card
1 With your phone powered off, remove the
battery door and battery.
2 Slide the latch away from the SIM card holder.
latch
23
Page 30
Getting Started
3 Open the SIM card holder.
4 Carefully slide your SIM card into the SIM card
holder.
24
5 Close the SIM card holder.
6 Slide the latch toward the SIM card holder.
Removing Your SIM Card
Important: To avoid loss or damage, do not remove
1 With your phone powered off, remove the
battery door and battery.
your SIM card from your phone unless
absolutely necessary .
2 Slide the latch away from the SIM card holder.
3 Open the SIM card holder.
4 Carefully slide your SIM card out of the SIM card
holder.
5 Close the SIM card holder.
6 Slide the latch toward the SIM card holder.
Page 31

Locking the Keypad
Note: Protect your SIM card as you would any
delicate object. Store it carefully.
Locking the Keypad
Locking the phone’s keypad prevents its buttons
from being pressed. When the keypad is locked,
you can only:
• Power the phone on and off
• Unlock the keypad
• Respond to incoming calls, messages, and
alerts
Important: Emergency calls cannot be placed while
To lock the keypad:
1 From the idle screen, press m.
2 Press *.
If you press a key while the keypad is locked,
instructions for unlocking the keypad display
briefly.
To unlock the keypad:
1 From the idle screen, press m.
2 Press *.
the keypad is locked.
You also have the option of setting your phone to
automatically lock the keypad if there has been no
activity for a specified time.
1 From the main menu, select Settings >
Security > Keypad Lock.
2 To lock the keypad immediately, select Lock
Now. You will be given the option to press m and
* to lock and unlock the keypad.
3 To set a specific time for the keypad to lock if
there has been no activity, select Auto Lock and
then select a time.
The keypad can be set to lock in 30 seconds or in
1, 5, 10, 15, or 20 minutes if the keypad is not
touched during the specified time. To turn the auto
lock off, repeat step 3 and select Off.
Antenna
The retractable antenna on your i880 phone is
designed to be extended during calls and is
essential to attain the hearing aid compatibility
rating on applicable models.
To extend the antenna, pull gently on the tip until
the antenna is fully extended and clicks into
position.
When finished with a call, retract the antenna by
pushing gently on the rounded tip until the antenna
clicks into place.
25
Page 32

Getting Started
To optimize your phone’s performance, extend the
antenna when you make or receive a call, and
avoid touching the antenna with any body part.
Important: Failure to fully extend or retract the
antenna until the antenna clicks into
place causes severely degraded
performance, which may result in
missed calls, dropped calls, or garbled
audio.
Accessories
Your phone comes with a memory card, Standard
Li-Ion Battery, rapid travel charger, and holster.
Various accessories are available for use with your
i880 phone, including larger capacity batteries and
cases, vehicle power chargers, data cables,
doors,
hands-free accessories, Bluetooth accessories,
and more.
To order additional accessories, go to
www.nextel.com or call 1-888-242-4187. You can
also contact your Nextel Authorized Sales
Representative or stop by any Sprint Store. For
information on Sprint Store locations, go to
www.sprintstorelocator.com.
26
Nextel® Customer Service
Nextel Customer Service: 1-800-639-6111 or dial
611 from your i880 phone.
Nextel Worldwide Customer Service:
+1-360-662-5202 (toll-free from your i880 phone).
Understanding Status Messages
You may receive status messages under certain
conditions. Before contacting Nextel Customer
Service, note the message, numeric code, and the
conditions under which the message appeared.
You can go to www.nextel.com for additional
information about status messages.
Page 33

Phone Calls
Making Calls
Your i880 phone makes two types of calls: digital
cellular phone calls and Walkie-Talkie calls.
Phone Calls
With the Flip Open
1 Enter the number you want to call.
2 To place the call:
Press s. -or-
If you entered the number from the idle screen,
press O.
3 To end the call:
Press e. -or-
Close the flip.
To end a call by closing the flip, you must have the
Flip to End feature turned on.
With the Flip Closed
You can make phone calls with the flip closed
using a voice name or the recent calls list to select
the number you want to call.
To end the call, press
..
Nextel® Walkie-Talkie Calls
To make a Walkie-Talkie call:
1 If the flip is open, enter the Walkie-Talkie number
you want to call. -or-
If the flip is closed, choose the number as you
would when making a phone call.
2 Press and hold the Walkie-Talkie button on the
side of your phone. Begin talking after your
phone emits a chirping sound.
3 Release the Walkie-Talkie button to listen.
A Walkie-Talkie call ends automatically if there is
no activity on the call for a few seconds.
Tip: To let someone know you want to talk to
him or her on a Walkie-Talkie call, send a
call alert.
27
Page 34

Making Calls
Receiving Calls
Phone Calls
When you receive a phone call, your phone rings,
vibrates, or lights up its backlight.
Answering
If the flip is closed, press
Open the flip. -or-
Press s. -or-
Press O. -or-
Press A under Yes. -or-
Press any number key.
To answer a call by opening the flip, you must have
the Flip to Ans feature turned on. To answer a call
by pressing any number key, you must have the
Any Key Ans feature turned on.
Sending to Voicemail
If the flip is closed, press
Press e. -or-
Press A under No.
28
t. -or-
.. -or-
Ending
If the flip is closed, press
Press e. -or-
Close the flip.
.. -or-
Walkie-Talkie Calls
When you receive a Walkie-Talkie call, your phone
emits a chirping sound or vibrates.
Answering
1 Wait for the caller to finish speaking.
2 Press and hold the Walkie-Talkie button on the
side of your phone. Begin talking after your
phone emits a chirping sound.
3 Release the Walkie-Talkie button to listen.
Ending
If the flip is closed, press
Press e. -or-
Press A under Exit. -or-
Close the flip.
A Walkie-Talkie call ends automatically if there is
no activity on the call for a few seconds.
.. -or-
Page 35

Using Speakerphone
Using Speakerphone
With the Flip Open
To turn speakerphone on or off:
Press A under Speaker. -or-
t.
Press
With the Flip Closed
When you make a call with the flip closed,
speakerphone is always on.
Opening the flip turns speakerphone off.
Using Mute
To turn mute on:
Press A under Mute.
While mute is on, Unmute appears as a display
option.
To turn mute off:
Press A under Unmute.
Making Emergency Phone Calls
Your phone supports emergency calling.
Emergency phone calls can be made even when
your SIM card is blocked or not in your phone.
Dial 911 to be connected to an emergency
response center. If you are on an active call, you
must end it before calling 911.
When you make an emergency call, your phone’s
GPS Enabled feature can help emergency service
personnel find you, if you are in a location where
your phone's GPS antenna has established a clear
view of the open sky and your local emergency
response center has the equipment to process
location information. Refer to “GPS Enabled” and
particularly “IMPORTANT: Things to Keep in Mind”
and “Making an Emergency Call” in the i880 User’s
Guide on the CD, for more information on the
limitations of this feature. Because of the
limitations of this feature, always provide your best
knowledge of your location to the emergency
response center when you make an emergency
call.
Important: Emergency calls cannot be placed while
the keypad is locked.
29
Page 36

Making Calls
Important: If you have not registered on the
Important: If you are bringing your phone number
network, emergency calls cannot be
placed while your SIM card is in your
phone.
to Nextel from your previous carrier,
you may receive a temporary telephone
number while your Nextel phone is
being programmed with your
permanent phone number. If you make
a call to 911 and the call fails, the 911
emergency response center will not be
able to call you back on your Nextel
phone if in the meantime, your Nextel
phone has been programmed with your
permanent telephone number. If the call
is disconnected before location and
details have been provided, call 911
again and advise that you were
disconnected.
Make an Emergency Call
Enter 911 and press s.
30
Page 37

Setting Up Your Voicemail Box
Nextel® Voicemail
Setting Up Y our V oicemail Box
Using your i880 phone, dial your 10-digit Nextel
Personal Telephone Number (PTN). For example:
7035557777. Follow the system instructions to
create a new 4- to 7-digit password, record your
name, and record a greeting. When the system
says, “Thank you for using Nextel Voicemail,” your
mailbox is set up.
If you are calling from a phone other than your
i880, dial your 10-digit Nextel PTN. When you hear
the greeting, press * to access your voicemail
box. The system will prompt you to enter your
password. Enter the last seven digits of your Nextel
PTN. For example: 5557777. This is your
temporary password.
You are in the main voicemail menu when you hear
the options listed below.
• To play your messages, press 1. (This option
plays only if you have new or saved messages.)
• To record a message, press 2.
• To change your greeting, press 3.
• To access your personal options, press 4.
If you press * while you are in a sub-menu, you
will go to the previous menu. If you press **, you
will go to the main voicemail menu. From the main
voicemail menu, press # to exit voicemail. At any
time, you may end the call by pressing e.
Receiving a Message
When you receive a voicemail message, New
Voice Mail Message appears on the display.
To call Nextel’s voicemail system and listen to the
message:
Press A under Call.
To dismiss the message notification:
If the flip is closed, press
If the flip is open, press O or press A under
Back, or close the flip.
If the caller leaves a message, this icon
appears on the display, reminding you that you
have a new message.
.. -or-
y
Accessing Voicemail From the Message Center
From the main menu, select Messages > Voice
Mail.
31
Page 38

Nextel® Voicemail
Sending Unanswered Calls to Voicemail
To send a phone call to voicemail instead of
answering it:
If the flip is closed, press
Press e. -or-
Press A under No.
.. -or-
Change Your Voicemail Language to Spanish
Nextel voicemail settings can be heard in English
or Spanish.
Use this feature to change the language you and
your callers will hear while in voicemail.
1 From the main voicemail menu, press 4 to
access your personal options
2 Press 4 again to access the language menu.
3 Follow the prompts to change your language
setting to English or Spanish.
32
Page 39

Wireless Data Services
Wireless Data Services
You can use your phone to access a suite of
wireless data products known as Wireless Data
Services. Services include Multimedia Messaging,
Instant Messaging, Wireless Web, Address Book,
Mobile Email and more.
Most services require the activation of a rate plan
with Wireless Data Services or the separate
purchase of a Wireless Data Services plan. To
order, call 1-800-639-6111 or contact your Nextel
sales representative.
* Wireless Data Services are available in the continental U.S.,
Canada, Mexico, Brazil, Argentina, and Peru. Wireless D ata
Services usage outside of the continental U.S. may incur
additional charges. See www.nextel.com for details.
Wireless Data Services
• Multimedia Messaging Service — send and
receive messages that may include text,
pictures, and audio recordings. You can send
and receive these messages from your phone,
through an email account, and from
www.nextel.com. For additional information,
refer to “Multimedia Messages” on the i880
User’s Guide CD.
• Web Service — access the wireless Internet
from your Nextel phone for information and
services from top wireless Web sites. Other
services and features available include access
to any wireless Internet address. Conduct topic
and key word searches, and bookmark sites and
applications.
• Downloads — personalize your phone with
downloadable ring tones, applications, games,
and wallpapers.
• Address Book — program your Contacts from
the Internet.
• Mobile Email — access personal and office
email accounts from your Nextel phone
(includes access to AOL
mail).
®
, MSN®, and Yahoo!®
• Instant Messaging — send and receive instant
messages through a phone-based interface
(includes access to AOL
MSN Messenger®, and Yahoo! Messenger®).
®
Instant Messenger™,
33
Page 40

Wireless Data Services
Accessing Wireless Data Services From Your Phone
You must first enable security on your phone to
receive Wireless Data Services. Enabling security
secures your data during over-the-air transmission
to and from your phone. See “Enabling Security”
on page 8.
To access Multimedia Messaging:
Press m to access the main menu and select
Messages > Inbox.
To access other Wireless Data Services*:
1 Press m to access the main menu and select
Net.
Your Wireless Data Services home page
displays.
2 Choose the service you want to access.
To access the Web:
Select Web Sites, Downloads&Services, or
Search.
To access MyNextel Address Book:
Select Business Tools > MyNextel Address
Book.
34
To access personal and office email accounts:
1 Select Email & IM.
2 Select your mail account.
To access Instant Messaging:
1 Select Email & IM.
2 Select your Instant Messenger.
To access Personalization catalogs:
Select Downloads&Services.
Many screens will require you to enter text. For
information on entering text, refer to “Entering
Text” on the i880 User’s Guide CD.
* To access your office or corporate email, address book an d ot her
related services from your Nextel phone, you will need to
download the Desk Assistant program to your office PC. If you
have an IT Administrator, you may need to review your company's
policy for desktop software and determine any necessary
technical or security requirements.
Navigation Keys
• Home — Press e to return to your home page.
Tip: Press e twice to return to your phone's
idle screen.
• Back — Press * to return to a previous screen.
Page 41

Tip: While navigating through Wireless Data
Services screens, a number may appear to
the left of the application or topic you want
to access. Press the corresponding number
on the keypad for quicker access to that
application or topic.
When transmitting highly personal or sensitive
data, such as a credit card number, this icon E
appears, indicating that the data is encrypted
during transmission.
Note: You may be asked to (re)enable security
as Nextel adds new services or upon your
return to the U.S. after traveling.
Guides and Demos
Quick Start Guides and demos with more details
on how to use your Wireless Data Services can be
accessed on www.nextel.com.
Guides and Demos
35
Page 42

Patent and Trademark Information
© 2006 Sprint Nextel. All rights reserved. SPRINT,
the “Going Forward” logo, the NEXTEL name and
logo, and other trademarks are trademarks of
Sprint Nextel.
MOTOROLA, the Stylized M Logo and all other
trademarks indicated as such herein are
trademarks of Motorola, Inc. ® Reg. U.S. Pat. &
Tm. Off. © 2006 Motorola, Inc. All rights reserved.
Microsoft and Microsoft Internet Explorer are
registered trademarks of Microsoft Corporation.
T9 is a trademark owned by Tegic
Communications.
®
Text Input Patent and Trademark Information
T9
This product is covered by U.S. Pat. 5,818,437,
U.S. Pat. 5,953,541, U.S. Pat. 6,011,554 and other
patents pending.
Java and all other Java-based marks are
trademarks or registered trademarks of Sun
Microsystems, Inc. in the U.S. and other countries.
All other product names or services mentioned in
this manual are the property of their respective
trademark owners.
Software Copyright Notice
The Motorola products described in this manual
may include copyrighted Motorola and third party
software stored in semiconductor memories or
other media. Laws in the United States and other
countries preserve for Motorola and third party
software providers certain exclusive rights for
copyrighted software, such as the exclusive rights
to distribute or reproduce the copyrighted software.
Accordingly, any copyrighted software contained in
the Motorola products may not be modified,
reverse-engineered, distributed, or reproduced in
any manner to the extent allowed by law.
Furthermore, the purchase of the Motorola
products shall not be deemed to grant either
directly or by implication, estoppel, or otherwise,
any license under the copyrights, patents, or patent
applications of Motorola or any third party software
provider, except for the normal, non-exclusive,
royalty-free license to use that arises by operation
of law in the sale of a product.
37
Page 43

Index
Index
A
Accessories 26
AgION antimicrobial iii
Antenna 26
Audio player 11
B
Battery
care 7
charging 6
door 4
inserting 5
Bluetooth 21
C
Calls
emergency 30
ending 29
making 28
phone calls 28
receiving 29
Camera 20
Customer Service 27
38
D
Display
options 10
screen 10
E
Emergency calls 30
End key 3
F
Flip action 28
H
Handset, see phone
I
Icons
status 13
Idle screen 10
K
Keypad 3
locking 25
L
Lists, see menus
M
Memory card 14
audio player 20
folders and files 18
inserting 15
removing 16
setting storage preference 16
Menu key 3, 11
Menus 10
context-sensitive 3, 11
main menu 11
Mute 30
N
Navigation key 3
Nextel
Customer Service 27
Wireless Data Services 34
P
Patent information 37
Phone 1, 10
flip action 28
off 7
on 7
Page 44

setting up 4
PUK code 23
S
Send key 3
Service, activating 8
SIM card 5, 21, 23
inserting 24
removing 25
SIM PIN 21
changing 22
requirement 21
unblocking 22, 23
Speakerphone 30
Status messages 27
T
Text display area 10
Trademark information 37
V
Voicemail
Message center 32
receiving 32
sending calls to 29, 33
setting up 32
Spanish 33
W
Walkie-Talkie number
receiving 8
viewing 9
Wireless data plan
availability 34
Wireless data services 34
accessing 35
navigating 35
ordering plan 34
39
Page 45

DECLARATION OF CONFORMITY
Per FCC CFR 47 Part 2 Section 2.1077(a)
Responsible Party Name: Motorola, Inc.
Address: 8000 West Sunrise Boulevard
Plantation, FL 33322 USA
Phone Number: 1 (800) 453-0920
Hereby declares that the product:
Product Name: i880
Model Number: H94XAH6RR4AN
Conforms to the following regulations:
FCC Part 15, subpart B, section 15.107(a),
15.107(d) and section 15.109(a)
Class B Digital Device
As a personal computer peripheral, this device
complies with Part 15 of the FCC Rules. Operation
is subject to the following two conditions: (1) this
device may not cause harmful interference, and (2)
this device must accept any interference received,
including interference that may cause undesired
operation.
Note: This equipment has been tested and
found to comply with the limits for a Class
B digital device, pursuant to part 15 of the
FCC Rules. These limits are designed to
provide reasonable protection against
harmful interference in a residential
installation. This equipment generates,
uses and can radiate radio frequency
energy and, if not installed and used in
accordance with the instructions, may
cause harmful interference to radio
communications. However, there is no
guarantee that interference will not occur
in a particular installation.
If this equipment does cause harmful
interference to radio or television reception,
which can be determined by turning the
equipment off and on, the user is
encouraged to try to correct the interference
by one or more of the following measures:
• Reorient or relocate the receiving
antenna.
• Increase the separation between the
equipment and receiver.
• Connect the equipment into an outlet on
a circuit different from that to which the
receiver is connected.
• Consult the dealer or an experienced
radio/TV technician for help.
41
Page 46

ALL MODELS WITH FCC ID AZ489FT5853 MEET THE
GOVERNMENT’S REQUIREMENTS FOR EXPOSURE
TO RADIO WAVES.
Your wireless phone is a radio transmitter and receiver. It
is designed and manufactured not to exceed the emission
limits for exposure to radiofrequency (RF) energy set by
the Federal Communications Commission of the U.S.
Government. These limits are part of comprehensive
guidelines and establish permitted levels of RF energy for
the general population. The guidelines are based on
standards that were developed by independent scientific
organizations through periodic and thorough evaluation of
scientific studies. The standards include a substantial
safety margin designed to assure the safety of all perso ns,
regardless of age and health.
The exposure standard for wireless mobile phones
employs a unit of measurement known as the Specific
Absorption Rate, or SAR. The SAR limit set by the FCC is
1
1.6W/kg.
Tests for SAR are conducted using standard
operating positions reviewed by the FCC with the phone
transmitting at its highest certified power level in all tested
frequency bands. Although the SAR is determined at the
highest certified power level, the actual SAR level of the
phone while operating can be well below the maximum
value. This is because the phone is designed to operate at
multiple power levels so as to use only the power required
to reach the network. In general, the closer you are to a
wireless base station antenna, the lower the power output.
Before a phone model is available for sale to the public, it
must be tested and certified to the FCC that is does not
exceed the limit established by the government-adopted
requirement for safe exposure. The tests are performe d in
positions and locations (e.g., at the ear and worn on the
42
body) as required by the FCC for each model. The highest
SAR value for this model phone when tested for use at th e
ear is 1.30 W/kg and when tested on the body, as
described in this user guide, is 1.57 W/kg during packet
data transmission. (Body-worn measurements differ
among phone models, depending upon available
accessories and FCC requirements.)
While there may be differences between the SAR levels of
various phones and at various positions, they all meet the
government requirement for safe exposure.
The FCC has granted an Equipment Authorization for this
model phone with all reported SAR levels evaluated as in
compliance with the FCC RF exposure guidelines. SAR
information on this model phone is on file with the FCC
and can be found under the Display Grant section of
http://www.fcc.gov/oet/fccid after searching on FCC ID
AZ489FT5853.
Additional information on Specific Absorption Rates (SAR)
can be found on the Cellular Telecommunications Industry
Association (CTIA) web-site at http://www.wow-com.com.
1
In the United States and Canada, the SAR limit for
mobile phones used by the public is 1.6 watts/kg (W/kg)
averaged over one gram of tissue. The standard
incorporates a substantial margin of safety to give
additional protection for the public and to account for any
variations in measureme nts.
2
The SAR information reported to the FCC includes the
FCC-accepted Motorola testing protocol, assessment
procedure, and measurement uncertainty range for this
product.
2
 Loading...