

Page 1

Sprint
iDEN
Digital Multi-service Data-capable Phone
i880 Phone User’s Guide
Page 2

Contents
Getting Started...........................................1
Removing the Battery Door...............................3
Locating Your SIM Card....................................4
Battery...............................................................4
Powering On and Off.........................................7
Activating Service..............................................7
Enabling Security ..............................................7
Phone Programming .........................................8
Finding Your Phone Number and
Walkie-Talkie Number ..................................8
®
Nextel
Voicemail..............................................8
Nextel Worldwide
Customizing Features .......................................9
Phone Basics ....................................................9
SIM Card Security...........................................14
Locking the Keypad.........................................18
Antenna...........................................................19
Accessories.....................................................19
Wireless Local Number Portability ..................19
®
Nextel
Customer Service ..............................20
i
®
Service...............................9
Understanding Status Messages ....................20
Making Calls .............................................21
Phone Calls.....................................................21
®
Walkie-Talkie .....................................21
Nextel
Accessing Walkie-Talkie
Numbers More Quickly...............................22
®
Nextel
Group Walkie-Talkie ..........................23
Talkgroup Calls ...............................................29
Receiving Calls ...............................................30
Choosing a Number to Call.............................31
Missed Phone Calls ........................................33
Using Speakerphone.......................................33
Using Mute......................................................33
Making Emergency Phone Calls.....................34
Using a Memory Card ..............................35
Inserting the Memory Card..............................35
Removing the Memory Card ...........................36
Setting Your Phone’s Storage Preference ......37
Ensuring Files on the Memory Card Are
Compatible With Your Phone .....................37
Using the Memory Card With
Your Computer ...........................................40
Page 3

Memory Cards Compatible
With Your Phone.........................................41
Audio Player.............................................42
Playing Audio Files With the Flip Closed.........42
Playing Audio Files With the Flip Open...........43
Adjusting the Volume ......................................44
How Your Audio Files Are Organized..............44
Playing Music While Files Are Loading...........45
Searching By First Letter.................................45
Playing a List and Using
Repeat and Shuffle.....................................45
Working With Playlists.....................................46
Working With Podcasts......................... ..........49
Deleting Audio Files ........................................52
DRM Items ......................................................52
Setting Audio and Visual Options....................53
Call Alerts................................................. 54
Sending Call Alerts..........................................54
Receiving Call Alerts.......................................54
Using the Call Alert Queue..............................55
Direct TalkSM.............................................57
Off-Network Walkie-Talkie ..............................57
Channels and Codes.......................................58
Private Direct Talk
Making Emergency Calls While in
Direct Talk
Setup Options .................................................61
SM
Calls..............................60
SM
Mode....................................61
Recent Calls..............................................63
Calls and Call Alerts........................................63
My Info From Other Phones............................64
Contact Information From Other Phones ........64
Viewing the Recent Calls List..........................65
Storing Items to Contacts................................65
Deleting Items.................................................66
Making Calls From the Recent Calls List ........66
Entering Text ............................................68
Using Word Mode ...........................................68
Special Function Keys.....................................69
Using Numeric Mode.......................................70
Contacts....................................................71
Accessing Contacts.........................................72
ii
Page 4

Creating Entries...............................................72
Editing Entries.................................................74
Viewing Entries................................................75
Deleting Entries...............................................77
Checking Capacity ..........................................77
Creating Pauses and Waits.............................78
International Numbers.....................................78
Making Calls From Contacts...........................79
Memo ........................................................ 80
Call Forwarding........................................81
Forwarding All Calls ........................................81
Turning Off Call Forwarding............................82
Forwarding Missed Calls.................................82
Viewing Call Forwarding Settings....................83
Advanced Calling Features.....................84
Call Waiting.....................................................84
Switching Between Calls.................................84
Putting a Call on Hold......................................85
Calling 2 People..............................................85
Creating Pauses and Waits While Dialing.......86
iii
Making International Calls...............................86
One Touch Walkie-Talkie................................86
Setting Flip Actions .........................................87
Call Timers......................................................88
Using Your Phone as a Modem ......................88
Features for the Hearing Impaired ..................90
Special Dialing Codes.....................................92
Nextel® Phone Services...........................93
Caller ID..........................................................93
Per-Call Blocking.............................................93
Per-Line Blocking............................................93
Second Line Service.......................................93
Call Restrictions ..............................................94
Sprint 411........................................................94
Ring Tones.................................. ... ...........95
Setting Your Phone to Vibrate.........................95
Ring and Vibrate .............................................96
Assigning Ring Tones to Contacts..................96
Viewing Ring Tone Assignments ....................96
Downloading More Ring Tones.......................97
Managing Memory ..........................................97
Page 5

Deleting Custom Ring Tones ..........................97
Message Center....................................... 98
Accessing the Message Center.......................98
Message Center Options.................................98
Receiving Messages................................ 99
Message Notifications.....................................99
Retrieving Messages.....................................100
Voicemail Messages.............................. 101
Receiving a Message....................................101
Accessing Voicemail From
the Message Center .................................101
Sending Unanswered Calls to Voicemail ......101
Nextel® Voicemail.................................. 102
Setting Up Your Voicemail Box.....................102
Playing Messages.........................................102
Changing Your Password..............................103
Recording Your Name...................................103
Recording Your Active Greeting....................104
Advanced Voicemail Features.......................104
Multimedia Messages ............................108
Navigating the Inbox, Drafts, and Sent Items108
Creating and Sending Messages..................108
Drafts.............................................................118
Sent Items.....................................................119
Receiving a Message....................................120
Navigating a Message...................................121
Viewing Received Messages
From the Message Center........................122
Actions for Received Messages....................122
Message Transmission .................................126
Customizing MMS.........................................126
Managing Memory ........................................129
SMS Messages .......................................130
Receiving a Message....................................130
Reading From the Message Center..............130
Calling and Storing Numbers ........................130
Wireless Data Services..........................132
Wireless Data Services.................................132
Accessing Wireless Data Services From Your
Phone .......................................................132
Navigation Keys............................................133
iv
Page 6

Guides and Demos........................................134
Using Nextel Direct SendSM..................135
Sending a Picture..........................................135
Receiving a Picture .......................................137
Sending My Info and Contact Information.....138
My Info............................ .. ... ...................141
Viewing My Info.............................................141
Editing My Info...............................................141
Setting Sending Options................................142
Camera ................................................... 143
Accessing the Camera..................................143
Taking Pictures..............................................143
More Actions for Captured Pictures ..............145
Recording Videos..........................................147
Changing Storage Preference.......................148
Accessing the Media Center .........................149
Customizing the Camera...............................149
Managing Memory.........................................149
Media Center.......................................... 151
Viewing the Media Center.............................151
v
Forward Locked Items...................................153
DRM Items ....................................................154
Pictures.........................................................154
Videos...........................................................156
Audio Recordings..........................................157
Renaming Items............................................159
Locking Items................................................159
Deleting Items...............................................159
Copying and Moving Items............................160
Changing Storage Preference.......................160
Accessing the Camera..................................161
Accessing the Audio Player ..........................161
Managing Memory ........................................161
Bluetooth® ..............................................162
Understanding Bluetooth® Access Settings..162
Setting Your Phone for Bluetooth
Accessing Bluetooth
Making a Bluetooth
®
...................................164
®
Connection..................164
Setting Device Details...................................167
Sending Contacts, Datebook Events, and
Media Center Items ..................................168
Receiving Items.............................................169
®
................163
Page 7

Voice Records........................................171
Viewing Voice Records .................................171
Creating Voice Records ................................171
Playing Voice Records..................................172
Labeling Voice Records ................................172
Locking Voice Records..................................172
Deleting Voice Records.................................173
Managing Memory.........................................173
Java Applications.................................. 174
Running Applications.....................................174
Suspending Applications...............................174
Resuming Applications..................................174
Ending Applications.......................................175
Downloading Applications.............................175
Deleting Applications.....................................175
Managing Memory.........................................176
Storing Java Applications
on the Memory Card.................................176
Shortcuts on the Main Menu .........................177
Java Applications and GPS Enabled.............178
Digital Rights Management ...................181
Installing Applications....................................181
Understanding DRM Status Icons.................181
Sharing Items................................................182
Managing DRM Items ...................................182
GPS Enabled...........................................185
IMPORTANT: Things to Keep in Mind ..........185
Making an Emergency Call ...........................187
Viewing Your Approximate Location .............188
Enhancing GPS Performance.......................189
Updating Satellite Almanac Data ..................190
Setting Privacy Options.................................191
Using GPS With Map Software.....................192
Datebook.................................................194
Viewing Datebook .........................................194
Creating Events.............................................195
Editing Events ...............................................197
Deleting Events.............................................198
Receiving Reminders....................................198
Making Calls From Datebook and Datebook
Reminders ................................................198
vi
Page 8

Customizing Datebook Setup........................200
Customizing Your Phone......................201
Setting the Volume........................................201
Setting Your Phone to Vibrate.......................201
Changing the Look of Your Phone................201
Temporarily Turning Off Transmissions........204
Using Settings...............................................205
Profiles ................................................... 211
Viewing Profiles.............................................211
Switching Profiles..........................................211
How Changing Settings Affects Profiles........211
Temporary Profiles........................................212
Creating Profiles............................................213
Editing Profiles ..............................................213
Deleting Profiles............................................213
Setting Call Filtering......................................214
Setting a Profile for Use With a Car Kit.........215
Shortcuts................................................ 216
Creating a Shortcut .......................................216
Using a Shortcut............................................216
vii
Editing a Shortcut..........................................217
Deleting Shortcuts.........................................217
Using a Headset .....................................218
Using a Bluetooth Headset ...........................218
Attaching a Headset.... ..................... .............218
Using a Remote Walkie-Talkie Button ..........219
Nextel® Customer Service.....................220
Domestic Customer Service..........................220
Nextel Worldwide
®
Customer Service...........221
Patent and Trademark Information.......222
Page 9

AgIONTM Antimicrobial —
Built-in Protection for
Your Phone
Motorola has incorporated AgION antimicrobial
into the painted surfaces of your phone to help
provide protection against a broad range of product
damaging bacteria, mold, and mildew.
Motorola is the first wireless phone manufacturer to
incorporate AgION antimicrobial into the phone's
painted surfaces.
The antimicrobial technology is an example of
Motorola's pursuit for innovation and creativity to
produce the best quality wireless experience.
The antimicrobial technology in the paint on
Motorola iDEN
against product damage caused by microbes, but
does not extend such protection to the user.
Versatile in application, the EPA-registered AgION
additive is recommended for institutional,
commercial and consumer applications. AgION
antimicrobials are used in many settings including
hospitals, offices, schools and food processing
facilities. They can also be found in leading
footwear, fabrics, appliances, water coolers and
architectural hardware.
®
phones helps provide protection
Benefits of AgIONTM*
• AgION antimicrobial technology helps provide
protection against product damaging bacteria on
the painted surfaces of the phone.
• AgION antimicrobial is effective in protecting the
product against a broad spectrum of bacteria.
• AgION helps inhibit the ability of microbes to
grow and spread on the painted surfaces of the
phone.
• The active ingredient helps break down
enzymes in the microbe, inhibiting its ability to
reproduce and spread on the painted surfaces of
the phone.
• Studies have shown that surfaces with AgION
antimicrobial can reduce the amount of certain
product damaging bacteria by 99%.
• The AgION coating will protect the painted
surfaces of the product against product
damaging bacteria for the life of the product.
* The antimicrobial technology is applied only to the painted
surfaces of the Motorola iDEN phones, thereby providing
protection against damage to such surfaces caused by microbes,
but does not extend such protection to the end user.
viii
Page 10

Safety
• AgION antimicrobial protection is based on
silver, a safe, non-toxic additive to the phone
paint. Silver is widely used as an antimicrobial
agent in many environments and industries.
• AgION antimicrobial technology is safe to use.
Thorough testing has shown the additive to be
less toxic than table salt and less irritating than
talcum powder.
How It Works
• The technology continuously inhibits the growth
of product damaging bacteria on the phone's
painted surfaces.The active ingredient helps
break down enzymes in the microbe, inhibiting
its ability to reproduce and spread on the painted
surfaces on the phonee.
• The active ingredient in AgION is silver, in the
form of silver ions.
ix
Accreditation
• The AgION antimicrobial compound is
registered with the Environmental Protection
Agency (EPA) as a preservative and
bacteriostatic agent for use in the manufacturing
of polymers and plastics.
• NSF, FDA-listed
Page 11
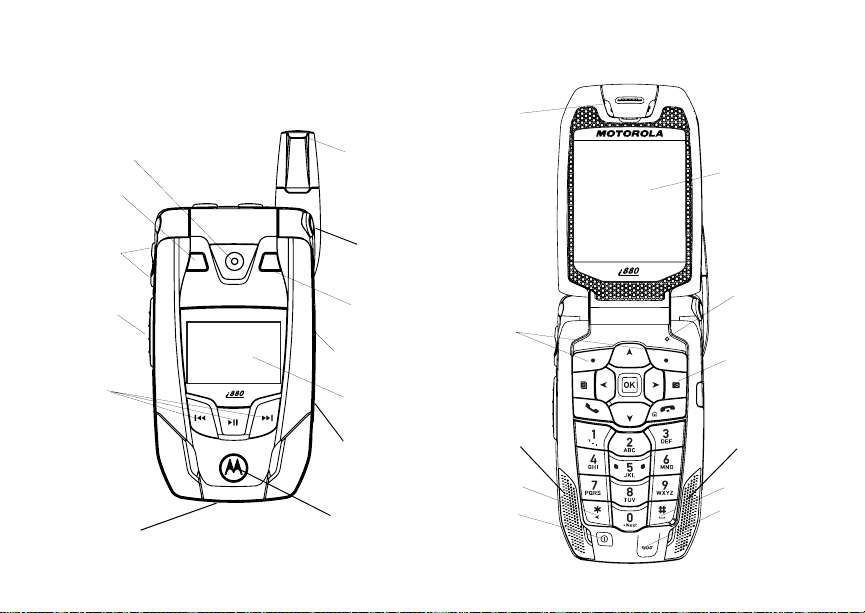
Getting St arted
earpiece
camera
lens
spotlight
volume
controls
Walkie-Talkie
button
audio player
keys
accessory
connector
retractable
antenna
flip open
button
mirror
stereo
headset jack
external
display
memory
card slot
backlit
logo
option keys
speaker
back key
power
button
internal
display
light sensor
camera key
speaker
space key
microphone
1
Page 12
Getting Started
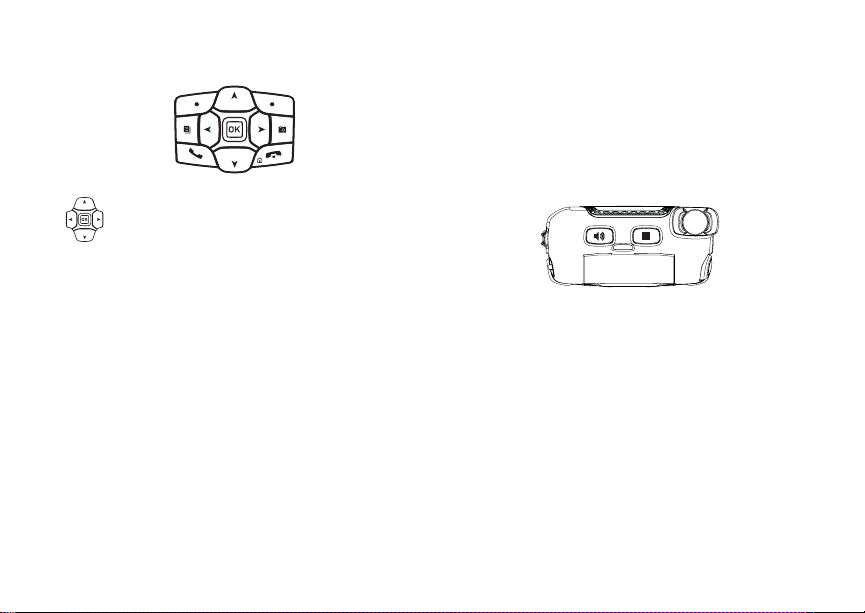
Navigation key — press the arrows to
scroll through menus and lists.
O OK key — selects highlighted item;
answers calls.
m Menu key — accesses context-sensitive
menus.
c Camera key — Accesses camera and
takes pictures.
A Option key — selects the option
appearing above it on the display.
Note: Throughout this User’s Guide,
the option keys will be
represented by A.
2
s Send key — places and answer phone
calls.
e End key — ends phone calls; returns to
idle screen; when using Wireless Data
Services, returns to home page.
t Acts like s when the flip is closed; turns
Walkie-Talkie speaker on and off; used
with voice names and voice records.
. Acts like e when the flip is closed;
accesses recent calls; sends incoming
calls to voicemail.
Page 13
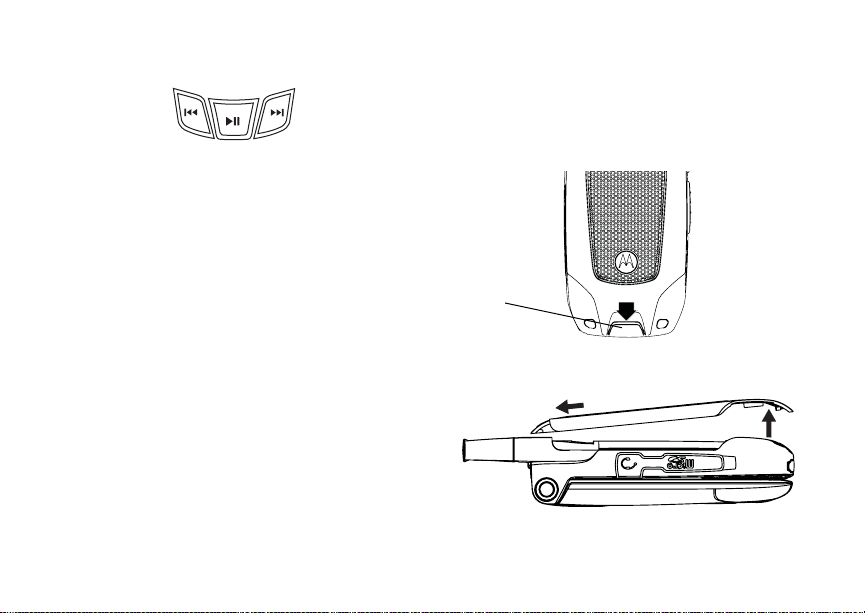
y Accesses the audio player when the flip is
closed; plays audio files; pauses audio
files.
z When an audio file is playing,
fast-forwards and skips to the next audio
file.
x When an audio file is playing, rewinds and
skips to the previous audio file.
To start using your i880 phone:
• Make sure your SIM card is in place.
• Charge the battery.
• Activate your service.
• Enable security.
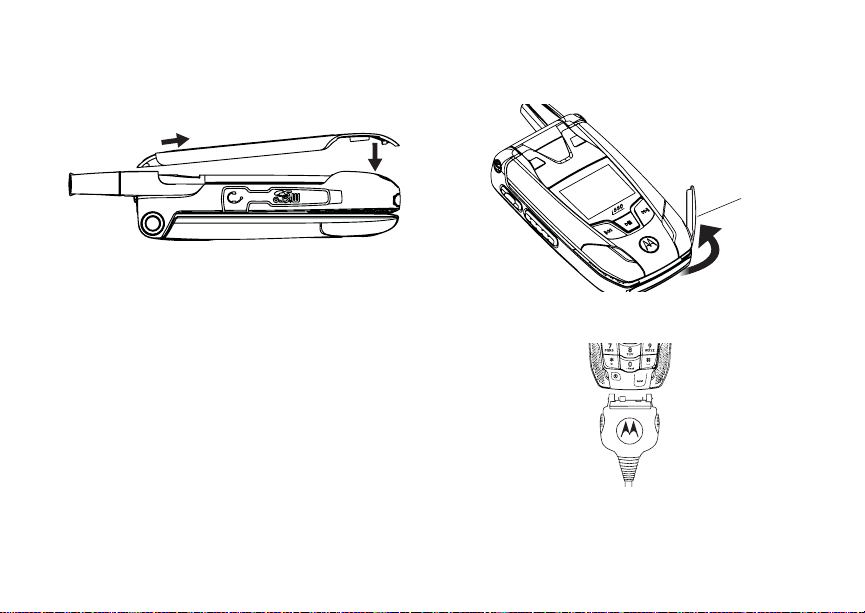
Removing the Battery Door
Removing the Battery Door
1 Make sure the phone is powered off. See
“Powering On and Off” on page 7.
2 Slide the release button back until it releases the
battery door.
release
button
3 Allow the battery door to pop up, slide it forward,
and remove it from the back of your phone.
3
Page 14
Getting Started
Locating Your SIM Card
Your SIM (Subscriber Identity Module) card is a
small piece of plastic located in the SIM card
holder in the back of your phone, underneath the
battery.
SIM card
If there is no SIM card in your phone, contact
Nextel Customer Service at 1-800-639-6111.
If you want to use a SIM card other than the one
that is in your phone, please contact Nextel
Customer Service to verify that the SIM card you
want to use is compatible with your phone.
4
Battery
Inserting the Battery
Your phone comes with a Standard Lithium Ion
(Li-Ion) Battery.
1 Remove the battery door.
2 Insert the battery into the battery area. Press the
battery down to secure it.
Page 15
Battery
3 Replace the battery door and press it gently until
you hear a click.
Charging the Battery
Your phone comes with a rapid travel charger.
1 Plug the charger into an electrical outlet.
2 Open the connector cover.
connector
cover
3 Plug the other end of the charger into the
accessory connector.
Charger Attached or Device Attached appears
on the display.
5
Page 16
Getting Started
Tip: To remove the charger from the accessory
connector: Press the buttons on the sides
of the plug. Pull the plug straight out.
4 If you have purchased optional batteries or
chargers, see “Charging Times”.
Charging Times
Check your battery and charger type against the
grid below to determine appropriate charging
times.
Battery Charger
Rapid Standard
Standard
Li-Ion
High
Capacity
Li-Ion
For best results, charge the batteries within the
temperature range of 50°F to 104°F (10°C to
40°C).
Prolonged charging is not recommended.
6
2 hours 5 hours
3 hours 6 hours
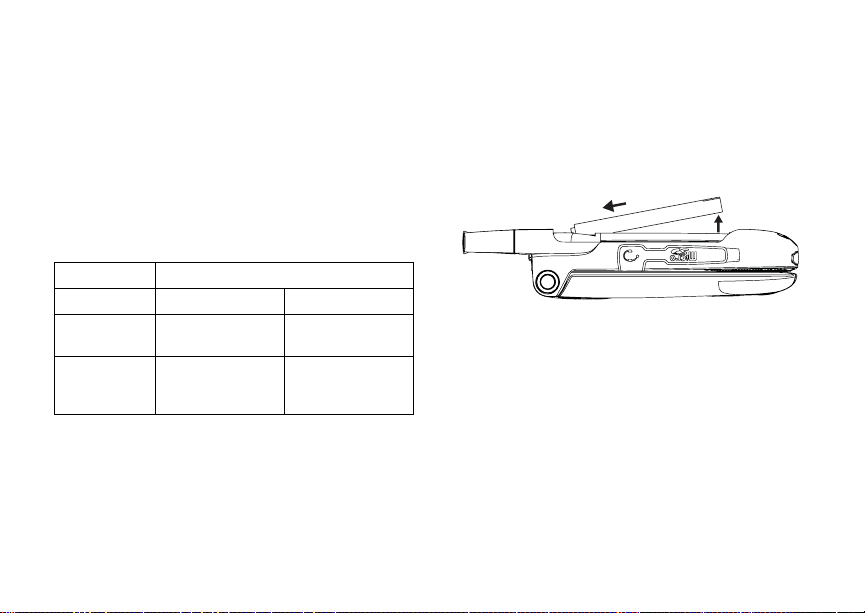
Removing the Battery
1 With the phone powered off, remove the battery
door.
2 Remove the battery by pushing it toward the
antenna and lifting it out.
Battery Use and Maintenance
• The Motorola iDEN Approved Lithium Ion
chargers provide optimum performance. Other
chargers may not fully charge the iDEN Lithium
Ion battery or may yield a reduced number of
lifetime charge cycles.
• Extreme temperatures degrade battery
performance. Do not store the battery where
temperatures exceed 140°F (60°C) or fall below
-4°F (-20°C).
Page 17

Powering On and Off
• Lithium Ion batteries have a self discharge rate
and, without use, lose about 1% of their charge
per day.
• The battery capacity is degraded if the battery is
stored for long periods while fully charged. If
long term storage is required, store at half
capacity.
Powering On and Off
To power your phone on:
1 Open the flip.
Tip: Press the flip open button to open the flip
easily.
2 Press p.
Note: When powering on, if you hold p until a
blue screen appears on the display, you
will turn off calls and other transmissions.
See “Temporarily Turning Off
Transmissions” on page 204.
As your phone connects to the network, you will
see a connecting message. When the idle screen
appears, the phone is ready to use.
To power your phone off:
1 Open the flip.
2 Press and hold p.
Activating Service
The first time you power your phone on, your
service is activated.
A screen then appears prompting you to select Ok
to update your browser information, which enables
security. This screen will only appear during initial
activation.
Enabling Security
You must enable security the first time you power
on your phone or within 10 days of first activation of
your phone.
1 Press A under Ok.
2 You are prompted to enable security. Press A
under Yes. A series of screens followed by the
default homepage displays.
3 Press e to return to the idle screen.
7
Page 18

Getting Started
Phone Programming
Within 24 hours of enabling security, you will
receive an alert notification containing your
Personal Telephone Number (PTN), Nextel
Customer Service number, Walkie-Talkie number,
and Talkgroups (if you subscribe to this service).
1 When you receive an alert notification saying
New Browser Message - Receive
Programming Info, press A under Goto.
2 You are prompted to accept changes to your
lists. Press A under Ok.
3 You are prompted again to accept changes to
your lists. Press A under Ok.
4 A confirmation screen displays. Press A under
Ok.
5 Press e to return to the idle screen.
8
Finding Your Phone Number and Walkie-Talkie Number
My Info lets you view your phone number,
Walkie-Talkie number, and other phone
information.
1 Press m to access the main menu.
2 Scroll to My Info.
Note: You may need to press A under More to
display My Info.
3 Press O.
4 Scroll to see your information:
Line 1 and Line 2 are your phone numbers.
Direct Connect is your Walkie-Talkie number,
the number that others use to contact you using
®
Nextel
Walkie-Talkie service. These numbers
appear when you receive your alert notification
after enabling security on your phone.
See “My Info” on page 141 for more information
about this feature.
Nextel® Voicemail
You must set up your voicemail box before you can
retrieve messages. See “Setting Up Your
Voicemail Box” on page 102.
Page 19
Nextel Worldwide® Service
Nextel Worldwide® Service
You can use your phone to make calls
internationally in select cities using other iDEN
networks by calling Nextel Customer Service to
activate international dialing on your account.
Countries in which you can use your phone include
Argentina, Brazil, Canada, Guam, Israel, Jordan,
Mexico, Peru, the Philippines, Singapore, and
South Korea*.
* Credit approval may be required. Other conditions may apply.
®
Customizing Features
You can control many features of your phone,
including the size of the text on the display, the way
you access main menu items, and the volume of
incoming sound, rings, and other tones. See
“Customizing Your Phone” on page 201.
Phone Basics
Flip Open Button
The flip open button located on the upper right
corner of your phone enables you to quickly open
the flip by pushing the button.
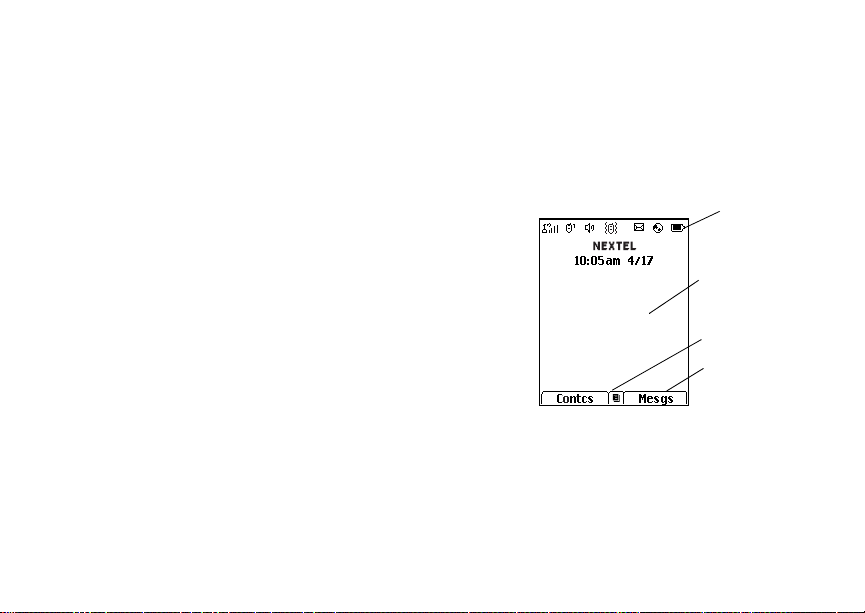
Display
Any time your phone is powered on, the display
provides you with information and options.
The external display shows a shortened version of
the internal display. To see more information, open
the flip.
status icons
text area
menu icon
display options
The screen shown above is the idle screen. The
idle screen appears when your phone is on, but not
engaged in any activity.
Text Area
This area displays menus, messages, names,
phone numbers, and other information.
9
Page 20

Getting Started
Display Options
Two display options appear at the bottom of most
screens. You select a display option by pressing
the option key below it.
Menus and Lists
Your phone’s features are arranged in menus,
submenus, and lists.
To access the items in a menu or list, scroll using
the navigation key at the top of your keypad. This
key lets you scroll up, down, left, or right. Holding
down the appropriate part of the navigation key
speeds up scrolling.
In this guide, this symbol > tells you to select a
menu or list item. For example, Settings >
Security means:
1 Scroll to Settings on the main menu.
2 Press O to see the Settings screen.
3 Scroll to Security.
4 Press O to see the Security screen.
10
OK Key
Pressing O:
• Selects the highlighted menu item or list item
• Sets options
• Confirms actions
• Places and answer calls
Menu Key
Many features provide context-sensitive menus
that let you access related features and actions.
This icon
menu is available. Press m to access the menu.
S appears any time a context-sensitive
Page 21

Phone Basics
Main Menu
All your phone’s features can be accessed through
the main menu. You can set the main menu to
appear as a list or as large icons (see “Setting the
Menu View” on page 203).
Net Access Nextel Wireless
a
Java Apps Access Java applications
q
Settings Customize your phone.
b
Ring Tones Assign ring tones and turn
m
* Music Player Access the audio player.
m Media Center Access stored pictures,
C Camera Access camera and take
Data Services. See
page 132.
on your phone. See
page 174.
See page 201.
ringer off. See page 95.
See page 42.
videos, and audio
recordings. See page 151.
pictures and videos. See
page 143.
n Downloads Provides a catalog of ring
Bluetooth
B
My Info View personal phone
j
DirecTalk Launch Direct TalkSM.
M
Walkie-Talkie Access any Walkie-Talkie
S
VoiceRecord Record and play audio
c
GPS Find your approximate
l
tones, wallpaper, games,
and Java applications that
you can download directly
to your phone. Items in this
catalog change frequently,
so check regularly for fresh
content. See page 97.
®
Connect to a device with
Bluetooth. See page 162.
information, including
phone number and
Walkie-Talkie number. See
page 8.
Access Setup and Help.
See page 57.
number and Groups on
your phone. See page 22.
messages. See page 171.
geographical location. See
page 185.
11
Page 22

Getting Started
Contacts Create, view, store, and
d
Messages Access messages. See
e
Call Forward Set call forwarding options.
f
Datebook Schedule appointments.
o
Memo Store a number to access
g
Call Timers Phone usage information.
h
Recent Calls Lists recent calls. See
i
Shortcuts Create shortcuts to
s
Profiles Groups of settings you
p
Call Alert Lists call alerts. See
k
12
edit Contacts and Groups.
See page 71.
page 98.
See page 81.
See page 194.
later. For information on
Memo, see page 80.
See page 88.
page 63.
screens. See page 216.
apply together. See
page 211.
page 54.
Quick Access to Main Menu Items
Each arrow in the navigation key and O can be
used to access a main menu item from the idle
screen. Each of these keys is assigned to a main
menu item when you receive your phone. To
assign different main menu items, see “Personalize
Features” on page 207.
Status Icons
Status icons appear at the top of the display. Some
appear at all times. Others appear only when your
phone is engaged in certain activities or when you
have activated certain features.
abcd
efgd
o p q
r s
6 No Service — Your phone is
A
Battery Strength — A fuller battery
indicates a greater charge.
Signal Strength — More bars next
to the antenna indicate a stronger
signal.
without service. You cannot make
or receive any type of call.
Phone In Use — Your phone is
active on a phone call.
Page 23

Phone Basics
B
S Group In Use— Your phone is
C
B Bluetooth In Use — Your phone is
1 2
G L
I J
H
K
RM
Q
Walkie-Talkie In Use — Your
phone is active on a Walkie-Talkie
call.
®
active on a Nextel
Walkie-Talkie call.
Talkgroup In Use — Your phone is
active on a Talkgroup call.
using Bluetooth. If this icon is
blinking, then your phone is in
discoverable mode. If this icon is
static, your phone is active in a
Bluetooth connection.
Active Phone Line — 1 indicates
phone line 1 is ready to make calls;
2 indicates phone line 2 is ready to
make calls.
Call Forward — Your phone is set
to forward calls. See “Call
Forwarding” on page 81.
Ringer Off — Your phone is set to
not ring. See “Setting Your Phone to
Vibrate” on page 95.
Group
u
w xT
yz
ljik
mXnW
DE
9 Transmitters — Your phone is set
Y Z
Speaker Off — Sets Walkie-Talkie
sound to come through the earpiece
rather than through the speaker.
Messages — You have one or
more messages. See page 98.
T9 Text Input — You are using T9
Text Input to enter text. See
“Entering Text” on page 68.
Internet — You are ready to
browse the Internet or are browsing
the Internet using a secure
connection.
not to receive calls and other
transmissions. See “Temporarily
Turning Off Transmissions” on page
204.
Packet Data — You are ready to
transfer packet data or are
transferring packet data. See “Using
Your Phone as a Modem” on page
88.
13
Page 24

Getting Started
N O
7 Hearing Aid — Your phone is set
5 Music Player — The audio player
43
c
U
TTY — You are ready to use your
phone to make calls using a
teletypewriter device. See “Making
TTY Calls” on page 90.
for use with a hearing aid and is
active on a phone call.
is active.
Voice Record — You have one or
more voice records stored. See
page 171.
USB Mass Storage — You are
using the USB mass storage
feature. See page page 40.
SIM Card Security
Your SIM card stores all your Contacts and
protects your personal information. Since this
information is stored on your SIM card, not in your
phone, you can remove the information by
removing your SIM card.
Note: Except for making emergency calls, your
phone will not function without the SIM
card.
14
To prevent unauthorized use of your phone, your
SIM card is protected by a PIN that you enter each
time the phone is powered on. You can change the
PIN or turn off the requirement that it be entered.
Turning the PIN Requirement On and Off
When the SIM PIN requirement is off, your phone
can be used without entering a PIN.
Important: When the SIM PIN requirement is off,
When the SIM PIN requirement is on, you are
prompted to enter your PIN each time you power
on your phone.
Note: If a SIM PIN is required, your phone will
1 From the main menu, select Settings >
Security > SIM PIN.
2 Select On or Off.
3 Enter the current SIM PIN.
Note: The default SIM PIN is 0000. Change your
the personal data on your SIM card is
not protected. Anyone can use your
phone and access your personal data.
not function until the SIM PIN is entered,
except for making emergency calls.
PIN to prevent fraudulent use of the SIM
card (see “Changing the PIN”).
Page 25

SIM Card Security
4 Press A under Ok.
Entering the PIN
1 When the Enter SIM PIN Code screen appears
after you power on your phone, enter your SIM
PIN.
2 Press A under Ok.
The message SIM Unlocked displays.
Important: If you enter your PIN incorrectly 3 times,
your SIM card is blocked. To unblock
your SIM card, you must contact Nextel
Customer Service. See “Unblocking the
PIN”.
Changing the PIN
Note: The SIM PIN requirement must be turned
on in order to access this feature.
1 From the main menu, select Settings >
Security > Change Passwords > SIM PIN.
2 At the Enter Old SIM PIN screen, enter the
current SIM PIN.
3 Press A under Ok.
4 At the Enter New SIM PIN screen, enter the
new 4- to 8-digit SIM PIN.
5 Press A under Ok.
6 At the Re-enter New SIM PIN screen, re-enter
the new SIM PIN to confirm.
7 Press A under Ok.
Changed: SIM PIN displays.
Unblocking the PIN
If you enter your PIN incorrectly 3 times, your SIM
card is blocked. To unblock your SIM card, you
must contact Nextel Customer Service to get a PIN
Unblock Code (PUK).
Important: If you unsuccessfully enter the PUK
To unblock the PIN:
1 Press * # m 1.
2 At your Nextel Customer Service
representative’s request, provide the information
needed to give you a PUK code.
3 Select Unblock PIN.
4 Enter the PUK code.
code 10 times, your SIM card is
permanently blocked and must be
replaced. If this happens, all data is
lost. You will get a message to contact
Nextel Customer Service. Except for
making emergency calls, your phone
will not function with a blocked SIM
card.
15
Page 26

Getting Started
5 Enter a new 4- to 8-digit SIM PIN.
6 Re-enter your SIM PIN.
Note: These steps must be performed in quick
succession.
If you entered the codes properly, SIM Unlocked
appears on the display.
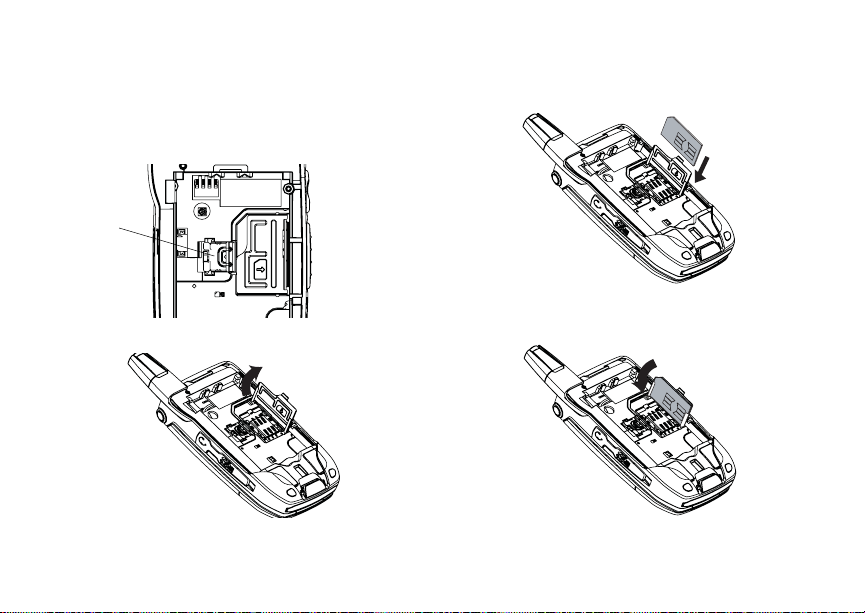
Inserting and Removing Your SIM Card
Important: Do not touch the gold-colored areas of
The SIM card is designed for optimal Contacts
storage and feature use. For Nextel SIM card
compatibility information, visit
www.nextel.com/sim.
Note: In some cases, Contacts and Groups may
If you remove your SIM card and use it with
another phone, or use another SIM card with your
phone, the following information is erased:
• The recent calls list
• Call forwarding settings
16
your SIM card.
not be accessible if you move your SIM
card to another phone. Contacts and
Groups created with your i880 phone may
not be readable by an older iDEN
SIM-based phone.
• Net alerts
• MMS messages
• Options set using the MMS Setup menu
• Information stored in Memo
• Pictures, video, and audio recordings accessible
through the Media Center that are saved in your
phone’s memory, except those that are forward
locked. (If you have a memory card inserted in
your phone, no items saved to the memory card
are erased.)
• 3 most recent GPS Enabled locations
• Voice records
• Voice names
• Datebook events
• Options set using the Personalize menu
Page 27
SIM Card Security
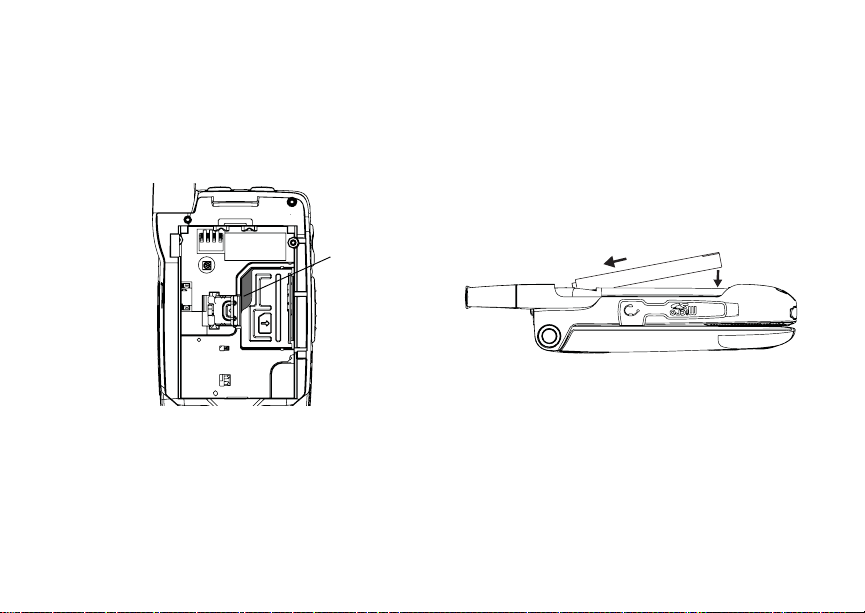
Inserting Your SIM Card
1 With your phone powered off, remove the
battery door and battery.
2 Slide the latch away from the SIM card holder.
latch
3 Open the SIM card holder.
4 Carefully slide your SIM card into the SIM card
holder.
5 Close the SIM card holder.
6 Slide the latch toward the SIM card holder.
17
Page 28

Getting Started
Removing Your SIM Card
Important: To avoid loss or damage, do not remove
1 With your phone powered off, remove the
battery door and battery.
your SIM card from your phone unless
absolutely necessary.
2 Slide the latch away from the SIM card holder.
3 Open the SIM card holder.
4 Carefully slide your SIM card out of the SIM card
holder.
5 Close the SIM card holder.
6 Slide the latch toward the SIM card holder.
Note: Protect your SIM card as you would any
delicate object. Store it carefully.
Locking the Keypad
Locking the phone’s keypad prevents its buttons
from being pressed. When the keypad is locked,
you can only:
• Power the phone on and off
• Unlock the keypad
• Respond to incoming calls, messages, and
alerts
Important: Emergency calls cannot be placed while
18
the keypad is locked.
To lock the keypad:
1 From the idle screen, press m.
2 Press *.
If you press a key while the keypad is locked,
instructions for unlocking the keypad display
briefly.
To unlock the keypad:
1 From the idle screen, press m.
2 Press *.
You also have the option of setting your phone to
automatically lock the keypad if there has been no
activity for a specified time.
1 From the main menu, select Settings >
Security > Keypad Lock.
2 To lock the keypad immediately, select Lock
Now. You will be given the option to press m and
* to lock and unlock the keypad.
3 To set a specific time for the keypad to lock if
there has been no activity, select Auto Lock and
then select a time.
The keypad can be set to lock in 30 seconds or in
1, 5, 10, 15, or 20 minutes if the keypad is not
touched during the specified time. To turn the auto
lock off, repeat step 3 and select Off.
Page 29

Antenna
Antenna
The retractable antenna on your i880 phone is
designed to be extended during calls and is
essential to attain the hearing aid compatibility
rating on applicable models.
To extend the antenna, pull gently on the tip until
the antenna is fully extended and clicks into
position.
When finished with a call, retract the antenna by
pushing gently on the rounded tip until the antenna
clicks into place.
To optimize your phone’s performance, extend the
antenna when you make or receive a call, and
avoid touching the antenna with any body part.
Important: Failure to fully extend or retract the
antenna until the antenna clicks into
place causes severely degraded
performance, which may result in
missed calls, dropped calls, or garbled
audio.
Accessories
Your phone comes with a memory card, Standard
Li-Ion Battery, rapid travel charger, and holster.
Various accessories are available for use with your
i880 phone, including larger capacity batteries and
doors,
cases, vehicle power chargers, data cables,
hands-free accessories, Bluetooth accessories,
and more.
To order additional accessories, go to
www.nextel.com or call 1-888-242-4187. You can
also contact your Nextel Authorized Sales
Representative or stop by any Sprint Store. For
information on Sprint Store locations, go to
www.sprintstorelocator.com.
Wireless Local Number Portability
Bringing Your Phone Number From Another Carrier
If you are bringing your phone number from
another carrier, your new phone will be active as
soon as you receive it. Nextel will provide you with
a temporary phone number so that you can begin
using your phone immediately. Once the number
you have brought to Nextel is activated, your
temporary phone number will be deactivated and
service with your previous carrier will be cancelled
automatically. You will receive a text message on
your phone letting you know that activation is
19
Page 30

Getting Started
complete. Simply turn your phone off and back on
again to complete activation.
Here is additional information you need to be
aware of until the number you have brought to
Nextel is active on the Nextel
®
National Network:
Nextel® Voicemail
We suggest you set up your voicemail box after the
number you brought to Nextel is active on your
Nextel phone and your temporary phone number is
deactivated. If you set up your voicemail box prior
to this, all messages and all settings (including
your greeting and password) will be lost when the
number you have brought to Nextel becomes
active.
Text Messaging
During the activation process, it is possible that text
messages may not be properly routed to your
phone.
911 Calls
Nextel continues to make efforts to ensure that all
911 calls are minimally impacted by this process. If
you make a call to 911 from your temporary phone
number and the call fails, the 911 emergency
response center will not be able to call you back on
your Nextel phone if in the meantime your Nextel
20
phone has been programmed with your permanent
phone number. As with any wireless 911 call, if
your call is disconnected before location and
details have been provided, be sure to call 911
again and advise that you were disconnected.
Go to www.sprint.com/bringyournumber for more
details.
Nextel® Customer Service
Nextel Customer Service: 1-800-639-6111 or dial
611 from your i880 phone.
Nextel Worldwide Customer Service:
+1-360-662-5202 (toll-free from your i880 phone).
Understanding Status Messages
You may receive status messages under certain
conditions. Before contacting Nextel Customer
Service, note the message, numeric code, and the
conditions under which the message appeared.
You can go to www.nextel.com for additional
information about status messages.
Page 31

Making Calls
Your i880 phone makes two types of calls: digital
cellular phone calls and Walkie-Talkie calls.
Phone Calls
With the Flip Open
1 Enter the number you want to call.
2 To place the call:
Press s. -or-
If you entered the number from the idle screen,
press O.
3 To end the call:
Press e. -or-
Close the flip.
To end a call by closing the flip, you must have the
Flip to End feature turned on (see “Setting Flip
Actions” on page 87).
With the Flip Closed
You can make phone calls with the flip closed
using a voice name or the recent calls list to select
the number you want to call. See “Using a Voice
Name” on page 32 and “Making Calls From the
Recent Calls List” on page 66.
To end the call, press
..
Nextel® Walkie-Talkie
Nextel offers the following Walkie-Talkie services:
• Local Walkie-Talkie — allows Walkie-Talkie
calling within your local coverage area.
• Nationwide Walkie-Talkie — allows
coast-to-coast Walkie-Talkie calling to Nextel
subscribers to and from anywhere on the Nextel
National Network (U.S.).
• International Walkie-Talkie — allows
Walkie-Talkie calling to and from select
countries.
• Group Walkie-Talkie — allows nationwide
Walkie-Talkie calling to up to 20 Nextel
subscribers simultaneously. (See “Nextel®
Group Walkie-Talkie” on page 23).
• Talkgroups — allows Walkie-Talkie calling to up
to 100 Nextel subscribers in the same
Walkie-Talkie network.
See www.nextel.com for more details on these
Walkie-Talkie services. Pricing for each of these
services is based on your service contract.
21
Page 32

Making Calls
To make a Walkie-Talkie call:
1 If the flip is open, enter the Walkie-Talkie number
you want to call. -or-
If the flip is closed, choose the number as you
would when making a phone call.
2 Press and hold the Walkie-Talkie button on the
side of your phone. Begin talking after your
phone emits a chirping sound.
3 Release the Walkie-Talkie button to listen.
A Walkie-Talkie call ends automatically if there is
no activity on the call for a few seconds.
Tip: To let someone know you want to talk to
him or her on a Walkie-Talkie call, send a
call alert. See “Call Alerts” on page 54.
Dialing Walkie-Talkie Numbers
Every Walkie-Talkie number has 3 parts — an area
ID, a network ID, and a member ID — with an
asterisk between each of these parts. For example:
999*999*9999.
When you place a Walkie-Talkie call, you must
enter the whole Walkie-Talkie number including the
asterisks.
22
Tip: When you store a Walkie-Talkie number in
Contacts, it is good practice to include the
whole Walkie-Talkie number, including the
asterisks.
Accessing Walkie-Talkie Numbers More Quickly
Quickly access any Nextel Walkie-Talkie number
on your phone so that you can make a
Walkie-Talkie call, or create a Group and make a
Group Walkie-Talkie call. Select one entry to make
a Walkie-Talkie call or select multiple entries to
make a Group Walkie-Talkie call. For more
information about Groups, see “Nextel® Group
Walkie-Talkie” on page 23.
To view a list of Groups and Contacts with
Walkie-Talkie numbers:
From the main menu, select Walkie-Talkie.
To move between Contacts, the recent calls list,
and Memo:
Scroll left or right. -or-
Press * or #.
To make a Walkie-Talkie call or group call:
1 Select the entries you want.
2 Press A under Done.
Page 33

Nextel® Group Walkie-Talkie
3 Press the Walkie-Talkie button.
To save your selections as a Group:
1 Press m.
2 Select Store Group.
3 If you want to assign a name to the Group, enter
the name.
Note: If you do not assign a name, the Group is
named “Group” followed by the number of
members in the Group. For example,
“Group (8)” for a Group with 8 members.
4 Press O.
Nextel® Group Walkie-Talkie
A Group Walkie-Talkie call is similar to a
Walkie-Talkie call to one user, but is made to
multiple Walkie-Talkie subscribers at once. You
can create Groups from your phone and call up to
20 Nextel subscribers anywhere on the Nextel
National Network to other Group Walkie-Talkiecompatible phones*. You can create a Group for
one-time use or store it to Contacts so you can call
it at any time.
* Not all phones are Group Walkie-Talkie-compatible. See
www.nextel.com for more details on Group Walkie-Talkie.
Note: In order to store Groups to your i880, you
must use the 128K SIM card that came
with your phone. The 128K SIM card is
labeled “Nextel 600 Contcs & 25 Grps”.
With this SIM card, a maximum of 25
groups can be added to your i880. Group
entries created with your i880 phone may
not be readable by older iDEN SIM-based
phones.
Group Talkgroup
Group Icons
Geography Nationwide Limited to local
Maximum
Group Size
Set-up Dynamically, via
Voice Activated
Dialing
S
21 (including
originator)
your phone
Yes No
I
market and
network (fleet)
100
Predefined, via
Nextel
administrator using
Talkgroup
Management
23
Page 34

Making Calls
Creating Groups in Contacts
1 From the main menu, select Contacts.
2 Select [New Group].
3 If you want to assign a name to the Group, enter
the name.
Note: If you do not assign a name, the Group is
named “Group” followed by the number of
members in the Group. For example,
“Group (8)” for a group with 8 members.
4 Add Group members. See “Adding Group
Members”.
5 If you want to create a voice name for the
Group, select [Options] > Voice Name. As
directed by the screen prompts, say and repeat
the voice name you want to assign to the Group.
Speak clearly into the microphone.
6 Press A under Save.
Adding Group Members
You can add Group members that have a
Walkie-Talkie number and Group
Walkie-Talkie-compatible phone to your Group by
selecting them from Contacts, the recent calls list,
memo, or by manually entering the Walkie-Talkie
number from your keypad. You can also add all
members in an existing Group to another Group by
selecting the Group name from Contacts.
24
To add Group members from Contacts, the recent
calls list, or Memo:
1 While creating a Group, select [Add Member].
-or-
2 Select [Add Number] and press A under
Browse.
Note: To move between Contacts, the recent
calls list, and Memo, scroll left or right, or
press * or #.
3 Scroll to the members you want from Contacts,
the recent calls list, or Memo, and press O. A
checkmark appears next to each selected
member.
Note: To deselect a member , scroll to a selected
member and press O.
4 Press A under Done.
To add Group members manually from the keypad:
1 While creating a Group, select [Add Number].
2 Enter the Walkie-Talkie number using the
keypad.
3 Press O.
Page 35

Nextel® Group Walkie-Talkie
Making Group Walkie-Talkie Calls
With the Flip Open
1 From Contacts or the recent calls list, scroll to or
select the Group you want. -or-
Press and hold
you to say the voice name. Say the voice name
assigned to the Group you want. -or-
From the idle screen, press the number on your
keypad assigned to the Group you want. See
“Shortcuts” on page 216. -or-
Enter or select a Walkie-Talkie number and add
more Walkie-Talkie numbers. See “Starting a
Group Walkie-Talkie Call With a Walkie-Talkie
Number” on page 25.
2 Press the Walkie-Talkie button.
With the Flip Closed
To make a Group Walkie-Talkie call from the recent
calls list with the flip closed:
1 Press
2 Press the Walkie-Talkie button.
.. Press the volume controls to scroll to
the Group you want. -or-
Press and hold
you to say the voice name. Say the voice name
assigned to the Group you want.
t until a prompt appears telling
t until a prompt appears telling
Receiving Group Walkie-Talkie Calls
To answer a Group Walkie-Talkie call:
Proceed as if answering a Walkie-Talkie call
from one user. Only one person at a time may
speak on a Group Walkie-Talkie call.
Starting a Group Walkie-Talkie Call With a Walkie-Talkie Number
You can start a Group Walkie-Talkie call with any
Walkie-Talkie number you want to call.
1 From the main menu, select Walkie-Talkie and
choose the first Walkie-Talkie number that you
want in the Group Walkie-Talkie call. -or-
From the idle screen, enter the Walkie-Talkie
number. -or-
From the Contacts list, scroll to an entry
containing the Walkie-Talkie number. -or-
From the recent calls list, scroll to an entry
containing the Walkie-Talkie number.
2 Press m.
3 Select Call New Group.
4 Add more Group members. See “Adding Group
Members” on page 24.
5 If you want to save the Group you have created:
Press m. Select Store Group. -or-
25
Page 36

Making Calls
If you do not want to save the Group, press A
under Done.
6 To make the call, press the Walkie-T alkie button.
Removing Members or Groups
To remove a member from a Group:
1 From Contacts, scroll to the Group you want to
delete the member from.
2 Press A under Edit.
3 Scroll to the member you want to remove.
4 Press m.
5 Select Remove Member.
6 Select Save.
To remove all members from a Group:
1 From Contacts, scroll to the Group you want to
delete all members from.
2 Press A under Edit.
3 Press m.
4 Select Remove All Members.
5 Press A under Yes.
To delete a Group from Contacts:
1 From Contacts, scroll to the Group you want to
delete.
2 Press m.
26
3 Select Delete Group.
4 Press A under Yes.
Storing Groups
You can store Groups to Contacts.
From the Recent Calls List
1 From the recent calls list, select the Group you
want.
2 Press A under Store.
3 If you want, add more information to the entry.
4 Press A under Save.
From an Active Group Walkie-Talkie Call
1 During an active Group Walkie-Talkie call, press
m.
2 Select Store Group.
3 If you want, add more information to the entry.
Note: You cannot record a voice name during an
active call.
4 Press A under Save.
Page 37

Nextel® Group Walkie-Talkie
Storing Members of Groups
You can store individual numbers and members
within Groups to Contacts.
From the Recent Calls List or Within Contacts
1 Select the Group containing the number or
member you want to store.
2 Press m.
3 Select Store Number.
4 Select the number or member you want to store.
5 If you want, add more information to the entry.
6 Press A under Save.
From an Active Group Walkie-Talkie Call
1 During an active Group Walkie-Talkie call, press
m.
2 Press m.
3 Select Store Number.
4 Select the number or member you want to store.
5 If you want, add more information to the entry.
Note: You cannot record a voice name during an
active call.
6 Press A under Save.
Group Walkie-Talkie Call Information
While you are in a Group Walkie-Talkie call, the
following appears on the screen:
• The name of the Group
• The name or the Walkie-Talkie number of the
person speaking
• The number of members who are participating in
the Group Walkie-Talkie call
Group Walkie-Talkie Call Details
During a Group Walkie-Talkie call, you can view
details about the other group members, such as
their name or Walkie-Talkie number, and their
status on the call.
To view Group Walkie-Talkie call details, press A
under Details.
In the Details view, these icons appear next to
member names or Walkie-Talkie numbers:
The member of the Group who is speaking.
T
A member of the Group who is active on the
A
Group Walkie-Talkie call, but not speaking.
A member of the Group who has exited the
O
call.
27
Page 38

Making Calls
A member of the Group who could not be
U
reached on the Group Walkie-Talkie call.
A member of the Group whose status is
u
unknown.
Sending Groups Using Nextel Direct
SM
Send
You can send a Group using Nextel Direct Send so
that the person who receives the Group can use
the list.
To send a Group from the recent calls list:
1 Scroll to or select the Group you want.
2 Press m.
3 Select Send Group.
4 T o include yourself in the Group, press A under
Yes. -or-
To exclude yourself from the Group, press A
under No.
Note: If you choose to include yourself and the
Group already contains 20 members, you
will be prompted that the list is full. You
will be excluded from the list.
28
5 Enter the Walkie-Talkie number of the person
you want to send the Group to. -or-
Select Browse to select a contact from
Contacts, the recent calls list, or Memo.
6 Press O.
7 To send the Group, push the Walkie-Talkie
button.
The Group will display in the recent calls list on
the phone that you send the Group to.
To send a Group from Contacts:
1 Scroll to or select the Group you want.
2 Press m.
3 Select Send Via....
4 T o include yourself in the Group, press A under
Yes. -or-
To exclude yourself from the Group, press A
under No.
Note: If you choose to include yourself and the
Group already contains 20 members, you
will be prompted that the list is full. You
will be excluded from the list.
5 Select Direct Send.
Page 39

Talkgroup Calls
6 Enter the Walkie-Talkie number of the person
you want to send the Group to. -or-
Select Browse to select a contact from
Contacts, the recent calls list, or Memo.
7 Press O.
8 To send the Group, push the Walkie-Talkie
button.
The Group will display in the recent calls list on
the phone that you send the Group to.
Talkgroup Calls
Using Predefined Talkgroups
A Talkgroup call is a Walkie-Talkie call to a
predetermined group that has been provisioned by
Nextel or an account administrator.
Groups can include up to 200 subscribers that are
in the same Walkie-Talkie network — that is,
subscribers that have the same Walkie-Talkie
network ID and are located in the home market.
(The network ID is the second set of numbers in a
Nextel Walkie-Talkie number. See “Dialing
Walkie-Talkie Numbers” on page 22 for more
information.)
Before you can make or receive Talkgroup calls, a
Talkgroup must be established. After the group is
established, you must join the Talkgroup.
Joining a Talkgroup
When you enable security, you receive a list of
Talkgroups that have been set up for you if you
subscribe to this service. The Talkgroup list is
saved to Contacts.
To receive calls made to any of these Talkgroups,
you must join the Talkgroup.
1 From the main menu, select Contacts.
2 Scroll to the Talkgroup you want to join.
3 Press A under Join.
Note: You will now be able to receive
communications from this Talkgroup only.
You can only monitor one Talkgroup at a
time.
Setting Up More Talkgroups
You can set up more Talkgroups in 3 ways:
• Using Talkgroup Management* on MyNextel at
www.nextel.com
* You must be an account administrator to use Talkgroup
Management.
• Contacting your Nextel Sales Representative at
the time of activation
• Using Wireless Manager to create, manage, and
delete Talkgroups
29
Page 40

Making Calls
When you create your Talkgroups, you can select
your own group numbers.
You can join a new Talkgroup by pressing # and
entering the number using the keypad. Then press
A under Join.
Making Talkgroup Calls
1 Press #. Then enter the Talkgroup number
using the keypad. -or-
Choose the Talkgroup name from Contacts or
the recent calls list.
2 Proceed as if making a Walkie-Talkie call.
Receiving Talkgroup Calls
To answer a Talkgroup call:
Proceed as if answering a Walkie-Talkie call.
Only one person at a time may speak on a
Talkgroup call.
The Walkie-Talkie number or name of the
person who is speaking will appear on the
display below the Talkgroup number.
30
Turning Off Talkgroup Calls
To set your phone to prevent you from hearing
your Talkgroup calls:
1 From the main menu, select Settings > DC/GC
Options > Tkgrp Silent.
2 Set this option On.
To set your phone to let you hear your Talkgroup
calls:
Set Tkgrp Silent to Off in step 2.
Receiving Calls
Phone Calls
When you receive a phone call, your phone rings,
vibrates, or lights up its backlights.
Answering
If the flip is closed, press
Open the flip. -or-
Press s. -or-
Press O. -or-
Press A under Yes. -or-
Press any number key.
t. -or-
Page 41

Choosing a Number to Call
To answer a call by opening the flip, you must have
the Flip to Ans feature turned on (see “Setting Flip
Actions” on page 87). To answer a call by pressing
any number key, you must have the Any Key Ans
feature turned on (see “Phone Calls Features” on
page 206).
Sending to Voicemail
If the flip is closed, press
.. -or-
Press e. -or-
Press A under No.
Ending
If the flip is closed, press
.. -or-
Press e. -or-
Close the flip.
Walkie-Talkie Calls
When you receive a Walkie-Talkie call, your phone
emits a chirping sound and the Walkie-Talkie
button backlight flashes rapidly, or your phone
vibrates.
Answering
1 Wait for the caller to finish speaking.
2 Press and hold the Walkie-Talkie button on the
side of your phone. Begin talking after your
phone emits a chirping sound.
3 Release the Walkie-Talkie button to listen.
Ending
If the flip is closed, press
.. -or-
Press e. -or-
Press A under Exit. -or-
Close the flip.
A Walkie-Talkie call ends automatically if there is
no activity on the call for a few seconds.
Choosing a Number to Call
You can choose the number you want to call in
many ways:
• Enter the number on the keypad.
• Say a voice name into your phone. See “Using a
Voice Name”.
• Use Speed Dial or Turbo Dial
call. See “Using Speed Dial and Turbo Dial®” on
page 32.
• Redial the last phone number called. See
“Redialing the Last Number” on page 33.
®
to make a phone
31
Page 42

Making Calls
• Select the number from the recent calls list. See
“Making Calls From the Recent Calls List” on
page 66.
• Select the number from Contacts. See “Making
Calls From Contacts” on page 79.
• Select a number stored in Datebook. For
information on making calls from Datebook and
Datebook reminders, see “Making Calls From
Datebook and Datebook Reminders” on page
198.
• Use One Touch Walkie-Talkie to make a
Walkie-Talkie call. See “One Touch
Walkie-Talkie” on page 86.
• Use the number in Memo. For information on
making calls from Memo, see “Memo” on page
80.
• Select the number in a text message you have
received. See “Calling a Number in a Message”
on page 123.
Using a Voice Name
If you have created a voice name in Contacts for
the number you want to call, say the voice name
into your phone to enter the number. See page 74
for information on voice names.
32
You can use a voice name to enter a number with
the flip open or closed.
1 Press and hold
you to say the voice name.
t until a prompt appears telling
2 Speaking into the microphone, say the voice
name assigned to the number you want to call.
Your phone plays the name back to you.
3 If you are making a phone call, the call is placed
automatically.
Tip: To stop a phone call from being completed,
press
. if the flip is closed or press e.
If you are making a Walkie-Talkie call or group
call, press and hold the Walkie-Talkie button to
place the call.
Using Speed Dial and Turbo Dial
Each phone number stored in Contacts is assigned
a Speed Dial number, which you can use to call
®
that number.
Speed Dial
1 From the idle screen, use the keypad to enter
the Speed Dial number assigned to the phone
number you want to call.
2 Press #.
3 Press s.
Page 43

Missed Phone Calls
Turbo Dial
From the idle screen, press and hold the Speed
Dial number (1 through 9) assigned to the phone
number you want to call.
Redialing the Last Number
Press and hold s to place a call to the last phone
number you called.
Missed Phone Calls
When you miss a call, this icon V and the number
of phone calls you have missed appear briefly.
With the Flip Open
If you want to dismiss the missed call message,
press A under Back. -or-
If you want to view the missed call on the recent
calls list, press A under View.
With the Flip Closed
If you want to dismiss the missed call message,
..
press
If you want to view the missed call on the recent
calls list, press
. twice.
Using Speakerphone
Turning on speakerphone makes incoming sound
come out of the phone’s speaker instead of the
earpiece. Speakerphone is available whenever you
are on an active phone call.
With the Flip Open
To turn speakerphone on or off:
Press A under Speaker. -or-
t.
Press
With the Flip Closed
When you make a call with the flip closed,
speakerphone is always on.
Opening the flip turns speakerphone off.
Using Mute
Muting calls lets you listen to incoming sound
without transmitting sound. Mute is available
whenever you are on an active call.
To turn mute on:
Press A under Mute.
While mute is on, Unmute appears as a display
option.
33
Page 44

Making Calls
To turn mute off:
Press A under Unmute.
Making Emergency Phone Calls
Your phone supports emergency calling.
Emergency phone calls can be made even when
your SIM card is blocked or not in your phone.
Dial 911 to be connected to an emergency
response center. If you are on an active call, you
must end it before calling 911.
When you make an emergency call, your phone’s
GPS Enabled feature can help emergency service
personnel find you, if you are in a location where
your phone's GPS antenna has established a clear
view of the open sky and your local emergency
response center has the equipment to process
location information. See “GPS Enabled” on page
185, and particularly “IMPORTANT: Things to
Keep in Mind” on page 185 and “Making an
Emergency Call” on page 187, for more
information on the limitations of this feature.
Because of the limitations of this feature, always
provide your best knowledge of your location to the
emergency response center when you make an
emergency call.
34
Important: Emergency calls cannot be placed while
Important: If you have not registered on the
Important: If you are bringing your phone number
the keypad is locked.
network, emergency calls cannot be
placed while your SIM card is in your
phone.
to Nextel from your previous carrier,
you may receive a temporary telephone
number while your Nextel phone is
being programmed with your
permanent phone number. If you make
a call to 911 and the call fails, the 911
emergency response center will not be
able to call you back on your Nextel
phone if in the meantime, your Nextel
phone has been programmed with your
permanent telephone number. If the call
is disconnected before location and
details have been provided, call 911
again and advise that you were
disconnected.
Page 45

Using a Memory Card
Your i880 phone comes with a memory card.
When the memory card is in your phone, many
types of pictures, videos, and audio files stored on
the memory card can be viewed or played using
your phone's Media Center. Music files and
podcasts stored on the memory card can be played
using your phone's audio player.
When the memory card is in your phone, you can
save these media items to it:
• Pictures received in Walkie-Talkie calls
• Pictures and videos taken with your phone’s
camera
• Pictures, videos, and audio recordings received
via Bluetooth
• Pictures, videos, and audio recordings received
in MMS messages
You can use a memory card reader and adapter or
a USB data cable to connect to your computer’s
USB port and access the memory card from your
computer. This lets you save files from your
computer to your memory card or save files from
your memory card to your computer.
Some files saved to a memory card while the
memory card is not in your phone may not be
accessible when the memory card is in your phone.
To make sure the files you save to the memory
card using your computer can be accessed using
your phone, see “Ensuring Files on the Memory
Card Are Compatible With Your Phone” on page
37.
Inserting the Memory Card
1 Open the memory card slot cover.
35
Page 46

Using a Memory Card
2 Slide in the memory card. Push the memory
card into the slot until it clicks into place.
3 Close the memory card slot cover.
4 Your phone may prompt you to use the memory
card to store new media items, go to the
camera, go to the Media Center, or do nothing. If
you select [Do Nothing], you will return to the
idle screen. Respond to the prompt now.
Formatting a New Card
The first time you insert a memory card in your
phone, you may be prompted to format the card.
Important: The Format Card option erases any data
36
saved to the memory card. It should
only be used if your phone prompts you
to format the memory card.
To format a memory card:
From the main menu, select Settings >
Memory Card > Format Card.
Removing the Memory Card
Important: Do not remove the memory card before
1 From the main menu, select Settings >
Memory Card > Remove Card.
2 Open the memory card slot cover.
3 Push the memory card to release it from the slot.
selecting the Remove Card option.
Removing the memory card before
selecting the Remove Card option
could result in loss of data.
Page 47

Setting Your Phone’s Storage Preference
4 Pull out the memory card.
5 Close the memory card slot cover.
Note: If you select the Memory Card > Remove
Card option but do not remove the
memory card, you cannot use the memory
card until you remove it and insert it again.
Setting Your Phone’s Storage
Preference
You can choose whether media items are saved to
your phone’s memory or to a memory card inserted
in your phone’s memory card slot.
To set the media storage option in Settings:
1 From the main menu, select Settings >
Memory Card > Store Media.
2 Select On Phone to set your phone to save
media items to the phone’s memory. -or-
Select Prefer On Card to set your phone to
save media items to the memory card if it is in
the phone. If no memory card is in the phone,
even if you choose Prefer On Card, the media
items are saved to your phone’s memory.
If you set the media storage option to save to your
phone’s memory, when you insert the memory
card your phone prompts you to switch to storing to
the memory card.
Ensuring Files on the Memory Card Are Compatible With Your Phone
When your memory card is connected to your
computer, your computer lets you save files to your
memory card in ways that may not allow you to
access these files when the memory card is in your
i880 phone.
37
Page 48

Using a Memory Card
To ensure the files you save to your memory card
are compatible with your i880 phone, use the folder
structure, file name rules, and formats described in
the following sections.
Folder Structure
The first time you insert the memory card into your
phone, your phone creates folders on the memory
card. When you save files from your computer to
the memory card, save each file to the appropriate
folder:
• The Music folder is for music files you will play
using the audio player. Files in this folder cannot
be accessed from the Media Center.
• The Podcast folder is for podcasts you will play
using the audio player. Files in this folder cannot
be accessed from the Media Center.
• The Audio folder is for audio files you will play
using the Media Center. Files in this folder
cannot be accessed from the audio player.
• The Image folder in for pictures you will view
using the Media Center.
• The Video folder is for videos you will play using
the Media Center.
38
Because your phone creates these folders the first
time the memory card is inserted, you should insert
the memory card into your phone at least once
before using it with your computer.
File Name Rules
When naming files stored on the memory card, the
following rules apply:
• The file name can contain both ASCII and
Unicode characters.
• File names up to 32 characters long, including
the file extension, can be displayed by your
phone. File names up to 255 characters long,
including the file extension, can be read by your
phone. If a file name is more than 32 characters
long, but no more than 255 characters long, your
phone displays an abbreviated name for the file,
but does not change the name of the file on the
memory card.
Note: Only files with names no longer than 32
characters can be stored in your phone’s
memory. When you copy or move a file
with a longer name to your phone’s
memory, you are prompted to rename the
file.
Page 49

Ensuring Files on the Memory Card Are Compatible With Your Phone
• The file name must be in a language your phone
can display. To see which languages your phone
can display, select Settings > Display/Info >
Language. Your phone can display the
languages listed and other languages that use
the same alphabets.
File Formats
Audio Player
These file formats are compatible with your
phone’s audio player:
MP3 version MPEG-1, MPEG-2, MPEG-2.5.
ACC LC Bit Rat es (kbits/sec)
Bit Rates (kbits/sec)
32, 40, 48, 56, 64, 80, 96, 112,
128,160, 192, 224, 256, 320.
Sampling Rates (kHz)
8, 11.025, 12,16, 22.05, 24, 32,
44.1, 48.
32, 40, 48, 56, 64, 80, 96, 112,
128, 160, 192, 224, 256, 320.
Sampling Rates (kHz)
8, 11.025, 12,16, 22.05, 24, 32,
44.1, 48.
AAC+ v1,
ACC+ v2
Bit Rates (kbits/sec)
32, 40, 48, 56, 80,96, 112, 128.
Sampling Rates (kHz)
8, 11.025, 12,16, 22.05, 24, 32,
44.1, 48.
Media Center
These types of video files are compatible with the
video playback capabilities of your phone’s Media
Center:
Video Formats M-JPEG, MPEG-4, H.263.
Audio Formats AMR-NB, AMR-WB.
Bit Rates
(kbits/sec)
Up to 128.
These types of audio files and picture files are
compatible with the Media Center:
File Type Task Formats
Audio Playback MIDI (FM-Midi, Type-0, 16
Polyphony, SP-Midi
compliant), WAV (8 kHz,
8-bit Mono PCM Canonical
Format), AMR, AU, MP3,
AAC, AAC+.
39
Page 50
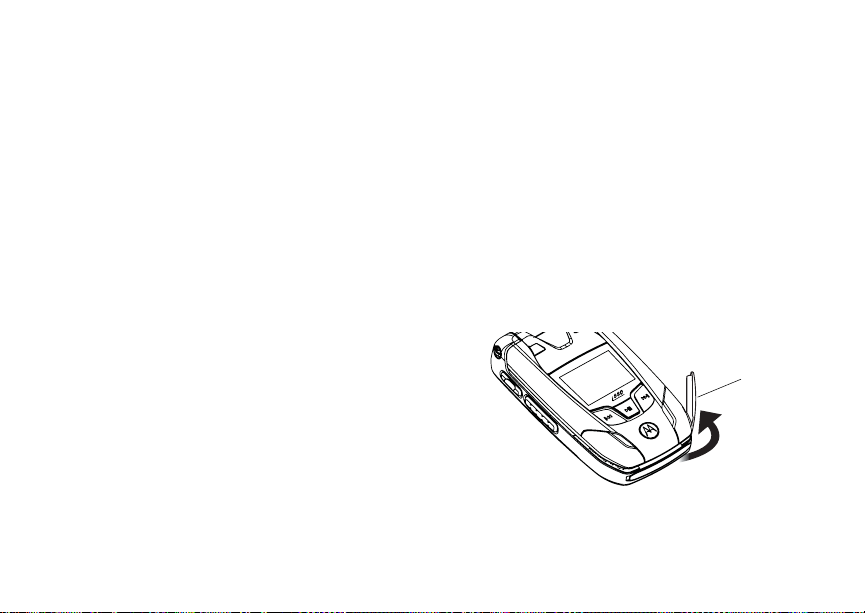
Using a Memory Card
Picture View GIF (GIF89A and GIF87A),
Capture JPEG.
JPEG, WBMP, PNG.
Using the Memory Card With Your Computer
The USB mass storage feature lets you access the
memory card inserted in your phone from your
computer by connecting your phone to your
computer with a USB data cable. The memory card
then is treated as a removable storage drive by
your computer. You can navigate to this drive as
you would any other drive on your computer.
You cannot use this feature while using Direct Talk.
When you are using your phone’s USB mass
storage feature, the memory card cannot be
accessed by your phone. Otherwise, your phone’s
functionality is not affected.
Setting Your Phone to Use the USB Mass Storage Feature
To turn on your phone’s ability to use the USB
mass storage feature:
1 From the main menu, select Settings >
Memory Card > USB Connection.
40
2 Select Reader Enabled.
To turn off your phone’s ability to use the USB
mass storage feature:
Set USB Connection to Reader Disabled in
step 2.
Using the USB Mass Storage Feature
To use your phone’s USB mass storage feature:
1 Ensure that your phone is powered on and not
set to Direct Talk, the memory card is inserted
your phone, and USB Connection is set to
Reader Enabled.
2 Open the connector cover.
connector
cover
3 Connect he USB cable to the USB port of your
computer.
Page 51

4 With the phone’s display facing up, insert the
USB data cable’s connector into the accessory
connector, until you hear a click.
Your memory card can now be accessed by your
computer.
Memory Cards Compatible With Your Phone
To purchase TransFlash and microSD memory
cards that are compatible with your i880 phone, go
to www.nextel.com or call 1-888-242-4187.
Memory Cards Compatible With Your Phone
41
Page 52

Audio Player
Your i880 phone includes an audio player that you
can use to play audio files stored in your phone’s
memory or on the memory card inserted in your
phone.
The audio player groups the audio files into folders
and lists. When you select an audio file to play, the
audio player plays this audio file and then plays the
other audio files grouped with it.
In addition to music, the audio player plays
podcasts that you have downloaded to your
computer and then saved on the memory card
inserted in your phone. You can mark highlights
within a podcast file to help you find the parts of the
podcast you most want to listen to. You can send
details of the podcast to a friend and send
feedback to the podcast creator using MMS
messages.
If you receive a phone call, Walkie-Talkie call, call
alert, message notification, a Datebook reminder,
or a GPS notification while playing an audio file
with the audio player, the audio file pauses and a
prompt appears asking you if you want to accept
the incoming call or alert or ignore it.
The audio player begins playing at the currently
selected volume, even when Vibrate All is set to
On.
42
Playing Audio Files With the Flip Closed
The controls on the front of your phone enable you
to use the audio player with your phone’s flip
closed:
• To access the audio player, press and hold y
any time your phone is not in a call or
transferring data.
• To play an audio file once you have accessed
the audio player, press y.
• To pause an audio file or resume playing it
again, press y.
• To skip to the next audio file, press z.
• To skip to the previous audio file, press x.
• To fast-forward, press and hold z.
• To rewind, press and hold x.
• To adjust the volume, use the volume keys.
• To suspend the audio player, press .. This
pauses the audio player and clears it from your
phone’s display. The next time you access the
audio player, you can continue playing the song
you were playing when you suspended it.
Page 53

Playing Audio Files With the Flip Open
Playing Audio Files With the
Flip Open
When your phone’s flip is open, you have more
ways to access the audio player and play the audio
files.
Accessing the Audio Player
From the Main Menu
From the main menu, select Music Player.
From the Media Center
1 Access the Media Center.
2 To view the audio recordings on your memory
card, press m. Select Filter > Card: Audio.
3 Select [Music Player] Play Music. -or-
Press A under Player.
Exiting the Audio Player
To exit the audio player, press A under Exit.
If Exit is not one of your options, press A under
Back or Cancel until it is.
Playing Audio Files
1 Access the audio player.
2 Scroll to a folder.
Tip: The Songs folder contains all the audio
files, except podcasts, on the memory card
in a single list.
3 To play the first audio file in the folder, press A
under Play. (If the folder you scrolled to contains
subfolders, this plays the first audio file in the
first of these subfolders.) -or-
Press O to view the contents of the folder. Then
scroll to an audio file and press A under Play to
play it, or scroll to a folder and press A under
Play to play the first audio file in it.
Any time you are viewing a list of folders with the
audio player, you can scroll to a folder and press
A under Play to start playing the contents of that
folder or press O to view the contents of the folder.
Any time you are viewing a list of audio files, you
can scroll to an audio file and press A under Play
to play it.
To stop viewing a folder and return to the folder or
list that contains it, press A under Back.
Pause and Resume
To pause a playing audio file, press A under
Pause or press O.
To resume playing a paused audio file, press A
under Play or press O.
43
Page 54

Audio Player
Skip to Next and Skip to Previous
To skip to the next audio file, press and release the
right side of the navigation key, as if scrolling right.
Do not hold the right side of the navigation key.
To skip to the previous audio file, press and
release the left side of the navigation key, as if
scrolling left. Do not hold the left side of the
navigation key.
Fast-Forward and Rewind
To fast-forward a playing audio file, press and hold
the right side of the navigation key, as if scrolling
right.
To rewind a playing audio file, press and hold the
left side of the navigation key, as if scrolling left.
Adjusting the Volume
To adjust the volume, use the volume keys.
44
How Your Audio Files Are Organized
The audio player groups the audio files on the
memory card into folders and lists.
Since you will probably want to use the audio
player primarily to play songs, the audio player
treats the audio files on the memory card as songs
when grouping and organizing them, unless the
audio player determines that the audio file is a
podcast.
The audio player uses metadata found in most
audio files to group the files on the memory card by
album, artist, and genre, or to classify them as
podcasts. You can also create your own groupings
of audio files, called playlists.
When you access the audio player, you see that
the audio files are grouped into these folders:
• Songs — All audio files on the memory card
inserted in your phone, except podcasts, listed
alphabetically by title.
• Playlists — Folders and lists you have created.
If you have not created any playlists, this folder
contains only the Favorite playlist, which is
empty.
Page 55

Playing Music While Files Are Loading
•Albums — Songs grouped by album. The
albums are listed alphabetically by title. The
songs on the albums are listed in the order that
they normally appear on the album.
•Artists — Songs grouped by artist. The artists
are listed alphabetically by name. Within each
artist’s folder, the songs are listed alphabetically
by title.
•Genres — Songs grouped by genre. The genres
are listed alphabetically by name. Within each
genre folder, the songs are listed alphabetically
by title.
• Podcasts — Podcast episodes grouped by
program. The programs are listed alphabetically
by name. Within each program folder, the
episodes are listed by date with the newest first.
In the Albums, Artists, and Genres folders, any
audio files that do not contain enough metadata to
be grouped by album, artist, or genre are placed in
a folder labeled “Unknown”.
Playing Music While Files Are
Loading
The first time the audio player encounters music
files on your memory card, it must load and
organize these files. If a large number of files must
be loaded, this may take a long time.
To play music while files are loading:
1 Access the audio player.
2 From the loading screen, press A under View.
3 In the folder view screen, scroll to a music file
and press A under Play. -or-
4 Press O
While music is playing, file loading is suspended.
Searching By First Letter
Any time you are viewing an alphabetical list of
audio files or folders, you can go to the items
starting with any letter by using your phone’s
keypad to enter that letter.
Playing a List and Using Repeat and Shuffle
When you select an audio file to play, the audio
player plays this audio file and then plays the other
audio files grouped with it. The repeat and shuffle
features help determine which of these songs are
played.
45
Page 56

Audio Player
If you are not using the repeat or shuffle features,
the audio player plays the audio file you select and
then plays the rest of the files in the list or folder, in
the order they appear, until it gets to the end of the
list or folder. The audio player then goes to the
beginning of the list and pauses until you resume
playing.
The repeat feature lets you set the audio player to
play all the audio files in a list or folder, in order,
starting again at the beginning of the list when it
gets to the end, without pausing or stopping. It also
lets you set the audio player to play one audio file
repeatedly, starting over as soon as it ends.
The shuffle feature lets you set the audio player to
play the audio files in a list or folder in random
order, until you stop it.
Setting Repeat
1 While viewing a list, viewing the details of the
audio file currently playing, or viewing visuals,
press m.
2 Select Setup.
3 Select Shuffle/Repeat.
4 Scroll to Repeat.
5 To set the audio player to repeatedly play the
contents of a list or folder, in order, select All.
-or-
46
To set the audio player to play one song
repeatedly, select One. -or-
To turn off the repeat feature, select Off.
Setting Shuffle
1 While viewing a list, viewing the details of the
audio file currently playing, or viewing visuals,
press m.
2 Select Setup.
3 Select Shuffle/Repeat.
4 Scroll to Shuffle.
5 To set the audio player to play the audio files in
a list or folder in random order, select On. -or-
To turn off the shuffle feature, select Off.
Working With Playlists
Playlists are lists of audio files you create from the
files already available through the audio player.
Playlists enable you to group audio files as you like
them, but they do not change anything in the other
folders or on the memory card. Adding a file to a
playlist does not copy it or move it. Removing a file
from a playlist, or deleting the playlist that a file is
listed in, does not delete the file from any other
location.
Page 57

Working With Playlists
Creating a Playlist
1 Access the audio player.
2 Select Playlists.
3 Select [Create New] > Name.
4 If you want to give the playlist a name, enter the
name. See “Entering Text” on page 68. When
you are finished, press A under OK.
Note: If you do not assign a name, the playlist is
named “playlist” followed by the number
of unnamed playlists you have, including
this one. For example, the first playlist you
create without naming is automatically
named “Playlist-1”.
5 Select [Add Songs].
A list of all audio files on the memory card
appears.
Tip: For options to help you sort through this list,
press m.
6 Select each audio file you want to put on the
playlist. A checkmark appears next to each
selected file.
Tip: To deselect a selected item: Scroll to a
selected file and press O.
7 When you are finished selecting files, press A
under Done.
8 If you want to change the order of the audio files
on a playlist, see “Reordering a Playlist” on page
47.
9 Select Save.
Editing a Playlist
After you have created a playlist, you can change
its name, add audio files, remove audio files, and
change the order of the audio files.
1 Access the audio player.
2 Select Playlists.
3 Scroll to the playlist you want to edit.
4 Press m.
5 Select Edit Playlist.
6 Make the changes you want.
7 Select Save.
Reordering a Playlist
You can change the order of the audio files on a
playlist before you save a new playlist or later,
while editing the playlist.
1 Before you have saved a new playlist or while
editing a playlist, press m.
2 Select Reorder Songs.
3 Scroll to the audio file you want to move.
4 Press A under Grab.
47
Page 58

Audio Player
5 Scroll to the place where you want the audio file
to appear.
6 Press A under Insert.
7 Repeat step 3 through step 6 for all the items
you want to move.
8 Press A under Done.
9 Press A under Save.
Removing Audio Files
You can remove some or all audio files from a
playlist before you save a new playlist or later,
while editing the playlist.
Removing an Audio File From a Playlist
1 Before you have saved a new playlist or while
editing a playlist, press m.
2 Scroll to the audio file you want to remove.
3 Press m.
4 Select Remove Song.
5 Press A under Save.
Removing All Audio Files From a Playlist
1 Before you have saved a new playlist or while
editing a playlist, press m.
2 Select Remove All Songs.
3 Press O or A under Yes to confirm.
4 Press A under Save.
48
Reordering Playlists
To change the order of the playlists in the Playlists
folder:
1 Access the audio player.
2 Select Playlists.
3 Press m.
4 Select Reorder Playlists.
5 Scroll to the playlist you want to move.
6 Press A under Grab.
7 Scroll to the place where you want the playlist to
appear.
8 Press A under Insert.
9 Repeat step 4 through step 8 for all the items
you want to move.
10 Press A under Done.
Deleting Playlists
Deleting a Playlist
1 Access the audio player.
2 Select Playlists.
3 Scroll to the playlist you want to delete.
4 Press m.
5 Select Delete Playlist.
6 Press A under Yes to confirm.
Page 59

Working With Podcasts
Deleting All Playlists
1 Access the audio player.
2 Select Playlists.
3 Press m.
4 Select Delete All Playlists.
5 Press O or A under Yes to confirm.
This deletes all playlists except the Favorites
playlist.
Using the Favorites Playlist
The Favorites playlist is a permanent playlist. You
can add audio files, remove audio files, and
change the order of the audio files, but you cannot
rename it or delete it.
You can add audio files to the Favorites playlist as
you would any other playlist.
You can also add audio files to the Favorites
playlist using the Add to Favorites shortcut.
Add the Audio File Currently Playing
1 While viewing a list, viewing the details of the
audio file currently playing, or viewing visuals,
press m.
2 Select Add to Favorites.
Add Any Audio File
1 Access the audio player.
2 Select Songs.
3 Scroll to the audio file you want.
4 Press m.
5 Select Add to Favorites.
Working With Podcasts
To access podcasts:
1 Access the audio player.
2 Select Podcasts.
3 Scroll to view individual podcast episodes or
folders containing multiple episodes of the same
program.
4 Press O to view the podcast episodes within a
folder or the details screen of an individual
podcast episode.
Playing a podcast is similar to playing any other
audio file. You can pause, resume, fast-forward,
and rewind just as with any other audio file.
Some functions differ when you a playing a
podcast:
49
Page 60

Audio Player
• Pressing O when you have scrolled to a podcast
displays a screen showing details of the
podcast, but does not play the podcast. To play
the podcast, press A under Play. After you
begin playing the podcast, pressing O pauses
and resumes the podcast.
• If the podcast you are playing contains
highlights, pressing and releasing the right or left
side of the navigation key skips to the next or
previous highlight within the podcast, or to the
beginning or the end of the podcast, rather that
skipping to the next or previous audio file.
Highlights
Highlights are portions of a podcast that are
marked to help you find them more easily.
Some podcasts you download my already have
highlights marked. You can use the audio player to
add and delete highlight markers.
Finding and Playing Highlights
To find and play highlights in the podcast you are
playing, press and release the right or left side of
the navigation key, as if scrolling right or left. Do
not hold the right or left side of the navigation key.
To play all the highlights in a podcast, and skip
everything that is not marked as a highlight:
1 While a podcast is playing or paused, press m.
50
2 Select Highlights Only. If the podcast has no
highlights, this option is not displayed.
Adding Highlight Markers
To add a highlight to a podcast:
1 While playing or paused within a portion of the
podcast that is not already marked as a
highlight, press m.
2 Select Add Highlights.
3 To mark the beginning of the highlight, press A
under On.
4 Go to the point in the podcast that you want to
mark as the end of the highlight. To do this,
fast-forward or let the podcast play to that point.
If you go too far, rewind.
If you reach the beginning of another highlight,
the beginning of that highlight automatically
becomes the end of the highlight you are
creating.
5 To mark the end of the highlight, press A under
Off.
6 Press A under Back.
Page 61

Working With Podcasts
Deleting Highlight Markers
To delete the beginning and end markers from a
highlight:
1 While playing or paused within the highlight you
want to delete the markers from, press m.
2 Press A under Clear.
To delete all highlight markers in a podcast:
1 While playing or paused within a podcast that
contains highlights, press m.
2 Select Add Highlights or Edit Highlights.
3 Press m.
4 Select Clear All Highlights.
Sending Podcast Information
If you want another person to hear a podcast you
have downloaded and saved to your memory card,
you can send information in an MMS messages the
person can save and use to download the podcast
on his or her computer.
If the person then plays the podcast on a phone
with an audio player like the one in your phone, he
or she sees any highlight markers you created
within the podcast on your phone.
To send podcast information:
1 When you have scrolled to, are playing, or have
paused within the podcast, press m.
2 Select Forward Details.
3 Create, send the message as you would any
other MMS message. See “Multimedia
Messages” on page 108. The podcast
information is automatically included in the
message.
Sending Feedback
If the creator of a podcast has included an email
address for feedback in the metadata of the
podcast, you can send an MMS message to that
email address.
To send feedback email to the creator of a
podcast:
1 When you have scrolled to, are playing, or have
paused within the podcast, press m.
2 Select Send Feedback.
3 Create and send the message as you would any
other MMS message. See “Multimedia
Messages” on page 108. The message is
automatically addressed to the email address
included with the podcast.
51
Page 62

Audio Player
Deleting Audio Files
You can delete audio files from the memory card
one at a time, by album, by artist, or by genre.
You can also delete all audio files from the memory
card by deleting everything in the Songs, Albums,
Artists, or Genres folder.
Deleting an audio file removes it from all playlists it
appears on.
Deleting an Audio File
1 Access the audio player.
2 Select the folder containing the audio file you
want to delete.
3 If the folder you selected contains more folders,
within that folder, select the folder containing the
audio file you want to delete.
4 Scroll to the audio file you want to delete.
5 Press m.
6 Select Delete Song or Delete Podcast.
7 Press A under Yes to confirm.
Deleting an Album, Artist, or Genre
1 Access the audio player.
2 Select the folder containing the audio files you
want to delete: Albums, Artists, or Genres.
52
3 Scroll to the album, artist, or genre you want to
delete.
4 Press m.
5 Select Delete Album, Delete Artist, or Delete
Genre.
6 Press A under Yes to confirm.
Deleting All Audio Files
Deleting everything in the Songs, Albums, Artists,
or Genres folder deletes all audio files from the
memory card.
1 Access the audio player.
2 Scroll to Songs, Albums, Artists, or Genres.
3 Press m.
4 Select Delete All Music.
5 Press O or A under Yes to confirm.
DRM Items
Some of the audio files on the memory card may
be DRM (digital rights management) items. When
a DRM items has expired, you can no longer play
it.
If you scroll to an audio file that is expired and try to
play it, a message saying you cannot play it
appears. If you play a list containing an expired
audio file, the audio player skips over the expired
item and no message is displayed.
Page 63

Setting Audio and Visual Options
Setting Audio and Visual
Options
You can customize the sound of the audio player
by setting the equalizer. You can customize the
look of the audio player screen by choosing a
theme or by viewing visuals while listening to an
audio file.
Setting the Equalizer
1 From anywhere in the audio player, press m.
2 Select Setup > Equalizer.
A checkmark appears next to the equalizer
mode that is in use.
3 Select the equalizer mode you want.
Choosing a Theme
The theme you choose controls the appearance of
the audio player screens.
1 Access the audio player.
2 Press m.
3 Select Setup > Themes.
A checkmark appears next to the theme that is
in use.
4 Select the theme you want.
Viewing Vis uals
To view visuals on the display instead of the details
of the song currently playing:
1 While viewing the details of the audio file
currently playing, press m.
2 Select Setup > Turn On Visuals.
To view the details of the song currently playing
instead of visuals:
1 While viewing visuals press m.
2 Select Setup > Turn Off Visuals.
53
Page 64

Call Alerts
Sending a call alert lets the recipient know you
want to talk to him or her on a Walkie-Talkie call.
When you send a call alert, the recipient’s phone
displays your name. The recipient’s phone emits a
series of beeps and the Walkie-Talkie button
backlight flashes slowly, or the phone vibrates.
The recipient can:
• Answer — begin a Walkie-Talkie call with the
sender
• Queue — store the call alert to the call alert
queue, which is a list of call alerts
• Clear — dismiss and delete the call alert
Note: Call alerts are not available for Group
Walkie-Talkie or Talkgroup calls.
Sending Call Alerts
1 Enter the Walkie-Talkie number you want to
send to, as you would when making a
Walkie-Talkie call.
2 Press A under Alert. Ready to Alert appears
on the display.
3 Press the Walkie-Talkie button until Alert
Successful appears on the display.
54
Note: If the alert is not successful, this may
mean the person you are trying to reach is
on a call or has the phone turned off.
Receiving Call Alerts
When you receive a call alert, you must answer,
queue, or clear it. You cannot receive phone calls
or Walkie-Talkie calls until you do.
To answer a call alert:
Press the Walkie-Talkie button to make a
Walkie-Talkie call to the sender.
To queue a call alert:
Press A under Queue.
To clear a call alert:
Press O. -or-
Press A under Clear. -or-
If the flip is closed, press
Note: The recent calls list also stores call alerts
you have received. They appear as
Walkie-Talkie calls. Call alerts remain in
your recent calls list until you delete them
or until they reach the end of the list.
..
Page 65

Using the Call Alert Queue
Using the Call Alert Queue
When you queue a call alert, it remains in the call
alert queue until you make a Walkie-Talkie call to
the sender or delete it.
Viewing Call Alerts
1 From the main menu, select Call Alert.
2 Scroll through the list.
Viewing Date and Time
To view the date and time a call alert was received:
1 From the main menu, select Call Alert.
2 Select the call alert you want information on.
Responding to Call Alerts in the Queue
After you queue a call alert, you can respond to it
by making a Walkie-Talkie call to the sender or
sending a call alert to the sender.
Making a Walkie-Talkie Call to the Sender
1 From the main menu, select Call Alert.
2 Scroll to the call alert you want to respond to.
3 Press the Walkie-Talkie button to begin the call.
This removes the call alert from the queue.
Sending a Call Alert to the Sender
1 From the main menu, select Call Alert.
2 Scroll to the call alert you want to respond to.
3 Press A under Alert. Ready to Alert appears
on the display.
4 Press the Walkie-Talkie button until Alert
Successful appears on the display.
Deleting Call Alerts
To delete a call alert from the queue:
1 From the call alert queue, scroll to the call alert
you want to delete.
2 Press m.
3 Select Delete.
4 Press O or press A under Yes to confirm.
To delete all call alerts from the queue:
1 From the call alert queue, press m.
2 From the call alert menu, select Delete All.
3 Press O or press A under Yes to confirm.
55
Page 66

Call Alerts
Sorting Call Alerts
Tip: You must have at least one call alert in the
queue to access this feature.
To sort call alerts by the order they were received:
1 From the main menu, select Call Alert.
2 Press m.
3 Select Sort By.
4 Select First on Top or Last on Top.
56
Page 67

Off-Network Walkie-Talkie
Direct Talk
SM
Off-Network Walkie-Talkie
Direct Talk is an all-digital, off-network walkie-talkie
service that works anywhere, anytime between
compatible phones. You can make and receive
Direct Talk calls outside of network coverage or
when network service is not available*. You can
talk to anyone on your code and channel who has
a Direct Talk-capable phone. Direct Talk has a
range of up to 6 miles.
* Terrain, weather, foliage, and man-made structures (such as
buildings), among other things, may impact range availability.
In-building usage may significantly reduce Direct Talk range.
Direct Talk is not approved for use in all countries. Please check
local laws before using outside of the United States.
Direct Talk allows you to:
• Make group or private Direct Talk calls
• Use up to 10 channels and 15 codes
Note: Direct Talk is only compatible with other
Direct Talk-capable units.
The following features and main menu items will
not be available while in Direct Talk mode:
on-network phone calls; Walkie-Talkie calls; Group
Walkie-Talkie calls; Talkgroup calls; Wireless Data
Services; data transmission; downloads; incoming
message notifications; musical ring tones;
Datebook; call forwarding; the message center; call
timers; call alerts; voice records; the audio player;
and the USB mass storage feature.
Using Direct Talk
To set your phone to Direct Talk:
1 From the main menu, select DirecTalk.
2 Select Go To DirecTalk.
Switching to DirecTalk Please Wait displays.
After a few seconds, the Direct Talk idle screen
appears. The channel you are set to appears on
the first line of the display. The code you are set to
appears on the second line of the display. DT
Ready appears on the bottom of the display.
Note: When switching from the network to Direct
Talk, the last channel and code that were
set appear on the idle screen.
While in Direct Talk, this icon M appears on the
display, indicating there is no network signal and
Direct Talk is active.
SM
57
Page 68

Direct Talk
Exiting Direct Talk
To set your phone to network mode when Direct
Talk is active:
1 From the Direct Talk idle screen, press m.
2 Select DT Options.
3 Select Exit DirecTalk.
Switching to Network Please Wait displays. After
a few seconds, the network idle screen appears.
SM
SM
Talk Range
Phones used in Direct Talk mode should be a
minimum of 6 feet apart to maximize performance
and improve transmission range.
Channels and Codes
Your phone has 10 channels and 15 codes.
Channels are divided into sets of frequencies that
allow you to make and receive Direct Talk calls.
Other parties may also be talking on the same
channel.
Codes help minimize interference from unwanted
messages and other disturbances when you are on
the same channel as others.
58
To have a conversation, all parties must be on the
same channel and code. For private Direct Talk
calls, the person you are calling must be in Direct
Talk mode and set to the same channel to which
you are set in order to receive your call.
Note: When making a Direct Talk call, all parties
that are on your code and channel can
hear your conversation.
To set a channel:
1 From the Direct Talk idle screen, press A under
Edit.
2 Scroll to Channel.
3 Press A under Edit.
4 Select a channel.
5 When you are finished, press A under Back to
return to the idle screen.
To set a code:
1 From the Direct Talk idle screen, press A under
Edit.
2 Scroll to Code.
3 Press A under Edit.
4 Select a code.
5 When you are finished, press A under Back to
return to the idle screen.
Page 69

Channels and Codes
Making and Receiving Calls in Direct
SM
Talk
Mode
To make a call on a specific code and channel
using Direct Talk:
1 From the Direct Talk idle screen or the channel
and code edit screen, press and hold the
Walkie-Talkie button. Transmit appears on the
display. Begin speaking after your phone emits
the Direct Talk tone.
2 Release the Walkie-Talkie button to listen.
The tone emitted from your phone when making a
Direct Talk call is 4 beeps and sounds different
from the standard tone heard with Walkie-Talkie
calls, Group Walkie-Talkie calls, and Talkgroup
calls.
If you receive an error message:
• There may be no parties on your channel or
code.
• You are out of range.
When you receive a call using Direct Talk, Receive
appears on the display.
Receive All
You can set your phone to receive Direct Talk
transmissions from any phone that is set to the
same channel, regardless of the code (1-15), by
setting the code to Receive All. When you receive
transmissions with the code set to Receive All, the
display changes from Receive All to the code on
which the transmission was received.
Note: You cannot initiate a call when the code is
set to Receive All. If you press the
Walkie-Talkie button with the code set to
Receive All, you will receive an error
message.
To set the code to Receive All:
1 From the Direct Talk idle screen, press A under
Edit.
2 Scroll to Code.
3 Press A under Edit.
4 Select Receive All.
5 When you are finished, press A under Back to
return to the idle screen.
59
Page 70

Direct Talk
SM
Private Direct TalkSM Calls
You can have a private conversation with another
person using Direct Talk. When on a private Direct
Talk call, no other parties can hear your
conversation. In order to make a private Direct Talk
call, you must use the valid Nextel 10-digit
Personal Telephone Number (PTN) of the person
you are calling. The person you are calling must be
in Direct Talk mode and set to the same channel to
receive your call.
If you receive an error message:
• You may not be using a valid PTN.
• The person that you are trying to reach may not
be in Direct Talk mode.
• The person that you are trying to reach is set to
a different channel or is out of range.
Private Only
To limit Direct Talk to private conversation only, set
your code to Pvt Only. In this mode, code calls will
be ignored and only private calls can be made or
received.
Note: You will be required to enter a valid PTN
before pressing the Walkie-Talkie button
to place a call.
60
To set the code to Pvt Only:
1 From the Direct Talk idle screen, press A under
Edit.
2 Scroll to Code.
3 Press A under Edit.
4 Select Pvt Only.
Making a Private Direct TalkSM Call
1 Enter the 10-digit PTN of the person you want to
call on your channel. -or-
Scroll to a number or name in Contacts. -or-
Scroll to a number in the recent calls list.
2 Press and hold the Walkie-Talkie button. Begin
speaking after your phone emits the Direct Talk
tone.
3 Release the Walkie-Talkie button to listen.
The number or name of the person you are calling
will appear in the first line of the display.
Receiving a Private Direct TalkSM Call
The number or name of the person who initiated
the call will appear in the first line of the display.
Page 71

Making Emergency Calls While in Direct TalkSM Mode
Ending a Private Direct TalkSM Call
A private Direct Talk call will end if there is no
communication for a few seconds.
Making Emergency Calls
While in Direct TalkSM Mode
If you attempt to make an emergency 911 call
while in Direct Talk
automatically exit Direct TalkSM mode and attempt
to find a network signal.
If you are out of network coverage, your phone will
not be able to make an emergency 911 cellular call
until you go back into a network coverage area.
You must wait until the phone reconnects to a
network before attempting to make an emergency
911 cellular call.
SM
mode, your phone will
Setup Options
Direct Talk setup options are available in the DT
Options screen in both network and Direct Talk
modes.
To access Setup Options in network:
1 From the main menu, select DirecTalk.
2 Select Setup.
To access Setup Options in Direct Talk:
1 From the main menu, select DT Options.
2 Select Setup.
You can set your phone to:
• Launch directly into Direct Talk when you select
DirecTalk from the main menu.
• Notify you periodically with a tone that you are in
Direct Talk.
Using Direct Launch
To set your phone to launch into Direct Talk when
you select DirecTalk from the main menu:
1 From the setup screen, select Direct Launch.
2 Select On.
Note: If Direct Launch is set to On, you will not
see DT Options when you select
DirecTalk from the main menu. In order to
have access to your setup options, Direct
Launch must be set to Off. Or you can
access setup options while in Direct Talk
mode by pressing m and selecting DT
Options.
To turn off Direct Launch:
1 From the setup screen, select Direct Launch.
2 Select Off.
61
Page 72

Direct Talk
Your phone now displays DT Options when you
select DirecTalk from the main menu.
SM
Using State Tone
To set your phone to notify you with a tone that you
are in Direct Talk:
1 From the setup screen, select State Tone.
2 Select the time frame during which you want to
be notified that you are in Direct Talk.
For example, if you select 1 hour, you will be
notified every hour that you are in Direct Talk.
To turn off State Tone:
1 From the setup screen, select State Tone.
2 Select Off.
62
Page 73

Recent Calls
The recent calls list displays information
associated with calls you have made and received
and call alerts you have received. It also displays
My Info and contact information sent to you from
other phones.
The recent calls list displays up to 20 items.
Calls and Call Alerts
The recent calls list contains the numbers of up to
20 of the most recent calls you have made and
received.
If the number of a recent call is stored in Contacts,
the following information appears:
• The name assigned to the number.
• The picture assigned to the number, if your
phone is set to show pictures on the recent calls
list. See “Choosing Picture View or List View” on
page 65. Pictures appear for phone calls only.
• The Contacts type icon associated with the
number. If the Contacts entry containing the
number has more than one number or address
stored,
<> surrounds the Contacts type icon. For
information on Contacts types, see page 71.
The Walkie-Talkie number Contacts type icon
appears when you receive a Walkie-Talkie call or
call alert, even if the number is not stored in
Contacts.
Call alerts you have received appear as
Walkie-Talkie calls. Like all items in the recent calls
list, they remain listed until you delete them or until
they reach the end of the list.
For phone calls, an additional icon appears giving
information about the call:
A call you made.
X
A call you received.
W
A missed call. Missed calls appear on the
V
recent calls list only if you have Caller ID.
When you select a call to view its details, you see
information such as the name associated with the
call, the number, date, time, and duration of the
call.
63
Page 74

Recent Calls
My Info From Other Phones
The recent calls list displays My Info sent from
other phones. See “Sending My Info and Contact
Information” on page 138.
This icon
phones on the recent calls list, along with the
Walkie-Talkie number of the person who sent the
information.
When you select My Info from other phones to view
its details, you see all the information sent.
If you receive My Info from the same phone more
than once, only the most recently sent version
appears in the recent calls list.
j appears with My Info sent from other
Contact Information From Other Phones
The recent calls list displays contact information
sent from other phones. This information comes
from the other phone’s Contacts list or recent calls
list. See “Sending My Info and Contact Information”
on page 138.
64
This icon
the recent calls list.
Contact information in the recent calls list displays:
• The name contained in the contact information.
• The Contacts type icon associated with the
The name or Walkie-Talkie number of the person
who sent the contact information appears as a
separate item on the recent calls list, above the
information sent. If one person sends you more
than one item of contact information, all the items
appear below the person’s name or Walkie-Talkie
number.
When you select contact information to view its
details, you see the name or Walkie-Talkie number
of the person who sent the information and all the
information in the item.
If you receive contact information with the same
name from the same phone more than once, only
the most recently sent version appears in the
recent calls list.
d appears with contact information on
number or address contained in the contact
information. If the item contains more than one
number or address stored,
Contacts type icon.
<> surrounds the
Page 75

Viewing the Recent Calls List
Viewing the Recent Calls List
With the Flip Open
1 From the main menu, select Recent Calls.
2 Scroll through the list.
To view the details of an item on the list:
From the recent calls list, select the item you
want information on.
Tip: To view the details of more items, keep
scrolling.
With the Flip Closed
1 Press
2 If you want to view the rest of the recent calls
3 Press
Choosing Picture View or List View
You can set your phone to show the picture
associated with each item as you view the recent
calls list or show the list without pictures.
1 From the recent calls list, press m.
2 Select Recent Calls View.
. to display the most recent call.
list, press the volume controls.
. to dismiss the recent calls list.
3 Select List View to show the recent calls list
without pictures. -or-
Select Picture View to show the picture
associated with each entry.
Storing Items to Contacts
1 From the recent calls list, scroll to or select the
item you want to store.
2 Press A under Save. -or-
If Save is not one of your options: Press m.
Select Save or Update Contacts.
Tip: If the item you want to store is a call, Save
does not appear if the number is already
stored in Contacts.
3 To store the item as a new entry, select [New
Contact]. -or-
To store the number to an existing entry, select
the entry.
Note: Storing My Info or contact information
from another phone to a Contacts entry
that has a name assigned to it does not
change the name of the Contacts entry.
65
Page 76

Recent Calls
4 If the item you want to store is a call, you must
assign a Contacts type to the number:
With the Contacts type field highlighted, scroll
left or right to display the Contacts type you want
to assign the number.
5 If you want to add more information to the entry,
follow the applicable instructions in “Creating
Entries” on page 72.
6 Press A under Save.
Deleting Items
To delete an item from the recent calls list:
1 From the recent calls list, scroll to or select the
item you want to delete.
2 Press A under Delete. -or-
If Delete is not one of your options: Press m.
Select Delete.
3 Press O or press A under Yes to confirm.
To delete all items on the recent calls list:
1 From the recent calls list, press m.
2 Select Delete All.
3 Press O or press A under Yes to confirm.
66
Making Calls From the Recent Calls List
With the Flip Open
1 From the main menu, select Recent Calls.
2 Scroll to the item containing the number you
want to call.
• If you scroll to a call, you can make a call to
the number that made the call. If the number
is stored in Contacts, you can make a call to
any of the numbers stored with it.
• If you scroll to My Info from another phone,
you can make a call to the Walkie-Talkie
number of the phone that sent the
information.
• If you scroll to contact information from
another phone, you can make a call to any of
the numbers in the contact information.
3 To place the call now, go to step 4. -or-
Scroll left or right to display the Contacts type for
the number you want to call.
4 To make a phone call, press s. -or-
To make a Walkie-Talkie call, press the
Walkie-Talkie button.
Page 77

Making Calls From the Recent Calls List
You can also make calls while viewing the details
of an item on the recent calls list:
1 From the recent calls list, select the item
containing the number you want to call.
• If you select a call or contact information from
another phone, you can make a call to the
number shown first on the details screen.
• If you scroll to My Info from another phone,
you can make a call to the Walkie-Talkie
number of the phone that sent the
information.
2 To make a phone call, press s. -or-
To make a Walkie-Talkie call, press the
Walkie-Talkie button.
With the Flip Closed
1 Press
. to display the most recent call.
2 Press the volume controls to scroll to the name
or number you want to call.
• If you scroll to a call, you can make a call to
the number that made the call.
• If you scroll to My Info from another phone,
you can make a call to the Walkie-Talkie
number of the phone that sent the
information.
• If you scroll to contact information from
another phone, you can make a call to the
number currently displayed.
3 To make a phone call, press
t on the top of
your phone. -or-
To make a Walkie-Talkie call, press the
Walkie-Talkie button.
67
Page 78

Entering Text
You can enter text, numbers, and symbols into
your phone using Alpha, Word, Numeric, or
Symbol text input modes.
l Alpha — Press a key several times for each
character.
j Word — Press a key once for each letter while
words likely to be the one you want are chosen from
a database.
k Numeric — Enter numbers.
i Symbols — Enter punctuation and other symbols.
When you access a screen that requires you to
enter text, you start in the mode last used.
To choose a text input mode:
1 At a screen that requires you to enter text, press
m.
2 Select the text input mode you want to use. A
checkmark appears next to the current mode.
68
Using Word Mode
In Word mode, T9 Text Input analyzes the letters
on the keypad buttons you press and arranges
them to create words. As you type, T9 Text Input
matches your keystrokes to words in its database
and displays the most commonly used matching
word. You can add your own words to this
database.
Entering a Word
1 Select Word as your text input mode.
2 Type a word by pressing one key for each letter.
For example, to type “test” press 8 3 7 8.
The displayed word may change as you type it.
Do not try to correct the word as you go. Type to
the end of the word before editing.
3 If the word that appears is not the desired word,
press 0 to change the word on the display to
the next most likely word in the database.
Repeat until the desired word appears.
If the desired word does not appear, you can add it
to the database.
Page 79

Special Function Keys
Adding Words to the Database
1 Select Alpha as your text input mode.
2 Type the word using Alpha mode.
3 Select Word as your text input mode.
4 Press #.
The word you typed in Alpha text entry mode is
now in the database.
Note: You cannot store alphanumeric
combinations, such as Y2K.
Choosing a Language
To change the language of the database:
1 At a screen that requires you to enter text, press
m.
2 Select Languages.
3 Select the language you want for your database.
Special Function Keys
Some of the phone’s keys assume different
functions while in Alpha or Word mode.
Spaces
Press # for a space.
Capitalization
When you press and hold the # key, it acts as a
3-way toggle. Press and hold # to make the next
letter typed uppercase (shift), to make all
subsequent letters typed uppercase (caps lock), or
to go back to lowercase letters.
These icons appear:
m or X
n
When neither of these icons appear, letters typed
are lowercase. Scrolling up after typing a letter
makes that letter uppercase.
Note: When creating a text message, you may
Your phone automatically makes the first letter of a
sentence uppercase.
Shift is on.
Caps lock is on.
or W
not be able to make a letter uppercase by
scrolling up, depending on the type of text
message and the text entry mode.
69
Page 80

Entering Text
Punctuation
Press 1 or 0 to insert punctuation. Continue to
press the key to view the list of symbols available
through that key. Pause to select the symbol you
want.
Note: Additional punctuation symbols are
available in Symbols mode.
Using Numeric Mode
1 Select Numeric as your text input mode.
2 Press the number buttons on your keypad to
enter numbers.
Using Symbols Mode
1 Select Symbols as your text input mode.
A row of symbols appears along the bottom of
the phone’s display. Scroll right to view the
complete row.
2 Press O to select the highlighted symbol.
70
Page 81

Contacts
Contacts stores up to 600 numbers or addresses.
Each Contacts entry can store several numbers or
addresses.
Information stored in Contacts is saved on your
SIM card.
A Contacts entry contains:
• A name — A name is required if you are storing
more than one number or address to the entry;
otherwise, it is optional. Typically, this is the
name of the person whose contact information is
stored in the entry.
• A ring tone — This is the sound your phone
makes when you receive phone calls or call
alerts from any of the numbers stored in the
entry. You can assign the ring tone from your list
of ring tones. If you do not assign a ring tone, the
entry is created with a default ring tone
assigned.
• A picture — This picture appears on the display
when you receive phone calls from any of the
phone numbers or the Walkie-Talkie number
stored in the entry. You can assign the picture
from the pictures stored in the Media Center. If
you do not assign a picture, the entry is created
with no picture assigned.
• A Contacts type — Each number or address
stored must be assigned a Contacts type:
Mobile phone number
A
DC Walkie-Talkie number
B
Work1 phone number
C
Work2 phone number
D
Home phone number
E
Email email address
F
Fax phone number
G
Pager phone number
H
Talkgroup Talkgroup number
I
Group Group
S
IP IP address
J
Other phone number
K
71
Page 82

Contacts
• A number or address — Each Contacts entry
must contain a number or address. This may be
any type of phone number, Walkie-Talkie
number, Group, Talkgroup number, email
address, or IP address.
Note: You can store numbers up to 64 digits
long, but every 20 digits must be
separated by a pause or wait. See
“Creating Pauses and Waits” on page 78.
• A Speed Dial number — When you store a
phone number, it is assigned a Speed Dial
number. You can accept the default Speed Dial
number or change it.
• A voice name — If you create a voice name for a
number, you can then dial that number by
saying the voice name into your phone. This
icon P appears to the left of the Contacts type
icon if a voice name is assigned.
Accessing Contacts
From the main menu, select Contacts. -or-
If you are on a call: Press m. Select Contacts.
72
Creating Entries
A number or address and a Contacts type are
required for all Contacts entries. Other information
is optional. You may enter the information in any
order by scrolling through the entry details.
After you have entered the number or address,
Contacts type, and any other information you want,
you can press A under Save to save the entry to
Contacts.
To cancel a Contacts entry at any time, press e to
return to the idle screen.
Note: For information about creating Groups,
see “Creating Groups in Contacts” on
page 24.
To create a Contacts entry:
1 To access the entry details screen:
Select Contacts > [New Contact]. -or-
From the Contacts list, press m. Select New
Contact.
2 If you want to assign a name to the entry:
Select Name.
Enter the name. See “Entering Text” on page
68. When you are finished, press O.
Page 83

Creating Entries
Tip: Press A under Browse to select a name
already in Contacts.
3 If you want to assign a ring tone or picture to the
entry, select [Ring Tone/Picture]. See
“Assigning a Ring Tone or Picture”.
4 To assign a Contacts type to the number or
address being stored:
Select the Contacts type field.
Select the Contacts type you want to assign.
5 To store a number or address:
Select the # field (or ID for an email address, or
IP for an IP address).
Enter the number or address. For phone
numbers, use the 10-digit format. For email
addresses, see “Entering Text” on page 68.
Tip: Press A under Browse to select a number
or address from Contacts, the recent calls
list, or Memo.
When you are finished, press O.
6 If you want to change the default Speed Dial
number or a create a voice name for the entry,
select [Options]. See “Assigning a Speed Dial
Number or Voice Name” on page 74.
7 If you want to add more numbers or addresses
to the entry:
Scroll past the information you already entered.
Enter the additional information for the entry
using step 3 through step 6. You must assign a
name to the entry, if you have not already.
8 Press A under Save.
Assigning a Ring Tone or Picture
1 If you have not already, select [Ring
Tone/Picture].
2 If you want to assign a ring tone:
With Ringer highlighted, scroll left or right to
choose a ring tone from the list of ring tones.
-or-
Select Ringer. Select the ring tone you want to
assign from the ring tones available in the Media
Center.
3 If you want to assign a picture from the Media
Center:
Select Picture. Select the picture you want to
assign.
Some large pictures cannot be assigned.
73
Page 84

Contacts
Note: If you choose a picture that is stored on
the memory card, that picture file is
automatically copied or moved to your
phone’s memory according to the rules
described in “Pictures Stored on the
Memory Card” on page 156.
Tip: If an entry has a picture assigned and you
want the entry to have no picture, select
[No Picture] or press A under Unassign.
4 When you are finished, press A under Back.
5 If you are finished creating the entry, press A
under Save.
Assigning a Speed Dial Number or Voice Name
1 If you have not already, select [Options].
2 The default Speed Dial number assigned to a
phone number is displayed in the Speed # field.
This is always the next available Speed Dial
location.
If you want to assign the phone number to a
different Speed Dial location:
With the Speed # field highlighted, press O.
Press A under Delete to delete the current
Speed Dial number.
74
Enter the new Speed Dial number using the
keypad.
When you are finished, press O.
3 If you want to create a voice name for a phone
number, select Voice Name.
As directed by the screen prompts, say and
repeat the name you want to assign to the
number. Speak clearly into the microphone.
4 When you are finished, press A under Back.
5 If you are finished creating the entry, press A
under Save.
Editing Entries
1 From the Contacts list, scroll to or select the
entry you want to edit.
2 Press A under Edit. -or-
If Edit is not one of your options: Press m. Select
Edit.
The entry details screen displays.
3 Follow the applicable instructions in “Creating
Entries” on page 72 to edit the various fields.
Page 85

Viewing Entries
Viewing Entries
When you view Contacts entries, you can choose
how much detail you want to see.
Viewing the Contacts List
In this view, each entry shows:
• The name assigned to the entry
• A small version of the picture assigned to the
entry, if you have set Contacts to show pictures
in the Contacts list. See “Choosing Picture View
or List View” on page 76.
• The types of numbers and addresses stored in
the entry
To view entries from the Contacts list:
1 Access Contacts.
2 Scroll to view entries.
Tip: To find Contacts entries faster, use the
keypad to enter the first letter of the name.
3 If an entry has more than one number or
address stored,
icon. Scroll left or right to view the icon for each
number stored in the entry.
<> surrounds the Contacts type
Selecting an Entry
In this view, each entry shows:
• The name assigned to the entry
• A small version of the picture assigned to the
entry
• The name of the ring tone assigned to the entry
• The numbers and addresses stored in the entry
To select an entry:
1 From the Contacts list, select the entry you want
to view.
2 Scroll to view the numbers and addresses
stored in the entry.
Tip: To select other entries: Scroll left or right.
Or, press # or *.
To return to the Contacts list, press A under
Back.
Viewing More Details
When an entry is selected, you can view more
details about the entry by selecting items within the
entry.
75
Page 86

Contacts
Viewing Details of a Number or Address
1 Select the entry.
2 Select the number or address you want to view
details of.
If you select a phone number, you can view its
Speed Dial number and see whether it has a
voice name.
To return to the entry, press A under Back or
press O.
Viewing a Large Picture
To view a large version of the picture assigned to
an entry:
1 Select the entry.
2 Select the first item shown on the entry screen.
This item shows the name assigned to the entry
or Unnamed.
Note: You cannot make calls from this view.
To return to the entry, press A under Back or
press O.
76
Choosing Picture View or List View
You can set Contacts to show the picture assigned
to each entry as you view the Contacts list or show
the Contacts list without pictures.
1 From the Contacts list, press m.
2 Select Contacts View.
3 Select List View to show the Contacts list
without pictures. -or-
Select Picture View to show the picture
assigned to each entry.
Searching for a Name
To search for a name in Contacts:
1 From the Contacts list, press A under Search.
-or-
If Search is not one of your options: Press m.
Select Search.
2 Enter the name you want to see. See “Entering
Text” on page 68.
3 Press O.
Your phone finds the name you entered or the
nearest match.
Page 87

Deleting Entries
Showing Only Walkie-Talkie Numbers, Groups, and Talkgroups
To set Contacts to show only entries that contain
Walkie-Talkie numbers, Groups, and Talkgroup
entries:
1 From the Contacts list, press m.
2 Select Filter.
3 Set this option to Show DC.
To set Contacts to show all entries:
1 From the Contacts list, press m.
2 Select Filter.
3 Set this option to Show All.
Deleting Entries
Delete an Entry
1 From the Contacts list, scroll to or select the
entry you want to delete.
2 Press m.
3 To delete the entire entry, select Delete Contact
or Delete Group.
4 Press O or press A under Yes to confirm.
Delete a Number or Address
1 From the Contacts list, scroll to the entry that
contains the number or address you want to
delete.
2 Scroll left or right to display the Contacts type for
the number you want to delete. -or-
Select the entry. Scroll to or select the number
you want to delete.
3 Press m.
4 Select Delete Number.
5 Press O or press A under Yes to confirm.
Note: If an entry contains only one number or
address, deleting the number or address
deletes the entry.
Checking Capacity
To see how many numbers are stored in Contacts:
1 From the Contacts list, press m.
2 Select Capacity.
77
Page 88

Contacts
Creating Pauses and Waits
When storing a number, you can program your
phone to pause or wait between digits while
dialing. A pause makes your phone pause for 3
seconds before dialing further. A wait makes your
phone wait for your response before dialing further.
This feature is useful when using voicemail or other
automated phone systems that require you to dial a
phone number and then enter an access number.
To program a pause:
Press and hold * until the letter P appears. The
P represents a 3-second pause.
If you store 17035551235P1234, when you select
this number and make a call, your phone dials the
first 11 digits, pauses for 3 seconds, then dials the
last 4 digits.
If you want a pause longer than 3 seconds, press
and hold * more than once. Each P represents a
3-second pause.
To program a wait:
Press and hold * until the letter W appears. The
W means your phone waits before dialing
further.
78
If you store 17035551235W1234, when you select
this number and make a call, your phone dials the
first 11 digits and then waits. A message appears
asking if you want to send the rest of the digits.
Press A under Yes to dial the last 4 digits.
Tip: You can create pauses and waits while
dialing a number from the keypad. See
“Creating Pauses and Waits While Dialing”
on page 86.
International Numbers
When storing a number that you plan to use for
international calls, use Plus Dialing:
1 Press and hold 0 for two seconds. A “0”
appears, then changes to a “+”.
Note: The network translates the “+” into the
appropriate international access code
needed to place the call.
2 Enter the country code, city code or area code,
and phone number.
For information about making international calls,
see “Making International Calls” on page 86.
Page 89

Making Calls From Contacts
Making Calls From Contacts
While Viewing the Contacts List
1 Access Contacts.
2 Scroll to the name or number you want to call.
Tip: To find Contacts entries faster, use the
keypad to enter the first letter of the name.
3 To place the call now, go to step 4. -or-
Scroll left or right to display the Contacts type for
the number you want to call.
4 To make a phone call, press s. -or-
To make a Walkie-Talkie call, press the
Walkie-Talkie button.
If you are making a Walkie-Talkie call, your phone
places the call to the Walkie-Talkie number stored
in the Contacts entry, even if the Walkie-Talkie icon
is not displayed.
If you are making a phone call:
• Your phone places the call to the phone number
assigned to the Contacts type displayed.
• If the Contacts type displayed is not a phone
number, your phone places the call to the phone
number stored in the Contacts entry.
• If the Contacts type displayed is not a phone
number and you have more than one phone
number stored in the Contacts entry, your phone
prompts you to select the phone number you
want to place the call to.
After Selecting an Entry
1 Access Contacts.
2 Select the Contacts entry that contains the
number you want to call.
3 Scroll to or select number you want to call.
4 To make a phone call, press s. -or-
To make a Walkie-Talkie call, press the
Walkie-Talkie button.
If you try to make a type of call that does not match
the Contacts type of the number you chose, no call
is placed.
Sending Contact s Using Next el Direct Send
You can send a Contact using Nextel Direct Send
so that the person who receives the Contact can
use it. See “Sending Contact Information” on page
139.
79
Page 90

Memo
Memo lets you store a number, make a call to that
number, and save it to Contacts.
To create a memo:
1 From the main menu, select Memo.
2 Enter the number using your keypad.
3 Press O.
To view the memo later:
From the main menu, select Memo.
To delete the memo:
1 From the main menu, select Memo.
2 Press and hold A under Delete.
3 Press O.
To edit the memo:
1 From the main menu, select Memo.
2 Enter the new number.
3 Press O.
To make a call to the memo number:
1 From the main menu, select Memo.
2 To make a phone call, press s. -or-
To make a Walkie-Talkie call, press the
Walkie-Talkie button.
80
To store the memo number to Contacts:
1 From the main menu, select Memo.
2 Press m.
3 Select Store to Contacts.
4 T o store the number as a new entry, select [New
Contact]. -or-
To store the number to an existing entry, select
the entry.
5 With the Contacts type field highlighted, scroll
left or right to display the Contacts type you want
to assign the number.
6 If you want to add more information to the entry,
follow the applicable instructions in “Creating
Entries” on page 72.
7 Press A under Save.
Page 91

Call Forwarding
Call forwarding sends calls to the phone numbers
you specify. You can forward all calls to one
number or forward missed calls to different
numbers depending on the reason you missed the
call.
You can forward phone lines 1 and 2
independently.
Forwarding All Calls
When you set your phone to forward all calls, an
icon appears in the top row of the display:
Phone line 1 is active; calls to phone line 1
G
are being forwarded.
Phone line 1 is active; calls to phone line 2
I
are being forwarded.
Phone line 1 is active; calls to phone lines 1
H
and 2 are being forwarded.
Phone line 2 is active; calls to phone line 1
J
are being forwarded.
Phone line 2 is active; calls to phone line 2
L
are being forwarded.
Phone line 2 is active; calls to phone lines 1
K
and 2 are being forwarded.
To forward all calls:
1 From the main menu, select Call Forward >
Forward > All Calls.
2 Select To.
If you specified a forwarding number for all calls
before, this number displays.
To forward calls to this number, press A under
Back.
To delete this number, press O, then press and
hold A under Delete.
3 To enter the number you w ant to forward calls
to:
Enter the number using your keypad. -or-
Press A under Search. Select Contacts,
Recent Calls, or Memo. Select the number you
want to enter.
4 Press O.
All your calls are now forwarded to the number
you specified.
81
Page 92

Call Forwarding
Turning Off Call Forwarding
If you do not want all your calls forwarded, turn the
feature off:
1 From the main menu, select Call Forward > To.
2 Set this option to Off.
All your calls are now sent to your phone.
Calls you miss are forwarded according to the
options set for missed calls. By default, missed
calls are forwarded to voicemail.
Forwarding Missed Calls
You can specify a forwarding number for each type
of missed call:
•If Busy — Your phone is on a call or transferring
data.
• If No Answer — You do not answer on the first
4 rings.
• If Unreachable — Your phone is out of
coverage or powered off.
82
Note: If you want a type of missed call sent to
voicemail, the call forwarding number for
that type of missed call must be your
voicemail access number. In most cases,
your voicemail access number is your
area code + first 3 digits of your PTN +
MAIL (6245). To verify your voicemail
access number, contact Nextel Customer
Service.
To forward missed calls:
1 From the main menu, select Call Forward >
Forward > Detailed.
Note: If your phone is set to forward all calls,
you must first turn off call forwarding to
access this option. See “Turning Off Call
Forwarding” on page 82
2 Select If Busy to specify a forwarding number
for calls received when your phone is busy.
3 If you specified a forwarding number for this type
of call before, this number displays.
To forward calls to this number, press B under
Back and go to step 6. -or-
To delete this number, press O, then press and
hold A under Delete.
4 To enter the number you want to forward this
type of call to:
Page 93

Enter the number using your keypad. -or-
Press A under Search. Select Contacts,
Recent Calls, or Memo. Select the number you
want to enter.
5 Press O.
6 Repeat step 2 through step 5 for If No Answer
and If Unreachable.
7 When you are finished, press A under Back.
Viewing Call Forwarding Settings
1 From the main menu, select Call Forward >
Forward > All Calls.
2 With To highlighted, press A under Status.
Viewing Call Forwarding Settings
83
Page 94

Advanced Calling Features
Call Waiting
Call Waiting lets you receive a second call while on
an active call. Call Waiting is always available,
unless you turn it off for a specific call.
If you are on a call and receive a second call, your
phone emits a tone and displays a message saying
you are receiving a second call.
To accept the second call and put the active call on
hold:
Press A under Yes.
To accept the second call and end the active call:
1 Press e.
Your phone rings with the second call.
2 Answer the second call.
To decline the second call:
Press A under No. If you subscribe to
voicemail, the call is forwarded to your voicemail
box, unless you set Call Forward for If Busy to
a different number.
84
Turn Off Call Waiting
To turn off Call Waiting during a call:
1 Press m.
2 Select In Call Setup > Call Waiting.
3 Set this option to Off.
Tip: To turn Call Waiting back on while still on
the call, set this option to On.
To turn off Call Waiting for the next call you make
or receive:
1 From the main menu, select Settings > Phone
Calls > Call Waiting.
2 Set this option to Off.
Call Waiting is turned back on when you end the
call.
Switching Between Calls
Any time you have one call active and one call on
hold, to make the call on hold active and put the
active call on hold:
Press A under Switch. -or-
If Switch is not one of your options: Press m.
Select Switch.
Page 95

Putting a Call on Hold
Putting a Call on Hold
1 While on an active call, press m.
2 Select Hold.
If you want to make the call active again, press A
under Resume.
Calling 2 People
Putting a Call on Hold, Making a Second Call
1 Place or receive a phone call.
2 While the call is active, press m.
3 Select 2nd Call. This puts the call on hold.
4 Enter the second phone number you want to
call.
Tip: For quick ways to enter the number, press
m.
5 Press s to place the call.
To end the second call and make the call on hold
active again:
Press e.
To make the call on hold active and put the active
call on hold:
Press A under Switch.
Merging 2 Calls Into a 3-Way Call
After you put a call on hold and place a second
call, you can combine these calls into a 3-way call:
1 Press m.
2 Select Join.
All 3 people in the call can speak to and hear each
other.
Note: To disconnect one party from a 3-way call,
you must advise either caller to hang up.
You cannot disconnect one party at a
time.
Making a 3-Way Call
1 Place or receive a phone call.
2 While the call is active, press m.
3 Select 3 Way. This puts the call on hold.
4 Enter the second phone number you want to
call.
Tip: For quick ways to enter the number, press
m.
5 Press s to place the call.
6 Press A under Join.
All 3 people in the call can speak to and hear each
other.
85
Page 96

Advanced Calling Features
Note: You cannot make any other calls after you
have joined a 3-way call, even if one party
disconnects.
Creating Pauses and Waits While Dialing
You can enter a pause or wait while dialing a
number. For more information on pauses and
waits, see “Creating Pauses and Waits” on page
78.
To create a pause while dialing a phone number:
1 From the keypad, enter the digits you want to
occur before the pause.
2 Press m.
3 Select Insert Pause.
4 Enter the digits you want to occur after the
pause.
To create a wait while dialing a phone number:
1 From the keypad, enter the digits you want to
occur before the wait.
2 Press m.
3 Select Insert Wait.
4 Enter the digits you want to occur after the wait.
86
Making International Calls
Your service default is “International Calls
Restricted.” Contact Nextel Customer Service to
obtain international dialing access.
Calls placed between the United States and
Canada do not require an international access
code.
Plus Dialing lets you place an international call to
most countries without entering the local
international access code.
1 Press and hold 0 for two seconds. A “0”
appears, then changes to a “+”.
Note: The network translates the “+” into the
appropriate international access code
needed to place the call.
2 Enter the country code, city code or area code,
and phone number.
3 Press s.
One Touch Walkie-Talkie
One Touch Walkie-Talkie sets your phone to call
the most recent Walkie-Talkie number or Group on
the recent calls list, or a Walkie-Talkie number you
choose, every time you press the Walkie-Talkie
button.
Page 97

Setting Flip Actions
Setting One Touch Walkie-Talkie
To the Most Recent Walkie-Talkie Number or
Group
1 From the main menu, select Settings > DC/GC
Options > One Touch DC.
2 Set this option to Last Call.
To an Assigned Walkie-Talkie Number
1 From the main menu, select Settings > DC/GC
Options > One Touch DC > Assigned
Number.
2 To enter the Walkie-Talkie number you want
your phone to call every time you press the
Walkie-Talkie button:
Enter the number using your keypad. -or-
Press A under Search. Select Contacts,
Recent Calls, or Memo. Select the number you
want to enter.
Tip: If you are entering a Talkgroup number,
enter # before the number.
3 Press O.
Turning Off One Touch Walkie Talkie
1 From the main menu, select Settings > DC/GC
Options > One Touch DC.
2 Set this option to Off.
Setting Flip Actions
For Answering Calls
To set your phone to answer calls when you open
the flip:
1 From the main menu, select Settings > Phone
Calls > Flip Activation > Flip to Ans.
2 Set this option to On.
To set your phone not to answer calls when you
open the flip:
Set Flip to Ans to Off in step 2.
For Ending Calls
To set your phone to end calls when you close the
flip:
1 From the main menu, select Settings > Phone
Calls > Flip Activation > Flip to End.
2 Set this option to On.
To set your phone not to end calls when you close
the flip:
Set Flip to End to Off in step 2.
87
Page 98

Advanced Calling Features
Note: If you are using your phone with a
headset, and you have the Flip to End
option set to On, closing your flip sends
incoming sound to the headset and does
not end the call.
Call Timers
Call timers measure the duration of your phone
calls, Walkie-Talkie calls, and circuit data use, as
well as the number of kilobytes sent and received
by your phone:
• Last Call — displays the duration of your most
recent phone call.
• Phone Reset — keeps a running total of your
phone call minutes, until you reset it.
• Phone Lifetime — displays the total minutes of
all your phone calls.
• DC/GC Reset — keeps a running total of all of
your Walkie-Talkie call minutes, until you reset
it.
• DC/GC Lifetime — displays the total minutes of
all your Walkie-Talkie calls.
• Circuit Reset — keeps a running total of all of
your circuit data use, until you reset it.
• Circuit Lifetime — displays the total minutes of
all of your circuit data use.
88
• Kbytes Reset — keeps a running total of the
number of kilobytes sent and received by your
phone, until you reset it.
To view or reset a timer:
1 From the main menu, select Call Timers.
2 Select the feature you want to view or reset.
3 To view a feature without resetting: Press O
when you are finished viewing. -or-
To reset a feature: Press A under Reset. Press
O or press A under Yes to confirm.
Note: The values displayed by Call Timers
should not be used for billing. Call timers
are estimates only.
Using Your Phone as a Modem
You can use your phone as a modem with a laptop,
handheld device, or desktop computer. In order to
use your phone as a modem, you must create
either a wired or wireless connection between your
phone and the other device.To connect your phone
wirelessly, you must have a Bluetooth adapter for
the other device. To create a wired connection, use
a serial data cable.
Page 99

Using Your Phone as a Modem
Connecting With a Data Cable
To use a data cable to connect your phone to a
laptop, handheld device, or desktop computer:
1 Open the connector cover.
connector
cover
2 With the phone’s display facing up, insert a data
cable’s connector into the accessory connector,
until you hear a click.
3 Insert the data plug into the data port of the
other device.
Connecting With Bluetooth
To use your phone as a modem via Bluetooth, the
laptop, handheld device, or desktop computer you
want to connect to must have a Bluetooth adapter
installed.
Check that the adapter is properly installed, and
then follow the specific instructions outlined in the
device’s user guide to connect the device to your
phone.
About Data Transfer Modes
When used as a modem, your phone has these
data transfer modes:
• Circuit data — used for sending and receiving
faxes and for transferring large files
• Packet data — used for small file transfers such
as email
To use these services, you must install the iDEN
Wireless Data Services software (available
separately) and subscribe to a Nextel data services
access plan. For more information on setting up
your computer and your i880 phone for packet and
circuit data calls, go to www.nextel.com.
89
Page 100

Advanced Calling Features
Features for the Hearing Impaired
Making TTY Calls
To use your phone to make phone calls using a
teletypewriter (TTY) device:
1 Connect one end of a 2.5mm cable into the
stereo headset jack on your phone. Connect the
other end of the cable to your TTY device.
2 Make sure that your phone’s TTY feature is on
and select the TTY mode you want to use.
3 Use your phone to enter phone numbers and
make calls.
When you make a TTY call, these icons appear on
the phone’s display:
Phone call is active.
N
Phone call is on hold.
O
TTY device features such as Turbo-Code,
High-Speed, and Interruption are not supported by
your phone. These features must be turned off or
disabled to use your TTY device with your phone.
90
Turning On the TTY Feature
Your phone’s TTY feature must be on if you want
to make TTY calls, set the TTY mode, or change
the TTY baud rate. To make sure the TTY feature
is on:
From the main menu, select Settings > Phone
Calls > TTY > Use TTY. This field must say On.
Choosing a Mode
Your phone supports these TTY modes:
•TTY — You type and read text on your TTY
device.
•VCO (Voice-Carry-Over) — You speak into your
phone and read text replies on your TTY device.
• HCO (Hearing-Carry-Over) — You type text on
your TTY device and listen to voice replies on
your phone speaker.
To change mode while not in a call:
1 From the main menu, select Settings > Phone
Calls > TTY > Type.
2 Select the TTY mode you want.
When you make a TTY call, the call begins in the
TTY mode you last selected.
 Loading...