

Page 1

Digital Multi-service Data-capable Phone
@NNTN5431B@
NNTN5431B
Nextel
iDEN
i830 Phone User’s Guide
Page 2

Page 3

i
Contents
Getti ng Sta rted ......... ... ......... ... ......... .......... 1
Removing the Battery Door...............................3
Locating Your SIM Card....................................3
Battery...............................................................4
Powering On and Off.........................................7
Activating Service..............................................7
Enabling Secu r ity ................... ................ .... ... ....8
Phone Programming .........................................8
Finding Your Phone Number and Direct
Connect® Number ........................................8
Nextel® Voice Mail.............................................9
Nextel Worldwide® Service ...............................9
Customizing Features .....................................10
Phone Basics ..................................................10
SIM Card Security ...........................................14
Locking the Keypad.........................................18
Accessories.....................................................19
Wireless Local Number Portability: Bringing
Your Phone Number From Another
Carrier.........................................................19
Nextel® Customer Care...................................20
Maki ng C a lls .... .. .......... .. .......... .. .......... .....22
Phone Calls.....................................................22
Direct Connect® Calls .....................................22
Receiving Calls ...............................................23
Ways to Enter Calls.........................................24
Missed Phone Call s ... .... ... .... ................ ... .... ...26
Using Speakerphone.......................................26
Using Mute......................................................27
Making Emergency Phone Calls.....................27
Call Alerts..................................................29
Sending Call Alerts..........................................29
Receiving Call Alerts .......................................29
Using the Call Alert Queue..............................29
Recent Calls..............................................31
Storing Recen t Call s to Con ta ct s .......... ... .... ...31
Deleting Recent Calls......................................32
Enter in g Tex t ..... .......... .. .......... .......... .. .....33
Using Alpha Mode...........................................33
Using Word Mode ...........................................33
Special Function Keys.....................................34
Page 4

ii
Using Numeric Mode.......................................35
Using Symbols Mode ......................................35
Contacts ................................................... 36
Viewing Con ta cts. ................ ... .... ................ ... .. 3 7
Creating Entries...............................................38
Storing Numbe rs Fast er ............. .... .... ............. 3 9
Editing Entries.................................................40
Deleting Entries...............................................40
Checking Capacity ..........................................40
Creating Pauses and Waits.............................40
International Numbers.....................................41
Memo ........................................................ 42
Call Forwarding........................................ 43
Forwardin g All Calls .... .... ............... .... .... .........4 3
Turning Off Call Forwarding ............................44
Forwardin g Miss e d Call s................ .... .... .... ... ..4 4
Viewing Call Forwarding Settings....................45
Advan c ed C al li n g Fe at u re s ......... .. .......... 46
Call Waiting.....................................................46
Switching Bet w een C all s............................... ..4 6
Putting a Call on Hold .....................................47
Calling 2 People..............................................47
Creating Pauses and Waits While Dialing.......48
Making International Calls...............................48
Setting One Touch Direct Connect®...............48
Setting Flip Actions .........................................49
Group Con nectTM Calls...................................50
Call Timers......................................................51
Using Your Phone as a Modem ......................52
Making TTY Calls............................................53
Special Dialing Codes.....................................54
Nextel® Phone Services.............. .. .. .........56
Caller ID ..........................................................56
Per-Call Blocking.............................................56
Per-Line Blocking............................................56
Alternate Line Service .....................................56
Call Restrictions ..............................................57
Nextel® 411.....................................................57
Ring Tones....................... .. .............. .........58
Setting Your Phone to Vibrate.........................58
Ring and Vibrate ............ ... .... .... ............... .... ...59
Page 5

iii
Assigning Ring Tones to Contacts..................59
Viewing Rin g Tone Assi gn me nt s .... .... .... .........5 9
Download in g Mor e Rin g Tone s..................... ..59
Managing Memory...........................................60
Deleting Custom Ring Tones ..........................60
Message Center....................................... 61
Accessing the Message Center.......................61
Message Center Options.................................61
Receiving Messages................................ 62
Message Notifications.....................................62
Message Center..............................................62
Voice M a il M e s sag e s........... .......... .. ........ 64
Receiving a Message......................................64
Accessing Voice Mail from
the Message Center ...................................64
Sending Unanswered Calls to Voice Mail .......64
Nextel® Voice Mail ................................... 65
Setting Up Your Voice Mail Box ......................65
Playing Messages ...........................................65
Changing Your Passwo rd .... ............... .... .... .....66
Recording Your Name.....................................66
Recording Your Active Greeting......................67
Advanced Voice Mail Features .......................67
Nextel® Voice Mail Tree..................................72
SMS an d Tw o -Way Messa g e s .. ... .......... ..73
SMS Messages...............................................73
Two-Way Mes sage s and Net Ale rts.. .... .......... 7 4
Wirel e ss D a ta Se r vi c e s ......... .. .......... .. .....77
Wireless Dat a Serv ic es ............................ .... ...77
Accessing Wireless D ata Services
From Your Phone .......................................78
Navigation Keys ..............................................78
Guides and Dem os .... ............... .... .... ..............79
Voice R ec o r d s ... ... ......... ... ......... ... .......... ..80
Creating Voice Records ..................................80
Playing Voice Records....................................80
Labeling Voice Records ..................................80
Deleting Voice Records...................................81
Locking Voice Records ...................................81
Managing Memory ..........................................81
Page 6

iv
Java Applications....................... ............ .83
Installing Applications......................................83
Running Applications.......................................83
Suspending Applications.................................83
Resuming Applications....................................84
Ending Applica ti ons. .... .... .... ... ................ .... ... ..8 4
Download in g Appli ca tio n s .............. .... .... .... .....84
Deleting Applications.......................................84
Managing Memory...........................................85
Shortcuts on the Ma in Menu ...... .... .... ............. 8 5
Java Applications and GPS Enabled...............86
GPS En abled ................... ... .......... .. .......... 89
IMPORTANT: Things to Keep in Mind ............89
Making an Emergency Call .............................90
Viewing Your App roxim a te Lo ca tio n ...... .... ... .. 9 1
Enhancing GPS Performance.........................92
Updating Satellite Almanac Data.....................94
Setting Priva cy Op tio ns................................. .. 9 5
Using GPS with Map Software........................96
Datebook .................................................. 99
Viewing Date b ook ....... ............... .... .... ............. 9 9
Creating Events.............................................100
Editing Events ...............................................102
Deleting Events.............................................103
Receiving Reminders....................................103
Making Call s From Datebook........ ............... .104
Customizing Datebook Setup........................104
Customizing Your Phone.......................106
Setting the Volume........................................106
Setting Your Phone to Vibrate.......................106
Changing the Loo k of Your Pho ne ............... .107
Airplane Mode—Temporarily Turning
Off Calls....................................................108
Using Settings...............................................109
Profiles ....................................................113
Viewing Pro fil es.......... .... ... ................ .... ... .....11 3
Switching Prof il es.............. .... .... ............... .... .113
How Changing Set tin gs Affects Profi le s........113
Temporary Profiles........................................114
Creating Profiles............................................115
Editing Profiles ..............................................115
Deleting Profiles............................................115
Page 7

v
Setting Call Fil teri ng ............ ... .... .... .... ........... 11 6
Shortcuts................................................ 117
Creating a Shortcut .......................................117
Using a Shortcut............................................117
Editing a Shortcut..........................................117
Deleting Shortcuts.........................................118
Using a He a dse t.. ... ......... ... .......... .. ........ 1 19
Attaching a Headset......................................119
Using a Remote PTT Button .........................119
Nextel® Customer Care......................... 120
Domestic Customer Care..............................120
Nextel Worldwide® Customer Care...............121
Understanding Status Messages......... 122
Nextel® Terms and
Conditions of Ser v ic e ...... ... ......... ... ... 126
Safety and General Information ........... 148
RF Operational Characteristics .....................148
Portable Radio Product Operation and EME
Exposure...................................................148
Electro Magnetic Interference/Compatibility..151
Medical Devices............................................151
Operational Warnings ...................................152
Operational Cautions ....................................153
Accessory Saf et y Inform at io n ... .... .... ............154
MOTOROLA LIMITED WARRANTY.......156
Limited Warranty
Motorola Communicatio n Products
(International)......................................160
Patent and Trademark Information.......164
Index ........................................................165
Page 8

vi
DECLARATION OF CONFORMITY
Per FCC CFR 47 Part 2 Section 2.1077(a)
Responsible Party Name: Motorola, Inc.
Address: 8000 West Sunrise Boulevard
Plantation, F L 33322 USA
Phone Number: 1 (800) 453-0920
Hereby d eclares that the pr oduct:
Product Name: i830
Model Number: H74XAH6RR4AN
Conforms to the following regulations:
FCC Part 15, subpart B, section 15.107(a),
15.107(d) and section 15.109(a)
Class B Digital Device
Note: This equipment has been tested and
found to comply with the limits for a Class
B digital device, pursuant to part 15 of the
FCC Rul es. These limits are designed to
provide reasonable protection against
harmful interference in a residential
inst allation. This equipme nt generates,
uses and can radiate radio frequency
energy and, if not installed and used in
accordance with the instructions, may
cause harmful interference to radio
communications. However, there is no
guarantee that interference will not occur
in a particul ar ins tal la ti o n.
If this equipment does cause harmful
interference to radio or television reception,
which can be determined by turning the
equipment off and on, the user is
encouraged to try to correct the interference
by one or more of the following measures:
• Reo rie nt or rel oc ate the receiv in g
antenna.
• Incre ase th e se para tio n betw e en the
equipme nt and receiver.
• Connect the equipment into an outlet on
a circuit different from that to which the
receiver is connected.
• Consult t he dealer or an experienced
radio/TV technician for help.
Page 9
1
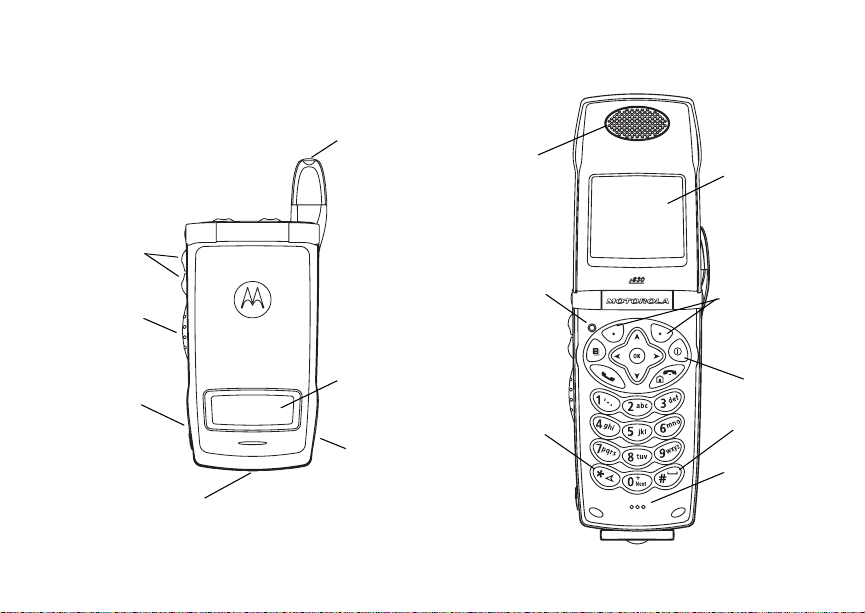
Getting Started
volume
controls
retractable
antenna
earpiece
internal
display
Push-to-talk
(PTT) button
audio jack
accessory connector
external
display
speaker
(in back)
light sensor
back key
option keys
power
button
space key
microphone
Page 10

2
Getting Started
p Power button.
Navigation key — press the arrows to
scroll through menus and lists.
O OK key — selects highlighted item;
answers calls.
m Menu key — accesses context-sensitive
t Acts like s when the flip is closed; turns
Direct Connect® / Grou p ConnectTM
speaker on and off; used with voice
names and voice records.
. Acts like e when the flip is closed;
accesses recent calls; sends incomin g
calls to voice mail.
menus.
A Option key — selects the o ption
appea rin g above it on the dis p lay .
Note: Throughout this User’s Guide,
the option keys will be
represe nt e d by A.
s Send key — p laces phone calls.
To start using your i830 phone:
• Make su re yo ur SI M card i s in pl ac e.
• Charge the battery.
• Activate your se rv ic e.
• Enable secu rity.
e End key — ends phone calls; returns to
idle screen; using Wireless Data
Services, returns to Net main menu.
Page 11
3
Removing the Battery Door
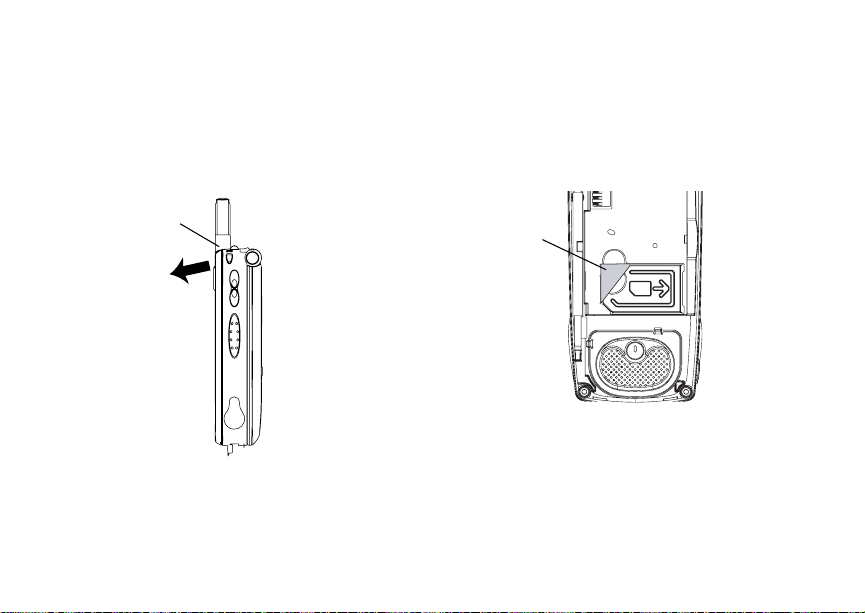
Removing the Battery Door
1 Make sure the phone is powered off. See
“Poweri ng On and Off” on page 7.
2 Press the release button and pull the battery
door away from the phone.
button
Locating Your SIM Card
Your SIM (Subscriber Identity Module) card is a
small piece of plastic located in the SIM card
holder in the back of your phone, underneath the
battery.
SIM card
If there is no SIM card in your phone, contact
Nextel Customer Care at 1-800-639-6111.
Page 12
4
Getting Started
Battery
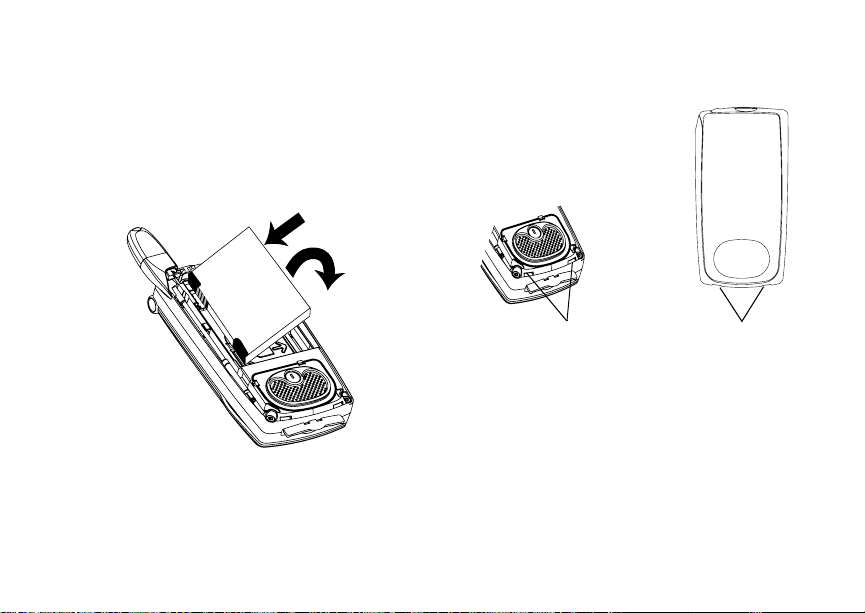
Inserting the Battery
Your phone comes with a Slim Lithium Ion Battery.
1 Remove th e ba ttery door.
2 Insert the battery into the battery area. Press the
battery down to secure it.
3 To replace the battery door, locate the tabs on
the battery door and the slots in the phone.
slots
4 Place the tabs on the batte r y door in to the slots
on the phone.
tabs
Page 13
5
Battery
5 Move the top of the batter y door into place.
Press it over the release button until you hear a
click.
Charging the Battery
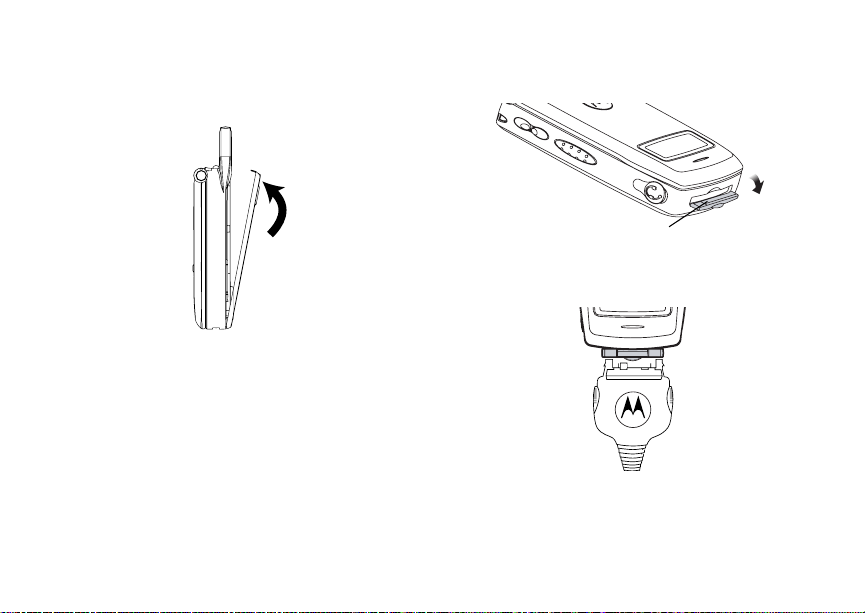
Your phone comes with a rapid tr avel charger.
1 Plug the charger into an electrical outlet.
2 Open the connector cover.
connector
cover
3 Plug the other end of the charger into the
accessory connector.
Charger Attached appears on the internal
display.
Page 14
6
Getting Started
Tip: To remove the charger from the accessor y
connector: Press the buttons on the sides
of the plug. Pull the plug straight out.
4 If you have pur c ha s ed optional ba t te r ie s or
chargers, see “Charging Times”.
Charging Times
Check your battery and charger type against the
below grid to de termine approp riate charging
times.
Recommended charging times:
Battery Charger
Rapid Standard
Slim Lithium
Ion SC
Standard
Lithium Ion
SC
For best results, charge the batteries within the
tempe rature range of 50 °F to 10 4°F (10°C to
40°C).
Prolonged charging is not recommended.
2 hours 2.5 ho urs
2 hours 4 hours
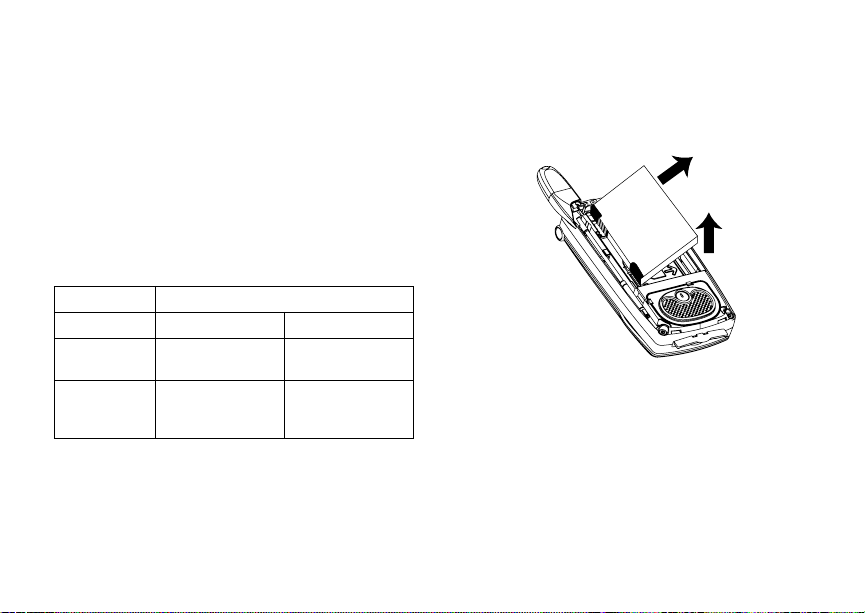
Removing the Battery
1 With the phone powered off, remove the battery
door.
2 Remove the battery by lifting it out from the side.
Battery Use and Maintenance
• The Motorola iDEN Approved Lithium Ion
chargers provide optimum perfor mance. Other
chargers may not fully charge the iDEN Lithium
Ion battery or may yield a reduced number of
lifetime charge cycles.
• Extreme temperatures degrade battery
performance. Do not store the battery where
temperatures exceed 140°F (60°C) or fall below
4°F (-20°C).
Page 15
7
Powering On and Off
• Lithium Ion batteries have a self discharge rate
and without use, lose about 1% of their charge
per day.
• The battery capacity is degraded if the batter y is
stored for long periods while fully charged. If
long term storage is required, store at half
capacity.
Powering On and Off
To power your phone on:
1 Open the flip.
2 Press p.
Note: When powering on, if yo u press p fo r
more than 5 seconds, you will turn on
Airplane mode. See “Air plane Mode—
Temporarily Turning Off Calls” on page
161.
As your phone connects to the network, you will
see a conn ecting message. When the idle screen
appea rs , the ph on e is re ad y to us e.
To power your phone off:
1 Open the flip.
2 Press and hold p.
Activating Service
The first time you power on your phone, your
service is activated.
A screen then appears prompting you to select Ok
to update your browser information. This screen
will only appear during initial activation. See
“Enabling Security”.
Page 16

8
Getting Started
Enabling Security
You must enable security the first time you po wer
on your ph on e or w it hi n 20 da ys of fir st a cti vat i on o f
your phone.
1 Press A under Ok.
Note: If you press A under Later, the idle
screen will appear. The next time you
select Net from the main menu, you will
be prompt ed t o enable secur ity befor e you
can use Wi r el es s D ata Se rvi ce s .
2 You are prompted to enable security. Press A
under Yes. A serie s of screen s an d then the
default homepage displays.
3 Press e to return to the idle screen.
Phone Pr og ra mmi ng
Within 24 hours of enabling security, you will
receive an alert notification containing your
Personal Telephone Number (PTN), Nextel
Customer Care number, Direct Connect number,
and Talkgroup lists for Gr oup Connect calls.
1 When you receive an alert notification saying
New Browser Message - Receive
Programmi ng Info , press A under Goto.
2 You are prompted to accept changes to your
lists. Press A under Ok.
3 You are prompted again to accept changes to
your lists. Press A under Ok.
4 A confirmation screen disp lays. Press A under
Ok.
5 Press e to return to the idle screen.
Findi ng Your Phone Nu mb e r and Direct Connect® Number
My Info lets you view your phone number, Direct
Connect number, and other phone information.
1 Press m to access the main menu.
2 Scroll to My Info.
3 Press O.
4 Scroll to see your information:
•Name — Enter your name. See “Entering
T ext” on page 33.
•Line 1 and Line 2 — your phone numbers for
phone lines 1 and 2. These are filled in when
you receive your alert notification after
enabling security on your phone.
Page 17

9
Nextel® Voice Mail
•Direct Connect — Your Direct Connect
number is the number that others us e to
contact you using Direct Connect
is fill ed in when you receive your alert
notification after enabling security on your
phone. To view your Direct Connect number,
scroll to Direct Connect and press O.
• Group ID — the number of the Talkgroup you
have jo in ed .
• Carrier IP — the IP address assigned to
Nextel. It is filled in when you register for
packet data services. To view your Carrier IP
address, scroll to Carrier IP and press O.
• IP1 Address and IP2 Address — the IP
addresses assigned to you for using t he
Internet with your phone. To view your IP
addresses, scroll to the IP address you want
to view and press O.
•Ckt — Your circuit data number is the number
you use if you want to use your phone to
transfer circuit data. See “Using Your Phone
as a Modem” on page 52. You receive this
number from Nextel.
Note: If you reque st equipment related
transactions on your account, Nextel
Custome r Care may require you to
provide specific information abou t your
phone. By pressing m anytime whil e i n My
Info, a context -s ens iti ve men u wi ll ap pear
®
service. It
that includes your phone's service stat us,
unit information, and phone identification
numbers including IMEI, SIM ID, and
Serial Number (SN). Please be prepared
to supply the representative with this
information when requesting these types
of tran sactions.
Nextel® Voice Mail
You must set up your voice mail box before you
can retr ieve messages. See “Setting Up Your
Voice Mail Box” on page 65.
Nextel Worldwide® Service
You can use your phone to make calls
internationally in select cities using other iDEN®
networks by calling Next el Customer Care to
activa te international dialing on your account.
Countrie s i n wh ic h yo u c an use your ph on e inc lu de
Argentina, Brazil, Canada, Israel, Jordan, Mexico,
Peru, t he Philippines, and Sin gapore*.
* Credit approval may be required. Other conditions may apply.
Page 18
10
Getting Started
Customizing Features
You can c ontrol many features of your phone,
includ ing the si ze of the te xt on the displa y, the way
you access main menu items, and the vol ume of
incoming sound, rings, and other tones. See
“Custo mizing Your Phone” on page 1 06.
Phone Basics
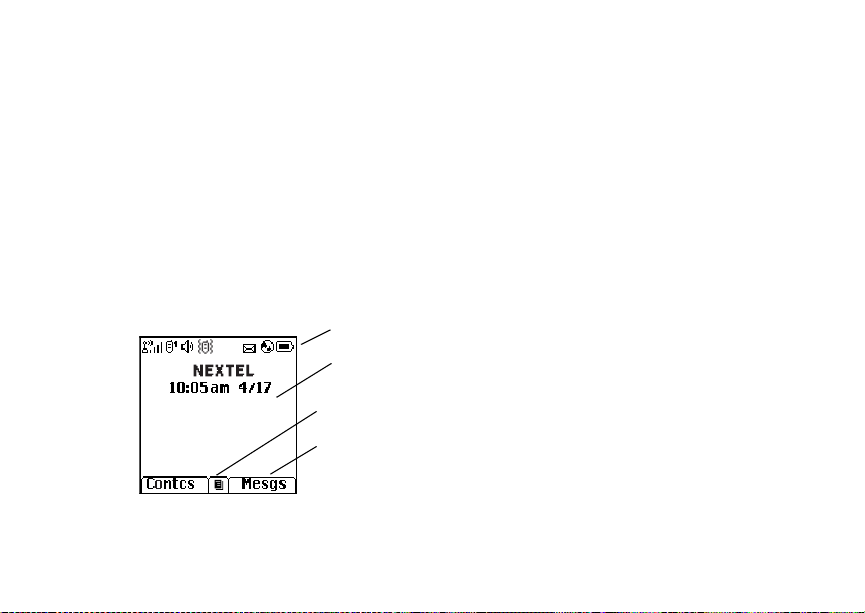
Any time your phone is powered on, the display
provides you with information and options.
The external display shows a shortened version of
the inte r nal di sp la y. T o se e mo re i nf orm at io n, op en
the flip.
status icons
text area
menu icon
display options
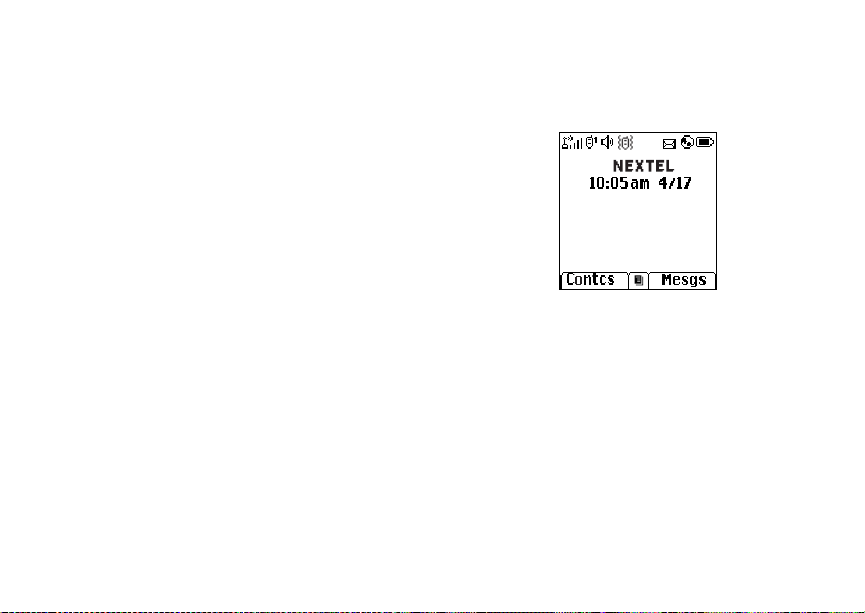
The scre en sho w n ab ov e is th e id le sc reen. The
idle screen appears when your phone is on, but not
engage d in any activity.
Text Area
This area displa ys menus, messages, names,
phone nu mbers, and other information.
Display Options
Two display options appear at the bot tom of most
screens. You select a display option by pressing
the option key below it.
Menus and Lists
Your phone’s features are arranged in men us,
submenus, and lis ts .
To acces s the items in a menu or list, scroll using
the navigation key at the top of your keypad. This
key lets you scroll up, down, left, or right. Holding
down the appropriate part of the navigation key
speeds up scrolling.
In this guide, this symbol > tells you to sele ct a
menu or list item. For example, Settings >
Security means:
1 Scroll to Settings on the main menu.
2 Press O to see the Settings screen.
3 Scroll to Security.
Page 19

11
Phone Basics
4 Press O to see the Security screen.
Quick Access to Main Menu Items
Each arrow in the navigation key and O ca n be
used to access a main menu item from the idle
screen. Each of these keys is assigned to a main
menu item when you receive your phone. To
assign d iffere nt mai n men u items, see “P ersona lize
Features” on page 110.
OK Key
Pressing O:
• Selects the hi ghlighted menu it em or list item
• Sets options
• Confirms actions
• Places and answer calls
• From the idle screen, accesses ring tones list.
This is the default setting. You can assign a
different main menu item to O.
Menu Key
Many features provide context-sensitive menus
that let you access related features and actions.
This icon
menu is available. Press m to access the menu.
S appears any time a context-sensitive
Main Menu
All your phone’s features can be accessed through
the main menu. You can set the main menu to
appear as a list or as large icons (see “Setting the
Menu View” on page 108).
Net Access to Wireless Data
a
Java Apps Java applications on your
q
Settings
b
Display/Info
Phone Calls
DC/GC Options
Personalize
Volume
Security
Advanced
Ring Tones
m
Vibrate All
list of ring tones
Ring Tones menu
VoiceRecord Record and play audio
c
Services. See page 77.
phone. See page 83.
Cust om iz e yo ur phone.
See page 106.
Assign ring tones and turn
ringer off. See page 58.
messages. See page 80.
Page 20

12
Getting Started
My Info View personal phone
j
n Downloads Provides a catalog of ring
GPS Find your approx imate
l
inform a tion, includ in g
phone nu mber and Direct
Connect number. See
page 8.
tones, wallpaper, games
and appl ications that you
can download directly to
your phone. Browse
through the catalog to add
a new ring tone, a
wallpaper to serve as the
backgrou nd i ma ge on y our
phone, a game for
entertainmen t, or an
application that serves
your business and
productivity ne eds. Items
in thes e ca ta l og s ch ange
frequently, so check
regularly for fresh content.
See page 59.
geographical location. See
page 89.
Contacts
d
new contact form
list of contacts
Contacts menu
Messages
e
Voice Ma il
Net Alert
SMS
Call Forward Set call forw ardi ng op tions.
f
Datebook
o
new event form
list o f events
Datebook menu
Memo Store a number to access
g
Call Timers Phone usage i nformation.
h
Recent Calls
i
list of calls
recent calls menu
Call Setup menu
Shortcuts Create shor tcu ts to
s
Create, view, store, edit
contacts. See page 36.
Access messages. See
page 61.
See page 43.
Schedul e ap po in tm en ts.
See page 99.
later. See page 42.
See page 51.
Lists recent calls. See
page 31.
screens. See page 117.
Page 21

13
Phone Basics
Profiles
p
new profile form
list of profiles
Profiles menu
Call Alert
k
list of ca ll alerts
Call Alerts menu
Groups of settings you
apply together. See
page 113.
Lists call alerts. See
page 29.
Status Icons
Status icons appear at the top of the display. Some
appear at all times. Others appear only when your
phone is engaged in certain activities or when you
have ac ti va t e d ce rt ai n fea t u res .
abcd
efgd
o p q r
s
A
B
Battery Strength — A fuller batte r y
indic at es a greater ch ar g e.
Signal Strength — More bars next
to the antenna indicate a stronger
signal.
Phone In Use — Your phone is
activ e on a phon e ca ll.
Direct Connect In Use — Your
phone i s active on a D irect Connect
call.
C
1 2
G L
J
I
K
H
M Q
u
w xT
yz
ljik
mXnW
Talkgroup In Use — Your phone is
active on a Group Connect call.
Active Phon e Line — 1 indicates
phone li ne 1 is ready to make calls;
2 indica tes phone line 2 is ready to
make calls.
Call Forwa rd — Your phone is set
to forward ca lls. See “Call
Forwarding” on page 43.
Ringer Off — Your phone is set not
to ring. See “Setting Your Phone to
Vibrate” on page 58.
Speaker Off — Sets Direct Connect
and Grou p Connect sound to come
through the earpiece rather than
throug h t he spe ak er.
Messages — You have one or
more mess ages. See page 61.
T9 Text Input — You are using T9
Text Input to enter text. See
“Entering Text” on page 33.
Page 22

14
Getting Started
DE
U
Y Z
N O
Internet — You are ready to
browse the internet or are browsing
the internet using a secure
connectio n.
Airplane Mode — Your phone is
set to Airpl an e Mod e. Se e “Ai rpl an e
Mode—Temporarily Turning Off
Calls” on page 108.
Packet D ata — You are ready to
transfer packet data or are
transferring packet data. See “Using
Your Pho ne as a Modem” on page
52.
TTY — You are re ad y to use your
phone to make calls using a
teletypewriter device. See “Making
TTY Calls” on page 53.
SIM Card Security
Your SIM card stores all your Contacts and
protects your personal information. Since this
information is stored on your SIM card, not in your
phone, you can remove the information by
removing your SIM card.
Note: Except for making emergency calls, your
phone will not func tio n with out the SIM
card.
To preve nt unauthor i ze d us e of yo ur ph on e, your
SIM card is protected by a PIN that yo u enter each
time the phone is powered on. You can change the
PIN or turn off the requirement that it be entered.
Turning the PIN Requirement On and Off
When the SIM PIN requirement is off, your phone
can be used without enteri ng a PIN.
Important: When the SIM PIN requirement is off,
When the SIM PIN requirement is on, you are
prompted to enter your PI N each tim e you power
on your ph one.
Note: If a SIM PIN is required, your phone will
1 From the main menu, select Se tting s >
Security > SIM PIN.
2 Select On or Off.
3 Enter the current SIM PIN.
the personal data on your SIM card is
not protected. Anyone can use your
phone and access your personal data.
not function until the SIM PIN is entered,
except for making emergency calls.
Page 23

15
SIM Card Security
Note: The default SIM PIN is 0000. Change your
PIN to prevent f raudulent use of the SIM
card (see “Changing the PIN”).
4 Press A under Ok.
Entering the PIN
1 When the Enter SIM PIN Code screen appears
after you power on your phone, enter your SIM
PIN.
2 Press A under Ok.
The mes s age SIM Unlocked displays.
Important: If you enter your PIN incorrectly 3 times,
your SIM card is blocked. To unblock
your SIM card, you must contact Nextel
Customer Care. See “Unblocking the
PIN”.
Changing the PIN
Note: The SI M PIN requ irement m ust be turned
on in order to access this feature.
1 From the main menu, select Se tting s >
Security > Change Password > SIM PIN.
2 At the Enter Old SIM PIN screen, enter the
current SIM PIN.
3 Press A under Ok.
4 At the Enter New SIM PIN screen, enter the
new 4- to 8-digit SIM PIN.
5 Press A under Ok.
6 At the Re-enter New SIM PIN screen, re-enter
the new SIM PIN to confirm.
7 Press A under Ok.
Changed: SIM PIN displays.
Unbl ocking the PIN
If you enter your PIN incorrectly 3 times, your SIM
card is blocked. To unblock your SIM car d, you
must contact Nextel Customer Care to get a PIN
Unblock Code (PUK).
Important: If you unsuccessfully enter the PUK
To unblock the PIN :
1 Press * # m 1.
2 At your Nextel Customer Care representat ive’s
request, provide the information nee ded to give
you a PUK cod e.
code 10 times, your SIM card is
permanently blocked and must be
replaced. If this happens, all data is
lost. You will get a message to contact
Nextel Customer Care. Except for
making emergency calls, your phone
will not function with a blocked SIM
card.
Page 24

16
Getting Started
3 Select Unblock PIN.
4 Enter the PUK code.
5 Enter a new 4- to 8-d igit SIM PIN.
6 Re-ent er yo ur S IM PI N.
Note: These steps must be performed in quick
succession.
If you entered the codes properly, SIM Unlocked
appears on the display.
Inserting and Removing Your SIM Card
Important: Do not touch the gold-colored areas of
The SIM card is designed for optimal Contacts
storage and feature use. For Nextel SIM card
compatibility information, visit nextel.com/sim.
If you remove your SIM card and use it with
another phone, or use another SIM ca rd with your
phone, the following information is erased:
• The recent calls list
• Call forwarding settings
• Net alerts
• Informat io n st ore d in Mem o
• 3 most recent GPS Enabled locations
• Voice records
your SIM card.
• Voice names
• Datebook events
• Options set using the Personalize menu
Note: In some cases, Contacts may not be
access ible if you move your SIM card to
another phone. Contacts entries created
with your i830 phone are not readable by
an older iDEN SIM-based phone.
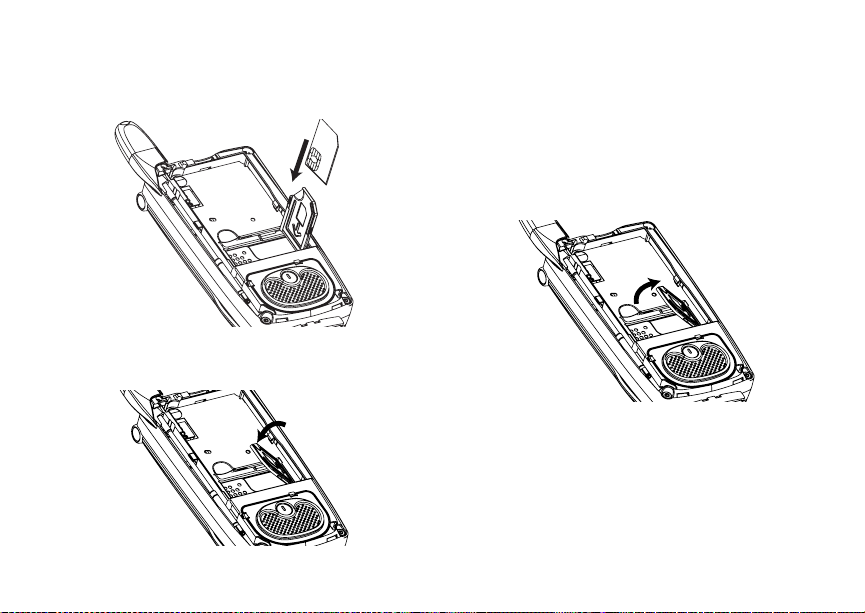
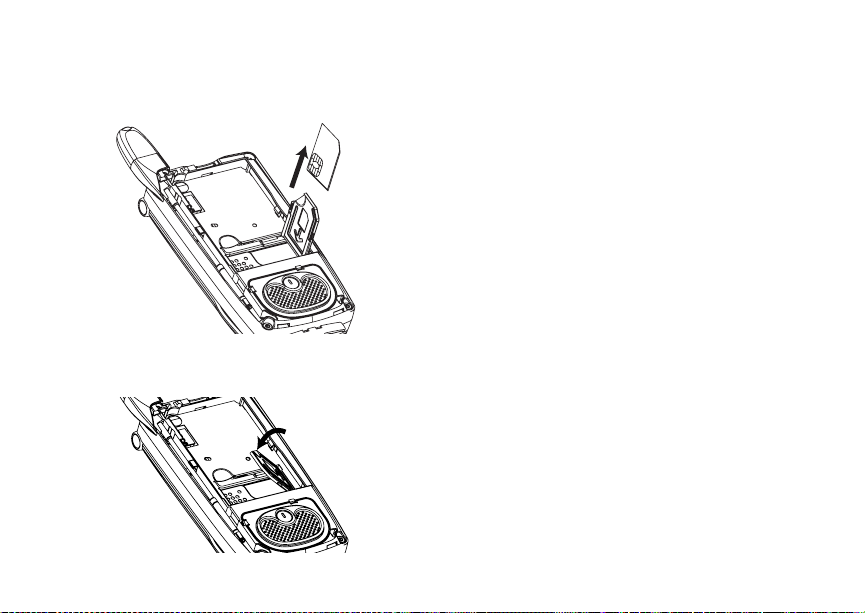
Inserting Your SIM Card
1 With your phone po were d off, rem o ve the
battery door and battery.
2 Open the SIM card holder.
Page 25
17
SIM Card Security
3 Carefully slide your SIM card into the SIM card
holder.
4 Close the SIM card holder.
Removing Your SIM Card
Important : To avoid loss or da mage, do not rem ove
your SIM card from your phone unless
absolutely necessary.
1 With your phone po were d off, rem o ve the
battery door and battery.
2 Open the SIM card holder.
Page 26
18
Getting Started
3 Careful ly sl id e you r SIM card ou t of t he SIM c ard
holder.
4 Close the SIM card holder.
Note: Protect your SIM card as you would any
delicate object. Store it carefully.
Locking the Keypad
Locking the phone’s keypad prevents its buttons
from being pressed. When the keypad is locked,
you can on ly:
• Power the phone on and off
• Unlock the keypad
• Respond to incoming calls, messages, and
alerts
Important: Emergency calls cannot be placed while
To lock the keypad:
1 From the idle screen, press m.
2 Press *.
If you press a key while the keypad is locked,
instructions for unlocking the keypad display
briefly.
To unlock the keypad:
1 From the idle screen, press m.
2 Press *.
the keypad is locked.
Page 27

19
Accessories
While the keypad is locked, you can respond to
incomin g calls, messages, and alerts just as you
do when the keypad is not locked. When finished,
press e to return to the idle screen. The keypad
remains l ocked.
You also have the option of setting your phone to
automatically l ock the keypad if there has bee n no
activity for a specified time.
1 From the main menu, select Se tting s >
Security > Keypad Lock.
2 To lock the keypad immediately, select Lock
Now. Y ou will be given the option to press m and
* to lock and unlock the keypad.
3 To set a specific time for the keypad to lock if
there ha s been no activi ty , sel ect Auto Lock and
then select a time.
The keypad can be se t to lock in 5, 10, 15 or 20
minutes if the keypad is not touched during the
specified time. To turn the auto lock off, repeat
step 3 and select Off.
Accessories
Your phone comes with a Slim Lithium I on Battery,
rapid travel charger, and holster.
Various accessories are available for use with your
i830 phone, including cases, vehicle power
charger , dat a ca bl es , Han ds- Fre e ac ces so rie s an d
more.
To order additional accessories, go to nextel.c om
or call 1-800-Nextel6. You can als o contact your
Nextel Authorized Sales Representative or stop by
any Nextel-owned Retail Store. For information on
Nextel retail store locations, go to nextel.com.
Wireless Local Number Portability: Bringing Your Phone Number From Another Carrier
If you are bringing your phone number from
anothe r carrier, your new phone will be act ive as
soon as you receive it. Nextel will provide you with
a temporary phone number so that you can begin
using your phone immediately. Once the numb er
you have brought to N extel is activated, your
temporary phone number will be deactivated and
service with your previo us carrier will be cancelled
automatically. You will r eceive a text messag e on
your Nextel phone letting you know that activation
is complete. Simp ly turn your phone off and back
on again to complete activation.
Page 28

20
Getting Started
Here is additional informatio n you need to be
aware of until the number you have brought to
Nextel is active on the Nextel network:
Nextel® Vo ice Mail
We suggest you set up your voice mail box after
the number you brought to Nextel is active on your
Nextel phone and your temporary phone number is
deactivated. If you set up your voice mail box prior
to this, all mes s ages and all settings (including
your greeting and password) will be lost when the
number you have brought to Nextel becomes
active.
Text Messaging
During the activation process, it is possible that text
messages may not be properly routed to you r
Nextel phone.
911 Calls
Nextel continues to make efforts to ensure that all
911 calls are minimally impacted by this process. If
you make a call to 911 from your temporary phone
number and the call fails, the 911 emergency
response cen ter wi ll no t be a bl e t o cal l yo u b ac k on
your Nextel phone if in the meantime your Nextel
phone ha s been pr o gram med w ith y our p erma ne nt
phone nu mber. As with any wireless 911 call, if
your call is dis c onnected before location and
details have been provid ed, be sure to call 911
again an d advise that you were disconnected.
Go to nextel.com/wlnp for more details.
Nextel® Customer Care
Nextel Cu st om er C are : 1-80 0- 639 - 61 11 or di a l 611
from your i830 phone.
Nextel Worldwide Customer Care:
+1-360-662-5202 (toll-free from your i830 phone) .
Page 29

21
Nextel® Customer Care
i830 Phone Menu Tree
Net
Java Apps
Java Applications (if any)
Deinstall
Permissions
License Info
Java System
Reset System
Delete All
Settings
Display/Info
Phone Calls
DC/GC Options
Personalize
Volume
Security
Advanced
Ring Tones
Vibrate All
Available Ring Tones
Vibrate
Silent
Assign To
Assign w/vibe
Overview
Memory Usage
Delete
VoiceRecord
[New VoiceRec]
VoiceRecords (if any)
Label
New
Lock/Unlock
Add To
Memory
Delete
Delete All
My Info
Name
Line 1
Line 2
Direct Connect
Group ID
Carrier IP
IP1 Address
IP2 Address
CKT
Service Status
Unit Info
IMEI/SIM ID/SN
Register Log
Downloads
GPS
Position
Privacy
Interface
Contacts
[New Contact]
Search
New
Capacity
Filter
Call Setup
Contacts (if any)
Edit
New
Search
Delete Contact
Delete Number
Capacity
Filter
Call Setup
Messages
Voice Mail
Net Alert
SMS
Memory
Delete All
Call Forward
All Calls
- To
Status
Detailed
If Busy
-
If No Answer
-
If Unreachable
-
Status
Datebook
[New Event]
Go To Today
Go To Date
Week View
Month View
Setup
Events (if any)
Edit
New
Go To Today
Go To Date
Week View
Month View
Setup
Delete
Copy
Call # in Event
Alert # in Event
Talkgroup
Memo
Store to Cntcs
Cancel
Delete
Call Timers
Last Call
Phone Reset
Phone Lifetime
DC/GC Reset
DC/GC Lifetime
Circuit Reset
Circuit Lifetime
Kbytes Reset
Recent Calls
Recent Calls (if any)
Store
Delete
Delete All
Call Alert Queue
Call Setup
Shortcuts
[New Entry]
Shortcuts (if any)
Edit
New
Reorder
Delete
Delete All
Profiles
[New Profile]
Profiles (if any)
View
Edit
New
Delete
Delete All
Setup
Call Alert
Call Alerts (if any)
Store
Delete
Delete All
Sort By
Recent Calls
Page 30

22
Making Calls
Your i830 phone makes two types of calls: digital
cellul ar phone ca lls and Direct Connect calls. With
Direct Connect c alls, you use your phone as a
long-range, di gital walkie-talkie.
Phone Calls
With the Flip Open
1 Enter the number you want to call.
2 To place the c all:
Press s. -or-
If you enter e d th e num ber from the idle screen,
press O.
3 To end the call:
Press e. -or-
Close the flip.
To end a call by closing the flip, you must have the
Flip to End feature turned on (see “Setting Flip
Actions” on page 49).
With the Flip Closed
1 Select the number you want to call from the
recent ca lls list and press t. -or-
Use a voice name to select the number and
place the cal l.
2 To end the call, press ..
Direct Connect® Calls
1 If the flip is open, enter the Direct Connect
number you want to call. -or-
If the flip is closed, select the number as you
would when making a phone call.
2 Press and hold th e PTT button on the side of
your ph on e. Beg in t alk in g a f ter you r ph on e emit s
a chirpin g sound.
3 Release the PTT button to listen.
Tip: To let someone know you want to talk to
him or her on a Direc t Connect call, send a
call alert. See “Call Alerts” on page 29.
Dialing Direct Connect® Numbers
Every Direct Con nect number has 3 parts — an
area ID, a network ID, and a member ID — with an
asteris k bet we en e ach of t hese p art s. For e xa mple:
999*999*9999.
Page 31

23
Receiving Calls
When you place a Direct Connect call, you must
enter the whole Direct Connect numb er includ ing
the aster isks.
Tip: When yo u stor e a Direc t Con ne ct n umb er in
Contacts, it is good practice to include the
whole Direct Connect number including the
asterisks in case you travel with your
phone, or anothe r Direct Connect user
whom you are trying to reach travels with
their phone, outside of your net work.
Receiving Calls
Phone Calls
When you receive a phone call, your phone rings,
vibrates, or lights up its backlight.
Answering
If the flip is closed, press t. -or-
Open the flip. -or-
Press s. -or-
Press O. -or-
Press A under Yes. -or-
Press any number key.
To answe r a cal l by open i ng th e fl i p, yo u mus t ha ve
the Flip to Ans feature turned on (see “Setting Flip
Actions” on page 49). To answer a call by pressing
any number key, you must have the Any Key Ans
feature turned on (see “Phone Calls Features” on
page 109).
Sending to Voice Mail
If the flip is closed, press .. -or-
Press e. -or-
Press A under No.
Ending
If the flip is closed, press .. -or-
Press e. -or-
Close the flip.
Direct Connect® Calls
When you receive a Direct Connect call, your
phone emits a chi rping sound or vibrates.
1 Wait for the caller to finish speaking.
2 Press and hold th e PTT button on the side of
your ph on e. Beg in t alk in g a f ter you r ph on e emit s
a chirpin g sound.
3 Release the PTT button to listen.
Page 32

24
Making Calls
Ways to En te r C all s
• Use the numbers on the keypad
• Select the number from the recent calls list
• Select the number from Contacts
• Select a number stored in Datebook
• Redial the last phone number call ed
• Say a voice name into your p hone
• Use Speed Dial or Turbo Dial
• Use One Touch Dire ct Co nnec t t o ma ke a Di rect
Connect call
• Use a TTY device — see “Making TTY Calls” on
page 53
From the Keypad
To enter the number you want t o call, press the
numbers on the keypad.
If you make a mistake:
• To clear a digit, press A under Delete.
• To clear all digits, press and hold A under
Delete.
• To insert or delete a digit anywhere in the string
of digits you have entered, scroll left or right.
• To cancel, press e.
®
From the Recent Calls List
The re ce nt calls lis t stores the las t 20 ca lls you
made or received.
With the Flip Open
1 From the main menu, select Recent Calls.
2 Scroll to the name or number you want to call.
With the Flip Closed
1 Press . to display the most recent call.
2 To view the rest of the recent calls list, press the
volume controls.
You can call the num ber disp laye d by press ing t
on the top of your phone.
From Contacts
If you have numbers stored in Contacts, you can
use these numbers to make cal ls. For information
on entering numbers into Contacts, see “Creating
Entries” on page 38.
1 From the main menu, select Con tacts.
2 Scroll to the name or number you want to call.
Tip: To find Contacts entries faster, use the
keypad to enter th e first lett er of the name .
Page 33

25
Ways to Enter Calls
3 Place the call no w. -or-
Scroll le f t or ri gh t t o di spl ay th e Co nt a cts ty pe fo r
the number you want to call.
If you are making a Direct Connect call, your phone
places t he call t o the Di rect Conn ect number st ore d
in the Contacts entry, even if the Direct Connect
icon is not dis p la yed.
If you are making a phone call:
• Your phone places the call to the phone number
assign ed to the Contacts type displayed.
• If the Contacts type displayed is not a phone
number, your phone places the call to the phone
number stored in the Contacts entry.
• If the Contacts type displayed is not a phone
number and you have more than one phone
number stored in the Contacts entry, your phone
prompts you to select the phone number you
want to place the call to.
From Datebook
If you have numbers stored as part of events in
Dateboo k , you can use these nu mbers to make
calls. For information on storing events in
Datebook, see “Datebook” on page 99.
1 From the main menu, select Datebook.
2 Select the day of the event containing the
number you want to call.
3 Highlight or select the event co ntaining the
number you want to call.
For details, see “Making Calls From Datebook” on
page 104.
Redialing the Last Number
Press and hold s to place a call to the last phone
number you called.
Using a Voice Name
If you have created a voice name in Cont acts for
the number you want to call, say the voice name
into your phone to enter the number. See page 37
for information on voice names.
You can us e a voice name to en ter a number with
the flip open or closed.
1 Press and hold t until a prompt appears
telling you to say the voice name.
2 Speaking into the microphone, say the voice
name assigned to the number you want to call.
Your phone play s the name back to you.
3 If you are making a p hone call, the call is placed
automatically.
Page 34

26
Making Calls
Tip: To st op a phon e ca ll from being co mpleted,
press . if the flip is closed or press e.
If you are making a Direct Connect call, press
and hold the PTT button to place the call.
Using Speed Dial and T urbo Dial
Each phone number stored in Contacts is assigned
a Speed D i al n umb er w hic h you c an us e t o ca ll t ha t
number.
Speed Dial
1 From the idle screen, use the keypad to enter
the Speed Dial number assigned to the phone
number you want to call.
2 Press #.
3 Press s.
Turbo Dial
From the idle screen, press and hold the Speed
Dial n umb er ( 1 thr o ugh 9 ) as si gned to t he p ho ne
number you want to call.
Using One To uch Direct Conn e ct
One Touch Direct Connect sets your phone to call
the most recent Direct Connect number on the
recent calls lis t, or a Direct Connect number y ou
choose, every time you press the PTT button. See
“Setting One Touch Direct Connect®” on page 48.
Missed Phone Calls
When you mi ss a ca ll , t hi s ic on V and the number
of phone calls you have missed appear briefly.
®
With the Flip Open
If you want to dismiss the missed call message,
press A under Back. -or-
If you want to view the missed call on the recent
calls lis t , pr es s A under View.
With the Flip Closed
If you want to dismiss the missed call message,
press ..
If you want to view the missed call on the recent
calls list, press . twice.
Usin g Spea ke r phon e
Turning on speake rphone ma kes incoming sound
come out of the phone’s speaker instead of the
®
earpiece . Spea ker phone is avai labl e whene ver you
are on an active phone call.
With the Flip Open
To turn speakerphone on or off:
Press A under Spkr. -or-
Press t.
Page 35

27
Using Mute
With the Flip Closed
When you m ake a call with the flip clos ed,
speakerphone is always on.
Opening the flip turns speakerphone off.
Using Mute
Muting calls lets you listen to incoming sound
without transmitting sound. Mute is available
whenever you are on an active call.
To turn mute o n:
Press A under Mute.
While mu te is on, Unmute appears as a display
option.
To turn mute off:
Press A under Unmute.
Making Emergency Phone Calls
Your phone supports emergency calling.
Emergency phone calls can be made even when
your SIM card is blocked or not in your phone.
Dial 911 to be connected to an emergency
response center. If you are on an active call, you
must end it before calling 911.
When you make an emergency call, your phone’s
GPS Enabled feature can help emergency service
personnel find you, if you are in a location where
your phon e' s GP S ant en na ha s est a blis he d a cl e ar
view of t he open sky and your lo cal emergency
response center has the equipment to process
location information. See “GPS Enabled” on page
89, and particularly “IMPORTANT: Things to Keep
in Mind” on page 89 and “Making an Emergency
Call” on page 90, for more information on the
limitations of this feature. Because of the
limitations of this feature, always provide your best
knowledge of your location to the emergency
response center w hen you make an emerge ncy
call.
Important: Emergency calls cannot be placed while
Important: If you have not registered on the
the keypad is locked.
network, emergency calls cannot be
placed while your SIM card is in your
phone.
Page 36

28
Making Calls
Important: If you are bringing your phone number
to Nextel from your previous carrier,
you may receive a temporary telephone
number while your Nextel phone is
being programmed with your
permanent ph one number. If you make
a call to 911 and the call fails, the 911
emergency response center will not be
able to call you back on your Nextel
phone if in the meantime, your Nextel
phone has been programmed with your
permanent telep hone nu mbe r . I f the ca ll
is disconnected before location and
details have been provided, call 911
again and advise that you were
disconnected.
Page 37

29
Call Alerts
Sendin g a call alert lets the r ec ip ie nt kn ow yo u
want to talk to him or her on a Direct Connect call.
When you s end a call alert, the recipient’s phone
emits a series of be eps, or vibrates, and displays
your name or Direct Connect number.
The recipient can:
• Answer — begin a Direct Connect cal l with the
sender
• Queue — store the call alert to the call alert
queue, which is a list of call alerts
• Clear — dismiss and delete the cal l alert
Sending Call Alerts
1 Enter the Direct Connect number you want to
send to, as you would when making a Direct
Connect call.
2 Press A under Alert. Read y to Alert appears
on the display .
3 Press the PTT button until Alert Successful
appears on the display.
Note: If the alert is not successful, this may
mean the person you are trying to reach is
on a call or has the phone turned off.
Receiving Call Alerts
When you receive a call alert, you must answer,
queue, or clear it. You cannot receive phone calls
or Direct Connect calls until you do.
To answer a call alert:
Press the PTT button to make a Direct Connect
call to the sender.
To queue a call alert:
Press A under Queue.
To clear a call alert:
Press O. -or-
Press A under Clear. -or-
If the flip is closed, press ..
Note: The re cent calls list also stores call alerts
you have rece iv ed . The y ap pear as Di re ct
Connect calls. Call alerts remain in your
recent calls list until you delete them or
unti l they reach the end of the list.
Using the Call Alert Queue
When you queue a call alert, it remains in the call
alert queue unt il you make a Di rect Connect call to
the sender or delete it.
Page 38

30
Call Alerts
Viewing Call Alerts
1 From the main menu, select Call Alert.
2 Scroll through the list.
Viewing Date and Time
To view the date and time a call alert was received:
1 From the main menu, select Call Alert.
2 Select the call alert you want inf ormation on.
Responding to Call Alerts in the Queue
After you queue a call alert, you can respond to it
by making a Direct Connect call to the sender or
sendin g a call alert to the sender.
Making a Direct Connect Call to the Sender
1 From the main menu, select Call Alert.
2 Scroll to the call alert you want to respond to.
3 Press the PTT butt on to begin the cal l.
This removes the call alert from the queue.
Sending a Call Alert to the Sender
1 From the main menu, select Call Alert.
2 Scroll to the call alert you want to respond to.
3 Press A under Alert. Read y to Alert appears
on the display .
4 Press the PTT button until Aler t Successful
appears on the display.
Deleting Call Alerts
To dele te a call alert from the queu e:
1 From the call alert queue, scroll to the call alert
you want to delete.
2 Press m.
3 Select Delete.
4 Press O or press A under Yes to conf ir m .
To delete all call alerts from the queue:
1 From the call alert queue, press m.
2 From the call alert menu, select Delete All.
3 Press O or press A under Yes to conf ir m .
Sor t ing Call A le rts
Tip: You must have at least one call alert in the
queue t o access this feature.
To sort call alerts by the order they were received:
1 From the main menu, select Call Alert.
2 Press m.
3 Select Sort By.
4 Select First on Top or Last on Top.
Page 39

31
Recent Calls
The recent calls list s tores the numbers of the 20
most recent calls you have made and received.
If the number of a recent call is stored in Contacts,
the name associated with the number appears on
the rece nt calls list.
An icon appears beside the name or number
indica ting the Contacts type of the number used in
the cal l. See “Contacts” on page 36.
For phone calls, an icon appears to the left of the
name or numb er givi ng mor e inf o rm atio n a bo ut th e
call:
A call you ma de.
X
A call you received.
W
A misse d call. Missed calls appear on the
V
recent calls list only if you have Caller ID.
Note: The re cent calls list also stores call alerts
you have rece iv ed . The y ap pear as Di r ect
Connect calls. Call alerts remain in your
recent calls list until you delete them or
until they reach the end of the list.
Viewing Recent Calls
With the Flip Open
1 From the main menu, select Recent Calls.
2 Scroll through the list.
To get more information on a recent ca ll:
From the recent calls list, select the call you
want informa tion on.
This displays information such as the name
associated with the call, the number, the date,
time, and duration of the call.
With the Flip Closed
1 Press . to display the most recent call.
2 To view the rest the recent call list, press the
volume controls.
3 Press . to dismiss th e recent calls list.
Tip: Press t to call the n u mb er di sp la yed.
Storing Recent Calls to Contacts
1 From the recent calls list, scr oll to the number
you want to store.
Page 40

32
Recent Calls
2 Press A under Store. -or-
If Store is not one of your options: Press m.
Select Store.
Tip: If Store is not on this menu, the number is
already stored in Contacts.
3 To store the numb er as a ne w entr y, select [New
Contact]. -or-
To store the number to an existing entry, select
the entry.
4 With the Contacts type field highlighted, scroll
left or right to display the Contacts type you want
to assign the number. For information on
Contacts types, see page 36.
5 If you want to add more information to the entry,
follow the applicable instructions in “Creating
Entries” on page 38.
6 Press A under Done.
Deleting Recent Calls
To delete a call:
1 From the recent calls list, scroll to th e call you
want to delete .
2 Press A under Delete. -or-
If Delete is not one of your optio ns : Pr es s m.
Select Delete.
3 Press O or press A under Yes to conf ir m .
To delete all calls:
1 From the recent calls list, press m.
2 Select Delete All.
3 Press O or press A under Yes to conf ir m .
Page 41

33
Entering Text
You can enter text into your phone us ing the
traditional method of pressing a key several times
for each character, or by pressing a key once f or
each letter while words likely to be the one you
want are chosen from a database. You can also
enter symbols and numbers into a text field.
In screens that require you to enter text, you see
the following icons. These icons tell y ou which text
input mode you are using:
Alpha — Press a key several times for each
l
character.
Word — Press a key once for each letter
j
while w ords likely to be the one yo u want are
chosen from a database.
Symbols — Enter punctuation and other
i
symbols.
Numeric — Enter numbers.
k
When you access a screen that requires you to
enter text, you start in the mode last used.
To choose a text input mode:
1 At a screen that requires you to enter text, press
m.
2 Select the text input mode you want to use. A
checkmark appears next to the current mode.
Usi n g Al p ha Mo de
• Press any key on the keypad to enter the letters,
numbers , and sy mbols on that ke y . For exampl e,
to enter the letter Y, press 9 three times.
• Type a letter then scroll up to make that letter
uppercase, or type a letter then scroll down to
make that letter lowercase.
• See “Special Function Keys” on page 34 for
more information on adding spaces,
capit alization, and punctuation.
Usi ng Wo rd Mo de
In Word mode, T9 Text Input analyzes the letters
on the ke ypa d b utt on yo u pr es s a nd ar ra ng es th em
to create words. As you type, T9 Text Input
matches your keystrokes to words in its database
and disp lays the most commonly used mat ching
word. You can add you own words to this
database.
Entering a Word
1 Select Word as your text input mode.
2 Type a word by pressing one key for each letter.
For example, to type “test” press 8 3 7 8.
Page 42

34
Entering Te xt
The displayed word may change as you type it.
Do not try to correct the word as you go. Type to
the en d of the word before editing.
3 If the w ord that appears is not the desired word,
press 0 to change the word on the display to
the next most likely word in the database.
Repeat until the desired word ap pears.
If the desi red wo rd do es not app ea r, yo u ca n ad d it
to the database.
Addi ng Word s t o the Database
1 Select Alpha as your text input mode.
2 Type the word using Alpha mode.
3 Select Word as your text input mode.
4 Press #.
The word you typed in Alpha text entry mode is
now in the database.
Note: You cannot st ore alphanumeric
combi nations, su ch a s Y2K.
Choosing a Language
To change the language of the database:
1 At a screen that requires you to enter text, press
m.
2 Select Languages.
3 Select the lan guage you want for your database.
Special Function Keys
Some of the phone’s keys assume differe nt
functions while in Alpha or Word mode.
Spaces
Press # for a space.
Capitalization
When you press and hold the # key, it acts as a
3-way toggle. Press and hold # to make the next
letter typed uppercase (shift), to make all
subsequ ent l et ter s ty ped up pe r cas e (ca ps lo ck ), or
to go back to lowercase letters.
These icons appe ar in the top row of your display:
m or X
n or W
When ne ither of these ic ons appear, le tte r s ty pe d
are lowercase. Scroll ing up after typi ng a letter
make s tha t let ter upperc as e.
Note: Your phone automatically makes the first
Shift is on.
Caps lock is on.
letter of a sentence uppercase.
Page 43

35
Punctuation
Press 1 or 0 to insert punctuation. Continue to
press the key to view the lis t of sy mb ol s av ailable
through that key. Pause to select the symbol you
want.
Note: Additional punctuation symbols are
availa bl e in S y mb ol s mode.
Usin g N u meri c Mo d e
1 Select Numeric as your text inpu t mod e.
2 Press the number buttons on your keypad to
enter numbers.
Using Symbols Mode
1 Select Symbols as your text input mode.
A row of symbols appears along the bottom of
the phone’s display. Scroll right to view the
complete row.
2 Press O to select the highlighted symbol.
Using Numeric Mode
Page 44

36
Contacts
Contacts stores up to 600 numbers or addresses.
Each Contacts entry can store several numbers or
addresses.
Information stored in Contacts is saved on your
SIM card.
A Contacts entry contains:
• A name — A n ame is required if you are storing
more than one number or address to the entry;
otherwise, it is optional. Typically, this is the
name of the person whose contact information is
stored in the entry.
• A ring t one — You can assign a ring tone to
each entry. This is the sound your phone makes
when you receive phone calls or call alerts from
any of the numbers stored in the entry.
• A Contacts type — Each number or address
stored must be assigned a Contacts type:
Mobile phone n umber
A
DC Direct Connect number
B
Work1 phone number
C
Work2 phone number
D
Home phone n umber
E
Email email address
F
Fax phone n umber
G
Pager phone number
H
Talkgroup Talkgroup number
I
IP IP address
J
Other phone number
K
• A number or address — Each Contacts entry
must contain a number or address. This may be
any type of phone number, Dir ect Connect
number, Talkgrou p n umb er, email addre ss , o r IP
address.
Page 45

37
Viewing Contacts
Note: You can store numbers up to 64 digits
long, but every 20 digits must be
separated by a pause or wait. See
“Creating Pauses and Waits” on page 40.
• A Speed Dial number — Whe n you store a
phone number, it is assigned a Speed Dial
number. You can accept the def ault Speed Dial
number or change it.
• A voice na me — If yo u c rea te a voice na me f or a
number, you can then dial that number by saying
the voic e name into your phone. This icon
appears to the left of the Contacts type icon if a
voice name is assigned.
Viewin g Co ntacts
To access Contacts:
From the ma in men u, sele ct Contacts. -or-
If you are on a call: Press m. Select Contacts.
To view entries:
1 From the Contacts list, scroll to the entry you
want to view.
2 If an entry has more than one number or
address stored,
icon. Scroll left or right to view the icon for each
number stored in the entry.
3 Press O to view the entry.
<> surrounds the Contacts type
P
4 Scroll to view t he other numbers and addresses
stored for the entry.
Tip: To view more entries , continue scrolling.
Searching for a Name
To search for a name in Contacts:
1 From the Contacts list, press A under Search.
-or-
If Search is not one of your options: Press m.
Select Search.
2 Enter the name y ou want to see. See “Entering
Text” on page 33.
3 Press O.
Your phone finds the name you ente red or the
nearest match.
Showing Only Direct Connect® Numbers and Talkgroups
To set Contacts to show only entries that contain
Direct Connect numbers and Talkgroup entries:
1 From the Contacts list, press m.
2 Select Filter.
3 Set this option to Show DC.
Page 46

38
Contacts
To set Contacts to show all entries:
1 From the Contacts list, press m.
2 Select Filter.
3 Set this option to Show All.
Creating Entries
A number or address and a Contacts type are
required for all Contacts entries. Other information
is optional. You may enter the informati on in any
order by scrolling through the entry details.
After you have entered the number or address,
Contacts type, and any other information you want,
you can press A under Done to save the entry to
Contacts.
To cancel a Contacts entry at any time press, e to
return to the idle sc ree n.
To create a Contacts entry:
1 To access the entry details screen:
Select Contacts > [New Contact] . -or-
From the Contacts list, press m . Select New.
2 If you want to assign a name to the entry :
Select Name.
Enter the name. See “Ente ring Text” on page
33. When you are finished, press O.
Tip: Press A under Browse to select a name
already in Contacts.
3 If you want to assign a ring tone to the name:
Select Ringer.
Select the ring tone you want to assign.
4 To assign a Cont acts type to the nu mber or
addres s be ing stored:
Select the Contacts type field.
Select the Contacts type you want to assign.
5 To store a number or address:
Select the # field (or ID for an email address, or
IP for an IP ad dr e s s) .
Enter the number or address. For phone
numbers, use the 10-dig it format. For email
addresses, see “Entering Text” on page 33.
Tip: Press A under Browse to select a number
or address from Contacts, the rece nt calls
list, or Memo.
When you are finished, press O.
6 If you want to assign more options to the
number, select [Options]. See “Assigning
Options” on page 39.
Page 47

39
Storing Numbers Faster
7 If you wa nt to add more number s or addresses
to the entry:
Scroll past the information yo u already entered.
Enter the additional information for the entry
using step 2 through step 6. You must assign a
name to the entry, if you have not already.
8 Press A under Done.
Assigning Option s
1 If you have not alrea dy, select [Options].
2 The default Speed Dial number assigned to a
phone number is displayed in the Speed # field.
This i s always the next av ailable Speed Dial
location.
If you want to assign the phone number to a
different Speed Dial locati on:
With the Speed # field highli gh ted, press O.
Press A under Delete to delete the current
Speed Dial number.
Enter the new Sp eed Dial number using the
keypad.
When you are finished, press O.
3 If you wa nt to create a voice name for a phone
number, select Voice Name.
As directed by the screen prompts, say and
repeat the name you want to assign to the
number. Speak clearly into the microphone.
4 When you are finished, press A under Back.
Storing Numbers Faster
To store nu mb ers t o Cont a cts fr o m the r ec ent ca ll s
list, se e “Sto rin g Rece nt Ca lls to Co nt ac ts ” o n pag e
31.
To store numbers to Contacts from Memo, see
“Memo” on page 42.
To store numbers to Contacts from the idle screen:
1 Use the keypad to enter the number you want to
store.
2 Press m.
3 Select Store Number.
4 To store the numb er as a new en try, select [New
Contact]. -or-
To store the number to an existing entry, select
the entry.
5 With the Contacts type field highlighted, scroll
left or right to display the Contacts type you want
to assign the number .
Page 48

40
Contacts
6 If you want to add more information to the entry,
follow the applicable instructions in “Creating
Entries” on page 38.
7 Press A under Done.
Editing Entries
1 From the Contacts list, scroll to the entry you
want to edit.
2 Press A under Edit. -or-
If Edit is not one of your options: Press m. Select
Edit.
The entry details screen displays.
3 Follow the applicable instructions in “Creating
Entries” on page 38 to edit the various fields.
Deleting Entries
Delete an Entry
1 From the Contacts list, scroll to the entry you
want to delete .
2 Press m.
3 To delete the entire entry, select Delete
Contact.
4 Press O or press A under Yes to co nf irm .
Delete a Number or Address
1 From the Contacts list, scroll to the entry that
cont ains the number or address you want to
delete.
2 Scroll le f t or ri gh t t o d is play th e C ont a ct s ty pe for
the number you want to delete.
3 Press m.
4 Select Delete Number.
5 Press O or press A under Yes to conf ir m .
Note: If an entry contains only one number or
address, deleting the number or address
delet es the entry.
Checking Capacity
To see how many numbers are stored in Contacts:
1 From the Contacts list, press m.
2 Select Capacity.
Creating Pauses and Waits
When storing a num ber, you can program your
phone t o pause or wait betw een digits while
dialin g. A pause makes yo ur phone pause for 3
seconds before dialing fur ther. A wait makes your
phone wait for your response before dialing further.
Page 49

41
International Numbers
This feature is useful when using voice mail or
other a ut omat ed p hone sy st ems tha t req ui re y ou t o
dial a ph one number and the n enter an access
number.
To progr am a pause:
Press and hold * until the letter P appears. The
P represents a 3-second pause.
If you store 17035551235P1234, when you select
this number and make a call, your phone dials the
first 11 digits , pauses for 3 seconds, then dials the
last 4 digits.
If you wan t a pause longer than 3 seconds, press
and hold * more than once. Each P repres ents a
3-sec on d pa us e.
To program a wait:
Press and hold * until the l etter W appears .
The W means your phone waits before dialing
further.
If you store 17035551235W1234, whe n you select
this number and make a call, your phone dials the
first 11 digits and then waits. A message appears
asking if you want to send the rest of the digits.
Press A un de r Yes to dial the last 4 digits.
Tip: You can create pauses and w ai ts wh il e
dialin g a number from the keypad. See
“Crea ting Pauses and Wait s Wh ile Di al ing ”
on page 48 .
International Numbers
When storing a number that you plan to use for
international calls, use Plus Dialing:
1 Press and hold 0 for two seconds. A “0”
appea rs, then changes to a “+”.
Note: The network translates the “+” into the
appropriate international access code
needed to place the call.
2 Enter the country code , ci ty code or area code,
and phon e nu mb er.
For infor m a tio n ab ou t mak i ng internationa l ca ll s,
see “Mak ing International Calls” on page 48.
Page 50

42
Memo
Memo lets you store a number, make a call to that
number, and save it to Contacts.
To create a memo:
1 From the main menu, select Memo.
2 Enter the number using your keypad.
3 Press O.
To view the memo later:
From the main menu, select Memo.
To delete the memo:
1 From the main menu, select Memo.
2 Press and hold A under Delete.
3 Press O.
To edit the memo:
1 From the main menu, select Memo.
2 Enter the new number.
3 Press O.
To make a call to the memo number:
1 From the main menu, select Memo.
2 To make a phone call, press s. -or-
To make a Direct Connect call, press the PTT
button.
To store the memo number to Contacts:
1 From the main menu, select Memo.
2 Press m.
3 Select Store to Cntcs.
4 T o st ore th e n umb er as a ne w en try, select [New
Contact]. -or-
To store the number to an existing entry, select
the entry.
5 With the Contacts type field highlighted, scroll
left or right to display the Contacts type you want
to assign the number .
6 If you want to add more information to the entry,
follow the applicable instructions in “Creating
Entries” on page 38.
7 Press A under Done.
Page 51

43
Call Forwarding
Call forwarding sends calls to the phone numbers
you specify. You can forward all calls to one
number or forward missed calls to different
numbers depending on the reason you missed the
call.
You can forward phone lin es 1 and 2
independently.
Forwarding All Calls
When you s et your phone to for ward all calls, an
icon ap pe ars in t he top row of the display :
Phone line 1 is active; calls to phone line 1
G
are being forwarded.
Phone line 1 is active; calls to phone line 2
I
are being forwarded.
Phone line 1 is active; c alls to phone lines 1
H
and 2 are being forwarded.
Phone line 2 is active; calls to phone line 1
J
are being forwarded.
Phone line 2 is active; calls to phone line 2
L
are being forwarded.
Phone line 2 is active; c alls to phone lines 1
K
and 2 are being forwarded.
To forward all calls:
1 From the main menu, select Call Forward >
Forward > All Calls.
2 Select To.
If you specified a forwarding number for all calls
before, this number displays.
To forward calls to this number, press A under
Back.
To delete this number, press O, then press and
hold A under Delete.
3 To enter the number you want t o forward ca lls to:
Enter the number using your keypad. -or-
Press A under Search. Select Contacts,
Recent Calls, or Memo. Select the number you
want to enter.
4 Press O.
All your cal ls are no w for wa rde d t o th e numb er you
specified.
Page 52

44
Call Forwa rdin g
Turning Off Call Forwarding
If you don’t want all you r calls forwarde d, turn the
feature off:
1 From the main menu, select Call Forward > To.
2 Set this option to Off.
All your calls are now sent to your phone.
Calls you miss are f or w ar d ed acc or d in g t o the
options set for missed calls. By default, missed
calls are forwarded to voice mail.
Forwarding Missed Calls
You can sp eci f y a fo r wardi ng nu mb er f or ea ch ty pe
of missed call:
•If Busy — Your phone is on a call or transferring
data.
• If No Answer — You do not answer on the first
4 rings.
• If Unreachable — Yo ur phone is out of
coverage or powered off.
Note: If you want a type of missed call sent to
voice mail, the call forw arding nu mber for
that type of missed call must be your
voice ma il acce ss nu mber. In most cases,
your voice mail access number is your
area code + first 3 digits of your PTN +
MAIL (6245). To verify your voice mail
access nu m b e r, contact Nex t e l Cu st om e r
Care.
To forward missed calls:
1 From the main menu, select Call Forward >
Forward > Detailed.
2 Select If Busy to specify a forwarding number
for calls received when your phone i s busy.
3 If you speci fie d a forwar din g number for this type
of call before, this number displays.
To forward calls to this number, press A under
Back and go to step 6. -or-
To delete this number, press O, then press and
hold A under Delete.
4 To enter the number you want to forward this
type of call to:
Enter the number using your keypad. -or-
Press A under Search. Select Contacts,
Recent Calls, or Memo. Select the number you
want to enter.
Page 53

45
5 Press O.
6 Repeat step 2 through step 5 for If N o Answe r
and If Unreachable.
7 When you are finished, press A under Back.
Viewing Call Forwarding Settings
1 From the main menu, select Call Forward >
Forward > All Calls.
2 With To highlighted, press A under Status.
Viewing Call For warding Settings
Page 54

46
Advanced Calling Features
Call Waiting
Call Waiting lets you receive a second call while on
an active call. Call Waiting is always available,
unless you turn it off for a specific call.
If you are on a call and receive a second call, your
phone emi ts a tone an d displ ays a mess age say ing
you are receivin g a second call.
To acce pt t he sec ond c al l a nd put th e act i ve cal l on
hold:
Press A under Yes.
To accept the second call and end the active call:
1 Press e.
Your phone rings with the second call.
2 Answer the second call.
To decline the second call:
Press A under No. If you subscribe to voice
mail, the call is forwarded to your voice mail box,
unless you set Call Forward for If Busy to a
different number.
Turn Off Call Waiting
To turn off Call Waiting during a call:
1 Press m.
2 Select In Call Setup > Ca ll Waiting.
3 Set this option to Off.
Tip: To turn Call Waiting back on while still on
the call, set this option to On.
To turn off Call Waiting for the next call you make
or receive:
1 From the main menu, select Se tt ing s > Phon e
Calls > Call Waiting.
2 Set this option to Off.
Call Waiting is turned back on when you end the
call.
Switching Between Calls
Any time you have one call active and one call on
hold, to make the call on hold active and put the
active c all on hold:
Press A under Switch. -or-
If Switch is not one of your options: Press m.
Select Switch.
Page 55

47
Putting a Call on Hold
Putting a Call on Hold
1 While on an active call, press m.
2 Select Hold.
If you want to make the call active again, press A
under Resume.
Calling 2 People
Putting a Call on Hold, Making a Second Call
1 Place or receive a phone call.
2 While the call is active, press m.
3 Select 2nd Call. This puts the call on hold.
4 Enter the second phone number you want to
call.
Tip: For quick ways to enter the number, press
m.
5 Press s to place the call.
To end the second call and make the call on hold
activ e ag ai n:
Press e.
To make the call on hold active and put the active
call on h old:
Press A under Switch.
Merging 2 Calls into a 3-Way Call
After you put a call on hold and place a second
call, you can combi ne these calls into a 3-w ay ca ll:
1 Press m.
2 Select Join.
All 3 people in the call can speak to and hear each
other.
Making a 3-Way Call
1 Place or receive a phone call.
2 While the call is active, press m.
3 Select 3 Way. This puts the call on hold .
4 Enter the second phone number you want to
call.
Tip: For quick w ay s to enter the nu mb er, pres s
m.
5 Press s to place the call.
6 Press A under Join.
All 3 people in the call can speak to and hear each
other.
Page 56

48
Advan c ed C al li ng Features
Creating Pauses and Waits While Dialing
You can enter a pause or wait while dialing a
number. For more information on pau ses and
waits, see “Creating Pauses and Waits” on page
40.
To create a pause while dialing a phone numbe r:
1 From the keypad, enter the digits you want to
occur before the pause.
2 Press m.
3 Select Insert Pause .
4 Enter the digits you want to occ ur afte r the
pause.
To create a wait while dialing a phone number:
1 From the keypad, enter the digits you want to
occur before the wait.
2 Press m.
3 Select Insert Wait.
4 Enter the digits you want to occ ur afte r the wait.
Making International Calls
Your service default is “International Calls
Restri cted.” Contact Nextel Customer Care to
obtain international dialing access.
Calls placed between the United States and
Canada do not require an international access
code.
Plus Dialing lets you place an international call to
most countries without entering the local
international access c ode.
1 Press and hold 0 for two seconds. A “0”
appea rs, then changes to a “+”.
Note: The network translates the “+” into the
appropriate international access code
needed to place the call.
2 Enter the country code , ci ty code or area code,
and phon e nu mb er.
3 Press s.
Setting One Touch Direct
Connect
One Touch Direct Connect sets your phone to call
the most recent Direct Connect number on the
recent calls list, or a Direct Connect number you
choose, every time you press the PTT button.
To set your phone to call the most recent Direct
Connec t nu mb er on the rece nt ca lls list:
1 From the main menu, select Se ttings > DC/GC
Options > One Touch DC.
®
Page 57

49
Setting Fli p Act ion s
2 Set this option to Last Call.
To set your phone to call a Direct Connect number
you choose:
1 From the main menu, select Se ttings > DC/GC
Options > One Touch DC > Assigned
Number.
2 To enter the Direct Connect number you want
your phone to call every time you press the PTT
button:
Enter the number using your keypad. -or-
Press A under Search. Select Contacts,
Recent Calls, or Memo. Select the number you
want to enter.
Tip: If you are entering a Talkgroup number,
enter # before the number.
3 Press O.
To turn of f One Touch Direct Connect:
1 From the main menu, select Se ttings > DC/GC
Options > One Touch DC.
2 Set this option to Off.
Setting Flip Actions
For Answering Calls
To set your phone to answer calls when you open
the flip:
1 From the main menu, select Se tt ing s > Phon e
Calls > Flip Activation > Flip to Ans.
2 Set this option to On.
To set your phone no t to answer calls w hen you
open the flip:
Set Flip to Ans to Off in step 2.
For Ending Calls
To set your phone to end calls when you c lose the
flip:
1 From the main menu, select Se tt ing s > Phon e
Calls > Flip Activation > Flip to End.
2 Set this option to On.
To set your phone not to end calls when you close
the flip:
Set Flip to End to Off in step 2.
Page 58

50
Advan c ed C al li ng Features
Note: If you are using your phone with a
heads et, and you have the Flip to End
option set to On, closing your flip sends
incoming sound to the headset and does
not en d the call.
Group C o nn ectTM Calls
A Group Connect call is similar to a Direct Connect
call, but is made to al l members of a Talkgroup at
once. A Talkgrou p is a predetermined group of up
to 25 Nextel customers.
Befor e yo u can make or re ce iv e Group Con ne ct
calls, a Talkgroup must be established. After the
Talkgroup is established, you must join the
Talkgroup.
Joining a Talkgroup
When you enable security, you receive a list of
Talkgroups that have been set up for you if you
subscribe to this servic e. The Talkgroup list is
saved to Co ntacts.
To receive Group Connect ca lls made to any of
these Talkgroups, you must join the Talkgroup.
1 Press A under Contcs. -or-
From the main men u, scro ll to Contacts and
press O.
2 Scroll to the Talkgroup y ou want to join.
3 Press A under Join.
Note: You will now be able to receive Group
Connect communications from this
Talkgroup only. You can only monitor one
Talkgroup at a time.
Setting Up More Talkgroups
You can s et up more Talkgroups in 3 way s:
• Using G roup Connect Management* on
MyNextel at nextel.com
* You must be an account administrator to use Group Connect
Management.
• Contacting y our Nextel Sales Representative at
the time of ac tiv ation
• Using W i rel ess Ma nage r to cr ea te, ma nage , an d
delete Talkgroups
When you create your Talkgroups, you can select
your own Talkgroup numbers.
You can join a new Talkgroup by pressing # and
entering the number using the keypad. Then press
A under Join.
Making Group ConnectTM Calls
1 Press #. Then enter the Talkgroup number
using the key pa d. -or-
Page 59

51
Call Timers
Choose the Talkgroup name from Contacts or
recent ca ll s l is t.
2 Proceed as if making a Dir ect Connect call.
Receiv in g Gro up ConnectTM Calls
To answer a Group Co nnect call:
Proceed as if answering a Direct Connect ca ll.
Only one person at a time may speak on a
Group Con nect call.
The Direct Connect number or name of the
person who is speaking will appear on the
displa y be lo w the T al kg r o up num be r .
Turning off Group ConnectTM Calls
To set your phone to prevent you from hearing
Group Connect calls to you r Talkgroup:
1 From the ma in men u, sele ct Settings > DC/GC
Options > Tkgrp Silent.
2 Set this option On.
To set your phone to let you hear Group Connect
calls to your Talkgr oup:
Set Tkgrp Silent to Off in step 2 .
Call Timers
Call timers meas ure the du ration of your phone
calls, Direct Connect or Group Conn ect calls, and
circuit data use, as well as the number of Kilobytes
sent and received by your phone:
•Last Call — displays the duration of your most
recent ph one call.
• Phone Reset — keeps a running total of your
phone call minutes, until you reset it.
• Phone Lifetime — displays the total minutes of
all your phone ca lls.
• DC/GC Reset — keeps a running total of all of
your Direct Connect and Group Connect call
minutes, until you reset it.
• DC/GC Lifetime — displays the total minutes of
all you r Direct Connect and Group Co nnect
calls.
• Circuit Res et — keeps a running total of all of
your circuit data use, until you reset it.
• Circuit Lifetime — displays the total minutes of
all of your circuit data use.
•Kbytes Reset — keeps a running total of the
number of Kilobytes sent and received by your
phone, until you reset it.
Page 60

52
Advan c ed C al li ng Features
To view or reset a timer:
1 From the ma in men u, sele ct Call Timers.
2 Select the feature you want to view or reset.
3 To view a feature withou t resett ing: Press O
when you ar e finished vie w in g. -or-
To reset a featu re: Pres s A unde r Reset. Press
O or press A under Yes to confirm.
Note: The values displayed by Call Timers
should not be used for billing. Call timers
are estimates only.
Usin g Your Phone as a Modem
To use your phone as a modem with a lapto p,
handhe ld device, or desktop computer:
1 Open the connector cover.
connector
cover
2 With the phone’s display facing up, insert a data
cable’s connector into the accessory connector,
until you hear a click.
3 Insert the data plug into the data port of the other
device.
When used as a modem, your phone has these
data trans fer modes:
• Circuit data — used for sending and recei v ing
faxes and for trans fe rr ing larg e fil es
• Packet data — used for small file transfers such
as email
Page 61

53
Making TTY Cal ls
To use these services, you must install the iDE N
Wireless Data Services software (available
separately) and subscribe to a Next el Wireless
Web access plan. For more information on setting
up your computer an d yo ur i830 phone for packet
and circuit data calls, go to nextel.com.
Making TTY Calls
To use your phone to make phone calls using a
teletypewriter (TTY) device:
1 Connec t one end of a 2.5 m m ca bl e into the
audio jack on your phone. Connect the other
end of the cable t o your TTY device.
2 Make sure that your phone’s TTY feature is on
and select the TTY mode you want to use.
3 Use your phone t o enter phone numbers and
make calls.
When you make a TTY call, these icons appear on
the phone’s display:
Phone call is active.
N
Phone call is on hold.
O
TTY device features such as Turbo-Code,
High-Speed, and Interrupti on are not supported by
your phone. These feature s must be turned off or
disabled to use your TTY device with your phone.
Turning On the TTY Feature
Your pho ne’s TTY feature must be on if you want
to make TTY calls, set the TTY mode, or change
the TTY baud rate. To make sure the TTY feature
is on:
From the main menu, select Se tt ing s > Phon e
Calls > TTY > Use TTY. This field must say On.
Choosing a Mode
Your phone supports these TTY modes:
•TTY — You typ e and read text on your TTY
device.
•VCO (Voice-Carry-Over) — You speak into your
phone and read text replies on your TTY device.
• HCO (Hearing-Carry-Over) — You type text on
your TTY device and listen to voice repl ies on
your phone speaker.
To change mode while not in a call:
1 From the main menu, select Settings > Phone
Calls > TTY > Type.
2 Select the TTY mode you want.
Page 62

54
Advan c ed C al li ng Features
When you make a TTY call, the call begins in the
TTY mode you last selected.
To change mode during a call using your phone:
1 Press m.
2 Select In Call Setup > T TY > Type.
3 Select the mode y ou want.
To change mode during a call using your TTY
device, issue one of the following commands:
• “VCO pl ease” — to select VCO mode
• “HCO please” — to select HCO mode
• “HCO off please” — to turn off HCO mode
Important: When you are using HCO, the sound
coming from your phone speaker may
be uncomfortably loud. Use caution
when putting the phone to your ear.
(For information on setting the volume
of your phone speaker, see “Setting the
Volume” on page 106.)
Changing the TTY Baud Rate
By default, your phone’s TTY baud rate is set to
45.45, the baud rate required for TTY calls within
the U.S. To make calls outside the U.S., se t your
TTY baud r ate to 50.0.
To change the TTY baud rate:
1 From the main menu, select Settings > Phone
Calls > TTY > Baud .
2 Select the baud rate for your location.
Special Dialing Codes
Non-Emergency Numbers
Nextel su pports many “non-emergency” numbers
(such as #77, 311,. ..) provided by local and state
governments. These numbers are used to report
non-emergency i ncidents. If the situation includes
imminent danger or loss of life, you should dial
911.
Telecommunications Relay Se rvi ce
Nextel supports services for communicating with
speech and/or hearing impaired individ uals. You
can dial 711 to reach a local Telecommu nications
Relay Center. You will then be connected to your
destination number. Relay service works through a
Communications Assist ant who reads messages
typed i nto a TDD/TTY device by a speech or
hearing impaired individual to you. The
Communic at io ns Assis ta nt then ty pe s you r spo ke n
Page 63

55
messages to the hearing or speech impaired
indivi dual. Telecommunications Relay S ervice is
available 24 hours a day, seven days a week, and
every call is strictly confidential.
Note: Using 711 to reach Telecommunications
Relay Se rv ic e ma y not be availa ble in all
areas.
Special Dialing Codes
Page 64

56
Nextel® Phone Services
Contact Nextel Customer Care to obtain these
services or for additional information:
Note: Some services are not available outside
of the continental United States.
Caller ID
Your phone can automatically display the phone
number or name (if the 10-digit phone number is
stored in your Contacts) of the person calling
(unless blocked b y the caller), enab ling you to
decide whe the r to ta ke the ca l l or f orwa r d it t o vo ic e
mail.
Caller ID infor mation is not available on all calls.
Per-Call Blocking
You can block delivery of your phone number to
other C aller ID units for a single phone call:
Press * 6 7 before dialing the call.
Your Next e l phon e n um be r ca nn ot be b l ock ed fr om
calls ma de to 911, 800, 855, 866, 877, 888, or
other toll- free phone numbers.
Per-Line Blocking
You can permanently block delivery of your phone
number on every call you make.
To show your number on a per-call basis:
Press * 8 2 before dialing the call.
Altern at e Li n e Se rv ice
You can have two different phone n umbers on the
same phon e. With Alternat e Line Service, you can:
• Set up different billing addresses for each phone
line.
• Use different ringer styles so that you can tell
which line is receiv ing the call.
• Forward incoming calls to the primary and
alternate line to different phone numbers.
To set the active line:
1 From the main menu, select Se tt ing s > Phon e
Calls > Set Line.
2 Select the phone line you want to be the active
line.
When calls made to the line that is not active are
set to be forwarded to the active line, these calls
are sent to voice mail without ringing. See “Call
Forwarding” on page 43.
Page 65

57
Call Restrictions
You can prevent your phone from making or
receiving long distance, incoming, and outgoing
(exce pt 91 1) calls.
Nextel® 411
You can call Nextel 411 within the continental
United States and Hawaii. Services include white
and yell ow page li stings, driving directions,
restau r an t r es erv ations, mo vie listing s an d
showtimes, and local event information.
Call Restric t ion s
Page 66

58
Ring Tones
To set the ring tone your phone makes when you
receive phone calls, message notifications, or call
alerts:
1 From the ma in men u, sele ct Ring Tones.
2 Make sure Vibrate All is set to Off.
3 Scroll t hr oug h the l is t of r i ng t o nes a nd se l ect the
one you want to assign . Vibrate sets your ph on e
to vib rat e i ns tea d of ma king a s oun d; Silent sets
your phone to neither vibrate nor make a sound.
Tip: Highlighting a ring tone lets you hear it.
4 Select the features you want to ass ign the ring
tone to.
5 When you are finished, press A under Done.
Note: This icon
set your phone to neither vibrate nor make
a sound for phone call s.
Setti ng Your Phone t o Vibr at e
You can set your phone to vibrate instead of
maki ng a soun d w he n yo u rec e i ve all phone calls,
Direct Connect c alls, Group Connect calls,
messages notifications, and call alerts.
1 From the main menu, select Ring T ones >
Vibrate All.
M appears on the display if you
2 Set this option to On.
Tip: Pressing the volume controls to turn down
the volume as far as possible sets Vibrate
All to On.
To set your phone to vibrate instead of making a
sound for some features but not others:
1 From the main menu, select Ring Tones.
2 Make sure Vibrate All is set to Off.
3 Select Vibrate from the list of ring tones.
4 Select the features you want to set to make no
sound.
5 When you are finished, press A under Done.
Note: To set ring options for Direct Connect
calls an d Gr oup Conne ct ca ll s, see
“Setting Your Phone to Vibrate” on page
106.
These icons indicate how the ringe r is set.
Q The phon e always vibra tes inst ead of making
a sound.
The phone vibrates instead of maki ng a
R
sound for phone ca lls.
Group Connect calls and Direct Connect
u
calls a re heard through the earpiece, not the
speaker.
Page 67

59
Ring and Vibrate
These ic ons may appear at the same time.
Ring and Vibrate
To set your phone to ring and v ibrate when you
receive phone calls or call alerts:
1 From the main menu, select Ring Tones.
2 Make sure Vibrate All is set to Off.
3 Scroll through the list of ring tones and highlight
the one you want to assign.
4 Press m.
5 Select Assign w/Vibe.
6 Select the features you want to set to ring and
vibrate.
7 When you are finished, press A under Done.
This icon
S appears on the display.
Assigning Ring Tones to Contacts
You can set the ring tone your phone makes when
you rece iv e phone call s or ca ll al er t s fr om
someone you have stored in Contacts.
1 From the ma in men u, sele ct Ring Tones.
2 Make sure Vibrate All is set to Off.
3 Scroll t hro ug h the l is t of r ing t on es and se l ect th e
one you want to assign .
4 Select A Contact.
5 Select th e Con tac t s en tr y you want to as si gn the
ring tone to.
Viewing Ring Tone Assignments
1 From the main menu, select Ring Tones .
2 Make sure Vibrate All is set to Off.
3 Highlight any ring tone.
4 Press m.
5 Select Overview.
6 Scroll to view ring tones assigned to features
and Cont ac t ent r ie s.
Downloading More Ring Tones
If you want to use other ring tones, you can
download them in to your phone for a fe e. Check
the Downloads menu option on your phone for a
catalog of additional items available for purchase
and download directly from your phone.
Page 68

60
Ring Tones
You can also go to nextel.com/downloads for a
wide selection of available ring tones and
downlo ading instru c t io ns .
Note: Ring tones may be downloaded onl y
once. If you delete a ring tone from your
phone, you must purchase it again to
downloa d it ag ai n.
Managing Memory
To view th e amount of memory availab le for
custom ring tones:
1 From the main menu, select Ring Tones.
2 Make sure Vibrate All is set to Off.
3 Highlight any ring tone.
4 Press m.
5 Select Memo r y U sa g e .
Deleting custom ring tones frees memory.
Note: Ring tones are stored in your phone using
the same memory space used t o store
messag es, voice records, Java
applications, and wallpaper images.
Deleting some of these other items frees
memory for ring tones.
Deleting Custom Ring Tones
To delete a custom ring tone:
1 From the main menu, select Ring Tones.
2 Make sure Vibrate All is set to Off.
3 Scroll to the ring tone you want to delete.
4 Press m.
5 Select Delete.
6 Press A under Yes to confirm.
Page 69

61
Message Center
The message center manages your mes sages.
When you receive the following types of
mess ag es , you can acce s s them throu gh the
mess ag e ce nter:
• Voice mail mes sa ge s
• Two-Way messages
• Short Message Service (SMS) messages
You can listen to or view these messages, delete
them, or continue to store them in the message
center.
Accessing the Message Center
From the main menu, select Messages.
Message Center Options
• Voice Mail — access voice mail messages you
have received.
•Net Alert — access Two-Way messages you
have received.
•SMS — access SMS messages you have
received.
Page 70

62
Receiving Messages
When you receive a voice mail message, Short
Message Service (SMS) messag e, or Net alert,
you have 2 ways to access the message:
• Respond to the message notification that
appears when the message is received.
• Dismiss the message notification and access
the mes sage later through the message center.
Message Notifications
When yo u r ec ei ve a mes s ag e, yo ur phone notifies
you with text on the disp la y an d a notific a tio n ton e
or vibration. Yo u can access the message or
dismis s the noti fic a tio n.
If you dismiss the notification, the messa ge is not
deleted. It can be accessed through the message
center.
If you are not on a phone call when you receive a
message, your phone sounds a notification tone
every 30 seconds until you access the message,
you dismi ss the no tification, or the alert time-out
expires.
Setting Notification Options
To control whether your phone sounds message
notification tones while you are on phon e calls:
1 From the main menu, select Se tt ing s > Phon e
Calls > Notifications.
2 Select the option you want:
• Receive All — Tones sound during calls for
all types of messages.
• Msg Mail Only — Tones sound during calls
for SMS messages; tones for all other types
of messages are held until you end ca lls.
• Delay All — Tones for all types of messag es
are held until yo u end calls.
Note: Delay All is the default setting.
Tip: To set notification options during a call:
Press m. Select In Call Setup >
Notifications.
Message Center
All your messages are stored in the message
center. The message center shows how man y
messages you have of each type.
To access your messages through the message
center:
1 From the main menu, select Messages.
Page 71

63
2 Scroll to the type of message you want to
access.
3 Press O or press A under the display option on
the left.
Note: In order for you to access voice mail for
the firs t time you mus t acc es s it by dial i ng
into your voice mail box using your PTN. If
there is already a message in your voice
mail box, then you can access your voice
mail through the message center.
Message Center
Page 72

64
Voice Mail M e ss a g e s
Receiving a Message
When you receive a voice mail message, New
Voice Mail Message appears on the display.
To call Nextel’s voice mail system and listen to the
message:
Press A under Call.
To dismiss the message notification:
If the flip is closed, press .. -or-
If the flip is open, press O or press A under
Back, or close the flip.
If the caller leaves a message, this icon
appears on the display, reminding you that you
have a new message.
Accessing Voice Mail from the Message Center
From the main menu, select Messages > Voice
Mail.
Sending Unanswered Calls to Voice Mail
To send a phone call to voice mail instead of
answering it:
If the flip is closed, press .. -or-
Press e. -or-
Press A under No.
y
Page 73

65
Nextel® Voice Mail
Note: To receive voic e mail messa ges, you must
first set up your voice mail box.
Note: If you are bring ing your phone number
from another carrier, we suggest you set
up your voice mail box after the number
you brought to Nextel is active on your
Nextel phone an d your temporary phone
number is deactivated. If you set up yo ur
voice mail box prior to this, all messages
and all settings (including your greeting
and password) will be lost when the
number you have brought to Nextel
becomes active.
Setting Up Your Voice Mail Box
Using yo ur i830 phone, dial your 10-digit N extel
Personal Telephone Number (PTN). For example:
703555 7777. Follow the system instructions to
create a new 4- to 7-digit password, record your
name, and record a greeting. When the system
says, “Thank you for using Nextel Voice Mail,” your
mailbox is set up.
If you are calling from a phone other than your
i830, dial your 10-digit Nextel PTN. When you hear
the greet ing, press the sta r key to access your
voice mail box. The system will prompt you to enter
your passw ord. Enter the last seven digits of your
Nextel PTN. For example: 5557777. This is your
tempo r ary passwo r d.
You are in the main voice mail menu when you
hear the options listed below.
• To play your messages, press 1. (This opt ion
plays only if you have new or saved messages.)
• To record a message, press 2.
• To change your greeting, press 3.
• To access your personal options, press 4.
If you pre s s * while you are in a sub-menu, you
will go to the previous menu. If you press **,
you will go to the main voice mail menu. From the
main voice mail menu, press # to exit voice mail.
At any time, you may end the call by pressing e.
Playing Messages
When you receive a new voice mail message, you
can either listen to it immediately by pressing A
under Call, or lat er by pressing A under Back.
These a re opti ons available w hile you are listening
to your messages:
Page 74

66
Nextel® Voice Mail
• Backup — press 1.
• Rewind to the beginning of the message —
press 11.
• Pause or con tin ue t he cur re nt me ss age — pr ess
2.
• Fast forward — press 3.
• Fast forward to the end of the message — press
33.
• Play the date and time stamp — press 55.
These op tions are available while a message is
playing or after it has played:
• Forward the message to another subscriber —
press 6.
• Delete the message — press 7.
• Reply to a message — press 8.
• Save the message — press 9.
• Skip to the next message — press #.
Messages that are not saved or deleted remain in
your mailbox as new messages. All messages are
automatically d eleted after 30 day s .
To retrieve deleted messages, press * 3. This
option only applies to the current voice mail
session. If you end the call, the messages will be
permanently deleted.
Important: After exiting the voice mail session, you
cannot recover deleted messages.
Changing Your Password
1 From the main voi ce mail menu, press 4 to
access pe r s on al options.
2 Press 4 to access pe rsonal preferences.
3 Press 1 to modify password.
4 Enter your n ew p a sswo rd. It mu st be 4 to 7 digi t s
long.
Note: It is important that you choose a number
that is easy for you to remember, but hard
for someone else to guess. Passwords
using all the same digits, for example
4,4,4,4 or a sequential series of digits,
1,2,3,4, will not be accepted.
5 Press ** to return to the main menu.
Note: If you forget your passwo rd, conta ct
Nextel Customer Care.
Recording Your Name
When you send, reply to, or copy a message, your
name response precedes the message. To record
or re-record your name at any time:
1 From the main voi ce mail menu, press 4 to
access pe r s on al options.
Page 75

67
Recor ding Your Active Greeting
2 Press 4 to access personal preferences.
3 Press 3 to access the reco rd yo ur name op tio n.
4 Press 2 to record your name.
5 Press ** to return to the main menu.
Recording Your Active Greeting
You may want to include one or all of the following
options in your greeting so that callers will know
they are available.
• Press 1 to send a numeric message.
• Press 2 to send an operator-assisted message.
(This option i s available only if you are a
subsc rib er of O pe r at or Ass is ted Messa gi ng .
Contact Nextel Customer Care for more
information.)
• Press # to skip the greeti ng and record a
message immedia tely.
To record or alter your greeting at any time:
1 From the main voi c e mail menu, press 3 to
change your greeting.
2 Press 1 to play, press 2 to record or
re-rec ord, or press 7 to delete your active
greeting.
3 Record your greeting and press # when you
have finished.
4 Press ** to return to the main menu.
Advanced Voice Mail Features
Multiple Greetings
You can c reate up to five different greetings and
design ate which greeting will be your active
greeting at any given time. The greeting that was
recorded during your initial voice mail box setup is
greeting 1. This is your default active greeting.
To record additional greetings:
1 From the main voi ce mail menu, press 3 to
access t h e greetings me nu.
2 Press 4 to modify greetings.
3 Enter the greeting number you wish to create or
modify.
4 Press 2 to record a greeting.
5 Record your greeting and press # when you
have finished.
6 Press ** to return to the main menu.
To select your active greeting:
1 From the main voi ce mail menu, press 3 to
access t h e greetings me nu.
2 Press 3 to select another greeting to be active.
3 Enter the number of the greeting that you would
like to be active. The system will confirm your
active greeting number.
Page 76

68
Nextel® Voice Mail
4 Press 1 to play your active greeting.
5 Press ** to return to the main menu.
Greetings Schedule
You can choose to have your greeting s
automatically activated based on a pre-determined
time schedule. By activating the Greeting
Schedule, Greetings 1, 2, and 3 will automatically
play according to the time schedule listed below.
Greetin g 1 Evenings an d
Weekends
5:00 pm – 7:5 9 am ,
Monday – Friday
24-hours, Saturday
and Sunday
Greetin g 2 Weekday
Mornings
Greetin g 3 Weekday
Afternoons
8:00 am – 11:59 am
Monday – Friday
Noon – 4:59 pm
Monday – Friday
To activate the greeting schedule:
1 From the main voi c e mail menu, press 3 to
access t he gr ee ti ngs menu.
2 Press 9 to activate your greeting schedule.
3 Press ** to return to the main menu.
Note: The greeting schedule, when on, will
override any other greeting that you may
set as active. If a greeting is not recorded,
a system stan da r d gre eting will be play e d.
Automatic Playback
By default, the playback mode of your voice mail
service is set to normal. This feature automatically
plays and saves ne w messages when you log in.
To activate automatic play back:
1 From the main voi ce mail menu, press 4 to
access pe r s on al options.
2 Press 4 to access pe rsonal preferences.
3 Press 2 to access pl ayback preferences.
4 Press 2 to switch between automatic and
normal playback.
5 Press ** to return to the main menu. Changing the Playback Order of Messages
You can s elect the order in which you want
unheard me ssa ge s t o be pla yed . You may lis te n to
the last received message first, or you may listen to
the firs t rec ei ved mes sag e fir st . To sel ect th e or der
in which new messages should be played:
1 From the main voi ce mail menu, press 4 to
access pe r s on al options.
2 Press 4 to access pe rsonal preferences.
Page 77

69
Advanced Voice Mail Feat ures
3 Press 2 to access pl ayback preferences.
4 Press 1 to switch between the playback orders.
5 Press ** to return to the main menu.
Recording, Forwarding, and Replying to Messages
These functions allow you to record and send,
reply to, or forward a message to an assigned
desti na tion address or grou p li st nu m be r . If you
record a complete or partial message, but do not
send it, Nextel Voice Mail service will refer to this
mess ag e as an “in pr e pa r a tion” messa ge.
To record and send a message:
1 From the main voi c e mail menu, press 2 to
record a message.
2 Record your message and press # to end the
message.
3 Press 9 at the prompt to indicate that you want
to send the message or press 5 for delivery
options.
4 Enter the mailbox number and/or group list
number(s). (A mailbox number is the 10-digit
Nextel PTN of a Nextel customer. The Nextel
custom er must b e in your local calling area. The
name of the recipient plays if it is recorded.)
5 Press # to send.
6 Press ** to return to the main menu.
Note: You can only send message s using this
method to N exte l cu stome rs in you r hom e
market.
Delivery Options
After you ha ve creat e d a mes sag e, yo u can ass ig n
the mess age to a category before you send it.
Below is a list of the optio ns that can be applied to
a message:
•Urgent — Recipient will hear this message
before other messages.
•Private — Recipient cannot copy the message
to another mailbox or phone number.
• Notification of Non-Delivery — You will be
notified if the recipient has not listened to your
message by a certain date and time.
• Future D elivery — You can specify a time and
date (up to three months in advance) for the
message to be delivered.
Note: All dates must have digits in the MM/DD
format (2 digits for the month and 2 digits
for the date). For example, January 2nd
would be 0102.
Important: Once a message has been sent for
future delivery, it cannot be retrieved or
deleted.
Page 78

70
Nextel® Voice Mail
To set a special delivery option:
1 After recording your message, but before
sendin g it, press 5 for delivery options.
2 Press the number that corresponds with the
desired delivery opti on:
• Press 1 for urgent.
• Press 2 for private.
• Press 3 for notification o f non-delivery. A t
prompt, specify time and date.
• Press 4 for future delivery of messages. At
prompt, specify time and date.
• Press 9 to send the message immediately.
3 The list of options will be presented again.
Select an additional option or press 9 to send
the message.
4 Enter the destination mailbox or group list
number of the recipient(s).
5 Press # to send.
6 Press ** to return to the main menu.
Working With Group Lists
This feat u re en ab le s you t o cr eat e a li st an d a ssi gn
it a unique name. Then, you can add mailbox
numbers, group lists, or individuals. Once you
create a list you can send a voice message to
everyone on the list by entering the group list
number. You can have up to 40 group lists. Each
list can hold up to 50 addresses.
To set up a group li s t:
1 From the main voi ce mail menu, press 4 to
access pe r s on al options.
2 Press 2 to access you r group lists.
3 Press 2 to create a group list.
4 Enter the 1- or 2-digit group list number and
press #.
5 Record a name for the list and press #.
6 Select group members by mailbox number,
group list, or name.
7 Press # to save all entries added to the list.
8 Press ** to return to the main menu.
To modify a group list:
1 From the main voi ce mail menu, press 4 to
access pe r s on al options.
2 Press 2 to access group lists.
Page 79

71
Advanced Voice Mail Feat ures
3 Press 4 to modify a group list. Enter the
number of the group list you want to modify.
4 Press 1 to add a new recipient.
5 Press # to save your changes.
6 Press ** to return to the main menu.
Deleting a group list:
1 From the main voi c e mail menu, press 4 to
access personal options.
2 Press 2 to access group lists.
3 Press 3 to delete a group list.
4 Enter the number of the group list you want to
delete. The system will play the name of the
group list.
5 Press # to delete the list.
6 Press ** to return to the main menu.
Message Forwar ding
Note: You can only forward messages to Nextel
customers in your home market.
This feature allows you to program your phone to
automatically forward incoming messages to
anothe r mailbox. There ar e two types of
forwarding: notified and silent. Notified forwarding
prompts the call er that the message will be
forwarded. Silent forwarding does not prompt th e
caller that the message will be forwarde d.
To modify forwarding options:
1 From the main voi ce mail menu, press 4 to
access pe r s on al options.
2 Press 5 to modify forwarding options.
3 Select the applicable option below:
• To create a forw arding number, press 2.
• If you have already created a forwarding
number, press 2 to modify the number.
• To enable or disable message forw arding,
press 3.
• T o change the forwarding type, press 2.
4 Press ** to return to the main menu.
Page 80

72
Nextel® Voice Mail
Nextel® Voice Mail Tree
Main Menu
Play
1
Messages
Record
2
Messages
Change
3
Greetings
Personal
4
Options
Retrieve
*3
Deleted Msgs
Unheard
11
Messages
Nextel
00
Customer
Care
Global
Commands
Previous
*
Menu
Main
**
Menu
Undelete
*3
Messages
Additional
0
Info (Help)
2
4
5
Personal
Options
Access
Group Lists
Personal
Preferences
Forwarding
Options
Personal
Preferences
Change
1
Password
Playback
2
Preferences
Name
3
1
2
3
4
5
7
8
9
8
Change
Greetings
Play Active
Greeting
Record Active
Greeting
Select Active
Greeting
Edit
Greetings
Skip Toggle
Delete Active
Greeting
Review
Schedule
Activate
Schedule
Messages
1
11
2
3
33
55
6
7
8
9
#
Play
Backup
Replay
Message
Pause/
Continue
Fast Forward
Forward to
End
Play Date
and Time
Forward
Message
Delete
Message
Reply to
Message
Save
Message
New Message/
Keep as New
Page 81

73
SMS and Two-Way Messages
SMS Messages
Short Me ss age S erv ice ( SMS ) mes sa ges are sh ort
text messages, also called text and numeric
messages. You can send SMS messages through
any email account or on next el.com.
Your phone receiv es SMS messages sent to its
SMS address, but does not send SMS messages.
Your phone's SMS address is your
PTN@page.nextel.com.
If your phone is powered off when you receive a
message, your phone notifies you the next time
you power it on. If you are out of your coverage
area, your phone alerts you when you return to
your coverage area.
Your ph on e a tte mp ts t o de li ver t hese mes sa ge s f or
up to 7 days.
Receiving a Messa ge
When you receive a text and numeric message,
New Text Me ssage appears on the display.
To view the message:
1 Press A under Read.
2 If the message fills more than one screen, scroll
to read it.
3 To keep the message, press O. -or-
To delete the message, scroll to the end of the
message, then press A under Delete.
To dismiss the message notification:
If the flip is closed, press .. -or-
If the flip is open, press A under Back or close
the flip.
This icon
you that yo u have a new mes s ag e.
w appears on the display, reminding
Reading from the Message Center
1 From the main menu, select Messages > SMS.
2 Select the message you want to read.
3 If the message fills more than one screen, scroll
to read it.
4 To keep the message, press O. -or-
To delete the message, scroll to the end of the
message, then pres s A under Delete
Page 82

74
SMS an d Two - Wa y Me ssages
Calling and Storing Numbers
If an SMS me ssage you receive contains a phone
numb er, yo u ca n ca ll that number by press in g s
while viewing the message.
If an SMS me ssage you receive contains a phone
number, Direct Connect number, or Talkgroup ID,
you can ca ll or send a call alert to that n umber, or
store that number to Contacts. Press m while
viewin g t he mes s ag e to ac cess thes e opt ions.
To call the number, select Call Back.
To send a call alert, select Alert, then press the
PTT butt on.
To store the number to Contacts, select Store
Number.
Two-Way Messages and Net Alerts
Two-Way messages can be sent and received
through any email account and on nextel.com.
Your phone sends and receives Two-Way
messages through Wirele s s Data Services .
Your phone 's Two- Way Messag ing ad dres s is your
PTN@messaging.nextel.com.
When you receive a T wo-Way message, you r
phone no tifies you with a N et alert. Each Net alert
lets you view the Two-Way message associated
with it.
Net ale rts ap pe ar i n t he me ssa ge ce nter . T wo- W ay
messages appear in the Wirless Data Services
browser.
Receiving a Messa ge
When you receive a T wo-Way message, a Net
alert notific ation appears on the display.
To view the message:
Press A under Goto.
This lets you read the message through Wireless
Data Services.
To dismis s the Net alert notification:
If the flip is closed, press .. -or-
If the flip is open, press A under Back or close
the flip.
This icon
you that yo u have a new mes s ag e.
w appears on the display, reminding
Page 83

75
Two-Way Messages and N et Alerts
Accessing Two-Way Messages
From Wireless Data Services
1 From the main menu, select Net > Text
Messaging > Read Messages > Messag e
Inbox.
2 Select the message you want to view.
From the Message Center
1 From the main menu, select Messages > Net
Alert.
2 Press O.
This takes you to your Message Inbox and lets
you read messages th rough Wireless Data
Services.
3 Select the message you want to view.
Deleting Net Alerts
When yo u de lete a Net alert, th e Tw o- W ay
message is not deleted, but it is no longer
accessible through the message center. You can
still access the message through Wireless Data
Services.
1 From the main menu, select Messages.
2 With Net Alert high lighted, pr e ss O.
3 Press A under Delete
4 Press A under Yes to confirm.
Sending Two-Way Messages
To send a Tw o-Way message from your phone:
1 From the main menu, select Net > Text
Messaging > Send Message.
2 If you are sending the mes sage to a new
address, select New Address. -or-
If you are sending the mess age to an address
you already sent a message to, select Sent
Address.
To send a message to a new address:
1 Enter the phone number or email address of the
person you are sending the message t o.
Note: Use t he ri g ht o pt ion ke y to sw it ch b et wee n
text entry modes .
2 Press A under Ok.
3 Select Compose New to compose and send a
new messa ge. -or-
Select Sent to send a previously sent message.
Scroll to th e sen t me ssa ge you w ant t o se nd an d
press A under Ok.
4 Press A under Send.
Page 84

76
SMS an d Two - Wa y Me ssages
To send a message to a sent address:
1 Scroll to the phone number or email address you
want t o se nd t he me ss ag e t o an d pr ess A und er
Ok.
2 Select Compose New to compose and send a
new messa ge. -or-
Select Sent to send a previou s ly sent message.
Scroll to th e sen t me ssa ge you w ant to send an d
press A under Ok.
3 Press A under Send.
Page 85

77
Wireless Data Services
You can use your phone’s Net feature to access a
suite of w ireless data products known as Wire less
Data Services. Services include Text Messaging,
Instant Messaging, Wireless Web, Address Book,
Mobile Email and more.
Most se rvices requ ir e the ac t i va tion of a rate pla n
with Wireless Data Services or the separate
purchase of a Wireless Data Services plan. To
order, call 1-800-NEXTEL6 or contact your Nextel
sales representative.
* Wireless Data Services is available in the continental U.S.,
Canada, Mexico, Brazil, Argentina, and Peru. Wireless Data
Services usage outside of the continental U.S. may incur
additional charges. See nextel.com for details.
Wireless Data Services
• Text Messaging Service — send and receive
messages when it is too loud to talk, too quiet, or
too private a conversation. You can send and
receive these messages from your phone,
through an email account, and from nextel.com.
• Web Service — access the wireless Internet
from your Nextel phone for information and
servic es from over 80 top wireless web sites.
Other services and features available include
access to any wirele ss I nte r n et ad dr e ss .
Condu c t topic and key w ord searches, and
bookmark sites and applications.
• Downl oads - personalize your phone with
downloadable ring tones, applications, games,
and wallpa pers.
• Address Book — program your Contac ts from
the Internet.
• Mobil e Email — ac cess personal and office
email accounts from your Nextel phone
(includes access to AOL
mail).
• Instant Messaging — send and receive instant
messages through a phone-based interface
(includes access to AOL
MSN Messenger®, and Yahoo! Messenger®).
®
, MSN®, and Yahoo!®
®
Instant Messenger™,
Page 86

78
Wireless Data Services
Accessing Wireless Data Services From Your Phone
You must first enable security, on your phone, to
receive Wireless Data Services. Enabling security
secures your data during over-the-air tr ansmission
to and from your phone. See “Enabling Security”
on page 8.
To acces s your office or corporate e-mail, address
book and other related services from your Nextel
phone, you will need to download the Desk
Assistant program to your office PC. If you have
an IT Admi nistrator, you may need to re view your
company 's polic y for desktop software and
deter m in e an y necessa r y tec h nical or security
requirements.
To access Wireless Data Services:
1 Press m to access the main menu and select
Net.
Your Wireless Data Services home page
displays.
2 Choose the service you want to access.
To access Text Messaging:
Select Text Messaging > Send Message.
To access the Web:
Select Web Sites, Downloads&Services, or
Search
To access Address Book:
Select Business Tools > Address Book
To access person al and office email accounts:
Select Email and IM > Email
To acces s Instant M essaging:
Select Email and IM > IM
To access Personalization catalogs:
Select Downloads
Many screens will require you to enter text. For
information on entering text, see “Entering Text” on
page 33.
Navi gat i on Ke ys
• Home — Press e to return to your home page.
Tip: Press e twice to return to your phone's idle
screen.
• Back — Press * to return to a previous screen.
Page 87

79
Tip: While navigating through Wireless Data
Services screens, a number may appear to
the left of the application or topic you want
to access . Pre ss the co rr espon di ng numb er
on the keypad for quicker access to that
application or topic.
When transmitting highly personal or sensitive
data, such as a credit card number, this iconE
appears, indicating that the data is encrypted
during transmission.
Note: You may be asked to (re)enable security
as Nextel adds new services or upon your
return to the U.S. after traveling.
Guides and Demos
Quick Start Guides and demos for Wireless Data
Services can be accessed on nextel.com.
Guides and De m o s
Page 88

80
Voice Records
A voice record is a recording you make with your
phone a nd can play back. You can record notes to
yourself or phone calls.
Your phone can store up to 20 voice records.
Creating Voice Records
To record a note to yourself:
1 From the main menu, select VoiceRecord >
[New VoiceRec] .
2 Say the message you want to record into the
microphone.
Tip: To stop recording before you are finished,
press A under Pause. To start recording
again, press A under Resume. To stop
recordi ng and discard the voice record at
any time, press A under Cancel.
3 When you are finished recording, press O.
To add to the end of voice record:
1 From the main menu, select VoiceRecord.
2 Scroll to the voice record you want to add to.
3 Press m.
4 Select Add To.
5 When you are finished recording, press O.
To recor d a phone call:
1 While on an active call, press m.
2 Select Record.
3 When you are finished recording, press O.
Note: Recor ding of phone calls is subject to
applicable laws regarding privacy and
recording of p hone conversations.
Playing Voice Records
1 From the main menu, select VoiceRecord.
2 Select the voic e record you w ant to play .
3 To stop the voic e rec or d whi l e it i s pl ayi n g, pr es s
O.
Tip: To fast forward, scroll right. T o rewind, scroll
left. To pause or resume, press any number
key.
Labeling Voice Records
When you c reate a voice rec ord, it is labeled with
the time and date it was recorded. You can then
rename it with a custom label.
1 From the main menu, select VoiceRecord.
2 Scroll to the voice record you want to label.
3 Press A under Label.
Page 89

81
Deleting Voice Records
4 Enter t he label you want to assign. See
“Entering Text” on page 33.
5 Press O.
Deleting Voice Records
To delete a voice record:
1 From the main menu, select VoiceRecord.
2 Scroll to the unlocked voice record you want to
delete.
3 Press m.
4 Select Delete.
5 Press O or A under Yes to confirm.
To delete all voice records:
1 From the main menu, select VoiceRecord.
2 Scroll to any voice record.
3 Press m.
4 Select Delete All.
5 Press O or A under Yes to confirm.
Locking Voice Records
When you lock a voice record , it cannot be deleted
until yo u un lo ck it.
1 From the main menu, select VoiceRecord.
2 Scro ll to the voice record you wan t to lock or
unlock.
3 Press m.
4 Select Lock to lock the message. -or-
Select Unlock to unlock the message.
When a voi ce rec or d is lo ck ed , th is ic on
next to it.
R appears
Managing Memory
To view th e amount of memory availab le for voice
records:
1 From the main menu, select VoiceRecord.
2 With [New VoiceRec] highligh ted, press A
under Memory. -or-
With any voice record highlighted, press m.
Select Memory.
To free more memory by deleting all unlocked
voice records:
1 From the voice records memory screen, press
A under Delete.
2 Press O or A under Yes to confirm.
Page 90

82
Voice R ecords
Note: Voice records are stored in your phone
using the same memory spac e used to
store messages, Java application data,
ring tones , and wallpaper images.
Deleting some of these other items frees
memory for voice records.
Page 91

83
Java Applications
Your phone arrives with Java applications loaded
and ready to install. You can download and instal l
more Java applications.
To down lo ad a nd i n stal l mo re Jav a ap pl ic ati on s, go
to nextel.com/d ownloads . You can also check the
Downloads menu opt ion on your phone for a
catalog of additional items available for purchase
and download.
Note: Using Java applications may cause your
phone to use up more battery power than
other use s of your phone.
Installing Applicatio ns
1 From the main menu, select Java Apps.
2 Select the application or suite of applications
you want to install.
Inst allation messages appear as the ap plication
installs.
3 If you want to create a shortcut to the Java
application on the main menu: Press A under
Next. Press A under Yes. Press O.
4 Press A under Done.
Running Applications
To run an application th at has a shortcut on the
main menu:
1 From the main menu, select the application or
suite of applications you want to run.
2 If you have selected a suite of applications,
select the application you want to run.
To run an ap pl ic at ion t ha t d oes no t ha ve a sho rtc ut
on the main menu:
1 From the main menu, select Java Apps.
2 Select the application or suite of applications
you want to run.
3 If you have selected a suite of applications,
select the application you want to run.
Tip: If you don’t hear the sounds associated with
the Java application, select Settings >
Volume and check the volumes of Java
Speaker an d Java Earpiece.
Suspending Applications
When you suspend an application, it does not stop
running. It goes to the background so that you can
run another application in the foreground.
To suspend an application:
Press e or close the flip.
Page 92

84
Java Applications
To view your suspended applications:
From the Java menu, select Suspended Apps.
You can have up to 3 applications running at one
time — 1 running in the foreground and 2 in the
background.
Resuming Applications
You can resume a suspended ap plication at any
time. This brings it to the foreground.
1 From the Java menu, select Suspended Apps.
2 Select the application you want to resume.
Ending Applications
To end an application:
1 From the main menu, select Java Apps.
2 If the application you want t o end is part of a
suite of applications, select the suite.
3 Scroll to the application you want to end.
Press A under End. -or-
If End is not one of your options: Press m. Select
End.
Tip: You can also end applications from the
Suspended Apps screen .
To end all applications:
1 From the main menu, select Java Apps.
2 Scroll to Suspended Apps.
3 Press m.
4 Select End All.
5 Press O or press A under Yes to conf ir m .
6 If you want to end all applications without letting
them exit, press A under EndNow.
Downloading Applications
If you want to run more Java applications, you can
download them into your phone.
Check the Downloads menu option on your phone
for a catalog of items available for purchase and
download.
You can a lso go to nextel.com/downloads for a
selection of Java applications and downloading
instructions.
Deleting Applications
To delete an application:
1 From the main menu, select Java Apps.
2 Scroll to the application you want to delete.
3 Press m.
Page 93

85
Managing Memory
4 Select Deinstall.
5 Press O or press A under Yes to co nf irm .
6 When your phone has finished deleting the
applic at ion , pr e ss A under Done.
To delete all Java applications:
1 From the main menu, select Java Apps.
2 Scroll to Java System.
3 Press m.
4 Select Delete All.
5 Press O or press A under Yes to co nf irm.
Managing Memory
To view th e amount of memory a vailable for Java
applications:
1 From the main menu, select Java Apps > Java
System.
2 Press A under Next.
3 To see more memory information, pr ess A
under Next again.
Deleting Java applications frees memory.
Note: Java application dat a is sto red in your
phone using the same memory space
used to store mess ages, voice records,
ring tones , and wallpaper images.
Deleting some of these other items frees
memory for Java applications.
Shortcuts on the Main Menu
When you install an application, you can create a
shortcut to the application on the main menu.
To create a shortcut to an application that is
already installed:
1 From the main menu, select Se tting s >
Personalize > Menu Options > Add/Remove
Apps. -or-
From the main menu: Press m. Select Main
Menu Setup > Add/Remove Apps.
2 Scroll to view the list of Java applications. Any
application that has a shortcut on the main menu
has a checkmark next to it.
3 Scroll to the application you want to create a
shortc ut for.
4 Press O.
5 Press A under Done.
Page 94

86
Java Applications
To remove a short cu t:
1 From the main menu, select Se tting s >
Personalize > Menu Options > Add/Remove
Apps. -or-
From the main menu: Press m. Select Main
Menu Setup > Add/Remove Apps.
2 Scroll to view the list of Java applications. Any
application that has a shortcut on the main menu
has a checkmark next to it.
3 Scroll to the application you want to remove the
shortcut for.
4 Press O.
5 Press A under Done.
Java Applications and GPS Enabled
Some Java applications can make use of your
phone’ s GPS f e atur e to d et e rmin e th e ap pro xim at e
geographical location of your phone. (See “GPS
Enabled” on page 89 for more information on the
GPS feat ure.) However, for privacy r easons, you
may not al ways want Java ap plications to access
the location of your phone. Your phone protects
your privacy by giving you the option to block all or
some Java applications from accessing the
location of your phone.
Setting Privacy for All Java Applications
These op tions c ontrol the privacy of all Ja va
applications on your phone:
• Restricted — No Java or similar software
applications may access the location of your
phone. However, location information may still
be available t o the phone’s owner, fleet
manager, or account a dministrator.
• Unrestricted — All Java applications may
access the location of you r phone, wit hout
notifying you.
• By Permi s si on — When a Java application
attempts to access the location of your phone,
you are prompted to give permission. However,
location information may still be available to the
phone’s owner, fleet manager, or account
administrator.
See “Setting Privacy Opt ions” on page 95 for
information on choosing these options.
Page 95

87
Java Applications and GPS Enabl ed
Gran t i ng or Denying Permission
If you choose By Permission, you must grant or
deny each Java application access to the location
of your phone when the applicatio n requests
access for the first time. You may be required to
grant or deny subsequent requests from the same
application, depending on the privacy s etting you
choose for the individual Java application (see
“Setting Privacy for E ach Java Applicatio n”).
When a Jav a application requests access to the
location of yo ur ph on e, a sc ree n a ppea r s in for mi ng
you.
To deny this request:
1 Press A under Deny. The application does not
access the location of your phone.
2 Select the denying option you want:
• Always — If the application requests access
to the location of your phone again, the
request is denied without notifying you.
• For this session — If the application
requests access to the location of your phone
again be fore you power off your phone, the
request is denied without notifying you.
• O n ly O nce — If the application requests
access to the loc ation of your phone again,
you are pro m pt e d to gr a nt or de ny
permission.
To grant this request:
1 Press A under Grant. The application accesses
your phone’s location.
2 Select the granting option you want:
•Always — If the application requests access
to the location of your phone again, the
request is granted without notifying you.
• For this session — If the appl ication
requests access to the location of your phone
again before you power off your phone, the
request is granted without notifying you.
• Only O nce — If the applic ation requests
access to the loc ation of your phone again,
you are pro m pt e d to gr a nt or deny
permission.
Setting Privacy for Each Java Application
After a given Java applic ation requests access to
the location of your phone for the first time, you
have the opportunity to set the GPS privacy option
for that Java application.
1 From the main menu, select Java Apps.
2 Scroll to the application or suite of applications
you want to set the privacy option for.
Page 96

88
Java Applications
If the application has requeste d access to the
location of your phone, this icon
when you hi ghlight the applicati on .
3 Press m.
4 Select Permissions.
5 Select the privacy option you want for this
application:
• Always — The application always has
permission to access the location of your
phone, without notifying you.
•Ask — When the application requests access
to the location of your phone, you are
prompted to grant or deny permission (see
“Granting or Denying Permission” on page
87).
• Never — When the application requests
access to the loc ation of your phone, the
request is denied without notifying you.
S appears
Page 97

89
GPS Enabled
Your phone’s GPS Enabled feature uses
information from Global Positioning System (GPS)
satellites orbiting the Earth to determine the
approximate geographical location of your phon e,
expres sed as latitude and longit ude. The
availability and accuracy of this location
information (and the amount of time that it takes to
calcul ate it) will va ry de pendin g on the enviro nment
in which you are using the GPS featu re. For
example , GPS location fixes are often difficult to
obtain indoors, in covered locat ions, between high
buildi ngs, or in ot he r si tu ati on s w here you have not
establ ished a clear bro ad view of the sky. SEE:
“IMPORTANT: Things to Keep in Mind”.
When you m ake a 911 emergency ca ll, the GPS
feature of your phone can help emergency
personnel locate you if your phone has adequate
access to GPS satel lite signals and yo ur
emergenc y res ponse center is eq uipp ed to pr oces s
such information.
You can also use the GPS feature to view your
approximate location. Location information
appears on the phone’s display.
Java appl ic at ions loade d on yo ur ph on e ca n also
request your location. If your phone is connected to
a laptop computer or similar device, software
running on that device can request your location.
To pro tec t your priva cy , yo u can contr ol whe th e r
these requests are gran ted.
IMPORTANT: Things to Keep in Mind
If you are using the G PS feature of your phone
while driving, please give full attention to driving
and to the road.
Where adequate signals from multiple satellites
are not av ailable (usually because yo ur GPS
antenn a cannot establish a view of a wide area of
open sky), the GPS feature of your phone WILL
NOT WORK. Such situations include but are
not limited to:
• In underground locations
• Inside of buildings, trains, or other covered
vehicles
• Under any other metal or concrete roof or
structure
• Between tall buildings or under dense
tree-cover
• Near a powerful radio or television tower
Page 98

90
GPS Enabled
• When your GPS antenna is covered (for
example, by your hand or other obje ct) or
facing the ground
• In temperature extremes outside the
operating limits of your phone
Walking or driving very slowly may also
substantially reduce GPS performance.
Even where location inf ormation can be
calculated in such si tuations, it may tak e much
longer to do so, and your location estimate may
not be as accurat e. Therefore, in any 911 call,
always report the location to the emergency
response center if you can and if you cannot,
remain on your phone for as long as the
emergency response center instructs you.
Even where adequate signals from multiple
satellites are available, your GPS fe ature will
only provide an approximate location, often
within 150 feet (45 meters) but sometimes
much further from your actual location. Advice
on how to improve GPS performance is
provided in “Enhancing GPS Performance” on
page 92.
While the GPS feature of yo ur phone can be a
valuable navigational aid, it does not replace the
need for careful navigating and good judgment.
Never rely solely on one device for navigation.
Remember that the accuracy of the location
information and the ti me needed to obtain it will
vary depending on circumstances, particularly the
ability to r ecei ve si gn al s fr om ad equa te nu mber s o f
satellites.
On emergency calls, your phone uses assistance
information from the phone network to impr ove the
speed and accuracy of your phone’s location
calculation: if such assistance information
becomes un avai la bl e, it m ay r educe t he spee d a nd
accuracy of the location calculation.
The satellites u sed by the GPS featur e of your
phone are controlled by the U.S. government and
are subj ec t to c han ge s imp leme nt ed in acc or dan ce
with the Department of Defense GPS us er po li cy
and the Federal Radionavigation Plan. These
changes may affect the performanc e of the GPS
feature of your phone.
Making an Emergency Call
Dial 911 to be connected to an emergency
response center. If you are on an active call, you
must en d it be f ore cal ling 911.
When yo u make an emerg ency 911 ca ll, th e GP S
featur e of your p ho ne be gi ns to se ek inf o rm ati on to
calcul ate your approximate location. It will take
the GPS feature of your phone some time to
determine your approximate location. Even
where yo ur phone has good access to sufficient
Page 99

91
Viewing Your Approximate Location
GPS satellite signals and n etwork assist data, it
may take 30 seconds or more to determine the
approxi mate lo cati on. Thi s time wil l incre ase wher e
there is reduced access to satellite signals. When
your approximate location is determined, it is made
available to the appropriate emergency re sponse
center.
In some cases, your local 911 emergency
response center may not be equipped to
receive GPS location information. Fo r this
reason, and because the GPS location information
reported is onl y approximate or may not be
available in yo ur locati on (see “IMPORTANT:
Things to Keep in Mind” on page 89), always
report your location to the 911 operator you
speak to wh en making an emerge ncy call, if able,
just as you would when using a phone without GPS
capabilities.
Note: If you are con ce rne d about whet he r you r
local 911 emergency response center is
equipped to receive GPS location
information, contact your local authorities.
In general, if your phone has access to signals
from more GPS satellites, your location will be
determined faster and more accurately than if your
phone ha s access to signals from fewer GPS
satellites.
If your phone does not have ade quate access to
GPS satellites signals, the location of the nearest
cell tower in contact with your ph one is
automatically ma de available to the emergency
response center, if the center has the capability to
receive such information.
See “Enhancing GPS Performance” on page 92
for information on how to help you r phone
determine your location.
Viewin g Your Approx i mat e
Location
1 From the main menu, select G PS > Position .
2 Scroll to view the entire screen.
This disp la ys the follo w in g inf orm a tio n ab ou t the
last time your location was calculated:
• The time (as Greenwich Mea n Time) and date
that the location was last calculated
• The approximate location, expressed as latitude
and long itu de
• The estimated accuracy of the calculated
location. This estimate of accuracy is only a very
rough estimate and may vary substanti ally from
the actual acc uracy of the approximate lo cation
info rmation reported.
Page 100

92
GPS Enabled
• The number of satellites used to calculate the
location. In general, more satellites make for
better accuracy.
To calculate your location again:
Press A under Rfrsh.
It may take your phone several minutes to
complete the process of determining your location.
During this time, a message usually appears on
your phone’s disp lay saying your phone is
scanning for satellites. For tips on getting the best
location calculation, see “Enha ncing GPS
Performance”.
The Position screen displays the updated
information.
To cancel a location calculation before it is
completed:
Press A under Cancel to return to the Position
screen. -or-
Press e to return to the idle screen.
Each time approximate location of your phone is
calculated, the latest location information is stor ed
in your phone and remains there even when your
phone is powered off. You will see this inf ormation
the next time you view the Position screen.
If you received a phone cal l or alert w hile
attempting to determine your location, the Position
screen will disappear, but your phone will continue
attempting to determine its location. If it is
successful, the n ew location information will be
displa yed the next time you view the Position
screen.
Enhancing GPS Performance
Sometimes the GPS feature of your phone may be
unable to compl ete a location cal c ulation
successfully. If this happens when you are making
an emergency call, the location o f the nearest cell
tower in contact with your phone is ma de available
to the appropriate emergency response center if
the center has the capability to receive such
information. If this happens when you are trying to
view your location on the phone’s display, you will
see a messa ge indicating that your phone cannot
access satellites.
 Loading...