

Page 1

Nextel
®
iDEN
Digital Multi-Service Data-Capable Phone
®
i80s Phone User’s Guide
@NTN9884A@
NTN9884-A
Page 2

091201
nextel.com
Page 3

Table of Contents
Introduction .......................................................................................... 1
Welcome to Nextel®.......................................................................................1
Customer Care.................................................................................................2
Ordering Information ......................................................................................3
Driving Safety Tips.........................................................................................3
Getting Started......................................................................................5
i80s Phone Features ........................................................................................6
i80s Phone Menu Tree ....................................................................................7
i80s Phone Icon Glossary................................................................................8
Battery.............................................................................................................9
Turning Your i80s Phone On/Off ................................................................11
Enabling Security ..........................................................................................12
Receiving Over-The-Air Programming.........................................................12
SIM Card.......................................................................................................13
Keypad Lock .................................................................................................20
Status of Your i80s Phone.............................................................................23
My Information .............................................................................................23
Using T9® Text Input ...................................................................................24
Display Essentials ............................................................................... 31
Display Screen...............................................................................................31
Status Icons....................................................................................................32
Text Display Area .........................................................................................34
Call Information Icons...................................................................................34
Menu Icon......................................................................................................34
Display Options.............................................................................................34
Navigating Menus and Lists..........................................................................35
Main Menu Options.......................................................................................36
Phonebook........................................................................................... 39
Phonebook Entries and Speed Dial Numbers................................................40
i
Page 4

Phonebook Icons ...........................................................................................40
Voice Names .................................................................................................41
Accessing Your Phonebook ..........................................................................41
About Phonebook Entries..............................................................................42
Sorting Phonebook Entries............................................................................43
Pause Digit Entry...........................................................................................51
Plus Dialing...................................................................................................52
Address Book................................................................................................52
Digital Cellular....................................................................................53
Making Phone Calls ......................................................................................54
Emergency Calling ........................................................................................59
Special Dialing Codes ...................................................................................59
Receiving a Phone Call.................................................................................60
Ending a Phone Call......................................................................................60
Recent Calls...................................................................................................61
Call Timers....................................................................................................64
Hands-Free Speakerphone.............................................................................65
Mute...............................................................................................................66
Call Waiting ..................................................................................................66
Call Hold .......................................................................................................68
Three-Way Calling ........................................................................................69
Call Forwarding.............................................................................................70
Caller ID........................................................................................................74
Alternate Line Service...................................................................................75
Call Restrictions ............................................................................................77
Nextel 411.....................................................................................................77
Nextel Voice Mail................................................................................ 79
Setting Up Your Voice Mail Box..................................................................79
Receiving Voice Mail Messages...................................................................80
Using Voice Mail ..........................................................................................81
Advanced Voice Mail Features .....................................................................86
Nextel Voice Mail Tree.................................................................................94
nextel.com
ii
Page 5

Messages.............................................................................................. 95
Message Center .............................................................................................95
Nextel Voice Mail.........................................................................................96
Text and Numeric Messaging........................................................................96
Nextel Two-Way Messaging.........................................................................99
Direct Connect .................................................................................. 101
Nextel Direct Connect®..............................................................................101
Private Call..................................................................................................102
Call Alerts....................................................................................................104
Group Call ...................................................................................................108
Datebook............................................................................................ 113
Datebook Icons............................................................................................114
Viewing Your Datebook .............................................................................114
About Datebook Events...............................................................................116
Adding New Events.....................................................................................117
Editing Events .............................................................................................121
Deleting Events ...........................................................................................122
Datebook Event Reminders.........................................................................122
Customizing Datebook Set Up....................................................................123
Memo .................................................................................................125
Adding a New Memo ..................................................................................125
Viewing a Memo.........................................................................................125
Editing a Memo ...........................................................................................126
Deleting a Memo.........................................................................................126
Voice Notes........................................................................................ 127
About Voice Notes......................................................................................127
Accessing Voice Notes................................................................................128
Recording a Voice Note ..............................................................................128
Playing a Voice Note...................................................................................129
Adding to a Voice Note...............................................................................129
iii
Page 6

Labeling a Voice Note.................................................................................129
Deleting Voice Notes ..................................................................................130
Locking/Unlocking a Voice Note................................................................131
Voice Notes Memory ..................................................................................131
Nextel Wireless Web.........................................................................133
Wireless Web Navigation Keys ..................................................................133
Starting the Microbrowser...........................................................................134
Using Your Phone as a Modem...................................................................135
Java Apps ..........................................................................................137
Accessing Java Apps...................................................................................137
Installing Java Apps ....................................................................................138
Running Java Apps......................................................................................138
Downloading Custom Applications ............................................................139
Deinstalling Java Apps................................................................................139
Java Apps Memory......................................................................................140
Customizing the i80s Phone.............................................................141
Settings........................................................................................................141
Styles ...........................................................................................................156
Shortcuts......................................................................................................161
Accessories......................................................................................... 165
Batteries.......................................................................................................165
Travel Chargers ...........................................................................................166
Universal Serial Bus (USB) ........................................................................168
Other Important Information ......................................................... 169
Nextel Customer Care .................................................................................169
Understanding Status Messages ..................................................................170
Nextel Terms and Conditions of Service ....................................................172
Safety and General Information ..................................................................178
RF Operational Characteristics ...................................................................178
Accessory Safety Information.....................................................................186
nextel.com
iv
Page 7

Limited Warranty Motorola Communication Products...............................189
Patent and Trademark Information..............................................................197
Index .................................................................................................. 199
IMPORTANT!
Read “Nextel Terms and Conditions of Service” on
page 172 and “Safety and General Information” on
page 178 beforeusing your i80s phone.
v
Page 8

vi
nextel.com
Page 9

Introduction
Welcome to Nextel
®
Thankyou for choosing Nextelas your wireless communicationsprovider.Your
i80s phone enables youto enjoy clear connectionsthrough Nextel’s All-Digital
National Network. In addition, with Nextel Worldwide
your i80s phone to roaminternationally in select cities using other iDEN
SM
Service, you can use
®
networks.
Nextel gives you more ways than anyone to communicate with everyone.
SM
Your i80s phone offersmany innovative features:
• Voice Activated Dialing –Youri80s phone offersstate-of-the-art Voice
Activated Dialing.
• Speakerphone — Youcan enjoyhands-free communication at the touch of
a button. And Speakerphoneis especiallygreat for conference calls.
• Phonebook– Your consolidated Phonebook holdsup to 250entries and
allows you to store multiple contact numbers for each person, offering you
various waysto communicate with yourbusinessand personal contacts.
• SIM Card – Yourphone’s SIM car d holds all ent ries stored i n your
Phonebook. In addition, you have a PIN (Personal I dentificationNumber)
to keep yourinformation safe and secure.
• Datebook– Schedule and keep track of appointments using your phone’s
Datebook feature.
• Messages – The Message Center allows you to manage and access your
Voice Mail, Text Messages and Two-Way Messagesall from the same
inbox.
• Nextel Direct Connect® – With Nextel Dir ect Connect, you can use your
phone as a digital two-way radio to communicate directly with business
and personal contacts at a fraction of the cost of cellular calls.
• Nextel Wireless Web – Usingthe Net feature with t he built-in
microbrowser, you canaccessNextel’s wireless Internet. It offers a suite of
Nextel wireless data pr oducts and Internet applications to quickly access
the information you needto get businessdone.
TM
• J2ME
– With the Java Apps feature,you can choose from the many Java
programs developed for Nextel. Download Java applications directly from
the Internet either over the air or using acable. You can select which
TM
applications will best help you get yourbusiness done.
Java
1
Page 10

• Customization – Use the Settings, Styles and Shortcuts features to
customize your i80s phone to meetyour individual needs. Personalizeyour
main menu order, designate unique ring st yles, create aset of behaviorsfor
your phone touse in certain situationssuch as meetings or in the car,and
more.
For more information on these and other features of the i80s phone, review this
User’s Gu ide.
Enjoy using your i80s phone!
Customer Care
For domestic customer care issues, including billing issues, general service
needs, or toorder additional services, contact Nextel Customer Care.
Visit nextel.com foravarietyofCustomerCareservices:
• Browse for information on phones, coverage, rates and other Nextel
services. View and download user's guides,try out our interactivevirtual
products and service demos, find answers to frequently asked questions,
order accessories,locate service and repair centers,upgrade phone
software, send a message and more.
• For self-service on your Nextel account, click on My Account to view
your account, pay your bill, add phones to youraccount, reset your Voice
Mail password, and m ore.
• For online assistance, click on Contact Us tosend us an email request. Our
representatives are committed to assisting you. Every effort will be made to
addressyour questions or concerns within 24 hours.Contact us to add
Wireless Web and other services, change rate plans, inquire on your bill,
and more.
Or, call us at 1-800-639-6111 or dial 611 fromyour Nextel phone.
To complement the i80s phone and NextelWorldwide Service, Nextel has also
launched International Roam ing Customer Care support. When traveling
outsideof the U.S.and Canada, call +1 (201) 531-5202 for yourCustomerCare
Serviceneeds. This Customer Care number will be toll-free from your Nextel
handset both domestically and internationally.
For more information about Nextel or to view thisguide on our Web site, visit
us on nextel.com.
International and domestic coverage, rates andother informationare also
available on nextel.com.
nextel.com
2
Page 11

Ordering Information
Ordering Information
NextelBusiness Networks®allowsyou to communicatewith individualsoutside
as well as inside your company. These Networks link Nextel customers in
similarindustries or geographies. So, if you need toreach a client,vendor, or
contractor instantly, work smar ter by joining the NextelBusiness Networks.
Call 1-888-NEXTEL2 (1-888-639-8352).
Various accessories are available for usewith your i80s phone, including a
LeatherCase, Vehicle Battery Charger, extra Batteries, a variety of Hands-Free
accessories, and more. To order accessories or anaccessoriescatalog, go to
nextel.com or cal l Nextel Nextday
SM
Accessories at 1-800-914-3240.You can
also contact your Nextel Aut horized Sales Representative or stopby any Nextel
Store. For informationon retail store locations, go to nextel.com.
Contact Nextel Customer Care to order any of the services discussed in this
guide, including Nextel Wireless Web, Nextel Direct Connect, Additional
Phone Services, Voice Mail, Nextel Mobile Messaging and much more!
For information on Direct Protect
SM
insurance protection for your i80s phone,
call 1-888-352-9182or contact yourNextel Authorized Representative.
Visit us atnextel.com to learn more aboutNextel products and services!
Driving Safety Tips
NOTE:For safety and legal reasons (in many countries), do not use
your phone while driving.
Check and follow the local laws r egarding the use of mobile
phones while driving.
Safety — Yourmost important call. The Wireless Industry reminds you to use
your phone safely when driving.
1. Get to know your wireless phone and its features such as speed dial
and redial.C arefully read your instruction manual and learn to take
advantage of valuabl e features most phones offer, including automatic
redial andmemory. Also, work to memorize the phone keypad so you can
use the speed dial function without taking your attention off the road.
2. When available, use a hands free device. A n umber of hands free
wireless phone accessories are readily available today. Whether you
choose an installed mounted device for your wireless phone or a speaker
phone accessory, take advantage of these devices if available to you.
3. Position your wireless phone within easy reach. Make sure you place
your wireless phone within easy reach and where you can grab it without
removing your eyes from the r oad. If you get an incoming call at an
inconvenient time, if possible, let your voice m ail answer it for you.
3
Page 12

4. Suspend conversations during ha zardous driving conditions or
situations. Let the person you are speaking with know you are driving; if
necessary, suspend the call in heavy traffic or hazardous weather
conditions. Rain, sleet, snow and ice can be hazardous, but so is heavy
traffic. As a driver, your first responsibility is topay attention to the road.
5. Do not tak e notes or l ook up phone numbers w hi le driving. If you are
reading an address book or bu siness card or writing a “to do” list while
driving a car,t hen you are notwatching w here you are goi ng. It's common
sense. Don't get caught in a dangerous situation because you are reading
or writing and not paying attention t o the road or nearby vehicles.
6. Dial sensibly and assess the traffic. If possible, place calls when y ou
are notmoving or before pulling into traffic. Try to plan your calls
before you begin your trip or attempt to coincide your calls with times
you may bestopped ata stopsign, red light or otherwise stationary.But if
you need to dial while driving, follow this simple tip — dial only afew
numbers, check the road and your mirrors, then cont inue.
7. Do not engage in stressful or emotional conversations that m ay be
distracting. St ressful or emotional conversations and driving do not mix
— they are distracting and even dangerous when you are behind the
wheel of a car. Make people you are talking with aware you are driving
and ifnecessary, suspend conversations which have the potential to divert
your attention from the road.
8. Use your wireless phone to call for help.Your wireless phone is one of
the greatest tools you can own to protect yourself and your family in
dangerous situations — with your phone at your side, help is only three
numbers away. Dial 9-1-1 or other local emergencynumber in the case of
fire, traffic accident, roadhazard o r medicalemergencies. Remember, it is
a free call on your wireless phone!
9. Use your wireless phone to help others in emergencies. Your wireless
phone provides you a perfect opp ortun ity to be a “Good Samaritan” in
your community. If you see an auto accident, crime in progress or other
serious emergency where lives are in danger, call 9-1-1 or other local
emergency number, as you would want others to do for you.
10.Call roadside assistance or a speci al wireless non-
emergency assistance number when necessary.
Certain situations you encounter while driving may
require attention but are not urgent enough to merit a
call for emergencyservices. But you still can use your
wireless phone t o lend a hand. If you see a brokendown vehicle posing no serious hazard, a broken
traffic signal, a minor traffic accidentwhere no one
appears to be injured or avehicle you know to be
stolen, call roadside assistance or other special nonemergency wireless numbers.
nextel.com
4
Page 13

Getting Started
This section will help youget started using yourphone. It containsdetails about
some of the features and functions described in the Getting Started Guide.
This section includes:
i80s PhoneFeatures Page 6
i80s Phone Menu Tree Page 7
i 80s Phone Icon Glossary Page 8
Battery Page 9
Turning Your i80s PhoneOn/Off Page11
Enabling Security Page 12
ReceivingOver-the-Air Programming Page 12
SIM Card Page 13
Keypad Lock Page 20
Statusof Your i80s Phone Page 23
My Information Page 23
Using T9®Text Input
Page 24
5
Page 14
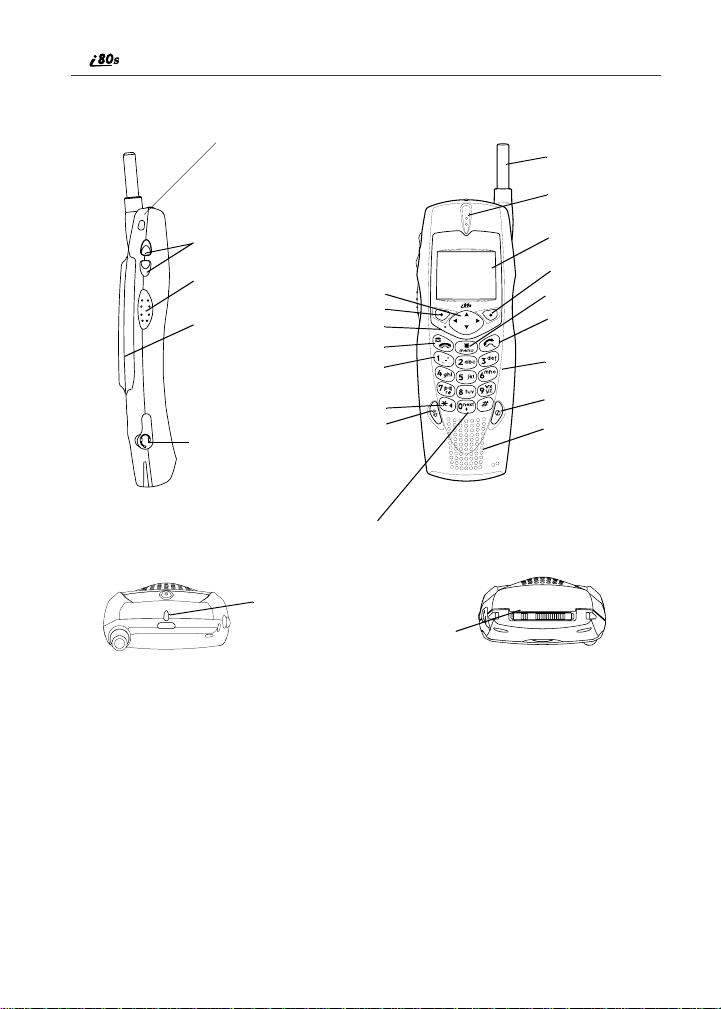
i80s
Phone Features
SIDE VIEW
TOP VIEW
Lanyard Hook
Volume Keys
Nextel Direct Connect®
Push-To-Talk (PTT)Button
Battery
Headset Jack
4-Way Navigation Key
Option Key*
Photosensor
End/Home Key
Punctuation Key
Back/Pause Dialing Key
SpeakerKey
Next Word/International
Plus Dialing Key
StatusLight
Accessory and Data
Cable Connector
* Throughout this User’s Guide, the option keys
C and D will be representedby A.
FRONT VIEW
Antenna
Earpiece
Display
Option Key*
Menu Key
Send Key
AlphaNumeric
Keypad
Power On/Off
Microphone
BOTTOM VIEW
nextel.com
6
Page 15

i80s
In Call Setup
Security
Personalize
Initial Setup
Voice Volume
Tkgrp Settings
Service Status
Entries (If Any)
Menu
P
New
Capacity
Sort By
New
Edit
View
Delete Record
Delete Number
Capacity
Sort By
All Calls
Detailed
Main Menu Item
Call Forward
;
Shortcuts (If Any)
[New Entry]
Shortcuts
n
Menu
P
Main Menu Item
New
Edit
Reorder
Delete
Delete All
DEINSTALL
Menu
P
Reset System
Format System
Java System
Go to Today
New
Setup
Menu
P
Week View
Main Menu Item
Datebook
H
Voice Mail
Text Msgs
Net Mail
Menu
P
Main Menu Item
Messages
U
Delete All
Memory Meter
Main Menu Item
Call Timers
z
Last Call
Phone Reset
Phone Lifetime
Prvt/Grp Reset
Prvt/Grp LifeTime
Circuit Reset
Circuit LifeTime
Kbytes Reset
Received Call Alerts
(If Any)
Main Menu Item
Menu
P
Call Alert
E
View
Store
Delete
Delete All
Sort By
Recent Calls
Recent Calls (If Any)
Menu
P
Recent Calls
j
Main Menu Item
View
Delete
Delete All
My Info
U
Main Menu Item
Name
Prvt ID
Line 1
Line 2
Carrier IP
IP1 Address
IP2 Address
Ckt
Main Menu Item
Memo
R
CANCEL STORE
(DELETE)
Phone Menu Tree
You can access the main menu options by pressingmorQfrom the idle screen. UseNto navigate through the
menus and submenus. Press
A
under the display option to perform the desired phone function.
7
Main Menu Item
7
Net
Your home page displays.
Store
Call Alert Queue
VoiceNotes
P
Menu
ABOUT
Main Menu Item
F
Java Apps
Applications (If Any)
DownloadApps
Main Menu Item
m
Apps
Ring Vibe
Phone Setup
To
If Busy
If No Answer
If Unreachable
Settings
P
Menu
New
Delete All
MenuP
New
Memory
Main Menu Item
v
Styles
[New Style]
Off
Styles (If Any)
P
Menu
View
Change
Edit
New
Delete
Delete All
Main Menu Item
(
V
oiceNotes
[
New VoiceNote]
VoiceNotes (If
MenuP
New
Lock/Unlock
Add To
Memory
Delete
Delete All
Label
Main Menu Item
b
MenuP
Any)
Phonebook
[
New Entry]
i80s Phone Menu Tree
Page 16
i80s
Fax
A
Navigation
d
g
Menu
P
2
Line and Call Info Info
0
1
G
E
X
Mobile
T
Main
N
h
Work
+
Home
C
%
Other
W
Status
s
Z
Y
%
c
i
Locked
M
On Hold
Main Menu
Net
j
F
Phonebook
b
Settings
m
Datebook
=
Shortcuts
n
;
z
My Info
U
Memo
O
Miscellaneous
:
k
>
S
T9
#
$
T9 Alpha
w
Q
{
*
-
[
\
y
K
End Call
?
]
<
Phonebook
Pager
a
Connected
6
D
u
R
Messages
R
R
Bullet
8
T9 Numeric
,
T9
Symbols
!
x
e
f
Phone Icon Glossary
You may see these icons whileusing your i80s phone:
Word
Net Mail
Voice Mail
7
Text Message
Java Apps
Message Read
VoiceNotes
(
Call Forward
T9 Caps Lock
T9 Uppercase
Call Timers
Secure Data
Recent Calls
Check Mark
Datebook Alarm
Recurring Appt
Styles
Call Alert
v
Private In Use
Missed Call
Talkgroup In Use
Vibrate All
Talkgroup ID
Speaker Off
Silent On
Vibrate On
Vibrate Then Ring
IP
Voice Name
)
|
Mobile IP
Packet Data
Signal Strength
Battery Strength
The icon of the mainmenu feature in usedisplays in thetop left of the status
icon rows. For a lis t of the main menu options, see “MainMenu Options” on
page 36.
Line 1 Active
Line 2 Active
Line 1 Forward
Private ID
Picker Up
Picker Left
Picker Down
Phone In Use
Packet Activity
Incoming Call
Outgoing Call
Line 2 Forward
Picker Right
Up Down Arrows
nextel.com
8
Page 17
Battery
Battery
Your i80s phone comes with aLithium Ion battery and charger. After attaching
the battery, you must charge it before you use it for the first time. See
“Batteries” on page 165for the appropriate charging times for your phone’s
battery.A fter theinitial charging, the battery can becharged more quickly.
Remove the battery from the protective plastic safety tray provided in the
original packaging. When the battery is not attached to the phone, store it in the
original tray.
NOTE:The battery and cover are one piece.
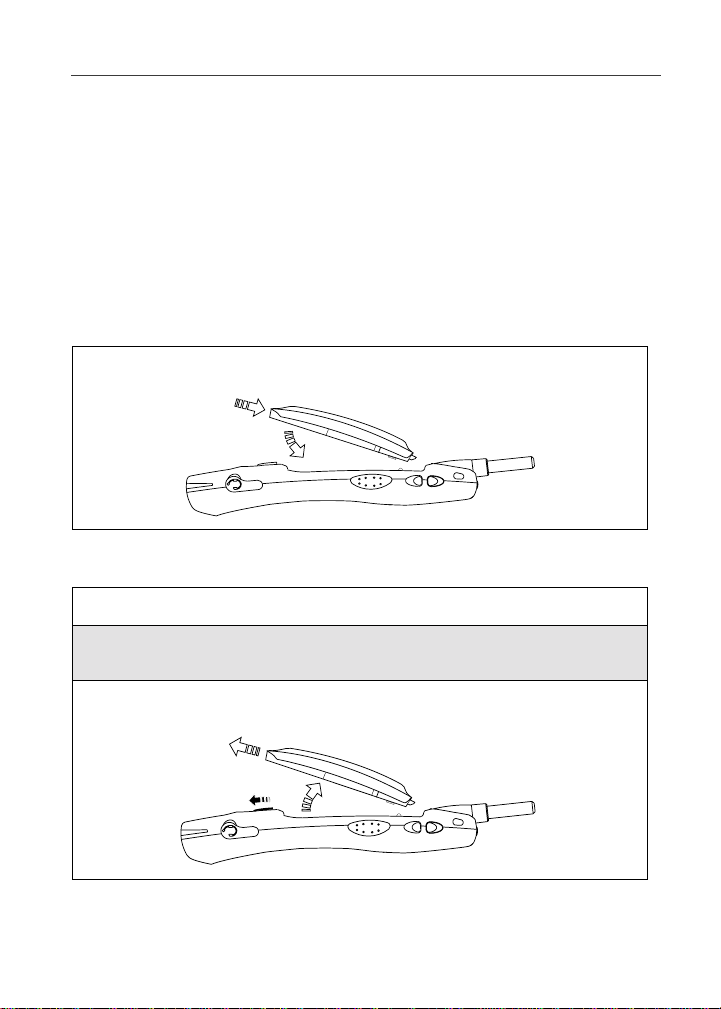
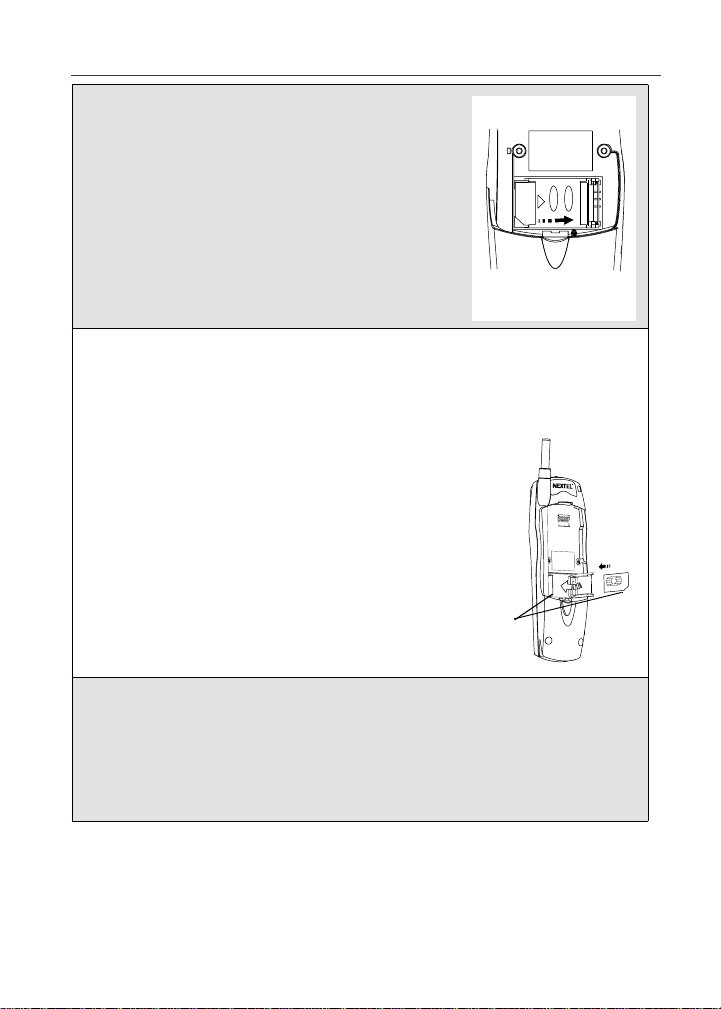
Attaching the Battery
Insert the top of the battery into the battery area. Press down on the
bottom of thebattery to secure it. Push forward until you hear a click.
Detaching the Battery
1
Ensure the phone is poweredoff before attempting to detach thebattery.
2
Press the battery release button and slide the battery away from the
antenna.
3
Remove the battery by pushing the battery toward the antenna and
liftingit out of the phone.
9
Page 18
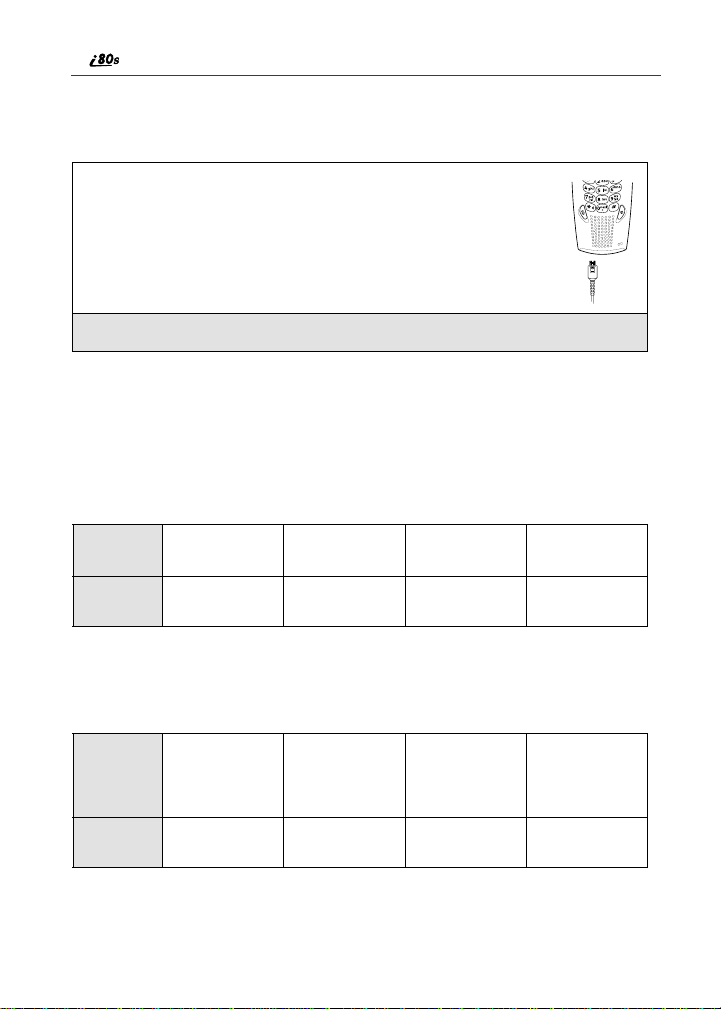
Charging the Battery
NOTE:The battery can be charged with the phone either turned on or
off. For best results, charge it with the phone turned off.
1
With your phone’s keypad faci ng up, plug thecharger’s
accessory connector into the left sideof the accessory
connectoron the bottom of the phone.
2
Plug the charger into an electricaloutlet.
NOTE:Your phone’s screen backlight will remain lit while the battery is
charging.
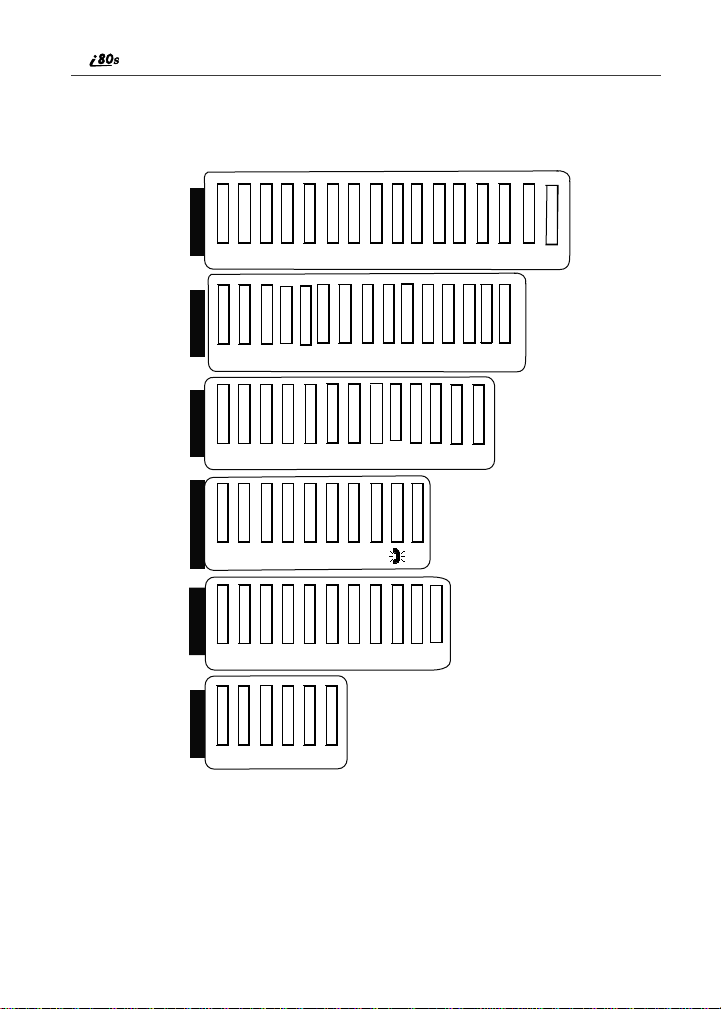
Battery Charging Status
The battery strength indicator icon foundon your phone’s displayscreen shows
thechargeamountremaininginthebattery.
When Using Phone
Icon
Display
Battery
Strength
NOTE:A short, chirp-like sound indicates a low battery. The icon
abcd
Low
Battery
flashes to indicate that you have approximately five minutes of
talk time remaining.
11% to
40%
41% to
70%
When Charging Battery
Icon
Display
Battery
Strength
efgh
1flashingbar 1flashingbar,
Low
Battery
1 continuous bar
31% to
60%
nextel.com
1 flashing bar,
2 continuous bars
61% to
90%
10
Fully
Charged
3 continuous bars
Fully
Charged
Page 19

Turning Your i80s Phone On/Off
Turning Youri80sPhone On/Off
NOTE:To register for the first time on the Nextel National Network, you
must turn on youri80sphone in your local calling area.
To power the phone on:
1
For optimal signal strength, extend the antenna.
2
Press and holdp near the bottom of the phone until the statuslight
glows red, a tone briefly sounds, and Powering Ondisplays.
3
If you have enabled your SIM PIN security feature (see “Enabling/
Disabling the PIN SecurityFeature” on page13), the Enter SIM PIN
Code screen displays.Enter your SIM PIN (see “Entering the PIN” on
page 15).
Press C under OK.
4
As your phone connects to the Nextel
National Network, you willsee Welcome
To Nextel and a connecting message.
When the idl e screen appears on the
display as shown here, you are ready to
use your i80s phone!
O
If your display reads No Service or doesn’t change to the idle screen when you
turn on yourphone, and you know you are in a Nextel coverage area, cont act
Nextel Customer Care. For details on Nextel coverage areas, go tonextel.com.
To power the phone off:
1
Press and holdp nearthe bottom of the phone until a tone briefly
sounds and Poweri ng Off displays.
2
Push down the antenna.
11
Page 20
Enabling Security
The first time you power on your phone (or within 20 days of first activation of
your phone), you must enable security.
1
Turn your phone on (see “Turning Your i80s PhoneOn/Off” on page
11).
2
From the idle screen, press m.
3
Press S to scroll to Net.
4
Press B under SELECT. A series of screens displays.
5
You are prompted to enable security. Press B underYes.Ifyou
subscribeto a NextelOnline
6
Press s to return to the idle screen.
SM
ServicePlan, your home page displays.
Receiving Over-The-Air Programming
If you have been set up toreceiveover-the-airprogramming OARSS, you will
receiveyour Private ID and Talkgroup lists for Direct Connect use, your
Personal Telephone Number and the Nextel Customer Care numbervia a Net
Mail message.
In order toreceive your programming,you must enable security (see “Enabling
Security” on page 12). Within 24 hours of enabling security,you will receivea
Net Mail message containingyour lists. To accept your phoneprogramming:
1
You will receive a Net Mail alert with the message New Browser
Message - Receive Programming Inf o.
2
Press B under GOTO.
3
You are prompted to accept changes to yourphone's lists. Press B
under OK.
4
A confirmation scre en displays. Press B under OK.
nextel.com
12
Page 21

SIM Card
5
You are prompted again to accept changes to your phone's lists. Press
B under OK.
6
A confirmation scre en displays. Press B under OK.
7
Press s to return to the idle screen.
SIM Card
Your phone comes with a built-in level ofsecurity protection through the use of
the SIM (Subscriber Identity Module) card. The SIM card stores all your
Phonebook informationand your Nextelaccount identification information.
Since this informationis stored on the SIM card, not in your phone itself, you
can remove theinformation by removing the SIM card.
The SIM card is located in the SIM Card Holder on the backof the phone,
underneath the battery. You can verify the SIMcard is in place by removingthe
batteryand viewing the SIM card through the SIMcard cover.
See “Removing/Inserting the SIM Card”on page 18for informationon locating
the SIM card. If there is no SIM card inyour phone, notify your Nextel
Authorized Representative.
NOTE:Exceptfor making emergency calls, your phonewill not
functionwithout theSIM card.
SIM Card Personal Iden tificati on N umber (PIN)
To prevent unauthorized use ofyour account, you canprotect your SIM cardby
enabling the SIM PIN security feature. With theSIM PIN enabled, you must
enter your PIN each time the phone is powered on. Youcan change or disable
your PIN if desired.
NOTE:It isrecommended that you enable the SIM PIN security feature
to prevent fraudulent use of the SIM card.
Enabling/Disabling the PIN Security Feature
When the PINsecurityfeature is enabled, you areprompted to enter your PIN
each time youturn on your phone. Until a valid PIN is entered, you can use the
phone only tomake emergency calls.
Afterthe PIN i s accepted, the phone registerson the network and the idle screen
displays.
13
Page 22

When the PINsecurityfeature is disabled,the phone can be used without
C
entering a PIN.
It is recommended that you enable the PIN
security feature to protect personal data on
your SIM card. This prevents anyone from
!
C a u t i o n
1
From the idlescreen, press m and then
press
S to scroll to Settings.
using your phone and accessing your
personal data.
B
2
Press B under SELECT. The Settings screen displays.
3
Press R to scroll to Security.PressB
under SELECT to access the Security
screen.
4
At the Security screen, press R to scroll toSIM PIN.PressB under
SELECT to access the SIM PIN screen.
14
nextel.com
Page 23
SIM Card
5
Press R to scroll to Onor Off. On enables the SIM PIN security
feature; Offdisablesthe SIM PIN security feature. Press
SELECT.
6
At theVerifySIM PINCode screen, enter the current SIM PIN and
B under OK.
press
NOTE:Your defaultSIM card PIN is 0000.
Once you have enabled the SIM PIN security feature, it is recommended that
you change yourPIN to a number known only to you(see “Changing the PIN”
on page 16).
Entering the PIN
Incorrectly entering your PINthree times
causes the SIM card to be blocked. To
unblock your SIM car d, you must c ontact
!
C a u t i o n
1
From the Enter SIM PIN Codescreen,
enter your four- to eight-digit PIN. An
asteriskappears for each character
entered. The default SIM PIN is 0000.
Nextel Customer Care. For more
information, see “Unb locking the PIN” on
page 17.
B under
NOTE:Other than emergency dialing,
you will be unable to use any of
the phone functions, including
receiving phone calls, until you
enter the PIN.
2
Press B under OK.
P
15
Page 24

If you enter an incorrect PIN,the message SIM PIN incorrect: Try again
appearson your phone’s screen. Aft er three cons ecutive incorrect attempts, the
SIM card is blocked. Once blocked, the phone will not allow you toenter your
PIN again, even after powering the phone off and back on. Ifthis happens, see
“Unblocking the PIN” on page 17.
Changing the PIN
NOTE:In order to change the PIN, the SIM PIN security feature must be
set to On. See “Enabling/Disabling the PIN Security Feature” on
page 13.
1
From the idlescreen, press m and then
press
R to scroll to Settings.
B
2
Press B under SELECT. The Settings screen displays.
3
Press R to scroll to Security.PressB
under SELECT to access the Security
screen.
C
4
At the Security screen,pressR to scrollto New Passwords.PressB
under SELECT to access the NewPasswords screen.
5
At theNew Passwordsscreen, press R to scroll to SIM PIN and
press
B under SELECT.
nextel.com
16
Page 25
SIM Card
6
At theEnt er Old SIM PIN Code screen, enter the current SIM PIN
and press
NOTE:The default SIM PIN is 0000.
7
At the Enter New SIMPIN Code screen, enter a new 4- to 8-digit SIM
PIN and press
8
At the Re-enter New SIMPIN Code screen, re-enter the new SIM PIN
to confirm, and press
B under OK.
B under OK.
B under OK.
Unblocking the PIN
If you forgetyour PIN and unsuccessfully enter it three times, access to your
phone will be blocked.
NOTE:Before you begin, obtain the PIN Unblocking Key (PUK) code
from Nextel Customer Care, then read and understand the PIN
unblocking sequence. When entering the key press sequence,
each key press must occur within 5 seconds of the prior key
press.
If you unsuccessfully enter the PUK code
ten times, the SIM card is permanently
blocked and must be replaced. If this
!
C a u t i o n
happens, all data will belost. You will get a
message to contact your service provider.
Contact Nextel Customer Care for
assistance. If the SIM card is blocked, the
i80s phone only allows outgoingEmergency
calls.
To unblock the PIN:
1
Press **05e.
2
Enter the 8-digit PUK code.
3
Press e.
17
Page 26
4
Enter a new 4- to 8-digit SIM PIN and press e.
5
Re-enter your SIM PIN and presse.
If you entered the codes properly, the SIM Unlocked screen displays.
Removing/Inserting the SIM Card
If you remove your SIM card and insert
another SIM card into your phone, the
following information is erased when you
!
C a u t i o n
!
C a u t i o n
use the phone withthe new SIM card:
• Datebook events
• Recent Calls list
• Voice Notes
• Voicenames for Phonebookentries and
Shortcuts
• Call Forwarding settings
• Call filtering settings in Styles
• Net Mail alerts
• InformationstoredinMemo
All Phonebook information will remain
stored on your original SIM card.
Do not touch the gold-coloredareas ofthe
SIM card.
To avoid loss or damage, do not remove
your SIM c ard fromyour phone unless
absolutely necessary.
1
With phone powered off, remove the battery. See “Detaching the
Battery” on page 9.
nextel.com
18
Page 27
2
With the back of the phone exposed and facing
up, locate the SIM cover and gently push it to
the right. Lift the cover up.
3
To insert the SIM card, very carefully place it in its holder with the gold
contactside facing down.
NOTE:The cut angled corner on the SIM card should be facing the
cut corner of the receptacle.
To close the SIM card cover, push it down
and slide it to the left until it clicks into
place.
Cut Angled
Corners
SIM Card
4
To remove the SIM card, slide the SIM card cover to the right and lift
up(asinstep2).Very carefully lift the SIM out of its holder. Do not
touch the gold-colored areas of the SIM card.
NOTE: Protect the SIM card as you would any delicate object. When
the SIM card is not in the phone, you should store it in
something protective, such as a mailing envelope.
19
Page 28

Keypad Lock
The i80s phone includes a Keypad Lock featurethat enables you to quickly lock
the phone’s keypad to avoid inadvertently pressing keysor placing calls. Once
Keypad Lock is activated, youcan only perform the followingtasks:
• receive incoming calls, messages, and alerts
• turn your phone onand off
• unlockthe keypad
NOTE:Emergency calls cannot be placed while Keypad Lock is
activated.
Beforelockingyour phone’s keypad, you maywant to read this entire sectionto
learnhowtorespondtoincomingcalls,messages,andalerts.
Activating Keypad Lock
From the idle screen, press
message Keypad Locked displayson your
phone.
m*.The
D
Whenevera key ispressed while in Keypad Lock mode,the unlock instructions
display briefly.
Receiving Incoming Calls
When you receive an incoming phone call (see“Receiving a Phone Call” on
page 60), Keypad Lock is temporarily disabled.
Press
B under YESor press e to answerthe call. When you end the
call, the Recent Calls list appears. Press
reactivate Keypad Lock andreturn to the idl e screen.
Or,
A underNOorpresss to send the call to Voice Mail and
Press
reactivate Keypad Lock.
nextel.com
20
s or press A under EXIT to
Page 29

Keypad Lock
Receiving Nextel Direct Connect Calls
When you receive an incoming Private Call, Group Call, or Call Alert (see
“Direct Connect” on page 101), Keypad Lock is temporarily disabled.
1
Press and hol d thePush-To-Talk(PTT) button onthe sideof the phone.
Begin talking after the phone emits a chirpingsound. Release t he PTT
buttonto listen.
2
When you end the call, the Recent Calls list appears. Press s or press
A under EXIT to reactivate Keypad Lock and return to theidle screen.
Receiving New Voice Mail
When you receive new Voice Mail (see “Nextel Voice Mail” on page79),
Keypad Lock is temporarilydisabled.
WhenNew VoiceMail Message displays, press
return to the idle screen andreactivate Keypad Lock.
Or,
B under CALL to access Voice Mail. Once you have finished,
Press
press
s to exit Voice Mail. The Recent Calls list displays. Press s or
press
A under EXIT to reactivate Keypad Lock and return to the idle
screen.
A under EXITto
Receiving New Text Messages
When you receive new Text Messages (see “Text and Numeric Messaging” on
page 96), Keypad Lock is temporarily disabled.
WhenNew Text Message displays, press
the i dle screen and reactivate Keypad Lock.
Or,
B under READ t o read the message. Press B under SAVE or
Press
DELETE. Once you have finished, press
reactivate Keypad Lock andreturn to the idl e screen.
A under EXIT to return to
s orpressA under EXIT to
21
Page 30

Receiving New Net Mail
When you receive new Net Mail (see “Two-WayMessaging” in the Nextel
Wireless Web User’s Guide for more information),Keypad Lock is temporarily
disabled.
When NewBrowser Message displays, press A under EXIT to return
to the idle screen and reactivate Keypad Lock.
Or,
B under GOTO. Press A under View. Press A under OK or
Press
Reply. Once you have finished, press
Lock and return to the idle screen.
Deactivating Keypad Lock
s until you reactivateKeypad
From the idle s creen, press
message KeypadUnlockeddisplays
briefly.
22
m*.The
E
nextel.com
Page 31

Status of Your i 80s Phone
Status of Your i80s Phone
Your i80s phone has a status light that displays on the top of the phone. The
statuslight indicates the statusof your connection.
Status Light
Indicator
Solid Red Signing on to the network. Please wait.
Flashing Red No service or outof coveragearea.
Flashing
Green
Solid Green In use.
i80s Phone Status
If you are in a coverage area, keep your phone
on and it will attempt to connect tothe network
every two minutes. If thephone does not
connect after 15 minutes or more, contact
Nextel Customer Care.
Inservice/Readytouse.
NOTE:Nextel Direct Connect is only
available in your home calling area.
My Information
You can select My Info from themain menu to display or edit the following:
• Name — enter your name in this field.
• PrivateID — your Private ID is displayed in this field. YourPrivate ID is
your Nextel Direct Connect numberand is composedof three parts: Area
ID * NetworkID * Member ID. For example:999*999*9999.
NOTE:The asterisks are part of the Private ID.
• Phone Numbersof Lines 1 and 2 —your phone’snumbers are displayedin
thesefields.Your phone number is automaticallyenteredwhen you receive
your first phonecall.
• IP Addresses — these fields display the IP addresses you use toaccess the
Internetwith your phone.
• Circuit Data Number (Ckt) — you can enteryour circuit data number in
this field.
23
Page 32

Viewing/Editing My Information
1
From the idlescreen, press m.
2
Press S to scroll to MyInfo.PressB under SELECT. TheMy
Information screen displays.
3
Use S to scroll through the fields.
4
Toedit the displayed information, press B under CHANGE. Edit
information as desired, and press
B under OKto save the changes.
To return to the idle screen, press
A under EXIT.
Using T 9®Text Input
Your i80s phone has embedded software, called T9®Text Input, that makes
typing on a phone keypad much liketyping on a computer keyboard: it
eliminates the traditional “multi-tap” method oftext entry. Asyou type, you
pressonly one key perletter. T9 Text Input matches your keystrokesto wordsin
its linguistic database of approxi mately 60, 000 wordsand proper names. You
may also store additionalwords you frequently use in your own user database,
which is incor porated into the T9 database.
T9 Text Input is available when you are typing t ext intoyour phone (for
example,in the Phonebook or Datebook)and while using Nextel Wireless Web
services.
T9 Text Input Entry Modes
Four text entry modes are available in T9 Text Input: Alpha, Word, Symbols,
and Numeric. When you are using T9 Text Input, an icon in the top right corner
of your phone’sdisplay screen (next to the battery strength indicator icon)
indicates t he T9 Text Inputentry mode you are using:
Icon* T9 Entry Mode
Name
w Alpha Standard “multi-tap” keypad
nextel.com
24
Used For...
text entry.
Page 33

Using T9®Text Input
# Word Entering words and
punctuation with one keypress per character.
! Symbols Entering punctuation and
symbols such as “@” or “?”.
, Numeric Entering keypad numbers.
* T9 icons do not display while you areusing Next el Wireless Web services.
Choosing a Text Entry Mode on Wireless Web
When you are using Nextel Wireless Web services, T9 Text Input becomes
available whenever you access a screen that requiresyou to enter text. The right
displayoption on your the phone’s screen indicates your current T9 Text Input
text entry mode:
• ALPHA andalpha for Alpha mode
• WORD or word for Word mode
• SYM1, SYM2,SYM3,orSYM4 for Symbols mode
• NUM forNumeric mode
To change text entry modes, pressthe
until the desired mode displays.
NOTE:The rest of the instructions for using T9 Text Input apply only to
entering text in ap plications other than Nextel Wireless Web
applications (for example, Phonebook or Datebook). See the
Nextel Wireless Web User’s Guide for instructions on using T9
Text Input for Nextel Wireless Web services.
B under the current textentry mode
Choosing a Text Entry Mode
You can select your text entry mode from a menu available whenever the phone
is displaying a screen that requires you to enter text (for example, the Name
screen or Titlescreen).
25
Page 34

To choose a text entry mode:
1
From any screen that requires textinput, press m to access the Entry
Method menu.
A check mark appears next tothe current text entry mode.When you
access a screen that requires text input, the default text entry mode is
Alpha.
2
Press S to scroll to the desired text entry mode.
3
Press B under SELECT.
The phone returns to the text entryscreen. An icon displays indicating
theactivetextentrymode.
Choosing a Language
To change the language of the T9 TextInput database:
1
From any screen that requires textinput, press m to access the Entry
Method menu.
2
Press S to scroll to Languages.
3
Press B under SELECT.
4
Press S to scroll to the language you want T9 Text Input to use.
5
Press B under SELECT.
NOTE:This feature is not available when using T9 Text Input with
Nextel Wireless Web services.
Using Alpha Mode
To enter text(letters and numbers) while in Alpha text entry mode:
• Press any key on the alphanumeric keypad to enter the letters and numbers
on that key. For example, to enter the letter Y, press 9 three times.
nextel.com
26
Page 35

Using T9®Text Input
• Press Q or press and hold the key to capitalize aletter.
• Pause briefly to leave the currently displayed character in place and move
on to the next place in the text entry field.
• Press
• Press
P or to create a space in the text entryfield.
A under DELETE to delete one character. Press and hold A under
DELETE to delete an entireentry.
Using Word Mode
In Word mode,T9 Text Input analyzes the letters on the keypad button you
press and arranges them to create words.As you type, T9 TextInput matches
your keystrokes to words in its dat abase and will display themost commonly
used matching word.
Special Key Functions
Some of your phone’s keys assume different functions while in T9 Text Input
Word mode.
Backspace and Erase
Press
A under DELETEonce to backspaceor to erase a singlecharacter. Press
and hold
Space
Press
A under DELETE t o erase the entire text entry field.
R onceto accept a word and insert a space when entering text.
Next Word inDatabase
Press
0 to display more words in the database that match the keystroke
sequence youentered.
Shift and Caps Lock
Press
# tomake the next letter typed uppercase (Shift), to make all subsequent
letters types uppercase (Caps Lock), orto go back to lowercase letters.
These icons appear in the top row of your display screen:
• $ forShift to uppercase
• x for Caps Lock
27
Page 36

When neither of theseicons appear, letters typed are lowercase.
Punctuation
In Word mode, T9 Text Input uses Smart Punctuation to quickly apply basic
rules of grammar to insert the correct punctuation within a word and at the end
of a sentence.
Press
1 to insert punctuation. One of eight basic punctuation symbolswill be
inserted(.,-’ @:?;).
Press
0 to change the inserted punctuationsymbolto anotherof the eight basic
punctuation symbols.
Press
R to accept the punctuat ion and continue typing.
NOTE:Additional punctuation symbols are available in Symbols mode.
EnteringaWord
To enter a word using Word mode:
1
Choose Word as yourtext entry mode.
2
Type a word by using onekey press perdesired letter.
For example, totype “test” press
NOTE: The displayed word may change as you type it. Do not try to
correct the word as you go. Type to the end of the word
before editing.
3
After you havefinished typing, if the word that appears is not the
desired word, press
most likely word in the database.
Repeat until the desired word appears.
If the desired word does notappear, you can add it to thedatabase of
words by deleting the displayed word and using the foll owing the
instructions in “Adding Words to the User Database” on page 29.
0 to change the word on the display to the next
nextel.com
8378.
28
Page 37

Using T9® Text Input
Adding Words to the User Database
To add words to the T9 database:
1
Change from Word text entry mode to Alpha text entry mode (see
“Choosing a Text Entry Mode” onpage 25).
2
Type the word using Alpha text entry mode.
3
Return to Word text entry mode.
4
Press R to add a space.
The word you typed in Alpha text entry mode is now in the database.
NOTE: You cannot store alphanumeric combinations, such as Y2K.
Using Symbols Mode
To use Symbols text entry mode:
1
Choose Symbols asyour text entry mode.
A r ow of 32 symbolsappears alongthe bottom of your phone’sdisplay
screen, just above the displayoptionsand menu icon.(Press
the complete row.)
T to view
2
Press T to highlight the symbol you want to enter into the text entry
field.
3
Press B under SELECT to enter the symbol.
Using Numeric Mode
To use Numeric text ent ry mode, choose Numeric asyour text entry mode and
press the number buttons on yourkeypad to enter numbers.
29
Page 38

30
nextel.com
Page 39

Display Essentials
Your i80s phone’s display screen tells you what you need toknow as you use
your phone.
This section includes:
DisplayScreen Page 31
Status Icons Page 32
Text Display Area Page 34
Call Information Icons Page 34
Menu Icon Page 34
Display Options Page 34
NavigatingMenus and Lists Page 35
Main Menu Options Page 36
Display Screen
Any time your phone is poweredon,
the display screen provides you with
information and options. The display
screen consists of:
• statusicon rows — the top two
rows display status. See “Status
Icons” on page 32.
• text display area —displaysup t o
four lines of text and icons. See
“Text Display Area” on page 34.
• menu icon — see “Menu Icon” on page 34.
• displayoptions — see “Display Options” on page 34.
Status
icon
rows
Text
display
area
Menu
icon
Display
options
O
31
Page 40

Idle Screen
The idl e screen displays any time t he phone is powered on, but not engaged in
some activity.
The idle screendisplays NEXTEL, the time and date, and any active styles (see
“Styles” on page 156). You must start at the idle screen to accessmany of your
phone’s features and functions.
Press s to access the idle screen at any time.
Status Icons
Statusicons provide you with information about your phone and itsfunctions.
These icons are context sensitive;meaning, the icons that appear depend on the
task you areperforming.
Statusicons appear in the two rows at thetop ofthe display screen. Some appear
at all times. Others appear only when your phone is engaged in certain activities
or when youhave activated certain features.
Icon Indicates...
32
abcd
efgd
opqr
s
01
GHI
JKL
c Phone In Use— phone is connected on an
BatteryStrength — remaining battery
charge.More bars on the battery indicate a
greater charge. See “Battery Charging
Status” on page10.
Signal Strength — strength of the
network signal. More bars next to t he
antenna indicate a stronger signal. Four
bars is themaximum .
Active Line — currently activephone line;
0 indicates Line 1 is active; 1 indicates
Line 2 is active.
Call Fo r wa rd — phone is set to forward
calls. See “Call Forwarding” on page 70.
active call.
nextel.com
Page 41

Status Icons
h
%
Y
Z
]
{
.
y
u
-[\*
PrivateI n Use — number being calledis a
Private ID.
Talkgroup In Use — phone is active on a
talkgroup call.
Packet Data Ready — phone is ready to
receive data through a datacable.
Packet Data Activity — phone is
transmitting data.
Mobile IP — phone is ready toaccess the
Internet.
Secure Data — phone is accessing the
Internetusing a secureconnection.
Text Message — you have one or more
unread Text Messages or Net Mail
messages.
Voice Mail — you have one or more
unheard Voice Mail messages.
Speaker Off — phone’s speaker is off.
Ring/Vibe — you have customizedthe
way in whichthe phone isset to notify you
when you receivecalls and other types of
messages. See “Ring Style and Notification
Type” on page 143.
w#,!
$x
The icon of the main menufeature in use always appears in thetop left of the
statusicon rows. For alist of the main menu icons, see “Main Menu Options” on
page 36.
T9 Text Input — you are usingT9 Text
Input to enter text. See “UsingT9® Text
Input” on page 24.
33
Page 42

Text Display Area
The text display area shows menuoptions,messages,names, phone numbers,
and other information.
Call Information Icons
The following icons appear onthe left sideof the text display area, providing
you with information about your calls.
Icon Indicates...
D In Call - phone is in an active call.
E Incoming Call - phone is receiving an
X Outgoing Call - phone i s placing an
? End Call -phone has endedthe active call.
incoming all (not active).
outgoing (not active).
On Hold- phonehas a call on hold.
Menu I con
The menu icon S appearson any screen from whicha menu can be accessed.
To access a menu, press
Menus are context sensitive. The menuthat appears depends on the scr een you
access it from, andthe items on the menu apply to the task you are currently
performing.
Press
m or Q from the idlescreen to access the main menu.
m on your keypad.
Display Options
Two display options appear at the bottom of most screens. These options enable
you to perform a wide var iety of actions, including changing, saving and
viewing information,running programs, and canceling previous actions.You
activate a display option by pressing A below it.
nextel.com
34
Page 43

Navigating Menus and Lists
NOTE:Throughout the User’s Guide, the option keys C and D will
be represented by
The idle screendi splay options provide quick access to two main menu features.
By default, the Phonebook (PHBK) and Messages (MESG) display options
appear on theidle screen. Youcan control which display options appearon the
idle screen using the phone’s Personalize feature in the Settings menu (see
“Changing Idle Screen Options” on page 148).
The display opt ions on screens other than t he idle screen cannot be customized.
Navigating Menus and Lists
The i80s phone is menu driven. By navigating menus, you accesssubmenus
which lead to all ofthe functions and features that are built into your phone. Use
the menus to store calls, manage your Phonebook and Datebook, change your
phone settings, browse the Internet, and more.
Some features include lists of names, numbers, or other information. These list
items can be accessed the same way menu options are.
To access the it ems ina menuor list,scroll using the four-way navigationkey at
the top of your keypad. Scroll down by pressing the lower portion of the
navigation key
key
Q. Holding down the appropriate part of the navigationkey speeds up
scrolling. If youcontinue scrolling after you havereached the bottom or topof a
menu or list,you “wrap-around” to the opposite end.
If more itemsappear in a menu or list than can be displayed in the text area, a
down arrow or up arrow appears in the left side of the screen indicating that
more options may be accessed by scrolling up or down.
R. Scroll upby pressing theupper port ion of the navigation
A.
Down arrow
B
Up arrow
S
35
Page 44

Main Menu Options
By default, the main menu options appe ar in the order shown in thi s table.You
can change theorder in which they appear by using the Personalize feature (see
“Reordering Main Menu” on page 148).
To access the main menu, press
Menu Item Use to ...
7 Net Browse the Nextel Wireless Web.
m or Q from theidle screen:
F Java Apps Run pre-installed and download custom
m Settings Customize your phone: Ring/Vibe, Phone
( VoiceNotes Record personal messages or the incoming
b Phonebook Storeandretrievea list of stored entries for
R Messages Receive, store, access, and manage Voice
; Call Forward Settingsfor forwarding calls in various
= Datebook Scheduleand organize events, by the day
O Memo Input and store numbers to access later.
z Call Timers Displaythe durationof phone calls, Private
Java applications on yourphone.
Setup,In Call Setup, Security, Personalize,
InitialSetup, Voice Volume, and
Talkgroup Settings.
portion of phone calls to playback at a later
time.
calling,editing,viewing, and delet ing.
Mail, Text Messages, and Net Mail.
situations.
or the month, such as appointments and
meetings.
or Group Calls, circuit data use, and
Kilobytessent and received.
36
nextel.com
Page 45

Main Menu Options
j Recent Calls Accessa list of the last 20sent, received,or
n Shortcuts Associate a menu option with a number on
U My Info View the name, PrivateID, phone numbers
v Styles Create or edit a group ofsettingsand save
: Call Alert Storereceived Nextel Direct Connect Call
To choose the highlighted main menu selection, press B under SELECT. To
exit the main menu and return to the idle screen, press
missedcalls. Calls can be made from this
list.
the alphanumeric keypad for quickand
easy access.
for lines 1and 2, IP address, and circuit
data number of your phone.
them as one for use in different
environments.
Alertsto respond to at your convenience.
A under EXIT or press
s.
37
Page 46

38
nextel.com
Page 47

Phonebook
The Phonebook allows you to store up to 250 frequently used names and
numbers.
When you store information in your Phonebook, itis saved on yourSIM card.If
you move your SIM card to another Nextel SIM-based phone, you can access
information in your Phonebook from thatphone.
NOTE:If you use a different SIM card in your phone, some information
stored in the phone will be lost. See “Removing/Inserting the
SIM Card” on page 18.
This section includes:
Phonebook Entries and Speed DialNumbers Page 40
Phonebook Icons Page 40
Voice N ames Pa ge 41
AccessingYour Phonebook Page 41
About Phonebook Entries Page 42
Viewing Phonebook Entries Page42
Sorting Phonebook Entries Page 43
Adding Phonebook Entries Page 45
Editing Phonebook Entries Page 50
Deleting Phonebook Entries Page 51
Pause Digit Entry Page 51
Plus Dialing Page 52
Address Bo ok Page 52
39
Page 48

Phonebook Entries and Speed Dial Numbers
Your Phonebook can storemultiple phone numbers to a single name. For
example,you can entersomeone’s name into your Phonebook once and then
add that person’s home, office, mobile phone and faxnumbers to thename. You
can store up toseven phone numbers, one Private ID,and an IPaddress for each
name.
Each phone numberstoredin your Phonebook is automaticallyassigned a Speed
Dial number that corresponds to its location in your Phonebook. Each phone
numberuses one Speed Dial location, even if it isassigned to thesame name as
other phone numbers. The phone number stored inlocation1 is assigned Speed
Dial number 1, the phone number stored in location 2 is assigned Speed Dial
number 2, and so forth, to location 250.
NOTE:Private IDs and Talkgroup numbers do not have associated
Speed Dial numbers.
Phonebook Icons
Icons that appear to the right of entries in your Phonebook convey i nformation
about those entries.
When you enter a number in your Phonebook, you can designate the number’s
type using any of the following icons:
W Mobile
h Private ID
+ Work
40
Q Main
L Home
b Pager
K Fax
Z Other
n Talkgroup
nextel.com
Page 49

Voice Names
|
NOTE:The Mobile icon automatically appears to the right of the first
number assigned to a name unless you choose another icon.
For more information on entering numbers into your Phonebook, see “Adding
Phonebook Entries” on page 45.
The “picker” arrows appearing around the number typeicon indicates multiple
numbers stored under one name:
ef Pickers
The Voice Name icon appearing tothe left of one ofthe number type icons
indicates that a voice name isassociated with the Phonebook entry:
p Voic e Na me
IP (Internet
Protocol)
Address
Voice Names
A voice name is anaudio recording you assignto a number in your Phonebook
by speaking into your i80s phone. You can then call the number by speaking the
words you recorded into the phone. See step6 of “Adding Phonebook Entries”
on page 45 for more informationon cr eating a voice name.
Accessing Your Phonebook
If PHBK is one of your display options:
From the idle screen, press
A under PHBK.
41
Page 50

If PHBK is not one of your display options:
1
From the idle screen, press m.
2
Press R to scroll to Phonebook.
3
Press B under SELECT.
USER TIP:You can also access the Phonebook while you are on an
activecall. Press
and press
This brings you to the Phonebook screen.From this screen, you canview, sort,
add, edit, and delete Phonebook entries, check Phonebook capacity,or make
calls.
m then press R to scroll to Phonebook
B under SELECT.
About Phonebook Entries
Each Phonebook entry may contain the following information:
• The name associated withthe entry: Typically, thisis the name of the
person whose number youare storing in the Phonebook.
• The type of number to bestored: Mobile, Private, Work, Main, Home,
Pager, Fax, Other, or Talkgroup. If you don’t choose a type, the number is
assignedtype Mobile, unless a Mobile number has already been assigned
to the name.
• The number to be stored: Every Phonebook entry must contain anumber.
This number may be any type of phone number, Private ID, or Talkgroup
number.
• A Speed Dial number: Youmay accept the default Speed Dial number or
assign a different one.
• A voice name audio recording for voice-activated di aling.
Viewing Phonebook Entries
Names with more t han one number assigned to them appear with ef
surrounding the icon to theright of thename. For example, if youhad st ored a
home and work number for Joe Smith, the entry for JoeSmith’s home phone
number would look like this:
Joe Smith eLf
42
nextel.com
Page 51

Sorting Phonebook Entries
When the name is highlighted, press T toscroll tothe icons representing each
of the numbers assigned to that name.
To view any of the numbers assigned to a name:
1
From the Phonebook screen,press S to scroll to the name associated
with the number you want to see.
2
Press T to view the icons representing the numbers assi gned tothat
name.
I
3
When the icon representing the number you want to view is displayed,
B under VIEW.
press
Or,
If there is a Private ID or a Talkgroup number stored for the entry, press
m.ThenpressR to scroll to View and press B under SELECT.
4
Press S to view the other numbers stored for this name.
Sorting Phonebook Entries
You can sortyour Phonebook entries by:
• Name — thenameyouenteredfortheentry.
• Speed No. — the SpeedDial location of the entry.
NOTE:Private IDs and Talkgroup numbers cannot be accessed from
the Phonebook when sorted by Speed Dial location.
• Voice N am e — all entries with voicenames appear atthe top of the list.
43
Page 52

To sort your Phonebook list:
1
From the Phonebook screen, press m to
view the Phonebook Menu screen.
}
2
Press R to scroll to Sort By.
3
Press A under SELECT.
4
Press R to scroll to the desired sortingmethod:Name, Speed No.,or
Voice Name.
5
Press A under SELECT.
Checking Phonebook Capacity
Your Phonebook can store upto 250 separate numbers. To see how many
entriesare stored inyour Phonebook:
1
From the Phonebook screen, press m to view the Phonebook Menu
screen.
2
Press R to scroll to Capacity.
3
Press B under SELECT.
The Capacity screen shows how many storage spaces in your
Phonebook arein use and how manyare empty.
nextel.com
44
Page 53

Sorting Phonebook Entries
Adding Phonebook Entries
Using the following instructions, youwill enter the information in t he order the
items appear on the Phonebook Entry Details screen. However,you can enter
this information in any order by pressing
Entry Details screen.
You can leave any item blank(except number) or unchanged by pressing
scroll past it on the EntryDetails screen. Only a number is requiredfor a valid
Phonebook entry.
To cancel a Phonebook entry at any time, press
To add a Phonebook entry:
1
Access the Entry Details screen:
From the Phonebook screen, with [New
Entry] highlighted, press
SELECT.
Or,
From the Phonebook screen, press
Then press
press
2
If you want to assign aname to your
Phonebook entry:
R to scroll to New and
B under SELECT.
B under
S to scroll through the items on the
S to
s to return to the idle screen.
m.
H
With the Name field highlighted, press
under CHANGE.
From the Name screen, enter the name
using the alphanumeric keypad.
See “Using T9® Text Input” onpage 24 for
information about entering text into this field.
When you are finished,press
The Entry Det ails screen returns with the Type field highlighted.
B under OK.
B
I
45
Page 54

3
To accept the number type Mobile,pressR to scroll to the No.field.
If you want to assign anumber type other
than Mobile to your Phonebook entry:
With the Type field highlighted, press
under CHANGE.
From the Type Editor screen, press
scroll to the t ype of number you want to
assign to the Phonebook entry.
B under SELECT.
Press
The Entry Det ails screen returns with the No . fieldhighlighted.
4
Assign a numberto your Phonebook entry:
With the No. field highlighted, press
Type the number using the alphanumerickeypad. For phone numbers,
use the 10-digit format. ForPrivate IDs, use Area ID * Network ID *
Member ID (theasterisks must be included as part of the Private ID).
Todelete a digit,press
See “Pause Digit Entry” on page 51 and
“Plus Dialing” on page 52 forinformation
on using these features when storing
phone numbers i n your Phonebook.
NOTE:The number can be up to 20
characters long.
When you are finished,press B under
OK.
A underDELETE.
B
R to
J
B under CHANGE.
K
The Entry Det ails screen returns with the Speed No. field highlighted.
nextel.com
46
Page 55

Sorting Phonebook Entries
5
The default SpeedDial number assigned to the phone number is
displayedintheSpeed No. field. This is always the next available
Speed Dial location.
NOTE:Private IDs and Talkgroup
numbers do not haveassociated
Speed Dial numbers.
Toaccept the default Speed Dial location,
go to step 6.
If you want to assign the phone number to
a different Speed Dial location:
With the Speed No. field highlighted,
B under CHANGE.
press
A under DELETE todelete the current Speed Dial number.
Press
Type the new Speed Dial number using thealphanumeric keypad.
When you are finished,press
NOTE:If youchange the Speed Dial number to one already in use,
you will be prompted to overwrite the entry that is currently
in that location. Pressing
existing entry from your Phonebook.
B under OK.
B under YES will delete the
L
47
Page 56

6
U
If you want to assign avoice name tothe
number:
With the Voice Name field highlighted,
press C under RECORD.
As directed by the screen prompts, say and
repeat the nam e you want to assign to the
number. Speak clearly into the
microphone.
M
USER TIP:For best results, use voice names such as “Joe Home” or
An ) icon appears in the Voice Name field indicating that the voice
name has been recorded.
If you do not want to store a voicename forthis number,continue to the
next step.
7
If you want to store more numbersto the
name associatedwith this Phonebookentry:
Press
of the Entry Details screenandthenpress
B under SELECT.
AnewType field appears for the additional
number.
Enter the information for the a dditional numbers using step 3 through
step 7.
NOTE:Each name in your Phonebook may haveup to seven phone
“Susan Work” and record in a quiet environment.
R to scroll to MORE at the bottom
numbers, one Private ID and one IP address associated with
it.
48
nextel.com
Page 57

Sorting Phonebook Entries
8
When you have entered all the
information for this Phonebook entry,
A under DONE.
press
N
Storing Numbers Fast
Your phone gives you two ways to storenumbers quickly: from the idle screen
and from the Recent Calls list.
To store a number from the idle screen:
1
From the idle screen, use the alphanumeric keypad to enter thenumber
you want to store. For phone numbers, use the10-digitformat. For
Private IDs, use Area ID * Network ID * Member ID.
2
Press m to access the Dialing Menu screen.
3
With Store Number highlighted, press B under SELECT.
This displaysthe Entry Details screen with the No. fieldfilledinwith
the number youtyped.
4
If you wantto addmore information to the Phonebook entry,followthe
applicable instructions in “Adding Phonebook Entries” on page 45.
5
Press A under D ONE.
49
Page 58

To store a number from the Recent Calls list:
1
From the Recent Calls screen, press R to scroll to thenumber you
want to store.
2
Press B under STORE.
Or,
Press
m to access the Rec. Calls Menu.PressS to scroll to Store.
Press
B under SELECT.
This displaysthe Entry Details screen with the No. fieldfilledinwith
thenumberoftherecentcall.
3
If you wantto addmore information to the Phonebook entry,followthe
applicable instructions in “Adding Phonebook Entries” on page 45.
4
Press A under D ONE.
Editing Ph onebook Entries
1
From the Phonebook screen, pressR to scroll to the entry you want to
edit.
2
Press m to view thePhonebook Menu.
3
Press R to scroll to Edit.
4
Press B under SELECT. The Entry Details screen displays.
5
Followthe applicable instructions in“Adding Phonebook Entries” on
page 45 to edit the various fields.
NOTE:To add additional numbers to an existing entry, press R to
scroll to MORE. Press
applicable instructions in “Adding Phonebook Entries” on
page 45.
B under SELECT. Follow the
nextel.com
50
Page 59

Pause Digit Entry
Deleting Phonebook Entries
1
From the Phonebook screen, pressR to scroll to the entry you want to
delete.
2
Press m to view thePhonebook Menu.
3
Press R to scroll to Delete Record or Delete Number.
Delete Re cord deletes the name and all numbers associated with that
name.
Delete Number deletesthe number associated with the icon that is
currently displayed in the Phonebook list for the name. The name and
all the other numbers will remain.
4
Press B under SELECT. A warning s creen displays requiring you to
confirm the deletion.
Pause Digit Entry
When storing anumber, you canprogram your phone soit will not only dial a
number but also pause before entering another series of numbers such as a
personal identification number (PIN) or password. This feature is particularly
usefulfor accessingautomatedservicessuch as voice mail and banking systems
from your i80s phone.
Example: Let’s sayyou have acompany voice mail accountthat you frequently
check while traveling. And, toaccess that account you must do the following:
• dial your worknumber
• press # while the voice mailgreetingis being played
• enter your PIN to access your messages
You can programyour phone to enter al l of the aboveinformation for you by
separating eachentry with a pause.The stored data would look like this:
17035551234P#P1234. In this example, thefirst eleven digits represent the
number that must be dialed to access your voice mail. The P represents a 3
second pause. The #interrupts your greeting. The second P representsanother 3
second pause. The last four digits represent your PIN.
51
Page 60

To create a three-secondpause, follow the steps below:
Press and hold
* for two seconds. The pause symbol (P) will appear
on the display screen.
NOTE:You can enter upto 20 characters in asingle entry, stored or
dialed.
NOTE:You can program your phone to pause for more than 3 seconds.
Performing the above step twice will program two pauses and
cause your phone to wait 6 seconds before entering thenext set
of numbers.
Plus Dialing
This feature enables you to place an international call from most countries —
without entering the local international access code. Use Plus Dialing for all
Phonebook entries if you plan to travel outside the United States. Begin by
following the instructions for “Adding Phonebook Entries” on page 45.Before
you type the phone number to be stored:
1
Press and hold 0 for twoseconds. A “0” appears, then changes to a
“+”.
NOTE:The network translates the “+” into the appropriate
international accesscode needed to place the call.
2
Enter the country code, city code, or area code (as needed), and phone
number.
3
Follow the rest ofthe instructions for “Adding Phonebook Entries” on
page 45.
Address Book
Manage your contact information with AddressBook. AddressBook provides
easy maintenanceand entry of contact information and accessto that
information from your i80s phone or nextel.com. Address Book is a Nextel
Wireless Webservice and requires the activationof a Nextel Online
Plan. To order, contactNextel Customer Care.
For instructions on how to usethis application, see “Address Book” in the
Nextel WirelessWeb User’s Guide.
nextel.com
52
SM
Service
Page 61

Digital Cellular
The i80s phone utilizes Nextel’s All-Digital Nat ional Network for digital
cellularservice. Youcan also use your Nextel phone to roam internationally on
other iDEN networks using Nextel Worldwide Service. See nextel.com for
coverage.
This section includes:
Making Phone Calls Page 54
Emergency Calling Page 59
Special Dialing Codes Page 59
Receiving a Phone Call Page 60
Transferring Calls to Voice Mail Page 60
Recent Calls Page 61
Call Timers Page 64
Hands-FreeSpeaker Phone Page 65
Mute Page 66
Call Waiting Page 66
Call Hold Page 68
Three-Wa y Calling Page 69
Call Forwarding Page 70
Caller ID Page 74
Alternate Line Service Page 75
Call Restrictions Page 77
Nextel 411 Page 77
53
Page 62

Making Phone Calls
Your i80s phone provides the fol lowing features formaking phone calls:
• Direct Dial
• Phonebook
• RecentCalls
• Speed Dial
• Turbo Dial®
• Voice-Activated Dialing
• Last Number Redial
• TTY — your phone supports TTYdevices and communications.
Using Direct Dial
1
From the idle screen, use the keypad to enter the 10-digitphone number
youwanttocall.
2
Press e to place the call.
3
Press s to end thecall.
NOTE:See “Plus Dialing” on page 52 for information on making
international calls.
If you make a mistake:
• To clear one digit, press
• To clear alldigits, press and hold
• To insert adigit,press
• To cancel, press
A under DELETE.
A under DELETE.
T to move the cursor.
s.
Making Calls from the Phonebook
After you haveenteredphone numbers into your Phonebook,you can use these
numbers to make phone calls.For informationon entering numbers into your
Phonebook, see “Adding Phonebook Entries” on page 45.
nextel.com
54
Page 63

Making Phone Calls
To make calls fromthe Phonebook:
1
From the idle screen, if PHBK is one of your display options, pressA
under PHBK.
Or,
From the idle screen, press
Press
B under SELECT.
2
Press R to scroll through the names in your Phonebook.
Or,
Use the alphanumeric keypadto enter the first letter of the name and
press
R to scroll through the names beginningwith that letter.
Stop when the name of the person youwant to call is highlighted.
3
If more thanone number is stored for theperson you want to call,ef
appearsaround the iconto the rightof the person’sname.
Press
T to scroll through the icons representingthe numbers stored
for that person.
Or,
B under VIEW to view the number. Youcan press S toscroll
Press
through other numbers stored for this person.
Or,
If there is a Private ID stored for this person, press
PhonebookMenu appears, press
under SELECT. Then pressR to scroll to thenumberyou want to call.
For more i nformation on assigningmultiple numbers to one person,see
“Adding Phonebook Entries” on page 45.
m,thenpressR toscrollto Phonebook.
m. Whenthe
R to scroll to View and press B
55
Page 64

4
Press e to place the call.
5
Press s to end the call.
Making Calls from the Recent Calls List
Your phone stores the numbers of the last 20 calls you received orsent in the
RecentCalls list.
1
From the idle screen, press R.
Or,
From the idle screen, press
Press
B under SELECT.
2
Press S to scroll through the listof received or sent recent calls until
you reach the desired call.
3
To view additional information about the call:
Press
B under VIEW.
Or,
m to access the Rec. Calls Menu.ThenpressR to scroll to
Press
View and press
4
Press e to place the call.
5
Press s to end the call.
B under SELECT.
m.PressR to scroll to RecentCalls.
nextel.com
56
Page 65

Making Phone Calls
Using Speed Dial
Each phone number stored inyour Phonebook is assigned a SpeedDial number.
You can use the SpeedDial number to quickly place a call.
1
From the idle screen, enter theSpeed Dial number assigned to the
phone number you want to call.
2
Press #. The number’s Phonebook ent ry information will displa y.
3
Press e to place the call.
4
Press s to end the call.
Using Tu rbo Dial
Turbo Dial allows you to quickly call the numbers in your Phonebook
associatedwithSpeedDialnumbers1through9bypressingandholdingthe
corresponding numeric keyon the keypad.
Press and holda number key (1 through 9).
NOTE:Turbo Dial cannot be accessed while the browser is active, nor
while Keypad Lock or SIM Lock is active.
Making Calls Using Voice-Activated Dialing
If you have recorded a voice namefor a phone number in your Phonebook (see
“Voice Names” on page 41), youcan use this feature to call the number.
USER TIP: If you have difficulty making phone calls using avoice
name, try assigning a longer voice name to the number. For
example, if the voice name “Joe” fails to place a call to Joe
Smith’s number, try assigning the voice name “Joe Smith”
to the number.
57
Page 66

1
From the idle screen, press and hold t near the bottom of your phone
until the phone beeps and the Say Name Now screen appears, then
release.
2
Speaking into the microphone,say the voice name assigned tothe
phone number you want to call.
3
Your phonewill play the name back toyou.
The call willautomatically be placed.
Last Number Redial
Press and hold
NOTE:If you receive “System Busy, TryLater,” press e toredial the
number automatically. You will hear a ring-back tone when the
call is successfully placed.
e to redial the last number you called.
Placing International Phone Calls
When making an international call, you can either enter the international access
code directly (for example, 011 i n the United States) or use Plus Dialing.
You can makeinternational calls from your Phonebook if you havestored the
numbers with Plus Dialing. See “Adding Phonebook Entries” on page 45 and
“Plus Dialing” on page 52 for more information.
NOTE:Yourservice default is “International Calls Restricted.” Contact
Customer Care to obt ain international dialing access.
To make an international call using Plus Dialing:
1
Press and hold 0 for twoseconds. A “0” appears, then changes to a
“+”.
NOTE:The network translates the “+” into the appropriate
international accesscode needed to place the call.
2
Enter the country code, city code, or area code (as needed), and phone
number.
nextel.com
58
Page 67

Emergency Calling
3
Press e to place the call.
4
Press s to end the call.
Making TTY Calls
You can use your phone to make calls using a TTY device.
When you make TTY call, thecall begins in the TTYmode you last selected.
You can change the TTY modeduring a call. Formore informationon choosing
a TTYmode, see “Setting TTY Mode” on page 154.
To make a call using a TTY device:
1
Connectone endof a2.5mm cable into the jack on thephone. (Tolocate
the jack, see page 6.) Connect the other end of the cord into your TTY
device.
2
Enter the phone number you wish to calland press e.
Emergency Calling
Your phone supports emergency calling. Emergency calls canbe made even
when the SIMcard is blocked or not i n the phone.
To place an emergency call, press 911
nearest emergency dispatch center. If you are on an active call, you must end it
beforecalling911.
NOTE: If you have enabled the Keypad Lock feature, you must unlock
the phone’s keypad before any calls can be made, including 91 1
emergency calls.
e. You will be connected to the
Special Dialing Codes
Non-Emergency Numbers
Nextelsupports many “non-emergency”numbers(such as #77,311,...)provided
by local andstate governments.These numbers areused to report nonemergency inci dents. If the situation includes imminent danger or loss oflife,
you should dial 911.
59
Page 68

Telecommunications Relay Service
Nextel supports services for communicating with speech and/or hearing
impaired individuals. You can press 711 to reach a local
Telecommunications Relay Center. You will then be connected to your
destinati on number.Relay service works through a Communications Assistant
who reads messages typed intoa TDD/TTY device by a speech or hear ing
impairedindividual to you. The Communications Assistantthen types your
spoken messages to thehearingor speech impaired individual.
TelecommunicationsRelay Service isavailable 24 hours a day, seven days a
week, and every call is strictly confidential.
NOTE:Using 711 to reach Telecommunications Relay Service may not
be available in all areas.
Receiving a Phone Call
Incoming calls are indicated by a ring, vibration, or backlight illumination.
The screen will display:
• the caller’s name if stored in your Phonebook, or
• the 10-digit number if Caller ID information is available.
Otherwise, the screen will display Incoming Call.
Press e or any keyon the keypad, or press B under YES to answer
the call.
Transferring Calls to Voi ce Mail
s or press A under NO while your phone is ringing to transf er
Press
incoming calls directly to Voice Mail. The
idle screen to remindyou that you have a storedVoice Mail message.
y icon will appear onthe
Ending a Phone Call
s.
Press
NOTE: The Recent Calls list displays briefly after each phone call.
nextel.com
60
Page 69

Recent Calls
Recent Calls
The Recent Calls featurestoresthe numbers ofthe20 most recent calls you have
made and received, including Private andGroup Calls.You can access Recent
Calls to:
• view your recent calls
• store numbers to the Phonebook
• deleterecentcalls
• call numbers on the Recent Calls list
NOTE: The Recent Calls list displays briefly after each call.
Recent Calls Icons
For Private Calls, Group Calls, and numbers stored in your Phonebook, an icon
appearsto the right of thename or number indicatingthe Phonebook type of the
number used in the call. See “Phonebook Icons” on page 40for more
information about Phonebook types.
For phone calls, an icon appears to the left of the name or number indicating the
type of call:
• N indicates an incoming call
• a indicates an outgoing call
• V indicates a missed call. (Missed calls appear on your Recent Calls list
only if you have Caller ID.)
For Nextel Direct Connect calls, an icon appears to theleft of the name or
number indicating the type of call:
• h indicates a PrivateCall
• n indicates a Group Call
Viewing Recent Calls
If the number of the recent call is stored in yourPhonebook,the name associated
with the number displays.
61
Page 70

To view your Recent Calls list:
1
From the idle screen, press R.
Or,
From the idle screen, press
Press
B under SELECT.
2
Press S to scroll the listof recent calls.
m.PressS to scroll to RecentCalls.
Getting Detailed Information About Recent Calls
To get more information about a recent call:
1
From the Recent Calls screen, press S to scroll to the call you want
more information on.
2
Press B under V IEW.
Or,
Press
m to access the Rec. Calls Menu.ThenpressR to scroll to
View and press
The screen that appears displays information such as the name associated with
the number of the recent call, the number, date, time, and duration of the call.
B under SELECT.
62
nextel.com
Page 71

Storing a Recent Call Number to the Phonebook
To st ore a number from the Recent Calls list to the Phonebook:
1
From the Recent Calls screen, press S to scroll to thenumber you
want to store.
2
Press B under STORE.
Or,
Press
m to access the Rec. Calls Menu.ThenpressR to scroll to
Store and press
This displays the Phonebook Entry Detail s screen with the No. field
filled in with the number of the recent call.
3
If you want to add more information tothe Phonebook entry, fol low
applicable the instructions in “Adding Phonebook Entries” on page 45.
B under SELECT.
Calling From the Recent Calls List
See “Making Calls from the Recent Calls List” on page 56.
Deleting Recent Calls
To delete a recent call:
Recent Calls
1
From the Recent Calls screen,pressS to scroll tothe call you want to
delete.
2
Press m to access the Rec. Calls Menu.
3
Press R to scroll to Delete.
4
Press B under SELECT.
5
Press A under YES to confirm the deletion.
63
Page 72

To delete all calls onthe Recent Calls list:
1
From the Recent Calls screen, press m to access the Rec. Calls
Menu.
2
Press R to scroll to Delete All.
3
Press B under SELECT.
4
Press A under YES to confirm the deletion.
Accessing Voice Notes From Recent Calls
You can access the Voice Notes feature from Recent Calls and use it to record
spoken messages that you can listen to later.
1
From the Recent Calls screen, press q to access the Rec. Ca lls
Menu.
2
Press R to scroll to Voice Notes.
3
Press C under SELECT.
For more information about Voice Notes, see“Voice Notes” on page 127.
Call Time rs
Call Timers meas ure the duration of your phone cal ls, Private or Group Calls,
and circuit data use, as well as the number of Kilobytes sent andreceived by
your phone.
The CallTimers menudisplays the following options:
• Last Call — displays the duration of your most recent phone call.
• PhoneReset — keepsa running total of yourphonecall minutes, until you
reset it.
• Phone Lifetime — displays thetotal minutes of all your phone calls.
• Prvt/Grp Reset — keeps a running total of allof your Private and Group
Callminutes,until you reset it.
64
nextel.com
Page 73

Hands-Free Speakerphone
• Prvt/GrpLifetime — displays the total minutes of all your Private and
Groups Calls.
• CircuitReset — keeps a runningtotal of allof your circuit data use, until
you reset it.
• Circuit Lifetime — displays the totalminutes of allof your circuit data
use.
• Kbytes Reset — keeps arunning total ofthe numbe r of Kilobytessent and
receivedby your phone, until you reset it.
To vi ew the Ca ll Timers menu:
1
From the idle screen, press m.
2
Press S to scroll to Call Timers.
3
Press B under SELECT.
To vi ew or reset a Cal l Timers option:
1
From the Call Timersmenu, press S to scroll to the Call Timers
option you want to view or reset.
2
Press B under SELECT.
3
If the feature does not include an option to reset or you do not wish to
reset the option, press
A under DONE when you are finished viewing.
To reset a feature, press
screen appears, press
NOTE:The values displayed by Call Timers are not intended for billing
purposes.
B under RESET. When the confirmation
A under YES to confirm the reset.
Hands-Free Speakerphone
Thisfeatureprovidesthe convenienceof ahands-free speakerphone forholding
impromptu meetings and placing safer phone calls. The speakerphone option
(SPKR) is available whenever you are on anactive phone.
65
Page 74

NOTE:During speakerphone operation, you may either speak or listen,
but you cannot do both at the same time.
To tu rn the speakerphone on:
While on an active call, press
Or, press
While speakerphone is on, Spkrphone On appears in the text display area.
To tu rn the speakerphone off:
Press
Or, press
t .
B under SPKR.
t .
B under SPKR.
Mute
Use the Mute feature to listen t o incoming audio without allowing sound from
your phone’s microphone to be transmittedover the phone line.
To turn m ute on:
While on an active call, press
While mute ison, UNMUTE appears as adisplay option and Muteappears in
the text display area.
To turn mute off:
B under UNMUTE.
Press
B under MUTE.
Call Waiting
Call Waiting allows you toreceive asecond call while you are talking on the
phone. You canswitch between calls soyou never have to miss a call. By
default, Call Waiting is always on unless you turn it off for a specific call.
nextel.com
66
Page 75

If you’re on a calland you receive a second call,
you will:
• hear a tone
• see a messageon your display informing
you of anotherincoming call
Call Waiting
Accepting Calls
Press B under YES. The first call is placed on hold.
To end the active cal l and accept the second call:
s.Thenpresse or press B under YES.
Press
Switching Between Calls
When you accept a secondcall while you are talking on thephone, your display
shows the name or number of each call.An iconappears to theleft of each name
or number indicating thecall is on hold or active D.
Press
B under SWITCH to switch
between calls.
e
Z
Declining Calls
A under NO. If you subscribe to Voice Mail, the call will be
Press
forwarded to your Voice Mail box.
67
Page 76

Ending the Active Call
Press
s.
Tu rning Off Call Waiting
If you do not want to be interrupt ed during a call, you can turn Call Waiting off
prior to making/receiving a call.
1
From the idle screen, press m.PressR to scroll to Settings,and
press
A under SELECT.
2
Press R to scroll to In Call Setup and press B under SELECT.
3
Press R to scroll to Call W aiting and press B under CHANGE.
4
Press R to scroll to Off and press B under SELECT.
Call Waiting is now disabled for the next call. It will automatically reset
to On when you end the call.
Call Hold
When you areon an active call, you can place the call on hold andmake a
second call.
To place an active call on hold:
1
Press m to access the Call Menu.
2
Press R to scroll to Hold.
3
Press B under SELECT.
4
If you have not placed a secondcall, you can resume this call by
pressing
B under RESUME.
nextel.com
68
Page 77

Three-Way Cal ling
To place a second call whil e the first call is on hold:
1
Enter the second phone number you want to call. Or select the number
from your Phonebook by pressing
2
Press e to place the second call.
To toggle betweenthe two calls:
B under SWITCH.
Press
To end the active call:
s. The call on hold becomes ac tive.
Press
m andselectingPhonebook.
Three-Way Calling
Using Three-Way Calling, you can combine two ongoi ng phone calls into one
conversation. While on anactive call, you can make a second call andcombine
the two calls.
To make a three-way call:
1
Place or receive a phone call.
2
While on the call, press m toaccess the CallMenu.
3
Press R to scroll to 3Way.
4
Press B under SELECT. The firstcall will be placed onhold.
69
Page 78

5
Enter the second phone number and press e to place the second call.
Or, access the number from your Phonebook:
m andthenpressR to scroll to Phonebook.
Press
B under SELECT.
Press
To place the call, see “Making Calls from the Phonebook” on page 54.
6
After you reach t he secondindividual, press m.
7
Press S to scroll to 3Way.
8
Press B under SELECT. Both callswill appear on your displa y.
Call Forwarding
Nextel’s Call Forwarding features forward calls to the number you designate.
The following Call Forwarding options are avail able:
• All Ca lls — When this option is turned on, all calls will be sent
automatically to a number youspecify. When this option is turned off,
your Detailed options will be activated.
• Detailed — Choosing this option enables you to forward calls you missed
to Voice Mail or other numbers, depending on why you missed each call:
• Busy — your phone is engaged in other activities.
• No Answer — you do not answer. The phonewill ring 4 times before
forwarding the call.
• Unreachable — yourphone is out of covera ge or powered off.
NOTE: For you to receive Voice Mail messages, the All Calls option
must be set to Off and the Detailed options must be set to your
Voice Mail access number. Your Voice Mail access number is
the first six digits of your 10-digit phone number followed by
6245.This is thedefault setting.
You can forward Line 1 and Line 2 independently. For moreinformation on
using two lines, see “Alternate Line Service” onpage 75.
70
nextel.com
Page 79

Call Forwarding
When your phone is set to forward All Calls, one of the following icons appears
on the top row of your display screen to indicate the call forwarding option you
have chosen:
Icon Indicates...
G Line1 is active; calls from Line 1 arebeing
H Line1 is active; calls from Line2 arebeing
I Line 1 is active; calls from Line 1 and Line
J Line2 is active; calls from Line1 arebeing
K Line2 is active; calls from Line 2 arebeing
L Line 2 is active; calls from Line 1 and Line
forwarded.
forwarded.
2 are being forwarded.
forwarded.
forwarded.
2 are being forwarded.
TurningOnCallForwarding
1
Press m then press S to scroll to Call Forward.
2
Press B under SELECT.
3
At the Call Forwardscreen, the
Forward field is highlighted. Press
under CHANGE.
B
71
Page 80

4
Press S to scroll to All Calls.
5
Press B under SELECT.
6
Press R to scroll to theTo field and press B under CHANGE.
7
To activate acall forwarding number:
If you have never used Call Forwarding before, the Forward screen
appears. To enter a call forwarding number, type the number on your
phone’skeypadorpress
stored in your phone. Press
Or,
If you have used Call Forwarding before, the cal l forwarding number
youlastusedisdisplayed.Press
Forward screen.
B under SEARCHto select from numbers
B under OK.
B under CHANGE to access the
To forward your calls to this number, press
To forward your cal ls to a different number, press and hold
DELETE to erasethe displayed number.Type the new number on your
phone’skeypadorpress
stored in your phone. Press
Your calls will now be forwarded to thenumber you selected.
B under SEARCHto select from numbers
B under OK.
B under OK.
Turning Off Call Forwarding
1
Press m then press R to scroll to Call Forward.
2
Press B under SELECT.
The Call Forward screen displays with the Forward field highlighted.
nextel.com
72
A under
Page 81
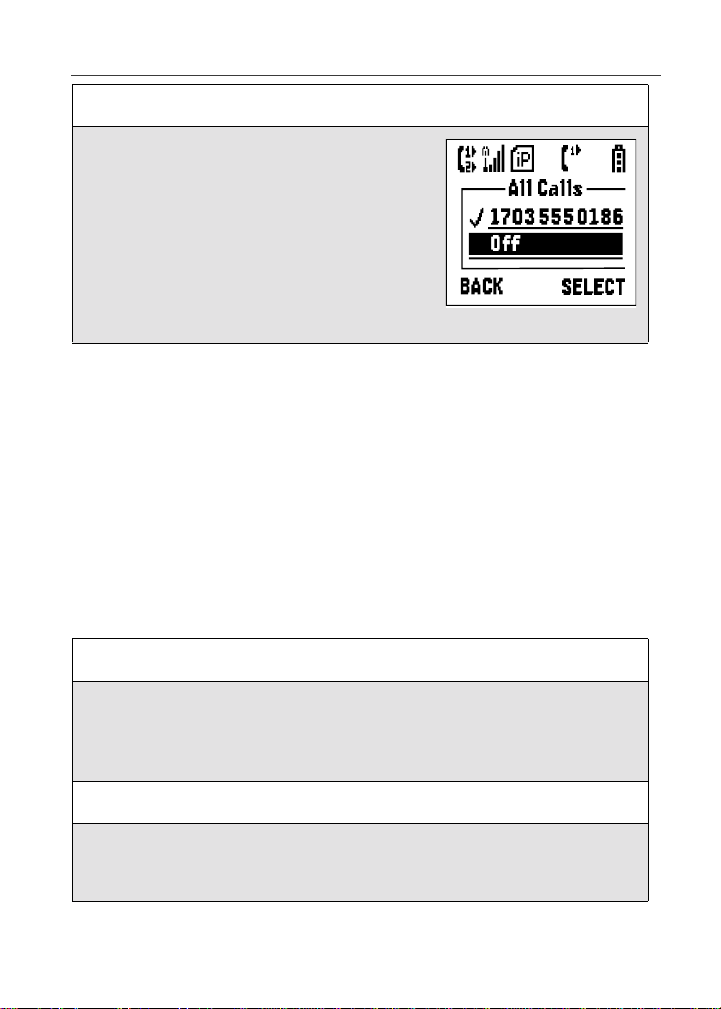
Call Forwarding
3
Press R to scroll to theTo field and press B under CHANGE.
4
Press S to scroll to Off and press B
under SELECT.
You will now receive all calls on your phone. W hen you are unavai lable, your
calls will be forwarded according to your Detailed Call Forwarding settings. By
default, the Detailed option is set to forward your calls to Voice Mail.
SettingCallForwardingtoVoiceMail
In most cases, turning off CallForwarding restoresyour ability to receive Voice
Mail messages when you are unavailable(see “Turning Off Call Forwarding”
on page 72). If you have completed those steps but are still not able to receive
Voice Mail messages, you canreset Call Forwardingto Voice Mail.
For you to receive Voice Mail messages, Call Forwarding must be set to
Detailed with your Voice Mail access number:
1
Press m then press R to scroll to Call Forward.
2
Press B under SELECT.
The Call Forward screen displays with the Forward field set to
Detailed.
3
Press R to scroll to theIf Busy field and pressB under CHANGE.
4
The call forwarding number you last used is displayed. Press B under
CHANGE. If this is your Voice Mail access number (the first six digits
of your 10-digit phone number followed by 6245),go to st ep 7.
73
Page 82

5
Press and hold A under DELETE to erase the displayed number.
6
Enter your Voice Mailaccess number.
Your Voice Mail access number is the first six digits of your 10-digit
phone number, followed by 6245. (For e xample 7035556245.)
7
Press B under O K.
8
Repeat step 3 through step 7 for the If No Answer field and the If
Unreachable field.
9
When finished, press A under EXIT.
NOTE:You can use the Detailed setting to forward calls to other
numbers if desired. However, it is recommended that you leave
Detailed set to the Voice Mail access number and use the All
Calls setting if you wish to forward your calls to another
number.
Additional Phone Features
In addition to the standard features that are included for all Nextel Digital
Cellular subscribers, there are also several features available for an additional
monthly or per-use fee. See the following sections for more information on
these services.Contact Nextel Customer Care for additionalinformation.
NOTE: Some services are not available outside of the continental
United States.
Caller ID
If you subscribe to Caller ID, your phone automaticallydisplays the phone
number or name (if the 10-digitphone number is stored in your Phonebook) of
the person calling(unlessblocked by thecaller), enablingyou to decide whether
to take the call or forward it to Voice Mail.
NOTE:Caller ID information is not available on all calls.
nextel.com
74
Page 83

Alternate Line Service
Displaying the Caller’sName
Acaller’s name is displayed if you have entered the per son’s number into your
Phonebook (see “Adding Phonebook Entries” on page 45). Otherwise, the
caller’s phone number will be displayed.
Maintaining Your Privacy with Per-Call and Per-Line
Blocking
Nextelprovidestwo methods toprevent those you call from seeing your number
on their own Caller ID displays.
NOTE:Your Nextel phone number cannot be blocked from calls made
to 911, 800, 855, 866, 877, 888 or othertoll-free phone numbers.
Per-Call Blocking
You can block delivery of your phone number to other Caller ID units for a
singlephone call.
To set:
Press
*67before dialing the call.
Per-Line Blocking
You can permanently blockdelivery of your phone number on every call you
make. Youmust order this feature by contacting NextelCustomer Care.
To disable on a per-call basis:
Press
*82before the call.
Alternate Line Service
As an AlternateLine customer, you will be givena separate phone number for
each line. With alternate lines, you can separate business and personal calls, or
designate one as a priority line.
75
Page 84

Nextel Mobile Messagingand Nextel Wireless W eb services use the Line 1
B
phone number. You only need to subscribe toCaller ID or Voice Mai l once —
these services will be available on both lines. Forwarding Line 2to Line 1 will
send Line 2 incoming calls directly to Voice Mail without ringing.
The following settings are independent for each phone line. When you enable
one of thesesettings,it applies only to the active line:
• Call Forwarding
• Ring/Vibe
• In Call Setup
• Call Timers
• Auto An swer
Selecting the Alternate Line
From the idle screen:
1
Press m,thenpressR to scroll to
Settings.Press
2
Press R to scroll to Phone Setup.PressB under SELECT.
B under SELECT.
Line2
3
With thecurrent line highlighted, press B under CHANGE.
4
Press R to scroll to the desired line and press B under SELECT.
Receiving Calls on Your Alternate Line
You can receive calls on either line, regardless of theactiveline setting. The
activeline icon (1or 2) displays to indicate which line the callis being received
on.
76
nextel.com
Page 85

Call Restrictions
Call Restrictions
You can prevent your phone from making or receiving specifictypes of calls.
Nextel currently offers three t ypes of Call Rest rictions:
• no long distance calls allowed
• no incoming calls
• no outgoing calls (except 911)
Contact Customer Care for more information.
Next el 411
Nextel 411 provides friendly services for on-the-go professionalsincluding:
WhitePageListings
You can request a telephone number for any person, business, or government
agency in the continental United States and Hawaii. Operators can also provide
addressinformation if available.
Yellow Page Listings
Youcan ask the operator to perform a search by category if the specificbusiness
name is unknown. Forexample, you can request information for the nearest
copy center to your hotel while on business travel.
Nationwide Call Completion
Nextel 411 opera tors can connect you to any listing in the continental United
States and Hawaii. If requested, the operator will stay on the line while
connecting to the number.
Driving Directions
Nextel 411 operators are able to provide directions to reacha specific
destinati on. Operators will work with you to determine your starting point and
provideclear directions to thedestination.
77
Page 86

Restaurant Reservations
Nextel 411 operators can assist in finding arestaurant and then coordinate
reservations. A Nextel 411 operator will confirm your reservationinformation
through a return phone call. For your convenience, the reservation will be in
your name.
Movie Listings and Showtimes
Nextel 411 operators have access to movie listingsat most theaters inthe
continental United Statesand Hawaii. You only need to askfora specificmovie
or movie theater to get currentmovies, locations or showti mes. Additional
information such as running time, synopsis, and ratings are also available.
Showtimes and listings are available 24-48 hours in advance.
Local Event Information
You can request information on local events such assporting events, concerts,
state and county fairs andother current events. Nextel 411 operators can
provide dates, times, and locations for these events.
Simply dial
continental United States and Hawaii.
411efromyour Nextel phone anywhere within the
78
nextel.com
Page 87

Nextel Voice Mail
Nextel Voice Mail is a flexible, easy-t o-use system that takesm essages when
you’re not available— so you never miss an important call.
This section includes:
Setting Up Your Voice Mail Box Page 79
Receiving Voice Mail Messages Page 80
Using Voice Mail Page 81
AdvancedVoice Mail Features Page 86
Nextel Voice Mail Tree Page 94
This section covers the most commonly used Voice Mail features. Once you log
into Voice Mail, there area numberof innovative features you can access. They
are also covered in this section. After you access Voice Mail, an automated
systemtells you each menu option and which button to press tomake a menu
selection. See “Nextel Voice Mail Tree” on page 94.
Setting Up Your Voice Mail Box
You must set up yourVoice Mail boxbefore you can listen to messages. The
followingsteps will tell you how to setup your mailbox. Before get ting start ed,
see “Recording Your Active Greeting”on page 85 for information you may
want to include in yourgreeting.
1
Using your Nextelphone, dial your 10-digitNextel PersonalTelephone
Number (PTN). For example: 7035557777.
If you are calling from a phone other than your i80s phone, dial your
10-digit Nextel Personal Telephone Number (PTN). When you hearthe
greeting, press * to access your Voice Mail box.
2
The system will prompt you to Enteryourpassword. Enter the last
seven digits of your Nextel Personal Telephone Number. For example:
5557777. This isyour temporary password.
79
Page 88

3
Follow the system instructions to:
• Create a new four- to seven-digitpassword (see “Changing Your
Password” on page 84).
• Record your name (see “Recording Your Name” on page 85).
• Record a greeting (see “Recording Your Active Greeting” onpage
85).
4
When the system says Enjoy using Nextel Voice M ail, your mailbox is
set up.
Receiving Voice Mail Messages
Yourphone is pre-programmed withdefault Call Forwardingsettings to forward
your calls to Voice Mail when you are notavailable. The defaultsetting is
Detailed with the IfBusy, IfNo Answer and If Unreachable fields set to your
Voice Mail access number. If you have subscribed to the Voice Mail andhave
setup your Voice Mail box, butare not receivingyour Voice Mail messages,see
“Setting Call Forwarding to Voice Mail” on page 73.
New Message Indicators
When you receive a new message:
• New VoiceMail Message will display on the screen.
f
• Your phonewill alert youevery 30 seconds until you press
CALL or
80
A under EXIT.
nextel.com
B under
Page 89

Using Voice Mail
Transferring Calls to Voi ce Mail
s or press A under NO while your phone is ringing to transf er
Press
incoming calls directly to Voice Mail. The
idle screen to remindyou that you have a storedVoice Mail message.
Using Voice Mail
Logging Into Voice Mail
To log into Voice Mail, you must first access the Message Center on your
phone.
If MESG is one of your displ ay options:
y icon will appear onthe
From the idle screen, press
If MESG is not one of your display options:
1
From the idle screen, press m.
2
Press R to scroll to Messages.
3
Press B under SELECT.
The Message Centerscreen displays numbers of new and total Voice Mail
messages.
B under MESG.
g
81
Page 90

From the MessageCenter screen, log into Voice Mail:
1
Press S to scroll to Voice Mail. The numbers of new and total V oice
Mail messages display.
2
Press B under CALL tolog into Nextel Voice Mail. Calling displays
as you are connected to the network.
NOTE:If your hear a message that says, “Enter the phone number
of the subscriber you are trying to reach,” enteryourown
10-digit Nextel Personal Telephone Number. When the
greeting plays, press
3
When prompted, enter your password.
NOTE:You must receive a message before you canaccess Voice Mail
for the first time from your i80s phone. (Tip: You can leave
yourself a message.)
* to receivea password prompt.
Main Voice Mail Menu
You are at the main Voice Mail menu when you hear the options listed below.
• To play yourmessages,press
or saved messages.)
• To record a message, press
• To change your greeting, press
• To access yourpersonaloptions press
1. (This option plays only if you have new
2.
3.
4.
If you press
If you press
From the mainVoice Mail menu, press
mayendthecallbypressing
* while you are in asub-menu, you will go to the previous menu.
**, youwill go to the main Voice M ail menu.
# to exit Voice Mail. At any time, you
s.
Playing Messages
When you receive a new Voice Mail message, you can either listen to it
immediately or later. Press
EXIT to listenlater.
B under CALLto listen nowor press A under
nextel.com
82
Page 91

Options availablewhile listening to your messages:
Using Voice Mail
Replay previous six seconds.
Rewind to beginning ofm essage.
Pause/continue the current message.
Fast forward 6 seconds.
Fast forward to end of message.
Playthedateandtimestamp.
Options availablewhile a messageis pl aying or after it has played:
Copy the messageto another subscriber.
(See “Recording, Copying and Replying
to Messages” on page 88.)
Deletethe message.
Reply to a message.
Save the message.
Skip to the next message.
Press 1
Press 11
Press 2
Press 3
Press 33
Press 55
Press 6
Press 7
Press 8
Press 9
Press #
Saving and Deleting Messages
While a message is playingor after you have finished li stening to it, you can
save it or delete it. Tosave amessage,press
To have messages automatically saved, see “AutomaticPlayback” on page87.
Messagesthat are not saved ordeleted remainin your mailbox as new messages.
All messages are automatically deleted after 30 days.
9. To delete a message, press 7.
83
Page 92

Recovering Deleted Messages
To retrieve deleted messages, press *3. This option only applies to the
current Voice Mail session. If you endthe call, the messages will be
permanently deleted.
After exiting the Vo ice Mail session, you
cannot recover deleted messages.
!
C a u t i o n
Changing Your Password
To change your current password:
1
From the main Voice Mail menu, press 4 to access Personal Options.
2
Press 4 to access Personal Preferences.
3
Press 1 to modify password.
4
Enter your newpassword. This passwordmust be all numbers. It must
be 4 to 7 digits long.
5
Press ** to return to the main menu.
NOTE:If you forget your password, contact Customer Care.
84
!
!
W A R N I N G
For security purposes, it is recommended that
you do notchoose s equential or repeated digits
like 1-2-3-4 or 5-5-5-5 for your password.
nextel.com
Page 93

Using Voice Mail
Recording Your Name
When you send,reply to, or copy amessage, your name response precedes the
message.To record or re-record your nameat any time:
1
From the main Voice Mail menu, press 4 to access Personal Options.
2
Press 4 to access Personal Preferences.
3
Press 3 to access the Record Your Name option.
4
Press 2 to record your name.
5
Press ** to return to the main menu.
Recording Your Active Greeting
ThroughNextel Voice Mail service,there are anumber ofways in which people
can reach you.You may want to include one or all of the following options in
your greeting so that callers will know they are available.
• Press 1 to send anumeric message.
• Press 2 tosend an operator assistedmessage.(This option is available only
if you are a subscriber of Operator Assisted Messaging. Contact Nextel
Customer Care for more information.)
• Press # to skip the greeting and record amessage immediately.
To record or alter your greeting at any time:
1
From the main Voice Mail menu, press 3 to change your greeting.
2
Press1 to play, press 2 to record or re-record,or press 3 to delete
your active greeting.
3
Record your greeting and press # when youhave finished.
4
Press ** to return to the main menu.
85
Page 94

Advanced Voice Mail Features
Multiple Greetings
NextelVoiceMail service allows you to haveup tofivedifferentgreetings. You
can designatewhich greetingwill beyour active greeting at any given time. For
example,instead of yourregular greeting, you may wishto activate a different
greetingfor days when you are out ofthe office oron vacation.
The greeting that was recorded during your initial Voice Mail box setup is
Greeting 1. This is your default active greeting.
Recording Additional Greetings
To record additional greetings:
1
From the main Voice Mail menu, press 3 to accessthe Greetings
menu.
2
Press 4 to modify greetings.
3
Enter the greeting number youwish to create or modify.
4
Press 2 to record a greeting.
5
Record your greeting and press # when youhave finished.
6
Press ** to return to the main menu.
Selecting Your Active Greeting
To select youractive greeting:
1
From the main Voice Mail menu, press 3 to accessthe Greetings
menu.
2
Press 3 to select another greeting to be active.
3
Enter the number ofthe greeting that you would like to be active.
4
The system willconfirm your active greeting number.
nextel.com
86
Page 95

Advanced Voice Mail Features
5
Press 1 to play your active greeting.
6
Press ** to return to the main menu.
Greetings Schedule
You can choose to have your greetings automatically activated based on a predetermined time schedule. By activatingthe Greeting Schedule, Greetings1, 2
and 3 will automatically play according to the time schedule listed below.
Greeting 1
Greeting 2
Greeting 3
Evenings and
Weekends
Weekday
Mornings
Weekday
Afternoons
5:00pm--7:59am,Monday--Friday
24-hours, Saturday and Sunday
8:00 am -- 11:59 am
Monday -- Friday
Noon -- 4:59 pm
Monday -- Friday
Activating Your Greeting Schedule
To activate the greeting schedule:
1
From the main Voice Mail menu, press 3 to accessthe Greetings
menu.
2
Press 9 to activate your greeting schedule.
3
Press ** to return to the main menu.
Automatic Playback
By default, the playback mode ofyour Voice Mailservice is setto N ormal.
Nextel’s Automatic Playback feature automatically plays and saves new
messageswhen you log in. Toactivate Automatic Playback:
1
From the main Voice Mail menu, press 4 to access Personal Options.
2
Press 4 to access Personal Preferences.
87
Page 96

3
Press 2 to access Playback Preferences.
4
Press 2 to switch between Automatic and Normal Playback.
5
Press ** to return to the main menu.
Changing the Playback Order of Messages
With Nextel Voice Mail service, you canselectthe order in which you want
unheard messages to be played. You maylisten to thelast received message
first, or you may listen to the first received message first. To select the order in
which new messages shouldbe played:
1
From the main Voice Mail menu, press 4 to access Personal Options.
2
Press 4 to access Personal Preferences.
3
Press 2 to access Playback Preferences.
4
Press 1 to switch between the playback orders.
5
Press ** to return to the main menu.
Recording, Copying and Replying to Messages
These functions allow you to record and send, reply to, or copy a message to an
assigned destination address or Group List number.
If you recorda complete or partial message, but do not send it, Nextel Voice
Mail service will refer to this message as an “in preparation” message. Before
sending messages you maywant to see “Creating GroupLists”on page 90.
To record and send a message:
1
From the main Voice Mail menu, press 2 to access Record a
Message.
2
Record your message and press # to end the message.
nextel.com
88
Page 97

Advanced Voice Mail Features
3
Press 9 at the prompt t o indicate that you want to sendthe message or
press
5 forDelivery Options.
4
Enter the mailbox number and/or group list number(s). (A mailbox
numberis the10-digit Nextel Personal Telephone Number of a Nextel
customer. The nameof the recipient plays ifit is recorded.)
5
Press # to send.
6
Press ** to return to the main menu.
NOTE:You can o nly send messages using this method to Nextel
customers in your home market.
Delivery Options
After you have cr eated amessage, you canassign the message to a category
before you send it. Below is a list of the options that can be applied to a
message:
Urgent
Recipient will hear this message before other
messages.
Private
Recipient cannot copy the message to another
mailbox or phonenumber.
Notification of
Non-Delivery
Future Delivery
You will be notified if the recipienthas notlistened
to your message by a certain date and time.
Youcanspecifyatimeanddate(uptothree
months in advance) for the message to be
delivered. (See “Time and Date Charts” on page
93.)
Important: Once a messagehas been sent for future
delivery, itcannot be retrieved or deleted.
To set a special delivery option:
1
After recording your message but before sendi ng it, press 5 for
Delivery Options.
89
Page 98

2
Press the number that corresponds with thedesired delivery option:
• Press
• Press
• Press
• Press
• Press
3
The list of options will be presented again. Sel ect an additional option
or press
4
Enter the destination mailbox or Group List number of the recipient(s).
5
Press # to send.
6
Press ** to return to the main menu.
1 for Urgent.
2 forPrivate.
3 forNotification of Non-Delivery. At prompt, specify
time and date.
4 forFuture Delivery of Messages. At prompt, specify
time and date.
9 to sendthe message immediately.
9 to send the message.
Working With Group Lists
The Group Listfeature enables you to create a list and assign it a unique name.
Then,you can add mailbox numbers, group lists or individuals — by name — to
the list. Once you create alist you can send avoice message to everyone on the
list by entering the grouplist number. You can have up to 40 group lists. Each
listcanholdupto50addresses.
Creating Group Lists
TosetupaGroupList:
1
From the main Voice Mail menu, press 4 to access Personal Options.
2
Press 2 to access your Group Lists.
3
Press 2 to create a Group List.
4
Enter the one-or two-digit group list number and press #.
nextel.com
90
Page 99

Advanced Voice Mail Features
5
Recordanameforthelistandpress#.
6
Select group m embers by mailbox number, Group List, or name.
7
Press # to save all entries added to the li st.
8
Press ** to return to the main menu.
Modifying a Group List
1
From the main Voice Mail menu, press 4 to access Personal Options.
2
Press 2 to access Group Lists.
3
Press 4 to modify a Group List.
4
Enter the number of the Group List you want to modify.
5
Press 1 to add a new recipient.
6
Press # to save your changes.
7
Press ** to return to the main menu.
Deleting a Group List
1
From the main Voice Mail menu, press 4 to access Personal Options.
2
Press 2 to access Group Lists.
3
Press 3 to delete a Group List.
4
Enter the number of the Group List youwant to delete. The system will
play the nameof the Group List.
91
Page 100

5
Press # to delete the list.
6
Press ** to return to the main menu.
Message Forwarding
This feature allows you to program your phone to automatically forward
incomingmessages to another Nextel customer’smailbox. There are three types
of forwarding: Immediate, Silent and Delayed. They are described below:
• Immediate Forwarding - Caller is notified that the message will be
forwarded.
• Silent Forwarding - Calleris not notified that the message will be
forwarded.
• Delayed Forwarding -Ifacaller’s message is not retrieved after a certain
amount of time, the messagewill automatically beforwarded toanother
mailbox or telephone number.
1
From the main Voice Mail menu, press 4 to access Personal Options.
2
Press 5 to modify Forwarding Options.
3
Select the applicable option below:
• To create a forwarding number,press
• If you have already created aforwarding number, press
modify the number.
• To enable or disable Message Forwarding, press
• To change the forwarding type, press
1 for Immediate Forwarding
• Press
• Press
2 for Silent Forwarding
3 for Delayed Forwarding
• Press
2.
2 to
3.
4.
4
Press ** to return to the main menu.
NOTE:You can o nly forward messages to N extel customers in your
home market.
nextel.com
92
 Loading...