

Page 1

Russell Simmons Phat Farm II
@NNTN5226A@
NNTN5226A
Signature Motorola i733
Getting Started Guide
Page 2

Page 3

Contents
Getting Started...........................................1
Removing the Battery Door .............................3
Locating Your SIM Card ..................................3
Battery .............................................................4
Powering On and Off.......................................6
Activating Service ............................................ 6
Enabling Over-the-Air Security ........................ 6
Finding Your Phone Number ...........................7
Completing Setup ............................................ 8
Phone Basics................................................... 9
SIM Card Security.......................................... 13
Locking the Keypad .......................................14
Wireless Local Number Portability: Bringing
Your Phone Number From Another Carrier ...15
Nextel®Customer Care ........................... 16
Making Calls.............................................18
Phone Calls ...................................................18
Direct Connect
Receiving Calls.............................................. 19
UsingOne Touch Direct Connect
TM
Calls.................................. 18
TM
..............19
Missed Phone Calls .......................................20
Using Speakerphone .....................................20
Using Mute.....................................................20
Making Emergency Phone Calls....................20
Nextel®Voice Mail................................... 22
Setting Up Your Voice Mail Box.....................22
Receiving Voice Mail......................................22
Sending Unanswered Calls to Voice Mail......23
Nextel Online®Services ......................... 24
NOL Services.................................................24
AccessingN OL Services From Your Phone ..24
Nextel®Terms and
Conditions of Service ............................. 26
Safety and General Information............. 38
RF Operational Characteristics......................38
Portable Radio Product Operationand EME
Exposure........................................................38
ElectroMagnetic Interference/Compatibility.. 41
Medical Devices.............................................41
Operational Warnings ....................................42
Operational Cautions .....................................43
i
Page 4

i733 Getting Started
Accessory Safety Information........................44
MOTOROLA LIMITED WARRANTY ........46
Limited Warranty
Motorola Communication Products
(International)...........................................50
Patent and Trademark Information ........54
ii
Page 5
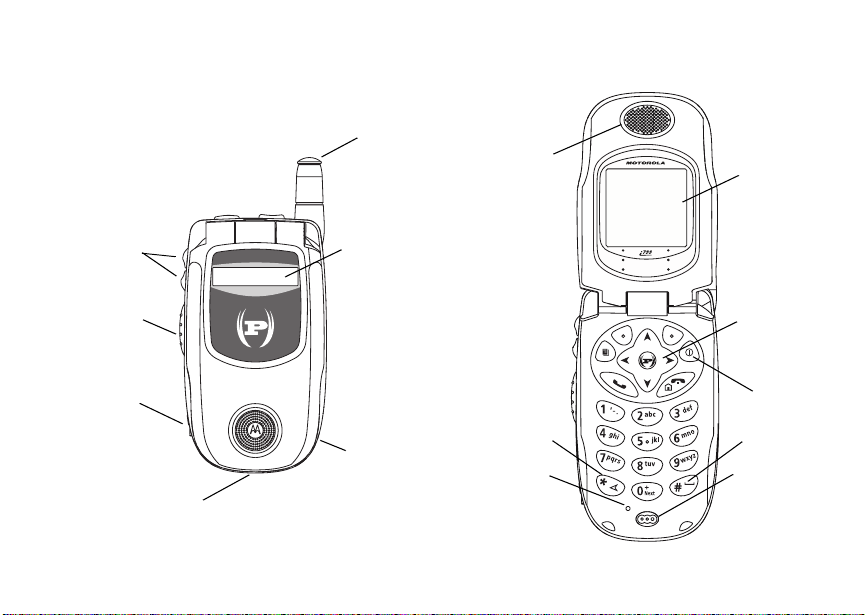
Getting Started
volume
controls
PUSHTO TALK
(PTTTM) button
audio jack
accessory connector
antenna
one-line
display
TM
speaker
(in back)
earpiece
back key
light sensor
full-sized
display
navigation
key
power
button
space key
microphone
1
Page 6
i733 Getting Started
p Power button.
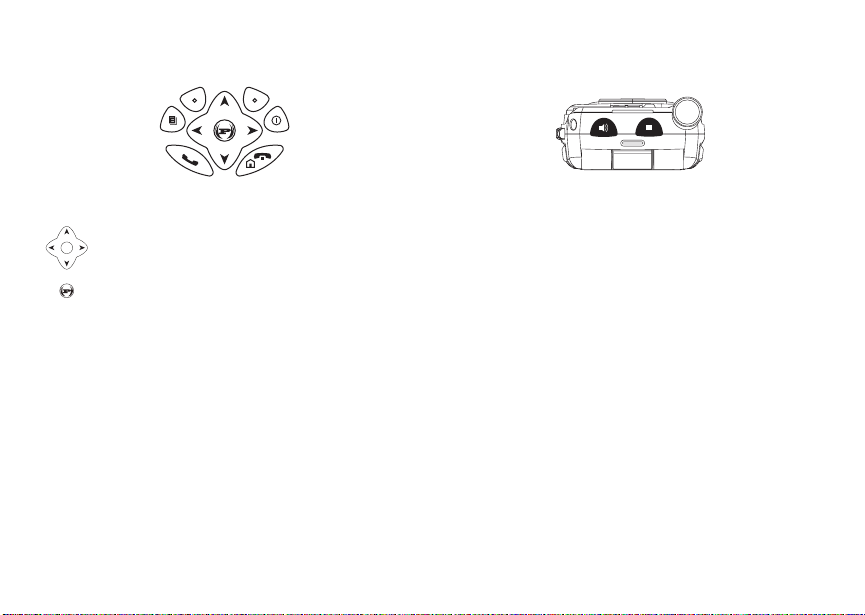
Navigation key —press the arrows to
scroll through menus and lists.
OK key — selects highlighted item;
answers calls.
Note: Throughout this guide and the
i733User’sGuide,theOKkeywill
be representedby O.
m Menu key — accesses context-sensit ive
menus.
A Option key —selectsthe optionappearing
above it on the display.
s Send key —placesphone calls.
e End key — ends phone calls; returns to
idle screen; in browser mode, returns to
Net main menu.
2
t Acts like s when the flip is closed; turns
Direct ConnectTM/ Group Connect
speakeron and off; usedwith voice names
TM
and voice records.
. Acts like e when the flip is closed;
accessesrecentcalls;sends incomingcalls
to voice mail.
Note: For moreinformationon your i733 phone,
refer to the i733 User’s Guideat
www.motorola.com/iden/support. To view
the guide, select Product Manuals and
choose the guide from the pull-down list.
To start using your i733 phone:
• Make sure your SIM cardis in place.
• Charge the battery.
• Activate your service.
• Enable over-the-air security.
Page 7
i733 Getting Started
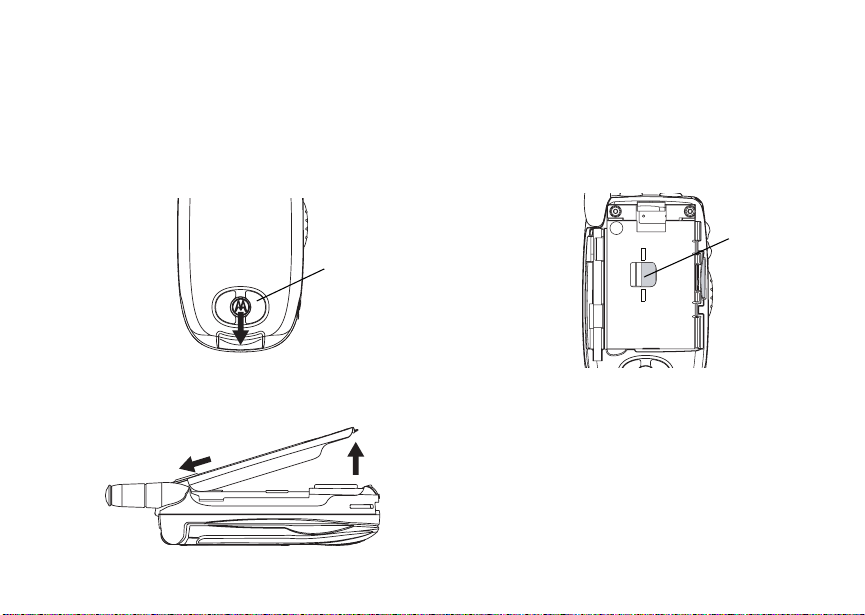
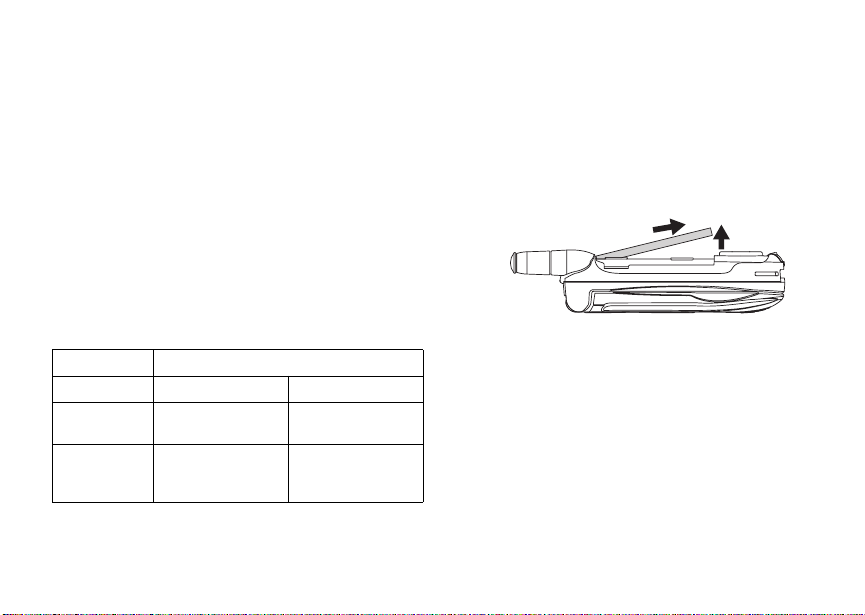
Removing the Batt ery Door
1 Make sure the phone is powered off. See
“Powering On and Off” on page 6.
2 Slidethe release button back until it releases the
battery door.
speaker
3 Allow the battery door to pop up, slide it forward,
and remove it fromthe back ofyour phone.
Locating You r SIM Card
Your SIM (Subscriber Identity Module) card is a
small piece of white plastic located in the SIM card
holderin the back of yourphone, underneath the
battery.
SIM card
If there is noSIM card in yourphone, contact Nextel
Customer Care at 1-800-639-6111.
3
Page 8
i733 Getting Started
Battery
Inserting the Battery
Yourphone comes with a Standard Lithium Ion
Battery.
1 Remove the battery door.
2 Insert the top of the battery into the battery area.
Press the bottom of the battery to secure it.
3 Replace the battery door and press it gently until
you hear a click.
4
Charging the Battery
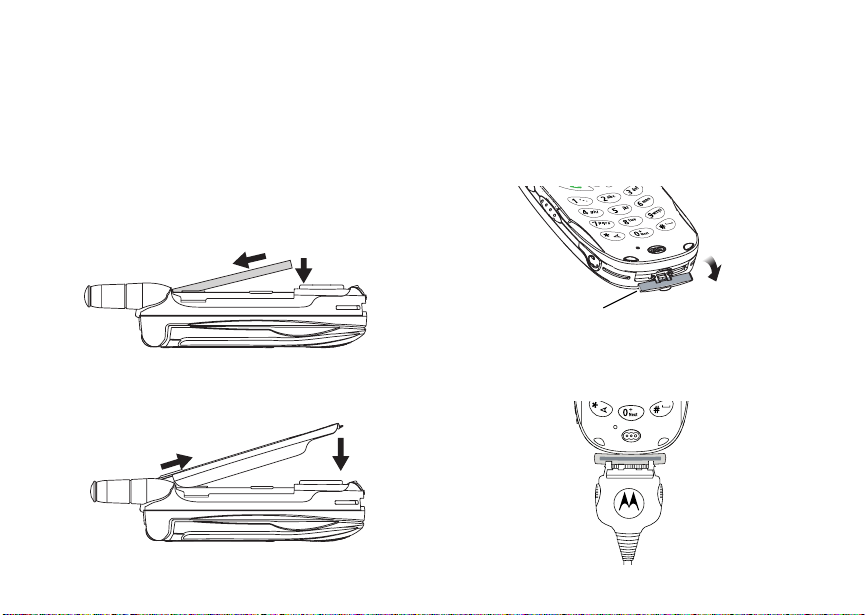
Yourphone comes with a rapid travel charger.
1 Plug the charger into an electrical outlet.
2 Open the connector cover.
connector
cover
3 Plug the other end of the charger into the
accessory connector.
Page 9
i733 Getting Started
ChargerAttached appears on the full-sized
display.
Tip: To remove the charger from the accessory
connector : Pressthe buttons on thesides of
theplug.Pulltheplugstraightout.
4 If you have purchased optional batteries or
chargers, see “Charging T imes”.
Note: While the phone is charging, the keypad
backlight will not illuminate.
Charging Times
See your Lithium Ionbattery and travel chargerto
determine the appropriate charging times.
Recommended charging times:
Battery Charger
Rapid Standard
Standard
Lithium Ion
High
Capacity
Lithium Ion
For best results, charge the batteries within the
temperature range of 50°F to 104°F (10°C to 40°C).
2 hours 4 hours
3 hours 7 hours
Prolonged charging is notrecommended.
Removing the Battery
1 With the phone powered off, remove the battery
door.
2 Remove thebattery bypushing the battery toward
the antenna and lifting it out.
Battery Use and Maintenance
• The Motorola iDEN ApprovedLithiumIon
chargers provide optimumperformance.Other
chargers may not fully charge the iDEN Lithium
Ion batteryor may yield a reducednumber of
lifetime charge cycles.
• Extreme temperatures degrade battery
performance. Do not store the battery where
temperatures exceed 140°F(60°C) orfall below
4°F (-20°C).
5
Page 10
i733 Getting Started
• LithiumIon batterieshave a self discharge rate
and without use, lose about1% of their charge
per day.
• The battery capacityis degraded if thebatteryis
stored for long periods while fully charged. If long
term storage is required,store at half capacity.
Powering On and Off
To power your phoneon:
1 Open the flip.
2 Pressp.
As your phone connects to the network,you will see
a connecting message. When the idle screen
appears, the phone is ready to use.
6
To power your phoneoff:
1 Open the flip.
2 Pressand hold p.
Activating Service
Thefirsttime you power on your phone,yourservice
is activated.
A screen then appears prompting you to select Ok
to update your browser information.This screen will
onlyappear during initialactivation. See “Enabling
Over-the-Air Security”.
Enabling Over-the-Air Security
To receive Over-the-AirRadio Service Software
(OARSS) Security youmust enable security the first
time you power on yourphone or within 20 days of
firstactivation of your phone.
1 Press A under Ok.
Note: If youpressA under Later, the idle screen
will appear. The next time you select Net
fromthemainmenu,youwillbeprompted
to enable security before you canuse
Nextel Online services.
2 You are prompted to enable security. Press A
under Yes. A series of screens and then the
default homepage displays.
Page 11

i733 Getting Started
3 Press e to return to the idle screen.
Within 24 hours of enabling security, you will receive
a Net alert containing your Personal Telephone
Number (PTN), Nex tel Customer Care number,
Direct Connectnumber,and Talkgroup lists for
Group Connect calls.
Note: If you are transferring your phone number
to Nextel from your previous carrier, that
number will be automatically programmed
into the Contactslist for all other phones
that were part ofyour order.For more
information, got o www.nextel.com/WLNP.
1 When you receive a Net alert saying New
Browser Message - Receive Programmi ng
Info,pressA under Goto.
2 Youare prompted to accept changes to your lists.
Press A under Ok.
3 You are prompted againto acceptchangesto
your lists. Press A under Ok.
4 A confirmation screen displays. Press A under
Ok.
5 Press e to return to the idle screen.
Finding Your Phone Number
1 Press m to access t he mainmenu.
2 Scroll to My Info.
3 Press O.
4 Scroll to see your information:
•Name— Enter your name.
•Line1and Line 2 — your phone numbers for
phonelines 1 and2. These arefilledin when
you receive your first Net alert after enabling
over-the-airsecurity on your phone.
• Direct Connect — Your Direct Connect
number is the number that others use to
contact you using DirectConnect service. It is
filled in when you receive your first Net alert
afterenabling over-the-airsecurity on your
phone.
•GroupID— the number of the Talkgroupyou
have joined.
• Carrier IP — theI P address assigned to
Nextel.Itisfilledinwhenyouregisterfor
packet data services.
•IP1Addressand IP2 Address —theIP
addresses assigned to you for using the
Internet with your phone.
•Ckt— Your circuit data number isthe number
you use if you want to use your phone to
transfer circuit data. You receive this number
from Nextel.
• Service Status — This informationmay be
used by Nextel Customer Care if there is a
problem with your phone’s services.
7
Page 12

i733 Getting Started
Completing Setup
Joining a Talkgroup
When you enable over-the-air security, you receive
a list of Talkgroups that have been set up for you if
you subscribe to thi s service. The Talkgroup list is
savedtoContacts.
To receive Group Connect calls made to anyof
these Talkgroups, you must join the Talkgroup.
1 Press A under Contcs. -or-
From the main menu, scroll to Contacts and
press O.
2 Scrollto the Talkgroupyou want to join.
3 Press A under Join.
Note: You will now be able to receive Group
Connect communications from this
Talkgroup only.You can only monitorone
Talkgroup at a time.
Setting Up More Talkgroups
You can set up more Talkgroups in three ways:
• Using Group Connect Management on MyNextel
at www.nextel.com
• Contacting your Nextel Sales Representative at
thetimeofactivation
8
• UsingWirelessManagerto create, manage, and
delete Talkgroups
When you create your Talkgroups, you can select
your own Talkgroupnumbers.
YoucanjoinanewTalkgroupbypressing# and
entering the number using the keypad. Then press
A under Join.
Nextel Worldwide®Service
You can use your phone to make calls
internationally in select cities using other iDEN
networks by calling Customer Care to activate
international dialing on your account. Countries in
whichyou can use your phone include Argentina,
Brazil, Canada, Philippines, Singapore, Israel,
Mexicoand Peru*.
* Credit approval may berequired. Other conditions may apply.
®
Customizing Features
You can controlmany features of your phone,
includingthesizeofthetextonthedisplay,theway
youaccessmainmenuitems,andthevolumeof
incoming sound, rings, and other tones. Refer to
“Customizing Your Phone” in the i733 User’s Guide
for more information.
Page 13
i733 Getting Started
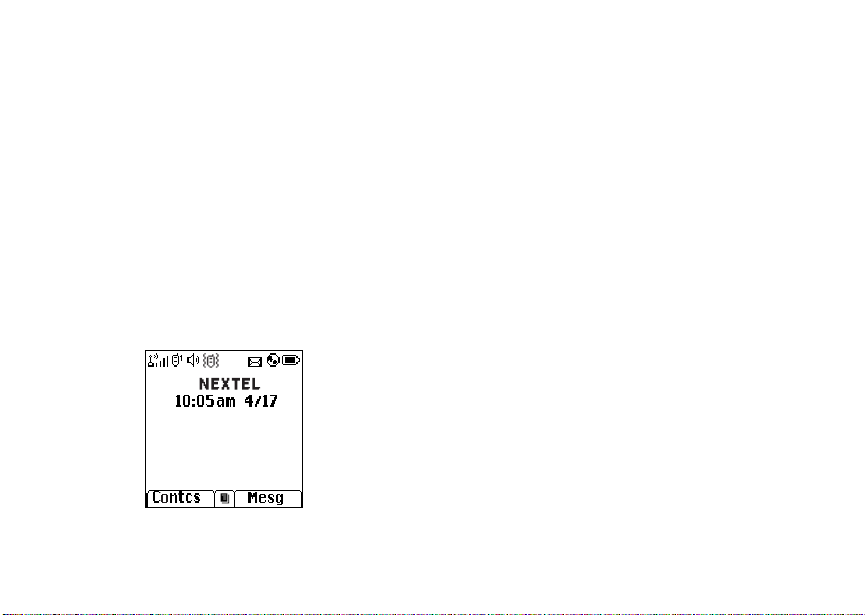
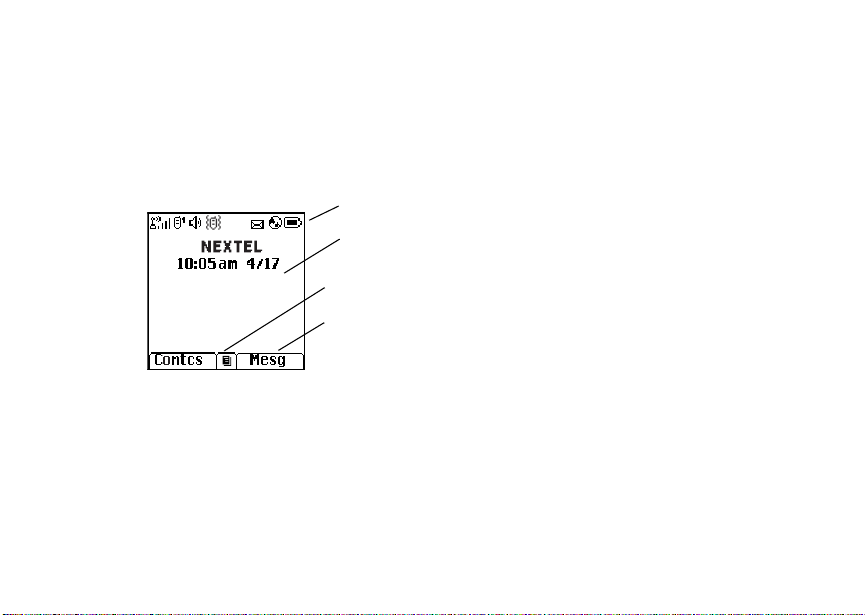
Phone Basics
Any time your phone is powered on, the display
provides you with information and options.
The one-line display shows a shortened version of
the full-sized display. To see more information, open
the flip.
Thescreenshownaboveistheidlescreen.Theidle
screenappearswhen your phone is on, butnot
engaged inany activity.
Text Area
This area displays menus, messages, names,
phone numbers, and other information.
status icons
text area
menu icon
display options
Display Options
Two display options appear at thebottom of most
screens. You select a display option by pressing the
option key below it.
Menus and Lists
Your phone’s features are arranged in menus,
submenus, and lists.
Toaccesstheitemsinamenuorlist,scrollusing
the navigationkey at thetop of yourkeypad. This
key lets you scroll up, down, left, or right. Holding
down the appropriatepart of thenavigation key
speeds up scrolling.
Inthisguide,thissymbol> tells you to select amenu
or list item. For example, Settings > Security
means:
1 Scroll to Settings on the main menu.
2 Press O to see the Settings screen.
3 Scroll to Security.
4 Press O to see the Security screen.
Quick Access to Main Menu Items
Each arrow in the navigation key andO canb e
used to access a main menui tem from the idle
screen. Each of these keys is assigned to a main
menu item when your receiveyour phone.
9
Page 14

i733 Getting Started
OK Key
Pressing O:
• Selects the highlighted menu item or list item
• Sets options
• Confirms actions
• Placesand answer calls
• From the idle screen,accesses ring tones list.
This is the default setting. You can assign a
different main menu item toO.
Menu Key
Manyfeaturesprovide context-sensitive menus that
let you access related featuresand actions. The
icon appears any time a context-sensitive menu is
available. Press m to access the menu.
S
Main Menu
All your phone’s features can be accessed through
the main menu.
Net Access to Nextel Online
a
Java Apps Java applications on your
q
10
services.
phone.
Settings
b
Display/Info
Phone Calls
DC/GC Options
Personalize
Volume
Security
Advanced
Ring Tones
m
VibeAll
list of ring tones
Ring Tones menu
VoiceRecord Recordand play audio
c
My Info View personal phone
j
Customize your phone.
Assign ring tones and turn
ringer off.
messages.
information, including
phone number and Direct
Connectnumber.
Page 15

i733 Getting Started
n Downloads Provides a catalog of ring
GPS Find your approximate
l
Contacts
d
new contact form
list of contacts
Contacts menu
Messages
e
Voice Mail
Net Alert
Text Msgs
tones,wallpaper, games
and applications that you
can download directlyfrom
your phone. Browse
throughthecatalogtoadd
a new ring tone,a
wallpaper to serve as the
background image on your
phone, a game for
entertainment, or an
applicationthat servesyour
business and productivity
needs. Items in these
catalogschangedaily, so
check regularly for fresh
content.
geographical location.
Create, view, store, edit
contacts.
Access messages.
Call Forward Set call forwarding options.
f
Datebook
o
new event form
list of events
Datebook menu
Memo Storeanumbertoaccess
g
Call Timers Phone usage information.
h
Recent Calls
i
list of calls
recent calls menu
Call Setup menu
Shortcuts Createshortcuts to
s
Profiles
p
new profile form
list of prof iles
Profiles menu
Call Alert
k
list of callalerts
Call Alerts menu
Schedule appointments.
later.
Lists recent calls.
screens.
Groupsof settings you
applytogether.
Lists call alerts.
11
Page 16

i733 Getting Started
Status Icons
Statusicons appear at the topof the display. Some
appear at all times. Others appear only when your
phone is engaged in certain activities or when you
have activated certain features.
abcd
efgd
opqr
s
A
B
C
12
12
Battery Strength — A fuller battery
indicates a greater charge.
Signal Strength — More bars next
to the antenna indicate a stronger
signal.
Phone In Use — Yourphone is
active on a phone call.
Direct Connect In Use —Your
phoneisactiveonaDirectConnect
call.
Talkgroup In Use —Your phone is
active on a Group Connect call.
Active Phone Line —1indicates
phoneline 1is ready to make calls; 2
indicates phone line 2is ready to
make calls.
GL
IJ
HK
M Q
u
wxT
yz
DE
U
YZ
N O
Call Forward — Your phone isset to
forward calls.
Ringer Off — Your phone is set not
to ring.
Speaker Off — Sets Direct Connect
and Group Connect sound tocome
through the earpiece rather than
through the speaker.
Messages — You have one or more
messages.
Internet — You are ready to browse
the internet or are browsing the
internet using a secureconnection.
Airplane Mode — Your phone is set
to Airplane Mode.
PacketData — You areready to
transfer packet data orare
transferringpacket data.
TTY — You are ready to use your
phonetomakecallsusinga
teletypewriter device.
Page 17

i733 Getting Started
SIM Card Security
Your SIM card stores all your Contactsand protects
your personalinformation. Since this information is
storedon yourSIMcard, not in your phone, you can
remove the information by removing your SIM card.
Note: Except for making emergency calls, your
phone will not function withoutthe SIM
card.
To prevent unauthorizeduse of your phone, your
SIM card isprotectedby a PIN thatyou enter each
time the phone is powered on. You can change the
PIN or turnoff the requirement that itbe entered.
Formoreinformationon turningthe PINrequirement
on and off, entering the PIN, changing the PIN, and
unblocking the PIN, refer to the i733 User’s Guide.
Inserting and Removin g Your SIM Card
The SIM card is designed for optimal Contacts
storageand feature use. ForNextel SIM card
compatibility information, visit www.nextel.com/sim.
If you remove yourSIM card and use it with another
phone,or use another SIM card with your phone,
the following information is erased:
• The recent calls list
• Call forwarding settings
• Net alerts
• InformationstoredinMemo
• 3 most recentGPS Enabled locations
• Voicerecords
• Voice names
• Datebook events
• Optionsset using the Personalize menu
Note: In somecases, Contactsmay not be
accessible ifyou move your SIM cardto
another phone.Contacts entries created
with y our i733 phone are not readable by
an older iDEN SIM-based phone.
Inserting Your SIM Card
1 With your phone powered off, remove thebattery
door and battery.
2 Hold your SIM cardas shown.
cut corner
13
Page 18

i733 Getting Started
3 Carefully slide yourSIMcardintoyourphone until
it lines up with the marks above and below the
SIM card holder.
SIM card
holder
Removing Your SIM Card
Important: To avoid loss or damage, do not remove
your SIM card from your phone unless
absolutely necessary.
1 With your phone powered off, remove the battery
door and battery.
14
2 While holding the tab down, slide your SIM card
out of the SIM card holder.
SIM card
holder
Note: Protect your SIM card as you would any
delicate object. S tore it carefully.
Locking the Keypad
Locking the phone’s keypad prevents its buttons
frombeing pressed.When thekeypadislocked,you
can only:
• Power the phone onand off
• Unlock the keypad
• Respond to incoming calls, messages, and alerts
Important: Emergency calls cannot be placed while
the keypad is locked.
Page 19

i733 Getting Started
To lock thekeypad:
1 From the idle screen, press m.
2 Press *.
If you pressa keywhile the keypad islocked,
instructions for unlocking the keypad display briefly.
To unlock the keypad:
1 From the idle screen, press m.
2 Press *.
While the keypad is locked, you canrespond to
incoming calls, messages,and alerts just as youdo
when the keypad is not locked. When finished, press
e to return to the idle screen. The keypad remains
locked.
You also have the option of setting your phone to
automaticallylock the keypad if there has been no
activity for a specified time.
1 From the main menu, select Settings > Security
>KeypadLock.
2 To lock the keypad immediately, select Lock
Now. You willbe given theoption to pressm and
* to lock and unlock the keypad.
3 To set a specific time for the keypad to lock if
there has been no activity, select Auto Lock and
then select a time.
The keypad can be set to lock in 5,10, 15 or 20
minutesif the keypad is not touched during the
specified time. To turnthe auto lock off, repeat
step 3 and select Off.
Wireless Local Number Portability: Bringing Your Phone Number Fro m Another Carrier
If you arebringingyour phone numberfrom another
carrier, there isadditionalinformation about certain
features on your Nextel phone that you need to be
aware of.Go to www.nextel.com/WLNP for more
details.
15
Page 20

i733 Getting Started
Nextel®Customer Care
Nextel Customer Care: 1-800-639-6111 or dial 611
from your i733 phone.
NextelWorldwide CustomerCare: +1-360-662-5202
(toll-free from your i733 phone).
16
Page 21

i733 Phone Menu Tree
Net
Java Apps
Java Applications (if any)
Deinstall
Permissions
License Info
Java System
Reset System
Delete All
Settings
Display/Info
Phone Calls
DC/GC Options
Personalize
Volume
Security
Advanced
Ring Tones
VibeAll On/Off
Available Ring Tones
Vibrate
Silent
Assign To
Assign w/vibe
Overview
Memory Usage
Delete
VoiceRecord
[New VoiceRec]
VoiceRecords (if any)
Label
New
Lock
Add To
Memory
Delete
Delete All
My Info
Name
Line 1
Line 2
Direct Connect
Group ID
Carrier IP
IP1 Address
IP2 Address
CKT
Service Status
Downloads
GPS
Position
Privacy
Interface
Contacts
[New Contact]
Search
New
Capacity
Filter
Call Setup
Contacts (if any)
Edit
New
Search
Delete Contact
Delete Number
Capacity
Filter
Call Setup
Messages
Voice Mail
Net Alert
Text Msgs
Memory
Delete All
Call Forward
All Calls
-
-
-
Detailed
To
Status
If Busy
If No Answer
If Unreachable
Status
Datebook
[New Event]
Go To Today
Go To Date
Week View
Month View
Setup
Events (if any)
Edit
New
Go To Today
Go To Date
Week View
Month View
Setup
Delete
Copy
Call # in Event
Alert # in Event
Talkgroup
Memo
Store to Cntcs
Cancel
Delete
Call Timers
Last Call
Phone Reset
Phone Lifetime
DC/GC Reset
DC/GC Lifetime
Circuit Reset
Circuit Lifetime
Kbytes Reset
i733 Getting Started
Recent Calls
Recent Calls (if any)
Store
Delete
Delete All
Call Alert Queue
Call Setup
Shortcuts
[New Entry]
Shortcuts (if any)
Edit
New
Reorder
Delete
Delete All
Profiles
[New Profile]
Profiles (if any)
View
Edit
New
Delete
Delete All
Setup
Call Alert
Call Alerts (if any)
Store
Delete
Delete All
Sort By
Recent Calls
17
Page 22

i733 Getting Started
Making Calls
Your i733 phone makes two types of calls: digital
cellular phone calls and Direct Connect calls. With
Direct Connect calls, you useyour phoneas a
long-range, digital walkie-talkie.
Phone Calls
With the Flip Open
1 Enterthe number you want to call.
2 To place the call:
Press s. -or-
If you entered the number from the idle screen,
press O.
3 To end the call:
Press e. -or-
Close the flip.
With the Flip Closed
1 Selectthe number you want to call from the
recentcalls list and presst. -or-
Use a voice name to select numberand place the
call.
2 To end the call, press ..
18
Direct ConnectTMCalls
1 If the flip is open,enterthe Direct Connect
numberyou want to call. -or-
If the flip is closed, select the number as you
wouldwhen making a phone call.
2 Press and hold the PTT button on the side ofyour
phone.Begin talkingafteryour phone emits a
chirping sound.
3 Release the PTT button to listen.
Tip: To let someoneknowyou want totalkto him
or her ona Direct Connect call, send a call
alert.
Dialing Direct ConnectTMNumbers
EveryDirectConnectnumberhas3 parts— an area
ID, a network ID, and a member ID — with an
asterisk between each of these parts. For example:
999*999*9999.
When you place a D irect Connect call, you must
enterthe whole Direct Connect number including
the asterisks.
Page 23

i733 Getting Started
Tip: When you store a Direct Connect number in
Contacts it isgood practice to include the
whole Direct Connect number including the
asterisks in case you travel withyour phone,
or another Direct Connect user whom you
are trying to reach travels with their phone,
outside of your network.
Receiving Calls
Phone Calls
When you receivea phone call,your phone rings,
vibrates, or lights up its backlight.
Answering
If the flip is closed, press t. -or-
Open the flip. -or-
Press s. -or-
Press O. -or-
Press A under Yes. -or-
Pressany number key.
SendingtoVoiceMail
If the flip is closed, press .. -or-
Press e. -or-
Press A under No.
Ending
Iftheflipisclosed,press..
Press e. -or-
Closethe flip.
Direct ConnectTMCalls
Whenyou receivea Direct Connectcall,your phone
emitsa chirping sound or vibrates.
1 Waitfor the caller to finish speaking.
2 Pressand hold the PTTbuttonon the side of your
phone. Begin talking after your phone emits a
chirping sound.
3 ReleasethePTTbuttontolisten.
Using One Touch Direct
Connect
One Touch Direct Connect sets your phone to call
the most recent DirectConnect number on the
recentcalls list, or a Direct Connect number you
choose, every time you press the PTT button. Refer
to “Setting One Touch Direct Connect” in the i733
User’sGuidefor more information.
TM
19
Page 24

i733 Getting Started
Missed Phone Calls
When you miss a call, this icon V and the number
ofphonecallsyouhavemissedappearbriefly.
With the Flip Open
Ifyouwanttodismissthemissedcallmessage,
press A under Back. -or-
If you want to view the missed call on therecent
callslist, press A under View.
With the Flip Closed
Ifyouwanttodismissthemissedcallmessage,
press ..
If you want to view the missed call on therecent
callslist, press . twice.
Using Speakerphone
Turning on speakerphone makes incoming sound
comeout ofthe phone’s speaker instead of the
earpiece. Speakerphone is available whenever you
areonanactivephonecall.
With the Flip Open
To turn speakerphone on or off:
Press A under Spkr. -or-
Press t.
20
With the Flip Closed
Whenyoumakeacallwiththeflipclosed,
speakerphone is always on.
Opening the flip turns speakerphone off.
Using M ute
Muting calls lets you listento incoming sound
without transmitting sound. Mute is available
whenever you are on an active call.
To turn mute on:
Press A under Mute.
While mute is on, Unmute appears as a display
option.
To turn mute off:
Press A under Unmute.
Making Emergency Phone Calls
Yourphone supportsemergency calling.
Emergency phone calls can bemade evenwhen
your SIM card is blocked or not in your phone.
Dial 911 to be connected to an emergency response
center.Ifyouareonanactivecall,youmustendit
before calling 911.
Page 25

i733 Getting Started
When you make an emergency call, your phone’s
GPS Enabled feature can help emergencyservice
personnel find you, if you are in a location where
your phone's GPS antenna hasestablished a clear
view of theopen sky and your localemergency
response center has the equipment to process
locationinformation. Refer to“GPS Enabled” in the
i733User’s Guide for moreinformation on the
limitations of this feature. Because of the limitations
of this feature, always provide your best knowledge
of your location tothe emergency response center
whenyoumakeanemergencycall.
Important: Emergency calls cannot be placed while
Important: If you have not registered o nthe
the keypad is locked.
network, emergency calls cannot be
placed while your SIM card is in your
phone.
Important: If you are bringingy our phone number to
Nextel from your previous carrier, you
may receive a temporary telephone
numberwhile your Nextel phone is being
programmedwith your permanent phone
number. If you make a call to 911 and the
call fails, the 911 emergency response
center will not be able to call you backon
your Nextel phone if in themeantime,
your Nextel phone has been
programmed with your permanent
telephonenumber. If the call is
disconnected before location and details
have been provided, call 911 again and
advise that you were disconnected.
21
Page 26

i733 Getting Started
Nextel®Voice Mail
Note: To receive voice mail messages, you must
firstset up your voicemail box.
Note: If you are bringingyour phone numberfrom
anothercarrier, it isrecommended thatyou
do not activate your Nextel voice mail until
your permanentnumber has been
activated on yourNextel phone. Messages
left in your Nextel voice mail box will be lost
afteryour permanentnumber has been
activated on yourNextel phone.
SettingUpYourVoiceMailBox
Using your i733 phone, dial your 10-digitNextel
Personal Telephone Number (PTN). For example:
7035557777. Follow the system instructions to
create a new 4- to 7-digit password, record your
name, and record a greeting. When the system
says, “Thank you for using Nextel Voice Mail,” your
mail box is set up.
If you are calling from aphone other than your i733,
dial your 10-digit Nextel PTN. When you hear the
greeting, press the star key to access your voice
mail box. The systemwill prompt you toenter your
password. Enter the last seven digits of your Nextel
PTN.For example:5557777.This is yourtemporary
password.
22
Youareinthemainvoicemailmenuwhenyouhear
the options listed below.
• To play your messages, press 1.(Thisoption
plays only if you have new or saved messages.)
• To record a message, press 2.
• T ochange your greeting, press 3.
• To accessyour personal options,press 4.
If you press * while you are in a sub-menu, you
will goto theprevious menu. If you press **,
you will go to the mainvoice mailmenu. From the
mainvoice mail menu, press # to exit voice mail.
At any time, you may end the call by pressing e.
Receiving Voice Mail
When you receive a voice mail message, New
Voice Mail Message appears on the display.
Press A under Call.
To dismiss the messagenotification:
If the flip is closed, press .. -or-
If the flip is open, press O or press A under
Back, or close the flip.
This icon
you that you have a new message.
y appears on the display, reminding
Page 27

Sending Unanswered Calls to Voice Mail
To send a phone call to voice mail instead of
answering it:
If the flip is closed, press .. -or-
Press e. -or-
Press A under No.
If the caller leaves a message, this icon
on the display, reminding you that you have a new
message.
Note: Refer to “NextelVoice Mail” in the i733
User’s Guide for more information.
y appears
i733 Getting Started
23
Page 28

i733 Getting Started
Nextel Online®Services
You can use your phone’s Net feature to access a
suite of wireless data products known as Nextel
Online (NOL) services. Services include Two-Way
Messaging,Web and PremiumWeb,AddressB ook,
Mobile Email, and wireless access to AOL
Messenger
With the exception of the Two-Way Messaging
Express service, Nextel Online*services requirethe
activation of a Nextel Online service plan. To order,
call 1-800-NEXTEL6 or contact your Nextel sales
representative.
* Nextel Online is only available in the continental United States.
TM
.
NOL Services
• Two-Way Messaging — Discretely send and
receive text messages viayour Nextel phone, any
email address, or www.nextel.com with Two-Way
Messaging. For customers who purchased aFree
Incoming plan, there is a nominal charge for each
messagesent and received. Or, customers have
the option of subscribing to aTwo-Way
Messaging Premierpackage for enhanced
functionality and unlimited messaging.
• Web — accessthe wireless Internetfrom your
Nextelphone.
24
®
Instant
• PremiumWeb — access any site on the wireless
Internet, conduct topic and keywordsearches,
bookmarksites and applications, and customize
your phone's browser menu.
• Address Book — program your Contacts from the
Internet.
• MobileEmail — access andsendemailfromyour
Nextel phone.
®
• AOL
Instant MessengerTM— send andreceive
instant messagesin real–time through a
handset-based interface.
Accessing NOL S ervices From Your Phone
You must first enable security on your phone to
receive NOL services. See “Enabling Over-the-Air
Security”onpage6.
1 Press m toaccessthemainmenuandselect
Net.
Your NOL home page displays.
2 Choosethe service you wantto access.
To access your Two-Way MessagingService:
Select the Text Messaging application from the
Net menu.
Page 29

i733 Getting Started
To access the Web:
Select Web Sites, Marketplace,orSearch
To access Address Book:
Select Business Tools > Address Book
To access Mobile Email:
Select Email & More > Mobile Email
®
To access AOL
InstantMessengerTM:
Select Email & More > AIM
Note: Many screenswillrequireyou to enter text.
For information on entering text, refer to
“Entering Text” in the i733 User’s Guide.
Navigation Keys
•Home—Presse to return to your home page.
Tip: Press e twice to return to your phone'sidle
screen.
•Back—Press* to return to aprevious screen.
•Scroll— A scrollbar on theleft of the phone’s
display indicates that additional text can be
viewed. Scroll using the navigation key.
Tip: While navigating through Nextel Online
screens,a numbermay appear t o the left of
the application or topic youwant to access.
Pressthe correspondingnumber on the
keypad for quicker access to that application
or topic.
When transmitting highly personalor sensitivedata,
such as a credit card number,this icon
E appears,
indicating that the data is encrypted during
transmission.
Note: You may beasked to (re)enable security as
Nexteladds new services or u pon your
return to the U.S. after traveling.
For more i nformationand multimedia demos, go to
www.nextel.com. You can also get one page
service-specific guides called Customer Quick Start
Guidesand other instruction for Nextel Online
services at www.nextel.com.
25
Page 30

i733 Getting Started
Nextel®Terms and Conditions of Service
TERMS ANDCONDITIONS OF SERVICE: This
Agreement starts when you open the inside
package of any phone oraccessory equipment
(“Equipment”), you (“Customer”) received with this
Agreement, or when you call to activate Nextel
wireless communications services (“Service”), or
when you sign this Agreement, whichever applies.
By using the Equipment, Customer applies and
subscribes for Services provided by Nextel (the
“Company”) and confirms that Customer has read,
understands, agrees to and accepts the terms and
conditions stated herein (the “Agreement”). Should
there be any conflict between the terms and
conditions below, and the terms and conditions of
any current Service/Subscriber Agreement between
Customer and Company coveringthe Equipment
accompanying this User’s Guide, the terms and
conditions of the current Service/Subscriber
Agreement willcontrol.
1. USE OF SERVICE – By executingthis
Agreement,Customer covenantsthat it shall comply
withall applicable laws, including without limitation
all Federal Communications Commission rules and
regulat ions. Customer will not use the Servicefor
any unlawfulpurpose.Customer will not usethe
26
Service in aircraft or in motor vehicles where
prohibited by law, ordinance or regulation, as
applicable. Customer acknowledges and agrees
thatall future purchases of Company Services and
Equipment by Customer shall be governed by the
termsand conditionscontained herein unless
Customer and Company enter into a subsequent
Subscriber Agreement.C ompany may change this
Agreement at anytime. Any changes are effective
whenCompany providesCustomerwith written
notice stating the effective date of the change(s). If
Customer elects to use the Servicesor make any
payment to Company on or after the effective date
of the changes, Customer is deemed to have
accepted the change(s).If Customer does not
accept the changes, Customer may terminate
Services as of the effective date by sending written
notice to Company at the address shown on
Customer’s bill. If Services are ter minated before
the end of the current billingcycle,(i) no credit or
refund will be provided for unused airtime; and (ii)
any monthly recurring charge will not be prorated to
thedateoftermination.
2. TERM –The Service Term of thisAgreement
shallbe specified on the Subscriber Agr eement
Form and shall commence as of thedate hereof.
Thereafter,unlessCustomeror Company
terminates thisAgreement as provided for herein,
this Agreement shall automatically renew on a
month-to-month basis. Notice of termination by
Page 31

i733 Getting Started
Customershall be made only in writing to Company
at the address shown onCustomer’s bill.Company
reserves the right not to renew this Agreement at
any time prior to the conclusion of the Service Term
or any renewal term. Except for a Customer
termination in response to Company changes in
accordance with Section 1 above, a$200
cancellationfee per unitwillbe charged to Customer
for cancellation withinthe Service Term, ifa one or
twoyear ServiceTerm is selectedon the Subscriber
Agreement. If Company permits Customer to
suspend Service to Customer’s account(s) for a
temporary period, Company may extend the term of
this Agreement by the length of the temporary
suspension. If Customer changes rate plansduring
the Service Term of this Agreement, or upgrades
Equipment at any time,then Customer may be
required to st art a new ServiceTerm of up to 24
monthsas of the date of the change or upgrade and
may be subject to a transfer fee.
3. CREDIT APPLICATION – This Agreement shall
be contingent upon Company’s approval of
Customer’s credit application. Company may
require Customer toupdateits credit application or
information from time to time. Customer warrants
and representsthat all information furnishedon the
creditapplicationis current,complete,accurate,and
true.If Companysubsequently determines t hat any
statement s madeon thecredit application are false,
incomplete or inaccurate, Company maydeclare
Customer to be in default under this Agreement and
may exercise any remedies it has under this
Agreement at law or in equity. Customer
understands that Company will rely upon the credit
information provided by Customer, including but not
limited to Customer’s social security number or tax
identification number, and otherconfidentialand
personal financial and credit information requested
by Company and supplied by Customer, in making a
decisionto provide Services. Customer consents to
Company’s requests for andverificationof
Customer’s bank references and Company’s
performance of a credit history check utilizing
standard commercial credit reference services in
connection with Company’s review of the
Customer’s creditworthiness. Customer
acknowledges thatCompany may provide payment
history and otherbilling/charge information to a
credit-reporting agency for inclusion in Customer’s
records maintained by such credit-reporting agency.
Customer understands that a security deposit or
airtime usage limit may berequired.
4. EQUIPMENT ANDINSTALLATION – Ifthe sale is
for cash only, title to theEquipment shallbe
transferredto Customer uponreceiptby Company
of a cashier’s or certified check or other equally
secureform of payment in the amount set forth on
the front of thisAgreement. Company shall not be
liable to Customer for delays in delivery or
unavailability of Equipment or any part thereof or for
27
Page 32

i733 Getting Started
the cancellation of any orders of Equipment bythe
manufacturer. Customer, at its option, may have the
Equipment installed by Company at the rate
specifiedon the front of this Agreement.If Customer
purchases the Equipment on credit or on an
installmentbasis,installations, repairs, and removal
of Equipment must be performed by a party
authorized by Company. Company shall not be
liablefor any damage to Customer’s vehicle(s)or
Equipment that may result from installation of
Equipment by any person who isnot employed by
Company. Customer shall not modify, disassemble,
de-install or alter the Equipment in any manner
whatsoever, except in accordancewith the User
Guide accompanying the Equipment.
5. CUSTOMER RADIO EQUIPMENT –Company is
notresponsible f or the installation,operation,quality
of transmission, or, unless separate maintenance
arrangementshave been made between Company
and Customer, maintenance of the Equipment. Any
changein Service or Equipment may require
additional programming or Equipmentor changesto
assigned codes ornumberswhich may require
programming fees. Company reserves the right to
change or remove assigned codes and/or numbers
when such change is reasonably necessary in the
conduct of its business. Customer does not have
any proprietary interest in such codes or numbers.
Although Federal and state laws maymake it illegal
forthirdpartiestolisteninonservice,complete
28
privacy cannot be guaranteed. Company shall not
be liable to Customer or to any third party for any
eavesdroppingonorinterceptionofcommunications
from Company’s System.
6. NEXTEL ONLINE SERVICES – Nextel Online
Services, consisting of certain applications such as
email, data, information and other wireless internet
services (the “Applications ”) are part of the Services
that can be obtained through Company. Certain
Applications offeredby Company or authorized third
parties may be compatible with the Equipment
and/or the Service offered by Company. Customer
acknowledges and agrees that there is no
guarantee or assurance that the Applications are
compatible, or will continue to be compatible, with
Company’s System or any of its Equipment or
Service offerings.Such compatibility or approval
fromCompanyof compatibility shall not be
construed as an endorsement of ap articular
Application ora commitment on thepart of
Company that Application(s) willcontinue to be
compatible with the System, Equipment or Service
for any periodof time. Company reservesthe right,
in its sole discretion, to disable or discontinue any
Application forany reason. Use of NextelOnline
Services requires a wireless internet compatible
phone, and is subject to any storage, memory or
Page 33

i733 Getting Started
otherEquipment limitation. Only certaininternet
sites may beaccessed, and certain Nextel Online
Services may not be available in all Company
Service areas.
7. APPLICATION CUSTOMER CARE AND
SUPPORT – Customer acknowledges and agrees
that in most cases, the developer ofan Application
is responsible for providing customercare and
Applicat ion support to allcustomers using t he
Application. In the event Customer contacts
CompanyCustomer Care with aproblem
concerning theuse of an Application,Customermay
be referred to the Application developer’s customer
care, and Company shall have no obligation to
supportsuch Application.
8. CONTENT; COMMUNICATIONS WITH
OTHERS; INTELLECTUAL PROPERTY RIGHTS –
Companyis not a publisherof third party content
thatC ustomermayfromt ime to time accessthrough
NextelOnlineServices; therefor e Company is not
responsible for the contentprovided by such third
parties, including but not limited tostatements,
opinions, graphics,photos,music,servicesand
otherinformation (“Content”), and accessed by
Customerthrough Next el Online Services. Nor is
Companyresponsible fort he actionsof third parties
arisingfrom a Customer’s contact with such third
partiesvia Nextel Online Services, whethersuch
contact is facilitated through Customer’s own
initiative orvia an embeddedlink on the Equipment.
Company gives noguarantee or assurance as to the
currency, accuracy, completenessor utility of
Content obtained throughNextel Online Services.
Company, Content providers and others have
proprietary interestsin certain Content. Customer
shall not, nor permit others, to reproduce, broadcast,
distribute, sell, publish,commercially exploitor
otherwise disseminate such Content in any manner
without the prior written consentof Company,
Content providers, or others with proprietary
interests in suchContent, as applicable.
9. DEPOSITS – Customer shall provide Company
with a deposit towards the purchaseof the
Equipmentin the amountsetforthon thefrontofthis
agreement. Company alsohas the right,exercisable
in its sole discretion at any time or from time to time,
to require Customer to make adepositto guarantee
paymentof sums duehereunder, including Service
charges.Unless otherwiserequiredby law, deposits
may be mixedwithother funds and willnot earn
interest. Customer hereby grants Company, as
applicable, a securityinterestin such deposits, to
secure the payment of all sums due hereunder as
well as theperformanceof all other payment
obligations Customer may have to the Company
whether now existing or hereafterarising. Upon
termination of Service, or upon thefirstbillingcycle
afterthe twelfthmonth of service, whichevercomes
first,Companymay apply the depositagainstany
29
Page 34

i733 Getting Started
outstanding Service charges of Customer or any
other amount owed to the Company. If Customer is
terminating theAgreement, any remaining balance
willbe released tothe Customer at theC ustomer’s
last known address within approximately 90 days. If
the Customer continueswith the Agreement,any
credit balance remainingafterthe deposit is applied
will be applied to any amounts that may become
owing to the Company in the future except that, at
Customer’s request, amounts of $50 or more will be
released to the Customer at thelatest address
known to Company within 30 days of the Customer
request. In all cases, Customer agrees that any
remaining balance will be retained by Company in
the event the postal service isunable to deliver the
funds to the Customer at the latest address known
to Company. Company reserves the right to
interrupt Services if Service appears to have
excessive charges, payments are delinquent, any
unusual calling patterns are observed on
Customer’s account, or during public safety
emergencies. Such interruption may be done to
protect Customeror Company as the Company
determines in its sole discretion, but in no event
shall the Company be liable to the Customer or to
any third party by reason of interrupting or failing to
cause an interruption of Service.
30
10. RATES, CHARGES AND PAYMENT – The
price established for Service is set forth in the
currentCompanyrate plan(s)selectedby Customer.
Company shall issue invoices for Service.Monthly
Access charges shall be invoicedin advance.
Airtime and longdistance charges shall be invoiced
in arrears. Customer is responsible to pay
Company, on a timelybasis,for charges for Service
as set forth on thefront of this Agreement , and any
modifications thereto. If Customer elects to pay
using a Company-approved credit or debit card,
CustomerherebyauthorizesCompanyto chargethe
credit or debitcardsspecified by Customer from
time to time on a recurring basis for all charges
incurred on the Company Account Numbers set
forthon Customer’s invoice. Customer (i) expressly
authorizesCompany to charge Customer’s
designated credit or debit card account number(s)
for all fees andchargesincurred; and (ii)
reauthorizes Company to charge such account
number each time services are used. Customer
shallpromptlynotifyCompanyofanychangesto the
credit or debitcard or bank account used for
payment. Enrollmentis for the durationof this
Agreement unless cancelledearlierby eitherparty
with thirty(30) days advance written noticeto the
otherparty.Customeracknowledges that
chargeable timefor telephone calls and Nextel
Direct Connect calltransmissions originated by a
unit begin when a connection is established with
Page 35

i733 Getting Started
Company facilities. A new Nextel Direct Connectcall
is initiated by a call participant if that participant
respondsmore than six (6) seconds after the other
party finishes its Nextel Direct Connect
transmission. Customeracceptsresponsibility for
Airtime charges from incoming telephone calls to its
mobile unit from the time that Customer responds to
the call. If Customer disputes any Service charges,
Customer must pay the entire amount set forth in
the invoice by the due date and submit a written
explanation within forty five (45) days from the date
on the invoice. Direct Connect, Group Connect, and
Nationwide Direct Con nect charges are calculated
by multiplying the minutes of use, number of
participants, and applicable rate, to be paidby the
initiator.If Company determinesthat an error was
made on Customer’s invoice, Company shall credit
Customer’s account in theamountof the error. If
Customerdoesnot pay the amount in dispute,
Company may exercise any remedies it may have
under this Agreement for non-payment of Service
charges.Company reserves theright to modify any
and all elements of the Service charges at any time
and each such modification shall be effective
immediately upon the Company’s communication
thereofto Customer, unless the Company’s
communication indicates a later effective date with
respectto such modification. Payments which are
not received within thirty (30) days from the date of
the invoice shall be subject to late payment charges
as set forth in this Agreement. If the parties have
agreed that payments are to be made in
installments, or on credit, as indicated on the front of
this Agreement,Customershall beresponsible for
payingamountsdueas agreedto in this Agreement.
If Customer does not make all payments when t hey
are due, such failure shall be a default under this
Agreement and Company shall be entitled to
exercise any remedies it mayhave under this
Agreement or at law or in equity. If the sale of the
Equipment ison a credit or installment basis and the
Customer acceptsdelivery of theEquipment, the
Customer maynot return the Equipment or receive a
refund of any amounts paid and agrees to continue
makingpayments as required under this agreement
until the Equipment sale price is paid in full.
11. NONPAYMENT/BREACH – A late payment
chargeof 1.5% (orthe maximum int erest rate
permitted by law)per month may be appliedto
Customer’s account if monthly invoices are not paid
by the due date.The late payment chargeis applied
to the total unpaid balance due and outstanding.
The late payment charge is for costs related to the
non-timely payment and shall not be deemed an
interest payment. Achargeof $25.00 will be made
by Company for anycheck or negotiableinstrument
tendered by Customer and returned unpaid by a
financial institution for anyreason. Company may
demand payment by money order, cashier’s check,
or similarlysecure form of payment,at Company’s
31
Page 36

i733 Getting Started
discretion at any time or from time to time. If
Company obtains the services of a collection or
repossession agency or an attorney to assist
Companyin remedying Customer’s breach of this
Agreement, including but not limited to the
nonpayment for cha rges hereunder, Customer shall
be liable for this expense. Customer understands
that in the event of nonpayment of charges or any
other breach of the terms and conditions of this
Agreement, in additionto any other remedies
Company may have, Company may temporarily or
permanently terminate Service to Customer. If
Service is terminated and not reconnected within
thirty (30) days, all outstanding payments to be
made in installments are accelerated and
immediately due infull.If Company disconnects the
Service, Customershall beliableto satisfy and
discharge all outstanding amounts due and pay a
reconnect charge of $25.00 per unit, in addition to
any advance payment of Service charges that may
be requested by the Company at its discretion,
beforethe Company willreactivate Service.
Company reserves the right to modify the terms of
Service as aprecondition to reactivating Service.If
the Equipment is purchased on an installment basis,
or credit, the Company may takepossession of the
Equipment, at any time wherever the same may be
without legal processand without being responsible
for loss and damage.
32
12. RISK OF LOSS; INSURANCE – Upon
Customer’s acceptanceof delivery of the
Equipment, allrisk of loss, damage, theft, or
destruction tothe Equipment shall be borneby the
Customer. No suchloss, damage, theft, or
destruction ofthe Equipment,in whole orpart,shall
impair the obligations ofCustomer hereunder,
including, withoutlimitation, responsibility for the
payment of Service Charges due hereunder.
13. PROPERTY DAMAGEINSURANCE – If
Customer selects Direct Protect insurance
protection, Company will remit the monthly charge
for the insurance that appearson Customer’s bill to
The Signal Telecommunications Insurance Services
(“Signal”) on Customer’s behalf.Customer
acknowledges that insurance protection is offered
by the Signal, not Company, and that any requests
for information or claims regarding the insurance
shall be directed to Signal. Customer acknowledges
having received a summary of coverage,including
deductible information, which is also available by
calling Signal at1-888-352-9182. Depending on the
type of Equipment being purchased by Customer,
Customer may not be eligible for Direct Protect
Insurance protection.
14. TAXES, FEES, SURCHARGES &
ASSESSMENTS – Customer must p ay all federal,
state,and local taxes, fees, surcharges, and other
assessments (collectively, “Charges”) thatare
Page 37

i733 Getting Started
imposed on transactions subject to this Agreement.
Customer will be responsible for such charges
regardless of whether the Charge is: (a) imposed
upon the sale of telecommunications services, other
services, equipment,and/or other products; (b)
measuredby gross receiptsfrom sales made by
Companyto Customer; (c) imposed upon the
Customer or upon the Company; (d) imposed as a
per-line or per-unit Charge.S uch Charges include,
but are not limitedto: excise taxes; sales and
transaction taxes; gross receipts taxes, utility taxes;
universal serviceassessments; telephone relay
service (TRS) assessments; and other regulatory
fees and assessments. Customer shall not be
responsible for taxes imposedon Company’s net
income.If Customer claims an exemption from any
such Charge, Customer must provide Company with
valid and properly-executed documentation of such
exemption before such exemption shall become
effective. Customer must provide Company with the
Customer’s Primary Place of Use of Company’s
Service, as defined by Customer’s residential street
addressor primary business address.
15.COVERAGEAREA–LocalDispatch(Direct
Connect), cellular calling, Nextel Online Services,
and respectivecoverageareas forthese Services
are subject to change at any time atthe sole
discretion of Company.
16. LIMITATION AND CONDITION OF LIABILITY;
INDEMNITY – Company does not assume and shall
havenoliability undertheAgreement for(i) failureto
deliver the Equipment within aspecified time period;
(ii)availability anddelays in delivery of the
Equipment, or(iii) damagecausedto the Equipment
due directly or indirectly to causes beyond the
control of Company, including, but not limited to acts
of God, acts of the public enemy, acts of the
government, acts or failure to act of the Customer,
its agents, employees or subcontractors,fires,
floods, epidemics, quarantine restrictions, corrosive
substances in theair or otherhazardous
environmental conditions, strikes, freight
embargoes, inability to obtain materialsor services,
commotion, terrorism, war, unusually severe
weather conditions or default of Company’s
subcontractorswhether or not due to anysuch
causes;(iv) the use of NextelOnlineServices,
including but not limitedto the accuracy or utility of
any information acquired from the Internet through
Nextel Online Services; or Internet Services,
Content or Applicationswhether or not supportedby
Company;or (v) any action Company takes in its
sole discretion to protect Company’s network,
systems, and the rights or property of Company, its
subscribers, or others from “hacking,” “spamming,”
“viruses ”or other acts of third partiesthat Company
believes adversely impact its network or systems.
WITHOUT LIMITING THE FOREGOING, THE
33
Page 38

i733 Getting Started
COMPANY’S SOLE LIABILITY FOR SERVICE
DISRUPTION, WHETHERCAUSED BY T HE
NEGLIGENCE OF THE COMPANY OR
OTHERWISE, IS LIMITED TO A CREDIT
ALLOWANCE NOT EXCEEDING AN AMOUNT
EQUAL TOTHE PROPORTIONATE CHARGE TO
THE CUSTOMER FOR THE PERIODOF SERVICE
DISRUPTION. EXCEPT AS OTHERWISE SET
FORTH IN THE PRECEDING SENTENCE, IN NO
EVENT IS THE COMPANY LIABLE FOR ACTUAL,
CONSEQUENTIAL, INCIDENTAL, SPECIAL OR
OTHER INDIRECTDAMAGES CAUSED BY ITS
NEGLIGENCE OR OTHERWISE, NORFOR
ECONOMIC LOSS, PERSONAL INJURIES OR
PROPERTY DAMAGES SUSTAINED BY THE
CUSTOMER OR ANY THIRD PARTIES.Customer
agrees to indemnify, defend, and hold Company
harmless from any Customer violations ofFCC rules
and regulations or Customer violation of any
statutes, ordinances or laws of any local, state, or
federal public authority.
17. COMPLETE
AGREEMENT/SEVERABILITY/WAIVER – This
Agreement setsforth all ofthe agreementsbetween
the parties concerning the Service and purchase of
the Equipment, and there are no oral or written
agreements between them other than as set forth in
this Agreement. Except for changes made by
Companyin accordance with Section 1 above,no
amendment or addition to this Agreement shall be
34
binding upon Company unless it is in writing and
signed by both parties (and, in the case of the
Company, by an officer of the Company).Company
shall not be bound by the terms and conditions in
Customer’s purchase order or elsewhere, unless
expressly agreed to in writing by an officer of the
Company. This Agreement becomeseffectivewhen
accepted by theCompany.Shouldany provision of
this Agreement be illegal or in contravention of the
law,such provisionshall be considerednulland void
but the remainder of this Agreementshall not be
affectedthereby.Thefailureof Company at any time
to require the performance by Customer of the
provisions of this Agreement shall not affect in any
way the right to require such performances at any
latertime nor shall the waiver by Company of a
breach of any provision hereof be taken or held to
be a waiver of compliance with or breach of any
otherprovisionor a continuingwaiver of such
provision.
18. ASSIGNMENT/RESALE/GOVERNING LAW –
This Agreement may be freely assigned by
Company t o any successor of itor any other firm or
entity capable of performing its obligations
hereunder, and upon any such assignment,
Company shall be releasedfrom all obligations to
Customer.CustomermaynotassignthisAgreement
or resell the services which are subject to this
Agreement without prior written consent of
Company. Subjectto the restrictions contained
Page 39

i733 Getting Started
herein,this Agreement shall bind and inure tothe
benefit of the successors and permitted assigns of
the parties hereto. This Agreement shall be
governedby the laws of the State or Commonwealth
in which this Agreement is executed by the
Company.
19. NOTICE REGARDING USE OF SERVICE FOR
911 OR OTHEREMERGENCY CALLS -(a) The
Service provided hereunder does not interact with
911 and other emergency services in the same
manner as landline telephone service. Depending
on Customer’s location and the circumstancesand
conditions of a particular call, the Service provided
hereunder may not beable to identifyCustomer’s
telephone numberand/or locationto emergency
services, and Customer may notalwaysbe
connected to the appropriate emergency services
provider . Company is deployingwirelessEnhanced
911 (“E911 ”) service to help publicsafety
authorities locate Customers and other users of the
Service who make 911 calls. However, E911 is not
availablein all areas,and even in those areaswhere
it is implemented, inherent limitations in this
advanced wireless technology prevent it from being
100% reliable.Accordingly,Companyagreesto
provideCustomerwithE911servicewhere
available, and Customer acknowledges that E911
service is not available in all areas and is not
completely reliable. (b) Customerherebyconsents
to Company’s disclosureof C ustomer information,
including but notlimitedto Customer name,
address,telephone number, and location, to
governmental andquasi-governmental institutions
such as emergency service providers and law
enforcement agencies, where Company deems it
necessary to respond to an exigent circumstance.
20. NO WARRANTY (SERVICE) – COMPANY
MAKES NO WARRANTIES, EXPRESS OR
IMPLIED, INCLUDINGWITHOUT LIMITATION,
ANY IMPLIED WARRANTY OF
MERCHANTABILITY ORFITNESS FOR A
PARTICULAR PURPOSE TO CUSTOMER IN
CONNECTION WITH ITS USE OF THE SERVICE.
IN NO EVENT SHALL COMPANY BE LIABLE FOR
INCIDENTAL, CONSEQUENTIAL OR OTHER
INDIRECT DAMAGES TOTHE FULLEXTENT THE
SAME MAY BE DISCLAIMED BY LAW.
CUSTOMER ACKNOWLEDGES THAT SERVICE
INTERRUPTIONS WILLOCCUR FROM T IME TO
TIME, AND AGREES TOHOLD COMPANY
HARMLESS FOR ALL SUCH INTERRUPTIONS.
21. NO WARRANTY (EQUIPMENT) – COMPANY
MAKES NO WARRANTIES OR
REPRESENTATIONS OF ANYKIND,
STATUTORY, EXPRESS OR IMPLIED, TO
CUSTOMER OR TO ANYOTHER PURCHASER
OF THIS EQUIPMENT. WITHOUT LIMITING THE
FOREGOING, COM PANY SPECIFICALLY MAKES
NO EXPRESS OR IMPLIED WARRANTIES OF
35
Page 40

i733 Getting Started
MERCHANTABILITY ORFITNESS FOR A
PARTICULAR PURPOSE. CUSTOMER HEREBY
WAIVES, AS AGAINST COMPANY, ALL OTHER
WARRANTIES, GUARANTEES, CONDITIONS, OR
LIABILITIES, EXPRESS OR IMPLIED, ARISING BY
LAW OR OTHERWISE. IN NO EVENT SHALL
COMPANY BE LIABLE F OR CONSEQUENTIAL,
SPECIAL, OR INCIDENTAL DAMAGES,
WHETHER OR NOT OCCASIONED BY COMPANY
NEGLIGENCE AND INCLUDING,WITHOUT
LIMITATION, LIABILITY FOR ANY LOSS OR
DAMAGE RESULTING FROM THE
INTERRUPTION OR FAILURE IN THE
OPERATION OF ANY EQUIPMENT SOLD OR
OTHERWISE PROVIDED HEREUNDER. THERE
ARE NO WARRANTIES WHICH EXTEND
BEYOND THE DESCRIPTION CONTAINED
HEREIN. CUSTOMER ASSUMES THE ENTIRE
RISK AS TO THE QUALITY AND PERFORMANCE
OF THE EQUIPMENT. UNLESS OTHERWISE
AGREED BY COMPANY, IF THE EQUIPMENT
PROVES DEFECTIVE, THE COSTS OF ALL
NECESSARY SERVICING AND REPAIR WILL BE
BORNE BY CUSTOMER.
22. NEXTEL ONLINE “GOLD ” SERVICES –Nextel
Online“Gold ”Servicesare those Int ernet and data
Services offered in conjunction with a Serviceplan
using the suffix “Gold ”; e.g., Packetsream Gold.
Company may charge an activation fee for each IP
addressfor these services. These servicesmay be
36
usedonly with mobile clients for Internet/intranet
accessand Internet e-mail via a standard HTML
browser (e.g., Netscape ® Navigator or
Communicator, Microsoft ®Internet Explorer, etc.) It
mayalsobeusedwithsoftwareforproxy
applications, for dispatchapplications, for POP3
email access, and for other use specifically
approved by Nextel. These Internetand data
Services may notbe substituted for a private line or
framerelayconnection, or be used for streaming
data feeds. Company reserves the right to deny
service, without notice, to any Customer whose
usage adversely impacts Company’s network,
systems or other subscribers’ use of Services.
23. NETWORK SECURITY, INTEGRITY, AND
OPTIMIZATION - Company may takeany and all
action it deems necessary or reasonable to (i)
protect its network and systems, or the rights of
Company, Company’s subscribers or others; (ii)
optimize or improveits network or systems; or (iii)
improve its products and services. Such action may
include, without limitation, employing methods,
technologies, orprocedures to filter or block
messages sent throughCompany’s networkor
systems.Accordingly, Company may, in its sole and
absolute discretion, at any time, filter “spam ”,
without regard to anyCustomer preferencesolicited
Page 41

i733 Getting Started
by Company or exercised by Customer. Company
shall not be liable to Customer or to any third party
for blocking messages sent through Company’s
networkor systems.
24. CUSTOMER INFORMATION – Company may
in its sole discretion access, use, and disclose to
thirdparties, any information (whether personally
identifying information, or “Customer proprietary
network information,” within the meaning of 47
U.S.C.§ 222 and its implementing regulations) it
collects, possesses or developsabout Customer(i)
to provide any product or service that Customer
purchases, or accesses through or useson the
Equipment; (ii)to conduct marketing activities in
accordance withapplicable law, and Company’s
privacy policy, asdescribed below; (iii) to provision a
number portability request, either through Company
or a new service provider; (iv) to complywith the
law; or (v) torespondto emergencies. Customer
acknowledges that( i) Company posts aprivacy
policy on its website that explains its policies with
respectto the collection, access, use, and
disclosure of personal Customer information; (ii)
Companymay revise such policy atany t ime; and
(iii)the most recent version of such policy shall at
any time serve as the effective privacy policy,
regardless of the date on whichC ustomer entered
into this Agreement.
25. COMMERCIAL LOCATION BASED SERVICES
- If Customer purchases any commercial location
based service for use through Company’snetwork
or Equipment, Customer shall clearly,
conspicuously, and regularly notify all its users that
location information (i.e., the geographic
coordinates of the Equipment) may be accessed,
used, or disclosed toprovidet he location based
serviceand that, as a result, Customer or someone
other than the user of the Equipment may beable to
identify the geographic coordinates of the
Equipment. CUSTOMER AGREES TO INDEMNIFY
AND HOLD COMPANY HARMLESS AGAINST
ANY AND ALLCLAIMS, DEMANDS, ACTIONS,OR
CAUSES OF ACTION (INCLUDING ALL ACTIONS
BY THIRD PARTIES) ARISING OUT OF A
BREACH OF THE OBLIGATIONS ENUMERATED
IN THIS SECTION25 OF THE AGREEMENT.
37
Page 42

i733 Getting Started
Safety and General Information
IMPORTANT IN FORMATION ON SAFE AND
EFFICIENT OPERATION.
READ THIS INFORMATION BEFORE USING
YOUR INTEGRATED MULTI-SERVICE
PORTABLE RADIO.
RF Operational Characteristics
Yourradio product containsa radio frequency
transmitterto convey the information you wish to
sendas well as occasional automaticsignalsused
to sustain connection to the wireless network, and a
receiver which enables you toreceive
communicationand connectioninformation from the
network.
Portable Radio Product Operation and EME Exposure
YourMotorolaradio product is designed to comply
withthe following nationaland international
standards and guidelines regarding exposure of
human beings to radio frequencyelectromagnetic
energy (EME):
38
• UnitedStates Federal Communication s
Commission, Code of FederalRegulations;47
CFR part 2 sub-part J.
• American National Standards Institute (ANSI) /
Institute of Electrical and Electronics Engineers
(IEEE). C95. 1-1992.
• Institute of Electrical and Electronics Engineers
(IEEE). C95. 1-1999 Edition.
• International Commission on Non-Ionizing
Radiation Protection (ICNIRP) 1998.
• Ministry of Health (Canada). Safety Code 6.
Limitsof Human Exposure to Radiofrequency
Electromagnetic Fields in theFrequencyRange
from 3 kHzto 300 GHz,1999.
• Australian Communications Authority
Radiocommunications (Electromagnetic
Radiation - Human Exposure) Standard 2003.
• ANATEL, Brasil Regulatory Authority, Resolution
256 (April 11, 2001) “additional requirements for
SMR, cellular and PCS product certification.”
To assure optimal radio product performance
and make sure human exposure to radio
frequency electromagnetic energyis within the
guidelines set forth in the above standards,
always adhere to the following procedures:
Page 43

i733 Getting Started
Phone Operation
When placing or receiving a phone call, hold your
radio product as you would a wireline telephone.
Speak directly into the microphone.
Two-way radio operation
When using your radio productas a
traditional two-way radio, hold the
radio product in a vertical position
with the microphone one to two
inches (2.5 to 5 cm) away from the lips.
Body-worn operation
To maintain compliance with FCC RF exposure
guidelines,if you wear a radioproduct on your body
when transmitting, always place the radio product in
a Motorola approved clip, holder,holster, case
or body harness for this product.Useof
non-Motorola-approved accessories may exceed
FCC RF exposure guidelines.If you do not use a
Motorola approved body-worn accessory and
are not using the radio product in the intended
use positions along side the head in the phone
mode or in front of the face in the two-way radio
mode, then ensure the antenna and the radio
product are kept the following minimum
distances from the body when transmitting
• Phone or Two-way radio mode: one inch (2.5
cm)
• Data operation using any data feature with or
without an accessory cable: one inch (2.5 cm)
Antenna Care
Use only the supplied or an approved
replacement antenna. Unauthorized antennas,
modifications, or attachments coulddamage the
radio product and may violate FCC regulations.
DO NOT hold the antenna when the radio
product is “IN USE”. Holding the antenna affects
call quality and may cause the radio product to
operate at a higherpower level than needed.
Approved Accessories
For a listof approved Motorolaaccessories call
1-800-453-0920, or visit our website at
www.motorola.com/iden.
39
Page 44

i733 Getting Started
ALL MODELS WITH FCC ID AZ489FT5824 MEET THE
GOVERNMENT’S REQUIREMENTS FOR EXPOSURETO
RADIO WAVES.
Your wireless phone is a radiotransmitter and receiver. Itis
designed and manufactured not to exceed the emission
limits for exposure to radiofrequency (RF) energy set by the
Federal Communications Commission of the U.S.
Government. These limits are part of comprehensive
guidelines and establish permitted levels ofRF energy for
the general population. The guidelines are based on
standards that were developed by independent scientific
organizations through periodic and thorough evaluation of
scientific studies. The standards include a substantial safety
margin designed to assure the safety of all persons,
regardless of age andhealth.
The exposure standard forwireless mobile phones employs
a unit of measurement known as theSpecific Absorption
Rate,orSAR.TheSARlimitsetbytheFCCis1.6W/kg.
Tests for SAR are conducted using standard operating
positions reviewed by the FCC with the phone transmitting
at its highest certified power level in all tested frequency
bands. Although the SAR is determined atthe highest
certified power level, the actual SAR level of the phone
while operating can be well below the maximum value. This
is because the phone isdesigned tooperate at multiple
power levels so as to use only the power required to reach
the network. In general, the closer you are to a wireless
base station antenna, the lower the power output.
Before aphone model is available for sale to the public, it
must be tested and certified to the FCC that is does not
exceed thelimit established by the government-adopted
requirement for safe exposure. The tests are performed in
positions and locations (e.g., at the ear and worn on the
40
1
body) as required by the FCC for each model. The highest
SAR value for this model phone when tested for use at the
ear is 1.186 W/kg and when tested on the body, as
described in this user guide, is 1.15 W/kg during packet
data transmission. (Body-worn measurements differ among
phone models, depending upon available accessories and
FCC requirements.)
While there may be differences between the SAR levels of
various phones and at various positions, they all meet the
government requirement for safe exposure.
The FCC has granted an Equipment Authorization for this
model phone with all reported SA R levels evaluated as in
compliance with the FCC RF exposure guidelines. SAR
information on this model phone is on file with the FCC and
can be found under the Display Grant section of
http://www.fcc.gov/oet/fccid after searching on FCC ID
AZ489FT5824.
Additional information on Specific Absorption Rates (SAR)
can be found on the Cellular Telecommunications Industry
Association (CTIA) web-site at http://www.wow-com.com.
1
In the United States and Canada, the SAR limit for mobile
phones used by thepublic is 1.6 watts/kg (W/kg)
averaged over one gram of tissue. The standard
incorporates a substantial margin of safety to give
additional protection for the public and to account forany
variations in measurements.
2
The SAR information reported to the FCC includes the
FCC-accepted Motorola testing protocol, assessment
procedure, and measurement uncertainty range for this
product.
2
Page 45

i733 Getting Started
Electro Magnetic Interference/Compatibility
Note: Nearly every electronic device is
susceptible to electromagnetic
interference (EMI) if inadequately
shielded, designed or otherwise
configured for electromagnetic
compatibility.
Facilities
To avoid electromagnetic interference and/or
compatibility conflicts, turn off your radio productin
any facility where posted notices instruct you to do
so. Hospitals or health care facilities may be using
equipment that issensitive to external RF energy.
Aircraft
When instructedto doso, turn off your radio product
when on board an aircraft. Any use ofa radio
productmust be in accordance with applicable
regulations per airline crew instructions.
Medical Devices
Pacemakers
The Advanced Medical TechnologyAssociation
(AdvaMed) recommendsthat a minimumseparation
of 6 inches (15 cm) be maintained betweena
handheld wireless radio product and a pacemaker.
These recommendat ions are consistent with those
of the U.S.Food and Drug Administration.
Personswith pacemakers should:
• ALWA YS keep the radio product more than 6
inches (15 cm) from their pacemaker when the
radioproductis turnedON.
• Not carry the radio product in a breast pocket.
• Use the earopposite the pacemaker tominimize
the potential for interference.
• Turn the radio product OFF immediately if you
haveany reason to suspectthat interference is
taking place.
Hearing Aids
Some digital wirelessradioproductsmay interfere
with some hearingaids.In the event of such
interference,you may want t o consult your hearing
aid manufacturer to discussalternatives.
41
Page 46

i733 Getting Started
Other Medical Devices
If you useany other personalmedicaldevice,
consult the manufacturer of your device to
determine if it is adequately shielded from RF
energy.Your physician may beable to assistyou in
obtaining thisinformation.
Use While Driving
Check the laws and regulations on the use of radio
products in the area where you drive. Always obey
them.
When using the radio product while driving, please:
• Give full attention to drivingand to the road
• Use hands-freeoperation, if available.
• Pull off the road and parkbeforemakingor
answering a callif driving conditions so require.
42
.
Operational Warnings
For Vehicles with an Air Bag
Do not place a portable radio productin the area
over the air bagor i n the air bag deployment area.
Airbagsinflatewith great force. If aportableradiois
placedintheairbagdeploymentareaandtheair
baginflates, the radio productmay be propelled with
greatf orce and causeserious injury to occupants of
the vehicle.
Potentially Explosive Atmospheres
Turnoff your radio productprior to enteringany area
witha potentially explosive atmosphere, unless it is
a radio producttype especiallyqualified for use in
such areas as “Intrinsically Safe” (for example,
Factory Mutual, CSA, orUL approved). Do not
remove, install, or charge batteries in such areas.
Sparks in a potentially explosive atmosphere can
cause an explosion or fire resulting in bodily injury or
even death.
Note: The areas with potentially explosive
atmospheres referred to above include
fueling areas such as below decks on
boats, fuel or chemicaltransfer or
storage facilities, areas where the air
contains chemicals or particles, such as
grain, dust or metal powders, and any
!!
Page 47

i733 Getting Started
other area where you would normally be
advisedtoturnoffyourvehicleengine.
Areas with potentially explosive
atmospheres are often but not always
posted.
Blasting Caps and Areas
To avoid possible interference with blasting
operations, turn off your radio product when you are
nearelectricalblastingcaps,in a blastingarea,or in
areas posted:“Turn off two-wayradio”.Obey all
signs and instructions.
Operational Cautions
Batteries
All batteries can cause property damage and/or
bodilyinjury, such as burns if a conductive material
such as jewelry, keys, or beaded chains touches
exposedterminals. The conductivematerial may
complete an electrical circuit (short circuit) and
become quite hot. E xercise care in handlin g any
chargedbattery, particularly when placing it inside a
pocket, purse, or other container with metal objects.
To reduce the risk of injury, batter ies should not be
exposedto fire,disassembled, or crushed.
!
Cleaning and Drying Con siderati ons
Usinga leathercarry case may help protectthe
surfaces and help prevent liquids (e.g., rain) from
entering into the interiorof the radio product. This
product is not water proof, and exposingthe unit to
liquids may result in permanent damage to the unit.
If your radio product interior gets wet, then do not try
to acceleratedrying with the useof an oven or a
dryeras this will damage the radio product and void
the warranty. Instead, do the following:
1 Immediat ely power off the radio product.
2 Remove Battery and S IM card(if so equipped)
from radio product.
3 Shakeexcessliquidfrom radio product.
4 Placethe radio productand battery in an area
thatis at roomtemperature and has goodair flow.
5 Let the radio product, battery, andSIM card dry
for 72 hours before reconnectingthe battery
and/or powering on the radio product.
If the radio product does not workafter followingthe
steps listed above, contact your dealer for servicing
information.
43
Page 48

i733 Getting Started
Cleanthe externalsurfaces of theradioproductwith
adampcloth,usingamildsolutionofdishwashing
detergent and water. Some household cleaners may
contain chemicals that could seriously damage the
radio product. Avoid the use of any petroleum-based
solventcleaners. Also, avoid applyingliquidsdirectly
on the radio product.
Accessory Safety Information
Important: Save these accessory safety
• Before using any battery or battery charger, read
allthe instructionsforandcautionary markingson
(1) the battery, (2) the battery charger, which may
include a separate wall-mounted power supply or
transformer, and (3) the radio product using the
battery.
• Do not exposeany battery charger to wat er, rain,
or snow as they are designed for indoor or
in-vehicle use only.
!!
44
instructions.
Warning: To reduce the risk of injury,
charge only the rechargeable
batteries described in “Battery” on
page 4. Other types of batteries may
burst, causing personal injury and
damage.
• To reducethe risk of damageto the cordor plug,
pull by the plu g rather than the cord when you
disconnect the battery charger from t he power
sourceoutlet.
• Do not operate any battery charger with a
damaged cord or plug— replace them
immediately.
• Battery chargers may become warm during
operation, butnot hot. Ifit becomes hot tothe
touch,unplugitfromthepoweroutlet immediately
and discontinue its use.
• Use of a non-recommended attachment to a
battery charger may result ina risk of fire, electric
shock, or injury topersons.
• Make sure the battery charger power cord is
locatedso that itwill not besteppedon, tripped
over, or subjectedto damage or stress.
• An extension cord should not beused with any
battery charger unless absolutelynecessary. Use
of an improper extensioncord could result in a
riskof fire and electricshock.I f anextensio n cord
must be used, make sure that:
• The pins onthe plug ofthe extension cord are
the same number, size, and shape as those on
the plug of the charger.
• The extension cord is properly wired and in
good electrical condition.
Page 49

• The cord size is 18AWG for lengthsup to100
feet and 16AWG for lengths up to 150 feet.
• Do not operate any battery charger if ithas
received a sharp blow, has been dropped, or
has been damaged in any way; takeit to a
qualified servicet echnician.
• Do not disassemble abattery charger;takeit to
a qualifiedservice technician when service o r
repair is required. Incorrect reassembly may
result in a risk of electric shock or fire.
• Maximum ambient temperature around the
powersupply or transformer of any battery
chargershould not exceed 40°C (104°F).
• The output power from the power supply or
transformer must not exceed the rating given
on the Desktop Dual-PocketCharger.
• The disconnection from the line voltage is
made by unpluggingthe powersupplyfromt he
AC receptacle.
• T o reduce risk of electric shock, unplug any
battery charger from the outlet before
attempting any maintenance or cleaning.
For optimum charging performance, turn off the
radio product while charging it in any battery
charger.
i733 Getting Started
45
Page 50

i733 Getting Started
MOTOROLA LIMITED WARRANTY
Note: FOR IDEN SUBSCRIBER PRODUCTS,
ACCESSORIES AND SOFTWARE
PURCHASED IN THE UNITED STATES
OR CANADA
What Does this Warranty Cover?
Subjectto the exclusionscontained below,
Motorola, Inc. warrants its Motorola iDEN Digital
Mobileand Portable Handsets ("Products"),
Motorola-branded or certified accessories sold for
use with these Products ("Accessories") and
Motorola software contained on CD-Roms or other
tangible media and sold for use with these Products
("Software") tobe free from defects inmaterials and
workmanship under normal consumer usage for the
period(s) outlined below.Thislimitedwarrantyisa
consumer's exclusive remedy, and applies as
follows to new Products, Accessories and
Software purchased by consumers in the United
States or Canada, which are accompanied by
this written warranty:
46
PRODUCTS COVERED LENGTH OF
Products as defined
above.
Accessories as defined
above.
Products or
Accessories that are
Repaired or Replaced.
Software as defined
above.Appliesonlyto
physical defectsin the
media that embodies the
copy ofthe software (e.g.
CD-ROM,or floppy disk).
COVERAGE
One (1) year from the
date of purchaseby the
firstconsumer purchaser
of the product.
One (1) year from the
date of purchaseby the
firstconsumer purchaser
of the product.
The balance of the
original warranty or for
ninety (90) days from
thedatereturnedtothe
consumer, whichever is
longer.
Ninety (90) days from
the date of purchase.
Page 51

i733 Getting Started
What is not covered? (Exclusions)
NormalWear and Tear. Periodic maintenance,
repairand replacementof parts d ue to normal wear
and tear are excluded from coverage.
Batteries. Only batteries whose fully charged
capacityfallsbelow 80% of their rated capacityand
batteries that leak are covered by this limited
warranty.
Abuse & Misuse. Defects or damage that result
from:(a) improper operation, storage,misuse or
abuse, accident or neglect, such as physical
damage (cracks, scratches, etc.) to thesurface of
the product resulting from misuse; (b) contact with
liquid, water, rain, extreme humidity or heavy
perspiration, sand, dirtor the like, extreme heat, or
food; (c) use of theProductsor Accessoriesfor
commercial purposes orsubjecting the Product or
Accessory to abnormal usage or conditions; or (d)
otheracts which arenot the fault of Motorola,are
excluded from coverage.
Use of Non-Motorola Products and Accessories.
Defectsor damagethat result from the useof
Non-Motorolabrandedor certified Products,
Accessories, Software or other peripheral
equipment are excluded from coverage.
UnauthorizedServiceor Mo dification. Defects or
damages resultingfrom service,testing,adjustment,
installation, maintenance,alteration, including
without limitation, softwarechanges,or modification
in any way by someone other than Motorola, or its
authorized service centers, are excluded from
coverage.
Altered Products. Products or Accessories with(a)
serialnumbers or date tags that have been
removed,altered or obliterated; (b) brokenseals or
that show evidenceof tampering; (c) mismatched
boardserialnumbers;or (d) nonconforming or
non-Motorola housings, antennas, or parts, are
excluded from coverage.
Communication Services. Defects, damages, or
the failureof Products, Accessoriesor Softwaredue
to any communicationservice or signalyou may
subscribe to or use with the Products, Accessories
or Software is excluded from coverage.
Software Embodied in Physical Media. No
warranty is made that the software will meet your
requirements or will work in combination with any
hardware or software applications providedby third
parties, that the operation of the softwareproducts
will be uninterrupted orerror free, or thatall defects
inthesoftwareproductswillbecorrected.
47
Page 52

i733 Getting Started
SoftwareNOTEmbodiedinPhysicalMedia.
Software thatis not embodied in physical media
(e.g.software that is downloaded from the internet),
is provided "as is" andwithoutwarranty.
Who is covered? This warranty extendsonlyto the
firstconsumerpurchaser, and isnot transferable.
What will Motorola Do? Motorola, at its option, will
at no charge repair, replace or refund the purchase
price of any Products, Accessories or Software that
does not conform to this warranty. We may use
functionally equivalent
reconditioned/refur bished/pre-ownedor new
Products,Accessoriesorparts.Nodata,software or
applications added to your Product, Accessory or
Software, includingbut not limitedto personal
contacts, games and ringer tones, will be reinstalled.
To avoid losing such data, software and applications
please create a back up prior to requesting service.
How to Obtain Warranty Service or Other
Information? To obtain service or information,
please call:
Motorola iDEN Customer Services
1-800-453-0920 or 954-723-4910
TTY-877-483-2840
Or visit us online at
http://www.motorola.com/iden/support
48
You will receive instructions on how to ship the
Products,Accessoriesor Software,at yourexpense,
to a Motorola Authorized RepairCenter.To obtain
service,you must include:(a)a copy of your receipt,
bill of sale or other comparable proof of purchase;
(b) a written description of the problem; (c) the name
of your service provider, if applicable; (d) the name
and location of the installation facility (if applicable)
and, most importantly;(e) your address and
telephone number.
What Other Limitations Are There? ANY IMPLIED
WARRANTIES, INCLUDING WITHOUT
LIMITATION THE IMPLIED WARRANTIES O F
MERCHANTABILITY ANDFITNESS FOR A
PARTICULAR PURPOSE, SHALL BE LIMITED TO
THE DURATION OF THIS LIMITED W ARRANTY ,
OTHERWISE THE REPAIR, REPLACEMENT, OR
REFUND ASPROVIDED UNDER THIS EXPRESS
LIMITED WARRANTY IS THE EXCLUSIVE
REMEDY OF THE CONSUMER, AND IS
PROVIDED IN LIEU OF ALL OTHER
WARRANTIES, EXPRESS OFIMPLIED. IN NO
EVENT SHALL MOTOROLA BELIABLE,
WHETHER IN CONTRACTOR TORT (INCLUDING
NEGLIGENCE) FOR DAMAGES INEXCESS OF
THE PURCHASE PRICE OF THE P RODUCT,
ACCESSORY OR SOFTWARE, OR FOR ANY
INDIRECT, I NCIDENTAL, SPECIAL OR
CONSEQUENTIAL DAMAGES OF ANY KIND, OR
LOSS OF REVENUE OR PROFITS, LOSS OF
Page 53

BUSINESS, LOSS OF INFORMATION OR DATA,
SOFTWARE OR APPLICATIONS OR OTHER
FINANCIAL LOSS ARISING OUT OF OR IN
CONNECTION WITH THE ABILITY OR INABILITY
TO USE THE PRODUCTS, ACCESSORIES OR
SOFTWARE TO THE FULL EXTENT THESE
DAMAGES MAY BE DISCLAIMED BY LAW.
Some states and jurisdictions do not allow the
limitation or exclusion of incidental or
consequential damages, or limitation on the
length of an implied warranty, so the above
limitations or exclusions may not apply to you.
This warranty gives you specific legal rights,
and you may also haveother rights that vary
from state to state or from one jurisdiction to
another.
Laws in the United States and other countries
preserve for Motorola certain exclusive rights for
copyrighted Motorola softwaresuch as the exclusive
rights to reproduce and distribute copies of the
Motorola software. Motorolasoftware may only be
copied into, used in, and redistributed with, the
Products associated with such Motorola software.
No other use, including without limitation
disassembly of such Motorola software or exercise
of the exclusive rights reserved for Motorola, is
permitted.
i733 Getting Started
49
Page 54

i733 Getting Started
Limited Warranty Motorola Communication Products (International)
Note: This Warranty appliesin Singaporeand the
Philippines.
I. W hat This Warrant y Covers
and For How Long:
MOTOROLA warrants the MOTOROLA
manufactured iDEN Communication Products listed
below(“Product”) against defects in material and
workmanship under normal use and service for a
period of time from the date of purchase as
scheduled below:
iDEN SubscriberDigitalMobile and
Portable Units
ProductAccessories (manufactured
by or under license from MOTOROLA)
Batteries One (1) Year
RechargeableB atterieswill be replacedduring the
applicable warranty period if:
a. the battery capacity falls below 80% of rated
50
One (1) Year
One (1) Year
capacity, or
b. the battery develops leakage.
MOTOROLA, at itsoption,willat nocharge either
repair the Product (with new or reconditioned parts),
replace it (with anew or reconditioned Product), or
refund the purchaseprice of the Product during the
warranty period provided it is returned in
accordance with the terms of this warranty.
Replaced partsor boards are warranted for the
balance of the original applicable warranty period.
All replaced parts of Product shall become the
property of MOTOROLA.
This express limited warranty is extended by
MOTOROLA to the originalend user purchaseronly
and is notassignable or transferable to anyother
party. This is the complete warranty for the Product
manufactured by MOTOROLA. MOTOROLA
assumes no obligations or liability for additions or
modifications tothiswarranty unlessmade in writing
and signed by an officer of MOTOROLA. Unless
made in a separate agreement between
MOTOROLA and the originalend user purchaser,
MOTOROLA does not warrantthe installation,
maintenance or service of the Product.
MOTOROLA cannot be responsible in any way for
any ancillary equipment not furnishedby
MOTOROLA which is attached toor used in
connection with the Product, or for operation of the
Page 55

i733 Getting Started
Product with any ancillary equipment, and all such
equipment if expresslyexcluded from this warranty.
Becauseeach systemwhich may use the Product is
unique, MOTOROLA disclaimsliability forrange,
coverage, or operation of the system as a whole, or
any portion of thesystemnot producedby
MOTOROLA,under this warranty.
II. General Provisions:
This warranty sets forth the full extent of
MOTOROLA’S responsibilities regarding the
Product, Repair, replacement or refund of the
purchaseprice,at MOTOROLA’S options, is the
exclusive remedy. THIS WARRANTY IS GIVEN IN
LIEU OF ALL OTHER EXPRESS WARRANTIES.
IMPLIED WARRANTIES, INCLUDING WITHOUT
LIMITATION, IMPLIEDWARRANTIES OF
MERCHANTABILITY AND FITNESS FOR A
PARTICULAR PURPOSE, ARE LIMITED TO THE
DURATION OF THIS LIMITED WARRANTY TO
THE FULL EXTENT SUCH MAY BE DISCLAIMED
BY LAW. IN NO EVENT SHALL MOTOROLA BE
LIABLE FOR DAMAGES IN EXCESS OF THE
PURCHASE P RICE OF THE PRODUCT,FOR ANY
LOSS OF USE, LOSS OF TIME,
INCONVENIENCE, COMMERCIAL LOSS, LOST
PROFITS OR SAVINGS OR OTHER INCIDENTAL,
SPECIAL OR CONSEQUENTIAL DAMAGES
ARISING OUT OF THE USE OR INABILITY TO
USE SUCH PRODUCT, TO THE FULL EXTENT
SUCH MAY BE DISCLAIMED BYLAW.
III. How to Get Warranty
Service:
You must provide proof of purchase (bearing the
dateof purchaseand Productitem serial number)in
orderto receive warrantyserviceand, also, deliver
or send theProductitem, transportationand
insurance prepaid, to anauthorized warranty service
location. Warrantyservice will be provided by
MOTOROLA throughone of its authorized w arranty
servicelocations. If you first contactthe company
whichsold you theProduct(e.g., dealeror
communicat ion service provider), it canfacilitat e
your obtaining warrantyservice.
IV. What This Warranty D oe s
Not Cover:
a. Defects or damage resulting from use of the
Product inother than its normal and customary
manner.
b. Defects or damage from misuse, accident,
water, or neglect.
c. Defects or damage from improper testing,
51
Page 56

i733 Getting Started
operation, maintenance, installation, alteration,
modification, or adjustment.
d. Breakage or damage to antennas unless
caused directly by defects in material
workmanship.
e. A Product subject ed to unauthorized P roduct
modifications, disassemblies or repairs
(including, without limitation, the audition to the
Product of non-MOTOROLA supplied
equipment).
f. Product which has hadthe serialnumber
removed or made illegible.
g. Rechargeable batteries if:
1.Any of the seals on the battery enclosure of
cells are broken or show evidence of
tampering.
2.The damage or defectis causedby charging
or using thebattery in equipment or service
other than the Product for which it is
specified.
h. Freight costs to the repair depot.
i. A Product which, due to illegalor unauthorized
alteration of the software/firmware in the
Product, does not f unction in accordance with
MOTOROLA’S published specifications or the
local type acceptance labeling in effect forthe
Product at the timethe Product was initially
52
distributed from MOTOROLA.
j. Scratches or othercosmet ic damage to Product
surfacesthat does noteffect t he operationof the
Product.
k. Normal and customary wear and tear.
l. Exclusion for defects or damage arising from
use ofthe productsin connection with
non-MOTOROLA equipment.
VI. Patent and Software
Provisions:
MOTOROLA w ill defend,at its own expense, any
suit broughtagainst the end userpurchaser to the
extent that it is based on a claim that the Product or
partsinfringe a patent, and Motoro la willpay those
costsand damages finally awarded against the end
user purchaser in any such suit which are
attributableto any such claim,but such defenseand
payments are conditioned on thefollowing:
a. That MOTOROLA will be notified promptly in
writing by such purchaser of any notice of such
claim;
b. That MOTOROLA will have sole control of the
defense of such suit and all negotiations for its
settlement or compromise; and
c. Should the Product or parts become, or in
Page 57

i733 Getting Started
MOTOROLA’S opinion be likely to become, the
subject of a claim of infringement of a patent,
that such purchaser will permit MOTOROLA, at
its option andexpense, either to procure for
such purchaser the right to continue using the
Product orparts or to replaceor modify the
same so that it becomes non-infringing orto
grant such purchaser a credit for the Product or
parts as depreciated and accept its return. The
depreciation will be an equal amount per year
over the lifetime of the Product or parts as
established by MOTOROLA.
MOTOROLA will have no liability with respect to any
claimof patentinfringementwhichis baseduponthe
combination of theProduct or parts furnished
hereunder with software, apparatus or devices not
furnished by MOTOROLA, nor will MOTOROLA
have any liability for the use of ancillary equipment
or software not furnished byMOTOROLAwhich is
attachedto or sued inconnection with theProduct
or any parts thereof. In noevent shall MOTOROLA
be liable for any incidental, special or consequential
damages arising from any claim of patent
infringement or alleged infringement.
Laws in the United States and other countries
preserve forMOTOROLAcertainexclusiverightsfor
copyrighted MOTOROLA software, such as the
exclusive rights to reproduce in copies and distribute
copiesof such MOTOROLAsoftware. MOTOROLA
softwaremaybeusedinonlytheProductinwhich
the software was originallyembodiedand such
software in such Product may not be replaced,
copied, distributed, modifiedin any way, or usedto
produce any derivative thereof. No other use
including, without limitation, alteration,modification,
reproduction, distribution, orreverseengineering of
such MOTOROLA so ftware or exerciseor rights in
suchMOTOROLAsoftware is permitted. No license
is granted by implication, estoppel orotherwise
underMOTOROLApatentrights or copyrights.
53
Page 58

i733 Getting Started
Patent and Trademark Information
©2003 Nextel Communications. NEXTEL®,the
NEXTEL logo
Done.
CONNECTTM, GROUP CONNECTTM,NATIONWIDE
DIRECT CONNECT
are service marks, trademarks, and/or registered
trademarks owned byN extel Communications,Inc.
MOTOROLA, the Stylized M Logo and all other
trademarks indicated as suchhereinaretrademarks
of Motorola, Inc.
Motorola, Inc. All rights reserved.
Microsoft and Microsoft Internet Explorer are
registered trademarks ofMicrosoft Corporation.
T9 is a trademark owned by TegicCommunications.
®
Text Input Patent and Trademark Information
T9
Thisproduct iscoveredby U.S.Pat. 5,818,437,U.S.
Pat.5,953,541, U.S. Pat. 6,011,554 and other
patents pending.
Java and all other Java-based marks are
trademarks or registeredtrademarks of Sun
Microsystems, Inc. in the U.S. and other countries.
54
®
TM
, NEXTEL ONLINE®, NEXTEL.
,PUSHTOTALKTM,PTTTM,DIRECT
TM
andNEXTELWORLDWIDE
®
Reg.U.S. Pat. &Tm. Off.© 2003
All other product or service names are theproperty
of their respective owners. All trademarks, service
marksand tradenames used in thisGuide are
protected by state, federaland/or international
trademark laws. All rights reserved.Printedin the
U.S.A.
Software Copyright Notice
®
The Motorola products described in this manual may
include copyrighted Motorola and third party
software stored in semiconductor memories orother
media. Laws in the United States and other
countries preserve for Motorola and third party
software providers certainexclusiverights for
copyrighted software, such as the exclusiverightsto
distribute or reproduce the copyrighted software.
Accordingly,any copyrightedsoftware contained in
the Motorola products may not be modified,
reverse-engineered, distributed, or reproduced in
any manner to theextentallowedby law.
Furthermore,the purchaseof the Motorolaproducts
shall not be deemed to grant either directly or by
implication,estoppel, or otherwise, any license
underthe copyrights, patents,or patent applications
of Motorolaor any thirdparty software provider,
except for the normal, non-exclusive, royalty-free
license to use that arises by operation of law in the
sale of a product.
 Loading...