

Page 1

Motorola iBoard
User ’s Guide
Page 2

Contents
The Motorola iBoard 1
Setting Phone’s Baud Rate 2
Setting Up the iBoard 3
When Using the iBoard 6
Pass-Through Charging 7
Using iBoard Key Shortcuts 8
Extended Character Set 11
Closing the iBoard 15
Frequently Asked Questions 17
More Information 21
Page 3

1
The Motorola iBoard
The Motorola iBoardTMis a convenient, portable
solution to typing text and commands quickly
and easily into your i85s, i50sx, or i55sr phone.
This compact, fully functional keyboard lets you:
• Type text for Phonebook and Datebook entries, and
almost anywhere else you enter text into your
phone.
• Create and answer email and other types of text
messages.
• Enter commands and access options with simple
key commands.
• Travel anywhere with a pocket-sized keyboard for
your phone.
End-Grips
Special
Function
Keys
Special
Function
Keys
Page 4

In addition to this User’s Guide, here’s what
you’ll find in this package:
Setting Phone’s Baud Rate
Before using your phone with the Motorola
iBoard, ensure that the phone’s baud rate is set
to 9600 or Auto:
1. Access the phone’s main menu. Aquick way to do
this is to press the phone’s end key e and then
press the phone’s menu key m.
2. Use the phone’s four-way navigation key R to
scroll to Settings and press the option key B
under SELECT.
3. Scroll to Initial Setup and press the option key B
under SELECT.
4. Scroll to Baud Rate and press the option key B
under CHANGE.
5. If the baud rate shown is not 9600 or Auto, scroll to
9600 or Auto and press the option key B under
SELECT.
Carrying Case
Motorola iBoard
2
Page 5

3
Setting Up the iBoard
You can open and close the iBoard smoothly
and easily without having to force the
mechanism:
Open iBoard
1. Hold the folded iBoard in your hand and pull the
button down to open the case.
2. Unfold the iBoard and set it on a firm, flat surface.
Page 6
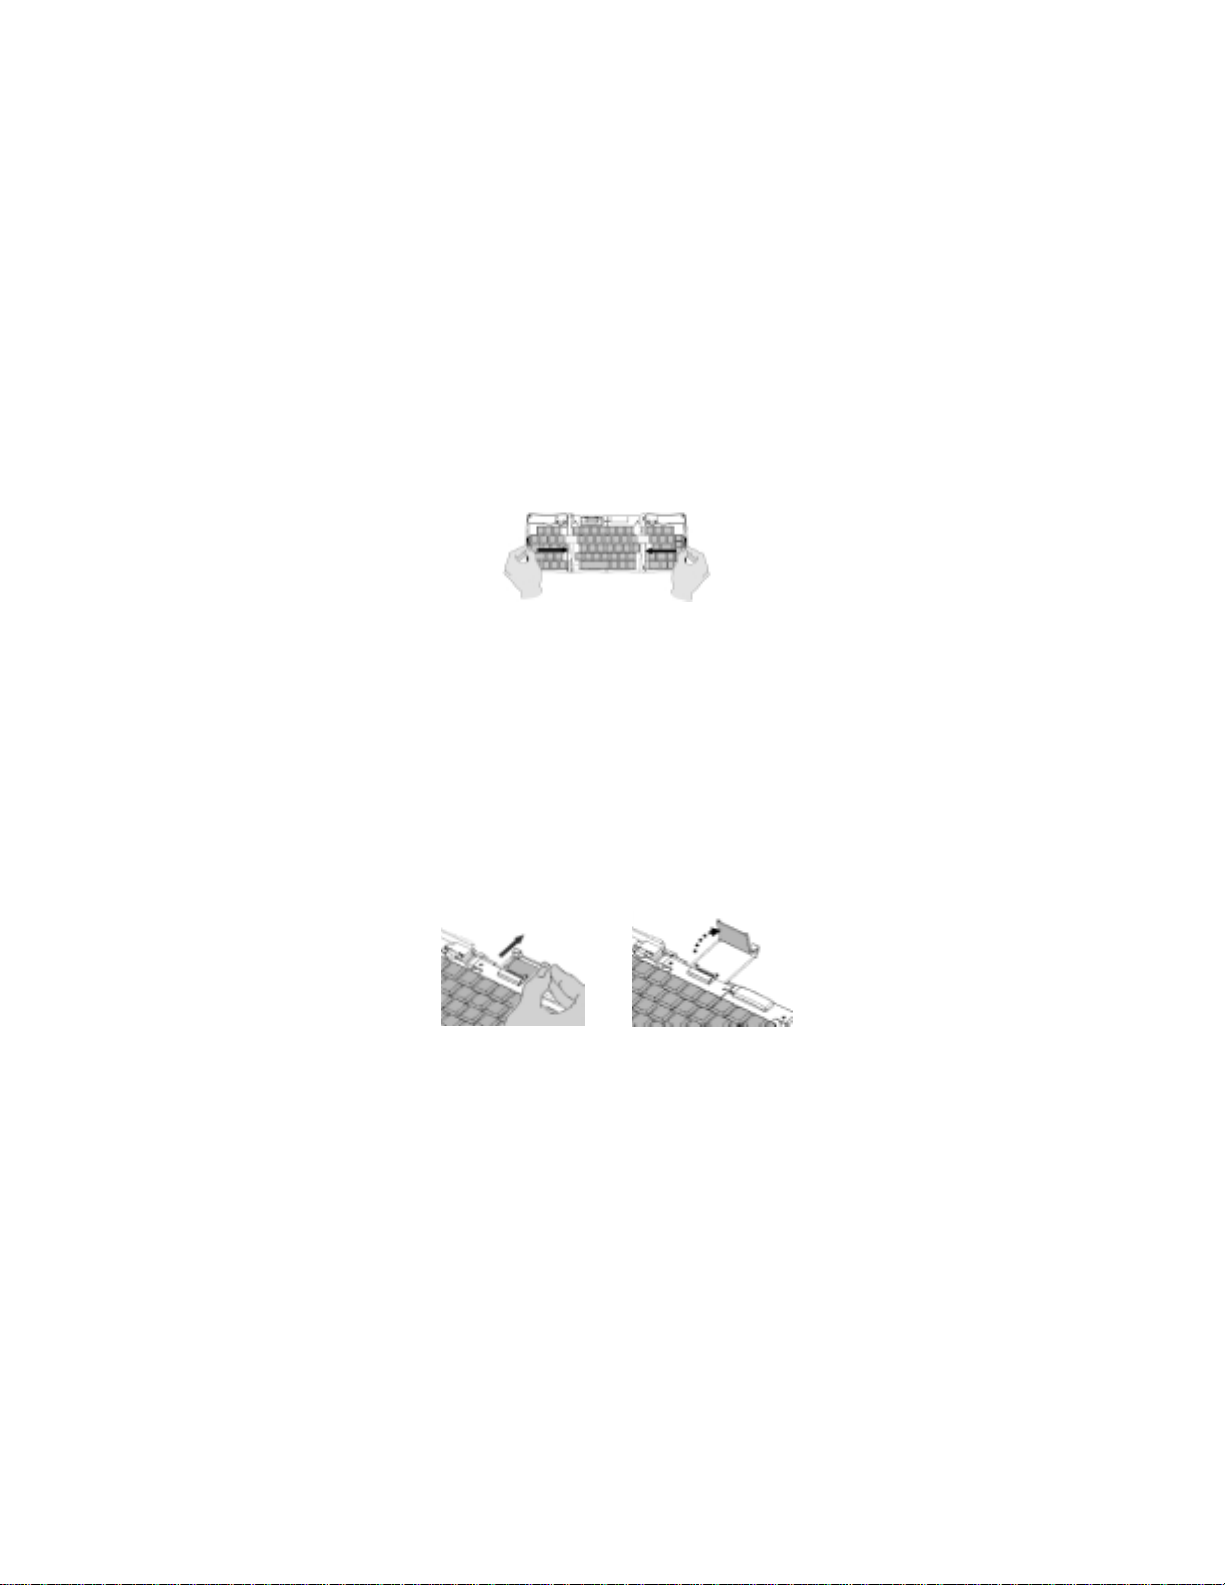
4
3 Grasp the red end-grips and slide them inward to
bring the iBoard sections completely together.
Turn on Phone
1. Before attaching your phone to the iBoard, turn the
phone on.
2. If your phone is protected by a SIM PIN, enter your
SIM PIN.
Note: For more information on turning on your phone
and entering your SIM PIN, refer to your phone’s
user’s guide.
Set Up Dock and Connector
1. Slide the dock all the way out of the iBoard until the
rear support springs upward.
Page 7
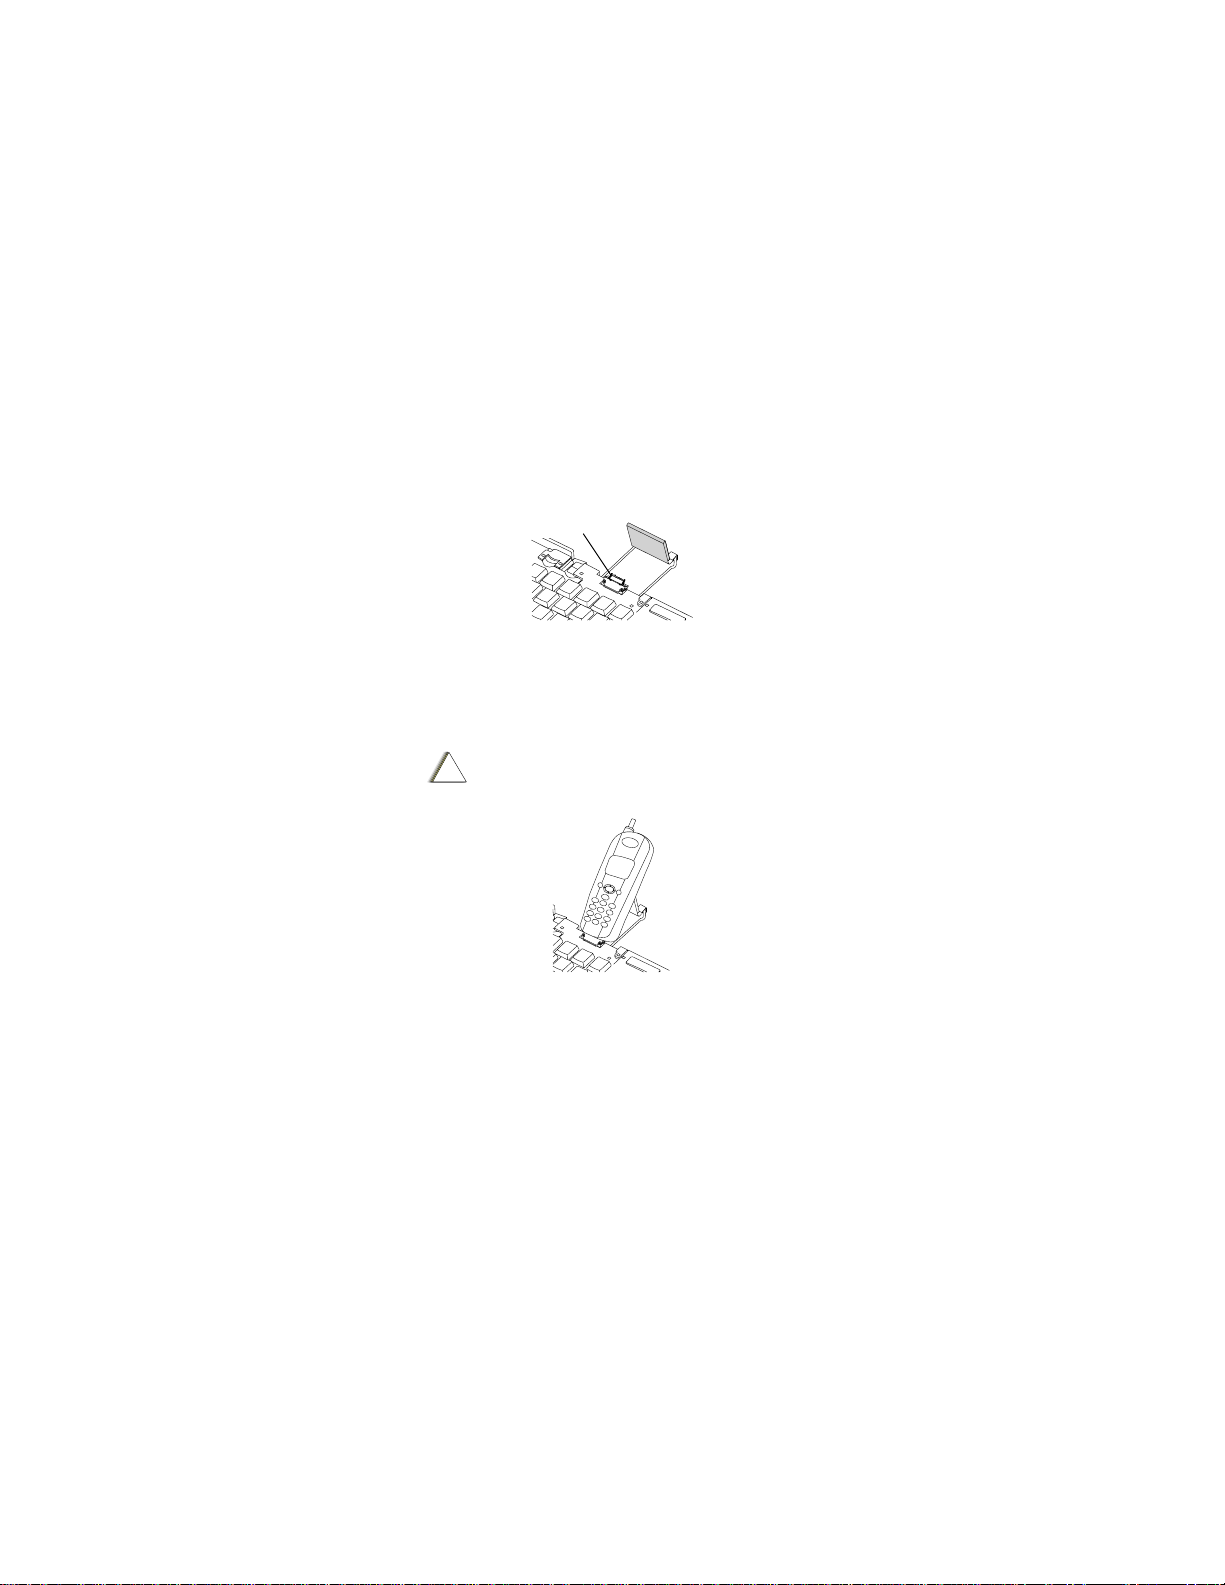
5
2. Tilt the iBoard’s phone connector upward until it
clicks into place.
Attach Phone to iBoard
Line up your phone with the iBoard’s phone
connector and push down gently to make the
connection.
CAUTION: Do NOT rock the phone from side
to side while attempting to attach it to the
connector.
When the phone is connected, Keyboard
Attached displays on the screen. This may take
up to five seconds from the time the phone is
attached to the connector.
Phone Connector
!
C a u t i o n
Page 8

6
Begin Typing
If you have set up the iBoard and phone
correctly, you can begin typing right away.
When Using the iBoard
Here are important points to remember when
using the Motorola iBoard:
• Use the iBoard on a flat, firm surface which
supports the iBoard as well as the attached phone.
For example, place a book or other flat surface on
your lap before using it as a laptop keyboard.
• Make sure that the dock mechanism is fully
extended and upright before attaching your phone.
Do not try to attach your phone before raising the
dock to the upright position.
• Your phone’s input fields accept the same number of
characters with the iBoard as without it. Your phone
accepts a maximum of 512 characters in its largest
input fields.
• Some of your phone’s functions cannot be used
simultaneously, just as when you are using your
phone without the iBoard. For example, you cannot
access Java applications while on a call.
Page 9

7
Pass-Through Charging
You can charge your phone’s battery while the
phone is attached to the Motorola iBoard:
1. Connect the accessory connector of your phone’s
Travel Charger or Vehicle Power Adapter to the
charger connector on the iBoard. The charger
connector is located next to the iBoard’s phone
connector.
2. Plug the charger into an electrical outlet.
3. Connect the phone to the iBoard and use as usual.
Always remove the phone from the iBoard before
disconnecting the charger’s accessory connector
from the iBoard.
Note: For more information on your phone battery,
Travel Charger, and Vehicle Power Adapter, refer to
their user’s guides or your phone’s user’s guide.
Charger Connector
Page 10

8
Using iBoa rd Key
Shortcuts
You can perform most of your phone’s functions
with the keys on the Motorola iBoard.
Note: For more on your phone’s functions and
features, refer to your phone’s user’s guide.
Basic Function Keys
* Also returns to phone’s idle or Ready screen. Returns
to home page when you are using the Wireless Web.
Phone
Key
Action Keyboard
Equivalent
m
menu
Accesses next
available menu
Menu key
A left
option
Chooses current left
display option
Left Option key
B right
option
Chooses current
right display option
Right Option key
s send
Begins phone call
Fn - s
e end
Ends phone call*
Fn - e
* Back
a page
Returns to previous
page in browser
Fn - Left arrow
key
Page 11

9
Navigation Keys
The arrow keys on the iBoard perform the function of
your phone’s four-way navigation key.
Phone Buttons
Phone
Key
Action Keyboard
Equivalent
Q
Scroll up Up arrow key
R
Scroll down Down arrow key
P
Scroll right Right arrow key
O
Scroll left Left arrow key
Phone Button Keyboard Equivalent
Push-To-Talk
(PTT)
Fn - MESG/PTT key
volume up Fn - Up arrow key
volume down Fn - Down arrow key
Power off Fn - Backspace/Off key
Page 12

10
Main Menu Options
The iBoard allows you to access several main menu
options with simple key commands.
Note: Phonebook and Datebook are the only
applications you can access using key commands
without exiting to the main menu first.
Main menu
option
Keyboard Equivalent
Phonebook
PHBK/s key
Datebook
DATEBK/e key
Messages MESG/PTT key
Java JAVA/NET key
Browser/Net Fn - JAVA/NET key
VoiceNotes
Fn - Tab/p key
Page 13

11
Extended Character Set
The iBoard enables you to type special
characters using a combination of keystrokes.
These special characters are available when
your phone is displaying a language other than
English. For more information about your
phone’s language, refer to your phone’s user’s
guide.
Note: The extended character set is available only
if you have the proper release of the iBoard
software in your phone. See “Frequently Asked
Questions” on page 17 for more information.
Page 14

12
Accent Marks
To create a letter with an accent mark over it, type the
keystrokes listed in the table below.
Accent
example
Description Keystrokes
á Acute accent (for
letters a,e,i,o,u,y)
single quote,
then letter
â Circumflex (for
letters a,e,i,o,u)
Shift and 6, then
letter
ä Umlaut (for letters
a,e,i,o,u)
Shift and quote,
then letter
à Grave accent (for
letters a,e,i,o,u)
grave accent,
then letter
ã Tilde (for letters
a,n,o)
tilde, then letter
å Nordic A-ring (for
letter a only)
Alt and letter
Page 15

13
Other Special Characters
To create other special characters, type the keystrokes
listed in the table below.
Character Description Keystrokes
ß Sharp s, German
sz ligature
Alt and S
æ or Æ Diphthong, AE
ligature
Alt and e or
Alt and E
ç or Ç Cedilla single quote,
then c or C
þ or Þ Icelandic thorn Alt and p or
Alt and P
ð or Ð Icelandic eth dash and d or
dash and D
ø or Ø Nordic O-Slash /, then o or O
¿ Upside down ? Alt and ?
¡ Upside down ! Alt and !
Page 16

14
Special Character Considerations
When your phone is displaying a language other than
English, these characters do not appear immediately
when typed: single quote, double quote, tilde (~),
grave accent (`), slash (/), dash (-), and circumflex (^).
To make these characters appear as typed, press the
space bar after typing them.
Page 17

15
Closing the iBoard
Closing the iBoard is as easy as setting it up.
Detach Phone and Charger
1. Pull your phone upward to remove it from the dock.
CAUTION: Do NOT rock the phone from side
to side while attempting to detach it from the
connector.
2. If you have a charger connected to the iBoard,
detach it from the iBoard.
Fold in Connector and Dock
1. Push the iBoard’s phone connector down until it
clicks into place.
2. Fold the dock support flat and slide it into the
iBoard.
Close iBoard
1. With the iBoard on a flat surface, grasp the red end-
grips and slide the iBoard sections apart to the ends
of the case. Make sure to slide the iBoard sections
as wide apart as possible.
!
C a u t i o n
Page 18

16
2. Lift the iBoard and push up from under the center to
form a “W” and then close.
3. Press the four corners of the case together until
they click into place.
Page 19

17
Frequently Asked
Questions
What should I do when I type on the iBoard and
nothing happens?
• Check to make sure phone is on.
• Check to make sure you have entered your SIM PIN
correctly before connecting the phone to the iBoard.
• Check to make sure that your phone is properly
connected to the iBoard.
• Check to make sure that your phone’s baud rate is
set to 9600 or Auto.
• Check your phone’s batteries.
• If you are using pass-through charging, check to
make sure your charger is properly connected to the
charger connector and an electrical outlet.
How does Release 1 of the iBoard software differ
from later releases?
Release 1 does not provides access to an extended
character set, as well as other enhanced features
described elsewhere in this frequently asked questions
list.
If I have Release 1 of the iBoard software in my
phone, how can I upgrade to a later release?
To download the latest release of the iBoard software,
contact your phone service provider.
Page 20

18
How do I find out what release of the iBoard
software is in my phone?
To view the software version on your phone:
1. If the phone’s Ready or idle screen is not displayed,
press the phone’s end key e to display it.
2. Press the following keys on the phone, in this order:
#
*
m
P (right side of four-way navigation key)
This causes the Trace Mode screen to appear on
the phone’s display screen. If the Dialing Menu
screen appears instead of the Trace Mode screen,
return to the Ready or idle screen and press the
keys more quickly.
3. At the Trace Mode screen, Unit Info is highlighted.
Press the option key B under VIEW.
4. At the Unit Info screen, use the phone’s four-way
navigation key R to scroll to Software. Press the
option key B under SELECT.
5. Look at the number displayed after Software Ver:.
If this number is R32.00.00, you have software
Release 1. If this number is not R32.00.00, you
have a later release.
6. Press the phone’s end key e.
Page 21

19
Certain characters don’t appear when I type them.
Why?
If your phone is displaying a language other than
English, you must press the space bar after a single
quote, double quote, ~, `, /, -, or ^ for the character to
appear.
Some special characters, like accent marks and
ligatures, are not available if you have Release 1
iBoard software in your phone and your phone is
displaying a language other than English.
See Extended Character Set on page 12 for more
information.
Why can’t I use the iBoard’s Enter key to choose
CHANGE, SELECT, or any other display option on
my phone’s screen?
The iBoard is designed to work like your phone’s
keypad. You must use the iBoard’s option keys
(located to the right of the space bar) to choose
display options.
Page 22

20
What happens if I remove my phone from the
iBoard while pressing the iBoard’s Push-To-Talk
(PTT) button?
If you have a release later than Release 1 iBoard
software in your phone, the PTT button is released
any time the phone is removed from the iBoard.
However, if you have Release 1 iBoard software in
your phone, the phone will behave as if the PTT
button is still being pressed after the phone is
removed from the iBoard. To get the phone to behave
as if the PTT has been released, you must press the
phone’s PTT button.
Can I do everything with the iBoard that I can do
with my phone’s keypad?
Yes, if you have a release later than Release 1 iBoard
software in your phone.
However, if you have Release 1 iBoard software in
your phone, there are a few things you can’t do with
the iBoard:
• Edit the information in My Information.
• Automatically search through the names in your
Phonebook by typing the first few letters of the
name.
• Begin editing a Phonebook entry by pressing any
key, instead of choosing CHANGE.
• Set a date or time in your Datebook by pressing the
desired number keys, instead of scrolling to the
desired numbers.
Page 23

21
More Information
Technical Support
For technical support, please contact our iDEN Customer Care
team at www.motorola.com/iden/support.
Important Safety Information
Read the safety information in your phone’s user’s guide
before using the iBoard.
Communication Regulations Information
To maintain compliance with United States FCC radio
frequency exposure guidelines, ensure the antenna and the
radio product is kept a minimum distance of one inch (2.5 cm)
from the body when transmitting.
This equipment has been tested and found to comply with
limits for a Class B digital device, pursuant to Part 15 of the
FCC rules. These limits are designed to provide reasonable
protection against harmful interference in a residential
installation. This equipment generates, uses and can radiate
radio frequency energy and, if not installed and used in
accordance with the instructions, may cause harmful
interference to radio communications. However, there is no
guarantee that interference will not occur in a particular
installation. If this equipment does cause harmful interference
to radio or television reception, which can be determined by
turning the equipment off and on, try to correct the interference
by one or more of the following measures:
• Reorient or move the T.V. or radio receiving antenna
• Consult the dealer or an experienced radio/TV expert.
You may also find helpful the FCC booklet: “How to Identify
and Resolve Radio-TV Interference Problems,” available from
the U.S. Government Printing Office, Washington D.C. 20402.
Page 24

Changes and Modifications not expressly approved by
Motorola can void your authority to operate this equipment
under FCC rules.
DOC Class B Compliance Statement
This digital apparatus does not exceed the Class B limits for
radio noise emissions from digital apparatus as set out in the
interference casing equipment standard entitles, “Digital
Apparatus,” ICES-003 of the Department of Communications.
Warranty Information
Refer to your phone’s user’s guide for warranty information
relating to your phone.
This Motorola Original Accessory has been manufactured to
Motorola’s quality standards and to meet the performance
requirements of your Motorola limited warranty. Ask your sales
representative for complete details on this warranty.
Motorola, Aftermarket Accessories Division (“Motorola”)
warrants the Motorola iBoard against defects in material and
workmanship under normal use and service for a period of
one (1) year from shipment. Items will be replaced or repaired
free of charge for the full warranty period. Freight charges to
and from the place where warranty replacement is provided
shall be the Customer’s responsibility.
The warranty does NOT cover defects or damages to the
Motorola iBoard resulting from (a) use in a manner other than
normal operation as specified in the Users Guide, (b) misuse,
accident, or neglect, (c) improper assembly, testing,
operations, maintenance, installation, adjustment, alteration,
repair or any modification by the customer or any other person
without the prior written consent of Motorola.
22
Page 25

If replacement under warranty is necessary:
Place a confirming warranty order through the Centralized
Customer Service at 800-453-0920 or 954-732-4910.
Send defective material, within 45 days of confirming warranty
order to:
Motorola
Aftermarket Accessories Division
1313 E. Algonquin Road
Schaumburg, IL 80196
Attn: Warranty Dept.
The Customer will not be invoiced for the replacement item if
original, identical items are shipped to the Warranty
Department within 45 days.
Patent, Copyright, and Trademark Information
This product is covered by US Patent #6174097, EP Patent
#968464 and GB Patent #2323331. Other US and Foreign
Patents Pending.
MOTOROLA, the Stylized M Logo and all other trademarks
indicated as such herein are trademarks of Motorola, Inc. ®
Reg. U.S. Pat. & Tm. Off.
Java and all other Java-based marks are trademarks or
registered trademarks of Sun Microsystems, Inc. in the U.S.
and other countries.
All other product or service names are the property of their
respective trademark owners.
© 2001 Motorola, Inc. All rights reserved.
23
Page 26

24
Software Copyright Notice
The Motorola products described in this manual may include
copyrighted Motorola and third party software stored in
semiconductor memories or other media. Laws in the United
States and other countries preserve for Motorola and third
party software providers certain exclusive rights for
copyrighted software, such as the exclusive rights to distribute
or reproduce the copyrighted software. Accordingly, any
copyrighted software contained in the Motorola products may
not be modified, reverse-engineered, distributed, or
reproduced in any manner to the extent allowed by law.
Furthermore, the purchase of the Motorola products shall not
be deemed to grant either directly or by implication, estoppel,
or otherwise, any license under the copyrights, patents, or
patent applications of Motorola or any third party software
provider, except for the normal, non-exclusive, royalty-free
license to use that arises by operation of law in the sale of a
product.
 Loading...