

Page 1

Nextel
®
iDEN
Digital Multi-Service Internet-ready Phone
®
i1000 plus Phone User’s Guide
@NTN9761A@
NTN9761-A(refresh)
Page 2

Page 3

Table of Contents
Introduction ...............................................................................1
Welcome to Nextel® .......................................................................... 1
Customer Care................................................................................... 3
Ordering Information .......................................................................... 4
Driving Safety Tips............................................................................. 4
Getting Started ..........................................................................7
i
1000
plus
Phone Features ............................................................... 8
Batteries............................................................................................. 9
i
1000
plus
Turning Your
Enabling Security............................................................................. 12
Receiving Over-the-Air Programming .............................................. 12
Your Nextel Phone Status................................................................ 13
Display Icons.................................................................................... 14
Modes and Menus ........................................................................... 15
i
Quick Guideto
1000
Creating, Editing and
Using Stored Lists ..................................................................21
Phone Programming........................................................................ 22
Storing Names and Numbers ....................................................22
Pause Digit Entry ....................................................................... 24
Editing Stored List Entries .........................................................25
Address Book................................................................................... 26
iDEN Organizer................................................................................ 27
Phone On/Off............................................. 11
plus
Phone Functions..................................... 17
Phone Mode ...........................................................................29
Digital Cellular.................................................................................. 29
Making Phone Calls ...................................................................30
Direct Dial .......................................................................... 30
i
Page 4

Making Phone Calls from the Stored List.............................. 30
Last Number Redial .............................................................. 32
Emergency Calling................................................................ 32
Special Dialing Codes........................................................... 33
Hands-Free Speakerphone................................................... 33
Mute ...................................................................................... 34
Placing International Phone Calls .............................................. 35
Plus Dialing........................................................................... 35
Country-to-Country (Using Plus Dialing)............................... 35
Country-to-Country (Using Direct Dial) . ................................ 36
Within-Country ...................................................................... 36
Receiving a Phone Call .............................................................36
Missed Call Indicator............................................................. 37
Retrieving a List of Missed Calls........................................... 37
Last 10 Numbers Received/Sent Calls List ............................... 37
Quickstore of Phone Numbers.............................................. 38
Reviewing/Storing/Dialing Received Calls............................ 38
Reviewing/Storing/Dialing Sent Calls.................................... 38
Ending aPhone Call ..................................................................39
Standard Features .....................................................................39
Call Hold ............................................................................... 40
Call Forwarding..................................................................... 40
Call Waiting........................................................................... 43
Three-Way Calling ................................................................ 44
Additional Phone Services ......................................................... 45
Alternate Line Service........................................................... 45
Call Restrictions.................................................................... 47
Caller ID ................................................................................ 47
Nextel 411............................................................................. 48
Nextel Voice Mail Service ................................................................ 50
Setting Up Your Voice Mail Box ................................................. 50
Receiving Voice Mail Messages ................................................51
Using Voice Mail ........................................................................ 52
Advanced Voice Mail Features ..................................................58
Voice Mail Tree .......................................................................... 68
ii
nextel.com
Page 5

Table of Contents
Messaging Services......................................................................... 69
Nextel Two-Way Messaging ...................................................... 69
Text and Numeric Messaging ....................................................70
Using YourPhone as a Modem....................................................... 74
Private/Group Mode ...............................................................75
Nextel Direct Connect®..................................................................... 75
Displaying Your Private ID............................................................... 76
Using the Private/Group Speaker .................................................... 76
Placing Private Calls........................................................................ 77
Receiving Private Calls.................................................................... 78
Quickstore of Private IDs ................................................................. 79
Sending a Call Alert......................................................................... 79
Receiving/Responding to a Call Alert............................................... 80
Call Alert Queuing............................................................................ 80
Group Call........................................................................................ 81
Group-Silent Programming.............................................................. 84
Net Mode .................................................................................87
Wireless Web Navigation Keys........................................................ 88
Starting the Microbrowser................................................................ 88
Customizing thei1000
Changing the Display Language...................................................... 91
Setting the Time and Date Format................................................... 92
Backlight Timer ................................................................................ 93
Keypad Silence ................................................................................ 94
Setting t he Ringer Volume .............................................................. 94
Selecting a Ring Style...................................................................... 95
Setting t he VibraCall
Selecting a Call Alert Style............................................................... 98
Programming Menu.......................................................................... 98
plus
Phone ........................................91
®
Alert Feature ................................................. 95
iii
Page 6

Accessories ..........................................................................105
Batteries......................................................................................... 105
Travel Chargers............................................................................. 108
Other Important Information ................................................111
Nextel Customer Care.................................................................... 111
Understanding Status Messages................................................... 112
Nextel Terms and Conditions of Service . ....................................... 115
Safety and General Information..................................................... 122
Limited Warranty Motorola Communication Products.................... 131
Patent and Trademark Information................................................ 139
Index ......................................................................................141
IMPORTANT!
Be sure to read “Nextel Terms and Conditions
of Service” on pag e 115 and “Safet y and
General Information” on page 122 before
using your i1000plus phone.
iv
nextel.com
Page 7

Introduction
Welcome to Nextel
®
Thank you for choosing Nextel as your wireless communications
provider. Your i1000plus phone enables you to enjoy clear connections
through Nextel’s All Digital National Network. In addition, with Nextel
Worldwide
internationally in select cities using other iDEN
SM
Service, you can use your i1000plus phone to roam
®
networks.
This guide contains all the information you need to take full advantage
of your Nextel service and i1000plus phone, including:
Quick Guide to i1000plus Phone Functions—Enables
experienced digital cellularphone and two-way radio
users to getstarted right away!
Digital Cellular Calling—Digital Cellular Calling
includes features such as Call Hold, Call Forwarding,
Call Waiting,and Three-Way Calling. Find out more
about placing calls inthis section.
International Roaming—Enables you to make phone
calls, check Voice mail, and more while traveling in
selected cities internationally.
AdditionalPhone Services—Includes Alternate Line
Service, Call Restrictions, Caller ID, and Nextel 411.
Find out more in this section.
Voice Mail—Takesmessages24hoursadayand
includes Message Forwarding,AutomaticPlayback and
more. Read more aboutVoice Mail in thissection.
Page 17
Page 29
Page 35
Page 45
Page 50
1
Page 8

Text and NumericMessaging—Lets you receive
numeric messages and important,short messages right
over the phone.Learn more about Messaging in this
section.
Page 70
Dial-Up Service—Dial-Up capability without landline
Page 74
access. Also see theNextel Online Dial-Up Service
User’s Guide.
Nextel Direct Connect
®
—An innovative feature for
Page 75
communicating instantly with one or moreco-workers at
a fraction of thecost of cellular. Read more about Nextel
Direct Connect in thissection.
Nextel Wireless Web—Stayconnected to the critical
Page 88
information you need tomake businessdecisions and get
business done. Also see theNextelWireless Web User’s
Guide.
Programming—You can customize your i1000plus
Page 98
phone and makeit behave the way you want it to.Learn
how in this section.
Other Nextel Advantages—Inaddition to all ofthe previouslymentioned
benefits,there’s more... Nextel features also include the following:
• The guaranteed All-Digital Nextel National Network
• No roaming fees while travelingthroughout the U.S.
• One-second call rounding after t he first minute
• Flat-rate l ong distance pricing to anywhere in the continental U.S.
• No landline connection charges
NOTE: Are you an experienced digital cellular phone and two-way
radio user? Turn to the Getting Started section beginning on
page 7. This section might be all you need to get started.
2
nextel.com
Page 9

Customer Care
Customer Care
For domestic customer care issues including billing issues, general service
needs, or to order additional services, contact Nextel Customer Care.
Visit nextel.com foravarietyofCustomerCareservices:
• Browsefor information on phones, coverage, rates and other
Nextel services. View and download user’s guides, try out our
interactive virtual product and service demos, find answers to
frequently asked questions, order accessories, locate service and
repair centers, upgrade phone software, send a message and more.
• For self-service on your Nextel account, click on My Account to
view your account, pay your bill, add phones to youraccount, reset
your Voice Mail password, add WirelessWebservicesand more.
• For online assistance, click on Contac t Us to send us an email
request. Our representativesare committed to assisting you. Every
effortwill be made to address yourquestions or concerns within 24
hours. Contact us toadd Wireless Web and other services, change
rate plans, inquireon your bill and more.
Or, call us at 1-800-639-6111 or dial 611 from your Nextel phone.
To complement the i1000plus phone and Nextel Worldwide Service,
Nextel has also launched International Roaming Customer Care
support. When traveling outside of the U.S.and Canada, call +1 (201)
531-5202 for your CustomerCare Service needs. This Customer Care
number will be toll-free from your Nextel handset both domestically
and i nternationally.
Internationaland domestic coverage, rates and other informationare
also available at nextel.com.
Ordering Information
NextelBusiness NetworksSMallow you to communicate with individuals
outside as well as inside your company. These Networks link Nextel
3
Page 10

customers in similar industries or geographies. So, if you need to reach a
client, vendor, or contractor instantly, work smarter by joining the Nextel
Business Networks. Call1-888-NEXTEL2(1-888-639-8352).
Various a ccessories are available for use with youri1000plus phone,
including a Hands-Free Car Kit, Carry Holster, Audio Adapter, and
Vehicle Battery Charger. To order accessories or an accessories catalog,
go to nextel.com or call Nextel Nextday
SM
Accessories at 1-800-914-
3240. You can also contact your Nextel Authorized Sales
Representative or stop by any Nextel Store. For information on retail
store locations, go to nextel.com.
Contact Nextel Customer Care to order any ofthe service sdiscussed in
this guide, including Nextel Wireless Web, Dire ctConnect, Additional
Phone Services, Voice Mail, Nextel Mobile Messagingand much more!
SM
For information on Direct Protect
Insurance protectionfor your
Nextel phone and more, c all 1-888-352-9182 or contact your Nextel
Authorized Representative.
Visitus atnextel.comto learn moreabout Nextel products andservices!
Driving Safety Tips
NOTE: Safety is the most important call you will ever make. For safety
1. Get to kno w your wireless phone and its features suchas speed
dial and redial. Carefully read your instruction m anual and learn
to take advantage of valuable features most phones offer,
including automatic redial and memory. Also, w ork to memorize
the phone keypad so you can use the speed dial function without
taking your attention off the road.
2. When available, use a hands free device. A numberof hands
free wireless phone accessories are readily available today.
and legal reasons (in many countries), do not use your phone
while driving.
Check and follow the local laws regarding the use of mobile
phones while driving.
4
nextel.com
Page 11

Driving Safety Tips
Whether you choose an installed mounted device for your
wireless phone or a speaker phone accessory, take advantage of
these devices if available to you.
3. Posi ti o n your wireless phone within easy reach. Make sure you
place your w ireless phone within easy reach and where you can
grab it without taking your eyes from the road. If you get an
incoming call at an inconvenient time, if possible, let your voice
mail answer it for you.
4. Suspend conversations during hazardous driving conditions
or situations. Let the person you are spea king with know you are
driving; if necessary, suspend the call in heavy tr affic or
hazardous weather conditions. Rain, sleet, s now and ice can be
hazardous, but s o is heavy traffic. A s a driver, your first
responsibility is to pay attention to the road.
5. Do not take notes or look up phone numbers while driving. If
you are r ead ing an address book or busin ess card, or writing a “to
do” list while driving a car, you are not watching where you are
going. It's common sense. Don't get caught in a dangerous
situation because you are reading o r writing and not paying
attention to the road or nearby vehicles.
6. Dial sensibly and assess the traffic. Ifpossible, place calls when
you are not moving or before pullin g into traffic. Try to plan your
calls before you begin your trip or attempt to coincide your calls
with times you may be stopped at a s top sign, red light or
otherwise stationary. But if yo u need to dial while driving, follow
this simple tip — dial only a few numbers, check the road and
your mirrors, then continue.
7. D o not engage in stressful or emotio nal conve rsations that
may be distractin g. Stressful or emotional conversations and
driving do not mix — they are distracting and even dangerous
when you are behind the wheel of a car. Make people you are
talking with aware you are driving and if necessary, suspend
conversations which have the potential to divert your attention
from the road.
8. Use your wireless phone t o call for h elp. Your wireless phone is
one of the gre at est tools you can own to protect yourself and your
5
Page 12

family in dangerous situations — with your phone at your side,
help is only three nu mbers away. Dial 9-1-1 or other local
emergency number in the case of fire, traffic accident, roa d hazard
or medical emergency. Reme m ber, it is a free call on your
wireless phone.
9. Use your wireless phone to help others in emergencies. Your
wireless phone provides you a perfect opportunity to be a “Good
Samaritan” in your commu nity. If you see an auto accident, crime
in progress or other serious emergency where lives are in danger,
call 9-1-1 or other local emergency number, as you would want
others to do for you.
10. Call roadside assistance or a special wireless non-emergency
assistance number when necessary. Certain situations you
encounter while driving may require attention but are not urgent
enough to merit a call for emergency services. But you still can use
your wirele ss phone to lend a hand. If you see a broken-down
vehicle posing no serious hazard, a broken traffic signal, a minor
traffic accident where no one appears injured or a vehicleyou know
to be stolen, call roadside assistance or other spec ial nonemergency wireless numbers.
11. Use your phone's Internet capabilities before
you drive. Wireless Internet services are not
designed to be used while driving.
6
nextel.com
Page 13

Getting Started
In thissection you will learn everything you need to beginusing your
i1000plus phone . This section also includes a Quick Guide portion so
experienced digital cellular phone and two-way radio users can get
started right away.
About This Section
This section includes instructions for the following tasks:
i1000plus PhoneFeatures Page 8
Batteries:Attaching, Detaching, and Charging Page 9
Turning Your i1000plus Phone O n/ Off Page 11
Enabling Security Page 12
Receiving Over-the-Air Programming Page 12
Your Nextel Phone Status Page 13
Display Icons Page 14
Modes andMenus Page 15
Quick Guide to Using i1000plus Phone Functions Page 17
7
Page 14
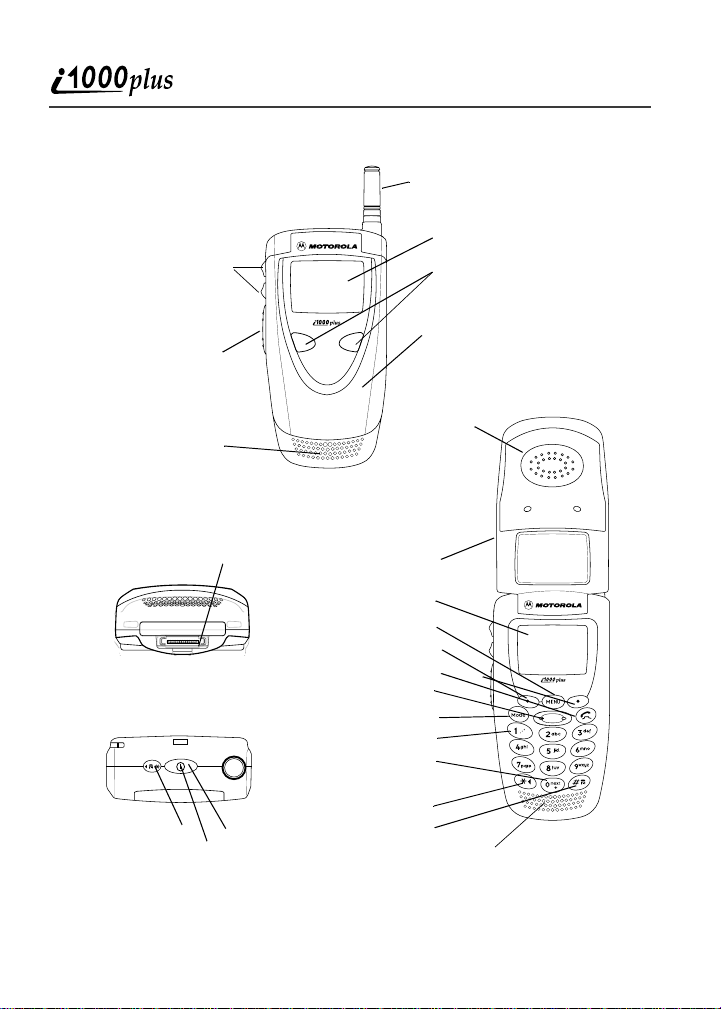
i10 00 plus Phone Features
Volume/List Control
Buttons
Nextel Direct
Connect®
Push-To-Talk (PTT)
Button
Antenna
Alphanumeric Display
Option Keys
Closed Cover
OPEN FRONT VIEW
Speaker and
Microphone
Accessory and Data
Cable Connector
BOTTOM VIEW
TOP VIEW
Speaker/Back/
Home Button
CLOSED FRONT VIEW
Alphanumeric Display
Next Word/International
Plus Dialing Key
Back Key/Pause Dialing
Status Light LED
On/Off Button
Send/End Key
PunctuationKey
Speaker and Microphone
Earpiece
Cover Open
Menu Key
OptionKeys
Scroll Key
Mode Key
Home Key
NOTE: The display backlight is activated by pressing any key or
button.
nextel.com
8
Page 15
Batteries
Batteries
Your i1000plus phone c omes with a Lithium Ion battery and charger.
After attaching the battery, you must charge it before you use it for the
first time. See “Charging Lithium Ion Batteries” on page 105 to learn
the appropriate c harging timesfor your phone’s battery. After the initial
charging, the battery can be charged more quickly.
Remove the battery from the protective case provided in the original
packaging. Whenthe batte ry is not attachedto the phone, store it in this
case.
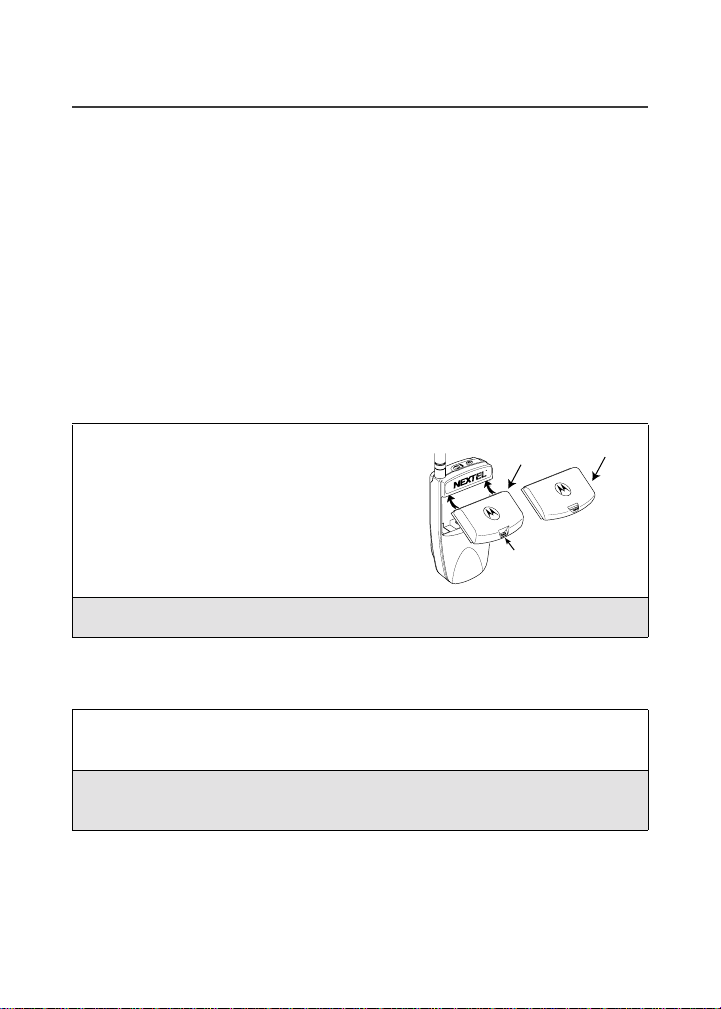
Attaching the Battery
1
Insert the top of the battery intothe
top of the battery area (locatedon
Standard Battery
900 mAh
the backof the phone) as shown in
the picture.
Latch
2
Press down on the battery until you hear a c lick.
Detaching the Battery
1
If the phone is turned on, press f until the message Powering
Off displays.
2
Press the latch on the battery cover upward and pull thebattery
outward and away from the phone.
Slim Battery
500 mAh
9
Page 16
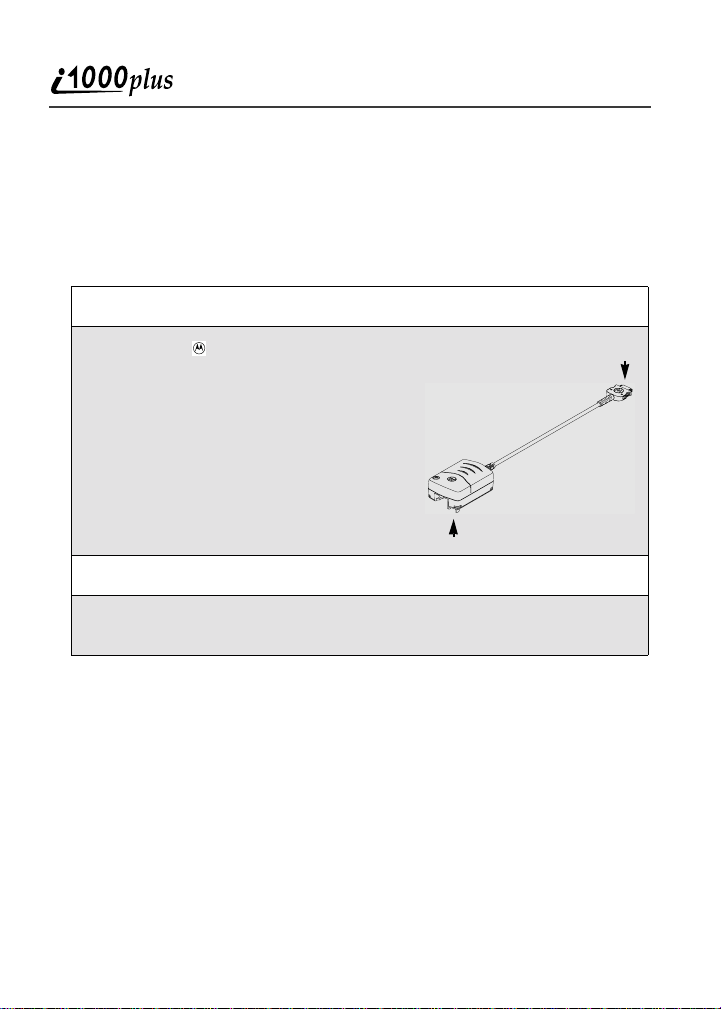
Charging the Battery
NOTE: Before you use the battery for the first time, charge it for at
NOTE: The battery can be charged with the phone either turned on or
1
2
leastthree hours. Afterthe initialcharging, the batterycan be
charged more quickly.
off. For best results, charge it with the phone turned off.
Make sure your i1000plus phone is facing you.
Withthe logoontheaccessory
connector facing you, plug the
Accessory Connector
(Connect to i1000plus phone)
accessory connector into the bottom of the i1000plus phone.
Charger
(Plug into AC outlet)
3
Flip open the prongs and plug the charger into an A C outlet.
4
To disconnect the Travel Charger, squeeze the side tabs of the
accessory connector and pull out.
10
nextel.com
Page 17
Turning Your i1000plus Phone On/Off
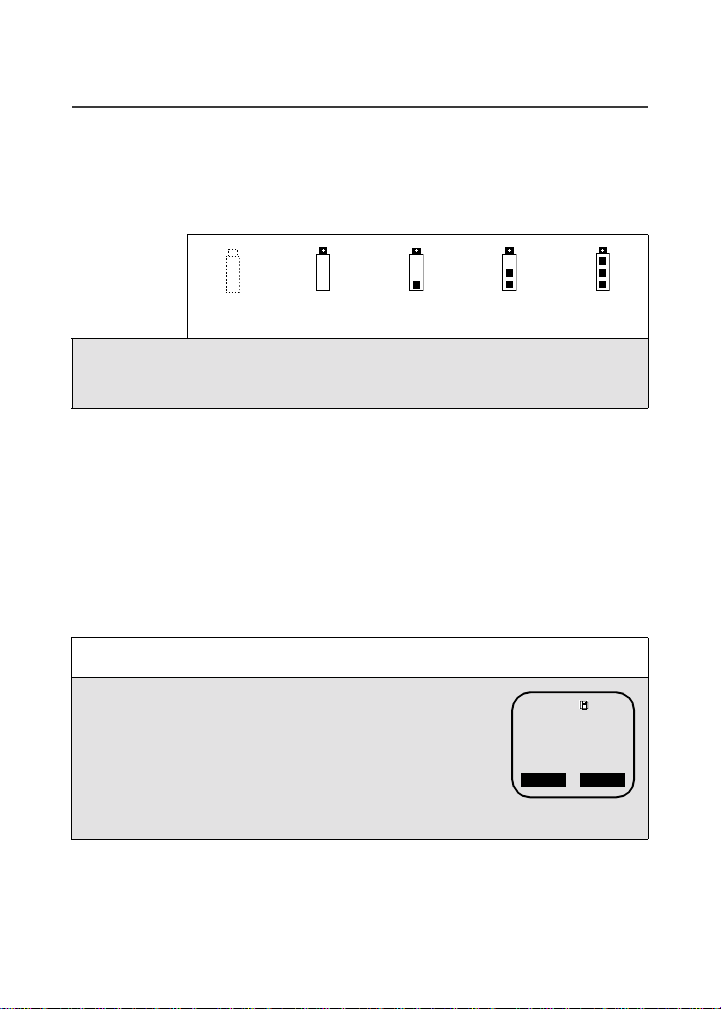
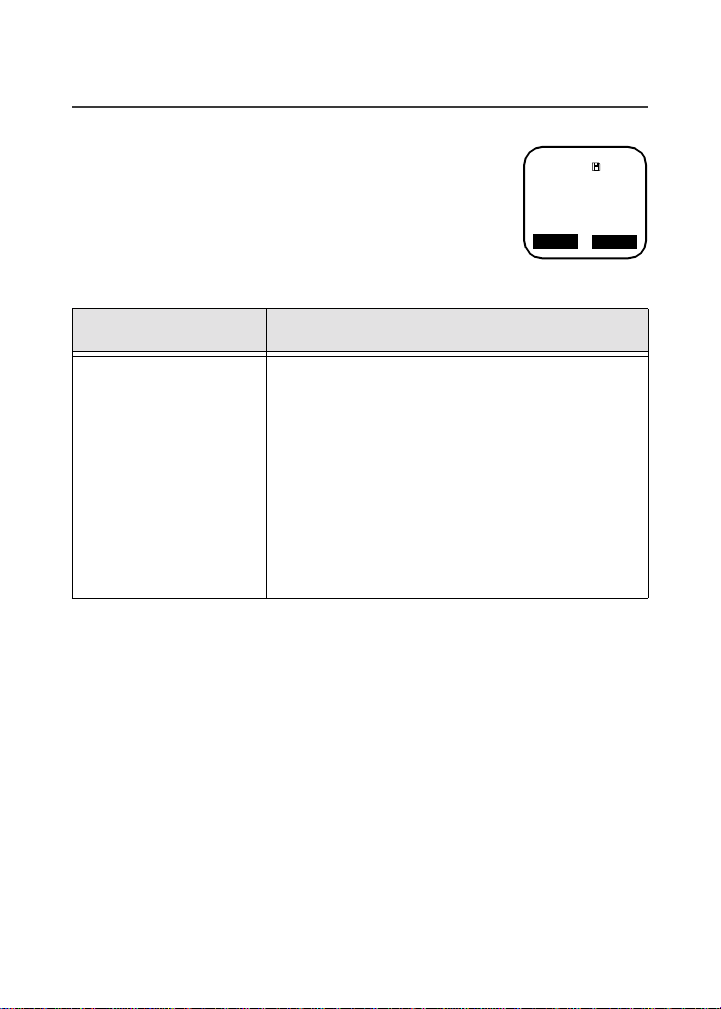
Battery Charging Status
The batte ry strength indic ator icon, found on your phone’s display
screen, shows the charge amount remaining in the battery.
Charge
Strength
Icon
Flashes
Low
Battery
Icon
Displays
0-30% 31-60% 61-90% 91-100%
Icon
Displays
Icon
Displays
Icon
Displays
Fully
Charged
A short, chirp-like sound indicates alow battery. T he icon flashes when
you have 5 minutes of talk time remaining.
Turning Your i1000plus Phone On/Off
NOTE: To register for the first time on the Nextel National Network,
Phone On
1
2
If your display reads No Service or doesn’t changeto the PhoneReady
screen when you turn on your phone, and you know you are in a Nextel
youmustturnonyouri1000plus phonein your local calling
area.
For optimal signal strength, extend the antenna.
Press a nd hold f.
As yourphone connec ts to the Nextel Nationa l
Network, you will see a Welcome to Nextel
message and a connecting message. When
Phone Ready appears on the display, you are
readytouseyouri1000plus phone!
a j
Phone Ready
Nextel
10:25a 03/12
Name
Mail
11
Page 18
coverage area, contact Nextel Customer Care. For details on Nextel
coverage areas, visit nextel.com.
Phone Off
1
Press a nd hold f until you see the message Powering Off.
2
Push in the antenna.
Enabling Secur ity
You must enable security the first time you poweron your phone or
within 20 days of first activation ofyour phone.
1
Turn your phone on.
2
Press m until you see Net Ready.
3
Press P under “Ok”. A series of screens displays.
4
You are prompted to enable security. Press P under “Yes”.If
you subscribe to a Nextel Online
displays.
5
Press m to return to Phone, Private or Group mode.
SM
ServicePlan, your home page
Receiving Over-th e- A ir Programm i ng
If you have been set up to receive over-the-air programming (OARSS),
you will receive your Private ID and Talkgroup lists for Direct Connect
use, your Personal Telephone Number and the Nextel Custom er Care
number via a Net Mail message.
12
nextel.com
Page 19
Your Nextel Phone Status
In order to receive your programming, you must have enabled security
(see “EnablingSecurity” on page 12). Within 24 hours of enabling
security,you will receive a Net Mail message containing your lists.
Follow the instructions to accept your phone programming:
1
You will receive a Net M ail alert with the message New Net
Mail – Receive Programming.
2
Press P under “Now” or “View”.
3
You are prompted to accept changes to your phone’s lists. Press
P under “OK”.
4
A confirmation screen displays. Press P under “OK”.
5
Press m to return to Phone, Private,orGroup mode.
Your Nextel Phone Status
Your i1000plus phone has a Status Light indicator. The Status Light
shows you the status of your connection (see “i1000plus Phone
Features” on page 8).
Status Light
Indicator
Nextel Phone Stat us
Flashing Red Signing on to the ne twork—Please Wait.
Solid Red No serviceor out of coveragearea. Ifyou are in
a coverage area, keep your phone on and it will
attempt to connect every two minutes. If you
cannot connec t after 15 minutes or more,
contactNextel Customer Care.
13
Page 20

Status Light
Indicator
Nextel Phone Stat us
Flashing
Green
In service/Ready to use.
NOTE: Nextel Direct Connect calls are only
available in your home calling area.
Solid Green In use.
Display Icons
After you turn on your phone, the following icons may appear on the
display:
a Signal Strength Indicator: Shows the signal
b Battery Strength Indicator: Shows the remaining
g Voice Mail Indicator: When flashing, indica tes that
c New Message Mail Flashing Indicator: Indicates
strength. Six bars indicate the strongest signal. Calls
and messages cannot be sent or received when there
is no signal.
charge in your battery.
you have new, unheard messages. Otherwise,
indicates that you have messages in your Voice Mail
box.
that you have incoming message mail.
u Unread Message Mail Indicator: Indicates thatyou
have unread message mail.
14
nextel.com
Page 21

Modes and Menus
q
j
i
z CallForward Indicator: Indicates that incoming
p Private/GroupSpeaker Indicator: Indicates that
,./ More Information Indicator : Indicates that there is
d Disk Icon: Indicates that you have subscribed to
VibraCall®Alert Indicator: Indicates that the
Vibrate All option is turned on. Your i1000plus
phone will vibrate inste ad of emitting ring tones.
Active Line Indi cator: Indicates the active phone
line (1 or 2).
phone calls for a spec ified line have been forwarded
(1, 2, or both).
thePrivate/Groupspeakeris off. You willhearNextel
Direct Connect calls through the earpiece.
more text to read above and/or below the current
screen.
Nextel Wireless Web services. Arrows indicate when
data is being transferred.
SecureData C onnectionIcon: Indicates that your
data information is encrypted during transmission.
Modes and Menus
When you first turn on your phone,the display defaultsto Phone mode.
However, your i1000plus phone operates in four different modes. To
switch between modes:
• Withthe cover closed, pressP under “Mode.”
Or,
• Open the cover and press
m.
15
Page 22
The table below provides more details about the four modes:
What theDisplay
Mode
LooksLikewithCover
Open
Function
Phone Mode To make digital
Private Mode To make private
Group Mode To make group
Net Mode To access Nextel
a j
Phone Ready
Nextel
10:25a 03/12
Name
Mail
a j
Prvt Ready
Bob Smith
10:25a 03/12
Alert
Name
a j
Group Ready
Talkgrp 1
10:25a 03/12
Alert
Mail
a j
Net Ready
Nextel
10:25a 03/12
Ok
Mail
cellular phone
calls.
digital two-way
radio calls using
Nextel Direct
Connect.
digital two-way
radio calls using
Nextel Direct
Connect.
Wireless Web
services.
16
nextel.com
Page 23
Quick Guide to i 1000plus Phone Funct ions
If the word Ready does not appear after the mode name in the display,
thatmode iseitherunavailableor it hasnot been activated. Once amode
is activated, there arevarious menu options within each modethat allow
you toaccess different functions. To switch between menu options
follow the steps below:
To use menu options:
• With the cover closed, the menu options change as you press the
option keys (l or o).
• With the cover open:
1
Press n.
2
Press the option key (O) under the desired menu option.
NOTE: Throughout this guide,Owill be used to represent the
option keys, whether used with the coveropen or closed.
Quick Guide toi1000
plus
Phone Functions
Now that you understand different modes, here’saquickwaytoget
started using them. This Quick Guide highlights some of the most
commonly used functions in Phone,Private, Group ,andNet modes.
These func tions are described in m ore detail in later sections.
Phone Mode
You must be in Phone mode to perform the following
functions:
a j
Phone Ready
Nextel
10:25a 03/12
Name
Mail
17
Page 24
Function Action
Programming
Your Own
Phone Number
DisplayingYour
Phone Number
Making a Phone
Call
Ending a Phone
Call
Last Number
Redial
Receiving a
Phone Call
1
Press *# 1 then P unde r
“Ok.” After you program your phone
number, this option will read “Edit.”
2
Enter your phone number and press P
under “Store” then P under “Exit.”
NOTE: Your phone number is automati-
Press
cally programmed when you
receive your first call.
*#1.
Using the keypad, enter the phone
number andpress
Cover Open: Press
e.
e or clos e the cover.
Cover Closed: Press P under “End”.
Press e.
Cover Closed: Openthecoverorpress
P under “Spkr”.
Cover Open: Press
e, * , #,orany
key (0 through 9).
18
nextel.com
Page 25
Quick Guide to i 1000plus Phone Funct ions
Private Mode*
You must be in Private mode to perform private
digital two-way radio func tions. Press
m to s witch
from Phone to P rivate mode.
Function Action
a j
Prvt Ready
1234
10:25a 03/12
Alert
Store
Sending a Private
Call
(cover open)
From the Prvt Ready screen, your most
recently used Nextel Direct Connect call
displays.To call another number, enter the
Private ID.
To place t he call,pressand hold the Nextel
DirectConnect Push-To-Talk button. Wait
for the chirp, then speak into the
microphone.
To listen, release the Nextel Direct
Connect Push-To-Talk button.
* This featureis only available in yourhome market area.
19
Page 26

Group Mode*
You must be in Group mode to perform group digital
two-way radio functions. Press
m to switch from
Private to Group mode.
Function Action
a j
Group Ready
Talkgrp 1
10:25a 03/12
Alert
Mail
Sending a Group
Call (cover open)
From the Group Readyscreen, yourmost
recently used Talkgroup displays. To
scroll other Talkgroups, press
To place a call to a Talkgroup, press and
hold the Nextel Direct Connect P ush-ToTalk button. Wait for the chirp, then speak
into the microphone.
To listen, release the Nextel Direct
Connect Push-To-Talk button.
* This featureis only available in yourhome market area.
Net Mode*
See “Net Mode” on page 87.
* This featureis only avail able in the continental United States.
s.
20
nextel.com
Page 27

Creating, Editing and
UsingStoredLists
A stored list is made up of names, phone numbers, Private IDs and
Speed Dial numbers. Storedlists are convenient because you do not
need to remember names and numbers. Instead, you simply scroll
through your stored list, press abutton and the number isdialed for you.
You can create and edit your lists using any of the following methods:
• Phone—using the programming functions
• Web/Phone—using Address Book
• Computer/Phone—using Nextel’siDENOrganizer
About This Section
This section includes instructions for the following tasks:
Phone Programming
• Storing Names and Numbers
• Pause Digit Entry
• Editing Stored List Entries
Address Book Page 26
iDEN Organizer Page 27
Page 22
Page 22
Page 24
Page 25
21
Page 28

Phone Programming
NOTE: Youmay want to read
“Plus Dialing” on page 35
Using Pause Digit Entry and Plus Dialing will enable you to
create stored lists that will save time when placing calls.
Storing Names and Numbers
This programming function allows you to store up to 100 names, phone
numbers and Private ID numbers. Your i1000plus phone will
automatically assign the next available Speed Dial number, which you
can change. Once you have stored an individual, you can call them by
scrolling through the list and finding their na me, using the Speed Dial
number or using Nextel Direct Connect (see “Nextel Dir ect Connect
on page 75). And, whenever the person calls you, your phone will
display their name if you entered their 10-digit phone number. The
displayholds 12 phone number characters. If thephone num ber exceeds
12 characters, you can press
characters. To return to the start of the number, press
“Numbr.”
You can store up to 100 names, phone numbers and Private IDs using
the following steps:
1
Press *#20.
2
The message: 20=Phone / Prvt List displays. Press P under
“Ok.” Another message will display with the remaining number
of slots available. The phone will then display the Enter Name
screen.
“Pause Digit Entry” onpage 24
beforeyou create a stored list.
and
P under “More” to see the remaining
P under
®
”
22
nextel.com
Page 29

Phone Programming
3
Enter the name of the individual you want to store.
Notice,each key has a number and several letters. To select
different letters on a key, quickly pressthe key until the desired
letter displays. Forexample, to enter the letter Y you mustpress
9 3timesquickly.
USER TIP: You can press and hold # to change the case of the
NOTE: Press the left side ofs to backspace or delete a letter.
4
Enter Phone Number displays. Enter the area code and phone
letter you just entered—lower to uppercase and upper
to lowercase. The default style is uppercase
Presstherightsideof
s to inse rt a space.
number.
Remember to add plus and pause entries if desired. See “Pause
Digit Entry” on page 24 and “Plus Dialing” on page 35.
P under “Store.”
Press
5
The name and Spd# = displays. The system automatically
assigns a Speed Dial number which you can change by entering
a new number.
Press
P under “Store.”
6
Enter PrvtID displays. Enterthe Direct Connect Private ID.
P under“Store.” If you do not wishto s tore a Private ID,
Press
O under “Skip.”
press
7
Repeat steps 2 through 6 to add additional names/numbers.
8
Press O under “Exit” when you have finished.
.
23
Page 30

Pause Digit Entry
When storing a number, you can program your phone so that it will not
only dial a number, but also pause and enter another series of numbers
such as a personal identification number (PIN) or password. This
feature is particularly useful for automated services such as voice mail
and banking systems.
Example: Let’s say you have a company voice mail account that you
frequently check while traveling. And, to access that account you must
do the following:
• Dial your work number
• Press # while the voice mail greeting is being played
• Enter your PIN to access your messages.
You can program your i1000plus phone to enter allof the above
information for you by separating each entry with a pause. The stored
data would look like this: 17035551234P#P1234. The firsteleven digits
representthe number that must be dialed to access your voice mail. The
P represents a 3 second pause. The # interrupts your greeting. The
second P represents another 3 second pause. The last four digits
represent your PIN.
To create a three-second pause, follow the steps below:
Press andhold * for two seconds. The pause s ymbol (P) will
appear on the display screen.
NOTE: Youcan enter up to 20 numbers/characters in a single entry,
NOTE: You can program your phone to pause for more than 3 sec-
stored or dialed.
onds. Performing the above step twice will program two
pauses and cause your phone to wait 6 seconds before entering the next set of numbers.
nextel.com
24
Page 31

Phone Programming
Editing Stored List Entries
Once you have created lists, you can edit them a s necessary. Select the
applicable optionbelow to edit a portion of a list.
Edit a Phone Number or Associated
Name or Speed Dial Number
1
Press *#21.
2
At the Phone List Editscreen, press P under “Ok.”
3
At the Edit Entry?screen, press P under “Ok.”
4
Press s until the desired entry appears.
5
Press P under “Ok.”
6
Edit the desired information (Number, Name, Speed Dial Number) and press
or more of the c omponents, just press
7
Press O under “Exit” until you see the Phone Ready screen.
P under “Store .” If you do not wish to edit one
P under “Store.”
Edit a Private ID or Associated Name
1
Press *#22.
2
At the Prvt ID List Edit s creen, press P under “Ok.”
3
At the Edit Entry?screen, press P under “Ok.”
4
Press s until the desired entry appears, press P under
“Ok.”
25
Page 32

5
Edit the desired information (Private ID, Name) and press P
under “Store.” If youdo notwish to edit one or more of the components, just press
6
Press O under “Exit” until you see the Phone Ready screen.
P under “Store .”
Erasing List Entries
To erase an entry item, follow thesteps below:
1
Press *#21to erase a phone number entry or *
#22
2
At the Phone (or PrvtID) List Edit screen, press P under
to erase a Private ID entry.
“Ok.”
3
Press s at the Edit Entry? screen until you see Erase
Entry?
4
Press P under “Ok.”
5
Press s until the desired entry appears.
6
Press P under “Ok.”
7
Press P under “Yes” at the Erase? screen.
8
Press O under “Exit” until you see the Phone Ready screen.
Address Book
See “Address Book” in the Nextel Wireless Web User’s Guide.
26
nextel.com
Page 33

iDEN Organizer
iDEN Organizer
If you want to use your computerto create stored lists for your
i1000plus phone, use Nextel’siDENOrganizer.It’s available for
programming names, phone numbers, and Privat e IDs into your phone.
To order, go to nextel.com or call Nextel Nextday
1-800-914-3240. You can also contac t your Nextel Authorized Sales
Representative or stop by any Nextel Store. For information on retail
store locations, go to nextel.com.
SM
Accessories at
27
Page 34

28
nextel.com
Page 35

Digital Cellular
Phone Mode
In Phone mode, you can enjoy Nextel’s all-digital
National Network for digital cellular service, and you
can roam internationally on other iDEN networks. See
nextel.com for coverage.
NOTE: For most phone functions, you will need to
be in Phone mode.Press
Phone Ready
page 15
.See
.
m untilyou see
“Modes and Menus” on
a j
Phone Ready
Nextel
10:25a 03/12
Name
About This Section
This section includes the following:
Making Phone Calls Page 30
Placing International Phone Calls Page 35
Receivinga Phone Call Page 36
Last 10 Numbers Received/Sent Calls List Page 37
Ending a Phone Call Page 39
Standard Features Page 39
AdditionalPhone Services Page 45
Mail
29
Page 36

Making Phone Calls
There a re five ways to make a phone call: Direct Dial, Scroll, Name
Search, Speed Dial, andTurbo Dial
®
.
Direct Dial
1
From PhoneReady, enter the number using the keypad.
2
Press e to place the call.
3
Press e or close the cover to endthe call.
If you make a mistake:
To Clear One
Digit
Press s
To Clear All Digits To Cancel
Press and hold s
Press P
under “Cancl”
MakingPhoneCallsfromtheStoredList
Before you can use the Scroll, Name Search, Speed Dial or Turbo Dial
methods, you first must create a phone list. See “Creating, Editing and
Using Stored Lists” on page 21.
30
nextel.com
Page 37

Scroll
Cover Open
1
Press s to scroll to the individual you want to call.
2
Press e.
Cover Clos ed
1
Press P under “List.”
2
Use the on the side of your phone to select the person you
want to call.
3
Press P under “Dial.” When the call connects, the speakerphone isactivated. F or a private conversation, open the cover
and use the earpiece.
4
To end the call,press O under “End”.
Name Search
Digital Cellular
1
Press O under “Name.”
2
Using the keypad, enter the first letter of the desired name.
3
Press s to scroll names .
4
Press e.
31
Page 38

Speed Di al
1
Press n until you see the “Spd#” option.
2
Press P under “Spd#.”
3
Using the keypad, enter the Speed Dial number.
4
Press e.
Turbo Dial
®
Allows you tocall any one of your first nine phonelist entries by
pressing and holding the corresponding numeric key (1-9).
Last Number Redial
Press e to re dial the last number you called.
NOTE: Ifyou receive “System Busy, Try Later,” presseto redial the
number automatically. You will hear a ring-back tone when the
call is successful.
Emergency Calling
Nextel phones fully support emergency calling. To place a call in an
emergency, dial 911
e. You will be connecte d to the nearest
emergency dispatch center. If you are on an active call, you m ust end it
before calling 911.
32
nextel.com
Page 39

Digital Cellular
Special Dialing Codes
Non-Emergency Numbers
Nextel supports “non-emergency” numbers (such as #77, 311, ...)
provided by local and state governments. These numbers are used to
report non-emergency incidents. If the situation includes imminent
danger or loss of life, you should dial 911. Nextel does not yet support
all local and state non-emergency numbers but is continuously
expanding support.
Telecommunications Relay Service
Nextel supports servic es for communicating withspeech and/or hearing
impaired individuals. You can dial 711 to reach a local
Telecommunications Relay Center. You will then be connected to your
destinationnumber. Relay service works through a Communications
Assistant who reads messages typed into a TDD/TYY device by a
speech or hearing impaired individual to you. The Communications
Assistant then types your spoken m essages to the hearing or speech
impaired individual. TelecommunicationsRelay Service is available 24
hours a days, seven days a week,and every call is strictly confidential.
NOTE: Telecommunications RelayService may not be available in all
areas.
Hands-Free Speakerphone
The i1000plus phone provides t he convenience of a hands-free
speakerphone for holding impromptu meetings or placing safer phone
calls.
NOTE: During speakerphone operation, you may either speak or
listen, but you cannot do both at thesametime.
Speakerphone operation varies according to whether the cover is open
or closed.
• If the cover is open during a speakerphone call and you close the
cover,you will end the call.
33
Page 40

• If the cover is closed during a speakerphone call and you open the
cover,the call switches to the earpiece. You can return to
speakerphone operation by pressing
To use the speakerphone:
Press
P under “Spkr.” The “Spkr” option flashes while the
speakerphone is on.
P under “Spkr.”
Mute
If there is background noise in your area, you may have difficulty
hearing a caller’s voice or messages. Muting the phone , which places
you in“listen only” mode, may resolve this problem.
Mute On
Whileonanactivecall:
Press n until you see“Mute” (ifit is notalreadyvisible).Press
P under “Mute.” T he display changes from Phone - In Use to
Phone - MUTE.
Mute Off
While the microphone is muted, you can hear incoming audio, but a
caller cannot hear you speak. You must turn “Mute” off to speak.
P under “Mute.” The display changesfrom Phone -
Press
MUTE to Phone - In Use, indicating t hat the microphone is on.
nextel.com
34
Page 41

Digital Cellular
Placing International Phone Calls
When making aninternational call, you caneitherenter the international
access code directly (011 in the United States) or use “Plus Dialing.”
You can also make internationalcalls from your storedlist(see “Storing
Names and Numbers” on page 22) using Scroll, Name Search, Speed
Dial, or Turbo Dial provided you have stored the number with Plus
Dialing.To place aninternational call using the PlusDialingfeature, see
the following section.
NOTE: Your phone’s default is “International Calls Restricted.” Con-
tact Customer Care to obtain international dialing access.
Plus Dialing
This fe ature enables you to place an international call from most
countries without entering the local international access code.
1
Press a nd hold 0 for two seconds. A “0” appears, then
changes toa “+.”
NOTE: The network translates the “+” into the appropriate interna-
2
Enter the country code, city code, and phone number.
3
Press e.
tionalaccess code needed to place the call.
Country-to-Country (Using Plus Dialing)
1
Pressand hold 0 for two seconds. A“0” appears, then changes
to a “+.”
2
After the “+” appears, enter the country code, city or area code
and phone number.
35
Page 42

3
Press e to send the call.
4
Press e to end the call.
Country-to-Country (Using Direct Dial)
1
Dial the international access code, the country code, city or area
code and phone number.
2
Press e to send the call.
3
Press e to end the call.
Within-Country
The steps for placing an international call within the same country are
identical to those for calling country-to-country e xcept it isnot
necessary to enter the country code. However, many in-country phone
numbers will require you to enter “0” before the local number.
Receiving a Phone Call
An incoming call is indicated by a ring, vibration or backlight
illumination. You can answer the call with the cover c losed or open.
Cover Closed
Press P under “Spkr” to activate the speakerphone.
Or, open the cover to answer the call using the earpiece.
36
nextel.com
Page 43

Cover Open
Press
Digital Cellular
e.
Or, press
NOTE: To activate the speakerphone, press P under “Spkr.”
*, #, or a ny numeric ke y (0 through 9).
Missed Call Indicator
Your i1000plus phone notifies you of unanswered
phone calls. If you subscribe to Caller ID (and itis
available in your a rea), your i1000plus phone
temporarily stores the caller’s phone number in your
Last 10 Received Ca lls list. Your screen displays a
a j b
Phone Ready
Nextel
2 Rcvd Calls
Name
Mail
flashing message with the number of missed calls.
Press any key to clear the flashingindicator.
Retrieving a List of Missed Calls
1
Press n until you see the “Calls” option.
2
Press O under “Calls.”
3
Press s to scroll the list.
Last 10 Numbers Received/Sent Calls List
If you subscribe to Caller ID, you can view, dial, and store the last ten
received and last tensent telephone numbers.The most recently
receivedor s ent callsappear first in your call lists. Thqe name(if stored)
or the phone number displays along with the time a nd date the call was
received or sent.
37
Page 44

Quickstore of Phone Numbers
Quickstore allows youto quickly store a received orsent phonenumber
without going through the Programming menu.
Reviewing/Storing/Dialing Received Calls
1
Press n until you see the “Calls” option.
2
Press O under “Calls.” The Rcvd Calls screenappears.
3
Press s to scroll entries. Press e to dial the number. Or,
press P under “Store” to store the numberin the first available
storage space.
4
To store the number, ente r the name using the keypad. (Notice,
each key has a number and several letters. T o select different letters on a key, quickly press the key until the desired letter displays. For example, to enter the letter Y you must press
9 3
times quickly.)
5
Press P under “Store” after you have enteredthe name.
6
Press O under “Cancl” to close the Rcvd Calls screen.
Reviewing/Storing/Dialing Sent Calls
1
Press n until you see the “Calls” option.
2
Press P under “Calls.”
3
Press n untilyou see “Sent” if this option isn’t a lready visible.
4
Press P under “Sen t.”
nextel.com
38
Page 45

Digital Cellular
5
Press s to scrollentries. (To store an entry fromthe Se nt list,
P under “Store” and follow steps 4-6 in “Reviewing/
press
Storing/Dialing Received Calls” on page 38.) Orpress
e to
dial the number.
Ending a Phone Call
Cover Open
Press e or close the cover.
Cover Closed
Press P under“End”.
Standard Features
Nextel offers a variety of included services to help you better manage
your business and personalcalls.
About This Section
The main topics covered in this section are listed below:
Call Hold Page 40
Call Forwarding Page 40
Call Waiting Page 43
Three-Way Calling Page 44
39
Page 46

Call Hold
When you are onan active call, you can place thecall on hold and make
asecondcall.
1
To place the active call on hold, press n until you see “Hold.”
2
Press O under “Hold.” You may then place another call.
3
Press n then press O under “Hold” to toggle between calls.
4
To take the active call off hold, press O under “Hold.”
Call Forwarding
Nextel’s Ca ll Forwarding features forward c alls to the number you
designate. There are four Call Forwarding options available:
• CallForwarding For All Calls (On)—
All c alls will be sent automatically to the number you select.
• CallForwarding When Busy (Bu sy)—
Calls will be sent to the designated number when your phone is
engaged in other acti vities.
• CallForwarding When You DoNot Answer (NoAns)—
Callswill be sent to the designatednumber w hen youdo not answer
the call. The phone will ring 4 times before forwarding the call.
• Call Forwarding When You Are Not Available (NoRch)—
Calls will be sent to the designated number when your phone is not
on the network.Thisincludes when theunit is powered off or out of
thecoveragearea.
NOTE: In order to receive Voice Mail messages, Call Forwarding
“Busy,”“NoAns,” and “NoRch” must be set to the Voice Mail
Accessnumber.Your Voice Mail access number is the first six
digits of your 10-digit phone number followed by 6245 (for
example 703-555-6245). This is the default setting.
40
nextel.com
Page 47

Digital Cellular
NOTE: YoumustbeinacoverageareatoactivateormodifyCall
Forwarding.
Turning On Call Forwarding for All Calls
1
Press n until you see “Forwd.”
2
Press O under “Forwd.”
3
Enter the phone number you want incoming calls forwarded to.
(Or, you may press
s to select a number from your stored
list.)
4
Press P under “On.” The Please Wait message displays.
5
Press O under “Exit.”
Your calls will now be forwarde d to the number that you selected and
you will see
z, y,orx (the Call Forward Indicatorwith the
forwarded line number(s) display(s) on your screen). You can forward
Line 1 or Line 2 independently.
Turning Off Call Forwarding for All Calls
1
Press n until you see “Forwd.”
2
Press O under “Forwd.”
3
Press P under “Off.” The Please Wait message displays.
4
Press O under “Exit.”
41
Page 48

Call forwa rding will now be reset to forward calls to Voice Mail when
you are not available. If you are not receiving your Voice Mail
messages, see “Setting Call Forwarding to Voice Mail” on page 42.
Setting Call Forwarding to Voice Mail
For you to receive Voice Mail messages, Call Forwarding for “Busy,”
“NoAns,” and “NoRch” must be set to “On” with your Voice Mail
access number.
1
Press n until you see “Forwd.”
2
Press O under “Forwd.”
3
Press n until you see “Busy.”
4
Press O under “Busy.”“Busy” should be set to “On.” If it is
not, press
5
Enter your Voice Mail access number. Your Voice Mail access
P under “On.”
number is the first six digits of your 10-digit phone number followed by 6245 (for example, 703-555-6245).
6
Press O under “Exit.”
7
Repeat steps 1-6 for “NoAns” and “NoRch.”
NOTE: You can use the “Busy,”“NoAns,” and “NoRch” options to
forward calls to other numbers if desired. However, it is recommended that you leave these options set to the Voice Mail
access number and use the “On” option to turn Call Forwarding on for all callsif youwish to forward your calls to another
number.
nextel.com
42
Page 49

Digital Cellular
Call Waiting
Call Waiting a llows you to receive a second call while you are talking
on the phone. With the i1000plus phone you can switch between calls
so you never have to miss a call. By default, Call Waiting is always
“On” unless you turn it “Off” for a specific call.
If you’re on a call and you receive a second call, you
will:
• Hear atone;and
• See a m essage on your display informing you of
another incoming call.
Accepting Calls
Press P under“Yes.”
Declining Calls
Press O under“No.” If you’rea NextelVoice Mail customer,
the call will be forwarded to your Nextel Voice Mail box.
Switching between Calls
O under“Hold.” Your phonewill refer tothe first callas
Press
Call-1 and the second call as Call-2. If call 1 is on hold your
display will read: Call 1 - Hold 7035551234.
Ending the Active Call
a j
7035551212
Take Call
On Line 1?
No
Yes
Press e.
43
Page 50

Turning Call Waiting Off
If you do not want to be interrupted during a call, you can turn Call
Waiting off prior to making/receiving a call.
1
Press n until you see “Wait.”
2
Press O under “Wait.”
3
Press P under “Off.”
Call Waiting is now disabled forthe next call. It wil l
automatically reset to “On” when you end the call.
Three-Way Calling
Using Three -Way Calling, you can combine two ongoing phone calls
into one conversation. This optionis available only when you initiate
the second call.
1
Placeor receive a phone call.
2
Press O under “3Way” to place the first call on hold.
3
Enter the phone number of the second individual you want to
call or press
press
s toselect the number from yourstored list, and
e.
4
After you reach the second individual, press O under “3Way.”
Both numbers will a ppear on your display.
5
T o end the three-way call, press e or close the cover.
nextel.com
44
Page 51

Digital Cellular
Additional Phone Services
In additi on to the standard features that are inc luded for all Nextel
Digital Cellular subscribers, there are also several features that are
available at an additional monthly or per-use fee. See the following
sections for more inform ation on these services. Conta ct Nextel
Customer Care for additional information.
NOTE: Some services are not available outside of the continental
UnitedStates.
About This Section
The main topics covered in this section are listed below:
AlternateLineService Page45
Call Restrictions Page 47
Caller ID Page 47
Nextel 411 Page 48
Alternate Line Service
As an Alternate Line customer, you will be given a s eparate phone
number for each line. With alternate lines, you can separate business
and pers onal calls, or designate one as a priority line.
Nextel Mobile Messaging and Nextel Wireless Web services use the
Line 1 phone number. You only need to subscribe to CallerID or Voice
Mail onc e—these services will be available on both lines.Forwarding
Line 2 to Line 1 will send Line 2 incoming calls directly to Voice Mail
without ringing.
45
Page 52

The following settings are independent for each phone line. When you
enable a setting, it applies only to the active line.
• Ringer Volume
• Selectable Ring Styles
• Call Forw arding numbers
• One-Minute Beep
• Display Timer
• Reset Timer
• Total Timer
SelectinganAlternateLine
1
Press n until you see “Line2.” (If you are
alreadyusing Line 2, “Line1” willappearas an
option.)
2
Press O under “Line2” to select Line 2; or, press O under
a j
Phone Ready
Nextel
10:25a 03/12
Line2
“Line1” to select Line 1, whichever is applicable.
Receiving Calls on Your Alternate Line
You can receive callson either line, regardless of the active line setting.
• If the call is on the sameline asthe currently active line, the Active
Line Indicator flashes.
• If the call is on the line that is not currently active, the Active Line
Indicator remains lit and the other line number icon flashes.
46
nextel.com
Page 53

Digital Cellular
Call Restrictions
You c an prevent your phone from making or receiving specific typesof
calls. Nextel currently offers three types of Call Restrictions:
• No long distance calls allowed
• No incoming calls
• No outgoing calls (except 911)
Contact Customer Care for more information.
Caller ID
If you subscribe to Caller ID, your i1000plus phone automatically
displays the phone number and/or name of the person c alling (unless
blocked by thecaller),enabling you todecide whe ther totake the call or
forward it to Voice Ma il.
NOTE: Caller ID information is not available on all calls.
Displaying the C aller’sName
Acaller’s name is displayed on your Nextel phone if you previously
programmed the person’s name into your phone list (see “Storing
Names and Numbers” on page 22). Otherwise, thecaller’s phone
number will be displa yed.
Maintaining Your Privacy with P er-Call/Per-Line Blocking
Nextel provides two methods to prevent those youcall from seeingyour
number on their own Caller ID displays.
NOTE: YourNextel phone number cannot be blocked from calls made
to 911, 800, 855, 866, 877 or 888 phone numbers.
47
Page 54

Per-Call Blocking
You can block delivery of your phone number to other Caller ID units
for one call.
Press
*67before dialing the call.
Per-LineBlocking
You can permanently block delivery of your phone number on every
call you make. ContactCustomer Care to order this feature.
You can disable this feature on a per-call basis by pressing *
82
before the call.
Nextel 411
Nextel 411 provides friendly services for on-the-go professionals
including:
White Page Listings
You can request a telephone number for any person, business, or
governmentagency in the continental United States and Hawaii.
Operators can also provide address information if available.
Yellow Page Listings
You can ask the operator to perform asearch by category if the specific
business name is unknown. For example, you can request information
for the nearest copy center to your hotel while on business travel.
48
nextel.com
Page 55

Digital Cellular
Nationwide Call Completion
Nextel 411 operators can connect you to any listing in the continental
United States andHawaii. If requested, the operatorwillstay on theline
while connecting to the number.
Driving Directions
Nextel 411 operators a re able to provide directions to reach a specific
destination.Operators will work with you to determine your starting
point and provide clear directions to the destination.
Restaurant Reservations
Nextel 411 operators can assist in finding a restaurant and then
coordinate reservations. A Nextel 411 operator will confirm your
reservation information through a return phone c all. For your
convenience, the reservation will be in your name.
Movie Listings and Showtimes
Nextel 411 operators have access to movie listingsat most theaters in
the continental United States and Hawaii. Youonly need to ask for a
specific movie or m ovie theater to get current movies, locations or
showtimes. Additional information s uch as running time, synopsis, a nd
ratings are also available. Showtimes and listings are available 24-48
hours in advance.
Local Event Information
You can request information on local events such as sporting events,
concerts, state and county fairs and other current events. Nextel 411
operators can provide dates, times, and locations for these events.
Simply dial
411efrom your Nextel phone anywhere within
the c ontinental United Statesand Hawaii.
49
Page 56

Nextel Voice Mail Servic e
Nextel Voice Mail Servic e is a flexible, easy-to-use system that takes
messages when you’re not available—so you never miss an important
call!
About This Section
The main topics covered in this section are listed below:
Setting Up Your Voice Mail Box Page 50
ReceivingVoice MailMessages Page 51
Using Voice Mail Page 52
Advanced Voice Mail Features Page 58
Voice Mail Tree Page 68
This section covers the m ost commonly used Voice Mailfeatures.Once
you log into Voice Mail, you can accessa number ofinnovative features
covered in this chapter. After you access Voice Mail, an automated
system tells you each menu option and which button to press to make a
menu selection. See “Nextel Voice Mail Tree” on page 68.
SettingUpYourVoiceMailBox
You must set up yourVoice M ail box before youcan retrieve messages.
Before ge tting started, s ee “Recording Your Active Greeting” on
page 57 for informationyou may want to includein your greeting.
nextel.com
50
Page 57

Nextel Voice Mail Service
1
Using your Nextel phone, dial your 10-digit Nextel Personal
Te lephone Number (PTN).
If you arecalling from aphone other than your Nexteli1000plus
dial your 10-digitNextel Personal Telephone
phone,
Number(PTN).
When you hear the greeting, press * to access
your Voice Mail box.
2
Thesystemwillpromptyouto“Enter your password.” Enter the
last seven digits of your Nextel phone number (example:
5557777). This is your temporary password.
3
The first time you access Voice Mail, you will be prompted to
follow the systeminstructions to:
• Create a new four- to seven-digit password (see “Changing
Your Password” on page 56).
• Record your name (see “Recording Your Name” on
page 56).
• Record a greeting (see “Recording Your Active Greeting” on
page 57).
4
When the system says, “Enjoy using Nextel Voice Mail,” your
mailbox is set up.
Receiving Voice Mail Messages
Your phone ispre-programmed with default Call Forwarding settings to
forward your calls to Voice Mail when you are not available . The
default settings are as follows: Call Forwarding for All Calls is turned
“Off,” and the “Busy,”“NoAns” and “NoRch” options are set to “On”
with your Voice Mail access number. If you have subscribed to Voice
Mail and have set up your Voice Mail box, but are not receivingyour
Voice Mail messages, see “Setting Call Forwarding to Voice Mail” on
page 42.
51
Page 58

New Message Indicators
When you receive a new message, the following occurs:
• New Voice MailWaiting will display on the screen.
a j g b
New Voice
Mail Waiting
Exit Dial
Voice Mail
Indicator
• The
g icon will flash at the top of t he display.
• Your i1000plus phone will alert you every 30 s econds until you
O under “Exit” or P under “Dial.”
press
Trans ferring Calls to Voice Mail
Press O under“End” while your phone is ringing to transfer
incoming calls directly to Voice Mail.
Using Voice Mail
Logging Into Voice Mail
1
From the Phone Ready screen, press P under “Mail.”
2
Select VoiceMail by using s to highlight VoiceMail or by pressing
asterisk indicates new messages.
nextel.com
1.An
a j g b
*1>VoiceMail
2>Mesg Mail
3>Net Mail
OkExit
52
Page 59

Nextel Voice Mail Service
3
Press P under “Ok.” The Voice Mail
screen appears.
The numbers of new and total messages
display. An exclamation point (!) indicates
an urgent message.
4
Press P under “Dial” to log into Nextel Voice Mail Service.
a j g b
Voice Mail
2 New !
3 Total
Exit
Phone-In Use displays as you are connected to the network.
Dial
NOTE: If you hear a message that says, “Enter the phone number
5
When prompted, enter your password.
NOTE: Youmust receive a message before you can accessVoice
of the subscriber you are trying to reach,” enteryourown
Nextel Personal Telephone Number. When the greeting
plays,press
Mail by pressing
(Tip: Y ou can leave yourself a message.)
*
to receive a password prompt.
P
under “Dial” from youri1000
plus
phone.
Main Voice Mail Menu
You are at the main Voice Mail menu when you hear the options listed
below.
• T o play your messages, press
1. (This option playsonly if you
have new or saved messages.)
• To record a message, press
• To change your greeting, press
• To access your personal options, press
If you press
menu. Ifyou press
* while you arein asub-menu,you will goto the previous
**, you will go to the main Voice Mail menu.
2.
3.
4.
53
Page 60

From the main Voice Mail menu, press # to exit Voice Mail. At any
time you may end the call by pressing
e or closing the cover.
Playing Messages
When you receive a new VoiceMail message , you caneither listen to it
immediatelyor later. Press
under “Exit” to listen later.
Options available while listening to a message:
P under “Dial” to listennow or press O
Replay the previous six seconds.
Replay from the beginning of the
message.
Pause/continuethe current
message.
Fast forward six seconds.
Fast forward to the end of the
message.
Play the day and time the message
was received.
Options available while a message is playing orafter it has played:
Copy the message to another
subscriber. (See “Recording,
Copying, and Replying to
Messages” on page 61.)
nextel.com
54
1.
Press
Press 11.
2.
Press
Press 3.
33.
Press
Press 55.
Press
6.
Page 61

Nextel Voice Mail Service
Delete the message.
Reply to the message.
Save the message.
Skip to the next message.
Saving and Deleting Messages
While a messageis playing or after you have finished listening to it,you
cansaveitordeleteit.Tosaveamessage,press
message, press
“Automatic Playback” on page 60.
Messages that are not saved ordeleted remain in your mailbox as new
messages. Allmessagesare automatically deleted after 30 days.
Recovering Deleted Messages
To retrieve deleted messages, press
the current Voice Mail session. If you end the call, the messages will be
permanently deleted.
7. To have messages automatically saved, see
*3. This optiononly appliesto
After exiting the Voice Mail session, you
cannot recoverdeleted messages.
Press 7.
8.
Press
Press 9.
#.
Press
9. To delete a
!
C a u t i o n
55
Page 62

Changing Your Password
To change your current password, follow the steps below.
1
From the main Voice Mail menu,press 4 to access Personal
Options.
2
Press 4 to access Personal Preferences.
3
Press 1 to modify password.
4
Enter your new password (four to seven digits).
5
Press ** to return to the main menu.
For security purposes, it is recommended
that you do not choose sequential or
!!
repeated digits like 1-2-3-4 or 5-5-5-5 for
your password.
W A R N I N G
NOTE: If you forget your password, contact Customer Care.
Recording Your Name
When you send, reply to, or copy a message, your name precedes the
message. To record or re-record your name at any time, use the
following steps:
1
From the main Voice Mail menu,press 4 to access Personal
Options.
2
Press 4 to access Personal Preferences.
nextel.com
56
Page 63

Nextel Voice Mail Service
3
Press 3 to access the Record Your Name option.
4
Press 2 to record your name.
5
Press ** to return to the main menu.
Recording Your Active Greeting
Through Nextel Voice Mail Service,there area number of ways people
can reach you. You may want to include one or all of the following
options in your greeting so that callers will know they are available.
• Press 1 to send a numeric message.
• Press 2 to send an operator assisted message. (This option is
available only if you are a subscriber of Operator Assisted
Messaging. Contact Nextel Customer Care for more information.)
• Press # to skip the greeting and record a message immediately.
To recordor alter your greeting at any time follow the steps below.
1
From the main Voice Mail menu,press 3 to change your
greeting.
2
Press 1 to play, press 2 to record or re-record, or press 3
to dele te your active greeting.
3
Record your greeting and press # when you have finished.
4
Press ** to return to the main menu.
57
Page 64

Advanced Voice Mail Features
Multiple Greetings
NextelVoice Mail Service allows you to have up to five different
greetings. You candesignatewhich greeting will beyour active greeting
at any given time. For example, instead of your regular greeting, you
may wish to activate a different greeting for days when you are out of
the office or on vacation.
The greeting thatwas recorded during your initial Voice Mailbox setup
is Greeti ng 1. This is your default active greeting.
Recording Additional Greetings
To recordadditional greetings, follow the steps below.
1
From the main Voice Mail menu,press 3 to access the Greetings menu.
2
Press 4 to modify greetings.
3
Enter the greeting number you wish to create or modify.
4
Press 2 to record a greeting.
5
Record your greeting and press # when you have finished.
6
Press ** to return to the main menu.
nextel.com
58
Page 65

Nextel Voice Mail Service
Selecting Your Active Greeting
To selec t your active greeting, follow the steps below.
1
From the main Voice Mail menu,press 3 to access the Greetings menu.
2
Press 3 to select another greeting to be active.
3
Enter the number ofthe greeting that you would like to be
active.
4
The system will confirm your active greeting number.
5
Press 1 to play your active greeting.
6
Press ** to return to the main menu.
Greeting Schedule
You can choose to have your greetingsautomaticallyactivated based on
a pre-determined time schedule. By activating theGreeting Schedule,
Greetings 1, 2 and 3 will automatically play according to the time
schedule listed below.
Greeting 1
Greeting 2
Greeting 3
Evenings &
Weekends
Weekday
Mornings
Weekday
Afternoons
5:00 pm–7:59 am, Monday–Friday
24 hours, Saturday and Sunday
8:00 am–11:59 am
Monday–Friday
Noon–4:59 pm
Monday–Friday
59
Page 66

Activating the Greeting Schedule
To activate the greeting schedule, follow the steps below.
1
From the main Voice Mail menu,press 3 to access the Greetings menu.
2
Press 9 to activate (or deactivate) the greeting schedule.
3
Press ** to return to the main menu.
Automatic Playback
By default, the Playback Mode of your Nextel Voice Mail Service isset
to Normal. Nextel’s Automatic Playback feature automatically plays
and s aves new message s when you log in. Toactivate Automatic
Playback, follow the steps below.
1
From the main Voice Mail menu,press 4 to access Personal
Options.
2
Press 4 to access Personal Preferences.
3
Press 2 to access Playback Preferences.
4
Press 2 to switch between Automatic and Normal Playback.
5
Press ** to return to the main menu.
Changing the Playback Order of Messa ges
With Nextel Voice Mail Service, you can select the order in which you
want unheard messages to beplayed. You may listen to the last received
message first, or you may listen to the first received message first. To
60
nextel.com
Page 67

Nextel Voice Mail Service
select the order in which new messages should be played, follow the
steps below.
1
From the main Voice Mail menu,press 4 to access Personal
Options.
2
Press 4 to access Personal Preferences.
3
Press 2 to access Playback Preferences.
4
Press 1 to switch between the playback orders.
5
Press ** to return to the main menu.
Recording, Copying, and Replying to Messages
These functions allow you to record and send, reply to, or copy a
message to an assigned destination address or Group List number.
NOTE: Ifyourecorda completeorpartial message, but do not sendit,
Nextel Voice Mail Service will refer to this message as an “in
preparation” message. (Before sending messagessee
ery Options” on page 62
.)
“Deliv-
To record and send a message, follow the steps below:
1
From the main Voice Mail menu,press 2 to record a message.
2
Record your message and press # to end the message.
3
Press 9 at theprompt to indic ate that you wantto send the message orpress
5 for Delivery Options.
61
Page 68

4
Enter the mailbox number and/or group list number(s). (A mailbox numberis the 10-digit Nextel Personal Tel ephone Number
of a Nextel customer.The name of the recipient plays if it is
recorded.)
5
Press # to send.
6
Press ** to return to the main menu.
NOTE: Youcan only send messages using this method to Nextel cus-
Delivery Options
tomers in yourhome market.
After you have created a mes sage, you can assign delivery options
before you send it.Below is a list of the optionsthat can be appliedto a
message:
Urgent
Recipient will hear this message before other
messages.
Private
Recipient cannot copy the message to another
mailbox or phone number.
Notification of
Non-Delivery
You will be notified if the recipient has not
listened to your message by a certain time and
date.
Future Delivery
Youcanspecifyatimeanddate(uptothree
months in advance) for the message t o be
delivered. (See “Time and Date Charts” on
page 66.)
Important: Once a message has be en sent for
future delivery, it cannot be retrieved or
deleted.
62
nextel.com
Page 69

Nextel Voice Mail Service
To seta special delivery option, follow the steps below.
1
After recording your message but before sending it , press 5
for Delive ry Options.
2
Press the number that corresponds with the desired delivery
option:
• Press
• Press
• Press
1 for Urgent.
2 for Private.
3 for Notification of Non-Delivery. At prom pt,
specify time and date.
• Press
4 for Future Delivery of Messages.At prompt,
specify time and date.
• Press
3
The list of options will be presented again. Select an additional
option or press
4
Enter the destination mailbox or Group List number of the
9 to send the message immediately.
9 to send the message.
recipient(s).
5
Press # to send.
6
Press ** to return to the main menu.
Working with Group Lists
The Group List feature enables you to create a list and assign ita unique
name. Then, you can add mailbox numbers, group lists or individuals—
by name—tothe list. Once you create a list you ca n send a voice
message to everyone on the list by entering the group list number. You
can store up to 40 group lists. Each list can hold up to 50 addresses.
63
Page 70

Creating a Group List
To set up a Group List follow the steps below.
1
From the main Voice Mail menu,press 4 to access Personal
Options.
2
Press 2 to access your Group Lists.
3
Press 2 to create a Group List.
4
Enter the one- or two-digit Group List number and press #.
5
Recordanameforthelistandpress#.
6
Select group members by mailbox number, Group List, or name.
7
Press # to save all entries added to the list.
8
Press ** to return to the main menu.
Modifying a Group List
1
From the main Voice Mail menu,press 4 to access Personal
Options.
2
Press 2 to access Group Lists.
3
Press 4 to modify a Group List.
4
Enter the number of the Group List you want to modify.
5
Press 1 to add a new recipient.
nextel.com
64
Page 71

Nextel Voice Mail Service
6
Press # to save your changes.
7
Press ** to return to the main menu.
Deleting a Group List
1
From the main Voice Mail menu,press 4 to access Personal
Options.
2
Press 2 to access Group Lists.
3
Press 3 to delete a Group List.
4
Enter the number of the Group List you want to delete. The system willplay the name of the Group List.
5
Press # to delete the list.
6
Press ** to return to the main menu.
Message Forwarding
This feature allows you to programyour phone toautomatically forward
incoming messages to another Nextel customer’s mailbox. T here are
threetypes of forwarding: Immediate, Silent and Delayed.
• Immediate Forwarding—Caller is notified that the message will
be forwarded.
• Silent Forwarding—Caller is not notified that the message will be
forwarded.
• Delayed Forwarding—If a caller ’s messageis not retrievedafter a
certain amount of time, the message will automatically be
forwarded to another m ailbox or te lephone number.
NOTE: Youcan only forwardmessages to Nextel cu stomers in your
home market.
65
Page 72

1
From the main Voice Mail menu,press 4 to access Personal
Options.
2
Press 5 to modify Forwarding Options.
3
Select the applicable option below:
• To create a forwarding number, press
• If you have already created a forwarding number, press
2.
2
to modify the number.
• To enable or disable Me ssage Forwarding, press
• To change the forwarding type, press
• Press
• Press
• Press
4
Press ** to return to the main menu.
1 for Immediate Forwarding.
2 for Silent Forwarding.
3 for Delayed Forwarding.
4.
3.
Time and Date Charts
Time and Date Charts can be referenced for specific tasks throughout
NextelVoice Mail Service.
24-hour Clock
Nextel Voice Mail Service uses a 24-hour clock:
NOTE: To compute the 24-hour clock time for pm, add 1200.
Below is a list of hours translated into 24-hour time:
Hour
24-hour
12:00
am
0000 0400 0800 1200 1600 2200
4:00
am
8:00
am
nextel.com
12:00
pm
66
4:00
pm
10:00
pm
Page 73

Nextel Voice Mail Service
Dates
All dates must have 4 digits in the MM/DD format (2 digits forthe
month and2 digits for the day). Januaryis 01, February is 02,etc. The
first day of the month is 01, the second day of the month is 02, etc.
For the days of the week, Sunday is 1, Monday is 2, etc.
67
Page 74

68
nextel.com
Main Menu
Play
1
Messages
Record
Message
2
Change
Greetings
3
Personal
Options
4
Exit
Voice Mail
#
Global Options
Previous
Menu
*
**
*3
Main
Menu
Recover
Deleted Messages
Nextel Voice Mail Tree
To access Voice Mail:
From your own Nextel phone, follow the instructions in the User's
•
Guide that came with your phone.
From any other phone:
•
1. Dial your own 10-digit Nextel phone number.
If you hear “Please enter the number of the subscriber you are trying
to reach," enter your own 10-digit Nextel phone number.
2. Press * when you hear your greeting.
3. Enter your password.
Change Greeting
Personal
Options
our Own
Group Lists
2
Personal
4
Preferences
Password
1
Playback
Preferences
2
3
Access
Modify
Record
Name
1
2
3
4
7
9
Play Active
Greeting
Record Active
Greeting
Select Active
Greeting
Modify Another
Greeting
Delete Active
Greeting
Activate Greeting
Schedule
Play Messages
Replay Last
3 Seconds
1
Pause/
2
Continue
Fast
Forward
3
Copy
Message
6
Delete
Message
7
Reply To
Message
8
9
#
Save
Message
Play N ext
Message
Voice Mail Tree
Page 75

Messaging Services
Messagin g Servi ce s
Your Nextel phone offers two choices in text messaging services with
Nextel Mobile Messaging—Text and Numeric Messaging and Nextel
Two-Way Messaging.
• Text and Numeric Messaging allowsothers to send you a message
that is displaye d directly on your Nextel phone.
• Two-Way Messaging uses the Nextel Wirel ess Web to provide
immediate contact, even when you can’tmakeortakeacall.Two-
Way Messaging allows you to send, re ceive and respond to text
messages quickly and discreetly.
About This Section
The main topics covered in this section are as follows:
Nextel Two-Way Messaging Page 69
Text andNumeric Messaging Page 70
Nextel Two-Way Messaging
With Two-Way Messaging, you can:
• Receive messages (up to 500 characters in length) with built-in
replies and respond to them at the touch ofa button.
• Create and store your own frequently used responses thatlet you
send inform ative answers without keying in text.
• Send m essages to one individual from your phone or contact
several at once from any email system or nextel.com.
• Respond to messages when you’re in a meetingor noisy location.
To activate this service, contact Nextel CustomerCare. For additional
information on how to use this service, see “Two-Way Messaging” in
the Nextel Wireless Web User’sGuide.
69
Page 76

Text and Numeric Me ssagi ng
Text and Numeric Messaging Feature s
With Nextel Text and Numeric Messaging, Nextel will:
• Allow numeric messages up to 20 characters in length a nd text
messages up to 140 characters in length.
• Accept your messages even if you are unavailable, if your phone is
turned off, or if you are busy on another call.
• Alert you of a new text or numeric message, even if you are on
another call.
• Store a message if you are using Nextel Direct Connect and deliver
it upon completion ofthe call.
• Store the message if you are outside of the coverage area and
deliver it as soon as you are back in a coverage area.
• Attempt continuous delivery of messages until succ essful, forup to
7days.
With Nextel Text and Numeric Messaging, your Nextel phone will:
• Refer to text and numeric messages as Message Mail.
• Stamp the message with the time and date the message was left.
• Store up to 16 messages at a time that will remainuntil you delete
them.
NOTE: “Mail Waiting, Memory Full” displays when 16 message regis-
tersarefull. (Messagesmust be erased beforeyoucanreceive
others.)
• Allow for “Auto Call Back” of a phone number that is included
within a message, by pressing
e. If the message contains two
phone numbers, Auto Call Back will dial the last number.
70
nextel.com
Page 77

Messaging Services
Notification of New Messages
When a new message arrives:
• “New Mail Rea d?” displays.
•
c flashes at the top of the screen.
• Phone rings every 30 seconds as an alert/reminder until you press
P under “Now” or “Later.”
Accessing New Messages
When you receive a message, you can view itimmediately or later:
Viewing a Message Immediately
1
Press P under “Now.” The numbers of new and saved messages display briefly, followed by your first message.
2
Press P under “Read.”
3
If the message fills more than one screen, use s to scroll
through the rest of the message.
4
Press P under “Save” to savethe message. Or,press O under
“Erase” to delete the message.
Viewing a Message Later
Press O under “Later.” The c icon will stop flashing but
u icon will remain on the display to remind you that
the
youhaveastoredmessage.
71
Page 78

Viewing Stored Messages
1
While in Phone mode (see “Modes and Menus” on page 15),
P under “Mail.”
press
2
Select Mesg Mail by using s to highlight Mesg Mail or by
pressing 2. An asterisk indicates a new message.
3
Press P under “Ok.” The Message Mail screen appears
briefly, displayingthe numbers of new and saved messages.
4
Press P under “Read.”
5
If the message fills more than one screen, use s to scroll
through the rest of the message.
6
Press P under “Save” to save the message.
Or, press
7
Press O under “Exit” to exit Mesg Mail.
O under “Erase” to delete the messa ge.
Sending a Message
Nextel’s Messaging feature includes four options: Web Messaging on
nextel.com,Email Messaging, Numeric Messaging and Operator
Assisted Messaging.
Web Messaging on nextel.com
Nextel’s W eb Messaging enables you to send a message to yours elf,
someone e lse or a group of Nextel customers. It also includes a
“Schedule For Later” option, which allows you to send yourself
reminders. You can also check on the delivery status of your messages.
72
nextel.com
Page 79

Messaging Services
For more information or to send a Web message, go to nextel.com and
click on Send a Message or Nextel Mobile Messaging.
Email Messaging
From a ny email account, type the 10-digit phone number of a Nextel
customer in the To field and add @messaging.nextel.com (for
example,7035551234@messaging.nextel.com). The entire messagecan
be up to 140 characters.
Numeric Messaging
• The caller must press “1” during your Voice Mail greeting.
• Only numeric messages can be sent.
Operator Assisted Messaging*
• The caller canpress “2” during your Voice Mail greeting. Or, call
1-800-NEXGRAM (1-800-639-4726). Outside of the U.S., call 1858-279-8495.
• A text message can be sent immediately or for future delivery.
• The operator will send the message.
* The Operator Assisted Messaging feature is required. There is als o an
additionalcharge for each message sent. For more information, contact
Customer Care.
73
Page 80

Using Your Phone as a Modem
With Nextel Online Dial-Up Service, you canuse your i1000plus phone
as a wireless modem! You can connect your IBM™-compatible
computer* or Personal Digital Assistant* (PDA) to your i1000plus
phone and access your company’s network or theInternet—all without
the hassle of locating a telephone jack for a landline connection.
* Visit nextel .com for information on compatible operating systems.
To use Nextel Online Dial-Up Service, you must subscribe to a Nextel
SM
Online
this service, please contact Nextel Customer Care.
Service Plan and have Dial-Up Service activate d. To activate
NOTE: Nextel Online Dial-Up Service is only available in the continen-
tal United States and Hawaii.
74
nextel.com
Page 81

Private/GroupMode
Nextel Direct Connect
®
Nextel Direct Connect is adigital two-way radiofeature that allowsyou
to communicate with your co-workersand clients for a fraction of the
cost of traditional cellular calls.
With Nextel Dire ct Connect, you can use the Private Call feature to
contact an individual. You can use the Group Call feature to contact a
group of people designated as a Talkgroup.
®
In addition, Nextel has created Nextel Business Networks
,which
allows you to communicate with individuals outside of your company.
These Networks linkNextel customers in similar industries or
geographies. So, if you need to reach a client, vendor, or contractor
instantly, work smarter by joining the Nextel Business Networks. For
more information, c all 1-888-NEXTEL2 (1-888-639-8352).
NOTE: Nextel Direct Connect is only available in your home calling
area.
About This Section
This section includes everything you need to take advantage of Nextel
Direct Connect (digital two-way radio) service:
Displaying Your Private ID Page 76
Using the Private/Group Speaker Page 76
Placing Private Calls Page 77
Receiving Private Calls Page 78
Quickstore of Private IDs Page 79
75
Page 82

Sending a Call Alert Page 79
Receiving/Responding to a CallAlert Page 80
Call Ale rt Queuing Page 80
Group Call Page 81
Group-Silent Programming Page 84
Displaying Your Private ID
To display your Private ID:
Press
*#2.
Using the P riva te/ Gro u p Speaker
You can disable or enable the speaker on your i1000plus phone for
Nextel Direct Connect use. The default settingis Speaker On. When the
speakeris on, the caller’s voice can be heard over the speaker. When the
speaker is off, the caller’s voice can only be heard through the earpiece
of your phone.
Turning the Speaker Off
Press k. p will appear onyour display. A briefalert tone will
notify you of incoming Private or Group calls.
Turning the Speaker On
k.
Press
76
nextel.com
Page 83

Placing Private Calls
Placing Pr ivate Calls
From Private mode, there are two ways to reach an individual using
Direct Connect.
Cover Closed
Contacting the Last Private ID Called
1
Press P under “Mode” until you see Prvt Ready on your display.
2
Press and hold the Push-To-Ta lk button on the side of the phone
to talk. Both phones will chirp before your voice can be heard.
3
Release the Push-To-Talk button to listen.
Selecting a N ame from a Stored List
NOTE: See
1
Press P under “Mode” until you see Prvt Ready on your display.
“Creating, Editing and Using Stored Lists” on page 21
.
2
Press P under “List.”
3
Use on the side of the phone to scroll to desired name.
4
Press and hold the Push-To-Ta lk button on the side of the phone
to talk. Both phones will chirp before your voice can be heard.
5
Release the Push-To-Talk button to listen.
77
Page 84

Cover Open
Entering the Private ID
1
Press m until you see Prvt Ready.
2
Enter the Private ID.
3
Press and hold the Push-To-Ta lk button on the side of the phone
to talk. Both phones will chirp before your voice can be heard.
4
Release the Push-To-Talk button to listen.
Selecting a N ame from a Stored List
NOTE: See
1
Press m until you see Prvt Ready.
2
Press s to scroll through the names.
Or, press
and enter the first initial of the name then press
“Creating, Editing and Using Stored Lists” on page 21
n until “Name” appears. Press O under “Name”
s to scroll
.
through the names.
3
Press and hold the Push-To-Ta lk button on the side of the phone
to talk. Both phones will chirp before your voice can be heard.
4
Release the Push-To-Talk button to listen.
Receiving Privat e Calls
When you receive a Nextel Direct Connect Private call, your phone will
automatically switch to Private mode. You will hear a c hirp indicating
78
nextel.com
Page 85

Quickstore of Private IDs
that someone is calling you. Press and hold the Push-To-Ta lk button to
talk and release it to listen.
Quickstor e of P r ivate IDs
Quickstore allows you to quickly storethe Private ID for a received or
sent c all without having to enter the Programming menu.
With the Private ID displayed:
1
Press P under “Store.”
2
Enter the name associated with the Private ID.
3
Press P under “Store.” The Stored message displays with the
name that you entered.
Sending a Call Alert
You can send a call alert with the cover closed or open, which lets the
recipientknow that you would like totalk with them. When you send an
alert, the recipient’s phone will chirp severa l times and your name (if
stored)orPrivateIDwillappearontheirdisplay.
Cover Closed
1
Press P under “Mode” until you see Prvt Ready.
2
Press P under “List.” Use t he on the side of your phone to
scroll to the desired name or Private ID.
3
Press P under “Alert,” then press the Push-To-Talk button
until Alert-Sent Successful displays.
79
Page 86

Cover Open
1
Press m until you see PrvtReady.
2
Press O under “Alert.”
3
Select the person youwant to alertby enteringtheir Private ID or
selecting their name from a stored list. (See “Selecting a Name
from a Stored List” on page 78.)
4
Press and hold the Push-To-Talk button until Alert-Sent Successfuldisplays. The alert plays intermittentlyuntil the individ-
ual answers, queues, or clears it.
Receiving/Responding to a Call Alert
When youreceive a call alert, your phone will automatically change to
Private mode. It willalso chirp and you will see the name (if stored) or
the Priva te ID number of the caller. You can either answer, que ue or
clear the call alert.
• Press and hold the Push-To-Talk button to answer the call alert. Or,
• Press
• Press
P under “Queue” to queue the call alert (see “Call Alert
Queuing” on page 80). Or,
O under “Clear” to clear the call alert.
NOTE: Until you answer, queue or clear the call alert, you will not
receive any additional Phone, Private, or Group calls.
To customize your call alert tone, see “Selecting a Call Alert Style” on
page 98.
Call Alert Queuing
Call alert queuing is a feature that allows you to save up to eight call
alerts in a queue or list.
80
nextel.com
Page 87

Group Call
Placing/Clearing a Call Alert in the Queue
When you receive a call alert, you can either clear the call alert or save it
to the list for later recall.
To place a call alert in the queue, press
P under “Queue.”
T o clear a call alert, press O under “Clear.”
NOTE: If you receive multiple call alerts,the last received call alert
displays and the remaining call alerts are stacked at the beginning of the queue.
Responding to a Call Alert within the Queue
You can respond to the call alert s in any order. To select a call alert for
response:
1
From Prvt Ready,press O under “Alert.”
2
Press P under “Queue.”
3
Press s to scroll to the desired call alert.
4
Press and hold the Push-To-Talk button to answer the call alert.
After you respond to the alert, it is removed from the queue.
Group Call
In a Group call, you can communicateinstantly with a group of people
that you have previously set up as a “Talkgroup.” Your Sales
Representative orNextel Customer Care must set upyour Talkgroup by
providing you with a Talkgroup number for each Talkgroup. After you
81
Page 88

have the number, you can assign each Talkgroup number a name and
store it in your i1000plus phone (see “Naming a Talkgroup” on
page 82).
Talkgroups appear on your display as numbers or progra mmed names
such as SALES TEAMor Talkgrp 5. Your Nextel phone can storeup
to 30 Talkgroups. You may initiateor participate in Group calls for
Talkgroups that have been created for you and that are stored in your
phone. Any communication activity within a Talkgroup automatically
switches your phone to Group mode.
Naming a Talkgroup
1
Press *#23.
2
At the Talkgroup List Program screen, press P under “Ok.”
3
At Add New Entry?, press P under “Ok.”
4
At Enter ID, enter the assigned Talkgroup number.
5
Press P under “Store.”
6
At Enter Name, enter the desired Talkgroup name.
7
Press P under “Store.”
8
When finished, press O under “Exit.”
82
nextel.com
Page 89

Making a Group Call
Cover Closed
To contact thelast group that you called:
1
From Group mode, press and holdthe Push-to-Talk button.
2
Wait for the chirp, then speak into the microphone.
3
Release the Push-To-Talk button to listen.
To s elect a Talkgroup from your Talkgroup list:
1
From Group mode, press P under “List.”
2
Use the on theside of your phone to scroll to the desired Ta lkgroup name.
3
Press and hold the Push-To-Talk button to talk. Release the
Push-To-Talk button to listen.
Group Call
Cover Open
To contact thelast group that you called:
1
From Group mode, press and holdthe Push-To-Talk button..
2
Wait for the chirp, then speak into the microphone.
3
Release the Push-To-Talk button to listen.
83
Page 90

To s elect a Talkgroup from your Talkgroup list:
1
From Group mode, press s to scroll to the desired Talk-
group name.
2
Press and hold the Push-To-Talk button to talk. Release the
Push-To-Talk button to listen.
Receiving a Group Call
When you receive a Group call, you will hear a chirp. Your Nextel
phone automatically switches to Group mode a nd the Talkgroup name
displays. To join a Group call:
1
Wait for the caller to finish speaking.
2
Press and hold the Push-To-Talk button to talk. Release the
Push-To-Talk button to listen.
NOTE: You can receive Group calls only in the Ta lkgroups that you
have predefined.
Group-Silent Programming
Group-Silent Programming enablesyou to silence incoming Group
alerts and communication:
Turning Group-Silent On/Off
1
Press *#38.
2
Press P under “On” or “Off.” (The a vailable option depends
on the current setting being used. For example, if “On” is the
current setting, “Off” will be an option.)
84
nextel.com
Page 91

Group-Silent Programming
3
If changing the setting to “On,” a c onfirmation screen displays.
P under “Ok.”
Press
4
Press O under “Exit.” The Group Ready screen displays as
Group-Silent.
85
Page 92

86
nextel.com
Page 93

Net Mode
Net mode uses your phone’s built-in microbrowser to access a suite of
wirelessdataproducts known as Nextel Wireless Web. You canuseyour
Nextel Internet-ready phone to send and receive email, obtain driving
directions, check weather and news updates,view the latest stock quotes,
conduct financial transactions, and more. Access the specific information
youneedtogetbusinessdone…easily…wirelessly!
Nextel Wireless Web* requires the activation of a Nextel Online
Service Plan. Nextel Online Service Plans vary in product and service
offerings.Select services are only availablewith theNextel Online Plus
Service Plan.
To order, contact Customer Care.
For more information, see the Nextel Wireless Web User’s Guide.
* Nextel Wireless Web is only available in the continentalUnited States.
About This Section
The topics covered in this section include:
Wireless Web Navigation Keys Page 88
Starting the Microbrowser Page 88
SM
87
Page 94

Wireless Web Navigat ion Keys
Some keys and buttons assume different functions when you are in Net
mode. You can navigate within the phone’s microbrowser by using the
following keys:
Mode: Your Interne t-ready phone operates in four different modes:
Phone mode,Private mode, Group mode, and Ne t mode. Press
switch between the four different modes.
m to
Home: Press
press and hold
Back:Press
closed, press
Scroll: Arrows at the bottom of the phone screen (
additional text can be viewed. Press
time, or press andhold to scroll one page at a time. W ith the c over
closed, use to scroll through text.
# to return to the home page, or with the cover closed,
k to go to the home page.
* to return to a previous pageor screen, or with the cover
k to return to the previous page.
,./) indicate that
s or to scroll one line at a
Starting the Microbrowser
Just as you use Netscape Navigator®or Microsoft®Internet E xplorer to
browsethe Web fromyourdesktop,the microbrowser contained in your
phone allows you to explore and use avariety of Internet services.
Follow the steps belowto begin using the Nextel WirelessWeb:
1
Press m until the Net Ready screen displays.
2
Press O under “Ok.” A series of screens displays.
88
nextel.com
Page 95

3
Y our home page displays.
Starting the Microbrowser
NOTE: The first time you access your home page, you will be
4
Scroll to highlight the service you wish to access and press O
asked to enable security to ensure your information
remains private and secure.
O
Press
Generating…, Computing…, Sending))))).
You may be asked to (re)enable security as Nextel adds
new servicesor upon your return to the US after traveling.
When transmitting highly personal or sensitive data such
as a credit card number, you will see the Secure Data icon
. This icon indicates that the data is encrypted during
transmission.
under “Yes.” The phone will display:
under “OK,” or press the number shown to t he left of your
desired selection to automatically jump to that service.
To return to the home page from anywhere within the various
menus and sub-menus, press
NOTE: Home pages will vary depending on the Nextel Online Ser-
5
Press m at any time to return to Phone, Private or Group
vice Plan to which you havesubscribed.
#, the home key.
mode.
89
Page 96

90
nextel.com
Page 97

Customizing the i
1000
plus
Phone
About This Section
This section includes everything you need to customize your i1000plus
phone:
Changing the Display Language Page 91
Setting the Time and Date Format Page 92
Backlight Timer Page 93
Keypad Silence Page 94
Setting the Ringer Volume Page 94
Selecting a Ring Style Page 95
Setting the VibraCall®Alert Feature
Selecting a Call Alert Style Page 98
Programming Menu Page 98
Changing the Display Language
You can customize the i1000plus phone to display menus in English,
Spanish, French, or Portuguese. The default language is English. To
change the display language:
1
Press *#70.
Page 95
91
Page 98

2
Press P under “Ok.”
3
Press s to scroll the la nguage options.
4
Press P under “Ok” to select the desired language.
5
Press O under “Exit.”
Setting the Time an d Date Format
You have a choice of a 12- or a 24-hour clock format, as shown in the
table below:
12-Hour Display
24-Hour Display
12:00a 6:25a 12:00p 10:25p
00:00 06:25 12:00 22:25
You have a choice of either a MM/DD (month/day) or a DD/MM (day/
month) date format as shown in the table below.
Date
Month/Day Format
(MM/DD)
Day/Month Format
(DD/MM)
January 2nd 01/02 02/01
December 31st 12/31 31/12
All ofthe modes (Phone, Private, Gro u p , Net) display the time and
date on the third line of the displa y. To set the time and date format,
follow the steps below:
1
Press *#71.
nextel.com
92
Page 99

Backlight Timer
2
Press P under “Ok.” The Time/Date Display screen appears.
The default (preset) time and date format is “On.” You may turn
“Off” this feature at this point.
3
Press s untilyou see the Time Format screen.
4
The hour format currently being used appears under Time Format. To keep the current s etting, simply skipto the next step.
Or, press
P under the available option. (For example, if 12
hour is the current setting, “24hr” will appear as an option.)
5
Press s untilyou see the Date Format screen. The format
being used appears under Date Format.
6
To keep your current format, press O under “Exit.”
Or, press
P under the available date format. (For example, if
MM/DD is the current setting, “DD/MM” will appear as an
option.)
7
Press O under “Exit.”
Backlight Timer
Your phone’s backlight is what illuminates the display when you, for
example, receive or make calls. You can customize the amount of time
that your backlight remains illuminated, either 10, 20, or 30 seconds.
To adjust the Backlight Timer, follow the steps below.
1
Press *#16.
2
The current timer setting displays. Press P under “Ok” to
change the timer.
93
Page 100

3
Press s to scroll through the available options.
4
Once the desired timeris found, press P under “Ok.”
5
Press O under “Exit.”
Keypad Silence
You may want to silence your keypad when entering text on your
phone. To silence your keypad, followthe steps below.
1
Press *#34.
2
Use to lower the keypad volume until the display reads
Silent.
3
Press O under “Exit.”
Setting the Ringer Vo lu me
You canadjust the ringer volume for incoming calls.
For Alternate Line customers, be sureto select the
phone line before setting the ringer volume. (See
“Receiving Calls on Your Alternate Line” on
page 46.)
1
Press *#30. The display shows your current ringer
volume.
2
Press on the side of your phone to raise or lower the volume.
The lowest setting is Volume Silent.
94
nextel.com
aj
30=Ringer
Volume
Exit
 Loading...