


ENGLISH___________________________________________________________________
IMPORTANT: The instruction manual you are holding includes essential information on the safety measures to be implemented for
installation and start-up. Therefore, the installer as well as the user must read the instructions before beginning installation and start-up.
Keep this manual for future reference.
Disposal of waste electrical and electronic domestic systems in the European Union
All the products marked with this symbol indicate that the product shall not be mixed or disposed with your
household waste at their end of use. It is responsibility of the user to eliminate this kind of wastes depositing them in
a recycling point adapted for the selective disposal of electrical and electronic wastes. The suitable recycling and
treatment of these wastes contributes in essential way to the preservation of the Environment and the health of the
users. For further information regarding the points of collection of this type of wastes, please contact to the dealer
The instructions given in this manual describe the operation and maintenance of DOMOTIC Series DOM-XX, DOM-XX PH and DOM-XX
PLUS Salt Electrolysis Systems. For optimum performance of the DOMOTIC Series Salt Electrolysis Systems, we recommend you to follow
the instructions given below:
1. CHECK THE CONTENTS OF THE PACK: ___________________________________________________________________________
You should find the following elements inside the box:
Power supply.
Electrolysis cell.
pH sensor (only in DOM-XXPH).
EX-ORP sensor (only in DOM-XX PLUS Series).
Calibration solutions pH 7.0 (green) / pH 4.0 (red) / ORP 470 mV (only in DOM-XXPH and DOM-XX PLUS models).
Sensor holder (only in DOM-XX PH and DOM-XX PLUS models).
CEE22 (M) connector for dosage pump (only in DOM-XX PH and DOM-XX PLUS models).
Operation Manual.
2. GENERAL FEATURES: _________________________________________________________________________________________
When DOMOTIC Series Salt Electrolysis System is installed, a quantity of salt must be dissolved into the swimming pool water. This salty
water then passes through the electrolysis cell that is located in the plant room. The DOMOTIC Series Salt Electrolysis System consists of
two elements: an electrolysis cell and a power supply. The electrolysis cell contains a quantity of titanium plates (electrodes) and when a
weak electrical current is passed through the plates inside the electrolysis cell, there is chlorine production.
Maintaining a level of chlorine in swimming pool water keeps the water sanitised and healthy to swim in. The DOMOTIC Series Salt
Electrolysis System will manufacture chlorine whenever the pool circulation system (pump and filter) is operational.
The power supply is provided with various safety devices, which are activated in case of irregular operation of the system, as well as a
microprocessor driven control system.
The DOMOTIC Series Salt Electrolysis Systems have an automatic cleaning system that avoids scale formation on the electrodes. Moreover,
DOMOTIC-PH Series Systems include a built-in pH controller, as well as an additional ORP controller in the case of DOMOTIC-PLUS Series
models.
3. SAFETY WARNINGS AND RECOMMENDATIONS: ___________________________________________________________________
The equipment should be assembled and handled by truly qualified people.
Current electrical and accident prevention regulations should be followed.
Under no circumstances will the manufacturer be held responsible for the assembly, installation or start-up, nor any handling or
fitting of components unless they are carried out on its premises.
The DOMOTIC Series Salt Electrolysis Systems operate at 230VAC, 50/60 Hz. Do not attempt to alter the system to operate at a
different voltage.
Check that all the electrical connectors are well tightened to avoid false contacts and their consequent overheating.
Before installing or replacing any component, disconnect the equipment from the mains, and use exclusively spare parts supplied
by IDEGIS.
Taking into account the fact that the equipment produces heat, it must be installed in places with sufficient ventilation. Fan
openings should be kept free of any element that could obstruct them. The equipment should not be installed near flammable
materials.
The DOMOTIC Series Salt Electrolysis Systems have an IP24 protection degree. They should never be installed in places
susceptible to flooding.
where you acquired the product or to your municipal authority.
1

POWER SUPPLY
A
3
/
3
/
3
/
2
A
MODEL
DESCRIPTION
DOM-12 / DOM-12 PH /
DOM-12 PLUS
DOM-24 / DOM-24 PH /
DOM-24 PLUS
DOM-32 / DOM-32 PH /
DOM-32 PLUS
Standard working voltage 230 V AC, 50/60 Hz.
Output (dc) 12 A (2x6 A) 24 A (2x12 A) 32 A (2x16A) 42 A (6x7A)
Production (g/h) 10 - 12 20 -24 25 - 32 34 - 42
Swimming pool (m3)
Warm: 16 – 24°C (60,8 – 75,2 °F)
Hot: +25°C (77 °F)
60
50
100
80
Flow detector Gas detector
Salinity /Temperature range 3 – 12 g./l. / +15 - 40oC (59 – 104oF)
Electrodes
SELF-CLEANING coated Titanium
Estimated lifetime: 4.000 – 7.000 hours of operation
Production control 0 – 100 % ( 11 production levels)
Cover control
Programmable reduction of production from control panel when cover is closed [10% ... 90%]
Input for potential free contact
Polarity switch Programmable from control panel: 2/3 hours + test mode
External control
Salt level protection
Two inputs for potential free contact for external flow detector and ORP/RESIDUAL CHLORINE control.
Programmable contact logics from unit control panel
utomatic production protection
ELECTROLYSIS CELL
MODEL
DESCRIPTION
Minimum recirculation flow 2 m3/h 4 m
DOM-12 / DOM-12 PH /
DOM-12 PLUS
DOM-24 / DOM-24 PH /
DOM-24 PLUS
h6 m
DOM-32 / DOM-32 PH /
DOM-32 PLUS
Electrode number 5 7 7 13
Material Methacrylate derivate
Pipe connections Gluing with PVC adhesive Ø 63 mm
Max. Recommended pressure 1 Kg./cm
Working temperature Less than 40oC (104°F)
PH / ORP CONTROL
MODEL
DESCRIPTION
DOM-12 PH
DOM-12 PLUS
DOM-24 PH
DOM-24 PLUS
DOM-32 PH
DOM-32 PLUS
Measure range 0.0 – 9.9 (pH)/ 0 – 999 mV (ORP)
Control range 7.0 – 7.8 (pH)/ 600 - 850 mV (ORP)
Precision ± 0.1 pH/ ± 1 mV
Calibration
utomatic, with calibration solutions
Control output [pH] One output 230 VAC/ 500 mA for dosage pump connection
o
pH / ORP sensor
Epoxy body, 12x150 mm., 0-80
blue, range 0 – 12 (pH),
C (32 – 176°F)
red, range 0 – 1000 mV (ORP)
DOM-42 / DOM-42 PH /
160
120
DOM-42 / DOM-42 PH /
h 8 m
DOM-42 PLUS
200
160
DOM-42 PLUS
h
DOM-42 PH
DOM-42 PLUS
2

Fig.1 Recommended installation diagram (DOMOTIC Series DOM-XX).
3

Fig.2 Recommended installation diagram (DOMOTIC Series DOM-XX PH and DOM-XX PLUS).
4

4. INSTALLATION: _______________________________________________________________________________________________
4.1. Installation of the power supply
Always install the POWER SUPPLY of the DOMOTIC Series system VERTICALLY on a solid and rigid surface (wall) as shown in the
recommended installation diagram (Figs. 1,2). In order to guarantee a good state of conservation, the POWER SUPPLY should be installed
in a well-ventilated dry place. Due to IP degree of the POWER SUPPLY the DOMOTIC Series system should not be installed outdoors. The
POWER SUPPLY should be installed a bit distant from the electrolysis cell so that it cannot accidentally suffer water splashes.
Beware of corrosive atmosphere formation due to pH decreasing solutions (specially, those ones based on hydrochloric acid "HCl"). Do not
install the DOMOTIC Series system near to any stores of these chemicals. We strongly recommend the use of chemicals based on sodium
bisulphate or diluted sulphuric acid. Power supply must be connected to the electrical control box of the pool, so that the pump and the
DOMOTIC Series System are turned on (and off) simultaneously.
4.2. Installation of the electrolysis cell
The electrolysis cell is made of a transparent polymer in whose interior the electrodes are placed. The electrolysis cell must be always
installed indoors and after the pool filter, and after any other equipment that may be present (heat pumps, control systems, etc.).
The installation of the cell should allow easy access to the installed electrodes by the user. It is highly recommended to install the electrolysis
cell VERTICALLY, in a place of the pipe that can be easily isolated from the rest of the installation by two valves, so that the tasks of
maintenance can be carried out with no need of partial or total draining of the swimming pool.
Where the cell is installed on a by-pass (recommended option), a valve to regulate the flow must be introduced. Prior to installation, please
consider the following commentaries:
Fig. 3
1. Flow direction marked in the cell
must be respected. Recirculation
system must guarantee the minimum
flow stated in the Table of Technical
Specifications for each model (see
Section 9).
2. The system flow detector activates if
there is not recirculation (flow) of water
through the cell or if flow is very low. If
electrolysis gases are not properly
removed through the electrolysis cell,
the generated gas bubble electrically
isolates the auxiliary electrode
(electronic detection). Therefore, when
locating the electrodes in the cell, the
level sensor (auxiliary electrode) will
have to be located in the higher area of
the cell. The safest orientation is shown
in the recommended installation
diagram.
Fig. 4
3. WARNING: if the in-out valves of the
electrolysis cell are closed
simultaneously, the flow detector (gas
detector) will not work correctly, with
the consequent risk of cell breakdown.
Although this situation is extremely
unusual, it can be easily avoided once
the equipment has been installed, by
locking at opened position the return
valve to the swimming pool, so it
cannot accidentally be manipulated.
Fig. 5
5

Other configurations would only be acceptable in the case that they allow for detection of gas bubbles when water flow through the cell is too
low.
Fig. 6
Recommended installation Allowed installation Not allowed installations
The electrodes must be inserted in the electrolysis cell, fitting the central electrode through the guides located at the top and bottom of the
cell.
4.3. Electrical connection of the electrolysis cell
Make the interconnection between the electrolysis cell and the power supply according to the following scheme. Due to relatively high current
intensity circulating do not modify or cut either the length or section of the supplied cables without making a previous consultation to an
authorized IDEGIS distributor. The cable connecting the electrolysis cell and the power supply should never exceed the maximum length
recommended in this Manual: DOM-12 (6 A), 7.5 m.; DOM-24 (12 A), 4.0 m.; DOM-32 (16 A), 3.0 m; DOM-42 (7 A), 16.0 m.
Fig. 7
Fig 10
Fig 8
Fig 9
Fig.11
6

4.4. Installation of the pH / ORP sensors (only in DOM-XX PH and DOM-XX PLUS).
1. Insert the pH / ORP sensors into their corresponding places of the holder (Fig. 12)
2. To that purpose, loosen the connection screws and insert the sensor into the holder.
3. The sensors must be installed in the holder so that it is guaranteed that the sensors located in their ends are always submerged in
the water circulating through the pipe.
4. Always install the pH / ORP sensors vertically or with a maximum inclination of 40
o
(Fig. 13).
Fig. 12
4.5. Installation of the optional external flow detector (not included with the equipment)
1. Install the saddle supplied in a section of the pipe at the entrance to the electrolysis cell. It should always be installed in a
horizontal position relative to the ground (see Fig. 14-1).
2. Install the flow detector (flow switch) vertically in the saddle (Fig. 14-1).
3. There is an arrow on the head of the flow detector. Make sure that this arrow is parallel to the pipe shaft and pointing in the
direction that the water flows (Fig. 14-2).
4. Do not install the flow detector near magnetic objects. They could affect the operation of the magnetic device it contains and
reduce its reliability.
Fig. 13
Fig. 14-1 Fig. 14-2
7

4.6. Installation of the removable control terminal
In the DOMOTIC series systems it is possible to establish a remote control of the electrolysis salt system installed in the swimming pool by
means of a control wall terminal installation. The interconnection between the power supply and the control terminal can be executed through
a 6-conductor signal cable connected to the respective connectors in power and visualization cards. The cable length will be determined by
the customer’s requirements but must be always lower than 40 meters. The terminal is 10,5 Vac auto-supplied by the communication bus, so
it doesn’t need any additional supply.
The wall terminal doesn’t require any special maintenance procedure, with the exception of these maintenance recommendations:
o Use a slightly moisten cloth to clean it.
o Don’t use aggressive cleaning products (bleach, sprays, solvents, alcohol, etc.)
The remote control is designed to be installed on a rigid wall. Its IP-65 degree allows the outdoor installation. Nevertheless, it’s recommended
not to expose the terminal to the solar rays. In order to install the remote control, follow the instructions shown below:
1. Remove the power supply cover by unscrewing the fixation screw (Fig. 11-1) and sliding upwards and outwards (Fig. 11-2). Then
turn the cover to the left (Fig. 11-3) and disconnect the communications bus (A) from power and visualization cards (Fig. 11-4).
2. Unscrewing its four fixation screws (Fig. 11-5).
3. Assemble the control terminal (Fig. 11-6).
OPTION A: installation using the original IDEGIS cable ref. DOM-020-XX (XX indicates the cable length in meters).
OPTION B: installation using a standard 6-conductor signal cable (each conductor must have a 0,22 mm2 minimum cross section).
In both cases the maximum possible length is 40 meters. Nevertheless, using an Unshielded Twisted Pair (UTP) (Category 5e
unshielded) allows interconnection distances until 60 meters.
4. For this purpose, put the new communications cable (A) through the cable gland situated in the terminal base and connect it in
either one of the two connectors of the visualization card (CN1A, CN2A) [OPTION A], or in the connector CN-5 [OPTION B].
Combine the visualization frontal and the terminal base using the four screws supplied.
5. Put the free end of the communications cable through the AUX 2 hole situated on the power supply base (Figs. 11-7, 11-8) and
connect it in the connector CN10A/CN11A [OPTION A] or in the connector CN-20 [OPTION B] in the power card (Fig. 11-9).
Replace the cover in the power supply (Fig. 11-7).
6. Fix the wall fixation (see section 8) in the chosen installation point and hang the control terminal on it.
4.7 PoolStation connection
8

9

4.8. Controls and indicators
DOMOTIC Series electrolysis systems are equipped with a control panel in the front (Figs. 15,16, 16b).
Fig. 15. DOM-XX models control panel
Fig. 16. DOMXX-PH models control panel
10

Fig. 16b. DOM-XX PLUS models control panel.
1. Key “” (decrease production / programming menu
navigation).
2. Indicator of activated AUTOMATIC COVER control.
3. Indicator of activated ORP control (AUTO mode)
4. Production scale (%)
5. SALINITY TEST scale.
6. Indicator of LOW SALINITY.
7. Indicator of HIGH SALINITY.
8. SALINITY scale (qualitative).
9. Key for “SALINITY TEST”.
10. SELF-CLEANING indicators
(DIRECT / REVERSE) polarity.
11. Display of SYSTEM INFORMATION.
12. Indicator of FLOW ALARM.
13. Indicator of ELECTRODE passivation ALARM
14. Key “” (increase production / programming menu
navigation).
15. Display of water pH.
16. Indicator of HIGH PH ALARM (> 8.5).
17. Key for pH CALIBRATION MODE.
18. Indicator of PH SETPOINT.
19. Indicator of LOW PH ALARM (< 6.5).
20. Key for PH SETPOINT PROGRAMMING
21. Display of water ORP.
22. Indicator of HIGH ORP ALARM (> 850 mV)
23. Key for ORP CALIBRATION MODE
24. Indicator of ORP SETPOINT.
25. Indicator of LOW ORP ALARM (< 650 mV)
26. Key for ORP SETPOINT PROGRAMMING
11

Besides basic operations, the DOMOTIC Series electrolysis system has three inputs for voltage-free contacts, enabling the connection of
additional external controls. They are located on connector [CN7] of the power card (Fig. 17).
The logic associated to these three inputs can be programmed during the system configuration process (see point 5.2)
o
[FS] OPTIONAL EXTERNAL FLOW DETECTOR CONTROL (not included with the equipment): input for potential-free
contact. When the contact connected to this input is open (external flow detector at rest), and the [FS] is configured as [FS1c],
the electrolysis system switches off due to the flow alarm. Connect the external flow detector wiring to the respective input
[FS], placed in the [CN7] connector, on the unit’s power card.
o
[co] AUTOMATIC COVER CONTROL: input for potential-free contact. Depending on the status of the contact connected to
it on the automatic cover’s electric panel, this input enables you to programme a reduction of the equipment’s output current to
a percentage of its nominal value.
Fig. 17
Fig. 18
Fig. 19
12

o
[or] ORP / RESIDUAL CHLORINE control (unavailable in DOMOTIC-XX PLUS models): input for potential-free contact. This
input can be used to install an external controller of the electrolysis system (ORP, RESIDUAL CHLORINE, PHOTOMETER,
etc.). To that purpose connect two cables from the potential-free contact, placed in the external controller, to the
corresponding input [or] placed in the system’s control card.
4.9. Start-up
1. Check that the filter is 100% clean, and ensure that the swimming pool and the installation do not contain copper, iron or algae. Ensure
that any heating equipment on the pool is suitable for use in salt water.
2. Ensure that the swimming pool water is balanced, because like that the chlorine produced is used more efficiently and effectively, and
ensures that the life of the electrodes is prolonged. Water should be maintained within the parameters shown below.
a) pH must be in the range 7.2-7.6
b) Total alkalinity must be in the range 60-120 ppm
3. Although the DOMOTIC Series system can operate within a salinity range of 4 – 6 g/l, the minimum recommended level of salt, 5 g/l, should
be maintained by adding 5 kg per m
additives like iodides, that is “apt for human consumption”. Never add the salt through the electrolysis cell. Add it directly to the swimming
pool or into the balance tank.
4. When adding the salt, and in case the swimming pool is going to be used immediately, carry out a treatment with chlorine. An initial dose of
3
2 g/m
of trichloroisocyanuric acid may be added.
5. Prior to starting up the salt chlorinator, disconnect the power supply to the salt chlorinator and run the pump for 24 hours to ensure that the
salt is completely dissolved.
6. Next, reconnect the power supply and turn on the salt chlorinator, locating the production level so that free chlorine concentration stays
within the recommended range (0.5 – 1.5 ppm).
NOTE: in order to establish the free chlorine level you will need to use a test kit.
7. In outdoor swimming pools it is advisable to maintain a level of 25-30 g/m3 of chlorine stabiliser (cyanuric acid) in the pool. A level of 75
ppm should be never exceeded. This will help to stop the chlorine that is in the water from being destroyed by the sun.
3
of water if the water did not previously contain salt. Always use common salt (sodium chloride), without
Fig. 20
13

5. OPERATION: __________________________________________________________________________________________________
5.1. System on stand-by
The system goes into “STAND-BY” when the “” [1] key is pressed until the “0%” light blinks. When this occurs, there is no production in the
electrolysis cell.
Fig. 21
5.2. System configuration
The DOMOTIC Series system can be reconfigured through a menu accessed from the control panel. The system has to be switched off, as
described in point 5.1, in order to access this menu. Once the system has been switched off, press the “” [1] key for a few seconds until the
system information screen [11] displays “CONF”. To enable selection of each menu option, keep the “SALT TEST” [9] key pressed for
approximately 1 second. Select the desired parameter using the “” [1] / “” [14] keys and validate by pressing the “SALT TEST” [9] key for
one second again (see Fig. 23). The configuration process enables you to establish the following operative parameters:
MODEL
domotic 12
domotic 24
domotic 32
domotic 42
SOFTWARE VERSION
POLARITY SWITCH
OUTPUT LEVEL CONTROL
WHEN CLOSED COVER
COVER CONTROL INPUT ACTIVATION
ORP/RESIDUAL CHLORINE
CONTROL INPUT ACTIVATION
GAS DETECTOR ACTIVATION
EXTERNAL FLOW DETECTOR
(FLOW SWITCH) ACTIVATION
Shows software version (two digits)
Switch every 2 hours
(2)
System may be configured to provide an output to cell in the range 10 ... 90% of its nominal
Deactivated (MANUAL)
Deactivated
Deactivated
Deactivated
(2)
(2)
(2)
Switch every 3 hours
capacity when the pool cover is closed.
Activated input when closed
Activated electrolysis system when closed contact (AUTO)
Activated electrolysis system when flooded detector
contact
Activated electrolysis system when closed contact
Switch every 2 minutes
(2)
Activated input when open
contact
(1)
(3)
(2)
(1)
WARNING: only use this mode for check tasks, for short periods of time, as it could damage the electrodes. This mode is cancelled when the system is switched off.
(2)
Factory defaults.
(3)
Factory default value in DOM-XX PLUS systems.
Fig. 22
14

Fig. 23 System programming flow-sheet.
15

5.3. Production level selection
To select the desired production level, press the “” [1] / “” [14] keys until the production level light blinks. The system information screen
[11] will display the value of the production scale light [4]. The system will set its production to the desired level after a few seconds.
Fig. 24
In normal conditions, the production value [4] should be the same as the programmed value. However, if the salt level in the water is outside
the permitted range (“HIGH SALT” [7] or “LOW SALT” [6] alarms on), or there is a problem in the electrolysis cell (“ELECTRODES” [13] alarm
on), the production value [4] could be lower than the programmed and displayed value [11].
WINTER Mode:
5.4. Salinity test
The DOMOTIC Series systems have an integrated system to detect the salinity level of pool water. To run the test, press the “SALT TEST” [9]
key. During the test, the production light will range from 20%-80% of the salinity scale [5], alternately displaying “SALT” and “TEST” on the
system information screen [11]. Once the test is completed, the light will blink for a few seconds on the scale [5] on the detected salinity value
(see Fig. 25). The equipment will return to normal operating mode after a few seconds.
The system might show lower than actual salt levels if the temperature falls beneath 20C (68 °F).
during periods of low water temperature select a production level [1] in the 50-60% range.
Fig. 25
16

5.5. Integrated pH controller (DOM-XXPH)
The integrated pH / ORP controller is supplied with a default factory calibration and programmed with the following parameters:
SETPOINT pH=”7.2” / ORP=”700 mV”
IMPORTANT: In order to have a correct regulation of the pH value, the Total Alkalinity of the pool water must be maintained in the range
60–120 ppm CaCO3. Use a pool water test kit to check the Total Alkalinity and adjust manually if necessary.
5.5.1. CONNECTION OF THE PH / ORP SENSORS (models DOM-XX PH and DOM-XX PLUS)
Connect the pH / ORP sensor provided with the unit to the corresponding BNC connectors located in the unit’s base (Fig. 26).
5.5.2. CONNECTION OF THE DOSAGE PUMP
The DOMOTIC Series systems (DOM-XXPH and DOM-XX PLUS) have a connector on their base for connecting a dosage pump to control
the pH of the water in the pool. The dosage pump can be connected through the CEE22 connector supplied for that purpose with the
equipment (Fig. 26).
Fig. 26
5.5.3. PH SETPOINT PROGRAMMING
Keep the “SET” [20] key pressed until the screen [18] displays the desired pH value within the 7.0 – 7.8 range. Release after selection.
Fig. 27
17

5.5.4. ORP SETPOINT PROGRAMMING (only in models DOM-XX PLUS)
Keep the “SET” [26] key pressed until the light displays the desired ORP value within the 600 – 850 mV range. Release after
selection.
Fig. 27b
5.5.5. SAFETY STOP CONFIGURATION OF THE DOSAGE PUMP (PUMP-STOP FUNCTION)
The integrated pH controller has a security system (PUMP-STOP FUNCTION) acting on the dosage pump which allows to avoid the following
situations:
Damages caused by the dry operation of pump (depleted pH-minus product).
Over-dosage of pH-minus product (damaged or aged sensor).
PH regulation problems due to high alkalinity in the water (newly filled pool, high carbonate levels).
When the PUMP-STOP FUNCTION is enabled (factory default), the system stops the dosage pump after a programmed time without having
reached the pH setpoint.
Fig. 27c.
The PUMP-STOP FUNCTION is factory set to 60 minutes. To change this value, follow the next procedure.
18

5.6. Alarms
HIGH SALT LEVEL
If too much salt has been added, the production level will automatically fall beneath the selected level. The “HIGH SALT” [7] light
will stay on. In this case, empty part of the pool (10%, for instance) and add fresh water to reduce the salt concentration. To
precisely measure the salt level, we recommend the use of a portable salinity-temperature meter
LOW SALT LEVEL
If there is less than the recommended salt content in the pool, the selected output level cannot be reached. The “LOW SALT” [6]
light will stay on. In this case, measure the salt level in the water and add the required amount of salt. The common salt (NaCl)
used for electrolysis should not contain additives (anti-caking agents, iodine) and must be suitable for human consumption. The
system may indicate a low salt level if the temperature falls beneath 20°C (68 °F). To precisely measure the salt level, we
recommend the use of a portable salinity-temperature meter.
Fig. 27d.
High salt level
Fig. 28
19
Low salt level

f
A
WATER LEVEL IN CELL/FLOW DETECTOR (GAS)
If an air or gas bubble forms at any time at the top of the electrolysis cell and the FLOW DETECTOR is not submerged, the system
will automatically switch off production, with the “FLOW” [12] light blinking and “FLO” displayed on the system information screen
[11]. The system automatically resets when water flows through the cell again or the bubble disappears.
1. Submerged gas detector. System running. 2. Gas detected. Insufficient flow. System of
OPTIONAL EXTERNAL FLOW DETECTOR / FLOW SWITCH (not included with the equipment)
During the system configuration process (point 5.2), the input for the external flow switch is activated (factory-programmed default
value), the system will automatically switch off production, with the “FLOW” [12] light blinking, and “FLO” displayed on the system
information screen [11]. The system automatically resets whenever water starts to flow through the flow switch again.
Fig. 29
.
ctivated flow detector (contact closed). System running. 2. Flow detector at rest (contact open). System off.
1.
Fig. 30
20

ELECTRODES
The DOMOTIC Series system has a light indicating malfunction of the electrolysis cell electrodes [13]. This usually occurs at the
end of the electrodes ’useful life, when they lose their power. However, although this is a self-cleaning system, this malfunction
could also be due to excessive scaling on the electrodes when the system operates with hard water with a high pH value.
Fig. 31
PH / ORP OUT OF RANGE (only in models DOM-XX PH and DOM-XX PLUS)
The integrated pH/ORP control system has two ALARM lights which come on whenever a pH value of less than 6.5 “LOW” [19] or
more than 8.5 “HIGH” [16] is detected, or ORP falls outside the 600 mV “LOW” [25] - 850 mV “HIGH” [22] range. When the
regulator detects an active pH alarm, it opens the control output of the dosage pump (pH).
21

6. MAINTENANCE: _______________________________________________________________________________________________
6.1. Maintenance of the electrolysis cell
The electrolysis cell must be kept in suitable conditions to ensure a long lifetime. This salt chlorination unit has an automatic electrode
cleaning system that helps to prevent scale build-up on the electrode surface. If the salt chlorination system is operated in accordance with
these instructions, and in particular if the pool water balance is kept within the recommended parameters, it should not be necessary to
manually clean the electrodes. However, if the pool water and the salt chlorination system are not maintained in line with these instructions
then it may be necessary to manually clean the electrodes following the procedure outlined below:
1. Cut off the 230 Vac unit’s supply.
2. Unscrew the closing nut located at the end where the electrodes are located, and remove the electrode package.
3. Use diluted hydrochloric acid (a part of commercial acid in 10 parts of water), submerging the electrode package in the prepared
solution for no more than 10 minutes.
4. NEVER SCRAPE OR SWEEP THE CELL OR THE ELECTRODES.
The electrodes of a salt chlorination system comprise of a titanium sheet coated with a layer of noble metal oxides. The electrolysis
processes that take place on their surface produce a progressive wearing down – the electrodes do have a finite life. In order to optimise
electrode lifetime, please consider the following aspects:
1. Although all DOMOTIC series salt electrolysis units are SELF-CLEANING, a prolonged operation of the system at pH values over
7.6 in waters of high hardness can produce scale formation on the surface of the electrodes. Scaling on the electrodes surface will
progressively deteriorate the coating, causing a decrease of lifetime.
2. Manually cleaning/washing the electrodes (as described above) will shorten their life.
3. Prolonged operation of the system at salinities lower than 3 g/l (3000 ppm) will cause a premature deterioration of the electrodes.
4. Frequent use of copper based algaecides will promote the formation of copper deposits on the electrodes, progressively damaging
the coating. Remember that chlorine is the best algicide.
6.2. Calibration of the pH sensor (only in DOM-XX PH and DOM-XX PLUS models)
The integrated pH-controller has two calibration modes of the pH-sensor: “FAST” and “STANDARD”. We recommend carrying out it at least
once a month during the period of use of the swimming pool.
6.2.1. “FAST” MODE
“FAST” MODE allows the calibration of the pH-sensor when there are small reading deviations with no need to extract the sensor from the
installation or to use calibration solutions.
PROCEDURE:
1. Be sure the point of insertion of the pH-sensor is flooded, and the pump is in recirculation.
2. Using a pH-test kit, measure the water pH of the swimming pool.
3. Press the “CAL” [17] key for approx. 5 seconds until the equipment beeps and release the key. The pH [18], screen will blink “7.0”.
4. Keep the “SET” [20] key pressed until the pH-value previously measured in the water with the pH-test kit appears. Once reached,
loosen and press “CAL” [17] key. If no error has been detected, the system will have been calibrated.
Fig. 32
22

6.2.2. “STANDARD” MODE
“STANDARD” MODE allows the precise calibration of the pH-sensor using two calibration solutions of pH 7.0 and 4.0, however this method
requires that the pH-sensor is removed from the installation.
PROCEDURE:
IMPORTANT: before closing the by-pass valves, stop the system from control panel (see Section 5.1).
1. Extract the pH-sensor from the holder and wash it with tap water.
Fig. 33
2. Press the “CAL” [17] key the equipment beeps and without releasing the key, press “SET” [20] for a few seconds until the pH
screen [15] displays a blinking “7.0”.
3. Gently shake the sensor to remove any possible drops of water and insert in the standard pH=7.0 solution (green). Gently shake
for a few seconds and press “CAL” [17]. Once stabilised, the screen [15] will display a blinking “4.0”.
Fig. 34
4. Remove the sensor from the calibration solution and rinse it with tap water.
5. Shake the sensor smoothly so that any drops of water that may be adhered to the plastic body are removed and introduce it in the
calibration solution pH=4.0 (red colour). Shake smoothly for a few seconds and press “CAL” [17] key. Once the measurement has
stabilised, the pH-controller will automatically leave the calibration mode and will be operative.
23
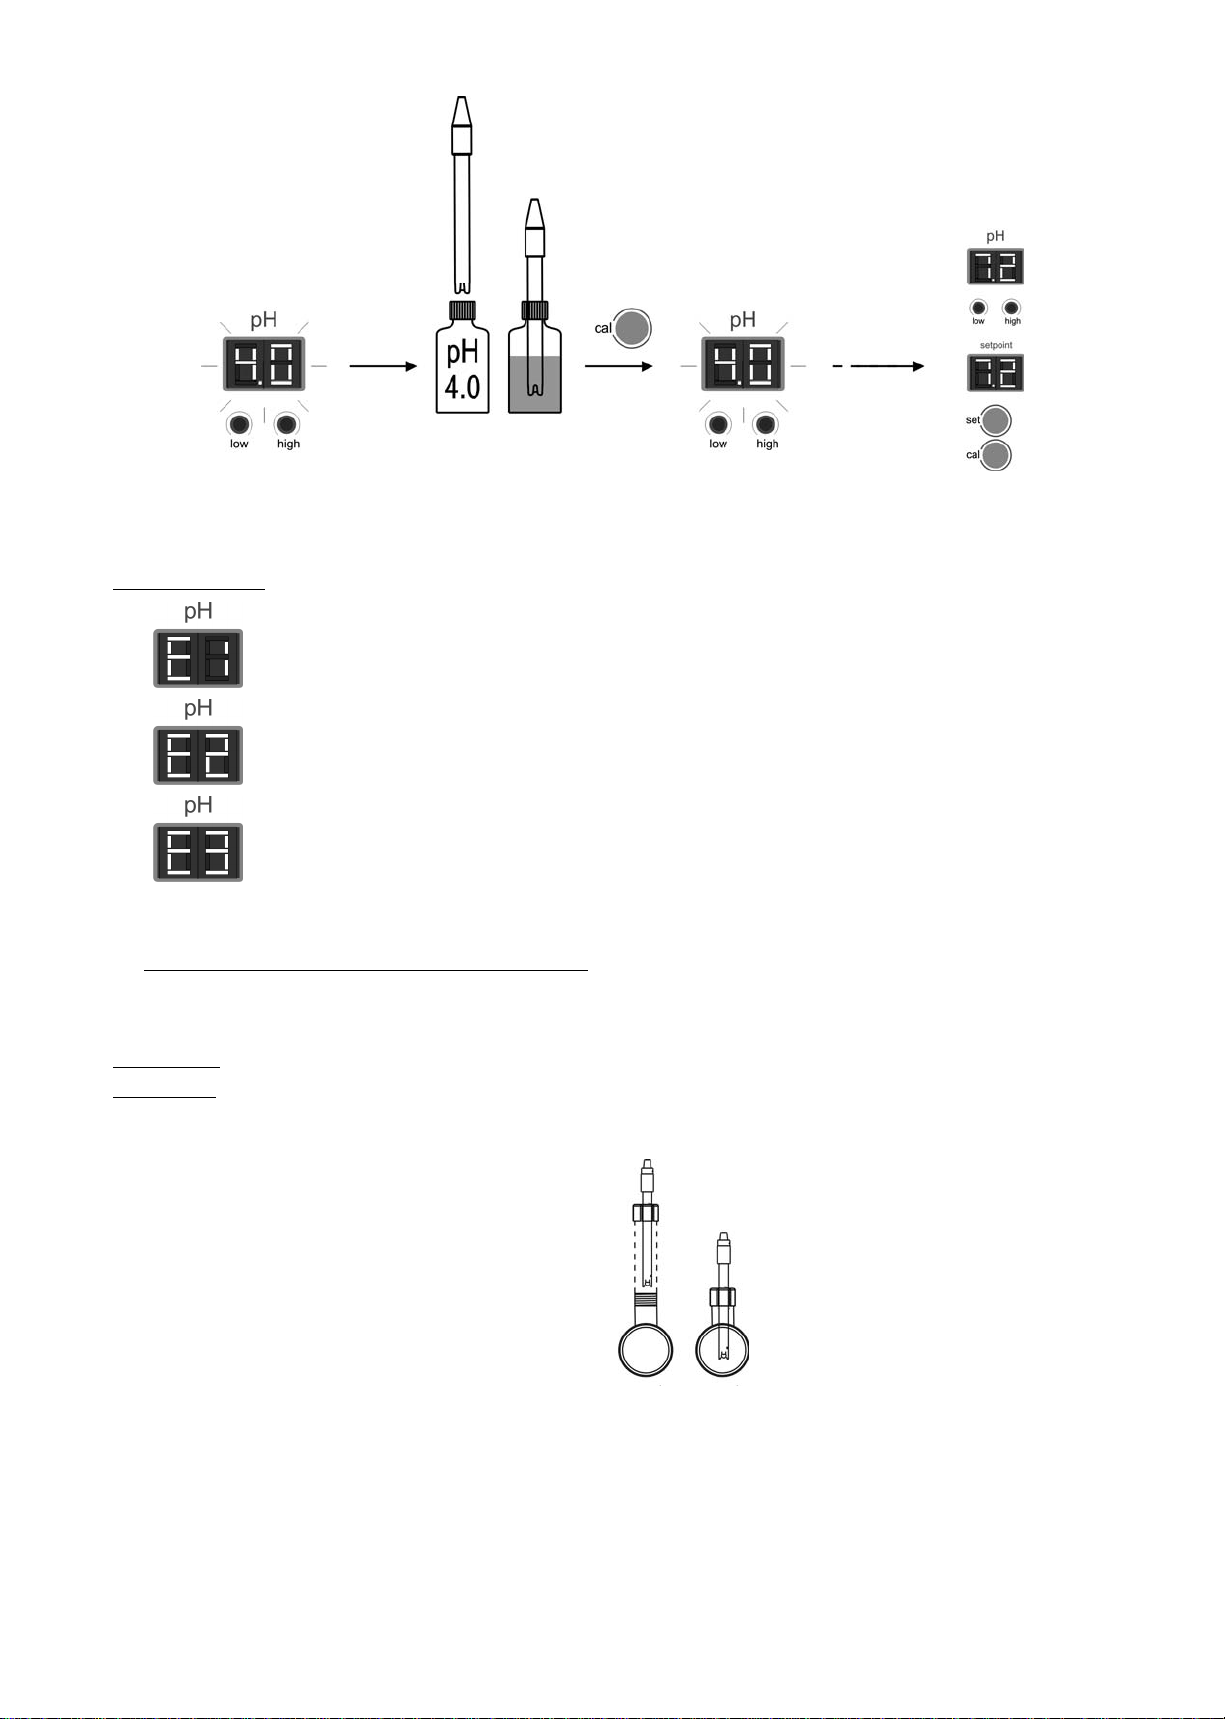
Fig. 35
ERROR MESSAGES:
If the calibration process is interrupted for whatever reason, the pH-controller will automatically leave the
calibration mode if the intervention of the user is not detected in a few seconds. In this case, “E1” indication in the
6.3. Calibration of the ORP sensor (only in DOM-XX PLUS models)
The calibration frequency of the controller will be determined in each particular application. Nevertheless, we recommend to make it at least,
once a month during the use period of the pool. The ORP controller has an automatic calibration system for the ORP sensors based on the
utilisation of a 470 mV reference solution.
PROCEDURE:
IMPORTANT: before closing the by-pass valves, stop system from control panel (see Section 5.1).
1. Extract the ORP sensor from the holder and wash it with tap water.
display [15] will appear.
If the pH value during the calibration process is very different from the expected one, (e.g., defective sensor, etc.),
display [15] will indicate “E2”, not allowing calibration.
If the pH measure is unstable during the calibration process, code “E3” will appear in display [15]. In addition, the
pH-sensor calibration will not be allowed.
Fig. 36
2. Press “CAL” [23] key for a few seconds, until the ORP display [24] blinks and indicates “470”.
3. Shake the sensor smoothly so that any water drops that may be adhered to the plastic body are removed and introduce it to the
calibration solution (470 mV). Shake smoothly for a few seconds and press “CAL” [23] key. If the process has concluded
satisfactorily, a long “beep” will be listened and the controller will be calibrated and ready to operate.
24

Fig. 37
ERROR MESSAGES:
If the calibration process is interrupted for whatever reason, the ORP controller will automatically leave the
calibration mode if the intervention of the user is not detected in a few seconds. In this case, “E1” indication in
display [21] will appear.
If the ORP value during the calibration process is very different from the expected one, (e.g., defective sensor,
etc.), display [21] will indicate “E2”, not allowing calibration.
If the ORP measure is unstable during the calibration process, code “E3” will appear in display [21]. In addition,
the sensor calibration will not be allowed.
6.4. pH / ORP sensors maintenance
1. Ensure that the sensor membrane remains moist all the time.
2. If the sensor in not going to be used for a long period, keep it submerged in a pH=4.0 conservation solution.
3. To clean the sensor, avoid the use of abrasive materials that can scratch the sensor surface.
4. The pH/ORP sensor is a consumable part and will need to be replaced over a period of time.
25

7. TROUBLESHOOTING: ________________________________________________________________________________________
Any action required to solve possible problems in the equipment should always be performed with the equipment disconnected from the
mains. Any problem not indicated in the following list should be solved by an IDEGIS technician.
PROBLEM
Production indicator always indicates “0” at all production levels Check electrodes.
Verify connections between power supply and the electrolysis
cell.
Check salt concentration.
The power supply is not turned on.
Free chlorine levels in the water are very low. Check that the system produces chlorine in pool jets.
Check the system is properly connected to 230 V/50-60 Hz in the
command box of the pump.
Check th estate of teh fuse located at the bottom of the power
supply.
Verify that the water Chemicals parameters (pH, combined
chlorine, isocyanuric acid, etc.) are correct.
Increase filtering time.
Add chlorine stabilizer (cyanuric acid) until a concentration of 25 –
30 g/m3 is achieved.
SOLUTION
pH/ORP controller always show extreme values, or readings are
unstable.
Impossible calibration of the pH/ORP sensor Polluted or expired calibration solution.
Slow response of the pH/ORP sensor Sensor electrostatically charged. During the calibration phase, the
The cable of the pH/ORP sensor is damaged. Clean the contacts
or replace the cable.
The pH/ORP sensor has an air bubble in the membrane area.
Hold the sensor in vertical position.Shake it lightly until the bubble
moves up.
Sensor fault. The connection cable is too long or it is too near to
sources of electrical interference (motors, etc.). Replace the
sensor. Locate the unit nearer to the sensor.
Blocked sensor membrane. Check the membrane is not
damaged. Clean the sensor with diluted acid in water, shaking it
lightly.
Sensor fault. Replace the sensor.
sensors should not be dried with paper or cloth. Clean it exclusively
with water and shake it lightly.
Insufficient renovation of the analyzed water (no flow through the
sample point). Ensure that the tip of the sensor is submerged in the
water at the sample point, and that no air bubbles are present.
26

8. COMPONENTS: _____________________________________________________________________________________________
POWER SUPPLY
ID DESCRIPTION
Power supply cover
1
Power card AC-12
2
Power card AC-22
2
Power card AC-30
2
Power card AC-7
2
Power card AC-12/PH
2
Power card AC-22/PH
2
Power card AC-30/PH
2
Power card AC-7/PH/ORP
2
Power card AC-12/PH/ORP
2
Power card AC-22/PH/ORP
2
Power card AC-30/PH/ORP
2
Power card AC-7/PH/ORP
2
Wall fixation
3
Cable gland M20
4
CEE22 F connector external pH pump
5
Electrolysis display card
6
Electrolysis/pH display card
6
Electrolysis/PH/ORP display card
6
Power transformer 190 VA
7
Power transformer 370 VA
7
Power transformer 480 VA
7
Power transformer 490 VA
7
External heat sink
8
Internal controllers structure
9
Fuse holder
10
Internal BNC cable
11
CEE22 M connector external pump
12
Frontal cover of the control terminal
13
Power supply cover fixation screw
14
Fixation screw embellisher
15
Power card-display card
16
DOM
12
X
X
X
X
X
X
X
X
X
X
X
X
X
DOM
24
X
X
X
X
X
X
X
X
X
X
X
X
X
DOM
32
X
X
X
X
X
X
X
X
X
X
X
X
X
DOM
42
X
X
X
X
X
X
X
X
X
X
X
X
X
DOM
12
PH
X
X
X
X
X
X
X
X
X
X
1
X
X
X
X
X
DOM
24
PH
X
X
X
X
X
X
X
X
X
X
1
X
X
X
X
X
DOM
32
PH
X
X
X
X
X
X
X
X
X
X
1
X
X
X
X
X
DOM
42
PH
X
X
X
X
X
X
X
X
X
X
1
X
X
X
X
X
DOM
12
PLUS
X
X
X
X
X
X
X
X
X
X
2
X
X
X
X
X
DOM
24
PLUS
X
X
X
X
X
X
X
X
X
X
2
X
X
X
X
X
DOM
32
PLUS
X
X
X
X
X
X
X
X
X
X
2
X
X
X
X
X
DOM
42
PLUS
X
X
X
X
X
X
X
X
X
X
2
X
X
X
X
X
NUM.
1
1
1
1
1
1
1
1
1
1
1
1
1
1
1
1
1
1
1
1
1
1
1
1
1
1
1
1
1
1
1
27

9. TECHNICAL CHARACTERISTICS: ______________________________________________________________________________
TECHNICAL SPECIFICATIONS:
Standard working voltage
Fuse
Output voltage
Production
Minimum recirculation flow
Electrode number
Net weight (packaging included)
230V AC – 50/60 Hz.
Cable: 3 x 1.0 mm
Domotic Series 12 0.8 A
Domotic Series 24 1.1 A
Domotic Series 32 1.5 A
Domotic Series 42 1.5 A
Domotic Series 12 2A T (5x20 mm)
Domotic Series 24 3.15A T (5x20 mm)
Domotic Series 32 4A T (5x20 mm)
Domotic Series 42 4A T (5x20 mm)
8 – 9 V DC (24 V DC DOM-40)
Cable 3 x 4 mm
Domotic Series 12 12 A (2x6 A)
Domotic Series 24 24 A (2x12 A)
Domotic Series 32 32 A (2x16 A)
Domotic Series 42 42 A (6x7 A)
Domotic Series 12 10 – 12 g./h.
Domotic Series 24 20 – 24 g./h.
Domotic Series 32 25 – 32 g./h.
Domotic Series 42 34 - 42 g./h.
Domotic Series 12 2 m
Domotic Series 24 4 m
Domotic Series 32 6 m
Domotic Series 42 8 m
Domotic Series 12 5
Domotic Series 24 7
Domotic Series 32 7
Domotic Series 42 13
Domotic Series 12 11 Kg.
Domotic Series 24 13 Kg.
Domotic Series 32 15 Kg.
Domotic Series 42 17 Kg.
2
, leng. 2 m.
2
, leng. 2 m.
GENERAL FEATURES:
Control system
Microprocessor.
Membrane keypad with control keys and operation
indication leds.
Control I/O: 3 inputs (potential-free contact type) for
monitoring the external flow switch, the state of the
automatic cover and ORP/residual chlorine controller.
Cell output: production control (11 discrete levels).
Integrated pH controller (only DOM –XX PH and DOMXX PLUS).
Integrated ORP controller.
(only in DOM-XX PLUS models).
Self-cleaning
Working temperature
Material
pH sensor (DOM-XXPH and DOM-XX PLUS)
3
/h.
3
/h.
3
/h.
3
/h.
ORP sensor (DOM-XX PLUS models)
Automatic polarity switch
°
From 0
C (32°F) to +40°C (104°F)
Cooling: natural convection
Power supply / wall terminal
o ABS
Electrolysis cell and sensor-holder
o Transparent methacrylate
Body: plastic (blue)
Range 0 -12 pH
Solid electrolyte
Body: plastic (red)
Range 0 – 1000 mV
Solid electrolyte
28

Dimensions
DOMOTIC (DOM-XX models)
DOMOTIC-PH / PLUS (DOM-XX PH and DOM-XX PLUS models)
29

10. WARRANTY CONDITIONS: ____________________________________________________________________________________
10.1. GENERAL ASPECTS
10.1.1. According to these provisions, the seller guarantees that the guaranteed product is in perfect condition upon delivery.
10.1.2. The Total Warranty period is 2 YEARS.
10.1.3. The Warranty period will be calculated as of delivery to the purchaser. The electrode is covered by a 2-YEAR WARRANTY (or
5.000 hours), which is not extendable. The pH /ORP sensors are covered by a 6-MONTH non-renewable warranty.
10.1.4. Should the Product be faulty and the seller is notified during the Guarantee Period, he shall repair or replace the Product at his own
cost wherever he sees fit, unless this is either impossible or out of proportion.
10.1.5. When the Product cannot be repaired or replaced, the buyer may request a proportional price reduction or, if the fault is important
enough, rescission of the sales contract.
10.1.6. Parts replaced or repaired pursuant to this warranty shall not extend the warranty period of the original Product, although they shall
have their own warranty.
10.1.7. For this warranty to be effective, the buyer shall accredit the date of acquisition and delivery of the Product.
10.1.8. When the buyer alleges a fault in the product over six months after its delivery, he shall accredit the original and existence of the
alleged fault.
10.1.9. This Warranty Certificate does not limit or prejudge consumer rights pursuant to national legislation.
10.2. SPECIFIC CONDITIONS
10.2.1. For this warranty to be effective, the buyer must closely follow the manufacturer’s instructions included in the documentation
supplied with the product, as applicable to each product range and model.
10.2.2. Whenever a schedule is defined for the replacement, maintenance or cleaning of certain product parts or components, the warranty
shall only be valid when said schedule has been correctly followed.
10.3. LIMITATIONS
10.3.1. This warranty shall only be applicable to sales to consumers, with consumer being defined as a person who purchases the product
for other than professional purposes.
10.3.2. No warranty is applicable to normal wear or the product, parts, components and/or fungible or consumable materials (except the
electrode).
10.3.3. The warranty does not cover cases in which the product: (i) has been incorrectly treated; (ii) has been inspected, repaired,
maintained or handled by an unauthorised person; (iii) has been repaired or maintained with non-original parts, or (iv) has been
incorrectly installed or started up.
10.3.4. When a faulty product results from incorrect installation or start-up, this warranty shall only be applicable when the installation or
start-up forms part of the product contract of sale and had been performed by the seller or under the seller’s responsibility.
10.3.5. Damage or faults due to any of the following causes:
o Bad programming of the system and/or user inadequate calibration of the pH/ORP sensors.
o Operation at salinity values of less than 3 g of sodium chloride per litre and/or temperatures lower than 15
than 40
o
C (104oF).
o
C (59oF) or higher
o Operation at a pH of more than 7.6.
o Use of explicitly unauthorised chemicals.
o Exposure to corrosive environments and/or temperatures of less than 0
o
C (32oF) or more than 50oC (125oF).
30

DOM10182540E109-14
Made in EC
I.D. ELECTROQUIMICA, S.L.
Polig. Ind. Atalayas, c./ Dracma R-19
Tel. +34 965101979 Fax +34 965107293
info@idegis.es www.idegis.es
E-03114 ALICANTE
Nous nous reservons le droit de modifier totalment oru en partie les caracteristiques de nos articles ou le contenu de ce document sans pré avis
Nos reservamos el derecho de cambiar total o parcialmente las características de nuestros artículos o el contenido de eeste documento sin previo aviso
Ci riservamo il dritto di cambiare totalemente o parzialmente le caratteristiche technique dei nostri prodotti ed il cotenuto di questo docuemntosenza nessum preavviso
Wir behalten uns das recht vor die eigenschatten unserer produkte oder den inhalt dieses prospektes teilweise oder vollstanding, ohne vorherige benachichtigung zu andern
Reservamo-nos no dereito de alterar, total ou parcialmente as caracteristicas dos nossos artigos ou o coteúdo deste documento sem avisdo prévio.
We reserve to change all or part of the articles or contents of this document, without prior notice
 Loading...