

Page 1
UK (BTP) Ver 2, Jun 2007
USER GUIDE
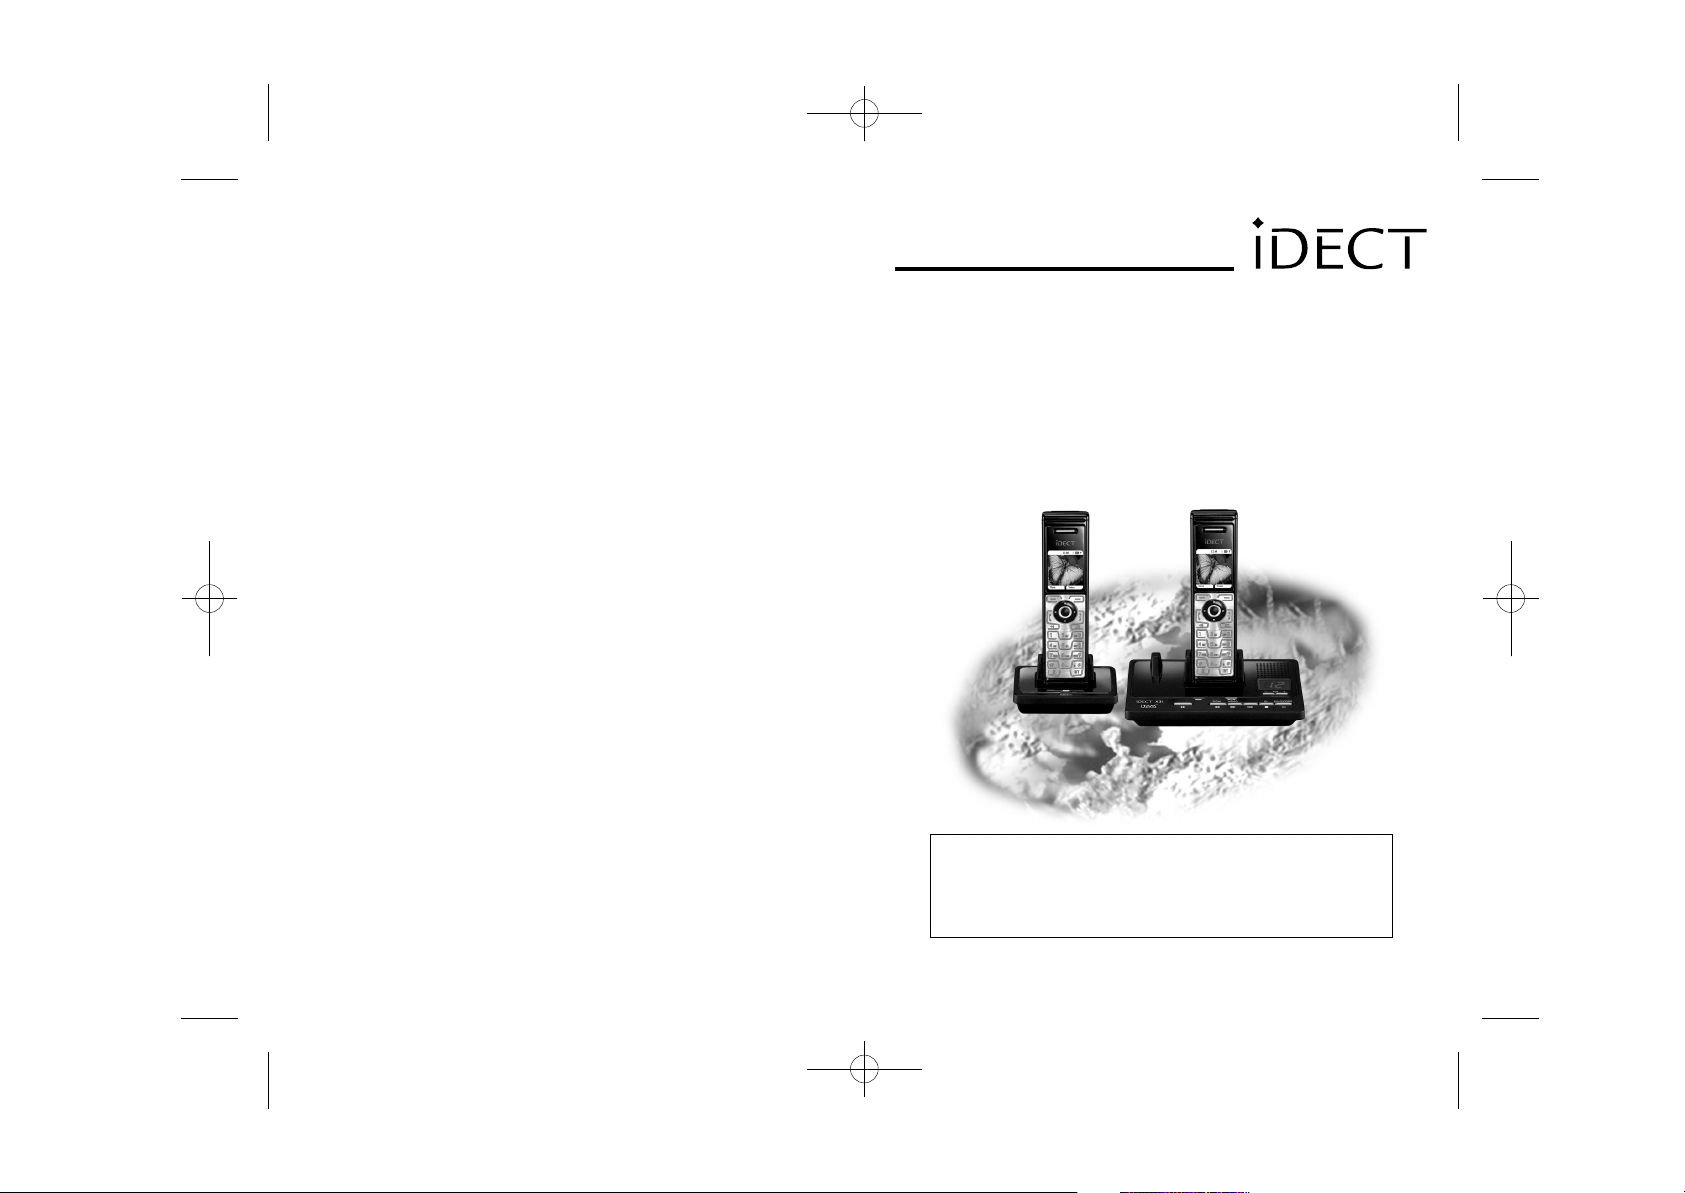
iDECT X3i System
Colour Display Telephone with
200 Name and Number Phonebook
and Answering Machine
and SMS Messaging
THIS EQUIPMENT IS NOT DESIGNED FOR MAKING
EMERGENCY TELEPHONE CALLS WHEN THE POWER
FAILS. ALTERNATIVE ARRANGEMENTS SHOULD BE
MADE FOR ACCESS TO DIAL EMERGENCY SERVICES.
Before operating this set,
please read these instructions carefully.
Page 2
Important note-
This telephone is not designed for making Emergency calls when
the main power fails. For Emergency calls you should have a
basic phone that does not need mains power, connected to
your line so that you can make calls during a power failure.
iDECT Helpline 0845 345 9677 (for UK only)
Monday to Friday from 9:00am to 5:00pm
**Please note that all calls are charged at local rate
Or visit our website: www.idectonline.com
Charging batteries for the first time
Before you start to use your telephone make sure that all
batteries are fully charged for 24 hours.
Unpacking your phone
In the box you will find:
the cordless handset (two handsets with a Twin system,
three with a Triple system, four with a Quad system and
five with a Quin system)
the base unit
One 2.4V 600mAh rechargeable battery pack and
a battery compartment cover for each handset
a telephone line cable for the base unit
a mains power lead, and DC 7.5V 600mA adapter for
the base unit
charger pods, each with a connected mains power lead
and DC 7.5V 480mA adapter, for multi-handset system
User Guide
** Keep your sales receipt as it is your guarantee
Page 3
Where to find it
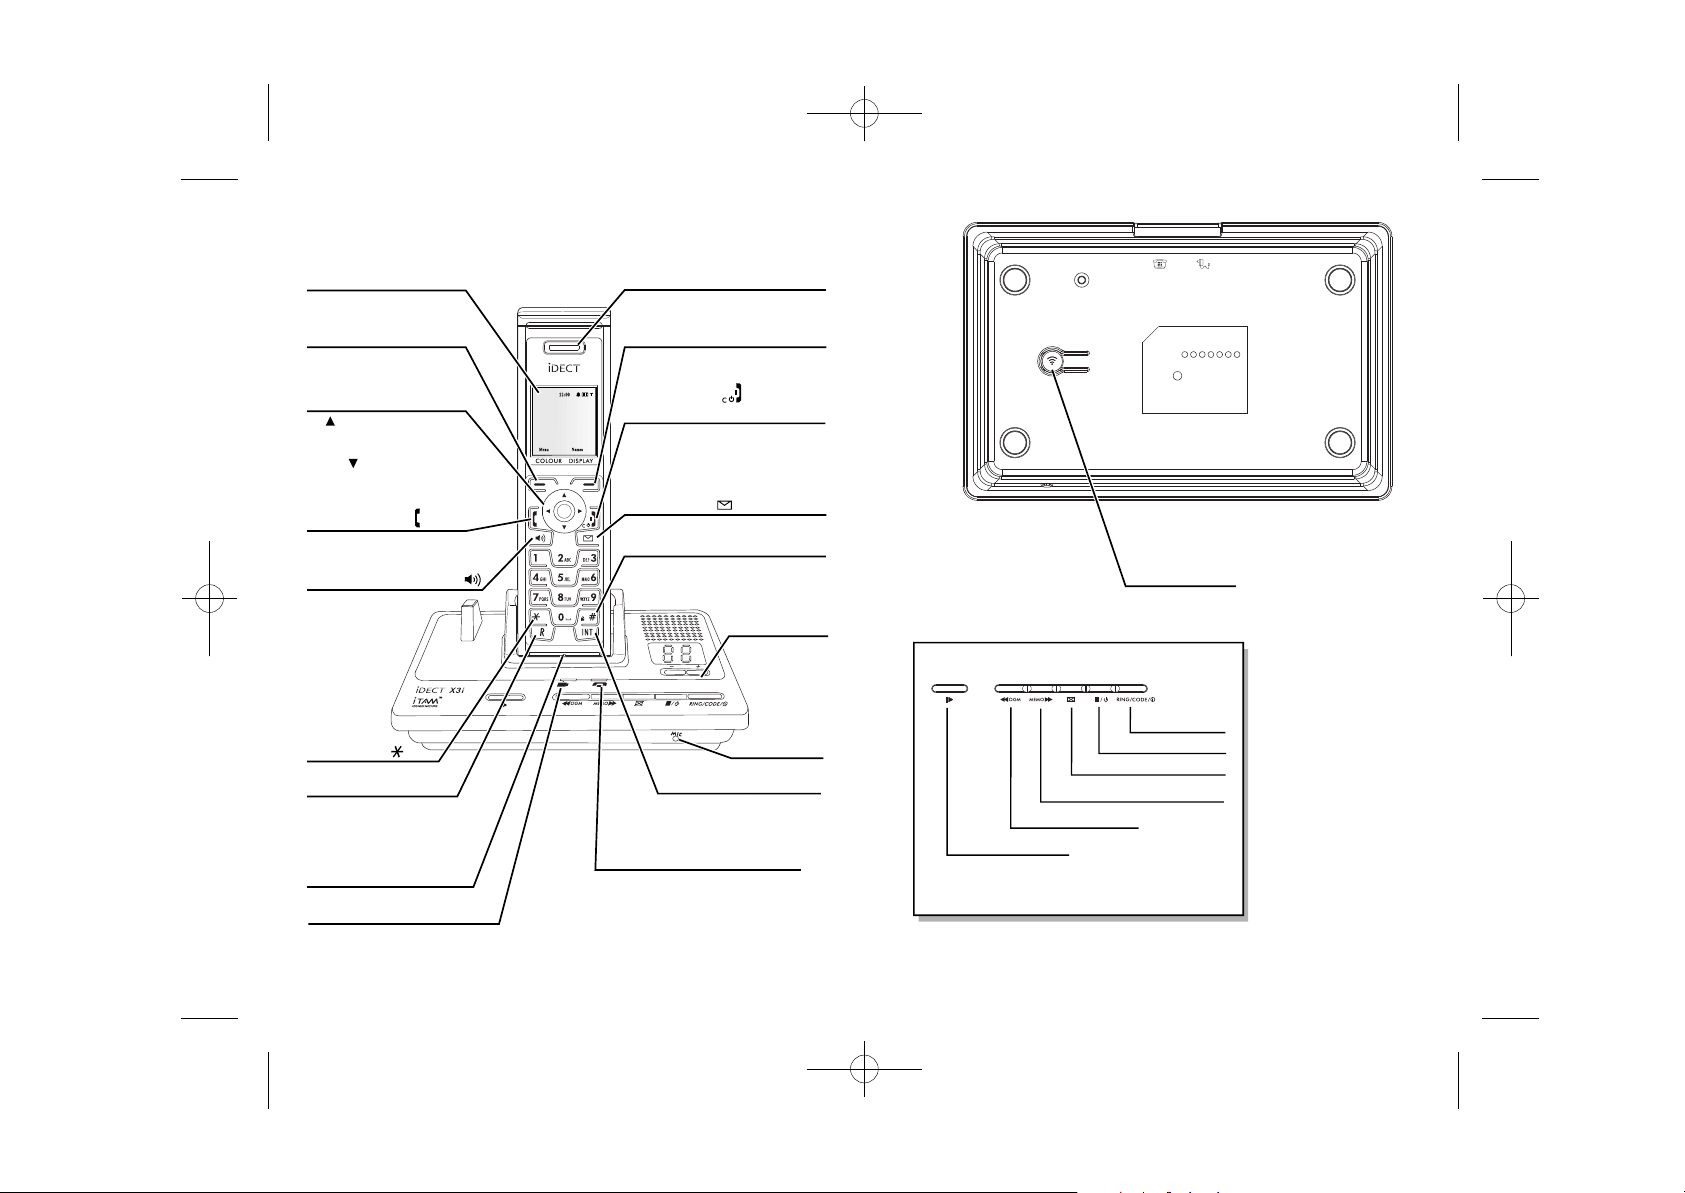
Colour Display with
backlight
Left Soft/ Menu
Access button
to access menu.
Press
Press for OK.
Navigation buttons
UP : access dialled calls.
Increase volume of earpiece
and handset speaker.
DOWN : access to phonebook.
Decrease volume of earpiece
and handset speaker.
PHONE button
Press to make or answer
a phone call.
Speakerphone button
Press to make
answer a
in speakerphone
mode, or to switch
speakerphone mode
on or off during
during a call.
or
phone call
Star button
RECALL button
You may need the Recall
function if your phone is
to a PBX, or if you use BT's
Supplementary Services.
Handset mouthpiece
Charge LED
This shows handset is charging.
EARPIECE
Right Soft/
Phonebook button
Press to access phonebook menu.
Press for BACK / CLEAR.
HANG UP/ C button
iDECT 1iDECT 1
iDECT 1iDECT 1
and power ON/OFF
Press to end a call.
Press during programming to go back
to idle mode.
Press and hold to switch off the handset.
Press to switch back on.
SMS button
Press to access
HASH/Keypad lock button
Press to lock keypad.
Press for conference calls.
INTERCOM button
Press for intercom calls.
In-use LED
Lights up when the base power is on.
Flashes when the line is in-use.
to the messaging menu.
Answering Machine
Loudspeaker
volume control
Adjust volume
during playback
Answering
Machine
Microphone
Answering machine buttons
STOP/ON-OFF button
DELETE button
FAST FORWARD/MEMO button
REWIND/OGM button
PLAY/PAUSE button
The functions of these buttons are
described on pages 39-44.
PAGE button
CLOCK/RING/
CODE button
Page 4
What's on the display?
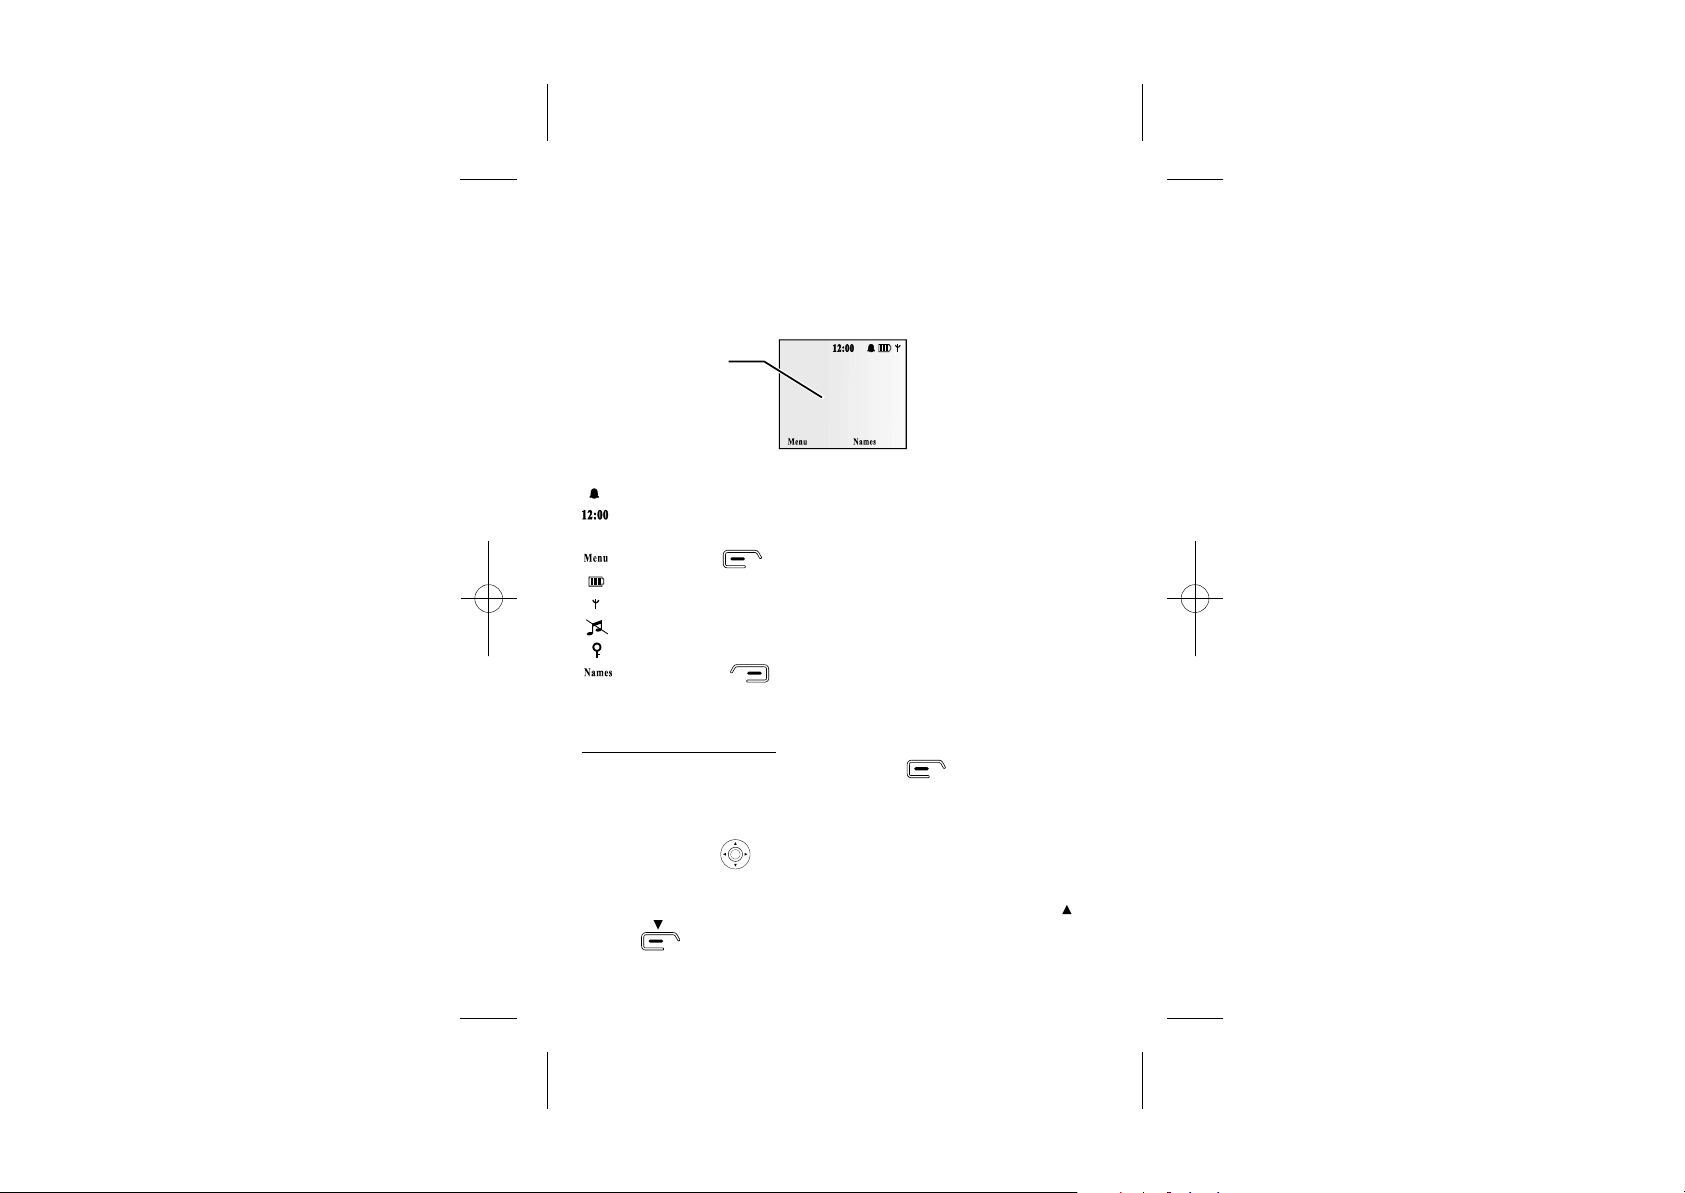
The display of your telephone contains one line of icons and the time at the top,
the soft key functions at the bottom, and a graphic display showing more icons,
the handset name, and details of names, numbers and menu lists.
This shows the
handset name.
iDECT 1iDECT 1
iDECT 1iDECT 1
Display in standby mode. If activated the following icons and text are shown -
Alarm active
Current time
iDECT 1iDECT 1
iDECT 1iDECT 1
Handset name
Left soft key to access Menu
Battery status: full, 50% charged, flat
Radio signal indicator
Ring tone off
Keypad lock active
Right soft key to access Phonebook
List of Menu Features
How to Select a Menu Option
To access the main menu, press the left soft key ; the menu option
will be displayed.
You can access the useful phone features that are organised in the
different menus with the navigation keys on your iDECT X3i.
The navigation keys allow you to navigate in a specific direction
by pressing on the corresponding keys.
To navigate within the menu options in the iDECT X3i, simply press UP/
or DOWN/ key until you reach your selected option; then press the left
soft key to confirm the selected option.
Page 5

What the symbols mean?
SMS
Calls Lists
Handset
Base Settings
Clock - Time Settings
Registration
New Message
Inbox
Outbox
Delete Messages
Settings
Received Calls
Missed Calls
Dialled Calls
Delete Calls List
Ringtone
Ring Volume
Ear Volume
Handset Name
Language
Menu Colour
Auto Talk
PABX Access Code
Wall paper
Handset Priority
Recall Mode
Dial Mode
System PIN
Alarm
Set Date & Time
Register Handset
Select Base
De-register
iDECT Help Line(for UK only): 0845 345 9677 (Local Call rate)
1
Page 6

Contents
What the symbols mean
Contents
Read First before Use
Choosing a site for the base unit
and charger pod
Radio signals between handset
and base unit
Interference
"Out of range" warning
Mains power connection
Battery safety
If you have a broadband line
Installation and Set-up
Choose a suitable site for
the base unit
Connect the mains power lead
Plug the main adaptor into your
wall socket
Fit the rechargeable batteries
in each Handset
Charge the batteries for 24 hours
st
before 1 time use
Connect the base unit to
the telephone line
Setting SMS
Your Telephone Operations
Switching on/off your phone
To lock/unlock the keypad
Set time and date
Set the alarm
Your handset's name
(change the name)
Select your phone language
Select your handset display colour
Select your handset wallpaper
Making and answering calls &
earpiece volume adjustment
Last number redial function
Memory/Phonebook management
To create a contact in
your phonebook
To delete contacts in
your phonebook
2
To edit contacts in phonebook
1
To store a last number redial entry
2
in phonebook
Dialling from phonebook
3
Caller ID log
Handset ringer volume, melody
3
Using a multi-handset system
Paging handset
3
Handset registration
4
4
SMS text messaging
4
Write and send a message
4
Save a text message to outbox
4
Delivery receipt
Read your text message
5
Reply to a message
Forward a message
5
Delete a message
5
Delete all messages
5
Advanced use of your Phone
Handset advanced settings
6
Shortcut to clear phonebook
memory
6
Set to default settings
Change your PIN code
7
Select mode for dialling
7
Set flash time (Recall)
Set handset priority
8
8
Setting up the answering machine
8
Setting the day, clock, number of
8
rings and security remote code
9
To check the day, clock, number of rings
and security remote code of your
10
answering machine
11
To set ring volume
11
12
Outgoing messages (OGMs)
To record OGM1
12
To record OGM2
13
14
Using the answering machine
Switch on/off the answering machine
15
To switch between OGMs
To record a memo
15
To play back your messages
To go back to the default OGMs
16
17
17
18
20
21
22
23
26
29
29
30
30
31
31
32
32
33
33
34
35
36
37
37
38
39
39
40
40
41
41
41
42
42
42
42
43
44
Page 7

Troubleshooting
Remote Operation
To check your messages remotely
Remote Operation keys
Keys to press during remote operation
Switching on remotely 46
45
45
Cleaning and Care
45
Declaration of Conformity
45
Guarantee and Service
Technical Details
Read First Before Use
47
51
51
52
53
Choosing a site
for the base unit
and charger pod
Radio signals
between handset
and base unit
iDECT Help Line(for UK only): 0845 345 9677 (Local Call rate)
The base unit and charger pod(s) should be placed on a level
surface, in a position where:
the mains adapter plug will reach an easily accessible 230-VAC
switched mains supply socket - never try to lengthen the
mains power cable.
the base unit's telephone line cable will reach your telephone
line socket or extension socket (the charger pod does not
have a telephone line connection).
it is not close to another telephone - this can cause radio
interference.
it is not close to a sink, bath or shower, or anywhere else
where it might get wet.
NOTE: if the base comes into contact with liquids, disconnect
it promptly and use a soft cloth to dry it; if you believe that the
liquid has seeped into the unit, do not reconnect the base
station. Contact the IDECT Helpline. Follow the same
procedure for your handset and remove the internal batteries.
it is not close to other electrical equipment - fridges,
washing machines, microwave ovens, fluorescent lights,
televisions etc.
it is away from hot, humid conditions and strong sunlight.
Signal range between the handset and the base station is in
accordance with the approved standard for DECT phones:
Maximum range: 300 metres outdoors.
Maximum range: 50 metres indoor.
The signal range could become lower during normal use. Any
large metal object, like a refrigerator, a mirror, a filing cabinet,
metallic doors or reinforced concrete, between the handset and
base unit may block the radio signal. The signal strength may
also be reduced by other solid structures, like walls, or by
other radio or electrical interference.
3
Page 8

For stronger radio signal, it is recommended that your telephone
is at the highest possible position. If there is no radio signal
reception, Base 1 message and the signal level icon will flash
on the display.
Interference If the sound quality gets worse as you move around while on a
"Out of range"
warning
Mains power
connection
Battery safety
If you have a
Broadband line
call, this is probably caused by interference between the handset
and the base unit, perhaps because you are too near to another
phone or other electrical equipment.
Move to a different position to clear the interference. If you do not
move, it might cause a short break or your call may be cut off.
If you hear a warning tone during a call, and the sound in the
earpiece becomes faint or distorted, you may be going out of
range of the base unit.
Move nearer to the base unit within 20 seconds, until the
warning tone stops. Otherwise, your call may be cut off.
IMPORTANT - The iDECT X3i base unit must be used with
the mains adapter supplied with the unit.
Using any other adapter will result in non-compliance with
EN60950, and will invalidate any approval given to this apparatus.
ONLY use the rechargeable batteries supplied with the handset.
DO NOT use non-rechargeable batteries - they may burst and
cause damage to your telephone.
If you connect your telephone to
a line with a broadband
connection, you will need to
insert a micro-filter between
the telephone and the telephone
line; otherwise you may get interference
between the telephone and the broadband, which could cause
problems.
In a home with broadband, every telephone must have a
micro-filter connected, not just the one at the telephone point
that your modem is connected to. If you need more broadband
micro-filters, contact your broadband supplier.
4
Page 9
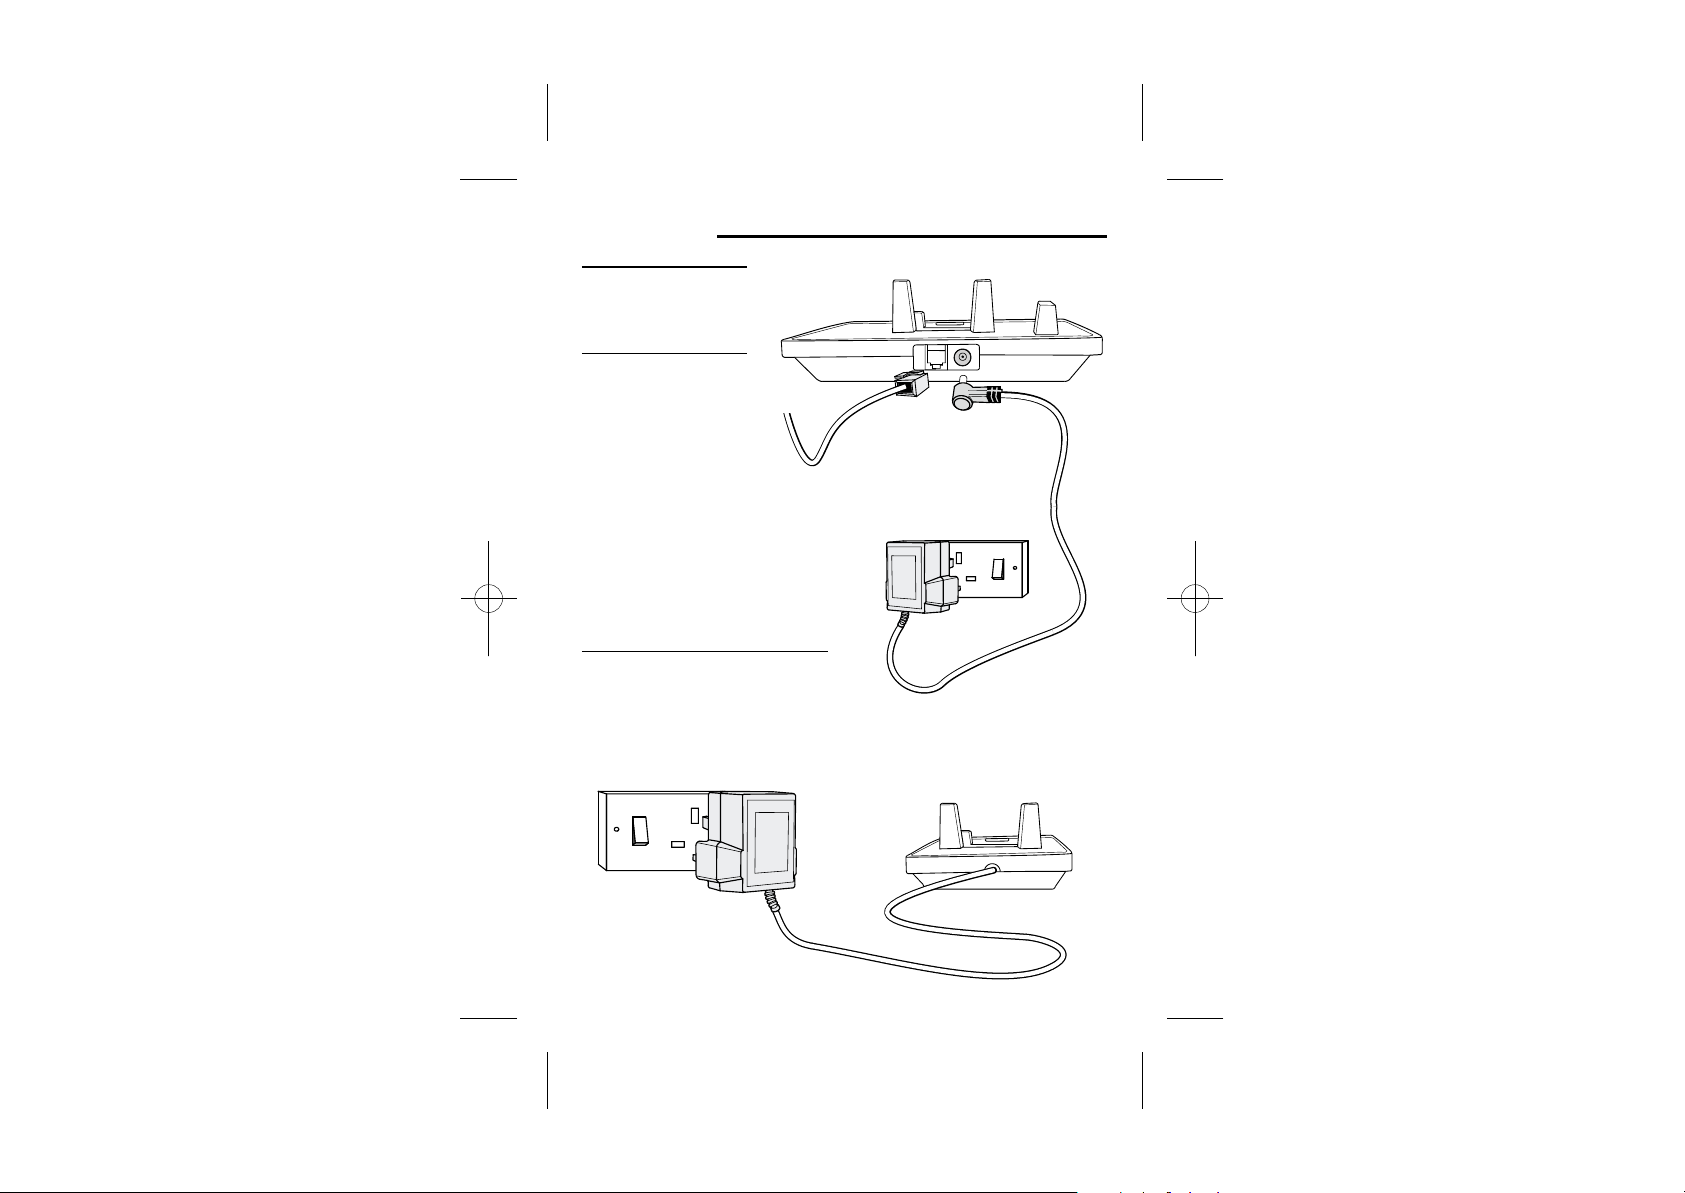
Installation and Set-up
1 Choose a suitable site
for the base unit
(see page 3).
2 Connect the mains
power lead and the
telephone line cord
into the base unit.
Plug one end of the
telephone line cord into
the socket on the back of
the base. Use the telephone
line cord supplied with your
iDECT X3i - other line cords
may not work with this phone.
3 Plug the mains adaptor into your wall
socket. If you have one or more charger
pods, plug in the mains adaptors
accordingly.
Make sure that the 230VAC, 50hz mains socket is switched OFF
when you plug the mains adapter into the socket. Switch it ON only
when you have the adaptor plugged in safely.
iDECT Help Line(for UK only): 0845 345 9677 (Local Call rate)
5
Page 10
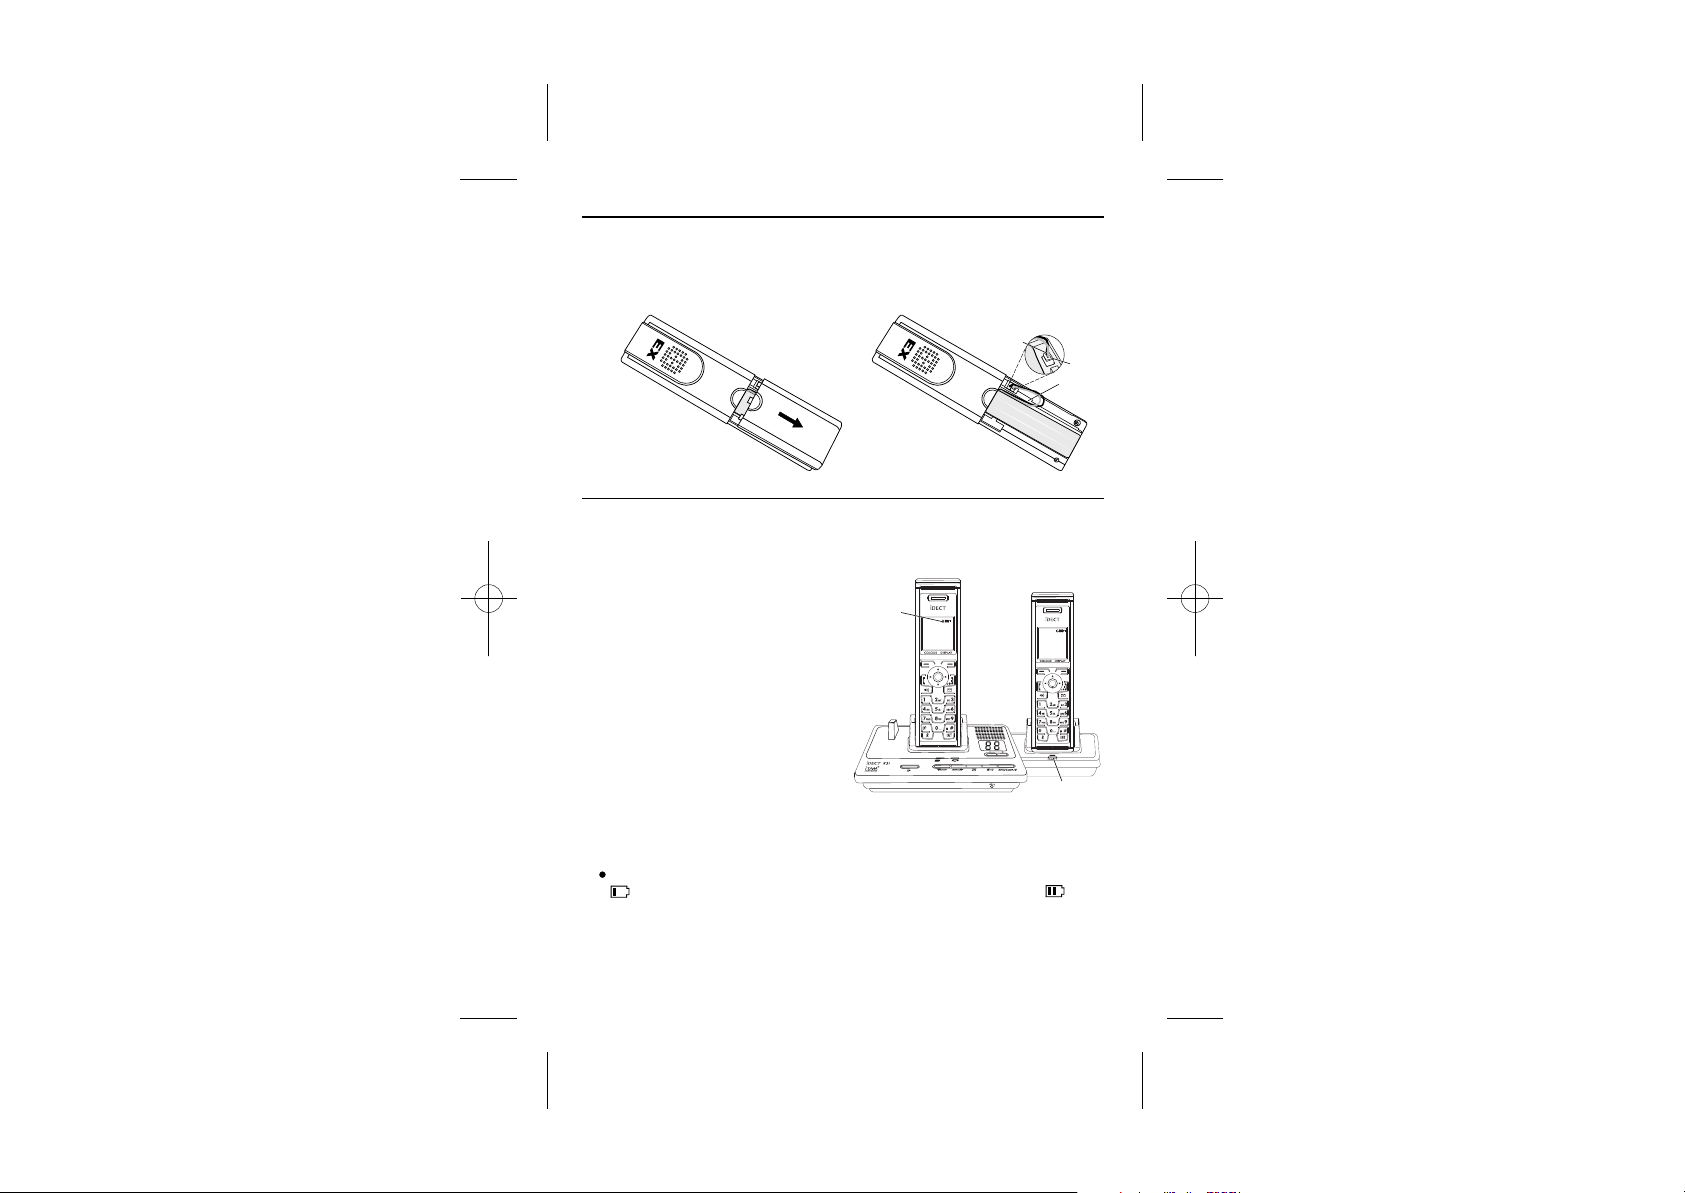
4 Fit the rechargeable batteries in each handset.
A. Push down on the top of the battery
compartment cover (located on the
back of the handset) and slide the
cover off as shown.
B. Lift the battery pack and connect
its plug to the socket inside the
compartment, as shown.
BLACK
RED
Store the wire in
the gap after
installing the
battery.
Charge the batteries for 24 hours before 1 time use.
5
Before you use the handset for the first time, it is important that you charge
the batteries fully. You will hear a 'beep' when the handset is correctly
positioned on the charging cradle.
Leave the handset on the
base unit or charger pod
for 24 hours. To keep the
batteries charged, whenever
you don't need to use the
handset (such as overnight,
or when you go out), leave it
on the base unit or charger pod.
Battery life:
Standby time: 100 hours
Talk time: 10 hours
Note:
Battery life depends on device usage. Therefore, it is recommended that you
read the following notes of caution.
When the batteries are low, the handset will display the corresponding icon
. Place the handset back on the base station: the battery icon will
start flashing.
The bars on the
battery level symbol
continuously change
as the batteries are
being charged.
st
12:58
iDECT 1
Menu Names
Menu Names
The CHARGE
light comes on.
6
12:58
iDECT 1
Page 11
Use only original batteries and charge them only on the original base
station or charger pod(s).
Insert the batteries properly as previously described.
Do not dispose of the batteries in fire: this may cause an explosion.
Remove the batteries from its compartment if the phone is not used for a
long period of time.
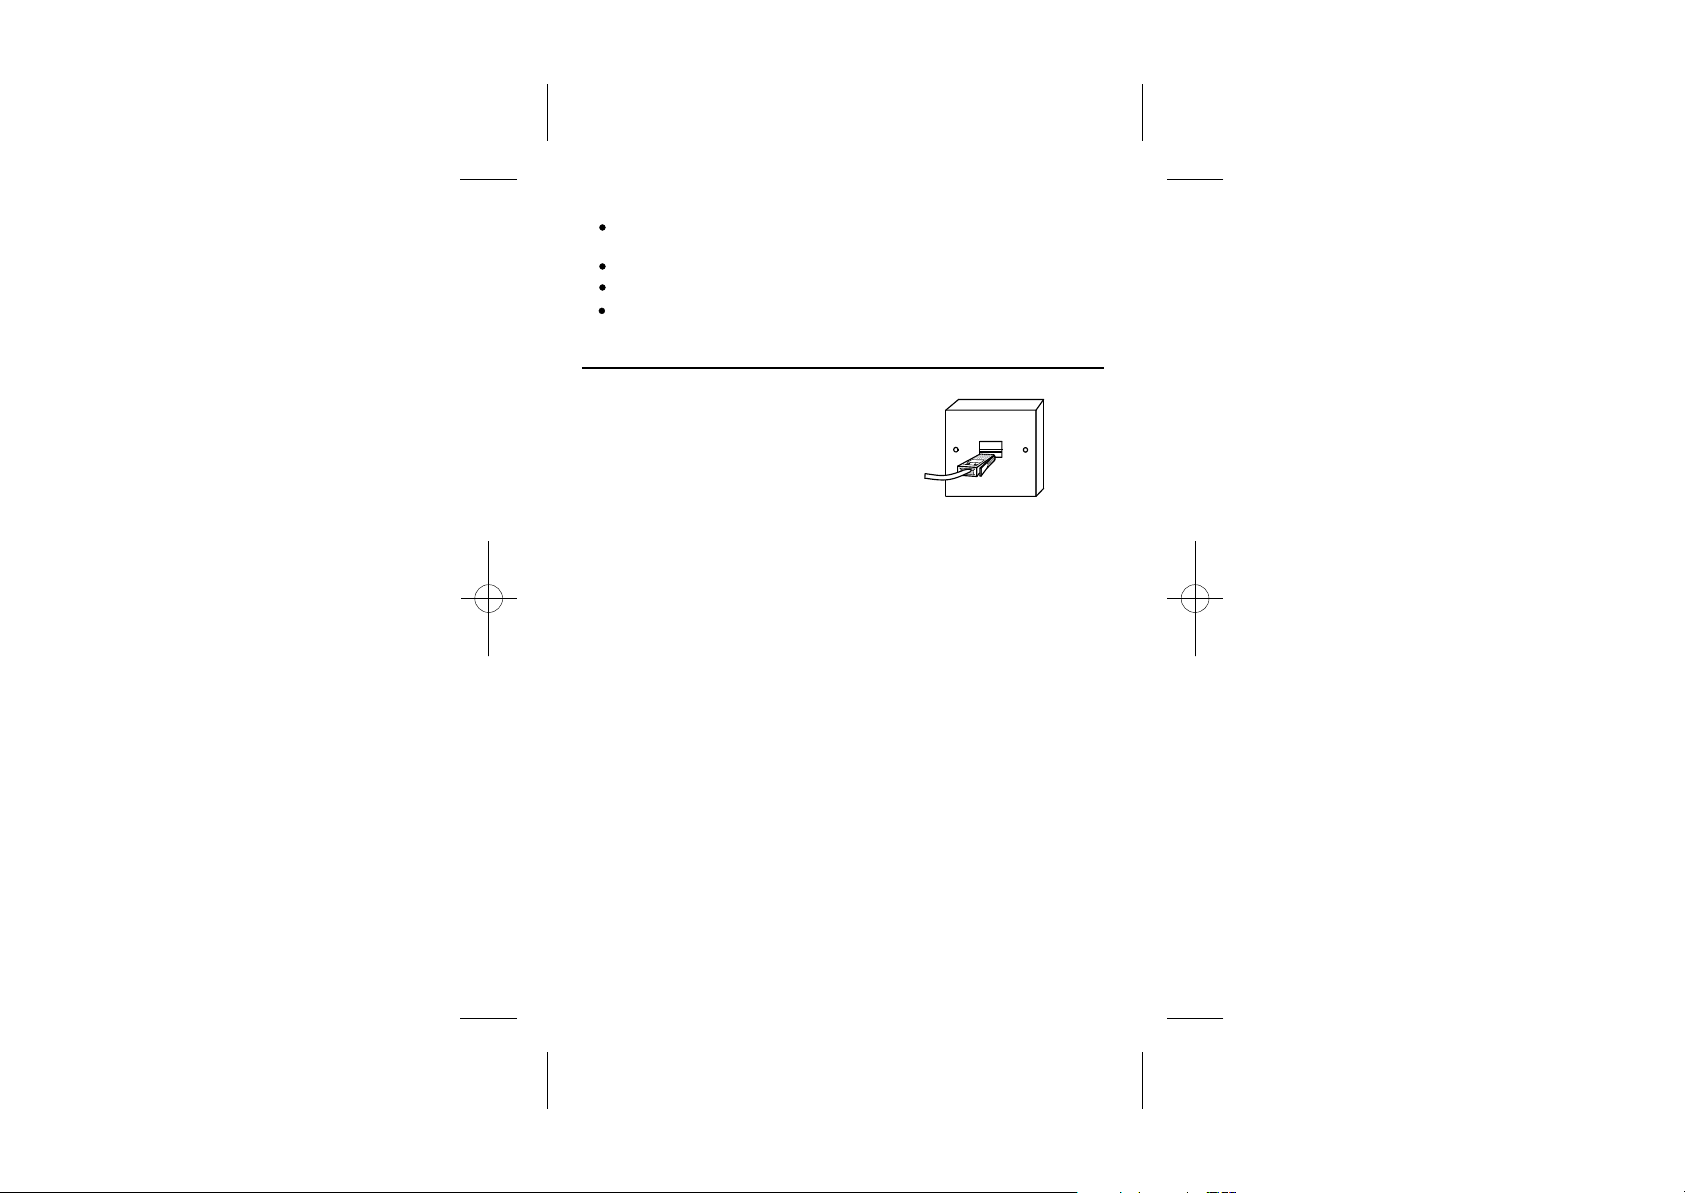
6 Connect the base unit to the telephone line.
Switch OFF power at the mains socket
and insert the telephone line plug into
the socket then switch mains power
back ON.
iDECT Help Line(for UK only): 0845 345 9677 (Local Call rate)
7
Page 12
Your Telephone Operations
Switching on/off
1
2
Note: To answer a call when the handset is switched off, you need to switch it
back on. It may take a few moments for the handset to re-establish a radio link
with the base unit.
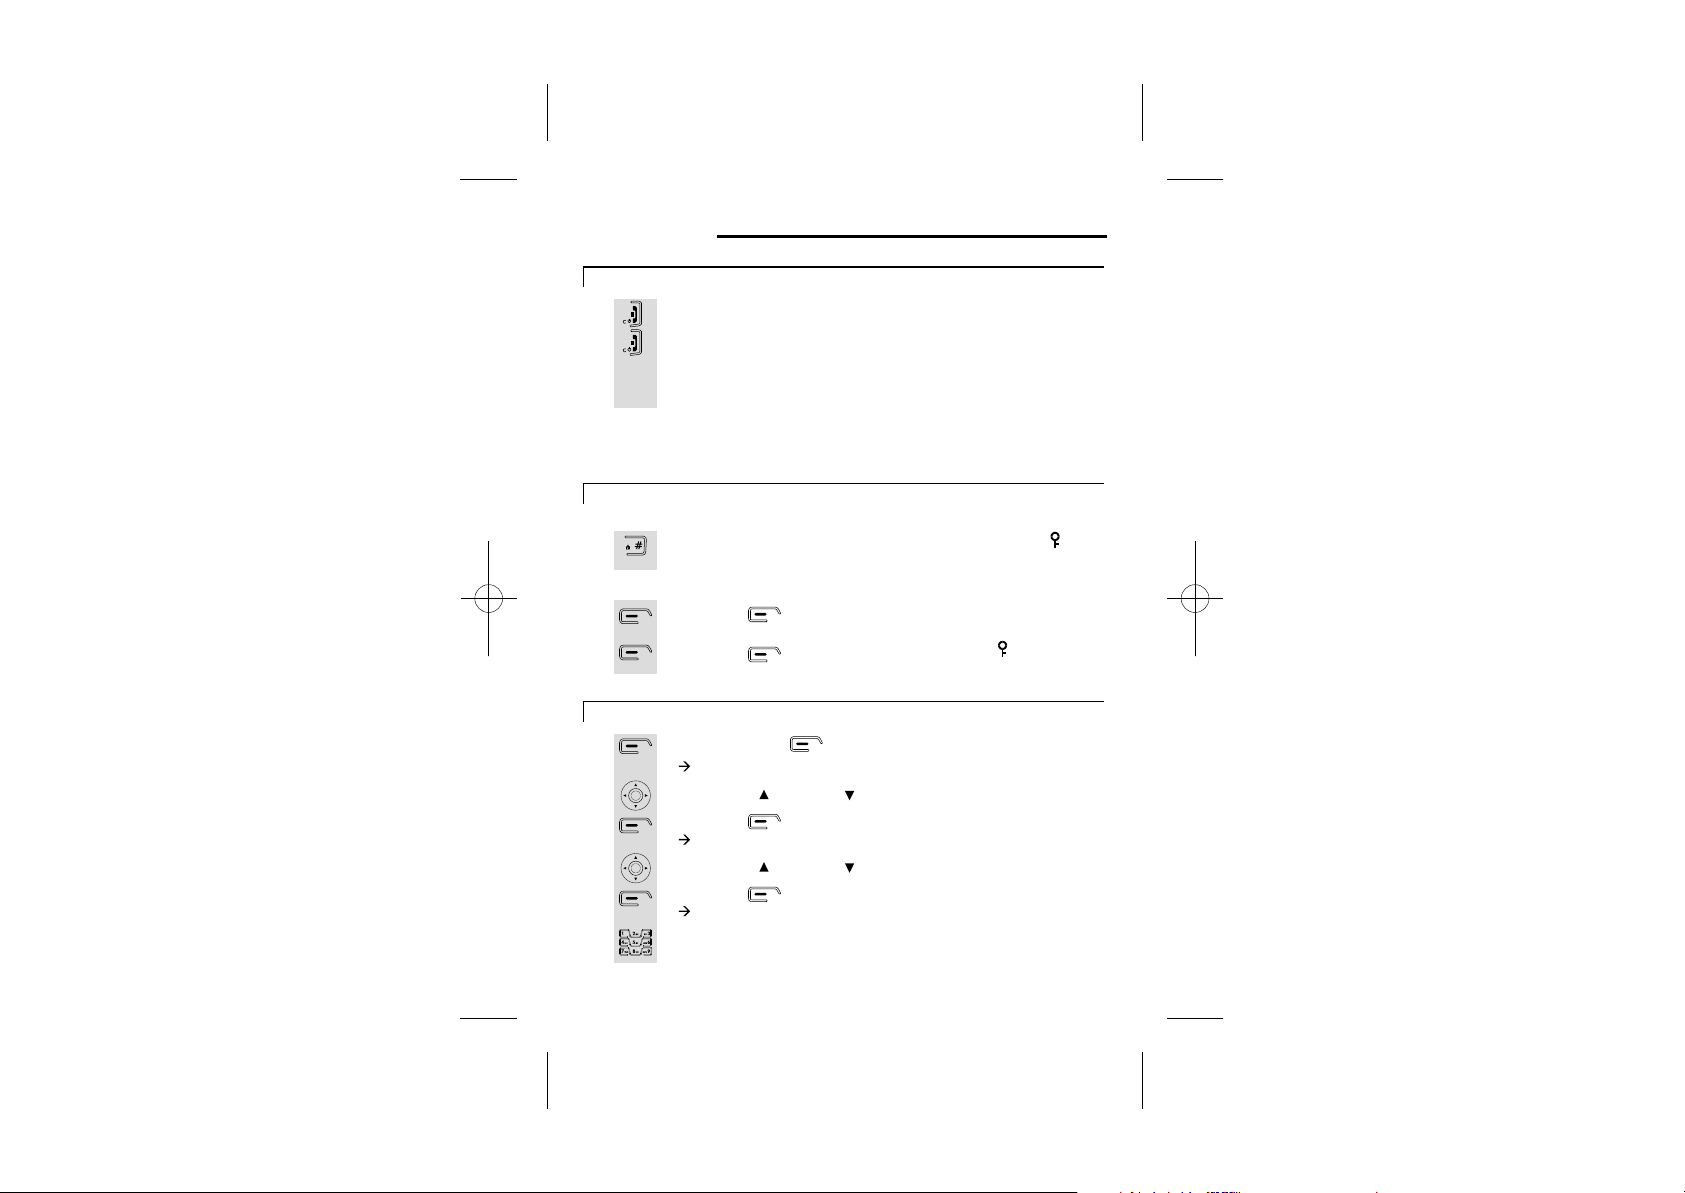
To lock/unlock the key pad
1
1
Press the HANG UP/ C button to turn the phone 'ON'.
Press the HANG UP/C button and hold for two seconds to turn
the phone 'OFF'.
** You can switch the handset off and save battery.
** When the handset is in "off" mode, the unit can not be used
for emergency calls.
To lock
Press the HASH button and hold for 2 seconds until the icon
appears on the display.
To unlock
Press the button to select 'Unlock'.
2
Set time & date
1
2
3
4
5
6
8
Press the button for 'Yes ' to confirm. The icon will
disappears from the display.
Press the menu button.
à The display shows SMS.
Use the UP/ or DOWN/ to select Time setting.
Press the button.
à The display shows Time setting >Alarm.
Use the UP/ or DOWN/ to select Set Date & Time.
Press the button.
à The display shows Date:.
Use the digit keys 0 to 9 to enter the date -format DD/MM.
Page 13
7
8
9
10
Set the Alarm
1
2
3
4
5
6
7
8
9
Press the OK button.
à The display shows Time (24 Hr):.
Use the digit keys to enter the time 0 to 9 - format HH:MM (It's a
24 hour clock).
Press the button to confirm.
à The display shows Time & Date Saved.
Press the HANG UP/C button to return to idle mode.
** The time of Answering Mechine need to be set seperately.
(Ref to Page 39)
Set the Alarm
Press the menu button.
à The display shows SMS.
Use the UP/ or DOWN/ to select Time setting.
Press the button.
à The display shows Time setting >Alarm.
Press the button to select Alarm.
Press the button to select On/Off.
Use the UP/ or DOWN/ to select the frequency (On Once,
On Daily or Off), then press OK.
à The display shows Time (24 Hr):.
Use the digit keys 0 to 9 to enter the time -format HH/MM
(24hour clock).
Press the button to confirm.
à The display shows Done.
Press the HANG UP/C button to return to idle mode.
** Alarm tone will last for 1 minute and can be stopped by
pressing any key on the handset.
iDECT Help Line(for UK only): 0845 345 9677 (Local Call rate)
9
Page 14
Set Alarm tone
1
2
3
4
5
6
7
8
9
Your handset's name (change the name)
1
2
3
4
5
6
7
8
9
Press the menu button.
à
à The display shows SMS.
Use the UP/ or DOWN/ to select Time setting.
Press the button.
à
à The display shows Time setting >Alarm.
Press the button to select Alarm.
Use the UP/ or DOWN/ to select Set Alarm Tone.
Press the button.
à The display shows Alarm Tone.
Use the UP/ or DOWN/ to select the alarm tone (there are
four tones to choose form).
Press the button.
à
The display shows Alarm Tone Saved.
Press the HANG UP/C button to return to idle mode.
The name can be up to 8 characters.
Press the menu button.
à The display shows SMS.
Use the UP/ or DOWN/ to select Handset.
Press the button.
à The display shows Handset >Ringtone.
Use the UP/ or DOWN/ to select Handset Name.
Press the button.
à The display shows Name: iDECT.
Press the button to delete characters.
Use the digit keys to enter letters.
Press the button to confirm.
à The display shows Done.
Press the HANG UP/C button to return to idle mode.
10
Page 15
Select your handset display language
1
2
3
4
5
6
7
Note: The 4 languages are: Italiano, Deutsch, Español, English.
Select your handset display colour
1
2
3
4
5
6
7
Note: The 3 colours are: Blue, Green, Yellow.
Press the menu button.
à The display shows SMS.
Use the UP/ or DOWN/ to select Handset.
Press the button.
à The display shows Handset >Ringtone.
Use the UP/ or DOWN/ to select Language.
Press the button, then press the UP/ or DOWN/
button to go through the language list (there are 4 languages to
choose from).
Press the button to select the language e.g. English, the
display shows English Saved.
Press the HANG UP/C button to return to idle mode.
Press the menu button.
à The display shows SMS.
Use the UP/ or DOWN/ to select Handset.
Press the button.
à The display shows Handset >Ringtone.
Use the UP/ or DOWN/ to select Menu Colour.
Press the button, then press the UP/ or DOWN/
button to go through the colour list (there are 3 colours to
choose from).
Press the button to select the colour e.g. Yellow, the
display shows Saved.
Press the HANG UP/C button to return to idle mode.
iDECT Help Line(for UK only): 0845 345 9677 (Local Call rate)
11
Page 16
Select your handset Wallpaper
1
2
3
4
5
6
7
Making and answering calls / Earpiece volume adjustment during calls
1
2
Press the menu button.
à The display shows SMS.
Use the UP/ or DOWN/ to select Handset.
Press the button.
à The display shows Handset >Ringtone.
Use the UP/ or DOWN/ to select Wallpaper.
Press the button, then press the UP/ or DOWN/
button to go through
Press the button to select the
e.g. BUTTERFLY, the display shows SAVED.
Press the HANG UP/C button to return to idle mode.
Make a call
Press the PHONE button or the SPEAKERPHONE
button to connect to the line.
Then dial the required telephone number.
the wallpaper list :Butterfly and Sunset .
wallpaper
3
4
Note: You can also make a call by using the Pre-dial function: Dial the
required telephone number first (if you enter a wrong number use the
make the call.
Press UP/ or DOWN/ button to adjust the volume of the
earpiece during your conversation (5 volume levels).
Press the HANG UP/C button to end the call.
button to delete and re-enter) then press the PHONE button to
12
Page 17
Answer a call
1
Press the PHONE button or Speakerphone buttonn to
answer a call when the telephone rings.
2
3
Note: If Auto answer is set then lifting the handset off the base or charger will
answer the call and no buttons need to be pressed.
Last number redial function
1
2
3
4
Press UP/ or DOWN/ button to adjust the volume of the
earpiece during your conversation (5 volume levels).
Press the HANG UP/C button to end the call.
Press UP/ to view dialled calls.
à The display shows Dialled calls.
Use the UP/ or DOWN/ button to stroll through the list of
dialled numbers.
Once selected press the PHONE button to dial.
Press the HANG UP/C button to end the call.
iDECT Help Line(for UK only): 0845 345 9677 (Local Call rate)
13
Page 18
Memory/Phonebook management
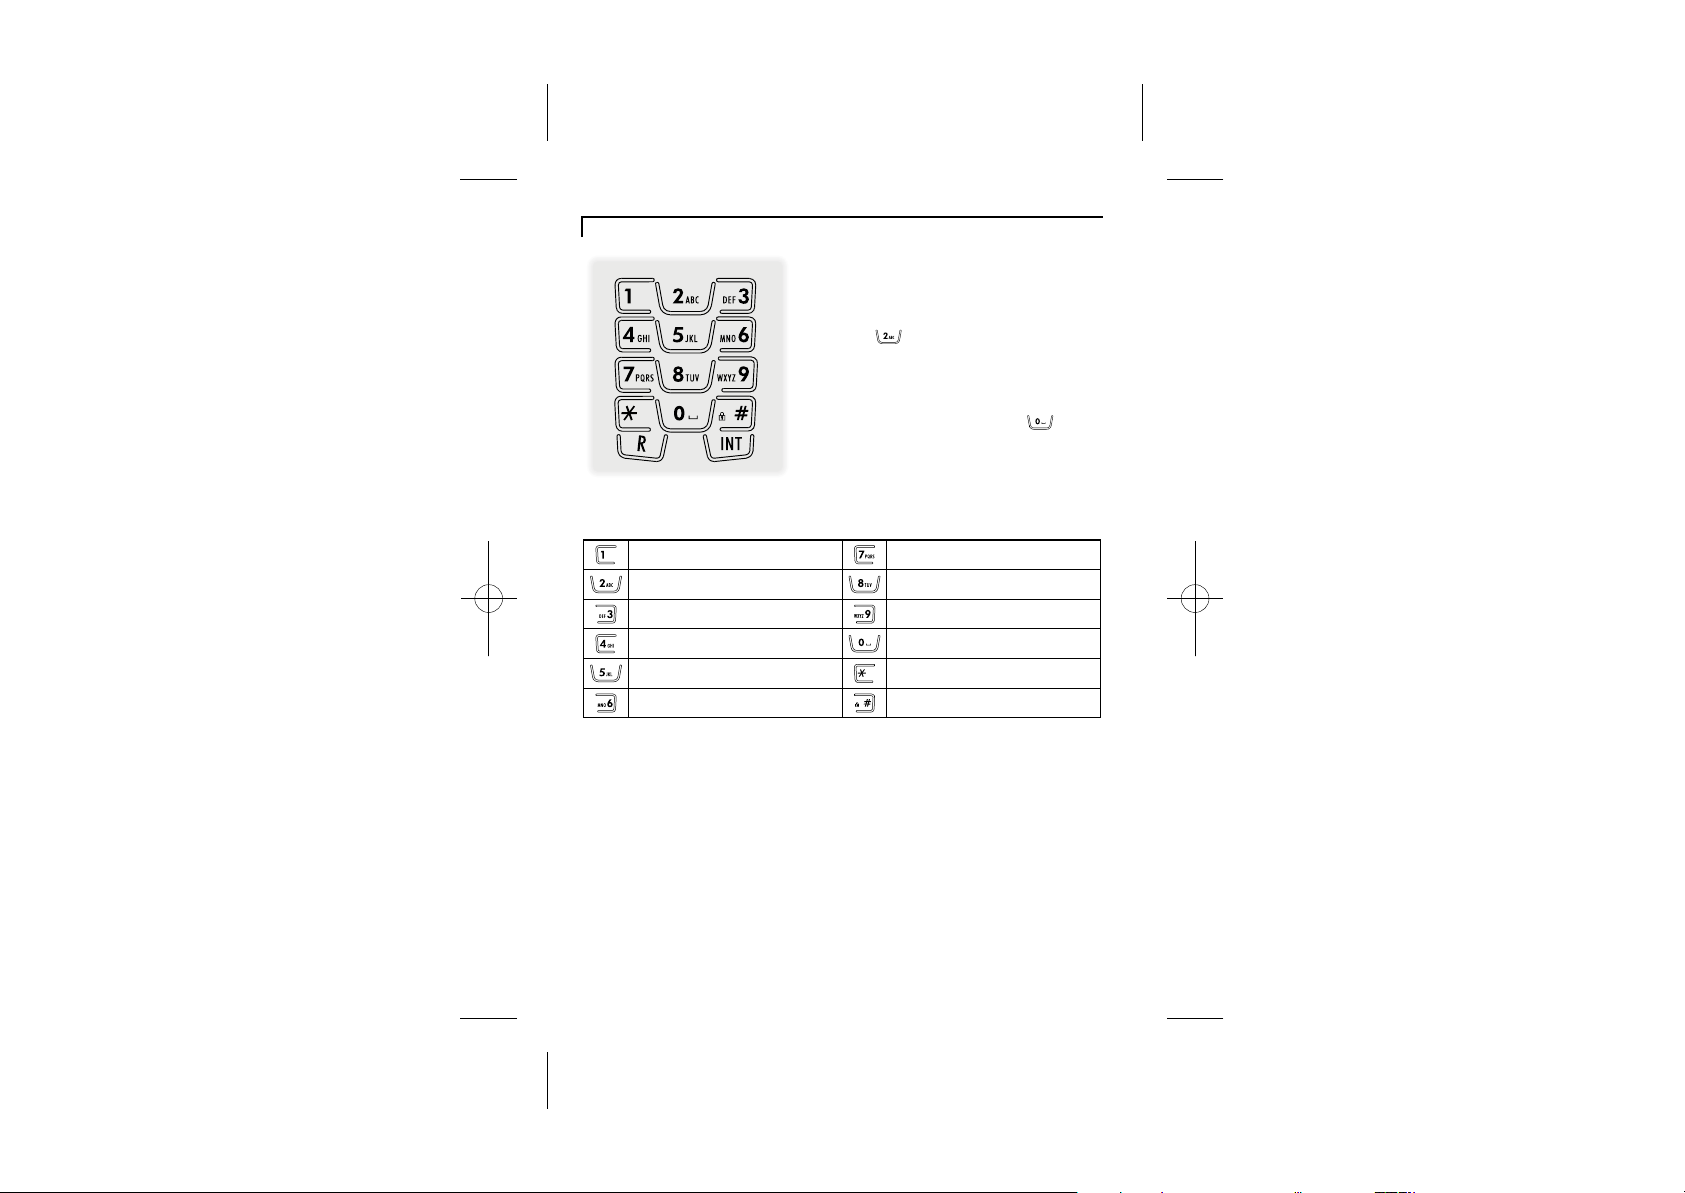
How to enter characters?
To use the characters you press on the
button where you see the character,
e.g. if you want to insert the letter 'A', you
press '2' , if you want to insert the letter
'B', you press twice and for 'C', three times
etc.
If you want to insert 'AA', then you will have
to wait for the first 'A' to stop flashing then
insert the second 'A'. Press '0' for
space.
Key pad table
!
.
, 1 : ; !
A B C 2 a b c à á â ã ä å æ ç ?
D E F 3 d e f è ê ë é
G H I 4 g h i ì í î ï
J K L 5 j k l -
M N O 6 m n o ñ ò ô õ ö ø ó ö
?
?
' "
P Q R S 7 p q r s ß
T U V 8 t u v ù ü
W X Y Z 9 w x y z )
(Spa ce) 0 @ & = + - < > %
* / \ ( ) € £ $ ¥
# § _ ^ ~ { | [ ] |
* When entering text the INT key can be used to change the letter case.
* The right and left arrows can be used to move back and forth through text.
14
Page 19
To create a contact in your phonebook
Names can be up to 16 characters and numbers can be up to 20 digits
1
2
3
4
5
6
7
8
To delete contacts in your phonebook
1
2
3
4
5
6
7
8
Press the button.
à The display shows Names >Find Entry.
Use the UP/ or DOWN/ to select Add Entry.
Press the button.
à The display shows Add Entry >Name:.
Use the digit keys to enter the name, e.g. Jane.
Press the button to confirm.
à The display shows Add Entry >Number:.
Use the digit keys to enter the number, e.g. 123456789
Press the button to confirm and the name of
the person would appear.
à The display shows Jane Added to names.
Press the HANG UP/C button to return to idle mode.
Press the button.
à The display shows Names >Find Entry.
Press the button, your phonebook list will appear.
Use the UP/ or DOWN/ button to scroll through the list of
names in your PHONEBOOK, or press the digit keys to skip
directly to entries beginning with the same letter.
Press the button to select.
Use the UP/ or DOWN/ to select Delete Entry.
*To delete all contacts in your phonebook, select Delete all
phonebook.
Press the button.
à The display shows Delete ...?.
Press the button to confirm.
Press the HANG UP/C button to return to idle mode.
.
.
iDECT Help Line(for UK only): 0845 345 9677 (Local Call rate)
15
Page 20
To edit contacts in phonebook
1
2
3
4
5
6
7
8
9
10
11
12
13
Press the button.
à The display shows Names >Find Entry.
Press the button, your phonebook list will appear.
Use the UP/ or DOWN/ button to stroll through the list of
names in your PHONEBOOK.
Press the button to select.
Use the UP/ or DOWN/ button to select Edit Entry.
Press the button.
à The display shows Edit Entry >Name:....
Press the button to delete characters.
Use the digit keys to enter new characters, e.g. Jane.
Press the button.
à The display shows Edit Entry >Number:....
Press the button to delete numbers.
Use the digit keys to enter new numbers, e.g. 123456789.
Press the button to confirm.
à The display shows Jane saved.
Press the HANG UP/C button to return to idle mode.
16
Page 21
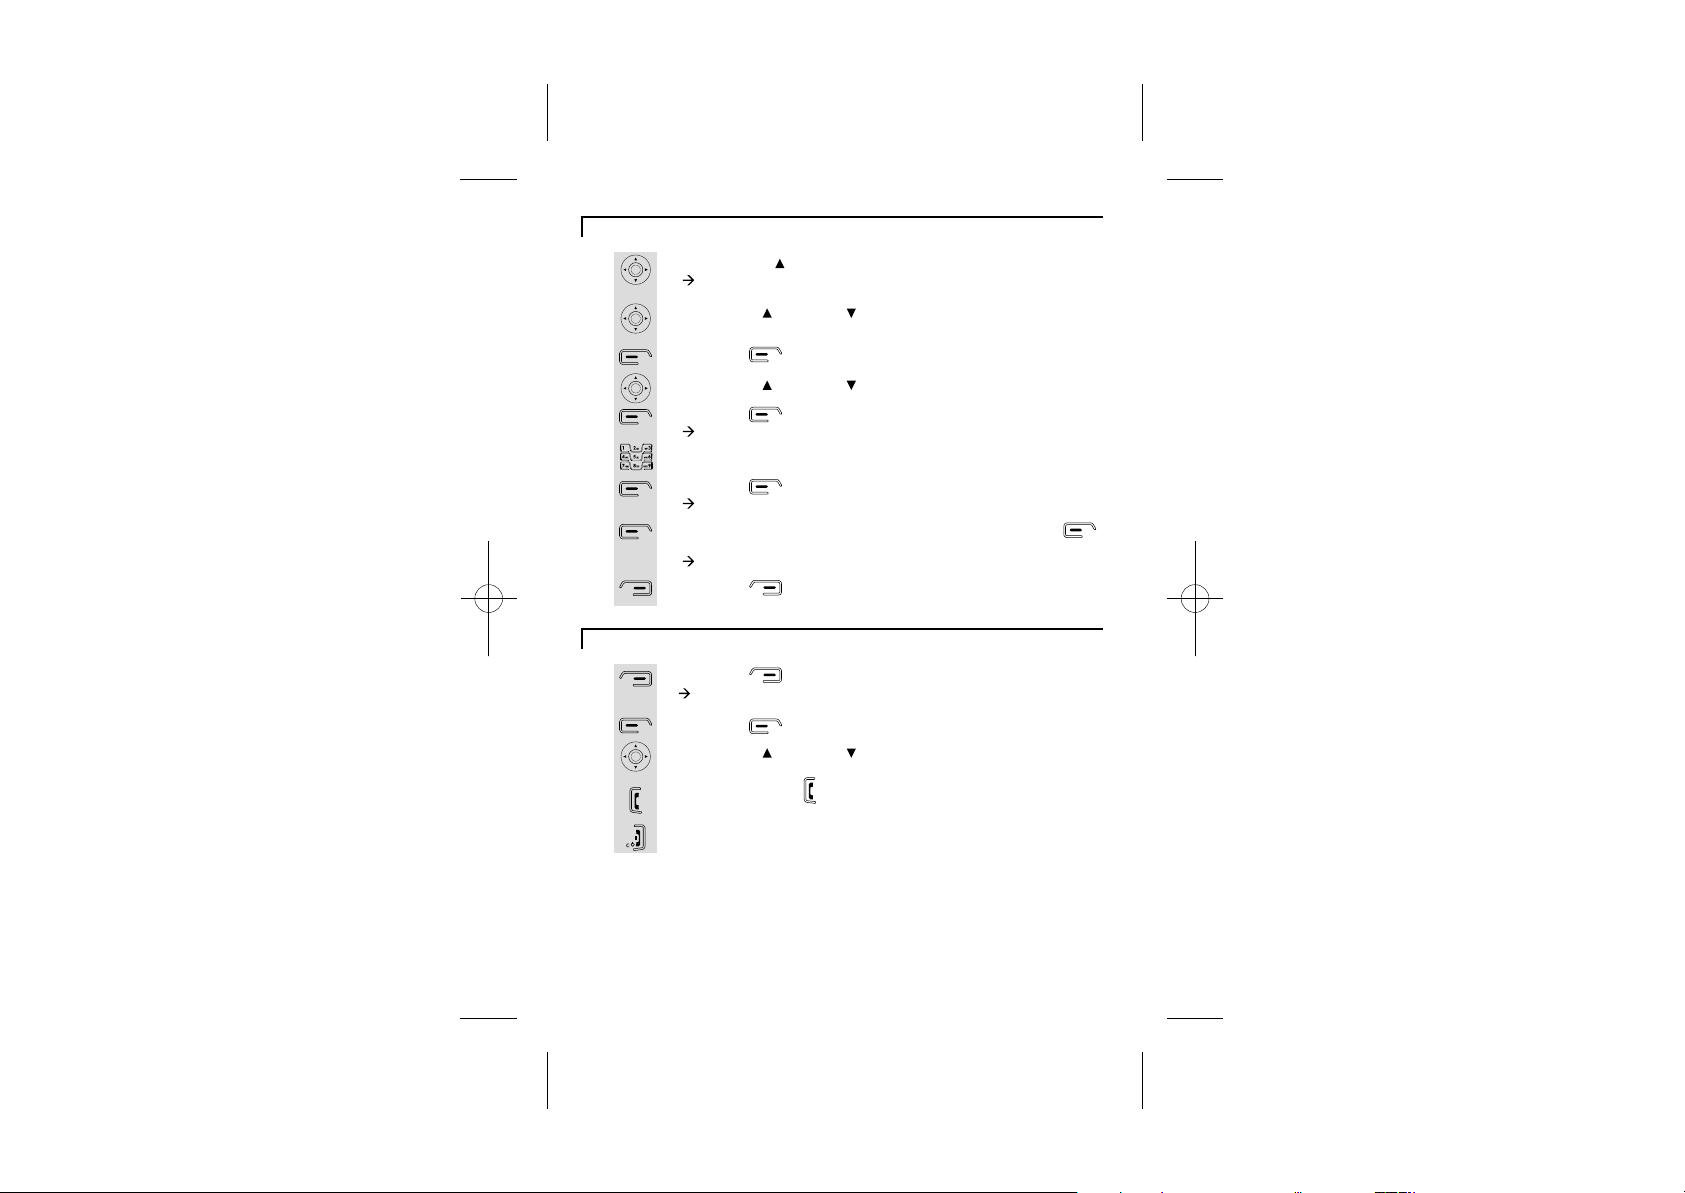
To store a last number redial entry in phonebook
1
2
3
4
5
6
7
8
9
Dialling from phonebook
1
2
3
4
5
Press the UP/ to view dialled calls.
à The display shows Dialled calls.
Use the UP/ or DOWN/ button to stroll through the list of
dialled numbers.
Press the button to select.
Use the UP/ or DOWN/ button to select Save Number.
Press the button.
à The display shows Name:.
Use the digit keys to enter characters for the name, e.g. Jane.
Press the button for OK.
à The display shows Number:.
Check if it is the number you want to save then press the
button for OK.
à The display shows Jane Added to names.
Press the button to go back to
Press the button.
à The display shows Names >Find Entry.
Press the button to select.
Use the UP/ or DOWN/ button to stroll through the
phonebook
Press the PHONE button to dial and the telephone number
will appear.
Press on HANG UP/C button to hang up.
.
dialled calls list.
iDECT Help Line(for UK only): 0845 345 9677 (Local Call rate)
17
Page 22
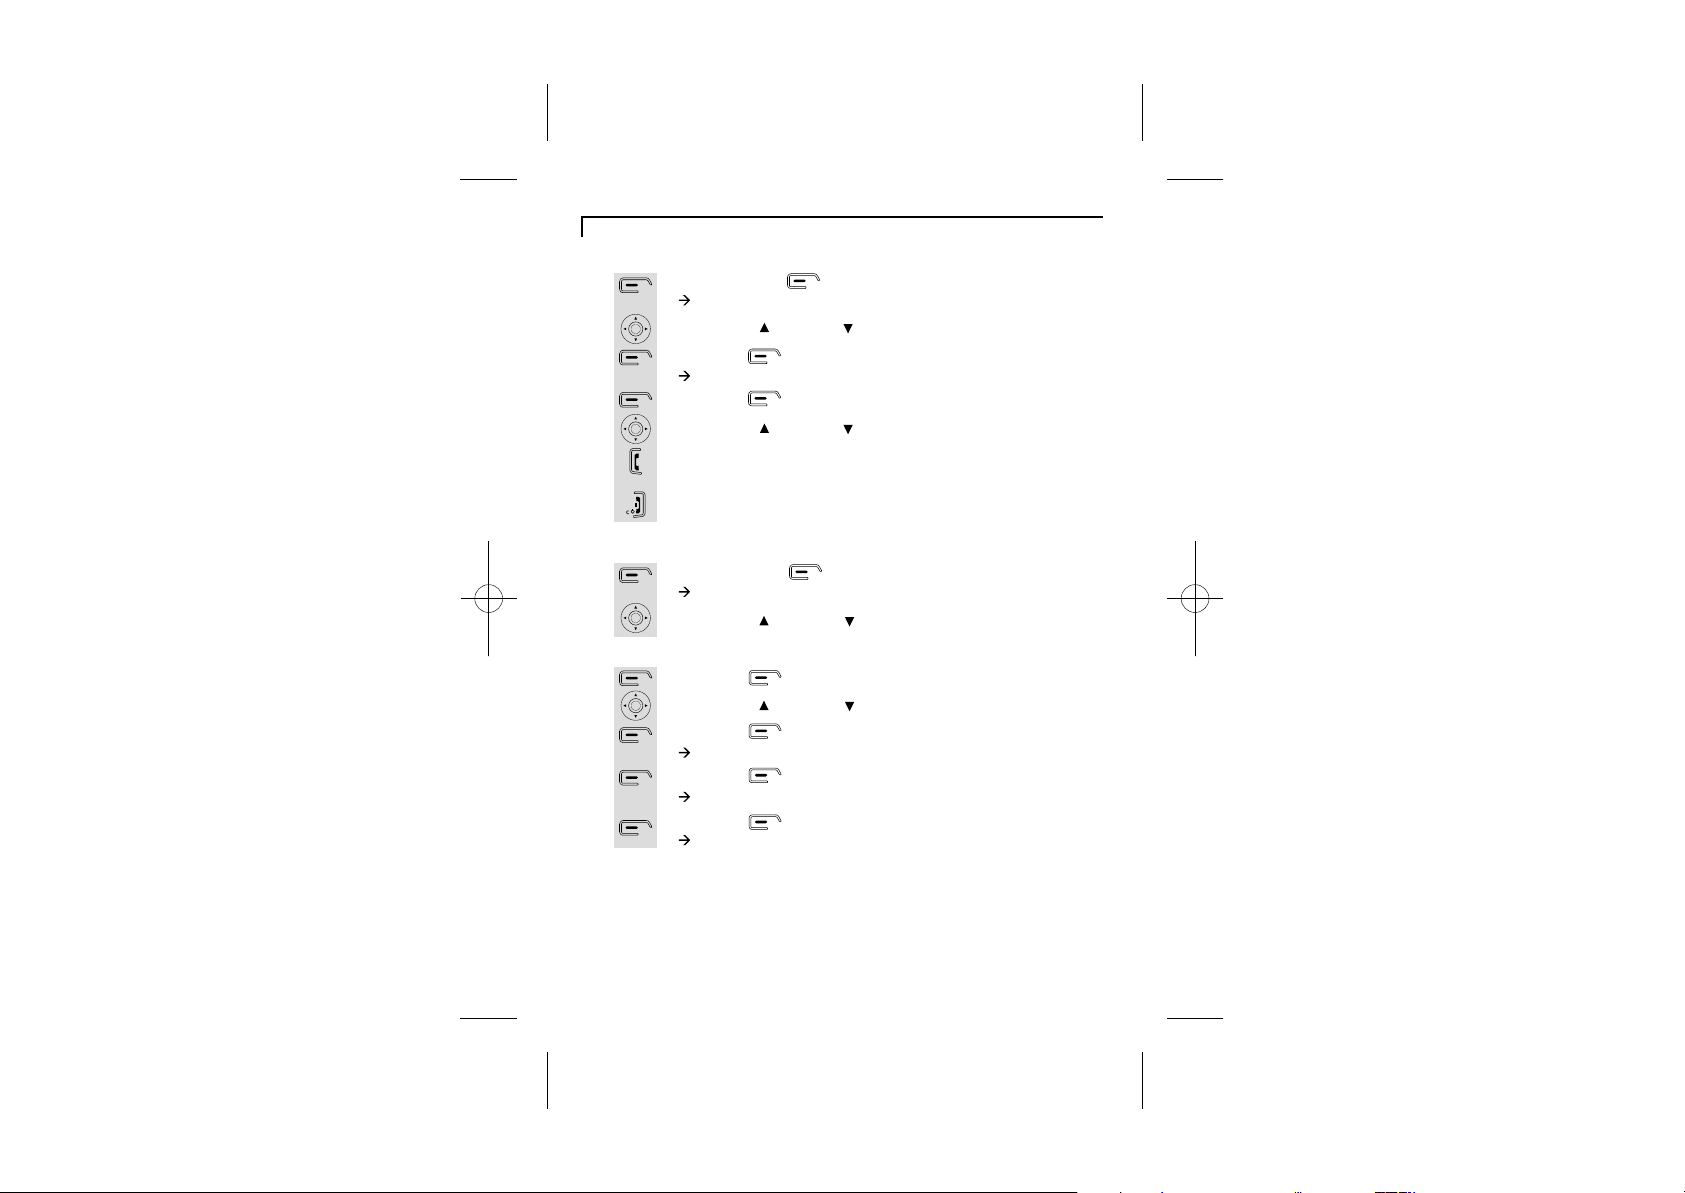
Caller ID log
1
2
3
4
5
6
1
2
1
2
3
4
5
To review the caller ID log
Press the menu button.
à The display shows SMS.
Use the UP/ or DOWN/ button to select .
Press the button.
à The display shows Calls lists >Received calls.
Press the button and a list of received calls will appear.
Use the UP/ or DOWN/ button to stroll through the list
of received numbers.
*If you want to dial a telephone number from the list press
PHONE and the number will appear.
Press the HANG UP/C button to go back to idle mode.
To delete the caller ID log
Press the menu button.
à The display shows SMS.
Use the UP/ or DOWN/ to select Calls lists.
If you want to clear all...:
Press the button.
Use the UP/ or DOWN/ to select Delete Calls List.
Press the button.
à The display shows Delete Calls List >Received calls.
Press the button.
à The display shows Delete received calls list?
Press the button for OK.
à The display shows All received calls deleted.
Calls lists
18
Page 23

1
2
3
4
1
2
3
4
5
6
7
8
9
10
11
12
13
If you want to clear individually...:
Press the button, the list of caller ID will appear.
Use the UP/ or DOWN/ to stroll through the list of received
numbers.
Once selected the number you want to delete, press the
button.
à The display shows Delete.
Press the button.
à The display shows Call Deleted.
Press the HANG UP/C
To store a Caller ID contact in the phonebook
Press the menu button.
à The display shows SMS.
Use the UP/ or DOWN/ button to select .
Press the button.
à The display shows Calls lists >Received calls.
Press the button to select and a list of received calls will
appear.
Use the UP/ or DOWN/ button to stroll through the list.
Press the button.
Use the UP/ or DOWN/ button to select Save Number.
Press the button for OK.
à The display shows Name:.
Use the digit keys to enter characters of the name, e.g. Jane.
Press the button for OK.
à The display shows Number:.
Check if it is the number you want to save.
Press the button for OK.
à The display shows Jane Added to names.
Press the HANG UP/C button to go back to idle mode
button to go back to idle mode.
Calls lists
iDECT Help Line(for UK only): 0845 345 9677 (Local Call rate)
19
Page 24
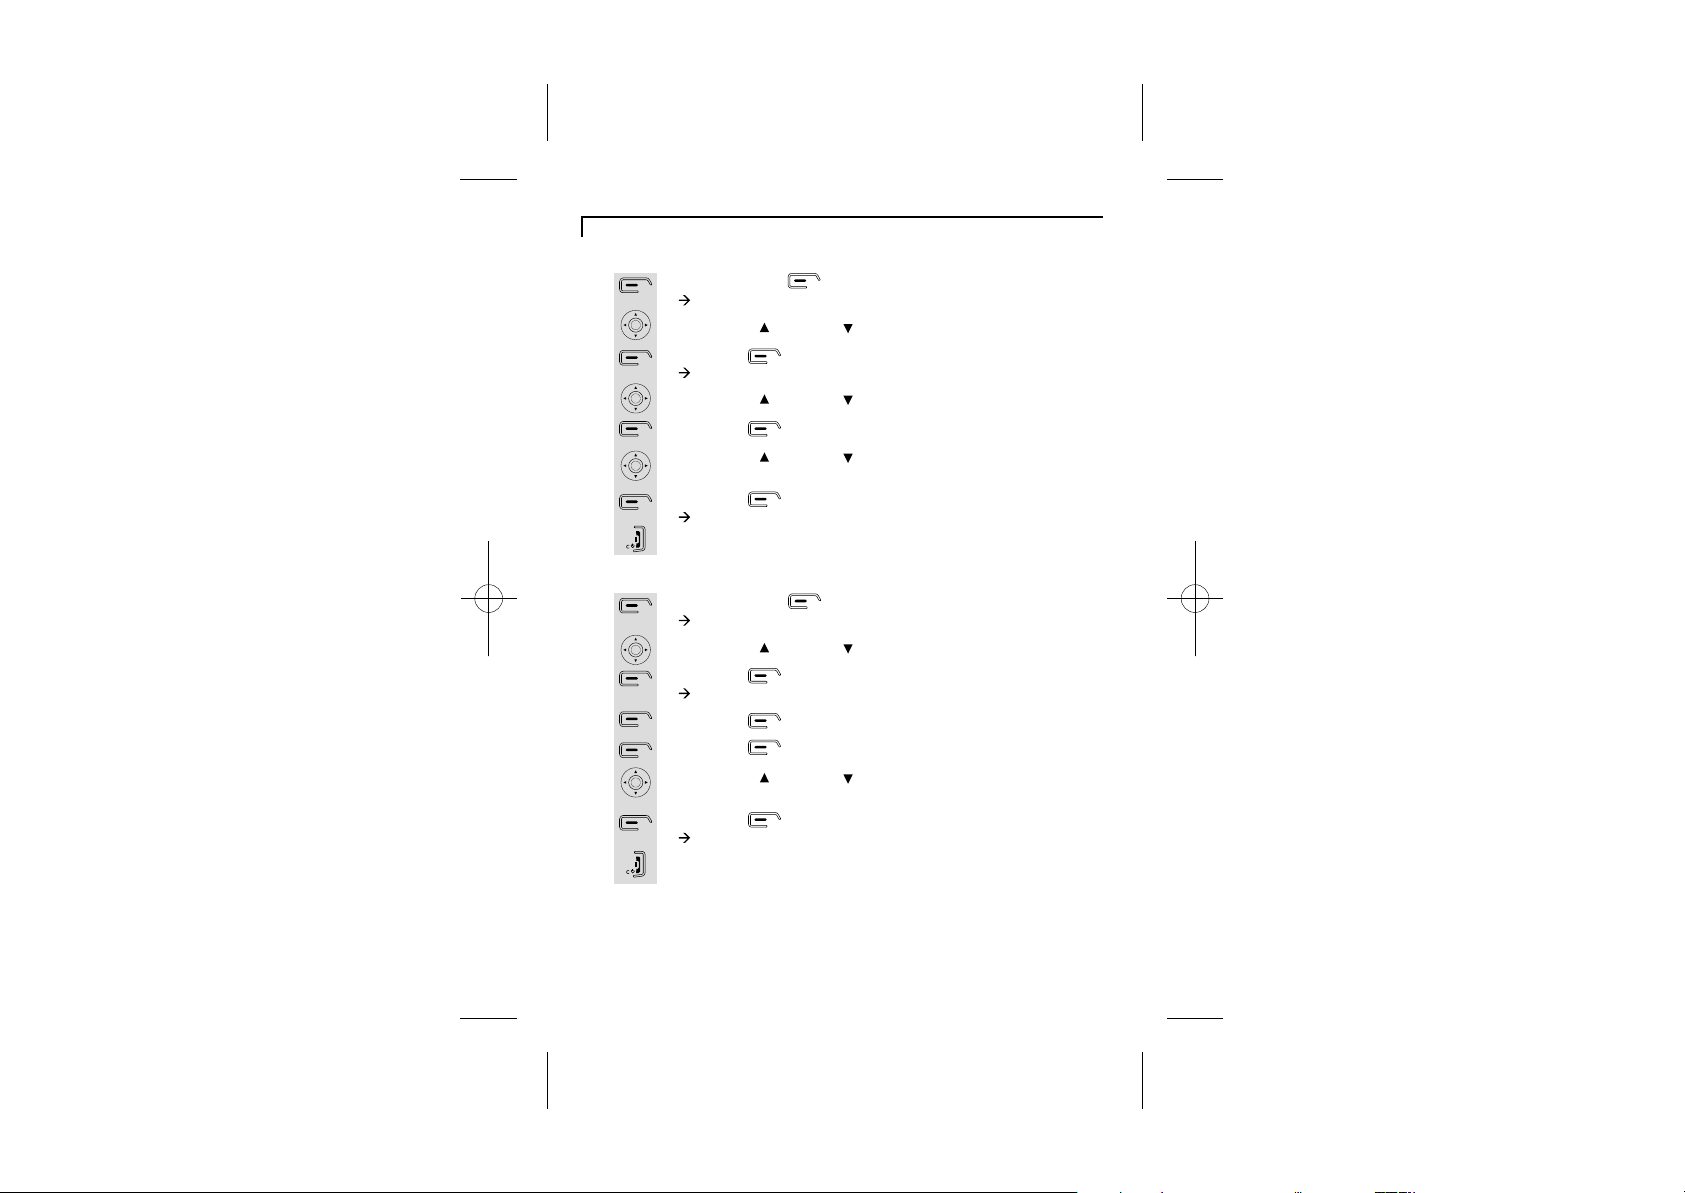
Handset ringer volume, melody
Change handset ringer volume
1
2
3
4
5
6
7
8
1
2
3
4
5
6
7
8
Press the menu button.
à The display shows SMS.
Use the UP/ or DOWN/ button to select Handset.
Press the button.
à The display shows Handset >Ringtone.
Use the UP/ or DOWN/ button to select Ring Volume.
Press the button.
Use the UP/ or DOWN/ button to choose the ringer volume
you want (Level from silent to 5).
Press the button for OK.
à The display shows Ring Volume Saved.
Press the HANG UP/C button to go back to idle mode.
Change handset ringer melody
Press the menu button.
à The display shows SMS.
Use the UP/ or DOWN/ button to select Handset.
Press the button.
à The display shows Handset >Ringtone.
Press the button.
Press the button to select External Call.
Use the UP/ or DOWN/ button to choose the ringer melody
you want (from 1 to 10), e.g. Melody 7.
Press the button for OK.
à The display shows Ringtone Saved.
Press the HANG UP/C button to go back to idle mode.
20
Page 25
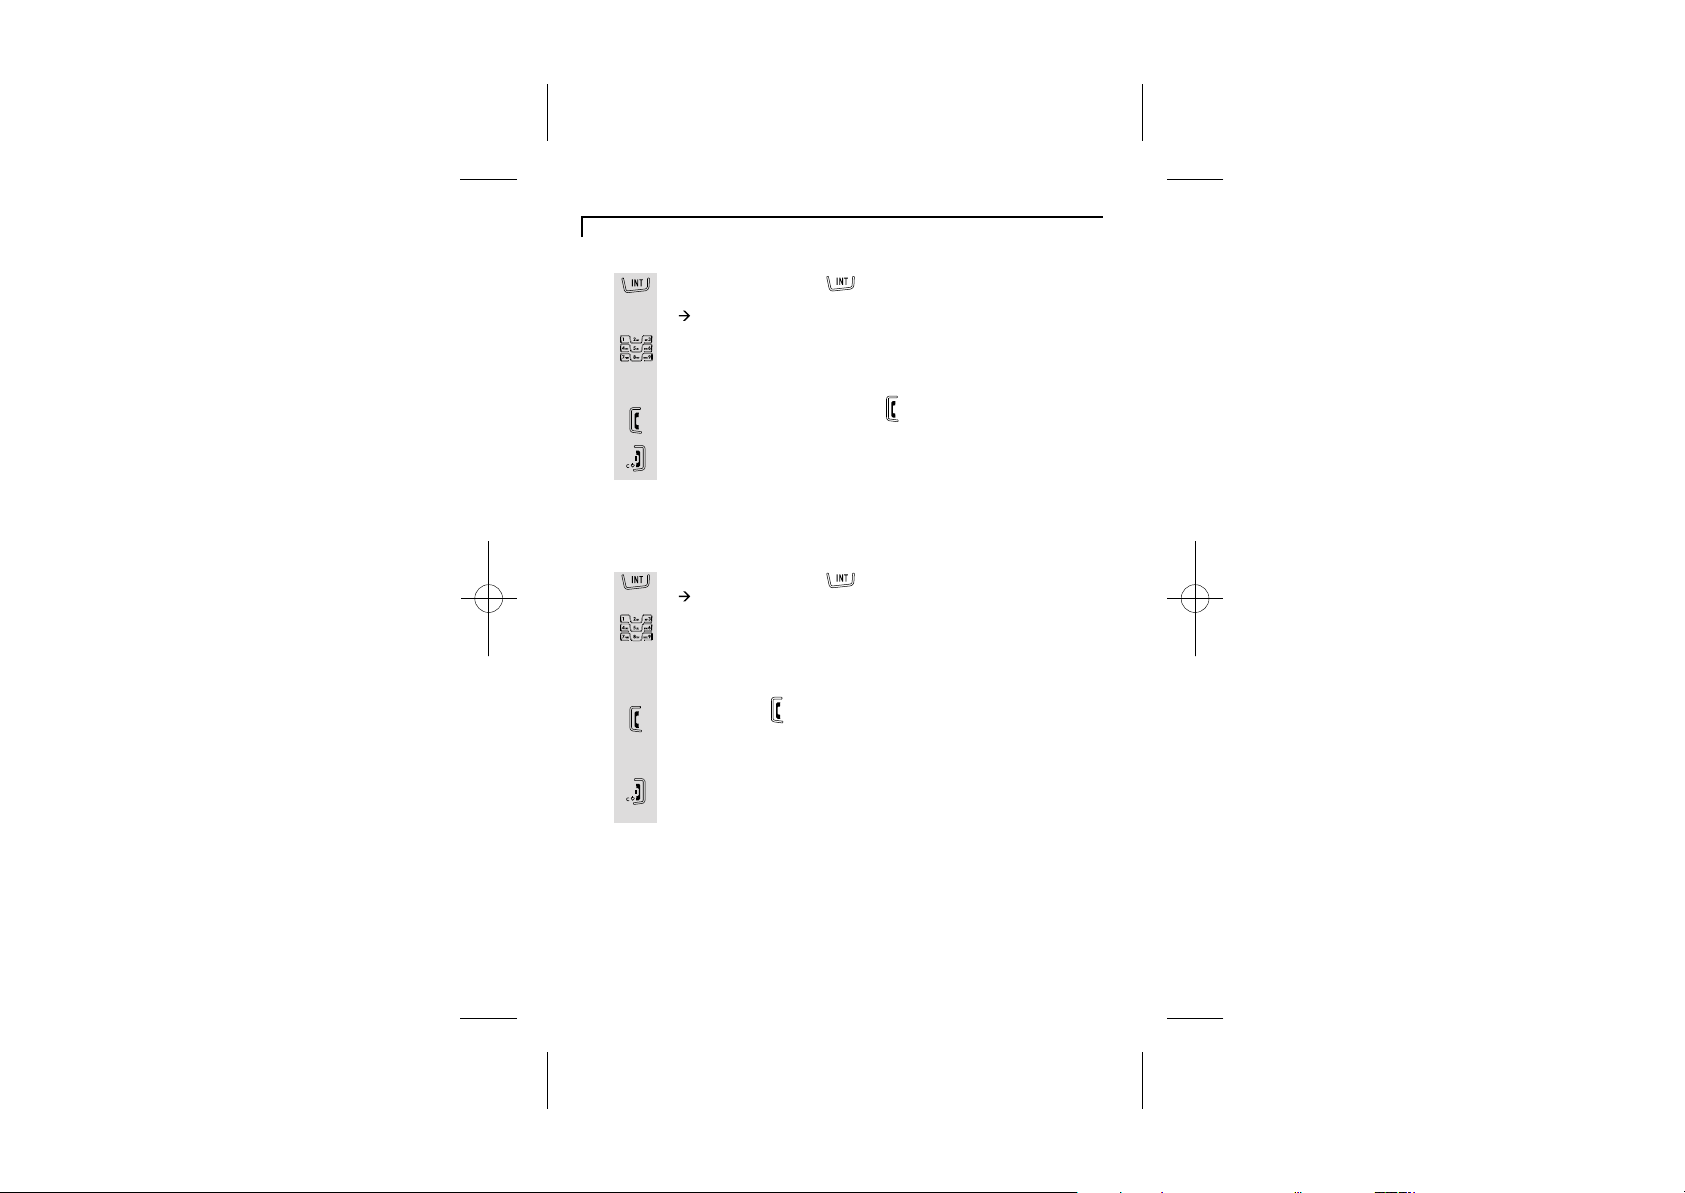
Using a multi-handset system
Make intercom calls
1
2
3
4
1
2
3
Press the INTERCOM button on any handset
(i.e. handset 1).
à The display shows Internal Call.
Use the digit buttons to enter the handset number you want to
call. (e.g. Handset 2)
Handset 2 will ring.
Press the handset 2's PHONE button to answer intercom
call.
Press the HANG UP/C button to go back to idle mode.
Transfer calls
When one handset is on an external call and you want to
transfer call to another handset.
Press the INTERCOM button on your handset.
à The display shows Internal Call.
Use the digit buttons to enter the handset number you want to
transfer the call to and the external caller will be automatically
put on hold. (e.g. Handset 2)
Handset 2 will ring.
4
5
iDECT Help Line(for UK only): 0845 345 9677 (Local Call rate)
Press PHONE on ringing handset and the two internal handsets
will be connected and can hold a private conversation, while the
external call remains on hold.
You can press the handset 1's HANG UP/C button to transfer
call to handset 2. Which ever of the handsets hangs up first
will automatically connect the other handset to the external call.
21
Page 26
1
2
3
4
Paging handset
1
2
Set up a three-way conference
You can have a three-way conference when you are on a call
with an external line.
Press the INTERCOM button on your handset.
à The display shows Internal Call.
Use the digit buttons to enter the handset number you want to
enter the conference and the external caller will be
automatically put on hold. (e.g. Handset 2)
Handset 2 will ring.
When the handset 2 answers your intercom call, press and hold
the handset 1's HASH button to enter conference call.
Any party can exit the conference by pressing the HANG UP/C
button, leaving the other two parties connected.
The paging function is useful when you need to locate your
handset(s).
At the bottom of the base set you will find the
LOCATOR button.
Press the HANDSET LOCATOR button and your
handset(s) will ring.
Press or button of the handset to stop it ringing.
HANDSET
22
Page 27
Handset registration
* When you purchase a iDECT X3i multi-handset system, all handsets are
already registered: you do not need to register any of the handsets.
* Handset registration is only necessary when you buy an extra-handset by
itself.
1
2
3
4
5
6
7
8
Registering a handset
On the base unit, press and hold the Handset Locator
button at the bottom of base set until you hear registration
tone (repeated 'beeps').
On the handset unit, press the menu button.
à The display shows SMS.
Use the UP/ or DOWN/ button to select Registration.
Press the button.
à The display shows Registration > Register Handset.
Press the button.
Use the UP/ or DOWN/ button to stroll through the list of
base. (If any of the list with Star at right side, the handset is
already registered to that base unit. ) When you reach the
base you want to register, press the button to select.
(e.g. Base 1)
à The display shows System PIN.
Enter the PIN using the digit buttons. (Default PIN: 0000)
Press the button for OK.
à The display shows Base Search.
*The display will go back to idle mode if the registration is
successful.
iDECT Help Line(for UK only): 0845 345 9677 (Local Call rate)
23
Page 28

De-registering a handset
*This operation is necessary when one of your handset is out of
order and needs to be repaired.
1
2
3
4
5
6
7
8
9
10
Note: You can't delete your own handset.
Press the menu button.
à The display shows SMS.
Use the UP/ or DOWN/ button to select Registration.
Press the button.
à The display shows Registration > Register Handset.
Use the UP/ or DOWN/ button to select De-register.
Press the button.
à The display shows System PIN.
Enter the PIN using the digit buttons. (Default PIN: 0000)
Press the button for OK.
à The display shows Please Wait.
Use the UP/ or DOWN/ button to stroll through the list of
handset. When you reach the one you want to de-register press
the button to select. (e.g. Handset 1)
à The display shows Confirm?.
Press the button for OK.
The display will shows De-registered.
Press the HANG UP/C button to go back to idle mode.
24
Page 29

Select a base unit
1
2
3
4
5
6
7
Press the menu button.
à The display shows SMS.
Use the UP/ or DOWN/ button to select Registration.
Press the button.
à The display shows Registration > Register Handset.
Use the UP/ or DOWN/ button to select Select Base.
Press the button.
Use the UP/ or DOWN/ button to stroll through the different
bases.
Once you have selected the base you want to register the
handset to the base, press the button to select. (e.g.
Base 1)
à The display shows Registered to Base.
* The display will go back to idle mode if the handset search to
base is successful.
AUTOMATIC to let the handset search for the nearest free
*
base unit.
iDECT Help Line(for UK only): 0845 345 9677 (Local Call rate)
25
Page 30
SMS text messaging
If the iDECT X3i is the only phone connected to the phone line,
the "Terminal Number" parameter in the SMS settings menu
(see " SMS text messaging") should be set to 9.
The default setting for the terminal number of iDECT X3i is
generally set to 9.
If multiple SMS-enabled phones are connected to the same
phone line, for the SMS service to function properly, you will
have to identify the enabled main phone to receive all the SMS
messages for the line. The terminal number for this phone
has to be set to 9.
The other phones that have an individual and different terminal
number, ranging between 1 and 8, will also be able to send and
receive SMS messages properly.
Note: Different terminals using the same telephone line should
each be assigned a unique terminal number different from the
other phones.
You can send and receive up to 35 standard SMS messages
with a maximum of 160 characters, or up to 8 messages
with up to 612 characters.
Set terminal number
1
2
3
4
5
6
7
8
Press the MESSAGE button.
à The display shows SMS >New Message.
Use the UP/ or DOWN/ button to select Settings.
Press the button.
à The display shows Settings > Service Centres.
Use the UP/ or DOWN/ button to select Terminal Number.
Press the button.
The display shows Terminal Number. (Default is 9)
à
The display shows Terminal Number. (Default is 9)
Use the UP/ or DOWN/ button or KEYPADS to enter the
terminal number.
Press the button for OK.
The display shows Done.
à
Press the HANG UP/C button to go back to idle mode.
26
Page 31
1
2
3
4
5
6
7
8
9
1
2
3
4
5
6
7
8
9
10
Set SMS alert
Press the MESSAGE button.
à The display shows SMS >New Message.
Use the UP/ or DOWN/ button to select Settings.
Press the button.
à The display shows Settings > Service Centres.
Use the UP/ or DOWN/ button to select SMS Alert.
Press the button.
The display shows Set Alert >Off.
Use the UP/ or DOWN/ button to choose Off, On or Set
Alert.
*If you select Set Alert, there are three tones to choose from
(Morse, Discreet and Polyphonic.)
Use the UP/
Press the button for OK.
à
The display shows Ringtone saved.
Press the HANG UP/C button to go back to idle mode.
Set receive centre number
Press the MESSAGE button.
à The display shows SMS >New Message.
Use the UP/ or DOWN/ button to select Settings.
Press the button.
à The display shows Settings > Service Centres.
Press the button.
Use the UP/ or DOWN/ button to select Receive Centre.
Press the button.
à The display shows Receive Centre. (Default: 080058752)
Press the button to clear number.
Use the keypad to enter the new service centre number.
Press the button for OK.
à The display shows Done.
Press the HANG UP/C button to go back to idle mode.
DOWN/
or
button to choose tone.
iDECT Help Line(for UK only): 0845 345 9677 (Local Call rate)
27
Page 32
1
2
3
4
5
6
7
8
9
10
1
2
3
4
5
6
7
8
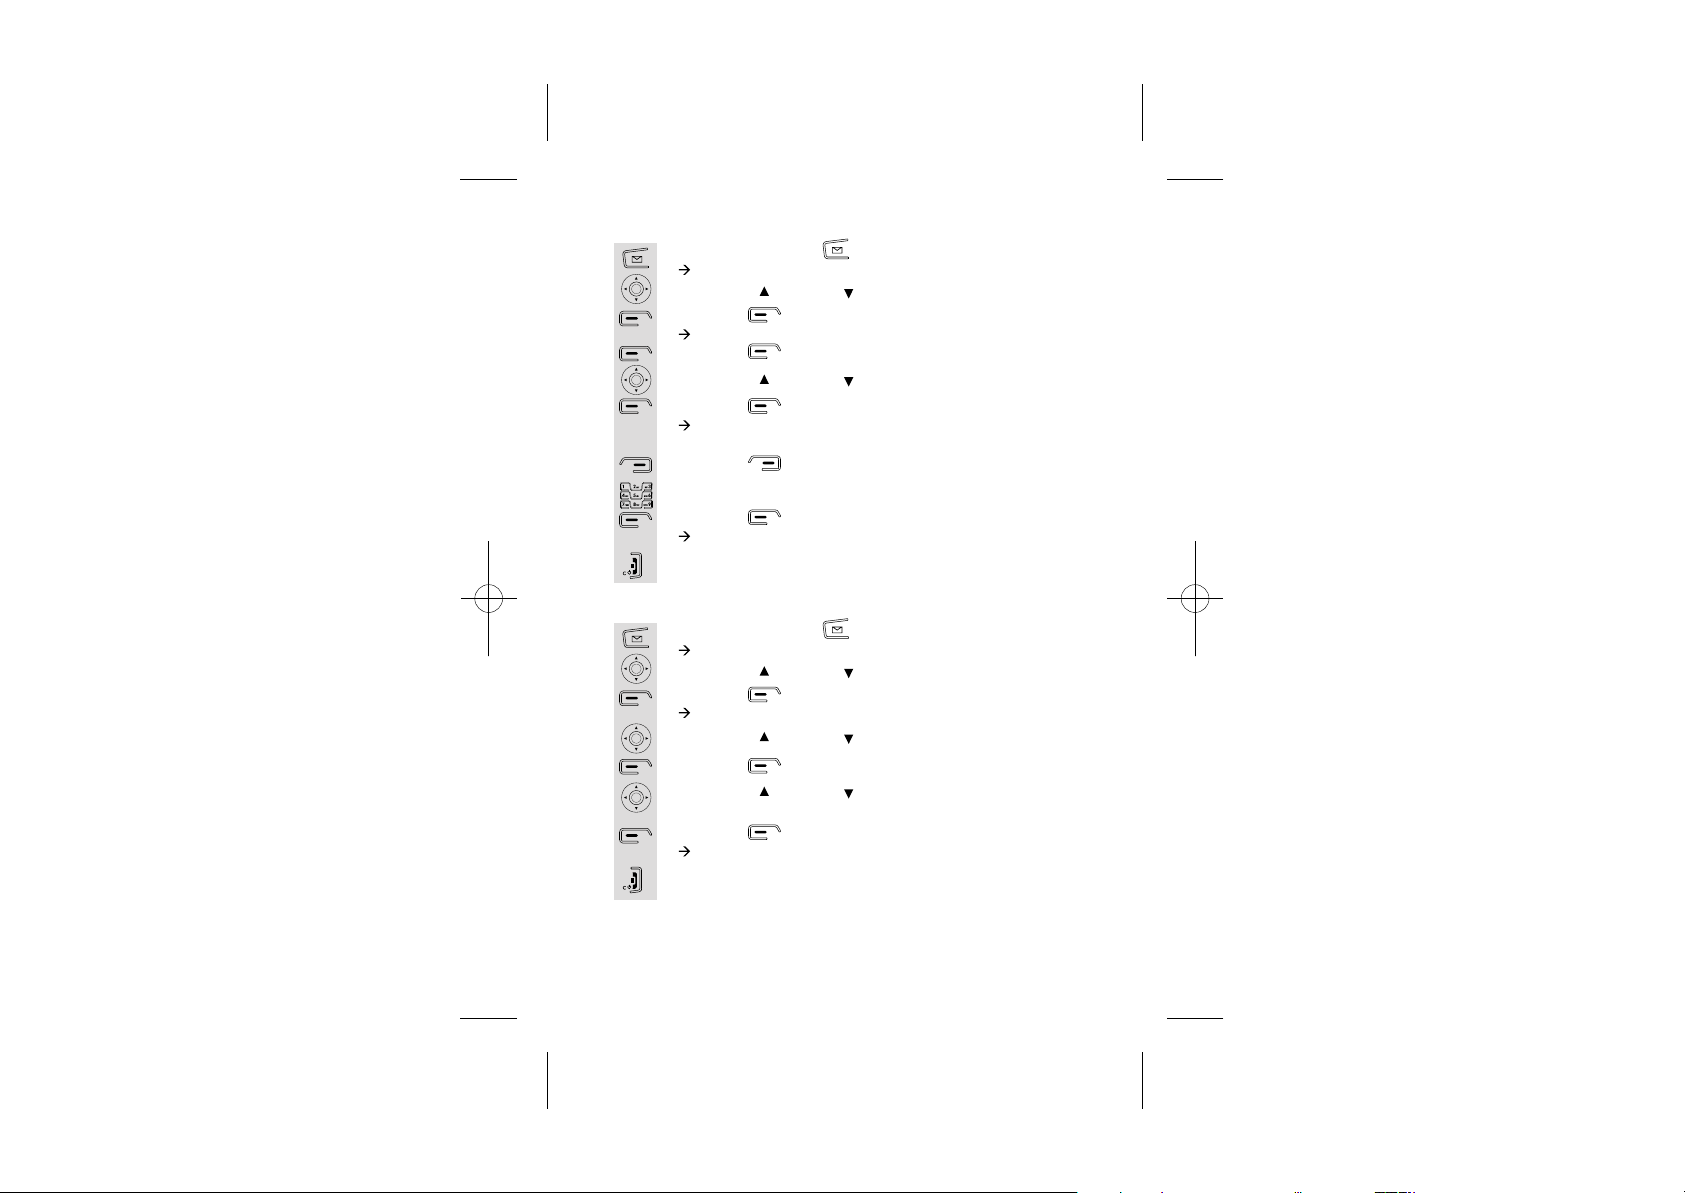
Set sending centre number
Press the MESSAGE button.
à The display shows SMS >New Message.
Use the UP/ or DOWN/ button to select Settings.
Press the button.
à The display shows Settings > Service Centres.
Press the button.
Use the UP/ or DOWN/ button to select Sending Centre.
Press the button.
à The display shows Sending Centre.
(Default: 1470P17094009)
Press the button to clear number.
Use the keypad to enter the new sending centre number.
Press the button for OK.
à The display shows Done.
Press the HANG UP/C button to go back to idle mode.
Selecting message size
Press the MESSAGE button.
à The display shows SMS >New Message.
Use the UP/ or DOWN/ button to select Settings.
Press the button.
à The display shows Settings > Service Centres.
Use the UP/ or DOWN/ button to select Message Size.
Press the button.
Use the UP/ or DOWN/ button to choose 612 Chars or 160
Chars.
Press the button for OK.
à The display shows Done.
Press the HANG UP/C button to go back to idle mode.
28
Page 33
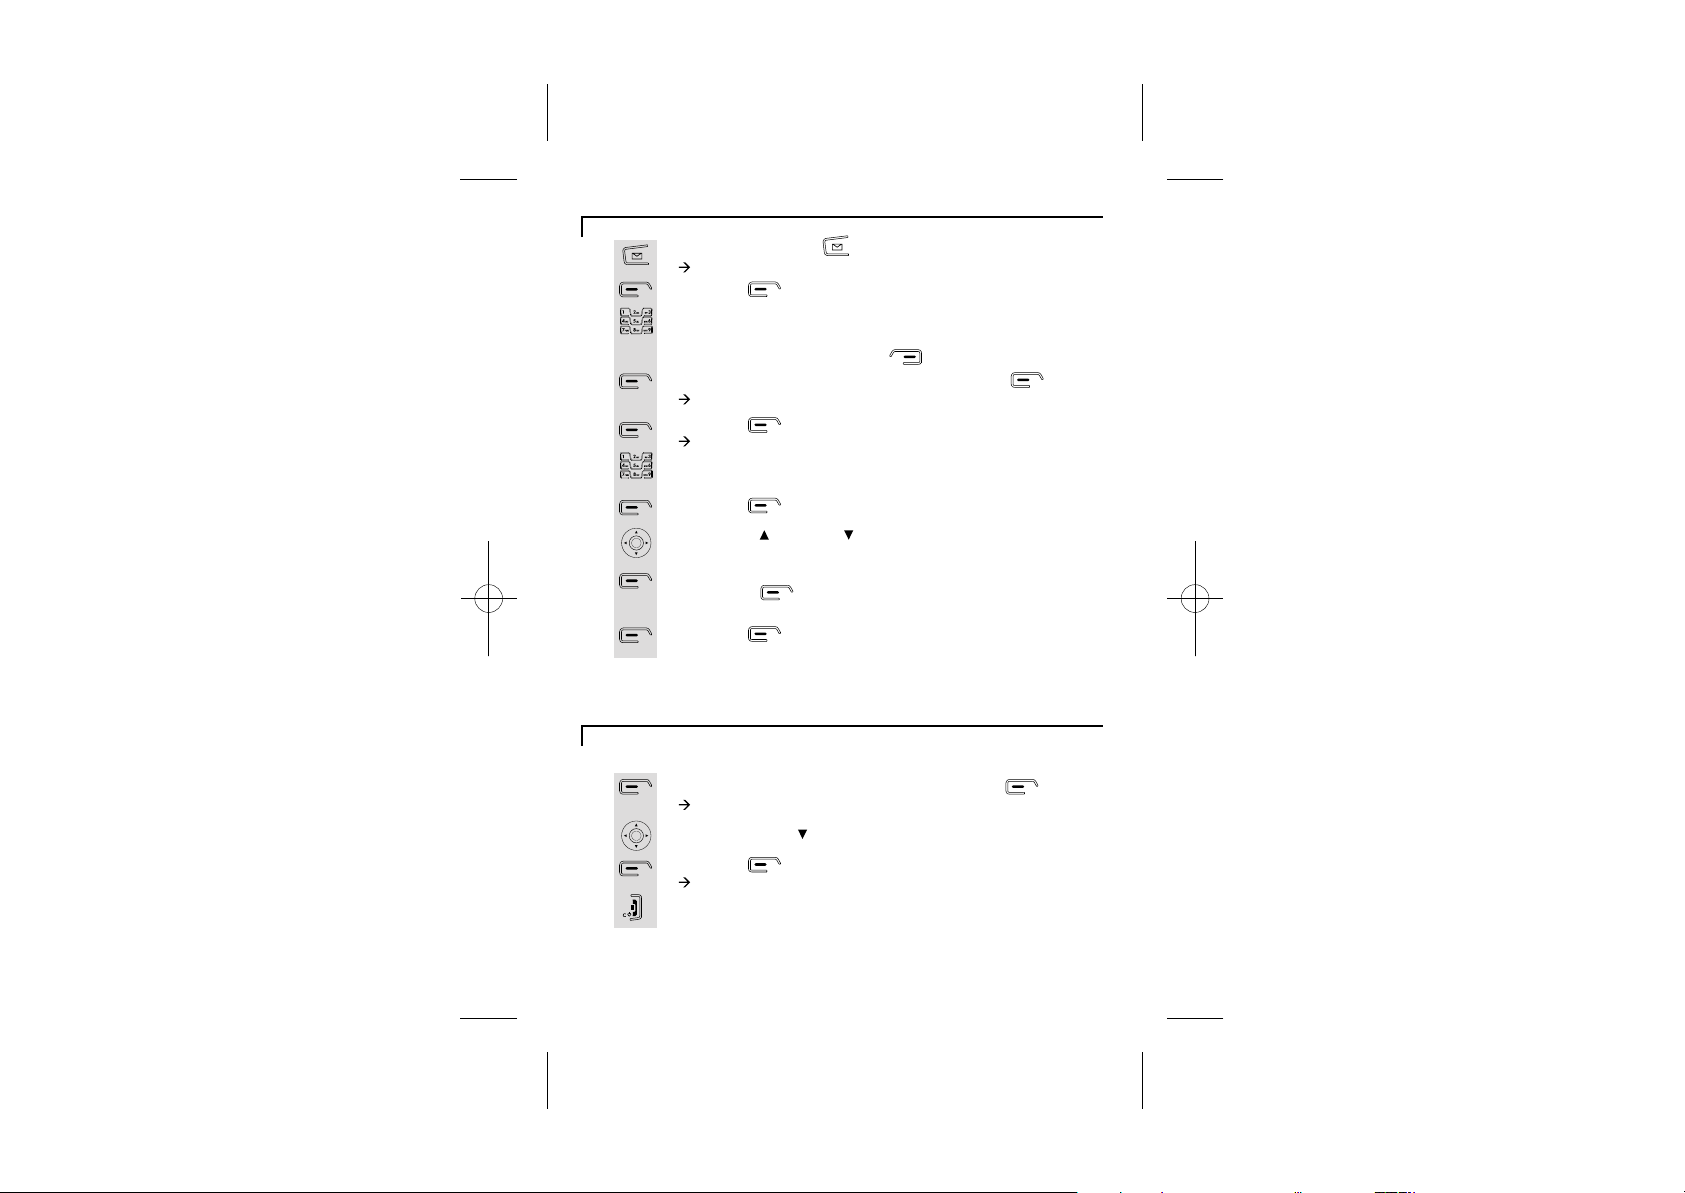
Write and send a message
1
2
3
4
5
Note: You can insert a symbol using the symbol table when writing a message
by pressing OPTIONS, DOWN twice and OK.
Save a text message to Outbox
1
2
3
4
Press the MESSAGE button.
à The display shows SMS >New Message.
Press the button.
Enter the text message using the alphanumeric keypad. Press
the number key corresponding to your desired alphabet (see
Memory phonebook management for keys).
* You can clear by pressing the button.
Once you have finished your message, press the button.
à The display shows Send to.
Press the button.
à The display shows Number:.
Enter the number you want to send the message to.
Or
Press the button to search your phonebook.
Use the UP/ or DOWN/ button to stroll through your
phonebook.
Once you have found the name you want to send the message
to press the button to select and number of the person
would appear.
Press the button for OK.
Once the message is sent the display will go back to idle mode.
After writing a message you can save the message in outbox.
Once you have finished your message press the button.
à The display shows Send to.
Press the DOWN/ button until Save.
Press the button.
à The display shows Saved.
Press the HANG UP/C button to go back to idle mode
iDECT Help Line(for UK only): 0845 345 9677 (Local Call rate)
29
Page 34
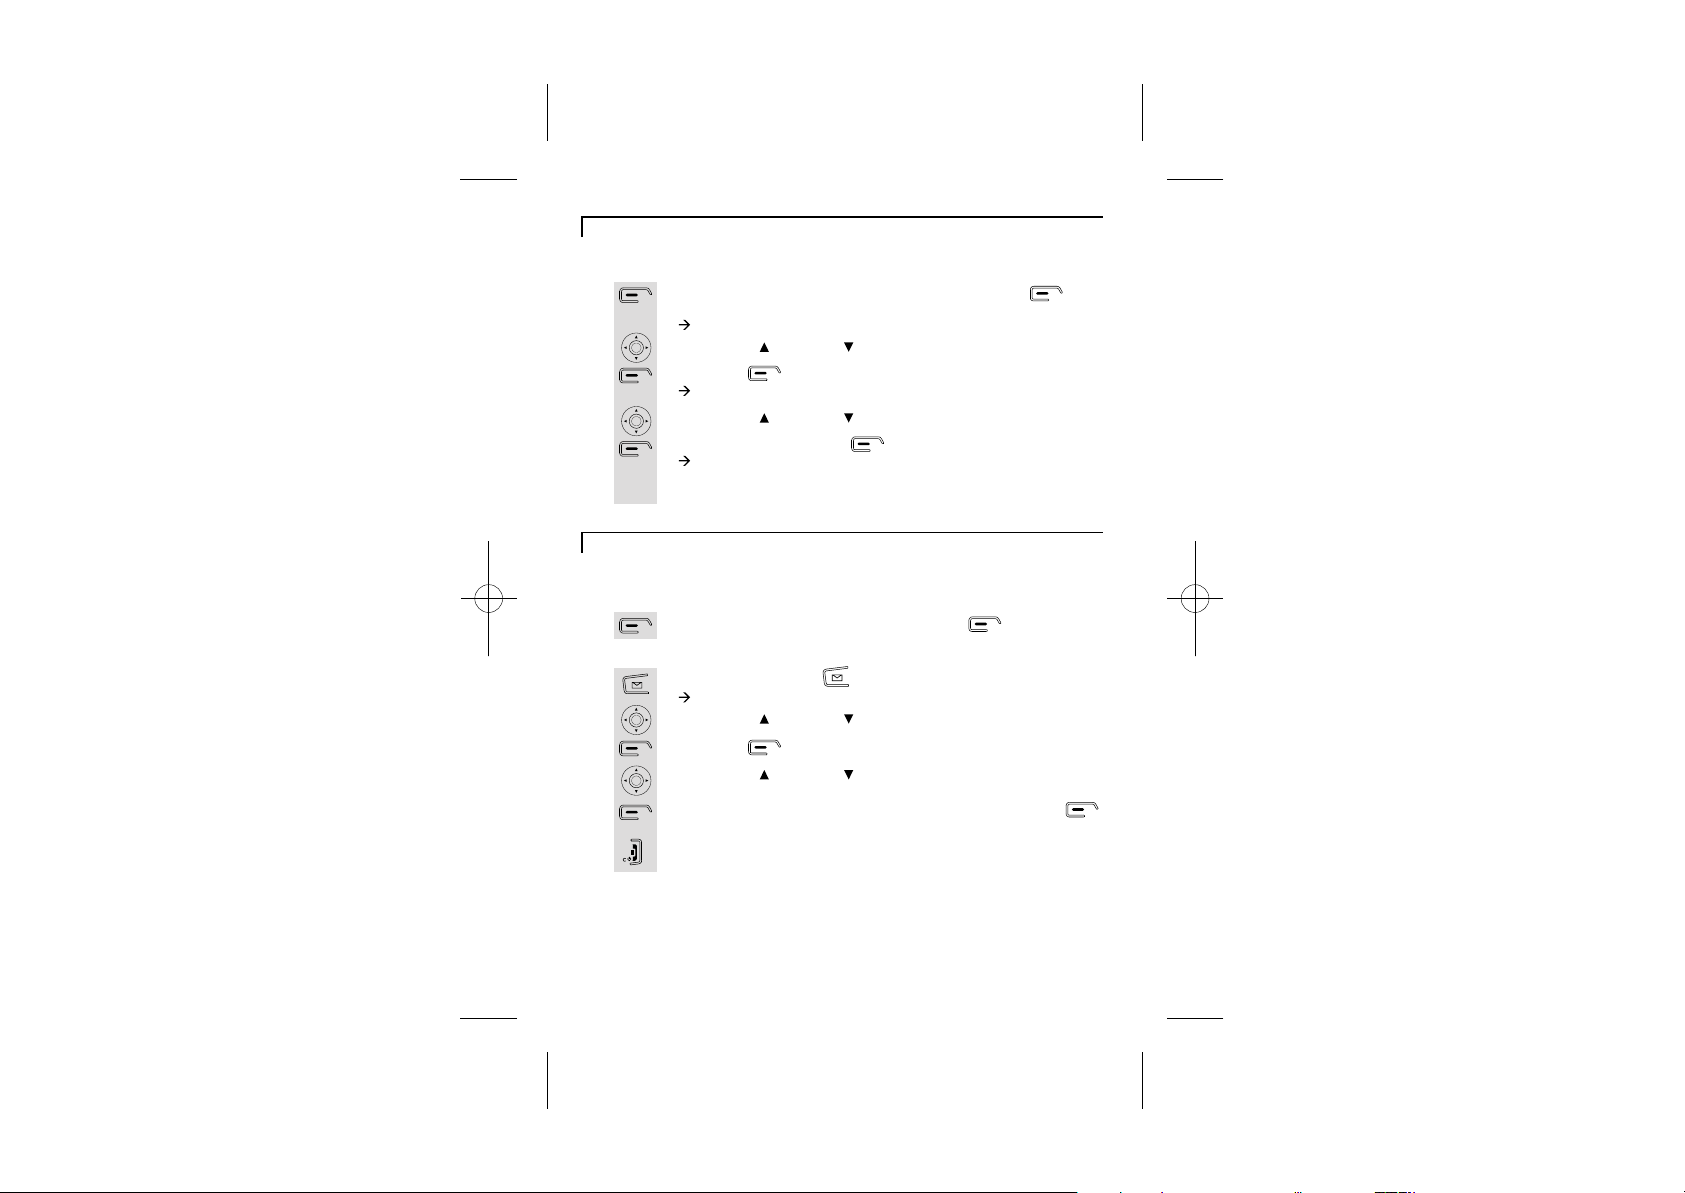
Delivery receipt
1
2
3
4
5
Before sending a message, you can activate the delivery receipt
feature that confirms whether or not the message has been sent.
Once you have completed your message, press the
button.
à The display shows Send to.
Use the UP/ or DOWN/ button to select Notify.
Press the button.
à The display shows Notify >Off.
Use the UP/ or DOWN/ button to select On or Off.
Once selected, press the button.
à The display shows Done.
* The display will go back to message mode and you can
continue to send your message.
Read your text message
1
2
3
4
5
6
When you receive an incoming message, the handset will emit
an alert tone and the message icon will appear on the display.
The message received will be saved in Inbox.
You can read the message by pressing the button.
If you want to read an old message...
Press the MESSAGE button.
à The display shows SMS >New Message.
Use the UP/ or DOWN/ button to select Inbox.
Press the button.
Use the UP/ or DOWN/ button to stroll through the
messages.
Once you are on the message you want to read, press the
button for OK.
Press the HANG UP/C button to go back to idle mode
30
Page 35
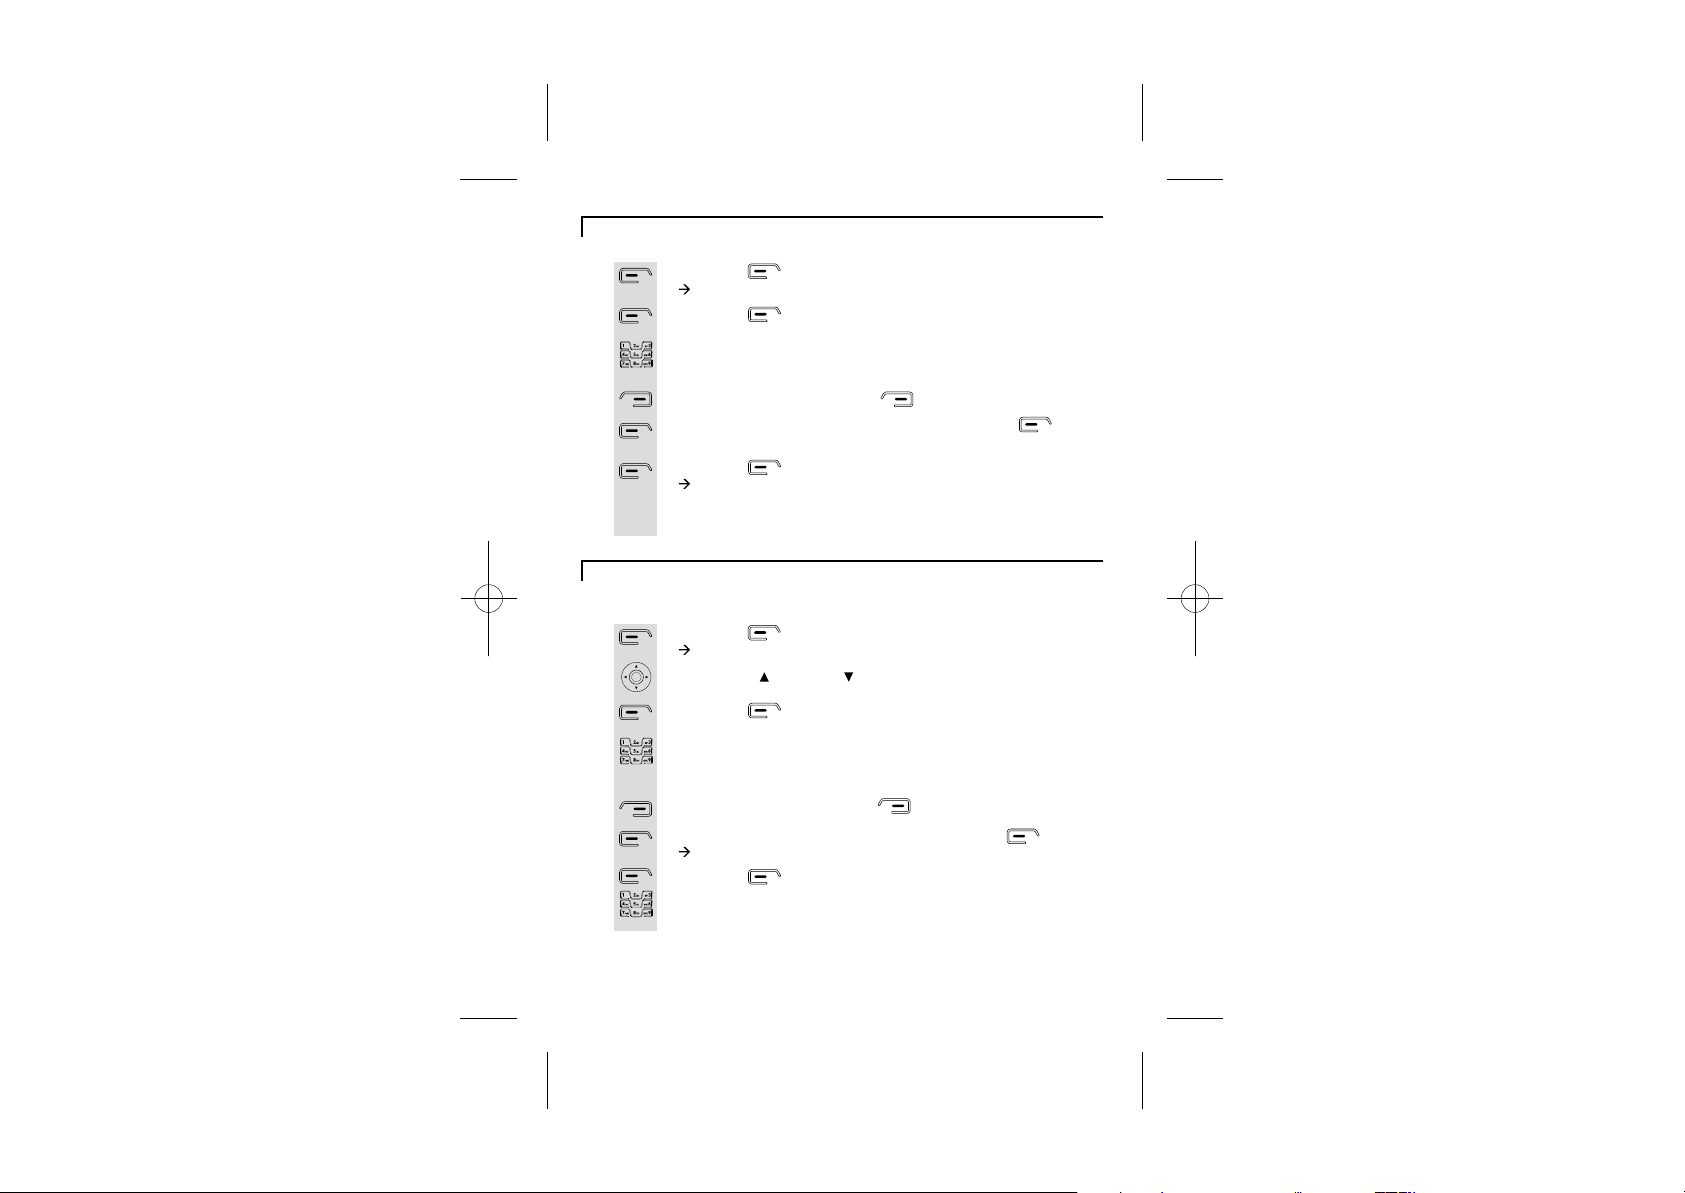
Reply a message
1
2
3
4
5
6
7
When you have read a message and want to send a reply.
Press the button to select.
à The display shows Reply.
Press the button.
Enter the text message using the alphanumeric keypad.
Press the number key corresponding to your desired alphabet
(see Memory phonebook management for keys).
You can clear by pressing the button.
Once you have completed the message, press the button
twice to send and the number would appear on the display.
Press the button.
à The display shows Sending SMS.
Once the message is sent, the display will shows Message Sent
and it will go back to idle mode
.
Forward a message
1
2
3
4
5
6
7
8
iDECT Help Line(for UK only): 0845 345 9677 (Local Call rate)
When you read a message and you want to forward the same
message to another recipient.
Press the button to select.
à The display shows Reply.
Use the UP/ or DOWN/ button to select Forward.
Press the button.
The message will appear and you can change the text using the
alphanumeric keypad. Press the number key corresponding to
your desired alphabet) (see Memory phonebook management
for keys).
You can clear by pressing the button.
Once you have finished your message press the button.
à The display shows Send to.
Press the button for OK.
Enter the number you want to send the message to.
Or
31
Page 36
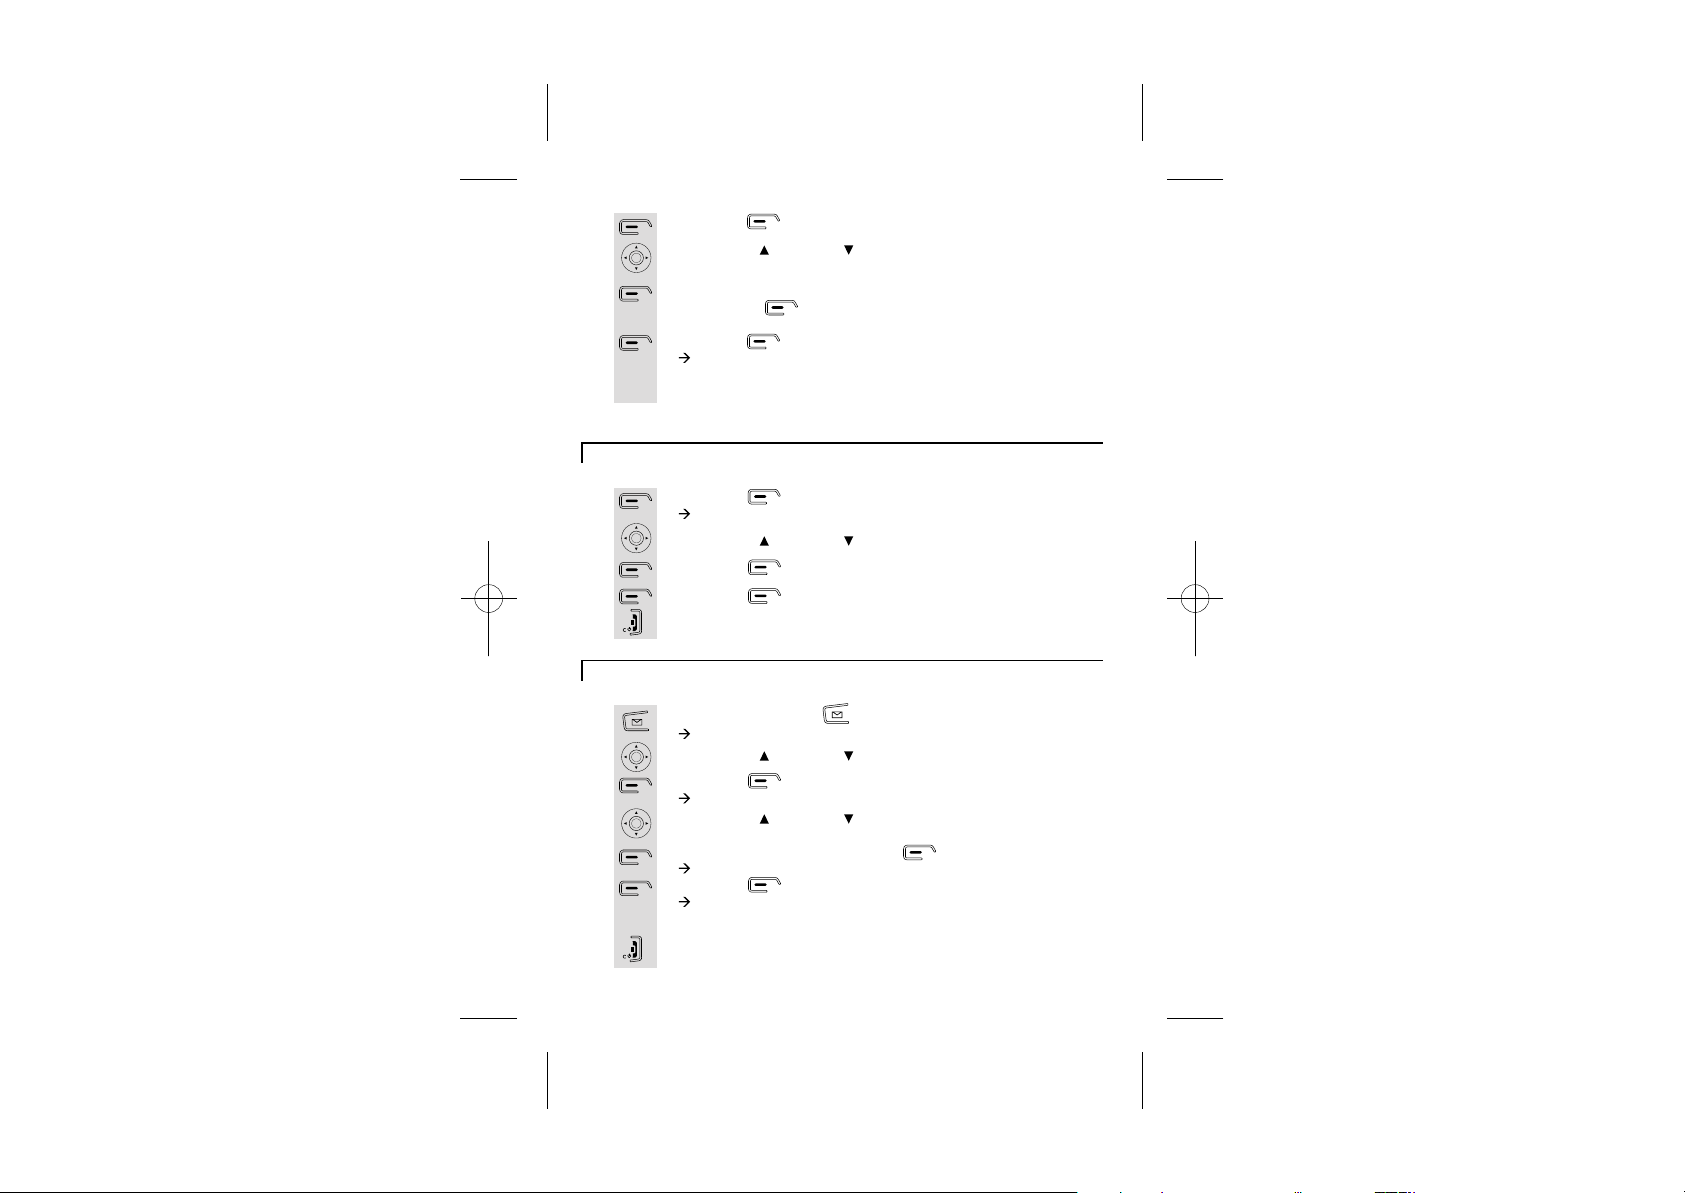
1
2
3
4
5
Note: You can send a saved message by following the above instructions.
Press the button to search your phonebook.
Use the UP/ or DOWN/ button to stroll through your
phonebook.
Once you have found the name you want to send the message
to press the button to select and number of the person
would appear.
Press the button for OK.
à The display shows Sending SMS.
Once the message is sent, the display will shows Message Sent?
and it will go back to idle mode.
Delete a message
1
2
3
4
5
Delete all messages
1
2
3
4
5
6
7
8
When you read a message and you want to delete it.
Press the button to select.
à The display shows Reply.
Use the UP/ or DOWN/ button to select Delete.
Press the button to select.
Press the button for OK.
Press the HANG UP/C button to go back to idle mode.
You can delete all inbox, all outbox or all messages.
Press the MESSAGE button.
à The display shows SMS >New Message.
Use the UP/ or DOWN/ button to select Delete Messages.
Press the button.
à
Use the UP/ or DOWN/ button to select. You have the option
to delete Inbox, Outbox or All Messages.
Once you have chosen press the button.
à The display shows ... Confirm?
Press the button.
à The display shows Please Wait....
Once delete is successful, the display will shows Done.
Press the HANG UP/C button to go back to idle mode
32
The display shows Delete Messages >Inbox.
Page 37
Advanced use of your phone
Handset advanced settings
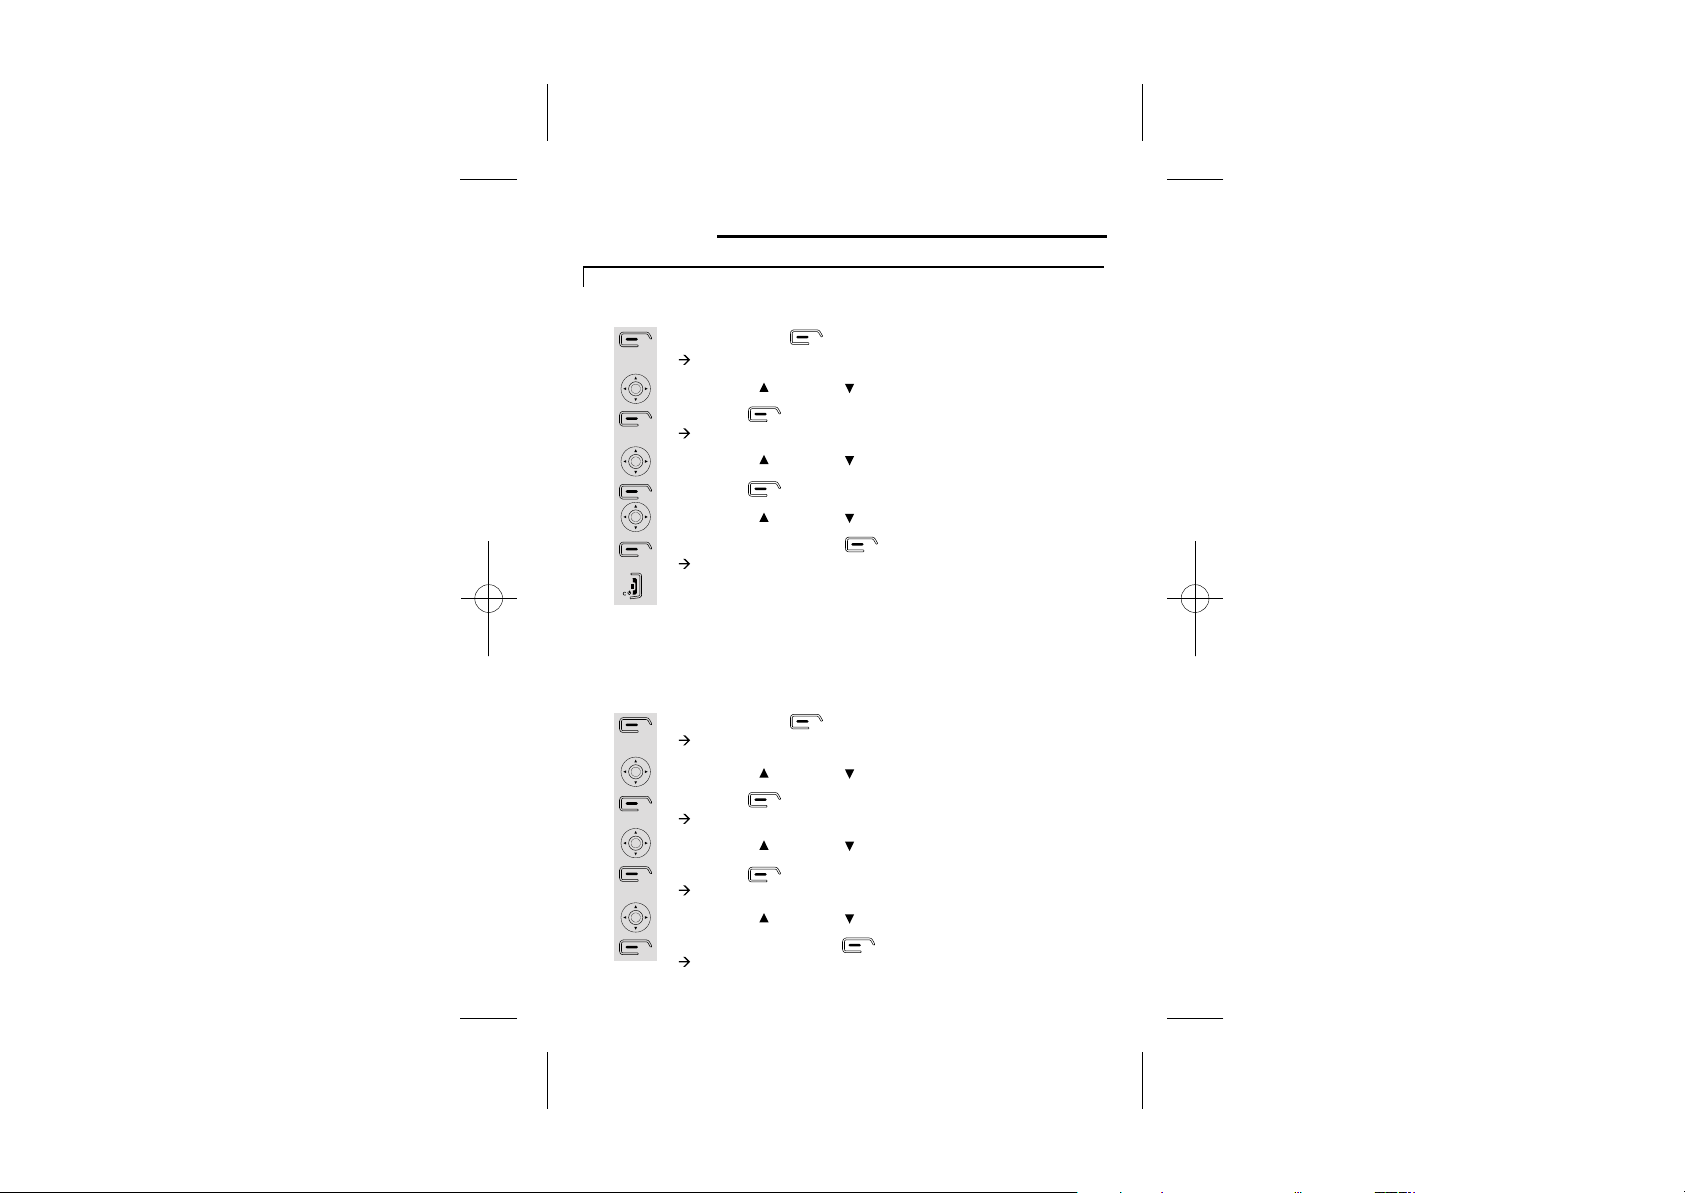
Turn on/off Auto-answer
1
2
3
4
5
6
7
8
1
2
3
4
5
6
7
iDECT Help Line(for UK only): 0845 345 9677 (Local Call rate)
Press the menu button.
à The display shows SMS.
Use the UP/ or DOWN/ to select Handset.
Press the button.
à The display shows Handset >Ringtone.
Use the UP/ or DOWN/ to select Auto Talk.
Press the button.
Use the UP/ or DOWN/ to select Off or On. (Default is Off)
Once chosen, press the button for OK.
à The display shows Auto Talk On/Off.
Press the HANG UP/C button to return to idle mode.
Set PABX External line access code
If you are using a switchboard with your telephone, you can set
an external line auto access code. Once set, the code will be
automatically selected before you redial a number in the
missed/received calls list or an entry/number in the phonebook.
Press the menu button.
à The display shows SMS.
Use the UP/ or DOWN/ to select Handset.
Press the button.
à The display shows Handset >Ringtone.
Use the UP/ or DOWN/ to select PABX Access Code.
Press the button.
à The display shows Set Code, On, Off.
Use the UP/ or DOWN/ to select Set Code.
Once chosen, press the button for OK.
à The display shows Set Code.
33
Page 38
8
9
10
Shortcut to clear phonebook memory
1
2
3
4
5
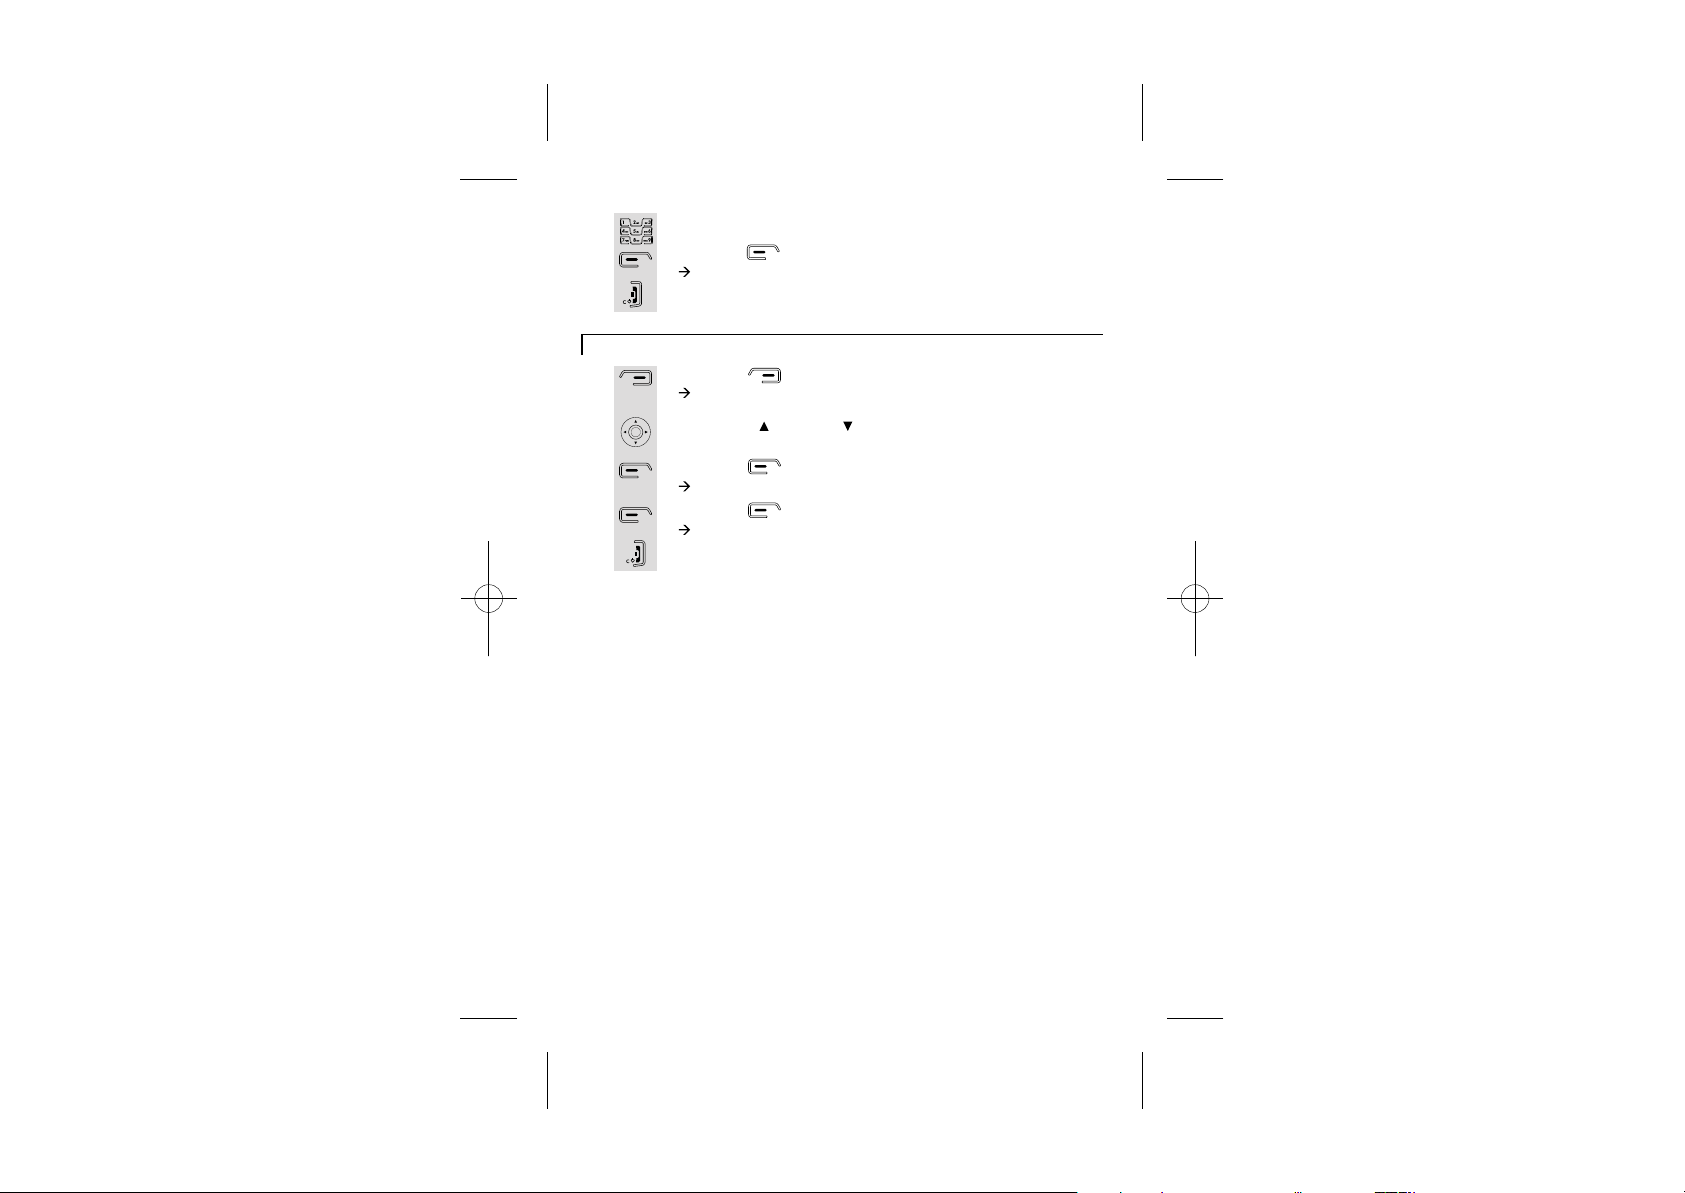
Enter the code using the key pad.
Press the button for OK.
à
The display shows Access Code Saved.
Press the HANG UP/C button to go back to idle mode.
Press the button.
à The display shows Names >Find Entry.
Use the UP/ or DOWN/ button to select Delete all
phonebook.
Press the button to confirm.
à The display shows Delete all phonebook.
Press the button.
à The display shows Pbook Deleted.
Press the HANG UP/C button to return to idle mode.
34
Page 39
Set to default Settings
Set handset settings to default
1
2
3
4
5
6
1
2
3
4
5
6
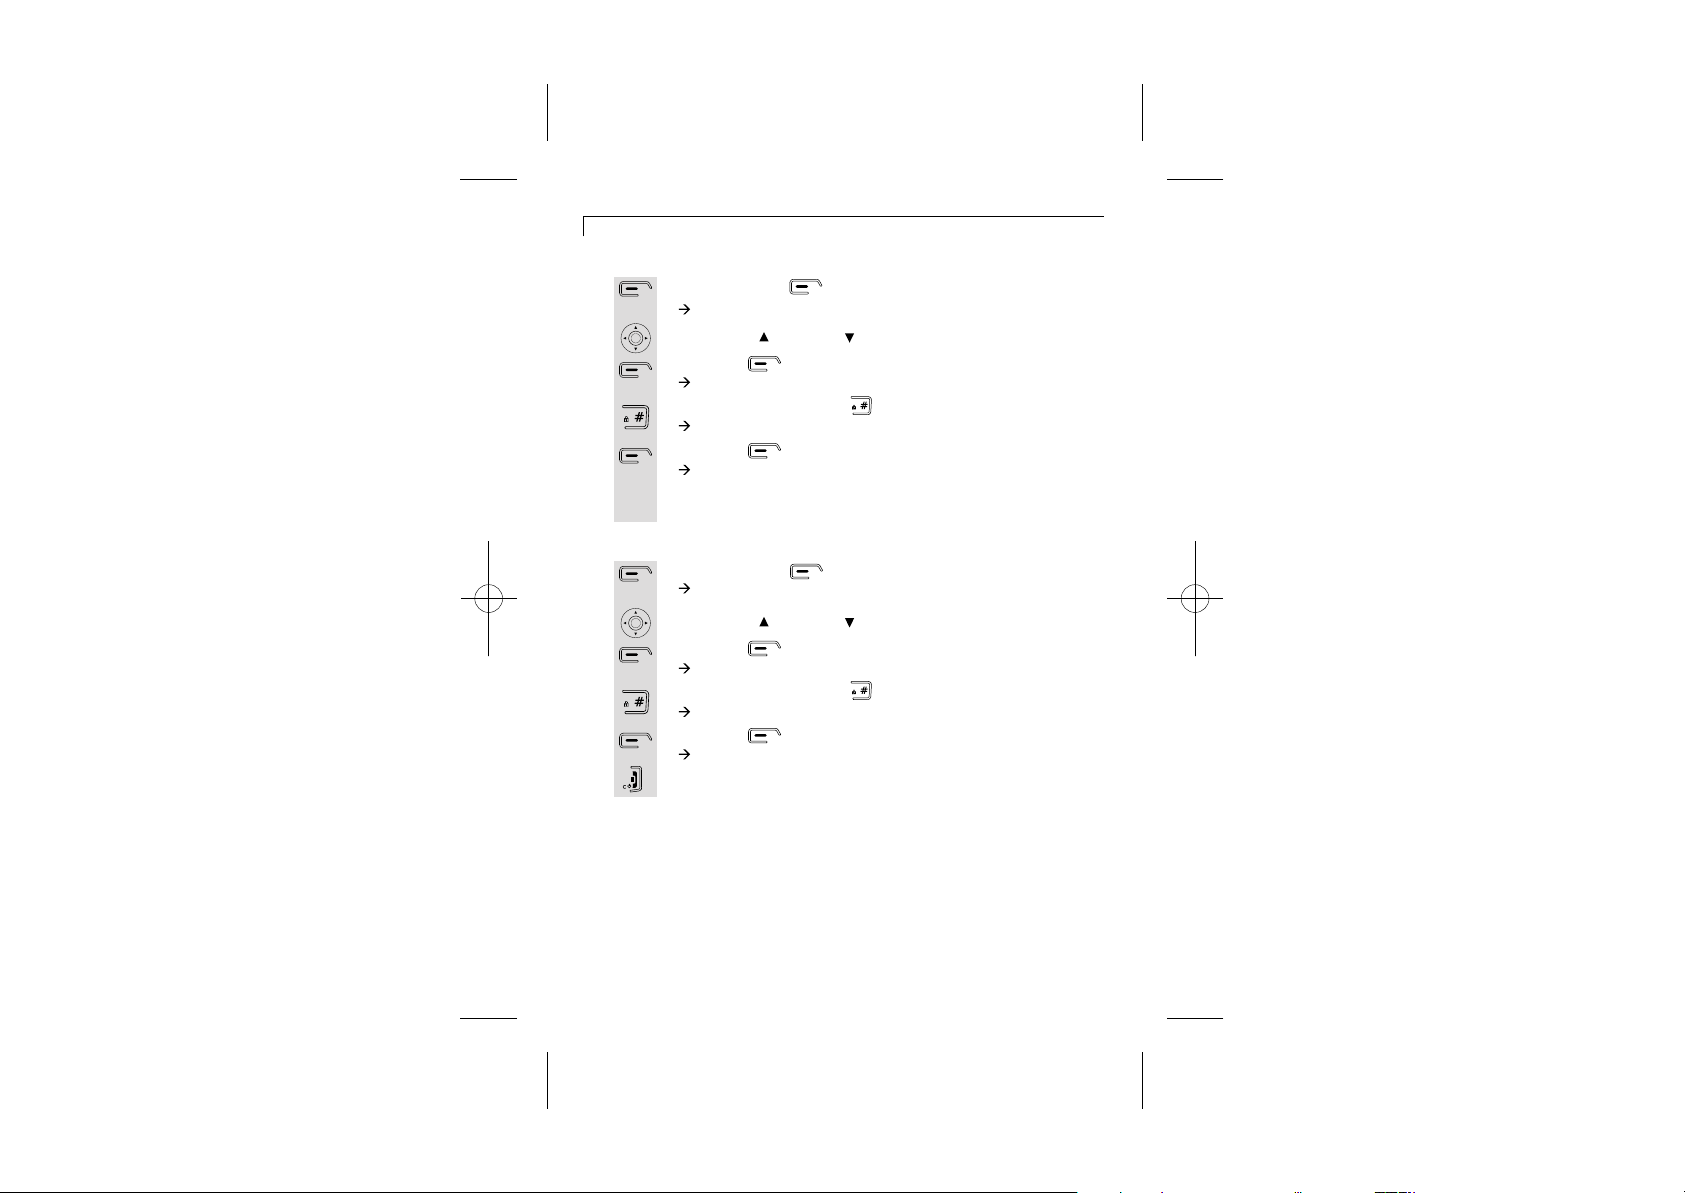
Press the menu button.
à The display shows SMS.
Use the UP/ or DOWN/ to select Handset.
Press the button.
à The display shows Handset >Ringtone.
Press and hold the HASH button for two seconds.
à The display shows Set Default Confirm?.
Press the button for OK.
à The display shows Please Wait....
Once the handset is set to default the display will go back to
idle mode.
Set base settings to default
Press the menu button.
à The display shows SMS.
Use the UP/ or DOWN/ to select Base settings.
Press the button.
à The display shows Base settings > Base Ringtone.
Press and hold the HASH button for two seconds.
à The display shows Set Default Confirm?.
Press the button for OK.
à The display shows Done.
Press the HANG UP/C button to go back to idle mode.
iDECT Help Line(for UK only): 0845 345 9677 (Local Call rate)
35
Page 40
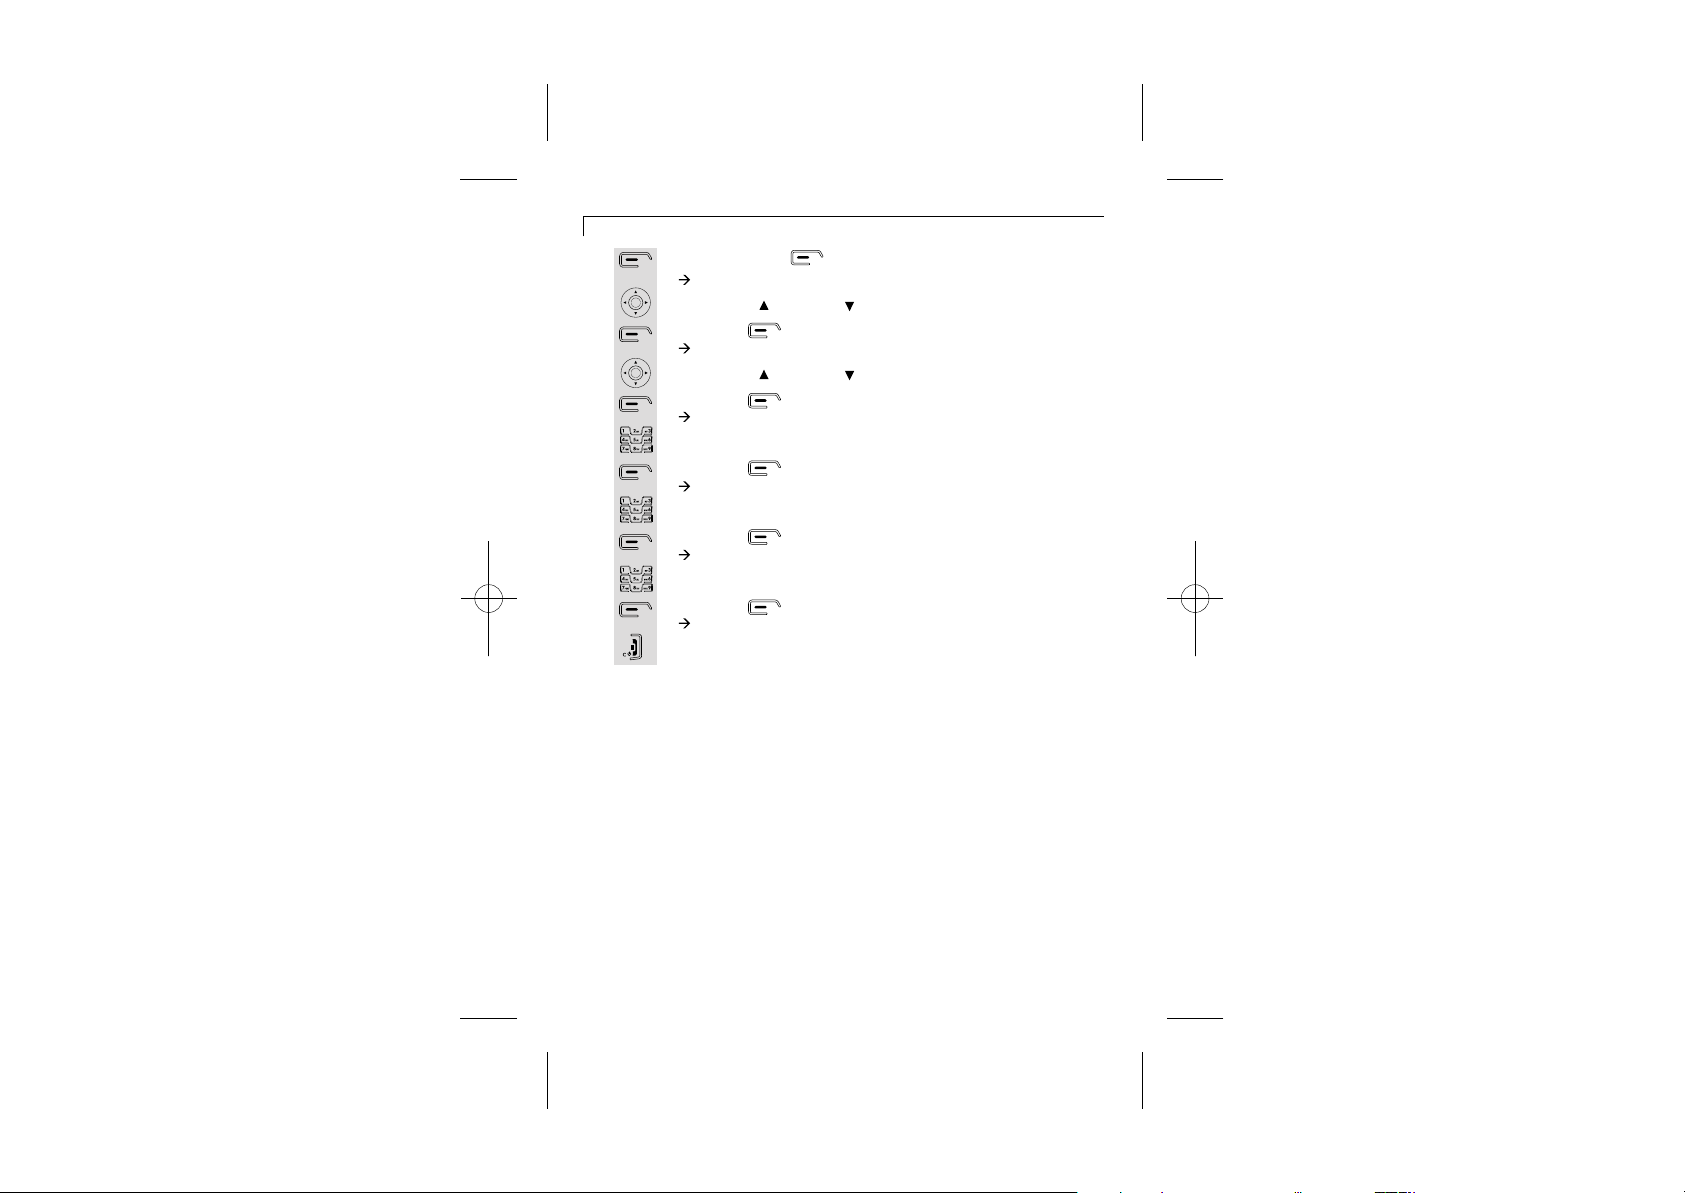
Change your PIN code
1
2
3
4
5
6
7
8
9
10
11
12
Press the menu button.
à The display shows SMS.
Use the UP/ or DOWN/ to select Base settings.
Press the button.
à The display shows Base settings > Base Ringtone.
Use the UP/ or DOWN/ to select System PIN.
Press the button.
à The display shows Enter Old PIN.
Enter the old pin using the key pad.
Press the button.
à The display shows Enter New PIN.
Enter the new pin using the key pad.
Press the button.
à The display shows Confirm New PIN.
Enter the new pin again.
Press the button.
à The display shows System PIN Changed.
Press the HANG UP/C button to go back to idle mode.
36
Page 41
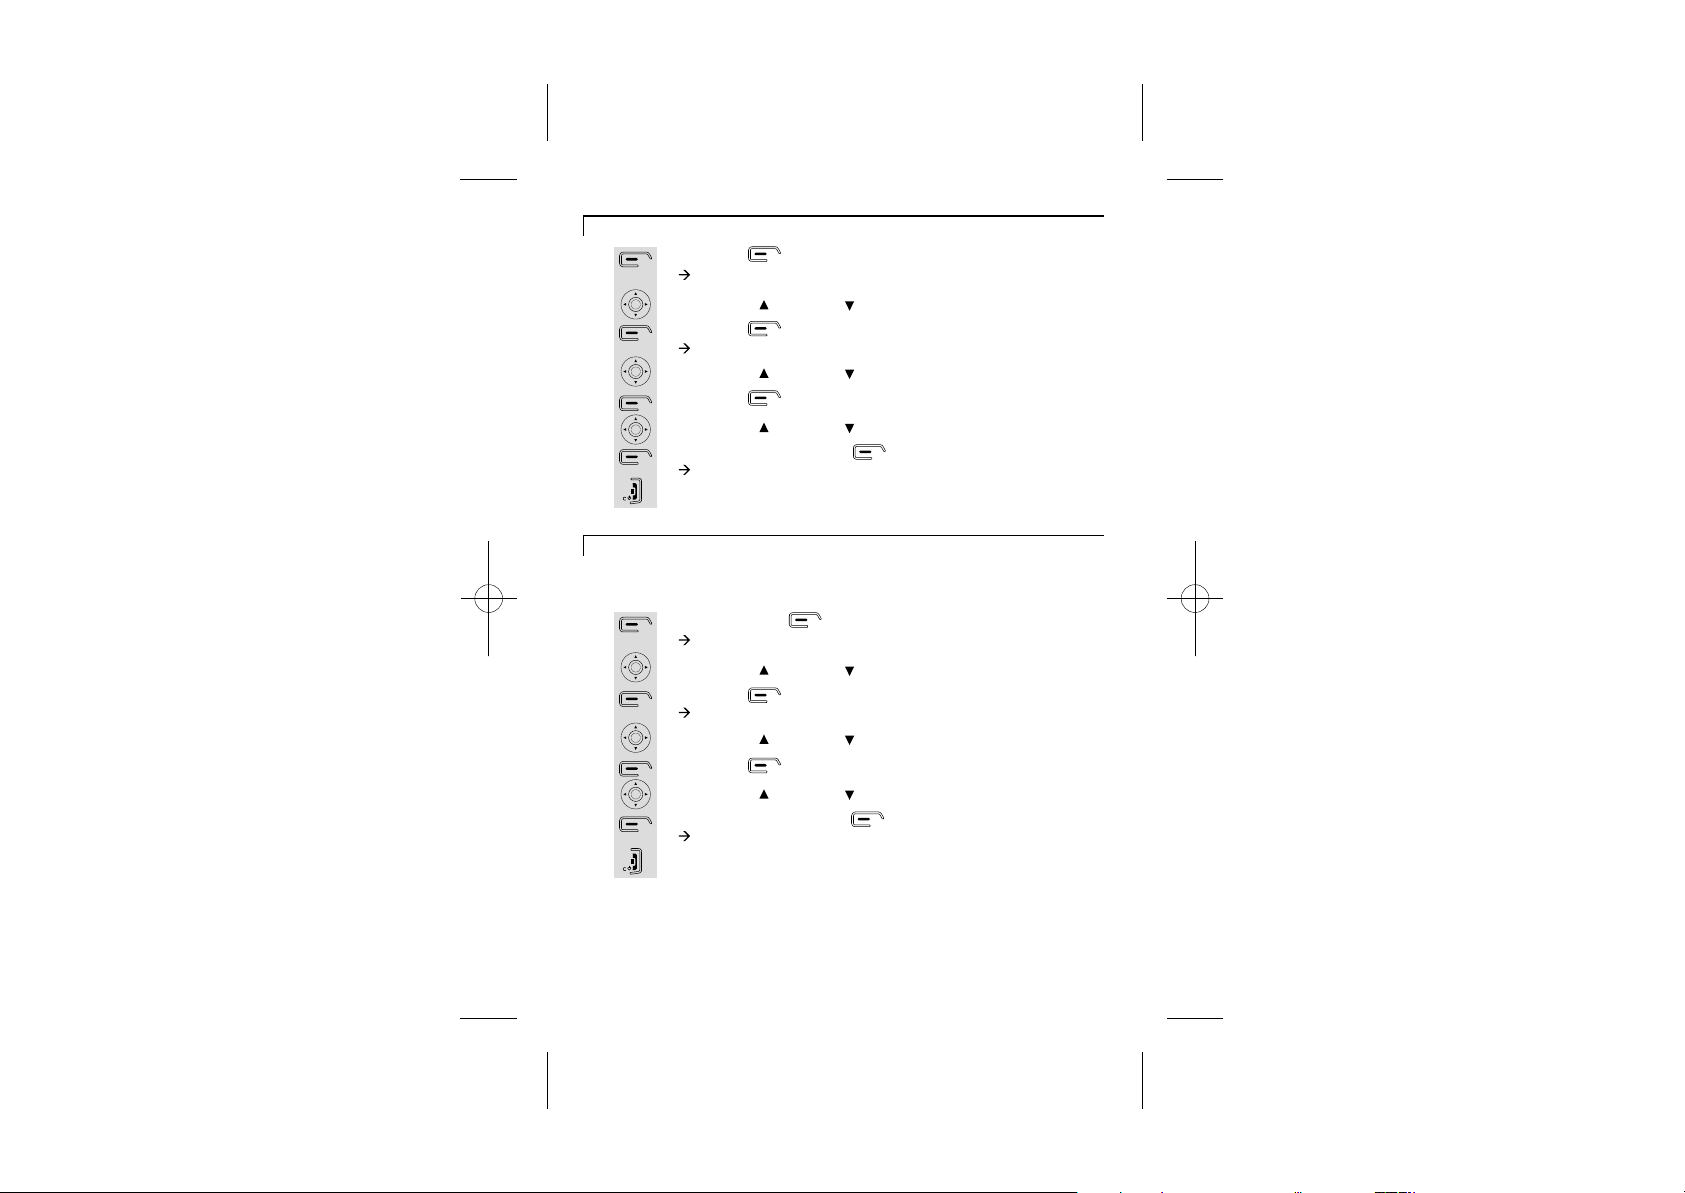
Select mode for dialling
1
2
3
4
5
6
7
8
Set flash time (Recall)
1
2
3
4
5
6
7
8
Press the button.
à The display shows Menu >SMS.
Use the UP/ or DOWN/ to select Base settings.
Press the button.
à The display shows Base settings > Base Ringtone.
Use the UP/ or DOWN/ to select Dial Mode.
Press the button.
Use the UP/ or DOWN/ to choose Pulse or Tone.
Once selected, press the button for OK.
à The display shows Dial Mode Stored.
Press the HANG UP/C button to go back to idle mode.
You may need to set the time flash if your phone is connected to
a PBX. The time of Recall 1 is 85ms and Rcall 2 is 100ms.
Press the menu button.
à The display shows SMS.
Use the UP/ or DOWN/ to select Base settings.
Press the button.
à The display shows Base settings > Base Ringtone.
Use the UP/ or DOWN/ to select Recall Mode.
Press the button.
Use the UP/ or DOWN/ to choose Recall 1 or Recall 2.
Once selected, press the button for OK.
à The display shows Recall Mode Stored.
Press the HANG UP/C button to go back to idle mode.
iDECT Help Line(for UK only): 0845 345 9677 (Local Call rate)
37
Page 42
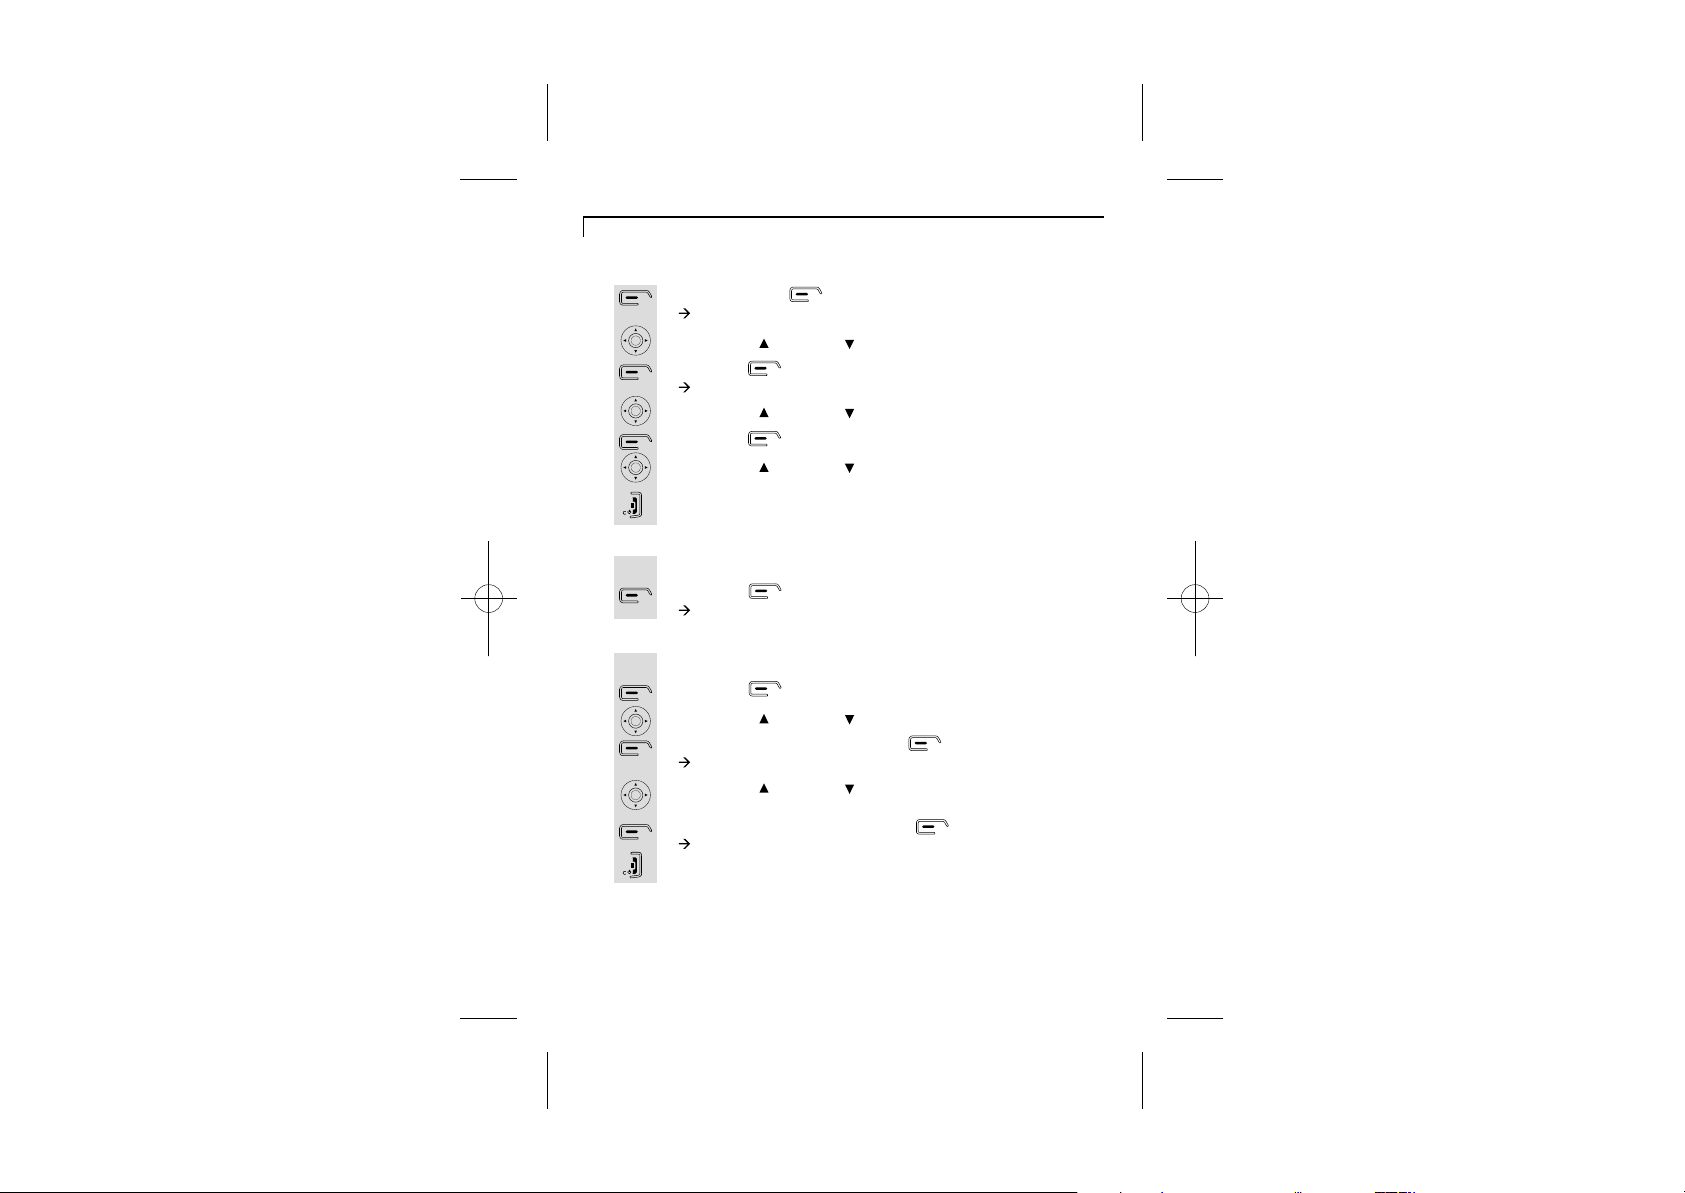
Set Handset Priority
If you have more then one handset you can set one handset to
ring before the others.
1
2
3
4
5
6
7
1
2
1
2
3
4
5
6
7
Press the menu button.
à The display shows SMS.
Use the UP/ or DOWN/ to select Base settings.
Press the button.
à The display shows Base settings > Base Ringtone.
Use the UP/ or DOWN/ to select Handset Priority.
Press the button.
Use the UP/ or DOWN/ to choose All Handsets or
Select Handset.
Press the HANG UP/C button to go back to idle mode.
If you want to select All Handsets:
Go to All Handsets.
Press the button.
à The display shows All Handsets Ring.
If you want to select a priority handset to ring before the others...:
Go to Select Handset.
Press the button.
Use the UP/ or DOWN/ to stroll through the list of handsets.
Once you have chosen, press the button
à The display shows Handset Priority.
Use the UP/ or DOWN/ to stroll through the list rings (Ring
2, 4 and 6).
Once you have selected, press the button.
à The display shows Handset Priority Saved.
Press the HANG UP/C button to go back to idle mode.
38
Page 43
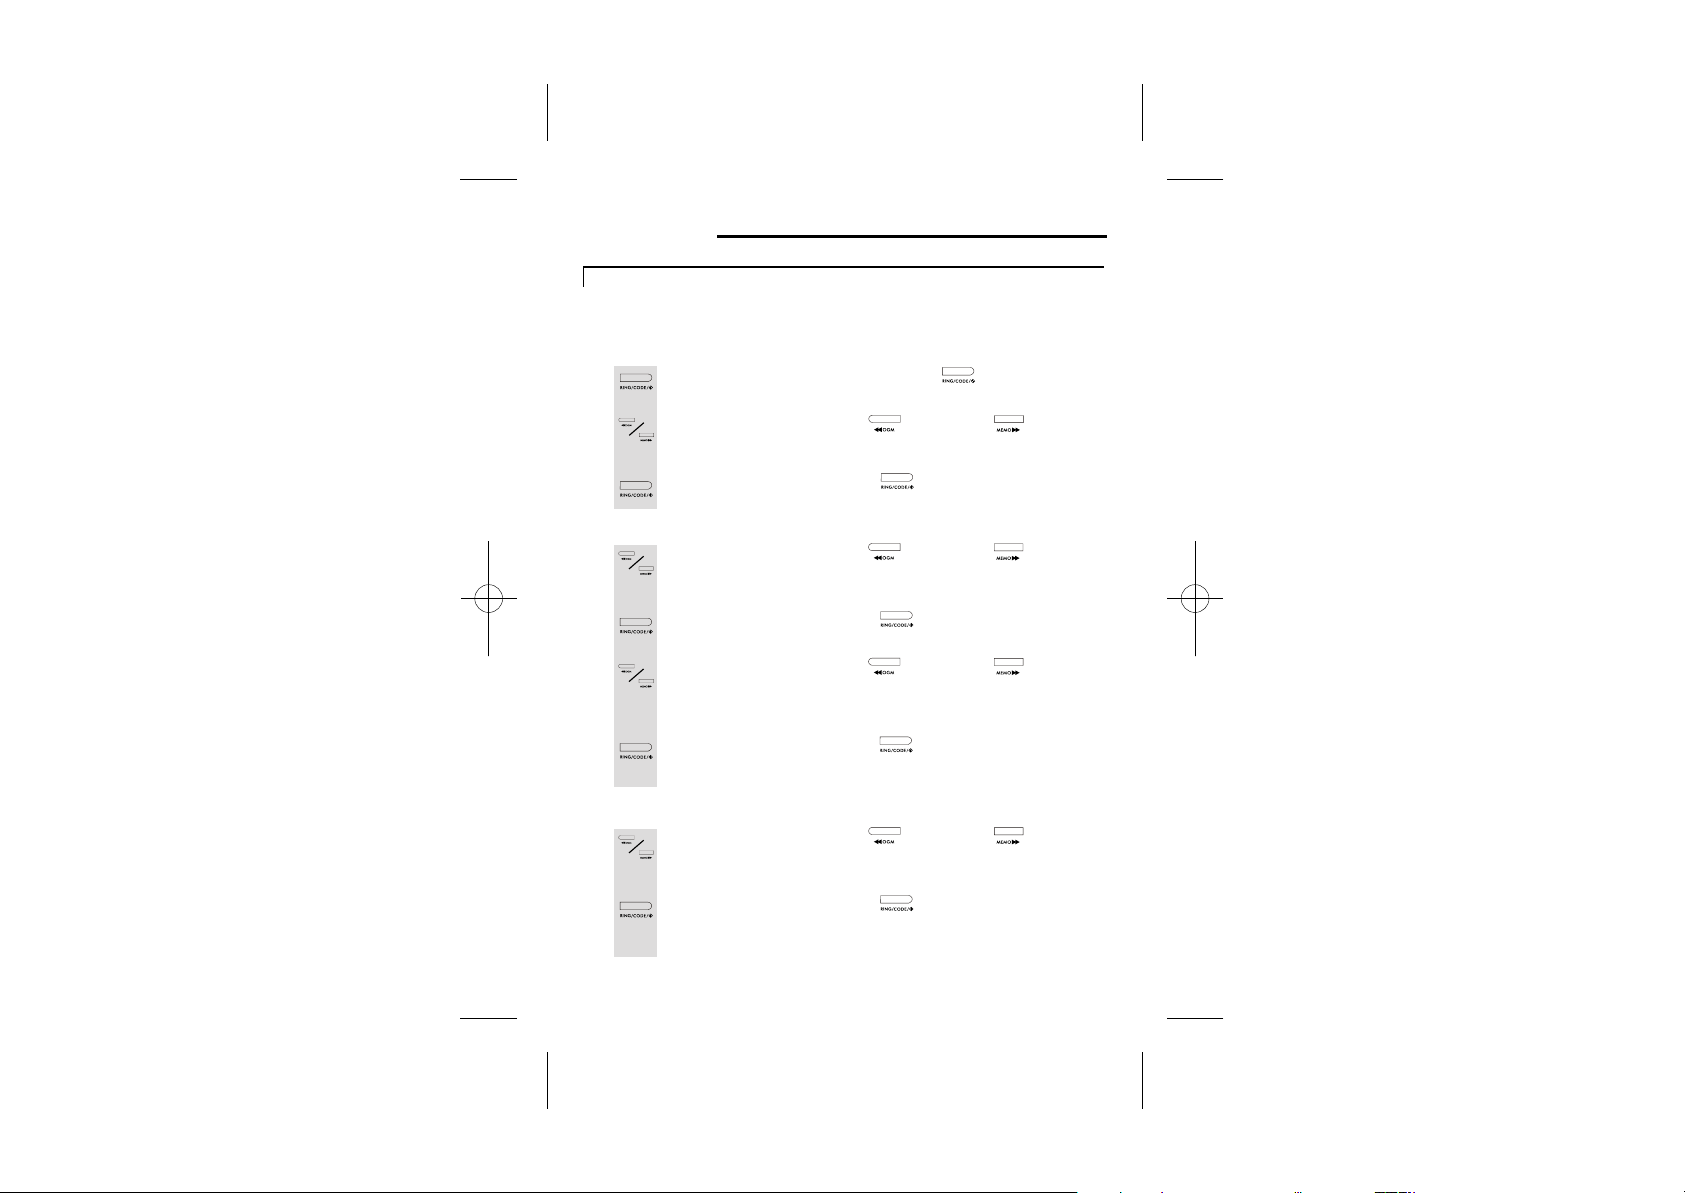
Setting up the answering machine
Setting the day, clock, number of rings and security remote code
If you pause too long between the steps listed below,
the machine will time out and you will need to start again.
To set the day
Press and hold the CLOCK/RING/CODE button until 1
the machine says 'SET DAY' and then the set day.
2
3
2
3
4
Press the FAST FORWARD or REWIND button
until you reach the day you want to set. As you press the machine
will say the days.
Press the CLOCK/RING/CODE button to confirm and the
machine will say 'SET HOUR' and then the set hour (24-hour clock).
To set the clock
Press the FAST FORWARD or REWIND button 1
until you reach the hour you want to set. As you press the machine
will say the hour and the display on the base will display the hour.
Press the CLOCK/RING/CODE button to confirm and
the machine will say 'SET MINUTES' and then the defaulted minutes.
Press the FAST FORWARD or REWIND button
until you reach the minutes you wish to set. As you press the machine
will say the minutes and the display on the base unit will also shows
the minutes.
Press the CLOCK/RING/CODE button to confirm and the
machine will say the day and time you have set, 'SET RING' and then
the set number of rings.
To set the ring
Press the FAST FORWARD or REWIND button 1
until you reach the rings you wish to set. As you press the machine
say the number of rings.
2
iDECT Help Line(for UK only): 0845 345 9677 (Local Call rate)
Press the CLOCK/RING/CODE button to confirm and the
machine tell you the number of rings you have set. The machine will
then say 'SET SECURITY CODE' and the first digit of the set security
remote code.
39
Page 44

To set the security remote code
Press the FAST FORWARD or REWIND button 1
reach the first number you want to set. As you press the
until you
machine will say the number and the display on the base will also
shows it (the code has 3 digits, and the default is 321).
2
3
Note: If you wish to change the day, clock, ring or security code then just repeat the
same steps as above.
To check the day, clock, number of rings and security remote code of
your answering machine
Note: The machine can answer calls after two to ten rings.
To set ring volume
Press the CLOCK/RING/CODE button to confirm and the
machine will say the first digit you have set and '2' for the second
digit.
Repeat steps 1 and 2 to set the second and third digit for the security
remote code. When you have set all 3 digits the machine will say
the numbers you have set.
Press the CLOCK/RING/CODE button and the machine 1
will say all settings.
If you do not set the number of rings, the machine will answer after five rings.
During standby stage.1
Press the VOLUME - or + buttons to select volume of ringer.2
The base display will show the setting from r0 to r5, where r0 is off
and r5 is the loudest setting.The base ringer will sound as the setting
is changed.
40
Page 45
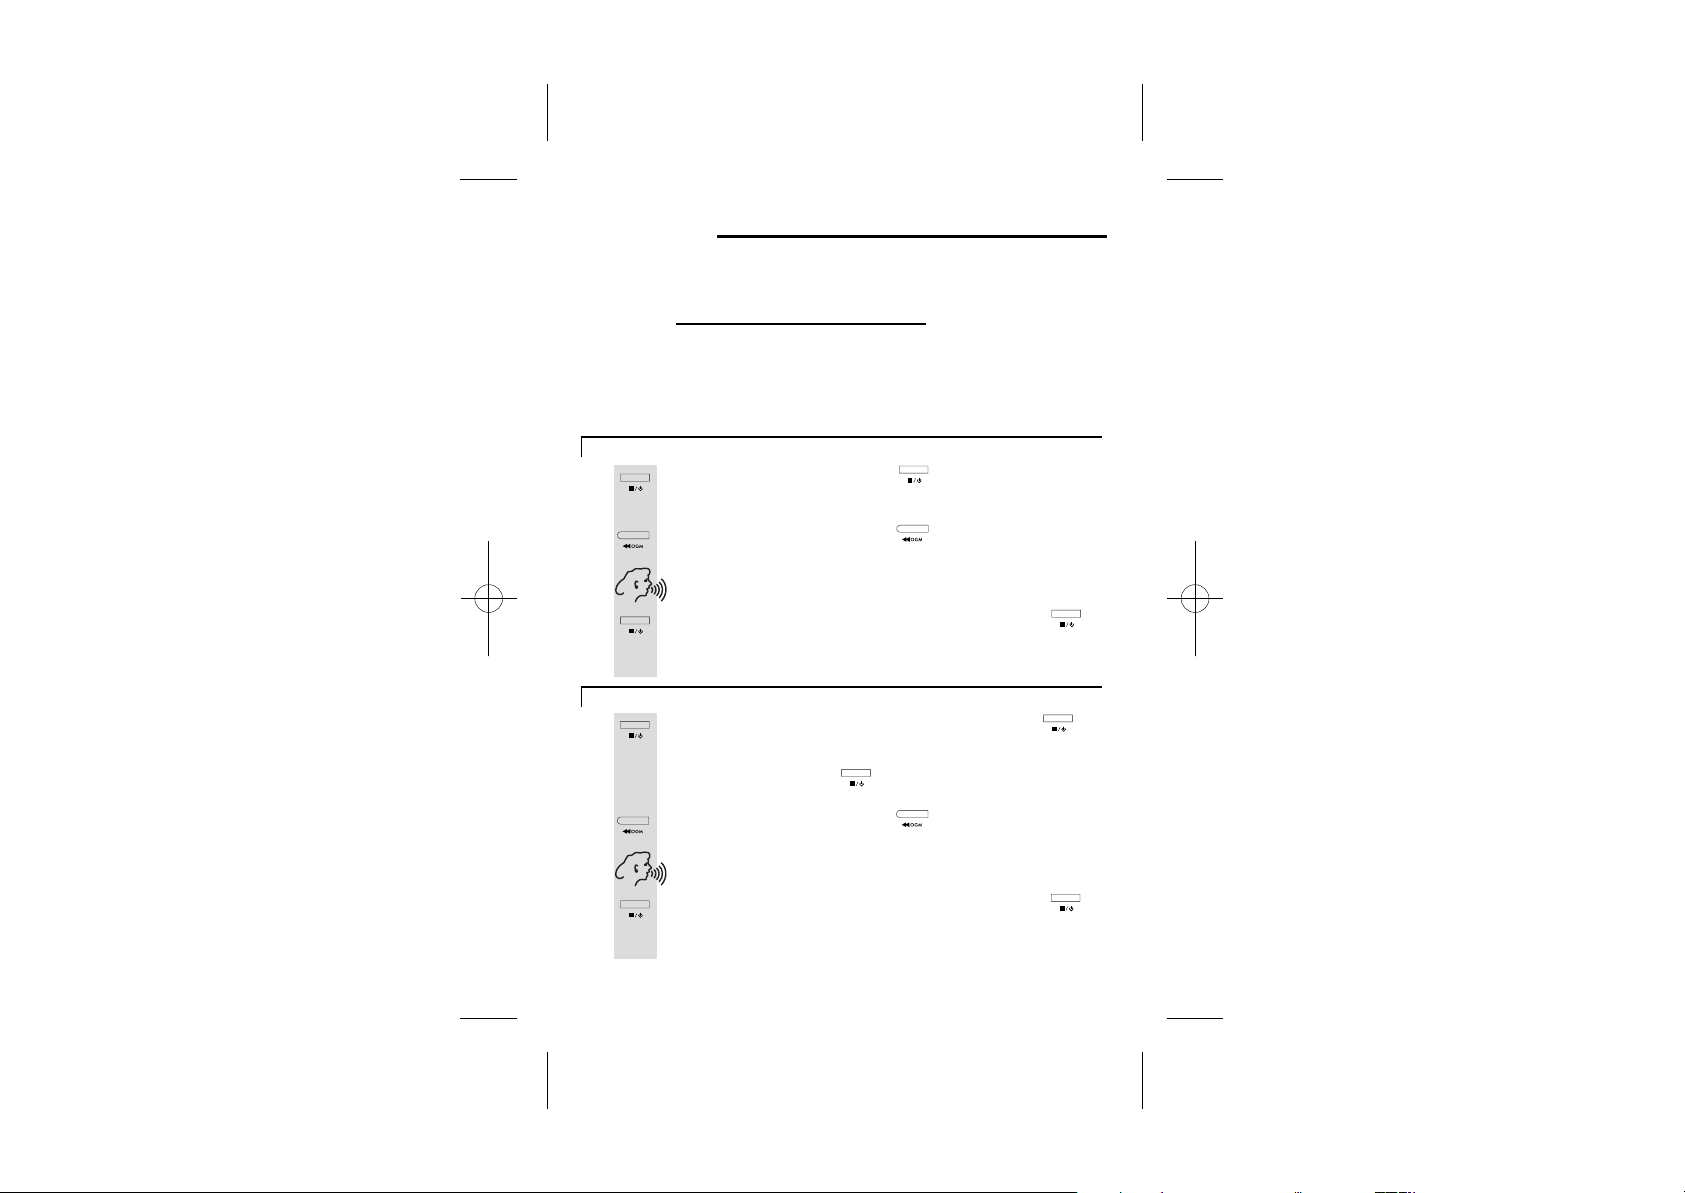
Outgoing messages (OGMs)
An OGM is the greeting the caller hears when he/she gets through to .
the answering machine. The X3i has two OGMs and you can record
your own message.
OGMs that are already on the machine:
OGM1- this invites callers to leave a message: 'Sorry, we cannot
answer your call now. Please leave your message after the beep.'
OGM2 - this simply asks callers to try later and does not give them
the opportunity to leave a message: 'Please call later.'
If you wish to create your own OGM, you can record between 4 seconds to
2 minute. If you speak for less than 4 seconds, your message will not be recorded.
To record OGM1
Press and hold the ON/OFF/STOP button until the machine 1
says 'ANSWERING MACHINE ON' and the base unit's display should
change from - - to 00.
2
3
To record OGM2
2
3
4
5
Note: You can listen to your OGM at any time by pressing the OGM button.
iDECT Help Line(for UK only): 0845 345 9677 (Local Call rate)
Press and hold the OGM/REWIND button until you hear
a beep and the segments on the base unit's display will start to rotate.
Record your personal OGM, speaking clearly from a distance of about
15cm (6 inches) from the base unit's microphone.
When you have finished speaking press the ON/OFF/STOP 4
button to stop the recording and the machine will play back your
recorded OGM
following steps 1 - 4.
If the machine is not on press and hold the ON/OFF/STOP1
button until the machine says 'ANSWERING MACHINE ON'.
The base unit display should
Press the ON/OFF/STOP button and the base unit
display should
Press and hold the OGM/REWIND button until you hear
a beep and the segments on the base unit's display will start to rotate.
Record your personal OGM, speaking clearly
about 15cm (6 inches) from the base unit's microphone.
When you have finished speaking press the ON/OFF/STOP
button to stop the recording and the machine will play back your
recorded OGM
following steps 1 - 4.
. If you want to change it, simply record it again by
shows 00.
shows 02 then A0.
from a distance of
. If you want to change it, simply record it again by
41
Page 46
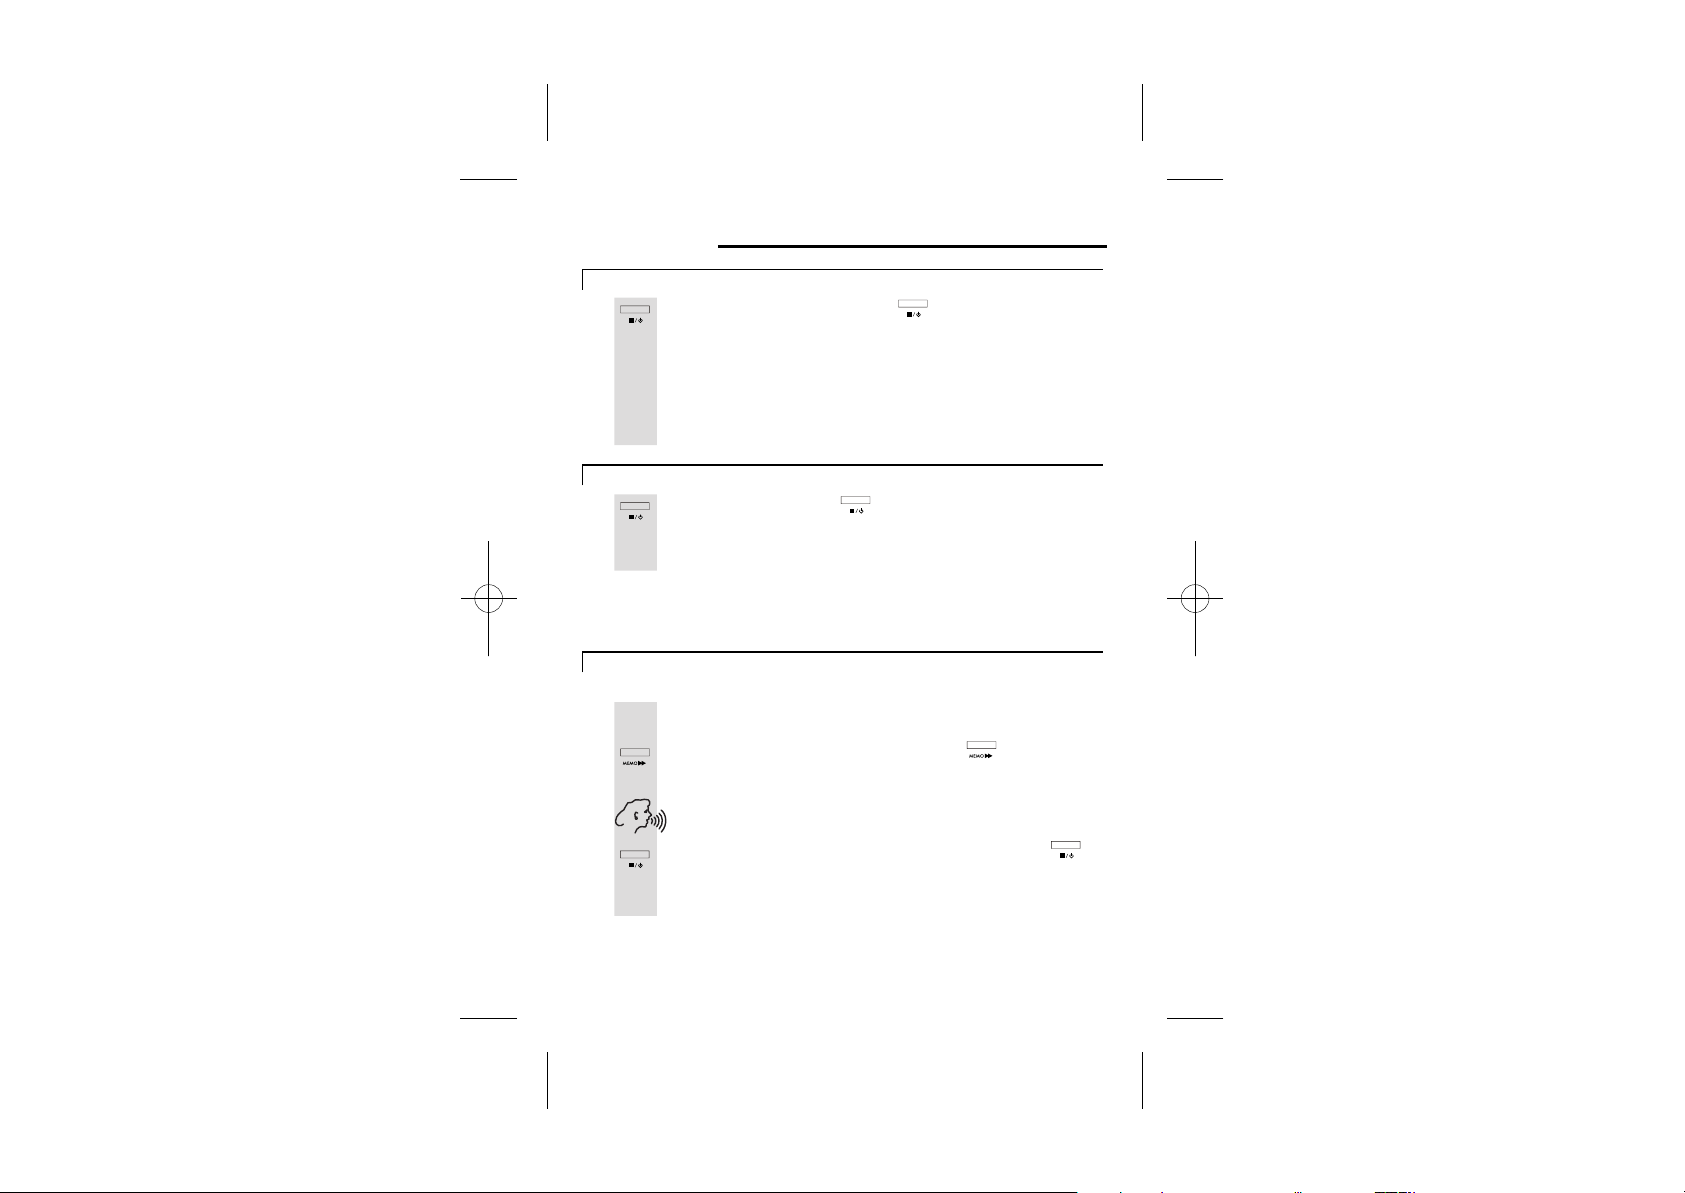
Using the answering machine
Switch on/off the answering machine
Press and hold the ON/OFF/STOP button to switch the machine 1
'on' or 'off'.
When the machine is first switched on, OGM1 is selected, so callers will
be able to leave messages. The base unit's display flashes to shows
the number of new messages; or shows the total number of messages
with a steady display if there are no new messages.
When the machine is switched off, it will answer after 15 rings and play
OGM2. You can switch it on using remote operation.
To switch between OGMs
Press the ON/OFF/STOP button switch between OGM1 and OGM2.1
When OGM2 is selected, the display shows A0 (for 'announcement
only', because callers can't leave messages). When you switch
between OGMs, the machine will play the one selected.
Note: When OGM2 is selected the machine will not record messages therefore if
you want callers to leave messages make sure OGM1 is selected.
To record a memo
To record a memo
You can record a memo (for 4 seconds to 2 minutes) directly into the
machine. It will be played back together with any messages from callers.
Press and hold the MEMO/FAST FORWARD button until you 1
hear a beep sound and the segments on the base unit's display will
start to rotate.
2
3
Record your memo, speaking clearly
(6 inches) from the base unit's microphone.
When you have finished speaking press the ON/OFF/STOP
button to stop the recording and the base unit's display will flash
the memo number e.g. if it's the first memo the display will flash
the second
02 etc.
from a distance of about 15cm
01,
42
Page 47

To Play back your messages
Play messages
The base unit's display will show the number of new messages and/
or memos (memos are counted as messages).
Press the PLAY/PAUSE button to play all new messages 1
and memos.
The machine will tell you the number of messages you have altogether;
and then the
message, it tells you the day and time it was recorded (according to
the day and time you have set the machine).
Pause and restart message
Press the PLAY/PAUSE button to play all new messages 1
and memos.
When you press the PLAY/PAUSE button, the base unit's
display will show PA . If you don't press the PLAY/PAUSE
button to restart playback, it will restart automatically after a
2-minute pause.
Play all messages
After playing your new messages you can press the 1
PLAY/PAUSE button again to play all your messages.
Repeat/Rewind
To repeat the current message, press the REWIND/OGM button.1
To replay the previous message, press the REWIND/OGM2
button twice.
Skip/Fast Forward
To skip to the next message, press the FAST FORWARD/1
MEMO button.
number of new messages. Before playing each new
Volume control
To adjust the volume of the loudspeaker during playback:
Press the VOLUME - or + buttons under the base unit1
display (there are 10 volume levels including L0 for 'off').
iDECT Help Line(for UK only): 0845 345 9677 (Local Call rate)
43
Page 48

To intercept a call
If you hear the answering machine recording a message and you want
to intercept the call and speak to the caller, you can:
Press the PHONE button on the handset.
OR
Press the SPEAKERPHONE button on the handset.
OR
Lift the handset of any other phone connected to the same line.
Note: When you intercept a call, the machine will stop recording the caller's message.
If you intercept a call within 3 seconds of its start,
the machine recording.
To delete the current messages
1
1
Note:
machine's memory may become full and will not be able to record any new messages.
When the memory is full the base unit's display will show FU. (When the memory is
full, it will answer after 15 rings.)
The machine will not delete any messages you have not yet listened to. The machine's
memory has room for 12 minutes of recording time, or up to 55 individual messages.
To go back to the default OGMs
Press the DELETE button during playback.
To delete all old messages
Press and hold the DELETE button until the machine says
'All messages deleted'.
Remember to delete messages after you have listened to them otherwise the
If you no longer want callers to hear the OGMs you have recorded,
you can delete them and revert to the original OGMs.
If necessary, press the ON/OFF/STOP button to switch to 1
the OGM you want to delete.
Press the OGM/REWIND button to play the message2
While the message is playing, press the DELETE button.3
the answering machine may not stop
44
Page 49
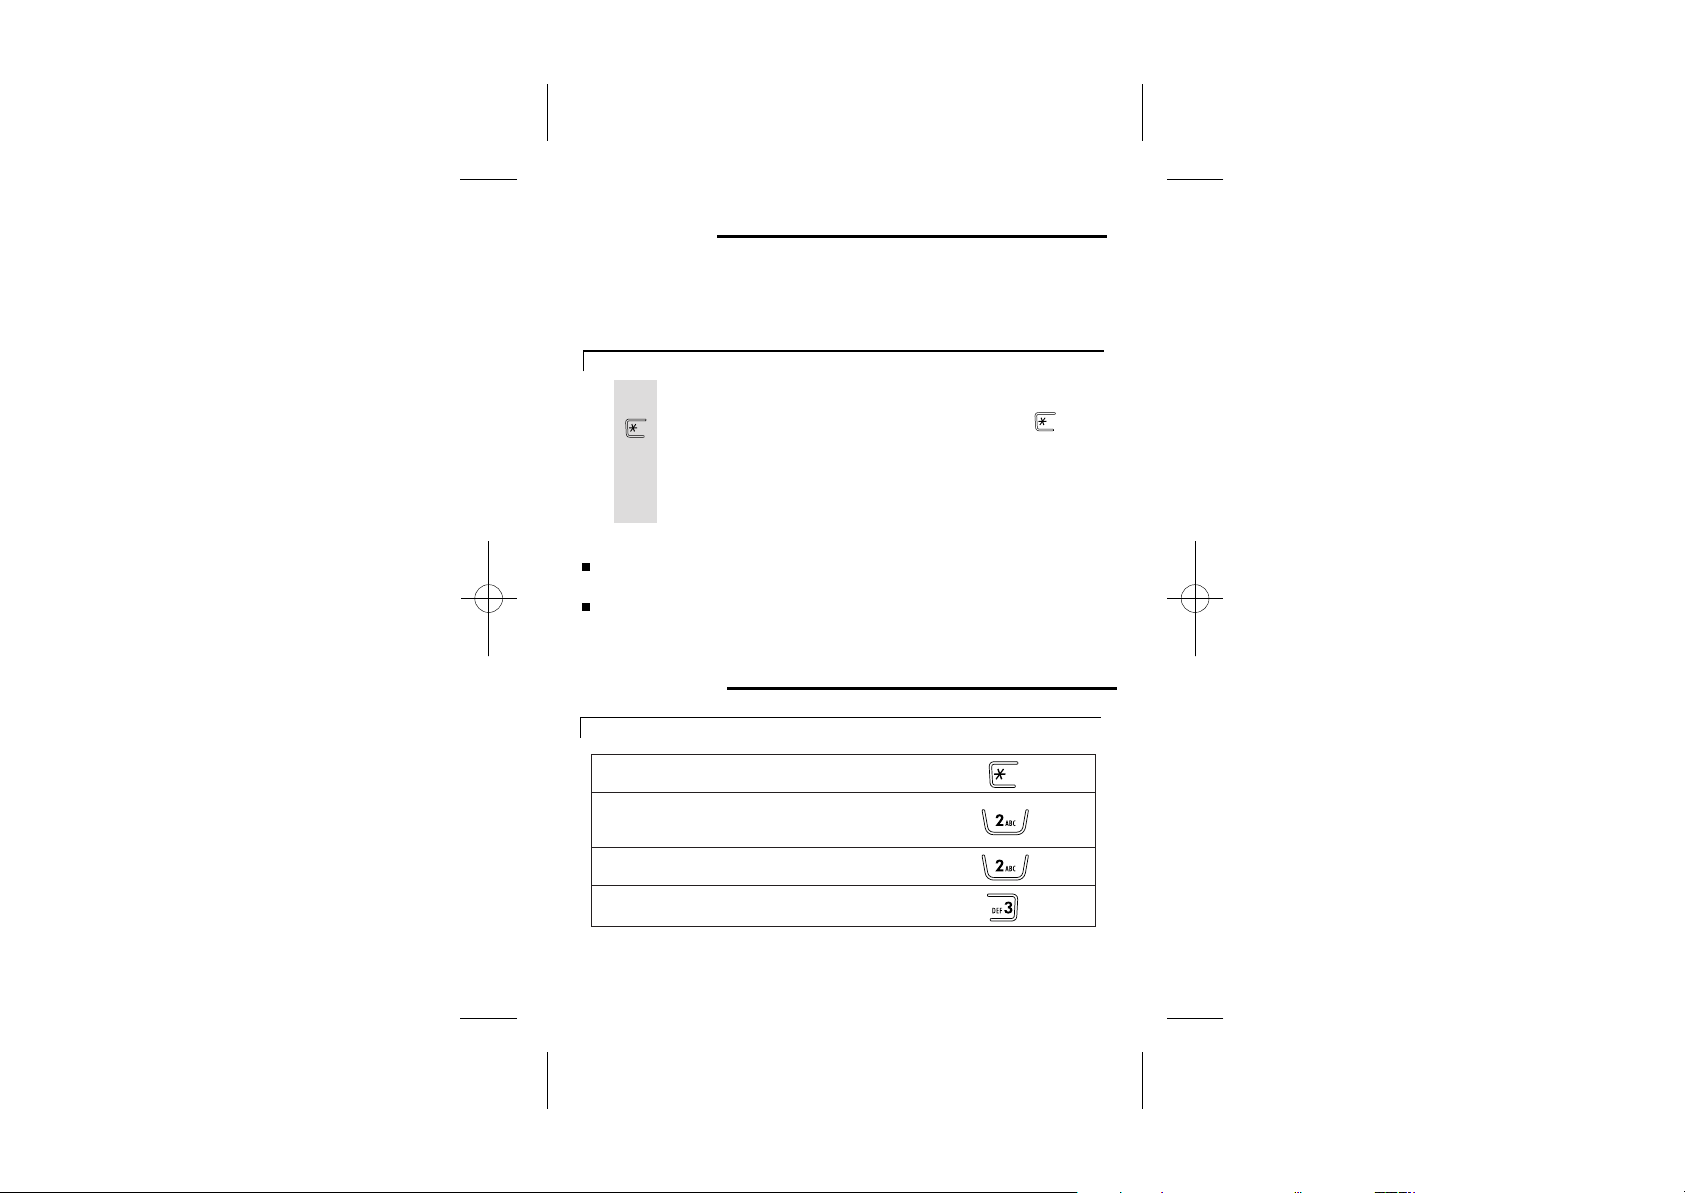
Remote operation
You need to enter a three-digit pass number if you want to dial
home to receive your messages. The original pass-number is
321. Otherwise you are able to set your own three-digit pass
number (please see page 39).
To check your messages remotely
Using a tone dialling phone, dial your home number1
2
3
4
Note:
At steps 2, 3 and 4, you must press the key within 7 seconds, or the machine will
cut off your call.
At step 3, if you key in the wrong code, you can try again. You have up to three
attempts to get the code right before the machine cuts off your call.
When you hear your outgoing message, press the STAR button
and you will hear 'Security code' and a 'beep'.
Enter your remote security code and your will hear a long 'beep'.
Press '2' on your handset to play back your messages and/or use
the keys listed in the table overleaf.
Remote operation keys
Keys to press during remote operation
Interrupt and bypass the outgoing message (OGM)
Play new messages (after playing back new messages,
you can press this again to hear all recorded messages)
Pause and restart during message playback
Skip the current message to the next one
iDECT Help Line(for UK only): 0845 345 9677 (Local Call rate)
45
Page 50
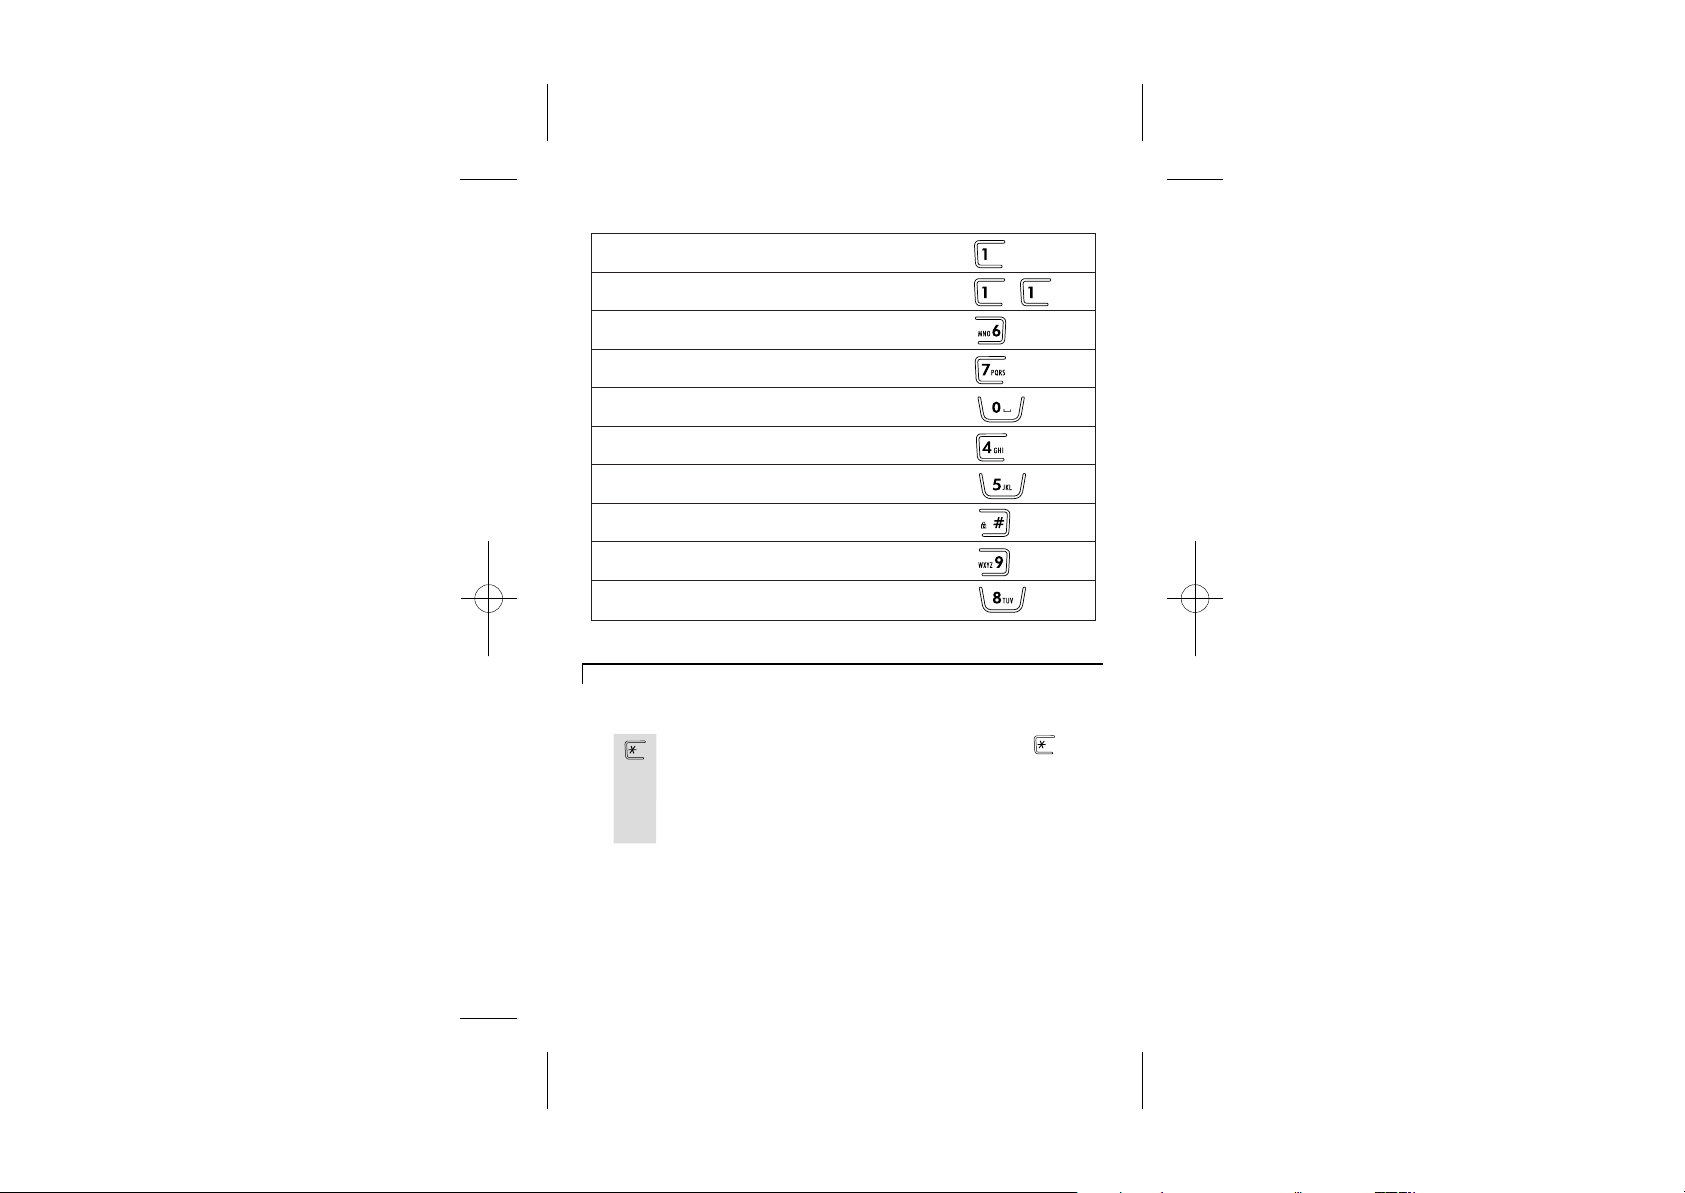
Repeat the current message
Go back to the previous message
Stop playback or recording
Delete the message currently being played back
Delete all messages that have been played back
Play the outgoing message (OGM1 or OGM2)
Record a new outgoing message (OGM1 or OGM2)
Record a memo
Switch the machine on
Switch the machine off
Switching on remotely
If the answering machine is switched off, if will answer your call after
15 rings. To switch the machine on remotely:
1
2
3
When you hear your outgoing message, press the STAR
When you hear 'Security code' and a 'beep', key in your remote
security code.
Press '9' on your handset to switch on.
button
46
Page 51

Troubleshooting
ALWAYS check
first that:
You have followed all the steps listed on page 5 to
install and set up your iDECT X3i.
All connectors are firmly inserted in their sockets.
Mains power to the base unit is switched on at the
socket.
The handset's batteries are correctly and securely
installed and are not run down.
Everyday use
"The handset does
not switch on."
"The handset
switches on but
cannot be
connected to the
base station."
"I cannot make or
answer calls."
iDECT Help Line(for UK only): 0845 345 9677 (Local Call rate)
Check the connection of the batteries as they are
probably flat or not inserted properly and charge the
handset on the base station.
Check the connection of the power supply unit of the
base unit.
Verify that the network socket where the power supply
unit is plugged in received voltage.
Repeat the handset registration procedure as described
on page 24.
If the handset's display is blank. It may be switched off.
Press the HANG UP button for five seconds to switch it
back on.
Check that the base unit's mains power adapter is
plugged in and power is switched on. The base unit
needs mains power for normal operation of the phone not
just for charging the batteries.
Make sure you are using the telephone line cable
supplied with your iDECT X3i. Other telephone line cables
might not work.
Move the handset closer to the base unit.
Check the battery Level symbol on the display. If it is low,
replace the handset on the base unit or charger pod to
recharge the batteries.
Switch off power at the mains socket, wait for a few seconds
and then switch back on. This may solve the problem.
47
Page 52

"I cannot make a
call."
"When I press keys,
nothing happens."
The handset's keypad may be locked. Unlock it before
you make a call.
Only one handset (or the base unit) can be connected to
the outside line at once. If another handset is already
using the line, you need to wait until it's finished its call.
Make sure the batteries are fitted in your handset. If the
Battery Level symbol on the display shows 'low', put your
handset back on the cradle for it to charge.
"When I key in a
number, it appears
on the display, but I
can not make an
outside call."
"The phone does
not ring."
"My call was cut off
when I went out of
range. Now I can't
use my handset."
"There is
interference and
noise on the line."
"I hear 'beeps' from
my handset while
I'm on a call."
Try a different position for the base unit somewhere
higher if possible, or further from other electrical
equipment.
Try moving the handset closer to the base unit.
Check that the base unit's mains power adapter is
plugged in and power is switched on. The base unit
needs mains power for normal operation of the phone not
just for charging the batteries.
Make sure you are using the telephone line cable that
was supplied with your iDECT X3i. Other telephone line
cables might not work.
Move the handset closer to the base unit before you try
again to make a call.
Move the handset closer to the base unit, or to a different
position.
Try moving the base unit so that it's not near other
electrical equipment, such as a television or a computer.
You'll get the best sound if you place the base unit as
high as possible. For example, in a two-storey house,
the first-floor landing is an ideal place.
You may be going out of range of the base unit. Move
closer or your call may be cut off.
Check the Battery Level symbol on the display. If it's low,
recharge the batteries.
48
Page 53

"The Caller Display
feature isn't
working."
"When I try to make
a call, I hear Busy
tone."
You need to subscribe to the Caller Display feature from
your network service provider. You should find contact
details on your phone bill.
The caller may have withheld their number by dialling
141. Or they may be calling from a network that does not
transmit the caller's number (e.g. it may be an
international call.)
If you're using a iDECT X3i multi-handset system, check
another handsets whether or not they are already on a
call.
"The volume in the
earpiece is low
when I'm on a call."
Make sure you're holding the earpiece correctly over your
ear.
Adjust the volume using the UP /DOWN button.
Intercom and transfer
"I can't transfer a
call."
Make sure the other handset is in range of the base unit.
Make sure you are dialling the correct number for the
other handset.
Batteries
"The handset is not
functioning even
after charging for 8
hours."
"The handset's
battery pack is
running low within
an hour or two."
iDECT Help Line(for UK only): 0845 345 9677 (Local Call rate)
Remove the batteries from the handset and wait for a few
seconds before replacing them. If the problem persists,
replace the batteries.
Before you first use the handset, you should have left it on
the base unit or charger pod for 24 hours to charge the
batteries fully.
You may need to replace the batteries.
Check the connection between the base unit and the
mains power socket.
49
Page 54

"I try to recharge
the batteries but I
still get a warning
that they are low."
You need to replace the batteries. To find out how to
obtain replacements call the iDECT Helpline on 0845
345 9677 from 9:00am to 5:00pm, Monday to Friday (UK
only).
Dispose of used batteries safely never burn them, or
put them where they could get punctured.
Do not use non-rechargeable batteries in your iDECT
X3i they may burst, causing damage.
If the fault persists...
Disconnect all other instruments connected to the
same line as the iDECT X3i and try to make a call.
Disconnect the base unit from the telephone line and
plug a different hone into the master telephone socket.
Try making a call. If this works, the line is OK.
If the call does not work, and you are using a two-way
socket adapter, remove it and plug a telephone directly
into the socket. If the call now works, the adapter may be
faulty.
If you cannot make a call, the fault may be on the
exchange line. Contact the service provider (the BT
engineers on 151 for UK only, or your cable company).
If you still cannot identify the cause of the problem,
contact the iDECT Helpline on 0845 345 9677 (UK only).
50
Page 55
Cleaning and care
Do not clean any part of your iDECT X3i with benzene,
thinner or other solvent chemicals this may cause
permanent damage which is not covered by the
Guarantee. When necessary, clean it with a damp
cloth.
Keep your iDECT X3i away from hot, humid conditions
or strong sunlight, and don't let it get wet.
Every effort has been made to ensure high standards of
reliability for your iDECT X3i. However, if something
does go wrong, please do not try to repair it yourself
consult your supplier or the IDECT Helpline.
Declaration of conformity
The DECT cordless phone, identified as iDECT X3i,
complies with the essential protective requirements and
objectives of:
EC R&TTE Directive 1999/5/EC
EC Low Voltage Directive 93/68/EEC
And conforms to the following relevant harmonized
standards:
Radio: EN 301406 (TBR 6)
EMC: EN 301489
Safety: EN 60950, EN 41003
The conformity to the requirements is validated by the
symbol.
NOTE: In compliance with Directive 2002/96/EC, when
you purchase a product that comes with the symbol
shown on the right, you are required to dispose the
electrical and electronic equipment by separate waste
collection and you cannot dispose of the product as
normal waste. This equipment and all its components,
subsystems and consumable materials formed an
integral part of this product and when you decide to
dispose them, you have to bring them to the local
recycling centres for appropriate waste disposal, in
compliance with the current regulations. Details about
the location of these centres can be obtained from you
local authority.
iDECT Help Line(for UK only): 0845 345 9677 (Local Call rate)
51
Page 56

Guarantee and service
While the unit
is under
Guarantee
After the
Guarantee
has expired
The iDECT X3i is guaranteed for 12 months from the date
of purchase shown on your sales receipt.
does not cover any faults or defects caused by accidents,
misuse, fair wear and tear, neglect, faults on the
telephone line, lightning, tampering with the equipment,
or any attempt at adjustment or repair other than through
approved agents.
Please keep your sales (till) receipt this is your
guarantee. You should also keep the original packaging
material.
In the unlikely event that you need to return your iDECT
X3i to our Repair Centre while it is under guarantee, there
will be a £5 handling charge.
Disconnect the base unit from the telephone line and the
1
mains electricity supply.
2
Pack up all parts of your iDECT X3i, using the original
packaging. Remember to include the mains adapter.
3
Return the unit to the shop where you bought it, making
sure you take your sales receipt.
If the unit is no longer under Guarantee, first follow steps 1
and 2 as for repair under Guarantee. Then...
Call iDECT Helpline on 0845 345 9677 (for UK only) and
3
ask for a quotation of the repair charge and details of
where to send your iDECT X3i for repair.
4
Make sure you include with your iDECT X3i:
Your name and address
A cheque or postal order for the value of the repair
5
Return your iDECT X3i to the address given by the Service
Department.
* This does not affect your statutory rights.
This guarantee
52
Page 57

Technical details
Standard
Frequency range
Channel bandwidth
Operating range
Operating time
Temperature range
Electrical power
2.4V rechargeable battery pack.
Base UNIT input 100-240V AC 50-60Hz 0.2A,
output 7.5VDC
CHARGER POD input 100-240VAC 50-60Hz 0.2A,
output 7.5V DC 480mA.
Port specification
mains power supply) is a SELV port with respect to EN41003.
The port (connected to the telephone line) is a TNV port
with respect to EN41003.
Digital Enhancement Cordless
Telecommunication (DECT)
1.88 to 1.9 GHz
(bandwidth = 20 MHz)
1.728 MHz
Up to 300m outdoors;
up to 50m indoors
Standby: 100 hours
Talking: 10 hours
Battery charge time: 24 hours
Operating 0 C to 40 C
Storage -20 C to 60 C
HANDSET 600mAH NiMH
600mA.
7.5V
The port (connect to the
iDECT Help Line(for UK only): 0845 345 9677 (Local Call rate)
53
 Loading...