

Page 1
BINATONE “ iDECT X1i System ”
User Guide - Front Page
1)White background and black letters
2)Material:
60lb Book Paper
3) Size: 105mm(w) x 148mm(H) A6
BINATONE “ iDECT X1i System ”
User Guide - Back Page
Ver. 2, Jun 06 (UK, BTP)
USER GUIDE
THIS EQUIPMENT IS NOT DESIGNED FOR
MAKING EMERGENCY TELEPHONE CALLS
WHEN THE POWER FAILS. ALTERNATIVE
ARRANGEMENTS SHOULD BE MADE FOR
ACCESS TO DIAL EMERGENCY SERVICES.
Before operating this set,
please read these instructions carefully.
DIGITAL CORDLESS
TELEPHONE WITH
iDECT X1i System
ANSWERING
MACHINE
Page 2

Important note — emergency calls
The iDECT X1i is not designed for making emergency
calls if the mains power fails. So you should make
alternative arrangements for access to Emergency
Services.
(This means that you should also have a basic
phone, that does not need mains power, connected
to your line so that you can make calls during a
power failure.)
If you need help …
The Help Line is available from 9.00 am to 5.00 pm,
Monday to Friday, on
0845 345 9677
Calls are charged at Local Call rate.
Unpacking your iDECT X1i system
In the box are:
■
the cordless handset (up to four, depending on
which iDECT X1i system you’ve bought)
■
the base unit
■
two batteries and a battery compartment
cover for each handset
■
a telephone line cable for the base unit
■
a mains power lead and adapter for the base
unit
■
up to three charger pods, each with a separate
mains power lead and adapter, for multi-handset
systems
Keep the packaging materials in a safe place in
case you later need to transport the unit. Keep
your sales (till) receipt, which is your guarantee.
Before you can use the handset to make calls
you’ll need to fit and fully charge the batteries,
as described on pages 5 and 6. Please read the
notes on page 4 before you install the base unit.
E:\Binatone2006\iDECT_X1i\iDECT_X1i_UK_03a.vp
12 June 2006 09:15:00
Color profile: Generic CMYK printer profile
Composite Default screen
Page 3
R
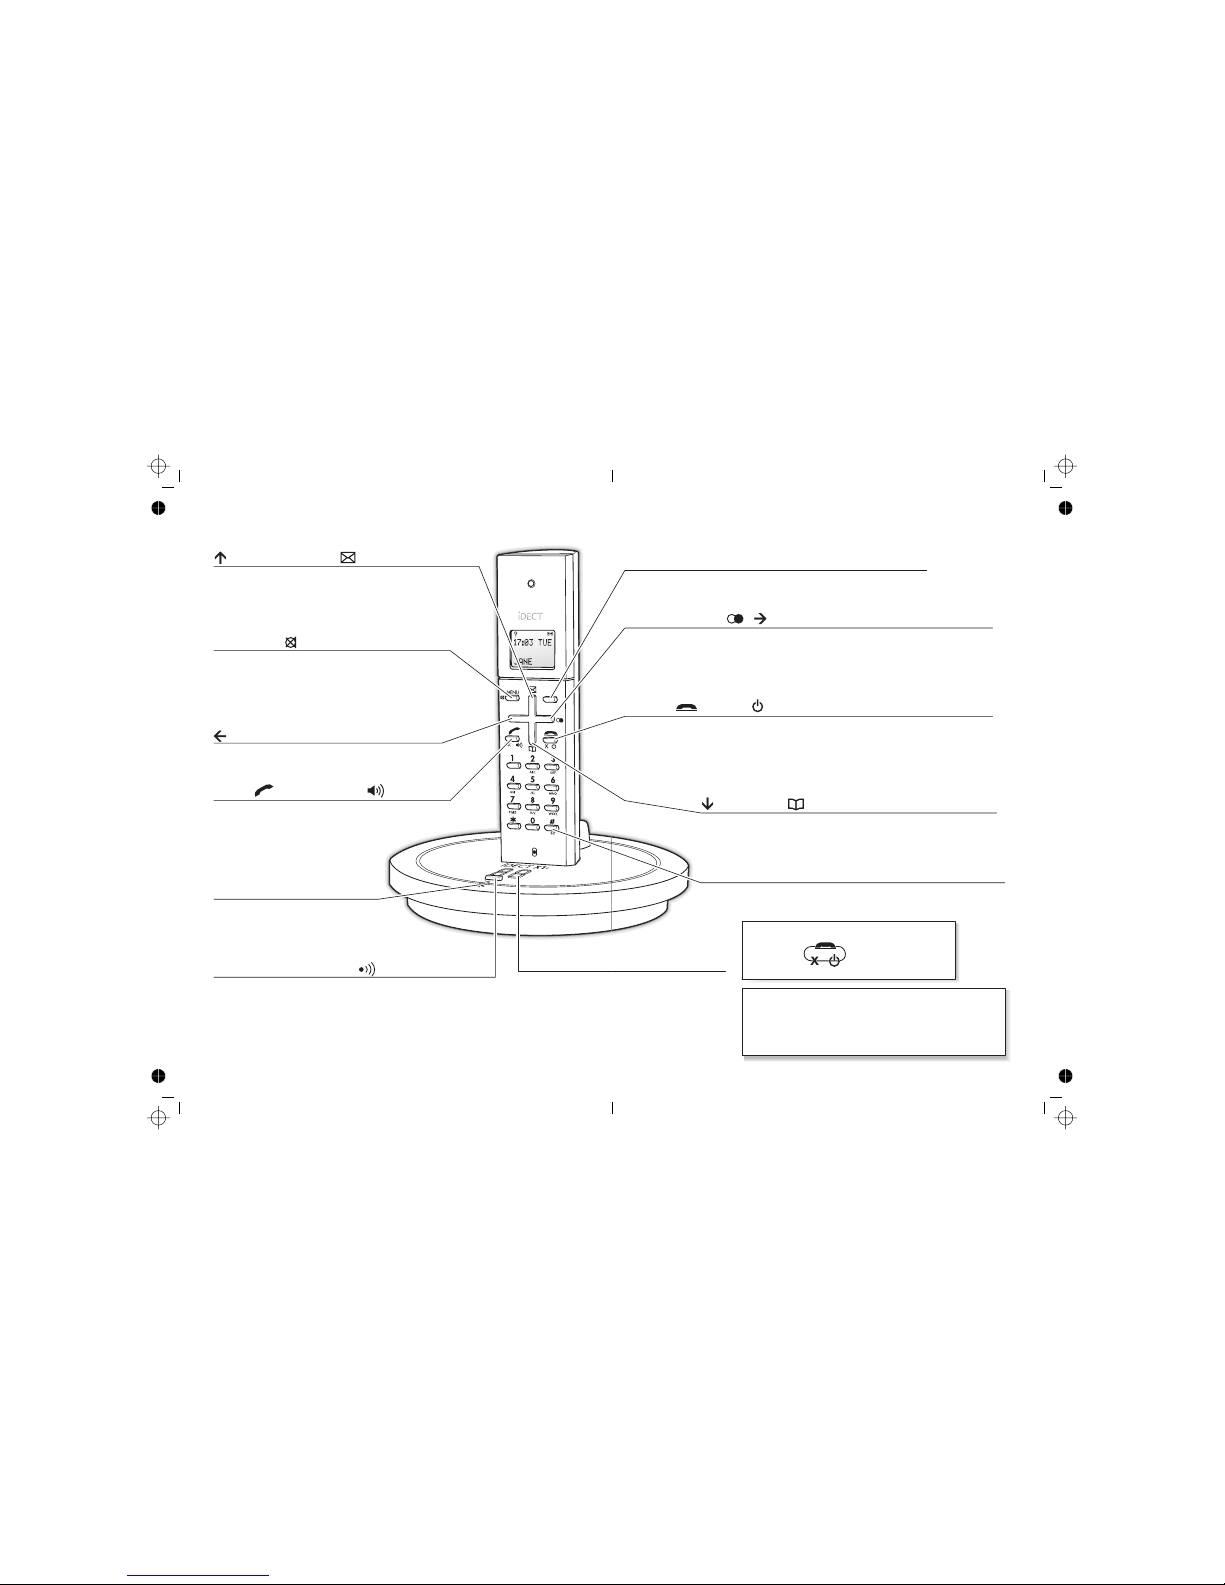
PHONE /SPEAKERPHONE /OK button
Press to begin, answer or end a phone call.
Press to switch the speakerphone on and off.
When editing or using Menu
functions, press to confirm your
selection.
HANDSET LOCATOR (PAGE) button
Press to make all registered handsets ring (this is useful if
you've forgotten where you put a handset).
Answering machi
n
This gives informa
t
number of recorde
details, see the ‘An
section of this gui
d
/Caller Display (CID) button
Press during a call to increase the volume in the earpiece.
Press while using Menu functions to move through the
options.
Press to show the list of Caller Display records.
Where to find it
IN USE light
This comes on when you have a
connection to the telephone line.
MENU/MUTE button
Press to start using Menu functions
Press while reviewing Phonebook, Redial or Caller
Display records, to start editing.
Press during a call to mute the mouthpiece so the
person on the other end can’t hear you.
button
Press when editing Phonebook, Redial or Caller
Display records, to move the cursor to the left.
R (Recall) button
You may need the Recall function during a call if your iDECT X1
is connected to a PBX, or if you use BT’s Select Services.
e information display
ion including the
d messages. For full
swering machine’
e.
HANG UP /ON–OFF / X (Cancel) button
Press to end a call.
Press and hold for 4 seconds to turn the handset on and off; or for 2 seconds to
lock and unlock the keypad.
Press while editing or using Menu functions, to cancel what you’re doing and
return the display to Standby mode.
Last Number Redial / /Pause button
Press to open a list of the last 10 phone numbers you called.
Press when editing Phonebook, Redial or Caller Display records, to move the
cursor to the right.
Press and hold while dialling to insert a pause (you might need this on a PBX).
#/INT (Intercom) button
Press and hold for 2 seconds to make an intercom call (if you have
more than one handset).
/Phone Book button
Press during a call to turn down the volume in the earpiece.
Press while using Menu functions to move through the options.
Press to open the Phone Book.
To subscribe to network features like Caller Display
and Call Waiting, simply call your network service
provider (the company that supplies your line). You
don’t need to do anything special on your iDECT X1
phone to set these features up.
If the display is blank
Press the button to switch
the handset on
E:\Binatone2006\iDECT_X1i\iDECT_X1i_UK_03.vp
12 June 2006 10:55:40
Color profile: Generic CMYK printer profile
Composite Default screen
Page 4
Help Line: 0845 345 9677 (Local Call rate) 1
18:44 WED
JANE 1
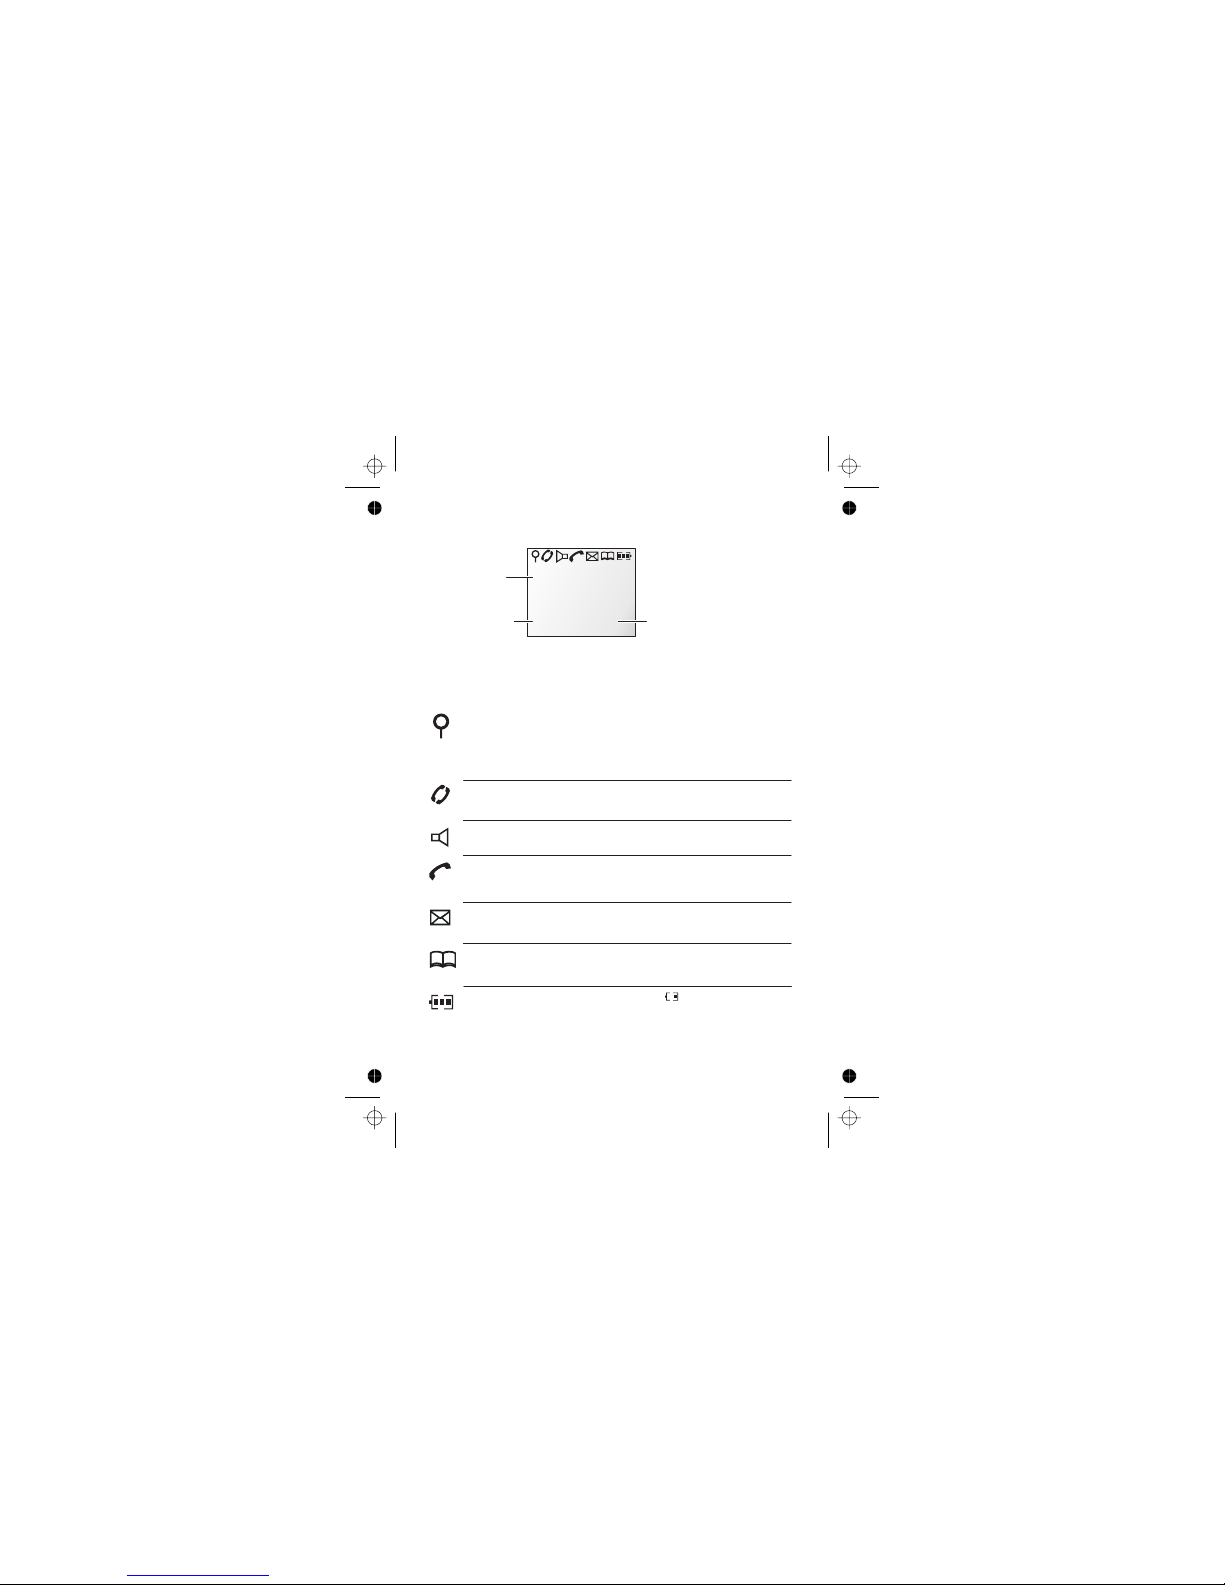
When this shows ‘nearly empty’ ( ), put the handset on
the base unit or charger pod as soon as possible, to charge
the batteries.
While the batteries are being charged, the symbol blinks.
Appears when you have a connection to the outside line.
Flashes when there’s an incoming call to be answered
(even if the ringer is turned off).
Appears when the speakerphone is turned on.
Symbols on the display
The handset’s number (if you
have more than one handset on
your iDECT X1 system)
The handset’s name
(the default is )
HANDSET
The time and date
Intercom
call
Memory/
store
Flashes while your handset is ringing for an intercom call, and
comes on steadily when the call’s connected.
Comes on when you’re storing numbers in memory, and when
you’re making calls to stored numbers.
Signal
level
This is on steadily when there’s a radio link between the handset
and base unit. lashes while the handset is trying to establish a
link .
.
It f
to the base unit
If this symbol flashes while you’re on a call, move closer to
the base unit
Battery
charge
level
Phone
Speakerphone
New call
Appears when you have missed incoming calls (if you
subscribe to Caller Display).
What the symbols mean
The duration of each call is shown on the display from 5 seconds
after you press the PHONE button for a line, until 10 seconds
after you end the call.
E:\Binatone2006\iDECT_X1i\iDECT_X1i_UK_03.vp
12 June 2006 10:53:48
Color profile: Generic CMYK printer profile
Composite Default screen
Page 5

Contents
Read these notes first 4
Choosing a site for the base unit and
charger pod 4
Radio signals between handset and
base unit 4
Mains power connection 4
Installation and set-up 5
Before you start 8
Electrical safety 8
Interference 8
‘Out of range’ warning 8
Switching on and off 9
To lock the keypad 9
Your handset’s name 10
To set the time and date 11
Ringer volume and melody 12
Making and answering calls 14
Using the speakerphone 14
To make a call 14
To answer a call 14
To end a call 14
Earpiece volume 15
To mute the mouthpiece 15
Last Number Redial (LNR) 15
To edit a number in the Redial list
15
To store a Redial number in the
Phone Book 16
The Phone Book (memory
dialling) 17
To store a number 17
To call a stored number 18
To edit a Phone Book entry 18
To delete a Phone Book entry 19
To delete all Phone Book entries 19
Caller Display 20
To check Caller Display records 21
To return a call 21
To store a Caller Display number in
the Phone Book 21
To edit a Caller Display record 22
Using a multi-handset system 23
To make an intercom call 23
To answer an intercom call 24
To end an intercom call 24
To transfer a call 24
To shuttle between two calls 25
To set up a three-way conference 25
New Call tone 26
To page all handsets from the
base unit 26
Registering new handsets 58
To register a new handset to your
base unit 58
To de-register a handset 59
To register to a different brand of
base unit 50
Answering machine
Introduction 27
To open and use the
TAM menu27
The display on the base unit 28
Outgoing messages 29
To record OGM1 29
To record OGM2 30
To check your OGMs 30
To select an OGM 31
2
E:\Binatone2006\iDECT_X1i\iDECT_X1i_UK_03.vp
12 June 2006 10:53:49
Color profile: Generic CMYK printer profile
Composite Default screen
Page 6

Contents
Help Line: 0845 345 9677 (Local Call rate) 3
Switching on and off 32
Recording a memo 33
Playing your messages 34
Options during playback 35
If memory is full … 36
Answering machine settings 37
Message recording time 37
Time stamping 38
Rings to answer 38
Call monitoring 39
Recording quality 39
Default settings 40
Remote operation 41
To change the PIN 41
To check your messages remotely 42
Switching on remotely 42
Keys to press during remote
operation 43
System settings
Handset settings 45
To open the Handset Setting menu
45
Earpiece volume 46
Key beep 46
Battery Low tone 47
Display language 47
Auto-answer 47
Returning to default settings 48
Handset PIN 49
Baby Call 50
To set or change the Baby Call
number 50
To turn Baby Call on and off 50
Base unit settings 51
To open the Base Setting menu 51
Returning to default settings 52
Dialling type and recall signal 52
Base unit PIN 53
Call control 54
The call timer 54
To bar certain types of call 55
To bar calls to specified numbers 55
Emergency numbers 57
Other information
Troubleshooting 58
Cleaning and care 67
Guarantee and service 68
Technical details 69
E:\Binatone2006\iDECT_X1i\iDECT_X1i_UK_03.vp
12 June 2006 10:53:49
Color profile: Generic CMYK printer profile
Composite Default screen
Page 7

Read these notes first
Choosing a site
for the base
unit and
charger pod
The base unit and charger pod(s) should be placed on a
level surface, in a position where:
■
the mains adapter plug will reach an easily accessible
230-V
AC switched mains supply socket — never try
to lengthen the mains power cable
■
the base unit’s telephone line cable will reach your
telephone line socket or extension socket (the charger
pod does not have a telephone line connection)
■
it is not close to another telephone — this can cause
radio interference
■
it is not close to a sink, bath or shower, or anywhere
else where it might get wet
■
it is not close to other electrical equipment — fridges,
washing machines, microwave ovens, fluorescent
lights, TVs etc.
Radio signals
between
handset and
base unit
To use your handset and base unit together, you must
be able to establish a radio link between them. Be
aware that:
■
Any large metal object — like a refrigerator, a mirror
or a filing cabinet — between the handset and the
base unit may block the radio signal.
■
Other solid structures, like walls, may reduce the
signal strength.
Mains power
connection
IMPORTANT — The iDECT X1i base unit and charger
pod must be used with the mains adapter supplied with
the unit. Using any other adapter will result in noncompliance with EN60950, and will invalidate any
approval given to this apparatus.
!
Make sure mains power to the base unit stays switched
on. The iDECT X1i needs electrical power for normal
operation; not just for charging the batteries.
4
E:\Binatone2006\iDECT_X1i\iDECT_X1i_UK_03.vp
12 June 2006 10:53:49
Color profile: Generic CMYK printer profile
Composite Default screen
Page 8
Installation and set-up
Help Line: 0845 345 9677 (Local Call rate) 5
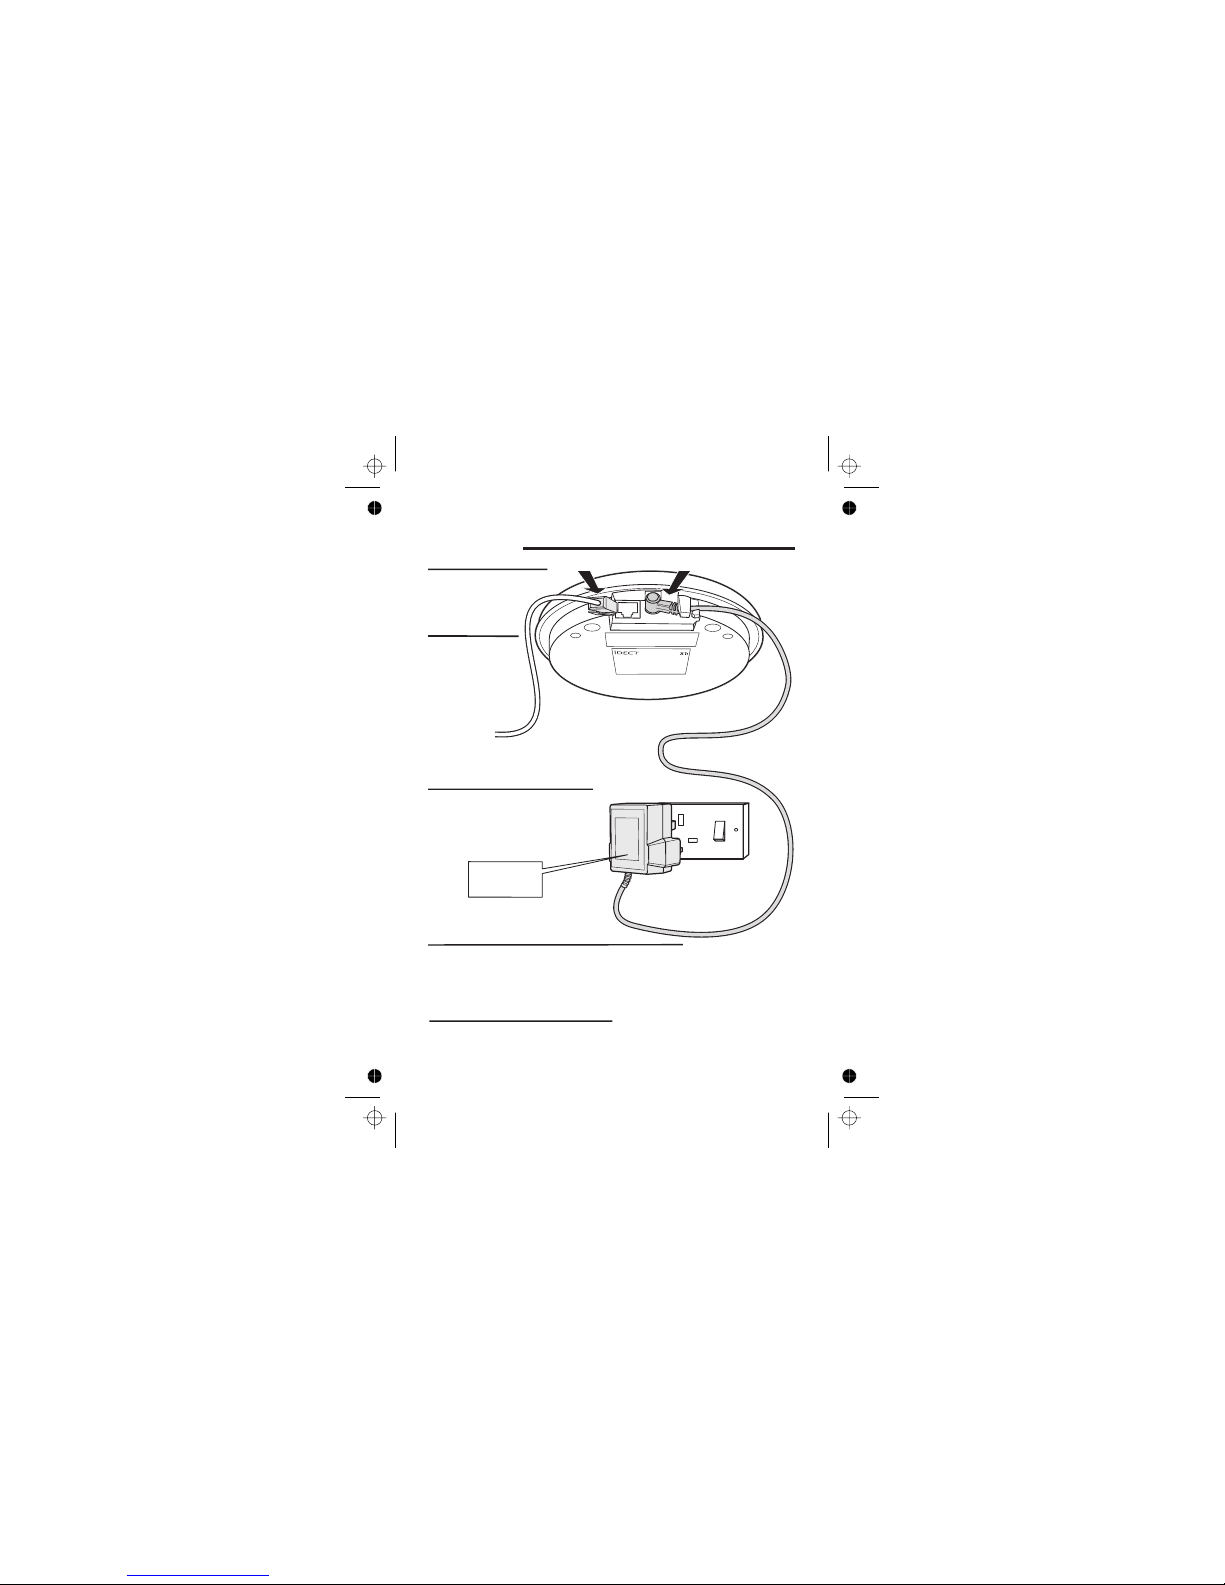
1
3
5
4
Choose a suitable
site for the base
unit
See page 4
Plug the mains adapter into
a 230 V AC, 50 Hz mains
socket, with the switch on
the socket set to OFF
Plug the mains adapter into a 230 V AC,
50 Hz mains socket, with the switch on
the socket set to OFF
Switch on at the mains socket(s)
If you have one or more charger pods …
2
See the note
on page 4
Use the telephone line
supplied with your
iDECT X1i —
do not use any other
telephone line cord
cord
Connect the
mains power
lead and the
telephone line
cord into the
underside of
the base unit
E:\Binatone2006\iDECT_X1i\iDECT_X1i_UK_03.vp
12 June 2006 10:53:51
Color profile: Generic CMYK printer profile
Composite Default screen
Page 9
Installation and set-up
6
6
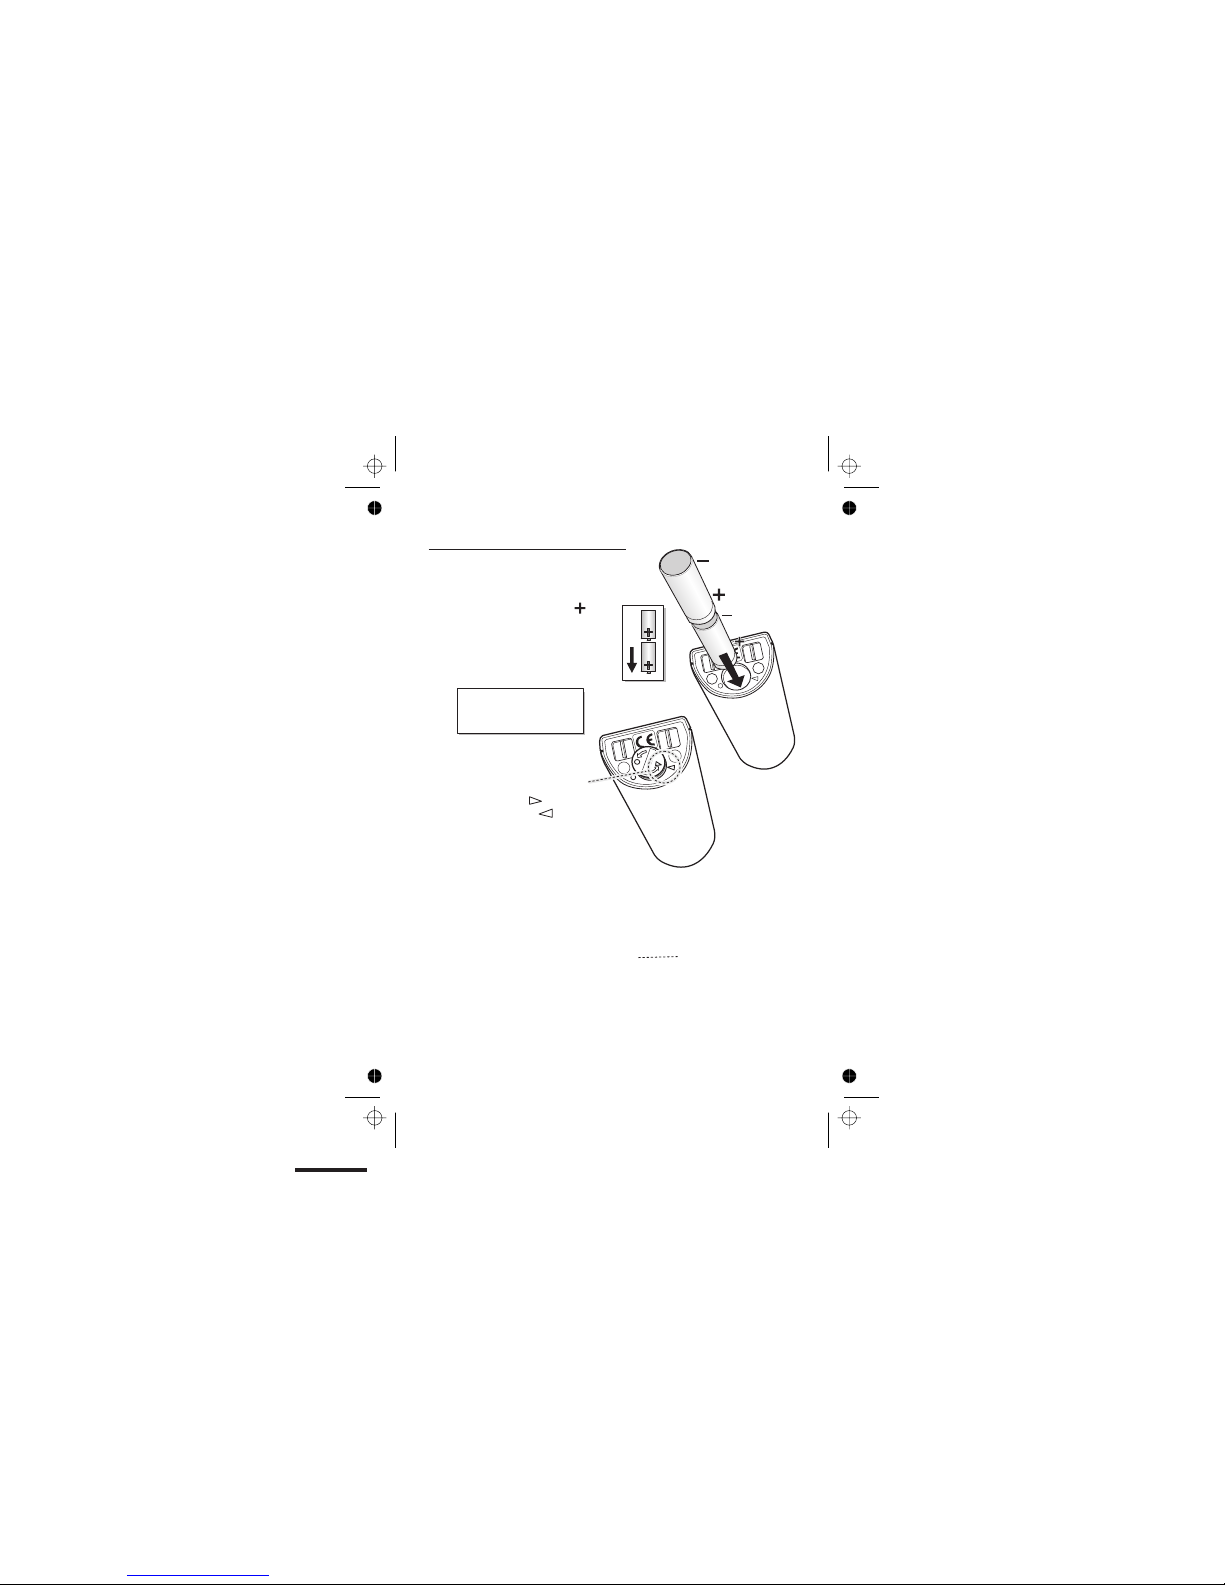
A. Insert the batteries in the
compartment, with the end
of each battery facing away
from the cover.
Fit two rechargeable batteries in
each handset
Always use the rechargeable
batteries supplied — never
use any other kind of
batteries in the handset.
Make sure the battery compartment door is securely
in place. If you have problems fitting the batteries,
contact the Help Line on 0845 345 9677.
B. Carefully close the battery
compartment door,
matching the symbol on
the door to the symbol
on the handset
E:\Binatone2006\iDECT_X1i\iDECT_X1i_UK_03.vp
12 June 2006 10:53:53
Color profile: Generic CMYK printer profile
Composite Default screen
Page 10
Installation and set-up
Help Line: 0845 345 9677 (Local Call rate) 7
7
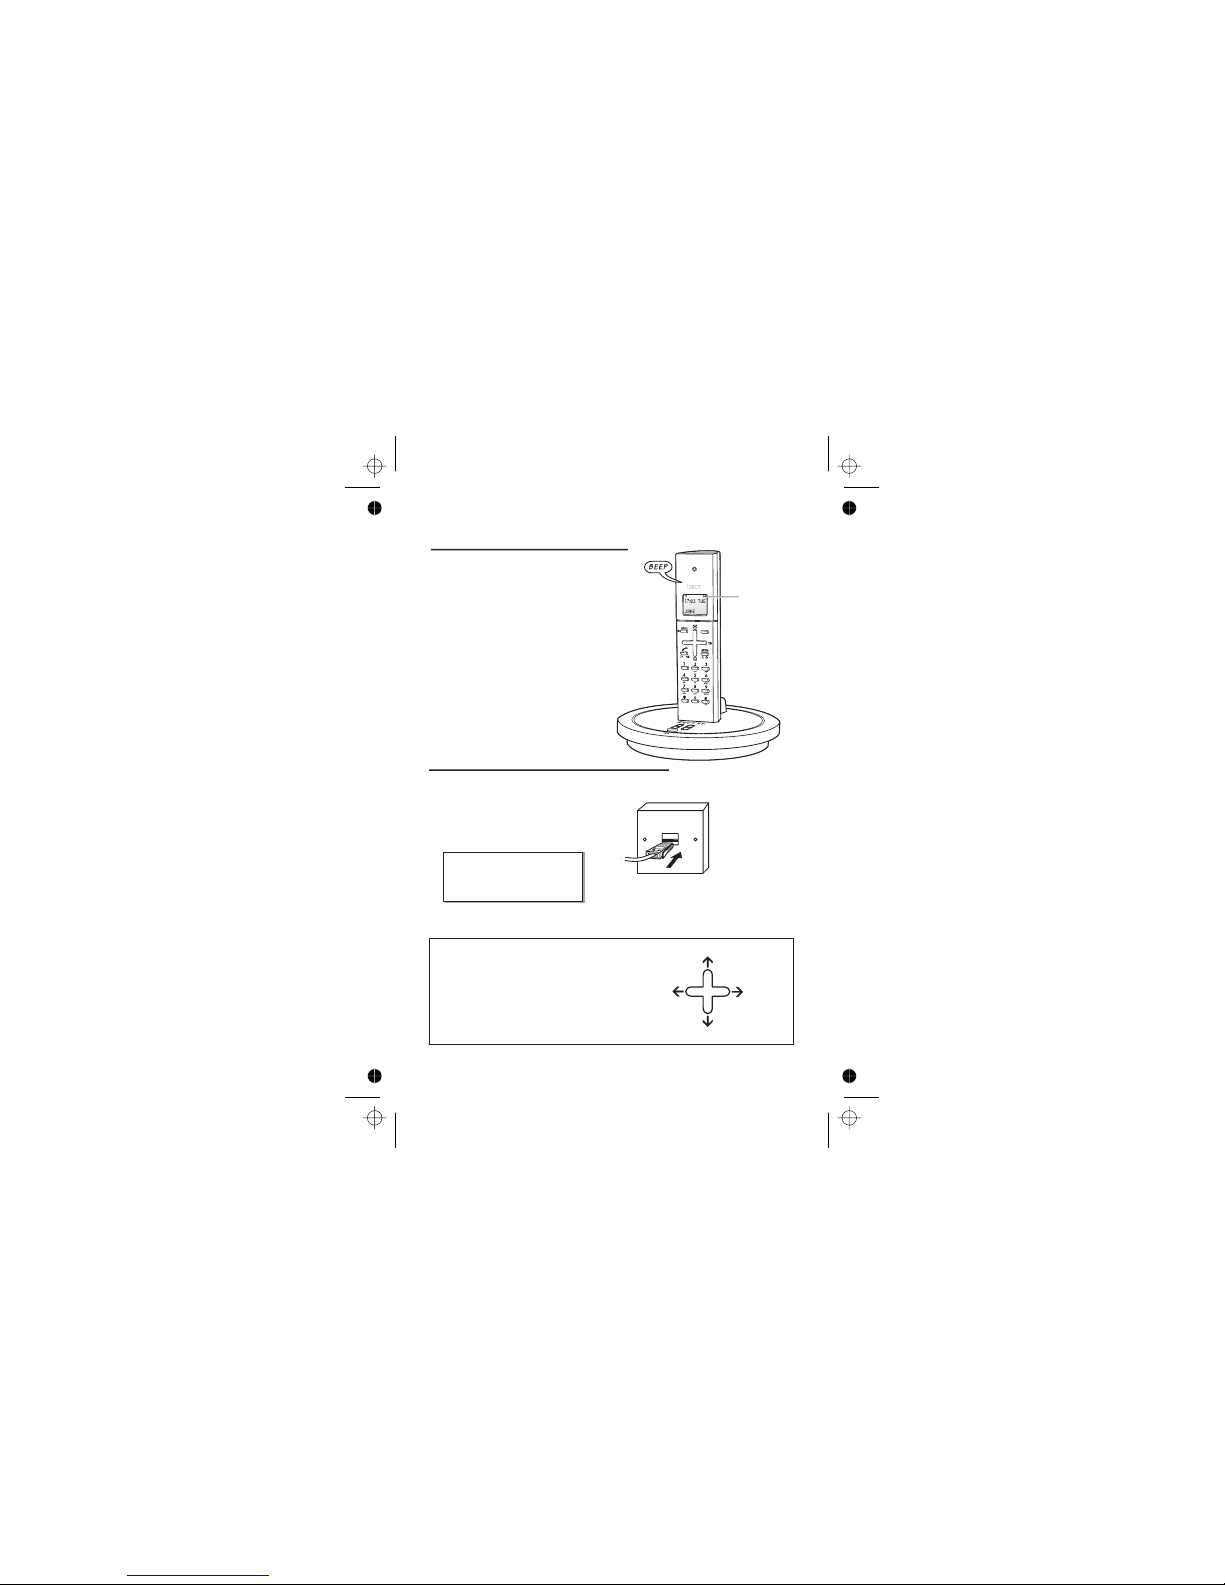
Charge the batteries for 15 hours
Before you use the handset for the
first time, it’s important to charge the
batteries fully.
The handset ‘beeps’ when it’s correctly
in position on the charging cradle.
Leave the handset on the charging
cradle for 15 hours.
Make sure the mains socket is
switched on if you want to use
the phone — it will not work
without electrical power
Connect the base unit to the telephone line
Switch off power at the mains socket
Insert the telephone line plug into
the socket as shown
Switch mains power back on
8
Use the plug to
raise the shutter
before pushing
it into the socket
NOTE: the charger pod does not have
a connection to the telephone line.
The ‘battery
charge level’
symbol blinks
The navigation buttons
In the instructions, these buttons are
represented by arrows, as shown here.
UP
LEFT
RIGHT
DOWN
E:\Binatone2006\iDECT_X1i\iDECT_X1i_UK_03.vp
12 June 2006 10:53:55
Color profile: Generic CMYK printer profile
Composite Default screen
Page 11

Before you start
Electrical
safety
■
DON’T let the base unit or charger pod get wet.
Electrical equipment can cause serious injury if used
while you are wet or standing in water.
■
If the base unit or charger pod ever falls into water,
DON’T retrieve it until you have unplugged the power
lead from the mains and the telephone line plug from
the telephone socket (base unit only); then pull it out by
the unplugged cables.
■
NEVER use your iDECT X1i outdoors during a thunder
storm — unplug the base unit from the telephone line
and the mains socket when there are storms in your
area. Damage caused by lightning is not covered by the
guarantee.
Interference If the sound quality gets worse as you move around
while on a call, this is probably caused by interference
between the handset and the base unit, perhaps
because you are too near to another phone or other
electrical equipment.
Move to a different position to clear the interference.
If you do not move, your call may be cut off.
!
Radio interference in the environment may occasion
ally cause a short break in the link between the
handset and the base unit while you are on a call.
The ‘signal level’ on symbol handset’s display may
flash until the link is restored.
‘Out of range’
warning
If you hear a warning tone during a call, and/or the
sound in the earpiece becomes faint or distorted, you
may be going out of range of the base unit. Move
nearer to the base unit within 20 seconds, until the
tone stops. Otherwise, your call may be cut off.
8
E:\Binatone2006\iDECT_X1i\iDECT_X1i_UK_03.vp
12 June 2006 10:53:55
Color profile: Generic CMYK printer profile
Composite Default screen
Page 12
Switching on and off
To switch the
handset on
and off
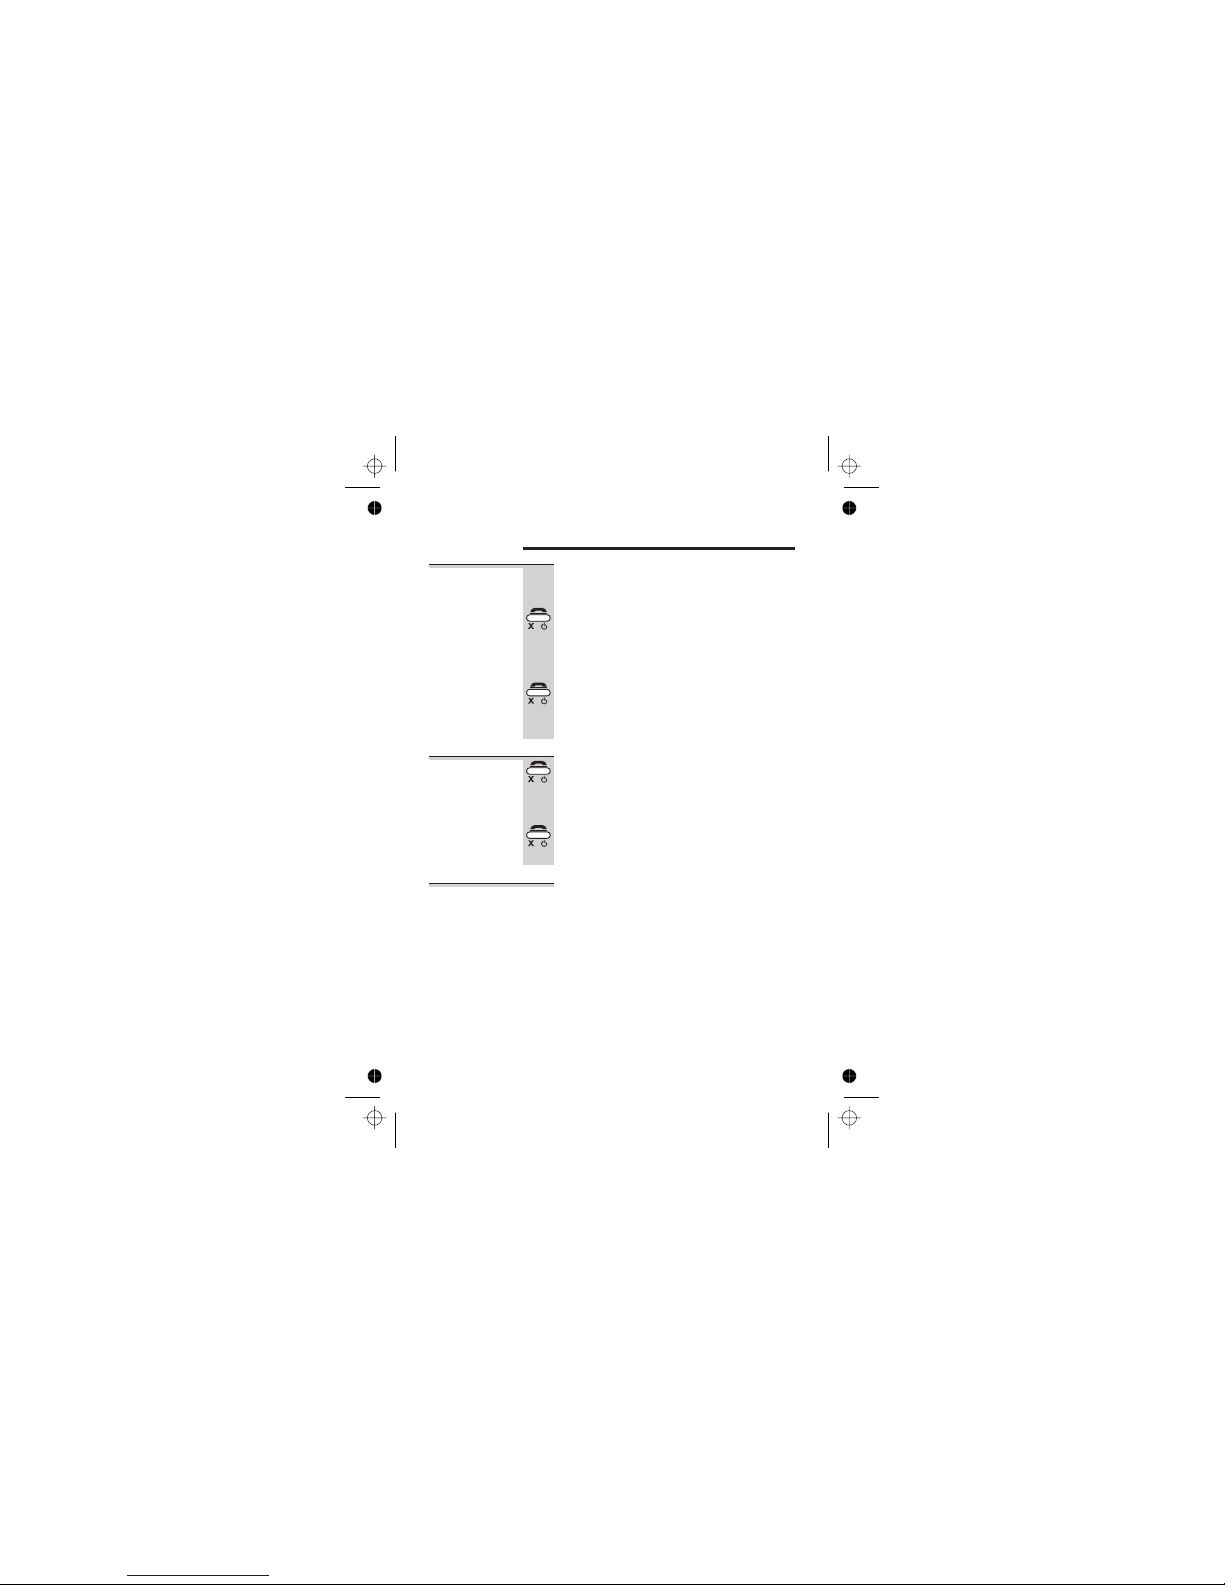
To switch the handset off (in case you need to
save battery power when the handset is away
from the base unit):
◗
Press the HANG UP button and hold it for
4 seconds
è
The display shows POWER OFF then goes
blank.
To switch the handset back on:
◗
Briefly press the HANG UP button, or replace
the handset on the base unit or charger pod
è
The display briefly shows 00:00 SUN before
returning to standby mode.
To lock the
keypad
◗
Press the HANG UP button and hold it for
2 seconds
è
The display shows KEYPAD LOCKED
To unlock the keypad:
◗
Press the HANG UP button and hold it for
2 seconds, or replace the handset on the
base unit or charger pod
Notes
■
When the handset is switched off, it can’t be used for
making calls, including emergency calls.
■
When the handset is switched off, it won’t ring for
incoming calls, but the base unit will ring. To answer a
call when the handset is switched off, you need to
switch it back on. It may take a few moments for the
handset to re-establish a radio link with the base unit.
Help Line: 0845 345 9677 (Local Call rate) 9
E:\Binatone2006\iDECT_X1i\iDECT_X1i_UK_03.vp
12 June 2006 10:53:55
Color profile: Generic CMYK printer profile
Composite Default screen
Page 13

Your handset’s name
Before you start to use your iDECT X1i handset, especially
if you have a multi-handset system, you’ll probably want
to personalise the display with your name. The name can
have up to eight characters (including spaces).
To change
the name
1 Press the MENU button
è
The display shows PHONEBOOK
2 Press the â button THREE times
è
The display shows SETTING
3 Press the PHONE/OK button
è
The display shows HANDSET SETTING
4 Press the PHONE/OK button
è
The display shows ACOUSTIC SETTING
5 Press the á button once
è The display shows HANDSET NAME and the
current name.
6 Press the PHONE/OK button
è
The display shows ENTER NAME and the
current name.
7 Press the HANG UP button to delete
characters from the current name, then key
in your chosen name
8 When you’ve finished, press the MENU/OK
button
9 Press the HANG UP button to go back to
standby mode
10
E:\Binatone2006\iDECT_X1i\iDECT_X1i_UK_03.vp
12 June 2006 10:53:56
Color profile: Generic CMYK printer profile
Composite Default screen
Page 14

To set the time and date
1 Press the MENU button
è
The display shows PHONEBOOK
2 Press the â button THREE times
è
The display shows SETTING
3 Press the PHONE/OK button then the â
button
è
The display shows BASE SETTING
4 Press the PHONE/OK button then the â
button
è
The display shows TIME & DAY SETTING
5 Press the PHONE/OK button
è
The display shows SET TIME and the time in
24-hour format.
6 Key in the time, as a four-digit number, then
press the PHONE/OK button
Remember to use the 24-hour clock and to
include any 0s (zeroes) — for example, 9:30 am
is
09:30; 6:05 pm is 18:05.
è
The display shows SET DAY and the day.
7 Use the â or á button to go to the correct
day of the week, then press the PHONE/OK
button
è
The display shows DD/MM/YY
8 Key in the date, as a six-digit number, then
press the PHONE/OK button
Remember to include any 0s (zeroes) — for
example, 6 July 2006 is
060706.
9 Press the HANG UP button to go back to
standby mode
Help Line: 0845 345 9677 (Local Call rate) 11
E:\Binatone2006\iDECT_X1i\iDECT_X1i_UK_03.vp
12 June 2006 10:53:56
Color profile: Generic CMYK printer profile
Composite Default screen
Page 15

Ringer volume and melody
Handset
ringer
1 Press the MENU button
è
The display shows PHONEBOOK
2 Press the â button THREE times
è
The display shows SETTING
3 Press the PHONE/OK button
è
The display shows HANDSET SETTING
4 Press the PHONE/OK button
è
The display shows ACOUSTIC SETTING
5 Press the PHONE/OK button
è
The display shows RINGER VOLUME LEVEL
and the current level
6 Press the PHONE/OK button
è
The display shows SET VOLUME LEVEL and
the handset rings at the current level. There are
four volume levels —
1, 2, 3 and 0. With the
volume at
0, the handset won’t ring.
7 Use the â or á button to go to the level you
prefer then press the PHONE/OK button
è
The display shows ACOUSTIC SETTING
8 Press the PHONE/OK button then the â
button
è
The display shows RINGER MELODY and the
current melody. There are six melodies,
numbered
1 to 6
9 Press the á or â button to move between
the melodies. When you reach the one you
prefer, press the PHONE/OK button
10 Press the HANG UP button to go back to
standby mode
12
E:\Binatone2006\iDECT_X1i\iDECT_X1i_UK_03.vp
12 June 2006 10:53:56
Color profile: Generic CMYK printer profile
Composite Default screen
Page 16

Base unit
ringer
1 Press the MENU button
è
The display shows PHONEBOOK
2 Press the â button THREE times
è
The display shows SETTING
3 Press the PHONE/OK button then the â
button
è
The display shows BASE SETTING
4 Press the PHONE/OK button
è
The display shows ACOUSTIC SETTING
5 Press the PHONE/OK button
è
The display shows RINGER VOLUME LEVEL
and the current level.
6 Press the PHONE/OK button
è
The display shows SET VOLUME LEVEL and
the base unit rings at the current level. There
are four volume levels —
1, 2, 3 and 0. With
the volume set to
0, the base unit won’t ring
for incoming calls.
7 Use the â or á button to go to the level you
prefer then press the PHONE/OK button
è
The display shows ACOUSTIC SETTING
8 Press the PHONE/OK button then the â
button
è
The display shows RINGER MELODY and the
current melody. There are six melodies,
numbered
1 to 6
9 Press the á or â button to move between
the melodies. When you reach the one you
prefer, press the PHONE/OK button
10 Press the HANG UP button to go back to
standby mode
Ringer volume and melody
Help Line: 0845 345 9677 (Local Call rate) 13
E:\Binatone2006\iDECT_X1i\iDECT_X1i_UK_03.vp
12 June 2006 10:53:56
Color profile: Generic CMYK printer profile
Composite Default screen
Page 17

Making and answering calls
Using the
speakerphone
The speakerphone lets you hear calls without holding
the handset to your ear.
You can switch between speakerphone and earpiece
mode during calls at any time by pressing the
PHONE/SPEAKERPHONE button. The display will show
SPEAKER PHONE ON or SPEAKER PHONE OFF
To make a call1 Key in the telephone number
If you make a mistake, press the HANG UP
button to clear digits one by one from the display.
2 Press the PHONE button
(You can dial the number after you press the
PHONE button to get Dial tone if you prefer,
but you can’t correct any mistakes if you do it
this way. If you press the PHONE button before
you dial, the display shows
ONLINE.)
To answer a
call
When there’s an incoming call, the base unit and handset
ring (unless the handset’s ringer is turned off). If you
subscribe to Caller Display (see page 20) the caller’s
number or name may appear on the display; otherwise,
the display shows
<<CALL>>.
◗
Press any button (except HANG UP) to answer the
call
è
The display shows ONLINE
To end a call
◗
Press the HANG UP button so that the
IN USE light on the base unit goes out
◗
Or just replace the handset on the base unit
è
The display shows CALL END and the
duration of the call.
14
E:\Binatone2006\iDECT_X1i\iDECT_X1i_UK_03.vp
12 June 2006 10:53:56
Color profile: Generic CMYK printer profile
Composite Default screen
Page 18
Earpiece
volume
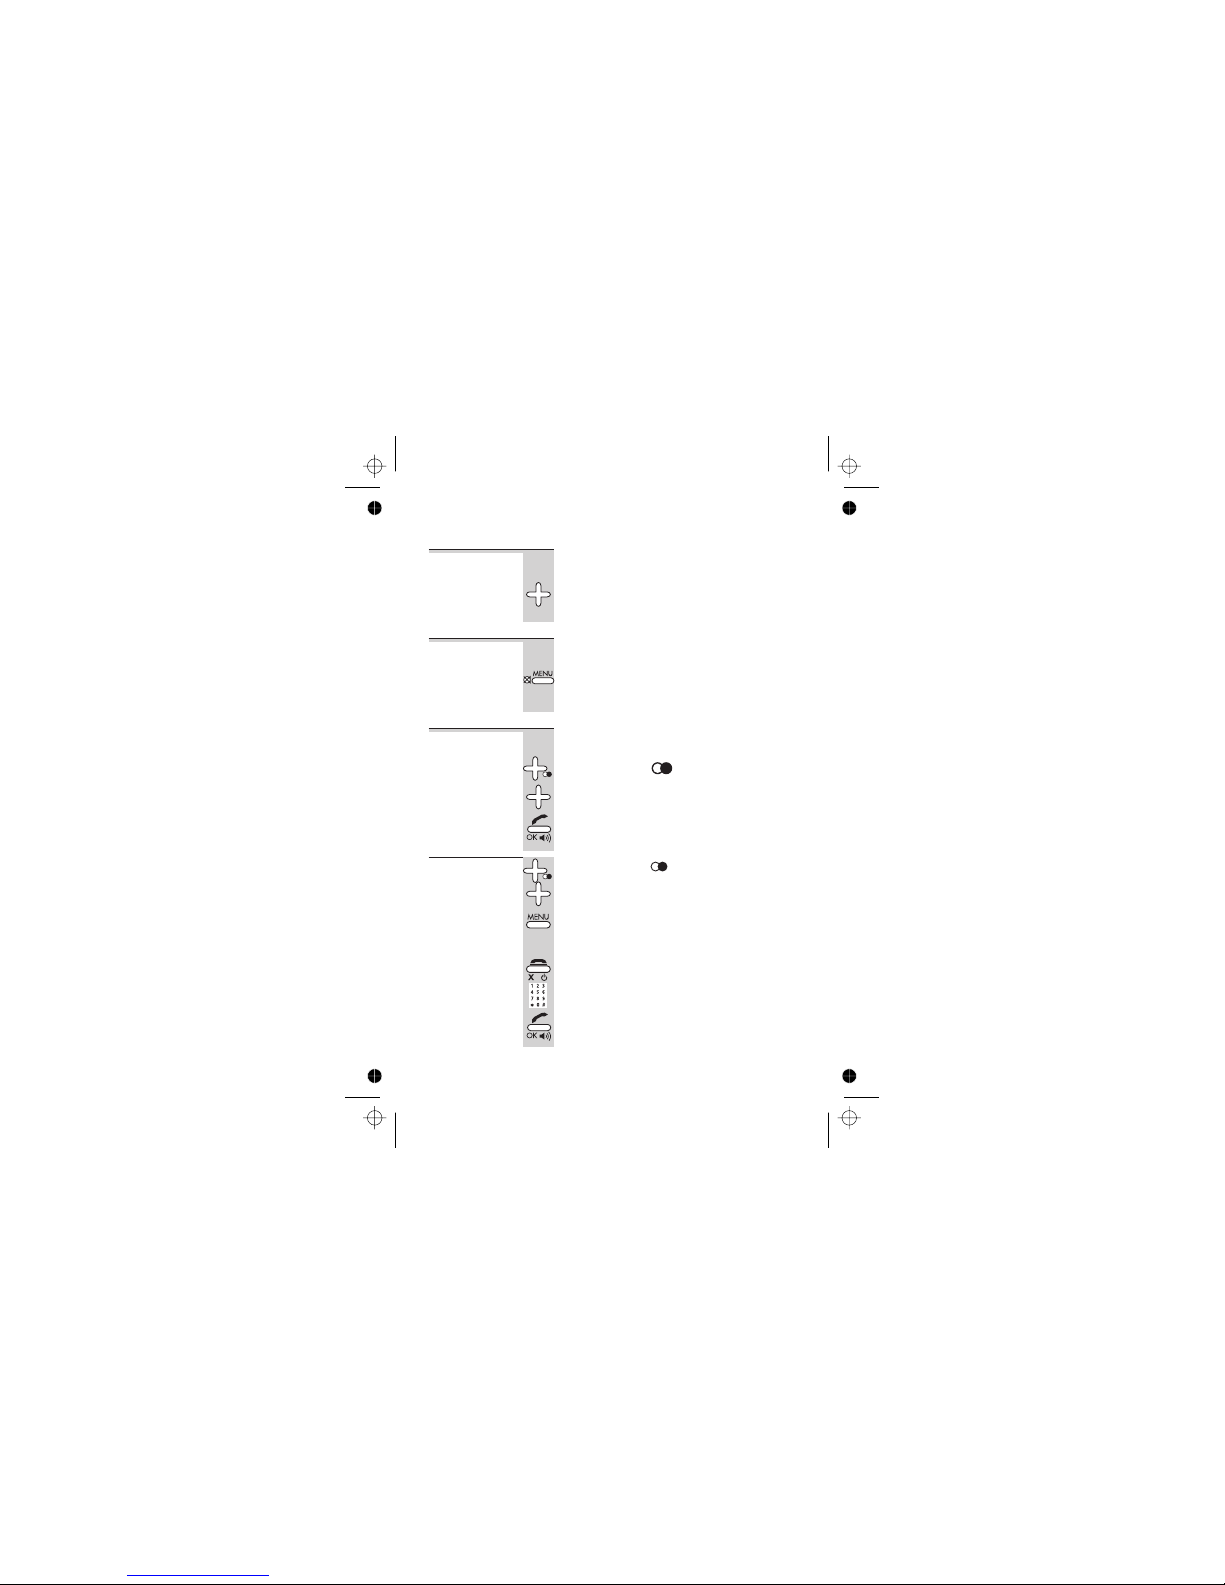
During a call, to adjust the volume in the earpiece
or speakerphone:
◗
Press the á or â button
There are three volume levels. After you end the
call, the volume will stay at the level you’ve set.
To mute the
mouthpiece
During a call, to mute the mouthpiece so the
person on the other end can’t hear you:
◗
Press the MENU/MUTE button
To un-mute the mouthpiece, press the
MENU/MUTE button again.
Last Number
Redial (LNR)
To make a repeat call to one of the last ten
numbers you dialled (up to 32 digits):
1 Press the Redial button
2 Press the á or â button if necessary until
the number is displayed
3 Press the PHONE button to dial the number
To edit a
number in the
Redial list
1 Press the Redial button, then the á or â
button until the number is displayed
2 Press the MENU button
è
The display shows EDIT REDIAL, the entry
number (
#01 upwards) and the stored number,
with a flashing cursor
3 Press the HANG UP button to delete digits,
then key in the new digits
4 When you’ve finished, press the PHONE/OK
button, then the HANG UP button to go
back to standby mode
Making and answering calls
Help Line: 0845 345 9677 (Local Call rate) 15
E:\Binatone2006\iDECT_X1i\iDECT_X1i_UK_03.vp
12 June 2006 10:53:57
Color profile: Generic CMYK printer profile
Composite Default screen
Page 19

To store a
Redial number
in the Phone
Book
1 Press the Redial button, then the á or â
button until the number is displayed
2 Press and hold the PHONE BOOK button for
2 seconds
è
The display shows ENTER NAME
3 Key in a name then press the PHONE/OK
button
è
The display show the name and STORED
(See the list below for which buttons to use
for which characters.)
4 Press the HANG UP button to go back to
standby mode
Making and answering calls
16
E:\Binatone2006\iDECT_X1i\iDECT_X1i_UK_03.vp
12 June 2006 10:53:57
Color profile: Generic CMYK printer profile
Composite Default screen
Page 20

The Phone Book (memory dialling)
You can store up to 50 numbers in the Phone Book.
Each number can have up to 32 digits, and can be
stored with a name of up to 20 characters (including
spaces).
To store a
number
1 Press the Phone Book button and hold
it for about 2 seconds*
è
The display shows PHONEBOOK ADD ENTRY
2 Press the PHONE/OK button
è
The display shows ENTER NAME
3 Key in a name** then press the PHONE/OK
button
è
The display shows ENTER NUMBER
4 Key in a number*** and press the MENU/OK
button
è
The display shows the name and STORED
5 Press the HANG UP button to go back to
standby mode
* This is a short-cut method. You can also press the
Phone Book button followed by the MENU button. Or you
can press MENU—PHONE/OK—MENU.
** Refer to the diagram on page 16 if you’re not sure how to
key in text using the numbered keypad.
*** If you use Caller Display, it’s best to store the number with
the full national dialling code, even if it’s a local number.
You’ll still be charged at Local rate when you call the number.
Help Line: 0845 345 9677 (Local Call rate) 17
E:\Binatone2006\iDECT_X1i\iDECT_X1i_UK_03.vp
12 June 2006 10:53:57
Color profile: Generic CMYK printer profile
Composite Default screen
Page 21

To call a
stored number
1 Press the Phone Book button
è
The display shows the first entry in the
Phone Book. If the number has more than nine
digits, it’s shown with an arrow
» at the end,
and you can press the à button to show the
rest of the digits.
2 Press the á or â button to go to the
number you want
OR you can search by pressing a button on the
numeric keypad for the first letter of the name,
then using the á and â buttons if necessary.
3 Press the PHONE button to dial the number
To edit a
Phone Book
entry
1 Press the Phone Book button then the á or
â button to go to the number you want
2 Press the MENU button, then the â button
è
The display shows PHONEBOOK EDIT ENTRY
3 Press the PHONE/OK button
è
The display shows EDIT NAME and the name.
4 To edit the name, use the HANG UP button
to delete characters, then key in the new ones
5 Press the PHONE/OK button
è
The display shows EDIT NUMBER and the
number.
6 To edit the number, use the HANG UP button
to delete digits, then key in the new ones
7 Press the PHONE/OK button then the
HANG UP button to go back to standby
mode
The Phone Book (memory dialling)
18
E:\Binatone2006\iDECT_X1i\iDECT_X1i_UK_03.vp
12 June 2006 10:53:57
Color profile: Generic CMYK printer profile
Composite Default screen
Page 22

To delete a
Phone Book
entry
1 Press the Phone Book button then the á or
â button to go to the number you want
2 Press the MENU button, then the â button
TWICE
è
The display shows PHONEBOOK
DELETE ENTRY
3 Press the PHONE/OK button
è
The display shows DELETE? and the name.
4 Press the PHONE/OK button to delete the
entry, or the HANG UP button to cancel and
go back one step
5 Press the HANG UP button to go back to
standby mode
To delete all
Phone Book
entries
1 Press the Phone Book button
2 Press the MENU button, then the â button
THREE times
è
The display shows PHONEBOOK DELETE ALL
3 Press the PHONE/OK button
è
The display shows ENTER H/S PIN
The handset’s PIN is 0000 unless you have
changed it (see page 49). When you key in the
PIN, the display shows it as
****
4 Key in the handset’s PIN and press the
PHONE/OK button
è
The display shows PHONEBOOK ALL DELETED
The Phone Book (memory dialling)
Help Line: 0845 345 9677 (Local Call rate) 19
E:\Binatone2006\iDECT_X1i\iDECT_X1i_UK_03.vp
12 June 2006 10:53:57
Color profile: Generic CMYK printer profile
Composite Default screen
Page 23
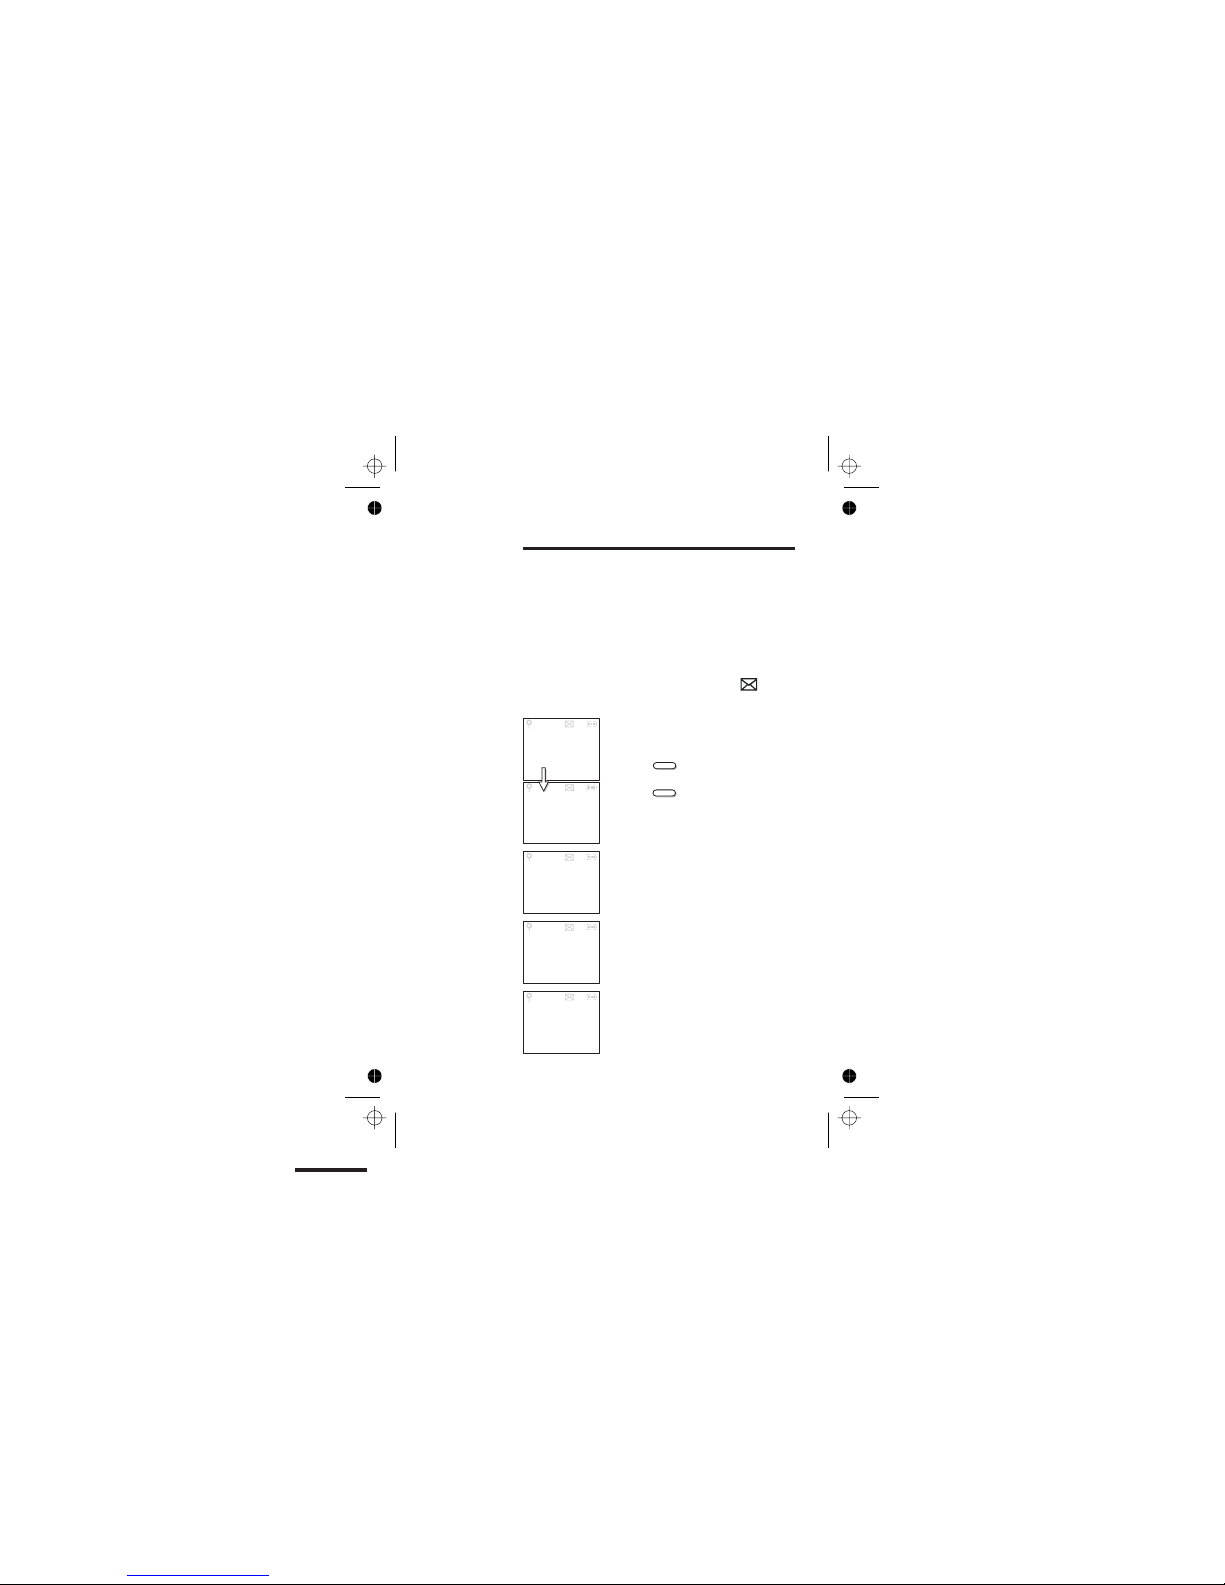
Caller Display
!
To subscribe to this feature, you need to contact your
service provider, who will tell how much it will cost.
Caller Display lets you see the phone numbers of your
callers on the handset’s display, before you answer. The
iDECT X1i will store the numbers of the last 20 callers
(whether or not you answered the call) so you can call
them back later. When the Caller Display list is full, the
next incoming number will overwrite the oldest one.
If you’ve got new Caller Display records, the symbol
is shown on the display.
20
A call from someone whose name
(Jenny) and number are stored in your
Phone Book.
Press the (HASH) button once to
see the full number.
came in
at 4:21 pm on Tuesday.
Press the button again to see
more details. In this example, there
have been two calls from this number
( ) and the most recent call
02x
A call from someone who withheld their
number by dialling 141.
A call from someone whose name and
number are not stored in your Phone
Book.
A call from someone whose number is
unavailable (for example, this may be
an international call).
The record number
is onwards.#01
CID #01
JENNY
CID #01
02x TUE
16:21
CID #02
07967345
678
CID #03
<PRIVATE>
CID #06
<OUT OF AR
EA>
#
#
Here are some
examples of
Caller Display
records:
E:\Binatone2006\iDECT_X1i\iDECT_X1i_UK_03.vp
12 June 2006 10:53:59
Color profile: Generic CMYK printer profile
Composite Default screen
Page 24

To check
Caller Display
records
1 Press the Caller Display button
è
The most recent record is shown on the display.
2 To see more details, press the # (HASH) button
(Refer to the diagram on page 20.)
3 Press the á or â button to scroll through
the records
è
Once you’ve checked all new records, the
symbol disappears from the display.
4 Press the HANG UP button to go back to
standby mode
To return a
call
To ring back someone who’s called you:
1 Follow steps 1 to 3 above (step 2 is optional)
to display the record
2 Press the PHONE button to dial the number
To store a
Caller Display
number in
the Phone
Book
1 Use steps 1 to 3 above (step 2 is optional) to
display the record
2 Press and hold the Phone Book button for
2 seconds
è
The display shows ENTER NAME *
3 Key in a name then press the PHONE/OK
button
è
The display show the name and STORED
4 Press the HANG UP button to go back to
standby mode
Caller Display
Help Line: 0845 345 9677 (Local Call rate) 21
E:\Binatone2006\iDECT_X1i\iDECT_X1i_UK_03.vp
12 June 2006 10:54:00
Color profile: Generic CMYK printer profile
Composite Default screen
Page 25

To edit a
Caller Display
record
1 Press the Caller Display button, then the á
or â button if necessar y, to display the
record
2 Press the MENU button
è
The display shows EDIT CID followed by the
record number and the phone number.
3 To edit the number, use the HANG UP
button to delete digits, then key in the new
ones
4 When you’ve finished, press the PHONE/OK
button
5 Press the HANG UP button to go back to
standby mode
Caller Display
22
E:\Binatone2006\iDECT_X1i\iDECT_X1i_UK_03.vp
12 June 2006 10:54:00
Color profile: Generic CMYK printer profile
Composite Default screen
Page 26

Using a multi-handset system
If you have an iDECT X1i multi-handset system, you
already have more than one handset registered to your
base unit. You can register additional handsets — up to
four per base unit. With two or more handsets, you can:
■
make intercom calls from one handset to another
■
transfer an outside call from one handset to another
■
shuttle between an outside call and an intercom call
■
set up a three-way conference call
Each handset’s number (1 to 4) is shown on its display.
!
Only one handset can be connected to the outside
line at once. If you try to make a call while another
handset is already on the line, you’ll hear Busy tone.
To make an
intercom call
There are two ways to make an intercom call.
First method:
1 Press and hold the INT/# button for 2
seconds until
INTERCOM is shown on the
display
2 Use the á or â button to scroll through
available handset numbers, then press the
PHONE/OK button
è
The other handset rings, and its display
shows
INTERNAL FROM # (with your handset
number). When the other handset user
answers, you’ll be connected.
Second method:
1 Press the MENU button then the â button
TWICE
è
The display shows INTERNAL CALL
2 Press the PHONE/OK button
è
INTERCOM appears on the display, and you
can carry on to select the handset number
(step 2 of the first method).
Help Line: 0845 345 9677 (Local Call rate) 23
E:\Binatone2006\iDECT_X1i\iDECT_X1i_UK_03.vp
12 June 2006 10:54:00
Color profile: Generic CMYK printer profile
Composite Default screen
Page 27

To answer an
intercom call
The ringing tune for intercom calls is different from that
for outside calls.
When someone makes an intercom call to you, your
handset’s display shows
INTERNAL FROM # with the
number of the handset calling you.
◗
Press any button (except HANG UP) to answer
To end
an intercom
call
◗
Press the HANG UP button
◗
Or simply replace the handset on the base
unit or charger pod
To transfer a
call
When you’re talking on an outside call (a call
you’ve either made or answered), you can
transfer it to another handset:
1 Press and hold the INT/# button until the
‘Intercom’ symbol flashes on the display.
Then use the á or â button to go to the
handset number (or press Ø to call all other
handsets)
è
The outside call is put on hold and the other
handset rings. When the other handset user
answers, you can speak to her/him.
If the other user does not answer, you can get
back to the outside call at any time by pressing
and holding the INT/# button again.
2 Press the HANG UP button to hang up and
transfer the call
If you prefer, you can press HANG UP to transfer
the outside call before the other handset
answers your intercom call. If the user hasn’t
answered after 30 seconds, the outside call will
come back to you and your handset will ring.
Using a multi-handset system
24
E:\Binatone2006\iDECT_X1i\iDECT_X1i_UK_03.vp
12 June 2006 10:54:00
Color profile: Generic CMYK printer profile
Composite Default screen
Page 28
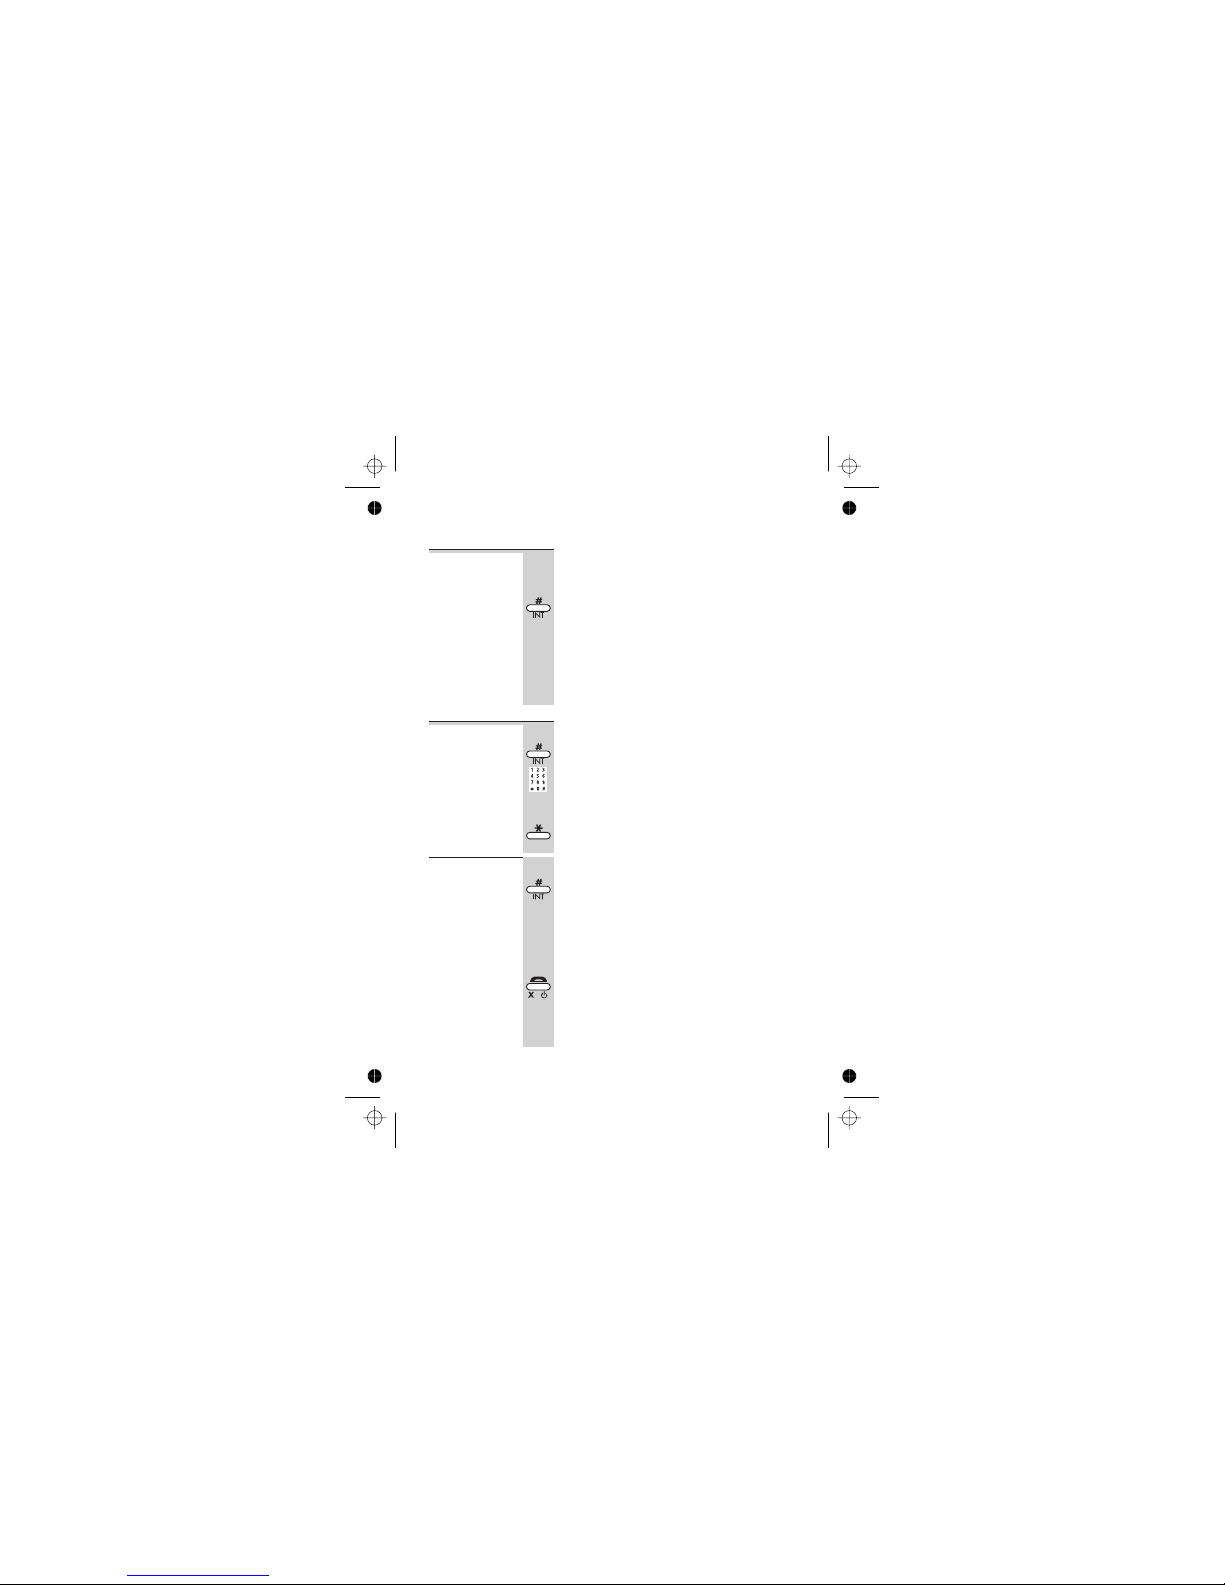
To shuttle
between two
calls
When you have made or answered an outside
call and then made an intercom call, you can
shuttle from one to the other, like this:
◗
Press and hold the INT/# button for one
second to speak to each in turn, putting the
other on hold
You can transfer the outside call to the other
handset by pressing HANG UP while you’re
connected to the intercom call
If you press HANG UP while you’re connected
to the outside call, you’ll disconnect it.
To set up a
three-way
conference
1 Make or answer an outside call
2 Press and hold the INT/# button then use
the á or â button to go to the handset
number (or press Ø to call all other handsets)
è The outside call is put on hold and the other
handset rings.
When the other user answers:
3 Press the Ø button for two seconds
To end the
conference
EITHER
◗
Press the # button for one second
è
You stay connected to the outside call and
the intercom call is put on hold*. Provided the
other user hasn’t hung up, you can bring
her/him back into the conference by pressing
the # button again.
OR, to drop out of the conference call, leaving
the other user connected to the outside call:
◗
Press the HANG UP button
* You can only do this if you were the one who set up
the conference. If you were brought into the conference
by the other user and you press the # button at this
point, you’ll cut off the conference call.
Using a multi-handset system
Help Line: 0845 345 9677 (Local Call rate) 25
E:\Binatone2006\iDECT_X1i\iDECT_X1i_UK_03.vp
12 June 2006 10:54:00
Color profile: Generic CMYK printer profile
Composite Default screen
Page 29
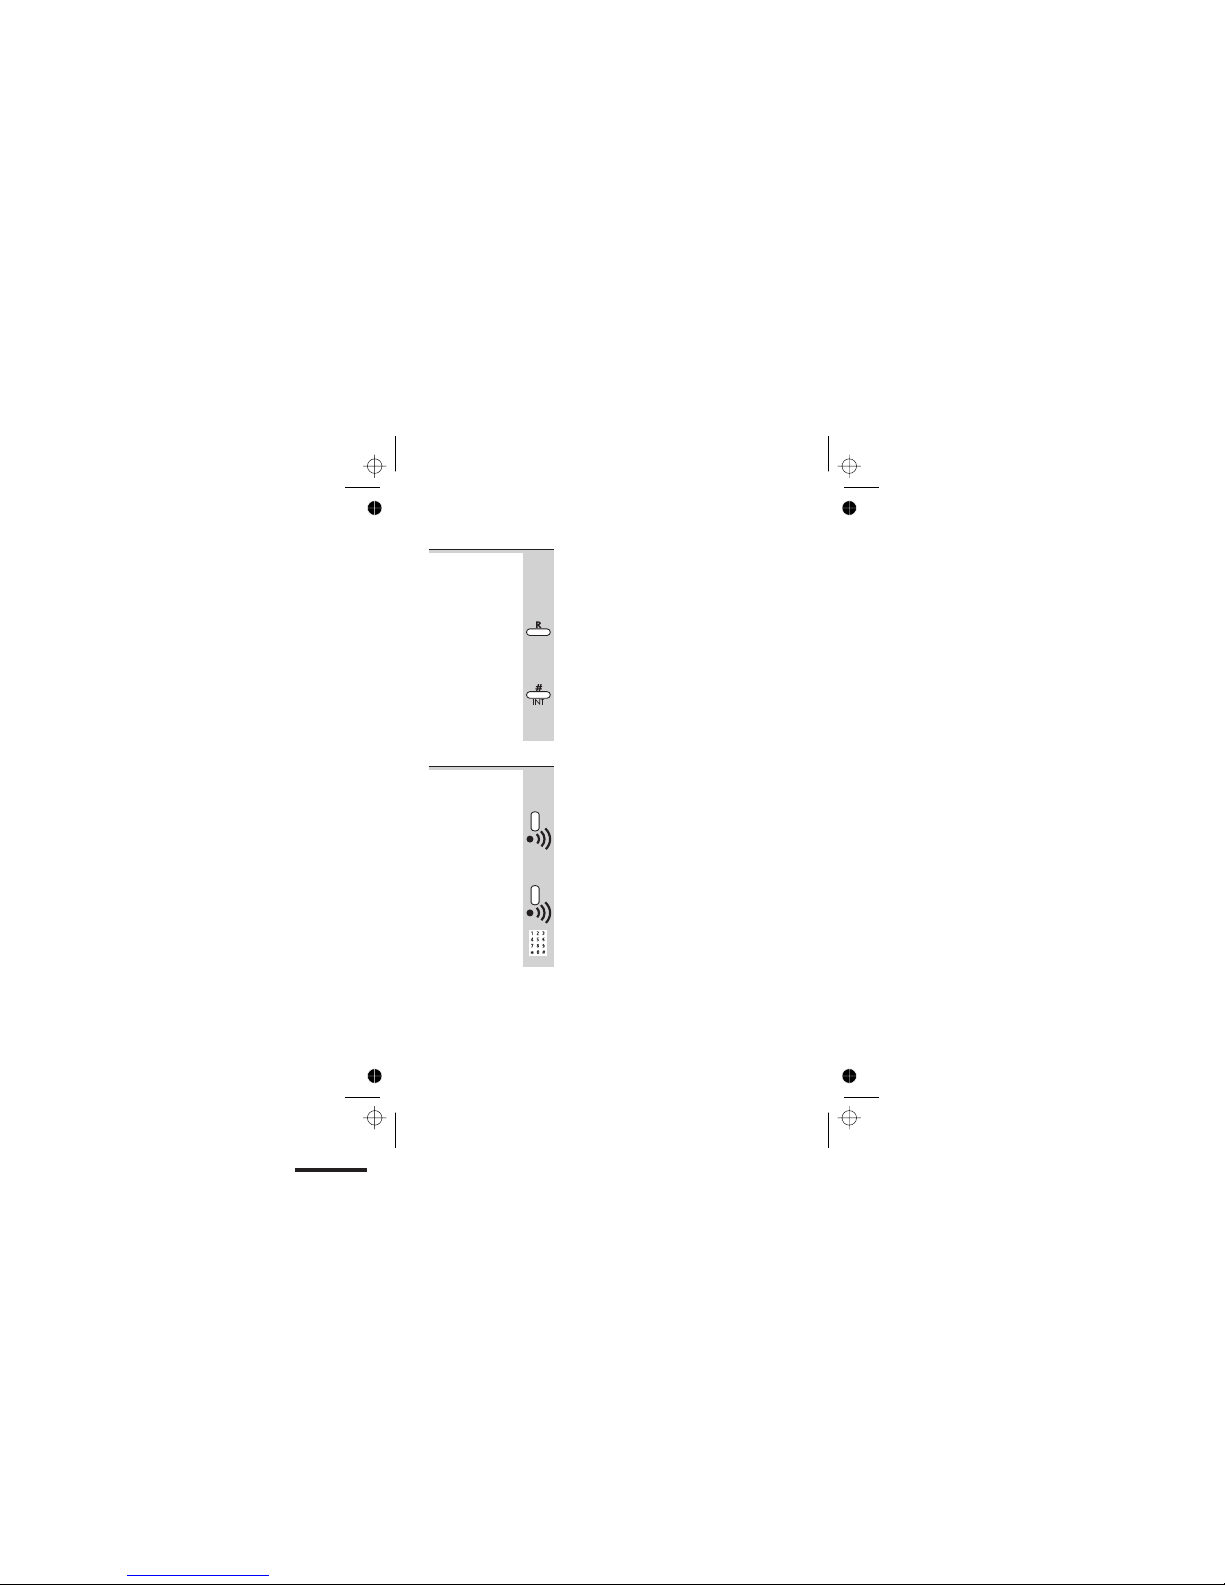
New Call tone When you are on an intercom call and an
outside call comes in, you’ll hear New Call
tone to tell you that someone is calling you.
To answer the outside call and end the
intercom call:
◗
Press the R button briefly
OR, to answer the outside call and put the
intercom call on hold (so you can later use
shuttle, conference or transfer):
◗
Press the INT/# button for one second
If you now want to set up a three-way
conference, simply press and hold the the Ø
button for two seconds.
To page all
handsets
from the
base unit
To make all registered handsets ring (this is
useful if you’ve forgotten where you put a
handset):
◗
Press the HANDSET LOCATOR button on
the base unit
è
Handsets ring for up to 30 seconds and their
displays show
<<PAGE>>.
To stop the ringing before 30 seconds:
◗
EITHER press the HANDSET LOCATOR
button again
◗
OR press any button (except HANG UP) on
any handset
Using a multi-handset system
26
E:\Binatone2006\iDECT_X1i\iDECT_X1i_UK_03.vp
12 June 2006 10:54:00
Color profile: Generic CMYK printer profile
Composite Default screen
Page 30

Answering machine — introduction
To operate the answering machine, use the
TAM OPERATION menu on the handset’s display (TAM
stands for ‘telephone answering machine’).
Messages are played through the handset’s earpiece; or
you can press the PHONE/OK/ button to turn the
speakerphone on or off.
To open and
use the
menu
1 Press the MENU button
è
The display shows PHONEBOOK
2 Press the â button FOUR times
è
The display shows TAM OPERATION
3 Press the PHONE/OK button
è
The display shows MESSAGE IGM
4 Press then the â button to go to the option
you want, then the PHONE/OK button to
select it
When you’ve finished:
5 Press the HANG UP button twice to go back
to standby mode
You can also press the HANG UP button at any point to
cancel what you’re doing and go back one step.
When you’re keying in numbers, if you make a mistake,
press the HANG UP button to delete digits.
E:\Binatone2006\iDECT_X1i\iDECT_X1i_UK_03.vp
12 June 2006 10:54:01
Color profile: Generic CMYK printer profile
Composite Default screen
Help Line: 0845 345 9677 (Local Call rate) 27
Page 31
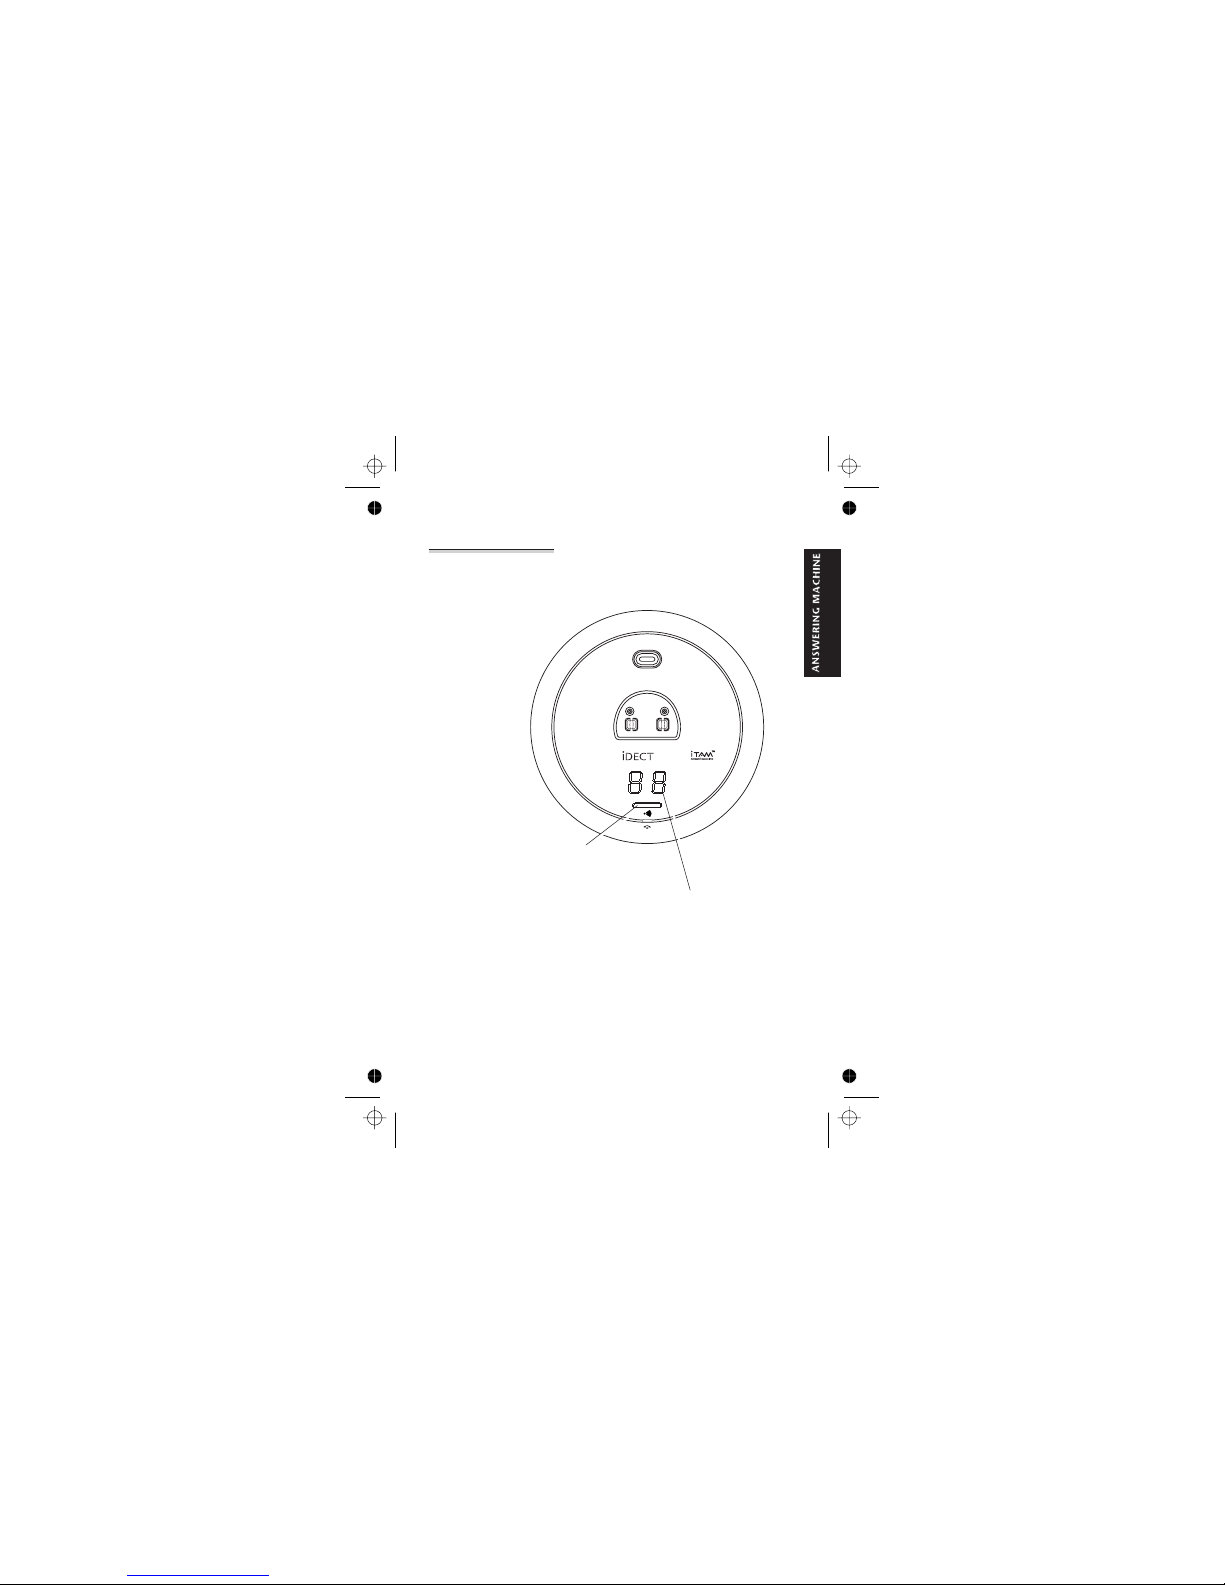
The display on
the base unit
The display shows
Answering machine — introduction
E:\Binatone2006\iDECT_X1i\iDECT_X1i_UK_03.vp
12 June 2006 10:54:01
Color profile: Generic CMYK printer profile
Composite Default screen
X1i
two digit display - number of message
28
page
Page 32

Outgoing messages
The outgoing message (OGM) is what callers hear when
the machine answers their calls. There are two OGMs:
■
OGM1 asks the caller to leave a message. The
machine has a default OGM1: “I cannot answer your
call right now. Please leave a message after the tone” or
you can record your own OGM1.
■
OGM2 asks the caller to call back later but does not
give them the opportunity to leave a message. The
machine has a default OGM2: “Please call later”
or you can record your own OGM2.
The OGMs you record can be up to 60 seconds long.
To record
OGM1
1 Press the MENU button then the â button
FOUR times
è
The display shows TAM OPERATION
2 Press the PHONE/OK button
3 Press the â button THREE times
è
The display shows OUTGOING MESSAGE
4 Press the PHONE/OK button
è
The display shows SELECT
5 Press the â button
è
The display shows RECORD
6 Press the PHONE/OK button
è
The display shows OGM01
7 Press the PHONE/OK button
è
The display shows REC. . . .
8 Record your OGM, speaking clearly into the
handset’s mouthpiece for at least 3 seconds.
Don’t shout
è
The display shows REC OGM01 and the
lapsed time as you’re speaking.
E:\Binatone2006\iDECT_X1i\iDECT_X1i_UK_03.vp
12 June 2006 10:54:01
Color profile: Generic CMYK printer profile
Composite Default screen
Help Line: 0845 345 9677 (Local Call rate) 29
Page 33

9 When you’ve finished, press the HANG UP
button to stop recording
è
The display goes back to the TAM OPERATION
menu. You can press the HANG UP button
again to go back to standby mode or the
PHONE/OK buttontoplaybackyournewOGM.
To record
OGM2
◗
Follow the steps for recording OGM1, but after step
6, press the â button to display
OGM02 before going
to step 7.
To check
your OGMs
1 Press the MENU button then the â button
FOUR times
è
The display shows TAM OPERATION
2 Press the PHONE/OK button
3 Press the â button THREE times
è
The display shows OUTGOING MESSAGE
4 Press the PHONE/OK button
è
The display shows SELECT
5 Press the â button TWICE
è
The display shows REPLAY
6 Press the PHONE/OK button
è
The display shows OGM01
7 Press the â or á button to scroll between
the options —
OGM01, OGM02, OGM DEF01 ,
OGM DEF02 . (OGM DEF01 and OGM DEF02 are
the pre-recorded default OGMs.)
8 Press the PHONE/OK button to play the
OGM shown on the display
è
The OGM is played through the handset’s
earpiece or speakerphone, then the display
goes back to the
TAM OPERATION menu.
Outgoing messages
E:\Binatone2006\iDECT_X1i\iDECT_X1i_UK_03.vp
12 June 2006 10:54:01
Color profile: Generic CMYK printer profile
Composite Default screen
30
Page 34
To select
an OGM
If you want your callers to leave messages,
make sure you select OGM1 — if OGM2 is
selected, callers will not be able to leave
messages.
1 Press the MENU button then the â button
FOUR times
è
The display shows TAM OPERATION
2 Press the PHONE/OK button
3 Press the â button THREE times
è
The display shows OUTGOING MESSAGE
4 Press the PHONE/OK button
è
The display shows SELECT
5 Press the PHONE/OK button
è
The display shows OGM01
7 Press the â or á button to scroll between
the options —
OGM01, OGM02, OGM DEF01 ,
OGM DEF02
OGM DEF01
and OGM DEF02 are the pre-
recorded default OGMs.
8 Press the PHONE/OK button to select the
OGM shown on the display
è
You hear a confirmation tone, then the
display goes back to the
TAM OPERATION
menu.
9 Press the HANG UP button twice to go back
to standby mode
Outgoing messages
E:\Binatone2006\iDECT_X1i\iDECT_X1i_UK_03.vp
12 June 2006 10:54:02
Color profile: Generic CMYK printer profile
Composite Default screen
Help Line: 0845 345 9677 (Local Call rate) 31
Page 35
Switching on and off
1 Press the MENU button then the â button
FOUR times
è
The display shows TAM OPERATION
2 Press the PHONE/OK button
3 Press the â button FOUR times
è
The display shows TAM ON/OFF
4 Press the PHONE/OK button
è
The display shows the current setting:
ON or OFF
5 Press the â or á button to change the
display
è
The display shows ON? or OFF? (meaning
that you can select the option shown).
6 Press the PHONE/OK button to confirm
è
You hear a ‘beep’, then the display goes
back to the
TAM OPERATION menu.
7 Press the HANG UP button twice to go back
to standby mode
E:\Binatone2006\iDECT_X1i\iDECT_X1i_UK_03.vp
12 June 2006 10:54:02
Color profile: Generic CMYK printer profile
Composite Default screen
32
Page 36

Recording a memo
Memos you record directly into the machine are stored
and played back like messages from callers (incoming
messages).
1 Press the MENU button then the â button
FOUR times
è
The display shows TAM OPERATION
2 Press the PHONE/OK button
3 Press the â button TWICE
è
The display shows RECORD MEMO
4 Press the PHONE/OK button
5 Record your memo, speaking into the
handset’s mouthpiece
è
The display shows REC MEMO and the lapsed
time as you’re speaking.
6 When you’ve finished, press the PHONE/OK
button to stop recording
è
The display goes back to the TAM OPERATION
menu.
E:\Binatone2006\iDECT_X1i\iDECT_X1i_UK_03.vp
12 June 2006 10:54:02
Color profile: Generic CMYK printer profile
Composite Default screen
Help Line: 0845 345 9677 (Local Call rate) 33
Page 37
Playing your messages
When the machine is switched on, and OGM1 is
selected, it will record messages from callers (incoming
messages).
To play back your incoming messages (and memos if
applicable):
1 Press the MENU button then the â button
FOUR times
è
The display shows TAM OPERATION
2 Press the PHONE/OK button TWICE
è
If you have new messages, they will be
played back. If you have no new messages, any
old messages will be played back. If you have
no messages at all, the display will show
NO MESSAGES!
During playback, the display shows:
n
the message number — ICM #1 etc
n
the time and date of the call
If you subscribe to Caller Display (page 20),
you can press the â or á button to switch the
display between the time/date and the caller’s
number (if the number is available). If the caller’s
number is stored in your handset’s Phone Book,
the name may be shown instead of the number.
If time stamping is turned on (page 38), the
machine will also tell you the time and date of
the call before playing the message.
è
After all new messages (or all old messages)
have been played back, the display shows
END OF MESSAGE for 2 seconds, then goes back
to the
TAM OPERATION menu.
See overleaf for functions you can use during message
playback.
E:\Binatone2006\iDECT_X1i\iDECT_X1i_UK_03.vp
12 June 2006 10:54:02
Color profile: Generic CMYK printer profile
Composite Default screen
34
Page 38
Options during
playback
During playback, you can press:
◗
the PHONE/OK button to switch between
the earpiece and the speakerphone
◗
the â or á button to change the volume in
the earpiece or speakerphone
◗
the HANG UP button briefly to stop playback
and go back to the
TAM OPERATION menu
◗
the HANG UP button (long press) to stop
playback and go back to standby mode
◗
the MENU button to display the playback
options menu:
n
SKIP FORWARD to the next message
n
DELETE the current message and start
playing the next message
n
SKIP BACK to the previous message
n
REPEAT the current message from the
beginning
n
CALL BACK the person who left the message
(if you subscribe to Caller Display and the
caller’s number is available)
n
DELETE ALL recorded message and memos
(new messages will not be deleted until you
have played them back)
From the
playback
options menu…
◗
Press the â or á button to scroll to the
option you want, then the PHONE/OK
button to select it
Playing your messages
E:\Binatone2006\iDECT_X1i\iDECT_X1i_UK_03.vp
12 June 2006 10:54:02
Color profile: Generic CMYK printer profile
Composite Default screen
Help Line: 0845 345 9677 (Local Call rate) 35
Page 39
Deleting
messages
If you select DELETE or DELETE ALL from the playback
options menu, the display shows:
DELETE? or DELETE ALL?
◗
Press the PHONE/OK button to confirm that
you want to delete the message(s), or the
HANG UP button to cancel
If memory is
full …
The answering machine has enough memory to record
up 14 minutes of messages (standard quality; see
page 39) or 7 minutes (high quality).
If the memory becomes full:
■
Callers can’t leave messages and you can’t record
memos or new OGMs.
■ Anyone trying to record a message or memo,
the handset’s
display shows
MEMORY FULL
■
The machine will automatically switch to OGM2, so
that new callers will be asked to call back later,
without being able to leave a message.
■
The display on the base unit will flash between the
number of recorded messages and 88
You need to delete some or all recorded messages to
make room in memory. Remember to select OGM1
again (page 31) if you want new callers to be able to
leave messages.
Playing your messages
E:\Binatone2006\iDECT_X1i\iDECT_X1i_UK_03.vp
12 June 2006 10:54:02
Color profile: Generic CMYK printer profile
Composite Default screen
36
Page 40

Answering machine settings
The SETTINGS menu lets you customise the way your
answering machine works.
To use the
SETTINGS menu:
1 Press the MENU button then the â button
FOUR times
è
The display shows TAM OPERATION
2 Press the PHONE/OK button
3 Press the â button ONCE
è
The display shows SETTINGS
4 Press the PHONE/OK button
è
The display shows ICM REC TIME
5 Press the â or á button to scroll to the
option you want, then the PHONE/OK
button to select it
6 When you have finished, press the HANG UP
button to go back to standby mode
Message
recording time
By default, callers can leave a message up to
2 minutes (120 seconds) long. You can change
this to 60 seconds or ‘No limit’.
1 Press the PHONE/OK button to select
ICM REC TIME from the TAM SETTINGS menu
è
The display shows the current setting.
2 Press the â or á button to scroll to the
option you want —
60s? or 120s? or
NO LIMIT?
3 Press the PHONE/OK button to select it
E:\Binatone2006\iDECT_X1i\iDECT_X1i_UK_03.vp
12 June 2006 10:54:03
Color profile: Generic CMYK printer profile
Composite Default screen
Help Line: 0845 345 9677 (Local Call rate) 37
Page 41
Time stamping With time stamping turned on, the machine
tells you that time and date of the call each
time it plays back a message. With time stamping
turned off, you won’t hear this information
(though it will be shown on the display);
instead, there will be a 2-second pause.
1 Press the PHONE/OK button to select
TIME STAMP from the TAM SETTINGS menu
è
The display shows the current setting.
2 Press the â or á button to scroll to the
option you want —
TIME STAMP ON? or
TIME STAMP OFF?
3 Press the PHONE/OK button to select it
Rings to
answer
The machine can answer calls after one to four
rings.
Or you can set ‘toll saver’ — it will answer after
two rings if there are new messages, or after
four rings if there are no new messages. So if
you call in to check your messages remotely,
and your call isn’t answered after two rings,
you can hang up and avoid paying for the call.
1 Press the PHONE/OK button to select
RING ANS from the TAM SETTINGS menu
è
The display shows the current setting.
2 Press the â or á button to scroll to the
option you want —
1 RING? or 2 RINGS? or
3 RINGS? or 4 RINGS? or TOLL SAVE?
3 Press the PHONE/OK button to select it
Answering machine settings
E:\Binatone2006\iDECT_X1i\iDECT_X1i_UK_03.vp
12 June 2006 10:54:03
Color profile: Generic CMYK printer profile
Composite Default screen
38
Page 42
Call
monitoring
With call monitoring turned on, when a caller is
leaving a message you can hear them through
the handset’s speakerphone — so you can
press the PHONE/OK button to pick up the call
and talk to the caller, stopping the message
recording. With call monitoring turned off, you
will not hear callers leaving messages. The
default setting is ON
1 Press the PHONE/OK button to select
MONITORING ON/OFF from the TAM SETTINGS
menu
è
The display shows the current setting.
2 Press the â or á button to scroll to the
option you want —
MONITORING ON? or
MONITORING OFF?
3 Press the PHONE/OK button to select it
Recording
quality
You can set the recording quality as ‘high’ or
‘standard’. With standard quality recording,
the machine has enough memory for
14 minutes of recorded messages; with high
quality recording, it has enough memory for
7 minutes.
1 Press the PHONE/OK button to select
RECORD QUALITY from the TAM SETTINGS
menu
è
The display shows the current setting.
2 Press the â or á button to scroll to the
option you want —
RECORD QUALITY HIGH?
or RECORD QUALITY STANDARD?
3 Press the PHONE/OK button to select it
Answering machine settings
E:\Binatone2006\iDECT_X1i\iDECT_X1i_UK_03.vp
12 June 2006 10:54:03
Color profile: Generic CMYK printer profile
Composite Default screen
Help Line: 0845 345 9677 (Local Call rate) 39
Page 43

Default
settings
This option returns the answering machine to
its default settings:
n
answering machine off
n
default OGM1 selected
n
no recorded incoming messages or memos
n
remote PIN — 123
n
message recording time — 120 seconds
(2 minutes)
n
time stamping — on
n
rings to answer — five
n
call monitoring — on
n
recording quality — standard
1 Press the PHONE/OK button to select
DEFAULT SETTING from the TAM SETTINGS
menu
è
The display shows
CONFIRM DEFAULT SETTING?
2 Press the PHONE/OK button to confirm or
the HANG UP button to cancel
Answering machine settings
E:\Binatone2006\iDECT_X1i\iDECT_X1i_UK_03.vp
12 June 2006 10:54:03
Color profile: Generic CMYK printer profile
Composite Default screen
40
Page 44

Remote operation
When you’re not at home, you can phone your iDECT X1i
to check your messages remotely. First, you need to set
up remote operation using the iDECT X1i’s handset.
The machine has a three-digit PIN (security code)
which you need to key in when you operate it remotely.
The default PIN is 123; you can leave it as 123 or
change it to any 3-digit number.
To change
the PIN
1 Press the MENU button
è
The display shows PHONEBOOK
2 Press the â button FOUR times
è
The display shows TAM
3 Press the PHONE/OK button
4 Press the â button FIVE times
è
The display shows REMOTE CONTROL
5 Press the PHONE/OK button
è
The display shows PIN CHANGE
6 Press the PHONE/OK button
è
The display shows ENTER PIN ORIGINAL
7 Key in the current PIN (default 123) and
press the PHONE/OK button
è
The display shows ENTER PIN NEW
8 Key in your new PIN and press the
PHONE/OK button
è
The display shows ENTER PIN CONFIRM
9 Key in your new PIN again and press the
PHONE/OK button
è
The display goes back to the
REMOTE CONTROL menu
E:\Binatone2006\iDECT_X1i\iDECT_X1i_UK_03.vp
12 June 2006 10:54:03
Color profile: Generic CMYK printer profile
Composite Default screen
Help Line: 0845 345 9677 (Local Call rate) 41
Page 45

To check
your
messages
remotely
1 Using a tone dialling phone, dial your home number
2 When your outgoing message starts playing,
press then key in your remote PIN
è
You hear one long ‘beep’. The machine tells you
how many messages you have, and how many new
messages.
If you have new messages, playback will start
automatically; or you can go to step 4 —
4 Press to play back all your messages
and/or use the keys listed on page 46
Notes
■
At steps 2 and 3, you must press a key within
10 seconds, or the machine will cut off your call.
■
At step 2, if you key in the wrong PIN, you can try
again. You have up to three attempts to get the code
right before the machine cuts off your call.
■ After about 2½ minutes playback, the machine will
pause and you’ll hear a tone (short ‘beeps’). To continue
playback, press any key within 10 seconds. If you
don’t press a key, your call will be cut off.
■
You’ll hear voice prompts to help you during remote
operation
Switching on
remotely
If the answering machine is switched off, it will answer
your call after 10 rings. To switch it on remotely:
1 When you hear
‘ Security code’, key in your
2 Press to switch on
Remote operation
E:\Binatone2006\iDECT_X1i\iDECT_X1i_UK_03.vp
12 June 2006 10:54:04
Color profile: Generic CMYK printer profile
Composite Default screen
42
remote PIN
Page 46
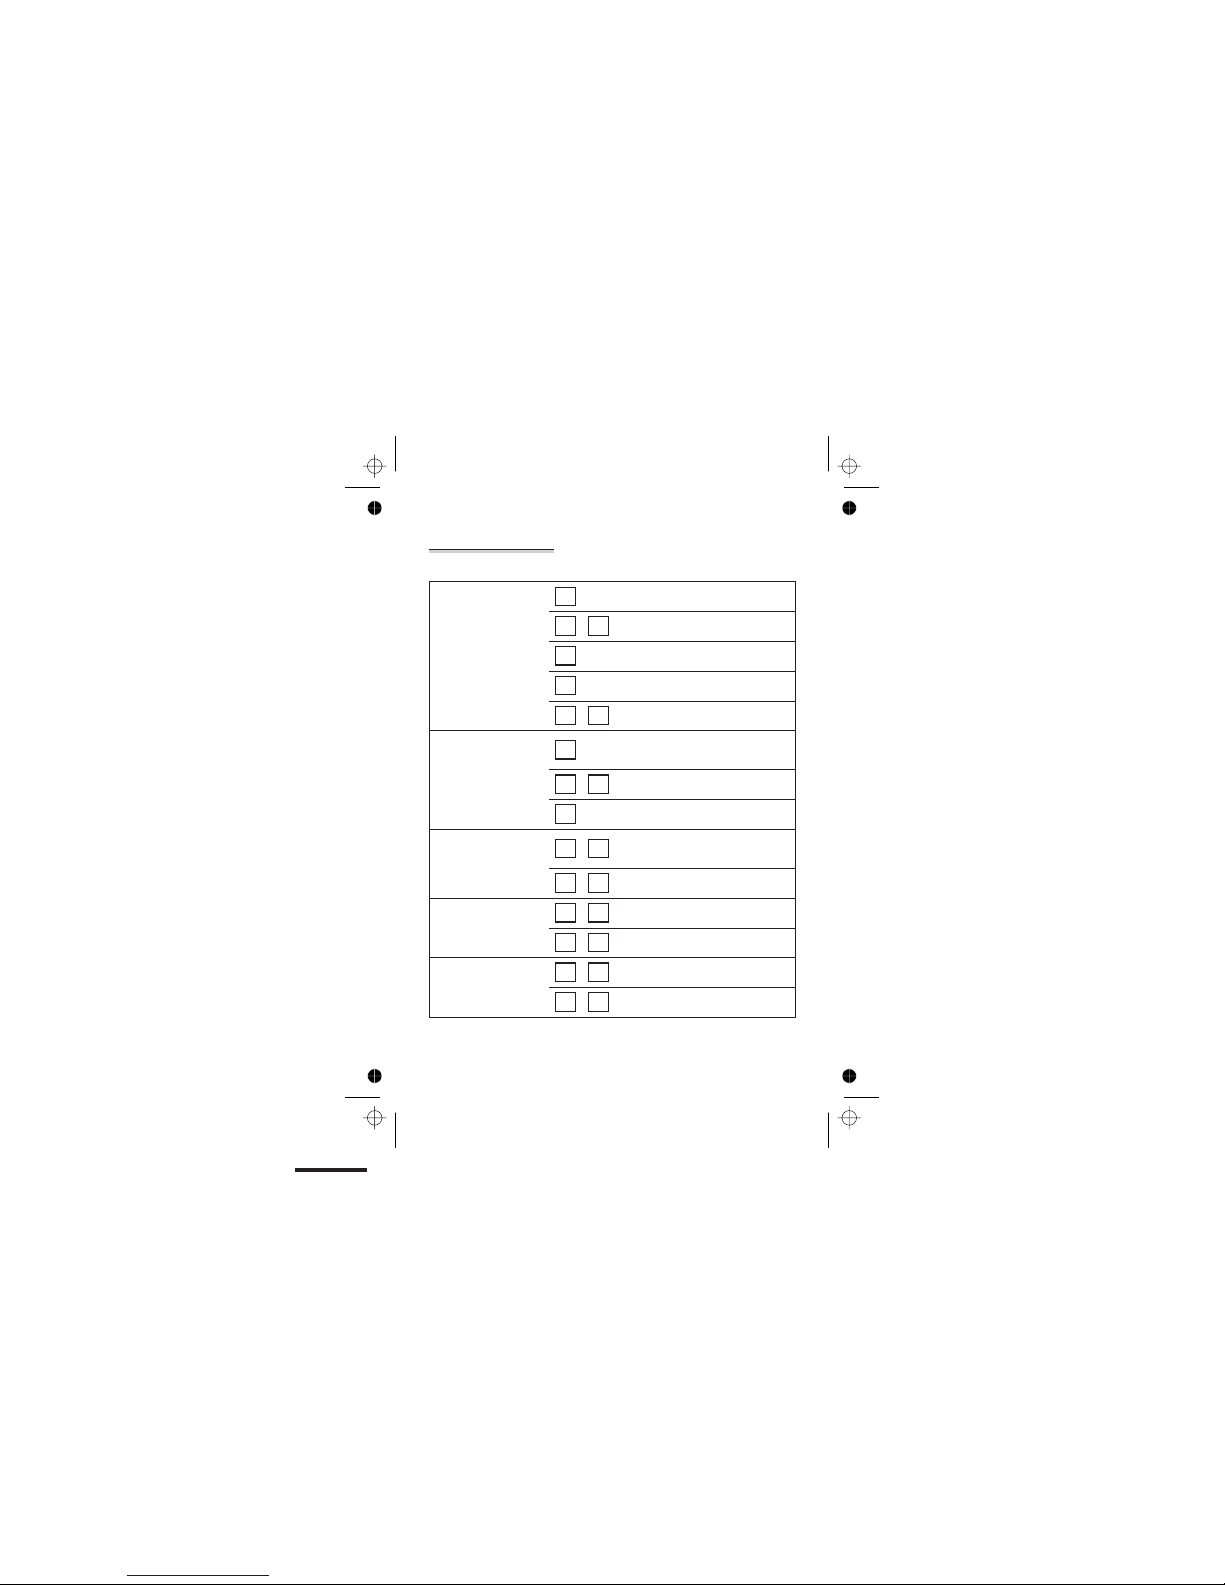
Keys to press during remote operation
To play your
messages and
memos, press:
2
to play all messages
Ü 2
to play only new messages
5
to pause during playback
2
to restart playback
5 5
to stop playback
To skip
backwards and
forwards during
playback, press:
1
to go back to the start of the current
message
1 1
to go back to the previous message
3
to go to the next message
To delete messages
and memos, press:
0 2
during playback to delete the current
message
0 2
after playback to delete all messages
To record a new
OGM, press:
6 1
to record OGM1
6 2
to record OGM2
To play your OGM,
press:
7 1
to play OGM1
7 2
to play OGM1
Remote operation
E:\Binatone2006\iDECT_X1i\iDECT_X1i_UK_03.vp
12 June 2006 10:54:04
Color profile: Generic CMYK printer profile
Composite Default screen
Help Line: 0845 345 9677 (Local Call rate) 43
Page 47
To select an OGM,
press:
9 1
to select OGM1
9 2
to select OGM2
To record a memo,
press:
6 3
to start recording
5
to stop recording (or just hang up)
To switch the machine
on and off, press:
8
Remote operation
E:\Binatone2006\iDECT_X1i\iDECT_X1i_UK_03.vp
12 June 2006 10:54:04
Color profile: Generic CMYK printer profile
Composite Default screen
44
Page 48

Handset settings
The HANDSET SETTING menu lets you customise your
handset to suit your preferences. Some of the functions
in this menu have been covered earlier in this User
Guide.
To open the
Handset
Setting
menu
1 Press the MENU button
è
The display shows PHONEBOOK
2 Press the â button THREE times
è
The display shows SETTING
3 Press the PHONE/OK button
è
The display shows HANDSET SETTING
4 Press the PHONE/OK button
If you’ve set a new PIN for the handset (page 49),
the display will show
ENTER H/S PIN * and
you’ll need to key it in. If you’ve left the PIN at
its default of 0000, you won’t be asked for it at
this point.
5 Press then the â button to go to the option
you want, then the PHONE/OK button to
select it
All instructions below follow from this step.
When you’ve finished:
◗
Press the HANG UP button to go back to
standby mode
You can also press the HANG UP button at any point to
cancel what you’re doing and go back one step.
When you’re keying in numbers, if you make a mistake,
press the HANG UP button to delete digits.
E:\Binatone2006\iDECT_X1i\iDECT_X1i_UK_03.vp
12 June 2006 10:54:04
Color profile: Generic CMYK printer profile
Composite Default screen
Help Line: 0845 345 9677 (Local Call rate) 45
Page 49

Ringer volume
and melody
These are set using the ACOUSTIC SETTING option. See
page 11 for details.
Earpiece
volume
There are three earpiece volume levels. You can
also change the earpiece volume during a call
using the â or á buttons (see page 15).
1 Select the ACOUSTIC SETTING option by
pressing the PHONE/OK button
2 Use the â or á button to go to EARPIECE
VOLUME
then press the PHONE/OK button
è
The display shows SELECT VOLUME and the
current volume level.
3 Use the â or á button to go to the level you
prefer, then press the PHONE/OK button to
confirm
Key beep Normally, whenever you press a button on the
handset you’ll hear a tone. You can turn this off
if you prefer:
1 Select the ACOUSTIC SETTING option by
pressing the PHONE/OK button
2 Use the â or á button to go to KEY BEEP
then press the PHONE/OK button
è
The display shows SET KEY BEEP and ON
or OFF
3 Use the â or á button to go to the setting
you prefer, then press the PHONE/OK
button to confirm
Handset settings
E:\Binatone2006\iDECT_X1i\iDECT_X1i_UK_03.vp
12 June 2006 10:54:04
Color profile: Generic CMYK printer profile
Composite Default screen
46
Page 50

Battery Low
tone
Normally, when the handset’s batteries are
running low, you’ll hear a warning tone. You
can turn this off if you prefer:
1 Select the ACOUSTIC SETTING option by
pressing the PHONE/OK button
2 Use the â or á button to go to BATTERY
LOW TONE
then press the PHONE/OK button
è
The display shows SET BATT LOW TONE and
ON or OFF
3 Use the â or á button to go to the setting
you prefer, then press the PHONE/OK
button to confirm
Display
language
To change the language on the display:
1 Select the LANGUAGE option by pressing the
PHONE/OK button
è
The display shows SELECT LANGUAGE and
the current language.
2 Use the â or á button to go to the
language you want
The options are
ENGLISH, GERMAN, FRENCH
or NEDERLANDS
3 Press the PHONE/OK button to select the
language
Auto-answer Normally, when there’s an incoming call, you need to
press a button on the handset to answer it.
With auto-answer turned on, if a call comes in when the
handset is in place on the base unit or charger pod, you
can answer the call by simply lifting the handset.
Handset settings
E:\Binatone2006\iDECT_X1i\iDECT_X1i_UK_03.vp
12 June 2006 10:54:04
Color profile: Generic CMYK printer profile
Composite Default screen
Help Line: 0845 345 9677 (Local Call rate) 47
Page 51

To turn auto-answer on and off:
1 Select the AUTOMATIC ANSWER option by
pressing the PHONE/OK button
è
The display shows SET AUTO ANSWER and
ON or OFF
2 Use the â or á button to go to the option
you prefer, then press the PHONE/OK
button to confirm
Returning to
default
settings
The default settings for the handset are:
■
Ringer volume level — 3
■
Ringer melody — 3
■
Earpiece volume level — 2
■
Speakerphone volume level — 3
■ Key beep — ON
■
Battery Low tone — ON
■
Auto-answer — OFF
■
Handset PIN — 0000
■
Baby Mode — OFF
■
Baby Number — none
■
Handset name — HANDSET
■
Language — ENGLISH
To return all handset settings to their defaults:
1 Select the DEFAULT SETTING option by
pressing the PHONE/OK button
è
The display shows CONFIRM DEFAULT
SETTING?
2 Press the PHONE/OK button to confirm, or
the HANG UP button to cancel
è
The display shows DEFAULT SETTING DONE
Handset settings
E:\Binatone2006\iDECT_X1i\iDECT_X1i_UK_03.vp
12 June 2006 10:54:04
Color profile: Generic CMYK printer profile
Composite Default screen
48
Page 52

Registration See page 27.
Handset PIN The default PIN (personal identity number, or security
code) for the handset is 0000. If you want to protect
your handset’s settings, you can change the PIN to any
four-digit number you’ll easily remember. Once you’ve
changed it, you’ll be asked for it every time you go into
the
HANDSET SETTING menu.
To change the PIN:
1 Select the CHANGE PIN option by pressing
the PHONE/OK button
è
The display shows ENTER OLD PIN *
2 Key in your existing PIN (default 0000) then
press the PHONE/OK button
è
The display shows ENTER NEW PIN *
3 Key in your chosen new PIN then press the
PHONE/OK button
è
The display shows CONFIRM NEW PIN *
4 Key in your new PIN again then press the
PHONE/OK button
è
The display goes back to standby mode.
If the PINs you key in at steps 2 and 3 don’t
match, you’ll hear an error tone, and you’ll
need to try again from the beginning.
If you want to turn PIN protection off, follow the steps
above to change the PIN back to 0000. Then you won’t
be asked for it when you change the handset’s settings.
Handset settings
E:\Binatone2006\iDECT_X1i\iDECT_X1i_UK_03.vp
12 June 2006 10:54:05
Color profile: Generic CMYK printer profile
Composite Default screen
Help Line: 0845 345 9677 (Local Call rate) 49
Page 53

Baby Call With Baby Call (babysitter’s call) turned on, the handset
will automatically dial a specified number when any
button (except MENU) is pressed. Before you can turn
Baby Call on, you must set (programme) the Baby Call
phone number to be dialled.
!
With Baby Call turned on, the iDECT X1i handset
can’t be used for calling Emergency Services. Make
sure there’s an alternative phone available for
emergencies.
To set or
change the
Baby Call
number
1 Select the BABY CALL NUMBER option by
pressing the PHONE/OK button
è
The display shows ENTER BABY NUMBER *
2 Key in the phone number then press the
PHONE/OK button
è
The display goes back to standby mode.
To turn Baby
Call on and off
1 Select the BABY MODE option by pressing the
PHONE/OK button
è
The display shows SET BABY MODE and ON
or OFF
2 Use the â or á button to go to the option
you prefer, then press the PHONE/OK
button to confirm
è
The display goes back to standby mode,
with
BABY MODE shown on the middle line.
If you try to turn Baby Call on before you’ve set
a Baby Call number, the display will show
ENTER BABY NUMBER * and you’ll need to key a
number in.
Your handset’s
name
See page 9.
Handset settings
E:\Binatone2006\iDECT_X1i\iDECT_X1i_UK_03.vp
12 June 2006 10:54:05
Color profile: Generic CMYK printer profile
Composite Default screen
50
Page 54

Base unit settings
The BASE SETTING menu lets you customise your base
unit to suit your preferences. Some of the functions in
this menu have been covered earlier in this User Guide.
To open the
Base Setting
menu
1 Press the MENU button
è
The display shows PHONEBOOK
2 Press the â button THREE times
è
The display shows SETTING
3 Press the PHONE/OK button then the â
button
è
The display shows BASE SETTING
4 Press the PHONE/OK button
If you’ve set a new PIN for the base unit (page
53), the display will show
ENTERBASEPIN*
and you’ll need to key it in. If you’ve left the PIN
at its default of 0000, you won’t be asked for it at
this point.
5 Press the â button to go to the option you
want, then the PHONE/OK button to select
it
All instructions below follow from this step.
When you’ve finished:
◗
Press the HANG UP button to go back to
standby mode
You can also press the HANG UP button at any point to
cancel what you’re doing and go back one step.
When you’re keying in numbers, if you make a mistake,
press the HANG UP button to delete digits.
E:\Binatone2006\iDECT_X1i\iDECT_X1i_UK_03.vp
12 June 2006 10:54:05
Color profile: Generic CMYK printer profile
Composite Default screen
Help Line: 0845 345 9677 (Local Call rate) 51
Page 55

Ringer volume
and melody
These are set using the ACOUSTIC SETTING option. See
page 13 for details.
Time & day See page 10 for details.
Returning to
default
settings
The default settings for the base unit are:
■
Ringer volume level — 2
■
Ringer melody — 3
■
Time and day — 00:00 SUN
■
Dialling mode — TONE
■
Recall (flash) length — 100MS
■
Base unit PIN — 0000
■
Call Barring — OFF
■
Emergency numbers — 999 and 112
To return all base unit settings to their defaults:
1 Select the DEFAULT SETTING option by
pressing the PHONE/OK button
è
The display shows CONFIRM DEFAULT
SETTING?
2 Press the PHONE/OK button to confirm, or
the HANG UP button to cancel
è
The display shows DEFAULT SETTING DONE
Dialling type
and recall
signal
The next option in the Base Setting menu is
LINE SET
TONE - 100MS
. This is for setting the dialling type and
the recall (flash) signal length, and you probably won’t
ever need this option.
You should always leave the dialling type at its
default setting —
TONE. You should not need to change
the recall signal setting unless you’re having problems
using your iDECT X1i on a PBX. Refer to page 65 for
more information.
Base unit settings
E:\Binatone2006\iDECT_X1i\iDECT_X1i_UK_03.vp
12 June 2006 10:54:05
Color profile: Generic CMYK printer profile
Composite Default screen
52
Page 56

Deregistering
handsets
For details of the DEREGISTER option, see page 28.
Base unit PIN The default PIN (personal identity number, or security
code) for the base unit is 0000. If you want to protect
your base unit’s settings, you can change the PIN to any
four-digit number you’ll easily remember. Once you’ve
changed it, you’ll be asked for it every time you go into
the
BASE SETTING menu.
To change the PIN:
1 Select the CHANGE PIN option by pressing
the PHONE/OK button
è
The display shows ENTER OLD PIN *
2 Key in your existing PIN (default 0000) then
press the PHONE/OK button
è The display shows ENTER NEW PIN *
3 Key in your chosen new PIN then press the
PHONE/OK button
è
The display shows CONFIRM NEW PIN *
4 Key in your new PIN again then press the
PHONE/OK button
è
The display goes back to standby mode.
If the PINs you key in at steps 2 and 3 don’t
match, you’ll hear an error tone, and you’ll
need to try again from the beginning.
If you want to turn PIN protection off, follow the steps
above to change the PIN back to 0000. Then you won’t
be asked for it when you change the base unit’s settings,
although you’ll still need it when you register a new
handset.
Base unit settings
E:\Binatone2006\iDECT_X1i\iDECT_X1i_UK_03.vp
12 June 2006 10:54:05
Color profile: Generic CMYK printer profile
Composite Default screen
Help Line: 0845 345 9677 (Local Call rate) 53
Page 57

Call control The CALL CONTROL options let you monitor and
control the calls made on your iDECT X1i. You can:
■
Use the call timer to see how much time has been
spent making outside calls.
■
For each handset, bar (prevent) international calls or
all outgoing calls.
■
For each handset, bar calls to numbers starting with
specified digits — for example, if you bar calls to
numbers starting with 090, you’ll bar calls to premium
rate numbers; or if you bar calls to numbers starting
with 0, you’ll bar calls to all non-local numbers.
■
Set up to four emergency numbers, which can
always be dialled even when other calls are barred.
The call timer To check the call timer:
1 Select the CALL CONTROL option by pressing
the PHONE/OK button
è
The display shows CALL TIMER
2 Press the PHONE/OK button
è
You have three options:
TOTAL CALL DURATION — to see how much
time in total has been spent on call since the
call timer was last reset.
LAST CALL DURATION — to see how long the
most recent call lasted.
RESET CALL DURATION — to reset the call
timer to zero.
3 Use the â or á button to go to the option
you want, then press the PHONE/OK button
You can go back to the
CALL TIMER screen by
pressing the HANG UP button, then select a
different option.
Base unit settings
E:\Binatone2006\iDECT_X1i\iDECT_X1i_UK_03.vp
12 June 2006 10:54:06
Color profile: Generic CMYK printer profile
Composite Default screen
54
Page 58

To bar certain
types of call
1 Select the CALL CONTROL option by pressing
PHONE/OK, then press the â button
è
The display shows CALL LIMIT
2 Press the PHONE/OK button
è
The display shows SELECT H/S HANDSET 1
3 Use the â or á button to go to the
handset number you want, then press the
PHONE/OK button
è
The display shows CALL LIMIT HANDSET 1
and the handset’s current status — either:
GLOBAL — all calls allowed
NATIONAL — no international calls allowed
INTERNAL — intercom calls only; no outgoing
calls
4 Use the â or á button to go to the option
you want, then press the PHONE/OK button
To bar calls to
specified
numbers
Before you turn barring of calls to specified numbers on
and off, you need to set up to three barred numbers.
Each barred number can have up to eight digits.
1 Select the CALL CONTROL option by pressing
PHONE/OK, then press the â button TWICE
è
The display shows CALL BARRING
2 Press the PHONE/OK button
è
The display shows SELECT H/S HANDSET 1
3 Use the â or á button to go to the
handset number you want, then press the
PHONE/OK button
è
The display shows BARRING MODE
Base unit settings
E:\Binatone2006\iDECT_X1i\iDECT_X1i_UK_03.vp
12 June 2006 10:54:06
Color profile: Generic CMYK printer profile
Composite Default screen
Help Line: 0845 345 9677 (Local Call rate) 55
Page 59

4 Press the â button
è
The display shows BARRING NUMBER
5 Press the PHONE/OK button
è
The display shows SELECT BARRING NO
BARR NUM 1
. This lets you set the first barred
number. There are three possible barred
numbers altogether.
6 (If you want to set a different barred number
[
2 or 3], use the â or á button to go to it.)
7 Press the PHONE/OK button
è
The display shows BARR NUM 1 *
8 Key in the number you want to bar, then
press the PHONE/OK button
You can go on to set two more barred numbers
if you wish.
Now you’ve set the barred numbers, you can turn this
kind of call barring on and off:
1 Select the CALL CONTROL option by pressing
PHONE/OK, then press the â button TWICE
è
The display shows CALL BARRING
2 Press the PHONE/OK button
è
The display shows SELECT H/S HANDSET 1
3 Use the â or á button to go to the handset
number you want, then press the PHONE/OK
button
è
The display shows BARRING MODE
4 Press the PHONE/OK button
è
The display shows SET BAR MODE and OFF
or ON
5 Use the â or á button to go to the setting
you want, then press the PHONE/OK button
to confirm
Base unit settings
E:\Binatone2006\iDECT_X1i\iDECT_X1i_UK_03.vp
12 June 2006 10:54:06
Color profile: Generic CMYK printer profile
Composite Default screen
56
Page 60

Emergency
numbers
You can set up to four emergency (SOS) numbers, each
with up to ten digits. These numbers can always be
dialled using any handset, even when call barring is
turned on. Emergency numbers 1 and 2 are preset as
999 and 112.
1 Select the CALL CONTROL option by pressing
PHONE/OK, then press the â button THREE
times
è
The display shows EMERGENCY NUMBER
2 Press the PHONE/OK button
è
The display shows EMERGENCY NUMBER
SOS NUM
and 1, 2, 3 or 4
3 If necessary, use the â or á button to go to
the number you want
(For example, you may want to leave numbers
1 and 2 as they are, and set a new emergency
number as number 3.)
4 Press the PHONE/OK button
è
The display shows ENTER SOS NUM 3 * (for
example) and any number that is already set.
5 Key in the new emergency number and
press the PHONE/OK button
è
The display goes back to EMERGENCY
NUMBER
and you can set another emergency
number if you wish.
Base unit settings
E:\Binatone2006\iDECT_X1i\iDECT_X1i_UK_03.vp
12 June 2006 10:54:06
Color profile: Generic CMYK printer profile
Composite Default screen
Help Line: 0845 345 9677 (Local Call rate) 57
Page 61

Registering new handsets
Important — The handset(s) supplied with your iDECT X1i base unit
are already registered to it, so you don’t need to
register them. But if you’ve bought extra handsets
separately, you’ll need to register them. Each iDECT X1i
handset can be registered to up to four base units.
To register a
new handset
to your base
unit
Make sure the handset you’re registering is in
standby mode.
1 Press the MENU button
è
The display shows
PHONEBOOK
2 Press the â button THREE times
è
The display shows
SETTING
3 Press the PHONE/OK button
è
The display shows
HANDSET SETTING
4 Press the PHONE/OK button then the â
button FOUR times
è
The display shows
REGISTER
5 Press the PHONE/OK button
è
The display shows
ENTER BASE PIN *
.
The PIN is 0000 unless you’ve set a new one
(see page 56).
6 Key in the PIN
è
The display shows
REGISTER IN PROGRESS
7 Immediately press the HANDSET LOCATOR
button on the base unit and hold it until you
hear a tone
è
The handset’s display flashes for a while, then
shows
REGISTER DONE
. The handset is auto
-
matically given the lowest free handset number.
continued overleaf …
E:\Binatone2006\iDECT_X1i\iDECT_X1i_UK_03.vp
12 June 2006 10:54:01
Color profile: Generic CMYK printer profile
Composite Default screen
Troubleshooting
58
Page 62

Registration
failed?
If registration has failed, the handset’s display will show
REGISTRATION FAILED for a few seconds then return to
standby mode.
If this happens, try again, making sure you don’t leave
too long between steps. If you still can’t register the
handset, contact the Help Line for advice.
To de-register
a handset
You may need to do this in order to replace a
faulty handset.
1 Press the MENU button
è
The display shows PHONEBOOK
2 Press the â button THREE times
è
The display shows SETTING
3 Press the PHONE/OK button then the â
button
è
The display shows BASE SETTING
4 Press the PHONE/OK button
è
If you’ve set a new PIN for the base unit
(see page 53), the display will show
ENTER
BASE PIN *
and you’ll need to key it in. If
you’ve left the PIN at its default, you won’t be
asked for it at this point.
5 Press the â button FOUR times
è
The display shows DEREGISTER
6 Press the PHONE/OK button
è
The display shows DEREGISTER HANDSET 1.
7 Press the â or á button to go to the
handset number you want to deregister
then press the PHONE/OK button
è
The display shows DEREGISTER DONE for a
few seconds
8 Press the HANG UP button to go back to
standby mode
Registering new handsets
E:\Binatone2006\iDECT_X1i\iDECT_X1i_UK_03.vp
12 June 2006 10:54:01
Color profile: Generic CMYK printer profile
Composite Default screen
Help Line: 0845 345 9677 (Local Call rate) 59
Page 63

To register to
a different
brand of base
unit
Your iDECT X1i can be registered to any GAPcompatible base unit; or your can register other GAPcompatible handsets to your iDECT X1i base unit.
But we do not guarantee that all features or
display messages will be available using other
manufacturers’ equipment.
1 Follow the instructions in the base unit’s User Guide to
put the base unit into registration mode (for example,
step 7 on page 58).
2 Follow the instructions in the handset’s User Guide to
register the handset (for example, steps 1 to 5 on
page 58). If you need to enter a PIN for the base unit,
refer to the base unit’s User Guide.
Registering new handsets
E:\Binatone2006\iDECT_X1i\iDECT_X1i_UK_03.vp
12 June 2006 10:54:01
Color profile: Generic CMYK printer profile
Composite Default screen
60
Page 64

!
The iDECT X1i must be serviced by trained engineers.
NEVER attempt any repairs or adjustments yourself
— you could make the problem worse and invalidate
the Guarantee.
ALWAYS check
first that:
■
you have followed all the steps listed on pages 5 to 7
to install and set up your iDECT X1i
■
all connectors are firmly inserted in their sockets
■
mains power is switched on at the socket
■
the handset’s batteries are correctly and securely
installed, and are not run down
Everyday use
“I cannot make
or answer calls.”
If the handset’s display is blank, it may be switched off.
Press the HANG UP button to switch it back on.
Check that the base unit’s mains power adapter is
plugged in and power is switched on. The base unit
needs mains power for normal operation of the phone
— not just for charging the batteries.
Make sure you’re using the telephone line cable that
was supplied with your iDECT X1i. Other telephone line
cables might not work.
Move the handset closer to the base unit.
Check the Battery Level symbol on the display. If it’s
low, replace the handset on the base unit or charger
pod to recharge the batteries.
If auto-answer is turned off (page 47), you need to
press any button (except HANG UP) on the handset to
answer an incoming call. Turn auto-answer on if you
want to answer calls by simply lifting the handset from
the base unit or charger pod.
Switch off power at the mains socket, wait for a few
seconds and then switch back on. This may help.
E:\Binatone2006\iDECT_X1i\iDECT_X1i_UK_03.vp
12 June 2006 10:54:06
Color profile: Generic CMYK printer profile
Composite Default screen
Troubleshooting
Help Line: 0845 345 9677 (Local Call rate) 61
Page 65

“I cannot make
a call.”
The handset’s keypad may be locked (see page 9).
Unlock it before you make a call.
Call barring may be set. Refer to pages 54 to 56 for
details.
“When I press
keys, nothing
happens.”
Make sure the batteries are correctly fitted in your
handset. If the ‘battery charge level’ symbol on the
display shows ‘low’, recharge the batteries.
“When I key in a
number, it
appears on the
display, but I
can’t make an
outside call.”
Try moving the handset closer to the base unit.
Try a different position for the base unit — somewhere
higher if possible, or further from other electrical
equipment.
If you have more than one registered handset, make
sure another handset isn’t already using the line.
“The phone
does not ring”
Check that the base unit’s mains power adapter is
plugged in and power is switched on. The base unit
needs mains power for normal operation of the phone
— not just for charging the batteries.
Make sure you’re using the telephone line cable that
was supplied with your iDECT X1i. Other telephone line
cables might not work.
Check that the total REN value of all equipment
connected to your telephone line is no more than 4
(see page 3). Disconnect one or more telephones and
see whether that helps.
“There is inter
ference and
noise on the
line.”
Move the handset closer to the base unit, or to a
different position.
Try moving the base unit so that it’s not near other
electrical equipment, such as a television or a
computer.
Troubleshooting
62
E:\Binatone2006\iDECT_X1i\iDECT_X1i_UK_03.vp
12 June 2006 10:54:06
Color profile: Generic CMYK printer profile
Composite Default screen
Page 66

You’ll get the best results if you site the base unit as
high as possible. For example, in a two-storey house,
the first-floor landing is an ideal place for the base unit.
“My call was cut
off when I went
out of range.
Now I can’t use
my handset.”
Move the handset closer to the base unit before you try
again to make a call.
“I hear ‘beeps’
from my
handset while
I’m on a call.”
You may be going out of range of the base unit. Move
closer, or your call may be cut off.
Check the ‘battery charge level’ symbol on the display.
If it is low, recharge the batteries.
“The Caller
Display feature
isn’t working.”
You need to subscribe to the Caller Display feature.
Contact your service provider (BT or cable company).
The caller may have withheld their number by dialling
141. Or they may be calling from a network that does
not transmit the Caller ID (for example, it may be an
international call).
“When I try to
make a call, I
hear Busy
tone.”
If you have more than one handset registered to your
base unit, make sure that another handset isn’t already
using the line.
“The volume in
the earpiece is
low when I’m
on a call.”
Make sure you’re holding the earpiece correctly over
your ear.
Adjust the volume using the á or â button.
Troubleshooting
Help Line: 0845 345 9677 (Local Call rate) 63
E:\Binatone2006\iDECT_X1i\iDECT_X1i_UK_03.vp
12 June 2006 10:54:07
Color profile: Generic CMYK printer profile
Composite Default screen
Page 67

Using a multi-handset system
“I can’t transfer
a call.”
Make sure the other handset is in range of the base unit.
Make sure you’re dialling the correct number for the
other handset (1 to 6, or Ø for all registered handsets).
The answering machine
“The machine
won’t record
messages.”
Make sure the answering machine is switched on.
The machine’s memory may be full. Delete some
messages to make room for new ones.
Check that outgoing message OGM1 is selected; with
OGM2 selected, callers can’t leave messages.
“I can’t switch
the machine
on.”
The machine’s memory may be full. Delete some or all
recorded messages (see page 36), then try again to
switch on.
“I can’t hear my
messages being
played back.”
Use the á or â button on the handset, to adjust the
volume in the earpiece or speakerphone.
“Remote
operation
doesn’t work.”
Make sure you’re using the correct remote PIN
(page 41).
Check that you’re using a tone-dialling phone. Some
cordless or mobile phones don’t generate continuous
tones, so aren’t suitable for remote operation.
Batteries
“The handset‘s
batteries are
running low
within an
hour or two.”
Before you first used the handset, you should have left it
on the base unit or charger pod for up to 15 hours to
charge the batteries fully.
You may need to replace the batteries (see below).
Troubleshooting
64
E:\Binatone2006\iDECT_X1i\iDECT_X1i_UK_03.vp
12 June 2006 10:54:07
Color profile: Generic CMYK printer profile
Composite Default screen
Page 68

Clean the battery charging contacts on the base unit
with a dry cloth.
Check the connections between the base unit and the
mains power socket.
“I try to
recharge the
batteries, but I
still get a
warning that
they are low.”
You need to replace the batteries. To find out how to
obtain replacements, call 0845 345 9677, between
9.00 am and 5.00 pm, Monday to Friday.
Dispose of used batteries safely — never burn them,
or put them where they could get punctured.
ALWAYS use the batteries supplied with your iDECT X1i
— other batteries may burst, causing damage.
PBX use
“The Recall
function doesn’t
seem to work.”
You may need to change the recall signal length from
its default of 100 ms. Consult your PBX documentation
for help if necessary. To change the recall setting, use
the
BASESETTING menu (page 52).
“Last Number
Redial and/or
memory dialling
don’t work on
a PBX.”
When you first make a call, after keying in the outside
line access code (e.g. 9), press and hold the Last
Number Redial button until a
P appears on the
display. This inserts a pause between the access code
and the telephone number. You should later be able to
redial the number.
When storing numbers in memory, you can include the
outside line access code (e.g. 9) with each number.
If your PBX requires you to wait for a second Dial tone
before dialling the telephone number, press and hold
the Last Number Redial button for a pause
between the access code and the number.
Troubleshooting
Help Line: 0845 345 9677 (Local Call rate) 65
E:\Binatone2006\iDECT_X1i\iDECT_X1i_UK_03.vp
12 June 2006 10:54:07
Color profile: Generic CMYK printer profile
Composite Default screen
Page 69

If the fault persists …
Disconnect all other instruments connected to the
same line as the iDECT X1i and see whether you can
make a call.
Disconnect the base unit from the telephone line and
plug a different phone into the master telephone
socket. Try making a call. If this works, the line is OK.
If the call does not work, and you are using a two-way
socket adapter, remove it and plug a telephone
directly into the socket. If the call now works, the
adapter may be faulty.
If you cannot make a call, the fault may be on the
exchange line. Contact the service provider (the BT
engineers on 151, or your cable company).
If you still cannot identify the cause of the problem,
contact the Help Line on 0845 345 9677.
Troubleshooting
66
Connection and conditions for use
You can connect your iDECT X1i to a direct exchange line (DEL) — a line
connected to a local exchange, with its own phone number; to an
extension socket connected to a DEL; or to an extension on an approved
compatible PBX. Do not connect the iDECT X1i as an extension to a
payphone.
The ringer equivalence numbers (RENs) of all instruments (phones,
fax machines, etc.) connected to an exchange line must not add up to
more than 4 — otherwise, one or more of them may not ring and/or
answer calls correctly. The iDECT X1i has a REN of 1, and most other
telephones have a REN of 1 unless marked otherwise.
E:\Binatone2006\iDECT_X1i\iDECT_X1i_UK_03.vp
12 June 2006 10:54:07
Color profile: Generic CMYK printer profile
Composite Default screen
Page 70

Cleaning and care
■
Do not clean any part of your iDECT X1i with benzene,
thinner or other solvent chemicals — this may cause
permanent damage which is not covered by the Guar
-
antee. When necessary, clean it with a damp cloth.
■
Keep your iDECT X1i away from hot, humid conditions
or strong sunlight, and don’t let it get wet.
■
Every effort has been made to ensure high standards of
reliability for your iDECT X1i. However, if something
does go wrong, please do not try to repair it yourself
— consult your supplier or the Help Line.
Help Line: 0845 345 9677 (Local Call rate) 67
E:\Binatone2006\iDECT_X1i\iDECT_X1i_UK_03.vp
12 June 2006 10:54:07
Color profile: Generic CMYK printer profile
Composite Default screen
Binatone Telecom plc operates a policy of continuous product
improvement, and so reserves the right to make changes to the
product and functions without notice.
The Binatone iDECT X1i complies with the essential
protective requirements and objectives of:
■
EC R&TTE Directive 1999/5/EC
■
EC Low Voltage Directive 73/23/EEC
■
EC EMC Directive 89/336/EEC
and conforms to the following relevant harmonised
standards:
■
Radio: EN 301406
■
EMC: EN 301489-1, EN 301489-6
■
Safety: EN 60950-6, All: 2004
Declaration of conformity
Page 71

Guarantee and service
The iDECT X1i is guaranteed for 12 months from the
date of purchase shown on your sales receipt. The Guar
antee does not cover damage by misuse or negligence,
or by excessive voltages — for example, faults on the
telephone line, or lightning.
Please keep your sales (till) receipt — this is your
guarantee. You should also keep the original packaging
material.
In the unlikely event that you need to return your
iDECT X1i to our Repair Centre while it is under
guarantee, there will be a £5 handling charge.
While the
unit is under
Guarantee
1 Disconnect the base unit from the telephone line and
the mains electricity supply
2 Pack up all parts of your iDECT X1i, using the original
packaging. Remember to include the mains adapter
3 Return the unit to the shop where you bought it,
making sure you take your sales receipt
After the
Guarantee
has expired
If the unit is no longer under Guarantee, first follow
steps 1 and 2 as for repair under Guarantee. Then …
3 Call our Service Department on 0845 345 9677 and ask
for a quotation of the repair charge and details of where
to send your iDECT X1i for repair
4 Make sure you include with your iDECT X1i:
■
your name and address
■
a cheque or postal order for the value of the repair
charge
5 Return your iDECT X1i to the address given by the
Service Department
68
E:\Binatone2006\iDECT_X1i\iDECT_X1i_UK_03.vp
12 June 2006 10:54:07
Color profile: Generic CMYK printer profile
Composite Default screen
Page 72

Technical details
Standard Digital Enhanced Cordless
Telecommunications (DECT)
Frequency range 1.88 to 1.9 GHz (bandwidth = 20 MHz)
Channel bandwidth 1.728 MHz
Operating range up to 300 m outdoors; up to 50 m
indoors
Operating time standby: 100 hours approx.
talking: 10 hours approx.
battery charge time: 12–15 hours
Temperature range Operating 0 ºC to 40 ºC
Storage -20 ºC to 60 ºC
Electrical power
Handset — two
2
/3 AAA 400 mAH NiMH
rechargeable batteries
Base unit/Charger pod — input 230 V AC, 50 Hz; output
DC 7.5V 500mA
Port specification The port (connected to the mains
power supply) is a SELV port with respect to EN41003.
The port (connected to the telephone line) is a TNV
port with respect to EN41003.
PBX compatibility Timed break recall: adjustable to
100 ms (default), 85 ms, 100 ms or 300 ms.
Pause length (using the button): 3 seconds.
Signalling type: DTMF (dual-tone multifrequency, also
called tone dialling); or loop disconnect (pulse dialling).
Network connection This equipment is intended to be
used in the UK only. Operation on other countries’ PSTN
termination points cannot be guaranteed.
Binatone Telecom plc operates a policy of continuous product
improvement, and so reserves the right to make changes to the
product and functions without notice.
Help Line: 0845 345 9677 (Local Call rate) 69
E:\Binatone2006\iDECT_X1i\iDECT_X1i_UK_03.vp
12 June 2006 10:54:07
Color profile: Generic CMYK printer profile
Composite Default screen
Page 73

Index
A answering a call, 14
answering an intercom call,
24
answering machine, 27–29,
41–44
call monitoring, 39
calling back the caller, 38
default settings, 40
deleting messages, 35–36
memo recording, 33
memory full, 36
message playback, 34–36
message recording time, 37
outgoing messages, 29–31
recording quality, 39
remote operation, 41–44
rings to answer, 38
skip back, 35
skip forward, 35
switching on and off, 32
time stamping, 38
toll saver, 38
auto-answer, 47
B ‘battery low’ tone, 47
Baby Call, 50
base settings, 51
base unit ringer, 13
batteries
charging the handset’s
batteries, 7
fitting the batteries, 6
replacing the batteries, 62
C call barring, 55
call control, 54
barring calls to specified
numbers, 55
barring certain types of call,
55
call timer, 54
emergency numbers, 57
call limit, 55
cleaning and care, 67
clock setting, 11
conference calls, 25
connection and conditions
for use, 66
D date and time, 11
default settings
base unit, 52
handset, 48
de-registering handsets, 58
E earpiece volume, 15, 46
electrical power, 5–7, 69
emergency numbers, 57
ending a call, 14
G guarantee, 68
H HANDSET LOCATOR button,
26–27
handset name, 10
handset ringer, 12–13
handset settings, 45–50
I installation, 5–7
intercom calls, 23–24
interference, 4, 8
K key beep, 46
L language, 47
Last Number Redial, 15
on a PBX, 65
locking the keypad, 9
70
E:\Binatone2006\iDECT_X1i\iDECT_X1i_UK_03.vp
12 June 2006 10:54:07
Color profile: Generic CMYK printer profile
Composite Default screen
Page 74

M making a call, 14
memory dialling, 17–19
multi-handset use, 23–28
N name, 10
New Call tone, 26
O ‘Out of range’ warning, 8
P the Phone Book, 17–19
calling a stored number, 18
deleting entries, 19
editing entries, 18
storing names and
numbers, 17
paging handsets, 26
pause, 65, 69
PBX compatibility, 65, 69
PIN
base unit, 53
for remote operation of the
answering machine, 41
handset, 49
problems, 58–66
R radio signals, 4, 9
recall signal, 52
recall type, 69
registering new handsets,
58
registration and deregistration, 58–60
REN (ringer equivalence
number), 66
ringer volume and melody
base unit, 13
handset, 12
S service information, 68
shuttling between calls, 25
signalling, 69
site for the base unit, 4
site for the charger pod, 4
SOS numbers, 60
switching on and off, 9
T three-way conference, 25
time and date, 11
transferring calls, 24
troubleshooting, 58–66
V volume control, 15, 38
Index
Help Line: 0845 345 9677 (Local Call rate) 71
Waste electrical products must not be
disposed of with household waste.
This equipment should be taken to
your local recycling centre for safe
treatment.
E:\Binatone2006\iDECT_X1i\iDECT_X1i_UK_03.vp
12 June 2006 10:54:09
Color profile: Generic CMYK printer profile
Composite Default screen
Page 75

72
E:\Binatone2006\iDECT_X1i\iDECT_X1i_UK_03.vp
12 June 2006 10:54:09
Color profile: Generic CMYK printer profile
Composite Default screen
 Loading...