

iDect Link Plus Single, Link Plus Twin, Digital Cordless Telephone with Answer Machine, Link Plus Triple User Manual
Page 1

THIS EQUIPMENT IS NOT DESIGNED FOR MAKING
EMERGENCY TELEPHONE CALLS WHEN THE POWER
FAILS. ALTERNATIVE ARRANGEMENTS SHOULD BE
MADE FOR ACCESS TO DIAL EMERGENCY SERVICES.
Before operating this set,
please read these instructions carefully.
USER GUIDE
Monday to Friday from 9:00am to 5:00pm
Tel: 0845 345 9677
Digital Cordless Telephone
Helpline (for UK only)
with Answer Mach
Link Plus Single
ine
Link Plus Twin
Link Plus Triple
Page 2

TECHNICAL DETAILS
Standard
Frequency range
Channel bandwidth
Operating range
Operating time
Temperature range
Digital Enhanced Cordless
Telecommunication (DECT)
1.88 to 1.9 GHz
1.728 MHz
Up to 300m outdoors;
Standby: 100 hours,
Talking: 10 hours
Battery charge time:15 hours
Operating 0 C to 40 C,
Storage -20 C to 60 C
(bandwidth = 20 MHz)
Up to 50m indoors
CLEANING AND CARE
Do not clean any part of your phone system with benzene, thinners
or other solvent chemicals as this may cause permanent damage which is not
covered by the Guarantee.
When necessary, clean it with a damp cloth.
Keep your
hot, humid conditions
or
strong sunlight, don't let it get wet.
Every effort has been made to ensure high standards of reliability for your
However, if something
does go wrong, please
repair it yourself, but
consult your supplier or the Helpline.
do
not try to
phone system away from
phone system.
Electrical power
Base unit:
Charger unit:
Ten Pao - S004LB0600030 / S004LV0600030
input 100-240VAC 50/60Hz 150mA,
Risk of explosion if battery is replaced by an incorrect type
Dispose of used batteries according to the instructions.
Port specification
The port (connec t ed to the mains power
respect to EN41003.
supply) is a SELV port with
respect to EN41003.
The port (connected to the telephone line) is a TNV port with
Ten Pao - S004LB0600045 / S004LV0600045
input 100-240VAC 50/60Hz 150mA,
output 6VDC 450mA
output 6VDC 300mA
Battery Information
GPI - VT40AAAHC 2 x1.2V AAA size 400mAh NiMH
BYD - H-AAA400A 2 x1.2V AAA size 400mAh NiMH
and
CORUN - AAAJ400 2 x 1.2 AAA Size 400mA NiMHh
Page 3

1
TABLE OF CONTENTS
1 IMPORTANT SAFETY INSTRUCTIONS·························································· 3
2 INSTALLING YOUR PHONE ··········································································5
2.1 CONNECTING THE BASE STATION·································································5
2.2 INSTALLING AND CH ARGING THE BATTERIES·············································5
3 GETTING TO KNOW YOUR PHONE······························································· 6
3.1 HANDSET OVERVIEW ·····················································································6
3.2 DISPLAY ICONS AND SYMBOLS······································································ 7
3.3 BASE STATION WITH TELEPHONE ANSWERING MAC HINE(TAM)CONTR OL ······9
3.4 BASE TWO DIGIT-LED DISPLAY INFORMATION············································ 9
3.5 MENU STRUCTURE ······················································································· 11
3.6 TEXT AND DIGIT ENTRY TABLE ··································································· 12
4
USING YOUR PHONE ··················································································13
4.1 INTRODUCING BLUETOOTH ·········································································· 13
4.2 BLUETOOTH SETUP ······················································································ 14
4.3 MAKE A CALL ·································································································· 15
4.4 ANSWER A CALL ··························································································· 17
4.5 END A CALL····································································································· 17
4.6 HANDSET SPEAKERPHONE ·········································································17
4.7 ADJUST VOLUME ·························································································· 18
4.8 MUTE A CALL ·································································································· 18
4.9 TURN OFF THE HANDSET RINGER ······························································· 18
4.10 TURN ON THE KEYPAD LOCK ····································································· 18
4.11 REDIAL THE LAST NUMBER ········································································ 18
4.12 FIND THE HANDSET························································································19
4.13 MAKE AN INTERNAL CALL(MULTI – HANDSET VERSIONS ONLY)············19
5 PRIVATE PHONEBOOK················································································21
5.1 ADD A NEW PHONEBOOK ENTRY································································· 21
5.2 SEARCH FOR A PHONEBOOK ENTRY ························································ 21
5.3 VIEW A PHONEBOOK ENTRY ······································································· 21
5.4 EDIT A PHONEBOOK ENTRY ········································································· 22
5.5 DELETE A PHONEBOOK ENTRY ·································································· 22
5.6 DELETE ALL PHONEBOOK ENTRIES···························································· 22
5.7 CHECK THE PHONEBOOK USAGE ······························································22
Page 4

2
6 CALLER DISPLAY (NETWORK DEPENDENT)·········································· 23
6.1 VIEW THE CALL LIST ···················································································· 23
6.2 STORE A CALL LIST NUMBER INTO THE PHONEBOOK····························· 23
6.3 DELETE AN ENTRY IN THE CALL LIST·························································· 24
6.4 DELETE ALL CALL LIST ENTRIES································································· 24
7
PHONE SETTINGS ······················································································· 25
7.1 DATE AND TIME SETTINGS············································································ 25
7.2 ALARM SETTINGS ························································································· 26
7.3 HANDSET SETTINGS ·····················································································26
7.4 BASE SETTINGS······························································································ 28
7.5 REGISTRATION ······························································································· 30
7.6 RESET YOUR PHONE ···················································································· 30
8 ANSWERING MACHINE················································································31
8.1 TURN ON/FF THE ANSWERING MACHINE ···················································· 31
8.2 LISTEN TO THE MESSAGES IN THE ANSWERING MACHINE······················ 31
8.3 DELETE ALL MESSAGES IN THE ANSERING MACHINE ···························· 32
8.4 RECORD MEMO ··························································································· 32
8.5 ANSWERING MACHINE SETTINGS································································ 33
REMOTE CARD·····························································································37
9 TROUBLESHOOTING ················································································39
10 DECLARATION OF CONFORMITY·······························································41
11 GU ARANTEE AND SERVICE ······································································ 42
Page 5

3
1 IMPORTANT SAFETY INSTRUCTIONS
When using your telephone equipment, basic safety precautions should always
be followed to reduce the risk of fire, electric shock and injury, including the
1) Read and understand all the instructions.
2) Follow all warnings and instructions marked on the product.
3) Unplug this product from the wall outlet before cleaning. Do not use liquid
cleaners or aerosol cleaners. Use a damp cloth for cleaning.
5) Do not overload wall outlets and extension cords as this can result in the
6) Unplug this product from the wall outlet and refer servicing to our Repair
• When the power supply cord or plug is damaged or frayed.
• If the product does not operate normally by following the operating instructions.
• If the product has been dropped and the cabinet has been damaged.
• If the product exhibits a distinct change in performance.
7) NEVER use your phone outdoors during a thunderstorm-unplug the
8) Do not use the telephone to report a gas leak in the vicinity of the leak.
9) Use only the supplied NiMH (Nickel Metal Hydride) batteries! The operation
periods for the handsets are only applicable with the default battery capacities
10) The use of other battery types or non-rechargeable batteries/primary cells
can be dangerous. These may cause interference and/or damage to the
11) Do not use third party charging bays. Damage may be caused to the batteries.
12) Please ensure the batteries are inserted in the correct polarity.
13) Dispose of batteries safely. Do not immerse them in water, burn them, or
following:
bath tub , kitchen sink, swimming pool).
Keep your phone away from hot, humid conditions or strong sunlight,
and don't let it get wet or use this product near water (for example, near a
base from the telephone line and the mains socket when there are storms
risk of fire or electric shock.
4)
Centre under the following conditions:
put them where they could get punctured.
unit or surroundings. The manufacturer will not be held liable for damage
arising from such non-compliance.
in your area. Damage caused by lightning is not covered by the guarantee.
Page 6

4
Package contents
The package contains the following items:
• 1 Handset
• 1 Base station
• 1 Mains power adapter
• 1 Telephone line cord
• 2 Rechargeable batteries
• 1 User manual
To use your handset and base together, you must be able to establish a radio
accordance with the normal standards for a DECT phone: Maximum range up
to 300 metres outdoors or 50 metres indoors.
The signal range may decrease if there is any large metal object between the
handset and the base, such as a refrigerator, a mirror, a filing cabinet, metallic
doors or reinforced concrete. The signal strength may also be reduced by other
solid structures like walls, or by other radio or electrical interference.
Note: If you have a Twin, Triple or Quad system, you will also have the requisite
extra handset(s) and battery packs, and a charger pod for each extra handset.
Connection and conditions for use:
You can connect your phone to a direct exchange line (DEL) on a local
exchange with its own phone number; to an extension socket connected to a
DEL; or to an extension on an approved compatible PBX. Do not connect as an
extension to a payphone.
The ringer equivalence numbers (REN) of all equipment (phones, fax machines,
modems, etc.) connected to an exchange line must not add up to more than 4,
otherwise one or more of them may not ring and/or answer calls correctly. The
marked otherwise.
phone has a REN of 1, and most other telephones have a REN of 1 unless
link between them. The signal between the handset and the base is in
Page 7

5
2 INSTALLING YOUR PHONE
2.1 Connecting the base station
1) Plug the power supply
and line cord
into
2) Plug the power adapter into a 230Vac,
3) Always use the cables provided in the box
Warning: Use only the provided adaptor, using
other power supplies may cause a hazard.
and the line cord into
the base station.
50Hz mains socket,
2.2 Installing and charging the batteries
3) Put the handset on the base and charge for
15 hours before using the handset for the first time.
If you have a
Broadband line
If you connect your telephone to a line with
insert a micro-filter between the telephone
and the telephone line, otherwise you may get
interference between the telephone and the broadband,
which could cause problems.
a broadband connection, you will need to
Warning: Install the base unit in a position where the mains adapter plug
will reach an
easily accessible mains socket. Never try to lengthen the
mains power cable.
Note: The base unit needs mains power for normal operation, not just for
charging the handset batteries.
Use only the NiMH rechargeable battery type provided.
2) Position the battery compartment cover over the
The handset will give a beep when it is properly placed on the base or
In a home with broadband, every telephone must have a micro-filter connected,
not just the one at the telephone point that your modem is connected to.
If you need more broadband micro-filters, contact your broadband supplier.
your telephone line socket.
charger.
batteries and slide up to click into place.
compartment with the polarity markings as shown
1) Place the 2 supplied batteries into the battery
Page 8

6
3 GETTING TO KNOW YOUR PHONE
3.1 Handset Overview
LEFT SOFT KEY
In idle mode:Press
to access the main menu
In sub-menu mode:
Press to confirm the selection
During a call: Press to access
Intercom/Phonebook/ Redial
List/ Call List
TALK
In idle / predialling mode:
Press to make a call
In Redial list / Call List /
Phonebook list
Press to make a call to
During ringing:
Press to answer a call
RIGHT SOFT KEY(CLEAR/
In sub-menu mode: Press to go
In sub-menu mode: Press and
In editing / predialling mode: Press
In editing / predialling mode:
Press and hold to delete all the
During a call: Press to mute/
In idle mode:Press to intercom
In main menu mode: Press to go
OFF
During a call: Press to end a call
In menu / editing mode: Press to
In idle mode:
Press and hold to power off the
In idle mode (when the handset is
UP
In idle mode:
Press to access the call list
In menu mode:
Press to scroll up the menu items
In Phonebook list / Redial list /
Call List:
Press to scroll up the list
During a call:
Press to increase the
earpiece volume
During ringing:
Press to increase the ringer volume
DOWN
In idle mode:
Press to access
In menu mode:
Press to scroll down
In Phonebook list /
Press to scroll down
During a call:
Press to decrease the
During ringing:
Press to decrease the
the redial list
the menu items
Redial list / Call List:
the list
earpiece volume
ringer volume
the displayed entry.
and go back to idle screen
go back to previous menu
handset
powered off): Press and hold to
power on the handset.
BACK/MUTE/INTERCOM)
back to idle screen
back to previous level
hold to go back to idle screen
to clear a character / digit
characters / digits
another handset
SPEAKERPHONE
During a call:
Press to turn on / off the
speakerphone.
Call List / Phonebook entry :
Press to make a call with
speakerphone
During ringing:
Press to answer a call with speakerphone
unmute the microphone
In idle mode: Press to predial
with mobile line if only one mobile
connected or show the mobile list
if two mobiles connected.
In predial mode: Press to dial to
the number with mobile line or
show the mobile list for selection
first if two mobiles connected.
During ringing in mobile line:
Press to answer the mobile line call.
In Call List / Redial List:
Press to dial the selected number
with mobile line or show the mobile
list for selection first if two mobiles
connected.
MOBILE
During a call:
Press to dial a recall
Page 9

7
The LCD display gives you information on the current status of the telephone.
3.2 Display Icons and Symbols
Steadily on when the handset is in range of the base.
Flashes when out of range of the base or not registered to the base.
Steadily on when an intercom is in progress.
Flashes when there is an incoming internal call.
Indicates a home call is in progress.
Flashes when a home call is on hold.
(For speakerphone model only)
Indicates that hands free are being used.
(For TAM models only)
Indicates when the telephone answering machine (TAM) is turned on.
Flashes when new TAM messages are received.
Indicates that the ringer is switched off.
Steadily on when an alarm is set.
Flashes when the alarm time set before reaches.
Indicates that the keypad is locked.
Indicates when there are received new Voice Message Waiting
(VMWI) not yet read.
Disappears when all the voice messages have been read.
Indicates when the battery is fully charged.
Whole icon flashes when the battery performs initial charging.
Internal block icon flashes when the battery is in final charging stage.
Page 10

8
Indicates when the battery needs charging.
Flashes when low battery power level is detected.
Indicates when a mobile call is in progress.
Flashes when a mobile call is on hold.
Indicates there is (are) Bluetooth device(s) paired.
Flashes when Bluetooth devise is being paired.
Indicates when Bluetooth device #1 or #2 is connected with the
telephone base.
Indicates when more characters are existed before the text currently
displayed.
Indicates when more characters are existed after the text currently
displayed.
(MENU)
Press to select more menu options if applicable
Press to confirm the current selection if applicable.
Steady when new TAM message / new call in TAM message list / call
list.
Turn off when new TAM message / new call has been read.
Scroll up / down the menu items / Phonebook list / Redial list / Call
List
(INT)
Press to conduct Intercom call when idle
(BACK)
Press to go back to previous menu level or cancel the current action
if applicable
Press to clear a character or stop the alarm if applicable, press to
mute / unmute during a call.
Page 11

9
0F-> --
0n-> XX
00 Steady ON: No voice messages in the TAM.
XX Flashing: There are XX new messages recorded where XX is
ZZ Steady ON: There are ZZ old messages in the TAM memory
no new messages.
XX/FF Flashing XX alternately with FF: There are XX new voice
and
Displayed when the answering machine is turned ON where
Displayed when the answering machine is turned OFF
3.4 Base Two Digit-LED Display Information
from 01 to 59.
3.3 Base Station with Telephone Answering Machine (TAM) Control
Press to turn on the
Press again to turn off
PLAY/STOP
Press to play
Press to stop the
message playback
DELETE
Press once to
machine.
Press to increase
answering machine.
the answering
Press to repeat playing the current
message from the beginning.
Press twice to skip back to the
delete the
message
during playback
all the old messages
SKIP
Press to skip the
current message
and play the next
message
messages
playback Volume.
Press to decrease
Volume.
the playback
In idle mode, press
and hold to delete
previous message.
Press to page your
registered handset(s).
Press and hold to start
the registration process.
XX is number of messages in TAM memory.
messages recorded and the TAM memory is full.
FIND
REPEAT
ANSWER ON/OFF
1 2
BLUETOOTH LEDs
Steady ON: Bluetooth device
Flashes: Bluetooth device is
in pairing set-up mode.
is paired to the base.
Off: If Bluetooth device is
disconnected.
Page 12

10
FF
Flashing FF: The TAM memory is full and there are no new
- - /XX
Flashing XX alternately with - -: The Time/Date is not set and
- -
Flashing - -: The Time/Date is not set and there are no new
XX
XX Steady ON: Playing the current XX old recorded message.
XX Flashing: Playing the current XX new recorded incoming
A1/A2
Steady ON: Playing the current outgoing message (OGM)
XX/An
Flashing XX alternately with An: Currently recording the new
rA
Flashing: Remote access is in progress from a handset or via
LX
Steady ON: Indicates the current volume level where X is
messages recorded.
message.
Only OGM.
XX incoming message.
the external line.
from 1 to 8.
messages.
where A1 is the Answer & Record OGM and A2 is the Answer
there are XX new messages recorded.
Page 13

11
3.5 Menu Structure
Press <UP> or <DOWN> to go to other options in the menu list.
Press <MENU/ OK> to enter a sub-menu or function.
Press <C/MUTE> to go back to the previous level.
<UP/DOWN>
Key Press
<MENU>
<UP/
DOWN>
<UP/
DOWN>
<UP/
DOWN>
<UP/
DOWN>
<UP/
DOWN>
<UP/
DOWN>
Refer to the following for the menu structure.
In idle mode, press <MENU/OK> to go to CALL LIST, the first option in the
menu list.
Main
Menu
CALL LIST PHONEBOOK BS
SETTINGS
HS SETTINGS MOBILE
SETUP
PAIRED
UNITS
Sub
menu
Review Call List
Under a selected
Call List entry:
ADD TO PB
DELETE
DELETE ALL
DETAILS
Review phonebook
list
Under a phonebook
entry:
ADD
VIEW
EDIT
DELETE
DELETE ALL
PB STATUS
BS RINGER
RING
VOLUME
DELETE HS
FLASH TIME
CHANGE
PIN
ALARM
RING SETUP
TONE SETUP
LANGUAGE
RENAME HS
HS DISPLAY
AUTO ANSWER
DATE & TIME
Main Menu REGISTRATION DEFAULT ANS. MACHINE
Sub menu
PIN? MSG PLAYBACK
DELETE ALL
MEMO
TAM ON/OFF
TAM SETTINGS
ANSWER MODE
OGM SETTINGS
ANSWER DELAY
RECORD TIME
REMOTE ACC.
COMPRESSION
BS SCREENING
CHANGE PIN
Page 14

12
3.6 Text and Digit Entry Table
The following table shows you where each letter and punctuation character can
be found, by using repeated presses of the alphanumeric keypad. This will be
helpful when storing a name in the
phonebook and renaming your handset.
In editing mode, a cursor is displayed to indicate the current text entry position.
It is positioned at the right of the last character entered.
Writing Tips:
1. Once a character is selected, the cursor will move to the next position after
2. You can move the cursor within the text with the <UP/DOWN> keys to
amend the text entry.
3. Press <C> to delete the last character.
4. Press and hold <C> to delete the entire text string.
3.6.1 English Character Set
Key Press
1st 2
nd
3rd 4th 5th 6th 7th 8th 9th 10th
1 space - 1 1
2 A B C 2 2
3
D E F 3 3
4 G H I 4 4
5 J K L 5 5
6 M N O 6 6
7 P Q R S 7 7
8 T U V 8 8
9 W X Y Z 9 9
0 0 0, or P (Pause) if press and hold
*
*
? / \
( ) *
# o
,
- #
Alphanumeric Editing
(For phonebook name editing and renaming handset )
Number Editing (For phone
number editing,date/time editing)
,
,
&
Some other characters are available with some of the alternative handset
language options (see 7.3.5).
a short pause.
Page 15

13
4 USING YOUR PHONE
4.1 Introducing Bluetooth
Your new telephone system with Bluetooth wireless technology has the
following features:
z Pairing a Bluetooth enabled mobile phone with the telephone base. Two
Bluetooth devices can be paired up and connected.
z Connecting a Bluetooth enabled mobile phone to make and receive
MOBILE calls. Two mobile phones can be connected but only one of them
can be used at a time.
z Making and receiving calls using your Bluetooth enabled mobile phone plan
while benefiting from the ease and comfort of your home telephone system.
Glossary of terms
Below are some terms used in this User’s Guide to help you become familiar
with using your Bluetooth devices and your new telephone system.
Bluetooth mobile phone - Refers to a Bluetooth enabled mobile telephone.
MOBILE line - The communications service provided through your Bluetooth
enabled mobile phone.
HOME line - Your conventional telephone land line.
Pairing - This refers to the process of two Bluetooth devices registering device
information with each other. The telephone base must be paired with a
Bluetooth enabled mobile phone before the Bluetooth device can be used.
IMPORTANT INFORMATION
z Refer to your mobile phone user’s guide for more information about its
Bluetooth function.
z Make sure that your Bluetooth enabled mobile phone is between one to
twelve feet away from the telephone base in order to maintain a clear and
consistent connection between your Bluetooth mobile phone, telephone
base and cell tower.
z Make sure that your Bluetooth enabled mobile phone has sufficient signal
strength. You may need to move the Bluetooth enabled mobile phone and
telephone base to a location where the mobile signal may be stronger.
z Charge your Bluetooth mobile phone while it is connected to the telephone
base because your mobile phone’s battery will discharge faster while it is
connected wirelessly to the telephone base.
z Monitor your mobile phone’s usage because airtime is deducted from your
mobile plan for the duration of the MOBILE calls.
Page 16

14
4.2 Bluetooth Setup
4.2.1 Setup Mobile
To pair and connect a Bluetooth enabled mobile phone:
1. Place your cell phone near the handset and base unit.
2. Press <MENU> and then <UP/DOWN> to select MOBILE SETUP.
3. Press <MENU> and display will show “READY?”.
4. Press <MENU> and display will show “DISCOVERING”. The Bluetooth
feature of system is activated.
5. Using your Bluetooth enabled mobile phone, turn on the Bluetooth feature
and search for a new device.
6. Once your Bluetooth enabled mobile phone has found the LINK PLUS
telephone, select it.
7. Using your Bluetooth enabled mobile phone, enter the PIN code of the
telephone (the default PIN code is 0000) to continue the pairing process.
8. Pairing will be confirmed when you hear a tone and the Bluetooth icon
appears on the handset.
Refer to the user’s manual of your Bluetooth enabled mobile phone to learn
how to search for or add new Bluetooth devices.
Notes: Paired device(s) will be connected automatically and stored into the
Paired Devices list.
. When a device is successfully connected, corresponding device icon will be
displayed on screen and Bluetooth device LED on base will be on.
. If you would like to pair up another Bluetooth device, please repeat the steps
as above.
4.2.2 Replace a paired device
If you have already paired up two Bluetooth devices, you will need to replace
one of them if you would like to pair up another device. Follow the below steps
to replace and pair up a new device.
1. Press <MENU> and then <UP/DOWN> to select MOBILE SETUP.
2. Press <MENU> and the display will show the already paired devices and
then you are requested to select the device to be replaced.
3. Press <UP/DOWN> to select the desired device.
4. Press <MENU> to confirm. Display will show “REPLACE?”.
5. Press <MENU> to confirm, and the device will be removed from paired list.
6. You will be requested to pair up the new Bluetooth device. Refer to section
4.2.1 to proceed with the next steps.
Page 17

15
Note: When pairing a new mobile, the connected mobile has to be disabled
temporarily.
4.2.3 Paired Devices
The mobile(s) paired up will be displayed in the paired devices list, no matter it
(they) is (are) connected or not. You can choose to connect, or remove the
mobile from this menu.
1. Press <MENU> and then <UP/DOWN> to select PAIRED UNITS.
2. Display will show the mobile name of paired device(s).
Note: Display will show “EMPTY” if there is no device paired.
3. Press <MENU> and then <UP/DOWN> to select the desired mobile device.
For the connected mobile device:
4. Press <MENU> to remove the mobile device.
5. Press <MENU> to confirm.
For the mobile phone that is not connected:
5. Press <MENU> and then <UP/DOWN> to select CONNECT or REMOVE.
6. Press <MENU> to confirm. If you select REMOVE, press <MENU> again to
confirm.
Notes: When the connected mobile is removed, corresponding Bluetooth
device icon and LED on base will be off.
. When the disconnected mobile is connected, corresponding device or will be
on.
. When the mobile is removed, the device name will be removed and EMPTY
will be displayed instead in the paired device list.
4.3 Make a Call
4.3.1 Preparatory dialing
Using the home line
Enter the phone number and press <TALK ON> or <SPEAKERPHONE> to dial
the number with home line.
Using the mobile line
Enter the phone number and press <MOBILE> to dial the number with mobile
line. If there are two mobile devices connected, you have to select one device
from the list.
Note: If no mobile device connected, display will show “NO MOBILE” and then
back to idle.
Page 18

16
4.3.2 Direct dialing
Using the home line
Press <TALK ON> or <SPEAKERPHONE> to take the home line and enter the
phone number.
Using the mobile line
1. Press <MOBILE> and <MENU/OK>, then enter the phone number.
2. Press <MOBILE> to dial with mobile line. If there are two mobile devices
connected, you have to select one device from the list.
Note: If no mobile device connected, display will show “NO MOBILE” and then
back to idle.
4.3.3 Call from the phonebook
1. Press <MENU/OK> to access the phonebook to get the desired phonebook
entry.
Using the home line
2. Press <TALK ON> or <SPEAKERPHONE> to dial the selected phonebook
entry with home line.
Using the mobile line
2. Press <MOBILE> to dial the selected phonebook entry with mobile line.
4.3.4 Call from the call list
1. Press <UP> to access the call list and then press <UP/DOWN> to select the
desired call list entry.
Using the home line
2. Press <TALK ON> or <SPEAKERPHONE> to dial the selected call list entry
with home line.
Using the mobile line
2. Press <MOBILE> to dial the selected call list entry with mobile line.
Page 19

17
4.3.5 Call from the redial list
Press <DOWN> to access the redial list and then press <UP/DOWN> to select
the desired redial number.
Using the home line
2. Press <TALK ON> or <SPEAKERPHONE> to dial the selected redial list
entry with home line.
Using the mobile line
2. Press <MOBILE> to dial the selected redial list entry with mobile line.
4.3.6 Call timer
Your handset automatically times the duration of every call. The call timer will
display a few seconds after the call ends. It is shown in hours, minutes and
seconds format (HH:MM:SS).
4.4 Answer a Call
Answering a home call
If handset is not on the charging cradle:
When the phone rings, press <TALK ON> / <SPEAKERPHONE> to answer a
call.
Answering a mobile call
If handset is not on the charging cradle:
When the phone rings, press <MOBILE> / <SPEAKERPHONE> to answer a
call.
If the handset is on the charging cradle or the base station, and Auto Answer is
turned on: When the phone rings, pick up the handset to answer a call.
Note: Refer to section 8.1.7 for the details about setting Auto Answer.
4.5 End a Call
During a call press <OFF> to end the call.
OR
Put the handset on the base station or charger to end the call.
During a call, you can press SPEAKERPHONE to alternate between hands-free
speakerphone and normal handset use.
4.6. Handset Speakerphone
Page 20

18 6
4.7 Adjust Volume
There are 5 levels (VOLUME 1 to VOLUME 5) to choose from for each of the
During a call:
When you end the call, the setting will remain at the last selected level.
4.8 Mute a Call
You can talk to someone nearby without letting the caller hear you during a call.
During a call:
Press <C/MUTE> to mute the microphone and “MUTED” will display on the LCD.
Your caller cannot hear you. Press <C > again to unmute the microphone.
4.9 the
In idle, press and hold <HASH/#> to turn off the handset ringer. The “RINGER
OFF”
icon is displayed on the LCD.
4.10 Turn on the Keypad Lock
4.11 Redial the last number
You can redial any of the 10 last numbers called. If you have stored a name
number, the name will be displayed instead.
4.11.1 Redial a Number from the Redial List
1. In idle mode, press <DOWN/REDIAL> to access the redial list.
Note: If the redial list entry shows a name, press <Hash/#> to view the number
2. Press <UP/DOWN> to browse the redial list.
3. Press <TALK> to dial to the selected redial number with home line. OR press
Note: If there are no numbers in the redial list, the display shows
“
EMPTY
”
.
Note: The display will still flash the Call icon and show CALL or the Caller Display
number, when there is an incoming call, even if the ringer is turned off
To turn the ringer back on, press and hold <HASH/#> again.
Note: You can still use <TALK> to answer a call when the handset is ringing.
To turn the keypad lock off, press and hold <STAR/*> again.
You can lock the keypad so that it cannot be used accidentally while carrying it
The most recent last number will display at the top of the redial list.
of this entry.
around. In idle, press and hold <STAR/*> to turn on the keypad lock, and the
Turn off Handset Ringer
Press <UP/DOWN> to select volume 1-5. The current setting is shown.
in phonebook to go with the
earpiece and speaker volumes.
/MUTE
<KEY LOCK> icon will display.
<MOBILE> to dial the selected redial list entry with mobile line.
Page 21

19
4.11.2 Store a Redial Number into the Phonebook
1. Follow Steps 1 and 2 in section 4.11.1.
2. Press <MENU/OK> and <UP/DOWN> to select ADD TO PB.
3. Press <MENU/OK> and then enter the name you want to use in the
4. Press <MENU/OK> and then modify the number, if necessary.
5. Press <MENU/OK> to show <MELODY 1>.
6. Press <UP/DOWN> to browse the ringtone list. The respective ringtone will
be played when browsing the ringtone list. (Note: the selected melody will
7. Press <MENU/OK> to confirm, and the entry will be stored.
only be played when you receive a call if you subscribe to Caller Display
stored number.)
4.11.3 Delete a Redial Number
1. Follow Steps 1 and 2 in section 4.11.1.
2. Press <MENU/OK> and <UP/DOWN> to select DELETE.
3. Press <MENU/OK> to confirm, and the entry will be deleted.
4.12 Find the Handset
You can locate the handset by pressing the Find button
produce the paging tone and show "PAGING" on the display for 60 seconds.
4.11.4
Delete all Redial List entries
1. Follow Steps 1 and 2 in section 4.11.1.
2. Press <MENU/OK> and <UP/DOWN> to select DELETE ALL.
3. Press <MENU/OK> to display <CONFIRM?>.
4. Press <MENU/OK> to confirm. All entries will be deleted and the display will
handset or <FIND> on the base again.
Note: If there is an incoming call during paging, the phone will ring with the
4.13 Make an Internal Call (
This feature is only applicable when there are at least two registered handsets.
It allows you to make internal calls, transfer external calls from one handset to
incoming call instead of paging.
another handset and make conference calls. If the called handset is not
answered within 60 seconds, the called handset will stop ringing and the calling
Note: If only one handset is registered to the base station, when <C/MUTE>
is pressed, it will display “NOT POSSIBLE”.
handset will return to
standby mode.
Multi - handset versions only)
and the incoming number matches the
in the middle of
show <EMPTY>.
phonebook.
You can stop the paging by pressing <TALK>/ <OFF> /<C> on any
the front of the base station. All the handsets registered to the base will
Page 22

20
4.13.1 Intercom Another Handset
1. In idle mode, press <C/MUTE>
and all the other registered handset number
2. Enter the number of the handset that you want to call, or enter "9" to call all
3. The called handset rings and <TALK> must be
Note: If only two handsets are registered to the base station, pressing
<C/MUTE> will call the other handset immediately.
will display, along with a "9".
establish the intercom call.
4.13.3 Transfer an External Call to another handset
During an external call:
1. Press <MENU/OK> and <UP/DOWN> to select INTERCOM
.
2. Press <MENU/OK> to show all the other registered handset numbers, plus
3. The external call is put on hold automatically and the called handset rings.
4. Press <TALK> on the called handset to establish
"9". Enter the number for the handset you want to transfer the call to.
handsets.
5. Press <OFF> on the calling handset or put the calling handset on the
charging cradle to end the current call with the external party.
6. The external call is transferred to the called handset.
4.13.2 Call All Handsets
1. In idle mode, press <C/MUTE> and the registered handsets will display.
2. Press <KEY 9> to ring to all registered handsets
4.13.4 Make a 3
The conference call feature allows one external call to be shared with two
handsets (in intercom).
The three parties can share the conversation and no additional network
subscription is required.
During an external call:
1.
Follow Steps 1 to 4 in section 4.13.3.
2.
Press and hold the star key <*> on the calling handset to establish the
Either handset can exit the conference by pressing <OFF>, leaving the
other handset still connected to the
external call.
pressed on that handset to
an internal call.
Note: If there is an external call while you are on an intercom call, you'll
answer the external call.
Note: If the other handset has not answered the intercom call, you can stop
the intercom and return to the external call by pressing < OFF>
-way Conference Call
hear warning beeps, and you have to end the intercom call, before you can
conference call.
Page 23

21
5 PRIVATE PHONEBOOK
Each handset can store up to 50 private phonebook entries with names and
numbers. Each phonebook entry can have a maximum of 20 digits for the
phone number and 12 characters for the name. You can also select different
ringtones for your phonebook entries. (Note: the different ringtones only play
5.1 Add a New Phonebook Entry
In idle:
PHONEBOOK and then
phonebook.
2. Press <MENU/OK> to show ADD.
3.
4. Press <MENU/OK> and then enter the number.
5. Press <MENU/OK> and <UP/DOWN> to select the desired ringtone for
6. Press <MENU/OK> to store the phonebook entry.
5.2 Search for a Phonebook Entry
In idle:
1. Press <MENU/OK> and <UP/DOWN> to select PHONEBOOK and then
2. Enter the first letter of the name using the alphanumeric keys (e.g. if it
5.3 View a Phonebook Entry
In idle:
1. Press <MENU/OK> and <UP/DOWN> to select PHONEBOOK and then
to access the phonebook.
2. Press <UP/DOWN> to select the desired phonebook entry.
3. Press <MENU/OK> and <UP/DOWN> to select VIEW.
4. Press <MENU/OK> and <UP/DOWN> to review the name, number and
ringtone of the selected phonebook entry.
Note: If the number is more than 12 digits, press <LEFT SOFT KEY> or
<RIGHT SOFT KEY> to view the remaining digits.
and then <UP/DOWN> to scroll to the entry you want.
begins with C, press the 2 key three times),
when you receive a call if you subscribe to Caller Display and the incoming
press <MENU/OK> to access the
your phonebook entry.
alphabetically by name.
Phonebook entries are stored
number matches the stored number.)
Press <MENU/OK> and then enter the name.
1. Press <MENU/OK> and <UP/DOWN> to select
press <MENU/OK> to access the phonebook.
press <MENU/OK>
Page 24

2206
5.4 Edit a Phonebook Entry
In idle:
1. Press <MENU/OK> and <UP/DOWN> to select PHONEBOOK and then
2. Press <UP/DOWN> to select the desired phonebook entry.
3. Press <MENU/OK> and <UP/DOWN> to select EDIT.
4. Press <MENU/OK> to display the current name.
5. Edit the name and press <MENU/OK>.
6. Edit the number and press <MENU/OK>.
7. Press <UP/DOWN> to select the ringtone and press <MENU/OK> to confirm.
5.5 Delete a Phonebook Entry
In idle:
1. Press <MENU/OK> and <UP/DOWN> to select PHONEBOOK and then
2. Press <UP/DOWN> to select the desired phonebook entry.
3. Press <MENU/OK> and <UP/DOWN> to select DELETE.
4. Press <MENU/OK> to confirm, and the entry will be deleted.
press <MENU/OK> to access the phonebook.
press <MENU/OK> to access the phonebook.
5.6 Delete all Phonebook entries
1. Press <MENU/OK> and <UP/DOWN> to select PHONEBOOK and then
2.
3.
Press <MENU/OK> and <UP/DOWN> to select DELETE ALL.
4.
Press <MENU/OK> to display <CONFIRM?>.
Press <MENU/OK> to confirm. All entries will be deleted and the display
5.7 Check the Phonebook Usage
You can check how many phonebook entries are stored in your handset and
how many phonebook entries are available for you to store in the phonebook.
1. Press <MENU/OK> and <UP/DOWN> to select PHONEBOOK and then
2. Press <MENU/OK> and <UP/DOWN> to select PB STATUS.
3. Press <MENU/OK> to display how much of the phonebook is being used,
for example <14/50> means 14 entries are stored out of the total 0 available
spaces.
will show <EMPTY>.
press <MENU/OK> to access the phonebook.
press <MENU/OK> to access the phonebook.
5
Page 25

233 7
6 CALLER DISPLAY (NETWORK DEPENDENT)
This feature is available if you have subscribed to the Calling Line Identification
service with your network service provider. Your phone can store up to 20
received calls with date/time information in the Call List. The number will be
shown on the handset display when the phone is ringing. If the number matches
with one of the entries in your Private Phonebook, the caller's name stored in the
private phonebook will be displayed alternately with the number, and the
handset will ring with the ringtone associated with that phonebook entry.
If the call is from someone who withheld their number, e.g. by dialling 141,
will display.
If the call is from someone whose number is unavailable, e.g. an international
call or from a private exchange, “OUT OF AREA” will display.
If you've got new Caller Display records, the handset will display "X NEW
6.1 View the Call List
All received calls are saved in the Call List with the latest call at the top of the list.
When the call list is full, the oldest call will be replaced by a new call. Any
unanswered calls which have not been viewed are marked with a <*> icon at the
CALLS" in standby mode. The New Calls indication will remain until all the new
call records have been viewed on that handset.
centre of the bottom line of the display.
1. Press <UP/CALLS> to access the call list.
OR Press <MENU/OK> and <UP/DOWN> to show CALL LIST, the press OK.
2. Press <UP/DOWN> to select the desired entry.
3. Press <#> to view the caller’s number if applicable.
6.2 Store a Call List Number into the Phonebook
1. Follow Steps 1 and 2 in Section 6.1.
2. Press <MENU/OK> and <UP/DOWN> to show ADD TO PB.
3. Press <MENU/OK> and then enter the name.
4. Press <MENU/OK> and the selected call list number is displayed.
5. Edit the number if necessary.
6. Press <MENU/OK> and <UP/DOWN> to select the ringtone.
7. Press <MENU/OK> to store the phonebook entry and return to the calls list.
“WITHHELD”
to display the date and time of the call. Press <MENU/OK> to go back to the
previous screen.
Press <MENU/OK>, <UP/DOWN> to show DETAILS, and then <MENU/OK>
4.
Page 26

2444 8
6.3 Delete an entry in the Call List
1. Follow Steps 1 and 2 in Section 6.1.
2. Press <MENU/OK> and <UP/DOWN> to select DELETE.
3. Press <MENU/OK> to confirm.
6.4
1. Follow Steps 1 and 2 in Section 6.1.
2. Press <MENU/OK> and <UP/DOWN> to select DELETE ALL.
3. Press <MENU/OK> to display <CONFIRM?>.
4. Press <MENU/OK> to confirm. All entries will be deleted and the display will
show<EMPTY>.
Delete all Call list entries
Page 27

25
7 PHONE SETTINGS
Your phone comes with a selection of settings that you can change to
personalise your phone the way you like it to work.
7.1 Date and Time Settings
If you subscribe to Caller Display the time and date settings will be automatically
updated by the
The Caller Display service only sends the month and date, not the year, so you
may need to set the year.
7.1.1 Change the Date Format
1. Press <MENU/OK> and <UP/DOWN> to select HS SETTINGS.
2. Press <MENU/OK> and <UP/DOWN> to select DATE & TIME.
3. Press <MENU/OK> and <UP/DOWN> to select DATE FORMAT.
4. Press <MENU/OK> and <UP/DOWN> to select your desired date format
(DD-MM-YYor MM-DD-YY
).
5. Press <MENU/OK> to confirm.
7.1.2 Change the Time Format
1. Press <MENU/OK> and <UP/DOWN> to select HS SETTINGS.
2. Press <MENU/OK> and <UP/DOWN> to select DATE & TIME.
3. Press <MENU/OK> and <UP/DOWN> to select TIME FORMAT.
4. Press <MENU/OK> and <UP/DOWN> to select your desired time format
5. Press <MENU/OK> to confirm.
7.1.3 Set the Time
1. Press <MENU/OK> and <UP/DOWN> to select HS SETTINGS.
2. Press <MENU/OK> and <UP/DOWN> to select DATE & TIME.
3. Press <MENU/OK> and <UP/DOWN> to select SET TIME.
4. Press <MENU/OK> and then enter the time information in 24 hour format.
5. Press <MENU/OK> to confirm.
Note: If time has been set before, the current time will display, otherwise,
“HH:MM”
will display.
7.1.4 Set the Date
1. Press <MENU/OK> and <UP/DOWN> to select HS SETTINGS.
2. Press <MENU/OK> and <UP/DOWN> to select DATE & TIME.
3. Press <MENU/OK> and <UP/DOWN> to select SET DATE.
4. Press <MENU/OK> and then enter the date information
5. Press <MENU/OK> to confirm.
Note: If date has been set before, the current date will display, otherwise,
7.1.1.
“DD-MM-YY ” will display.
(12 HR or
24 HR).
network when you receive an incoming call.
in the format you
set in Section
Page 28

26
When the alarm time is reached,
the alarm icon< > and
“
ALARM ON
”
flash on the handset display, and the
You can press any key to disable the alarm.
the alarm will sound again at the end of the
Note:
a. A key press will still disable the alarm even if the handset keypad is locked
b. The alarm volume level is the same as the settings of the handset ringer
volume. If the handset ringer is set to VOLUME OFF, the alarm still sounds
at VOLUME 1
level.
when the alarm rings.
c. During an external call or internal call, if an alarm is set and when the alarm
time is reached, the < > and “ALARM ON” will still flash. An
alarm tone will be emitted from the earpiece to alert the user the alarm time
is reached. Once the user presses any key or presses and holds.
d. During paging or ringing, the alarm will not sound when the alarm time is
reached. However, if the snooze function is enabled and there is no paging
7.2.1 Turn on/off the Alarm
1. Press <MENU/OK> and <UP/DOWN> to select HS SETTINGS.
2. Press <MENU/OK> and <UP/DOWN> to select ALARM.
4. Press <MENU/OK> to confirm.
Note: If ON is selected, you will be asked to set the alarm time.
7.2.2 Set the Alarm Time (If Alarm time is set to be ON)
1.
2. Enter the alarm time in24 hour format.
3. Press <MENU/OK> to display "SNOOZE".
4. Press <MENU/OK> and <UP/DOWN> to select snooze ON or OFF.
5. Press <MENU/OK> to confirm.
7.3 Handset Settings
7.3.1 Set the Ringer Melody for Internal Calls
1. Press <MENU/OK> and <UP/DOWN> to select HS SETTINGS.
2. Press <MENU/OK> and <UP/DOWN> to select RING SETUP
3. Press <MENU/OK> and <UP/DOWN> to select INT RING.
4. Press <MENU/OK> and <UP/DOWN> to select the melody you want to
Note: The respective melody will be played while browsing the ringtone list.
5. Press <MENU/OK> to confirm.
3. Press <MENU/OK> and <UP/DOWN> to select ON/OFF.
<OFF> to disable the alarm, the display will revert to the call duration.
or ringing, the alarm will sound again at the end of the snooze period.
while the alarm is sounding, to stop the alarm and turn off the snooze function.
hear for internal calls.
7.2 Alarm Settings
icon < > is shown on the handset display.
alarm tone rings for 45 seconds.
If the snooze function is activated,
snooze period of seven minutes. You can also press and hold <OFF>
Follow Steps 1 to 4 in Section 7.2.1.
You can set an alarm time on this phone. When an alarm is set, the alarm
Page 29

27
1. Press <MENU/OK> and <UP/DOWN> to select HS SETTINGS.
2. Press <MENU/OK> and <UP/DOWN> to select RING SETUP.
3. Press <MENU/OK> and <UP/DOWN> to select EXT RING.
Press <MENU/OK> and <UP/DOWN> to select melody you want to hear for
Note: The respective melody will be played while browsing the ringtone list.
5. Press <MENU/OK> to confirm.
7.3.3 Set the Ringer Volume
1. Press <MENU/OK> and <UP/DOWN> to select HS SETTINGS.
2. Press <MENU/OK> and <UP/DOWN> to select RING SETUP.
3. Press <MENU/OK> and <UP/DOWN> to select RING VOLUME.
4. Press <MENU/OK> and <UP/DOWN> to select the desired ringer volume (a
VOLUME OFF).
Note: The respective ringer volume will be played during your selection.
If VOLUME OFF is selected, the <Ringer Off> icon will be displayed.
5. Press <MENU/OK> to confirm.
7.3.4 Set Alert Tones
Three different alert tones are set on by default, but can be turned off, if desired.
Key Tone - a single beep is emitted when you press a key.
you need to charge the handset batteries.
1. Press <MENU/OK> and <UP/DOWN> to select HS SETTINGS.
2. Press <MENU/OK> and <UP/DOWN> to select TONE SETUP.
3. Press <MENU/OK> and <UP/DOWN> to select KEY TONE / BATTERY
4. Press <MENU/OK> and <UP/DOWN> to turn on or off these tones.
5. Press <MENU/OK> to confirm.
Out of Range Tone - emitted while you are talking on the phone to alert you to
Low Battery Tone - emitted while you are talking on the phone to alert you that
7.3.5 Set the Handset Language
1. Press <MENU/OK> and <UP/DOWN> to select HS SETTINGS.
2. Press <MENU/OK> and <UP/DOWN> to select LANGUAGE.
3. Press <MENU/OK> and <UP/DOWN> to select the desired language.
4. Press <MENU/OK> to confirm.
7.3.6 Ren
ame the Handset
1. Press <MENU/OK> and <UP/DOWN> to select HS SETTINGS
2. Press <MENU/OK> and <UP/DOWN> to select RENAME HS.
3. Press <MENU/OK> and change the name of your handset, using <C/MUTE> to
4. Press <MENU/OK> to confirm.
keys to enter up to 10 letters for the name.
move closer to the base unit, before the call is lost.
total of 6 ringer volume levels including
TONE/OUT OF RANGE.
external calls.
delete letters and the alphanumeric
4.
7.3.2 Set the Ringer Melody for External Calls
Page 30

28
You can choose to display time or handset name in your idle screen.
1. Press <MENU/OK> and <UP/DOWN> to select HS SETTINGS.
2. Press <MENU/OK> and <UP/DOWN> to select HS DISPLAY.
3. Press <MENU/OK> and <UP/DOWN> to select HANDSET NAME or TIME
.
4. Press <MENU/OK> to confirm.
7.3.8 Set the Auto Answer
If you turn on the Auto Answer, you can answer a call automatically by just lifting
1. Press <MENU/OK> and <UP/DOWN> to select HS SETTINGS.
2. Press <MENU/OK> and <UP/DOWN> to select AUTO ANSWER.
3. Press <MENU/OK> and <UP/DOWN> to turn on or off the auto answer feature.
4. Press <MENU/OK> to confirm.
the handset off the base or charger, without having to press any key.
7.4 Base Settings
1. Press <MENU> and <UP/DOWN> to select BS SETTINGS.
2. Press <OK> and <UP/DOWN> to select BS RINGER.
3. Press <OK> and <UP/DOWN> to select the desired melody you want from a
Note: The respective ringer melody will be played while browsing the melody list.
Press <OK> to confirm.
7.4.1 Set the Base Ringer Melody
4.
choice of 5.
1. Press <MENU> and <UP/DOWN> to select BS SETTINGS.
2. Press <OK> and <UP/DOWN> to select RING VOLUME.
volume levels including VOLUME OFF).
Note
: The respective ringer volume will be played during your selection.
4. Press <OK> to confirm.
7.4.2 Set the Ringer Volume
6 ringer
3. Press <OK> and <UP/DOWN> to select the desired ringer volume (a total of
Note: If TIME is selected, but no time has been set the display will show ----------.
7.3.7 Choose the Information to be Displayed in Idle
Page 31

29
6. Press <UP/DOWN> to step through the list of registered handsets, and
select the number of the handset you want to de-register.
7.4.
1. Press <MENU/OK> and <UP/DOWN> to select BS SETTINGS.
2. Press <MENU/OK> and <UP/DOWN> to select FLASH TIME.
3. Press <MENU/OK> and <UP/DOWN> to select your desired flash time
4. Press <MENU/OK> to confirm.
You may need to change the recall (flash) time if your phone is connected to a
PBX. The recall time options are SHORT (the default value of 100ms),
0ms) or LONG (600ms).
7.4.
A 4-digit system PIN code is used for changing the system settings of the base
station. It is used to protect your phone against unauthorised use. The default
system PIN code is 0000.
1. Press <MENU/OK> and <UP/DOWN> to select BS SETTINGS.
2. Press <MENU/OK> and <UP/DOWN> to select CHANGE PIN.
3. Press <MENU/OK> and PIN?------
4. Enter the old system PIN.
5. Press <MENU/OK>
6. Press <MENU/OK> to display CONFIRM?------, and enter your new 4-digit
Note: If the new PIN entered in Step 6 is not the same as the new system PIN
entered in Step 5, you must enter the new system PIN at step 5 again.
7. Press <MENU/OK> to confirm
30
LONG,
with the current setting indicated by and asterisk
MEDIUM (
the display shows
again,
to display NEW PIN?------, and enter your new 4-digit
system PIN again.
(SHORT,MEDIUM,
to the right).
system PIN.
7. Press <MENU/OK> to confirm, and the chosen handset will be de-registered.
4 Change the Flash (Recall) Time
5 Change the System PIN Code
This operation should only be necessary if one of your handsets becomes faulty
You will need to enter the 4-digit system PIN (Default PIN is 0000) in order to
Note: You cannot de-register the handset that you are currently using.
7.4.3 De-register a Handset
de-register a handset from the base station. A de-registered handset will have
1. Press <MENU/OK> and <UP/DOWN> to select BS SETTINGS.
2. Press <MENU/OK> and <UP/DOWN> to select DELETE HS.
3. Press <MENU/OK> and the display shows PIN?----
4. Enter the 4-digit system PIN.
5. Press <MENU/OK> and the first handset number is displayed.
or lost and needs to be replaced.
the antenna flashing and REGISTER on the display.
Page 32

30
7.5 Registration
You can register additional handsets to have up to five handsets per base unit,
with each handset's number (1 to 5) shown on its display. (Note: each handset
1. Press and hold <FIND> on the base station for more than five seconds, to
put the base station into registration mode. It will stay in registration mode
To register a new handset to your base:
2. Press <MENU/OK> and <UP/DOWN> to select REGISTRATION.
3. Press <MENU/OK>
4. Enter the 4-digit system PIN(default0000).
5. Press <MENU/OK> to confirm, and the display will show PLEASE WAIT.
If the handset registration is successful, you will hear a confirmation tone and
The handset will automatically be allocated the next available handset number.
This handset number is shown in the handset display in standby mode. If the
handset registration is unsuccessful, the <antenna icon> will still flash.
7.6 Reset Your Phone
You can reset your phone to the default settings . After a reset, all
your
1. Press <MENU/OK> and <UP/DOWN> to select
DEFAULT.
2. Press <MENU/OK>
3. Enter the 4-digit system PIN(default 0000).
4. Press <MENU/OK> to display CONFIRM?
5. Press <MENU/OK> to confirm, and the phone will be reset to its default
can only be registered to one base.)
for about 1 minute, so the following handset sequence must be completed
unchanged.
IMPORTANT: When you purchase your phone system, all handsets are
messages will be deleted but your phonebook remains
the <antenna icon> will stop flashing.
personal settings, call list entries, redial list entries, and answering machine
within this time.
already registered to your base, so you do not need to register them.
Handset registration is only necessary when you buy extra
handsets or if a handset has become faulty.
to display PIN?------.
to display PIN?-----.
settings.
Page 33

31
ANSWERING MACHINE
Your phone includes a telephone answering machine that records unanswered
calls when it is on.The answering machine can store up to 59 messages within
incoming messages, you can record memos for other users of your phone.
the maximum recording time of approximately 15 minutes. As well as recording
8
memory is full, the Handset will display
TAM FULL alternately with the handsets name or time, depending on the
handset standby display mode set (see section 7.3.7), and you will have to
delete some messages before any new ones can be recorded.
If the answering machine
1. Press <MENU/OK> and <UP/DOWN> to select ANS. MACHINE.
2. Press <MENU/OK> and <UP/DOWN> to select TAM ON/OFF.
3. Press <MENU/OK> and <UP/DOWN> to select
ON or OFF.
4. Press <MENU/OK> to confirm.
¾ If answering machine is set to ON, <TAM ON icon> displays on the
¾ If answering machine is set to OFF, <TAM ON icon> will not display on the
handset LCD.
When new messages are recorded on the answering machine, the <TAM icon>
flashes on the handset display until all the new messages are played.
After a new message is played it will be saved as an old message
Old messages will be played after all new messages are played completely.
1.
Press <MENU/OK> and <UP/DOWN> to select ANS. MACHINE.
2. Press <MENU/OK> and <UP/DOWN> to select MSG PLAYBACK.
3. Press <MENU/OK> to start message playback through the earpiece and the
You can turn the answering machine on or off using the handset.
When the answering machine is set to ON, calls will be answered after the
set answer delay and the caller can then leave you a message.
When the answering machine is set to OFF, calls will be answered after 14
8.1 Turn On/Off the Answering Machine
not be able to leave you a message.
handset LCD.
automatically unless it is deleted.
Some answering machine functions can be operated from the base,
including playing messages and turning the answering machine on or
off. See section "3.3 Base Station with Telephone Answering Machine
(TAM) Control" for further details.
The answering machine can also be controlled and set up using the
handset menu functions, as below.
screen displays the date and time information of the message received.
8.2 Listen to the Messages in the Answering Machine
rings and the answer only message will be played to your callers. They will
Page 34

32
4. During message playback, press <UP> or <DOWN> to increase or decrease
the message playback volume respectively.
5. Press <MENU/OK> and <UP/DOWN> to select STOP, FORWARD,
PREVIOUS, DELETE to perform the following functions during message
Note: A <STAR icon> is placed at the centre of the bottom of the handset
display to indicate that it is a new message.
When a message has been played, the <STAR icon> will disappear and will not
Note: If there are no messages, the handset display will briefly show
then return to MSG PLAYBACK.
"00-00 00-00"
be shown when you listen to this message again.
playback.
STOP: Stop the current message playback and return to the
ANS. MACHINE
menu.
FORWARD: Skip to play the next message. The date and time information
of the next message will display if there is another message.
PREVIOUS: Repeat playing the current message from the beginning.
The date and time information of the current message will display.
DELETE: Delete the current message and the next message will be played.
Note: Alternatively, you can use the following shortcut keys to control different
Press <Key 5> to stop message playback.
Press <Key 4> once to skip to repeat playing the current message from the
Press <Key 6> to skip to play next message.
Press <Key 2> to delete the current message playback.
beginning.Press twice to skip backward to play the previous message.
operations during message playback.
1. Press <MENU/OK> and <UP/DOWN> to select ANS. MACHINE.
2. Press <MENU/OK> and <UP/DOWN> to select DELETE ALL.
3. Press <MENU/OK> to display CONFIRM?
4. Press <MENU/OK> to delete all old messages.
Note: If there are no more messages in the answering machine, "EMPTY " will
display and
return back to ANS. MACHINE menu.
You can record a memo message for another user. When you record a memo,
the message counter will increase by one and the message can be played back
in the same way as answering machine messages. Memo recording can still
function even when the answering machine is turned off.
1. Press <MENU/OK> and <UP/DOWN> to select ANS. MACHINE.
2. Press <MENU/OK> and <UP/DOWN> to select MEMO.
3. Press <MENU/OK> to start memo recording and
“
RECORDING
”
is displayed.
4. Press <MENU/OK> to stop memo recording and save the memo.
8.3 Delete All Messages in the Answering Machine
8.4 Record Memo
Page 35

33
OR
4. Press <C> to stop memo recording without saving and return back to
ANS. MACHINE
menu.
You can use the TAM SETTINGS menu through the handset to change the
settings of your answering machine.
8.5 Answering Machine Settings
By default, the answer machine is set in
ANS & REC mode which allows callers
to leave a message. This mode can be changed to ANSWER ONLY which
8.5.1 Set the Answer Mode
does not allow callers to leave a message. In that case, your callers will be
prompted to call back later.
1. Press <MENU/OK> and <UP/DOWN> to select ANS. MACHINE
.
2. Press <MENU/OK> and <UP/DOWN> to select TAM SETTINGS
.
3. Press <MENU/OK> and <UP/DOWN> to select ANSWER MODE
.
4. Press <MENU/OK> and <UP/DOWN> to select ANS & REC or
ANSWER ONLY
5. Press <MENU/OK> to confirm.
You can record your own OGM for ANS & REC mode or ANSWER ONLY mode.
When you record your own OGM, it will be used when the answering machine
answers the call. If your personalised OGM is deleted, the pre-set OGM will be
1. Press <MENU/OK> and <UP/DOWN> to select ANS. MACHINE.
2. Press <MENU/OK> and <UP/DOWN> to select TAM SETTINGS.
3. Press <MENU/OK> and <UP/DOWN> to select OGM SETTINGS.
4. Press <MENU/OK> and <UP/DOWN> to select ANS & REC or ANSWER
restored automatically.
When your answering machine memory is full and it is in
ANS & RECORD
mode automatically after some
answer mode will change to ANSWER ONLY
automatically. It will return to
messages have been deleted.
8.5.2 Record Your Own Outgoing Message (OGM)
ONLY.
,the
& RECORD
ANS
.
5. Press <MENU/OK> and <UP/DOWN> to select RECORD MESS.
6. Press <MENU/OK> to start recording your personalised OGM and
“RECORDING”
7. Press <MENU/OK> to stop and save your personalised OGM. Your newly
Alternatively, press <BACK> to return to previous screen without saving the
is displayed on the screen.
personalised OGM.
saved OGM will playback automatically.
Page 36

34
OGM during playback and record a new one whenever you want.
Please note that pre-set OGM cannot be deleted.
You can playback your own personalised OGM or the pre-set OGM for ANS &
REC mode or ANSWER ONLY mode and choose to delete your personalised
8.5.3 Playback and Delete the Outgoing Message (OGM)
1. Press <MENU/OK> and <UP/DOWN> to select ANS. MACHINE.
2. Press <MENU/OK> and <UP/DOWN> to select TAM SETTINGS.
3. Press <MENU/OK> and <UP/DOWN> to select OGM SETTINGS.
4. Press <MENU/OK> and <UP/DOWN> to select ANS & REC or
ANSWER ONLY.
5. Press <MENU/OK> and <UP/DOWN> to select PLAYBACK.
6. Press <MENU/OK> to playback your current OGM and
is displayed on the screen.
7. Press <MENU/OK> to stop the OGM playback and return to the previous
Note: If a personalised OGM has not been recorded, the pre-set OGM will be
8.5.3.2 Delete the Personalised OGM
1. Repeat Steps 1 to 6 in Section 8.5.4.1
2. Press <C> while the OGM is playing to delete your personalised OGM and
return to the previous menu and the pre-set OGM is restored automatically.
Note: If the pre-set OGM is playing, you are not allowed to delete it, so
You can set the number of rings before the answering machine answers and
starts playing your OGM. You can set the answering machine to answer after
two to eight rings or TIME SAVER.
will answer after 4
rings if there are no new messages, or after 2 rings if there
is a new message, so if you call in and you don't get an answer
after 2 or 3 rings, you can hang up and save on call charges.
"PLAYING OGM"
8.5.3.1 Playback the OGM
8.5.4 Set the Answer Delay
played.
pressing <C> will just stop the playback and return to the previous menu.
menu.
If Time Saver is set the answering machine
1. Press <MENU/OK> and <UP/DOWN> to select ANS. MACHINE.
2. Press <MENU/OK> and <UP/DOWN> to select TAM SETTINGS.
3.
P ress <MENU/OK> and <UP/DOWN> to select ANSWER DELAY (Available
.
4. Press <MENU/OK> and <UP/DOWN> to select your desired answer delay.
5. Press <MENU/OK> to confirm.
options: 2 RINGS, 4 RINGS, 6 RINGS, 8 RINGS or TIME SAVER)
Page 37

35
You can set the maximum length of the recording time of the incoming messages.
1. Press <MENU/OK> and <UP/DOWN> to select ANS. MACHINE
.
8.5.5 Set the Recording Time of Incoming Message
2. Press <MENU/OK> and <UP/DOWN> to select TAM SETTINGS.
3. Press <MENU/OK> and <UP/DOWN> to select RECORD TIME (Available
4. Press <MENU/OK> and <UP/DOWN> to select your desired recording time.
5. Press <MENU/OK> to confirm.
options: 60S, 120S, 180S, or UNLIMITED)
When the answering machine is on and takes a call, you can listen to the caller
leaving a message. You can then identify the caller and decide whether to take
If the answering machine is set to ON, when there is an incoming message,
the handset will display “SCREENING?”
1. Press <MENU/OK> to start call screening. Any Handset can listen to who is
the call or not.
2. The handset will display “SCREENING”.
3. You can adjust the earpiece volume by pressing <UP or DOWN>.
OR
the call in person.
Call Screening
leaving the message and decide whether to pick up
The call can be screened at the base and with any handset.
8.5.6.1 Screening at the base
By default, answering machine calls are played automatically through the base
speaker and the volume can be adjusted with the VOL + and VOL - keys on the
If you don't want the caller to be heard when leaving a message, the base
screening can be turned off.
1. Press <MENU/OK> and <UP/DOWN> to select ANS> MACHINE.
2. Press <MENU/OK> and <UP/DOWN> to select TAM SETTINGS.
3. Press <MENU/OK> and <UP/DOWN> to select BS SCREENING.
4. Press <MENU/OK> and <UP/DOWN> to select OFF or ON. (The current
setting will be indicated by a *.)
5. Press <MENU/OK> to confirm the setting.
8.5.6.2 Screening with a handset
8.5.6
base.
4. Press <C/MUTE> to return to previous screen and you cannot hear the
machine is in the process of recording, the message already stored will be
saved.
recording. At any time if you want to pick up the call, you can press <TALK>
and the message recording will be stopped automatically. If the answering
Page 38

36
Three different compression rates (HIGH, MEDIUM and LOW) are provided for
rate, the higher the recording quality level attained, but the
1. Press <MENU/OK> and <UP/DOWN> to select ANS. MACHINE.
2. Press <MENU/OK> and <UP/DOWN> to select TAM SETTINGS.
3. Press <MENU/OK> and <UP/DOWN> to select COMPRESSION.
4. Press <MENU/OK> and <UP/DOWN> to select your desired compression
5. Press <MENU/OK> to confirm.
Your phone lets you check your messages, or otherwise operate your answering
you to select different quality levels of recording incoming message. The lower
the compression
8.5.7 Change the Compression Rate
8.5.8 Activate Remote Access
shorter the total recording time available. ( LOW=7 minutes, MEDIUM=10
minutes, HIGH=15 minutes approx).
machine, by calling the answering machine when you are away from home and
then dialling a 4-digit remote access PIN from a tone-dialling phone.
The 4-digit remote access PIN code is used to prevent other people from
unauthorised access of your answering machine.
Note: Remote Access must be turned on if you want to be able to use this
feature, see 8.5.9.2.
rate.
8.5.8.1
1. Press <MENU/OK> and <UP/DOWN> to select ANS. MACHINE.
2. Press <MENU/OK> and <UP/DOWN> to select TAM SETTINGS.
3. Press <MENU/OK> and <UP/DOWN> to select CHANGE PIN.
4. Press <MENU/OK> and enter the Old PIN. (Default Remote Access PIN
5. Press <MENU/OK> and enter the New PIN.
6. Press <MENU/OK> and enter the New PIN again.
Note: If the new PIN entered in Step 6 is not the same as the new system PIN
entered in Step 5, you must enter the new system PIN at step 5 again.
7. Press <MENU/OK> to reconfirm.
Change the 4-Digit Remote Access PIN
is 0000).
Page 39
37
4. Press <MENU/OK> and <UP/DOWN> to select ON or OFF to turn the remote
5. Press <MENU/OK> to confirm.
1. Press <MENU/OK> and <UP/DOWN> to select ANS. MACHINE.
2. Press <MENU/OK> and <UP/DOWN> to select
TAM SETTINGS.
3. Press <MENU/OK> and <UP/DOWN> to select REMOTE ACC.
8.5.8.2 Activate or Deactivate the Remote Access
access on or off respectively.
You can ring your phone from another tone-dialling phone to switch the
answering machine on or off, and/or listen to your messages remotely.
1. Place a call from a tone-dialling phone to your phone.
2. When the answering machine answers the call and starts playing the OGM,
Note: The * must be entered while the OGM is still playing, and the 4-digit PIN
3. Enter the 4-digit Remote Access PIN (default PIN is 0000). You will not hear
Note: If the 4-digit Remote Access PIN is entered incorrectly three times
consecutively, the line will be released automatically.
4. Press the following keys to carry out your desired function.
should be follow without any delays.
8.5.8.3 Access Your Answering Machine Remotely
any confirmation tones or prompts, but you will need to press 5 to start
playing any messages.
press the <*> key. The OGM will stop playing
Remote operation
Using a tone-dialling phone, dial your home number
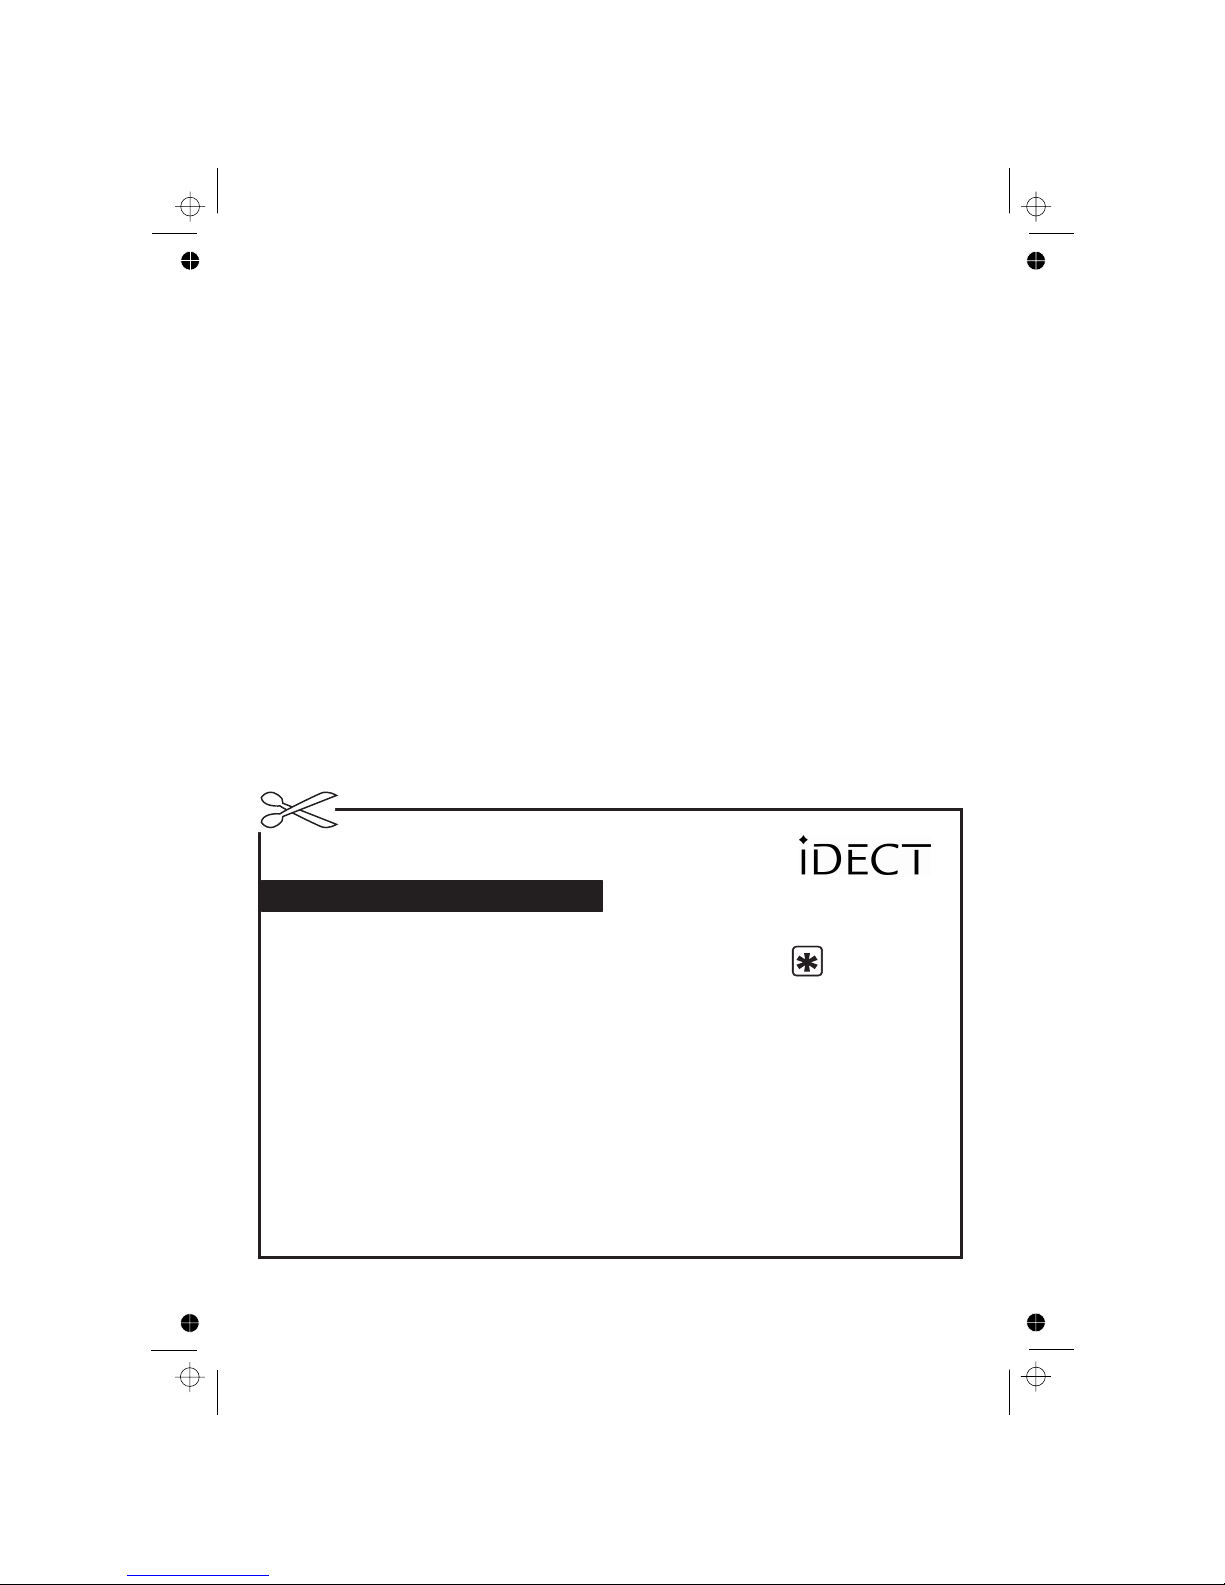
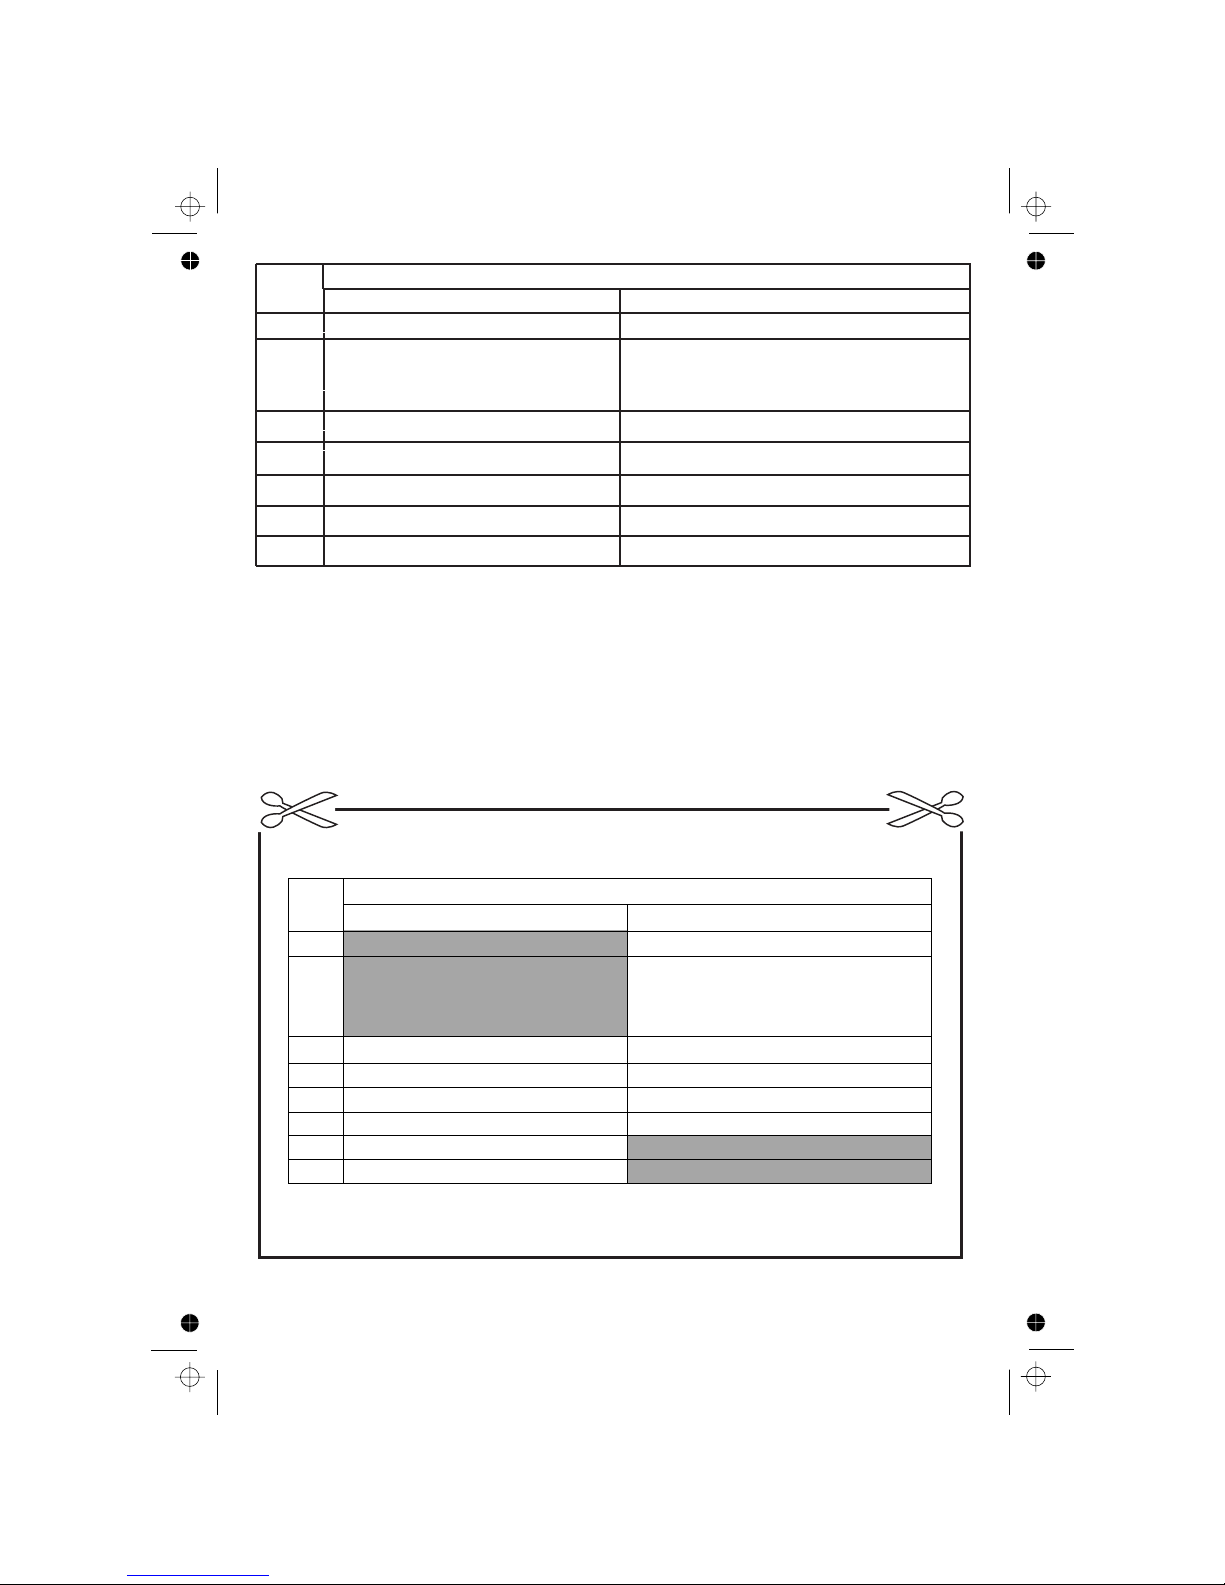
You can also use the codes on the other side of this card
While your outgoing message is playing, press
Key in your remote security code
The default code is 0000. For details of how to set a new code,
see the User Guide 8.5.9.1 on page 36.
1
2
3
4
Note: <*> key must be entered while the OGM is still playing, and the 4-digit
consecutively, the line will be release
d
Note: If your answering machine is switched off, the phone will enter into
the remote access mode after 14 rings.
You can then enter the 4-digit remote access PIN
(Default Remote Access PIN is 0000) to activate the remote access feature.
The
PIN should follow without any delays.. If the 4-digit Remote Access
PIN is entered incorrectly three times
automatically.
Link Plus system
Page 40
38
)XQFWLRQV
.H\V
:KLOHPHVVDJHLVQRWSOD\LQJ :KLOHPHVVDJHLVSOD\LQJ
'HOHWHWKHFXUUHQWPHVVDJHSOD\ing
5HSHDWSOD\LQJWKHFXUUHQWPHVVDJH
IURPWKHEHJLQQLQJ3UHVVWZLFHWRVNLS
EDFNZDUGWRSOD\WKHSUHYLRXVPHVVDJH
3OD\WKHPHVVDJH 6WRSWKHFXUUHQWPHVVDJHSOD\EDFN
6NLSWRSOD\WKHQH[WPHVVDJH
7XUQRQWKHDQVZHULQJPDFKLQH
6WRSWKHFXUUHQWPHVVDJHSOD\EDFN
7XUQRIIWKHDQVZHULQJPDFKLQH
Note: If your answering machine is switched off, the phone will enter into the
remote access mode after 14 rings.
You can then enter the <*> key and the 4-digit remote access PIN (Default
Remote Access PIN is 0000) to activate the remote access feature.
Functions
Keys
While message is playing
2
Delete the current message playing.
4
Repeat playing the current message
5
Play the message
Stop the current message playback
6
Skip to play the next message
7
8
Stop the current message playback
9
Turn off the answering machine
from the beginning. Press twice to
skip backward to play the previous
message.
Turn on the answering machine
While message is not playing
Page 41
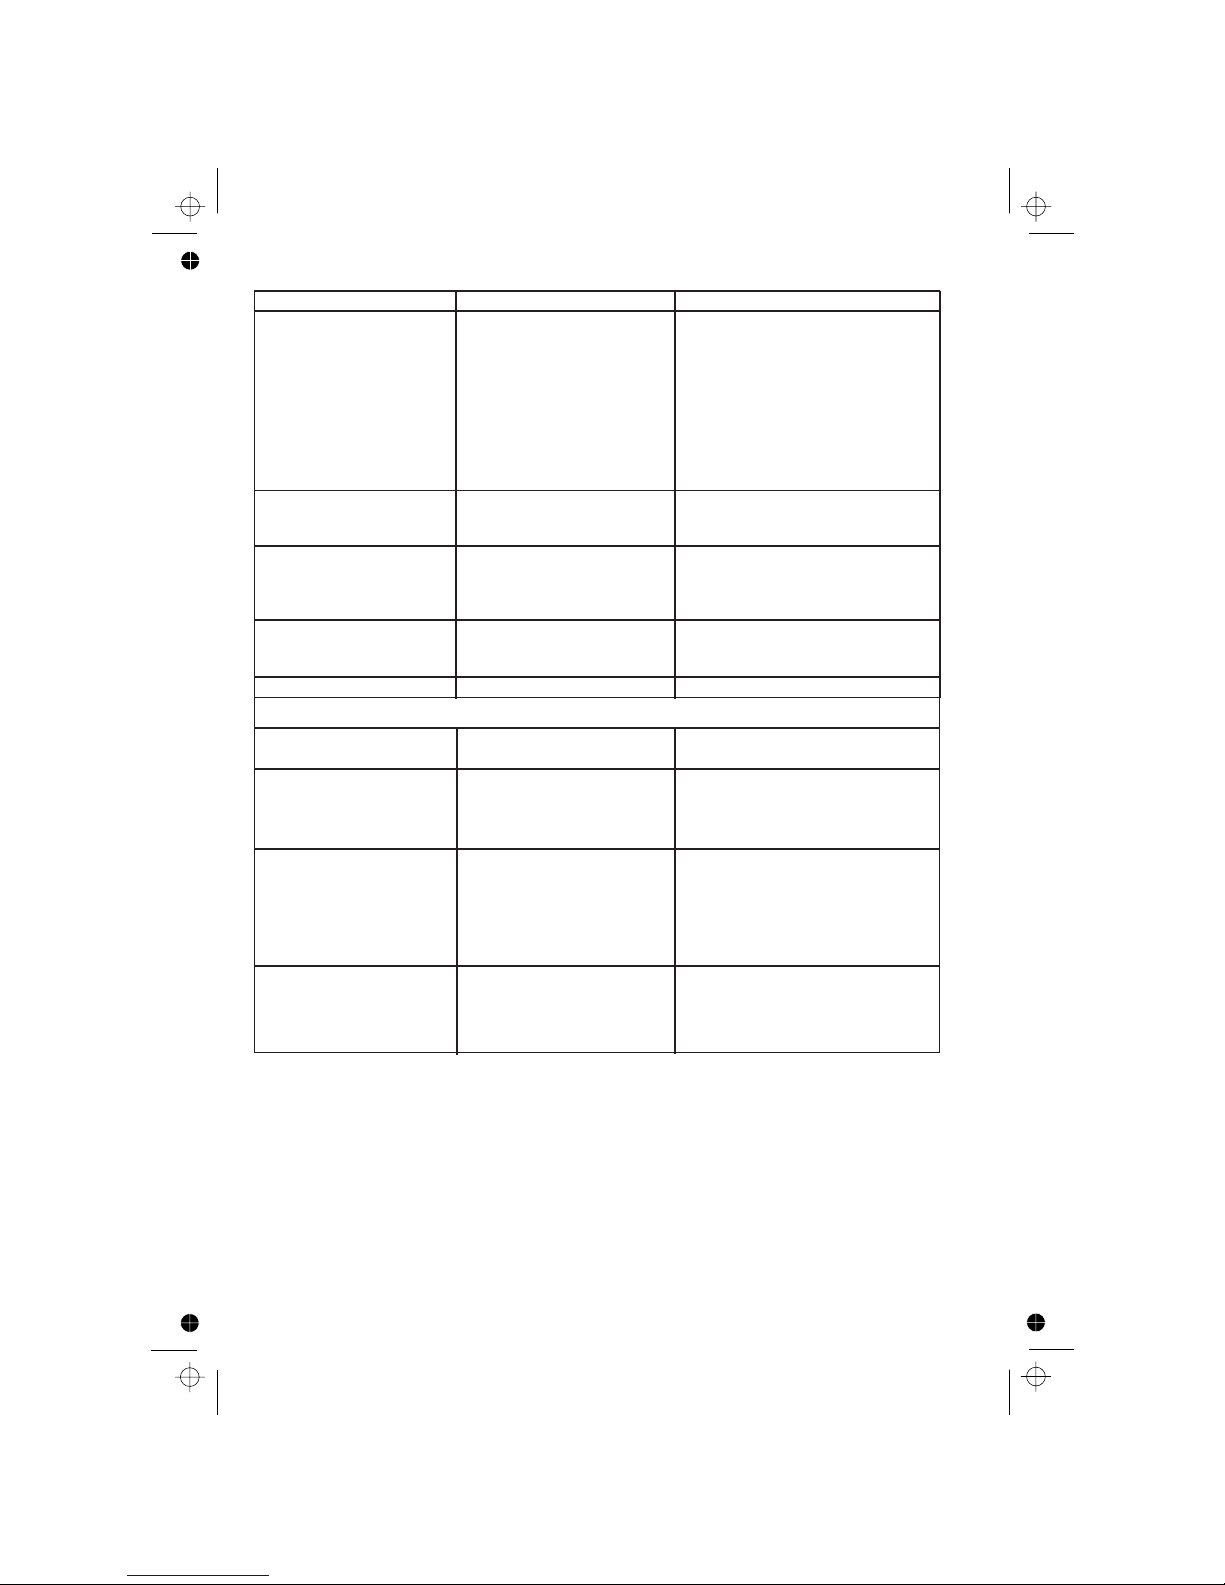
39
Problem Causes Solutions
No dialling tone when
pressing <TALK > key
a. The connection cord of
the base station is not
plugged in.
b. The adapter cord is not
plugged in correctly in
the base station.
c. Another handset is using
the base to make a call.
d. Wrong telephone line cord
a. Check the connections. Unplug
and plug back in the mains.
Check that the telephone cord
has been plugged into the base
station and the phone socket.
b. Check the base station plug and
the 230V plug (remove and plug-in).
c. Wait until the line is unoccupied.
d. Use the original telephone line
cord supplied
When connect to a PBX,
no and/or wrong connection
after dialling.
Dialling prefix is needed. Insert the dialling prefix
"SEARCHING" is displayed.
a. Base station out of
range.
b. Base station not
connected to mains.
Reduce the range.
Connect base station to
mains.
The call does not work.
Service not activated or
Check your Subscription with the
network.
No display. Empty battery Recharge battery
Please contact the technical support of the network provider for further information.
This telephone is not equipped with a grounding function
used in PBX systems.
, and therefore some of
the functions may be limited when
9 TROUBLESHOOTING
Answering Machine
The unit does not record
new messages.
The answering machine is
turned off.
Turn on the answering machine.
The caller cannot leave a
message.
a. The answering machine
is turned off.
b. Message memory is full.
a. Turn on the answering machine.
b. Erase unnecessary messages.
I cannot operate the
answering machine
remotely.
a. You are entering the
wrong remote access code
b. You are pressing the dial
keys too quickly.
c.
You are using a pulse
telephone.
a. If you forget the remote access
code, reset to the default settings.
b. Press each key firmly.
While recording an outgoing
message or listening to
messages, the unit rings
and recording stops.
A call is being received.
Answer the incoming call
and try again to record your
out going message later.
c. ANSWER ONLY mode is set.
c. Change to ANS & REC mode.
c. Try again using a touch tone
phone.
wrong setting
Page 42

40
Technical Support
If the fault persists...
Disconnect all other instruments connected to the same line as the phone
Disconnect the base unit from the telephone line and plug a different phone
system and try to make a call.
into the master telephone socket.
Try making a call. If this works, the line is OK.
If the cal l does not work, and you are using a two-way socket adapter, remove
it and plug a telephone directly into the socket. If the cal l now works, the adapter
may be faulty.
Page 43
41
DECLARATION OF CONFORMITY
We the manufacturer / Importer : Binatone Telecom Plc,
1 Apsley Way London, NW2 7HF.
Declare under our sole responsibility that the following product
Type of equipment:
Digital cordless telephone
Model Name:
Country of Origin:
China
Brand:
complies with the essential protection requirements of R&TTE Directive 1999/5/EC on
the approximation of the laws of the Member States relating to
Radio Spectrum Matters
,
Statesrelating to electromagnetic compatibility (EMC) and the European Community
Directive 2006/95/EC relating to Electrical Safety.
Assessment of compliance of the product with the requirements relating to the
essential requirements according to Article 3 R&TTE was based on Annex III of the
Directive 1999/5/EC and the following standard:
Radio Spectrum:
EMC:
Safety:
Manufacturer / Importer
(signature of authorized person)
Date
The conformity to the requirements is validated by the
symbol.
NOTE: In compliance with Directive 2002/96/EC, when you purchase a product
that comes with the symbol shown on the right, you are required to dispose of
electrical and electronic equipment by separate waste collection and you
cannot dispose of the product as normal waste.
This equipment and all its components, subsystems and consumable materials
formed an
integral part of this product and when you decide to dispose
takethem to a local recycling centre for
appropriate waste disposal, in compliance with the current regulations.
Details about the location of these centres can be obtained from
your local authority.
of them you have to
Notes for battery disposal
Your product contains batteries covered by the European Directive 2006/66/EC,
which cannot be disposed of with normal household waste.
Please be aware of the local rules on separate collection of batteries. The
10
hazards.
Signature
EN60950 -1 : 2006 + A 1: 2009
the Council Directive 2004/108/EC on the approximation of the laws of the Member
correct disposal of batteries helps protect the environment and prevent health
ETSI EN 301406 : V 2.1.1 (2009-07)
ETSI EN 301489-6: V1.3.1 (2008-08)
ETSI EN 301489- : V1.8.1 (2008- 4)1 0
201
1
Link Plus Series
iDECT
15 July 1
Page 44

42
11
GUARANTEE
shown on your sales receipt. This guarantee does not cover any
defects caused by accidents,misuse, fair wear and tear, neglect, faults on
the telephone line, lightning, tampering with the equipment, or any attempt
at adjustment or repair other than through approved agents.
Please keep your sales (till) receipt this is your guarantee.
You should also keep the original packaging material.
In the unlikely event that you need to return your phone system to our
Repair Centre while it is under guarantee, there may be a handling charge.
11.1 While the unit is under Guarantee
1. Disconnect the base unit from the telephone line and the mains electricity
supply.
2. Pack up all parts of your phone system, using the original package.
3. Return the unit to the shop where you bought it, making sure you take your
sales receipt.
11.2 After the Guarantee has expired
Remember to include the mains adapter.
3. Call Helpline on 0845 345 9677 (for UK only) and ask for a quotation of the
repair charge and details of where to send your phone system for repair.
4. Make sure you include with your phone system.
5.
If the unit is no longer under Guarantee, first follow steps 1 and 2 as for repair
under Guarantee. Then...
¾ Your name and address
¾ A cheque or postal order for the value of the repair
* This does not affect your statutory rights.
Return your phone system to the address given by the Service Department.
¾ A brief description of the fault.
The phone system is guaranteed for 12 months from the date of purchase
faults or
AND
SERVICE
 Loading...