

Page 1

SX9Z-B801-01
SX5L SERIES
®
LONWORKS
Communication T erminals
User’s Manual
Page 2

SAFETY PRECAUTIONS
• Read this user’s manual to make sure of correct operation before starting installation, wiring, operation, maintenance, and
inspection of the SX5L communication terminals.
• All SX5L modules are manufactured under IDEC’s rigorous quality control system, b ut users must add a backup or f ailsafe
provision to the control system using the SX5L in applications where heavy damage or personal injury may be caused in
case the SX5L should fail.
• In this user’s manual, safety precautions are categorized in order of importance to Warning and Caution:
Warning
•Turn off the power to the SX5L before starting installation, removal, wiring, maintenance, and inspection of the SX5L.
Failure to turn power off may cause electrical shocks or fire hazard.
• Special expertise is required to install, wire, program, and operate the SX5L. People without such expertise must not use
the SX5L.
• Emergency stop and interlocking circuits must be configured outside the SX5L. If such a circuit is configured inside the
SX5L, failure of the SX5L may cause disorder of the control system, damage, or accidents.
Caution
• Install the SX5L according to the instructions described in this user’s manual. Improper installation will result in falling,
failure, or malfunction of the SX5L.
• The SX5L is designed for installation in a cabinet. Do not install the SX5L outside a cabinet.
• Install the SX5L in environments described in this user’s manual. If the SX5L is used in places where the SX5L is subjected to high-temperature, high-humidity, condensation, corrosive gases, excessive vibrations, and excessive shocks, then
electrical shocks, fire hazard, or malfunction will result.
• The environment for using the SX5L is “Pollution degree 2.” Use the SX5L in environments of pollution degree 2 (according to IEC 60664-1).
Warning notices are used to emphasize that improper operation may cause
severe personal injury or death.
Caution notices are used where inattention might cause personal injury or
damage to equipment.
• Prevent the SX5L from falling while moving or transporting the SX5L, otherwise damage or malfunction of the SX5L will
result.
• Prevent metal fragments and pieces of wire from dropping inside the SX5L housing. Put a cov er on the SX5L modules dur ing installation and wiring. Ingress of such fragments and chips may cause fire hazard, damage, or malfunction.
• Make sure of safety before starting and stopping the SX5L or when operating the SX5L to force outputs on or off. Incorrect
operation on the SX5L may cause machine damage or accidents.
• Connect a protective ground to the cabinet containing the SX5L using a wire of UL1007 AWG16 (grounding resistance
100 Ω maximum).
• Do not disassemble, repair, or modify the SX5L modules.
• When disposing of the SX5L, do so as an industrial waste.
IMPORTANT INFORMATION
Under no circumstances shall IDEC Corporation be held liable or responsible for indirect or consequential damages resulting
from the use of or the application of IDEC SX5L communication terminals, individually or in combination with other equipment.
All persons using these components must be willing to accept responsibility for choosing the correct component to suit their
application and for choosing an application appropriate for the component, individually or in combination with other equipment.
All diagrams and examples in this manual are for illustrative purposes only. In no way does including these diagrams and examples in this manual constitute a guarantee as to their suitability for any specific application. To test and approve all programs,
prior to installation, is the responsibility of the end user.
SX5L COMMUNICATION TERMINAL USER’S MANUAL PREFACE-1
Page 3

About This Manual
This user’s manual primarily describes hardware and software specifications of the SX5L communication terminals,
installation and wiring methods, and troubleshooting procedures.
CHAPTER 1: GENERAL INFORMATION
General information about the LONWORKS network system and the features and functions of the SX5L communication
terminals.
CHAPTER 2: HARDWARE SPECIFICATIONS
Hardware specifications of the SX5L communication terminals.
CHAPTER 3: INSTALLATION AND WIRING
Methods and precautions for installing and wiring the SX5L communication terminals.
CHAPTER 4: SOFTWARE SPECIFICATIONS
Software specifications of the SX5L communication terminals. Designing a LONWORKS network requires complete
understanding of the functional blocks available on each SX5L communication terminal. Before starting system configura-
tion, read this chapter to understand available functional blocks.
CHAPTER 5: TROUBLESHOOTING
Procedure to determine the cause of trouble and actions to be taken when any trouble occurs while operating the SX5L
communication terminals.
APPENDIX
Type numbers of the SX5L communication terminals and accessories, and a glossary of major terms related to LON-
WORKS.
INDEX
Alphabetical listing of key words.
LON, LONWORKS, LonMaker, LONMARK, 3120, and Echelon are registered trademarks of Echelon, USA.
PREFACE-2 SX5L COMMUNICATION TERMINAL USER’S MANUAL
Page 4

TABLE OF CONTENTS
HAPTER 1: GENERAL INFORMATION
C
LONWORKS Network . . . . . . . . . . . . . . . . . . . . . . . . . . . . . . . . . . . . . . . . . . . . . 1-1
ONWORKS Device and Functional Block . . . . . . . . . . . . . . . . . . . . . . . . . . . . . . 1-2
L
Standard Network Variable Type and Standard Configuration Property Type . . . . 1-2
Address and Table . . . . . . . . . . . . . . . . . . . . . . . . . . . . . . . . . . . . . . . . . . . . . 1-2
Network Building Procedures . . . . . . . . . . . . . . . . . . . . . . . . . . . . . . . . . . . . . . 1-3
SX5L Communication Terminal Models and Features . . . . . . . . . . . . . . . . . . . . 1-4
Finger-safe Spring-up Terminal Block Features . . . . . . . . . . . . . . . . . . . . . . . . . 1-5
System Setup Examples . . . . . . . . . . . . . . . . . . . . . . . . . . . . . . . . . . . . . . . . . 1-6
HAPTER 2: HARDWARE SPECIFICATIONS
C
Parts Description . . . . . . . . . . . . . . . . . . . . . . . . . . . . . . . . . . . . . . . . . . . . . . 2-1
Dimensions . . . . . . . . . . . . . . . . . . . . . . . . . . . . . . . . . . . . . . . . . . . . . . . . . . 2-2
Hardware Common Specifications . . . . . . . . . . . . . . . . . . . . . . . . . . . . . . . . . . 2-3
Digital Input Module SX5L-SBN16B1 . . . . . . . . . . . . . . . . . . . . . . . . . . . . . . . . 2-4
Digital Output Modules SX5L-SBT16K1 / SX5L-SBT16S1 . . . . . . . . . . . . . . . . . 2-6
Digital I/O Modules SX5L-SBM16K1, -SBM16K2, -SBM16S1, -SBM16S2 . . . . . . 2-8
Analog Input Module SX5L-SBAN041 . . . . . . . . . . . . . . . . . . . . . . . . . . . . . . . 2-12
Ω Input Modules SX5L-SBPT04X1 / SX5L-SBPT04Y1 . . . . . . . . . . . . . . . 2-14
Pt100
Pulse Input Module SX5L-SBCN081 . . . . . . . . . . . . . . . . . . . . . . . . . . . . . . . 2-16
Remote-control Relay Control Module SX5L-SBRR081 . . . . . . . . . . . . . . . . . . . 2-18
HAPTER 3: INSTALLATION AND WIRING
C
Mounting on DIN Rail . . . . . . . . . . . . . . . . . . . . . . . . . . . . . . . . . . . . . . . . . . . 3-1
Removing from DIN Rail . . . . . . . . . . . . . . . . . . . . . . . . . . . . . . . . . . . . . . . . . 3-1
Mounting on Panel . . . . . . . . . . . . . . . . . . . . . . . . . . . . . . . . . . . . . . . . . . . . . 3-1
I/O Wiring . . . . . . . . . . . . . . . . . . . . . . . . . . . . . . . . . . . . . . . . . . . . . . . . . . . 3-2
Grounding . . . . . . . . . . . . . . . . . . . . . . . . . . . . . . . . . . . . . . . . . . . . . . . . . . . 3-2
Network Cable Wiring . . . . . . . . . . . . . . . . . . . . . . . . . . . . . . . . . . . . . . . . . . . 3-3
Terminators . . . . . . . . . . . . . . . . . . . . . . . . . . . . . . . . . . . . . . . . . . . . . . . . . . 3-3
Removing the Detachable Terminal Block . . . . . . . . . . . . . . . . . . . . . . . . . . . . . 3-4
Installing the Detachable Terminal Block . . . . . . . . . . . . . . . . . . . . . . . . . . . . . 3-4
Insertion Pin Positions . . . . . . . . . . . . . . . . . . . . . . . . . . . . . . . . . . . . . . . . . . 3-4
SX5L COMMUNICATION TERMINAL USER’S MANUAL i
Page 5

TABLE OF CONTENTS
HAPTER 4: SOFTWARE SPECIFICATIONS
C
General . . . . . . . . . . . . . . . . . . . . . . . . . . . . . . . . . . . . . . . . . . . . . . . . . . . . . 4-1
Node Object Functional Block . . . . . . . . . . . . . . . . . . . . . . . . . . . . . . . . . . . . . 4-2
Digital Input Functional Block . . . . . . . . . . . . . . . . . . . . . . . . . . . . . . . . . . . . . 4-3
Digital Output Functional Block . . . . . . . . . . . . . . . . . . . . . . . . . . . . . . . . . . . . 4-4
Virtual I/O Functional Block . . . . . . . . . . . . . . . . . . . . . . . . . . . . . . . . . . . . . . 4-5
Shot Output/Digital Input Functional Block . . . . . . . . . . . . . . . . . . . . . . . . . . . . 4-8
Analog Input Functional Block . . . . . . . . . . . . . . . . . . . . . . . . . . . . . . . . . . . . 4-10
Pt100Ω Input Functional Block . . . . . . . . . . . . . . . . . . . . . . . . . . . . . . . . . . . 4-13
Pulse Count Functional Block . . . . . . . . . . . . . . . . . . . . . . . . . . . . . . . . . . . . 4-15
Remote-control Relay Control Functional Block . . . . . . . . . . . . . . . . . . . . . . . . 4-17
HAPTER 5: TROUBLESHOOTING
C
PPENDIX
A
Type List . . . . . . . . . . . . . . . . . . . . . . . . . . . . . . . . . . . . . . . . . . . . . . . . . . . . A-1
Glossary . . . . . . . . . . . . . . . . . . . . . . . . . . . . . . . . . . . . . . . . . . . . . . . . . . . . A-2
NDEX
I
ii SX5L COMMUNICATION TERMINAL USER’S MANUAL
Page 6

1: GENERAL INFORMATION
Introduction
This chapter describes general information about the LONWORKS network system and provides the features and functions
of the SX5L communication terminals.
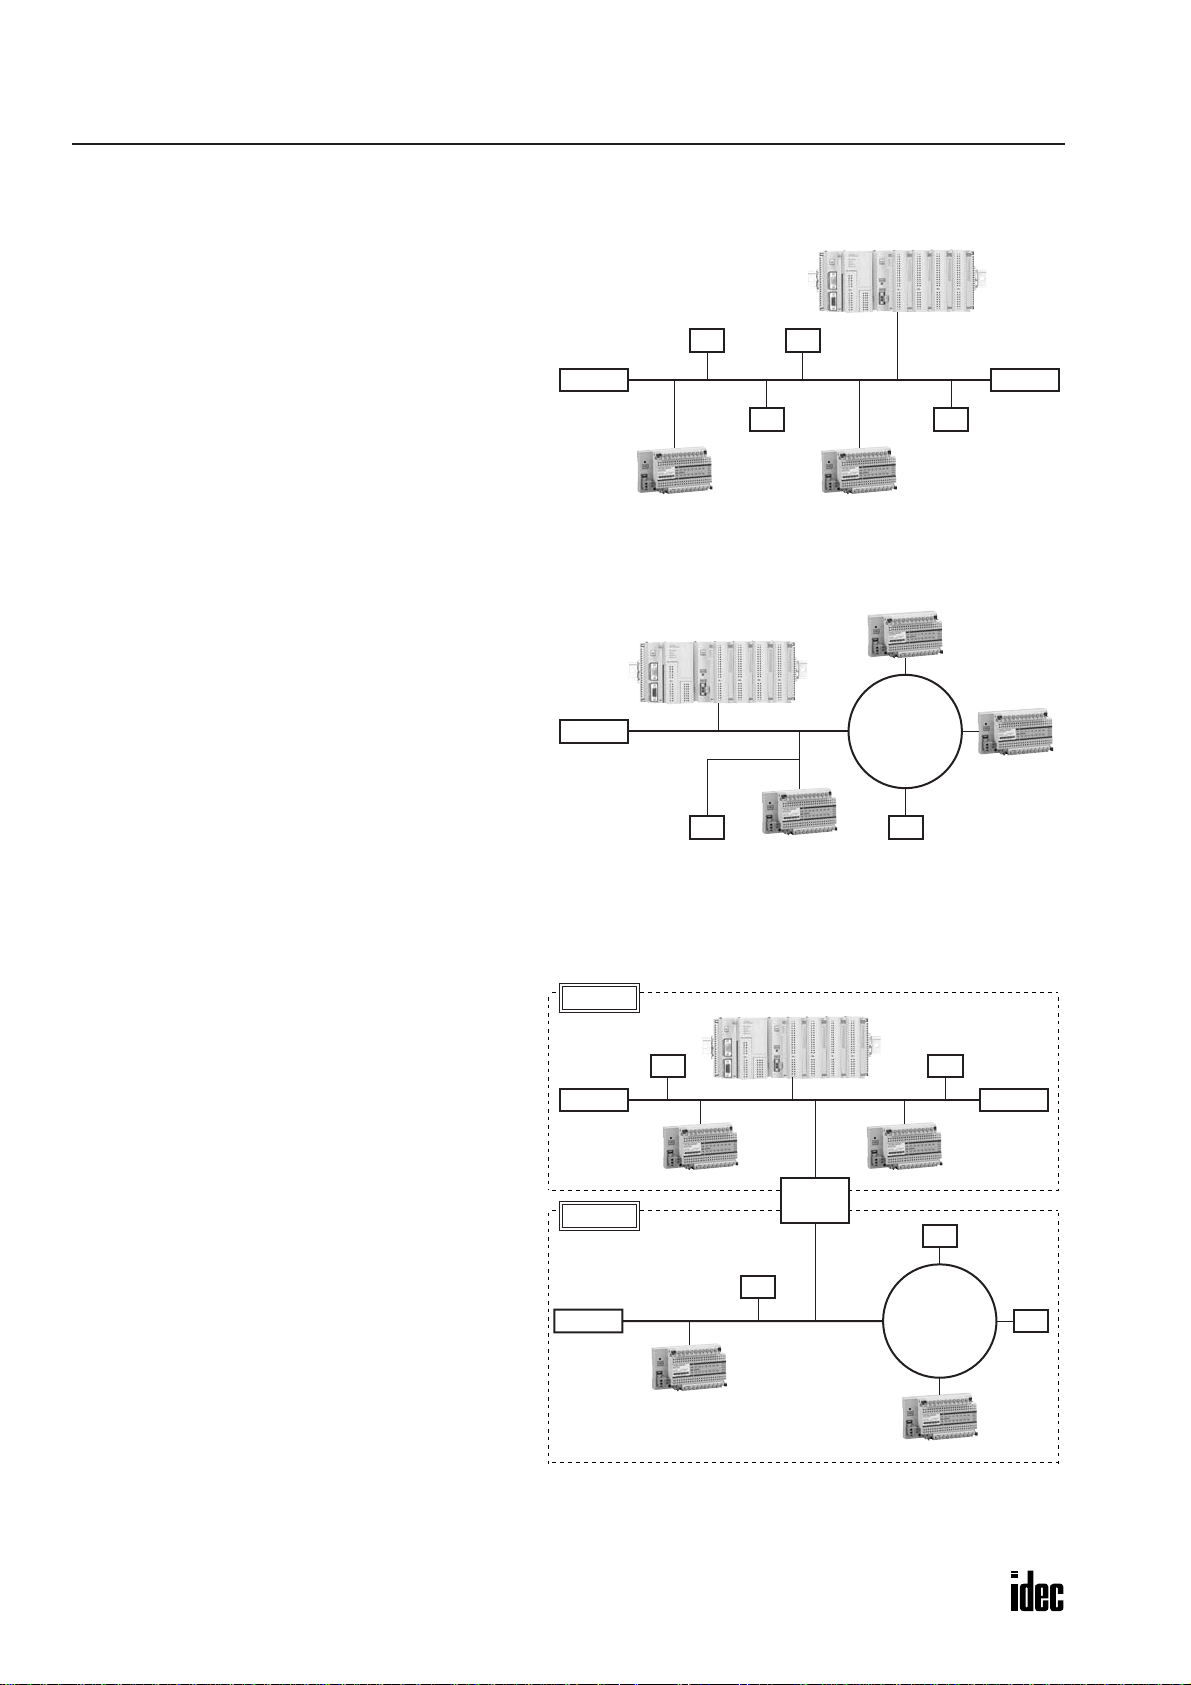
LONWORKS Network
LONWORKS refers to the whole multi-purpose network technology de veloped by Echelon Corporation to provide solutions
for building and home automation, industrial, transportation, and public utility control networks. LONWORKS is a fieldlevel open network that enables to build open, multi-vendor control systems of the peer-to-peer distributed control configuration.
Status monitor / scheduled operation control signals
Sensor data / actuator operation control signals
Ethernet
LONWORKS Gateway LONWORKS Gateway LONWORKS Gateway
Air-conditioner
Control Valve
LONWORKS
Network
Digital Data Loader
Thermometer
Non-LONWORKS
SX5L
Device
I/O Module
SX5L
SX5L
SX5L
SX5L
SX5L
SX5L
Control Server / Control Monitor Terminal
Fluorescent Light
Voltage
Current
Power
Alarm
Failure
Control
Illumination Meter
Intrusion Detector
Blind
Example of LONWORKS Network for Building Automation (BA)
In the above control system, LONWORKS devices are connected to the LONWORKS network, such as air-conditioner, control valve, digital data loader, thermometer, fluorescent light, blind, illumination meter, intrusion detector as well as SX5L
communication terminals. These LONWORKS devices contain a microprocessor called Neuron Chip and a LONWORKS
transceiver to communicate with other devices using the LonTalk protocol.
In the centralized control system, the network consists of one host controller, such as a PLC or computer, and multiple terminals, such as sensors and actuators, connected in the 1:N configuration. The host takes care of almost all processing for
intended control operations while terminals work as instructed by the host through the network communication. Therefore,
the host alone contains the control program and network settings.
In contrast to the centralized control system, LONWORKS is a distributed control system with each device containing an
application program. Operation of each device can be programmed by changing configuration parameters. The destination
and contents of communication can be designated for each device using a network management tool.
SX5L COMMUNICATION TERMINAL USER’S MANUAL 1-1
Page 7

1: GENERAL INFORMATION
LONWORKS Device and Functional Block
The following figure illustrates examples of LONWORKS devices. Device A consists of switches to send the ON/OFF status
signals of three switches to the network when they are operated. Device B consists of two lamps which go on or off when
receiving ON/OFF signals from the network.
Neuron
Chip
Device A Device B
The intended operation programmed in the L
Example of LONWORKS Devices
ONWORKS device is represented by a functional block. The interf ace with the
Neuron
Chip
network to send the operation results and receive commands is the network variable.
In the next figure, the operation performed by device A is represented by functional block A, which contains three network
variables to send the statuses of three switches. The operation performed by de vice B is represented by functional block B,
which has two network variables to receive commands to turn on and off the lamps. Network variables to send data are
called output network variables, and those to receive data are input network variables.
When network variable D is designated as the destination of network variable A, it is made possible for the device A
switches to turn on or off the device B lamps. This procedure is called binding.
Network Variable A
Network Variable B
Network Variable C
Network Variable D
Network Variable E
Functional Block A
Example of Functional Blocks
Functional Block B
Standard Network Variable Type and Standard Configuration Property Type
As shown in the figure of the example of LONWORKS Network on the preceding page, the LONWORKS network can deal
with various types of data in addition to ON/OFF statuses, such as angle, temperature, illuminance, voltage, and current.
Unlike other field-level networks which transmit data without physical units, LONWORKS can send data with physical
units. The LONMARK Interoperability Association defines Standard Network Variable Types (SNVTs) to facilitate interoperability by providing a well-defined interface for communication between devices made by different manufacturers. The
association also defines Standard Configuration Property Types (SCPTs) to further facilitate interoperability by providing
a well-defined compact mechanism for handling large amounts of configuration information on a device
Address and Table
The LonTalk protocol usually uses a combination of domain ID, subnet ID, and node ID to identify the address of the
receiving device. Each L
store the addresses to send data to (destination addresses). All SX5L communication terminals can store 2 addresses in the
domain table and 15 addresses in the address table, or the maximum quantities allowed for a LONWORKS device.
To identify each network variable contained in a L
selector address. Mutually bound network variables are assigned the same selector address. When the value of a network
variable is sent to multiple network variables, the network variable of the transmitting device sometimes require another
1-2 SX5L COMMUNICATION TERMINAL USER’S MANUAL
ONWORKS device has a domain table to store its address (source address) and an address table to
ONWORKS device, each network variable is assigned an address called
Page 8
1: GENERAL INFORMATION
place, called an alias table, to store the second and subsequent selector addresses. The allowable quantity of selector
address entries for the alias table depends on the type of the device. The maximum quantity is 62 according to the LON-
WORKS specifications. For the quantity of address table entries of the SX5L, see page 4-1.
When using the LonMaker Integration Tool for binding, the tool automatically assigns the selector addresses. Therefore,
users do not have to consider the selector addresses. However, if the device use up the alias table and more binding is
attempted, the tool indicates an error. The network must be designed to keep the selector address quantity within the alias
table entry capacity.
Network Building Procedures
A network management tool is needed to build a LONWORKS network. The most widely used tool is the LonMaker Integration Tool from Echelon. The basic procedures are illustrated below. For detailed procedures, see the user’s manual for
each tool you use.
(1) Understand the functionality of the device.
Confirm the built-in functional blocks and network variables to understand the functionality.
(2) Determine device arrangement (addresses).
A management tool is available which automatically assigns an address when a device is placed.
(3) Place functional blocks and bind network variables.
Connect the transmitter and receiver for each network variable.
(4) Download the programmed network configuration to corresponding devices.
Identify devices by their Neuron ID and write the configuration data to the devices.
End
Network Building Procedures
(1) Understand the functionality of the device.
Before proceeding with building the network, it is necessary to understand the types and quantities of functional blocks
contained in the device you are using, the details of the functionality, and the network variables. F or details about the functional blocks contained in the SX5L, see Chapter 4: Software Specifications.
(2) Determine device arrangement (addresses).
From this step, a network management tool is used. The LONWORKS network identifies the logical location of a device by
its domain ID, subnet ID, and node ID. The LonMaker Integration Tool automatically assigns these three IDs when a
device symbol is placed on the data base. For step (2) and after, the information about the device must be sent to the network management tool. One method is using a XIF file, and another is uploading from the device through the network.
(3) Place functional blocks and bind network variables.
As shown in the figure of functional blocks on the preceding page, bind network variables as many as required for the
entire network. Generally, steps (2) and (3) are performed offline.
(4) Download the programmed network configuration to corresponding devices.
Connect the network management tool to the network, and download the information concerning addresses and binding
specified in steps (2) and (3) to each LONWORKS device through the network. Then use the Neuron ID (hexadecimal 12digit number) contained in the Neuron Chip to identify the download destination device. The SX5L communication terminal is attached with a label indicating the Neuron ID. The Neuron ID can also be sent to the network by pressing the SERVICE REQUEST button on the SX5L.
SX5L COMMUNICATION TERMINAL USER’S MANUAL 1-3
Page 9

1: GENERAL INFORMATION
SX5L Communication Terminal Models and Features
The SX5L is a terminal block type LONWORKS I/O device available in a variety of models designed for multi-vendor
building automation and industrial control networks.
All SX5L communication terminals contain Standard Network Variable Types (SNVTs) defined by the L
Interoperability Association.
Output network variables can be made to be sent only when the input status changes in order to reduce the network traf fic,
and also can be made to be sent at regular intervals (heartbeat) while the input status does not change.
When the network is powered up, each node sends the initial values of the output network variables at different timing.
Digital Input, Output, and I/O Modules
• 16 inputs, 16 outputs, or 8 in/8 out
• Start/stop control module is also available with 8 inputs and 8 outputs.
• Contains virtual I/O functional blocks which can be used for Boolean opera-
tion (AND, OR, NOT) on bit data and for enabling/disabling output network
variables.
• Power voltage 24V DC
Analog Input Module
• 4 analog input channels for 1 to 5V and 4 to 20 mA DC inputs
• Network variable types can be changed to meet the unit of analog input data.
• Power voltage 24V AC/DC
ONMARK
Pt100Ω Input Module
• 4 input channels for room temperature control (0 to +50°C)
• 4 input channels for water temperature control (–20 to +80°C)
• Power voltage 24V AC/DC
Pulse Input Module
• 8 inputs for counting input pulses of minimum pulse width 50 ms
• Maintains counter current values when power is interrupted.
• Counter current values can be changed by input variable.
• Power voltage 24V AC/DC
Remote-control Relay Control Module
• Controls 8 remote control relays for fluorescent lamps.
• Remote-control relays on existing illumination system can also be controlled.
• Power voltage 24V AC
1-4 SX5L COMMUNICATION TERMINAL USER’S MANUAL
Page 10

Finger-safe Spring-up Terminal Block Features
Time saving
The innovative terminals on the SX5L series use special,
spring-loaded screws. This makes installation as easy as pushing down and turning with a screwdriver. Installation time is
cut in half since the screws do not need to be backed out to
install wiring.
Screw terminals accept bare wire or ring or spade connectors.
Finger-safe
The screws are held captive once installed and are 100% fin-
ger-safe.
1. Insert the wire connector into the slot in the side of the ter-
2. Using a Phillips screwdriver, push down and turn the
The wire is now connected, and the screw terminal is fingersafe.
1: GENERAL INFORMATION
minal block.
screw.
Insertion pin
Detachable
The terminal block can be removed simply by squeezing both
latches on top of the block inward to unlock the block from
the socket. To reattach the terminal block, place the block in
the socket with the latches opened and press the block until it
bottoms in the socket, then the latches snap outward to lock
the terminal block.
Wiring can be done with the terminal block removed, so
installation in narrow areas is quite easy. When replacing the
SX5L modules, simply remove the terminal blocks and reinstall the terminal blocks into the new SX5L module, without
disconnecting wires.
Insertion pins
Insertion pins are positioned on the base of the terminal block
and inside the socket to prevent insertion of invalid terminal
blocks into the socket. The pins are keyed to make sure of
correct matching of terminal block and socket, and to prevent
swapping of upper and lower terminal block.
SX5L COMMUNICATION TERMINAL USER’S MANUAL 1-5
Page 11
1: GENERAL INFORMATION
System Setup Examples
Bus Topology
Nodes are connected to one trunk line. The trunk line
can be extended up to 1,400 meters.
Terminators are needed at both ends of the network.
Free Topology
The network can also be connected in star, loop, bus,
and combination of these configurations. The network
can be expanded and modified flexibly.
One terminator is needed at any place on the network.
NodeNode
Ter minator Ter minator
Node Node
Maximum trunk cable length: 1,400 meters
Ter minator
Quantity of Nodes (FTT-10A Transceiver Nodes)
A maximum of 64 nodes can be connected to one
channel. When connecting more than 64 nodes, a
router or repeater is needed.
One router is regarded as one node. Consequently,
when using one router, the maximum number of nodes
connected to one channel will reduce to 63.
NodeNode
Maximum total cable length: 500 meters
Maximum distance between nodes: 400 meters
Channel 1
Node
Ter minator Terminator
Channel 2
Ter minator
Router
Node
Node
Node
Node
1-6 SX5L COMMUNICATION TERMINAL USER’S MANUAL
Page 12
2: HARDWARE SPECIFICATIONS
Introduction
This chapter describes hardware specifications of the SX5L communication terminals.
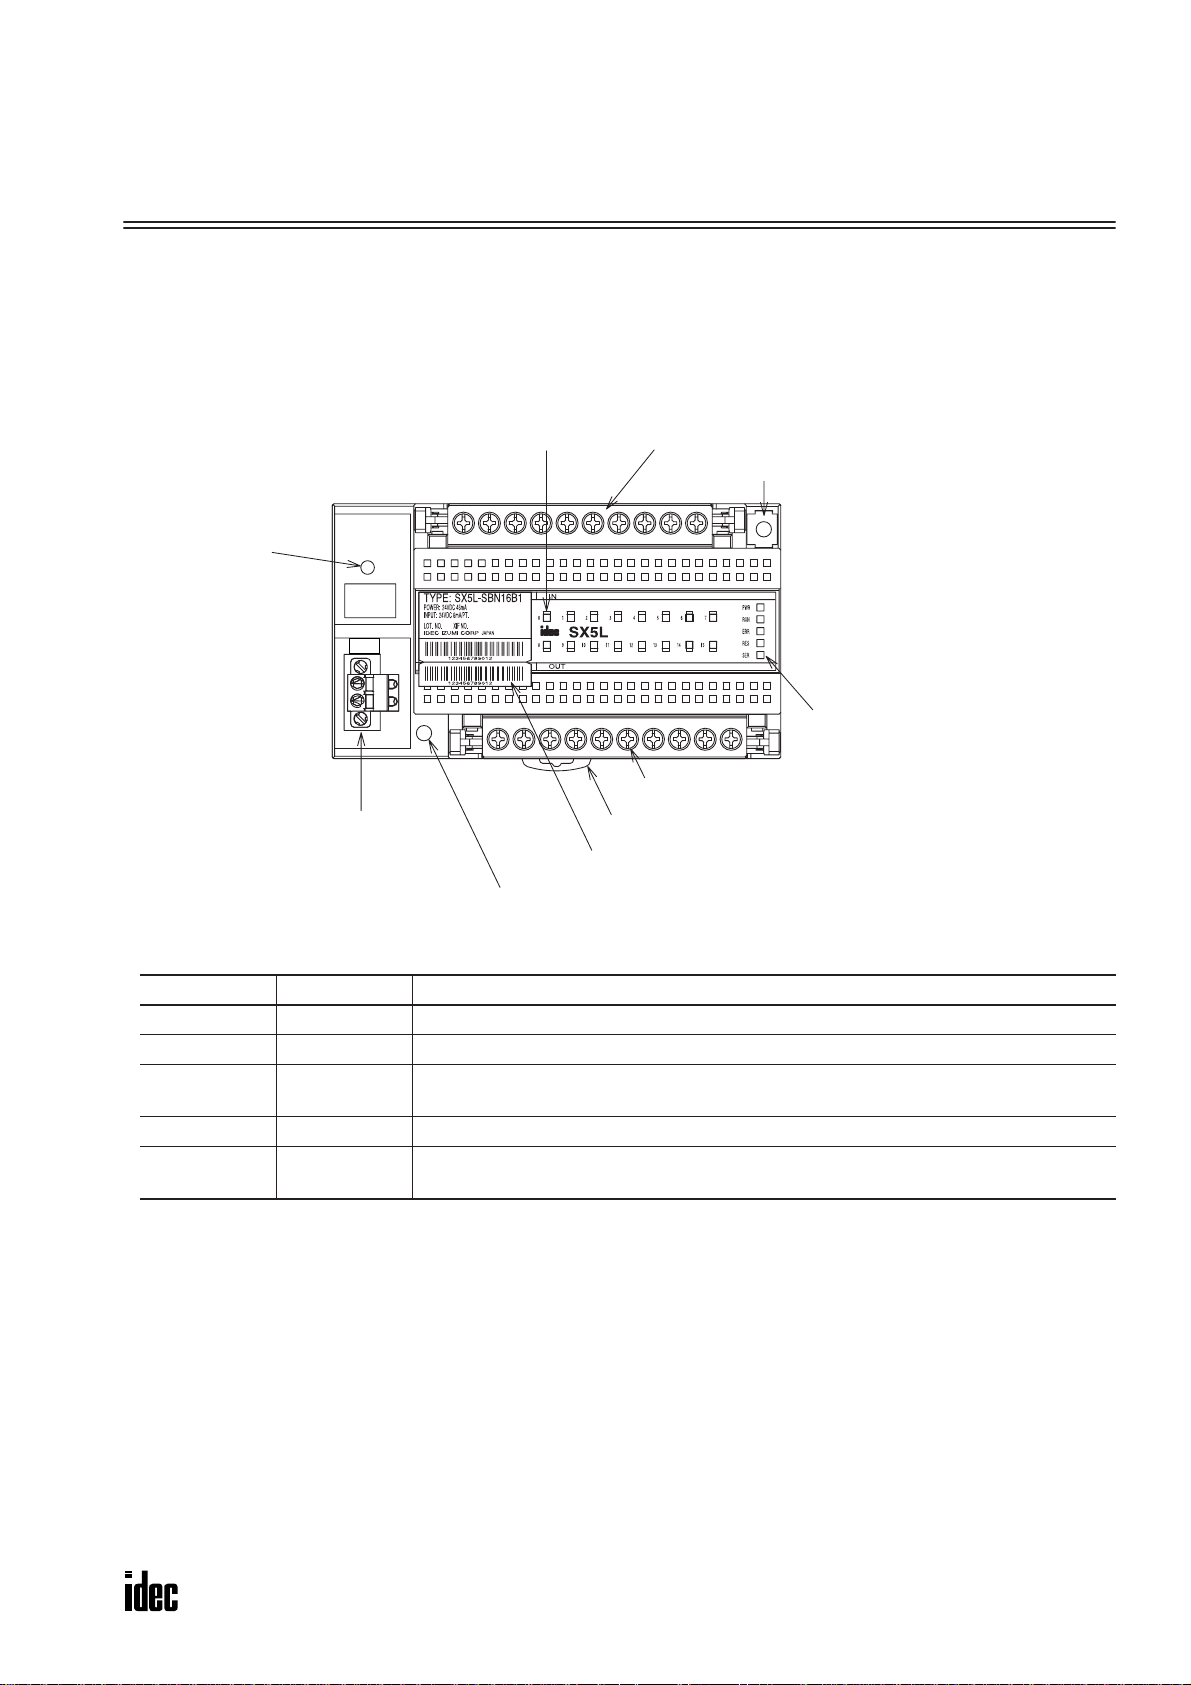
Parts Description
SERVICE
REQUEST
(Pushbutton)
Network Interface Connector
SERVICE
REQUEST
LON
I/O LEDs
Panel Mounting Hole (M4)
Detachable Terminal Block (Upper)
FG Terminal and Panel Mounting Hole (M4)
Communication Status LEDs
Detachable Terminal Block (Lower)
DIN Rail Mounting Clamp
Neuron ID Number and Barcode (Code 39: Narrow bar 0.1 mm)
Communication Status LEDs
Name Color Description
PWR Green Remains on while power is supplied.
RUN Green Goes on when, after powerup, self-diagnosis has completed and application starts.
ERR Red
RES — Reserved (does not go on)
SER Yellow
Goes on when, after application has started, output network variable update failed.
Goes off when output network variable is updated successfully.
Goes on when application program is not configured yet.
Flashes when network information is not configured yet.
SX5L COMMUNICATION TERMINAL USER’S MANUAL 2-1
Page 13
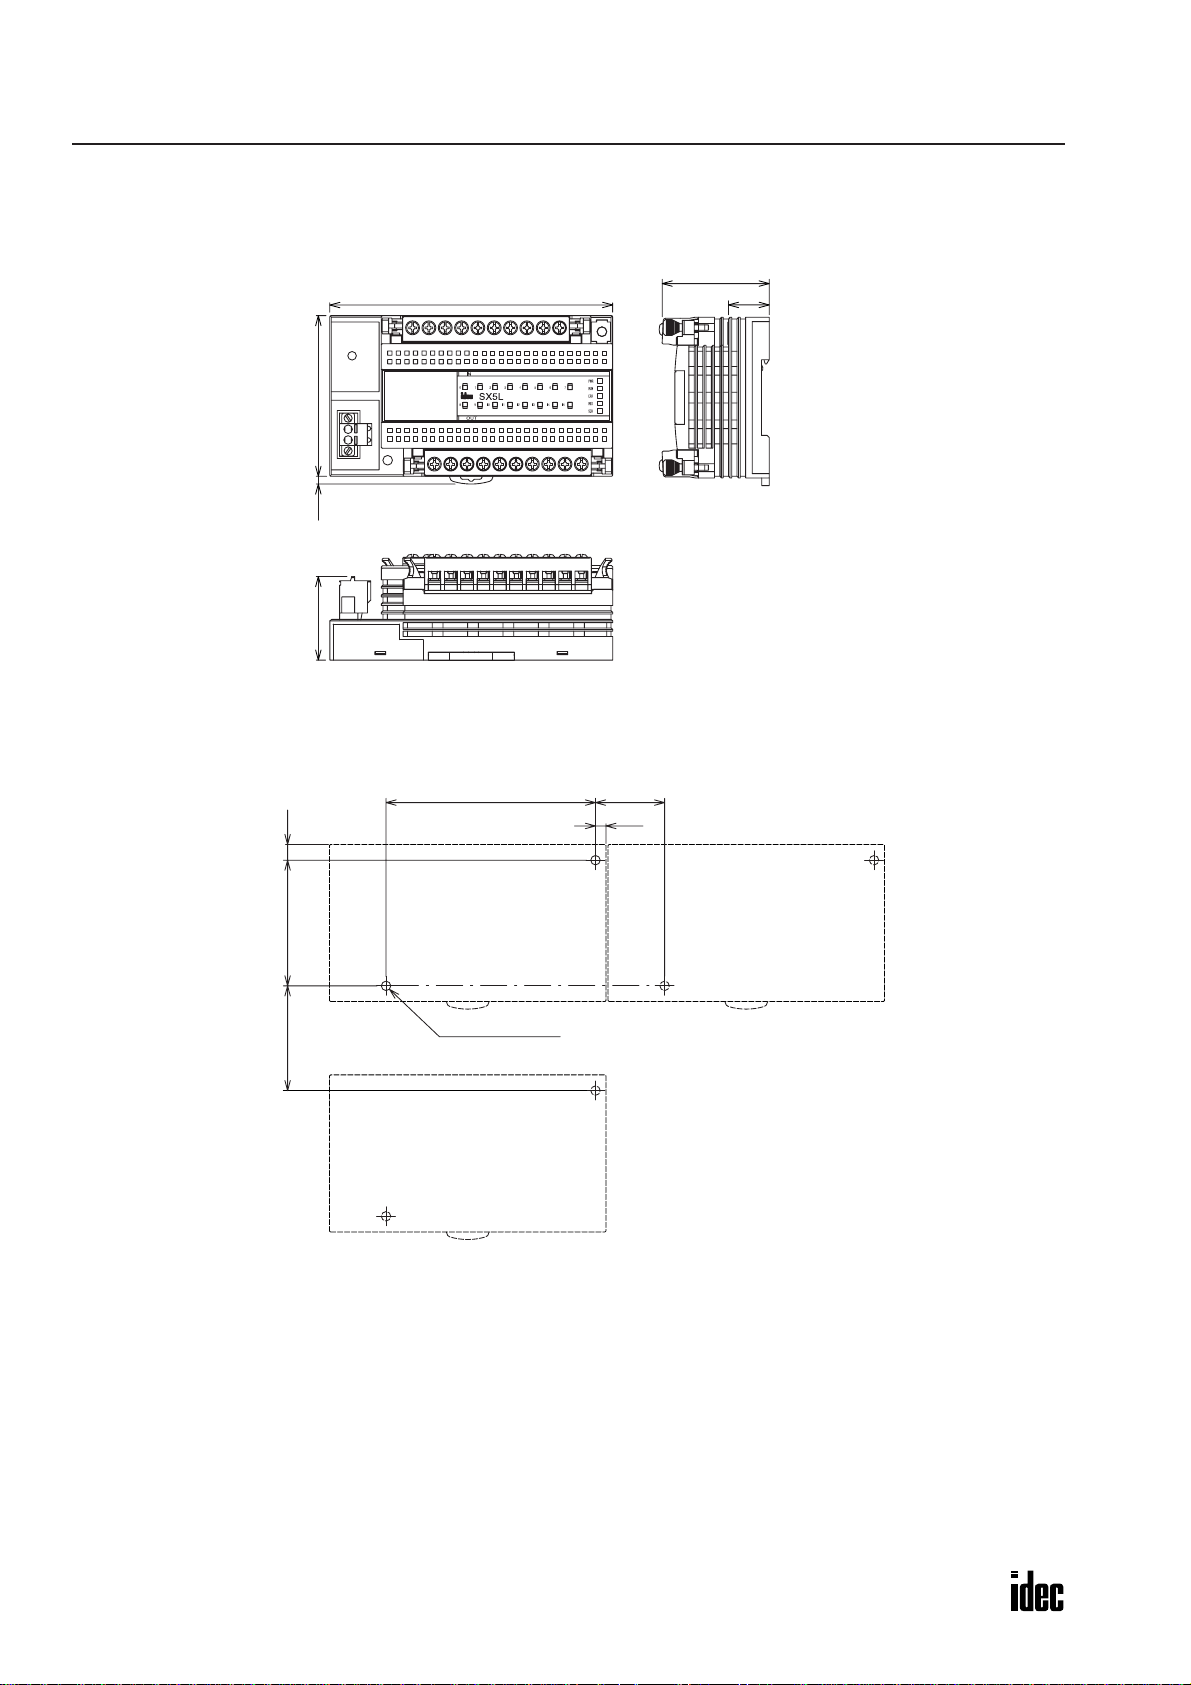
2: HARDWARE SPECIFICATIONS
Dimensions
All SX5L modules has the same external demensions.
132
3.6
39 75
48
19
Mounting Hole Layout
7.560±0.550 min.
100±0.5 33±0.5
5.0
2-M4 or ø4.5 holes
All dimensions in mm.
2-2 SX5L COMMUNICATION TERMINAL USER’S MANUAL
Page 14

Hardware Common Specifications
Communication Specifications
Communication System LON® system
Transceiver FTT-10A
Connection Topology Bus topology, free topology
Transmission Speed 78 Kbps
Transmission
Distance
Neuron Chip TMPN3120FE5M (Toshiba)
Bus Topology
Free Topology
Detachable Finger-safe Terminal Block
Rated Insulation Voltage 250V
Ter minal Screw M3 (on 7.62-mm centers)
No. of Poles 10 poles
Rated Thermal Current 7A
Insertion/Removal Durability 100 times
1,400m (when using only FTT-10A transceivers)
(Level 4, AWG22 cable)
500m total, 400m between nodes
(Level 4, AWG22 cable)
2: HARDWARE SPECIFICATIONS
Network Interface Connector
Receptacle in Module Housing Connector for Cable
Phoenix Contact Type No. MSTBV2.5/2-GF-5.08 FKC2.5/2-STF-5.08
IDEC Type No. — SX9Z-CN23
Insertion/Removal Durability 100 times
SX5L COMMUNICATION TERMINAL USER’S MANUAL 2-3
Page 15

2: HARDWARE SPECIFICATIONS
Digital Input Module SX5L-SBN16B1
General Specifications
Rated Power Voltage 24V DC
Power Voltage Range 21.6 to 26.4V DC (including 5% ripple)
Power Consumption 1.0W (24V DC)
Power Inrush Current 3A maximum (24V DC)
Allowable Momentary Power Interruption 10 ms minimum (at the rated power voltage)
Dielectric Strength 1,000V AC, 1 minute between power and FG terminals
Insulation Resistance 100 MΩ minimum between power and FG terminals (500V DC megger)
Operating Temperature 0 to 55°C (no freezing)
Operating Humidity 30 to 90% RH (non-condensing)
Storage Temperature –20 to +75°C (no freezing)
Storage Humidity 30 to 90% RH (non-condensing)
Pollution Degree 2 (IEC 60664)
Corrosion Immunity Atmosphere free from corrosive gases
Altitude
Vibration Resistance
Shock Resistance 294 m/s
Mounting 35-mm-wide DIN rail, direct panel mounting (M4 mounting screws)
Weight (approx.) 240g
Operation: 0 to 2,000m
Transport: 0 to 3,000m
10 to 57 Hz amplitude 0.075 mm, 57 to 150 Hz acceleration 9.8 m/s
2 hours per axis on each of three mutually perpendicular axes
2
, 11-ms sinusoidal half-wave pulse
2
Digital Input Specifications
Input Points 16 points
Input Type No-voltage input (DC 2-wire sensor, 3-wire sensor, no-voltage contact)
Rated Input Voltage 24V DC
Input Voltage Range 0 to 26.4V DC
Input Impedance Approx. 4.0 kΩ
Input Current 6 mA/point (24V DC)
No. of Common Circuits 1
Input Common Polarity Plus and minus common compatible
Input Delay Time 250 ms
Input Turn ON Voltage 15V minimum (between input and COM terminals)
Input Turn OFF Voltage 5V maximum (between input and COM terminals)
Input OFF Current 1 mA maximum
Isolation from Power Line Photocoupler isolation
Dielectric Strength
Insulation Resistance
500V AC, 1 minute between input and FG terminals
500V AC, 1 minute between input and power terminals
100 MΩ minimum between input and FG terminals (500V DC megger)
100 MΩ minimum between input and power terminals (500V DC megger)
2-4 SX5L COMMUNICATION TERMINAL USER’S MANUAL
Page 16

2: HARDWARE SPECIFICATIONS
Input Internal Circuit
Input 0
Common
Internal
Circuit
Input 1
Common
Terminal Arrangement
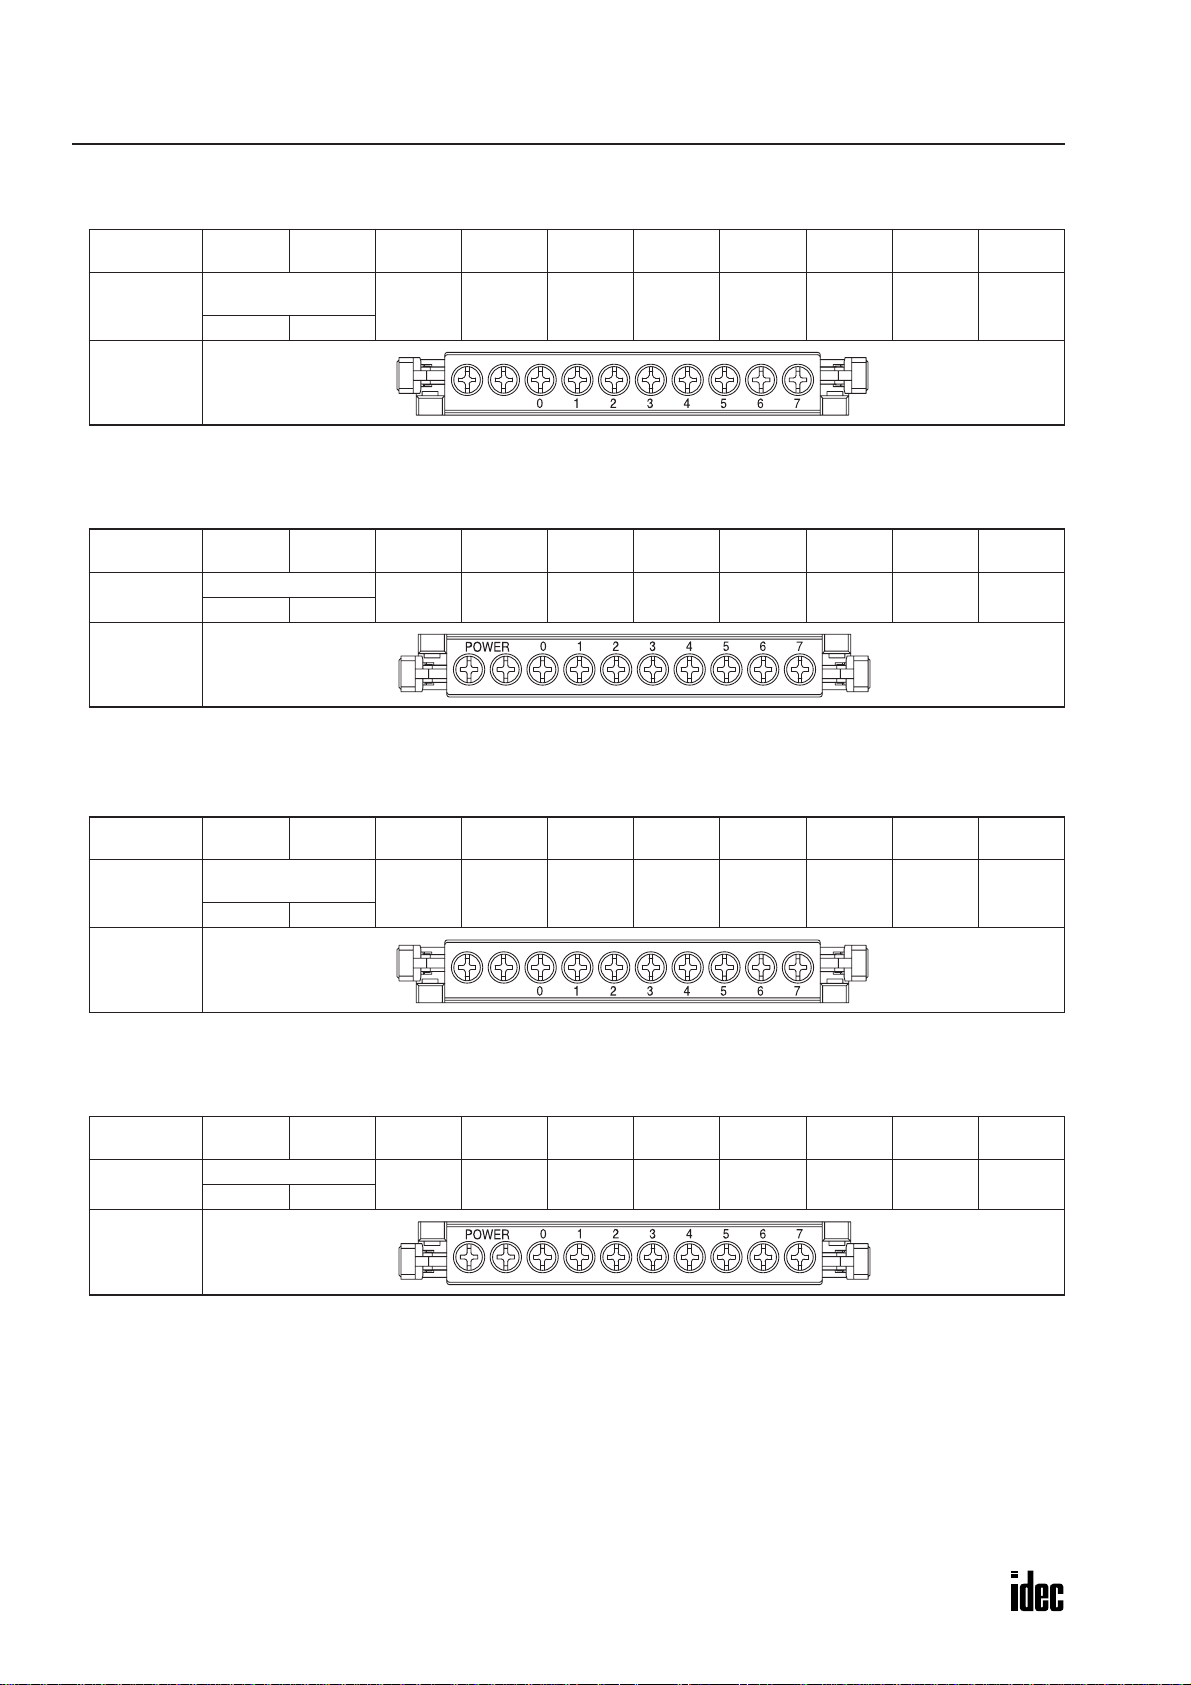
•
Upper Terminal Block (SX9Z-SS10)
Marking COM COM 01234567
Name Input Common Input 0 Input 1 Input 2 Input 3 Input 4 Input 5 Input 6 Input 7
Front View
• Lower Terminal Block (SX9Z-SS2)
Marking
Name
Front View
POWER +POWER
–
Power Voltage
24V DC 0V
Wiring Examples
–
+
SERVICE
REQUEST
LON
NPN
COM COM
TYPE: SX5L-SBN16B1
3-wire
sensor
IN
3210
SX5L
891011 15141312
IN
891011 12 13 14 15
Input 8 Input 9 Input 10 Input 11 Input 12 Input 13 Input 14 Input 15
+–
• Plus Common Wiring• Minus Common Wiring
SX5L
OUT
3-wire
sensor
3210
+
+
–
–
2-wire
sensor
71234560
PWR
7456
RUN
ERR
RES
SER
OUT
–
–
+
+
2-wire
sensor
71234560
PWR
7456
RUN
ERR
RES
SER
SERVICE
REQUEST
LON
+
PNP
–
COM COM
TYPE: SX5L-SBN16B1
891011 15141312
IN
IN
15141312111098
Fuse
+–
24V DC
+
POWER
+–
–
Note: The internal circuit and input circuit can be powered by the same power supply.
Two COM terminals are connected together internally.
SX5L COMMUNICATION TERMINAL USER’S MANUAL 2-5
+
POWER
+–
–
15141312111098
Page 17

2: HARDWARE SPECIFICATIONS
Digital Output Modules SX5L-SBT16K1 / SX5L-SBT16S1
General Specifications
Rated Power Voltage 24V DC
Power Voltage Range 21.6 to 26.4V DC (including 5% ripple)
Power Consumption 1.2W (24V DC)
Power Inrush Current 3A maximum (24V DC)
Allowable Momentary Power Interruption 10 ms minimum (at the rated power voltage)
Dielectric Strength 1,000V AC, 1 minute between power and FG terminals
Insulation Resistance 100 MΩ minimum between power and FG terminals (500V DC megger)
Operating Temperature 0 to 55°C (no freezing)
Operating Humidity 30 to 90% RH (non-condensing)
Storage Temperature –20 to +75°C (no freezing)
Storage Humidity 30 to 90% RH (non-condensing)
Pollution Degree 2 (IEC 60664)
Corrosion Immunity Atmosphere free from corrosive gases
Altitude
Vibration Resistance
Shock Resistance 294 m/s
Mounting 35-mm-wide DIN rail, direct panel mounting (M4 mounting screws)
Weight (approx.) 240g
Operation: 0 to 2,000m
Transport: 0 to 3,000m
10 to 57 Hz amplitude 0.075 mm, 57 to 150 Hz acceleration 9.8 m/s
2 hours per axis on each of three mutually perpendicular axes
2
, 11-ms sinusoidal half-wave pulse
2
Transistor Output Specifications
Type No. SX5L-SBT16K1 SX5L-SBT16S1
Output Points 16 points
Output Type N-MOS open drain (NPN transistor output) P-MOS open drain (PNP transistor output)
Rated Load Voltage 24V DC
Load Voltage Range 21.6 to 26.4V DC
Maximum Load Current
Output Common Polarity Plus common Minus common
Voltage Drop (ON Voltage)
Leakage Current 1 mA maximum
Isolation from Power Line Photocoupler isolation
Dielectric Strength
Insulation Resistance
500 mA per point
6A per common line
0.8V maximum
(voltage between the power – terminal and
output terminals when output is on)
500V AC, 1 minute between output and FG terminals
500V AC, 1 minute between output and power terminals
100 MΩ minimum between output and FG terminals (500V DC megger)
100 MΩ minimum between output and power terminals (500V DC megger)
0.8V maximum
(voltage between the power + terminal and
output terminals when output is on)
2-6 SX5L COMMUNICATION TERMINAL USER’S MANUAL
Page 18

Output Internal Circuit
2: HARDWARE SPECIFICATIONS
• SX5L-SBT16S1• SX5L-SBT16K1
24V DC
24V DC
Output 0
Output 0
Internal
Circuit
Internal
Circuit
Output 1
Output 1
0V
0V
Terminal Arrangement
•
Upper Terminal Block (SX9Z-SS1)
Marking +–01234567
Name
Load Power
24V DC 0V
Output 0 Output 1 Output 2 Output 3 Output 4 Output 5 Output 6 Output 7
Front View
+
–
• Lower Terminal Block (SX9Z-SS2)
Marking
Name
POWER +POWER
–
Power Voltage
24V DC 0V
891011 12 13 14 15
Output 8 Output 9 Output 10 Output 11 Output 12 Output 13 Output 14 Output 15
Front View
Wiring Examples
SERVICE
REQUEST
LON
TYPE: SX5L-SBT16K1
Fuse
+–
24V DC
+–
+
+–
+
–
891011 15141312
POWER
–
Load
OUT
OUT
SX5L
Load
+–
• SX5L-SBT16S1 (Minus Common Wiring)• SX5L-SBT16K1 (Plus Common Wiring)
–
Load
+
71234560
3210
PWR
7456
RUN
ERR
RES
SER
15141312111098
SERVICE
REQUEST
LON
+–
TYPE: SX5L-SBT16S1
+
POWER
–
+–
Load
OUT
3210
SX5L
891011 15141312
OUT
71234560
PWR
7456
RUN
15141312111098
ERR
RES
SER
Note: The internal circuit and output circuit can be powered by the same power supply.
SX5L COMMUNICATION TERMINAL USER’S MANUAL 2-7
Page 19

2: HARDWARE SPECIFICATIONS
Digital I/O Modules SX5L-SBM16K1, -SBM16K2, -SBM16S1, -SBM16S2
General Specifications
Rated Power Voltage 24V DC
Power Voltage Range 21.6 to 26.4V DC (including 5% ripple)
Power Consumption 1.2W (24V DC)
Power Inrush Current 3A maximum (24V DC)
Allowable Momentary Power Interruption 10 ms minimum (at the rated power voltage)
Dielectric Strength 1,000V AC, 1 minute between power and FG terminals
Insulation Resistance 100 MΩ minimum between power and FG terminals (500V DC megger)
Operating Temperature 0 to 55°C (no freezing)
Operating Humidity 30 to 90% RH (non-condensing)
Storage Temperature –20 to +75°C (no freezing)
Storage Humidity 30 to 90% RH (non-condensing)
Pollution Degree 2 (IEC 60664)
Corrosion Immunity Atmosphere free from corrosive gases
Altitude
Vibration Resistance
Shock Resistance 294 m/s
Mounting 35-mm-wide DIN rail, direct panel mounting (M4 mounting screws)
Weight (approx.) 240g
Operation: 0 to 2,000m
Transport: 0 to 3,000m
10 to 57 Hz amplitude 0.075 mm, 57 to 150 Hz acceleration 9.8 m/s
2 hours per axis on each of three mutually perpendicular axes
2
, 11-ms sinusoidal half-wave pulse
2
Digital Input Specifications
Type No. SX5L-SBM16K1 / SX5L-SBM16K2 SX5L-SBM16S1 / SX5L-SBM16S2
Input Points 8 points
NPN input type
Input Type
Rated Input Voltage 24V DC
Input Voltage Range 0 to 26.4V DC
Input Impedance Approx. 4.0 kΩ
Input Current 6 mA/point (24V DC)
No. of Common Circuits 1
Input Common Polarity Minus common Plus common
Input Delay Time 250 ms
Input Turn ON Voltage 15V minimum (between input and COM terminals)
Input Turn OFF Voltage 5V maximum (between input and COM terminals)
Input OFF Current 1 mA maximum
Isolation from Power Line Photocoupler isolation
Dielectric Strength
Insulation Resistance
No-voltage input (DC 2-wire sensor, NPN
3-wire sensor, no-voltage contact)
500V AC, 1 minute between input and FG terminals
500V AC, 1 minute between input and power terminals
100 MΩ minimum between input and FG terminals (500V DC megger)
100 MΩ minimum between input and power terminals (500V DC megger)
PNP input type
No-voltage input (DC 2-wire sensor, PNP
3-wire sensor, no-voltage contact)
2-8 SX5L COMMUNICATION TERMINAL USER’S MANUAL
Page 20

2: HARDWARE SPECIFICATIONS
Input Internal Circuit
• SX5L-SBM16S1 / SX5L-SBM16S2• SX5L-SBM16K1 / SX5L-SBM16K2
24V DC
Input 0
Input 0
Input 1
Transistor Output Specifications
Type No. SX5L-SBM16K1 / SX5L-SBM16K2 SX5L-SBM16S1 / SX5L-SBM16S2
Output Points 8 points
Output Type N-MOS open drain (NPN transistor output) P-MOS open drain (PNP transistor output)
Rated Load Voltage 24V DC
Load Voltage Range 21.6 to 26.4V DC
Maximum Load Current
Output Common Polarity Plus common Minus common
Voltage Drop (ON Voltage)
Leakage Current 1 mA maximum
Isolation from Power Line Photocoupler isolation
Dielectric Strength
Insulation Resistance
500 mA per point
4A per common line
0.8V maximum
(voltage between the power – terminal and
output terminals when output is on)
500V AC, 1 minute between output and FG terminals
500V AC, 1 minute between output and power terminals
100 MΩ minimum between output and FG terminals (500V DC megger)
100 MΩ minimum between output and power terminals (500V DC megger)
Internal
Circuit
Input 1
0V
0.8V maximum
(voltage between the power + terminal and
output terminals when output is on)
Internal
Circuit
Output Internal Circuit
Internal
Circuit
• SX5L-SBM16S1 / SX5L-SBM16S2• SX5L-SBM16K1 / SX5L-SBM16K2
24V DC
Output 0
Internal
Output 1
0V
Circuit
SX5L COMMUNICATION TERMINAL USER’S MANUAL 2-9
24V DC
Output 0
Output 1
0V
Page 21
2: HARDWARE SPECIFICATIONS
Terminal Arrangement (SX5L-SBM16K1 / SX5L-SBM16S1)
• Upper Terminal Block (SX9Z-SS1)
Marking +–01234567
Input Common/
Name
Load Power
24V DC
*1
0V
Input 0 Input 1 Input 2 Input 3 Input 4 Input 5 Input 6 Input 7
*2
Front View
+
–
*1: Common terminal for SX5L-SBM16S1 inputs
*2: Common terminal for SX5L-SBM16K1 inputs
• Lower Terminal Block (SX9Z-SS3)
Marking
Name
Front View
POWER +POWER
–
Power Voltage
24V DC 0V
01234567
Output 0 Output 1 Output 2 Output 3 Output 4 Output 5 Output 6 Output 7
+–
Terminal Arrangement (SX5L-SBM16K2 / SX5L-SBM16S2)
• Upper Terminal Block (SX9Z-SS1)
Marking +–01234567
Input Common/
Name
Load Power
24V DC
*1
0V
Status 0 Alarm 0 Status 1 Alarm 1 Status 2 Alarm 2 Status 3 Alarm 3
*2
Front View
*1: Common terminal for SX5L-SBM16S2 inputs
*2: Common terminal for SX5L-SBM16K2 inputs
• Lower Terminal Block (SX9Z-SS3)
Marking
Name
Front View
POWER +POWER
–
Power Voltage
24V DC 0V
01234567
Start 0 Stop 0 Start 1 Stop 1 Star t 2 Stop 2 Star t 3 Stop 3
+–
+
–
2-10 SX5L COMMUNICATION TERMINAL USER’S MANUAL
Page 22

Wiring Examples
• SX5L-SBM16K1 / SX5L-SBM16K2
(Input: Minus Common Wiring)
(Output: Plus Common Wiring)
2: HARDWARE SPECIFICATIONS
• SX5L-SBM16S1 / SX5L-SBM16S2
(Input: Plus Common Wiring)
(Output: Minus Common Wiring)
SERVICE
REQUEST
LON
Fuse
24V DC
–
+
TYPE: SX5L-SBM16K∗
+–
+–
+
+–
NPN
POWER
IN
OUT
–
Load
–
OUT
+
3-wire
2-wire
sensor
sensor
3210 7456
SX5L
3210 7456
Load
–
+
71234560
PWR
RUN
ERR
RES
SER
76543210
SERVICE
REQUEST
LON
+
–
+–
TYPE: SX5L-SBM16S∗
PNP
+
POWER
+–
IN
SX5L
OUT
–
Load
Note: The internal circuit, input circuit, and output circuit can be powered by the same power supply.
+
+
OUT
–
–
3-wire
2-wire
sensor
sensor
71234560
3210 7456
3210 7456
Load
PWR
RUN
ERR
RES
SER
76543210
SX5L COMMUNICATION TERMINAL USER’S MANUAL 2-11
Page 23

2: HARDWARE SPECIFICATIONS
Analog Input Module SX5L-SBAN041
General Specifications
Rated Power Voltage 24V AC (50/60Hz) / 24V DC compatible
Power Voltage Range 21.6 to 26.4V AC/DC (including 5% ripple)
Power Consumption 3.0 VA (24V AC), 1.8W (24V DC)
Power Inrush Current 15A maximum (24V AC/DC)
Allowable Momentary Power Interruption 10 ms minimum (at the rated power voltage)
Dielectric Strength 1,000V AC, 1 minute between power and FG terminals
Insulation Resistance 100 MΩ minimum between power and FG terminals (500V DC megger)
Operating Temperature 0 to 55°C (no freezing)
Operating Humidity 30 to 90% RH (non-condensing)
Storage Temperature –20 to +75°C (no freezing)
Storage Humidity 30 to 90% RH (non-condensing)
Pollution Degree 2 (IEC 60664)
Corrosion Immunity Atmosphere free from corrosive gases
Altitude
Vibration Resistance
Shock Resistance 294 m/s
Mounting 35-mm-wide DIN rail, direct panel mounting (M4 mounting screws)
Weight (approx.) 250g
Operation: 0 to 2,000m
Transport: 0 to 3,000m
10 to 57 Hz amplitude 0.075 mm, 57 to 150 Hz acceleration 9.8 m/s
2 hours per axis on each of three mutually perpendicular axes
2
, 11-ms sinusoidal half-wave pulse
2
Analog Input Specifications
Input Points 4 points
Input Type
Input Impedance
Digital Resolution 12 bits
A/D Conversion Time 80 ms per point
Sample Duration Time 300 ms per point
Error
Isolation between Input Channels No isolation
Dielectric Strength
Insulation Resistance
Voltage input: 1 to 5V DC
Current input: 4 to 20 mA DC
Voltage input: 1 MΩ
Current input: 250Ω
±0.6% (at 25°C)
±1.0% (over the operating temperature range)
500V AC, 1 minute between input and FG terminals
500V AC, 1 minute between input and power terminals
100 MΩ minimum between input and FG terminals (500V DC megger)
100 MΩ minimum between input and power terminals (500V DC megger)
2-12 SX5L COMMUNICATION TERMINAL USER’S MANUAL
Page 24

Input Internal Circuit
2: HARDWARE SPECIFICATIONS
Channel 0 Voltage Input
Channel 0 Current Input
Channel 0 Common
Channel 1 Voltage Input
Channel 1 Current Input
Channel 1 Common
A/D
Conversion
Circuit
Photocoupler
Isolation
Power
Supply
Internal
Circuit
Terminal Arrangement
•
Upper Terminal Block (SX9Z-SS12)
Marking NC NC SLD C0 I0 V0 SLD C1 I1 V1
Name No Connection Shield
Common
Channel 0
Current
Input
Voltage
Input
Shield
Common
Channel 1
Current
Input
Front View
• Lower Terminal Block (SX9Z-SS9)
Marking
Name Power Voltage Shield
POWER LPOWER
N
SLD C2 I2 V2 SLD C3 I3 V3
Common
Channel 2
Current
Input
Voltage
Input
Shield
Common
Channel 3
Current
Input
Voltage
Input
Voltage
Input
Front View
Wiring Examples
SERVICE
REQUEST
LON
TYPE: SX5L-SBAN041
Fuse
~
24V AC
+–
24V DC
NC NC
L
+–
POWER
~
+–
N
Analog Current
Output Device
IN
Analog Voltage
Output Device
SX5L
IN
Termination on unused terminals
V1C0 I0 V0 SLD C1 I1SLD
PWR
RUN
ERR
RES
SER
V3I3C3SLDV2I2C2SLD
Note: Connect together the terminals of an unused
channel using an optional jumper BPJ-26B (ring
type) or BPJ-26FB (spade type) or using wires.
SX5L COMMUNICATION TERMINAL USER’S MANUAL 2-13
Page 25

2: HARDWARE SPECIFICATIONS
Pt100Ω Input Modules SX5L-SBPT04X1 / SX5L-SBPT04Y1
General Specifications
Rated Power Voltage 24V AC (50/60Hz) / 24V DC compatible
Power Voltage Range 21.6 to 26.4V AC/DC (including 5% ripple)
Power Consumption 3.0 VA (24V AC), 1.8W (24V DC)
Power Inrush Current 15A maximum (24V AC/DC)
Allowable Momentary Power Interruption 10 ms minimum (at the rated power voltage)
Dielectric Strength 1,000V AC, 1 minute between power and FG terminals
Insulation Resistance 100 MΩ minimum between power and FG terminals (500V DC megger)
Operating Temperature 0 to 55°C (no freezing)
Operating Humidity 30 to 90% RH (non-condensing)
Storage Temperature –20 to +75°C (no freezing)
Storage Humidity 30 to 90% RH (non-condensing)
Pollution Degree 2 (IEC 60664)
Corrosion Immunity Atmosphere free from corrosive gases
Altitude
Vibration Resistance
Shock Resistance 294 m/s
Mounting 35-mm-wide DIN rail, direct panel mounting (M4 mounting screws)
Weight (approx.) 250g
Operation: 0 to 2,000m
Transport: 0 to 3,000m
10 to 57 Hz amplitude 0.075 mm, 57 to 150 Hz acceleration 9.8 m/s
2 hours per axis on each of three mutually perpendicular axes
2
, 11-ms sinusoidal half-wave pulse
2
Pt100Ω Input Specifications
Type No. SX5L-SBPT04X1 SX5L-SBPT04Y1
Input Points 4 points
Input Type 3-wire Pt100Ω resistance thermometer
Temperature Measurement Range 0 to +50°C –20 to +80°C
Digital Resolution 12 bits
Input Detection Current 1.0 mA maximum
A/D Conversion Time 80 ms per point
Sample Duration Time 1 sec
Allowable Conductor Resistance 100Ω maximum (3 wires must have the same resistance)
Burnout Yes (data: +327.67°C)
Error ±0.4% FS
Isolation between Input Channels No isolation
Dielectric Strength
Insulation Resistance
500V AC, 1 minute between input and FG terminals
500V AC, 1 minute between input and power terminals
100 MΩ minimum between input and FG terminals (500V DC megger)
100 MΩ minimum between input and power terminals (500V DC megger)
2-14 SX5L COMMUNICATION TERMINAL USER’S MANUAL
Page 26
Input Internal Circuit
2: HARDWARE SPECIFICATIONS
A0
B0Channel 0
A1
B1Channel 1
b0
b1
A/D
Conversion
Circuit
Photocoupler
Isolation
Power
Supply
Internal
Circuit
Terminal Arrangement
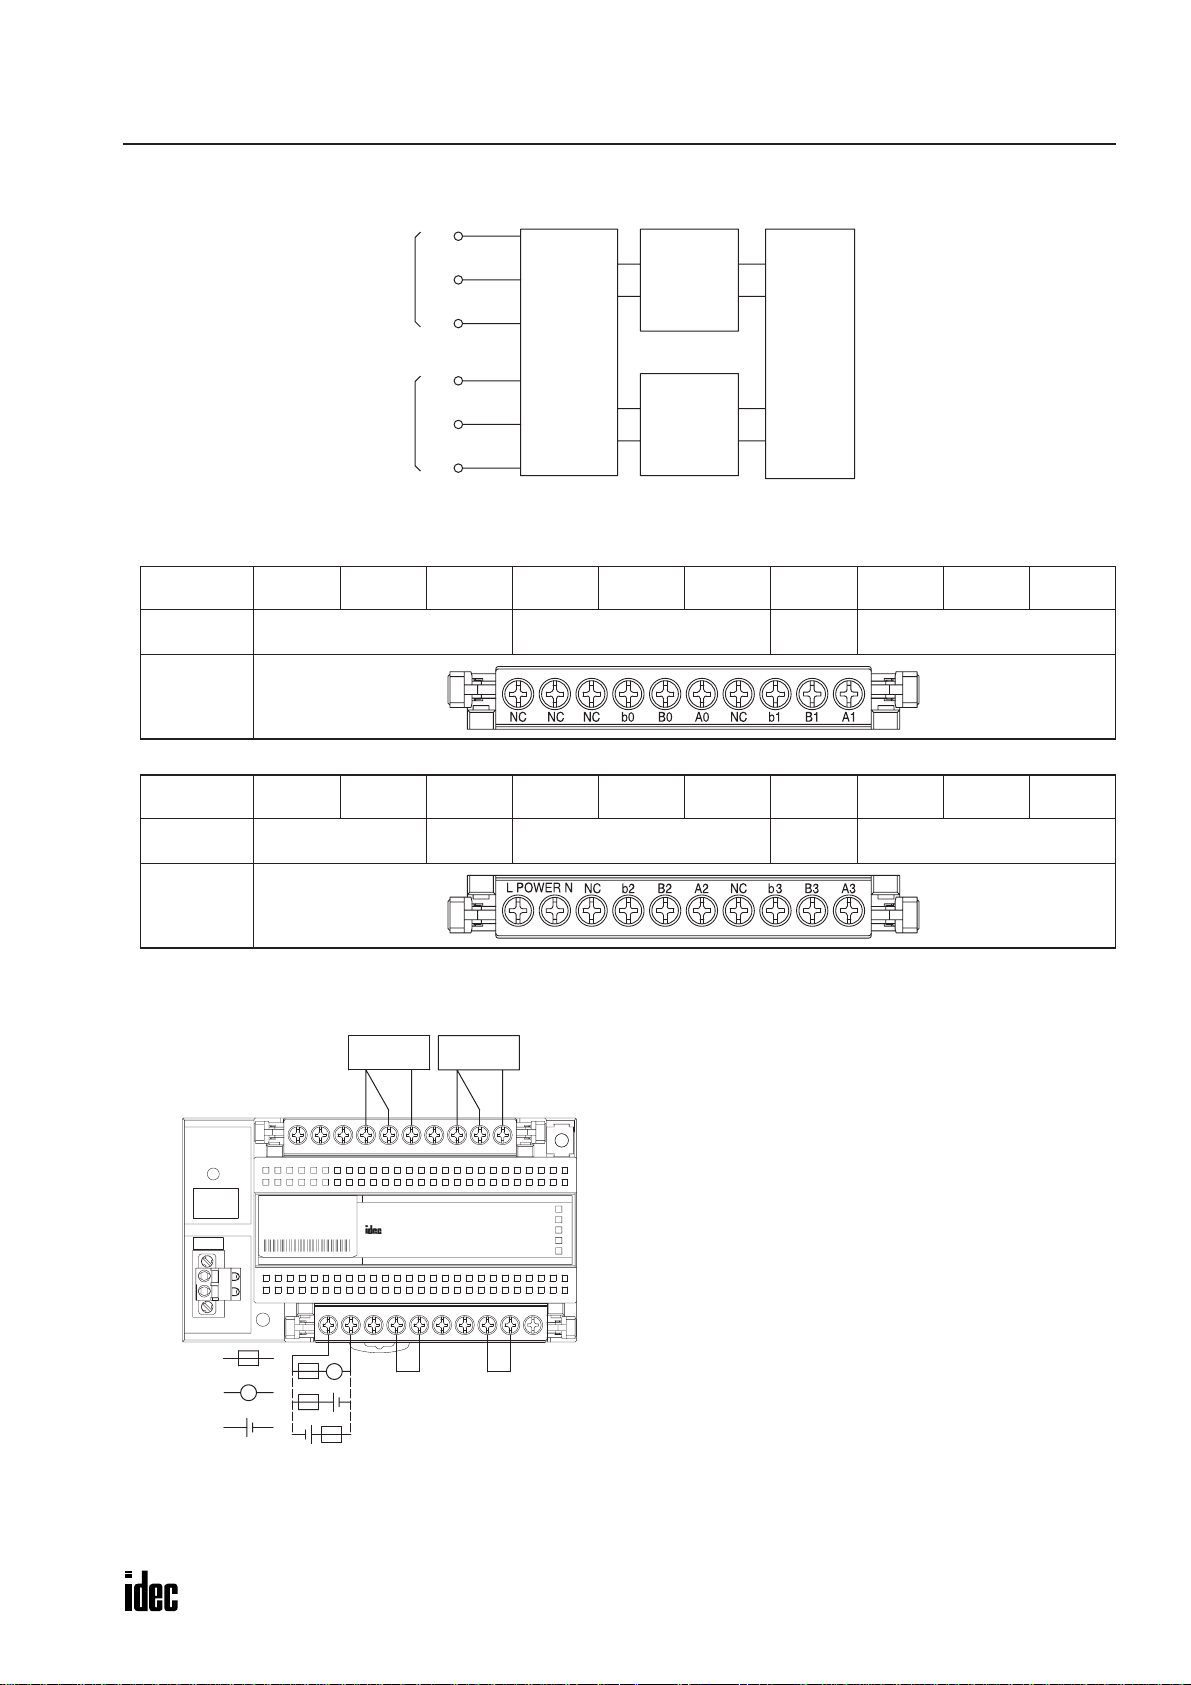
•
Upper Terminal Block (SX9Z-SS13)
Marking NC NC NC b0 B0 A0 NC b1 B1 A1
Name No Connection Channel 0 Pt100Ω Input
No Con-
nection
Channel 1 Pt100Ω Input
Front View
• Lower Terminal Block (SX9Z-SS14)
Marking
Name Power Voltage
POWER LPOWER
N
NC b2 B2 A2 NC b3 B3 A3
No Connection
Channel 2 Pt100Ω Input
No con-
nection
Channel 3 Pt100Ω Input
Front View
Wiring Examples
SERVICE
REQUEST
LON
Fuse
~
24V AC
+–
24V DC
TYPE: SX5L-SBPT04∗1
NC NC
+–
L
POWER
~
+–
Resistance
Thermometer
IN
Resistance
Thermometer
SX5L
IN
N
Termination on unused terminals
A1b0 B0 A0 NC b1 B1NC
PWR
RUN
ERR
RES
SER
A3B3b3NCA2B2b2NC
Note: Connect together the terminals of an unused
channel using an optional jumper BPJ-26B (ring
type) or BPJ-26FB (spade type) or using wires.
SX5L COMMUNICATION TERMINAL USER’S MANUAL 2-15
Page 27

2: HARDWARE SPECIFICATIONS
Pulse Input Module SX5L-SBCN081
General Specifications
Rated Power Voltage 24V AC (50/60Hz) / 24V DC compatible
Power Voltage Range 21.6 to 26.4V AC/DC (including 5% ripple)
Power Consumption 2.0 VA (24V AC), 1.0W (24V DC)
Power Inrush Current 15A maximum (24V AC/DC)
Allowable Momentary Power Interruption 10 ms minimum (at the rated power voltage)
Dielectric Strength 1,000V AC, 1 minute between power and FG terminals
Insulation Resistance 100 MΩ minimum between power and FG terminals (500V DC megger)
Operating Temperature 0 to 55°C (no freezing)
Operating Humidity 30 to 90% RH (non-condensing)
Storage Temperature –20 to +75°C (no freezing)
Storage Humidity 30 to 90% RH (non-condensing)
Pollution Degree 2 (IEC 60664)
Corrosion Immunity Atmosphere free from corrosive gases
Altitude
Vibration Resistance
Shock Resistance 294 m/s
Mounting 35-mm-wide DIN rail, direct panel mounting (M4 mounting screws)
Weight (approx.) 250g
Operation: 0 to 2,000m
Transport: 0 to 3,000m
10 to 57 Hz amplitude 0.075 mm, 57 to 150 Hz acceleration 9.8 m/s
2 hours per axis on each of three mutually perpendicular axes
2
, 11-ms sinusoidal half-wave pulse
2
Pulse Input Specifications
Input Points 8 points
Rated Input Voltage 24V DC
Input Voltage Range 0 to 26.4V DC
Minimum Pulse Width
Maximum Frequency Response 8 Hz
Input Impedance Approx. 3.4 kΩ
Input Current 7 mA/point (24V DC)
No. of Common Circuits 1 common circuit/point
Input Common Polarity Plus and minus common compatible
Input Turn ON Voltage 15V minimum (between input and COM terminals)
Input Turn OFF Voltage 5V maximum (between input and COM terminals)
Isolation from Power Line Photocoupler isolation
Dielectric Strength
Insulation Resistance
Current Value Backup Times
ON duration: 50 ms
OFF duration: 50 ms
500V AC, 1 minute between input and FG terminals
500V AC, 1 minute between input and power terminals
500V AC, 1 minute between input terminals
100 MΩ minimum between input and FG terminals (500V DC megger)
100 MΩ minimum between input and power terminals (500V DC megger)
100 MΩ minimum between input terminals (500V DC megger)
10,000 times of current value storage into the built-in EEPROM during
power interruption
2-16 SX5L COMMUNICATION TERMINAL USER’S MANUAL
Page 28

2: HARDWARE SPECIFICATIONS
Input Internal Circuit
Input 0
Common 0
Internal
Circuit
Input 1
Common 1
Terminal Arrangement
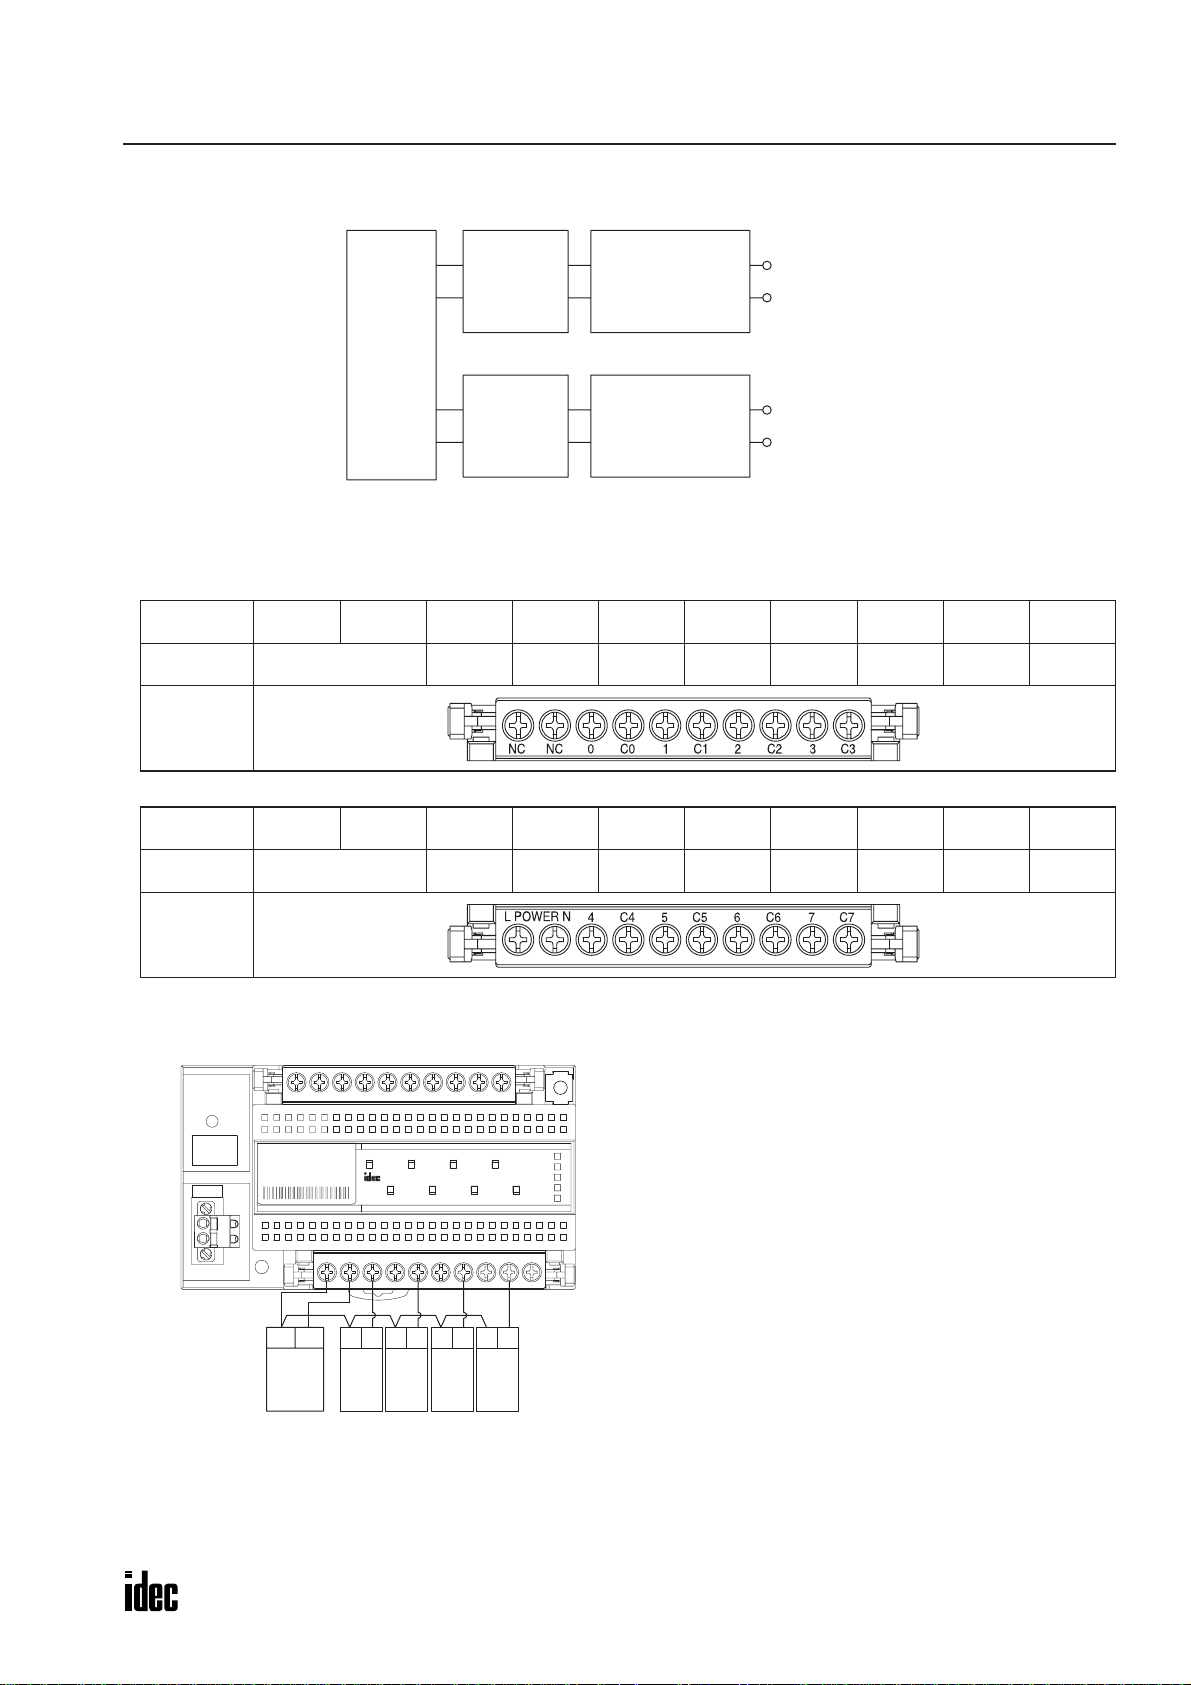
•
Upper Terminal Block (SX9Z-SS11)
Marking NC NC 0 C01C12C23C3
Name No Connection Input 0
Front View
Common
0
Input 1
Common
1
Input 2
Common
2
Input 3
Common
3
• Lower Terminal Block (SX9Z-SS7)
Marking
Name Power Voltage Input 4
Front View
POWER LPOWER
N
Wiring Examples
NC NC
+–
L
POWER
~
+–
IN
45 76
IN
N
NPN
10
23
SX5L
SERVICE
REQUEST
LON
Fuse
24V AC
24V DC
TYPE: SX5L-SBCN081
~
+–
4C45C56C67C7
Common
4
Input 5
Common
5
Input 6
Common
6
Input 7
Common
7
• Plus Common Wiring• Minus Common Wiring
C3C0 1 C1 2 C2 30
PWR
RUN
ERR
RES
SER
C77C66C55C44
+
–
SERVICE
REQUEST
LON
NC NC
TYPE: SX5L-SBCN081
L
POWER
N
~
+–
+–
IN
10
SX5L
45 76
IN
PNP
C3C0 1 C1 2 C2 30
23
PWR
RUN
ERR
RES
SER
C77C66C55C44
–
+
Note: Besides common wiring, input circuits can also be connected separately.
When using a DC power supply, the internal circuit and pulse input circuit can be powered by the same power supply.
When using an AC power supply for the internal circuit, the same power supply cannot be used for the pulse input circuit.
SX5L COMMUNICATION TERMINAL USER’S MANUAL 2-17
Page 29

2: HARDWARE SPECIFICATIONS
Remote-control Relay Control Module SX5L-SBRR081
General Specifications
Rated Power Voltage 24V AC (50/60Hz) supplied from a remote-control transformer
Power Voltage Range 21.6 to 26.4V AC (including 5% ripple)
Power Consumption 1.8 VA (24V AC) not including power consumption by remote-control relays
Power Inrush Current 15A maximum (24V AC)
Allowable Momentary Power Interruption 10 ms minimum (at the rated power voltage)
Dielectric Strength 1,000V AC, 1 minute between power and FG terminals
Insulation Resistance 100 MΩ minimum between power and FG terminals (500V DC megger)
Operating Temperature 0 to 55°C (no freezing)
Operating Humidity 30 to 90% RH (non-condensing)
Storage Temperature –20 to +75°C (no freezing)
Storage Humidity 30 to 90% RH (non-condensing)
Pollution Degree 2 (IEC 60664)
Corrosion Immunity Atmosphere free from corrosive gases
Altitude
Vibration Resistance
Shock Resistance 294 m/s
Mounting 35-mm-wide DIN rail, direct panel mounting (M4 mounting screws)
Weight (approx.) 250g
Operation: 0 to 2,000m
Transport: 0 to 3,000m
10 to 57 Hz amplitude 0.075 mm, 57 to 150 Hz acceleration 9.8 m/s
2 hours per axis on each of three mutually perpendicular axes
2
, 11-ms sinusoidal half-wave pulse
2
Remote-control Relay Control Specifications
Input Points 8 points
Input Type Feedback input from remote control relays through output signal lines
Output Type Remote-control relay output
Output Pulse ON Width 100 ms
No. of Common Circuits 1 common circuit for 8 points
Applicable
Devices
Isolation from Power Line Photocoupler isolation
Dielectric Strength 500V AC, 1 minute between remote-control relay control and FG terminals
Insulation Resistance
Remote-control Relay
Remote-control Transformer
BR-12D, BR-22D, BR-1 (Mitsubishi Electric)
WR6165 (Matsushita Electric Works)
BRT-10B, BRT-20B, BRT-1 (Mitsubishi Electric)
WR2301 (Matsushita Electric Works)
100 MΩ minimum between remote-control relay control and FG terminals
(500V DC megger)
2-18 SX5L COMMUNICATION TERMINAL USER’S MANUAL
Page 30
Input Internal Circuit
2: HARDWARE SPECIFICATIONS
Output 0
Common
Output 1
Common
Internal
Circuit
Photocoupler
Photocoupler
Remote-control Relay
Control Circuit
Remote-control Relay
Control Circuit
Terminal Arrangement
•
Upper Terminal Block (SX9Z-SS11)
Marking NC NC 0 C01C12C23C3
Name No Connection Output 0 Common Output 1 Common Output 2 Common Output 3 Common
Front View
• Lower Terminal Block (SX9Z-SS7)
Marking
Name Power Voltage Output 4 Common Output 5 Common Output 6 Common Output 7 Common
POWER LPOWER
N
4C45C56C67C7
Front View
Wiring Examples
SERVICE
REQUEST
LON
TYPE: SX5L-SBRR081
Blue
Remotecontrol
Transformer
NC NC
White
POWER
L
N
Blue
Remotecontrol
Relay
Red Blue
OUT
10
SX5L
45 76
OUT
Red Blue
Remote-
Remote-
control
control
Relay
Relay
C3C0 1 C1 2 C2 30
Red
Remotecontrol
Relay
PWR
RUN
ERR
RES
SER
C77C66C55C44
23
Red Blue
Note: Common terminals C0 through C7 and the POWER N
terminal are connected together internally.
Only one remote-control relay can be connected to
each output circuit.
SX5L COMMUNICATION TERMINAL USER’S MANUAL 2-19
Page 31

2: HARDWARE SPECIFICATIONS
2-20 SX5L COMMUNICATION TERMINAL USER’S MANUAL
Page 32

Pull out
35-mm-wide DIN Rail
Clamp
3: INSTALLATION AND WIRING
Introduction
This chapter describes the methods and precautions for installing and wiring the SX5L communication terminals.
Before starting installation and wiring, be sure to read “Safety Precautions” in the beginning of this manual and under-
stand precautions described under Warning and Caution.
Mounting on DIN Rail
Warning
Caution
1. Fasten the DIN rail to a panel using screws firmly.
2. Pull out the clamp from the SX5L module, and put
the groove of the module on the DIN rail. Press the
module towards the DIN rail and push in the clamp as
shown on the right.
3. Use BNL6P mounting clips on both sides of the
SX5L module to prevent moving sideways.
• Turn off the power to the SX5L before mounting and removing. Failure to turn power off may
cause electrical shocks or fire hazard.
• Install the SX5L modules according to instructions described in this user’s manual. Improper
installation will result in falling, failure, or malfunction of the SX5L.
• Mount the SX5L modules on a 35-mm-wide DIN rail or a panel surface.
Applicable DIN rail: IDEC’s BAA1000NP or BAP1000NP (1000mm/39.4” long)
Groove
35-mm-wide DIN Rail
Press
Clamp
Removing from DIN Rail
1. Insert a flat screwdriver into the slot in the clamp.
2. Pull out the clamp from the SX5L module.
3. Turn the SX5L module bottom out.
Mounting on Panel
The SX5L modules can also be mounted directly on a panel surface using M4 mounting screws. For the mounting hole
layout, see page 2-2.
SX5L COMMUNICATION TERMINAL USER’S MANUAL 3-1
Page 33

3: INSTALLATION AND WIRING
I/O Wiring
Warning
Caution
• Turn of f the power to the SX5L before wiring the I/O and netw ork cable. Failure to turn po wer off
may cause electrical shocks or fire hazard.
• Prevent metal fragments and pieces of wire from dropping inside the SX5L housing. Put a cover
on the SX5L module during wiring the I/O and network cable. Ingress of such fragments and
chips may cause fire hazard, damage, or malfunction.
• Run the power supply wiring as far away possible from motor lines to prevent malfunction.
• Use wires of an appropriate size to meet the voltage and current requirements. Using inappropri-
ate wires may cause overheat, resulting in possible fire hazard.
• Make sure of correct connection. Incorrect connection may cause overheat, resulting in possible
fire hazard.
• Do not run the I/O wiring in parallel with or in the vicinity of motor lines. Keep the I/O wiring
away from noise sources. Check for loose connection periodically. Loose connection may cause
overheat, resulting in possible fire hazard.
• Keep the power voltage and frequency within the rated values, otherwise the SX5L may be damaged.
• Keep the input signal within the rated values, otherwise the SX5L may be damaged.
Applicable Wires
For power and input wiring, use AWG18 or AWG16 (0.75 to 1.25 mm2) solid or stranded wires. When connecting two
wires together, use wires of the same size.
Terminal Tightening Torque
Tighten the I/O terminals to a toque of 0.6 to 1.0 N·m. Also tighten unused I/O terminals.
Wire Termination
When using crimping terminals for wire termination, be sure to use an insulation tube on
ø3.2 min.
the crimping terminal. One or two crimping terminals can be connected to one screw terminal. Dimensions of an applicable crimping terminal are shown at right.
6.0 max.
When wiring without using crimping terminals, strip the wire as long as the terminal clamp
plate (approx. 6 mm), and insert the wire until the wire insulation touches the end of the ter-
5.2 min.
3.0 max.
minal clamp plate.
Optional Jumper
When using the analog input module or Pt100Ω input module, be sure to interconnect input terminals of each unused
channel using a wire or optional ring or spade type jumper. Otherwise an error may exceeds the rated value.
Grounding
The upper-right mounting hole has a FG terminal. Connect the FG terminal and control box as shown in the figure below.
Use a UL1007 AWG16 wire to connect the FG terminal to the ground (grounding resistance 100Ω at the maximum).
The FG terminal is supplied with an M4 screw and
an embedded nut for ground connection when
mounting on a DIN rail. When mounting the SX5L
directly on a panel, prepare a proper screw for
grounding.
Remove paint from the panel surface for grounding
to make sure of electrical connection.
SERVICE
REQUEST
LON
SERVICE
REQUEST
LON
3-2 SX5L COMMUNICATION TERMINAL USER’S MANUAL
Page 34

Network Cable Wiring
+
R
C1
C2
Network
+
3: INSTALLATION AND WIRING
Caution
• Do not run the network cable in parallel with or in the vicinity of power, output, or motor lines.
Keep the network cable away from noise sources. Check for loose connection periodically. Loose
connection may cause overheat, resulting in possible fire hazard.
Applicable Cables
Use twisted pair cable with core wires of AWG24 to AWG14 (0.2 to 2.5 mm2) applicable to the LONWORKS network. One
or two wires can be connected to one network interface connector. When connecting two wires together, use wires of the
same size, AWG24 to AWG16 (0.2 to 1.5 mm2). Whether connecting one or two wires, always use ferrules to terminate the
wires for connection to the network interface connector.
Network Interface Connector
The network interface connector features spring-clamp terminals. Push in the
orange pin to open the cable hole using a flat screwdriver, and insert a ferrule
into the cable hole. The LONWORKS network cable can be connected to the
two terminals in either polarity.
For tightening the mounting screws of the network interface connector, use a
flat screwdriver with a straight shank at the tip.
Orange Pin
Recommended Screwdriver: Phoenix Type No. SZS 0,6 x 3,5
(Order No.: 12 05 05 3)
Tightening Torque
Tighten the network interface connector mounting screws to a torque of 0.3 to 0.5 N·m.
Applicable Ferrules
Wire Thickness Phoenix Type (Order No.)
2
AWGCross Section (mm
24 0.25 AI 0,25-8 YE (32 00 85 2) —
20 0.5 AI 0,5-8 WH (32 00 01 4) AI-TWIN 2 x 0,5-8 WH (32 00 93 3)
18 0.75 AI 0,75-8 GY (32 00 51 9) AI-TWIN 2 x 0,75-8 GY (32 00 80 7)
18 1.0 AI 1-8 RD (32 00 03 0) AI-TWIN 2 x 1-8 RD (32 00 81 0)
16 1.5 AI 1,5-8 BK (32 00 04 3) AI-TWIN 2 x 1,5-8 BK (32 00 82 3)
14 2.5 AI 2,5-8 BU (32 00 52 2) —
) For 1-cable connection For 2-cable connection
For 1-cable connection For 2-cable connection
6.0 8.0
7.0 8.0
To crimp the ferrules, use a special crimping tool.
Crimping Tool: Phoenix Type No. CRIMPFOX ZA 3
(Order No.: 12 01 88 2)
AI 1-8 RD AI-TWIN 2 x 1-8 RD
Terminators
LONWORKS networks require terminators. Connect terminators consisting of one resistor and two
capacitors shown at right (note the polarity of capacitors).
The bus topology requires two terminators at both ends of the network, and the free topology can
connect a terminator at any position in the network.
Topology Bus Topology Free Topology
R 105Ω±1%, 1/8W 52.3Ω±1%, 1/8W
C1 and C2 100 µF, ≥50V 100 µF, ≥50V
Connect Position Te rminators at both ends of the network One terminator at any position in the network
Applicable Terminator Echelon 44101 Echelon 44100
SX5L COMMUNICATION TERMINAL USER’S MANUAL 3-3
Page 35

3: INSTALLATION AND WIRING
Removing the Detachable Terminal Block
Warning
• Turn off the power to the SX5L before removing and installing the detachable terminal block.
Failure to turn power off may cause electrical shocks or fire hazard.
To remove the detachable terminal block from the SX5L module, squeeze both latches on top of the terminal block inward
to unlock the terminal block from the socket.
Installing the Detachable Terminal Block
Place the terminal block in the socket with the latches opened and press the terminal block until it bottoms in the socket.
Insertion Pin Positions
Insertion pins are positioned on the base of the terminal block and inside the socket to prevent insertion of invalid terminal
blocks into the socket. The pins are keyed to make sure of correct matching of terminal block and socket, and prevent
swapping of upper and lower terminal blocks.
When the terminal block does not fit into the socket properly, check to see if the pin positions on the terminal block agree
with the pin-slot arrangement in the socket. If the pins and the pin slots are in matching positions, check for any chips and
obstacles in the socket.
When purchasing terminal blocks separately, set the insertion pins as shown below.
ABCD EFGH
HEF GAB CD
Ter minal Block Bottom View
Applicable Terminal Blocks and Insertion Pin Positions
Module Name Type No.
Digital Input SX5L-SBN16B1
Digital Output
Digital I/O
Analog Input SX5L-SBAN041
Pt100Ω Input
Pulse Input SX5L-SBCN081
Remote-control Relay Control SX5L-SBRR081
SX5L-SBT16K1
SX5L-SBT16S1
SX5L-SBM16K1
SX5L-SBM16K2
SX5L-SBM16S1
SX5L-SBM16S2
SX5L-SBPT04X1
SX5L-SBPT04Y1
Ter minal Block
Ter minal Block
Position
Upper SX9Z-SS10 B D F H
Lower SX9Z-SS2 A C F H
Upper SX9Z-SS1 B C E G
Lower SX9Z-SS2 A D F H
Upper SX9Z-SS1 B C F H
Lower SX9Z-SS3 A D E G
Upper SX9Z-SS12 A D E H
Lower SX9Z-SS9 B C F G
Upper SX9Z-SS13 B D E H
Lower SX9Z-SS14 A C F G
Upper SX9Z-SS11 A C E H
Lower SX9Z-SS7 B C E H
Upper SX9Z-SS11 B D F G
Lower SX9Z-SS7 A D F G
Type No.
Insertion Pin
Positions
3-4 SX5L COMMUNICATION TERMINAL USER’S MANUAL
Page 36

4: SOFTWARE SPECIFICATIONS
Introduction
This chapter describes the software specifications of the SX5L communication terminals. Designing a LONWORKS network requires complete understanding of the functional blocks available on each SX5L communication terminal. Before
starting system configuration, read this chapter to understand available functional blocks.
General
The SX5L communication terminals contain an application program installed before shipment from factory . The functions
of application programs are configured in units of functional blocks. More than one functional block is installed in one
SX5L communication terminal. Available functional blocks are listed in the table below.
To set up a LONWORKS network, every device on the network, including the SX5L modules, must be commissioned individually to assign an address using a network management tool. A Neuron ID is needed to identify each L ONWORKS mod-
ule. While commissioning the SX5L using a network management tool, either enter the 12-digit alphanumeric Neuron ID
printed on the label on the SX5L manually, or press the SERVICE REQUEST button on the SX5L module to send the service pin message.
Available Functional Blocks
Input
Functional Block
Node Object
Digital Input
Digital Output
Virtual I/O
Shot Output/Digital Input
Analog Input
Pt100Ω Input
Pulse Count
Remote-control
Relay Control
Quantity of
Alias Table Entries
Module
SBN16B1
Output
Module
SBT16K1
SBT16S1
I/O
Module
SBM16K1
SBM16S1
I/O
Start/Stop
SBM16K2
SBM16S2
Analog
Input
SBAN041
Pt100Ω
Input
SBPT04X1
SBPT04Y1
Pulse
Input
SBCN081 SBRR081
Remote-
control
xxxxxxxx
xx
xx
xx
x
x
x
x
x
62 62 62 16 8 8 16 16
Page
4-2
4-3
4-4
4-5
4-8
4-10
4-13
4-15
4-17
SX5L COMMUNICATION TERMINAL USER’S MANUAL 4-1
Page 37

4: SOFTWARE SPECIFICATIONS
Node Object Functional Block
nviRequest nvoStatus
Node Status
The Node Object functional block is installed in all SX5L modules. When receiving an input to n viRequest, this functional
block sends out nvoStatus in reply. This functionality makes it possible for the network to confirm that the responding
node is in on-line status.
I/O Name Type Description
Input Network Variable nviRequest SNVT_obj_request For node objects
Output Network Variable nvoStatus SNVT_obj_status For node objects
Delay in sending nvoStatus immediately
nciPwrup SCPTpwrUpDelay
Configuration Property
nciMaxStsSendT SCPTmaxSndT
Initial Status Transmission
This functional block sends output network variable nvoStatus to the network within 3 seconds after powerup. The delay
depends on a random number based on the Neuron ID, and differs on each node.
The sending time can be delayed by changing the nciPwrup value. At system startup, if the SX5L sends nvoStatus before
the addressee device is ready to receive communication, set the nciPwrup to a larger value.
The preset value for nciPwrup can be between 0 and 60 seconds (0.1-sec increments). The sending time is determined by
the sum of the nciPwrup value and a random number.
after powerup
(factory setting: 0 seconds)
nvoStatus heartbeat transmission interval
(factory setting: 3 minutes)
Event-driven Transmission
When receiving nviRequest, this functional block sends output network variable nvoStatus to the network.
Heartbeat Transmission (Periodical Transmission)
After the first transmission of output network variable nvoStatus, this functional block sends nvoStatus repeatedly at intervals designated by nciMaxStsSendT. When the nciMaxStsSendT value is 0, the heartbeat transmission is disabled.
The configuration type of nciMaxStsSendT is SNVT_elapsed_tm (day, hour, minute, second, millisecond). When a value
over 12 hours is set, the interval is designated as 12 hours 00 minutes 00 seconds. The millisecond value has no effect.
Presets
When sending input network variable n viRequest to the SX5L, set all values to 0. The SX5L always sends output network
variable nvoStatus with all values set to 0.
4-2 SX5L COMMUNICATION TERMINAL USER’S MANUAL
Page 38

Digital Input Functional Block
4: SOFTWARE SPECIFICATIONS
nvoDI[0]
nvoDI[1]
nvoDI[2]
nvoDI[3]
nvoDI[4]
nvoDI[5]
nvoDI[6]
nvoDI[7]
DI[0]
SX5L-SBN16B1 SX5L-SBM16K1 / SX5L-SBM16S1
nvoDI[8]
nvoDI[9]
nvoDI[10]
nvoDI[11]
nvoDI[12]
nvoDI[13]
nvoDI[14]
nvoDI[15]
DI[1]
nvoDI[0]
nvoDI[1]
nvoDI[2]
nvoDI[3]
nvoDI[4]
nvoDI[5]
nvoDI[6]
nvoDI[7]
DI
Digital input terminals 0 through 15 correspond to output network variables nvoDI[0] through nvoDI[15], respectively.
When the status at any input terminal changes, the Digital Input functional block sends a corresponding output network
variable to the network.
I/O Name Type Description
Output Network Variable nvoDI[0] to [15] SNVT_switch Correspond to inputs 0 through 15
Configuration Property
nciMaxStsSendT1
[0] to [15]
SCPTmaxSndT
nvoDI[0] to [15] heartbeat transmission interval
(factory setting: 3 minutes)
Initial Status Transmission
This functional block sends output network variables nvoDI[0] through nvoDI[15] to the network within 3 seconds after
powerup. The delay depends on a random number based on the Neuron ID, and differs on each node.
The sending time can be delayed by changing the nciPwrup value designated in the Node Object functional block. At system startup, if the SX5L sends output network variables before the addressee device is ready to recei ve communication, set
the nciPwrup to a larger value.
The preset value for nciPwrup can be between 0 and 60 seconds (0.1-sec increments). The sending time is determined by
the sum of the nciPwrup value and a random number.
Event-driven Transmission
When the status at any input terminal changes or when receiving a request (polling) from the network, this functional
block sends a corresponding output network variable to the network.
Heartbeat Transmission (Periodical Transmission)
When the status at any input terminal does not change, this functional block sends the output network variable repeatedly
at intervals designated by nciMaxStsSendT1[0] to [15]. When the nciMaxStsSendT1[0] to [15] value is 0, the heartbeat
transmission is disabled.
The configuration type of nciMaxStsSendT1[0] to [15] is SNVT_elapsed_tm (day, hour, minute, second, millisecond).
When a value over 12 hours is set, the interv al is designated as 12 hours 00 minutes 00 seconds. The millisecond v alue has
no effect.
Input Terminal Status vs. Output Network Variable
Input Terminal Status Output Network Variable
ON (state) = 1, (value) = 100.0%
OFF (state) = 0, (value) = 0.0%
SX5L COMMUNICATION TERMINAL USER’S MANUAL 4-3
Page 39
4: SOFTWARE SPECIFICATIONS
Digital Output Functional Block
nviDO[0]
nviDO[1]
nviDO[2]
nviDO[3]
nviDO[4]
nviDO[5]
nviDO[6]
nviDO[7]
DO[0]
SX5L-SBT16K1 / SX5L-SBT16S1 SX5L-SBM16K1 / SX5L-SBM16S1
nviDO[8]
nviDO[9]
nviDO[10]
nviDO[11]
nviDO[12]
nviDO[13]
nviDO[14]
nviDO[15]
DO[1]
nviDO[0]
nviDO[1]
nviDO[2]
nviDO[3]
nviDO[4]
nviDO[5]
nviDO[6]
nviDO[7]
DO[0]
Digital output terminals 0 through 15 correspond to input network variables nviDO[0] through nviDO[15], respectively.
When any of these input network variables receives a new value, the value effects the ON/OFF status of a corresponding
output terminal.
I/O Name Type Description
Input Network Variable nviDO[0] to [15] SNVT_switch Correspond to outputs 0 through 15
Input Network Variable vs. Output Terminal Status
Each time the input network variable is updated, a corresponding output terminal status is updated according to the
received data.
The existing output terminal status is maintained until the input network variable is updated.
When receiving a reset command or when power is cycled, all outputs are initialized to OFF.
Input Network Variable Output Terminal Status
(state) = 1, (value) = no effect ON
(state) = 0, (value) = no effect OFF
4-4 SX5L COMMUNICATION TERMINAL USER’S MANUAL
Page 40

Virtual I/O Functional Block
4: SOFTWARE SPECIFICATIONS
nviSWA[0] nvoSWA[0]
nviSWB[0] nvoSWB[0]
VIO[0]
nviSWA[1] nvoSWA[1]
nviSWB[1] nvoSWB[1]
VIO[1]
nviSWA[2] nvoSWA[2]
nviSWB[2] nvoSWB[2]
VIO[2]
SX5L-SBT16K1 / SX5L-SBT16S1 SX5L-SBM16K1 / SX5L-SBM16S1
nviSWA[3] nvoSWA[3]
nviSWB[3] nvoSWB[3]
VIO[3]
nviSWA[4] nvoSWA[4]
nviSWB[4] nvoSWB[4]
VIO[4]
nviSWA[5] nvoSWA[5]
nviSWB[5] nvoSWB[5]
VIO[5]
nviSWA[0] nvoSWA[0]
nviSWB[0] nvoSWB[0]
VIO[0]
nviSWA[1] nvoSWA[1]
nviSWB[1] nvoSWB[1]
VIO[1]
nviSWA[2] nvoSWA[2]
nviSWB[2] nvoSWB[2]
VIO[2]
The Virtual I/O functional block is not designed for a particular hardware type, but can be used to configure required circuits. For example, the Virtual I/O functional block can be used to link alarm signals to digital output functional blocks,
and configure a simple interlocking circuit by combining multiple Virtual I/O functional blocks.
I/O Name Type Description
nviSWA[0] to [5] SNVT_switch Value to be sent from nvoSWA[0] to [5]
Input Network Variable
nviSWB[0] to [5] SNVT_switch
nvoSWA[0] to [5] SNVT_switch
Output Network Variable
nvoSWB[0] to [5] SNVT_switch
Configuration Property nciAndOr[0] to [5] SCPTdefltBehave
Forces to change the nvoSWA and nvoSWB output
values.
When receiving (state) = 1, nvoSWA sends 0 and
nvoSWB sends 1.
Sends the received nviSWA[0] to [5] values without
change.
Inverts the received nviSWA[0] to [5] values and
sends the inverted values (logical NOT).
Designates Boolean operation for functional blocks.
When (state) = 0, as shown above.
When (state) = 1 is set, the following output is sent:
nvoSWA sends logical AND of nviSWA and nviSWB.
nvoSWB sends logical OR of nviSWA and nviSWB.
Initial Status Transmission
When receiving the reset command at powerup, input network variables nviSWA and nviSWB are initialized to (value,
state) = (0, 0). Based on these values, output network variables nvoSWA and nvoSWB are sent to the network.
Event-driven Transmission
Each time nviSWA or nviSWB is received, nvoSWA and nvoSWB are sent.
SX5L COMMUNICATION TERMINAL USER’S MANUAL 4-5
Page 41
4: SOFTWARE SPECIFICATIONS
SNVT and SCPT Truth Table
Input Network Variable Output Network Variable
nviSWA[0] (state) nviSWB[0] (state) nciAndOr[0] (state) nvoSWA[0] nvoSWB[0]
000OFFON
100ONOFF
1 or 0 1 0 OFF ON
001OFFOFF
011OFFON
101OFFON
111ONON
ON: (state) = 1, (value) = 100.0%
OFF: (state) = 0, (value) = 0.0%
Presets
The configuration type of nciAndOr is SNVT_switch (value, state). Its value has no effect.
When nciAndOr is changed, the result takes effect after the node has been reset or after either nviSWA or nviSWB has
received an input.
Caution
• Do not make a binding such that output network variables (n v oSWA[0] to [5], nvoSWB[0] to [5])
are directly fed back to input network variables (nviSWA[0] to [5], nviSWB[0] to [5]). If send
and receive signals make a loop, data transmission continues infinitely and the network can not
perform correct communication. The same consideration is needed to prevent multiple V irtual I/O
functional blocks from making a loop.
Example 1: Using Virtual I/O functional block VIO[0] for Boolean operation (Inversion/Buffer)
1. Set configuration property nciAndOr[0] (state) to 0.
2. Set input network variable nviSWB[0] (state) to 0.
3. Make input network variable nviSWA[0] (state) to receive 0 or 1.
When nviSWA[0] (state) receives 0:
nvoSWA[0] sends the same value as nviSWA[0], that is (state = 0, value = 0.0%).
nvoSWB[0] sends the inverted value of nviSWA[0], that is (state = 1, value = 100.0%).
When nviSWA[0] (state) receives 1:
nvoSWA[0] sends the same value as nviSWA[0], that is (state = 1, value = 100.0%).
nvoSWB[0] sends the inverted value of nviSWA[0], that is (state = 0, value = 0.0%).
Example 2: Using Virtual I/O functional block VIO[0] for forced stop
1. Set configuration property nciAndOr[0] (state) to 0.
2. Make input network variable nviSWB[0] (state) to receive 1.
Then, regardless of nviSWA[0] (state), nvoSWA[0] sends OFF (state = 0, value = 0.0%), and nvoSWB[0] sends ON (state
= 1, value = 100.0%).
Example 3: Using Virtual I/O functional block VIO[0] for Boolean operation (AND/OR)
1. Set configuration property nciAndOr[0] (state) to 1.
2. Make input network variables nviSWA[0] (state) and nviSWB[0] (state) to receive 0 or 1.
Then, nvoSWA[0] sends the logical AND result of nviSWA[0] (state) and nviSWB[0] (state). Similarly, nvoSWB[0] sends
the logical OR result of nviSWA[0] (state) and nviSWB[0] (state).
4-6 SX5L COMMUNICATION TERMINAL USER’S MANUAL
Page 42
4: SOFTWARE SPECIFICATIONS
Example 4: Using Virtual I/O functional block VIO[0] to communicate with multiple input network variables
The figure below illustrates a network consisting of Device 1 with one output network variable and Device 2 with eight
input network variables. In this network configuration, Device 1 uses seven alias tables, because binding more than one
network variable on one device requires additional alias tables.
nvoDI[0]
Device 1
Network Consisting of Digital Input and Digital Output Functional Blocks
nviDO[0]
nviDO[1]
nviDO[2]
nviDO[3]
nviDO[4]
nviDO[5]
nviDO[6]
nviDO[7]
Device 2
The next example shows a network consisting of Device 3 with one output network variable and De vice 4 with eight input
network variables and a Virtual I/O functional block. In this network configuration, Device 3 uses only one alias table.
Using virtual I/O functional blocks, Device 3 can communicate with more input network variables as many as six alias
tables.
nvoDI[0]
nviSWA[0] nvoSWA[0]
nviSWB[0] nvoSWB[0]
VIO[0]
Device 3
nviDO[0]
nviDO[1]
nviDO[2]
nviDO[3]
nviDO[4]
nviDO[5]
nviDO[6]
nviDO[7]
Device 4
Network Containing Virtual I/O Functional Block
SX5L COMMUNICATION TERMINAL USER’S MANUAL 4-7
Page 43
4: SOFTWARE SPECIFICATIONS
Shot Output/Digital Input Functional Block
nviDO[0] nvoDI[0]
nviOVR[0] nvoDI[1]
nvoOVR[0]
DIO[0]
nviDO[1] nvoDI[2]
nviOVR[1] nvoDI[3]
nvoOVR[1]
DIO[1]
nviDO[2] nvoDI[4]
nviOVR[2] nvoDI[5]
nvoOVR[2]
DIO[2]
nviDO[3] nvoDI[6]
nviOVR[3] nvoDI[7]
nvoOVR[3]
DIO[3]
The Shot Output/Digital Input functional block is designed for start/stop control. The output pulse signals can be used to
turn on and off external keep relays. While input variable nviOVR is off, input variable nviDO can be used to generate a
start or stop signal. For example on DIO[0], when n viDO[0] recei v es an ON signal, output terminal 0 outputs a start pulse.
When nviDO[0] receives an OFF signal, output terminal 1 outputs a stop pulse. When input variable nviOVR[0] turns on,
output terminal 1 outputs a stop pulse and subsequent nviDO[0] signals are ignored.
This functional block also has input terminals to receive the operation status and alarm inputs, which are reflected on output network variables n voDI to be sent to the network. The output network variables have the same function as the Digital
Input functional block, and have no relationship with output pulse signals sent from output terminals.
I/O Name Type Description
Sends start/stop pulses from Start 0 and Stop 0
(output terminals 0 and 1)
Sends start/stop pulses from Start 1 and Stop 1
(output terminals 2 and 3)
Sends start/stop pulses from Start 2 and Stop 2
(output terminals 4 and 5)
Sends start/stop pulses from Start 3 and Stop 3
(output terminals 6 and 7)
Sends stop pulses from Stop 0 to Stop 3 (output
terminals 1, 3, 5, 7), and disables nviDO[0] to [3]
Sends the received nviOVR[0] to [3] values to the
network
nvoDI[0] and [1] heartbeat transmission interval
(factory setting: 3 minutes)
nvoDI[2] and [3] heartbeat transmission interval
(factory setting: 3 minutes)
nvoDI[4] and [5] heartbeat transmission interval
(factory setting: 3 minutes)
nvoDI[6] and [7] heartbeat transmission interval
(factory setting: 3 minutes)
Input Network Variable
Output Network Variable
Configuration Property
nviDO[0] SNVT_switch
nviDO[1] SNVT_switch
nviDO[2] SNVT_switch
nviDO[3] SNVT_switch
nviOVR[0] to [3] SNVT_switch
nvoDI[0], [2], [4], [6] SNVT_switch Sends Status 0, 1, 2, and 3 to the network
nvoDI[1], [3], [5], [7] SNVT_switch Sends Alarm 0, 1, 2, and 3 to the network
nvoOVR[0] to [3] SNVT_switch
nciMaxStsSendT1[0] SCPTmaxSndT
nciMaxStsSendT1[1] SCPTmaxSndT
nciMaxStsSendT1[2] SCPTmaxSndT
nciMaxStsSendT1[3] SCPTmaxSndT
Initial Status Transmission
This functional block sends output network variables within 3 seconds to the network after po werup. The delay depends on
a random number based on the Neuron ID, and differs on each node.
The sending time can be delayed by changing the nciPwrup value designated in the Node Object functional block. At system startup, if the SX5L sends output network variables before the addressee device is ready to recei ve communication, set
the nciPwrup to a larger value.
The preset value for nciPwrup can be between 0 and 60 seconds (0.1-sec increments). The sending time is determined by
the sum of the nciPwrup value and a random number.
Event-driven Transmission
When the status at any input terminal changes or when receiving a request (polling) from the network, this functional
block sends a corresponding output network variable.
4-8 SX5L COMMUNICATION TERMINAL USER’S MANUAL
Page 44

4: SOFTWARE SPECIFICATIONS
Heartbeat Transmission (Periodical Transmission)
When the status at any input terminal does not change, this functional block sends the output network variable repeatedly
at intervals designated by nciMaxStsSendT1[0] to [3]. When the nciMaxStsSendT1[0] to [3] value is 0, the heartbeat
transmission is disabled.
The configuration type of nciMaxStsSendT1[0] to [3] is SNVT_elapsed_tm (day, hour, minute, second, millisecond).
When a value over 12 hours is set, the interv al is designated as 12 hours 00 minutes 00 seconds. The millisecond v alue has
no effect.
Input Network Variables vs. Output Pulse
Depending on the statuses of input variables nviDO and nviOVR, a start or stop output pulse is generated or suppressed.
For DIO[0], the following tables summarize the relationships of input variables nviDO[0] and n viO VR[0] with start or stop
output pulse generation from output terminal 0 or 1, respectively. For DIO[1] through DIO[3], start and stop output pulses
are generated from output terminals 2 through 7 similarly.
nviOVR[0] Status nviDO[0] Received Data Pulse Output
OFF
ON Receive either ON or OFF signal No output
nviOVR[0] Received Data nviDO[0] Status Pulse Output
Receive ON signal Either ON or OFF Sends a stop 0 pulse from output terminal 1
Receive OFF signal
Receive ON signal Sends a star t 0 pulse from output terminal 0
Receive OFF signal Sends a stop 0 pulse from output terminal 1
ON Sends a start 0 pulse from output terminal 0
OFF Sends a stop 0 pulse from output terminal 1
(1) While nviOVR[0] is off
When nviDO[0] receives an ON signal while nviOVR[0] is
off, this functional block sends a start 0 pulse (pulse width
approximately 1 second) from output terminal 0. When
nviDO[0] receives an OFF signal, this functional block sends
nviDO[0] (state) Received Data
Start 0 Pulse (Output terminal 0)
Stop 0 Pulse (Output terminal 1)
a stop 0 pulse (pulse width approximately 1 second) from output terminal 1.
Note: Once nviOVR[0] has received an OFF (or ON) signal, the internal nviOVR[0] status remains of f (or on) until nviOVR[0]
receives an ON (or OFF) signal. Similarly, once nviDO[0] has received an OFF (or ON) signal, the internal nviDO[0] status
remains off (or on) until nviDO[0] receives an ON (or OFF) signal.
(2) While nviOVR[0] is on
While nviO VR[0] is on, nviO VR[0] o v errides n viDO[0]. Consequently, this functional block does not send a start or stop
pulse even when nviDO[0] receives an ON or OFF signal
while nviOVR[0] is on.
nviDO[0] (state) Received Data
Start 0 Pulse (Output terminal 0)
Stop 0 Pulse (Output terminal 1)
(3) While nviDO[0] is on
When nviOVR[0] receives an ON signal while nviDO[0] is
on, this functional block sends a stop pulse (pulse width
approximately 1 second) from output terminal 1. When
nviOVR[0] receives an OFF signal, this functional block
sends a start pulse (pulse width approximately 1 second) from
nviOVR[0] (state) Received Data
Start 0 Pulse (Output terminal 0)
Stop 0 Pulse (Output terminal 1)
output terminal 0.
(4) While nviDO[0] is off
When nviOVR[0] receives either an ON or OFF signal while
nviDO[0] is off, this functional block sends a stop pulse
(pulse width approximately 1 second) from output terminal 1.
SX5L COMMUNICATION TERMINAL USER’S MANUAL 4-9
nviOVR[0] (state) Received Data
Start 0 Pulse (Output terminal 0)
Stop 0 Pulse (Output terminal 1)
Page 45

4: SOFTWARE SPECIFICATIONS
Analog Input Functional Block
nvoAI0
nvoAI1
nvoAI2
nvoAI3
AI
Analog input channels 0 through 3 correspond to nvoAI0 through nvoAI3, respectively. At the factory settings, analog
input signals of 1 to 5V or 4 to 20 mA are converted to 1 through 100%, and the result is sent to the network.
The output network variable type of the Analog Input functional block can be changed to various SNVTs as shown on
page 4-11.
I/O Name Type Description
nvoAI0 SNVT_lev_percent Corresponds to channel 0
Output Network Variable
Configuration Property
nvoAI1 SNVT_lev_percent Corresponds to channel 1
nvoAI2 SNVT_lev_percent Corresponds to channel 2
nvoAI3 SNVT_lev_percent Corresponds to channel 3
nciMaxStsSendT1 SCPTmaxSndT
nciMinSendT1 SCPTminSndT
nciMaxRng[0] SCPTmaxRnge
nciMaxRng[1] SCPTmaxRnge
nciMaxRng[2] SCPTmaxRnge
nciMaxRng[3] SCPTmaxRnge
nciMinRng[0] SCPTminRnge
nciMinRng[1] SCPTminRnge
nciMinRng[2] SCPTminRnge
nciMinRng[3] SCPTminRnge
nciMinDelta[0] SCPTsndDelta
nciMinDelta[1] SCPTsndDelta
nciMinDelta[2] SCPTsndDelta
nciMinDelta[3] SCPTsndDelta
nvoAI0 to nvoAI3 heartbeat transmission interval
(factory setting: 3 minutes)
nvoAI0 to nvoAI3 minimum transmission interval
(factory setting: 1 second)
Designates nvoAI0 maximum value
(factory setting: 100%)
Designates nvoAI1 maximum value
(factory setting: 100%)
Designates nvoAI2 maximum value
(factory setting: 100%)
Designates nvoAI3 maximum value
(factory setting: 100%)
Designates nvoAI0 minimum value
(factory setting: 0%)
Designates nvoAI1 minimum value
(factory setting: 0%)
Designates nvoAI2 minimum value
(factory setting: 0%)
Designates nvoAI3 minimum value
(factory setting: 0%)
Minimum change to send nvoAI0
(factory setting: 0%)
valid for every input level
Minimum change to send nvoAI1
(factory setting: 0%)
valid for every input level
Minimum change to send nvoAI2
(factory setting: 0%)
valid for every input level
Minimum change to send nvoAI3
(factory setting: 0%)
valid for every input level
4-10 SX5L COMMUNICATION TERMINAL USER’S MANUAL
Page 46

4: SOFTWARE SPECIFICATIONS
Initial Status Transmission
This functional block sends output network variables to the network within 3 seconds after po werup. The delay depends on
a random number based on the Neuron ID, and differs on each node.
The sending time can be delayed by changing the nciPwrup value designated in the Node Object functional block. At system startup, if the SX5L sends output network variables before the addressee device is ready to recei ve communication, set
the nciPwrup to a larger value.
The preset value for nciPwrup can be between 0 and 60 seconds (0.1-sec increments). The sending time is determined by
the sum of the nciPwrup value and a random number.
Event-driven Transmission
When receiving a request (polling) from the network or when detecting a change larger than the value designated by
nciMinDelta[0] through nciMinDelta[3], this functional block sends a corresponding output network variable.
Heartbeat Transmission (Periodical Transmission)
When the analog input value at any input terminal does not change, this functional block sends the output network v ariable
of the analog input value repeatedly at intervals designated by nciMaxStsSendT1. When the nciMaxStsSendT1 value is 0,
the heartbeat transmission is disabled.
The configuration type of nciMaxStsSendT1 is SNVT_elapsed_tm (day, hour, minute, second, millisecond). When a v alue
over 12 hours is set, the interval is designated as 12 hours 00 minutes 00 seconds. The millisecond value has no effect.
Scaling and Sampling Intervals
The input data of 1 to 5V or 4 to 20 mA DC received by channel 0 is converted to a value in the range between nciMinRng[0] and nciMaxRng[0], and the resultant output network variable n voAI0 is sent to the netw ork. Similarly , for channels
1 through 3, network variables nvoAI1 through nvoAI3 are sent to the network.
When the input value drops below 1V or 4 mA DC or exceeds 5V or 20 mA DC, an input in the range between –4% and
+104% is converted and the resultant output network variable is sent to the network. When the input v alue further drops or
exceeds, output network variable 7FFF is sent as input error data.
The configuration type of nciMinSendT1 to designate the minimum transmission interval is SNVT_elapsed_tm (day , hour ,
minute, second, millisecond). When a value over 60 seconds is set, the interval is designated as 60 seconds.
Changing SVNT Type
The type of output network variables nvoAI0 through nvoAI3 can be changed. To change the type of the output network
variable, use the LonMaker Browser. Right-click on the network variable you want to change, and from the short-cut
menu, select [Change Type]. The changeable network variable types are listed in the table below, with the SNVT index
approved by the LONMARK Interoperability Association.
Index Type Index Type Index Type Index Type
1 SVNT_amp 20 SVNT_length_mil 41 SVNT_vol 100 SVNT_density
2 SVNT_amp_mil 23 SVNT_mass 42 SVNT_vol_kilo 102 SVNT_rpm
3 SVNT_angle 24 SVNT_mass_kilo 43 SVNT_vol_mil 104 SVNT_angle_deg
4 SVNT_angle_vel 25 SVNT_mass_mega 44 SVNT_volt 105 SVNT_temp_p
5 SVNT_btu_kilo 26 SVNT_mass_mil 45 SVNT_volt_dbmv 107 SVNT_time_sec
6 SVNT_btu_mega 27 SVNT_power 46 SVNT_volt_kilo 110 SVNT_area
8 SVNT_count 28 SVNT_power_kilo 47 SVNT_volt_mil 113 SVNT_press_p
9 SVNT_count_inc 29 SVNT_ppm 71 SVNT_grammage 123 SVNT_time_min
13 SVNT_elec_kwh 30 SVNT_press 76 SVNT_freq_hz 124 SVNT_time_hour
14 SVNT_elec_whr 31 SVNT_res 77 SVNT_freq_kilohz 125 SVNT_ph
15 SVNT_flow 32 SVNT_res_kilo 78 SVNT_freq_milhz 129 SVNT_smo_obscur
16 SVNT_flow_mil 33 SVNT_sound_db 79 SVNT_lux 131 SVNT_temp_ror
17 SVNT_length 34 SVNT_speed 81 SVNT_lev_percent 138 SVNT_volt_ac
18 SVNT_length_kilo 35 SVNT_speed_mil 82 SVNT_multiplier 139 SVNT_amp_ac
19 SVNT_length_micr 39 SVNT_temp 98 SVNT_pwr_fact
SX5L COMMUNICATION TERMINAL USER’S MANUAL 4-11
Page 47

4: SOFTWARE SPECIFICATIONS
Example: Connect a pressure sensor to channel 0 of an analog input module and change the SNVT type
Sensor specifications
Measurement Range 20 to 100 kPa
Analog Output Value 4 to 20 mA
1. Use the LonMaker Browser to change the SNVT type of nvoAI0.
On the LonMaker Browser screen, right-click on the network variable line. From the short-cut menu, select [Change
Type], then select “SNVT_press.”
2. Set the nciMinRng[0] and nciMaxRng[0] values as shown below.
nciMinRng[0] 20
nciMaxRng[0] 100
When the analog input module receives an analog value of 20 kP a (4 mA), the analog input module sends nvoAI0 data representing 20 kPa to the network. Similarly, when receiving 50 kPa (10 mA), the analog input module sends nvoAI0 data
representing 50 kPa.
20
Current (mA)
10
4
0
0
20 50
Pressure (kPa)
100
4-12 SX5L COMMUNICATION TERMINAL USER’S MANUAL
Page 48

4: SOFTWARE SPECIFICATIONS
Pt100Ω Input Functional Block
nvoPT[0]
nvoPT[1]
nvoPT[2]
nvoPT[3]
PT
Four input channels 0 through 3 of Pt100Ω resistance thermometers correspond to output variables nvoPT[0] through
nvoPT[3], respectively. When detecting any change in measured temperature, this functional block sends a corresponding
output network variable to the network.
I/O Name Type Description
nvoPT[0] SNVT_temp_p Corresponds to channel 0
Output Network Variable
Configuration Property
nvoPT[1] SNVT_temp_p Corresponds to channel 1
nvoPT[2] SNVT_temp_p Corresponds to channel 2
nvoPT[3] SNVT_temp_p Corresponds to channel 3
nciMaxStsSendT1 SCPTmaxSndT
nciMinSendT1 SCPTminSndT
nciMinDelta[0] SCPTsndDelta
nciMinDelta[1] SCPTsndDelta
nciMinDelta[2] SCPTsndDelta
nciMinDelta[3] SCPTsndDelta
nvoPT[0] to nvoPT[3] heartbeat transmission interval
(factory setting: 3 minutes)
nvoPT[0] to nvoPT[3] minimum transmission interval
(factory setting: 1 second)
Minimum change to send nvoPT[0]
(factory setting: 0°C)
valid for every input level
Minimum change to send nvoPT[1]
(factory setting: 0°C)
valid for every input level
Minimum change to send nvoPT[2]
(factory setting: 0°C)
valid for every input level
Minimum change to send nvoPT[3]
(factory setting: 0°C)
valid for every input level
Initial Status Transmission
This functional block sends output network variables to the network within 3 seconds after po werup. The delay depends on
a random number based on the Neuron ID, and differs on each node.
The sending time can be delayed by changing the nciPwrup value designated in the Node Object functional block. At system startup, if the SX5L sends output network variables before the addressee device is ready to recei ve communication, set
the nciPwrup to a larger value.
The preset value for nciPwrup can be between 0 and 60 seconds (0.1-sec increments). The sending time is determined by
the sum of the nciPwrup value and a random number.
Event-driven Transmission
When receiving a request (polling) from the network or when detecting a change larger than the value designated by
nciMinDelta[0] through nciMinDelta[3], this functional block sends a corresponding output network variable.
The resistance value of the Pt100Ω resistance thermometer connected to channel 0 is converted to a value between 0 and
+50°C (SX5L-SBPT04X1) or between –20 and +80°C (SX5L-SBPT04Y1), and the resultant output network variable
nvoPT[0] is sent to the network. Channels 1 through 3 work similarly with nvoPT[1] through nvoPT[3].
SX5L COMMUNICATION TERMINAL USER’S MANUAL 4-13
Page 49

4: SOFTWARE SPECIFICATIONS
Heartbeat Transmission (Periodical Transmission)
When the input value at any input terminal does not change, this functional block sends output network v ariables n v oPT[0]
through nvoPT[3] repeatedly at intervals designated by nciMaxStsSendT1. When the nciMaxStsSendT1 value is 0, the
heartbeat transmission is disabled.
The configuration type of nciMaxStsSendT1 is SNVT_elapsed_tm (day, hour, minute, second, millisecond). When a v alue
over 12 hours is set, the interval is designated as 12 hours 00 minutes 00 seconds. The millisecond value has no effect.
Sampling Intervals
The configuration type of nciMinSendT1 to designate the minimum transmission interval is SNVT_elapsed_tm (day , hour ,
minute, second, millisecond). When a value over 60 seconds is set, the interval is designated as 60 seconds.
4-14 SX5L COMMUNICATION TERMINAL USER’S MANUAL
Page 50

4: SOFTWARE SPECIFICATIONS
Pulse Count Functional Block
nviPreset[0] nvoCount[0]
nviPreset[1] nvoCount[1]
nviPreset[2] nvoCount[2]
nviPreset[3] nvoCount[3]
nviPreset[4] nvoCount[4]
nviPreset[5] nvoCount[5]
nviPreset[6] nvoCount[6]
nviPreset[7] nvoCount[7]
PI
The Pulse Count functional block counts input pulses to each terminal. Pulse input terminals 0 through 7 correspond to
output network variables nvoCount[0] through nvoCount[7], respectively. When the node power is turned off, the Pulse
Count functional block maintains the current value, and continues counting when power is restored.
I/O Name Type Description
Input Network Variable nviPreset[0] to [7] SNVT_count_f Receives adding counter new current value
Output Network Variable nvoCount[0] to [7] SNVT_switch Sends adding counter current value
nvoCount[0] to [7] heartbeat transmission interval
(factory setting: 3 minutes)
nvoCount[0] to [7] minimum transmission interval
(factory setting: 1 second)
Enable nvoCount[0] to [7] event-driven transmission (factory setting: enable)
Maximum value of nvoCount[0] to [7] counters
(factory setting: 9,999,999)
Configuration Property
nciMaxStsSendT1 SCPTmaxSndT
nciMinSendT1 SCPTminSndT
nciDefaults SCPTdefltBehave
nciMaxRng
[0] to [7]
SCPTmaxRnge
Adding Counter Specifications
The Pulse Count functional block has eight adding counters assigned to input terminals 0 through 7, and sends output network variables nvoCount[0] through nvoCount[7] of the counter current values to the network.
When power is turned off, the current values are stored to the EEPROM in the Neuron Chip. Data storage can be repeated
a maximum of 10,000 times according to the Neuron Chip specifications.
When the pulse input module is started, the current values stored in the EEPROM are restored to nvoCount[0] through
nvoCount[7]. The current values can be changed by sending new values to nviPreset[0] through nviPreset[7] from the network.
The maximum current values of nvoCount[0] through nvoCount[7] can be designated using nciMaxRng[0] through
nciMaxRng[7]. Valid values are between 0 and 9,999,999. After the current v alue reaches the maximum value, the current
value changes to 0 on the next count up, and the counter repeats another counting cycle.
Initial Status Transmission
This functional block sends output network variables to the network within 3 seconds after po werup. The delay depends on
a random number based on the Neuron ID, and differs on each node.
The sending time can be delayed by changing the nciPwrup value designated in the Node Object functional block. At system startup, if the SX5L sends output network variables before the addressee device is ready to recei ve communication, set
the nciPwrup to a larger value.
The preset value for nciPwrup can be between 0 and 60 seconds (0.1-sec increments). The sending time is determined by
the sum of the nciPwrup value and a random number.
SX5L COMMUNICATION TERMINAL USER’S MANUAL 4-15
Page 51

4: SOFTWARE SPECIFICATIONS
Event-driven Transmission
Event-driven transmission is enabled or disabled by setting the nciDefaults state as shown below.
nciDefaults Event-driven Transmission
Enable event-driven transmission.
(state) = 1, (value) = no effect
(state) = 0, (value) = no effect Disable event-driven transmission.
Whether event-driven transmission is enabled or not, nv oCount[0] through nvoCount[7] are sent when receiving a request
(polling) from the network or at regular intervals designated by nciMaxStsSendT1.
Heartbeat Transmission (Periodical Transmission)
This functional block sends nvoCount[0] through nvoCount[7] repeatedly at intervals designated by nciMaxStsSendT1.
The configuration type of nciMaxStsSendT1 is SNVT_elapsed_tm (day, hour, minute, second, millisecond). When a v alue
over 12 hours is set, the interval is designated as 12 hours 00 minutes 00 seconds. The millisecond value has no effect.
When the nciMaxStsSendT1 value is 0, the heartbeat transmission is disabled.
Sampling Intervals
The nciMinSendT1 designates the minimum interval of sending nvoCount[0] through nvoCount[7].
The configuration type of nciMinSendT1 is SNVT_elapsed_tm (day, hour, minute, second, millisecond). When a value
over 12 hours is set, the interval is designated as 12 hours 00 minutes 00 seconds. The millisecond value has no effect.
When the nciMinSendT1 value is 0, the minimum transmission interval is disabled.
Output network variables nvoCount[0] through nvoCount[7] are sent immediately
when any change occurs in these values.
(factory setting)
4-16 SX5L COMMUNICATION TERMINAL USER’S MANUAL
Page 52

4: SOFTWARE SPECIFICATIONS
Remote-control Relay Control Functional Block
nviLampValue[0] nvoLampValueFb[0]
nviLampValue[1] nvoLampValueFb[1]
nviLampValue[2] nvoLampValueFb[2]
nviLampValue[3] nvoLampValueFb[3]
nviLampValue[4] nvoLampValueFb[4]
nviLampValue[5] nvoLampValueFb[5]
nviLampValue[6] nvoLampValueFb[6]
nviLampValue[7] nvoLampValueFb[7]
RR
Remote-control relay control terminals 0 through 7 correspond to input network variables nviLampValue[0] through
nviLampValue[7] and output network variables nvoLampValueFb[0] through nvoLampValueFb[7], respectively. When
nviLampValue receives an ON or OFF signal, this functional block sends a signal to directly control the remote-control
relay. This functional block also monitors the remote-control relay, and sends nvoLampValueFb to the network when
detecting a change in the ON/OFF status of the remote-control relay.
I/O Name Type Description
Input Network Variable nviLampValue[0] to [7] SNVT_switch Controls remote-control relay
Output Network Variable nvoLampValueFb[0] to [7] SNVT_switch Sends feedback signal
nvoLampValueFb[0] to [7] heartbeat
nciMaxStsSendT1 SCPTmaxSndT
Configuration Property
nciDefaults SCPTdefltBehave
transmission interval
(factory setting: 3 minutes)
Enable nvoLampValueFb[0] to [7] eventdriven transmission
(factory setting: enable)
Input Network Variable vs. Remote-control Relay Status
When input variables nviLampValue[0] through nviLampValue[7] receive the following signal, this functional block turns
on or off the remote control relay.
Input Network Variable Remote-control Relay
(state) = 1, (value) = no effect ON
(state) = 0, (value) = no effect OFF
Each time receiving an input variable, this functional block controls one remote-control relay so that more than one
remote-control relay does not turn on simultaneously.
Initial Status Transmission
This functional block sends output network variables to the network within 3 seconds after po werup. The delay depends on
a random number based on the Neuron ID, and differs on each node.
The sending time can be delayed by changing the nciPwrup value designated in the Node Object functional block. At system startup, if the SX5L sends output network variables before the addressee device is ready to recei ve communication, set
the nciPwrup to a larger value.
The preset value for nciPwrup can be between 0 and 60 seconds (0.1-sec increments). The sending time is determined by
the sum of the nciPwrup value and a random number.
SX5L COMMUNICATION TERMINAL USER’S MANUAL 4-17
Page 53

4: SOFTWARE SPECIFICATIONS
Event-driven Transmission
Event-driven transmission is enabled or disabled by setting the nciDefaults state as shown below.
nciDefaults Event-driven Transmission
Enable event-driven transmission.
(state) = 0, (value) = no effect
(state) = 1, (value) = no effect Disable event-driven transmission.
Whether event-driven transmission is enabled or not, nvoLampValueFb[0] through nvoLampValueFb[7] are sent when
receiving a request (polling) from the network or at regular intervals designated by nciMaxStsSendT1.
Heartbeat Transmission (Periodical Transmission)
This functional block sends nvoLampValueFb[0] through nvoLampValueFb[7] repeatedly at intervals designated by
nciMaxStsSendT1.
The configuration type of nciMaxStsSendT1 is SNVT_elapsed_tm (day, hour, minute, second, millisecond). When a v alue
over 12 hours is set, the interval is designated as 12 hours 00 minutes 00 seconds. The millisecond value has no effect.
When the output network variable has been sent upon receiving a status change signal from the remote-control relay, the
heartbeat transmission timer is reset and restarts to time down.
Output Network Variable Data
Depending on the remote-control relay status, output network variables n voLampValueFb[0] through nvoLampValueFb[7]
send the following data to the network:
Output network variables nvoLampValueFb[0] through nvoLampValueFb[7] are
sent immediately when any change occurs in these values.
(factory setting)
Remote-control Relay Output Network Variable
ON (state) = 1, (value) = 100.0%
OFF (state) = 0, (value) = 0.0%
4-18 SX5L COMMUNICATION TERMINAL USER’S MANUAL
Page 54

5: TROUBLESHOOTING
Introduction
This chapter describes the procedure to determine the cause of trouble and actions to be taken when any trouble occurs
while operating the SX5L communication terminals.
Troubleshooting Diagram 1
The PWR LED does not go on.
Is AC or DC power
supplied correctly?
YES
Is the terminal block
inserted completely?
YES
Is the power voltage
21.6 to 26.4V?
YES
Is DC power used?
YES
Is the DC power
polarity correct?
NO
NO
NO
NO
Are the
module power and I/O power
shorted?
NO
NO
YES
Supply AC or DC power correctly.
Insert the terminal block to the
bottom.
Supply power voltage of 21.6 to
26.4V AC or DC, accordingly.
Wire the power correctly.
Replace the SX5L or call IDEC for
assistance.
Connect the DC power correctly.
YES
Do the module
power and I/O power use the
same source?
NO
YES
SX5L COMMUNICATION TERMINAL USER’S MANUAL 5-1
Make sure of correct power ter minals for the SX5L internal circuit and
I/O circuits.
Replace the SX5L or call IDEC for
assistance.
Page 55
5: TROUBLESHOOTING
Troubleshooting Diagram 2
The RUN LED does not go on.
Is the network online?
YES
Is the SER LED
flashing at 0.5 Hz?
NO
Is the SER LED
flashing at other than
0.5 Hz?
NO
Does the SER LED
remain on?
NO
NO
YES
YES
YES
Use LonMaker or another management tool to
send online command.
Network information is not configured yet.
Perform commissioning.
Call IDEC for assistance.
Application program is lost.
Call IDEC for assistance.
Replace the SX5L or call IDEC for assistance.
5-2 SX5L COMMUNICATION TERMINAL USER’S MANUAL
Page 56

Troubleshooting Diagram 3
The ERR LED is on.
5: TROUBLESHOOTING
Is the addressee device
operating normally?
YES
Is the network
interface connector inserted
completely?
YES
Is the network cable
connected correctly?
YES
Is the transmission
distance within the limit?
YES
NO
NO
NO
NO
If a reply message is not returned from the
addressee device, the ERR LED goes on, and
remains on until communication is established.
Check the node status of the addressee device.
Insert the network interface connector to the
bottom.
Attach ferrules to the LONWORKS cable ends, and
connect the cable to the connector correctly.
Keep the transmission distance within the limit.
See page 2-3.
Is a terminator
installed correctly?
NO
Without a terminator, stable communication may
not be ensured. Install one or two terminators
correctly. See pages 1-6 and 3-3.
YES
Is there influence
of external noise?
YES
Keep away from external noise and confirm
operation again.
NO
Replace the SX5L or call IDEC for assistance.
Note: If the ERR LED goes on repeatedly, see “Communication seems incomplete” on page 5-8.
SX5L COMMUNICATION TERMINAL USER’S MANUAL 5-3
Page 57

5: TROUBLESHOOTING
Troubleshooting Diagram 4
Commissioning is impossible.
Is the PWR LED on?
YES
Is the network
interface connector inserted
completely?
YES
Is the network cable
connected correctly?
YES
Is a terminator
installed correctly?
YES
Is the
transmission distance within
the limit?
YES
NO
NO
NO
NO
NO
See Troubleshooting Diagram 1,
“The PWR LED does not go on.”
Insert the network interface connector to the
bottom.
Attach ferrules to the LONWORKS cable ends, and
connect the cable to the connector correctly.
Without a terminator, stable communication may
not be ensured. Install one or two terminators
correctly. See pages 1-6 and 3-3.
Keep the transmission distance within the limit.
See page 2-3.
Does the XIF match
the XIF No. indicated on the
SX5L front?
NO
Download the XIF file for your SX5L from the
IDEC web site or call IDEC for assistance.
YES
Is data
transmitted from the
management tool?
YES
Is the network traffic high?
NO
Is there influence
of external noise?
NO
YES
YES
Send data from the management tool.
Note: To confirm data transmission, use a protocol analyzer.
Reduce the network traffic and retry commisioning.
Note: To confirm data transmission, use a protocol analyzer.
Keep away from external noise and confirm
operation again.
NO
Replace the SX5L or call IDEC for assistance.
5-4 SX5L COMMUNICATION TERMINAL USER’S MANUAL
Page 58
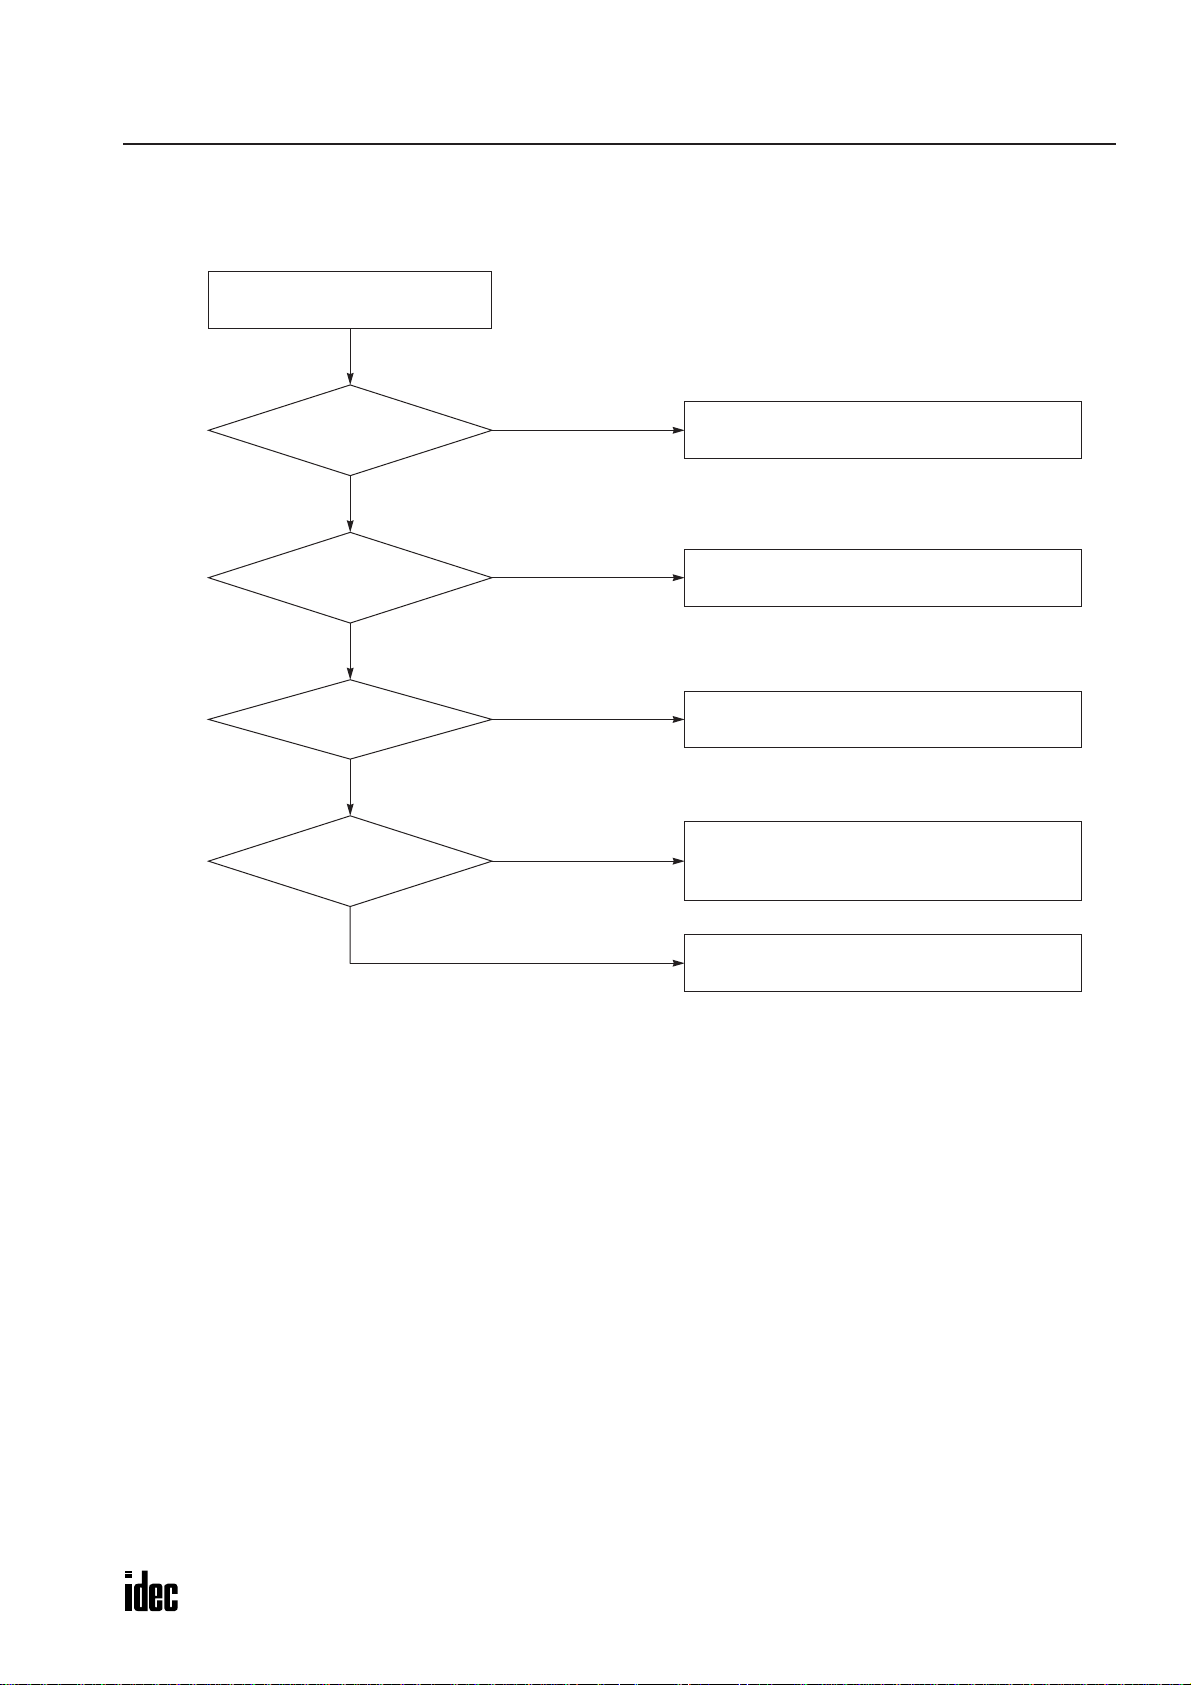
Troubleshooting Diagram 5
Input LED does not go on.
5: TROUBLESHOOTING
Is the PWR LED on?
YES
Is the terminal block
inserted completely?
YES
Is the input wired correctly?
YES
Is the input voltage
higher than the input turn
ON voltage?
YES
NO
NO
NO
NO
See Troubleshooting Diagram 1,
“The PWR LED does not go on.”
Insert the terminal block to the bottom.
Make sure of correct input wiring.
Make sure that the digital input voltage or the
pulse input voltage is higher than the input turn
ON voltage. See pages 2-4, 2-8, and 2-16.
Replace the SX5L or call IDEC for assistance.
SX5L COMMUNICATION TERMINAL USER’S MANUAL 5-5
Page 59
5: TROUBLESHOOTING
Troubleshooting Diagram 6
Output devices cannot be controlled correctly.
Is the PWR LED on?
YES
Does the output LED go on?
YES
Is the output wired correctly?
YES
Is voltage applied
to the load power
terminals?
YES
Is the connected load
within the rated value?
NO
NO
NO
NO
NO
See Troubleshooting Diagram 1,
“The PWR LED does not go on.”
Send (state = 1) to the input variable for the
output terminal.
Make sure of correct output wiring.
Connect a 24V DC power supply to the load
power terminals. See pages 2-7 and 2-11.
Make sure that the load is within the rated value.
YES
Replace the SX5L or call IDEC for assistance.
5-6 SX5L COMMUNICATION TERMINAL USER’S MANUAL
Page 60

Troubleshooting Diagram 7
5: TROUBLESHOOTING
Analog data accuracy is not satisfactory.
connected device output meet
Does the
the SX5L input?
NO
YES
Is the input device
connected correctly?
NO
YES
channel terminals connected
Are unused
together?
NO
YES
Is configuration
property designated
correctly?
NO
YES
Analog Input Module and Pt100Ω Input Module
Connect an output device to meet the input
specifications of the SX5L.
Connect the input device to the SX5L correctly.
Connect together the terminals of an unused
channel using an optional jumper or wire.
See pages 2-13 and 2-15.
Data may not be transmitted. Set correct values
to the heartbeat intervals, minimum transmission intervals, and minimum change to send output variables.
Is the network variable
type changed?
YES
NO
Is the network
variable type changed
correctly?
YES
Check that the connected device generates output values correctly.
Use the measuring instrument correctly.
Does the connected
device output correct
values?
NO
YES
Is there influence
of external noise?
YES
NO
NO
Make sure that the analog output device generates correct output values.
Keep away from external noise and confirm
operation again.
Replace the SX5L or call IDEC for assistance.
Set the type change and configuration
property of the network variable correctly.
SX5L COMMUNICATION TERMINAL USER’S MANUAL 5-7
Page 61

5: TROUBLESHOOTING
Troubleshooting Diagram 8
Communication seems incomplete.
Note: To confirm data transmission, use a protocol analyzer.
Is the heartbeat
transmission interval
short?
NO
Are analog value data
sent frequently?
NO
Are pulse
count current value data
sent frequently?
NO
Is a loop made
by virtual I/O functional
blocks?
NO
YES
YES
YES
YES
Expand the heartbeat transmission interval designated in the output network variable configuration proper ty to reduce the traffic.
Adjust the output network configuration properties, such as the minimum transmission inter val
and minimum change to send output variables.
Adjust the output network configuration properties, such as the heartbeat transmission interval, minimum transmission inter val, and enable
event-driven transmission.
Bind functional blocks without making a loop.
Is the FG terminal
connected to the ground
correctly?
YES
Is there influence
of external noise?
NO
NO
YES
Connect the FG terminal to a proper ground
correctly. See page 3-2.
Keep away from external noise and confirm
operation again.
Replace the SX5L or call IDEC for assistance.
5-8 SX5L COMMUNICATION TERMINAL USER’S MANUAL
Page 62

APPENDIX
Introduction
This chapter describes type numbers of the SX5L communication terminals and accessories, and also provides a glossary
of major terms related to LONWORKS.
Type List
SX5L Communication Terminal Type Number
Module Name
Digital Input 24V DC 16-point source/sink input, plus/minus common compatible SX5L-SBN16B1
Digital Output 24V DC
Digital I/O 24V DC
Analog Input 24V AC/DC 4-point, 1 to 5V, 4 to 20 mA SX5L-SBAN041
Pt100Ω Input 24V AC/DC
Pulse Input 24V AC/DC 8-point pulse input, plus/minus common compatible SX5L-SBCN081
Remote-control
Relay Control
Power
Voltage
16-point transistor sink output, plus common SX5L-SBT16K1
16-point transistor source output, minus common SX5L-SBT16S1
8-point source input, minus common
8-point transistor sink output, plus common
8-point source input, minus common
8-point transistor sink output, plus common (start/stop control)
8-point sink input, plus common
8-point transistor source output, minus common
8-point sink input, plus common
8-point transistor source output, minus common (start/stop control)
4-point, 3-wire Pt100Ω resistance thermometer, 0 to 50°C SX5L-SBPT04X1
4-point, 3-wire Pt100Ω resistance thermometer, –20 to +80°C SX5L-SBPT04Y1
24V AC 8-point, remote-control relay control SX5L-SBRR081
I/O Points Type No.
SX5L-SBM16K1
SX5L-SBM16K2
SX5L-SBM16S1
SX5L-SBM16S2
Accessories
Name Type No. Ordering Type No. Package Quantity
Terminal Block 1 SX9Z-SS1 SX9Z-SS1 1
Terminal Block 2 SX9Z-SS2 SX9Z-SS2 1
Terminal Block 3 SX9Z-SS3 SX9Z-SS3 1
Terminal Block 7 SX9Z-SS7 SX9Z-SS7 1
Terminal Block 9 SX9Z-SS9 SX9Z-SS9 1
Terminal Block 10 SX9Z-SS10 SX9Z-SS10 1
Terminal Block 11 SX9Z-SS11 SX9Z-SS11 1
Terminal Block 12 SX9Z-SS12 SX9Z-SS12 1
Terminal Block 13 SX9Z-SS13 SX9Z-SS13 1
Terminal Block 14 SX9Z-SS14 SX9Z-SS14 1
DIN Rail
Mounting Clip BNL5 BNL5PN10 10
Network Interface Connector SX9Z-CN23 SX9Z-CN23PN02 2
Jumper (Note)
Note: For connecting terminals of an unused channel on analog input and Pt100Ω input modules
Aluminum (1m long) BAA1000 BAA1000PN10 10
Steel (1m long) BAP1000 BAP1000PN10 10
Ring BPJ-26B BPJ-26BPN10 10
Spade BPJ-26FB BPJ-26FBPN10 10
SX5L COMMUNICATION TERMINAL USER’S MANUAL A-1
Page 63

APPENDIX
Glossary
Alias
When binding network variables, binding may not be completed due to the limitations on selector numbers which are automatically assigned by the management tool. Alias is a technique used to virtually divide one network variable into se veral
variables.
Application program
A program for the application layer in the OSI reference model, written in Neuron C which is derived from ANSI C. Since
IDEC has created and installed an application program into the SX5L, users do not have to create a user program.
Binding
A task to define a sender and receiver(s) of a network variable.
Commission
A task to identify the LONWORKS device by the Neuron ID and write configuration information into the device.
Configuration property
A data value used to determine initial values and parameters, such as maximum v alue, minimum v alue, and time, for a par ticular LONWORKS device.
Domain ID
The first layer of the device address.
Functional block
A symbolic representation of an individual function to be performed by the application program installed in a LONWORKS
device. Every SX5L module contains more than one functional block.
Gateway
A hardware or software provision to connect networks that communicate in different protocols.
LonMaker integration tool
A tool supplied by Echelon to perform network management.
LONMARK Interoperability Association (http://www.lonmark.org/)
An organization that was established to promote the easy integration of multi-vendor systems based on LONWORKS net-
works using standard tools and components. Today ov er 300 companies around the w orld are members of the association,
including device manufacturers, integrators, and end users.
LonTalk protocol
A complete seven-layer protocol in compliance with the Open System Interconnection (OSI) defined by the International
Standard Organization (ISO). Also known as LONWORKS protocol.
LONWORKS device
A device in which a Neuron Chip and LONWORKS transceiver are installed to communicate with other devices using the
LonTalk protocol.
LONWORKS transceiver
A LONWORKS transceiver contains an FTT-10A (free topology transceiver).
The FTT-10A transceiver is of a transformer-coupled type and has the following specifications:
Name Communication Medium Transmission Speed Transmission Distance (Note)
FTT-10A Twisted-pair cable 78 kbps
Note: The transmission distance is the values when using Level 4 AWG22 cable and proper terminators.
Network management
Bus topology: 1,400m
Free topology: 500m
A task to install network configuration information (addressing and binding) into LONWORKS devices. Network management must be done when setting up a LONWORKS network system.
A-2 SX5L COMMUNICATION TERMINAL USER’S MANUAL
Page 64

APPENDIX
Network management tool
A tool used to perform network management.
Network variable
A data item that a particular device application program expects to get from other device on a network (an input network
variable) or expects to make available to other devices on a network (an output network variable). Examples are a temperature, switch value, and actuator position setting.
Neuron Chip
A microprocessor that supports LonT alk protocol. The SX5L uses Toshiba TMPN3120FE5M with a 10-MHz clock quartz
oscillator.
Neuron ID
Every LONWORKS device has a unique 48-bit identifier called the Neuron ID. The Neuron ID is typically assigned when a
device is manufactured and used for network management.
Node ID
The third layer of the device address. Node ID identifies an individual device within a subnet. Up to 127 devices can be
defined within a single subnet.
Protocol analyzer
Software or hardware that enables to monitor the data transmitted through the network.
SCPT
An acronym for Standard Configuration Property Type. SNVTs are standardized definitions of the units, scaling, encoding,
and meaning of the contents of configuration properties.
SNVT
An acronym for Standard Network Variable Type. SNVTs are standardized definitions of the units, scaling, and encoding
of the contents of network variables.
SNVT_elapsed_tm
SNVT index 87, used to measure elapsed time. The SX5L uses SNVT_elepsed_tm for configuration property nciMaxStsSendT to determine the heartbeat transmission intervals.
Measurement Type Size and Structure Size Valid Type Range Note
Elapsed Time
SNVT_lev_percent
7 bytes
typedef struct {
unsigned long day;
unsigned short hour;
unsigned short minute;
unsigned short second;
unsigned long millisecond;
} SNVT_elapsed_tm;
day 0 .. 65,534 65,535: null elapsed
hour 0 .. 23 —
minute 0 .. 59 —
second 0 .. 59 —
millisecond 0 .. 999 —
SNVT index 81, used to represent data in percent. The SX5L uses SNVT_lev_percent for output network variables
nvoAI0 through nvoAI3 of the Analog Input functional block. When the measured value exceeds the limit, 0x7FFF is sent.
Measurement Type Size and Category Valid Type Range Type Resolution Note
Percentage Level 2 bytes (signed long) –163.840% .. 163.830% 0.005% or 50 ppm 0x7FFF: invalid data
SX5L COMMUNICATION TERMINAL USER’S MANUAL A-3
Page 65

APPENDIX
SNVT_switch
SNVT index 95. The SX5L uses SNVT_switch mainly for digital input and output statuses. When the input variable has
(state) = 1, digital output is on. When (state) = 0, digital output is off. When the digital input is on, an output network variable is sent with (state) = 1, (value) = 1. When the digital input is off, an output network variable is sent with (state) = 0,
(value) = 0.
Measurement Type Size and Structure Valid Type Range Note
2 bytes
typedef struct {
Switch
unsigned value;
signed state;
} SNVT_switch;
SNVT_temp_p
SNVT index 105, used for heating, ventilation, and air-conditioning (HVAC) applications. The SX5L uses SNVT_temp_p
for output network variables nvoPT[0] through nvoPT[3] of the Pt100Ω Input functional block. When the measured temperature value exceeds the limit, 0x7FFF is sent.
Measurement Type Size and Category Valid Type Range Type Resolution Note
Temperature 2 bytes (signed long)
–273.17 .. +327.66
degrees C
SNVT_time_sec
SNVT index 107, used to measure elapsed time. The SX5L uses SNVT_time_sec for configuration property nciPwrup to
determine the transmission delay immediately after powerup.
0 .. 100% Resolution: 0.5%
0: off
0 .. 1, 0xFF
0.01 degree C 0x7FFF: invalid data
1: on
0xFF: undefined
Measurement Type Size and Category Valid Type Range Type Resolution Note
Elapsed Time 2 bytes (unsigned long) 0.0 .. 6553.4 sec 0.1 sec 0xFFFF: invalid data
Subnet ID
The second layer of the device address. Up to 255 subnets can be defined within a single domain.
Topology
The physical arrangement of devices in a communication network, such as bus, ring, and star topology.
XIF
An acronym for External Interface File, whose filename has extension XIF. A XIF file contains network variable information, a part of hardware parameter, and communication parameter concerning a particular node. The XIF file is mainly
supplied from a manufacturer, and can also be imported from the device depending on the type of management tool.
A-4 SX5L COMMUNICATION TERMINAL USER’S MANUAL
Page 66

INDEX
A accessories A-1
adding counter specifications 4-15
address 1-2
alias A-2
analog input
functional block 4-10
module 2-12
AND/OR 4-6
applicable
cable 3-3
terminal block 3-4
wires 3-2
application program A-2
B binding A-2
Boolean operation
AND/OR 4-6
inversion/buffer 4-6
bus topology 1-6, 3-3
C cable 3-3
changing SVNT type 4-11
commission A-2
communication
medium A-2
status LEDs 2-1
configuration property A-2
crimping tool 3-3
D detachable
finger-safe terminal block 2-3
terminal block 3-4
digital
I/O module 2-8
input
functional block 4-3
module 2-4
output
functional block 4-4
module 2-6
dimensions 2-2
DIN rail 3-1
domain ID A-2
F features 1-4
ferrule 3-3
finger-safe spring-up terminal block 1-5
forced stop 4-6
free topology 1-6, 3-3
FTT-10A transceiver 1-6
functional block 1-2, 4-1, A-2
G gateway A-2
general information 1-1
glossary A-2
grounding 3-2
H hardware
common specifications 2-3
specifications 2-1
HVAC A-4
I I/O
module 2-8
wiring 3-2
input module 2-4
insertion pin positions 3-4
installation and wiring 3-1
installing detachable terminal block 3-4
inversion/buffer 4-6
J jumper 3-2
L LonMaker integration tool A-2
LonMark Interoperability Association A-2
LonTalk protocol A-2
LonWorks
device 1-2, A-2
network 1-1
transceiver A-2
M maximum
distance between nodes 1-6
total cable length 1-6
trunk cable length 1-6
models 1-4
mounting
hole layout 2-2
on DIN rail 3-1
on panel 3-1
multiple input network variables 4-7
N network
building procedures 1-3
cable wiring 3-3
interface connector 2-3, 3-3
management A-2
tool A-3
variable A-3
Neuron
Chip 2-3, A-3
ID A-3
node
ID A-3
object functional block 4-2
quantity 1-6
O optional jumper 3-2
output module 2-6
P panel mounting 3-1
parts description 2-1
Phoenix 3-3
protocol analyzer A-3
Pt100Ω input
functional block 4-13
module 2-14
SX5L COMMUNICATION TERMINAL USER’S MANUAL i
Page 67

INDEX
pulse
count functional block 4-15
input module 2-16
Q quantity of nodes 1-6
R remote-control relay control
functional block 4-17
module 2-18
removing
detachable terminal block 3-4
from DIN rail 3-1
S scaling and sampling intervals 4-11
SCPT A-3
shot output/digital input functional block 4-8
SNVT A-3
_elapsed_tm A-3
_lev_percent A-3
_switch A-4
_temp_p A-4
_time_sec A-4
and SCPT truth table 4-6
software specifications 4-1
standard
configuration property type 1-2, A-3
Network variable type A-3
network variable type 1-2
subnet ID A-4
system setup examples 1-6
T table 1-2
terminal block 3-4
terminal tightening torque 3-2
termination 3-2
terminator 3-3
tightening torque 3-2, 3-3
topology A-4
transceiver 2-3
transmission
distance 2-3, A-2
speed A-2
troubleshooting 5-1
truth table 4-6
type
list A-1
number A-1
V virtual I/O functional block 4-5
W wire termination 3-2
X XIF A-4
ii SX5L COMMUNICATION TERMINAL USER’S MANUAL
Page 68

JAPAN
IDEC IZUMI CORPORATION
7-31, Nishi-Miyahara 1-Chome,
Yodogawa-ku, Osaka 532-8550, Japan
Tel: +81-6-6398-2571
Fax: +81-6-6392-9731
www.idec.com
UNITED STATES
IDEC CORPORATION
1175 Elko Drive,
Sunnyvale, CA 94089-2209, USA
Tel: +1-408-747-0550
Toll Free: (800) 262-IDEC
Fax: +1-408-744-9055
Fax: +1-800-635-6246
E-mail: opencontact@idec.com
www.idec.com
CANADA
IDEC CANADA LIMITED
Unit 22-151 Brunel Road,
Mississauga, Ontario, L4Z 1X3, Canada
Tel: +1-905-890-8561
Toll Free: (888) 317-4332
Fax: +1-905-890-8562
AUSTRALIA
IDEC AUSTRALIA PTY. LTD.
2/3 Macro Court,
Rowville, Victoria 3178, Australia
Toll Free: 1-800-68-4332
Fax: +61-3-9763-3255
E-mail: sales@au.idec.com
UNITED KINGDOM
IDEC ELECTRONICS LIMITED
Unit 2, Beechwood,
Chineham Business Park, Basingstoke,
Hampshire RG24 8WA, United Kingdom
Tel: +44-1256-321000
Fax: +44-1256-327755
E-mail: idec@uk.idec.com
GERMANY
IDEC ELEKTROTECHNIK GmbH
Wendenstraße 331,
D-20537 Hamburg, Germany
Tel: +49-40-25 30 54 - 1
Fax: +49-40-25 30 54 - 24
E-mail: service@idec.de
HONG KONG
IDEC IZUMI (H.K.) CO., LTD.
Room No. 1409, Tower 1, Silvercord,
30 Canton Road, Tsimshatsui,
Kowloon, Hong Kong
Tel: +852-2-376-2823
Fax: +852-2-376-0790
E-mail: idec@idechk.com
CHINA
IDEC IZUMI (Shanghai) Co., Ltd.
Room E, 15F, Majesty Building, No. 138 Pudong Avenue,
Shanghai 200120, P.R.C.
Tel: +86-21-5887-9181, Fax: +86-21-5887-8930
TAIWAN
IDEC T AIW AN CORPORATION
8F-1, No. 79, Hsin Tai Wu Road, Sec. 1,
Hsi-Chih, T aipei County , Taiwan,
Republic of China
Tel: +886-2-2698-3929
Fax: +886-2-2698-3931
E-mail: idectpe@idectwn.hinet.net
SINGAPORE
IDEC IZUMI ASIA PTE. LTD.
No. 31, Tannery Lane #05-01,
Dragon Land Building, Singapore 347788
Tel: +65-6746-1155
Fax: +65-6844-5995
©2003 IDEC IZUMI CORPORATION. All Rights Reserved.
Manual No. B-801(1) Printed in Japan 06/2003
 Loading...