

Page 1

USER GUIDE
Wireless room thermostat
with hot water control
(DHW & single zone CH)
Logic Heat H / Logic Max Heat H / Logic System S /
Logic Max System S / Vogue System / Vogue Max System
Page 2

2
Page 3

Contents
Introduction ......................................................................................................................4
Ideal Touch kit contents ..............................................................................................5
Thermostat location guidelines ................................................................................ 5
Features ............................................................................................................................. 6
Operating modes (auto/on/o) ............................................................................... 6
Using the Ideal Touch thermostat ........................................................................... 7
Setting the time .............................................................................................................. 8
Setting the date .............................................................................................................. 9
Changing central heating schedule ......................................................................10
Review the central heating schedule.....................................................................13
Override central heating ........................................................................................... 14
Cancel override central heating ..............................................................................16
Central heating boost ..................................................................................................17
Changing hot water schedule ..................................................................................18
Review the hot water schedule ............................................................................. 20
Override hot water .......................................................................................................21
Cancel hot water override ........................................................................................23
Ideal relay transceiver ................................................................................................24
Glossary ...........................................................................................................................25
Default times ..................................................................................................................26
Troubleshooting ............................................................................................................26
Battery replacement ...................................................................................................28
Warranty ..........................................................................................................................29
3
Page 4

Introduction
Welcome to the Ideal Touch heat
and system. This guide will help you
control both your central heating
and hot water using your Ideal Touch
Thermostat.
A quick start guide, installation
guide and FAQ’s can be found at
www.idealboilers.com.
The Ideal Touch heat and system must
be installed by a competent person.
Page 5

Ideal Touch kit contents
provide compensation control that has been
permanently enabled. The boiler has been
instructions which have been supplied to the
A. Touch thermostat
B. Mounting bracket cover
C. Mounting bracket
D. Desktop stand
E. Ideal relay transceiver
A B C
E
F
G
F. Batteries (AA)
G. Screws and plugs
H. Instructions
I. SAP registration label
D
H
I
Model Name:
Model Qualifier:
I certify that this boiler is connected to a weather
compensation control as indicated:
Touch enhanced load compensator (Class V)
Touch enhanced load compensator & OS2 weather
compensator temperature sensor (Class VI)
These products are compatible with the boiler and
commissioned in accordance with the manufacturer
householder. The central heating temperature control
knob should normally be set in the mid-position.
Signed: Date:
IDEAL BOILERS LTD
Touch (Single Zone)
ErP Class V or ErP Class VI
UIN 217679 A01
Installation guide
Wireless room thermostat
with hot water control
(DHW & single zone CH)
Logic Heat H / Logic System S / Vogue System
Thermostat location guidelines
In-between the Ideal relay transceiver and the Touch thermostat there must be:
• Less than 20 metres
• No more than a total of 3 walls and ceilings
• No large metallic objects (e.g. American fridge/freezer)
• No large mirrors or windows
• No walls running along the RF path
The Touch thermostat must not be within 1 metre of a wifi booster / router and
should not be placed near draughts, in direct sunlight or near heat sources.
You will see the Ideal relay transceiver installed in your home, usually near your hot
water cylinder. This should only be opened and worked on by a qualified electrician.
5
Page 6

Features
O
On
Auto
TARGET
Zone: 1
ROOM TEMP
21 .5
22 .5
º
º
O
On
Auto
WED 06:58
1
2
3
4
5
6
7
8
9
10
11
12
13
14
15
16
17
18
19
20
21
22
23
0
• Simple user Interface
• Rotating outer wheel
• Summer/winter time (GMT/BST)
automatically updated
• 7 day control of heating
• 7 day control of hot water
• Delivers maximum boiler operating
eciency
• Boost
• Tap to wake
• Up to 6 programmable ON/OFF
periods for heating and hot water
every day.
Operating modes (auto/on/o)
WED 06:58
Tap here to
change the
central heating
operating mode
(from auto to
continuously on to
continuously o)
O
On
Auto
22
21
20
19
18
21 .5
17
TARGET
16
15
23
ROOM TEMP
14
13
0
Zone: 1
22 .5
12
1
2
3
4
5
º
6
º
11
7
8
9
10
O
on to continuously
On
Auto
Tap here to
change the hot
water operating
mode (from auto
to
continuously
o)
Auto Your heating will run as set by
your schedule
On
O Heating is constantly o Hot water is constantly o
6
Heating is constantly on, use outer
wheel to adjust temperature
Your hot water will run as set by
your schedule
Hot water is constantly on
Page 7
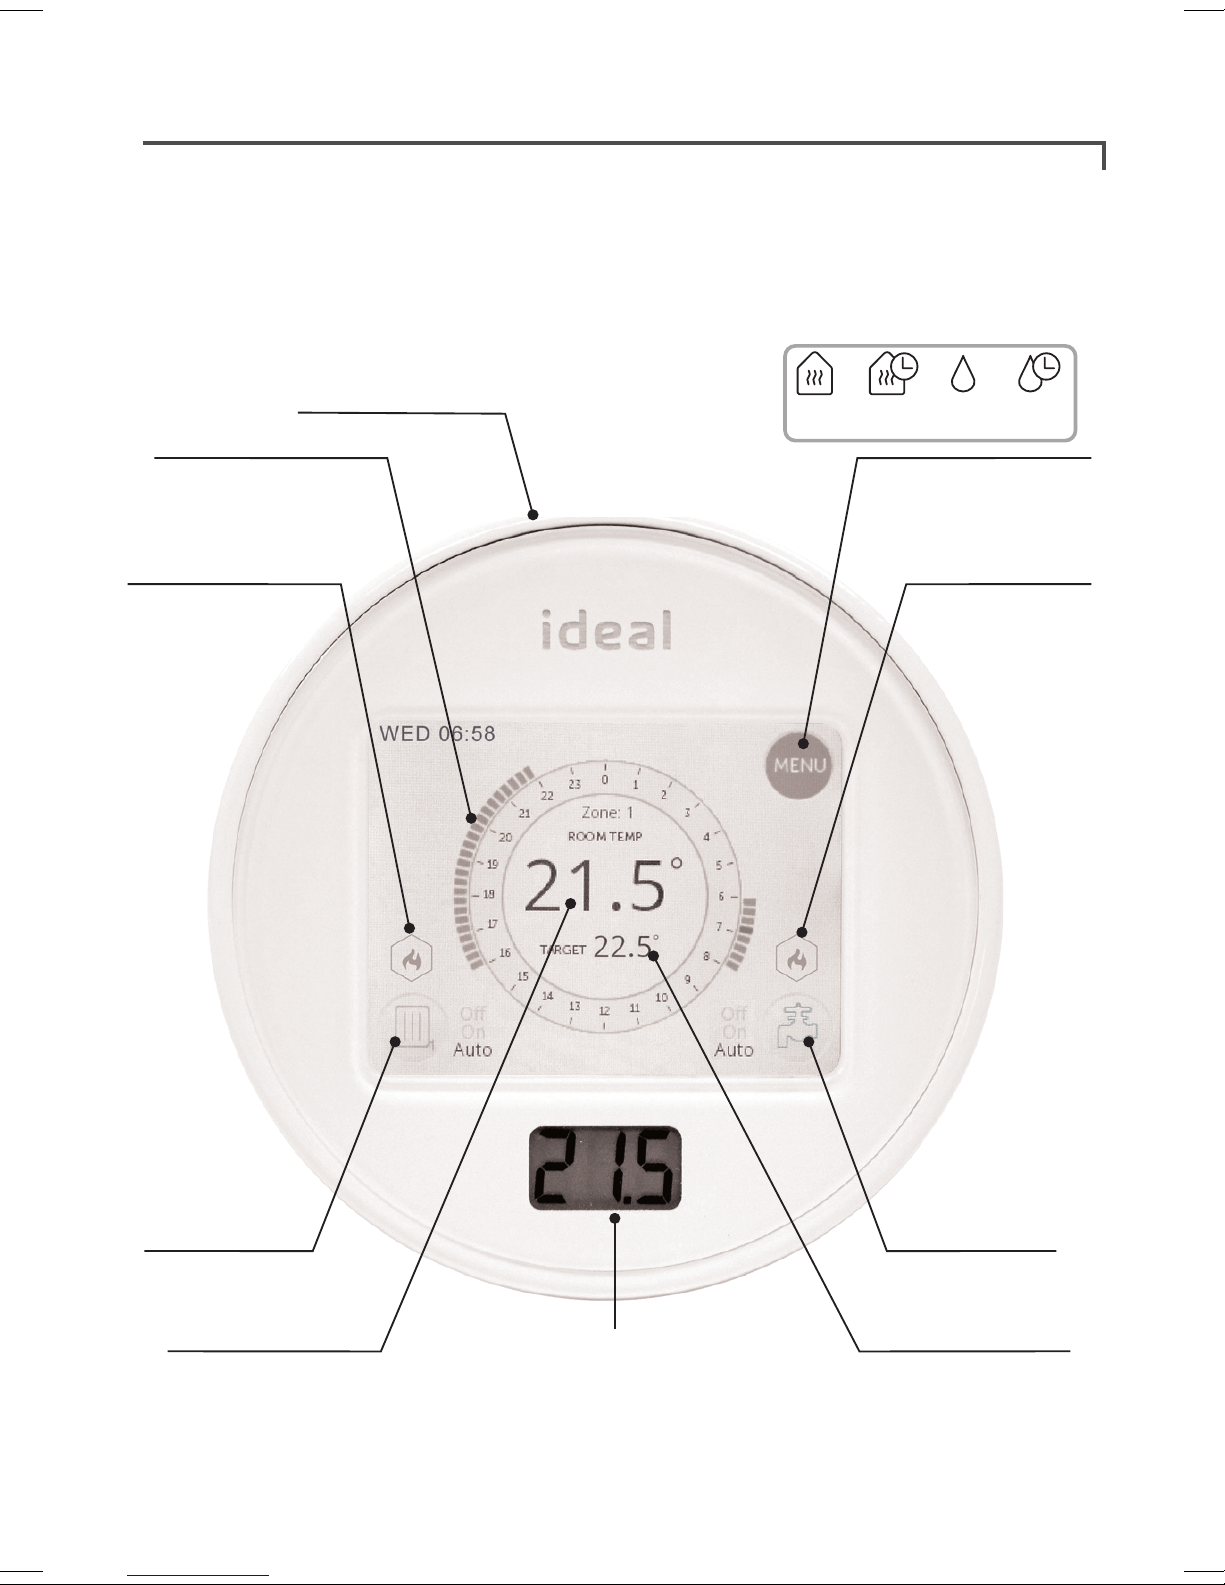
Using the Ideal Touch thermostat
If central heating is timed on or continuously on, the target room temperature can be
adjusted by rotating the outer plastic wheel of the device.
If central heating is timed o then central heating can be activated by rotating the
outer wheel until the desired room temperature is shown (Boost).
Rotate to boost
room temperature
OVERRIDE
HEATING
HEATING
SCHEDULE
OVERRIDE
HOT WATER
HOT WATER
SCHEDULE
Heating schedule
indicated by blue
Flame symbol
indicates
heating on
Tap to access
main menu
tappets
Flame symbol
indicates hot
water on
Tap to change
heating
operating mode
Actual room
temperature
Note. Only heating schedule shown.
For hot water schedule refer to “Review the hot water schedule”.
Actual room
temperature
Tap to change
hot water
operating mode
Target room
temperature
7
Page 8

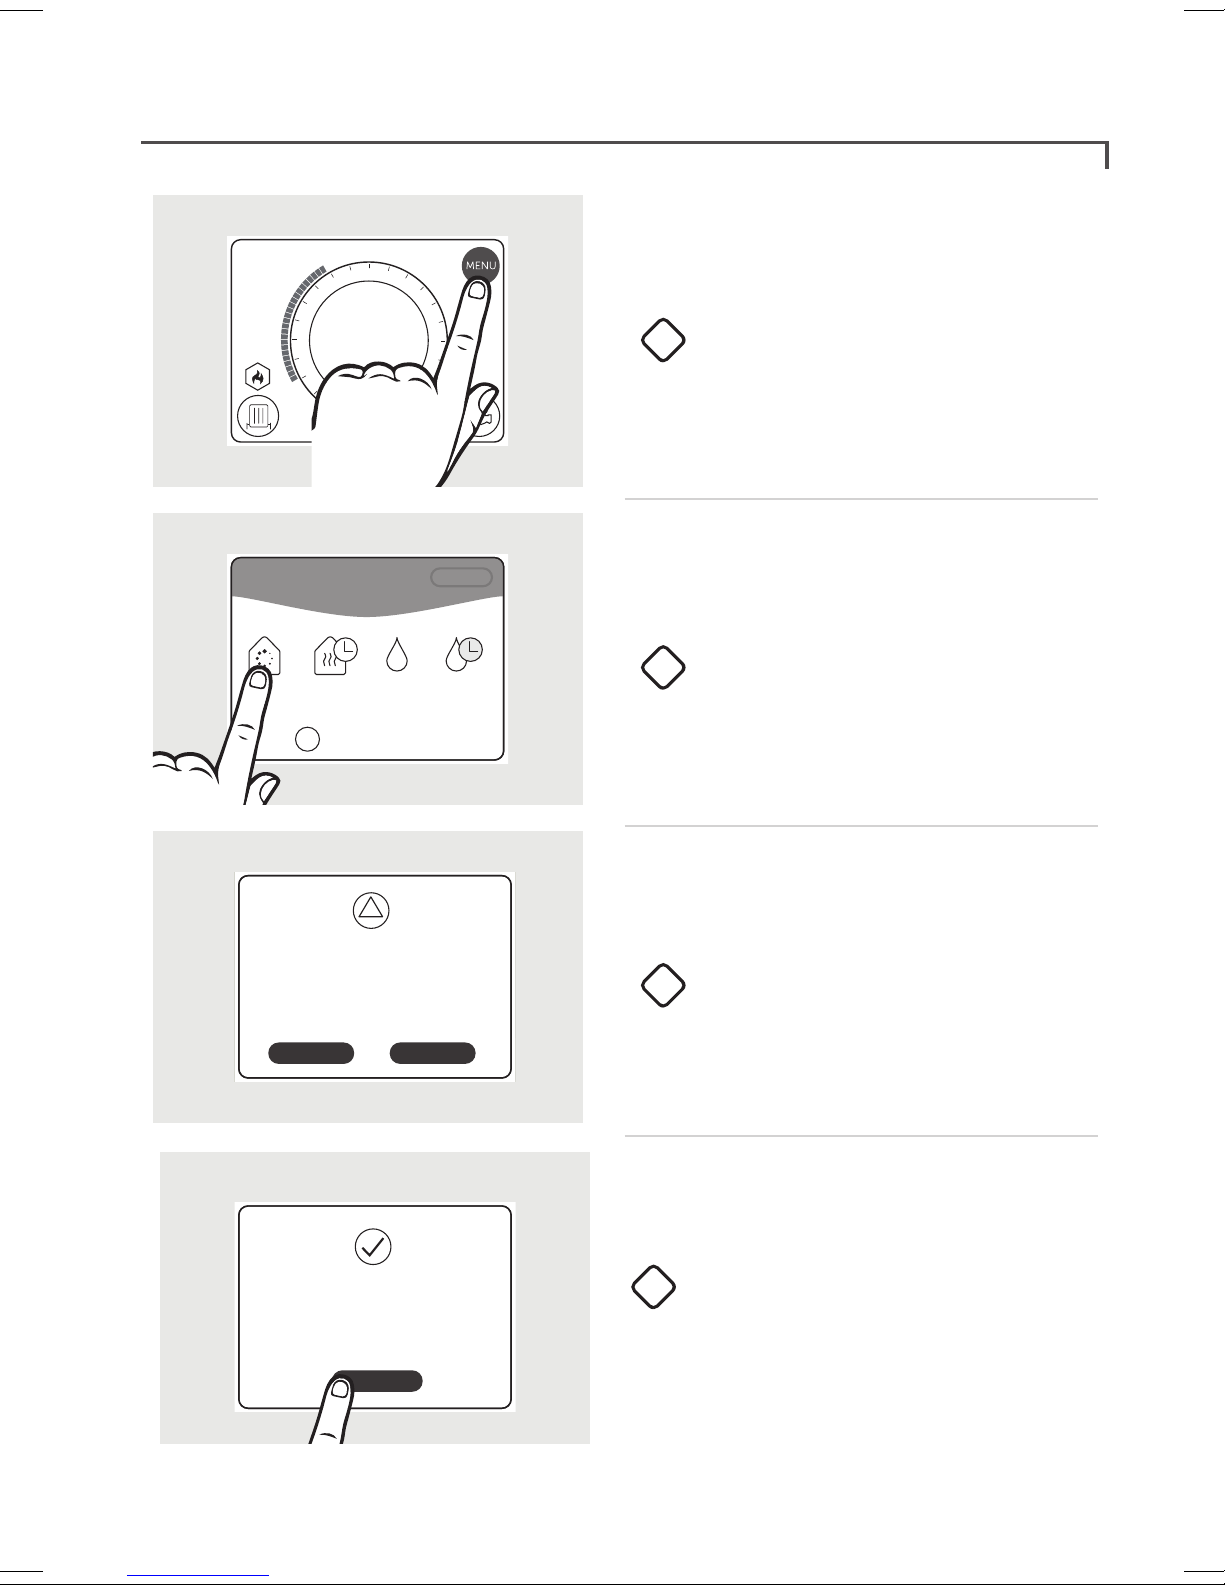
Setting the time
WED 06:58
0
1
23
Zone: 1
ROOM TEMP
22 .5
13
12
2
3
4
5
º
6
7
º
8
9
10
11
O
On
Auto
O
On
Auto
20
19
18
17
16
22
21
21 .5
TARGET
15
14
Tap screen to wake up.
1
Press MENU.
MAIN MENU
OVERRIDE
HEATING
?
SETTINGS MENU
CHANGE
DAT E
HEATING
SCHEDULE
HELP & SETTINGS
CHANGE
TIME
OVERRIDE
HOT WATER
?
HELP &
SUPPORT
BACK
HOT WATER
SCHEDULE
BACK
OPTIMISATION
MODE
Press HELP & SETTINGS.
2
Press CHANGE TIME.
3
Set system time
00 00
8
DONE
Set the time using the up and down
4
arrows.
Press DONE.
Page 9

WED 06:58
Setting the date
0
1
23
Zone: 1
ROOM TEMP
22 .5
13
12
2
3
4
5
º
6
7
º
8
9
10
11
O
On
Auto
O
On
Auto
20
19
18
17
16
22
21
21 .5
TARGET
15
14
Tap screen to wake up.
1
Press MENU.
MAIN MENU
OVERRIDE
HEATING
?
SETTINGS MENU
CHANGE
DAT E
HEATING
SCHEDULE
HELP & SETTINGS
CHANGE
TIME
OVERRIDE
HOT WATER
?
HELP &
SUPPORT
BACK
HOT WATER
SCHEDULE
BACK
OPTIMISATION
MODE
Press HELP & SETTINGS.
2
Press CHANGE DATE.
3
Set system date
18 04 18
DONE
Set the date using the up and down
4
arrows.
Press DONE.
9
Page 10

Changing central heating schedule
The Ideal Touch thermostat comes pre-programmed with a default heating
schedule which can be easily altered and/or reviewed.
WED 06:58
0
1
23
Zone: 1
ROOM TEMP
22 .5
13
12
2
3
4
5
º
6
7
º
8
9
10
11
O
On
Auto
Tap screen to wake up.
1
Press MENU.
O
On
Auto
20
19
18
17
16
22
21
21 .5
TARGET
15
14
MAIN MENU
OVERRIDE
HEATING
HEATING
SCHEDULE
HELP & SETTINGS
?
HEATING
SCHEDULE
MODIFY REVIEW
OVERRIDE
HOT WATER
BACK
HOT WATER
SCHEDULE
BACK
Press HEATING SCHEDULE.
2
Press MODIFY.
3
Select days to set
MON
TUE WED
THU FRI MON SUNSAT
NEXT
10
BACK
Press the days you would like to set.
4
Press NEXT.
Page 11

Changing central heating schedule
Set ON time for period 1
05 00
DONE
Set OFF time for period 1
08 00
DONE
BACK
BACK
Set the ON time using the up and
5
down arrows.
Press DONE.
Set the OFF time using the up and
6
down arrows.
Press DONE.
Set temperature for period 1
20 0
DONE
MON TUE WED THU FRI SAT SUN
Heating period 1 Set
Would you like to Modify
the second heating period
YESNO
BACK
Set the temperature using the + and
7
- buttons.
Press DONE.
To add another ON period, press
8
YES. If not press NO.
11
Page 12

Changing central heating schedule
MON TUE WED THU FRI SAT SUN
Heating schedule set
07:30
12:00
15:00
19:30
>
>
>
>
DONE
08:30
14:00
17:30
22:45
18.5
19.5
20.5
19.5
Press DONE.
9
12
Page 13

Review the central heating schedule
WED 06:58
0
1
23
Zone: 1
ROOM TEMP
22 .5
13
12
2
3
4
5
º
6
7
º
8
9
10
11
O
On
Auto
Tap screen to wake up.
1
Press MENU.
O
On
Auto
20
19
18
17
16
22
21
21 .5
TARGET
15
14
MAIN MENU
OVERRIDE
HEATING
HEATING
SCHEDULE
HELP & SETTINGS
?
HEATING
SCHEDULE
MODIFY REVIEW
OVERRIDE
HOT WATER
BACK
HOT WATER
SCHEDULE
BACK
Press HEATING SCHEDULE.
2
Press REVIEW.
3
Sunday
Heating schedule set
07:30
NEXT
12:00
15:00
19:30
>
>
>
>
08:30
14:00
17:30
22:45
EDIT
18.5
19.5
20.5
19.5
BACK
To change the schedule press EDIT.
4
To see the next day press NEXT. To
exit press EXIT or press NEXT on
Sunday’s schedule.
13
Page 14

Override central heating
WED 06:58
Overriding the central heating will set your heating on or o until the time you specify.
0
1
23
Zone: 1
ROOM TEMP
22 .5
13
12
2
3
4
5
º
6
7
º
8
9
10
11
O
On
Auto
Tap screen to wake up.
1
Press MENU.
O
On
Auto
20
19
18
17
16
22
21
21 .5
TARGET
15
14
MAIN MENU
OVERRIDE
HEATING
HEATING
SCHEDULE
HELP & SETTINGS
?
What would you like to do?
TURN HEATING ON UNTIL ...
KEEP HEATING OFF UNTIL ...
OVERRIDE
HOT WATER
BACK
HOT WATER
SCHEDULE
BACK
Press OVERRIDE HEATING.
2
Press the desired option.
3
Keep heating on until...
05 00
DONE
14
BACK
Set the time required using the up
4
and down arrows.
Press DONE.
Page 15

Override central heating
Override set
Your heating will be on
until 09:00
DONE
Press DONE. Note that the override
5
period will be shown by blue
tappets.
15
Page 16
Cancel override central heating
WED 06:58
0
1
23
Zone: 1
ROOM TEMP
22 .5
13
12
2
3
4
5
º
6
7
º
8
9
10
11
O
On
Auto
Tap screen to wake up.
1
Press MENU.
O
On
Auto
20
19
18
17
16
22
21
21 .5
TARGET
15
14
MAIN MENU
CANCEL
OVERRIDE
HEATING
SCHEDULE
HELP & SETTINGS
?
OVERRIDE
HOT WATER
!
Are you sure you would like to
cancel the override setting?
NO YES
BACK
HOT WATER
SCHEDULE
Press CANCEL OVERRIDE.
2
Press the desired option.
3
Heating override cancelled
DONE
16
Press DONE.
4
Page 17

Central heating boost
Boosting the central heating will keep the heating at your desired target temperature
until the next heating on period. Once the next heating on period is reached the
Touch thermostat will revert back to the times and temperatures set in your schedule
period. If you require heating for a timed period please use the override function.
WED 06:58
WED 06:58
e
t
a
t
o
R
O
On
Auto
Auto
21
20
19
18
21 .5
17
16
15
20
19
18
17
16
O
On
0
23
22
Zone: 1
ROOM TEMP
TARGET
22 .5
14
13
12
0
23
22
21
Zone: 1
ROOM TEMP
21 .5
TARGET
22 .5
15
14
13
12
1
2
3
4
5
º
6
7
º
8
9
10
11
O
On
Auto
1
2
3
4
5
º
6
7
º
8
9
10
11
O
On
Auto
Tap screen to wake up.
1
Rotate the outer wheel until your
2
desired target temperature is
reached.
Target Room Temperature
23 0
The display will now show the target
3
temperature.
17
Page 18

Changing hot water schedule
The Ideal Touch thermostat comes pre-programmed with a default hot water
schedule which can be easily altered and/or reviewed.
WED 06:58
0
1
23
Zone: 1
ROOM TEMP
22 .5
13
12
2
3
4
5
º
6
7
º
8
9
10
11
O
On
Auto
Tap screen to wake up.
1
Press MENU.
O
On
Auto
20
19
18
17
16
22
21
21 .5
TARGET
15
14
MAIN MENU
OVERRIDE
HEATING
HEATING
SCHEDULE
HELP & SETTINGS
?
HOT WATER
SCHEDULE
MODIFY REVIEW
OVERRIDE
HOT WATER
BACK
HOT WATER
SCHEDULE
BACK
Press HOT WATER SCHEDULE.
2
Press MODIFY.
3
Select days to set
MON
TUE WED
THU FRI MON SUNSAT
NEXT
18
BACK
Press on the days you would like
4
to set.
Press NEXT.
Page 19

Changing hot water schedule
Set ON time for period 1
05 00
DONE
Set OFF time for period 1
08 00
DONE
BACK
BACK
Set the ON time using the up and
5
down arrows.
Press DONE.
Set the OFF time using the up and
6
down arrows.
Press DONE.
Hot water period set
Would you like to Modify
the second hot water period
NO YES
MON TUE WED THU FRI SAT SUN
Hot water schedule set
06:00
16:00
>
>
DONE
08:00
22:00
7
To modify the 2nd period press YES.
Once ON / OFF times are set for
the 2nd period, press YES to add
another period.
If no additional periods are required,
press NO.
Press DONE.
8
19
Page 20

Review the hot water schedule
WED 06:58
0
1
23
Zone: 1
ROOM TEMP
22 .5
13
12
2
3
4
5
º
6
7
º
8
9
10
11
O
On
Auto
Tap screen to wake up.
1
Press MENU.
O
On
Auto
20
19
18
17
16
22
21
21 .5
TARGET
15
14
MAIN MENU
OVERRIDE
HEATING
HEATING
SCHEDULE
HELP & SETTINGS
?
HEATING
SCHEDULE
MODIFY REVIEW
OVERRIDE
HOT WATER
BACK
HOT WATER
SCHEDULE
BACK
Press HOT WATER SCHEDULE.
2
Press REVIEW.
3
Sunday
Hot water schedule set
NEXT
05:00
14:00
18:00
>
>
>
08:00
16:00
20:00
EDIT
20
BACK
To change the schedule press EDIT.
To see the next day press NEXT. To
4
exit press BACK or press NEXT on
Sunday’s schedule.
Page 21

Override hot water
WED 06:58
0
1
23
Zone: 1
ROOM TEMP
22 .5
13
12
2
3
4
5
º
6
7
º
8
9
10
11
O
On
Auto
O
On
Auto
20
19
18
17
16
22
21
21 .5
TARGET
15
14
Tap screen to wake up.
1
Press MENU.
MAIN MENU
OVERRIDE
HEATING
HEATING
SCHEDULE
HELP & SETTINGS
?
What would you like to do?
TURN HOT WATER OFF UNTIL ...
KEEP HOT WATER ON UNTIL ...
OVERRIDE
HOT WATER
BACK
HOT WATER
SCHEDULE
BACK
Press OVERRIDE HOT WATER.
2
Press the desired option.
3
Keep hot water on until...
09 00
DONE
BACK
Set the time required using the up
4
and down arrows.
Press DONE.
21
Page 22

Override hot water
Override set
Your water will be on from now
until 09:00
DONE
Press DONE.
5
22
Page 23

Cancel hot water override
WED 06:58
0
1
23
Zone: 1
ROOM TEMP
22 .5
13
12
2
3
4
5
º
6
7
º
8
9
10
11
O
On
Auto
Tap screen to wake up.
1
Press MENU.
O
On
Auto
20
19
18
17
16
22
21
21 .5
TARGET
15
14
MAIN MENU
OVERRIDE
HEATING
HEATING
SCHEDULE
?
CANCEL
OVERRIDE
HELP & SETTINGS
!
Are you sure you would like to
cancel the override setting?
NO YES
BACK
HOT WATER
SCHEDULE
Press CANCEL OVERRIDE.
2
Press the desired option.
3
Hot water override cancelled
DONE
Press DONE.
4
23
Page 24

Ideal relay transceiver
Below are the descriptions of each light on the front of the Ideal relay transceiver.
When illuminated green;
Radio Frequency (RF) connection
1
relay transceiver is connected to thermostat
The
Power
2
Power is being supplied to the relay transceiver.
Opentherm connection
3
Opentherm connection to the boiler is working correctly.
Note. normal operation is indicated by all three green lights being illuminated.
.
1
2
3
24
Page 25
Glossary
Terms Definition
Boost Central heating override until your next timed period
Central heating Radiator system
Hot water Cylinder - usually in the airing cupboard
On Central heating and / or hot water is continuously
running
O Central heating and / or hot water is set to completely
o
On time The time period when your central heating and / or hot
water is due to be running
O time The time period when your central heating and / or hot
water is due to be o
Schedule The full list of time periods over the week your central
heating and / or hot water is due to be running
Set point / target
temperature
Temperature required This is the temperature you have set that you wish the
Timed / auto This is the mode where your thermostat will be on / o
This is the temperature you have set that you wish the
house to be
house to be
as set in your schedule
25
Page 26

Default times
Central Heating Hot Water
Day
Period 1 Period 2 Period 1 Period 2
Mon 06:00 - 08:00 16:00 - 22:00 06:00 - 08:00 16:00 - 22:00
Tues 06:00 - 08:00 16:00 - 22:00 06:00 - 08:00 16:00 - 22:00
Wed 06:00 - 08:00 16:00 - 22:00 06:00 - 08:00 16:00 - 22:00
Thurs 06:00 - 08:00 16:00 - 22:00 06:00 - 08:00 16:00 - 22:00
Fri 06:00 - 08:00 16:00 - 22:00 06:00 - 08:00 16:00 - 22:00
Sat 06:00 - 08:00 16:00 - 22:00 06:00 - 08:00 16:00 - 22:00
Sun 06:00 - 08:00 16:00 - 22:00 06:00 - 08:00 16:00 - 22:00
Troubleshooting
WED 06:58
!
19
18
17
O
On
Auto
23
22
21
Zone: 1
ROOM TEMP
20
21 .5
TARGET
22 .5
16
15
14
13
0
1
2
3
4
5
º
6
7
º
8
9
10
11
12
O
On
Auto
If your Touch heat and system thermostat shows a fault,
press the warning triangle for further information
26
Page 27

Troubleshooting
FAU LT ACTION
Radiators will not
switch o
Radiators will not
switch on
I do not have any
hot water
The screen will not
light up
Warning triangle is
showing
No response to
temperature / time
adjustments
Check that the Touch thermostat is not set to on.
Rotate outer wheel anti clockwise until the target temperature
is below the actual temperature.
Check that the Touch thermostat is set to on or auto. If
set to Auto check you are within a scheduled-on period
(blue tappets) and rotate outer wheel clockwise until target
temperature is above the actual temperature.
Check hot water is set to on or Auto. Review of hot water on
times may be required.
Wait 10 seconds, press the screen again. If the screen is still
blank replace the batteries.
Press warning triangle. If “Zone 1 Fault” is shown refer to
location guidelines. If “Boiler Fault” is shown, check boiler
display and refer to boiler installation manual.
Check the left-hand light on the relay transceiver. If this is o,
refer to the location guidelines.
Relay transceiver
FAU LT ACTION
LED light 1 is o Refer to location guidelines.
LED light 2 and/or
3 is o
Note. All electrical installation and maintenance work should be carried out by a
suitably qualified electrician or other competent person.
Contact Installer.
27
Page 28

Battery replacement
Batteries should operate for approximately 18 to 24 months. Only good quality
alkaline batteries are to be used.
If the batteries run out then central heating and hot water will continue to operate
during the set time periods but room temperature control will become less accurate.
Un-clip the thermostat from its cradle by
1
sliding the Touch thermostat upwards.
Using a flat bladed screwdriver, remove
2
the rear cover.
Replace batteries and refit battery
3
cover.
28
Page 29

Warranty
All Ideal Touch Controls oer customers the comfort of a 12 month Ideal warranty,
subject to the following terms and conditions. During the period of the warranty we
will replace free of charge, where it suers a mechanical or an electrical breakdown
as a result of defective workmanship or materials, subject to the following conditions
and exclusions;
The warranty will commence from the
date of installation. Without proof of
purchase the warranty will commence
from the date of manufacture (via
serial number).
The Installation needs to be registered
within 30 days of installation, it can be
registered online by visiting
www.idealboilers.com
If the control suers a mechanical or
an electrical breakdown we should be
contacted on one of the
following numbers:
Northern Ireland: 02890 331444
Elsewhere in the UK: 01482 498660
Our normal working times, excluding
Bank holidays, are:
8am – 6pm Monday to Friday
8am – 4pm Saturday
The warranty does not apply:
To any defect, damage or breakdown
caused by deliberate action, accident,
misuse or third party interference
including modification or
failed batteries.
To any defect, damage or breakdown
caused by the design, installation
and maintenance of the central
heating system.
To any other costs or expenses
caused by or arising as a result of the
breakdown of the controls.
To any defect resulting from the
incorrect installation of the controls.
To any costs incurred during delays in
fixing reported faults.
8am – 12 noon Sunday
Our Ideal Warranty is oered in
addition to the rights provided to
a consumer by law. Details of these
rights can be obtained from a Trading
Standards Authority or a Citizens
Advice Bureau.
Guarantor – Ideal Boilers Ltd, P.O. Box
103, National Avenue, Hull, HU5 4JN.
29
Page 30

WEEE DIRECTIVE 2012/19/EC
Waste Electrical and Electronic Equipment Directive
• At the end of the product life, dispose of the packaging and
product in a corresponding recycling centre.
• Do not dispose of the unit with the usual domestic refuse.
• Do not burn the product.
• Remove the batteries.
• Dispose of the batteries according to the local statutory
requirements and not with the usual domestic refuse.
Ideal Boilers Ltd
P.O. Box 103, National Avenue
Hull, HU5 4JN.
www.idealboilers.com
For further information including a User Guide and FAQs, see www.idealboilers.com
SCAN HERE FOR FURTHER HELP
Consumer Helpline
T: 01482 498660
Technical Helpline
212879 A02
T: 01482 498663
 Loading...