


IDBLUE Support
06/17/2011
IDBLUE R8.HF
Users Guide

Contents
Change Record .............................................................................................................................................. 4
Disclaimer...................................................................................................................................................... 5
Trademarks ................................................................................................................................................... 5
Introduction .................................................................................................................................................. 6
Package Contents ...................................................................................................................................... 6
Device Overview ........................................................................................................................................... 7
Components: ............................................................................................................................................. 7
Identifying the device name ..................................................................................................................... 8
Getting Started .............................................................................................................................................. 9
Charging the IDBLUE R8.HF Device ........................................................................................................... 9
Using IDBLUE R8.HF .................................................................................................................................. 9
Turning the device on ........................................................................................................................... 9
Turning the device off ........................................................................................................................... 9
Reading and Writing RFID Tags ........................................................................................................... 10
Scanning a tag ..................................................................................................................................... 10
Device Communication ............................................................................................................................... 12
Physical Connections............................................................................................................................... 12
Logical Connections ................................................................................................................................ 12
Bluetooth Discoverable Mode ................................................................................................................ 12
Bluetooth Name and PIN Code ............................................................................................................... 13
Device Configuration ................................................................................................................................... 13
IDBLUE Factory Default Settings ............................................................................................................. 13
Operating Modes .................................................................................................................................... 15
Disconnected Operating Mode ........................................................................................................... 15
Connected Operating Mode ............................................................................................................... 15
Power Saving Settings ............................................................................................................................. 16
Device Timeout ................................................................................................................................... 16
RFID Operation Timeout ..................................................................................................................... 16
Bluetooth Timeout .............................................................................................................................. 16
RFID Protocols ......................................................................................................................................... 16

General Settings ...................................................................................................................................... 16
Audio Buzzer ....................................................................................................................................... 17
On-board Clock ................................................................................................................................... 17
Performing a device reset ....................................................................................................................... 17
User Feedback ............................................................................................................................................. 17
Device Status LED .................................................................................................................................... 17
Not Charging ....................................................................................................................................... 17
Charging .............................................................................................................................................. 18
Bluetooth Discoverable ....................................................................................................................... 19
RFID Status LED ....................................................................................................................................... 19
Audio Buzzer ........................................................................................................................................... 19
Events ...................................................................................................................................................... 19
Demo Applications ...................................................................................................................................... 21
FCC Disclaimer ............................................................................................................................................. 22
Troubleshooting .......................................................................................................................................... 23
Contact Information .................................................................................................................................... 24

Change Record
Version
Date
Author
Comments
1.7
1.6
June 17, 2011
February 3, 2010
CBP
DMB
Update FCC dislaimer
Updates for RTM5
1.5
June 18, 2009
DMB
Updates for RTM2
1.4
1.3
March 16, 2009
February 19, 2009
CBP
DMB
RTM1
Updates for RTM
1.2
Sept. 11, 2008
DAR
FCC Disclaimer added
Back label updated
1.1
January 17, 2008
CBP
1.0
October 4, 2007
CBP
Initial Draft

Disclaimer
Copyright© 2010 Cathexis Innovations Inc. All Rights Reserved.
Cathexis Innovations Inc. assumes no responsibility for any errors which may appear in this document,
reserves the right to change systems or specifications detailed herein at any time without notice, and
does not make any commitment to update the information contained herein. No licenses to patents or
other intellectual property of Cathexis are granted by the Company in connection with the sale of
Cathexis products, expressly or by implication.
All specifications are subject to change without notice.
Cathexis, IDBLUE, CathexisWEB, and Powered by Cathexis RFID Engine are either registered trademarks
or trademarks of Cathexis Innovations Inc. in Canada and/or other countries.
Trademarks
IDBLUE® is a registered trademark of Cathexis Innovations Inc. (www.cathexis.com/)
Bluetooth® is a registered trademark of the Bluetooth SIG (http://www.bluetooth.com/).
Microsoft, Microsoft Windows XP, Microsoft Windows Vista, Microsoft Windows Server 2003, PocketPC,
Windows Mobile are either registered trademarks or trademarks of Microsoft Corporation
(http://www.microsoft.com/) in the United States and/or other countries.

Introduction
IDBLUE R8.HF RFID Device
Mini-B USB Cable
IDBLUE Quick Start Guide w/ Sample RFID Tag
Congratulations on purchasing your new IDBLUE R8.HF Device. This guide will help you to
familiarize yourself with the new device and learn how it works.
To help you get the most benefit from IDBLUE R8.HF, please make sure that you download and
install the latest version of IDBLUE Manager that will allow you to configure your device and
allow you to get up and running as quickly as possible. If you do not already have this software
package installed on your machine please visit:
http://www.idblue.com/support/downloads.aspx
Package Contents
Upon receiving your IDBLUE package, please ensure that it contains the following items:

IDBLUE R8.HF Users Guide
7
Device Overview
F e b r u a r y 3 , 2 0 1 0
Components:
1. USB Port
2. Stylus Tip
3. RFID Status LED
4. Action Button
5. Device Status LED
6. Power Button
7. Lanyard Loop
\
Device Overview
Please take a moment to examine IDBLUE R8.HF, and familiarize yourself with its components.

IDBLUE R8.HF Users Guide
8
Device Overview
F e b r u a r y 3 , 2 0 1 0
Identifying the device name
The device name is printed on the back label of the device. The default name is a combination
of the hardware revision (Revision 8 in the example below), and the last 4 digits of the
Bluetooth® address (DC:33 in the example above).
Device Name

IDBLUE R8.HF Users Guide
9
Getting Started
F e b r u a r y 3 , 2 0 1 0
IMPORTANT
You must install the IDBLUE R8.HF USB driver in order for your device to charge properly.
Please download the driver at:
http://www.idblue.com/media/10176/idbluehf.inf
Getting Started
This section covers how to get up and running with your new IDBLUE R8.HF, including charging,
device usage, and Bluetooth configuration.
Charging the IDBLUE R8.HF Device
Please ensure that IDBLUE R8.HF is fully charged before each use. Before initial use, the device
must be charged for at least 2 hours. Subsequent recharging should take a maximum of 1 to 1.5
hours typically.
Use the supplied USB cable to charge IDBLUE R8.HF, making sure to use a high power USB port
on a laptop/PC/hub.
IDBLUE R8.HF will not charge with a 100mA USB charge source when it is turned on as the
device draws more current than is provided.
Although a dedicated USB wall charger is not provided, any USB 2.0 compliant charger is
compatible.
Using IDBLUE R8.HF
This section covers the basic operations for using IDBLUE R8.HF, including turning the device on
and off, and how to use the device’s user interface to read RFID tags.
Turning the device on
Turn on IDBLUE R8.HF by pressing and holding the power button for approximately 2 seconds.
When the device is powered on, the rear LED will turn green. At this point you can release the
rear button while the device finishes powering up. Once the device has powered up, the device
will emit two high tones and both the device status LED and the RFID Status LED will display
two green flashes. Please refer to Table 5 : User Feedback on Events to review all LED feedback.
Turning the device off
There are a number of methods with which to shut down IDBLUE R8.HF.
1. The device may be manually shut down by pressing and holding the power button,
found on the rear of the device for at least 2 seconds. This is the recommended method

IDBLUE R8.HF Users Guide
10
Getting Started
F e b r u a r y 3 , 2 0 1 0
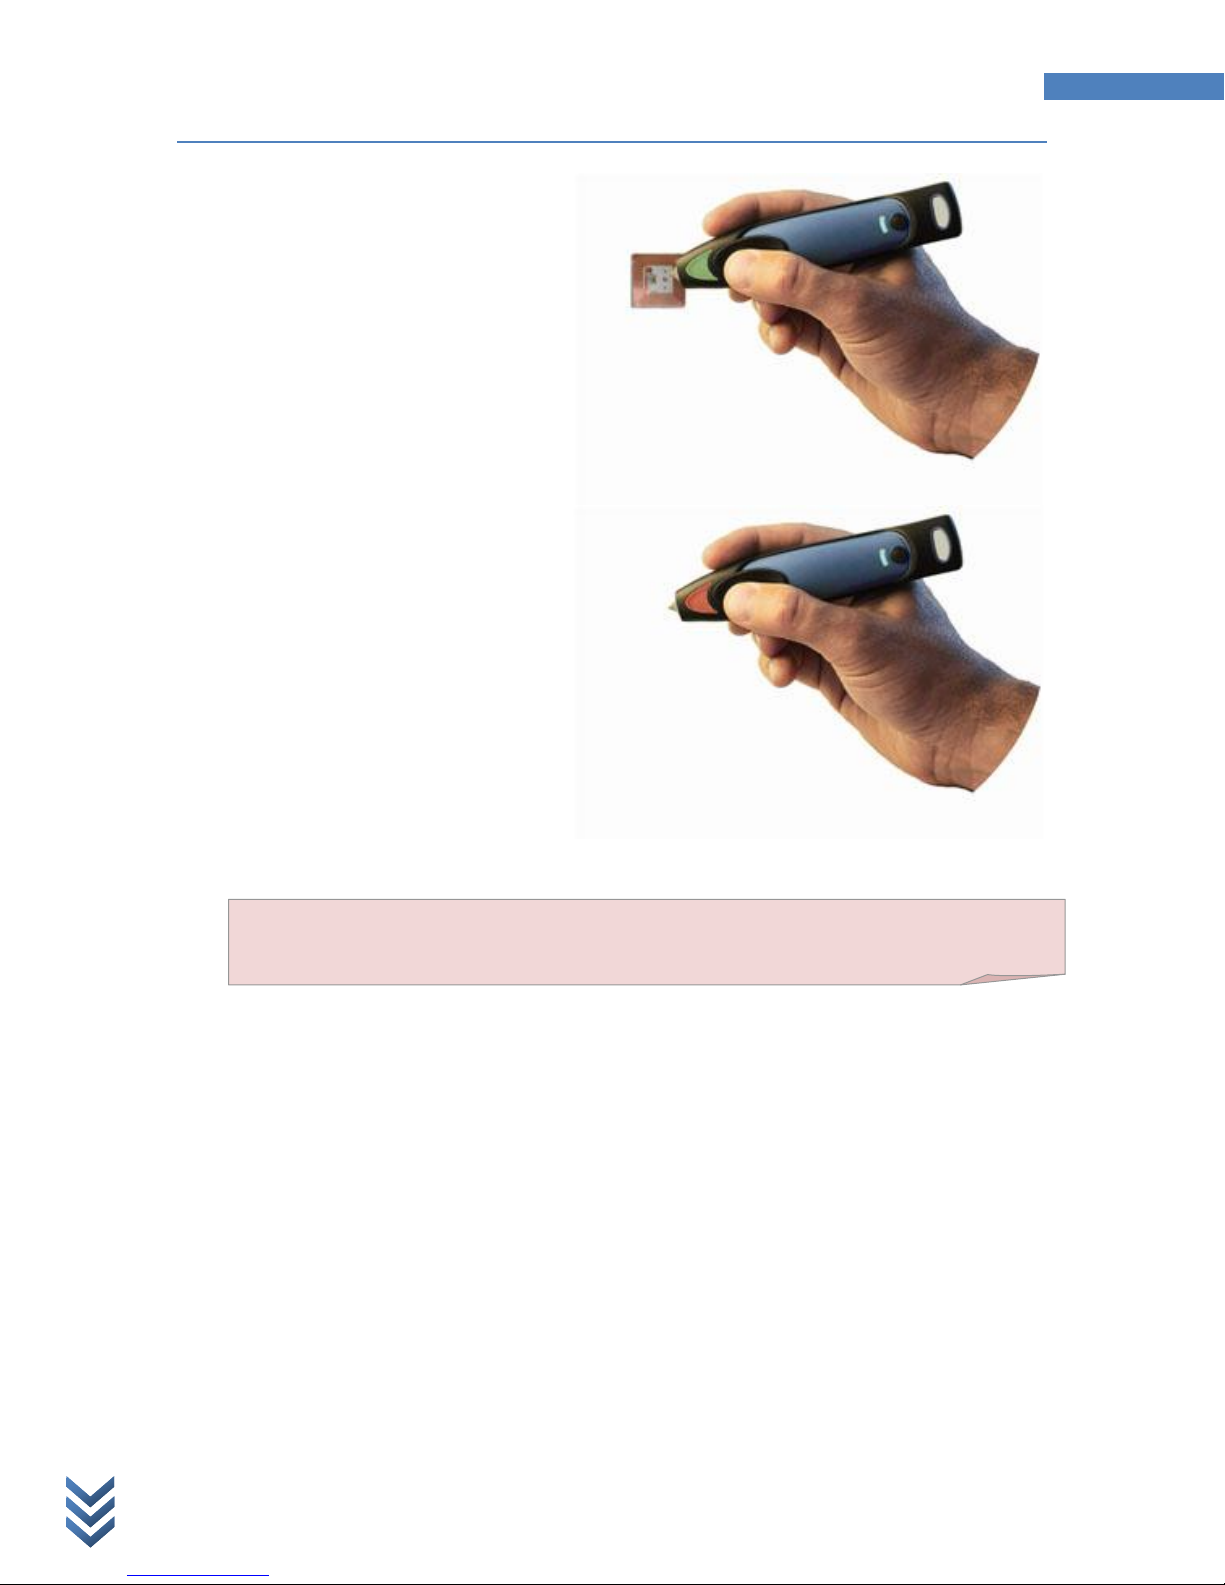
1. Ensure that the device is powered on and
ready for use.
2. Press and release the action button on
IDBLUE R8.HF.
3. The RFID Status LED will change to
blue to indicate that the device is “busy”
(i.e. attempting to scan RFID tags).
4. Move the tip of the IDBLUE device
close to the tag – the optimal read range
for most tags will be 2-3 cm.
to shut down the device. In this case, the device will emit two high tones and the device
status LED will display two green flashes before shutting down.
2. Each IDBLUE R8.HF has a Device Timeout setting that causes the device to automatically
power down after a period of inactivity (where inactivity is defined as a period of time
with no button press or commands sent to the device from a connected application). Set
your device timeout to a suitable value for your application. The device timeout can be
set under the ‘Basic Device Settings’ using IDBLUE Manager.
3. IDBLUE R8.HF may be shut down via a command sent from a connected application,
such as IDBLUE Manager.
For more information about IDBLUE Manager, the standard configuration and
management application for IDBLUE R8.HF, please refer to IDBLUE Manager User’s
Guide.
Reading and Writing RFID Tags
IDBLUE R8.HF can perform a wide range of RFID related operations, including scanning tags,
reading and writing data to/from RFID tags, etc. All of these operations are typically driven by
pressing and releasing the action button.
By default, IDBLUE R8.HF is shipped to you in Tag Verify mode (Please see Table 1 :
Disconnected Mode Options for different operating modes). This mode will allow you to
become more familiar with the device, ensure it is working properly, and check tag
compatibility.
Scanning a tag
IDBLUE R8.HF Users Guide
11
Getting Started
F e b r u a r y 3 , 2 0 1 0
5. Upon a successful tag read, the device
will emit a high tone and the RFID
Status LED will flash green
6. If the device cannot find the tag before
the operation times out, the RFID Status
LED will flash red. Note: the default
RFID timeout value is four (4) seconds.
This value can be configured using
IDBLUE Manager.
NOTE: Unless specifically noted otherwise, to “press” the button on the IDBLUE device
means to press and release the button.

IDBLUE R8.HF Users Guide
12
Device Communication
F e b r u a r y 3 , 2 0 1 0
1
Device Communication
Physical Connections
Firmware versions 4.1.0.98 and above support both Bluetooth1 and USB communication
mechanisms. IDBLUE R8.HF is considered physically connected when the device is plugged into a
computer via a USB cable and/or there is an established Bluetooth connection. It is possible to
be physically connected via both USB and Bluetooth simultaneously. A low to high audio tone is
emitted when a physical connection is established, and a high to low audio tone is emitted when
a physical connection is dropped. During a Bluetooth connection, the device status LED will
switch from Magenta to Cyan to indicate the transition from a connectable to physically
connected state. However, the device status LED will remain Magenta for a USB connection to
distinguish between a USB and Bluetooth physical connection.. Please refer to Table 5 : User
Feedback on Events to review all audio and LED feedback.
Logical Connections
IDBLUE R8.HF is considered logically connected when there is a logical channel established to a
host application. IDBLUE R8.HF will allow only one logical connection at a time. Once a logical
connection is established over one of the physical channels, IDBLUE will prevent another logical
connection via the other physical channel. In the case of establishing a logical USB connection,
the IDBLUE R8.HF device will actually disable Bluetooth and drop any current physical
connection. The device status LED will switch from Cyan to Blue when a logical connection is
established, but no audio feedback is provided. Please refer to Table 5 : User Feedback on
Events to review all audio and LED feedback.
Bluetooth Discoverable Mode
When attempting to first configure IDBLUE R8.HF to connect to a host, Bluetooth Discoverable
Mode must be used. In this mode, IDBLUE R8.HF broadcasts its available services so that a host
computer can discover and connect to it. To place the IDBLUE R8.HF device in Bluetooth
Discoverable mode, press and release the power button of the device when the device is in
connectable mode (Flashing Magenta). Once in Discoverable mode, the device status LED will
flash Blue while it is waiting for a Bluetooth physical connection to be established. IDBLUE R8.HF
will return to the previous mode if no connection is established within the Discovery timeout (60
seconds), or will indicate a physical connection if a Bluetooth connect is established.
Connecting an IDBLUE R8.HF with firmware version 4.1.1.2 or earlier to a computer running Windows
Vista SP2 or Windows 7 requires the user to manually pair IDBLUE R8.HF from Bluetooth Devices
configuration available from the Windows Control Panel (Classic View).

IDBLUE R8.HF Users Guide
13
Device Configuration
F e b r u a r y 3 , 2 0 1 0
Note: Press and release the power button to re-enable Bluetooth when it is disabled.
Bluetooth Name and PIN Code
IDBLUE R8.HF comes pre-configured with a device name (as printed on the label on the bottom
of the device). This is the Bluetooth name that will identify the device on a Bluetooth network.
It also comes pre-configured with a PIN code (sometimes referred to as a “pass code”); this is a
security feature that will only allow you to connect to IDBLUE R8.HF if the PIN code is known.
Note: The default factory pin code is ‘0000’
Renaming IDBLUE R8.HF to your own specification or naming scheme is recommended. Please
refer to IDBLUE Managers Guide for details on how to rename IDBLUE R8.HF.
Device Configuration
This section covers the basic configuration options for IDBLUE R8.HF. These options are typically
updated using either IDBLUE Manager or a custom application; please consult IDBLUE Manager
User’s Guide for more information on how to configure these settings.
IDBLUE Factory Default Settings
The following lists all of the factory default property settings for IDBLUE R8.HF device:
Block Count = 1
Block Data = 00000000
Block Index = 0
Bluetooth Timeout = 0 minutes (disabled)
Connected Mode = TagID
Continuous Scanning = False
Continuous Scanning Timeout = 16 seconds
Device Timeout = 10 minutes
Disconnected Mode = Tag Verify
Duplicate Elimination Timeout = 0 (no duplicate elimination)
Hold To Scan = True

IDBLUE R8.HF Users Guide
14
Device Configuration
F e b r u a r y 3 , 2 0 1 0
IDBLUE Name = IDBLUE_R8<last 4 digits of Bluetooth MAC address>
RFID Protocol = ISO15693
RFID Timeout = 4 seconds
Timestamp Required = True

IDBLUE R8.HF Users Guide
15
Device Configuration
F e b r u a r y 3 , 2 0 1 0
Disconnected Mode
Description
Tag Verify
The device will read a Tag ID and not store any information. This
function is offered to simply verify that a tag is compatible with the
device.
Tag Store
The device will store the Tag ID, a timestamp, and first byte of data
in non-volatile memory. This information can be later retrieved using
IDBLUE Manager or other equivalent software.
Connected Mode
Description
Reactive (Button Press)
The device will send a button press event back to the host, where
the host decides what command to execute. This mode is typically
used by application developers.
Select Tag ID
The device will read the Tag ID and send this Tag ID back to the host.
This is the default mode.
Read Block
The device will read the Tag ID and the data in a single block and
send this information back to the host.
Read Multiple Blocks
The device will read the Tag ID and data from a series of blocks, and
send this information back to the host.
Write Block
The device will read the Tag ID of a tag, write a single block of data to
the tag, then send the Tag ID back to the host.
Note: IDBLUE will only read tags in Tag Store mode if the device’s on-board clock has been
set. The IDBLUE clock will be set from the factory, however if the IDBLUE battery is
completely drained, the device will lose its clock. In this case, the device will need to be
synchronized with a host. If the clock is not set, when the button is pressed in this mode the
RFID status LED will flash double-yellow.
Operating Modes
Disconnected Operating Mode
The disconnected operating mode setting defines what happens when IDBLUE R8.HF does not
have an established Bluetooth connection to a host, and the Action button is pressed. The
disconnected mode options are:
Table 1 : Disconnected Mode Options
Connected Operating Mode
The connected operating mode setting defines what happens when IDBLUE R8.HF has an
established USB or Bluetooth connection to a PC or PocketPC device, and the Action button is
pressed. These modes are used by application developers to customize the behaviour of IDBLUE
R8.HF to different types of applications and workflows. The connected mode options are:
Table 2 : Connected Mode Options

IDBLUE R8.HF Users Guide
16
Device Configuration
F e b r u a r y 3 , 2 0 1 0
2
Power Saving Settings
Device Timeout
The device timeout is a power saving feature that allows IDBLUE R8.HF to automatically shut
down after a pre-defined period of inactivity. Inactivity is defined as a period of time (in
minutes) with no button press (during connected or disconnected operating modes) or no
commands sent to the device from a connected application. The default value of this setting is
10 minutes, but may be adjusted to best suit your application using IDBLUE Manager. Setting
the Device Timeout to 0 will prevent IDBLUE R8.HF from automatically shutting down.
RFID Operation Timeout
The RFID timeout setting controls how the device performs when attempting to read an RFID
tag. This setting is the length of time (in seconds) that the device will attempt to perform an
RFID operation before timing out.
It is recommended that you not exceed the default four (4) second setting in order to conserve
battery life.
Bluetooth Timeout
The Bluetooth timeout is a power saving feature that shuts down the Bluetooth module when
the device is in disconnected mode. This setting is the length of time (in minutes) after which
the Bluetooth module will shutdown if there is no user interaction with the device (i.e. no
button press).
The default value for this option is zero (0) minutes, meaning that the Bluetooth module onboard IDBLUE R8.HF will not timeout and shutdown, but should be adjusted to 1 minute if the
device is primarily used in disconnected mode
RFID Protocols
Firmware version 4.1.0.98 will support only ISO156932. Further protocols will be available in
future releases.
General Settings
This section covers some of the general settings and features of the device.
Reading and writing to ISO 15693 tags is only supported for tags with a block structure of 4
bytes per block. Unsupported tags for reading and writing include STMicroelectronics LRI64 (1
byte per block) and EM Microelctronic (8 bytes per block) tags.

IDBLUE R8.HF Users Guide
17
User Feedback
F e b r u a r y 3 , 2 0 1 0
Audio Buzzer
IDBLUE R8.HF is equipped with an audio buzzer to provide feedback to the user. The user may
enable or disable the audio buzzer using IDBLUE Manager. When the buzzer is enabled, the user
will hear an audible tone upon a successful operation, as well as unique tones on various state
changes. Please see Table 5 : User Feedback on Events for more information on the audio
feedback.
To conserve battery power, the user may disable the audio buzzer under ‘Basic Device Settings’
of IDBLUE Manager.
On-board Clock
IDBLUE R8.HF has an internal real time clock to allow time stamping of each tag scan. This clock
is set from the factory and under normal use does not need to be reset. However, in the case
where the battery on IDBLUE R8.HF is completely drained, the device will lose its clock setting
and will need to be synchronized with IDBLUE Manager or other similar host application.
Performing a device reset
In the unlikely event IDBLUE R8.HF becomes unresponsive, it will be necessary to perform a
device reset. To reset the device, press and hold both the power button and the action button
simultaneously for at least 3 seconds. While holding both buttons, the reading status and device
status LEDs will display a solid cyan color. When both of these LEDs turn off, the device has
performed a reset. Release both buttons. To power the device back up and continue using it
press and hold the rear button for 2 seconds.
User Feedback
This section details how the user interface elements of IDBLUE R8.HF respond to different
events and device states. IDBLUE R8.HF provides user feedback through three different
methods:
1. Device Status LED – Provides feedback on battery level and communication status.
2. RFID Status LED– Provides feedback on RFID related events
3. Audio Buzzer – Provides feedback on RFID and transition events
Device Status LED
The device status LED displays the status of the power and communications of the device. The
patterns of colors displayed will differ depending on if the device is on or off, and charging or
not charging.
Not Charging
When on but not charging, the device status LED default value is off, and will flash two
consecutive colors in a continuous pattern. The first flash indicates power (battery level) and the

IDBLUE R8.HF Users Guide
18
User Feedback
F e b r u a r y 3 , 2 0 1 0
Device Status
Power Color
Communication Color
Comms Disabled – Good Battery
Green
None
Comms Disabled – Medium Battery
Yellow
None
Comms Disabled – Low Battery
Red
None
Connectable – Good Battery
Green
Magenta
Connectable – Medium Battery
Yellow
Magenta
Connectable – Low Battery
Red
Magenta
USB Physically Connected – Good Battery
Green
Magenta
USB Physically Connected – Medium Battery
Yellow
Magenta
USB Physically Connected – Low Battery
Red
Magenta
Bluetooth Physically Connected – Good Battery
Green
Cyan
Bluetooth Physically Connected – Medium Battery
Yellow
Cyan
Bluetooth Physically Connected – Low Battery
Red
Cyan
Logically Connected – Good Battery
Green
Blue
Logically Connected – Medium Battery
Yellow
Blue
Logically Connected – Low Battery
Red
Blue
Off
None
None
second communication. The color of each of these flashes will indicate the various states as
shown below:
Table 3 : Device Status LED When Not Charging
Charging
When charging, the power LED is normally on, and will flash a single color. The solid color
indicates the current charge level of the battery and the second will indicate the communication
status as shown below:

IDBLUE R8.HF Users Guide
19
User Feedback
F e b r u a r y 3 , 2 0 1 0
Device Status
Power Color
Communication Color
Comms Disabled – Good Battery
Green
None
Comms Disabled – Medium Battery
Yellow
None
Comms Disabled – Low Battery
Red
None
Connectable – Good Battery
Green
Magenta
Connectable – Medium Battery
Yellow
Magenta
Connectable – Low Battery
Red
Magenta
USB Physically Connected – Good Battery
Green
Magenta
USB Physically Connected – Medium Battery
Yellow
Magenta
USB Physically Connected – Low Battery
Red
Magenta
Bluetooth Physically Connected – Good Battery
Green
Cyan
Bluetooth Physically Connected – Medium Battery
Yellow
Cyan
Bluetooth Physically Connected – Low Battery
Red
Cyan
Logically Connected – Good Battery
Green
Blue
Logically Connected – Medium Battery
Yellow
Blue
Logically Connected – Low Battery
Red
Blue
Off
Green
None
Table 4 : Device Status LED When Charging
Bluetooth Discoverable
When IDBLUE R8.HF is in Bluetooth Discoverable mode, the device status LED pattern will flash
blue to indicate this unique state. The LED pattern will return to either the charging or not
charging states after the Discovery timeout (60 seconds) or if IDBLUE R8.HF is connected via
Bluetooth, whichever occurs first.
RFID Status LED
The Reading Status LED will display feedback on RFID operations. See Table 5 : User Feedback
on Events.
Audio Buzzer
The audio buzzer will provide audio feedback on various connection and RFID events. See Table
5 : User Feedback on Events.
Events
The following table should be used as a reference to identify an event.

IDBLUE R8.HF Users Guide
20
User Feedback
F e b r u a r y 3 , 2 0 1 0
Event
Audio Buzzer
RFID Status LED
Device Status LED
Power On (Startup)
None
None
Solid Green
Power On (Ready)
Two High Tones
Two Green Flashes
Two Green Flashes
Power Off
Two High Tones
None
Two Green Flashes
Physical Bluetooth
Connection Established
Low to High
Transition
None
Blue Flash and Communication
Flash Sequence = Cyan
Physical Bluetooth
Connection Dropped
High to Low
Transition
None
Green Flash and Communication
Flash Sequence = Magenta
Physical USB Connection
Established
Low to High
Transition
None
None
Physical USB Connection
Dropped
High to Low
Transition
None
None
Logical Connection
Established
None
None
Communication Flash Sequence
= Blue
Logical Connection
Dropped
None
None
Communication Flash Sequence
= Cyan/Magenta
Action Button Pressed
None
Solid Blue
None
RFID Operation Success
High Tone
Green Flash
None
RFID Operation Failure
None
Red Flash
None
Tag Store – Invalid Clock
None
Two Yellow Flashes
None
Power Button Press and
Hold
None
None
Solid Cyan (for 2 sec)
Power + Action Button
Press and Hold
None
Solid Cyan (for 3 sec)
Solid Cyan (for 3 sec)
Table 5 : User Feedback on Events

IDBLUE R8.HF Users Guide
21
Demo Applications
F e b r u a r y 3 , 2 0 1 0
Demo Applications
Please visit http://www.idblue.com/support/downloads.aspx for a list of available demo
applications.

IDBLUE R8.HF Users Guide
22
FCC Disclaimer
F e b r u a r y 3 , 2 0 1 0
FCC Disclaimer
English
This device complies with FCC Part 15 and Industry Canada license-exempt RSS standard(s).
Operation is subject to the following two conditions: (1) this device may not cause interference,
and (2) this device must accept any interference, including interference that may cause
undesired operation of the device.
Warning! Changes or modifications not expressly approved by the manufacturer could void the
user's authority to operate this equipment
French
Ce dispositif est conforme à la norme FCC Partie 15 et Industrie Canada exempts de
licence standard RSS (s). L'opération est soumise aux deux conditions suivantes: (1) cetappareil
ne peut pas provoquer d'interférences et (2) cet appareil doit accepter toute interférence, y
compris les interférences qui peuvent causer un mauvais fonctionnement de l'appareil.
Attention! Les changements ou modifications non expressément approuvés par le
fabricantpourrait annuler l'autorisation de l'utilisateur à utiliser cet équipement

IDBLUE R8.HF Users Guide
23
Troubleshooting
F e b r u a r y 3 , 2 0 1 0
Troubleshooting
For the most up-to-date FAQ and other support information, please consult IDBLUE R8.HF
support website at:
http://www.idblue.com/support.aspx
When contacting IDBLUE Support, please ensure that you have the following information
available in order to streamline the resolution process:
IDBLUE serial # (Bluetooth address)
IDBLUE firmware version (Found under ‘Update Firmware’ in IDBLUE Manager)
Bluetooth hardware information
o Vendor (e.g. DLink)
o Model number (e.g. DBT-120 B4)
o Bluetooth stack type and version
Device make and model for PocketPC devices and laptop / TabletPC’s.
Any error messages, or screenshots of error messages that you have encountered.

Contact Information
IDBLUE Product Page
http://www.idblue.com/products.aspx
IDBLUE Sales
Email: sales@idblue.com
Phone: +1 (709) 754-7343
Fax: +1 (709) 754-7349
IDBLUE Support
http://www.idblue.com/support.aspx
Phone: +1 (866) 304-7343 Ext. 322
+1 (709) 754-7343 Ext. 322
General Inquiries:
IDBLUE
100 Signal Hill Road, The Lower Tower
St. John’s, NL, Canada
A1A 1B3
For more information about IDBLUE R8.HF and other IDBLUE products and services:
Copyright© 2005 - 2010 Cathexis Innovations Inc. All Rights Reserved. Cathexis Innovations Inc. assumes no responsibility for
any errors which may appear in this document, reserves the right to change systems or specifications detailed herein at any
time without notice, and does not make any commitment to update the information contained herein. No licenses to patents
or other intellectual property of Cathexis are granted by the Company in connection with the sale of Cathexis products,
expressly or by implication. All specifications are subject to change without notice. Cathexis, IDBLUE, and
Mobile.RFID.Solutions are either registered trademarks or trademarks of Cathexis Innovations Inc. in Canada and/or other
countries. The Bluetooth name and Bluetooth registered trademarks are owned by Bluetooth SIG, Inc. Microsoft, Windows,
and the Windows logo are trademarks or registered trademarks of Microsoft Corporation in the United States and/or other
countries.
 Loading...