

Page 1

PLEASE READ THIS USER MANUAL COMPLETELY BEFORE OPERATION THIS UNIT AND RETAIN THIS BOOKLET FOR FUTURE REFERENCE
ENGLISH
FRANÇAIS
NEDERLANDS
DEUTSCH
ESPAÑOL
ITALIANO
....EN1-EN4
....FR1-FR4
....D1-D4
....DE1-DE4
....ES1-ES4
....IT1-IT4
This product meets the essential requirements of Directive 1999/5/EC.
http://www.idanceaudio.com/documentation/declarationofconformity/bc20/
WORLD
HEADQUARTERS:
iDance H.K.
Unit i, 6/F., MG Tower,
133 Hoi Bun Road, Kwun Tong,
Kowloon, Hong Kong.
UK OFFICE:
iDance Audio U.K.
Graham Lloyd Building, Midland
Structures Industrial Estate
Ampthill Road, Bedford MK42 9JJ,
United Kingdom
EUROPE OFFICE:
iDance Audio Europe
Gaasterland 2c
1948RG Beverwijk
The Netherlands
DISCO CUBE
BLUETOOTH KARAOKE System with Built-in Light Show
Systeme Karaoke Bluetooth avec jeux de lumieres inclus
BC-20
Page 2

EN1
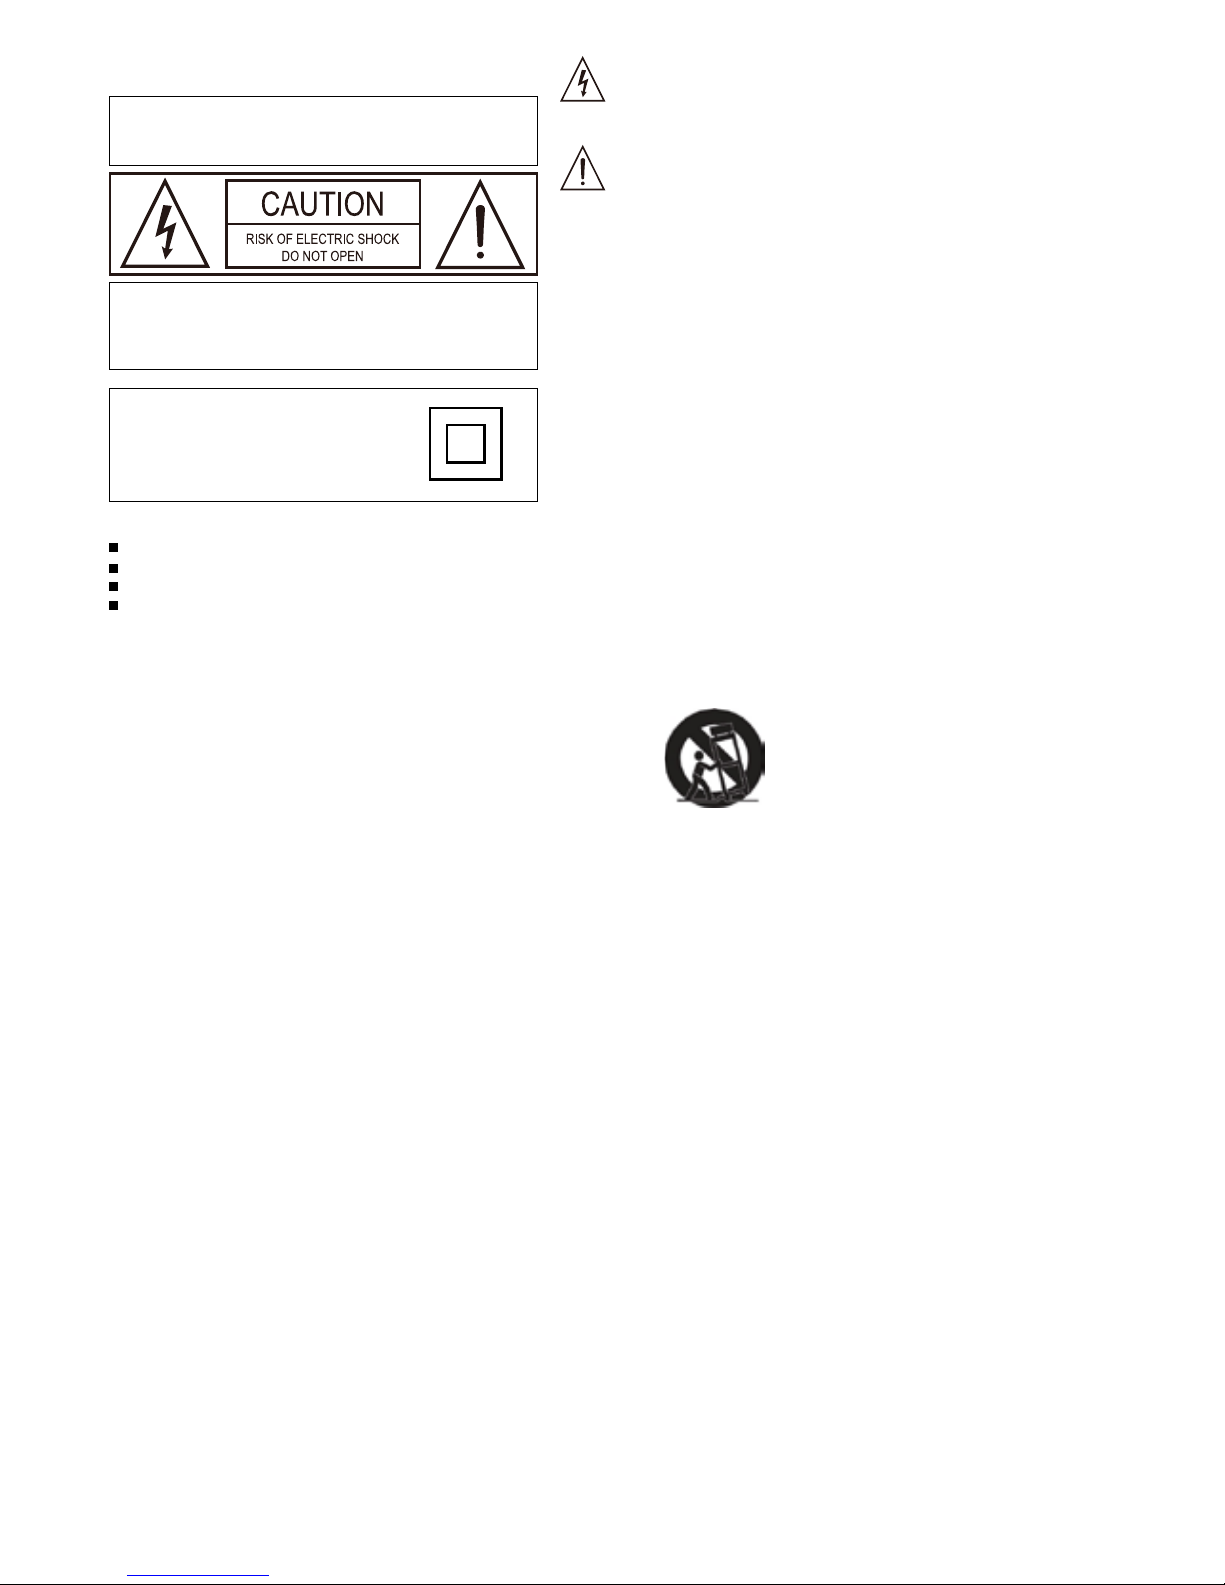
WARNING
WARNING: TO REDUCE THE RISK OF FIRE OR SHOCK,
DO NOT EXPOSE THIS PRODUCT TO RAIN OR MOISTURE
The exclamation mark inside an equilateral triangle is
intended to alert user of the presence of the important
operating and maintenance (servicing) instructions in the
literature accompanying the product.
The lightning ash with arrowhead symbol inside an
equilateral triangle is intended to alert User of the presence
of un-insulated “hazardous voltage” within the product’s
enclosure, which may be of sufcient magnitude to induce
a risk of electric shock to persons
NOTES:
Please do not attempt to open the back cover
or power adapter as opening or removing the
covers may expose you to dangerous voltage
or other hazards, and it will also cause the
restricted servicing to be disabled: There are
no user servicing components inside.
NOTES:
This digital apparatus does not exceed the Class B
limits for radio noise emissions from digital apparatus
as set out in the Radio Interference Regulations of
Industry Canada. These limits are designed to provide
reasonable protection against harmful interference in
a residential installation.
NOTES:
Reorient or relocate the receiving antenna.
Increase the separation between the equipment and the receiver.
Connect the equipment into an outlet on a circuit different from that to which the receiver is connected
Consult the dealer or an experienced radio/TV technician for assistance.
CAUTION: TO REDUCE THE RISK OF FIRE OR
SHOCK, DO NOT REMOVE COVER OR BACK.
NO USER-SERVICEABLE PARTS INSIDE. REFER
SERVICING TO QUALIFIED PERSONNEL
Class II equipment symbol
This symbol indicates that
the unit has a double system.
IMPORTANT SAFETY INSTRUCTIONS
1. Read these instructions.
2. Keep these instructions. Heed all warnings.
3. Follow all instructions.
4. Do not use this apparatus near water.
5. Clean only with dry cloth.
6. Do not block any ventilation openings.
7. Install in accordance with the manufacturer’s instructions.
8. Do not install near any heat sources such as radiators, heat registers, stoves, or other apparatus (including amplifiers)
that produce heat.
9. Do not defeat the safety of the polarized of the polarized or grounding-type plug. A polarized plug has two blades with
one wider than the other. A grounding type plug has two blades and a third grounding prong. The wide blade or the
third prong are provided for your safety. If the provided plug does not fit into your outlet, consult an electrician for
replacement of the obsolete outlet.
10. Protect the power cord from being walked on or pinched particularly at plugs, convenience receptacles, and the point
where they exit from the apparatus.
11. Only use attachments/accessories specified by the manufacturer.
12. Use only with the cart, stand, tripod, bracket, or table specified by the manufacture, or sold with the apparatus. When
a cart is used, use caution when moving the cart/apparatus combination to avoid injury from tip-over. Portable Cart
Warning
13. Unplug this apparatus during lightning storms or when unused for long periods of time.
14. Refer all servicing to qualified service personnel. Servicing is required when the apparatus has been damaged in any
way such as power-supply cord or plug is damaged, liquid has been spilled or objects have fallen into the apparatus,
the apparatus has been exposed to rain or moisture does not operate normally, or has been dropped.
15. The apparatus shall not be exposed to dripping or splashing and no objects filled with liquids, such as vases, shall be
placed on the apparatus.
16. The battery shall not be exposed to excessive heat such as sunshine, fire or the like.
17. The MAINS plugs used as the disconnect device, which shall remain readily operable.
Page 3

• To charge the battery of the unit, connect the provided power adapter to an AC100V~AC240V port
• Charging time is approximately 6 hours.
• Once it is fully charged unplug the power supply, as leaving a full battery on charge may cause damage to
the battery.
• If the speaker has been left unused for a long time, please let the battery fully charge before using it again,
otherwise it will cause damage to the battery!
• Always try to charge the unit once a month.
• During the process of playback, keep the unit away from high temperature environments, high magnetic
fields and high frequencies. If the system fails to work, turn off the power source and restart it to resume
playback
1. Master volume adjustment
2. Power off/on
3. Wired and wireless microphone volume adjustment
4. Wired and wireless microphone echo adjustment
5. Colorful LED switch
6. DC 9V charge jack
7. 6.5MM microphone input jack
8. 3.5MM audio input jack
9. USB/SD slot
10. Repeat song on MP3 mode
11. Next song on MP3 mode
12. Play/Stop on MP3 mode
13. Previous song on MP3 mode
14. Mode button to choose input signal
15. Full charge LED indicator
16. Charging LED indicator
Charging the speaker
Rear Panel Functions
EN2
LED ACTIVATE
ON OFF
DC 9V / 1AMICAUX IN
USB
ECHOVOLUME
MASTER
VOLUME
CHARING
FULL
MODE REPEAT
POWER
OFFS D-CARD BT
ON
BC20
DISCO CUBE
MIC
1
2
3 4
5
67
8
9
1011121314
15
16
Page 4
EN3
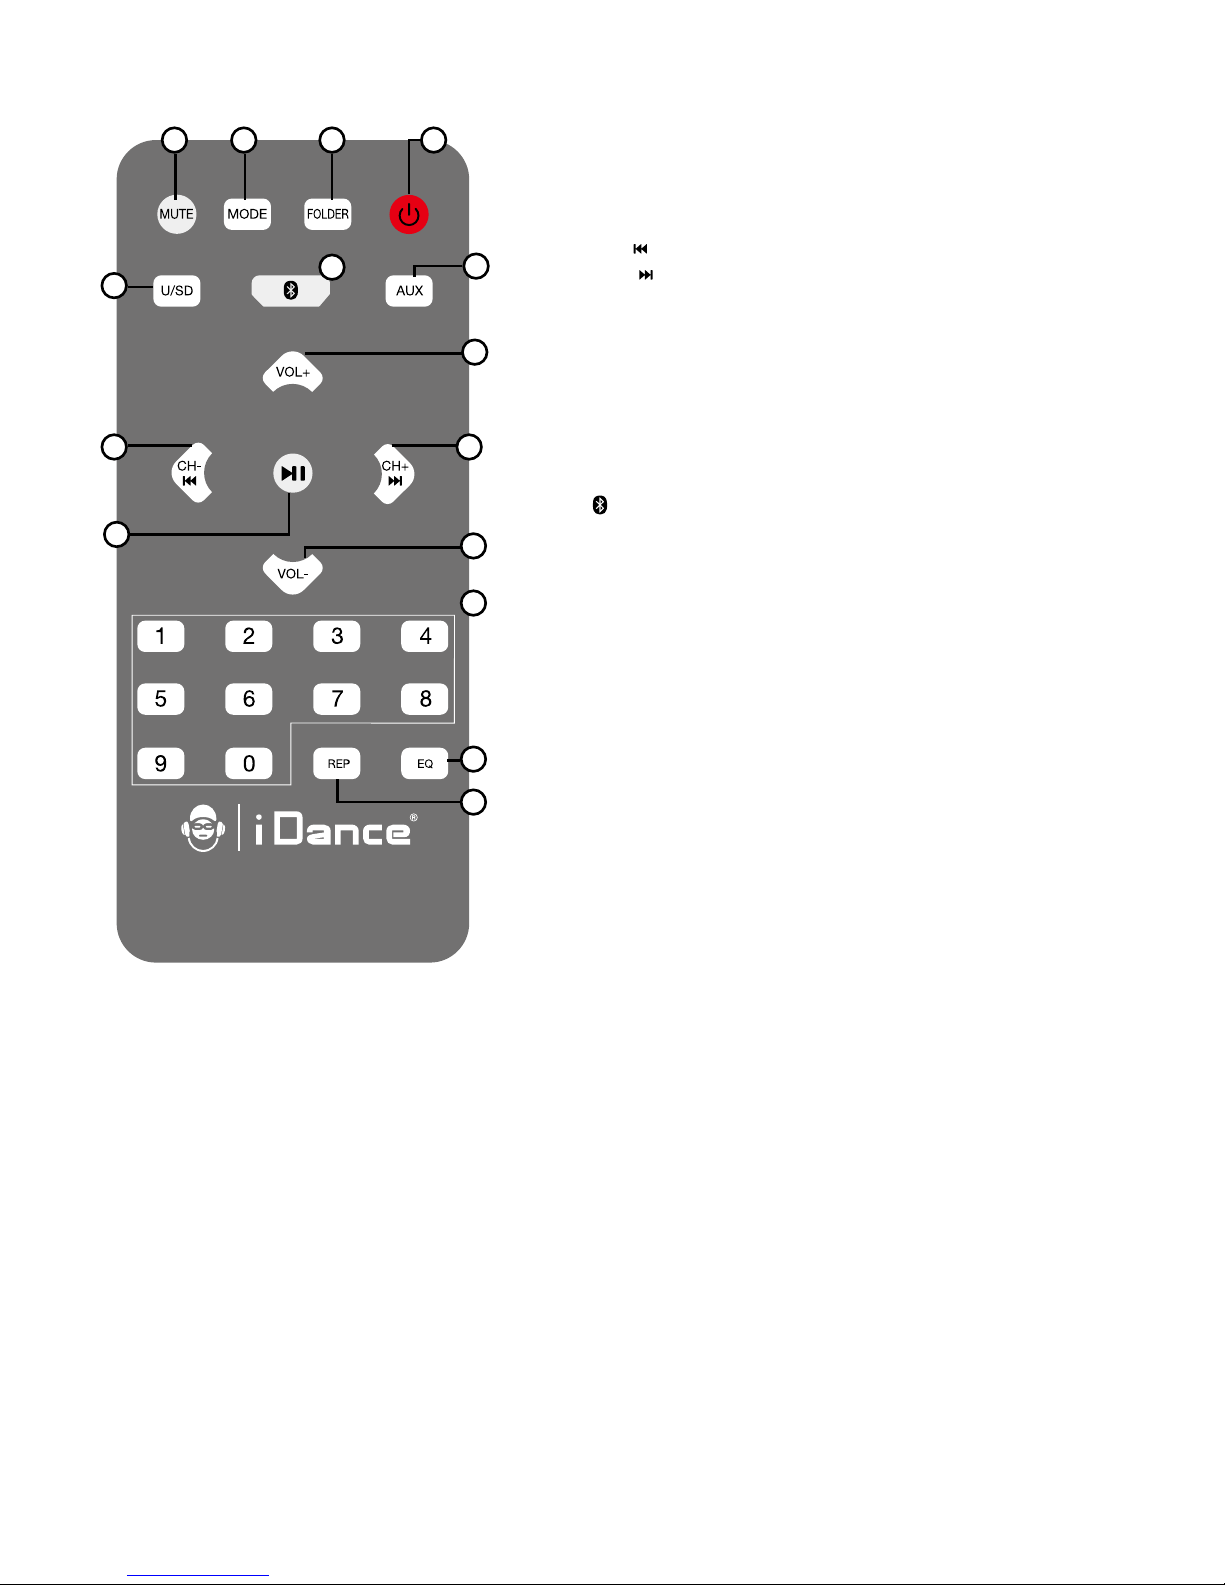
REMOTE CONTROL
Connecting to Bluetooth
1. [STANDBY] Power key
2. [AUX] Choose AUX input signal
3. [VOL+]Increase music volume
4. [VOL-]Decrease music volume
5. [CH-/ ] Previous song
6. [CH+/ ] Next song
7. [0-9 Buttons] Choose song number directly
8. [EQ] Different Sound Effects
9. [U/SD]Choose USB/SD input signal
10. [MODE] Choose signal input
11. [MUTE] Mute key
12. [REP] Repeat song
13. [PLAY/PAUSE] Play/Pause key
14. [FOLDER] switch from one MP3 file to another
15. [ ] Switch to Bluetooth Mode
BC20
DISCO CUBE
1
2
3
4
7
8
5
9
10 1411
12
13
6
15
1. Select the Bluetooth mode using the “mode” switch on the panel of the unit or from the remote control
itself in order to change the audio source. (all obstacles between the unit and the device connected must
be removed in order to ensure a proper connection)
2. Once you have selected the Bluetooth mode, the indicator light will flash and the speaker will emit a “beep”
sound.
3. Turn on the Bluetooth of your cell phone and then connect the phone to the unit. Search for BC-20 on the
phone and pair the device with the unit.
4. A password is not required to pair the phone with the BC-20
5. Once the unit and the phone have successfully been paired, the Bluetooth indicator light will flash and
music playback can begin.
6. Once the pairing process is completed, the next time the unit connects to the Bluetooth device, it will
connect automatically.
7. When listening to music via the Bluetooth function, the functions such as play, pause, next track, previous
track will be operative and can be changed through the panel on the unit, the remote control or directly
from your smartphone (Bluetooth device)
Page 5

EN4
USB/SD Function
AUX connection
LED lights
1. Press the "MODE" button on the control panel of the unit or the remote control itself, to change the audio
source to the input "USB" or "SD" mode. You can also access directly by pressing "U/SD" from the remote
control.
2. Carefully insert the USB drive into the connector and / or the SD card into the slot.
3. The system will automatically start reading the MP3 files from the USB and / or from the SD card.
4. You can control play, pause, previous track or next track from the control panel of the unit or the remote
control.
5. To go to a specific track use the number keys on the remote control.
6. Press the "REP" key will give you the option of repeating "ONE"- one song or "ALL" – all songs played.
7. Press the "FOLDER" key, this will allow you to go from one folder to another.
8. Select "EQ" and select the various sound effects; "POP", "ROC", "JAZ", "CLA", "COU" and "NOR"
9. Press "MUTE" to silence the playback.
1. Select the input mode "AUX" using the "MODE" button on the control panel of the unit or the remote
controller itself, from which you can also press "AUX" for a shortcut.
2. Music playback will start automatically.
3. Press "PLAY / PAUSE" to stop playback or play.
4. Other functions are not operational and cannot be changed from the control panel of the unit or from the
remote control.
• To activate it, position the switch "LED POWER" to ON. The LED on the top will begin to light up, randomly
changing colours or lighting up all at once.
Note: USB storage media or SD cards that have been wrongly connected could cause serious damage to the unit.
An SD card, which is blocked, is not detected and will not be played by the unit.
USB or SD cards will be accepted will be of version 2.0 and up to 32GB
Page 6

FR1
AVERTISSEMENT
WARNING: TO REDUCE THE RISK OF FIRE OR SHOCK,
DO NOT EXPOSE THIS PRODUCT TO RAIN OR MOISTURE
Le symbole de l’éclair avec une èche dans un triangle
équilatéral est destiné à alerter l’utilisateur de la
présence de tension dangereuse dans le boitier, qui
peut être d’une ampleur sufsante pour induire un risque
de choc électrique.
Le point d’exclamation dans un triangle équilatéral
est destiné à alerter l’utilisateur de la présence de
maintenance dans le manuel de l’utilisateur.
Remarque:
Veuillez ne pas ouvrir le couvercle arrière de l’appareil
ou l’adaptateur secteur car l’ouverture ou le retrait
des couvercles peut vous exposer à des tensions
dangereuses ou autres dangers, et annulera également
votre garantie. Il n’y a pas de pièce réparable à l’intérieur
de l’appareil.
Remarque:
Cet appareil numérique ne dépasse pas les limites de la
classe B pour les émissions de bruit radio des appareils
numériques comme indiqué dans le règlement sur les
interférences radio de l’Industrie Canada. Ces limites
sont conçues pour fournir une protection raisonnable
contre les interférences nuisibles dans une installation
résidentielle.
Remarque:
Réorienter ou déplacer l’antenne de réception.
Augmenter la distance entre l’équipement et le récepteur
Brancher l'équipement dans une prise sur un circuit différent de celui sur lequel le récepteur est branché
Consulter le revendeur ou un technicien radio/TV expérimenté pour assistance.
CAUTION: TO REDUCE THE RISK OF FIRE OR
SHOCK, DO NOT REMOVE COVER OR BACK.
NO USER-SERVICEABLE PARTS INSIDE. REFER
SERVICING TO QUALIFIED PERSONNEL
Class II equipment symbol
This symbol indicates that
the unit has a double system.
IMPORTANT SAFETY INSTRUCTIONS
1. Lire les instructions.
2. Garder les instructions.
3. Tenir compte des avertissements.
4. Suivre toutes les instructions.
5. Ne pas utiliser l’appareil près de l’eau.
6. Nettoyer uniquement avec un chiffon sec.
7. Ne pas bloquer les ouvertures de ventilation. Installer en suivant les instructions du fabricant.
8. Ne pas installer près des sources de chaleurs tels que radiateur, four, ou tout autre appareil (y compris les
amplificateurs) qui produit de la chaleur.
9. Ne pas retirer la sécurité de la prise de terre. Une fiche polarisée possède deux lames dont une est plus large que
l'autre. Une prise de terre possède deux lames et une broche de terre. La lame large ou la troisième broche est prévues
pour votre sécurité. Si la fiche fournie ne rentre pas dans votre prise, consultez un électricien pour faire remplacer la
prise obsolète.
10. Ne pas piétiner ou pincer le cordon d’alimentation, en particulier au niveau des fiches, des prises et où ils sortent de
l’appareil.
11. Utiliser uniquement les accessoires spécifiés par le fabriquant.
12. Utiliser uniquement avec un chariot, un trépied, une console ou une table spécifié par le fabricant, ou vendu avec
l’appareil.Lorsqu’un chariot est utilisé, déplacer l’ensemble chariot/appareil avec prudence afin d’éviter les blessures en
cas de chutes.
13. Débrancher l’appareil pendant l’orage ou lorsqu’il n’est pas utilisé pendant une longue période.
14. Confier toutes réparations à un personnel qualifié. Une réparation est nécessaire lorsque l’appareil a été endommagé,
cordon d’alimentation ou la fiche endommagé, liquide renversé ou objets tombés dans l’appareil, l’appareil a été
exposé à la pluie ou à l’humidité, ne fonctionne pas normalement ou est tombé.
15. L’appareil ne doit pas être exposé à des gouttes ou à des éclaboussures et aucun objet rempli de liquide, tels que vases,
ne doit être posé sur l’appareil.
16. La prise secteur est utilisée comme un dispositif de déconnexion et doit rester facilement accessible.
17. L’appareil doit être connecté à une prise secteur avec prise de terre.
Page 7

FR2
• Pour charger la batterie de l’appareil, connectez l’adaptateur secteur fourni à un port AC100V~AC240V
• Le temps de charge est d’environ 6 heures.
• Une fois la batterie complètement chargée, débranchez l’alimentation car une batterie pleine peut être
endommagée.
• Si le haut-parleur a été laissé inutilisé pendant une longue période, laissez la batterie se recharger
complètement avant de l’utiliser à nouveau, sinon elle endommagera la batterie !
• Toujours essayez de recharger l’appareil une fois par mois.
• Pendant le processus de lecture, gardez l’appareil éloigné des environnements à haute température, des
champs magnétiques élevés et des hautes fréquences. Si le système ne fonctionne pas, éteignez la source
d’alimentation et redémarrez-la pour reprendre la lecture.
1. Réglage du volume MASTER
2. Allumer/Eteindre l’appareil
3. Réglage du volume du microphone filaire et sans fil
4. Réglage de l’écho du microphone filaire et sans fil
5. Commutateur à LED
6. Prise de charge DC 9V
7. Prise d’entrée microphone 6.5mm
8. Prise d’entrée audio 3.5mm
9. Port USB/SD
10. En mode MP3 Répétition du morceau
11. En mode MP3 Morceau suivant
12. En mode MP3 Play/Stop
13. En mode MP3 Morceau précédent
14. Bouton Mode pour choisir le signal d’entrée
15. Indicateur de charge complète
16. Indicateur de charge
Chargement du haut-parleur
Fonctions du panneau arrière
LED ACTIVATE
ON OFF
DC 9V / 1AMICAUX IN
USB
ECHOVOLUME
MASTER
VOLUME
CHARING
FULL
MODE REPEAT
POWER
OFFS D-CARD BT
ON
BC20
DISCO CUBE
MIC
1
2
3 4
5
67
8
9
1011121314
15
16
Page 8

FR3
Fonctions de la télécommande
Connexion au Bluetooth
1. [STANDBY] Touche marche/arrêt
2. [AUX] Sélectionner le signal d’entrée AUX
3. [VOL+] Pour augmenter le volume de la musique
4. [VOL-] Pour diminuer le volume de la musique
5. [CH-/ ] Morceau précédent
6. [CH+/ ] Morceau suivant
7. [Bouton 0-9] Pour choisir directement le numéro du
morceau
8. [EQ] Différents effets sonores
9. [U/SD] Pour choisir le signal d’entrée USB/SD
10. [MODE] Pour choisir l’entrée du signal
11. [MUTE] Bouton Mute
12. [REP] Répéter le morceau
13. [PLAY/PAUSE] Touche Lec/Pause
14. [FOLDER] Pour passer d’un fichier MP3 à un autre
15. [ ] Bluetooth Mode
BC20
DISCO CUBE
1
2
3
4
7
8
5
9
10 1411
12
13
6
1. Sélectionnez le mode Bluetooth en utilisant le commutateur “mode” sur le panneau de l’appareil ou depuis
la télécommande elle-même afin de changer la source audio. (Tous les obstacles entre l’appareil et l’appareil
connecté doivent être enlevés afin d’assurer une bonne connexion)
2. Une fois que vous avez sélectionné le mode Bluetooth, le voyant clignote et le haut-parleur émet un bip.
3. Allumez le Bluetooth de votre smartphone, puis connectez le téléphone à l’appareil. Recherchez BC-20 sur
le téléphone et associez les appareils.
4. Un mot de passe n’est pas nécessaire pour lier le téléphone au BC-20
5. Une fois que l’appareil et le téléphone ont été couplés avec succès, le voyant Bluetooth clignote et la lecture
de la musique peut commencer.
6. Une fois le processus de jumelage terminé, la prochaine fois que l’appareil se connecte au périphérique
Bluetooth, il se connecte automatiquement.
7. Lorsque vous écoutez de la musique via la fonction Bluetooth, les fonctions telles que la lecture, la pause,
la piste suivante, la piste précédente seront opérationnelles et peuvent être modifiées via le panneau de
l’appareil, de la télécommande ou directement depuis votre smartphone (périphérique Bluetooth)
15
Page 9

FR4
Fonction USB/SD
Connexion AUX
Lumières LED
1. Appuyez sur le bouton "MODE" du panneau de commande de l’appareil ou de la télécommande pour
changer la source audio en mode d’entrée “USB” ou “SD”. Vous pouvez également accéder directement en
appuyant sur “U/SD” de la télécommande.
2. Insérez avec précaution le lecteur USB dans le connecteur et/ou la carte SD dans le logement.
3. Le système démarre automatiquement la lecture des fichiers MP3 à partir de l’USB et/ou de la carte SD.
4. Vous pouvez contrôler la lecture, la pause, la piste précédente ou la piste suivante à partir du panneau de
commande de l’appareil ou de la télécommande.
5. Pour accéder à une piste spécifique, utilisez les touches numériques de la télécommande.
6. Appuyez sur la touche “REP” vous permet de répéter “ONE” – une chanson ou “ALL” – toutes les chansons
jouées.
7. Appuyez sur la touché "FOLDER", ce qui vous permettra de passer d’un dossier à l’autre.
8. Sélectionnez “EQ” et sélectionnez les différents effets sonores "POP", "ROC", "JAZ", "CLA", "COU" et "NOR"
9. Appuyez sur "MUTE" pour faire taire la lecture.
1. Sélectionnez le mode d’entrée “AUX” à l’aide de la touche “MODE” du panneau de commande de l’appareil
ou de la télécommande elle-même, à partir de laquelle vous pouvez également appuyez sur « AUX » pour
un raccourci.
2. La lecture de la musique démarre automatiquement
3. Appuyez sur "PLAY / PAUSE" pour arrêter la lecture ou la lecture.
4. D’autres fonctions ne sont pas opérationnelles et ne peuvent pas être modifiées à partir du panneau de
commande de l’appareil ou de la télécommande.
• Pour l’activer, positionnez l’interrupteur "LED POWER" sur ON. La LED sur le dessus commencera à s’allumer,
changeant aléatoirement les couleurs ou allumant tout à la fois.
Remarque : Les supports de stockage USB ou les cartes SD mal raccordés peuvent endommager sérieusement
l’appareil. Une carte SD, bloquée, n’est pas détectée et ne sera pas lue par l’appareil. Les Clés USB ou carte SD
seront acceptées sont la version 2.0 et jusqu’à 32 Go.
Page 10

D1
WAARSCHUWING
WARNING: TO REDUCE THE RISK OF FIRE OR SHOCK,
DO NOT EXPOSE THIS PRODUCT TO RAIN OR MOISTURE
Het uitroepteken binnenin een driehoek is om de
gebruikers aan te geven dat er belangrijke reparatie en
onderhoud instructies te vinden zijn. Deze kunt u vinden
in de handleiding die bij dit product zit.
Het ash teken binnenin een driehoek geeft aan dat
er een gevaarlijk voltage aan de binnenkant van het
product zit. Deze kan gevaarlijk genoeg zijn om een
stroomstoot te geven aan de gebruiker.
Nota:
Probeer nooit om de achterkant of de power adapter te
openen omdat u zich blootstelt aan een gevaarlijk voltage
of andere gevaren. Uw garantie zal dan ook voorbij
zijn. Er zijn geen gebruikersvriendelijke objecten in de
binnenkant.
Nota:
Dit apparaat overschrijdt niet de B Klasse limieten voor
radio storingen emissies voor digitale apparaten als
aangegeven in de Radio Interference Regulations of
Industry Canada. Deze limieten zijn er om er voor te
zorgen dat er geen schadelijke radio storingen worden
uitgestoten in residentiële area's.
Nota:
Verander de antenne van positie.
Zet het apparaat verder van de zender af.
Sluit het apparaat aan een andere stroomtoevoer aan dan de zender.
Vraag aan uw dealer of een ervaren radio/TV technicus voor assistentie.
CAUTION: TO REDUCE THE RISK OF FIRE OR
SHOCK, DO NOT REMOVE COVER OR BACK.
NO USER-SERVICEABLE PARTS INSIDE. REFER
SERVICING TO QUALIFIED PERSONNEL
Class II equipment symbol
This symbol indicates that
the unit has a double system.
Belangrijke veiligheid instructies
1. Lees deze instructies.
2. Bewaar deze instructies. Let op alle waarschuwingen.
3. Volg deze instructies.
4. Gebruik dit apparaat niet dichtbij water.
5. Maak alleen schoon met een droge doek.
6. Bedek geen ventilatie openingen.
7. Installeer volgens de aanwijzingen van de fabrikant.
8. Installeer niet in de buurt van hitte bronnen zoals radiatoren, fornuizen of andere apparaten zoals speakers.
9. Let op het type stopcontact dat nodig is om dit product aan te sluiten. Als deze niet hetzelfde is vraag dan aan een
elektricien voor hulp.
10. Zorg ervoor dat er niet op de stroomkabel wordt gestaan of dat deze wordt beschadigd.
11. Gebruik alleen officiële accessoires die door de fabrikant worden aangegeven.
12. Wanneer u het product beweegt deze alleen met de bijgevoegde kar bewegen om schade te voorkomen.
13. Sluit het apparaat af als er sprake is van onweer of als u het product niet meer gebruikt.
14. Laat reparaties en onderhoud alleen aan ervaren personeel over. Dit is nodig als de kabel beschadigd is, er vloeistoffen
zijn gemorst of het apparaat gebroken is of niet meer werkt.
15. Geen objecten gevuld met vloeistoffen bovenop het apparaat plaatsen.
16. De batterij kan niet blootgesteld worden aan vuur of veel zonlicht.
17. De MAINS plug wordt gebruikt om het apparaat af te sluiten.
Page 11
D2
• Sluit de meegeleverde lichtnetadapter aan op een stopcontact met 100 V ~ 240 V wisselspanning om de
batterij van de eenheid op te laden.
• De oplaadtijd is ongeveer 6 uur.
• Haal de lichtnetadapter uit het stopcontact zodra de eenheid volledig is opgeladen, omdat wanneer een
volle batterij aan de oplader wordt gelaten, de batterij kan beschadigen.
• Als de luidspreker gedurende langere tijd niet wordt gebruikt, laadt de batterij dan volledig op voordat u
hem weer gebruikt; anders kan dit de batterij beschadigen!
• Probeer altijd om de eenheid één keer per maand op te laden.
• Houd de eenheid tijdens het afspelen uit de buurt van omgevingen met hoge temperaturen, sterke
magnetische velden en hoge frequenties. Als het systeem niet werkt, schakel dan de voedingsbron uit en
herstart het om het afspelen te hervatten.
1. Master volumeregeling
2. In-/uitschakelen
3. Volumeregeling van bekabelde en draadloze microfoons
4. Echoregeling van bekabelde en draadloze microfoons
5. Kleurige led-schakelaar
6. Oplaadaansluiting 9 V gelijkspanning
7. 6,5 mm microfooningang
8. 3,5 mm audio-ingangsaansluiting
9. USB-/SD-sleuf
10. Herhaal het nummer in MP3-modus
11. Volgende nummer in MP3-modus
12. Afspelen/stoppen in MP3-modus
13. Vorig nummer in MP3-modus
14. Modustoets om het ingangssignaal te kiezen
15. Led-indicator volledig opgeladen
16. Led-indicator voor opladen
Het opladen van de luidspreker
Functies achterpaneel
LED ACTIVATE
ON OFF
DC 9V / 1AMICAUX IN
USB
ECHOVOLUME
MASTER
VOLUME
CHARING
FULL
MODE REPEAT
POWER
OFFS D-CARD BT
ON
BC20
DISCO CUBE
MIC
1
2
3 4
5
67
8
9
1011121314
15
16
Page 12

D3
Functies op de afstandsbediening
Het verbinden met Bluetooth
1. [STANDBY] Aan-/uittoets
2. [AUX] Kies AUX-ingangssignaal
3. [VOL+] Muziekvolume verhogen
4. [VOL-] Muziekvolume verlagen
5. [CH-/ ] Vorig nummer
6. [CH+/ ] Volgend nummer
7. [Toetsen 0-9] Kies direct een volgnummer van een nummer
8. [EQ] Verschillende geluidseffecten
9. [U/SD] Kies ingangssignaal van USB/SD
10. [MODE] Kiezen signaalingang
11. [MUTE] Toets dempen
12. [REP] Herhaal nummer
13. [PLAY/PAUSE] Toets afspelen/pauze
14. [FOLDER] Schakel van het ene MP3-bestand naar een ander
15. [ ] Bluetooth Mode
BC20
DISCO CUBE
1
2
3
4
7
8
5
9
10 1411
12
13
6
1. Selecteer met de toets "MODE" op het bedieningspaneel van de eenheid of op de afstandsbediening zelf
de Bluetoothmodus om de geluidsbron te wijzigen. (alle obstakels tussen de eenheid en het verbonden
apparaat moeten worden verwijderd om een goede verbinding te verzekeren)
2. Zodra u de Bluetoothmodus hebt geselecteerd, knippert het indicatielampje en laat de luidspreker een
pieptoon horen.
3. Schakel Bluetooth van uw mobiele telefoon in en verbind dan de telefoon met de eenheid. Zoek op de
telefoon naar BC-20 en koppel het apparaat met de eenheid.
4. Er is geen wachtwoord vereist om de telefoon met de BC-20 te koppelen
5. Zodra het koppelen van de eenheid en de telefoon is geslaagd, knippert de Bluetoothindicator en kan het
afspelen van muziek beginnen.
6. Zodra het koppelen is voltooid, koppelt de eenheid automatisch wanneer hij de volgende keer met het
Bluetoothapparaat verbindt.
7. Wanneer via de Bluetoothfunctie wordt geluisterd, zijn de functies zoals afspelen, pauze, volgende nummer,
vorige nummer werkzaam en kunnen via het paneel op de eenheid, via de afstandsbediening of direct van
uw smartphone worden gewijzigd (Bluetoothapparaat)
15
Page 13

D4
USB-/SD-functie
AUX-aansluiting
Led-lampjes
1. Druk op de toets "MODE" op het bedieningspaneel van de eenheid of op de afstandsbediening zelf om de
geluidsbron te wijzigen naar de ingang "USB" of "SD"-modus. U kunt dit ook rechtstreeks openen door op
de afstandsbediening op"U/SD" te drukken.
2. Sluit het USB-station voorzichtig aan op de connector en/of steek de SD-kaart in de sleuf.
3. Het systeem start automatisch met het lezen van de MP3-bestanden van de USB en/of van de SD-kaart.
4. U kunt vanaf het bedieningspaneel van de eenheid of de afstandsbediening afspelen, pauze, vorige nummer
of volgende nummer bedienen.
5. Gebruik de toetsen op de afstandsbediening om naar een specifiek nummer te gaan.
6. Door op de toets "REP" te drukken krijgt u de optie om "ONE": één nummer of "ALL": alle gespeelde
nummers te herhalen.
7. Druk op de toets "FOLDER", hierdoor kunt u van de ene map naar de andere gaan.
8. Selecteer "EQ" en selecteer the verschillende geluidseffecten; "POP", "ROC", "JAZ", "CLA", "COU" en "NOR"
9. Druk op "MUTE" om het afspelen te dempen.
1. Selecteer met de toets "MODE" op het bedieningspaneel van de eenheid of op de afstandsbediening zelf de
ingangsmodus "AUX". U kunt hier ook als snelkoppeling op "AUX" drukken.
2. Het afspelen start automatisch.
3. Druk op "AFSPELEN/PAUZE" om het afspelen te starten of te stoppen.
4. Andere functies zijn niet werkzaam en kunnen niet vanaf het bedieningspaneel van de eenheid of vanaf de
afstandsbediening worden gewijzigd.
• Zet de schakelaar "LED POWER" in de stand ON (aan). De led bovenop licht plotseling op en wijzigt
willekeurig van kleur.
Opmerking: USB opslagmedia of SD-kaarten die verkeerd worden aangesloten, kunnen ernstige schade aan
de eenheid veroorzaken. Een geblokkeerde SD-kaart wordt niet gedetecteerd en wordt niet door de eenheid
afgespeeld.
Geaccepteerde USB- of SD-kaarten zijn van versie 2.0 of hoger tot maximaal 32GB
Page 14

DE1
WARNUNG
WARNING: TO REDUCE THE RISK OF FIRE OR SHOCK,
DO NOT EXPOSE THIS PRODUCT TO RAIN OR MOISTURE
(Das Ausrufungszeichen innerhalb des
gleichschenkligen Dreiecks weist die Benutzer auf
wichtige Anweisungen zu Bedienung und Pege des
Produkts hin.)
(Der Blitz innerhalb des gleichschenkligen Dreiecks
weist die Benutzer auf die Anwesenheit nicht isolierter
gefährlicher Spannung innerhalb der Hülle des Produkts.
Diese kann stark genug sein um ein Elektroschock bei
Menschen zu verursachen.)
ANMERKUNGEN :
Bitte versuchen Sie nicht die hintere Seite der Hülle oder
das Netzteil zu öffnen. Beim Öffnen der Hülle gehen Sie
ein gefährliches Schockrisiko ein, und Sie können dabei
auch den Lautsprecher beschädigen. Es benden sich
keine Einstellungsinstrumente für Nutzer innerhalb der
Hülle.
ANMERKUNGEN :
Dieses digitale Gerät überschreitet nicht die Grenzwerte
der Klasse B für Funkstörungen aus digitalen Geräten,
wie in den Anforderungen des RIRIC (Radio Interference
Regulations of Industry Canada) festgelegt. Diese
Grenzwerte wurden festgelegt um einen angemessenen
Schutz vor schädlichen Störungen in Wohngebieten zu
gewährleisten.
ANMERKUNGEN :
Orientieren Sie die Empfang Antenne.
Vergrößern Sie Trennung zwischen Gerät und der Empfänger.
Stecken Sie das Gerät und den Empfänger an unterschiedliche Steckdosen.
Fragen Sie Ihren Verkäufer oder einen erfahrenen Fernsehtechniker nach Rat.
CAUTION: TO REDUCE THE RISK OF FIRE OR
SHOCK, DO NOT REMOVE COVER OR BACK.
NO USER-SERVICEABLE PARTS INSIDE. REFER
SERVICING TO QUALIFIED PERSONNEL
Class II equipment symbol
This symbol indicates that
the unit has a double system.
WICHTIGE SICHERHEITSHINWEISE
1. Lesen Sie diese Hinweise.
2. Behalten Sie diese Hinweise. Beachten Sie auf alle Warnungen.
3. Befolgen Sie alle Hinweise.
4. Benützen Sie dieses Apparat nicht in der nähe des Wassers.
5. Putzen Sie es nur mit Trockene Stoffe.
6. Blockieren Sie keine Ventilations Öffnungen.
7. Bauen Sie das Gerät übereinstimmend mit den Aufbauanleitungen.
8. Bauen Sie es nicht in der nähe Wärmquellen wie Heizungen, Öfen, oder andere Geräte die Hitze produzieren können.
9. Verlieren Sie nicht die Sicherheit des polarisierten oder Boden-Stecker. Ein polarisierter Stecker hat zwei Stifte und
einen dritten Erdungsstift. Der breite Stift oder der dritte Stift dienen Ihrer Sicherheit. Wenn der mitgelieferte Stecker
nicht in die Steckdose passt, erkundigen Sie einen Elektriker für den Ersatz der veralteten Steckdose
10. Schützen Sie das Netzkabel vom getreten werden oder einklemmen an den Steckdosen, und an der Stelle, wo es aus
dem Gerät heraus kommt.
11. Benützen Sie nur vom Hersteller spezifizierte Zubehöre für dieses Gerät.
12. Verwenden Sie nur Wagen, Ständer, Stativ, Halter oder Tische, die vom Hersteller empfohlenen oder mit dem Gerät
verkauft werden. Wenn ein Wagen benutzt wird, seien Sie vorsichtig, während der Bewegung des Wagens oder des
Gerätes, um Verletzungen durch Umkippen zu vermeiden. Vorsicht bei der Nutzung eines Tragbaren Wagens.
13. Stecken Sie das Gerät während eines Blitzsturmes oder nach längeren ohne Nutzung für eine lange Zeit aus.
14. Lassen Sie alle Wartungsarbeiten qualifiziertem Servicepersonal. Eine Wartung ist notwendig, wenn das Gerät in
irgendeiner Weise beschädigt wurde, wie wenn beispielsweise das Netzkabel oder der Stecker beschädigt ist, Flüssigkeit
verschüttet wurde oder Gegenstände in das Gerät gefallen sind. Auch wenn das Gerät zu regen oder Feuchtigkeit
ausgesetzt wurde nicht normal funktioniert, oder wurde fallen gelassen.
15. Das Gerät darf keine Tropfe oder Spritzwasser abbekommen. Stellen Sie keine mit Flüssigkeiten gefüllte Objekte wie
Vasen und Gläser, auf das Gerät.
16. Die Batterie sollte keiner übermäßigen Hitze wie direktem Sonnenlicht, Feuer oder ähnlichem ausgesetzt werden.
17. Die Netzstecker die als Trennvorrichtung verwendet werden, sollen leicht bedienbar bleiben.
Page 15

DE2
• Um den Akku im Gerät aufzuladen, verbinden Sie das mitgelieferte Netzteil mit einer Steckdose
• (100 V ~ 240 V Wechselspannung)
• Die Ladedauer beträgt ungefähr 6 Stunden.
• Sobald der Akku voll aufgeladen ist, entfernen Sie bitte das Netzteil. Durch weiteres Aufladen des vollen
Akkus könnten Sie diesen beschädigen.
• Wenn Sie den Lautsprecher längere Zeit nicht benutzt haben, laden Sie den Akku bitte vollständig auf, bevor
Sie ihn verwenden. Anderenfalls könnte der Akku beschädigt werden.
• Laden Sie das Gerät mindestens einmal pro Monat vollständig auf.
• Bitte halten Sie das Gerät während der Wiedergabe fern von hohen Umgebungstemperaturen, starken
Magnetfeldern und hohen Frequenzen. Wenn das Gerät nicht richtig funktioniert, schalten Sie es aus und
wieder ein.
1. Einstellen der Wiedergabelautstärke
2. Ein-/Ausschalter
3. Lautstärkeregelung für kabelloses und Kabel-Mikrofon
4. Echoregelung für kabelloses und Kabel-Mikrofon
5. Ein-/Ausschalter für farbige LEDs
6. Buchse für Netzteil, DC 9V
7. Mikrofoneingang, 6,5 mm
8. Audioeingang, 3,5 mm
9. USB/SD-Slot
10. Titel wiederholen (MP3-Modus)
11. Nächster Titel (MP3-Modus)
12. Wiedergabe/Pause (MP3-Modus)
13. Vorheriger Titel (MP3-Modus)
14. Einstellen des Eingangssignals
15. LED-Anzeige (vollständig aufgeladen)
16. LED-Anzeige (laden)
Aufladen des Lautsprechers
Funktion der Bedienelemente auf der Rückseite
LED ACTIVATE
ON OFF
DC 9V / 1AMICAUX IN
USB
ECHOVOLUME
MASTER
VOLUME
CHARING
FULL
MODE REPEAT
POWER
OFFS D-CARD BT
ON
BC20
DISCO CUBE
MIC
1
2
3 4
5
67
8
9
1011121314
15
16
Page 16

DE3
Funktionen der Bedienelemente auf der Fernbedienung
Bluetooth-Kopplung
1. [STANDBY] Ein-/Ausschalter
2. [AUX] Auswahl des Eingangssignals (AUX)
3. [VOL+] Wiedergabelautstärke erhöhen
4. [VOL-] Wiedergabelautstärke verringern
5. [CH-/ ] Vorheriger Titel
6. [CH+/ ] Nächster Titel
7. [0-9 Buttons] Direkte Titelauswahl
8. [EQ] Verschiedene Soundeffekte
9. [U/SD] Auswahl des Eingangssignals (USB/SD)
10. [MODE] Auswahl des Eingangssignals
11. [MUTE] Stummschalttaste
12. [REP] Titel wiederholen
13. [PLAY/PAUSE] Wiedergabe/Pause
14. [FOLDER] Wechsel von einem MP3-Ordner zum nächsten
15. [ ] Bluetooth Mode
BC20
DISCO CUBE
1
2
3
4
7
8
5
9
10 1411
12
13
6
1. Wählen Sie den Bluetooth-Modus durch Drücken der „Mode“-Taste auf dem Gerät oder auf der
Fernbedienung aus, um die Audioquelle zu wechseln. (Um eine einwandfreie Verbindung sicherzustellen,
sollten alle Hindernisse zwischen dem Lautsprecher und dem zu verbindenden Gerät entfernt werden.)
2. Nachdem Sie den Bluetooth-Modus ausgewählt haben, beginnt die Bluetooth-LED zu blinken und der
Lautsprecher gibt einen Piepton wieder.
3. Aktivieren Sie Bluetooth auf Ihrem Handy. Suchen Sie auf dem Handy nach BC-20 und koppeln Sie das
Handy mit dem Lautsprecher.
4. Um das Handy mit dem BC-20 zu koppeln, wird kein Passwort benötigt.
5. Sobald der Lautsprecher und das Handy erfolgreich gekoppelt wurden, leuchtet die Bluetooth-LED
dauerhaft und Sie können Musik wiedergeben.
6. Wenn der Kopplungsvorgang einmal erfolgreich abgeschlossen wurde, verbinden sich die Gerät das nächste
Mal automatisch.
7. Wenn Sie Musik im Bluetooth-Modus hören, können Sie Funktionen wie Wiedergabe/Pause, nächster/
vorheriger Titel verwenden - entweder über das Gerät selbst, die Fernbedienung oder von Ihrem Handy/
Bluetooth-Gerät aus.
15
Page 17

DE4
USB/SD-Funktion
AUX-Verbindung
Farbige LEDs
1. Drücken Sie die Taste „MODE“ auf dem Gerät oder der Fernbedienung, um die Audioquelle auf „USB“ oder
„SD“ umzustellen. Sie können durch einen Druck auf die Taste „U/SD“ auf der Fernbedienung auch direkt
darauf zugreifen.
2. Stecken Sie den USB-Stick oder die SD-Karte vorsichtig in die dafür vorgesehenen Steckplätze.
3. Der Lautsprecher beginnt automatisch mit der Wiedergabe der MP3-Dateien vom USB-Stick und/oder von
der SD-Karte.
4. Sie können die Wiedergabe/Pause/nächster oder vorheriger Titel über das Gerät selbst oder die
Fernbedienung steuern.
5. Wenn Sie einen bestimmten Titel auswählen wollen, verwenden Sie die Zifferntasten auf der
Fernbedienung.
6. Durch Druck auf die Taste „REP“ können Sie entweder einen (ONE) oder alle (ALL) Titel wiederholen, die
wiedergegeben werden.
7. Durch Druck auf die Taste „FOLDER“ können Sie von einem zum anderen Ordner wechseln.
8. Durch Druck auf die Taste „EQ“ können Sie zwischen verschiedenen Soundeffekten auswählen: „POP“,
„ROC“, „JAZ“, „CLA“, „COU“ und „NOR“
9. Durch Druck auf die Taste „MUTE“ schalten Sie die Wiedergabe stumm.
1. Wählen Sie „AUX“ über die Taste „MODE“ am Gerät oder auf der Fernbedienung (hier ist auch eine
Direktwahl über die Taste „AUX“ möglich.
2. Die Wiedergabe startet automatisch.
3. Durch Druck auf die Taste „PLAY/PAUSE“ beenden oder setzen Sie die Wiedergabe fort.
4. Weitere Funktionen sind in diesem Modus nicht verfügbar und können nicht über das Gerät oder die
Fernbedienung gesteuert werden.
• Stellen Sie den Schalter „LED POWER“ auf „ON“, um die farbigen LEDs zu aktivieren. Die oberen LEDs
beginnen zu leuchten und verändern entweder ihre Farbe oder leuchten alle gleichzeitig auf.
Hinweis: Wenn Sie USB-Speichermedien oder SD-Karten falsch mit dem Gerät verbinden, kann das zu schweren
Schäden am Gerät führen. Speichergeschütze SD-Karten werden nicht erkannt und auch nicht wiedergegeben.
USB-Speichermedien oder SD-Karten (Version 2.0) werden bis zu einer Größe von 32GB wiedergegeben.
Page 18
ES1
Cuidado
WARNING: TO REDUCE THE RISK OF FIRE OR SHOCK,
DO NOT EXPOSE THIS PRODUCT TO RAIN OR MOISTURE
El signo de exclamación dentro de un triángulo
equilátero está para alertar usuarios de la presencia de
instrucciones importantes de operación y mantenimiento
en la literatura acompañando al producto.
El símbolo de rayo con echa está para alertar al usuario
de la presencia de un “voltaje dañino” no aislado dentro
del producto, que puede llegar a ser de una magnitud
suciente para dar un choque de corriente a una
persona.
Notas:
Por favor no intente abrir la tapadera trasera o el
adaptador de corriente ni abrir o quitar la tapadera, ya
que puede ponerse en contacto con voltajes peligrosos
u otros peligros, y también hará que se rompa su uso
restringido: No hay componentes para el servicio del
usuario en el interior.
Notas:
Este aparato digital no supera los límites de clase B
de emisiones de ruido de radio, tal como indicado
en las Regulaciones de Industria de Interferencia de
radio de Canadá. Estos límites están diseñados para
ofrecer una protección racional en contra de peligrosas
interferencias en una instalación residencial.
Notas:
Vuelva a orientar o mueva la antena de recepción.
Separe más la equipación del receptor.
Conecte la equipación a un enchufe diferente al que está enchufado el receptor.
Consulte el vendedor o un técnico con experiencia en radio/TV para asistencia.
CAUTION: TO REDUCE THE RISK OF FIRE OR
SHOCK, DO NOT REMOVE COVER OR BACK.
NO USER-SERVICEABLE PARTS INSIDE. REFER
SERVICING TO QUALIFIED PERSONNEL
Class II equipment symbol
This symbol indicates that
the unit has a double system.
Instrucciones de seguridad importantes
1. Lea estas instrucciones.
2. Guarde estas instrucciones. Lea todas las precauciones.
3. Siga todas las instrucciones.
4. No use este aparato cerca del agua.
5. Solo lo limpie con toallas secas.
6. No bloquee ninguna apertura de ventilación.
7. Instale acorde con las instrucciones del fabricante.
8. No lo instale cerca de ninguna fuente de calor como radiadores, registros de calor, forno u otros aparatos (incluyendo
amplificadores) que producen calor.
9. No se equivoque con que enchufe usar. Un enchufe polarizado tiene dos hojas, uno más ancho que el otro. Un enchufe
de tierra tiene dos hojas y una clavija de tierra. La hoja ancha de la tercera clavija está para su seguridad. Si el enchufe
proporcionado no se puede usar en su enchufe, consulte un electricista para reemplazar su enchufe obsoleto.
10. Proteja el cable de corriente de ser pisoteado y dañado especialmente en los enchufes, y donde salen del aparato.
11. Solo use accesorios especificados por el fabricante.
12. Use solo con el carro, trípode, bracket, o mesa especificada por el fabricante, o vendido junto al producto. Cuando use
un carro, tenga cuidado al mover el aparato y carro para evitar daños al caerse. Aviso de Carro Portátil.
13. Desconecte este aparato durante tormentas o cuando no se use durante largos periodos de tiempo.
14. Deje todos los arreglos a personal de servicio profesional. Reparaciones son necesitadas cuando el aparato ha sido
dañado de cualquier manera como daño en el adaptador de corriente, daño de agua o si algún objeto ha caído dentro
del aparato, el aparato ha sido expuesto a lluvia o humedad y no funciona de manera correcta, o ha caído.
15. El aparato no deberá ser expuesto a pequeñas cantidades de líquidos, ni se podrá colocar ningún objeto lleno de agua
por encima.
16. La batería no podrá ser expuesta a calor excesiva tal como el sol, fuego o parecidos.
17. Los enchufes principales serán usados para desconectar el dispositivo.
Page 19

ES2
• Conecte el adaptador eléctrico incluido a una conexión de 100 V CA-240 V CA para cargar la batería de la
unidad.
• El tiempo de carga es de aproximadamente 6 horas.
• Una vez cargada completamente, desconéctela de la alimentación eléctrica, ya que dejar cargando una
batería llena podría causar daños en la misma.
• ¡Si no se ha usado el altavoz durante mucho tiempo, deje que la batería se cargue completamente antes de
volver a usarlo, de lo contrario la batería resultará dañada!
• Intente siempre cargar la unidad una vez al mes.
• Mantenga la unidad alejada de los entornos con temperaturas elevadas, campos magnéticos intensos y
altas frecuencias durante la reproducción. Si el sistema no funciona, apáguelo y vuelva a encenderlo para
reanudar la reproducción.
1. Control maestro del volumen
2. Apagar/encender
3. Control de volumen de micrófono con cable e inalámbrico
4. Control de eco de micrófono con cable e inalámbrico
5. Interruptor LED de colores
6. Conector de carga de 9 V CC
7. Conector de entrada de micrófono de 6,5 mm
8. Conector de entrada de audio de 3,5 mm
9. Ranura SD/USB
10. Repetir canción en modo MP3
11. Canción siguiente en modo MP3
12. Reproducir/detener en modo MP3
13. Canción anterior en modo MP3
14. Botón de modo para elegir la señal de entrada
15. Indicador LED de carga completa
16. Indicador LED de carga
Carga del altavoz
Funciones del panel trasero
LED ACTIVATE
ON OFF
DC 9V / 1AMICAUX IN
USB
ECHOVOLUME
MASTER
VOLUME
CHARING
FULL
MODE REPEAT
POWER
OFFS D-CARD BT
ON
BC20
DISCO CUBE
MIC
1
2
3 4
5
67
8
9
1011121314
15
16
Page 20

ES3
Funciones del mando a distancia
Conectar a Bluetooth
1. [STANDBY] Botón de encendido
2. [AUX] Elegir señal auxiliar de entrada
3. [VOL+] Subir el volumen de la música
4. [VOL-] Bajar el volumen de la música
5. [CH-/ ] Canción anterior
6. [CH+/ ] Canción siguiente
7. [Botones 0-9] Elegir directamente el número de canción
8. [EQ] Diferentes efectos de sonido
9. [U/SD] Elegir señal de entrada por USB/SD
10. [MODE] Elegir señal de entrada
11. [MUTE] Botón de silencio
12. [REP] Repetir canción
13. [PLAY/PAUSE] Botón de reproducir/pausar
14. [FOLDER] Pasar de un archivo MP3 a otro
15. [ ] Bluetooth Mode
BC20
DISCO CUBE
1
2
3
4
7
8
5
9
10 1411
12
13
6
1. Seleccione el modo Bluetooth con el botón "Mode" del panel de la unidad o desde el mando a distancia
para cambiar la fuente de audio. (se debe retirar todos los obstáculos entre la unidad y el dispositivo
conectado para garantizar una conexión correcta).
2. Una vez seleccionado el modo Bluetooth, la luz indicadora parpadeará y el altavoz emitirá un pitido.
3. Encienda el Bluetooth de su teléfono móvil y conéctelo a la unidad. Busque BC-20 con el teléfono y vincule
el dispositivo a la unidad.
4. No se necesita ninguna contraseña para vincular el teléfono al BC-20.
5. Una vez la unidad y el teléfono estén vinculados correctamente, la luz indicadora del Bluetooth parpadeará
y podrá empezar a reproducir música.
6. Cuando el proceso de vinculación esté completado, la próxima vez que la unidad se conecte con el
dispositivo Bluetooth lo hará automáticamente.
7. Cuando escuche música a través de la función Bluetooth, las funciones de reproducción, pausa, pista
siguiente y pista anterior estarán operativas y podrá cambiarlas mediante el panel de la unidad, el mando a
distancia o directamente desde su smartphone (dispositivo Bluetooth).
15
Page 21

ES4
Función USB/SD
Conexión auxiliar
Luces LED
1. Pulse el botón "MODE" del panel de control de la unidad o del mando a distancia para cambiar la fuente
de audio al modo "USB" o "SD". También puede acceder directamente pulsando "U/SD" en el mando a
distancia.
2. Inserte con cuidado la unidad USB en el conector y/o la tarjeta SD en la ranura.
3. El sistema empezará a leer automáticamente los archivos MP3 del USB y/o de la tarjeta SD.
4. Puede reproducir, pausar, pasar a la pista anterior o a la pista siguiente desde el panel de control de la
unidad o desde el mando a distancia.
5. Para ir a una pista concreta, utilice los botones de número del mando a distancia.
6. Pulsando el botón "REP" podrá elegir entre repetir "ONE", una canción, o "ALL", todas las canciones.
7. Pulsando el botón "FOLDER" podrá pasar de una carpeta a otra.
8. Pulse "EQ" y seleccione los diversos efectos de sonido, "POP", "ROC", "JAZ", "CLA", "COU" y "NOR".
9. Pulse "MUTE" para silenciar la reproducción.
1. Seleccione el modo de entrada "AUX" con el botón "MODE" del panel de control de la unidad o del mando
a distancia, en el que también puede pulsar "AUX" como acceso directo.
2. La música empezará a reproducirse automáticamente.
3. Pulse "PLAY/PAUSE" para detener la reproducción o para reproducir.
4. Las demás funciones no están operativas y no se pueden cambiar desde el panel de control de la unidad ni
desde el mando a distancia.
• Para activarlas, coloque el interruptor "LED POWER" en "ON". El LED superior empezará a iluminarse y
cambiará aleatoriamente de colores o se iluminará de golpe.
Nota: las unidades de almacenamiento USB o tarjetas SD conectadas incorrectamente podrían provocar daños
graves en la unidad. La unidad no detectará ni reproducirá las tarjetas SD bloqueadas.
Solo son compatibles las unidades USB o tarjetas SD versión 2.0 o superior y con una capacidad máxima de 32
GB.
Page 22

IT1
ATTENZIONE
WARNING: TO REDUCE THE RISK OF FIRE OR SHOCK,
DO NOT EXPOSE THIS PRODUCT TO RAIN OR MOISTURE
Il simbolo di un punto esclamativo all'interno di un
triangolo equilatero avvisa l'utente della presenza di
importanti istruzioni di funzionamento e manutenzione
(riparazione) nella documentazione allegata al prodotto.
Il simbolo del lampo appuntito all'interno di un triangolo
equilatero avvisa l'utente della presenza di correnti non
isolate con "tensione pericolosa" all'interno della custodia
del prodotto, che hanno intensità sufciente a esporre le
persone al rischio di scariche elettriche
NOTE:
Mai tentare di aprire il coperchio posteriore o
l'alimentatore elettrico, poiché l'apertura o la rimozione
delle coperture può esporre l'utente a tensioni elettriche
pericolose o altri rischi; inoltre possono indicare tentativi
di riparazione non autorizzati: L'unità non contiene
componenti riparabili dall'utente al suo interno.
NOTE:
Il presente dispositivo digitale non supera i limiti di
emissione radio per gli apparecchi digitali di Classe
B, stabiliti nei Regolamenti Canadesi sulle Interferenze
Radio nell'Industria. Tali limiti sono stati deniti per
fornire ragionevoli livelli di protezione contro interferenze
dannose nelle installazioni residenziali.
NOTE:
Potrebbe essere necessario riorientare o riposizionare l'antenna ricevente.
Aumentare la distanza tra il dispositivo e il ricevitore.
Collegare l'apparecchio a una presa appartenete a un circuito diverso rispetto a quello cui è collegato il
ricevitore
Consultare il proprio rivenditore o un tecnico radio/TV qualicato per ulteriore assistenza.
CAUTION: TO REDUCE THE RISK OF FIRE OR
SHOCK, DO NOT REMOVE COVER OR BACK.
NO USER-SERVICEABLE PARTS INSIDE. REFER
SERVICING TO QUALIFIED PERSONNEL
Class II equipment symbol
This symbol indicates that
the unit has a double system.
IMPORTANTI ISTRUZIONI DI SICUREZZA
1. Leggere le presenti istruzioni.
2. Conservare le presenti istruzioni. Prestare attenzione a tutte le avvertenze.
3. Rispettare tutte le istruzioni.
4. Non usare il presente apparecchio in prossimità di acqua.
5. Servirsi solo di panni asciutti per la pulizia.
6. Non ostruire le aperture di ventilazione.
7. Installare in base alle istruzioni del produttore.
8. Non installare l'apparecchio in prossimità di fonti di calore quali termosifoni, bocchette di mandata, stufe o altri
dispositivi (inclusi amplificatori) che producono calore.
9. Non rimuovere le sicure delle spine polarizzate o con messa a terra. Una spina polarizzata è dotata di due connettori
uno più largo dell'altro. Una spina con messa a terra è dotata dei due connettori standard più un terzo polo di messa
a terra. Il connettore più largo e il terzo polo sono presenti per la sicurezza dell'utente e non vanno rimossi. Se la spina
in dotazione non si adatta alla propria presa di corrente, consultare un elettricista qualificato per provvedere alla
sostituzione della presa obsoleta.
10. Proteggere il cavo di alimentazione perché non sia calpestato o teso eccessivamente dalle spine, alle prese a muro o
dalle uscite dall'apparecchio.
11. Usare solo dispositivi di collegamento/accessori indicati dal produttore.
12. Usare solo carrelli, sostegni, basi, staffe o tavoli indicati dal produttore o in dotazione con l'apparecchio. In caso di
utilizzo di carrelli, prestare attenzione agli spostamenti del sistema carrello/apparecchio per evitare di farsi male a
causa di ribaltamenti del sistema. Avviso sul carrello portatile
13. Disconnettere l'unità dalla presa elettrica in caso di temporali o per periodi prolungati di inutilizzo.
14. Per le riparazioni rivolgersi esclusivamente a personale qualificato. L'unità richiede riparazioni in caso presenti danni
di qualunque tipo, ad esempio al cavo di alimentazione o alla spina, danni causati da versamento di liquidi o caduta di
oggetti sull'apparecchio, esposizione dello stesso a pioggia o umidità, o ancora in caso di caduta.
15. L'apparecchio non deve essere esposto a sgocciolamenti o schizzi d'acqua e, allo stesso modo, non si devono
appoggiare su di esso oggetti contenenti liquidi, ad esempio vasi.
16. La batteria non deve essere esposta a calore eccessivo, ad esempio alla luce solare o a fiamme libere.
17. Le spine elettriche usate per la disconnessione dell'apparecchio, devono essere agevolmente raggiungibili.
Page 23

IT2
• Per caricare la batteria dell'unità, collegare l'alimentatore fornito a una porta CA100V ~ CA240V
• Il tempo di ricarica è di circa 6 ore.
• Una volta caricata completamente scollegare l'alimentatore, in quanto lasciare la batteria sotto carica può
danneggiarla.
• Se l'altoparlante non è utilizzato per un tempo prolungato, permettere alla batteria di ricaricarsi
completamente prima di utilizzala nuovamente, altrimenti la batteria può danneggiarsi!
• Cercare di caricare la batteria almeno una volta al mese.
• Durante la riproduzione, tenere l'unità lontana da ambiente con alte temperature, campi magnetici
elevati e alte frequenze. Se il sistema non funziona, spegnere l'alimentazione e riavviarla per riprendere la
riproduzione.
1. Regolazione volume principale
2. Accensione/spegnimento
3. Regolazione volume microfono cablato e wireless
4. Regolazione eco microfono cablato e wireless
5. Interruttore LED a colori
6. Jack di ricarica CC 9 V
7. Jack ingresso microfono 6,5 MM
8. Jack ingresso audio 3,5 MM
9. Slot USB/SD
10. Ripetizione brano in modalità MP3
11. Brano successivo in modalità MP3
12. Riproduzione/Interruzione in modalità MP3
13. Brano precedente in modalità MP3
14. Pulsante Modalità per scegliere il segnale di ingresso
15. Indicatore LED carica completa
16. Indicatore LED ricarica
Ricarica dell'altoparlante
Funzioni pannello posteriore
LED ACTIVATE
ON OFF
DC 9V / 1AMICAUX IN
USB
ECHOVOLUME
MASTER
VOLUME
CHARING
FULL
MODE REPEAT
POWER
OFFS D-CARD BT
ON
BC20
DISCO CUBE
MIC
1
2
3 4
5
67
8
9
1011121314
15
16
Page 24

IT3
Funzioni remote
Collegamento Bluetooth
1. [STANDBY] Tasto Accensione
2. [AUX] Scegliere segnale ingresso AUX
3. [VOL+] Aumentare volume musica
4. [VOL+] Abbassare volume musica
5. [CH-/ ] Brano precedente
6. [CH+/ ] Brano successivo
7. [Pulsanti 0-9] Scegliere direttamente il numero di un brano
8. [EQ] Effetti sonori diversi
9. [U/SD] Scegliere segnale ingresso USB/SD
10. [MODE] Scegliere ingresso segnale
11. [MUTE] Tasto silenziamento
12. [REP] Ripetere brano
13. [PLAY/PAUSE] Tasto Riproduzione/Pausa
14. [FOLDER] Commutazione da un file MP3 all'altro
15. [ ] Bluetooth Mode
BC20
DISCO CUBE
1
2
3
4
7
8
5
9
10 1411
12
13
6
1. Selezionare una modalità Bluetooth usando il selettore "mode" sul pannello dell'unità o dal telecomando
stesso per cambiare la sorgente audio. (tutti gli ostacoli tra l'unità e il dispositivo collegato devono essere
rimossi per assicurare una corretta connessione)
2. Una volta selezionata la modalità Bluetooth, la spia lampeggia e l'altoparlante emetterà un "bip".
3. Accedere il Bluetooth del proprio telefono cellulare e quindi collegare il telefono all'unità. Ricercare
4. BC-20 sul telefono e accoppiare il dispositivo all'unità.
5. Non è necessaria un password per accoppiare il telefono con il BC-20.
6. Una volta che l'unità e il telefono sono stati accoppiati con successo, la spia Bluetooth lampeggia e la
riproduzione della musica può iniziare.
7. Una volta che il processo di accoppiamento è completato, la volta successiva che l'unità si collega al
dispositivo Bluetooth, si collegherà automaticamente.
8. Quando si ascolta la musica mediante la funzione Bluetooth, le funzioni come riproduzione, pausa, traccia
precedente, traccia successiva saranno funzionanti e possono essere modificate attraverso il pannello
sull'unità, il telecomando o direttamente dal proprio smartphone (dispositivo Bluetooth).
15
Page 25

IT4
Funzione USB/SD
Collegamento AUX
Spie LED
1. Premere il pulsante "MODE" sul pannello di controllo dell'unità o sul telecomando stesso, per cambiare
la sorgente audio alla modalità di immissione "USB" o "SD". È possibile anche accedere direttamente
premendo "U/SD" dal telecomando.
2. Inserire con attenzione unità USB nel connettore e/o la scheda SD nello slot.
3. Il sistema avvierà automaticamente la lettura dei file MP3 dalla USB e/o dalla scheda SD.
4. È possibile controllare riproduzione, pausa, traccia precedente o traccia successiva dal pannello di controllo
dell'unità o del telecomando.
5. Per andare a una traccia specifica utilizzare i tasti numerici sul telecomando.
6. Premere il tasto "REP" per avere la possibilità di ripetere "ONE"- un brano o "ALL" – tutti i brani riprodotti.
7. Premere il tasto "FOLDER", ciò permetterà di passare da una cartella all'altra.
8. Selezionare "EQ" e i vari effetti sonori; "POP", "ROC", "JAZ", "CLA", "COU" e "NOR"
9. Premere "MUTE" per silenziare la riproduzione.
1. Selezionare la modalità di immissione "AUX" usando il pulsante "MODE" sul pannello di controllo dell'unità
o sul telecomando stesso, da cui è possibile premere anche "AUX" come scorciatoia.
2. La riproduzione della musica inizia automaticamente.
3. Premere "PLAY/PAUSE" per arrestare la riproduzione o riprodurre.
4. Altre funzioni non sono operative e non possono essere modificate dal pannello di controllo dell'unità o dal
telecomando.
• Per attivare, posizionare l'interruttore "LED POWER" su ON. Il LED sulla parte superiore inizia a lampeggiare,
modificando in modo casuale i colori o accendendo tutto insieme.
Nota: Il dispositivo di archiviazione USB o le schede SD collegate in modo errato possono causare seri danni
all'unità. Una scheda SD, che è bloccata, non è rilevata e non sarà riprodotta dall'unità.
Le schede USB o SD per essere accettate dovranno essere della versione 2.0 e fino a 32GB
 Loading...