

My Music Player
My Music Player LE
User Guide
V1.0 - May 11, 2017
© 2017, Waves System

ID-AL - My Music Player and My Music Player LE - User Guide V1.0
-2- © 2017, Waves System
The ID-AL products are the exclusive manufacturing of Waves System.
Waves System
Impasse de La Ville en Bois
44830 BOUAYE
FRANCE
Sales and information: +33 (0)2 40 78 22 44
E-mail: info@id-al.com
Website: www.id-al.com
Technical support: support@wsystem.com
A technical support is also available on our website www.id-al.com.
Information in this user guide is subject to change without notice and does not represent any commitment from Waves System. The
equipment described in this manual is supplied under condition of the terms of license specifying the legal use conditions. This manual
may not be reproduced or used, in whole or in part, in any form and by any means, for other use than private, without the written
permission from Waves System.
ID-AL is a trademark of Waves System.
© Waves System - 2016

ID-AL - My Music Player and My Music Player LE - User Guide V1.0
CE Marking
The CE marking is found on the nameplate, at the rear side of the device. It certifies the conformance of the device with the low voltage
CE Directive, according to the EN 55022 standard, and the Electromagnetic Compatibility Directive 61000-4-x.
Directives
The requirements related to the electromagnetic compatibility and low voltages directive are met.
Safety Instructions
Overview
Proper usage conforming to the product intended purpose involves strict compliance with the instructions given in this user guide .
The staff should receive instructions regarding the proper usage of the device.
Only the use of genuine parts ensures perfect safety for the user and correct operation of the device. Moreover, only the accessories
mentioned in the technical documentation or explicitly approved by the manufacturer must be used. If accessories or consumable
products from other brands are used, the manufacturer cannot stand guarantee for the correct and safe operation of the device.
Damages caused through the use of accessories or consumable products from other brands will not entail right to any benefit under the
terms of warranty.
The manufacturer will be liable for the safety, reliability and functioning of the product as long as the assembly, settings, modifications,
extensions, and repairs have been carried out by the manufacturer or a company approved by the manufacturer, and if the device is
used in accordance with the instructions mentioned in this manual.
The player complies with the technical safety standards in force at the date of print of this manual. All rights reserved for the electrical
diagrams, procedures, names, and devices mentioned herein.
Any reproduction of the technical documentation, even partial, without a written authorization from Waves System is prohibited.
General Safety Instructions
This device has been shipped out from our facilities in perfect working condition. In order to preserve these conditions, for safety, and to
avoid any risk of accidental bodily injury, the user must imperatively follow the safety instructions and read the “Caution!” messages
included in this manual.
This device, manufactured by Waves System, has been designed in a way that practically eliminates any risk if it is used in accordance
with its intended purpose. Nevertheless, for the sake of safety, we would like to draw your attention to the following instructions:
When using the device, comply with all local rules and regulations in force. Any modification or conversion of the device automatically
entails loss of the certification. The operation of a modified device is liable to a penalty. In the interests of occupational safety, the
operator and the user are held responsible for complying with the regulations.
Keep the original packing for a possible product reshipment. Also ensure that the packing material is kept out of the reach of children.
Only this original packing ensures optimal protection for the product during transportation. If a product reshipment appears to be
necessary during the guarantee period, Waves System is not liable for any ensuing damages arising during the transportation and
attributable to a defective packing.
This device should be used only by persons whose training or knowledge ensures proper handling.
Before each use, the operator must check that the device is in perfect working condition.
This product must not be used in places where there is a potential explosion risk. Besides, it must neither be used in an environment
favoring combustion nor in a humid or excessively hot or cold location.
The device must be installed in a dry and dust-free area. Do not install the device directly against a wall.
-3- © 2017, Waves System
CAUTION! DO NOT EXPOSE TO MOISTURE OR DUST!
FOR YOUR SAFETY, PLEASE READ THE USER’S GUIDE CAREFULLY BEFORE USING YOUR PLAYER.
Unplug the power supply cable before any servicing!

ID-AL - My Music Player and My Music Player LE - User Guide V1.0
Safety Instructions against Risks Due to Electric Currents
The device must be connected to a grounded AC power outlet or a European standard outlet installed as per good professional
practices.
Before connecting the device, check that the mains voltage and frequency match the specifications indicated on the mains adapter.
Before powering, check that the device and cables are not damaged. Damaged cables and connections must immediately be replaced.
Never allow the power cords to come in contact with other cables. Handle the mains adapter cable as well as all other cables connected
to the mains with extreme care.
Always connect the power cord to the device first, then to the mains. The power outlet must remain accessible after the installation.
Check the device and its mains adapter cable from time to time. Disconnect the device from the mains when it is no longer used or for
the purpose of maintenance.
Handle the power cord by using only the plug. Never remove the plug by pulling the power cord.
Electrical connections, repairs, and maintenance must be carried out by qualified personnel.
Do not switch the device on or off within a short period of time as this reduces its lifespan.
Terms of Use
This product has been designed for indoor use only.
If this device has been exposed to very high temperature fluctuations (e.g.: after transportation), do not connect it immediately. The
condensation formed inside the device could damage it. Allow the device to reach ambient temperature before connecting it.
Do not shake the device. Avoid sudden movements during its installation or handling.
When selecting the spot for installation of the player, ensure that it is not exposed to a high source of heat, moisture, or dust. There
should not be any cables lying around as they might jeopardize your and others’ safety.
Delivery Details
My Music Player
12 V / 500 mA mains adapter
Infrared remote control
My Music Player LE
12 V / 2 A mains adapter
Infrared remote control
-4- © 2017, Waves System

ID-AL - My Music Player and My Music Player LE - User Guide V1.0
Table of Contents
1. Introduction.................................................................................................................................................. 8
2. Features....................................................................................................................................................... 9
3. My Music Player and My Music Player LE comparison..............................................................................10
4. Hardware Description................................................................................................................................. 11
4.1. My Music Player................................................................................................................................. 11
4.2. My Music Player LE........................................................................................................................... 12
4.3. Infrared Remote Control....................................................................................................................12
5. Installation.................................................................................................................................................. 13
5.1. My Music Player................................................................................................................................ 13
5.2. My Music Player LE........................................................................................................................... 14
6. Prior to switching on the Player................................................................................................................. 15
6.1. Main Storage Device (Main Media).................................................................................................... 15
. Introduction........................................................................................................................................ 15
. Music Folders (MUSIC)..................................................................................................................... 15
. Playlist Folders (PLAYLIST)............................................................................................................... 15
. Message and Commercial Folders (SPOT)....................................................................................... 16
. System Folder (SYSTEM)................................................................................................................. 16
. Temporary Folder (TMP).................................................................................................................... 17
6.2. External Audio Sources...................................................................................................................... 17
. Introduction........................................................................................................................................ 17
. Web Radios....................................................................................................................................... 17
. Auxiliary Input (My Music Player only)............................................................................................... 18
6.3. Alternative Storage Devices (Alternate Media) (My Music Player only).............................................18
6.4. Preparing a Storage Device............................................................................................................... 18
6.5. Files and Folders Naming Rules........................................................................................................19
6.6. Organizing the Files and Folders onto the Main Storage Device (Main Media).................................20
. Introduction........................................................................................................................................ 20
. MUSIC – Music Folders..................................................................................................................... 20
. PLAYLIST – Playlist Folders..............................................................................................................21
. SPOT – Message and Commercial Folders.......................................................................................21
. SYSTEM – System Management Folder........................................................................................... 22
6.7. Organizing the Files and Folders onto Alternative Storage Devices (Alternate Media)(My Music
Player only)................................................................................................................................................ 22
7. First Use.................................................................................................................................................... 23
7.1. Requirements.................................................................................................................................... 23
7.2. Preparation........................................................................................................................................23
7.3. First boot............................................................................................................................................ 23
8. Use of the Player....................................................................................................................................... 25
8.1. Playback of the Audio Files, Web radios and Other Audio Sources...................................................25
. Playback of a Music Folder (MUSIC).................................................................................................25
. Playback of a Playlist Folder (PLAYLIST)..........................................................................................26
. Playback of a Messages and Commercials (SPOT)..........................................................................26
. Playback of a Web Radio................................................................................................................... 27
. Switching to the Auxiliary Input of the Player (My Music Player only)................................................27
. Playback of an Alternative Storage Device (Alternate Media) (My Music Player only).......................28
8.2. Playback Command........................................................................................................................... 28
. Resuming the Playback (PLAY Command).......................................................................................28
. Stopping the Playback (STOP Command).........................................................................................28
. Playing the Next Track or Next Web Radio (NEXT Command).........................................................29
. Playing the Previous Track or Previous Web Radio (PREVIOUS Command)...................................30
8.3. Changing the Main Volume................................................................................................................ 30
9. Programming the Player............................................................................................................................ 32
9.1. Playback at the Startup (Autoplay)....................................................................................................32
. Introduction........................................................................................................................................ 32
. Setting of the “Autoplay” function.......................................................................................................33
-5- © 2017, Waves System

ID-AL - My Music Player and My Music Player LE - User Guide V1.0
9.2. Web Radio......................................................................................................................................... 33
. Operating the Web Radios................................................................................................................. 33
. Operating of the Monitoring of the Web Radios.................................................................................34
. Settings of the Web Radios............................................................................................................... 35
9.3. Timestamped Programming with the Scheduler................................................................................ 35
. Introduction........................................................................................................................................ 35
. Principle............................................................................................................................................. 35
. List of commands...............................................................................................................................38
. Creating a Scheduler File.................................................................................................................. 39
. Application of a Timestamped Programming to the Player................................................................39
9.4. Management of the Main Storage Device Content............................................................................39
. Introduction........................................................................................................................................ 39
. Using the Main Media with a Computer............................................................................................. 40
. Using the USB Device Connector (My Music Player only).................................................................41
. Using the Embedded FTP Server...................................................................................................... 42
. Using the Embedded Samba Server................................................................................................. 43
. Using the Embedded FTP Clients in a Synchronization Mode...........................................................44
. Using the Embedded FTP Clients with a Script................................................................................. 45
. Using a Removable Device Storage with a Script..............................................................................47
. Setup the FTP Client Presets............................................................................................................ 48
9.5. Ethernet Network Connection............................................................................................................50
. Introduction........................................................................................................................................ 50
. Establishing the Wired Connection.................................................................................................... 51
. Identify the player on the network...................................................................................................... 51
. Accessing the Player with Internet.....................................................................................................52
. Ethernet Network Glossary................................................................................................................ 54
9.6. Setting the Clock of the Player........................................................................................................... 55
. Introduction........................................................................................................................................ 55
. Setting the Date and the Time...........................................................................................................56
. Setting the Time Zone........................................................................................................................ 56
. Configuring the Network Time Protocol (NTP)...................................................................................57
9.7. Setting the Volumes and the Gains of the Player...............................................................................57
. Introduction........................................................................................................................................ 57
. Changing the Volumes of the Independent Outputs..........................................................................58
. Changing the Gains of the Independent Outputs...............................................................................58
. Changing the Volumes of the Audio Sources.....................................................................................59
9.8. Fade In and Fade Out Between the Audio Sources (FADE IN/FADE OUT).......................................59
. Introduction........................................................................................................................................ 59
. Changing the Fade In and Fade Out settings.................................................................................... 60
9.9. Audio File Encryption......................................................................................................................... 60
9.10. Updating the Firmware..................................................................................................................... 61
. Introduction........................................................................................................................................ 61
. Select a way of procedure................................................................................................................. 61
. Determinating the Current Firmware Version..................................................................................... 61
. Performing the Firmware Update.......................................................................................................61
9.11. Settings of the Parameters with “system.ini” File.............................................................................63
Appendix A. Characteristics........................................................................................................................... 64
A.I. Interfacing and Connectivity............................................................................................................... 64
A.II. Audio File Formats Supported...........................................................................................................64
A.III. Playlist File Formats Supported........................................................................................................ 64
A.IV. Web Radio Stream Formats Supported............................................................................................65
A.V. Other File Formats Supported........................................................................................................... 65
A.VI. Storage Devices............................................................................................................................... 65
A.VII. Network........................................................................................................................................... 65
A.VIII. Build-in Clock................................................................................................................................. 65
A.IX. Power Supply................................................................................................................................... 65
A.X. Consumption (12 V supplied)............................................................................................................ 66
A.XI. Temperatures...................................................................................................................................66
-6- © 2017, Waves System

ID-AL - My Music Player and My Music Player LE - User Guide V1.0
A.XII. Size................................................................................................................................................. 66
A.XIII. Weight............................................................................................................................................ 66
Appendix B. Player Audio Diagram................................................................................................................ 67
B.I. My Music Player................................................................................................................................. 67
B.II. My Music Player LE........................................................................................................................... 67
Appendix C. Front Panel User Interface........................................................................................................ 68
C.I. Information Displays........................................................................................................................... 68
C.II. Changing the Main Volume............................................................................................................... 69
C.III. Quick Launch Menu to Select an Audio Source...............................................................................69
C.IV. Advanced Menu to Select an Audio Source and Configure the Player.............................................69
Appendix D. Web server................................................................................................................................ 74
D.I. Home Page........................................................................................................................................74
D.II. About Page........................................................................................................................................ 75
D.III. Log In Page...................................................................................................................................... 76
D.IV. User Page........................................................................................................................................ 76
D.V. Administrator Page............................................................................................................................ 78
D.VI. Date/Time........................................................................................................................................81
D.VII. Ethernet Page................................................................................................................................. 82
D.VIII. Web Radio Page............................................................................................................................ 83
D.IX. FTP Client Page............................................................................................................................... 85
Appendix E. Content Updates with the Use of Scripts................................................................................... 87
E.I. Introduction......................................................................................................................................... 87
E.II. [HEADER] Section............................................................................................................................. 88
E.III. [COMMANDS] Section..................................................................................................................... 88
E.IV. [COMMENTS] Section..................................................................................................................... 90
E.V. Examples...........................................................................................................................................90
Appendix F. RS-232 Serial Link Protocol....................................................................................................... 92
Appendix G. Configuration File (system.ini)...................................................................................................93
Appendix H. System Clock Calibration.......................................................................................................... 94
H.I. Introduction........................................................................................................................................ 94
H.II. Performing the NTP Calibration.........................................................................................................94
-7- © 2017, Waves System

ID-AL - My Music Player and My Music Player LE - User Guide V1.0
1. Introduction
The My Music Player and My Music Player LE are standalone background music players that manages
WAV/MP3 files stored on USB or SD flash drives, web radios as well as local audio source. The playback of
a wide quantity of audio files is allowed automatically, without recurrence, according to the “Autoplay” setting,
a timestamped programming or an external event trigger (Web command or RS232 serial command). The
My Music Player and My Music Player LE allow various possibilities of update processes, connected or
disconnected.
The My Music Player and the My Music Player LE are dedicated to a wide spectrum of playback usages
within public spaces such as retails, malls hotels, waiting rooms, bars, amusement parks, etc.
-8- © 2017, Waves System

ID-AL - My Music Player and My Music Player LE - User Guide V1.0
2. Features
• Playback possibilities: A wide variety of playback contexts can be performed,
◦ Background music and audio content
◦ Messages and commercials
◦ Playlist files
◦ Web radio streams
◦ Extra audio sources (My Music Player only)
Audio and playlist files formats supported are WAV, MP3, encrypted MP3 and M3U.
• Web radio active monitoring: In case the web radio audio stream is broken or lost, a defined local
media audio content is played until the stream is restored to be played again.
• Timestamped programming: The playback of a defined audio source, the start/stop of the playback
and the volume change at a specific time are easy to implement thanks to the built-in clock and the
Scheduler software.
• Smart “AutoPlay”: this setting allows to start automatically the playback of predefined audio source
or timestamped audio programming. This feature is configurable and can be disabled.
• Flash drive devices:
◦ The My Music Player LE has an external USB host for a usage basic and a cost effective of the
content media support, by connecting a USB flash drive to the external USB host receptacle of
the player.
◦ The My Music Player has a complete set of flash drive hosts: External USB host, Internal USB
host, SD/SDHC memory card slot.
• Audio inputs and outputs: the My Music Player range of players allows to choose the right audio
solution depending on needs.
◦ The My Music Player offer an uncompromising and versatile audio I/O set with unbalanced and
balanced line-level stereo audio outputs on RCA and XLR connectors, and an unbalanced linelevel stereo audio auxiliary input on RCA connectors.
◦ The My Music Player LE offer an all-in-one cost effective audio I/O set with an unbalanced line-
level stereo audio outputs on RCA and amplified stereo audio output on terminal blocs.
• Networking: My Music Player and My Music Player LE embedded a complete set of Ethernet
services like a Web server, a FTP server, a FTP client, a Samba server or a NTP client to ensure a
flexible and remote control, setting and content updating.
• Flexible content updating: the My Music Player range of players offers multipurpose solution to
update the musics, messages, playlists and timestamped programming depending on the player
location, the connectivity possibilities and the update frequency needs. The players embedded
dedicated functions as scripting, file synchronization, FTP and samba possibilities.
• RS-232 serial link: It is possible to control the My Music Player with a PLC, a computer, or a remote
control using a serial link.
-9- © 2017, Waves System

ID-AL - My Music Player and My Music Player LE - User Guide V1.0
3. My Music Player and My Music Player LE comparison
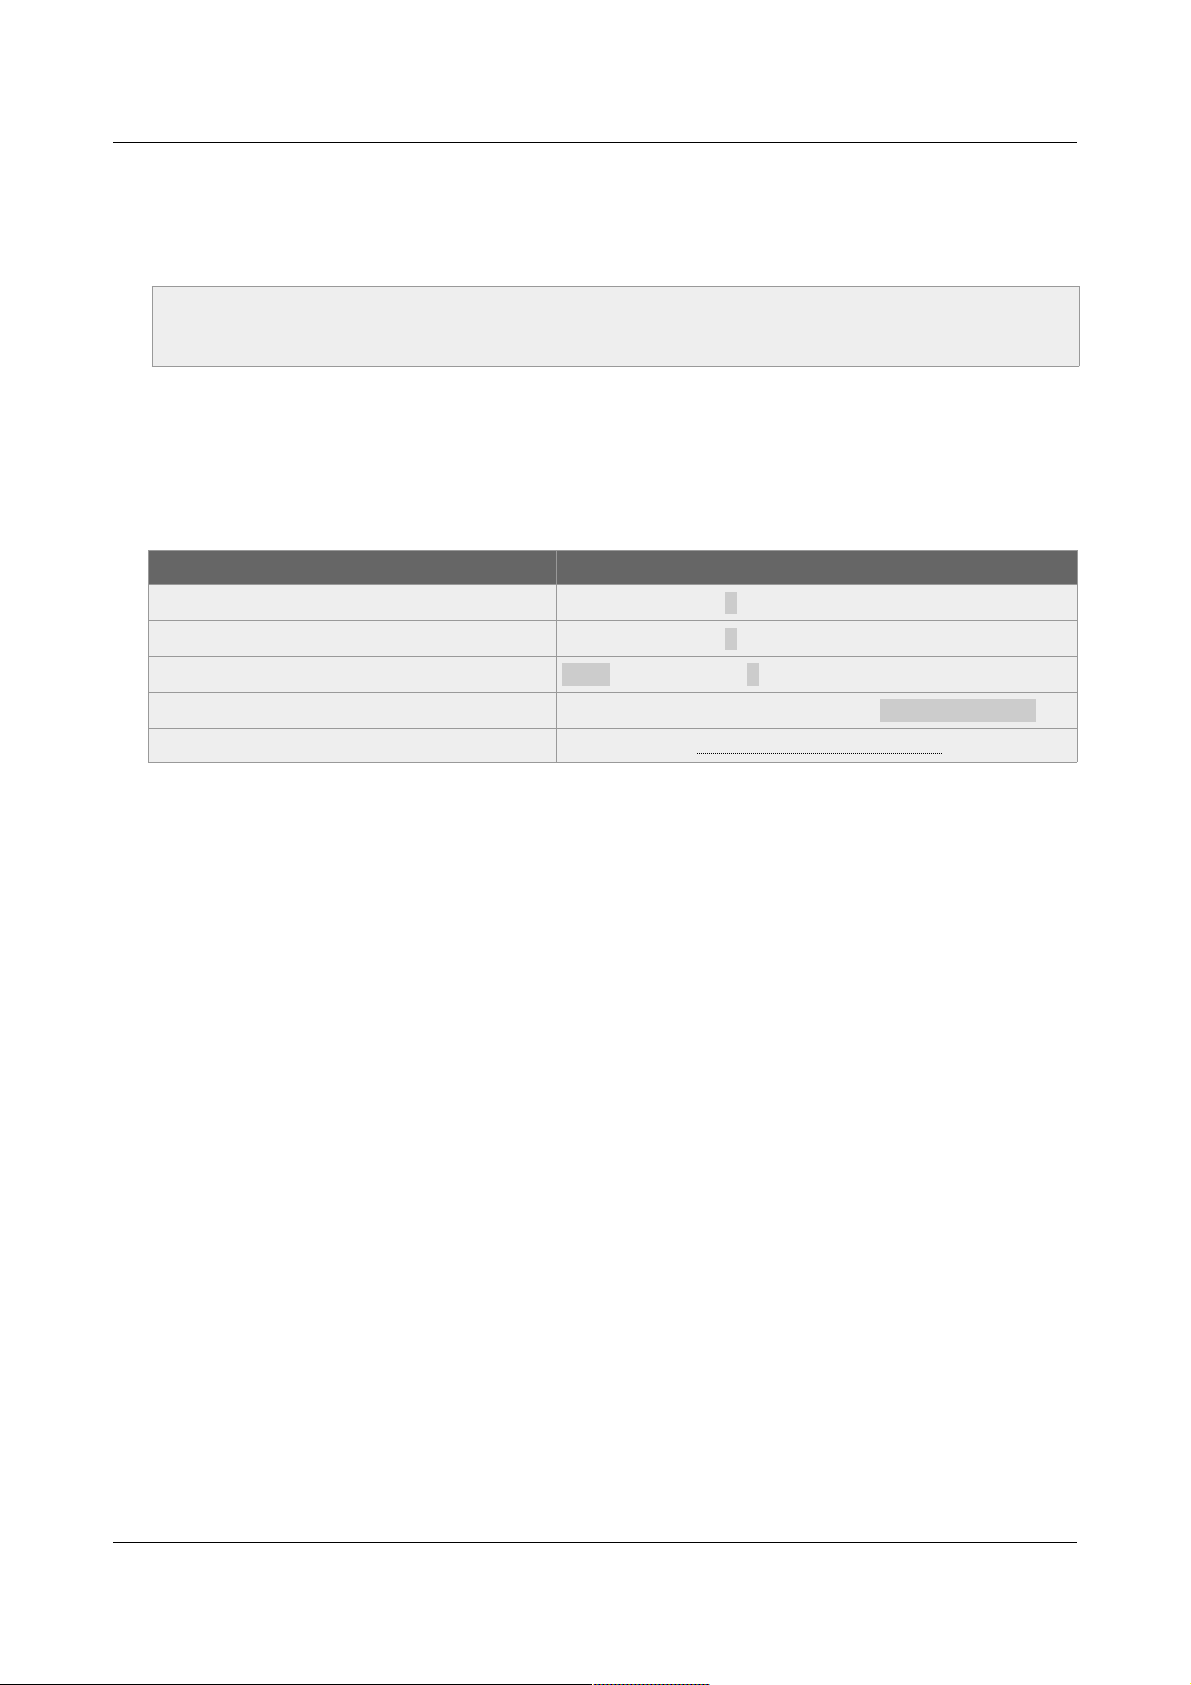
Table 1: Comparison between the My Music Player and the My Music Player LE
Function My Music Player LE My Music Player
LCD screen ● ●
Clickable knob ● ●
Transport command buttons 1-2 ●
Infrared sensor ● ●
External USB host ● ●
Internal USB host ●
SD/SDHC memory card slot ●
RCA - Unbalanced line-level stereo audio output ● ●
Terminal blocs - Amplified stereo audio output ●
XLR - Balanced professional-level stereo audio output ●
RCA - Auxiliary line-level stereo audio input ●
RJ45 connector ● ●
Terminal blocs - RS-232 serial link ●
Micro USB device ●
On/Off Switch button ●
Mounting screw holes ●
Rack mountable (1/3 of a rack) - metal case ●
Small form design - plastic case ●
Playback MP3 and WAV audo files ● ●
Playback proprietary encrypted MP3 audio files ● ●
Playback M3U playlist ● ●
Web radio ● ●
Smart “Autoplay” function ● ●
Timestamped programming ● ●
Embedded Web server ● ●
Embedded FTP server ● ●
Embedded Samba server ● ●
Build-in RTC ● ●
Network time protocol NTP function ● ●
Content update by “Script” ● ●
Content update by file synchronization ● ●
Fade In/Out audio transitions ● ●
-10- © 2017, Waves System

ID-AL - My Music Player and My Music Player LE - User Guide V1.0
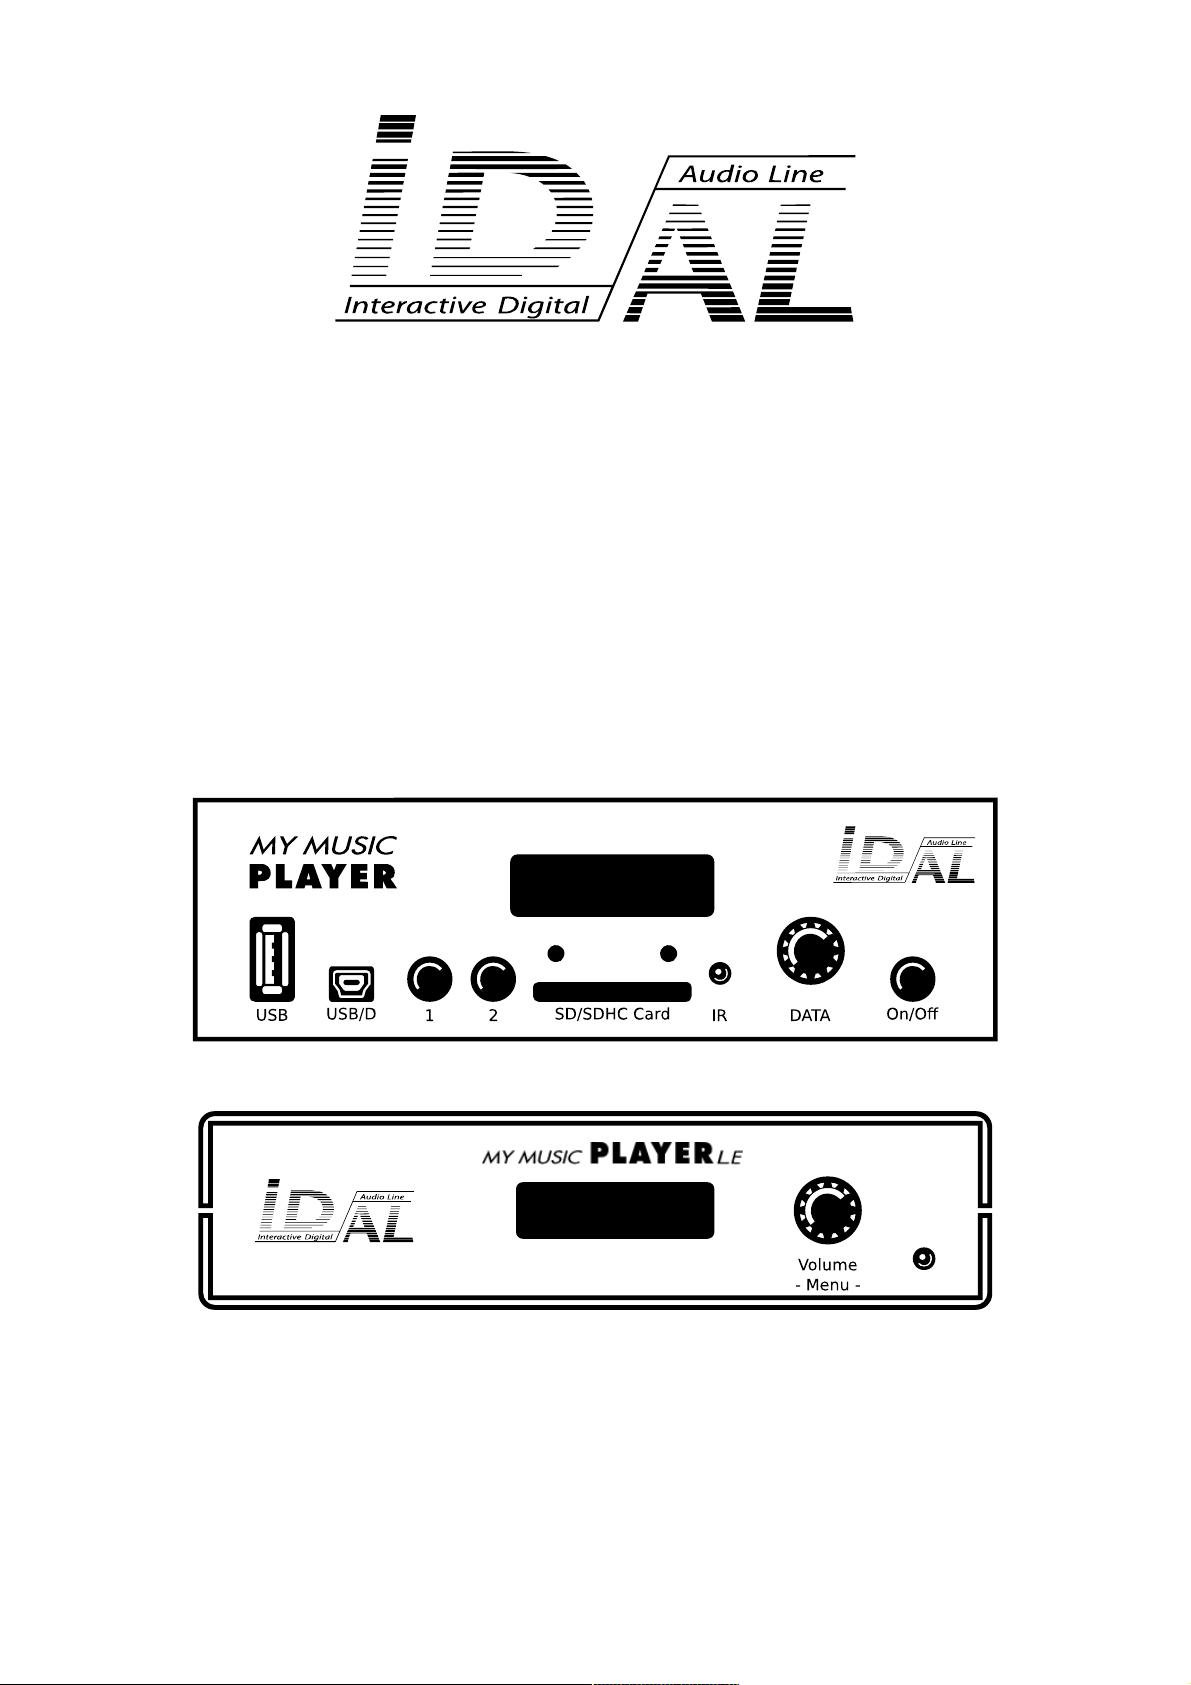
4. Hardware Description
4.1. My Music Player
Front face
1. External USB host receptacle for USB flash drive
2. USB device for an updating straight from a
computer
3. Button 1 – Play / Stop
4. Button 2 – Next file (or next web radio)
5. SD/SDHC memory card slot
6. Infrared sensor
7. LCD screen
8. Clickable knob for volume control, transport
commands and setup menu
9. On/Off switch
Rear face
10. Power supply connector of the player
11. RS-232 serial link
12. RJ45 connector for the Ethernet network
13. Auxiliary line-level stereo audio input
14. Unbalanced line-level stereo audio output
15. Balanced professional line-level stereo audio
output
Bottom face
16. Screw holes for mounting of the case
Internal connectors (after unscrewing the top cover)
17. Internal USB host receptacle for USB flash drive
18. SATA host receptacle for SSD (HW V1.0 only)
19. Fixing holes for a mounting kit of a SSD (in option)
20. Internal LCD screen connector.
-11- © 2017, Waves System

ID-AL - My Music Player and My Music Player LE - User Guide V1.0
4.2. My Music Player LE
Front face
1. LCD screen
2. Clickable knob for volume control, transport
commands and setup menu
3. Infrared sensor
Rear face
4. Power supply connector of the player
5. RJ45 connector for the Ethernet network
6. USB host receptacle for USB flash drive
7. Unbalanced line-level stereo audio output
8. Amplified stereo audio output
4.3. Infrared Remote Control
1. (None)
2. Stop
3. Next file (or web radio)
4. Volume -
5. (None)
6. Previous file (or web radio)
7. Play
8. Volume +
-12- © 2017, Waves System
ID-AL - My Music Player and My Music Player LE - User Guide V1.0
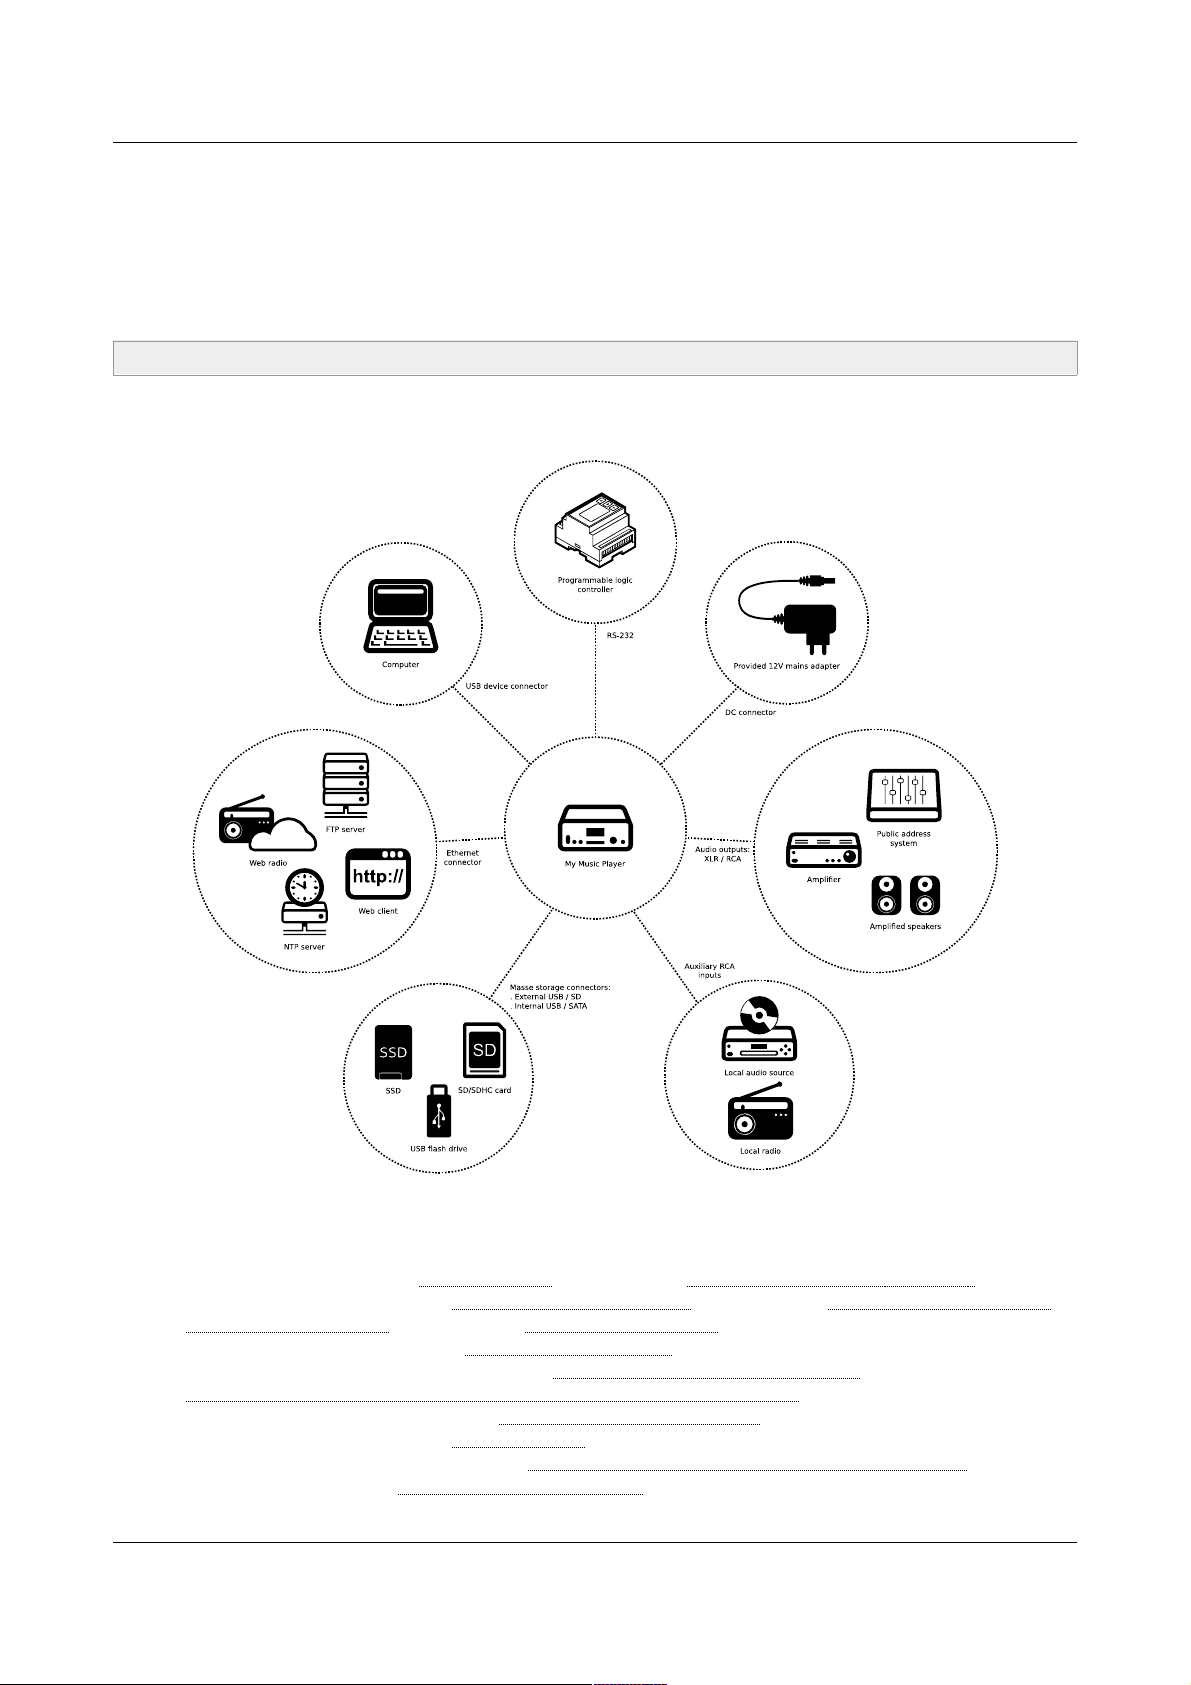
5. Installation
The following diagrams show the set of possible connections proposed by the My Music Player and the My
Music Player LE. Please only connect the devices that will be used. For each type of connections, please
refer to the chapters of their implementations.
Caution! Before any connection of a device onto a player, it is required to switch it off.
5.1. My Music Player
For a precise information of the use of each connection of the My Music Player, please refer to the pertaining
chapters, related to the connections:
• In general: please refer to Characteristics (page 63) and Hardware Description (page 11 ) .
• Audio outputs: please refer to Changing the Main Volume (page 29) and Setting the Volumes and
the Gains of the Player (page 56) and Player Audio Diagram (page 66).
• Auxiliary inputs: please refer to External Audio Sources (page 17).
• Mass storage connectors: please refer to Main Storage Device (Main Media) (page 15) and
Alternative Storage Devices (Alternate Media) (My Music Player only) (page 18).
• Ethernet connector: please refer to Ethernet Network Connection (page 49).
• DC connector: please refer to Characteristics (page 63).
• USB device connector: please refer to Management of the Main Storage Device Content (page 38).
• RS-232: please refer to RS-232 Serial Link Protocol (page 91).
-13- © 2017, Waves System
ID-AL - My Music Player and My Music Player LE - User Guide V1.0
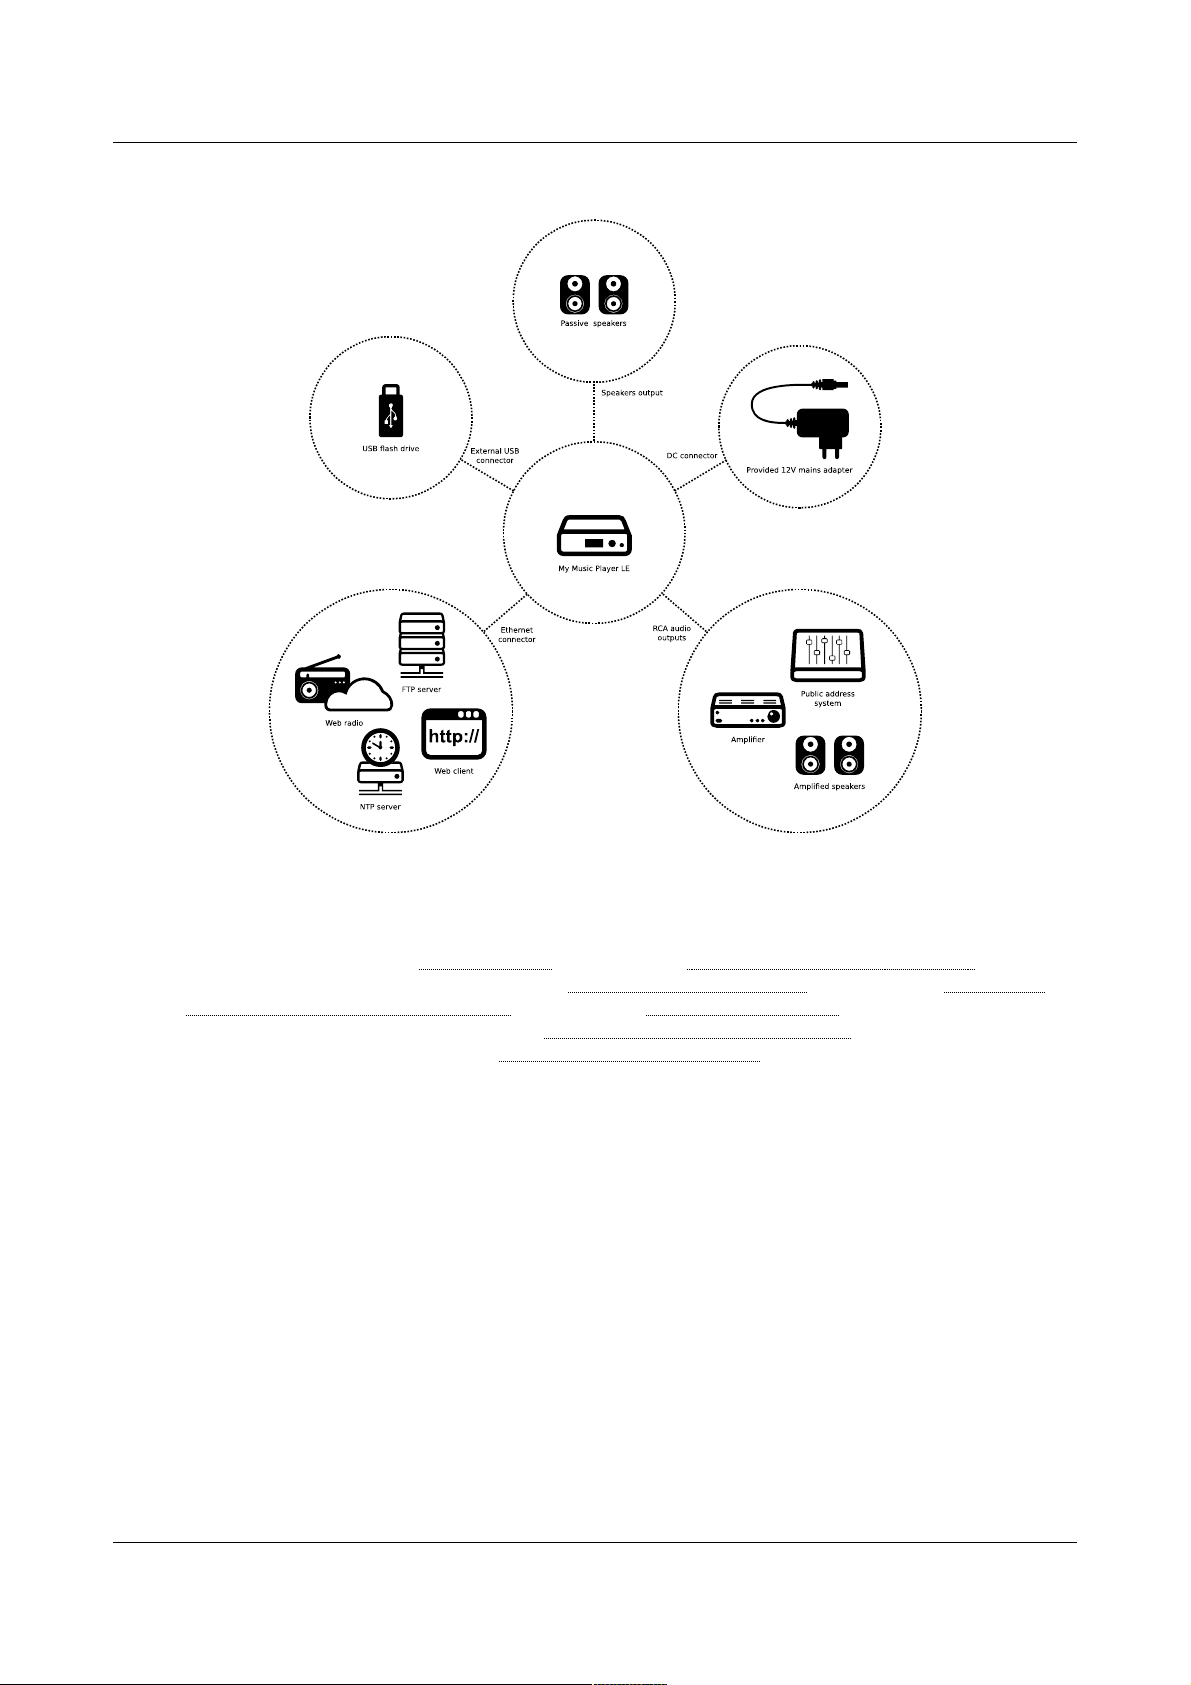
5.2. My Music Player LE
For a precise information of the use of each connection of the My Music Player LE, please refer to the
pertaining chapters, related to the connections:
• In general: please refer to Characteristics (page 63) and Hardware Description (page 11 ) .
• Audio and speaker outputs: please refer to Changing the Main Volume (page 29) and Setting the
Volumes and the Gains of the Player (page 56) and Player Audio Diagram (page 66).
• External USB connector: please refer to Main Storage Device (Main Media) (page 15).
• Ethernet connector: please refer to Ethernet Network Connection (page 49).
-14- © 2017, Waves System

ID-AL - My Music Player and My Music Player LE - User Guide V1.0
6. Prior to switching on the Player
6.1. Main Storage Device (Main Media)
. Introduction
The functioning of the My Music Player and the My Music Player LE requires a referent media storage device
called Main Media. The player cannot work without a Main Media. Within the Main Media are stored the
music, audio and playlists files that will be played by the player. Within the Main Media are also stored the
timestamped programming file and any other useful files.
The various options of functionality of the player are set in motion with a precise organization of root folders
and sub-folders within the Main Media. Each folder pertains to a type of playback or a type of programming:
• MUSIC folders for background music.
• PLAYLIST folders for background music managed with playlists.
• SPOT folders for Messages and Commercials.
• SYSTEM folder for the timestamped programming file and advanced system files.
• TMP folder to save the playback history files self generated by the player.
For more information about folders and files organization on the Main Media, please refer to Organizing the
Files and Folders onto the Main Storage Device (Main Media) (page 19).
. Music Folders (MUSIC)
Recommendations
• These folders are assigned to the playback of background music.
Accepted file formats
• WAV, MP3 and Encrypted MP3 files.
Player behavior
• The MUSIC folders are dedicated to play a large quantity of audio files. The folder content is played
in a loop. Two playback modes are possible: random and sequential. By default, when the playback
returns to a folder, the playback resumes according to the playback history that allows to avoid a
repetition of playback. An option is also available to reset the history.
◦ In sequential mode playback, the files are played in order, according to the file naming.
▪ Without the reset option, the previous playback position is restored upon the playback
launch.
▪ With the reset option, the playback always begins to play the first file of the folder.
◦ In random mode, no file is repeated until all the files of the folder are played. Back to the folder,
the playback history is reset or not, according to the presence of the reset option.
For more information about the preparation and the playback of the MUSIC folders, please refer to
Organizing the Files and Folders onto the Main Storage Device (Main Media) (page 19) and Playback of a
Music Folder (MUSIC) (page 24).
. Playlist Folders (PLAYLIST)
Recommendations
• These folders are assigned for background music management with playlists.
-15- © 2017, Waves System
ID-AL - My Music Player and My Music Player LE - User Guide V1.0
Accepted file formats
• M3U files.
Player behavior
• The PLAYLIST folders are dedicated to play one or more audio playlists. The folder content is
played in a loop. There are two playback modes for all the playlists of the folder: random and
sequential. By default, when the playback returns to a folder, the playlists are sequentially played
and the playback resumes according to the playback history of each playlist of the folder. An option
is available to reset the history.
◦ In sequential mode, the files are played following the playlist’s structure.
▪ Without the reset option, the previous playback position is restored upon each playlist
launch.
▪ With the reset option, the playback always begins at the start of the playlist.
◦ In random mode, no file is repeated until all the files of each playlist is played. When returning
to the folder, the playback history of each playlist is reset or not, according to the presence of
the reset option.
For more information about the preparation and the playback of the PLAYLIST folders, refer to Organizing
the Files and Folders onto the Main Storage Device (Main Media) (page 19) and Playback of a Playlist
Folder (PLAYLIST) (page 25).
. Message and Commercial Folders (SPOT)
Recommendations
• These folders are assigned for messages, ringtones, commercials and announcements.
Accepted file formats
• WAV, MP3 and Encrypted MP3 files.
Player behavior
The SPOT folders are dedicated to play immediately one or more audio files. The folder content is
played once and then returns to the playback position preceding the entry into the SPOT folder
whatever the previous playback state. Four playback modes are possible:
◦ Playback of all the files of the folder once:
▪ In random.
▪ In sequential.
◦ Playback of a defined number of files of the folder:
▪ In random.
▪ In sequential.
Once the defined files of the folder have been played, the playback resumes according to the
playback history without the repetition of the already played files. The player will play again an
audio file only once all the audio files of the folder have been played.
For more information about the preparation and the playback of the SPOT folders, refer to Organizing the
Files and Folders onto the Main Storage Device (Main Media) (page 19) and Playback of a Messages and
Commercials (SPOT) (page 25).
. System Folder (SYSTEM)
Recommendations
• This unique folder is used to store the timestamped programming file and advanced system files.
Accepted file formats
-16- © 2017, Waves System

ID-AL - My Music Player and My Music Player LE - User Guide V1.0
• TM3, INI, TXT and ZIP files.
Player behavior
• The SYSTEM folder is dedicated to manage the files that are not audio files / playlist files. This
folder is used to store a timestamped programming file, a temporary file of an advanced
configuration or different log files self-generated by the player.
For more information about the preparation and the playback of the SYSTEM folders, refer to Organizing the
Files and Folders onto the Main Storage Device (Main Media) (page 19) and Timestamped Programming
with the Scheduler (page 34) and Settings of the Parameters with “system.ini” File (page 62).
. Temporary Folder (TMP)
Recommendations
• This unique folder is self-generated by the player in order to store playback history files.
Player behavior
• The temporary folder (tmp) folder is self-generated by the player starting at the first playback. This
folder stores the playback history files, and allows the player to remember the audio files already
played. This files allow the player to avoid a repetition of playback. The users do not need to
manage this folder, but, the tmp folder can be manually deleted to erase the playback file. A new
record of the playback history will be automatically regenerate at next playback.
6.2. External Audio Sources
. Introduction
The external audio sources are that are not stored on the Main Media or an Alternate Media. Contrary to
locally stored audio files (MUSIC, PLAYLIST, SPOT and Alternate Media). Specific playback controls of the
external audio source (like the positioning or the duration) can not be be performed, because this control
relies on a third-party source process.
External audio sources possibilities:
• Web radio.
• Auxiliary input for external sound system (analog audio source) (My Music Player only).
. Web Radios
Recommendations
• The web radio playback offers to use the player as a message box or an alternative music sound
system using web radio programming.
Accepted stream formats
• MP3 streams and M3U stream containers.
Player behavior
• The Web Radio presets allow to play audio stream from third-party sound system solution. The
playback starts when the stability of the audio stream is reached, according to the web radio
settings (buffer size, buffer fill rate and duration of stability). A monitoring of the web radio switches
on a music folder when the audio stream is unstable. The web radio resumes when the audio
stream is detected stable again
For more information about the settings and playback of the web radios, please refer to Web Radio (page
-17- © 2017, Waves System

ID-AL - My Music Player and My Music Player LE - User Guide V1.0
32) and Playback of a Web Radio (page 26 ) .
. Auxiliary Input (My Music Player only)
Recommendations
• The auxiliary input allows to use the player as a message box or an alternative music system within
an existing sound system.
Player behavior
• The auxiliary input allows to switch to the playback of a local third-party audio device plugged onto
the audio input of the My Music Player. If an audio content of the Main Media or an Alternate Media
Media is played, the current playback is stopped before the switch to the auxiliary input.
For more information about the switch to the auxiliary input, please refer to Switching to the Auxiliary Input
of the Player (My Music Player only) (page 26).
6.3. Alternative Storage Devices (Alternate Media) (My Music Player only)
Introduction
• An Alternate Media is an optional storage device containing audio files for a temporary unusual
playback.
Recommendations
• This playback source is appropriate for temporarily playing extra user contents.
Accepted file formats
• The MUSIC folder accepts WAV, MP3 and Encrypted MP3 files.
Player behavior
• The Alternate Media aims to play all files in a third-party flash memory different from the Main
Media. The Alternate Media content is played in a loop and in a random mode exclusively. Back to
an Alternate Media, the playback resumes according to the playback history. No playback repetition
is done until all the audio files of the Alternate Media are played.
With the My Music Player an Alternate Media is a storage device used onto:
▪ USB-INT: internal USB host receptacle
▪ USB-EXT: external USB host receptacle
▪ SD-CARD: SD/SDHC memory card slot
▪ HDD-INT: internal SATA host receptacle (HW V1.0 only)
On an Alternate Media, the entire audio content is played, without reference to the folder set-up.
For more information about the preparation and the playback of the Alternate Media, please refer to
Organizing the Files and Folders onto Alternative Storage Devices (Alternate Media)(My Music Player only)
(page 21) and Playback of an Alternative Storage Device (Alternate Media) (My Music Player only) (page
27).
6.4. Preparing a Storage Device
The storage device (Main Media or Alternate Media) must be a flash memory, such as an USB flash drive, a
SD card or a SSD. The size and model to be chosen depends on the player used the required storage
capacity and the type connector. For more information about specifications of the flash memory to be used,
please refer to Characteristics (page 63)
-18- © 2017, Waves System

ID-AL - My Music Player and My Music Player LE - User Guide V1.0
It is recommended to use a support storage for to optimize a no-stop functioning. We recommend to use a
Sandisk© storage device.
In order, the storage devices that will be used as Main Media or Alternate Media must, prior to its use, be
formatted in FAT32. Other file systems are not supported. For a large capacity storage devices (as SSD),
only one partition is accepted.
• Under Microsoft© Windows: in the file explorer, right click the drive and select Format….
• Under Macintosh© MAC OS X: use the Disk Utility application of the OS.
• Under Linux OS: use fdisk command line or disk utility like Gparted.
Note: in the recent Microsoft© Windows versions, the formatting in FAT32 is limited to 32Go. This limitation
is not based on anything concrete and previous versions of Windows are not affected by it. Third-party
software makes it possible to format larger partitions into FAT32 (e.g. Partition Manager from Paragon
Software©).
6.5. Files and Folders Naming Rules
In order to ensure proper operation of the player, only the 7-bit ASCII character set is allowed to name files
and folders. This means that special characters that are not part of the following character list are not
allowed. Also, some characters not allowed by the Microsoft conventions for file and folder names are
excluded.
List of allowed characters for naming files and folders
0 1 2 3 4 5 6 7 8 9 A B C D E
F G H I J K L M N O P Q R S T
U V W X Y Z a b c d e f g h i
j k l m n o p q r s t u v w x
y z ! # $ % &
'
( ) + , - . ;
= @ [ ] ^ _ ` { } ~ (Space)
6.6. Organizing the Files and Folders onto the Main Storage Device (Main Media)
. Introduction
Refer to Main Storage Device (Main Media) (page 15), in order to run various
functionalities of the player, the useful files are organized in different folders
and sub-folders, and each folders is pertaining to playback or programming.
When a Main Media is assigned in the use of a player (please refer to First Use
(page 22)), the player automatically created four root folders: MUSIC,
PLAYLIST, SPOT and SYSTEM.
In these four root folders the folders and the files must be are organized as
explained in the following chapters.
-19- © 2017, Waves System
ID-AL - My Music Player and My Music Player LE - User Guide V1.0
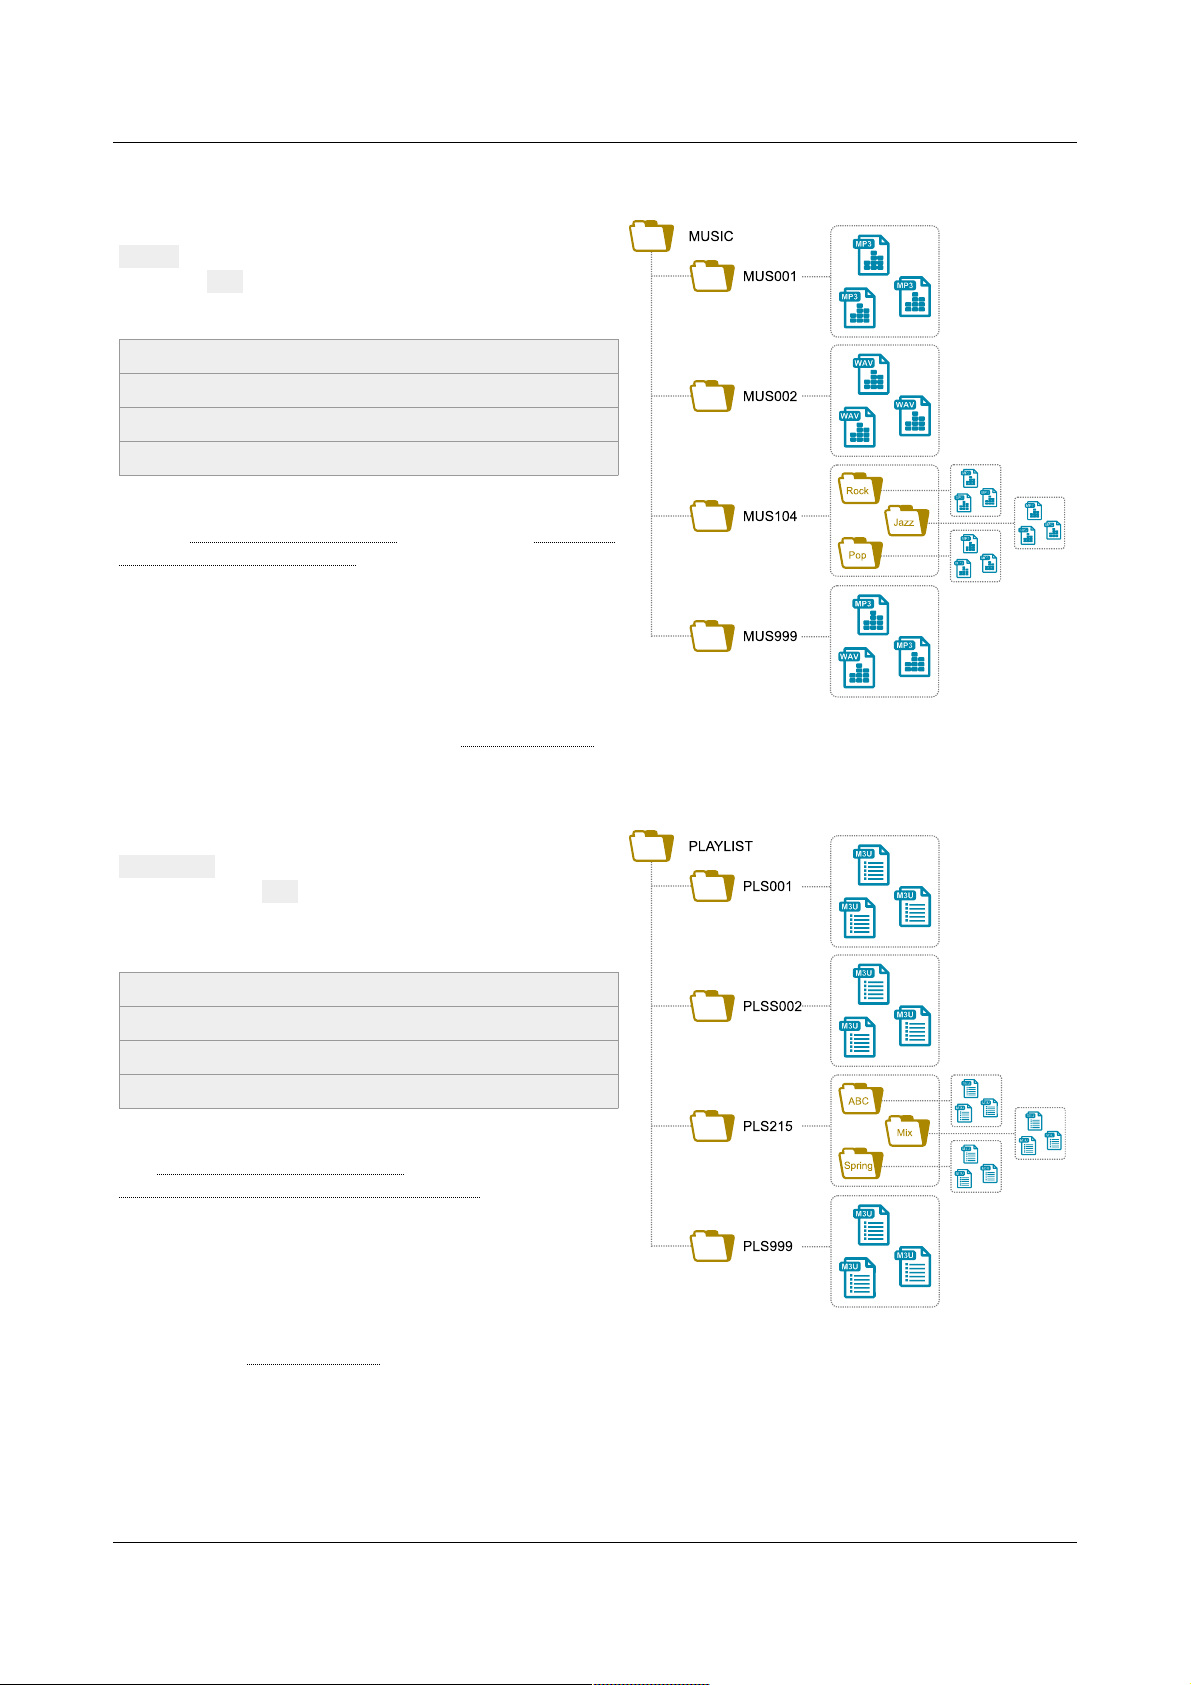
. MUSIC – Music Folders
The music folders are stored into a root folder named
MUSIC. The naming of a music folder is composed of
the prefix MUS and 3 digits between 001 and 999 and an
optional arbitrary name.
Examples
MUS001
MUS003 – Morning songs
MUS246 – Soul music
MUS999
The music folders behaviors and uses are described
into the Music Folders (MUSIC) (page 15) and Playback
of a Music Folder (MUSIC) (page 24).
In a music folder, the organization and the naming of the
sub-folders and the files is free. All audio files stored
into a music folder are played, without reference to the
internal organization the folder.
The music folders accept WAV, MP3 and Encrypted MP3 files. (For more information about audio file formats
supported by the player please refer to Characteristics (page 63))
. PLAYLIST – Playlist Folders
The playlist folders are stored into a root folder named
PLAYLIST. The name of a playlist folder is composed of
the prefix name PLS and 3 digits between 001 and 999
and an optional arbitrary name.
Examples
PLS001
PLS017 – Summer playlist
PLS145 – Anniversary collection
PLS999
The playlist folders behaviors and uses are described
into Playlist Folders (PLAYLIST) (page 15) and
Playback of a Playlist Folder (PLAYLIST) (page 25).
In a playlist folder, the organization and the naming of
the sub-folders and the files is free. All playlist files
stored into a playlist folder are played, without reference
to the internal organization the folder.
The playlist folders accept M3U files. (For more information about playlist file formats supported by the player
please refer to Characteristics (page 63))
-20- © 2017, Waves System
ID-AL - My Music Player and My Music Player LE - User Guide V1.0
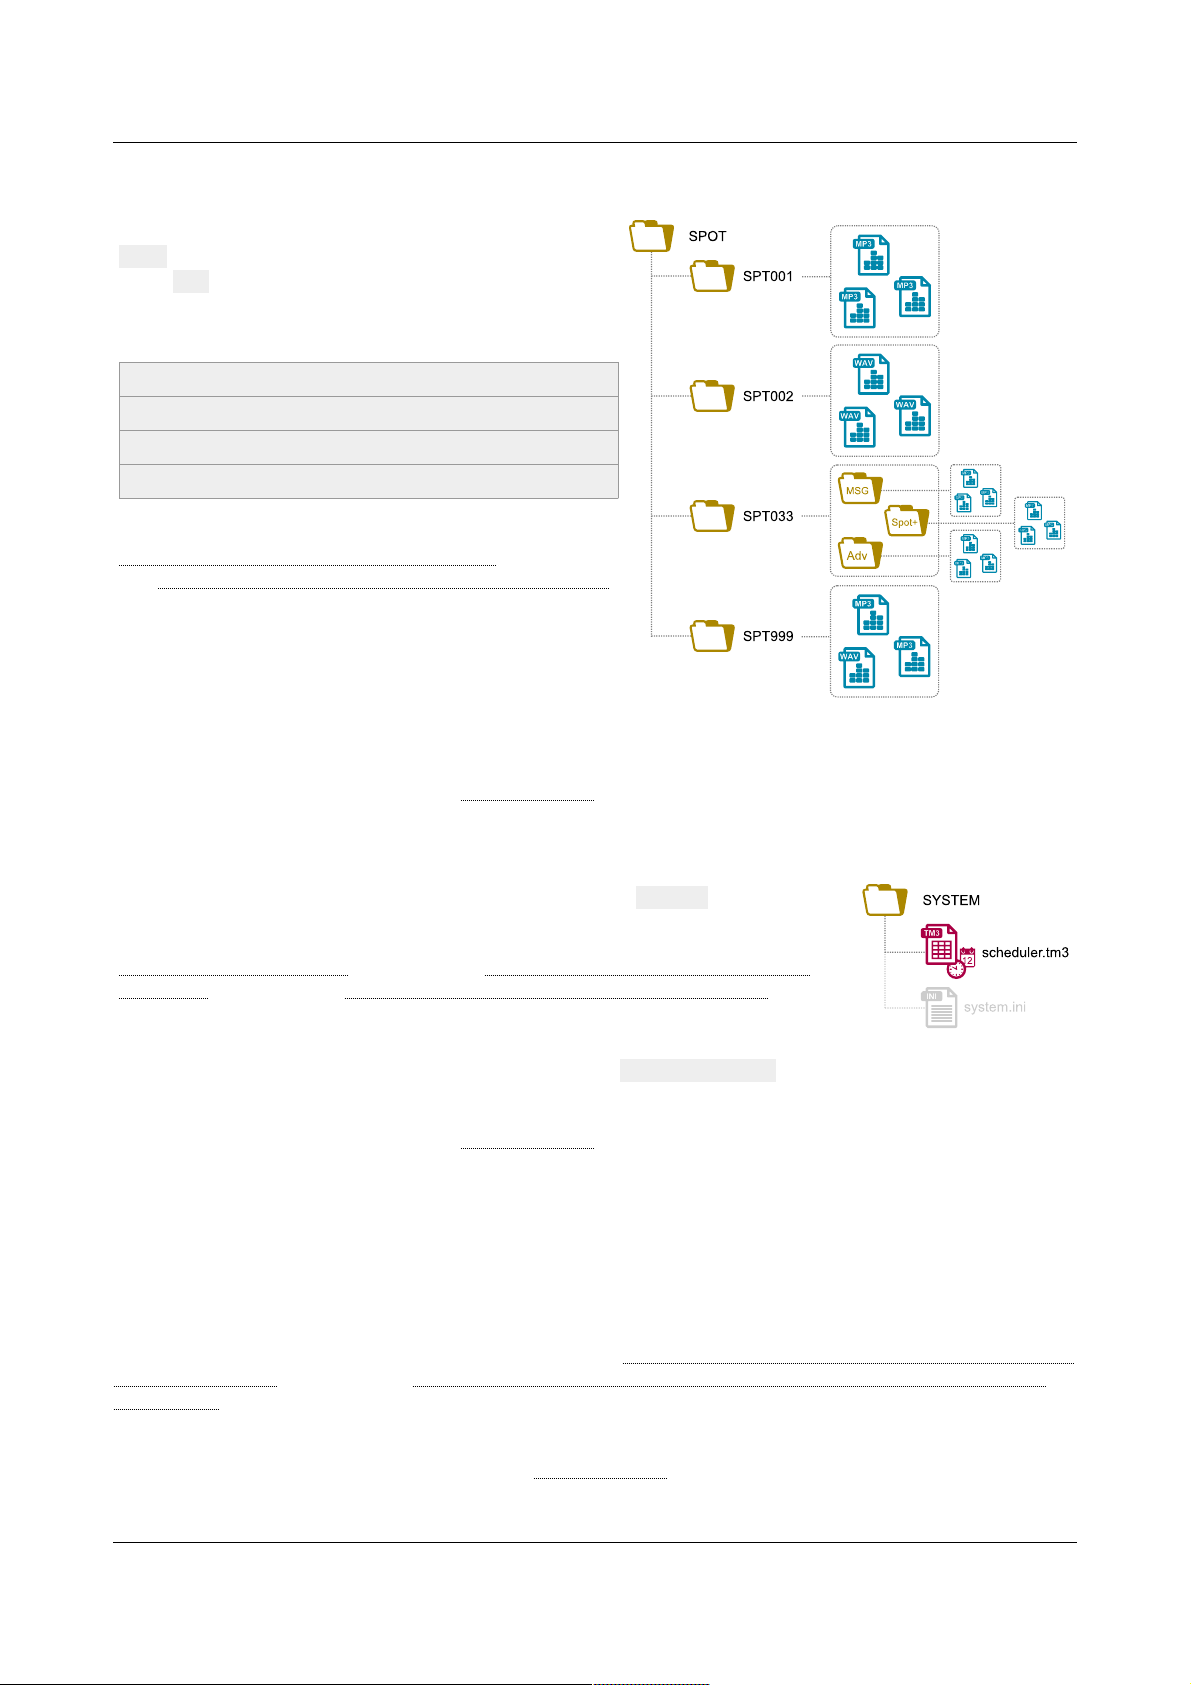
. SPOT – Message and Commercial Folders
The spot folders are stored into a root folder named
SPOT. The name of a spot folder is composed of the
prefix SPT and 3 digits between001 and 999 and an
optional arbitrary name.
Examples
SPT001
SPT002 – Shop advertisement
SPT003 – Closing message
SPT999
The spot folders behaviors and uses are describe into
Message and Commercial Folders (SPOT) (page 16)
and Playback of a Messages and Commercials (SPOT)
(page 25).
In a spot folder, the organization and the naming of the
sub-folders and the files is free. All audio files stored
into a spot folder are played, without reference to the
internal organization the folder.
The spot folders accept WAV, MP3 and Encrypted MP3 files. (For more information about audio file formats
supported by the player please refer to Characteristics (page 63))
. SYSTEM – System Management Folder
The root folder for the files system management is named SYSTEM.
The system folder behavior and timestamped programming are described into
System Folder (SYSTEM) (page 16) and Timestamped Programming with the
Scheduler (page 34) and Settings of the Parameters with “system.ini” File (page
62).
In the system folder, the files are stored at the root of the folder and the naming of files depends of the
functionality required (e.g. the timestamped file is named scheduler.tm3).
The system folder accept TM3, INI, TXT and ZIP files. (For more information about system file formats
supported by the player please refer to Characteristics (page 63))
6.7. Organizing the Files and Folders onto Alternative Storage Devices (Alternate Media)(My Music Player only)
In a Alternate Media, the organization and the naming of the folders and files is free; All audio files stored into
an Alternate Media are played, without reference to the internal organization the folder.
The Alternate Media behavior and use are described into Alternative Storage Devices (Alternate Media) (My
Music Player only) (page 18) and Playback of an Alternative Storage Device (Alternate Media) (My Music
Player only) (page 27).
The Alternate Media accept WAV, MP3 and Encrypted MP3 files. (For more information about playlist file
formats supported by the player please refer to Characteristics (page 63))
-21- © 2017, Waves System

ID-AL - My Music Player and My Music Player LE - User Guide V1.0
7. First Use
7.1. Requirements
• A computer based on Microsoft Windows, MAC OS or Linux operating system.
• A storage device used as the Main Media.
• A sound system with speakers and/or an amplifier
• (Optional) A RJ45 connection to the local Ethernet network.
Before the first the connection and switching on of the player please read carefully the Safety Instructions
and Hardware Description (page 11) and Installation (page 13) and Characteristics (page 63).
7.2. Preparation
1. Switch off the player.
2. Connect the selected audio outputs to an audio system (Please refer to Player Audio Diagram (page
66)).
3. (Optional) Connect the player to the Ethernet network (Please refer to Network (page 64)).
4. With a computer, prepare the Main Media.
• Format the Main Media with the instructions in Preparing a Storage Device (page 18).
• Organize the audio content of the Main Media with the instructions in Organizing the Files and
Folders onto the Main Storage Device (Main Media) (page 19).
or
• Download a content example from the player support page (www.id-al.com) and copy it on the
Main Media with the instructions from the support page.
For more information about the Main Media please refer to Main Storage Device (Main Media) (page
15).
5. Remove the storage device with the use of the removal procedure of the computer operating system.
6. Insert the Main Media into the chosen storage device connector of the player.
7.3. First boot
1. Switch on the player.
2. During the boot, player’s LCD is empty.
Only on the My Music Player:
1. When the boot is completed, the player requires to
define the Main Media. Turn the knob to select the
connector where the storage device is plugged
(USB-INT, USB-EXT, SD-CARD, HDD-INT) and
press the knob to validate the selection.
MAIN MEDIA
USB-INT
2. The player restarts...
PLAYER REBOOT
PLEASE WAIT...
3. When the start or the restart is completed, the player
displays its product name, its serial number and its
firmware version.
My Music Player
SN:B04F v1704
Now the player is ready to be used.
-22- © 2017, Waves System

ID-AL - My Music Player and My Music Player LE - User Guide V1.0
The player asks to redefine the Main Media when:
• No storage device is plugged to the player
• The storage device is not prepared as described into Preparing a Storage Device (page 18).
• The selected connector is different of the connector used (My Music Player only).
On the My Music Player
• The player asks to redefine the connector where the storage
device is plugged thanks to the knob as described here.
MAIN MEDIA
USB-INT
On the My Music Player LE
• The player asks to insert a storage device into the USB host
receptacle and to press the knob to validate the selection.
INSERT VALID
MEDIA AND REBOOT
For more information about the LCD screen, please refer to Front Panel User Interface (page 67).
-23- © 2017, Waves System

ID-AL - My Music Player and My Music Player LE - User Guide V1.0
8. Use of the Player
The current chapter explains how to control the playback and the volume that can be achieved from several
interfaces, listed below. For more information about each interface, please refer to the pertaining chapters.
• From the front panel user interface:
◦ “Quick launch” menu: short press on the knob (< 5 s).
◦ “Advanced” menu: long press on the knob (≥ 5 s).
◦ “Volume” menu: if the player is out of “Quick launch” or “Advanced” menus, turn the knob.
Please refer to Front Panel User Interface (page 67).
• From a web browser:
1. Connect to the player by enter the HTTP address of the player, composed of the http:// and
the player network address (e.g. http://mmp-8b0a or http://192.168.0.104). To know
the player network address, please refer to Identify the player on the network of Ethernet
Network Connection (page 49).
2. Click on Log In and enter the username and the password for the embedded web server (user
or administrator).
• Default user account: username = user, password = user.
• Default administrator account: username = admin, password = admin.
3. Click on User.
Please refer to Ethernet Network Connection (page 49) and Web server (page 73).
• with the use of the infrared remote control: please refer to Infrared Remote Control (page 12).
• with the use of a front panel button (My Music Player only): please refer to Hardware Description
(page 11).
• with the use of a timestamped programming (Scheduler): please refer to Timestamped Programming
with the Scheduler (page 34).
• with the use of the RS-232 serial link (My Music Player only): please refer to RS-232 Serial Link
Protocol (page 91).
8.1. Playback of the Audio Files, Web radios and Other Audio Sources
. Playback of a Music Folder (MUSIC)
Procedure:
1. Select a folder number between 1 and 999 (from MUS001 to MUS999).
2. Select a playback option:
• RND or Random: random playback.
• RND + RST or Random+Reset: random playback with the reset option.
• SEQ or Sequential: sequential playback.
• SEQ + RST or Sequential+Reset: sequential playback with the reset option.
For more information about the music folders, please refer to Main Storage Device (Main Media)
(page 15) and Organizing the Files and Folders onto the Main Storage Device (Main Media) (page
19).
Methods:
-24- © 2017, Waves System

ID-AL - My Music Player and My Music Player LE - User Guide V1.0
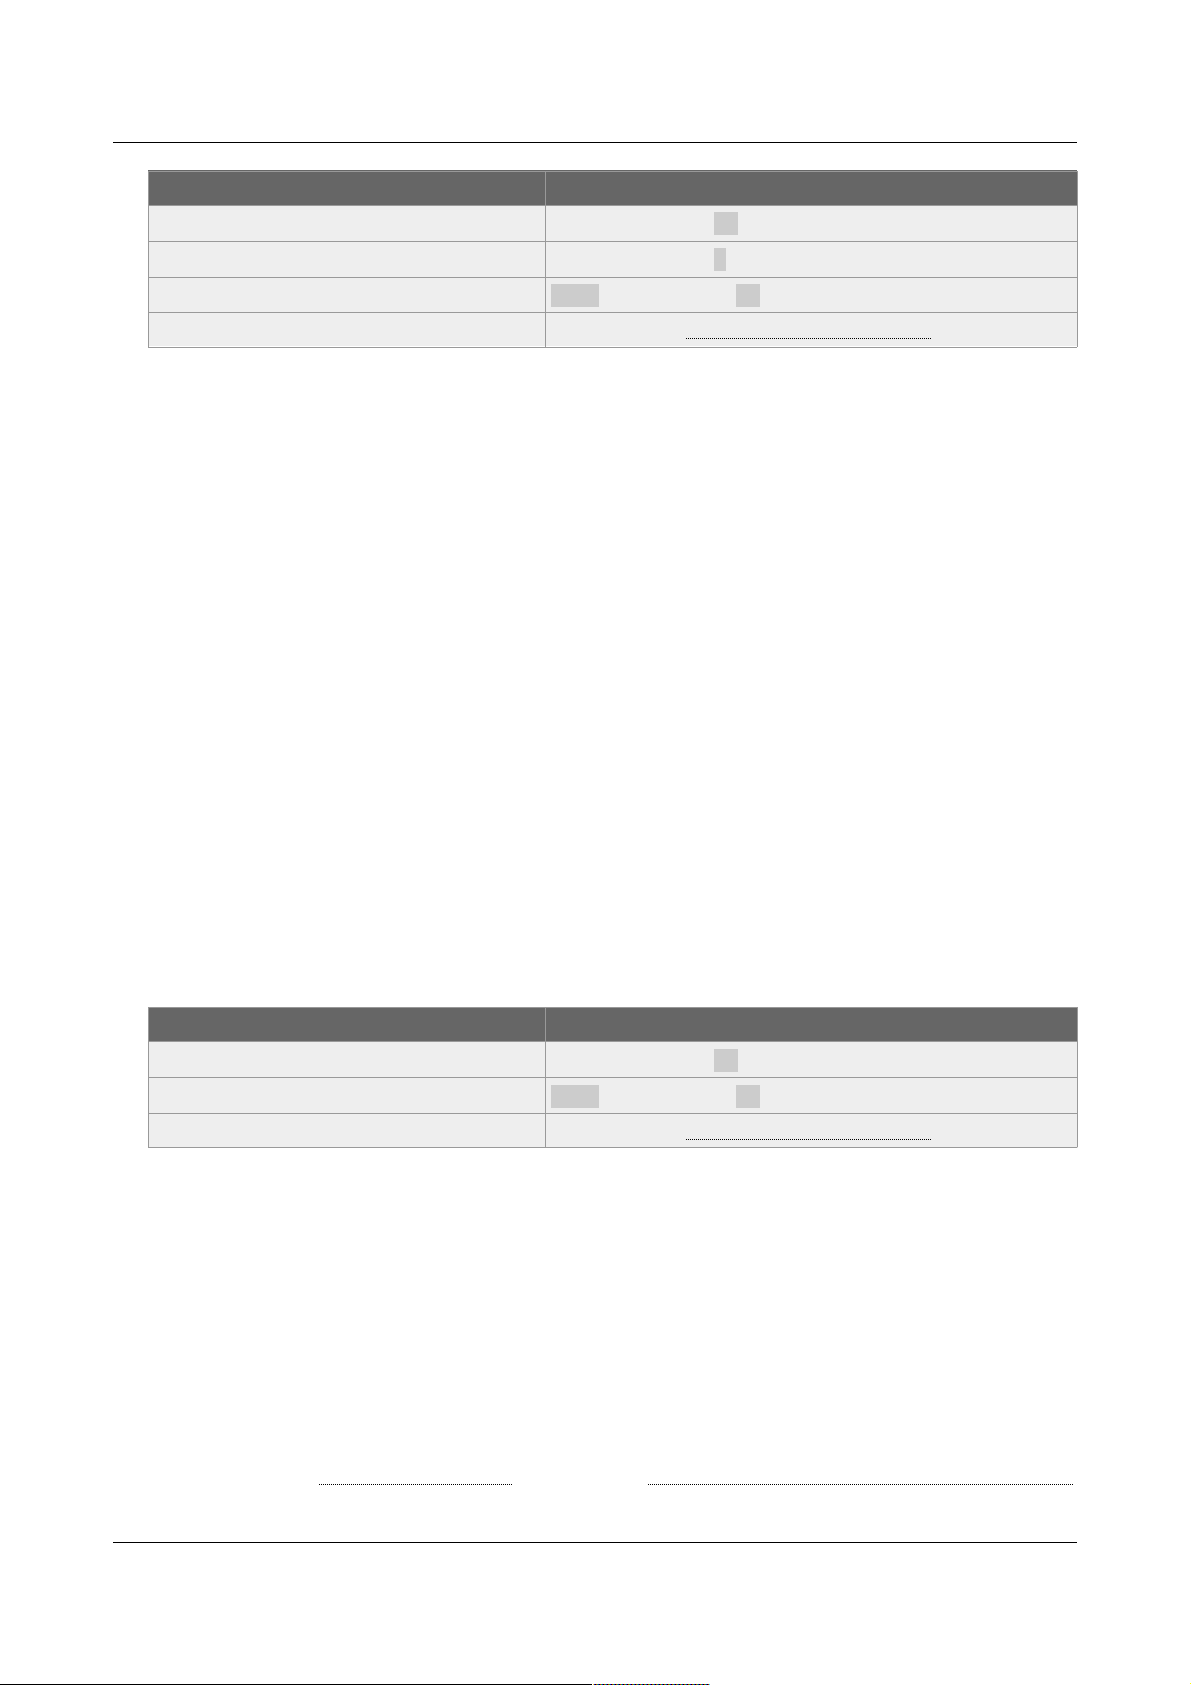
Method Process
“Quick launch” menu SOURCE: MUSIC → Select a folder (number + folder name).
“Advanced” menu USER → SOURCE → SELECT SOURCE MUS/PLS/SPT → MUS → Select a
folder number → Select a playback mode.
Web browser software User page → MUSxxx folder: → Select a folder number → Select a
playback mode → Click on Play.
Timestamped programming
(Scheduler)
Within an event → Add a command MUSIC (playback mode) with a
folder number.
RS-232 serial link Please refer to RS-232 Serial Link Protocol (page 91).
. Playback of a Playlist Folder (PLAYLIST)
Procedure:
1. Select a folder between 1 and 999 (betweenPLS001 and PLS999).
2. Select a playback mode:
• RND or Random: random playback.
• RND + RST or Random+Reset: random playback with the reset option.
• SEQ or Sequential: sequential playback.
• SEQ + RST or Sequential+Reset: sequential playback with the reset option.
For more information about the playlist folders, please refer to Main Storage Device (Main Media)
(page 15) and Organizing the Files and Folders onto the Main Storage Device (Main Media) (page
19).
Methods:
Method Process
“Advanced” menu USER → SOURCE → SELECT SOURCE MUS/PLS/SPT → PLS
→ Select a folder number → Select a playback mode.
Web browser software User page → PLSxxx folder: → Select a folder number →
Select a playback mode → Click on Play.
Timestamped programming
(Scheduler)
Within an event → Add a command PLAYLIST (playback
mode) with a folder number.
RS-232 serial link Please refer to RS-232 Serial Link Protocol (page 91).
. Playback of a Messages and Commercials (SPOT)
Procedure:
1. Select a folder between 1 and 999 (between SPT001 andSPT999).
2. Select a playback mode
• RND or Random: random playback of all the folder content.
• SEQ or Sequential: sequential playback of all the folder content.
• X FILE(S) (Random): random playback of a determinate number of files.
• X FILE(S) (Sequential): sequential playback of a determinate number of files.
For more information about the spot folders, please refer Main Storage Device (Main Media) (page
15) and Organizing the Files and Folders onto the Main Storage Device (Main Media) (page 19).
-25- © 2017, Waves System
ID-AL - My Music Player and My Music Player LE - User Guide V1.0
Methods:
Method Process
“Advanced” menu USER → SOURCE → SELECT SOURCE MUS/PLS/SPT → SPT
→ Select a folder number → Select a playback mode.
Web browser software User page → SPTxxx folder: → Select a folder number →
Select a playback mode → Click on Play.
Timestamped programming
(Scheduler)
Whithin an event → Add a command SPOT (playback
mode) with a folder number. Add a number of file if an X
FILE(S) is selected.
RS-232 serial link Please refer to RS-232 Serial Link Protocol (page 91).
. Playback of a Web Radio
Procedure:
Select the web radio between the presets 1 and 10. For more information about the web radios,
please refer to External Audio Sources (page 17) and Web Radio (page 32).
Methods:
Method Process
“Quick launch” menu SOURCE: WEBRADIO → Select a web radio preset (number +
web radio name).
“Advanced” menu USER → SOURCE → SELECT WEBRADIO → Select a web radio
preset number.
Web browser software User page → Web radio: → Select a web radio name →
Click on Play.
Timestamped programming
(Scheduler)
Within an event → Add a command WEBRADIO with the web
radio preset number (URL field).
RS-232 serial link Please refer to RS-232 Serial Link Protocol (page 91).
. Switching to the Auxiliary Input of the Player (My Music Player only)
Procedure:
Simply swicth to the auxiliary input. For more information about the auxiliary input, please refer to
External Audio Sources (page 17).
Methods:
Method Process
“Advanced” menu USER → SOURCE → SELECT SOURCE ALTERNATE → AUX-
INPUT.
Web browser software User page → Alternate: → AUX-INPUT → Click on Play.
Timestamped programming
(Scheduler)
Within an event → Add a command AUXILIARY INPUT.
RS-232 serial link Please refe to RS-232 Serial Link Protocol (page 91).
-26- © 2017, Waves System
ID-AL - My Music Player and My Music Player LE - User Guide V1.0
. Playback of an Alternative Storage Device (Alternate Media) (My Music
Player only)
Procedure:
Select one alternative storage device in the following list: USB-INT - USB-EXT or SD-CARD or HDDINT. For more information about the Alternate Media, please refer to Alternative Storage Devices
(Alternate Media) (My Music Player only) (page 18) and Organizing the Files and Folders onto
Alternative Storage Devices (Alternate Media)(My Music Player only) (page 21).
Methods:
Method Process
“Advanced” menu USER → SOURCE → SELECT SOURCE ALTERNATE → USB-
INT - USB-EXT or SD-CARD or HDD-INT.
Web browser software User page → Alternate: → Internal USB or External
USB or SD Card or Internal HHD → Click on Play.
Timestamped programming
(Scheduler)
Within an event → Add a command INTERNAL USB or
EXTERNAL USB or SD-CARD or INTERNAL HDD.
RS-232 serial link Please refe to RS-232 Serial Link Protocol (page 91).
8.2. Playback Command
. Resuming the Playback (PLAY Command)
Principle:
• This command resumes the playback from the last playback position.
• Player behavior:
This command resumes the playback where the player has stopped in a MUSIC folder, a PLAYLIST
folder, a web radio or a Alternate Media.
Procedure:
After have launched a STOP command when a MUSIC folder, a PLAYLIST folder or Web radio is
playing, launch a PLAY command to resume the playback position into the current context.
Methods:
Method Process
Infrared remote control Press the button ( ► ).
Front panel button (My Music Player only) Press the button ( 1 ). Toggle Play/Stop.
Web browser software User page → click ( ► ).
Timestamped programming (Scheduler) Within an event → Add a command RESUME PLAYBACK.
RS-232 serial link Please refer to RS-232 Serial Link Protocol (page 91).
. Stopping the Playback (STOP Command)
Principle:
-27- © 2017, Waves System
ID-AL - My Music Player and My Music Player LE - User Guide V1.0
• This command to stops the current playback.
• Player behavior:
This command stops the current playback of a MUSIC folder, a PLAYLIST folder, a web radio or a
Alternate Media.
Note: the STOP command is not taken into consideration when the player is switched to the auxiliary
input. During the playback of a SPOT folder, the STOP command stops the playback and the playback
go back to the playback position that precedes the SPOT command.
Procedure:
After have launched the playback of a MUSIC folder, a PLAYLIST folder or Web radio, the STOP
command interrupts the playback of the current context.
Methods:
Method Process
Infrared remote control Press the button ( ■ ).
Front panel button (My Music Player only) Press the button ( 1 ). Toggle Play/Stop.
Web browser software User page → click ( ■ ).
Timestamped programming (Scheduler) Within an event → Add a command STOP PLAYBACK.
RS-232 serial link Please refer to RS-232 Serial Link Protocol (page 91).
. Playing the Next Track or Next Web Radio (NEXT Command)
Principle:
• This command is assigned to play the next entry of the current playback.
• Player behavior:
The behavior of the NEXT command depends of the played source:
◦ MUSIC folder: the next track of the current MUSIC folder. If the playback reaches the last track
of the current folder, the first track of the folder is played.
◦ PLAYLIST folder: plays the next track of the current playlist. If the playback reach the last track
of the current playlist, the first track of the next playlist is played.
◦ SPOT folder: plays next track of the SPOT folder. If all tracks of the folder have been played, the
playback returns to the position preceding the SPOT command.
◦ Web radio: plays the next web radio in the web radio list. If the playback reaches the last web
radio of the list, the first web radio of the list is played.
◦ Auxiliary input: no action.
◦ Stopped: plays the next track according to the position of the playback when the player has
stopped.
Procedure:
After have launched the playback of a MUSIC folder, a PLAYLIST folder or Web radio, launch the
NEXT command to play the next entry of the current playback context.
Methods:
-28- © 2017, Waves System
ID-AL - My Music Player and My Music Player LE - User Guide V1.0
Method Process
Infrared remote control Press the button ( ►► ).
Front panel button (My Music Player only) Press the button ( 2 ).
Web browser software User page → click ( ►► ).
RS-232 serial link Please refer to RS-232 Serial Link Protocol (page 91).
. Playing the Previous Track or Previous Web Radio (PREVIOUS
Command)
Principle:
• This command is assigned to play the previous entry of the current playback.
• Player behavior:
The behavior of the PREVIOUS command depends on the played source:
◦ MUSIC folder: plays the previous track of the MUSIC folder. If the playback reaches the first
track of the current folder, the first track of the folder is replayed.
◦ PLAYLIST folder: plays the previous track of the current playlist. If the playback reaches the first
track of the current playlist, the first track of the playlist is replayed.
◦ SPOT folder: plays previous track of the SPOT folder. If the playback reaches the first track of
the current folder, the first track of the folder is replayed.
◦ Web radio: plays the previous web radio in the web radio list. If the playback reaches the first
web radio preset of the listing, the last preset web radio of the list is played.
◦ Auxiliary input: no action.
◦ Stopped: plays previous entry according to the playback position when the player has been
stopped.
Procedure:
After have launched the playback of a MUSIC folder, a PLAYLIST folder or Web radio, launch the
PREVIOUS command to play the previous entry of the current playback context.
Methods:
Method Process
Infrared remote control Press the button ( ◄◄ ).
Web browser software User page → click ( ◄◄ ).
RS-232 serial link Please refer to RS-232 Serial Link Protocol (page 91).
8.3. Changing the Main Volume
Principle:
• This command is assigned to modify the main volume setting of the player.
• Player behavior:
The main volume affects the global setting of the volume of the player indifferently to the context of
playback. This setting applies an attenuation towards the nominal volume of the main volume.
Procedure:
Select a volume level value between 0dB to -64 dB (MUTE). For more information about volumes,
please refer to Player Audio Diagram (page 66) and Setting the Volumes and the Gains of the Player
(page 56).
-29- © 2017, Waves System

ID-AL - My Music Player and My Music Player LE - User Guide V1.0
Methods:
Method Process
Volume knob Turn to left the knob to decrease the main volume. Turn to right
the knob to increase the main volume.
Web browser software User page → Volume: → Select a volume level value
between 0 to -64 (MUTE) → Click on Apply.
Infrared remote control Press the button ( - ) to decrease the main volume. Press the
button ( + ) to increase the main volume.
Timestamped programming
(Scheduler)
Within an event → Add a command VOLUME with a folder
volume between 0 to -64 (MUTE).
RS-232 serial link Please refer to RS-232 Serial Link Protocol (page 91).
-30- © 2017, Waves System

ID-AL - My Music Player and My Music Player LE - User Guide V1.0
9. Programming the Player
This chapter explains how to configure the player and to program the playback. These procedures can be
performed from the several interfaces listed below. For more information about each interface, please refer to
the pertaining chapters.
• From the front panel user interface:
◦ “Advanced” menu with a long press on the knob (≥ 5 s).
Please refer to Front Panel User Interface (page 67).
• From a web browser:
1. Connect to the player with the HTTP address of the player, http:// and the player network
address (e.g. http://mmp-8b0a or http://192.168.0.104). To know the player network
address, please refer to Identify the player on the network of Ethernet Network Connection (page
50).
2. Click on Log In and enter the username and the password of the embedded web server (user
or administrator).
• Default administrator account: username = admin, password = admin.
3. Click on the section that refers to the function to be configured.
Please refer to Ethernet Network Connection (page 49) and Web server (page 73).
• From the configuration file (system.ini): please refer to Settings of the Parameters with
“system.ini” File (page 62).
9.1. Playback at the Startup (Autoplay)
. Introduction
• The AUTOPLAY function allows to play a specific audio source at each startup of the player. The
audio sources playback is described in Playback of the Audio Files, Web radios and Other Audio
Sources (page24). Here is the list of possible settings:
-31- © 2017, Waves System

ID-AL - My Music Player and My Music Player LE - User Guide V1.0
Autoplay mode
Description
Web Server Setting “Advanced” menu
None NONE
Does not play at the startup.
MUSxxx folder MUS
Play a selected music folder (MUSIC).
PLSxxx folder PLS
Play a selected music folder (PLAYLIST).
Web radio WEBRADIO
Play a selected Web radio.
Aux input AUX-INPUT
Switch to the auxiliary input of the player. (My Music Player
only)
Last LAST
Resumes the playback from the last known state/position of
the player at its switching off.
Scheduler SCHEDULER
Resumes the playback from the last state/position described
within the timestamped programming file (Scheduler).
-
USB-INT
Playback from the internal USB as an alternative storage
device. (My Music Player only)
-
USB-EXT
Playback from the external USB as an alternative storage
device. (My Music Player only)
-
SD-CARD
Playback frome the SD card as an alternative storage device.
(My Music Player only)
-
HDD-INT
Playback from the internal HDD as an alternative storage
device.(My Music Player (HW V1.0) only)
. Setting of the “Autoplay” function
Method Process
“Advanced” menu ADMINISTRATOR → SELECT AUTOPLAY: MUS/PLS → MUS or PLS →
Select a folder number → Select a playback mode, or a WEBRADIO →
Select a web radio preset number, or. MISC MODE → (LAST /
SCHEDULER / NONE) + (My Music Player only USB-INT / USB-EXT / SDCARD / HDD-INT / AUX-INPUT).
Web browser software Administrator page → Autoplay: → Select an autoplay mode
(None, MUSxxx folder, PLSxxx folder, Web radio, Last,
Scheduler or Aux input) → if necessary, select a folder number and
a playback mode → Click on Save at the bottom of the page.
Configuration file (system.ini) Please refer to Settings of the Parameters with “system.ini” File (page
62).
9.2. Web Radio
. Operating the Web Radios
The web radio function allows to play an audio stream from a third-party sound system solution as described
in External Audio Sources (page 17). This audio stream can be generated both by a remote service (as the
internet web radios) or by a local service (as a local broadcast audio server). The supported audio stream
format is the MP3 standard (MPEG layer 3). The address of the web radio (URL) must be a MP3 stream path
(.mp3) or a M3U playlist path (.m3u) that points to a MP3 stream path. (Please refer to Characteristics (page
63)).
-32- © 2017, Waves System

ID-AL - My Music Player and My Music Player LE - User Guide V1.0
Up to 10 web radios can be configured in the settings called “Presets”, numbered from 1 to 10.
A web radio preset is composed of a name (an arbitrary name for the web radio preset) and an URL (the
MP3 address or M3U address of the web radio stream)
Once a web radio is setup, please refer to Playback of a Web Radio (page 26) to play a web radio.
. Operating of the Monitoring of the Web Radios
The availability of a web radio depends of external parameters such as the network reliability and the
streaming quality. For this reason, the web radio function is associated to a monitoring function that allows a
continuity of playback even if the web radio is no more available. The web radio playback starts when the
stability of the audio stream is sufficient and according to the web radio settings. The monitoring switches to
a music folder when the audio stream is unstable. The web radio come backs to the playback when the
audio stream is again stable.
Functioning of the web radio monitoring
The “without stream” music folder is played exclusively in random mode, without any reset option. If the
music folder setting designates an empty folder, the monitoring function will play nothing when the web radio
stream is lost.
The web radio monitoring setting is done with the following parameters:
• Without stream, play folder: Set the number of the played Music folder when the web radio
stream is lost. From 001 to 999 (MUS001 to MUS999). Default folder number = 001.
• Time to switch back to the web radio: Set the stream stability duration before the start of
the web radio playback. Default value = 20 seconds.
• Cache size (32 to 10240 kB): Set the total cache size of the web radio (from 32 to 10240).
Default value = 320 kB.
• Minimum cache level (0 to 99%): Set the minimum percent of the total cache which must be
filled before restore the playback of the web radio (from 0 to 99). Default value = 20 %.
-33- © 2017, Waves System

ID-AL - My Music Player and My Music Player LE - User Guide V1.0
. Settings of the Web Radios
Method Process
Web browser software Administrator page → Web Radio:
• For web radio monitoring:
1. Without stream, play folder: select a folder number
from 001 to 999.
2. Time to switch back to the web radio: set a
duration from 20 to 999 s (Default = 20 s).
3. Cache size (32 to 10240 kB): set a cache size from
32 to 10240 kB (Default = 320 kB).
4. Minimum cache level (0 to 99%): set a percent from
0 to 99 %. (Default = 20 %)
• For each preset of web radio:
1. Name: set a preset name.
2. URL: set a MP3/M3U address.
• Click on Save at the bottom of the page.
Configuration file (system.ini) Please refer to Settings of the Parameters with “system.ini” File (page
62).
9.3. Timestamped Programming with the Scheduler
. Introduction
The player can be programmed thanks to the Scheduler, according to a timetable provided on the Main
Media. It manages the playback of all the audio sources available (Main Media contents, web radio, auxiliary
input, etc.) thanks to play, stop, resume, and volume commands. It also allows to schedule Main Media
updates over FTP at specific date and time.
Note: This feature depends on the clock of the player (Please refer to Setting the Clock of the Player (page
54)).
. Principle
The Player uses its clock to perform the scheduled actions. These actions are stored in a timestamped
programming file named the Scheduler file.
Functioning of the Scheduler
The Scheduler file is made of a calendar (from January 1, 2000 to December 31, 2037). Each date of the
calendar refers to a “day template” containing a set of scheduled actions.
-34- © 2017, Waves System

ID-AL - My Music Player and My Music Player LE - User Guide V1.0
Functioning of the calendar
• The dates that do not require any action are left empty and do not refer to any day template.
• If several dates require the exact same set of actions, then the calendar refers to the same day
template for these dates.
A day template contains all the events to be scheduled in a day, for every minute, from 00:00 till 23:59.
These events describe one or more commands (actions) to be executed, and when these actions have to be
executed (precise time).
With the Scheduler feature of the My Music Player and My Music Player LE:
• A Scheduler can contain up to 255 different day templates.
• Within a day template, a different event can be scheduled for each minute.
• An event takes place precisely upon minute change.
• An event can execute up to 32 commands.
• The commands of an event are executed one after another.
• The commands that follow a SPOT folder command will be executed when the SPOT folder is
entirely played.
• An event can be executed with priority if required:
◦ Priority: The playback is stopped immediately in order to execute the commands of event.
◦ No priority: The playback is played till the end of the track, before executes of the commands of
event.
The notion of priority depends on the initial playback source of the player when a scheduled event happens.
The following table shows the different possibilities of sequence, when the “No-priority” option is selected for
a scheduled event:
Initial Playback Source
Final State of Playback
Stopped Music / Playlist / Spot Web radio Auxiliary input Alternate Media
Stopped I I I I I
Music / Playlist / Spot ● ● ● ● ●
Web radio I I I I I
Auxiliary input I I I I I
Alternate Media ● ● ● ● ●
-35- © 2017, Waves System

ID-AL - My Music Player and My Music Player LE - User Guide V1.0
I: the commands of the event are executed immediately
●: the commands of the event are executed at the end of the currently played file.
Functioning of a day template
-36- © 2017, Waves System

ID-AL - My Music Player and My Music Player LE - User Guide V1.0
. List of commands
Command Description
MUSIC
(Random)
Play a Music folder in random mode. Select a folder number from 1 to 999 (from
the folder MUS001 to MUS999).
MUSIC
(Random+Reset)
Play a Music folder in random mode with the reset option. Select a folder number
from 1 to 999 (from the folder MUS001 to MUS999).
MUSIC
(Sequential)
Play a Music folder in sequential mode. Select a folder number from 1 to 999 (from
the folder MUS001 to MUS999).
MUSIC
(Sequential+Reset)
Play a Music folder in sequential mode with the reset option. Select a folder number
from 1 to 999 (from the folder MUS001 to MUS999).
PLAYLIST
(Random)
Play a Playlist folder in random mode. Select a folder number from 1 to 999 (from
the folder PLS001 to PLS999).
PLAYLIST
(Random+Reset)
Play a Playlist folder in random mode with the reset option. Select a folder number
from 1 to 999 (from the folder PLS001 to PLS999).
PLAYLIST
(Sequential)
Play a Playlist folder in sequential v. Select a folder number from 1 to 999 (from the
folder PLS001 to PLS999).
PLAYLIST
(Sequential+Reset)
Play a Playlist folder in sequential mode with the reset option. Select a folder
number from 1 to 999 (from the folder PLS001 to PLS999).
SPOT
(Random)
Play a Spot folder in random mode. Select a folder number from 1 to 999 (from the
folder SPT001 to SPT999).
SPOT
(Sequential)
Play a Spot folder in sequential mode. Select a folder number from 1 to 999 (from
the folder SPT001 to SPT999).
SPOT X FILE(S)
(Random)
Play a Spot folder in random mode with a determinate number of files. Select a
folder number from 1 to 999 (from the folder SPT001 to SPT999) and a number of
files from 1 to 255.
SPOT X FILE(S)
(Sequential)
Play a Spot folder in sequential mode with a determinate number of files. Select a
folder number from 1 to 999 (from the folder SPT001 to SPT999) and a number of
files from 1 to 255.
RESUME PLAYBACK Resume the playback.
STOP PLAYBACK Stop the playback.
VOLUME Set the main volume. Select an attenuation volume from 0 to -63 or MUTE.
MUTE VOLUME Enable or disable the mute to ON or OFF.
WEBRADIO Play a web radio. Select a web radio number from 1 to 10 (from the preset 1 to 10).
AUXILIARY INPUT Switch to auxiliary audio input.
FTP UPDATE Preform a FTP update. Select an URL number from 1 to 10 (from the preset 1 to
10).
SD-CARD Play an Alternate Media plugged on the SD/SDHC memory card slot.
EXTERNAL USB Play an Alternate Media plugged on the External USB host receptacle.
INTERNAL USB Play an Alternate Media plugged on the Internal USB host receptacle.
INTERNAL HDD Play an Alternate Media plugged on the SATA host receptacle (HW V1.0 only).
For more information about playback and main volume adjustment, please refer to Use of the Player (page
24).
-37- © 2017, Waves System

ID-AL - My Music Player and My Music Player LE - User Guide V1.0
For more information about FTP update, please refer to Management of the Main Storage Device Content
(page 38) and FTP Client Page (page 84).
. Creating a Scheduler File
The Scheduler file is generated by the Scheduler software developed for this purpose. Please check our
website for additional information (www.id-al.com support page). The files generated by the Scheduler
software are TM3 files with the .tm3 extension. Prior to any use of the Scheduler software, carefully read the
information related to its prerequisites as well as its user’s guide.
Important: The Scheduler file must be named scheduler.tm3. Another naming is not supported.
. Application of a Timestamped Programming to the Player
Once the Scheduler programming file has been created, copy this programming file scheduler.tm3 into
the SYSTEM folder of the Main Media storage device.
The Scheduler programming file is copied in the same way as the other files, for more information regarding
the updating of the content, please refer to Main Storage Device (Main Media) (page 15) and Management of
the Main Storage Device Content (page 38).
9.4. Management of the Main Storage Device Content
. Introduction
All the files and folders of the Main Media (audio contents, playlists, Scheduler, etc.) can be added, deleted,
renamed, or moved using various methods. The most suitable method depends on the context of use.
The following table describes the available methods and their characteristics, defined below:
• Network: required network access to the player:
◦ None: no network.
◦ Local: through a local network (LAN).
◦ Remote: through the Internet.
• Handling: whether a local handling of the player is required.
• Scheduler: whether the content update can be programmed with the Scheduler.
• Deployment: expected scale of the number of players to update.
• Provider Skills: skill level of the provider required to prepare and deploy a content update.
-38- © 2017, Waves System

ID-AL - My Music Player and My Music Player LE - User Guide V1.0
Method Network Handling Scheduler Deployment Provider Skills
Main Media connected to a
computer
None Yes No Small Low
Player as Computer USB Device None Yes No Small Low
Embedded FTP Server Local or
remote
No No Small or
medium
Medium
Embedded Samba Server Local No No Small or
medium
Medium
Synchronization with Remote FTP
Server(s)
Local or
remote
No (or Yes)* Yes Small, medium,
or large
Medium
Remote FTP Server(s) with Script Local or
remote
No (or Yes)* Yes Small, medium,
or large
High
Removable Storage Device with
Script
None Yes No Small, medium,
or large
High
* If the Scheduler is not used, the content update can be launched either from the embedded website or from
the front panel user interface of the player.
The following chapters explains how the content management can be done , method by method. For more
information about the preparation of the Main Media, please refer to Organizing the Files and Folders onto
the Main Storage Device (Main Media) (Page 19).
. Using the Main Media with a Computer
Description
• Manage directly the content on the Main Media with a computer.
Use the Main Media on a Computer
Requirements
• A computer with USB port (or SD Card reader (My Music Player only)).
• The file manager of a computer’s operating system.
Recommended usage
• This method is recommended when the update is operated directly to a single player by the end
user, and when the preparation is made before any installation or maintenance, player by player.
• Pros:
◦ Easy to use.
◦ Recommended for an on-site maintenance.
◦ Recommended for a content management directly made by the end user.
• Cons:
◦ Not recommended to manage more than one player.
◦ Not recommended when the use of a built-in connector is required for the Main Media (My
Music Player only).
◦ Required an on-site handling.
◦ Required a stop of the playback.
Procedure
-39- © 2017, Waves System

ID-AL - My Music Player and My Music Player LE - User Guide V1.0
1. Switch off the player.
2. Remove the Main Media.
3. Plug the Main Media on a computer.
4. Use the file manager to update the content on the Main Media.
5. Remove the Main Media with the use of the eject procedure of the computer operating system.
6. Insert the Main Media into the chosen storage device connector of the player.
7. Switch on the player.
. Using the USB Device Connector (My Music Player only)
Description
• Manage the content of the Main Media with a computer with the use of the USB device connector
of the player.
Use the USB Device Connector (My Music Player only)
Requirements
• A computer with USB port.
• An USB cable – Mini-B plug to type-A plug.
• The file manager of a computer’s operating system.
Recommended usage
• This method is recommended when the update is operated directly to a single player by the end
user, and when the preparation is made before any installation and maintenance, player by player.
• Pros:
◦ Easy to use.
◦ Recommended for an on-site maintenance.
◦ Recommended when a content management is directly made by the end user.
◦ Recommended when the use of a built-in connector is required for the Main Media (My Music
Player only).
• Cons:
◦ Not recommended for managing more than one player.
◦ Implies an on-site handling.
◦ The distance between the player and the computer depends on the USB cable length.
Procedure
1. Connect the player to the computer with an appropriate USB cable.
2. In the “Advanced” menu, ADMINISTRATOR → USB DEVICE MODE → PRESS TO CONNECT.
The Main Media appears in the file manager as a standard mass storage device (the name of the
mass storage device depends on the connector used with the Main Media).
3. Use the file manager to update the content on the Main Media.
4. Remove the Main Media with the use of the eject procedure of the computer operating system.
5. In the “Advanced” menu, ADMINISTRATOR → USB DEVICE MODE → PRESS TO EXIT.
6. Unplug the USB cable connected to the player and the computer.
For more information about the USB device handling, please refer to: Hardware Description (Page
11) and Front Panel User Interface (page 67).
-40- © 2017, Waves System

ID-AL - My Music Player and My Music Player LE - User Guide V1.0
. Using the Embedded FTP Server
Description
• Manage the content of the Main Media over a local or remote network with the use of a computer
and a FTP client software.
Use the Embedded FTP Server
Requirements
• A computer with a FTP client software (e.g. FileZilla client).
• A LAN (Local Area Network) access from the player and the computer, for the local networking
content management.
• An Internet access from the player and the computer, for remote networking content management.
Recommended usage
• This method is recommended when the update is done remotely over a local Ethernet network or
over the Internet network, player by player, or for a group of players with a third-party appropriate
FTP client tools.
• Pros:
◦ Recommended for off-site handling.
◦ Recommended for exclusive content management with a distant provider.
◦ Recommended with the use of a built-in connector for the Main Media (My Music Player only).
◦ Recommended for managing one or more players.
◦ Free selection of the FTP client tools according to the requirements.
• Cons:
◦ Required skills about the Ethernet network deploy.
◦ The Scheduler function cannot be used to execute an update of content that depends on a
remote operation.
◦ Some network administration policies do not authorize an access from an external FTP.
◦ For technical reasons, the use of the SATA are not supported properly with the FTP functions
(My Music Player HW V1.0 only).
◦ The management of a large number of players requires higher skill level of the FTP clients tools
used (batch, scheduling, content synchronization).
Procedure
• Many FTP client software exist and their modalities of use can change from a software to another,
but the settings can be summarized as follows:
1. The player needs to be properly connected and accessible through the network. Please refer to
Ethernet Network Connection (page 49) and Ethernet Page of the Web server (Page 81).
2. Launch the FTP client software of the computer.
3. In the Host setting enter:
• With a local area network (LAN) or with an Internet access through a VPN:
◦ The player network address (e.g. mmp-8b0a or 192.168.0.104). To know the player
network address, please refer to Identify the player on the network of Ethernet Network
Connection (page 50).
For a VPN (Virtual Private Network) use, please refer to Accessing the Player with Internet
(page 51).
• With an Internet access to the player directly through an Internet router:
◦ The IP address of the local router from where the player is connected (or a domain name if
a DynDNS (Dynamic Domain Name System) is used).
4. In the Port setting enter the port number 21 of the FTP server of the player. When an Internet
access is done directly through an Internet router, the NAT/PAT configuration can modify the port
-41- © 2017, Waves System

ID-AL - My Music Player and My Music Player LE - User Guide V1.0
number as shown in Accessing the Player with Internet (page 51).
5. In the Username setting enter the username of the FTP connection (by default ftp). To change the
username, please refer to FTP Server Access section in Ethernet Page (page 81).
6. In the Password setting enter the password of the FTP connection (by default ftp). To change the
password, please refer to FTP Server Access section in Ethernet Page (page 81).
7. Limit the number of simultaneous connections to 10.
8. Log on to the FTP server of the player. The FTP client software displays a list of folders that shows
the storage devices plugged to the player. Each folder name is composed of the name of the
connector used and a mount point of the storage device on this connector (e.g.:1.0-scsi-
0:0:0:0-part1 or :part1).
• On the My Music Player, the connector names are:
▪ usb-ext for the External USB host receptacle.
▪ usb-int for the Internal USB host receptacle.
▪ sd for the SD/SDHC memory card slot.
▪ sata-hdd for the SATA host receptacle (HW V1.0 only).
• On the My Music Player LE, the connector name is: usb.
9. Open the folder name that pertains to the connector used with the Main Media (e.g. usbint:1.0-scsi-0:0:0:0-part1 or usb:1.0-scsi-0:0:0:0-part1).
10. Manage the content of the Main Media.
11. When the content updating is completed, please log off to the FTP.
. Using the Embedded Samba Server
Description
• Manage the content of the Main Media over a local network with the use of a Samba client.
Embedded Samba Server
Requirements
• A computer with a Samba client file manager.
• A LAN (Local Area Network) access from the player and the computer.
Recommended usage
• This method is recommended when the update is done remotely over a local Ethernet network,
player by player.
• Pros:
◦ Easy to use.
◦ Recommended for off-site handling.
◦ Recommended for a content management directly done by the end user.
◦ Recommended whit the use of a built-in connector for the Main Media (My Music Player only).
◦ Recommended for the management of one or more players on the same local network.
• Cons:
◦ Limited to a local area network (LAN) use.
◦ The Scheduler function cannot be used to execute the content updating that depends on a
remote operation.
◦ No recommended for a large number of players.
◦ For technical reasons, the use of the SATA are not supported properly with the FTP functions
(My Music Player HW V1.0 only).
◦ The management of a large number of players can require higher level of skill for the Samba
clients tools used (batch, scheduling, content synchronization).
Procedure
-42- © 2017, Waves System

ID-AL - My Music Player and My Music Player LE - User Guide V1.0
• The client Samba file management modalities of use can change from an operating system to
another, but the settings can be summarized as follows:
1. The player needs to be properly connected and accessible through the network. Please refer to
Ethernet Network Connection (page 49) and Ethernet Page of the Web server (Page 81).
2. Open the file manager application of the computer.
3. Select the Network section.
4. If necessary, select the Workgroup where the player is networked (by default WORKGROUP). To
change the Workgroup, please refer to Samba section in Ethernet Page (page 81).
5. To log on to the player, select its NetBIOS name in the list of network devices (e.g. MMP8B0A for a
“by default” factory name or PlayerSMB for a NetBIOS custom name). To know the NetBIOS name
of the player, please refer to Identify the player on the network of Ethernet Network Connection
(page 50). To change the NetBIOS name, please refer to Samba section in Ethernet Page (page
81).
6. Open the network folder media.
7. In the Username field, enter the username of the Samba connection. By default, no username is
defined, it is necessary to add one to use the Samba. To change the username, please refer to
Samba section in Ethernet Page (page 81).
8. In the Password field, enter the password of the Samba connection. By default, no username is
defined, it is necessary to add one to use the Samba. To change the password, please refer to
Samba section in Ethernet Page (page 81).
9. Log on to the Samba server of the player. The file manager application displays a list of folders that
shows the storage devices plugged to the player. Each folder name is composed of the name of
connector used and a mount point of the storage device on this connector (e.g. :1.0-scsi-
0:0:0:0-part1 or :part1).
1. On the My Music Player, the connector names are:
1. usb-ext for the External USB host receptacle.
2. usb-int for the Internal USB host receptacle.
3. sd for the SD/SDHC memory card slot.
4. sata-hdd for the SATA host receptacle (HW V1.0 only).
2. On the My Music Player LE, the connector name is: usb.
Note: a malfunction in the Samba server may display incorrect folder names in the file manager.
10. Open the folder name that pertains to the connector used by the Main Media (e.g. : usb-
int:1.0-scsi-0:0:0:0-part1 or usb:1.0-scsi-0:0:0:0-part1).
11. Manage the content of the Main Media.
. Using the Embedded FTP Clients in a Synchronization Mode
Description
• Manage the content of the Main Media over a local or remote network with a FTP synchronization
between the player content and a server content. The FTP synchronization are called manually or
scheduled with the use of a timestamped programming.
Embedded FTP Clients in Synchronization Mode
Requirements
• A server computer with a FTP server software.
• A LAN (Local Area Network) access to the player and to the server computer, for the local
-43- © 2017, Waves System

ID-AL - My Music Player and My Music Player LE - User Guide V1.0
networking content management.
• An Internet access to the player and to the server computer, for remote networking content
management.
• For off-site handling use, a Scheduler file (scheduler.tm3) to timestamped the FTP
synchronization between the player content and the server content.
Recommended usage
• This method is recommended for a small or a large number of players when the update is done
remotely over a local Ethernet network or over the Internet network, manually or with a
timestamped programming.
• Pros:
◦ Recommended for an off-site handling with the use of the Scheduler function.
◦ Recommended for an exclusive content management with a distant provider.
◦ Recommended for managing one or more players.
◦ Recommended with the use of a built-in connector for the Main Media (My Music Player only).
◦ Easy preparation of the update content.
◦ Unscheduled content updates can be operated directly with the front panel user interface (on-
site handling) or from the web server (remote handling).
◦ Easy to install in restricted network access policies environment.
• Cons:
◦ Required skill level about the Ethernet network deployment.
◦ The unscheduled content update requires minimum skills for the operator.
◦ For technical reasons, the use of the SATA are not supported properly with the FTP functions
(My Music Player HW V1.0 only).
◦ Customizing the content of each player requires more space available within the content server.
Procedure
1. The player needs to be properly connected and accessible through the network. Please refer to
Ethernet Network Connection (page 49) and Ethernet Page of the Web server (Page 81).
2. The used FTP client must be configured, please refer to Setup the FTP Client Presets (page 47).
3. Perform the content update through the FTP client, with one of these four methods:
Method Process
“Advanced” menu ADMINISTRATOR → UPDATE FTP NOW → Select a PRESET
number from 01 to 10 → FTP (preset number) SURE?, select
YES.
Web browser software FTP Client page → In the chosen Preset → Click on
Launch Preset.
Timestamped programming
(Scheduler)
Within an event → Add a command FTP UPDATE with a preset
number from 1 to 10.
RS-232 serial link Please refer to RS-232 Serial Link Protocol.
. Using the Embedded FTP Clients with a Script
Description
• Manage the content of the Main Media over a local or remote network with the use of a FTP server
that contains a management command script file and an update content. The execution of the file
management commands are called manually or scheduled with the use of a timestamped
programming.
-44- © 2017, Waves System

ID-AL - My Music Player and My Music Player LE - User Guide V1.0
Embedded FTP Clients in Script Mode
Requirements
• A server computer with a FTP server software.
• A script file (script.txt) on the server.
• The script file and the update content can optionally be compressed to a ZIP file using compatible
software. This ZIP file also may be password-protected.
• A LAN (Local Area Network) access to the player and the server computer, for the local networked
content management.
• An Internet access to the player and the server computer, for remote networked content
management.
• For an off-site handling use, a Scheduler file (scheduler.tm3) to timestampe the execution of the
script commands.
Recommended usage
• This method is recommended both for a small or a large number of players when the update is
done remotely over a local Ethernet network or over the Internet network, manually or with a
timestamped programming.
• Pros:
◦ Recommended for an off-site handling with the use of the Scheduler function.
◦ Recommended for an exclusive content management with a distant provider.
◦ Recommended for the management of one or more players.
◦ Recommended with the use of a built-in connector for the Main Media (My Music Player only).
◦ Unscheduled content updates can be operated directly with the front panel user interface menu
(on-site handling) or with the web server (remote handling).
◦ Easy to install in restricted network access policies environment.
• Cons:
◦ Required skill level about the Ethernet network deploy.
◦ Required skill level about the Script function.
◦ Required to know exactly the content paths into the Main Media before the writing of the Script.
◦ The unscheduled content update requires a minimum skill level of the operator.
◦ For technical reasons, the use of the SATA are not supported properly with the FTP functions
(My Music Player HW V1.0 only).
Procedure
1. The player requires to be properly connected and accessible through the network. Please refer to
Ethernet Network Connection (page 49) and Ethernet Page of the Web server (Page 81).
2. The used FTP client must be configured, please refer to Setup the FTP Client Presets (page 47).
3. Copy a script file (script.txt) with its content, or a zipped script file (script.zip) into the
Source folder of the FTP client preset used. To create a script file, please refer to Content
Updates with the Use of Scripts (page 86).
4. Perform the content update through the FTP client, with one of these four methods:
-45- © 2017, Waves System
ID-AL Player Server
Client FTP
Script
Network
Script
Scheduler

ID-AL - My Music Player and My Music Player LE - User Guide V1.0
Method Process
“Advanced” menu ADMINISTRATOR → UPDATE FTP NOW → Select a PRESET
number from 01 to 10 → FTP (preset number) SURE?, select
YES.
Web browser software FTP Client page → In the chosen Preset → Click on
Launch Preset.
Timestamped programming
(Scheduler)
Within an event → Add a command FTP UPDATE with a preset
number from 1 to 10.
RS-232 serial link Please refer to RS-232 Serial Link Protocol (page 91).
. Using a Removable Device Storage with a Script
Description
• Manage the content of the Main Media with the use of a storage device that contains a
management command script file and an update content. The file management commands are
executed with the reboot of the player when the storage device is plugged into the player.
Removable Device Storage with Script
Requirements
• A computer with a text file editor to prepare a script file.
• A third-party storage device with a script file (script.txt) and the update content.
• The script file and the update content can optionally be compressed to a ZIP file using compatible
software. This ZIP file also may be password-protected.
Recommended usage
• This method is recommended when the update is done with the use of a removable storage device,
when the player is not accessible through the network. Its also recommended for the preparation
before any installation and maintenance, player by player.
• Pros:
◦ Easy to use.
◦ Recommended for an on-site maintenance.
◦ Recommended for an exclusive content management with a distant provider.
◦ Recommended for the management of distant location players without an Ethernet connection
access.
◦ Recommended with the use of a built-in l connector for the Main Media (My Music Player only).
◦ Easy to install in a restricted network access policies environment.
• Cons:
◦ Required skill level about the Script function.
◦ Requires an on-site handling.
◦ Required to know exactly the content paths into the Main Media before the writing of the Script.
◦ Required a third-party storage support in order to update
◦ Required a stop of playback.
Procedure
1. On a computer, prepare a third-party storage device (an USB flash drive or a SD card):
• Format the storage device following the instructions in Preparing a Storage Device (page 18).
• Onto the storage device, copy a script file (script.txt) with its content or a zipped script file
(script.zip). In order to create a script file, please refer to Content Updates with the Use of
-46- © 2017, Waves System
ID-AL Player
Secondary Storage Device
or Main Media
Script

ID-AL - My Music Player and My Music Player LE - User Guide V1.0
Scripts (page 86).
• Remove the storage device with the use of the eject procedure of the computer operating
system.
2. Switch off the player.
3. Insert the storage device on a free storage device connector of the player that is not used by the
Main Media.
4. Switch on the player. The startup of the player will last as long as the update procedure will require
it.
5. When the player boot up is finished, remove the update storage device.
Note: the Main Media can be used instead of a third-party storage device, but all the files
necessary to the Script will have to be removed manually after the update.
. Setup the FTP Client Presets
The “FTP Client” setup is necessary when the management of the Main Media content is done with the
embedded FTP clients in “Synchronization” or in “Script” mode. The setup is composed of:
1. The general settings define the access rights between the FTP client function and all FTP servers
used.
2. 10 presets define an individual access to the folders of FTP servers. Several presets can define the
access to several folders of a same FTP server (e.g. Preset 1 → Host = ftp.MyServer.com →
Source folder = Song/ and Preset 2 → Host = ftp.MyServer.com → Source folder =
Advertising/). A preset can be use in synchronization mode (Sync.) or scripted mode (Script).
In synchronization mode (Sync.), advanced options of inclusions and exclusion of file and folder
can be add.
Setup the FTP client as follow:
Prior to configure the FTP client, be sure that the player is properly connected and accessible through the
network. Please refer to Ethernet Network Connection (page 49) and Ethernet Page of the Web server (Page
81).
1. With a web browser, log on to the embedded web server of the player with the administrator account.
2. Click on FTP Client.
3. Setup the general settings
Considering the specifications of the FTP servers used the general settings may require changes.
Setting Description
Waiting time before
reconnecting
Set the wait time before reconnecting the drive to the FTP server when the
connection has been interrupted.
Number of attempts Set the number of attempts to connect to the FTP server before leaving the
update operation.
Passive mode Enable or disable the “Passive mode” of the connection. Usually disable.
4. Setup the FTP client presets
Please consider each individual access to a FTP server path. Configure one or more presets.
-47- © 2017, Waves System

ID-AL - My Music Player and My Music Player LE - User Guide V1.0
Setting Description
Name Set an arbitrary name for the FTP client preset (e.g. My Company FTP).
Host Set the URL (web or IP address) of the FTP server (e.g. ftp.mycompany.com or
192.168.100.10).
Port Set the connection port number of the FTP server. Usually the port 21.
Username Set the username of the access of FTP server.
Password Set the password of the access of FTP server.
Source folder Select the path to the FTP server from which the update will be performed (e.g.
data/MyPlayer/).
Sync. Perform the content update in FTP synchronization mode.
Script Perform the content update in script mode.
Advanced
Sync. options
By default the FTP Synchronization mode performs the content update with the
synchronizing all the files and folders of the server with the player, from the path
of server defined with the Source folder setting. In order, to include or exclude
some files and folders of the server from the synchronization process with the files
and folders of the player, select the Advanced Sync. options.
Sync. included
folders/files
Set a path list of the files and folders to be included into the synchronization. Each
path is defined from the Source folder parameter. Only files and folders listed
in Sync. included folders/files will be synchronized with the player.
Other paths will be ignored both on the player and on the server. A path is defined
between two quotation marks (“) and separated by a space. (e.g. “MUSIC/”
“PLAYLIST/PLS002 – Jazz/” “SPOT/” “SYSTEM/scheduler.tm3”). If
Sync. included folders/files list is empty, all the files and folders of the
server will be synchronized with the player.
Sync. excluded
folders/files
Set a path list of the files and folders to be excluded from the synchronization.
Each path is defined from the Source folder parameter. The files and folders
listed in Sync. excluded folders/files will be ignored by the
synchronization with the player. A path is defined between two quotation marks
(“) and separated by a space. (e.g. “MUSIC/MUS001 – Classic/”
“SPOT/SPT005 2016” “PLAYLIST/PLS002 – Jazz/50s Sound.m3u”).
The path name of a folder is composed of a folder name and a slash (/) separator between each
folder name. It is always finished by an end slash (/) but do not put a slash (/) at the beginning (e.g.
data/ or MUSIC/MUS001 Classic/Mozart/). The path name of file is composed of its folder
path name with the name of the file and its extension (e.g. SYSTEM/scheduler.tm3).
Exemple 1 – Without included and excluded folders/files options
Source folder: data/MyPlayer/
[ ] Advanced sync.options
In this example, from folder data/MyPlayer/ of the server, the FTP synchronization reproduces
the exact content of the server to the Main Media of the player.
Exemple 2 – With included and excluded folders/files options
Source folder: data/MyPlayer/
[x] Advanced sync.options
Sync. included folders/files: “MUSIC/” “SPOT/” “SYSTEM/scheduler.tm3”
Sync. excluded folders/files: “SPOT/SPT005 2016” “MUSIC/MUS001 Classic/”
In this example, from folder data/MyPlayer/ of the server, the FTP synchronization reproduces
the exact content of the folders MUSIC and SPOT, and the file scheduler.tm3 from the SYSTEM
-48- © 2017, Waves System

ID-AL - My Music Player and My Music Player LE - User Guide V1.0
folder, to the Main Media of the player. But the sub folder SPT005 2016 of the folder SPOT and the
sub folder MUS001 Classic of the folder MUSIC will be ignored with the FTP synchronization
process.
The button Clear Preset allows to delete all settings of a Preset and the button Launch Preset
allows to perform the content update with the settings of the Preset.
5. Click on Save at the bottom of the page.
9.5. Ethernet Network Connection
. Introduction
The Ethernet RJ45 connection makes possible to interconnect the player with a local network (Ethernet) as
well as the worldwide computer network (Internet). This interconnection with a standard computer network
allows to access to the different functionalities listed bellow:
Functions Description Network Type How Use?
Web radio client Web radios playback. Local / Remote Web Radio (page 32).
Embedded HTTP
Web server
Check status, send commands
and configuration.
Local / Remote Web server (page 73).
File Transfer Protocol
(FTP) server
Manage the player content with
a client application.
Local / Remote Management of the Main Storage
Device Content (page 38).
File Transfer Protocol
(FTP) Clients
Manage the player content with
servers.
Local / Remote Management of the Main Storage
Device Content (page 38).
Samba Server Manage the player content with
a client application.
Local Management of the Main Storage
Device Content (page 38).
Network Time
Protocol (NTP)
Keeps the clock of the player
accurate with accuracy
servers.
Local / Remote Setting the Clock of the Player
(page 54).
Ethernet Network
Network Functions
-49- © 2017, Waves System

ID-AL - My Music Player and My Music Player LE - User Guide V1.0
. Establishing the Wired Connection
If your are not familiar with the Ethernet network vocabulary please read the section Ethernet Network
Glossary (page 53) that follows this chapter.
Hardware connection
1. Be sure that the player is powered off.
2. Plug an Ethernet cable from the local network access (switch or router) to the player RJ45 Ethernet
port (Please refer to Hardware Description (page 11))
3. Switch on the player.
In order to obtain all network functions of the player, it is necessary to know whether your network supports
DHCP.
Automatic connections with DHCP
If the network supports DHCP, then the player may already be set up for online access. To check point,
simply open a web browser and try to access to the web server of the player as referred into Web server
(page 73).
If the player is still not online after the following steps, try to set up the network connection manually using a
static IP address.
Manual configuration with static address
If the network does not support DHCP, it is necessary to get information about the network before the player
can get online. If these information are unknown, then contact the local network administrator or the IPS
(Internet Service Provider)..
• An IP address: is a unique address used to identify the player within the network. An IP address is
always given with four numbered groups, separated by dots, for example: 192.168.100.10. Once
the player is connected using DHCP, this address will periodically change (explaining the word
“dynamic”). Nevertheless, if the player is configured with a static IP address, the IP address will
never change.
• A network mask: indicates to the player the size of the network to which it is being connected. It is
formatted the same way as the IP address but usually looks like 255.255.255.0.
• A gateway: is the IP address of the device that the player looks for an access to the Internet, usually
the router’s IP address.
• DNS server: is the IP address of the DNS (Domain Name Service) server. DNS is what the player
uses to resolve the access to the IP addresses with the domain names. It allows to the player to
access to the FTP, NTP and Webradio servers directly with their domain names. For example
https://www.wikipedia.org refers to the IP address 208.80.154.224 (IP address of the
Wikipedia website on the Internet). DNS is used and that is not necessary to record the IP
addresses. Domain names (like wikipedia.org) are much easier to use. It is needed at least one
DNS server address but it is possible to setup up to two addresses in case one server is unavailable.
To manually configure a wired connection without an access to the web server of the player, please refer to
Front Panel User Interface (page 67) then open a web browser and try to access to the web server of the
player as referred into Web server (page 73).
. Identify the player on the network
To access to the embedded web and FTP servers of the player, it is necessary to identify the network
address of the player on the Ethernet network. Several methods are available to addressing the player,
depending to the nature of the network:
-50- © 2017, Waves System

ID-AL - My Music Player and My Music Player LE - User Guide V1.0
• With the default NetBIOS name of the player:
Through the NetBIOS service of the Ethernet network, by default, the player responds to a factory
name. The factory name is composed to the characters string mmp- (or MMP-) and the hexadecimal
serial number of the player (e.g. mmp-8b0a or MMP-B04F). Use of uppercase or lowercase does not
matter. To find the hexadecimal serial number of the player, check the sticker below the case of the
player or on the LCD screen when the player is stopped, please refer to Information Displays (page
67).
• With the IP address of the player:
On the Ethernet network the player responds to a unique IPv4 address (e.g. 192.168.0.104).
Depending to the settings of network, this address can be fixe (a IP address is manually attributed to
the player and does not evolve in the time) or dynamically affected by a DHCP server (the IP
address is attributed by the DHCP and can change at any time). To find the current IP address of the
player check the “Advanced” menu (Administrator → Ethernet), please refer to Advanced
Menu to Select an Audio Source and Configure the Player (page 68).
Note: Because the IP address attribution can change in DHCP mode, it is better to use the
NetBIOS host name identification which is independent to the IP address of the player.
• With a custom NetBIOS name:
Through the NetBIOS service of the Ethernet network, the player can responds to a custom name.
The custom name is setup in the NetBIOS entry of the Samba settings of the player, please refer to
Ethernet Page in Web server (page 81). If the NetBIOS setting is empty, the default factory name is
used. Use of uppercase or lowercase does not matter.
. Accessing the Player with Internet
When the Ethernet parameters are properly setup, the network functionalities of the player are easy to reach
from the local area network (LAN), but some embedded functions, like the web server or the FTP server,
required additional settings in order to make them accessible from the Internet worldwide network. The
player availability on the network as well as the Internet accessibility depend on the network infrastructure
within which the player is installed. If more information on the network setup are required, then contact the
local network administrator or the IPS (Internet Service Provider).
Several network configurations are possible in order to provide an access to the web server and the FTP
server over the Internet worldwide network. Because all the setups possibilities can not be developed, please
find below two usual examples:
1. Use a secure network with a VPN solution (recommended setup):
Use a third-party VPN solution to access to the player over Internet in the same way as on the local
network. This method is highly recommended because it offers a secure network access by using
tunneling protocols and encryption techniques while maintaining the ease of use of a local area
network (LAN). To obtain the better security solution as possible we suggest to install a point-to-point
VPN, as illustrated in the following example.
-51- © 2017, Waves System

ID-AL - My Music Player and My Music Player LE - User Guide V1.0
Example: Internet access with point-to-point VPN solution
Of course, other setups are possible. Please, contact the network administrator to deploy properly a
VPN solution.
2. Use a non-secure network with the NAT/PAT configuration of the local Internet router:
For a basic access to the player over Internet without security cares, most Internet routers allow to
create a gateway between the local area network and the Internet network. In order to do this, it is
necessary to add translation rules in the NAT/PAT (Network Address Translation / Port Address
Translation) configuration of the local router.
For a player, two translation rules will be established:
1. For the web server from the player IP address on the port 80 to the Internet router address on
the free port number (port 80 recommended).
2. For the FTP server from the player IP address on the port 21 to the Internet router address on
the free port number (port 21 recommended).
To obtain the Internet address of the router, then contact the local network administrator or the IPS
(Internet Service Provider).
On the Internet router, the settings can be done as follow:
1. Log In to the administration service of the router.
2. In the NAT/PAT settings, add a new translation rule for each the service which is necessary
to render accessible over Internet. For each rule, select the TCP protocol and the player
identifier on the network (its IP or its NetBIOS name).
◦ For the web server rule:
▪ Select the HTTP (Web server) as Application (Service) setting.
▪ Select the port 80 as Source (Internal) setting.
▪ Select the a free port (port 80 recommended) as Target (External) setting.
◦ For the FTP Server rule:
▪ Select the FTP as Application (Service) setting.
▪ Select the port 21 as Source (Internal) setting.
▪ Select the a free port (port 21 recommended) as Target (External) setting.
3. Save and apply the new translation rules.
4. In the “firewall” settings, ensure that the ports chosen port are not filtered.
-52- © 2017, Waves System

ID-AL - My Music Player and My Music Player LE - User Guide V1.0
Note: The player only support IPv4 network, that mean that the modem, the bridge or the router
which allows to be connected to the Internet network need to provide a NAT/PAT function. The
player web server use the port 80 and the player FTP server use the port 21.
Example: Internet access with the NAT/PAT configuration of the router
In the following example:
◦ The IP address of the player is 192.168.0.25 (NetBIOS name mmp-8b0a).
◦ The Internet IP address of the router is 193.48.100.46.
◦ The NAT/PAT of the router is set translate:
▪ The web server of the player (TCP protocol / HTTP) from the port 80 to the port 1234.
▪ The FTP server of the player (TCP protocol / FTP) from the port 21 to the port 5678.
Meaning that:
◦ The web server of the player is accessible with a web browser software over the Internet
network at the http://193.48.100.46:1234 address.
◦ The FTP server of the player with a FTP client software over the Internet network at the host
address 193.48.100.46 and the port 5678.
. Ethernet Network Glossary
Wired connection: a wired connection is when a device is physically connected to a router or Ethernet port
with a cable. This is the most common method of connecting to the Internet and local network for desktop
computers.
Ethernet port: an Ethernet port is what an Ethernet cable is plugged into when a wired connection is used.
Router: a router is a specially designed device that, using its software and hardware, routes information
from the Internet to a network. It is also sometimes called a gateway.
IP (Internet Protocol) address: a IP address is a unique number assigned to a player so that the router
can identify the player on the network. It is like a phone number for the player. Having this unique address
allows the router to speak to the player, and therefore send/receive data.
MAC Address: a MAC address a fixed hardware address for the player. Known this information is
sometimes important when using a cable modem connection. To find the mac address of the player. Please
refer to Web server (page 73).
DHCP (Dynamic Host Configuration Protocol): the DHCP is a way for the player to automatically be
configured to access the network and/or Internet connection. DHCP is usually automatically configured on a
router. This is usually the quickest and easiest way of establishing a connection to the Internet. If it is not
sure that the router is setup to use DHCP, it may be necessary to contact the IPS’s (Internet Service
-53- © 2017, Waves System

ID-AL - My Music Player and My Music Player LE - User Guide V1.0
Provider) customer service line to check. If the router isn’t configured to use DHCP then they will also be
able to give configuration settings needed in order to get online. If the player is connected to an office LAN
(Local Area Network), contact the network administrator.
VPN (Virtual Private Network): a VPN extends a private network across a public network, such as the
Internet. It enables users to send and receive data across shared or public networks as if their computing
devices were directly connected to the private network. Applications running across the VPN may therefore
benefit from the functionality, security, and management of the private network.
NAT/PAT (Network Address Translation / Port Address Translation): The majority of NAT/PAT map
multiple private hosts to one publicly exposed IP address.
Firewall: a firewall is a network security system that monitors and controls the incoming and outgoing
network traffic based on predetermined security rules.
FTP (File Transfer Protocol): is a standard network protocol used to transfer computer files between a
client and server on a computer network.
Samba: allows file and print sharing between computers running Microsoft Windows and computers
running Unix.
NetBIOS (Network Basic Input/Output System): is a service which provides a corresponding between a
NetBIOS name and a IP address for each device in the network.
9.6. Setting the Clock of the Player
. Introduction
When the Scheduler function of the player is required, the player uses its embedded clock to start
programmed actions at the wished date and time. The accuracy of the player's clock system is essential to
ensure a precise trigger of programmed actions.
• The start and the end of the daylight saving time are automatically handled through the management
of the legal time zones defined for each country.
Note: Except for time zone rules which have changed since 2012, all the global time zone rules are
supported.
• A built-in clock, called RTC (Real Time Clock), allows that the date and time of the player are always
kept up-to-date, whether the player is powered or not, thanks to a built-in battery.
For the timekeeping duration when the player is not powered, please refer to Characteristics (page
63).
• The Network Time Protocol (NTP) function maintains a highest accuracy of the clock with using the
Ethernet network in order to synchronize the system clock and the RTC with external NTP servers.
-54- © 2017, Waves System

ID-AL - My Music Player and My Music Player LE - User Guide V1.0
Important: My Music Player only, if the player is not connected to the Ethernet network, or if the automatic
update of the time system thanks to the network (NTP) is not possible while the player is connected to the
network, it is necessary to perform the System Clock Calibration (page 93) to obtain the highest level of the
clock accuracy.
. Setting the Date and the Time
Principle:
These settings are assigned to apply manually the date/time to the clock of the player when the
player is not using the NTP function.
Procedure:
1. Disabled the NTP.
2. Select a time of day:
1. The hours (as 24-hour clock), from 00 to 23.
2. The minutes, from 00 to 59.
3. The seconds, from 00 to 59.
3. Select date:
1. The year, from 2000 to 2037.
2. The month of the year, from the first month of the year (01) to the last month of the year (12).
3. The day of the month, from the first day of the month (01) to the last day of the month (29/30/31).
Methods:
Method Process
“Advanced” menu ADMINISTRATOR → DATE/TIME:
1. NTP MODE: set NTP MODE = OFF.
2. TIME: set hours (from 00 to 23), minutes (from 00 to
59) and seconds (from 00 to 59).
3. DATE: set day of the month (from 01 to 31), month of
the year (from 01 to 12), year (from 2000 to 2037).
Web browser software Administrator page:
1. NTP synchronization = Off.
2. Click on Save at the bottom of the page.
3. Change Date/Time:
1. Date: select Year (from 01 to 12), Month of the
year (from 01 to 12), Day of the month (from 01 to
31).
2. Time: select hours (from 00 to 23), minutes (from
00 to 59) and seconds (from 00 to 59)
3. Click on Save.
. Setting the Time Zone
Principle:
This setting is assigned to define the legal time zone handles the automation of the start and the end
of the daylight saving time.
Procedure:
Select the parameters which define a geographical rule specification: World area, Country, and
-55- © 2017, Waves System

ID-AL - My Music Player and My Music Player LE - User Guide V1.0
Region.
◦ The list of world area is as follows: Africa (AFR), America (AME), Antarctica (ANT), Arctic (ARC),
Asia (ASI), Atlantic (ATL), Australia (AUS), Europe (EUR), Indian (IND) and Pacific (PAC).
◦ The list of countries depends on the chosen world area.
◦ The list of regions is linked to the chosen country. This parameter only exists if the chosen
country have several regional rules.
Methods:
Method Process
“Advanced” menu ADMINISTRATOR → DATE/TIME → TIME ZONE: select the
short name reference of World Area, Country and Region.
Web browser software Administrator page → Change Date/Time → select the
name reference of World Area/Country/Region.→ Click
on Save.
. Configuring the Network Time Protocol (NTP)
Principle:
• This setting is assigned to enable or disable the Network Time Protocol (NTP) when the player is
connected to the Ethernet network.
Procedure:
Enable or disable the Network Time Protocol (NTP) function.
Methods:
Method Process
“Advanced” menu ADMINISTRATOR → DATE/TIME → NTP MODE: set NTP
MODE = OFF to disable the NTP or set NTP MODE = ON to
enable the NTP.
Web browser software Administrator page → Set NTP synchronization = Off
to disable the NTP or set NTP MODE = On to enable the NTP →
NTP server 1, NTP server 2, NTP server 3 and NTP
server 4→ Set from 1 to 4 NTP server addresses. Click on
Save at the bottom of the page.
9.7. Setting the Volumes and the Gains of the Player
. Introduction
Independently to the main volume adjustment (Please refer to Changing the Main Volume (page 29)), the
current chapter explains how to adjust the gains and the volumes of the separate audio outputs and audio
sources of the player. The number and types of audio outputs and audio sources depend on the
specifications of the player used.
For more information about the volumes and the gains of the player used, please r efer to Player Audio
Diagram (page 66), Hardware Description (page 11) and Characteristics (page 63).
-56- © 2017, Waves System

ID-AL - My Music Player and My Music Player LE - User Guide V1.0
. Changing the Volumes of the Independent Outputs
Principle:
• This setting is assigned to modify individually the volume setting of each audio outputs of the player.
• Player behavior:
The setting of the output volumes are independent, and are affected indifferently to the context of
playback. These settings apply an attenuation to the nominal volume of each output. The setting of
the audio outputs depends to the model of the player used:
◦ My Music Player: XLR and RCA audio outputs.
◦ My Music Player LE: Amplified and RCA audio outputs.
Procedure:
Select an attenuation value from 0 dB to -64 dB (MUTE) for each audio outputs of the player.
Methods:
Method Process
“Advanced” menu ADMINISTRATOR → VOLUMES/GAINS → VOLUME OUTPUT →
XLR and RCA for the My Music Player, or AMP (amplified) and
RCA for the My Music Player LE → Select a volume attenuation
from 00 to -64.
Web browser software Administrator page → RCA output volume and XLR
output volume for the My Music Player, or RCA output
volume and Amplified output volume for the My Music
Player LE → Select a volume attenuation from 0 to -64 (MUTE)
→ Click on Save at the bottom of the page.
RS-232 serial link Please refer to RS-232 Serial Link Protocol (page 91).
Configuration file (system.ini) Please refer to Settings of the Parameters with “system.ini” File
(page 62).
. Changing the Gains of the Independent Outputs
Principle:
• This setting is assigned to modify individually the gain setting of each audio outputs of the player.
• Player behavior:
The setting of the output gains are independent, and are affected indifferently to the context of
playback. These settings apply a gain to the nominal volume of each output. The setting of the audio
outputs depends on the model of the player used:
◦ My Music Player: XLR and RCA audio outputs.
◦ My Music Player LE: Amplified and RCA audio outputs.
Procedure:
Select a gain value from 0 dB to 9 dB for each audio outputs of the player.
Methods:
-57- © 2017, Waves System

ID-AL - My Music Player and My Music Player LE - User Guide V1.0
Method Process
“Advanced” menu ADMINISTRATOR → VOLUMES/GAINS → GAIN OUTPUT →
XLR and RCA for the My Music Player, or AMP (amplified) and
RCA for the My Music Player LE → Select a gain from 0 to +9.
Configuration file (system.ini) Please refer to Settings of the Parameters with “system.ini” File
(page 62).
. Changing the Volumes of the Audio Sources
Principle:
• This setting is assigned to modify individually the volume of each audio source.
• Player behavior:
The setting if the volume of the sources is independent, and apply an attenuation to the nominal
volume depending to the context of playback. The setting of sources depends on the model of the
player used:
◦ My Music Player: Main Media content playback, web radio playback and auxiliary input.
◦ My Music Player LE: Main Media content playback, web radio playback.
Procedure:
Select an attenuation value from 0 dB to -64 dB (MUTE) for each audio sources of the player.
Methods:
Method Process
“Advanced” menu ADMINISTRATOR → VOLUMES/GAINS → VOLUME INPUT →
P (Main Media content playback), A (Auxiliary input, My Music
Player only) and W (Web radio) → Select a volume attenuation
from 00 to -64.
Web browser software Administrator page → Player volume (Main Media
content playback), Web radio, and Aux input volume (My
Music Player only) → Select a volume attenuation from 0 to
-64 (MUTE) → Click on Save at the bottom of the page.
Configuration file (system.ini) Please refer to Settings of the Parameters with “system.ini” File
(page 62).
9.8. Fade In and Fade Out Between the Audio Sources (FADE IN/FADE OUT)
. Introduction
When a new playback command happen, the audio fades properties allow to operate progressives
transitions between the initial state of playback and the final state of playback.
1. Fade out on the initial state of playback: reduce the player volume from the current setting to the
minimal level (mute) in a determinate time duration.
2. Fade in on the final state of playback: increase the player volume from the minimal level (mute) to
the current setting in a determinate time duration.
-58- © 2017, Waves System

ID-AL - My Music Player and My Music Player LE - User Guide V1.0
Fade out and Fade in function
In order to obtain the fastest and cleanest fade between two states of playback:
• Even if the fade out duration time is set, it may vary according to the playback mode. The fade out
duration time will be dynamically reduced if the remaining time of the current played file is less than
the fade out duration time.
• Because the playback process is fully mastered when the player plays a local content, no fade in is
required when the final position of playback is a Main Media content (Music folders, Playlist folders
and Spot folders) or an Alternate Media content.
Initial State of playback
Final State of playback
Stopped Music / Playlist / Spot Web radio Auxiliary input Alternate Media
Stopped - / - - / - - / - - / - - / -
Music / Playlist / Spot Out / - Out / - Out / In Out / In Out / -
Web radio Out / - Out / - Out / In Out / In Out / -
Auxiliary input Out / - Out / - Out / In Out / In Out / -
Alternate Media Out / - Out / - Out / In Out / In Out / -
. Changing the Fade In and Fade Out settings
Procedure:
Select a duration value from 0 seconds (no fade) to 5 seconds for fade in and fade out parameters.
Methods:
Method Process
“Advanced” menu ADMINISTRATOR → FADE IN/OUT → IN and OUT → Select a
duration from 0 to 5 seconds.
Web browser software Administrator page → Fade-in(s) and Fade-out(s),
→ Select a duration from 0 to 5 → Click on Save at the bottom
of the page.
Configuration file (system.ini) Please refer to Settings of the Parameters with “system.ini” File
(page 62).
9.9. Audio File Encryption
The player can play specific encrypted MP3 files. These encrypted MP3 files are compatible only with ID-AL
range of players. In order to prevent their use with other devices than those provided in a given installation.
In addition, the property information (license name, information of supplier) are within the files, and allow to
identify their legal authorship in the event of theft or an unauthorized use.
-59- © 2017, Waves System

ID-AL - My Music Player and My Music Player LE - User Guide V1.0
The encrypted MP3 files are created from standard MP3 files (identical quality and audio encoding process)
and have the same extension name (.mp3). For more information about encrypted files supported with the
player, please refer to Characteristics (page 63).
The encryption is performed with a licensed software that is attributed to a unique legal owner. This license
are exclusively accorded by our company after a user request. The grating of a new license is at the
discretion of the ID-AL / Waves System company. To obtain a MP3 encryption software with an exclusive
license, please contact ID-AL / Waves System company.
9.10. Updating the Firmware
. Introduction
This chapter explains how to perform the update of the internal firmware of the player whatever is the
previously installed version of your player. Read this chapter entirely before performing your update. The
firmware update adds new features, improves existing functions within the build-in firmware. To have the best
experience with the ID-AL player, it is strongly recommended to update the firmware.
. Select a way of procedure
The procedure to update the firmware depends on two parameters:
1. The firmware version of the player.
2. The settings must be keep or be reset.
Depending on the answers, it can be necessary to install a “Bootloader” software before the installation of
the new firmware and the selection of the right extension name of the firmware file.
The following table shows which method must be performed:
Current Firmware
Version
Reset the Current Player Settings
(Reset Factory)
Keep the Current Player Settings
< 1610 1. “Bootloader” Update
2. Firmware update with the reset of
the player settings
≥ 1610 and < 1695 1. Bootloader’ Update
2. Firmware update with the reset of
the player settings
1. Bootloader’ Update
2. Firmware update with the retain
of the player settings
≥ 1695 • Firmware update with the reset of
the player settings
• Firmware update with the retain
of the player settings
. Determinating the Current Firmware Version
In order to perform the firmware update it is necessary to know the firmware version that is installed into the
player. The firmware version can be known with the following procedure:
• On the front panel user interface: please refer to Information Displays (page 67).
• On the web server: please refer to Home Page (page 73).
. Performing the Firmware Update
Before achieving to the firmware update, please select the appropriate procedure tanks to the careful reading
of the previous paragraphs of this chapter.
-60- © 2017, Waves System

ID-AL - My Music Player and My Music Player LE - User Guide V1.0
• Requirements
◦ A computer.
◦ A USB flash drive (or a SD card) formatted as described in Preparing a Storage Device (page
18). The Main Media device storage can also be used to perform the firmware update, except if
the Main Media is plugged on the internal SATA host receptacle (HDD-INT / Internal HDD) of
a My Music Player (HW V1.0 only).
Warning! All the USB flash drive of the market are not compatible with the firmware update
process. To avoid this issue with a My Music Player, it is highly recommended to use an SD card
instead a USB flash drive, to perform this procedure.
• Download on your computer the firmware from the support page of the player (www.id-al.com).
• Unzip the firmware file (ZIP file) into the folder of your choice. Two folders are created, “bootloader”
folder and the “firmware” folder.
• “Bootloader” Update:
1. From the folder named bootloader, copy the my_music_player_fw.bin file at the root of
the USB flash drive (or the SD card).
2. Remove the USB flash drive (or the SD card) using the standard eject process of the operating
system.
3. Turn off the player.
4. Insert the USB flash drive (or the SD card) into an appropriate slot of the player and turn it on.
The process should not be much longer than a standard boot*.
5. When this updating is completed, the LCD screen displays the same information as the standard
startup, with or without Main Media (Please refer to First boot (page 22)). The update of the
“Bootloader” is completed. You can turn off the player, remove the USB flash drive (or the SD
card) used for the update.
6. Proceed to the firmware update, depending on which has been chosen.
• Firmware Update by Reset the Player Settings (Reset Factory):
1. From the folder named firmware, copy or replace the my_music_player_fw.bin file at the
root of the USB flash drive (or the SD card).
2. Remove the USB flash drive (or the SD card) by using the standard eject process of the
operating system.
3. Turn off the player.
4. Insert the USB flash drive (or the SD card) into an appropriate slot of the player and turn it on.
This process should take about 5 minutes*.
5. When this updating is completed, the LCD screen displays the same information as the standard
startup, with or without Main Media (Please refer to First boot (page 22)). The update of the
“Firmware” is completed. You can turn off the player, remove the USB flash drive (or the SD
card) used for the update.
6. Perform a standard startup of the player.
• Firmware Update by Keeping the Player Settings:
1. From the folder named firmware, copy or replace the my_music_player_fw.bin file at the
root of the USB flash drive (or the SD card).
2. Rename the .bin extension of the my_music_player_fw.bin file into .upd extension to
obtain the file named my_music_player_fw.upd
3. Remove the USB flash drive (or the SD card) with the use of the standard eject process of the
operating system.
4. Turn off the player.
5. Insert the USB flash drive (or the SD card) into an appropriate slot of the player and turn it on.
This process should take about 5 minutes*.
-61- © 2017, Waves System

ID-AL - My Music Player and My Music Player LE - User Guide V1.0
6. When this updating is completed, the LCD screen displays the same information as the standard
startup, with or without Main Media (Please refer to First boot (page 22)). The update of the
“Firmware” is completed. You can turn off the player, remove the USB flash drive (or the SD
card) used for the update.
7. Perform a standard startup of the player.
*Caution! Do not remove the update USB flash drive (or the update SD card) until the operation is
completed
9.11. Settings of the Parameters with “system.ini” File
This chapter will coming soon...
-62- © 2017, Waves System

ID-AL - My Music Player and My Music Player LE - User Guide V1.0
Appendix A. Characteristics
A.I. Interfacing and Connectivity
• Backlit LCD screen – 2 x 16 characters
• Clickable knob
• Infrared sensor - Protocol SONY SIRC 12 bits modulated at 38 kHz
• External USB Host 2.0 High Speed (480 Mb/s), standard “mass storage” driver, type-A receptacle
connector
• An unbalanced line-level -10 dB stereo audio output on a standard RCA connector
• Ethernet network 10/100 Mbit/s, type RJ45 connector
• External DC power supply connector – Ø 2.1 mm / 5.5 mm
• My Music Player:
◦ External SD/SDHC Card slot
◦ Internal USB Host 2.0 High Speed (480 Mb/s), standard “mass storage” driver, type-A receptacle
connector
◦ A button “Play/Stop”
◦ A button “Next file” (or “Next web radio”)
◦ A balanced professional line-level +4 dB stereo audio output on a standard XLR connector
◦ Auxiliary unbalanced line-level -10 dB stereo audio input on a standard RCA connector
◦ External USB Device 2.0 High Speed (480 Mb/s), standard “mass storage” driver, Mini-B
receptacle connector
◦ RS-232 serial link on 3.81 mm pluggable terminal block
◦ Internal Serial ATA host bus revision 1.0 on a standard SATA connector (data and power pins)
(HW V1.0 only)*
• My Music Player LE:
◦ Class D amplified stereo audio output on 3.81 mm pluggable terminal block
▪ 2 x 6 W - 8 Ohms THD 10%
▪ 2 x 12 W - 4 Ohms THD 10%
*(HW V1.0 only): the My Music Player sold after the september 2015 do not have anymore SATA
connector.
A.II. Audio File Formats Supported
• MP3 (.mp3): MPEG-1/2 Audio Layer III, mono/stereo, 16 bits, 44.1/48 kHz, from 32 kbit/s to
320 kbit/s, CBR (Constant Bit Rate) or VBR (Variable Bit Rate) files
• WAV (.wav): mono/stereo, 16/24 bits, 44.1/48 kHz (BWF Broadcast Wave Format not supported*)
• Encrypted MP3 (.mp3): MPEG-1/2 Audio Layer III, encryption V2 and V3, mono/stereo, 16 bits,
44.1/48 kHz, from 32 kbit/s to 320 kbit/s, CBR (Constant Bit Rate) or VBR (Variable Bit Rate) files
*Various professional software for composition and editing create Broadcast Wave Format files
instead of standard WAV files. The player is not compatible with this file type. It is necessary to use
standard WAV files to ensure a perfect compatibility between the audio files and the specifications of
the player.
A.III. Playlist File Formats Supported
• M3U (.m3u): playlist files that only support with either relative paths, or absolute paths prefixed with
Windows-like drive letters.
-63- © 2017, Waves System

ID-AL - My Music Player and My Music Player LE - User Guide V1.0
A.IV. Web Radio Stream Formats Supported
• MP3 (.mp3): MPEG-1/2 Audio Layer III, mono/stereo, 16 bits, 44.1/48 kHz, from 32 kbit/s to
320 kbit/s, CBR (Constant Bit Rate) or VBR (Variable Bit Rate) files
• M3U (.m3u): URL of a MP3 audio stream
A.V. Other File Formats Supported
• TM3 (.tm3): timestamped programming file (scheduler.tm3) - Scheduler V3 file format
• INI (.ini): system configuration file (system.ini) – raw text format
• TXT (.txt): text file for scripting usage (script.txt) – raw text format
• ZIP (.zip): compressed file for scripting usage (script.zip) – without or with password
A.VI. Storage Devices
• Supports FAT32 file system
• Supports long filenames
• My Music Player:
◦ Accepts SD cards
◦ Accepts SDHC cards
◦ Accepts USB flash drives
◦ Accepts SATA storage devices (HW V1.0 only)
• My Music Player LE:
◦ Accepts USB flash drives
A.VII. Network
• Embedded FTP server for remote content update
• Embedded FTP client, with content update by script or by file synchronization (10 clients)
• Embedded Samba server for local content update
• Embedded Web server for control and configuration of the player
• Embedded NTP client (4 servers)
• Embedded web radio streaming client (10 radio stations)
• DHCP and fixed IP (IPv4) possibilities
• Embedded NetBIOS identification service
A.VIII. Build-in Clock
• Timekeeping when the player is not powered: up to 2 months for the My Music Player (Ind C or
higher) and the My Music Player LE (Ind F or higher)
A.IX. Power Supply
• Player power supply input:
◦ Nominal voltage: 12 V DC
◦ Power supply range:
▪ My Music Player with internal SATA host device (HW V1.0 only): 12 V DC
▪ My Music Player without internal SATA host device: 6 V to 16 V DC
▪ My Music Player LE: 8 V to 12.5 V DC
• Supplied mains adapter input:
◦ My Music Player:
▪ Voltage: 100 V to 240 V
▪ Frequency: 50 Hz to 60 Hz
◦ My Music Player LE:
-64- © 2017, Waves System

ID-AL - My Music Player and My Music Player LE - User Guide V1.0
▪ Voltage: 96 V to 264 V
▪ Frequency: 47 Hz to 63 Hz
• The player is protected against polarity reversal.
A.X. Consumption (12 V supplied)
• My Music Player without internal SATA host device and with a low power USB flash drive: 350 mA
• My Music Player LE without amplifier(1) and with a low power USB flash drive(2): 250 mA
(1) With the amplifier usage, the consumption can be up to 2 A
(2) Do not use a USB flash drive which the consumption is upper to 350 mA
A.XI. Temperatures
• Operating ambient temperature: from 0 to +60 °C
• Storage temperature: from -20 to +60 °C
A.XII. Size
• My Music Player:
◦ Width: 143 mm - (1/3 of a rack)
◦ Height: 44 mm (1U)
◦ Depth (with terminal block connectors): 250 mm
◦ Screw diameter for the mounting of the case: M3 metric type
• My Music Player LE:
◦ Width: 141 mm
◦ Height: 35 mm
◦ Depth (with terminal block connectors): 141 mm
A.XIII. Weight
• My Music Player: 415 g (with the pluggable terminal blocks)
• My Music Player LE: 228 g (with the pluggable terminal blocks)
-65- © 2017, Waves System

ID-AL - My Music Player and My Music Player LE - User Guide V1.0
Appendix B. Player Audio Diagram
B.I. My Music Player
Audio diagram of the My Music Player
B.II. My Music Player LE
Audio diagram of the My Music Player LE
Front Panel User Interface
Front Panel User Interface
-66- © 2017, Waves System

ID-AL - My Music Player and My Music Player LE - User Guide V1.0
Appendix C. Front Panel User Interface
The front panel features an LCD and a clickable knob aimed at viewing the player state, controlling the
player, and configuring it. This chapter explains how to use this user interface.
In the “Quick Launch” menu and in the “Advanced” menu:
• In order to navigate from one menu item to another, turn the knob:
• counterclockwise to display the previous menu item.
• clockwise to display the next menu item.
• To select a menu item, press the knob.
• After a timeout of 30 seconds, the menu is exited automaticaly.
C.I. Information Displays
This section explains what is displayed on the LCD screen depending the player status. These displays
appear when the player is out of “Quick launch” or “Advanced” menus.
LCD Screen Player State
MY MUSIC PLAYER
SN:(xxxx) v(xxxx)
When the playback is stopped: the screen displays
MY MUSIC PLAYER, the SN: text followed the
product serial and firmware version numbers.
(name of file being played)
MUS(xxx) (hh):(mm):(ss)
In MUSIC folder playback: the screen displays the
name of the file being played, the folder short name
and the remaining time of the file being played.
(name of file being played)
PLS(xxx) (hh):(mm):(ss)
In PLAYLIST folder playback: the screen displays
the name of the file being played, the short folder
name and the remaining time of the file being played.
(name of file being played)
SPT(xxx) (hh):(mm):(ss)
In SPOT folder playback: the screen displays the
name of the file being played, the folder short name
and the remaining time of the file being played.
(web radio name)
WEBRADIO:(xx) *
In web radio playback: the screen displays the web
radio name being played, the web radio number
(WEBRADIO:) and an activity indicator.
AUX MODE
(dd)/(mm)/(yyyy)▪(hh):(mm)
In auxiliary input playback: the screen displays the
AUX MODE text and the current date and current
time.
(name of file being played)
(device type) (hh):(mm):(ss)
In Alternate Media playback: the screen displays the
name of the file being played, the name of the device
type and the remaining time of the file being played.
PLEASE WAIT...
When the player receives a command to change of
state, the screen displays a PLEASE WAIT…
message.
C.II. Changing the Main Volume
When the player is out of “Quick launch” or “Advanced” menus, please turn the knob in order to change the
main volume:
-67- © 2017, Waves System

ID-AL - My Music Player and My Music Player LE - User Guide V1.0
• counterclockwise to decrease the volume,
• clockwise to increase the volume.
For more information about the main volume, Please refer to Player Audio Diagram (page 66) and Changing
the Main Volume (page 29).
C.III. Quick Launch Menu to Select an Audio Source
The “Quick Launch” menu is assigned to quickly play a basic audio source such as the music folders
(MUSIC) or a web radio. In order to play another audio source from the front panel user interface, please
refer to Advanced Menu to Select an Audio Source and Configure the Player (page 68).
When the player is out of “Quick launch” or “Advanced” menus, please make a short press knob (< 5s) in
order to access to the “Quick Launch” menu.
LCD Screen Function
SOURCE: MUSIC
Select a MUSIC folder from the Main Media as the
playback source. The folder will be played
exclusively in random mode.
►
SOURCE: MUSIC
(number)_(name of folder)
Select a MUSIC folder with its number and its name
in the listing of the existing folders onto the Main
Media or abort the command with EXIT.
SOURCE: WEBRADIO
Select of a Web radio as the playback source.
►
SOURCE: WEBRADIO
(number)_(name of web radio)
Select a web radio with its number and its name in
the listing of the configured web radios presets, or
abort the command with EXIT.
SOURCE: EXIT
Quit the “Quick Launch” menu.
C.IV. Advanced Menu to Select an Audio Source and Configure the Player
The “Advanced” menu is assigned to: select an audio source with the advanced options, in order to perform
specific commands and configure the player. This menu is composed of two main sections.
• USER: to select the audio sources with the complete playback options.
• ADMINISTRATOR: to configure the player.
Note: some playback options and settings are only available through the web server of the player. For more
information about the web server, Please refer to Web server (page 73).
When the player is out of “Quick launch” or “Advanced” menus, please make a long press long press on the
knob (≥ 5 s) in order to access to the “Advanced” menu.
-68- © 2017, Waves System

ID-AL - My Music Player and My Music Player LE - User Guide V1.0
LCD Screen Function
USER ▼
USER menu for commands and settings of the user
access.
►
SOURCE ▼
(Source Name)
Select a specific playback source.
►
SELECT SOURCE
MUS/PLS/SPT →
Select a MUSIC, a PLAYLIST or a SPOT folder from
the Main Media as the playback source.
►
SELECT SOURCE
(Type)/(Folder)/(Mode)
Select a type of folder (MUSIC / PLAYLIST / SPOT),
a folder number (from 001 to 999) and a playback
mode, or CANCEL the command.
►
SELECT SOURCE
WEBRADIO →
Select of a Web radio as the playback source.
►
SELECT SOURCE
WEBRADIO:(Preset Number)
Select a web radio preset (from 01 to 10), or
CANCEL the command.
►
SELECT SOURCE
ALTERNATE →
My Music Player only: select the auxiliary input or an
Alternate Media. as the playback source. (My Music
Player only)
►
SELECT SOURCE
(Alternate Source Name)
My Music Player only: select the name of an extra
source (AUX-INPUT / USB-INT / USB-EXT / SD-
CARD / HDD-INT), or CANCEL the command.
►
SELECT SOURCE
↑CANCEL ▲
Cancel the selection of a playback source.
►
↑RETURN ▲
Return to the parent menu.
ADMINITRATOR ▲
▼
ADMINISTRATOR menu for commands and settings
of the administrator access.
►
MAIN MEDIA ▼
(Storage Device Connector)
My Music Player only: select a new connector
location for the Main Media (USB-INT / USB-EXT /
SD-CARD / HDD-INT), or CANCEL the setting.
►
VOLUMES/GAINS ▲
▼
Adjust volumes and gains for the independent audio
outputs and the playback sources.
►
VOLUME OUTPUT
XLR:(±xx)▪RCA:(±xx) ▼
Adjust the volume attenuation from 00 to -64 of the
audio outputs: XLR and RCA for the My Music Player,
AMP (Amplified) and RCA for the My Music Player LE.
-69- © 2017, Waves System

ID-AL - My Music Player and My Music Player LE - User Guide V1.0
►
GAIN OUTPUT ▲
XLR:(±xx)▪RCA:(±xx) ▼
Adjust the volume gain from 0 to +9 of the audio
outputs: XLR and RCA for the My Music Player, AMP
(Amplified) and RCA for the My Music Player LE.
►
VOLUME INPUT ▲
P(±xx)▪A(±xx)▪W(±xx) ▼
Adjust the volume attenuation from 00 to -64 of the
playback source: P (Main Media content playback), A
(Auxiliary input, My Music Player only) W (Web radio).
►
↑RETURN ▲
Return to the parent menu.
►
DATE/TIME ▲
(Current Date/Time) ▼
Settings of the system clock and embedded clock
(RTC) parameters: clock updating service through
network (NTP), Time Zone, Date and Time.
►
NTP MODE
(ON/OFF) ▼
Enable or disable the clock updating service through
network with the setting NTP ON or OFF.
►
TIME ZONE ▲
World Area/Country/Region ▼
Select short names for the time zone settings:
World Area, Country and Region.
►
TIME ▲
(hh):(mm):(ss) ▼
Adjust the time when NTP = OFF: hours (from 00 to
23), minutes (from 00 to 59) and seconds (from 00
to 59).
►
DATE ▲
(dd)/(mm)/(yyyy) ▼
Adjust the date when NTP = OFF: day of the month
(from 01 to 31), month of the year (from 01 to 12),
year (from 2000 to 2037).
►
↑RETURN ▲
Return to the parent menu.
►
ETHERNET ▲
(IP Address) ▼
Settings of the Ethernet network options.
►
ETHERNET DHCP
DHCP (ON/OFF) ▼
Enable or disable the Dynamic Host Configuration
Protocol service with the settings DHCP ON or OFF.
►
IP ADDRESS ▲
(xxx):(xxx):(xxx):(xxx) ▼
Select a IP Address (IPv4) from 000.000.000.000
to 255.255.255.255.
►
ETHERNET MASK ▲
(xxx):(xxx):(xxx):(xxx) ▼
Select a sub-network mask address (IPv4) from
000.000.000.000 to 255.255.255.255.
►
GATEWAY ▲
(xxx):(xxx):(xxx):(xxx) ▼
Select a gateway address (IPv4) from
000.000.000.000 to 255.255.255.255.
►
ETHERNET DNS ▲
Enable or disable the Domain Name System service
with the settings DNS ON or OFF.
-70- © 2017, Waves System

ID-AL - My Music Player and My Music Player LE - User Guide V1.0
DNS (ON/OFF) ▼
►
PRIMARY DNS ▲
(xxx):(xxx):(xxx):(xxx) ▼
Select a primary DNS address (IPv4) from
000.000.000.000 to 255.255.255.255.
►
ALTERNATIVE DNS ▲
(xxx):(xxx):(xxx):(xxx) ▼
Select an alternative DNS address (IPv4) from
000.000.000.000 to 255.255.255.255.
►
↑RETURN ▲
Return to the parent menu.
►
AUTOPLAY ▲
(Autoplay Setting) ▼
Select a specific playback source that will be played
at the player startup.
►
SELECT AUTOPLAY
MUS/PLS →
Select a MUSIC or a PLAYLIST folder from the Main
Media to be played at the player startup.
►
SELECT AUTOPLAY
(Type)/(Folder)/(Mode)
Select a type of folder (MUSIC / PLAYLIST), a folder
number (from 001 to 999) and a playback mode, or
CANCEL the setting.
►
SELECT AUTOPLAY
WEBRADIO →
Select a Web radio to be played at the player startup.
►
SELECT AUTOPLAY
WEBRADIO:(Preset Number)
Select a web radio preset (from 01 to 10), or
CANCEL the setting.
►
SELECT AUTOPLAY
MISC MODE →
Select another option of playback at the startup.
►
SELECT AUTOPLAY
(Source or Mode)
Select a source or a mode (LAST / SCHEDULER /
NONE) + (My Music Player only USB-INT / USBEXT / SD-CARD / HDD-INT / AUX-INPUT), or
CANCEL the setting.
►
SELECT AUTOPLAY
↑CANCEL ▲
Cancel the setting.
►
UPDATE FTP NOW ▲
▼
Launch a content update from a FTP server.
►
UPDATE FTP NOW
PRESET:(Preset Number)
Select a FTP preset (from 01 to 10), or CANCEL the
setting.
►
UPDATE FTP NOW
Confirm the execution of the update selected with
YES or NO.
-71- © 2017, Waves System

ID-AL - My Music Player and My Music Player LE - User Guide V1.0
FTP:(xx)▪SURE?:(YES/NO)
►
FTP UPDATING
PLEASE WAIT...
Message displayed by the LCD during an FTP
update.
►
USB DEVICE MODE ▲
▼
My Music Player only: select the USB device mode.
►
USB DEVICE MODE
PRESS TO CONNECT
My Music Player only: press the knob in order to
activate the USB device mode.
►
USB CONNECTED...
PRESS TO EXIT
My Music Player only: press the knob in order to exit
the USB device mode.
►
FADE IN/OUT ▲
IN:(s)▪OUT:(s) ▼
Adjust the fade in and the fade out duration time
from 0 to 5 seconds.
►
↑RETURN ▲
Return to the parent menu.
↑EXIT ▲
Quit the “Advanced” menu.
-72- © 2017, Waves System

ID-AL - My Music Player and My Music Player LE - User Guide V1.0
Appendix D. Web server
The web server is assigned to control the status of the player and to obtain an information about the player,
to select an audio source with the advanced options, to perform special commands and also to configure the
player. The access to the different pages of the web server depends on the rights authorized by the log in
process. The web server access is composed of three levels of login:
Log in Rights Description
Public Provides a basic access to the pages of the web server (Home, About, and Log In). This
account allows to control the player status. No username and password are required.
User Provides a partial access to the pages of the web server (Home, About, Log In, Log
Out and User). This account allows to control the player status, to execute the playback
commands. For a user access rights, a username and a password are required.
Administrator Provides full access to all pages of the web server (Home, About, Log In, Log Out,
User, Administrator, Date/Time, Ethernet, Web Radio and FTP Client). This
account allows to control the player status, to execute the playback commands and to
configure the player. For an administrator access, a username and a password are
required.
To have an access to the web server, a web browser is required:
1. In the web browser address bar, enter the HTTP address of the player, composed of the http://
and the player network address (e.g. http://mmp-8b0a or http://192.168.0.104). In order to
know the player network address, please refer to Identify the player on the network of Ethernet
Network Connection (page 50).
By default, all the public pages of the web server are accessible.
2. When a user or an administrator access rights are required, click on Log In and enter the
username and the password in the embedded web server (user or administrator).
◦ By default the user account accesses are: username = user, password = user.
◦ By default the administrator account accesses are: username = admin, password = admin.
In order to log out from the User account or from the Administrator account, please click on Log Out.
In order to ensure a maximum safety when the player is connected to the Ethernet network, it is highly
recommended to choose a new username and password for the user account and the administrator account.
In order to redefine the User username and password, please refer to User Page (page 75). In order to
redefine the Administrator username and password, please refer to Administrator Page (page 77).
For more information about the Ethernet connection, please refer to Ethernet Network Connection (page 49).
D.I. Home Page
The Home page provides a quick overview of the player status and the basic information without being
logged to the web server.
-73- © 2017, Waves System

ID-AL - My Music Player and My Music Player LE - User Guide V1.0
Home page view
Home
Configuration
Date Current date.
Time Current time.
Source Current source used with the player.
State Playback status (Playing or Stopped) of the player.
Ethernet
IP address Player IP address.
Subnet mask Player sub-network mask address.
Gateway Player gateway address.
Primary DNS Player primary DNS address.
Alternative DNS Player alternate DNS address.
MAC Address Player MAC address.
Last Update
Name Name of the last update of content performed (with the FTP synchronization or with the
script procedure).
Date/time Date and time of the last update of content performed.
Version Number of the version of the last update of content performed. (with the script procedure
only).
Product ID Product serial number (hexadecimal number).
Firmware version Firmware version number of the player.
D.II. About Page
This About page provides the information in order to contact the company ID-AL without being logged to the
web server.
-74- © 2017, Waves System

ID-AL - My Music Player and My Music Player LE - User Guide V1.0
About page view
About
Contact US
Address ID-AL company postal address
Website ID-AL company website address
E-mail ID-AL company E-mail address
Phone ID-AL company phone number
Fax ID-AL company fax number
D.III. Log In Page
The Log In page allows to Log In to the web server with the user access rights or the administrator access
rights.
Log In page view
Log In
Username Enter a username to log in a User or Administrator account.
Password Enter a password to log in a User or Administrator account.
Log In
Connection to an account according a username and a password used.
D.IV. User Page
The User page provides the complete status of the playback, and allows to select an audio source with the
advanced options and also to configure the User access account with a username and a password.
-75- © 2017, Waves System

ID-AL - My Music Player and My Music Player LE - User Guide V1.0
User page view
User
Player
State Playback status (Playing or Stopped) of the player.
Source Source used by the player.
• My Music Player: Internal USB, External USB, SD card, Internal HDD,
Web radio, Aux input.
• My Music Player LE: USB.
Now Playing Audio file or web radio being played from the Main Media, an Alternate Media or a Web
radio.
Current folder Logical folder played from the Main Media, with its used playback mode.
Main Media Selected storage device port used as the Main Media: Internal USB, External USB,
SD card, Internal HDD. (My Music Player only)
◄◄
Play the previous track or web radio.
■
Stop the playback.
►
Resume the playback.
►►
Play the next track or web radio.
-76- © 2017, Waves System

ID-AL - My Music Player and My Music Player LE - User Guide V1.0
Remaining time Remaining time of the audio file played from the Main Media or an Alternate Media.
Elapsed time Elapsed time since the web radio connection.
Volume Set the main volume with an attenuation value from 0 to -64 or MUTE.
Apply
Apply the volume adjustment to the main volume.
Source Selection
MUSxxx folder Select a folder number from 1 to 999 (from the folder MUS001 to MUS999).
RND Select the random playback option.
RND + RST Select the random playback with the reset option.
SEQ Select the sequential playback option.
SEQ + RST Select the sequential playback with the reset option.
Play
Play a Music folder according to the folder number and the selected playback mode.
PLSxxx folder Select a folder number from 1 to 999 (from the folder PLS001 to PLS999).
RND Select the random playback option.
RND + RST Select the random playback with the reset option.
SEQ Select the sequential playback option.
SEQ + RST Select the sequential playback with the reset option.
Play
Play a Playlist folder according to the folder number and the selected playback mode.
SPTxxx folder Select a folder number from 1 to 999 (from the folder SPT001 to SPT999).
RND Select the random playback option.
SEQ Select the sequential playback option.
Play
Play a Spot folder according to the folder number and the selected playback mode.
Webradio Select the number of the web radio with the preset 1 to 10.
Play
Play a web radio according to the preset number selected.
Alternate Select an Alternate Media (Internal USB, External USB, SD card, Internal
HDD) or the auxiliary input (Aux input) as playback source (My Music Player only)
Play
Play an Alternate Media or switch to the auxiliary input (My Music Player only).
User Web Access
Username Set the username of the User account (default user).
Password Set the password of the User account (default user).
Save
Apply and save the username and the password of the User account.
For more information about the User functions, please refer to Use of the Player (page 24).
D.V. Administrator Page
The Administrator page allows to configure several parameters of the player like the Clock, the Main
Media, the “Autoplay” mode, the fades, the volume of the sources, the administrator account and many
more.
-77- © 2017, Waves System

ID-AL - My Music Player and My Music Player LE - User Guide V1.0
Administrator page view
Administrator
Date/Time Parametres
Change Date/Time Modify date, time and time zone parameters.
Date Current date.
Time Current time.
-78- © 2017, Waves System

ID-AL - My Music Player and My Music Player LE - User Guide V1.0
Time zone Current time zone.
NTP Synchronization Enable or disable the NTP synchronization service (On / Off).
NTP server 1 Set the URL of the first NTP server used with the NTP synchronization service
(default 0.pool.ntp.org).
NTP server 2 Set the URL of the second NTP server used with the NTP synchronization
service.
(default 1.pool.ntp.org).
NTP server 3 Set the URL of the third NTP server used by with NTP synchronization service.
(default 2.pool.ntp.org).
NTP server 4 Set the URL of the fourth NTP server used by with NTP synchronization service.
(default 3.pool.ntp.org).
Administrator General Parameters
Default Main Media Select a storage device port used for the Main Media: Internal USB,
External USB, SD card, Internal HDD. (My Music Player only)
Autoplay Select a specific playback source to be played at player the startup: None,
MUSxxx folder, PLSxxx folder, Web radio, Last or Scheduler (or Aux
input My Music Player only). (default NONE)
RND When MUSxxx folder or PLSxxx folder Autoplay mode is selected, select
the random playback option.
RND + RST When MUSxxx folder or PLSxxx folder Autoplay mode is selected, select
the random playback with the reset option.
SEQ When MUSxxx folder or PLSxxx folder Autoplay mode is selected, select
the sequential playback option.
SEQ + RST When MUSxxx folder or PLSxxx folder Autoplay mode is selected, select
the sequential playback with the reset option.
Folder When MUSxxx folder or PLSxxx folder Autoplay mode is selected, select
a folder number from 1 to 999 (from folder MUS001 / PLS001 to MUS999 /
PLS999).
Web radio preset When Web radio Autoplay mode is selected, select the number of the web
radio from the preset 1 to 10.
Fade-in (s) Adjust fade in duration time from 0 to 5 seconds (default 0).
Fade-out (s) Adjust fade out duration time from 0 to 5 seconds (default 0).
Audio Parameters
Player volume Adjust the volume attenuation from 0 to -64 and MUTE of the Main Media
playback content (default 0).
Web radio volume Adjust the volume attenuation from 0 to -64 and MUTE of the web radio stream
(default 0).
Auxiliary volume Adjust the volume attenuation from 0 to -64 and MUTE of the auxiliary audio
input (default 0). (My Music Player only)
RCA volume Adjust the volume attenuation from 0 to -64 and MUTE of the RCA audio outputs
(default 0).
XLR volume Adjust the volume attenuation from 0 to -64 and MUTE of the XLR audio outputs
(default 0). (My Music Player only)
Amplified output volume Adjust the volume attenuation from 0 to -64 and MUTE of the amplified audio
-79- © 2017, Waves System

ID-AL - My Music Player and My Music Player LE - User Guide V1.0
outputs (default 0). (My Music Player LE only)
Protection
Zip script file password Set a protection password for the update of content with the script procedure
using the zip compressed files (default – empty –).
Administrator Web Access
Username Set the username of the Administrator account (default admin).
Password Set the password of the Administrator account (default admin).
Save
Apply and save all parameters configured in the Administrator page.
Reboot
Force the restart of the player.
For more information about the Administration functions, please refer to Setting the Clock of the Player (page
54) and Main Storage Device (Main Media) (page 15) and Playback at the Startup (Autoplay) (page 31) and
Fade In and Fade Out Between the Audio Sources (FADE IN/FADE OUT) (page 58) and Setting the Volumes
and the Gains of the Player (page 56) and Management of the Main Storage Device Content (page 38).
D.VI. Date/Time
The Date/Time page allows to specifically configure the date, the time and the time zone parameters.
Date/Time page view
Date/Time
Change Date/Time
Date Set the year (from 2000 to 2037), the month (from 1 to 12) and the day (from 1 to 31)
of the player clock.
Time Set the hour (from 0 to 23), the minutes (from 0 to 59) and the seconds (from 0 to 59)of
the player clock.
Time zone Set the time zone (World Area, Country and Region) of the player clock.
Save
Apply and save all parameters configured in the Date/Time page.
-80- © 2017, Waves System

ID-AL - My Music Player and My Music Player LE - User Guide V1.0
For more information about the Date/Time, please refer to Setting the Clock of the Player (page 54).
D.VII. Ethernet Page
The Ethernet page allows to set several parameters pertaining to the Ethernet network configuration, the
FTP server access and the samba server access.
Ethernet page view
Ethernet
Ethernet General Parameters
DHCP Enable or disable the automatic assignment of an IP address with the DHCP (On / Off).
IP address Display the current IP address (Actual Value column) and set a fixed IP address
when the DHCP option is disabled (DHCP column).
Subnet mask Display the current Subnet mask address (Actual Value column) and set a fixed
Subnet mask address when the DHCP option is disabled (DHCP column).
Gateway Display the current Gateway address (Actual Value column) and set a fixed Gateway
address when the DHCP option is disabled (DHCP column).
MAC address Display the MAC address of the player.
DNS auto Enable or disable the automatic DNS option (On / Off).
Primary DNS Display the current Primary address (Actual Value column) and set a fixed Primary
address when the DNS auto option is disabled (DNS auto column).
Alternative DNS Display the current Alternative address (Actual Value column) and set a fixed
-81- © 2017, Waves System

ID-AL - My Music Player and My Music Player LE - User Guide V1.0
Alternative address when the DNS auto option is disabled (DNS auto column).
FTP Server Acess
Username Set the username for the access of the FTP server (default ftp).
Password Set the password for the access of the FTP server (default ftp).
Samba
Off Disable the Samba server.
Server Enable the Samba server.
Workgroup Set the Workgroup name of the Samba server (default WORKGROUP).
NetBIOS Set a customized NetBIOS name for the player. If empty, the NetBIOS = mmp- + the
hexadecimal serial number of the player (default – empty –).
Server string Set displayed name by the player into a Samba network (default MyMusicPlayer).
Username Set the username of the access of Samba server (default – empty –).
Password Set the password of the access of Samba server (default – empty –).
Save
Apply and save all parameters configured in the Ethernet page.
D.VIII. Web Radio Page
The Web radio page allows to configure the parameters for the web radio usage, like the settings of the
monitoring, the naming and the URL of the web radios.
-82- © 2017, Waves System

ID-AL - My Music Player and My Music Player LE - User Guide V1.0
Web Radio page view
Web Radio
Web Radio General Parameters
Without stream, play folder Set the number of the music folder to by played when the web radio
stream is cut, from the folder 001 to 999 (default 001).
Time to switch back to the web radio Set the stream stability duration time prior to the web radio stream
starts again, from 20 to 999 seconds (default 20).
Cache size (32 to 10240 kB) Set the total cache size of the web radio from 32 to 10240 kB
(default 320).
Minimum cache level (0 to 99%) Set the minimum percent of the total cache needs to be filled prior to
play the web radio stream stars again, from 0 to 99% (default 20%)
Preset 1 to Preset 10
Name Set an arbitrary name for the web radio preset.
URL Set a MP3 address or M3U address for the web radio stream.
Clear Preset
Delete all the settings of the preset.
The same setup options are available from all web radio presets
Save
Apply and save all parameters configured in the Web radio page.
-83- © 2017, Waves System

ID-AL - My Music Player and My Music Player LE - User Guide V1.0
For more information about the web radio, please refer to Web Radio (page 32).
D.IX. FTP Client Page
The FTP Client page allows to configure the parameters pertaining to the FTP clients update, to the
connection settings, to the naming, to the server locations, to the access accounts, to the modes used and
more.
FTP Client page view
FTP Client
FTP General Parameters
Wait up to Set the number of seconds to wait prior to reconnect the player to a FTP
server once disconnected to this server, from 0 to 999 seconds (default 5).
Try again up Set the number of trials to perform in order to connect the player to a FTP
-84- © 2017, Waves System

ID-AL - My Music Player and My Music Player LE - User Guide V1.0
server prior to the abortion of the FTP update, from 0 to 99 attempts (default
5).
Passive mode Enable or disable the passive mode in order to determine the setting up of
the FTP connection port (default disable / active mode).
Preset 1 to Preset 10
Name Set an arbitrary name for the FTP client preset.
Host Set the URL of the FTP server.
Port Set the connection port number. (default 21)
Username Set the username for the access to the FTP server.
Password Set the password for the access to the FTP server.
Source folder Select the path of the FTP server from which the update will be performed.
Update mode Select an update mode with the FTP server: file synchronization (Sync.) or
script file (Script). (default Sync.)
Advanced sync. options Enable or disable the advanced options for the file synchronization mode
(default – disable –).
Sync. Included folders/files Add folder or file paths in the Main Media which will be included with the file
synchronization mode.
Sync. excluded folders/files Add folder or file paths in the Main Media which will be excluded with the file
synchronization mode.
Launch Preset
Perform the FTP update.
Clear Preset
Delete all the settings of the preset.
The same setup options are available from all FTP client presets
Save
Apply and save all the parameters configured in the FTP client page.
For more information about the update with the FTP function, please refer to Management of the Main
Storage Device Content (page 38).
-85- © 2017, Waves System

ID-AL - My Music Player and My Music Player LE - User Guide V1.0
Appendix E. Content Updates with the Use of Scripts
E.I. Introduction
The Script function is used for the content management from:
• A third-party storage device, see Using a Removable Device Storage with a Script (page 46).
• The Ethernet network, see Using the Embedded FTP Clients with a Script (page 44).
The principle is to manage the content of the Main Media with a Script file (script.txt) and the new
content to add. The Script file describes which files and folders will be created, deleted or renamed on the
Main Media, and which files and folders will be added from the new content to the Main Media. The Script file
can also provides to the player some information like the date, the name, the version of the update.
There are 3 ways to create a script:
Method Description
Uncompressed data The Script file and the new content are directly copied at the root of storage device
or on the FTP server.
Zipped The Script file and the new content are stored in a compressed ZIP file before to be
copied at the root of storage device or on the FTP server.
Zipped + Password The Script file and the new content are stored in a compressed ZIP file and
protected by a password before to be copied at the root of storage device or on the
FTP server. The password is defined into Zip script file password field of
the Administrator page of the web server of the player (see Web server (page
73)).
The script file is a text file (raw text, without formatting) named script.txt that can be created with any
simple text editor like the Notepad from Windows, or similar. This file must be saved with the ANSI encoding.
And did not include any special characters. Only the 7-bit ASCII character set is allowed. This means that
special characters that are not part of the following character list are not allowed. Also, some characters not
allowed by the Microsoft conventions for file and folder names are excluded.
List of allowed characters for naming files and folders
0 1 2 3 4 5 6 7 8 9 A B C D E
F G H I J K L M N O P Q R S T
U V W X Y Z a b c d e f g h i
j k l m n o p q r s t u v w x
y z ! # $ % &
'
( ) + , - . ;
= @ [ ] ^ _ ` { } ~ (Space)
A Script file is structured with 3 types of sections:
1. An optional header part: [HEADER]
2. A commands part: [COMMANDS]
3. An optional comments part: [COMMENTS]
Notice:
• A line beginning with * character is a comment line and will be ignore by the Script.
• The empty lines are ignored
-86- © 2017, Waves System

ID-AL - My Music Player and My Music Player LE - User Guide V1.0
• The empty parameters are ignored or the default values are used.
• Only one command by line is accepted.
E.II. [HEADER] Section
The [HEADER] section provides to the player some data like the date, the name and the version of the
update. This data are displayed on the home page of the web server of the player, see Home Page (page
73). Each data field is written on a line. The line begin by the name of the field, written in capital letter,
followed by the equal character (=), then the data written in the specific format of the field. If this section or a
data field of this section is missing, the default value of the missing data field will be attributed to the player.
Available data fields:
Data Field Data Format Default Value Description Example
UPDNAME Text (16 characters max.)
Update
Update Name
UDPNAME=My Update
UPDDATE Date: dd/mm/yy, (8
characters)
(process date of
the update)
Update Date
UPDATE=19/11/17
UPDVERSION Version number: Vxx.yy. (6
characters)
V00.00
Update number
version
UPDVERSION =V02.01
Note: If the script cannot be finished or is interrupted by an issue, the information of the header will not be
updated by the player
E.III. [COMMANDS] Section
The [COMMANDS] section describes the file and folder management commands that will be performed by the
Script.
Each command is written on a line. The line begin by the name of the command, written in capital letter,
followed by one or more parameters. Each parameters are separated by a space character. A parameter is
written in quotation marks ("). The folder path begin by a backslash character (\).
Available commands:
• COPY
Description:
Copy a single file or a complete folder from the update content to the Main Media of the player. If a
file already exist on the Main Media, it is replaced. If a path do not exist on the Main Media, it is
created.
Parameter(s):
Source path + (space) + Destination path
Examples:
COPY "\UPDATE\song.mp3" "\MUSIC\MUS001"
Copy the file song.mp3 from the folder UPDATE of the update content into the folder MUS001 of the
MUSIC folder of the Main Media of the player.
COPY "\UPDATE\TRACKS" "\MUSIC\MUS001"
Copy the files and folders from the folder TRACKS of the folder UPDATE of the update content into
-87- © 2017, Waves System

ID-AL - My Music Player and My Music Player LE - User Guide V1.0
the folder MUS001 of the MUSIC folder of the Main Media of the player.
• COPYALL
Description:
Copy the entire contents from the update content to the Main Media. If a file already exist on the
Main Media, it is replaced. If a path do not exist on the Main Media, it is created.
Parameter(s):
(none)
Example:
COPYALL
Copy the entire contents from the update content to the Main Media.
• DEL
Description:
Delete a single file or a complete folder into the Main Media of the player.
Parameter(s):
Target path
Examples:
DEL "\MUSIC\MUS045\oldsong.mp3"
Delete the file oldsong.mp3 into the folder MUS045 of the folder MUSIC of the Main Media of the
player.
DEL "\MUSIC\MUS161"
Delete the folder MUS161 into the folder MUSIC folder of the Main Media of the player, with all
included files and folders.
• DELALL
Description:
Deletes all files and folders of the Main Media of the player.
Parameter(s):
(none)
Example:
DELALL
Delete the entire contents of the Main Media.
• REN
Description:
Rename a file or a folder into the Main Media of the player.
Parameter(s):
Source path + (space) + New name
Examples:
REN "\MUSIC\MUS001\Song.mp3" "Track.mp3"
-88- © 2017, Waves System

ID-AL - My Music Player and My Music Player LE - User Guide V1.0
Rename the file Song.mp3 to Track.mp3, into the folder MUS001 of the folder MUSIC of the Main
Media of the player.
REN "\SPOT\SPT067" "SPT067 – Welcome Message"
Rename the folder SPT067 to SPT067 – Welcome Message, into the folder SPOT folder of the
Main Media of the player.
• MKDIR
Description:
Create a new folder into the Main Media of the player.
Parameter(s):
Path of the new folder.
Example:
MKDIR "\MUSIC\MUS378 New Groove"
Create a new folder named MUS378 New Groove into the folder MUSIC of the Main Media of the
player.
MKDIR "\temp DATA"
Create a new folder named temp DATA into the root of the Main Media of the player.
E.IV. [COMMENTS] Section
The [COMMENTS] section is a free section that allows to add additional information about the Script.
E.V. Examples
Example 1 – With a various set of commands
[HEADER]
UPDNAME=MY UPDATE
UPDDATE=26/01/17
UPDVERSION=V02.10
[COMMANDS]
DEL “\MUSIC\MUS067 Jazz”
COPY “\New Soul” “\MUSIC\MUS045 New Soul”
DEL “\MUSIC\MUS002 Rock\80s\Magic Song.mp3”
REN “\PLAYLIST\PLS001 New" "\PLAYLIST\PLS200 Saved”
COPY “\New Playlist” “PLAYLIST\PLS001 New”
MKDIR “\SPOT\SPT151 Adv 2017”
COPY “\Advertising 2017\First Adv 2017.mp3” “\SPOT\SPT151 Adv 2017”
COPY “\Advertising 2017\Second Adv 2017.mp3” “\SPOT\SPT151 Adv 2017”
[COMMENTS]
The Smart Company
Copyright © 2017
New advertising campaign for shopping centers
In this example:
1. The header data informs the player of the name, date and version of the update.
2. The folder MUS067 Jazz in the folder MUSIC of the Main Media is deleted.
-89- © 2017, Waves System

ID-AL - My Music Player and My Music Player LE - User Guide V1.0
3. The folder New Soul from the source is copied as the folder MUS045 New Soul in the folder
MUSIC of the Main Media.
4. The file Magic Song.mp3 in the folder path \MUSIC\MUS002 Rock\80s of the Main Media is
deleted.
5. The folder PLS001 New in the folder PLAYLIST of the Main Media is renamed to PLS200 Saved.
6. The folder New Playlist from the source is copied as the folder PLS001 New in the folder
PLAYLIST of the Main Media.
7. A new folder named SPT151 Adv 2017 is created in the folder SPOT of the Main Media.
8. The file First Adv 2017.mp3 from the source folder Advertising 2017 is copied in the folder
SPT151 Adv 2017 of the SPOT folder of the Main Media.
9. The file Second Adv 2017.mp3 from the source folder Advertising 2017 is copied in the folder
SPT151 Adv 2017 of the SPOT folder of the Main Media.
10. Optional comments are added to the script file.
Example 2 – Minimal set of commands
[COMMANDS]
DELALL
COPYALL
In this example,:
1. All files and folders of the Main Media are deleted.
2. All the files and folders of the source are copied in the Main Media.
It is script with a very minimal set of command, without header and comments data. Its is used to replace all
the Main Media content by a new one.
-90- © 2017, Waves System

ID-AL - My Music Player and My Music Player LE - User Guide V1.0
Appendix F. RS-232 Serial Link Protocol
This chapter will coming soon...
-91- © 2017, Waves System

ID-AL - My Music Player and My Music Player LE - User Guide V1.0
Appendix G. Configuration File (system.ini)
This chapter will coming soon...
-92- © 2017, Waves System

ID-AL - My Music Player and My Music Player LE - User Guide V1.0
Appendix H. System Clock Calibration
H.I. Introduction
The accuracy of the clock system of the player is a sine qua non requirement for the respect of a timetable.
As accurate as the system clock of the player, a slight drift may occur over the time.
In order to remedy to this potential drift, an automatic update system time with the network, called NTP
(Network Time Protocol) has to be done. With the regular consulting of a time-setting network service
(identical to a computer or a mobile phone), this mechanism ensures that the player's clock will always be at
the right date and time, whatever the drift of the system clock.
Sometimes, the connection to the Ethernet network is not possible and only the player's system clock will be
therefore used with a drift induced by a long period functioning without a human intervention to correct the
time.
Since the 1698 version of the player's firmware, a correction mechanism called “NTP calibration” has been
added to ensure a higher accuracy of the build in clock when the player is not connected to the Ethernet
network. This chapter explains how to perform this calibration prior to the setting up of installing the player.
When is it necessary to make the calibration?
When the Scheduler is used and the player is not connected to the Ethernet network, or when the automatic
update of the time by the network (NTP) is not possible while the player is connected to the network.
When the calibration is necessary?
Prior the first setting up of the player and on each new update of the firmware.
What is required to perform the calibration?
• An installed player's firmware version below or higher than the version 1698.
• A preliminary connection to the Ethernet network in order to have access to the automatic update
time service by the network (NTP).
How long time does it take to calibrate the player?
The more the calibration time is long, the more the calibration is accurate. The calibration should last at least
4 hours but is optimal after 48 hours.
H.II. Performing the NTP Calibration
Prior to perform the NTP calibration, be assured to have read Ethernet Network Connection (page 49),
Setting the Clock of the Player (page 54), Web server (page 73) and Front Panel User Interface (page 67).
1. Connect the player to the Ethernet network.
2. Make sure the network settings are configured correctly according to the local network setting
(DHCP or static IP), in order to be sure that the update service of the clock by the network (NTP) is
accessible.
3. Enable the network update clock service (NTP). Two ways are possible:
-93- © 2017, Waves System

ID-AL - My Music Player and My Music Player LE - User Guide V1.0
Method Process
“Advanced” menu ADMINISTRATOR → DATE/TIME → NTP MODE → set the NTP to ON.
Web browser software Administrator page → set the NTP synchronization → to ON →
Click on Save at the bottom of the page.
4. Let the player switched on and get connected to the network for a period between 4 and 48 hours.
During this period the player will operate the calibration of the system clock with regularly comparing
the system clock with the NTP time network.
The more the calibration time is long, the more the calibration is accurate. In order to be effective,
the calibration must last at least 4 hours.
5. Once the calibration duration time is done, please turn off the player. The calibration of the clock is
now recorded within the built-in memory of the player. An Ethernet connection is no longer
necessary.
-94- © 2017, Waves System

ID-AL - My Music Player and My Music Player LE - User Guide V1.0
-95- © 2017, Waves System

ID-AL - My Music Player and My Music Player LE - User Guide V1.0
by
-96- © 2017, Waves System
For more information
visit our website
www.id-al.com
 Loading...