

ID-AL EVP380 Quick Start Manual
ID-AL Event Video Player EVP380
Quick Start Guide V1.0
1 Introduction
This guide explains how to quickly start up the EVP380 for a first use. For further information, documentation,
firmware, software, and examples, see the support page of the EVP380 on www.id-al.com.
The EVP380 is a standalone and interactive show control and 4K HDR UHD video player capable of playing SC3
show control files synchronously with video, picture, or audio files. These files can be stored in an internal memory,
on a microSD card, or on a USB flash drive. The playback can be programmed to start automatically, to follow a
schedule, or to respond to external events (infrared remote control, input contacts, RS-232, TCP/IP, DMX512, or
Art-Net).
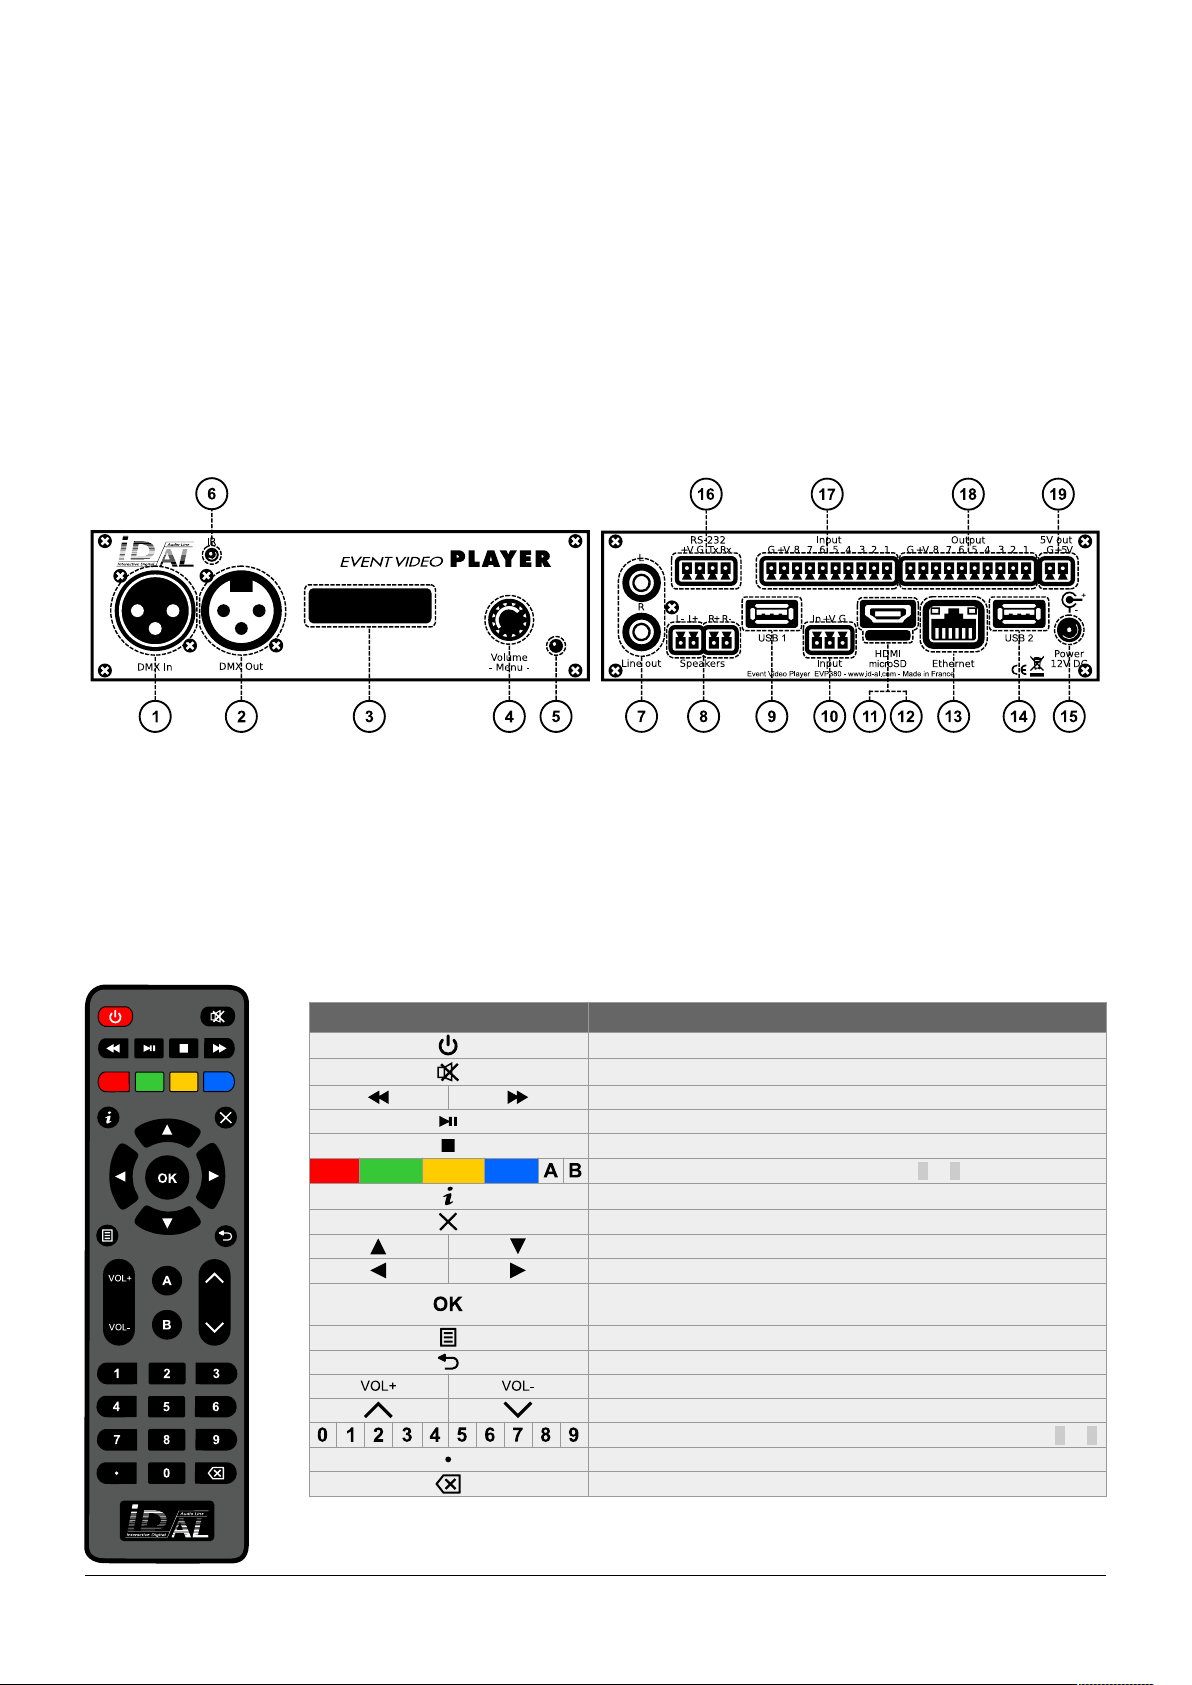
2 Hardware Description
1 Isolated DMX512 input with built-in switchable 120 Ω termination
and switchable pass-through to the DMX512 output, male XLR3
2 Isolated DMX512 output, female XLR3
3 Backlit LCD display
4 Clickable knob (volume and LCD menu)
5 Status LED
6 Infrared sensor
7 0 dBu line-level stereo audio output, RCA
8 Amplified stereo speaker output, pluggable terminal blocks
9 USB Host 2.0 for USB flash drive, type-A
10 Standalone opto-isolated input contact and power supply pass-
through, pluggable terminal block
11 HDMI audio/video output, type-A
12 microSD card slot
13 10/100 Mbps Ethernet, RJ45
14 USB Host 2.0 for USB flash drive, type-A
15 External DC power supply chassis socket
16 RS-232 serial link and power supply pass-through, pluggable
terminal block
17 8 combined opto-isolated input contacts and power supply pass-
through, pluggable terminal block
18 8 MOSFET outputs and power supply pass-through, pluggable
terminal block
19 5 V DC output, pluggable terminal block
Button Description
Short press: standby/wake-up. Long press: power off / restart.
Mute/unmute.
Skip 10 seconds backward/forward.
Play/pause.
Stop.
Red Green Yellow Blue
Programmable buttons: by default, play folder 1 to 6, respectively.
Toggle on-screen information display.
Exit.
In menu context: up/down. In playback context: next/previous folder.
In menu context: left/right. In playback context: previous/next file.
In menu context: validate selection. In playback context: toggle onscreen information display.
Toggle on-screen menu display.
Back.
Increase/decrease the volume.
When selecting a value, typically with a slider control, skip many values.
In menu context: digit characters. In playback context: play folder 0 to 9.
Dot character.
Erase previous character.
© 2019, Waves System – 7 impasse de La Ville en Bois, 44830 Bouaye, France – Phone: +33 2 40 78 22 44 – info@wsystem.com
ID-AL Event Video Player EVP380 – Quick Start Guide V1.0
3 Connecting the Hardware Interfaces
First, make sure that the player is off (mains adapter unplugged). Then, connect the hardware interfaces according
to the needs:
Interface Usage
microSD and USB If needed, prepare a storage device, then plug it into the player. See 5 Programming the Player .
Video output Compatible with a wide range of HDMI displays.
Audio outputs Connect non-amplified speakers to the amplified speaker output, or amplified speakers to the line-level audio
output, or use the HDMI audio.
Ethernet network Player time synchronization using NTP, access to the player storage through FTP, media stream playback,
playback synchronization for a group of players, player control using a dedicated TCP/IP protocol or Art-Net,
transmission on the DMX512 output or recording of an Art-Net stream.
Power supply outputs
(pluggable terminal blocks)
Power supply for accessories requiring little power.
RS-232 serial link Control of other devices, such as video projectors or PLCs, or control of the player from another device using a
dedicated protocol.
DMX512 input and output Connect them respectively to a DMX512 controller, such as a lighting console, and to DMX512 receivers, such as
dimmers or moving lights.
Input and output contacts Connect them as explained in the following sections.
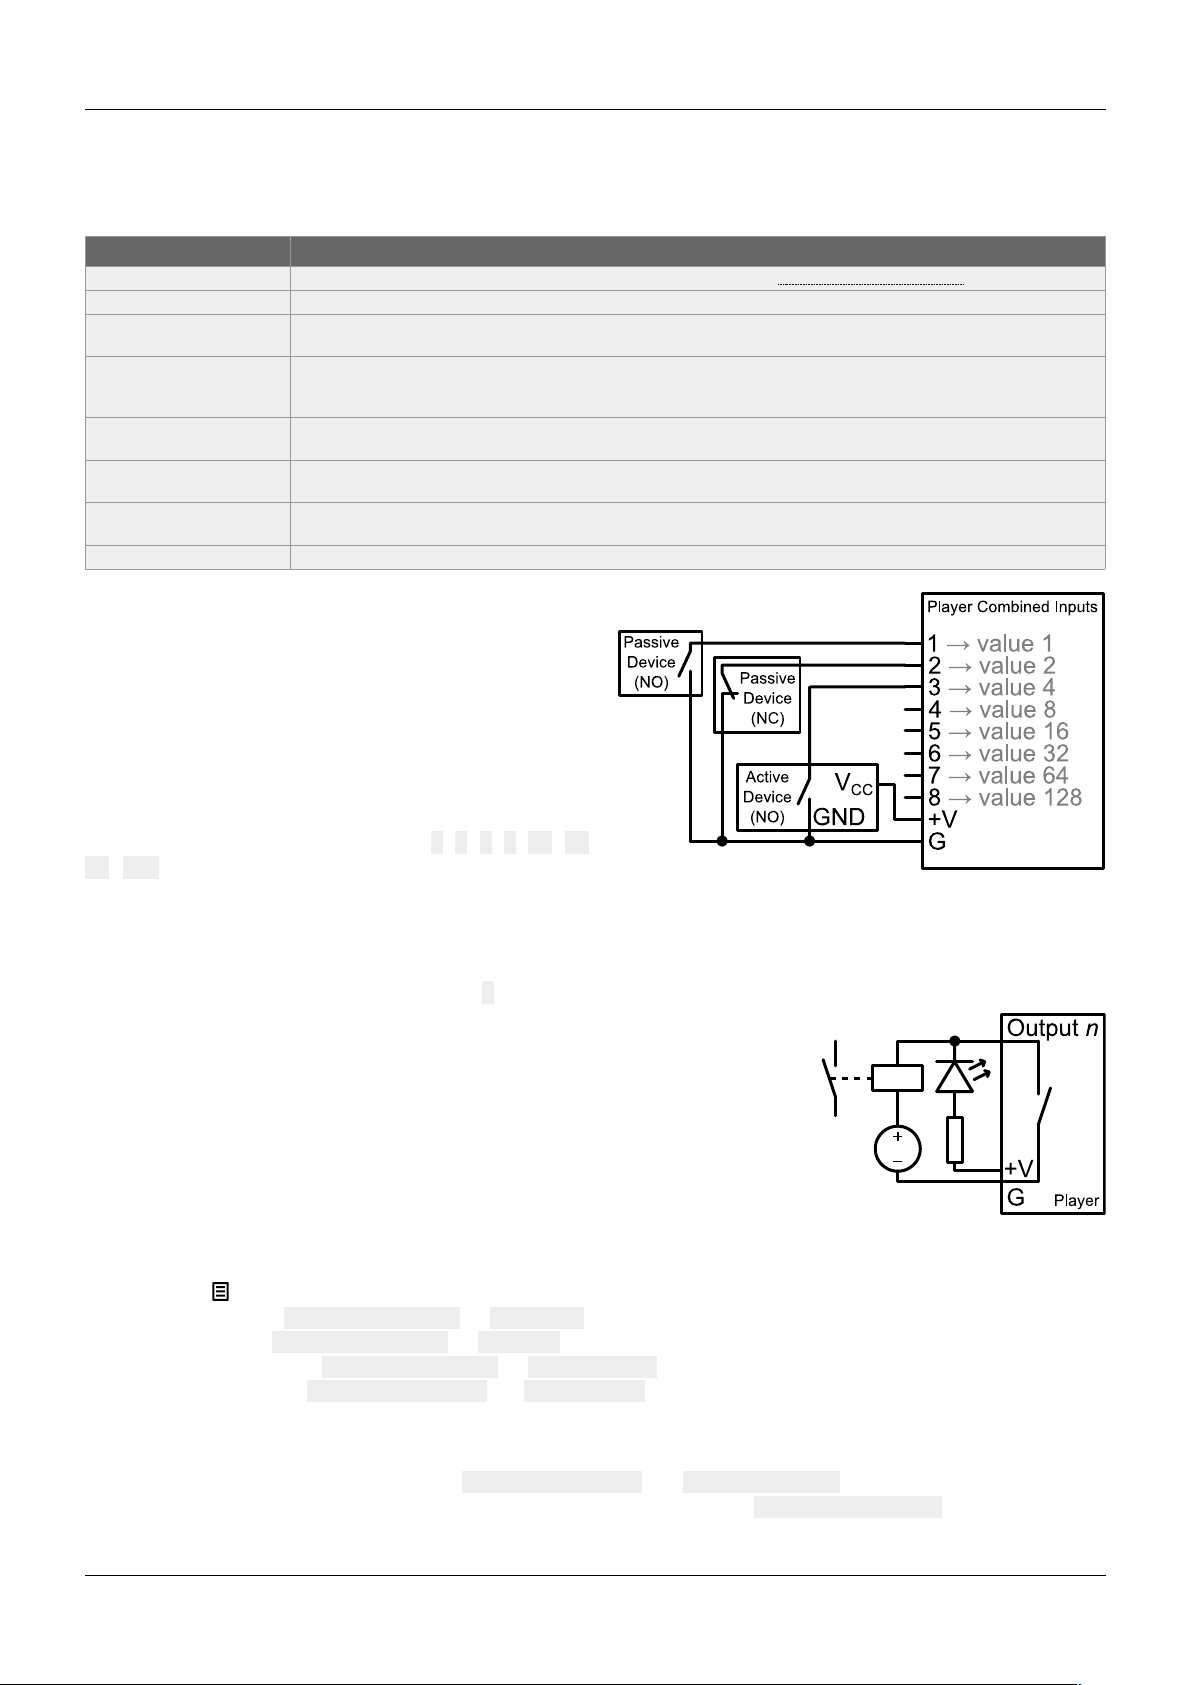
3.1 Input Contacts
The 1 + 8 input contacts can be configured to trigger
various actions, such as playback control, standby, wakeup, or sending a serial frame. Devices behaving like
switches can be connected between these inputs and the
ground of the player (e.g.: push-button, presence sensor,
relay, PLC, SensoPad, IRPad). Active devices can use
the power supply pass-through. Each input can be
configured as normally open or closed.
The 1st to 8th combined inputs are respectively associated
with the following values when active: 1, 2, 4, 8, 16, 32,
64, 128. The action taken for these inputs depends on
their combination, defined as the sum of the values of all
the active inputs, which is simply the value of an input if it is the only one active. If more than 8 triggering devices
are needed, the ID-AL Ext15In board or a diode-based circuit can be used to get more than 8 combinations from
these devices.
By default, the standalone input plays folder 1, and the 8 combined inputs play the folder numbered with the active
combination.
3.2 Output Contacts
The 8 outputs behave like normally-open switches between each contact and
the ground of the player (up to 500 mA per output). They can be used to operate
devices such as power relays, motor controllers, lights, or players.
4 Starting the Player
• After having connected all the required interfaces, turn the player on by
plugging the mains adapter. The status LED should quickly get red, which signals that the player is booting.
• Wait for the status LED to turn green, which indicates that the player is ready.
• Press on the remote control to display the menu, then configure the following if needed:
◦ language: System settings → Language,
◦ network: System settings → Network,
◦ date and time: System settings → Date & time,
◦ FTP server: System settings → FTP server (for security reasons, it is highly recommended to
change the username and the password).
• Browse the menu for possible other useful settings.
• In order to make sure that the player benefits from the latest features and improvements, it is possible to
perform a firmware update from System settings → System update. If an Internet connection is
available, it is recommended to follow the automatic procedure using Check for update.
© 2019, Waves System – 7 impasse de La Ville en Bois, 44830 Bouaye, France – Phone: +33 2 40 78 22 44 – info@wsystem.com
 Loading...