

ID-AL ChronoPlayer User Manual

ChronoPlayer
User Guide
V1.0 - July 12, 2016
© 2016, Waves System

ID-AL ChronoPlayer - User Guide V1.0
-2- © 2016, Waves System
© Waves System - 2016
The ID-AL products are exclusively manufactured by Waves System.
Waves System
Impasse de La Ville en Bois
44830 BOUAYE
FRANCE
Sales and information: +33 (0)2 40 78 22 44
E-mail: info@id-al.com
Website: www.id-al.com
Technical department: support@wsystem.com
Technical support: For a detailed list of the technical support options, we suggest that you visit our site:
www.id-al.com.
Information in this manual is subject to change without notice and does not represent any commitment from Waves System. The
equipment described in this manual is supplied under condition of the terms of license specifying the legal use conditions. This manual
may not be reproduced or used, in whole or in part, in any form and by any means, for other use than private, without the written
permission from Waves System.
ID-AL is a trademark of Waves System.

ID-AL ChronoPlayer - User Guide V1.0
CE Marking
The CE marking is found on the nameplate, at the rear side of the device. It certifies the conformance of the device with the low voltage
CE Directive, according to the EN 55022 standard, and the Electromagnetic Compatibility Directive 61000-4-x.
Directives
The requirements related to the electromagnetic compatibility and low voltages directive are met.
Safety Instructions
Overview
Proper usage conforming to the product intended purpose involves strict compliance with the instructions given in this manual.
The staff should receive instructions regarding the proper usage of the device.
Only the use of genuine parts ensures perfect safety for the user and correct operation of the device. Moreover, only the accessories
mentioned in the technical documentation or explicitly approved by the manufacturer must be used. If accessories or consumable
products from other brands are used, the manufacturer cannot stand guarantee for the correct and safe operation of the device.
Damages caused through the use of accessories or consumable products from other brands will not entail right to any benefit under the
terms of warranty.
The manufacturer will be liable for the safety, reliability and functioning of the product as long as the assembly, settings, modifications,
extensions, and repairs have been carried out by the manufacturer or a company approved by the manufacturer, and if the device is
used in accordance with the instructions mentioned in this manual.
The player complies with the technical safety standards in force at the date of print of this manual. All rights reserved for the electrical
diagrams, procedures, names, and devices mentioned herein.
Any reproduction of the technical documentation, even partial, without a written authorization from Waves System is prohibited.
General Safety Instructions
This device has been shipped out from our facilities in perfect working condition. In order to preserve these conditions, for safety, and to
avoid any risk of accidental bodily injury, the user must imperatively follow the safety instructions and read the “Caution!” messages
included in this manual.
This device, manufactured by Waves System, has been designed in a way that practically eliminates any risk if it is used in accordance
with its intended purpose. Nevertheless, for the sake of safety, we would like to draw your attention to the following instructions:
When using the device, comply with all local rules and regulations in force. Any modification or conversion of the device automatically
entails loss of the certification. The operation of a modified device is liable to a penalty. In the interests of occupational safety, the
operator and the user are held responsible for complying with the regulations.
Keep the original packing for a possible product reshipment. Also ensure that the packing material is kept out of the reach of children.
Only this original packing ensures optimal protection for the product during transportation. If a product reshipment appears to be
necessary during the guarantee period, Waves System is not liable for any ensuing damages arising during the transportation and
attributable to a defective packing.
This device should be used only by persons whose training or knowledge ensures proper handling.
Before every use, the operator must check that the device is in perfect working condition.
This product must not be used in places where there is a potential explosion risk. Besides, it must neither be used in an environment
favoring combustion nor in a humid or excessively hot or cold location.
The device must be installed in a dry and dust-free area. Do not install the device directly against a wall.
-3- © 2016, Waves System
CAUTION! DO NOT EXPOSE TO MOISTURE OR DUST!
Unplug the power supply cable before any servicing!
FOR YOUR SAFETY, PLEASE READ THE USER’S GUIDE CAREFULLY BEFORE OPERATING YOUR PLAYER.

ID-AL ChronoPlayer - User Guide V1.0
Safety Instructions against Risks Due to Electric Currents
The device must be connected to a grounded AC power outlet or a European standard outlet installed as per good professional
practices.
Before connecting the device, check that the mains voltage and frequency match the specifications indicated on the mains adapter.
Before powering, check that the device and cables are not damaged. Damaged cables and connections must immediately be replaced.
Never allow the power cords to come in contact with other cables. Handle the mains adapter cable as well as all other cables connected
to the mains with extreme care.
Always connect the power cord to the device first, then to the mains. The power outlet must remain accessible after the installation.
Check the device and its mains adapter cable from time to time. Disconnect the device from the mains when it is no longer used or for
the purpose of maintenance.
Handle the power cord by using only the plug. Never remove the plug by pulling the power cord.
Electrical connections, repairs, and maintenance must be carried out by qualified personnel.
Do not switch the device on or off within a short period of time as this reduces its lifespan.
Terms of Use
This product has been designed for indoor use only.
If this device has been exposed to very high temperature fluctuations (e.g.: after transportation), do not connect it immediately. The
condensation formed inside the device could damage it. Allow the device to reach ambient temperature before connecting it.
Do not shake the device. Avoid sudden movements during its installation or handling.
When selecting the spot for installation of the player, ensure that it is not exposed to a high source of heat, moisture, or dust. There
should not be any cables lying around as they might jeopardize your and others’ safety.
Delivery Details
ChronoPlayer
12V mains adapter
Infrared remote control
-4- © 2016, Waves System

ID-AL ChronoPlayer - User Guide V1.0
Table of Contents
1 Introduction.................................................................................................................................................. 7
2 Features....................................................................................................................................................... 8
3 Installation.................................................................................................................................................... 9
3.1 Connection of the Inputs.................................................................................................................... 10
4 Storage Device Preparation and Update................................................................................................... 12
4.1 Storage Device Initial Preparation.....................................................................................................12
4.2 Update of the Storage Device Contents............................................................................................. 12
5 Control of the ChronoPlayer with the Folders and the Files.......................................................................13
5.1 Organization of the Folders................................................................................................................ 13
5.1.1 [Jxxx] - Jump to the Folder xxx at the End of the Playback of the Folder...................................15
5.1.2 [RET] - Return to the Previous Folder at the End of the Playback of the Folder........................16
5.1.3 [SEQ] or [RND] - Sequential or Random Playback Mode.......................................................... 16
5.1.4 [V+xx] or [V-xx] – Relative Volume of the Folder........................................................................16
5.1.5 [NT] – Disable the Command Events during the Playback of the Folder...................................17
5.1.6 [RSxxx] - Send Bytes onto the RS-232 Output.......................................................................... 17
5.1.7 [WHL] - Play the Folder while the Assigned Input Combination Remains Activated..................19
5.1.8 [NXTxxx] - Play the Next xxx Audio Files each Time the Folder is Played.................................19
5.2 Organization of the Files inside the Folders.......................................................................................20
5.2.1 [Jxxx] - Jump to the Folder xxx at the End of the Playback of the File.......................................21
5.2.2 [NT] - Disable the Command Events during the Playback of the File........................................22
5.2.3 [RSxxx] - Send Bytes onto the RS-232 Output.......................................................................... 22
5.2.4 [V+xx] or [V-xx] - Relative Volume of the File.............................................................................22
6 Control of the ChronoPlayer with a Timestamped Programming (Scheduler)............................................23
6.1 Introduction........................................................................................................................................ 23
6.2 Principle............................................................................................................................................. 23
6.3 Creation of a Timestamped Programming File................................................................................... 25
6.4 Application of a Timestamped Programming to the Player.................................................................25
7 LCD Display and Clickable Knob............................................................................................................... 26
7.1 Current State of the Player................................................................................................................ 26
7.2 Playback Control Command (PLAY/STOP)....................................................................................... 27
7.3 Main Volume Control Using the Knob................................................................................................ 27
7.4 Setup of the Player Clock Parameters............................................................................................... 27
8 Main Volume Control.................................................................................................................................. 30
8.1 Introduction........................................................................................................................................ 30
8.2 Modification of the Main Volume........................................................................................................31
9 Configuration File....................................................................................................................................... 32
9.1 Assign a Device Number - #ID:xxx.................................................................................................... 33
9.2 Volume Setting - #VOLUME:xx.......................................................................................................... 33
9.3 Configuration of the Baud Rate of the RS-232 Serial Link - #BAUDRATE:xxxxx...............................33
9.4 Monitoring of the Player through the RS-232 Serial Link - #RS_MONITORING:x.............................34
9.5 Choice of the Folder to Play on Startup - #BOOT:xxx........................................................................35
9.6 Assign Specific Commands to the Inputs - #INPUTxx:cmd................................................................35
9.7 Assign Specific Commands to the Special Buttons of the Infrared Remote Control - #BUTTONx:cmd
................................................................................................................................................................... 36
9.8 Example of a Configuration File.........................................................................................................37
10 RS-232 Serial Link Protocol..................................................................................................................... 38
10.1 Reception Protocol........................................................................................................................... 38
10.1.1 Byte 1 (Status) 1xxxxxxxb........................................................................................................ 38
10.1.2 Byte 2 (Command) 0xxxxxxxb + Byte 3 (Data) 0xxxxxxxb.......................................................39
10.2 Transmission Protocol - Monitoring.................................................................................................. 41
11 Firmware Update...................................................................................................................................... 44
Appendix A Characteristics............................................................................................................................ 45
A.I Interfacing and Connectivity................................................................................................................ 45
A.II Audio File Formats Supported............................................................................................................45
A.III Other File Formats Supported........................................................................................................... 45
-5- © 2016, Waves System

ID-AL ChronoPlayer - User Guide V1.0
A.IV Storage Devices................................................................................................................................ 45
A.V Built-in Clock...................................................................................................................................... 45
A.VI Power Supply.................................................................................................................................... 45
A.VII Consumption (12 V supplied)........................................................................................................... 46
A.VIII Temperatures.................................................................................................................................. 46
A.IX Size................................................................................................................................................... 46
A.X Weight................................................................................................................................................ 46
Appendix B Infrared Remote Control............................................................................................................. 47
Appendix C Built-in Clock.............................................................................................................................. 48
C.I Principle.............................................................................................................................................. 48
C.II Built-in Clock Setup............................................................................................................................ 48
C.III Clock Setup....................................................................................................................................... 49
-6- © 2016, Waves System

ID-AL ChronoPlayer - User Guide V1.0
1 Introduction
The ChronoPlayer is a standalone audio player supporting WAV and MP3 audio files stored on an SD/SDHC
card or a USB flash drive. Files are played automatically according to an “AutoPlay” setting, a timestamped
programming, or a triggering by external events (dry-contact inputs, RS-232 serial commands, etc.).
The ChronoPlayer aims at playing musics, sounds, or messages in various environments such as schools,
museums, exhibitions, showrooms, stores, attraction parks, touristic places, or any other public spaces.
-7- © 2016, Waves System

ID-AL ChronoPlayer - User Guide V1.0
2 Features
• Interactivity:
◦ Electrical contacts: 8 inputs that can be combined to trigger the playback of up to 255 folders
through sensors, push-buttons, relays, etc.
◦ Commands through the RS-232 serial link. A simple protocol is used to send instructions to the
player.
◦ Infrared sensor usable with a remote control.
• Timestamped programming: The built-in clock coupled to the Scheduler feature of the ChronoPlayer
is used to timetable the music playback, to stop or restart the playback at a specific time and day
(defined within the Scheduler).
• AutoPlay: This feature makes it possible to automatically start playback upon power-on. This feature
is configurable and can be disabled.
• Playback behavior: The audio files stored on an SD memory card or a USB flash drive can be
organized in a particular way that defines the playback rules with the names assigned to the files and
the folders. This smart programming allows a wide flexibility of use.
• A line-level stereo audio output on a standard RCA connector.
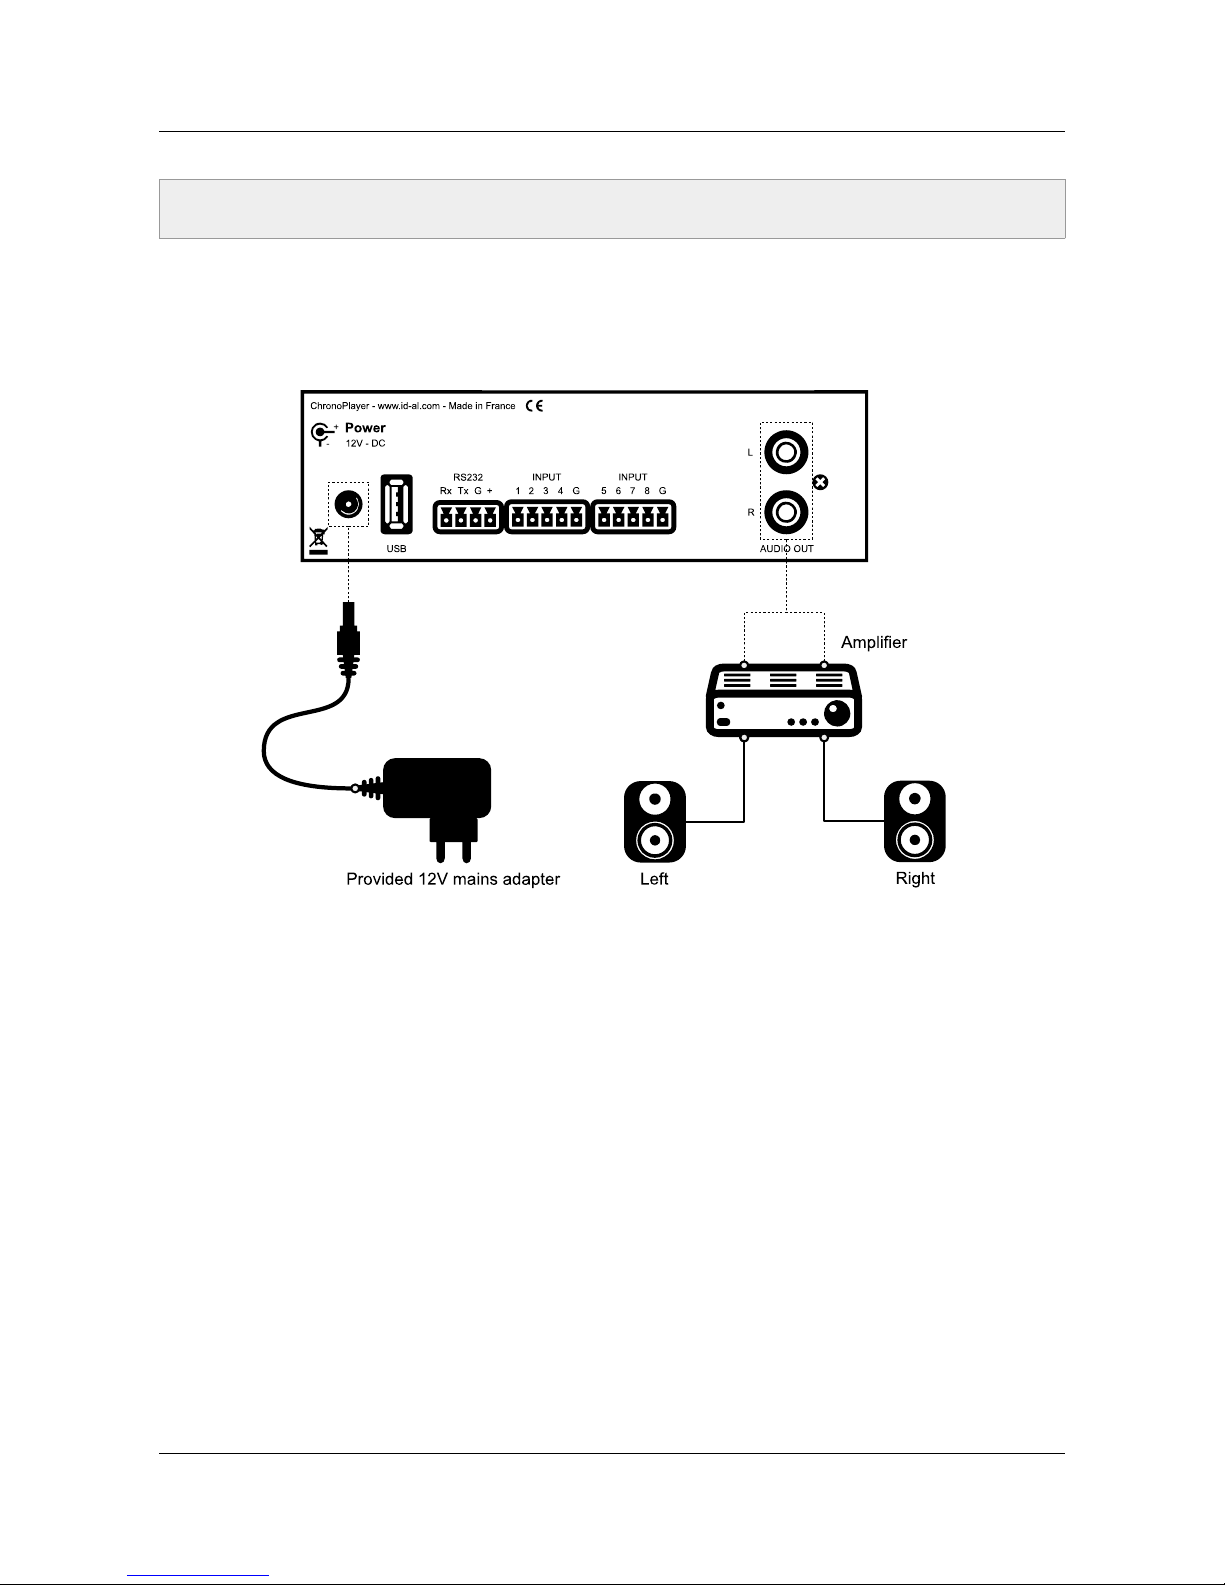
• Power supply: A 12-V mains adapter is required. The player is protected against polarity reversal and
against the use, by mistake, of an alternating-current power supply instead of the provided DC power
supply. Caution! The player supports a power supply voltage between 10 V and 15 V. Beyond this
voltage range, the player can be damaged. The input power supply is transferred to the RS-232
connector (pluggable terminal block) to supply the connected accessories.
A 500-mA (6-W) power supply is adequate to run the player. If you use a PSU of a lower power, you
may get a very poor sound and also a PSU overheating till broken down.
• RS-232 serial link: The ChronoPlayer can be controlled by a PLC, a computer, or a remote control
using a serial link. The ChronoPlayer receives data on its Rx input and sends data on its Tx output.
The serial-link protocol of the ChronoPlayer is described in this manual.
-8- © 2016, Waves System
ID-AL ChronoPlayer - User Guide V1.0
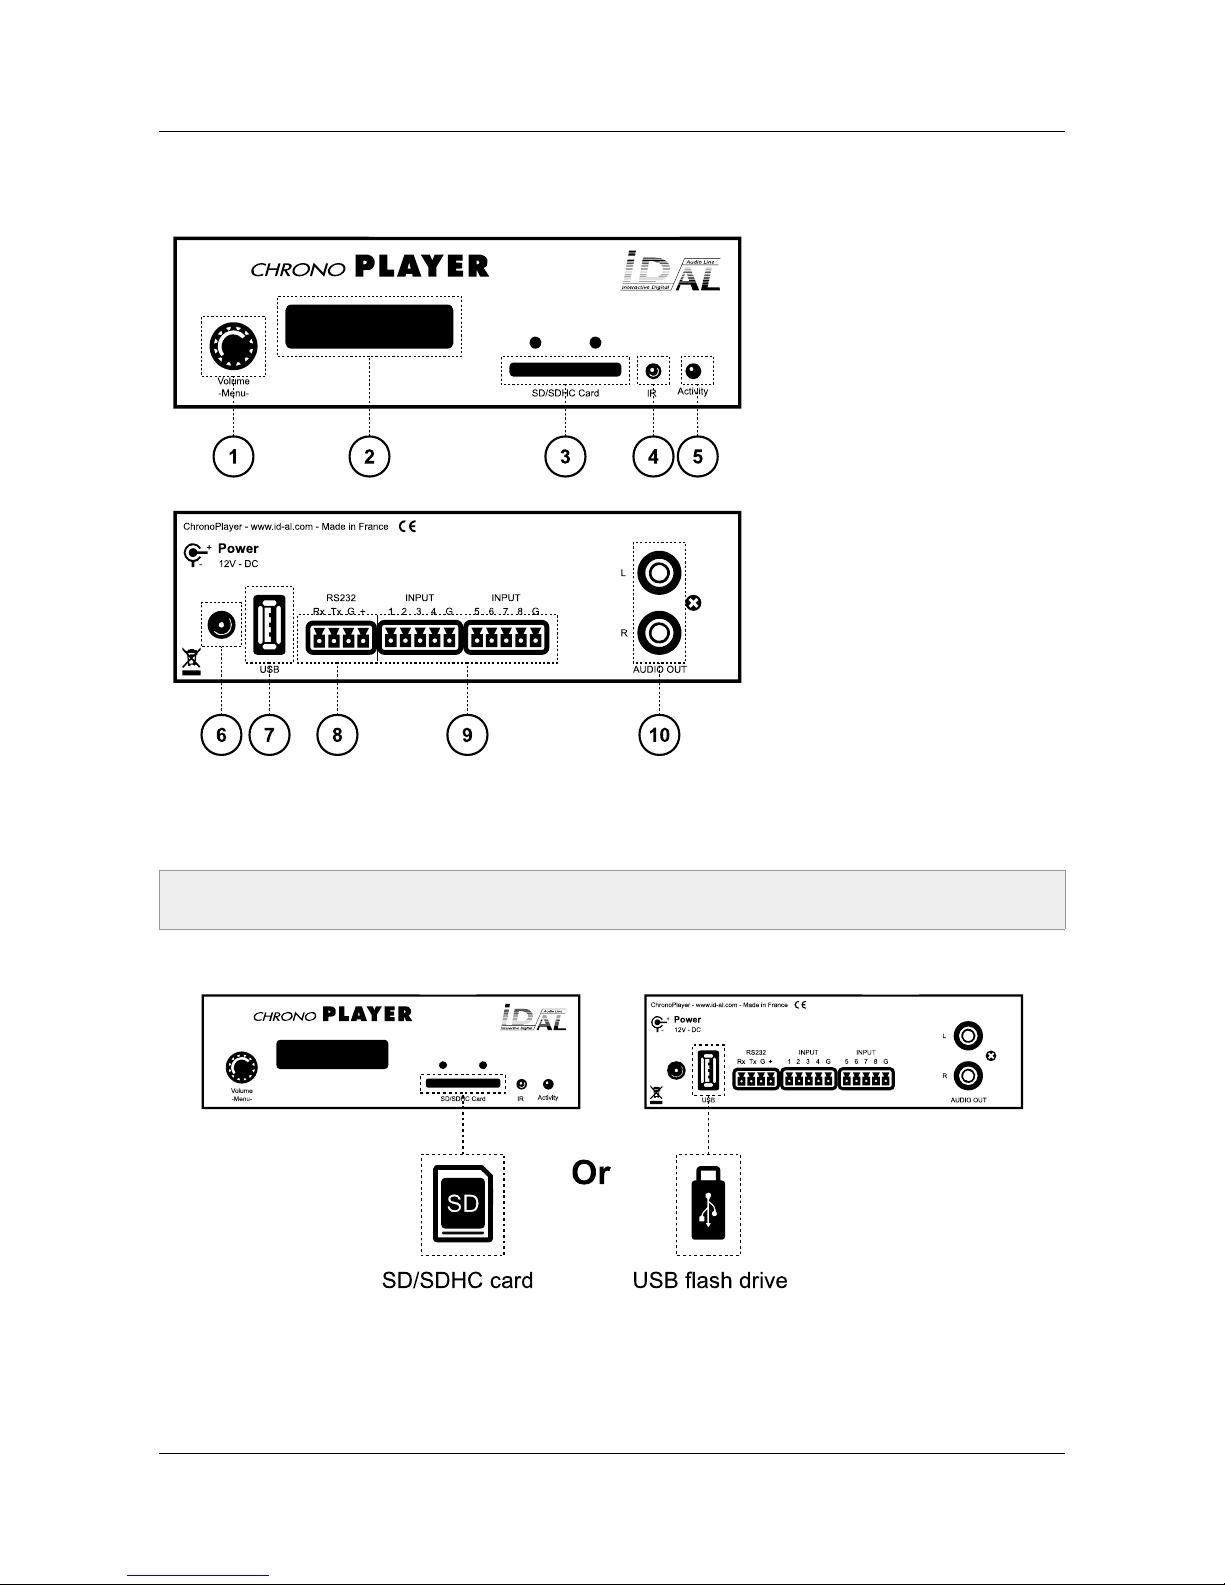
3 Installation
1. Clickable knob for volume
control and the setup menu
2. LCD display (player status
and settings)
3. SD/SDHC memory card
slot
4. Infrared sensor
5. Activity LED
6. Power supply connector of
the player
7. USB host receptacle for
USB flash drive
8. RS-232 serial link
9. Dry-contact inputs
10. Line-level stereo audio
output
First use: The ChronoPlayer ships with default factory settings, and it is ready to operate when a prepared
media is inserted in (see the chapter Control of the ChronoPlayer with the Folders and the Files).
1. Prepare and insert a quality SD memory card or a USB flash drive.
• With an SD card: Choose a quality model. Insert it into the slot to the stop without forcing. To remove
it, gently push on the memory card to unlock it.
• With a USB flash drive: Choose a quality model. Plug the USB flash drive into the USB receptacle of
the player.
-9- © 2016, Waves System
Caution! Before inserting a storage device (SD card or USB flash drive), it is absolutely necessary to
power off the player.
ID-AL ChronoPlayer - User Guide V1.0
The SD cards or the USB flash drives used with the ChronoPlayer need to be properly prepared. For more
information regarding the preparation of the storage device, see the chapter Storage Device Preparation and
Update.
2. Connect speakers or a sound system to the audio output and switch the player on thanks to the PSU.
Power Supply Unit: It is recommended to use the mains adapter provided with the player. If another PSU or a
battery is used, the specified voltage range must be respected (see the chapter Characteristics). The power
consumption depends on the power level of the amplifier.
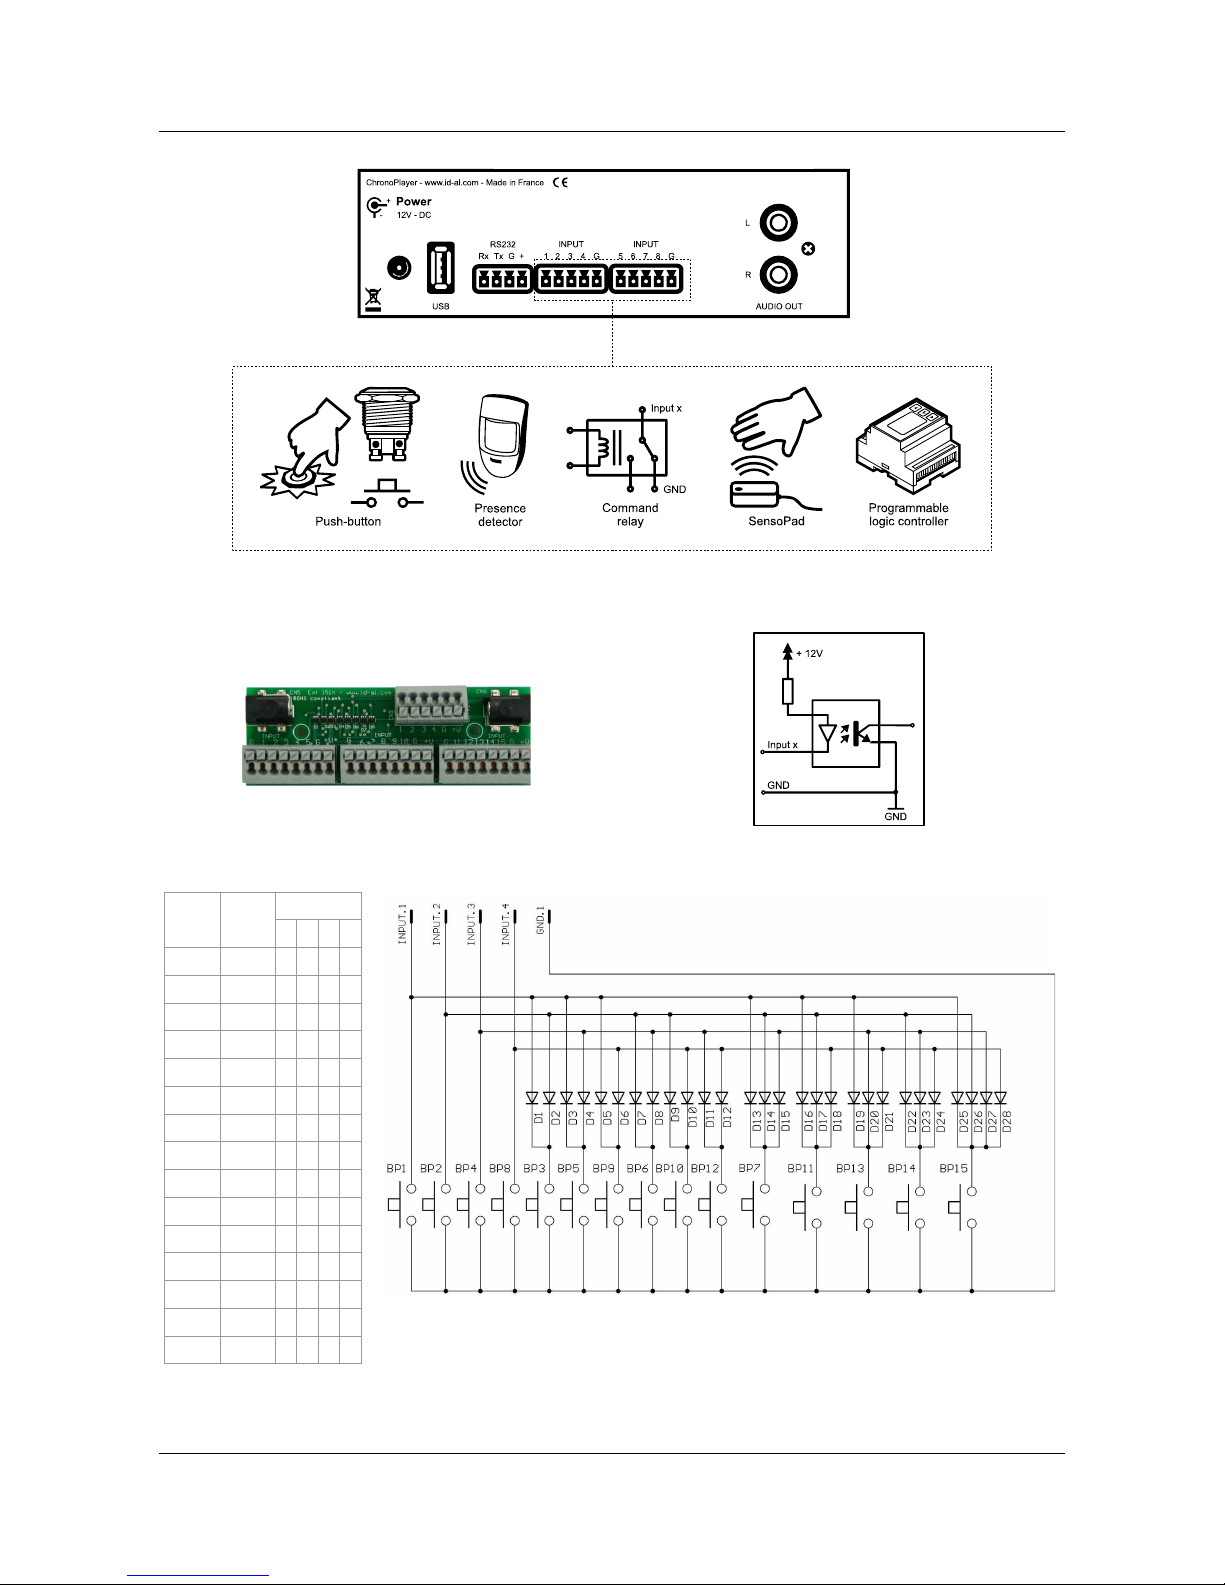
3.1 Connection of the Inputs
The 8 inputs are used to trigger the playback of folders. An input is activated if it is connected to the ground
of the player. The states of all the inputs are combined to form a binary code identifying the folder to play.
Triggering devices can be connected to these inputs in one of two ways:
• Up to 8 triggering devices directly connected to the player inputs. In that case, the associated folders
are 001, 002, 004, 008, 016, 032, 064, and 128.
• Up to 255 triggering devices connected to the player inputs through a circuit encoding their ID. In
that case, the associated folders are 001 to 255. Such an encoding circuit can be made out of
diodes. An optional extension board interfacing up to 15 triggering devices to the player inputs is
available.
-10- © 2016, Waves System
Note: If both an SD card and a USB flash drive are connected, the SD card has the priority, and the USB
flash drive is not used by the player.
ID-AL ChronoPlayer - User Guide V1.0
Button Folder
Input
1 2 3 4
BP1 001 ●
BP2 002 ●
BP3 003 ● ●
BP4 004 ●
BP5 005 ● ●
BP6 006 ● ●
BP7 007 ● ● ●
BP8 008 ●
BP9 009 ● ●
BP10 010 ● ●
BP11 011 ● ● ●
BP12 012 ● ●
BP13 013 ● ● ●
BP14 014 ● ● ●
BP15 015 ● ● ● ●
D1 to D28: 1N4148 diodes
15 push-buttons mapped to 4 inputs
-11- © 2016, Waves System
Figure 1: Examples of triggering devices on the dry-contact inputs
Figure 2: Optional extension board
Figure 3: Internal schematic of a player input

ID-AL ChronoPlayer - User Guide V1.0
4 Storage Device Preparation and Update
In order to work, the ChronoPlayer needs either an SD/SDHC card or a USB flash drive containing all the
required data, mainly numbered folders and audio files, as well as optional files such as a Scheduler
timestamped programming file, the setup file config.txt, or the serial.txt file containing the byte
frames to transmit on the RS-232 serial output.
4.1 Storage Device Initial Preparation
It is highly recommended to initially format the storage device (even if it is brand new) as FAT or FAT32
(FAT32 from 512 MiB).
The latest versions of Windows do not allow to format large storage devices (> 32 GiB) as FAT32. In that
case, a formatting tool from a third party is required. Such tools can easily be found on the Internet, even free
of charge for some of them.
4.2 Update of the Storage Device Contents
The structure of the contents on the storage device is explained in the chapter Control of the ChronoPlayer
with the Folders and the Files. The ChronoPlayer support page (www.id-al.com) provides test contents that
can be used as an example for the first startup of the player.
The content update of the storage device has to be performed as follows:
1. Switch off the player.
2. Remove the storage device (SD card or USB flash drive) from the player.
3. Connect the storage device to a computer.
4. Copy, rename, or delete the necessary files or folders by following the instructions in the chapter
Control of the ChronoPlayer with the Folders and the Files or in any other chapter about the player
contents.
5. Remove the storage device by using the eject procedure of the computer operating system.
6. Insert the storage device in the player.
7. Switch on the player.
-12- © 2016, Waves System
Important: The SDXC cards (which are most of the time larger than 32 GiB) are not supported by the
ChronoPlayer.
Note: The other file systems (NTFS, exFAT, EXT, HFS, HFS+, etc.) are not compatible with the
ChronoPlayer.
Important: With an Apple computer running OS X, the hidden files generated by this system when
preparing or modifying the storage device must be deleted. More information about this procedure is
available in the FAQ on the support page of the ChronoPlayer: www.id-al.com.

ID-AL ChronoPlayer - User Guide V1.0
5 Control of the ChronoPlayer with the Folders and
the Files
The naming of the folders and the files define the playback rules. The folders and the files must be named
and copied according to a specific organization described in the following chapters.
5.1 Organization of the Folders
Only one folder level is allowed at the root of the storage
device. The folder names are composed of 3 digits (from
000 to 999) followed by optional parameters and an
optional arbitrary name.
You must not use special or accented characters.
Example
Folder Name
001
003 [J003]
008 folder name
247 [V+02][SEQ] my folder
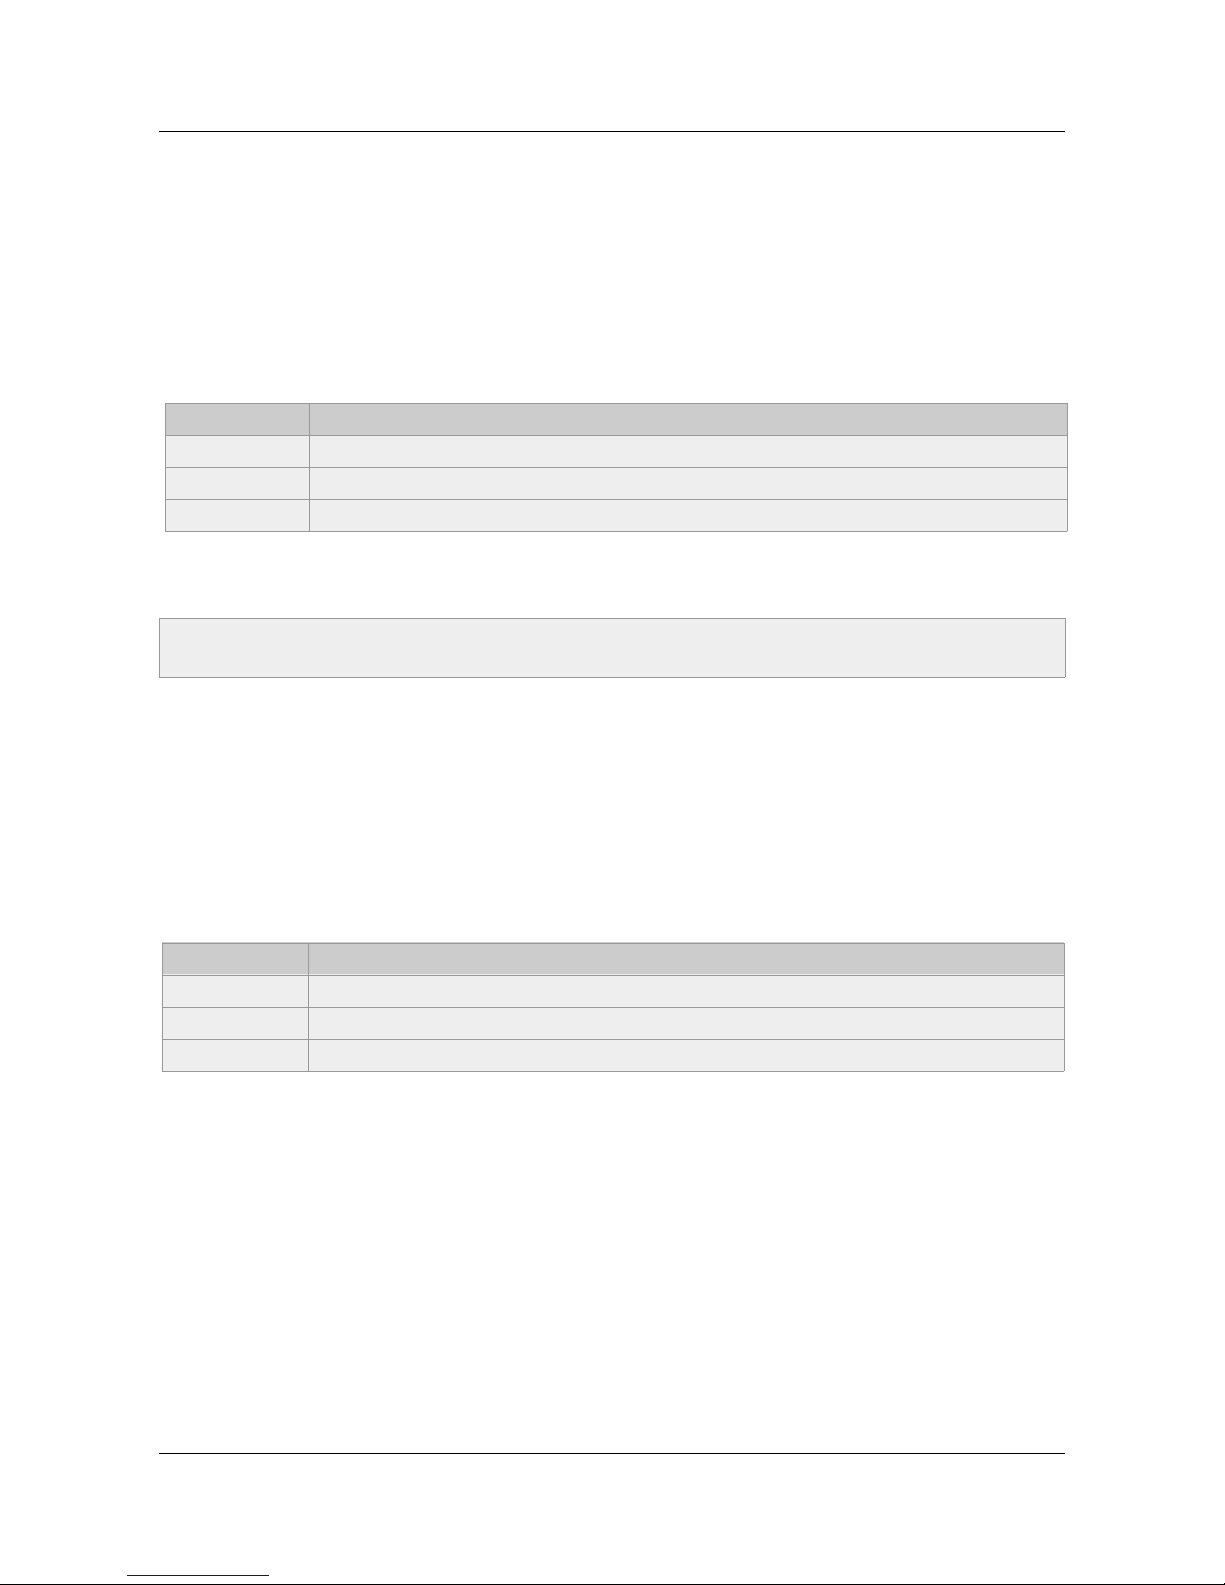
The first 3 digits represent the folder number, and are
therefore the main part of its name.
The folders are numbered from 000 to 999.
Example
Folder No. Description
000 Folder number 0 - “AutoPlay” folder, which is automatically played upon power-on.
001 Folder number 1.
034 Folder number 34.
The folder number identifies the folder to be played on startup, or as the target of a jump, or in case of an
input triggering or a scheduled triggering. You can use any number between 000 and 999.
-13- © 2016, Waves System
Important: The 8 input contacts allow the triggering of the folder with the number corresponding to the
binary code formed by the states of all the inputs, from 001 to 255. It is possible to reassign the first 15
input codes, either to the playback of another folder, or to another command, with the file config.txt
(see the chapter: Configuration File).
ID-AL ChronoPlayer - User Guide V1.0
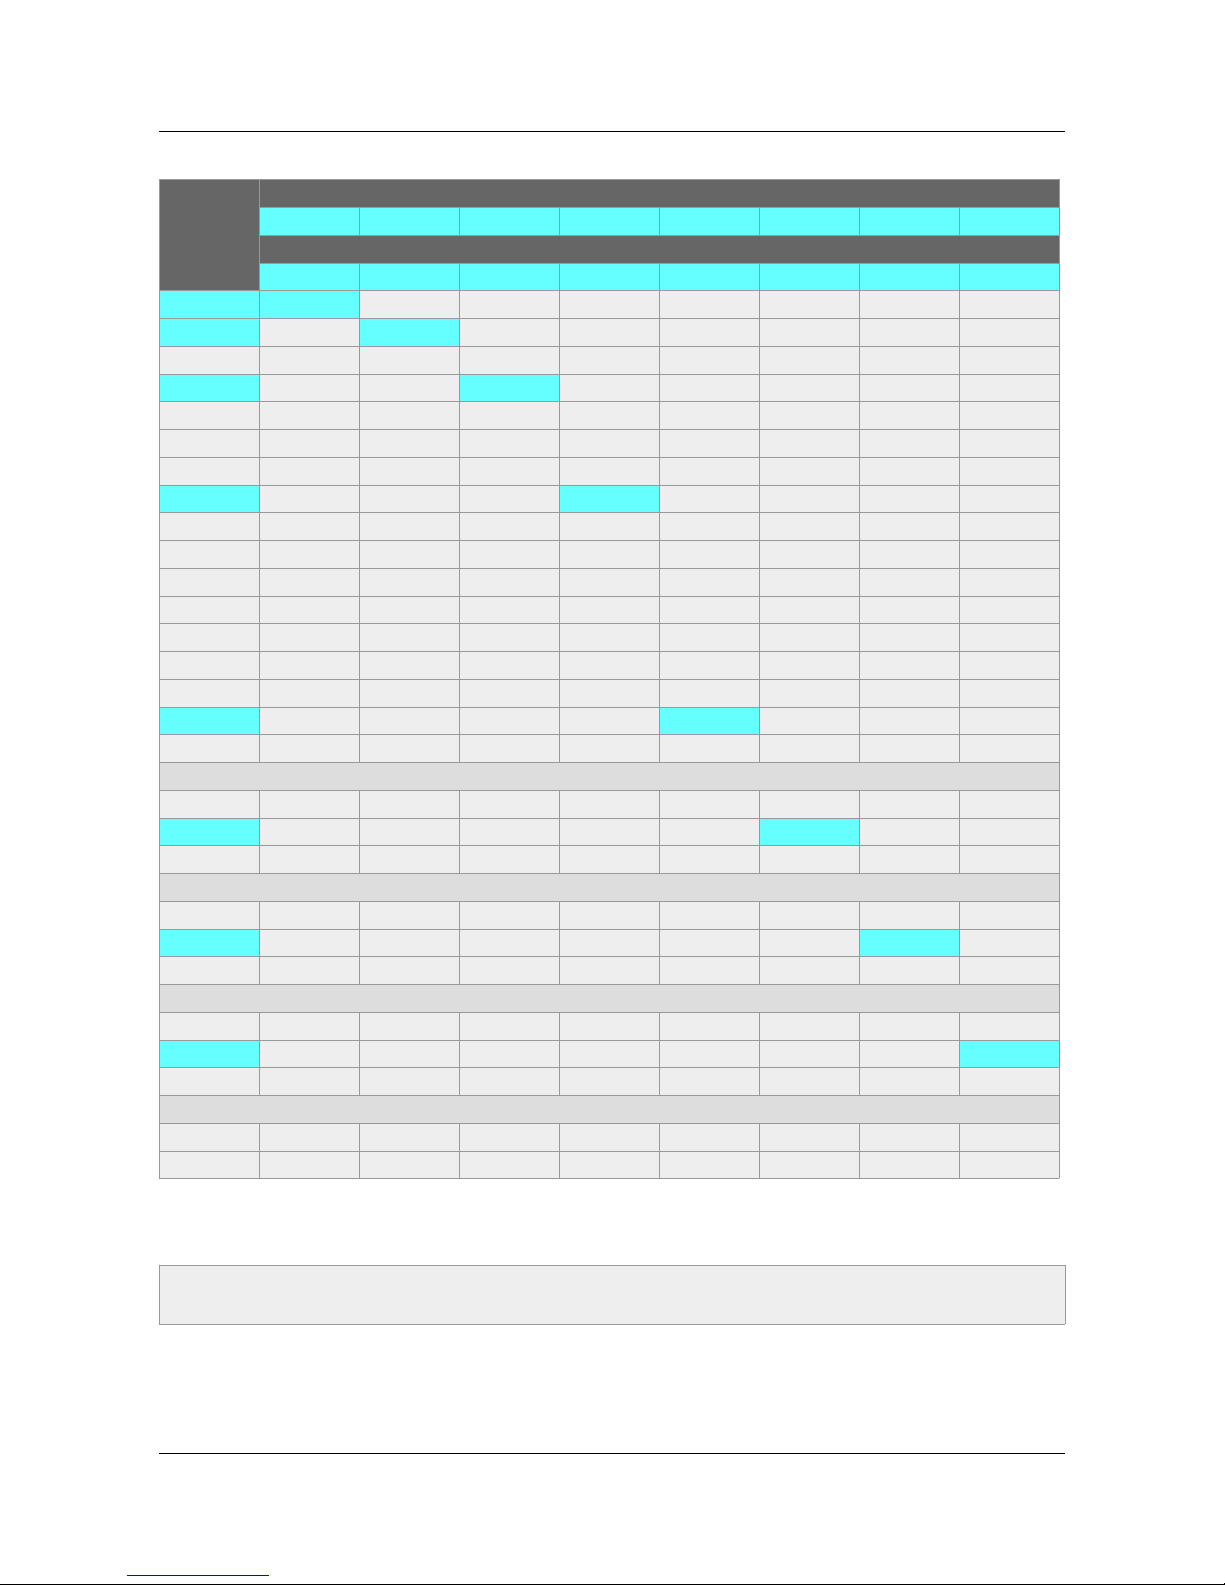
Table 1: Correlation between the inputs and the folder numbers
Folder No.
Input No.
1 2 3 4 5 6 7 8
Corresponding Binary Values
1 2 4 8 16 32 64 128
001 ●
002 ●
003 ● ●
004 ●
005 ● ●
006 ● ●
007 ● ● ●
008 ●
009 ● ●
010 ● ●
011 ● ● ●
012 ● ●
013 ● ● ●
014 ● ● ●
015 ● ● ● ●
016 ●
017 ● ●
...
031 ● ● ● ● ●
032 ●
033 ● ●
...
063 ● ● ● ● ● ●
064 ●
065 ● ●
...
127 ● ● ● ● ● ● ●
128 ●
129 ● ●
...
254 ● ● ● ● ● ● ●
255 ● ● ● ● ● ● ● ●
Special case: The folder 000 is the folder played by default on startup, if present. If this folder is missing, the
player switches to the STOP state.
-14- © 2016, Waves System
Note: The folder that is played by default on startup can be modified in the configuration file (see the
chapter: Configuration File).
ID-AL ChronoPlayer - User Guide V1.0
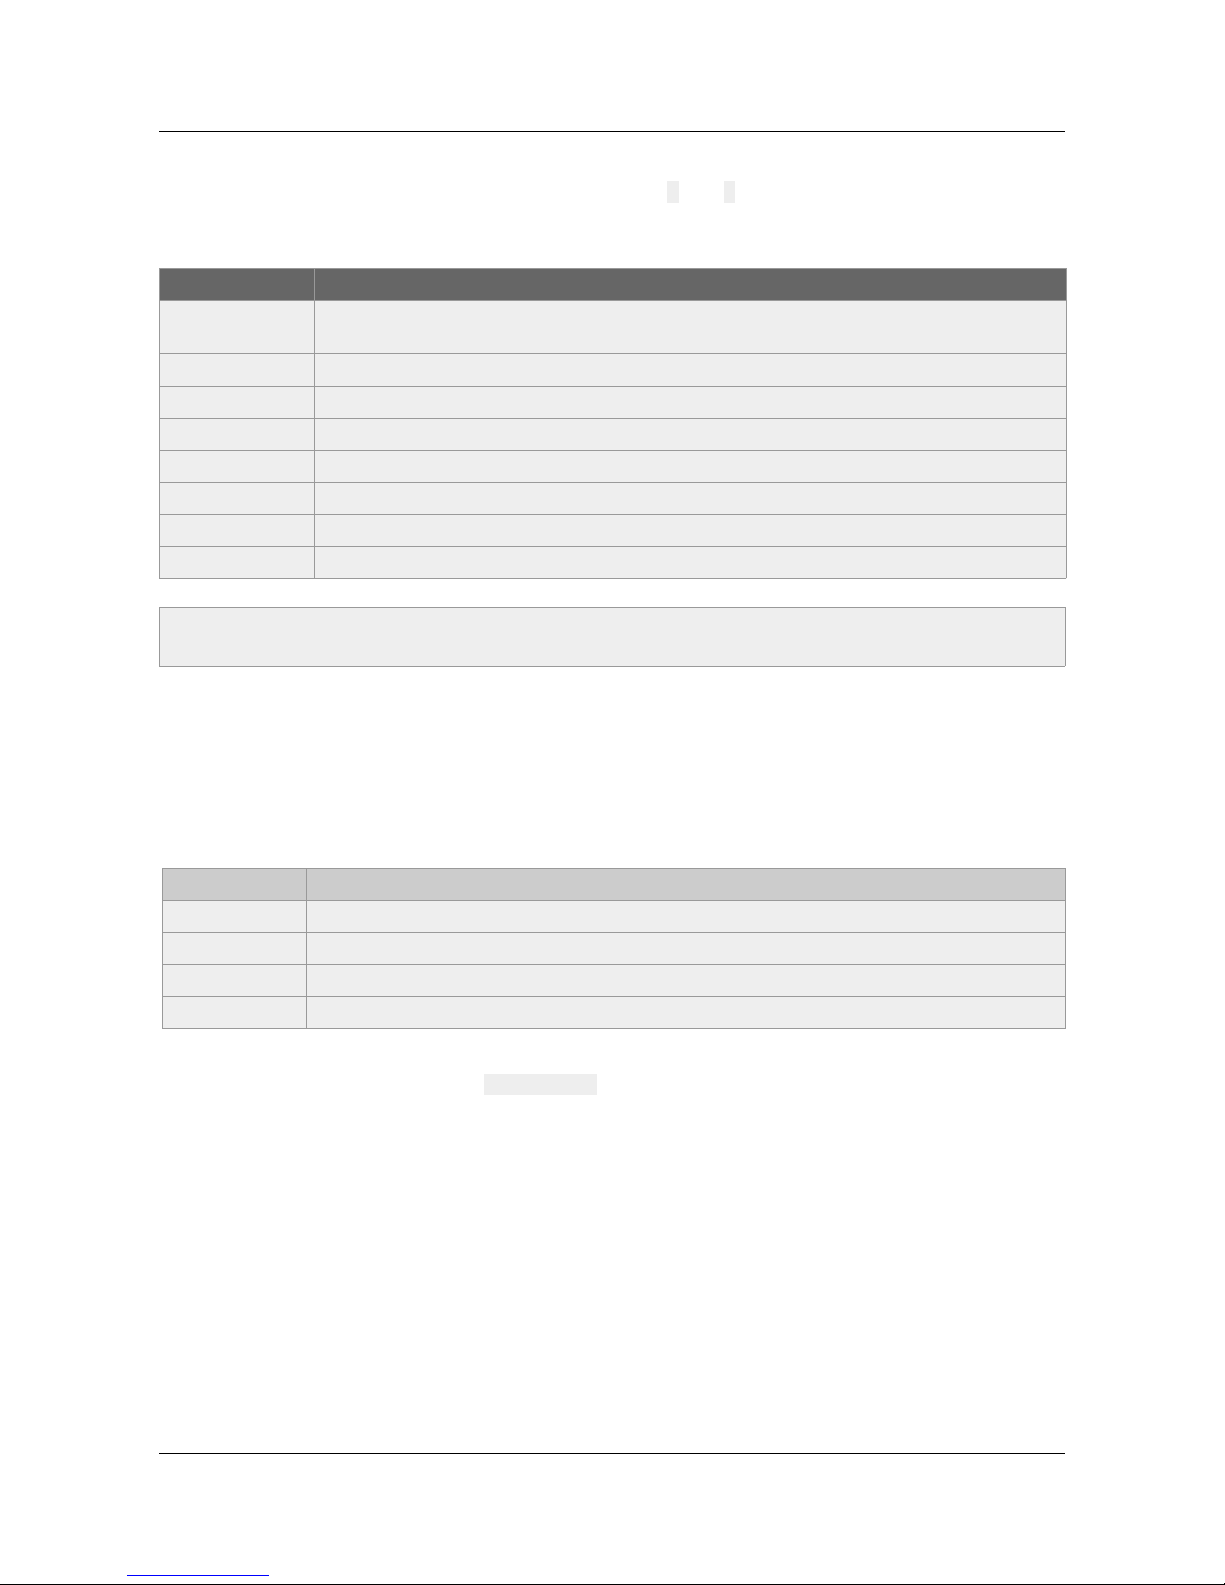
To change the behavior of the player, optional parameters can be added to the folder names. These
parameters have to be enclosed between square brackets ([ and ]). Several parameters can be added to
the same folder name.
Table 2: Optional tags pertaining to the names of the folders
Tag Description
[Jxxx] Jump to another folder after the playback of the folder, or play in a loop (i.e. jump to the
same folder at end of playback).
[RET] Return to the previous folder after the playback of the folder.
[RND] or [SEQ] Random or sequential playback mode of the folder.
[V+xx] or [V-xx] Relative volume setting of the folder.
[NT] Disable the command events.
[RSxxx] Send an RS-232 frame.
[WHL] Play the folder while the assigned input combination remains activated.
[NXTxxx] Play a specific number of audio files from the folder.
5.1.1 [Jxxx] - Jump to the Folder xxx at the End of the Playback of the
Folder
This tag defines the behavior at the end of the playback of the folder. It indicates the 3-digit number (xxx from
000 to 999) of the next folder to play, which can also be the number of the folder itself in order to play it in a
loop. By default, if this tag is missing, the playback stops at the end of the folder.
Example
Folder Name Action Performed by the Tag
001 [J002] Jump to folder 002 after playing folder 001.
003 [J003] Jump to folder 003 after playing folder 003 -> create a loop of the 003 folder.
008 [J023] Jump to folder 023 after playing folder 008.
458 [J999] Jump to folder 999 after playing folder 458.
To play in a loop some audio files on startup, the folder 000 must be used and tagged with [J000] (default
value that can be modified through the config.txt file (see the chapter Configuration File).
Example: 000[J000]
• If the destination folder does not exist, the playback is stopped.
• An empty target folder is not a special case. Its playback is just instantaneous since there are no
files to play. This means that the tags of an empty target folder are applied normally if any. The
playback stops in such a folder unless it has [Jxxx] or [RET] tags.
-15- © 2016, Waves System
Note: If no optional parameters are indicated, the player plays randomly the complete folder, and then
stops. The playback of the folder can be interrupted by a triggering event.
ID-AL ChronoPlayer - User Guide V1.0
5.1.2 [RET] - Return to the Previous Folder at the End of the Playback
of the Folder
During the playback of a folder, if an event or a tag instructs to play another folder tagged with [RET], then
the player jumps to the new folder. At the end of the playback of this new folder, the player jumps back to the
initial folder.
This function can be used to resume the playback of a folder interrupted by the playback of a message
triggered by an event.
Example
Folder Name Action Performed by the Tag
001 [J100] After the folder 001 playback, jump to the folder 100.
002 [J100] After the folder 002 playback, jump to the folder 100.
100 [RET] After the folder 100 playback, return to the previous folder (001 or 002).
In the above example, after the playback of the folder 001 or 002, the folder 100 is played, then the player
jumps back to the initial folder (001 or 002).
5.1.3 [SEQ] or [RND] - Sequential or Random Playback Mode
By default, without this parameter, the folder is played in random mode.
• [SEQ]: playback of the numbered files (from 001 to 999) of the folder, in ascending order (see the
chapter Organization of the Files inside the Folders).
• [RND]: playback in a random order.
Example
Folder Name Action Performed by the Tag
001[SEQ] Play the folder 001 in sequential mode, then stop.
002[RND][J002] Play the folder 002 in random mode and in a loop.
003[J001] Play the folder 003 in random mode, then jump to the folder 001.
Caution! With [SEQ], the files that are not numbered are ignored. Therefore, a folder without any numbered
file is always considered as empty.
5.1.4 [V+xx] or [V-xx] – Relative Volume of the Folder
This function can be used to play folders (e.g. containing messages) more or less loud than the other folders.
The xx parameter of the tag is the volume of the folder relatively to the main volume (see the Table 6:
Volume (dB) against the selected setting value). It is expressed in volume steps. It is always written with 2
digits (example: 01, 32, 64), ranging from 00 to 64.
-16- © 2016, Waves System
Note: The [RET] tag has only one level of return, i.e. the target folder is always the previously played
folder, whatever the number of folders tagged with [RET] played in a row.
 Loading...