

Idaho Star Operator's Manual

Cover photo courtesy
of
the Idaho STAR Motorcycle Safety Program
SKILLS
TRAINING
ADVANTAGE
FOR
RIDERS
idahostar.org
Cover design by: Paulll1e Davis, Graphic Altist, lTD
111e
Idaho Transportation Deparbnent (lTD) is committed to compliance with 1itle VI
of
the Civil Rights
Act
of
1964
and
all related regulations
and
directives. lTD assures that
no
person
shaD
on the grounds
of
race, color,
national origin, gender, age,
or
disability be excluded from participation
in,
be
denied the benefits of,
or
be
othenvise subjected
to
discrimination under any
lTD
service, program,
or
activity.
111e
department also assures
that every effort will
be
made to prevent discrimination through the impacts
of
its programs, policies,
and
activities on minority
and
low-income populations.
In
addition, the department will take reasonable steps to
provide meaning/ill access to services
for
persons with limited English proficiency.
Idaho
Motorcycle
Operator's
Manual
March 2014
Published
by
The Idaho Transportation
Department
Division
of
Motor
Vehicles
P.O. Box 7129
Boise,
ID
83707-1129
Phone #
Fax #
Web Address
(208) 334-8735
(208) 334-8739
dmv.idaho.gov
Th
is handbook paraphrases the language
of
the
Idaho Mot
or
Vehicle
Code. Courts go
by the
actual language
of the
code, not this text.
01-
968130-
3
PREFACE
Operating a motorcycle* safely in traffic requires special skills and
knowledge. The purpose
of
this manual is
to
educate Idaho motorcycle
operators and to convey essential safe-driving information that will help
them avo id acc i
dents
whil e
safe
ly
operating
a motorcyc le.
Wh
il e
designed
for
the
novice,
all
motorcyclists
can
benef
it
from
the
information contained in this manual.
The Idaho Transportation Department used information provided by the
Motorcycle
Safety Foundation (MSF)
to
compile the Idaho Motorcycle
Operators
Manual
and written tests.
The
Nat
ional Pub lic
Serv
ices
Research
Inst
itute, under contract to the
Nat
ional Hi
ghway
Safety
Administration, developed the original Motorcycle Operators Manual.
The
Idaho Transportation Department also received assistance from a
certified
MSF Motorcycle Chi
ef
Instructor, representatives from the
Department
of
Education, the Idaho S TAR Motorcycle Safety Program,
and a member
of
the Idaho Coalition for Motorcycle Safety.
These
individuals used their own riding experience, and the Motorcycle Safety
Foundation's
outlines used by other states, to assi
st
the department in
developing a motorcycle program for the state
of
Idaho.
The Motorcycle
Safety Foundation helped Idaho and 40 other states
to
adop t the
Motorcycle
Operators
Manual
for
use
in their licensi
ng
programs. In addition, Idaho and 28 other states utili
ze
the related
motorcycle written tests.
Improved licensing along wi
th
quality motorcycle rider education and
increased public awareness have the potential
to
reduce the number and
severity
of
motorcycle crashes.
* A motorcycle means every motor vehicle having a seat
or
saddle
for
the
use
of
the rider
and
designed to travel on not more than three wheels
in
contact with the ground, but er:cluding a tractor
and
moped.

Do
you need a motorcycle endorsement?
If
you operate any motorized vehicle on public
roadways, Idaho law requires you to have a valid
driver's license and acceptable
proof
ofliability
insurance.
If
you operate a motorcycle on public
roadways, you will also need to add a motorcycle
endorsement
to
your Idaho driver's license.
Review
the
definitions below to see
if
the
vehicle you op
erate
is a
motorcycle or motor-driven cycle
that
req
uir
es you to have a motorcycle
e
nd
orseme
nt
on your
dri
ver's
license.
Definitions:
• "Motorcycl
e"
[49-114(11)] every motor vehicle having a seat or saddle for
the use
of
the rider and designed to travel on not more than three (3) wheels in
contact with the ground, that meets the federal motor vehicle safety standards
(FMVSS) as originally designed, and includes a converted motorbike, but does
not include a motor-driven cycle, a motorbike, a tractor or a moped. Motorcycles require a motorcycle endorsement
"Motorbike"
[49-114(10)] means a vehicle as defmed in [67-7101(9)] -
means any
self
-propelled two (2) wheeled motorcycle or motor-driven cycle,
excluding tractor, designed for or capable
of
traveling
off
developed roadways
and highways and also referred to as trail bikes, enduro bikes, trials bikes,
motocross bikes or dual purpose motorcycles.
Such vehicle shall be titled and
may be approved for motorcycle registration, upon certification by the owner
of
the installation and use
of
conversion components that make the motorbike
compliant with
FMVSS.
If
converted, operation on public roads requires a
motorcycle endorsement.
"Motor
-Dri
ven Cycl
e"
[49-114(13)] means a cycle with a motor that
produces five (5) brake horsepower or less as originally manufactured that
meets federal motor vehicle safety standards as originally designed, and does
not
include
mopeds.
Such
vehicles
shall
be
titled
and a motorcycle
endorsement
is
required for its operation.
"Motor Scooter" and
"Scooter"
- generic terms, not defined
in
the Idaho
traffic law manual, referring to a wide variety
of
motorized cycles and toys. A
two or three-wheeled vehicle
of
any size, manufactured for use on public
roadways
and
sold by a licensed dealer
is
probably a motorcycl
e.
A vehicle
with two or more wheels n
ot
manufactured for use on public roadways
and
sold
by retail variety stores
is
probably a toy.

How Do You Get a Motorcycle Endorsement?
• You must pass a written knowledge test and a motorcycle skills test.
• Successfully completing an approved motorcycle rider training
course will waive the requirement for the motorcycle skills test.
• If you are under 21, you are required to successfully complete an approved
motorcycle rider training course instead of the motorcycle skills test.
• “Moped” [49-114(9)] means a limited-speed motor-driven cycle having:
(a) Both motorized and pedal propulsion that is not capable of
propelling the vehicle at a speed in excess of thirty (30) miles per
hour on level ground, whether two (2) or three (3) wheels are in
contact with the ground during operation. If an internal
combustion engine is used, the displacement shall not exceed fifty
- (50) cubic centimeters and the moped shall have a power drive
system that functions directly or automatically without clutching
or shifting by the operator after the drive system is engaged; or
(b) Two (2) wheels or three (3) wheels with no pedals, which is
powered solely by electrical energy, ha s an automatic
transmission, a motor which produces less than two (2) gross
brake horsepower, is capable of propelling the device at a
maximum speed of not more than thirty (30) miles per hour on
level ground, and as originally manufactured, meets federal motor
vehicle safety standards* (FMVSS) for motor-driven cycles.
(*Vehicle must have FMVSS labeling certifying compliance with
these National Highway Traffic Safety Administration (NHSTA)
requirements.) A moped is not required to be titled and no
motorcycle endorsement is required of its operator.
• “Segway” is considered an “Electric personal assistive mobility device”
[49-106(1)] - a self-balancing two (2) non-tandem wheeled device designed to
transport only one (1) person, with an electric propulsion system limiting the
maximum speed to fifteen (15) miles per hour or less.
• “Pedestrian” [49-117(5)] means any person afoot and any person operating
a wheelchair, motorized wheelchair or electric personal assistive mobility
device.
• “Motorized Toys” are not considered mopeds, and are not manufactured for
use on streets. Adding lights and a seat to any of these vehicles still does not
make them street legal. ITD policy prohibits the titling and registration of
vehicles not manufactured for use on highways, so these cannot legally be
operated on roadways.

Ul
~
:z
~
~
~
0
Cl)
VEHICLE
~
~
u
15
o::l
~
f-.
~
cn!iJ
el
Cl)
~
~
~
~~
u
t5
do
:::E
Motorcycle, regardless
of
engine size
or
description
Originally manufactured
to
meet FMVSS requirement - •
for operation as a street legal vehicle.
y y y y y
FMVSS Labeling required.
Motorbike,
50
cc's
or
larger
Not originally manufactured as a
y
N
y
NIA NIA
street legal vehicle *
--·
Motorbike, Jess than 50 cc's
Effective July I, 2008 N N N NIA NIA
Not originally manufactured as a
--·
street legal vehicle *
Motor-Driven Cycle Ejfecti1•e July I, 2008
--·
Vehicle is classified as a motorcycle FMVSS
y y y y y
Labeling
required
--·
Moped, > 30 MPH, > 50 CCs Vehicle is classified
as a motorcycle
y y y y y
--·
Moped, $ 30 MPH, $ 50 CCs
Vehicle is not classified as a motorcycle
FMVSS
Labeling
may be
required-
see
--·
N N
y y
N
definition.
Segway
--·
N N N N N
Motorized Toys not manufactured for street use
CANNOT
be legally
--·
operated on any public
roadway or sidewalk.
*Driver's
license and Motorcycle endorsement are required
ifthe
motorbike is
converted and operated on public roads.

EARNING YOUR LICENSE
ENDORSEMENT AND TEST FEES................................... 1
PREPARING TO RIDE
RIDING GEAR...................................................................... 2
Helmet Use........................................................................ 2
Helmet Selection............................................................... 3
Eye and Face Protection.................................................... 3
Clothing............................................................................. 4
KNOW YOUR MOTORCYCLE.......................................... 6
The Right Motorcycle for You........................................... 6
Required Equipment.......................................................... 6
Borrowing and Lending..................................................... 7
Get Familiar with the Motorcycle Controls....................... 7
Check Your Motorcycle..................................................... 8
KNOW YOUR RESPONSIBILITIES................................. 10
RIDE WITHIN YOUR ABILITIES
BASIC VEHICLE CONTROL............................................. 11
Body Position.................................................................... 11
Shifting Gears.................................................................... 12
Braking.............................................................................. 13
Turning.............................................................................. 15
KEEPING YOUR DISTANCE............................................. 17
Lane Positions................................................................... 17
Following Another Vehicle............................................... 18
Being Followed................................................................. 19
Passing and Being Passed................................................. 19
Lane Sharing..................................................................... 21
Merging Cars..................................................................... 21
Cars Alongside.................................................................. 22
“SIPDE”.................................................................................. 23
Table of Contents

INTERSECTIONS................................................................. 25
Blind Intersections............................................................. 26
Stop Signs and Signals...................................................... 26
Traffic Control Signals...................................................... 26
Passing Parked Cars.......................................................... 27
Parking at the Roadside..................................................... 27
SEE AND BE SEEN............................................................... 28
Clothing............................................................................. 28
Headlight........................................................................... 28
Signals............................................................................... 28
Brake Light........................................................................ 29
Using Your Mirrors............................................................ 29
Head Checks...................................................................... 30
Horn................................................................................... 30
Riding at Night.................................................................. 31
CRASH AVOIDANCE........................................................... 32
Quick Stops....................................................................... 32
Front-Wheel Skids............................................................. 32
Rear-Wheel Skids ............................................................. 32
Swerving or Turning Quickly............................................ 33
Cornering........................................................................... 34
HANDLING DANGEROUS SURFACES........................... 35
Uneven Surfaces and Obstacles......................................... 35
Slippery Surfaces............................................................... 36
Railroad Tracks, Trolley Tracks, Pavement Seams........... 37
Grooves and Gratings........................................................ 37
MECHANICAL PROBLEMS.............................................. 38
Tire Failure........................................................................ 38
Stuck Throttle.................................................................... 38
Wobble............................................................................... 38
Drive Train Problems........................................................ 39
Engine Seizure................................................................... 39
ANIMALS............................................................................... 40
FLYING OBJECTS............................................................... 40
GETTING OFFTHE ROAD................................................ 40

CARRYING PASSENGERS AND CARGO........................ 41
Equipment......................................................................... 41
Instructing Passengers....................................................... 41
Riding with Passengers...................................................... 42
Carrying Loads.................................................................. 42
GROUP RIDING.................................................................... 43
Keep the Group Small....................................................... 43
Keep the Group Together................................................... 43
Keep Your Distance........................................................... 44
BEING IN SHAPE TO RIDE
WHY THIS INFORMATION IS IMPORTANT................. 46
Alcohol and Other Drugs in Motorcycle Operation.......... 46
Alcohol in the Body........................................................... 47
Blood Alcohol Concentration (BAC)................................. 47
Alcohol and the Law.......................................................... 48
Consequences of Conviction............................................. 48
Alcohol Test Refusal.......................................................... 49
Administrative License Suspensions................................. 49
Minimize the Risks............................................................ 50
Make an Intelligent Choice................................................ 50
Step in to Protect Friends.................................................. 50
FATIGUE................................................................................. 51
PROFESSIONALTRAINING INFORMATION............... 51
SMART RIDER COMMITMENTS...................................... 54
KNOWLEDGE TEST (Sample Questions).......................... 55
MOTORCYCLE SKILL TEST............................................. 56
ANSWERS TO SAMPLE QUESTIONS.............................. 61

Safe riding requires a combination of knowledge and skill. Objectively
assessing your own riding skills and knowledge is difficult at best, and it’s even
harder for friends and relatives to be totally honest about your riding skills.
Taking a motorcycle knowledge test is the best way to determine if you have
the minimum knowledge necessary to operate a motorcycle safely in traffic.
Knowledge test questions are based on information, practices, and concepts
found in this manual. In order to pass the test, you must know and understand
road rules and safe riding practices. Motorcycle riding skills tests are conducted
in a controlled, off-street area.
Any person applying for a motorcycle endorsement or transferring or renewing
a license expired for 25 months or longer will be required to pass both a written
knowledge test and motorcycle skills test*. If you are surrendering an out-ofstate or foreign license (not expired over one year) that has a motorcycle
endorsement, you are required to pass a written motorcycle knowledge test.
Any person under 21 will be required to take a written knowledge test and
successfully complete an approved motorcycle rider training course. It is a good
idea to take a course even if you are over 21.
* Successful completion of an approved motorcycle rider training course may
waive the requirement for the riding skills test, if completed within the year
prior to adding the endorsement to your license.
A motorcycle instruction permit is available to anyone who holds a valid Idaho
Class A, B, C, or D license. This permit is valid for 180 days and allows
motorcycle operators to practice riding under the following restrictions.
• Daylight riding only
• No freeway riding
• No passengers
You must pass the written motorcycle knowledge test before applying for an
instruction permit. If you add the motorcycle endorsement to your Idaho
driver’s license during the instruction permit period, the one-time motorcycle
endorsement fee will be waived. Once the instruction permit has expired, you
must pay the endorsement fee.
You will have to pay one or more of the following fees in addition to the cost of
your regular license:
Motorcycle “M” Endorsement: $15.00 (one-time fee)
Motorcycle Instruction Permit: $15.00 (valid for 180 days)
Earning Your License
For information and to register for a rider course nearest you, contact
Idaho STAR online at idahostar.org or toll-free (888) 280-STAR (7827)
1

Motorcycle Skills Test: $10.00 (paid to skills tester)
Motorcycle Written Test: $3.00 (paid to county)
If you fail a written and/or skills test, you must wait three days to retest and pay
the fee again.
What you do before you start a trip goes a long way toward determining
whether or not you’ll get where you want to go safely. Before taking off on any
trip, a safe rider makes a point to:
• Wear the right gear.
• Check the motorcycle equipment.
• Become familiar with the motorcycle.
• Be a responsible rider.
RIDING GEAR
When you ride, your gear is “right” if it protects you. In any crash, you have a
far better chance of avoiding serious injury if you wear:
• An approved helmet.
• Face or eye protection.
• Protective clothing.
Helmet Use
Crashes can occur, particularly among untrained beginning riders. And one out
of every five motorcycle crashes results in head or neck injuries. Head injuries
are just as severe as neck injuries, and are more common. Accident analysis
show that head and neck injuries account for a majority of serious and fatal
injuries to motorcyclists. Research shows that, with few exceptions, head and
neck injuries are reduced by properly wearing an approved helmet. Idaho law
requires all persons under the age of 18 to wear a DOT-approved protective
helmet while riding on or operating a motorcycle or ATV on or off road.
Some riders don’t wear helmets because they think helmets will limit their view
to the sides. Others wear helmets only on long trips or when riding at high
speeds. Consider the following:
• A DOT-approved helmet lets you see as far to the sides as necessary. A
study of more than 900 motorcycle crashes, where 40% of the riders
wore helmets, did not find even one case in which a helmet kept a rider
from spotting danger.
• Most crashes happen on short trips (less than five miles long), just a few
minutes after starting out.
Preparing To Ride
2
• Most moto rcycle crashes occur
at
less than
30
mph. At these speeds,
helmets can cut both the number and the severity
of
head injuries by half
No matter what the speed, helmeted riders are three times more
li
kely to survive
head injuries than those not wearing helmets
at
the time
of
the crash. The single
most important thing you can do to improve your chances
of
surviving a crash
is to wear a securely-fastened,
approved helm
et
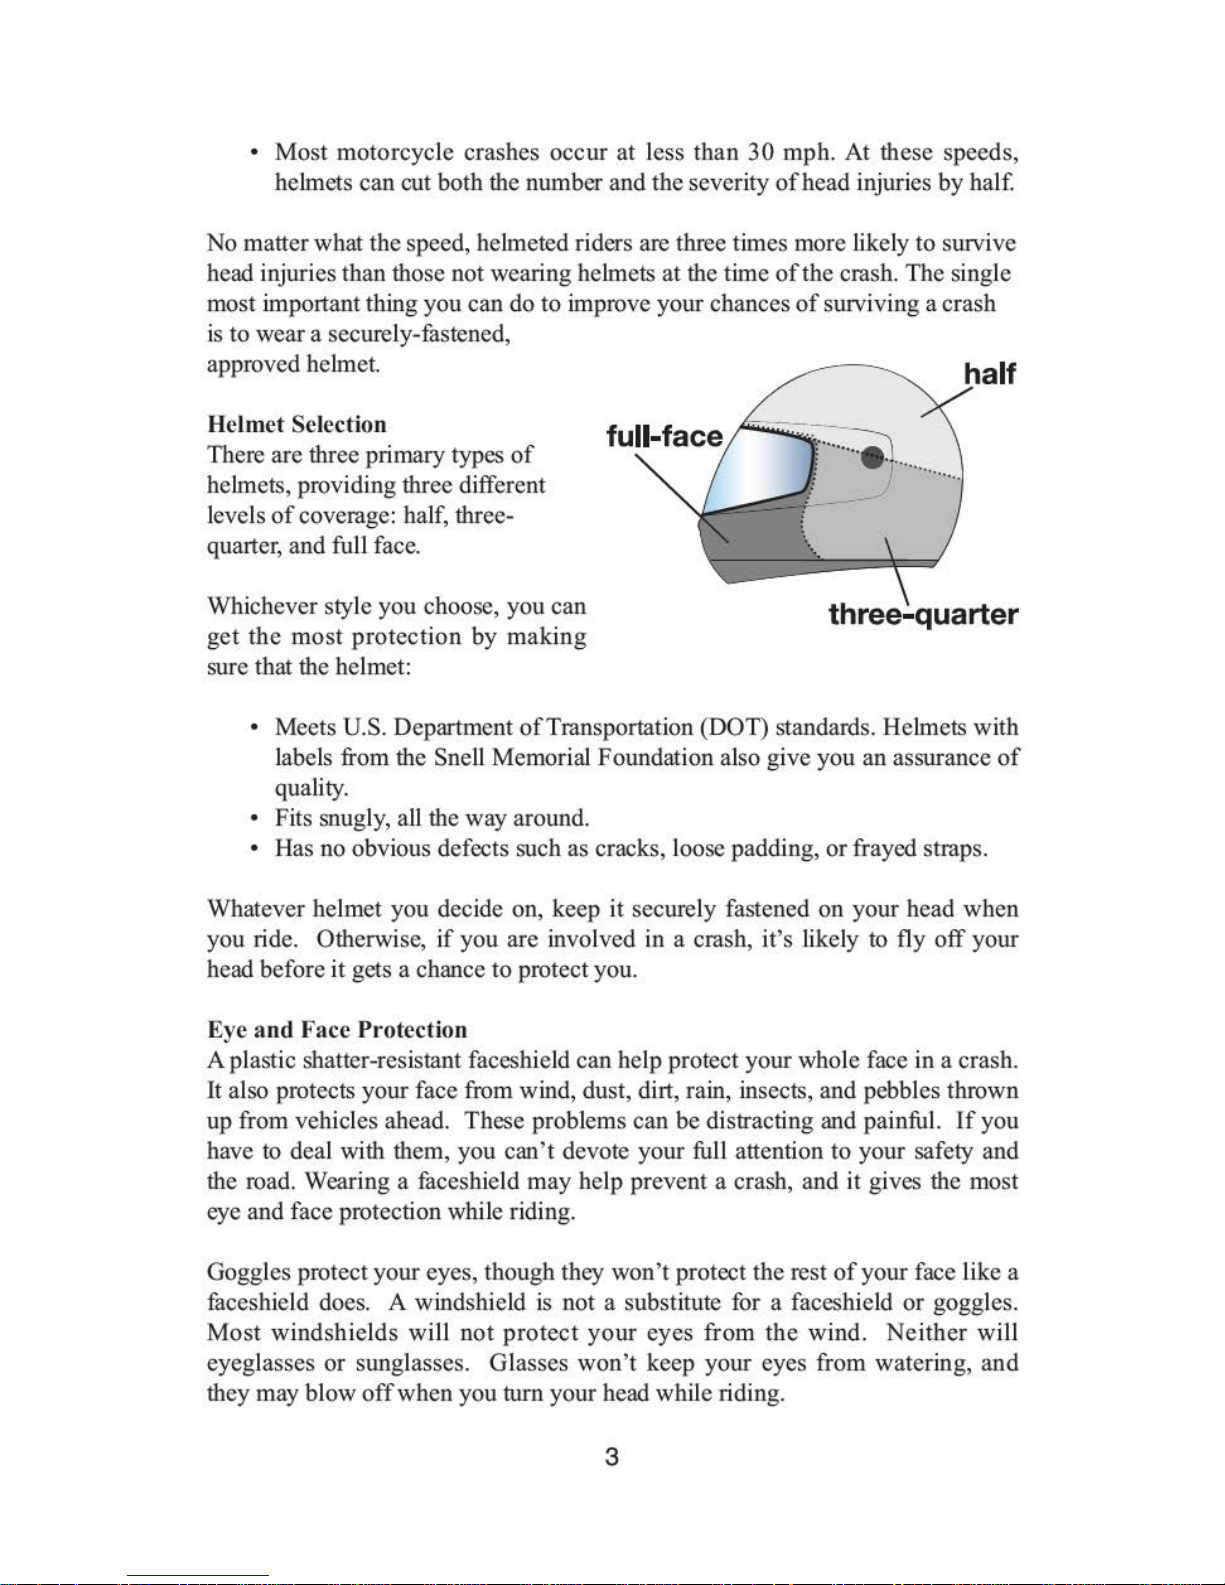
Helmet Selection
There are three primary types
of
helmets, providing three different
levels
of
coverage: hal
f,
three-
quarter, and fu ll face.
Whichever style you choose, you can
get
the
most
protect
ion by maki
ng
sure that the helmet:
three-quarter
• Meets U.S. Department ofTransportation (DOT) standards. Helmets with
labels from the
Sne
ll
Memori
al
Foundation also give you an assurance
of
quality.
• Fits snugl
y, all
the way around.
• Has no obvious defects such as cracks, loose padding,
or
frayed straps.
Whatever helmet you decide on, keep it securely fastened on your head when
you
ri
de. Otherwise, if you are involved in a crash, it's likely
to
fly
off
your
head before it gets a chance to protect you.
Eye
and
Face Protection
A plastic shatter-resistant faceshield can help protect your whole face in a crash.
It al
so
protects your face from wind, dust, dirt, rain, insects, and pebbles thrown
up from vehicles ahead. These problems can be distracting and
pa
inful.
If
you
have
to
deal wi
th
them, you
can't
devote your full attention to your safety and
the road. Wearing a faceshield may help prevent a crash, and it gives the most
eye and face protection
wh
ile riding.
Goggles protect your eyes, though they won't protect the rest
of
your face like a
faceshield does. A windshield is not a substitute for a faceshield
or
goggles.
M
ost
windshields will not
protect
your
eyes from
the
wind.
Ne
ither will
eyeglasses
or
sunglasses. Glasses
won't
keep your eyes from watering, and
they may blow
off
when you
turn
your head while riding.
3

To be effective, eye or face protection must:
• Be free of scratches.
• Be resistant to penetration.
• Give a clear view to either side.
• Fasten securely, so it does not blow off.
• Permit air to pass through, to reduce fogging.
• Permit enough room for eyeglasses or sunglasses, if needed.
Tinted eye protection should not be worn at night or any other time when little
light is available.
Clothing
The right clothing protects you in a crash. It also provides comfort, as well as
protection from heat, cold, debris, and hot and moving parts of the motorcycle.
It can also make you more visible to others.
• Jacket and pants should cover your arms and legs completely. They should
fit snugly enough to keep from flapping in the wind, yet loosely enough to
move freely. Leather is very popular and offers good protection. Sturdy
synthetic material provides a lot of protection as well. Wear a jacket even in
warm weather, to prevent dehydration. Many are designed to protect without
getting you overheated, even on summer days. Some riders choose jackets
and pants with rigid “body armor” inserts in critical areas for additional
protection.
• Boots or shoes should be high and sturdy enough to cover your ankles and
give them support. Soles should be made of hard, durable, slip-resistant
material. Choose boots or shoes with short heels so they do not catch
on rough surfaces. Tuck laces in so they won’t catch on your motorcycle.
• Gloves allow a better grip and help protect your hands in a crash. Your
gloves should be made of leather or similar durable material.
• Hearing Protection - The roar of engines and the rushing wind is
exhilarating, but sustained exposure, even in a good-fitting helmet, can result
in hearing loss. Earplugs are cheap and disposable – keep a supply handy and
use them! Tests show that earplugs can prevent hearing loss by reducing
sound levels by 30 decibels. Whether you choose disposable foam plugs or
reusable custom molded devices, be sure you adhere to state laws regarding
hearing protection.
In cold or wet weather, your clothes should keep you warm and dry, as well as
protect you from injury. You cannot control a motorcycle well if you are numb
from the cold. Riding for long periods in cold weather can cause severe chill
and fatigue. A winter jacket should resist wind and fit snugly at the neck,
wrists, and waist. Good-quality rainsuits designed for motorcycle riding resist
tearing apart or ballooning up at high speeds.
4

So~ne
Ride
..
s
have
High
Visibility
I
But
you'
..
e
no
ISP
Moto
..
Office
..
Get
visible!
Leaa"nhowat
www.RighViz.oa"g.
5

KNOW YOUR
MOTOR
CYC
LE
There are plenty
of
things on the highway that can cause you trouble. Your
motorcycle should not be one
of
them. To make sure that your motorcycle
won't l
et
you down:
• Start with the right motorcycle for you.
• Read the owner's manual first
•
Be fam
ili
ar with the motorcycle controls.
• Check the motorcycle before every ride.
• Keep it
in
safe riding condition between rides.
•
Avo
id add-ons and modifications that make your motorcycle harder to
handle.
Th
e Rig
ht
Motorcycle For You
First, make sure your motorcycle is right for you. It should "fit'' you. Your fe.
et
should reach t
he
ground while you are seated on the motorcycle, and t
he
controls should be easy to operate. Smaller motorcycles are usually easi
er
for
beginners to operate.
Re
quir
ed
Equipment
Idaho l
aw
requires all motorcycles
operated
on Idaho roads to have
the
fo
llowing:
• Br akes: The law requires a brake on at least one whee
l.
It can be
operated by hand or by
foot
• Fenders: All motorcycles must have fenders on both wheels that
extend in
fu
ll width from a point just forward
of
the center
of
the tire to
a point
no
t more than 20" above the surface
of
the highway.
• P
asse
nger Se
at and
Footrests: Motorcyclists are prohibited from
carrying passengers
un
less a permanently attached seat and footrests
are provided for the passenger. Passenger footrests must be designed
exclusively for use by the passenger.
• Headlight: Motorcycles must have a headlight suffic i
ent
to
reveal a
person or
veh
icle not less than 100 fe.
et
ahead when traveling 25 mph
or less; not less than
200 fe.
et
when traveling 25-35 mph; and not less
than
300 fe.et when traveling more than 35 mph.
• Helme
t:
Any person under the
age
of
18 must wear a prot
ective
6

helmet while operating or riding on a motorcycle or ATV, on or off
road.
• Horn: You must have a horn that can be heard up to 200 feet away.
• Insurance: You must have (and carry on your person) liability
insurance in an amount of not less than $25,000.
• Mirror: Motorcycles must have a mirror that provides a view of the
highway for at least 200 feet to the rear.
• Muffler: Motorcycles must have a muffler that does not increase
engine noise to a level above that of the muffler originally installed by
the motorcycle manufacturer.
• Brake Light: A red stop light that comes on when you work the brakes
must be visible for 100 feet to the rear during normal sunlight.
• Taillight: Motorcycles must have one red taillight visible for 500 feet
to the rear.
• Reflector: motorcycles and motor-driven cycles shall have at least one
(1) rear reflector.
Borrowing and Lending
Borrowers and lenders of motorcycles, beware. Crashes are fairly common
among beginning riders — especially in the first months of riding. Riding an
unfamiliar motorcycle adds to the problem. If you borrow a motorcycle, get
familiar with it in a controlled area and make sure it is insured, because you are
liable. If you lend your motorcycle to friends, make sure they are licensed and
know how to ride before allowing them out into traffic.
No matter how experienced you may be, ride extra carefully on any motorcycle
that’s new or unfamiliar to you. More than half of all crashes occur on
motorcycles that have been ridden by the operator for less than six months. It
takes time to adjust, so give yourself a greater margin for errors.
Get Familiar with the Motorcycle Controls
Make sure you are completely familiar with the motorcycle before you take it
out on the street. This is particularly important if you are riding a borrowed
motorcycle. If you are going to use an unfamiliar motorcycle:
• Review the owner’s manual.
• Make all the checks you would on your own motorcycle.
• Find out where everything is, particularly the turn signals, horn,
headlight switch, fuel-supply valve, and engine cut-off switch (usually
located on right hand grip). Learn to operate these items without having
to look for them.
• Know the gear pattern. Work the throttle, clutch, and brakes a few times
before you start riding. All controls react a little differently.
• Ride very cautiously. Accelerate gently, take turns more slowly, and
leave extra room for stopping.
7
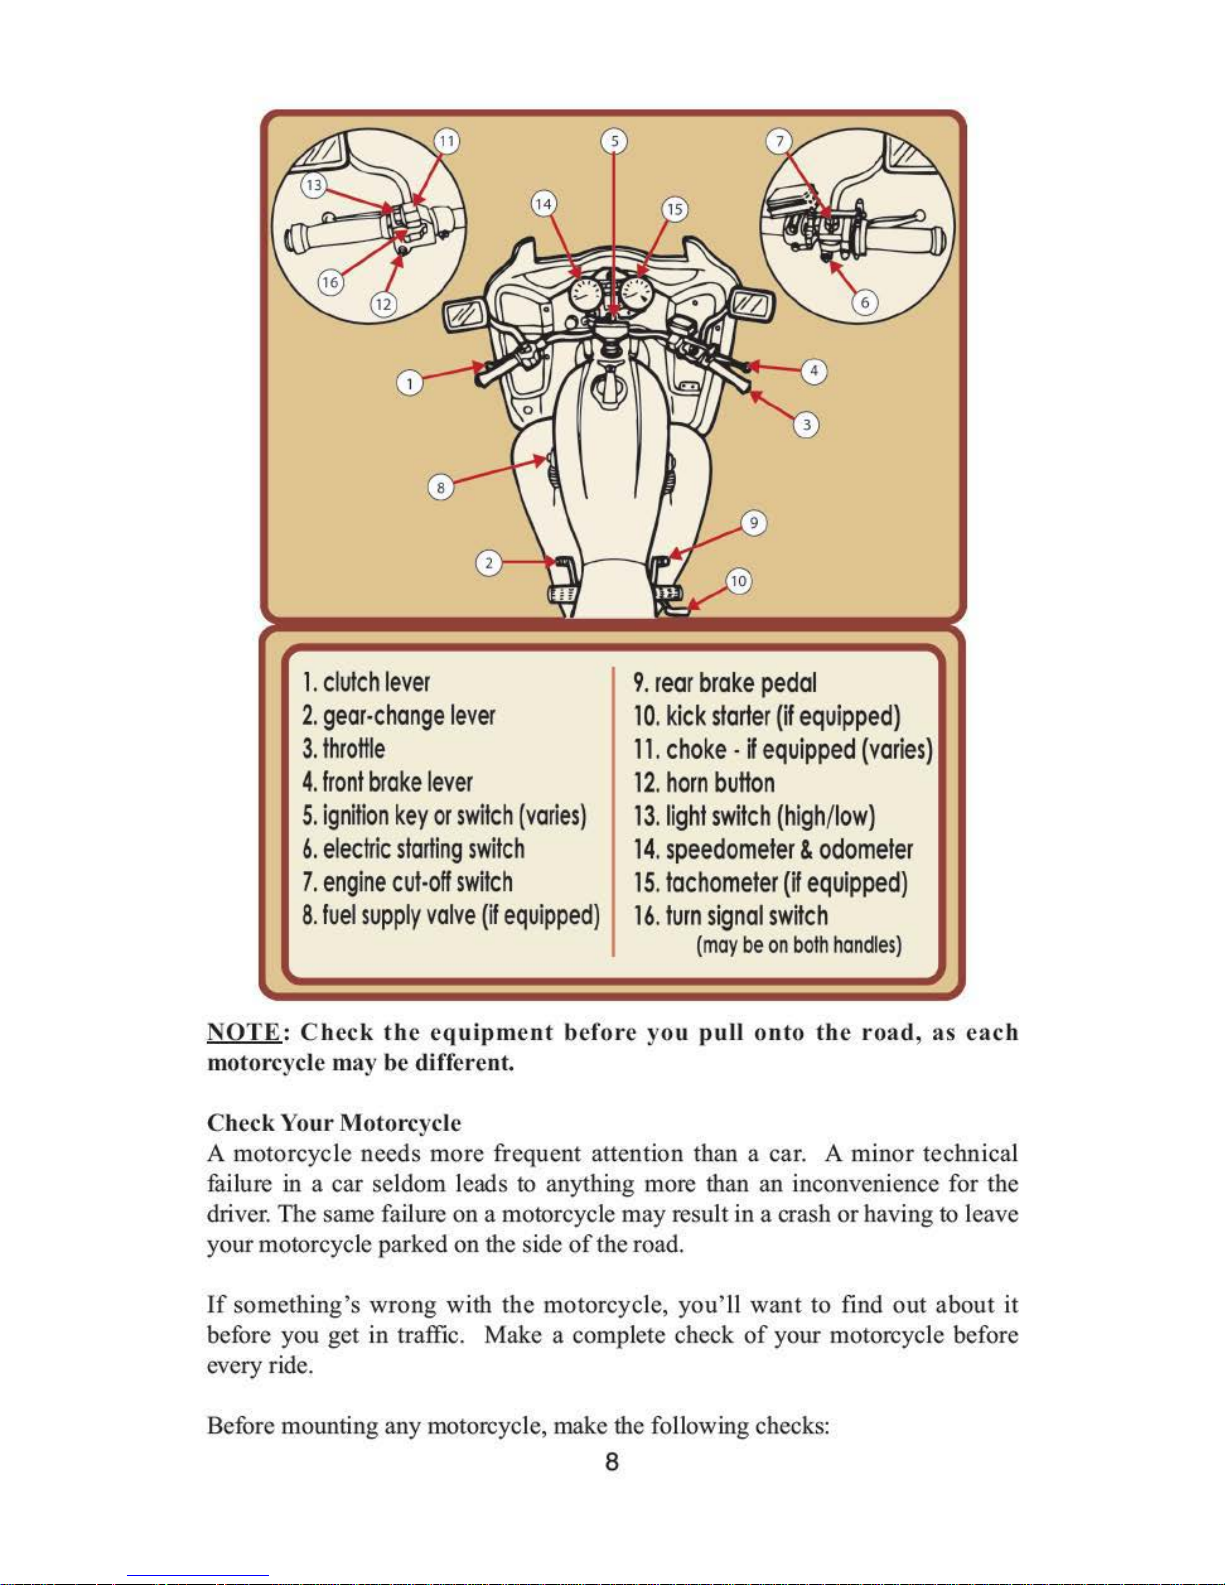
1.
clutch
lever
9.
rear
brake
pedal
2.
gear-change
lever
10. kick
starter
(if
equipped)
3.
throttle
11.
choke· W equipped
(varies)
4.
front
brake
lever
12. horn
button
5.
ignition
key
or
switch
(varies)
13.1ight
switch (high/
low)
6.
electric
starting
switch
14. speedometer & odometer
7.
engine
cut-off
switch
15. tachometer
(H
equipped)
8.
fuel supply
valve
(if
equipped
)
16. turn
signal
switch
(may
be
on
both
handles)
NOTE: Check
the
equipment
before
you
pull
onto the
road,
as
each
motorcycle ma y be
diff
erent.
Check
Your Motorcycle
A motorcycle needs more frequent attention than a car. A minor technical
failure in a car seldom leads
to
anything more than an inconvenience for the
driver.
The
same failure on a motorcycle may result in a crash
or
having
to
leave
your motorcycle parked on the side
of
the road.
If
something's wrong with the motorcycle, you'll
want
to find
out
about
it
before you get
in
traffic. Make a complete check
of
your motorcycle before
every ride.
Before mounting any motorcycle, make the following checks:
8

9
• Tires — Check the air pressure, general wear, and tread.
• Fluids — Oil and fluid levels. At a minimum, check hydraulic fluids and
coolants weekly. Look under the motorcycle for signs of fluid leaks.
• Headlights and Taillight — Check them both. Test your switch to make
sure both high and low beams are working.
• Turn Signals — Turn on both right and left turn signals. Make sure all
four lights are working properly.
• Brake Light — Try both brake controls, and make sure each one turns
on the brake light.
Once you have mounted the motorcycle, complete the following checks before
starting out:
• Clutch and Throttle — Make sure they work smoothly. The throttle
should snap back to the idle position when you let go. The clutch should
feel tight and operate smoothly.
• Mirrors — Clean and adjust both mirrors before starting. It’s difficult to
ride with one hand while you try to adjust a mirror. Adjust each mirror
so you can see the lane behind and as much as possible of the lane next to
you. When properly adjusted, a mirror may show the edge of your arm
or shoulder — but what’s more important is seeing the road behind and
to the side of you.
• Brakes — Try the front and rear brake levers one at a time. Make sure
each one feels firm and holds the motorcycle when the brake is fully
applied.
• Horn — Try the horn. Make sure it works.
• Fuel Supply Valve — If your motorcycle has one, make sure the valve is
open. Your motorcycle may start with the fuel still in the lines, but will
stall after the lines are empty.
In addition to the checks you should make before every trip, check the wheels,
cables, and fasteners at least once a week.
2. More than half of all crashes:
A. Occur at speeds greater than 35 m.p.h.
B. Happen at night.
C. Are caused by worn tires.
D. Involve riders who have ridden their motorcycles less than six months.
1. A plastic shatter-resistant face shield:
A. Is not necessary if you have a windshield.
B. Only protects your eyes.
C. Helps protect your whole face.
D. Does not protect your face as well as goggles.
Answers to sample questions are located on last page.

10
KNOW YOUR RESPONSIBILITIES
“Accident” implies an unforeseen event that occurs without anyone’s fault or
negligence. Most often in traffic, that is not the case. In fact, most people
involved in a crash can usually claim some responsibility for what takes place.
Consider a situation where someone tries to squeeze through an intersection on
a yellow light that is turning red. Your light turns green. You pull into the
intersection without checking for possible latecomers. That is all it takes for the
two of you to tangle. It was the other driver’s responsibility to stop. And it was
your responsibility to look before pulling out. Neither of you held up your end
of the deal. Just because someone else is the first to start the chain of events
leading to a crash, it doesn’t leave any of us free of responsibility.
As a rider you can’t be sure that other operators will see you or yield the right of
way. To lessen your chances of a crash occurring:
• Be visible — wear proper clothing, use your headlight (set on dim during
daylight hours), and ride in the best lane position to see and be seen.
• Communicate your intentions — use the proper signals, brake light,
and lane position.
• Maintain an adequate space cushion — allow extra space when
following, being followed, lane sharing, passing, and being passed.
• Search your path of travel 20 seconds ahead.
• Identify and separate multiple hazards in your path of travel.
• Be prepared to act — remain alert and know how to use proper crash-
avoidance skills.
Blame doesn’t matter when someone is injured in a crash. There is rarely a
single cause of any crash. The ability to ride aware, make critical decisions, and
carry them out separates responsible riders from all the rest. Remember, it is up
to you to keep from being the cause of, or an unprepared participant in, any
crash.

Ride Within Your Abilities
Th
is manual cannot teach you how to contro l direction, speed, or balance.
That
's
something you can learn only through practice and proper training. But
control begins with knowing your abilities, riding wi
th
in them, and obeying the
rules
of
the road.
BA
SIC VEHI C
LE
CON
TROL
Body Position
To
control a motorcycle well:
• Se
at
- Sit far enough forward so that arms are slightly bent when you
ho
ld the handlegrips. Bending your arms perm i
ts
you
to
press on the
handlebars without having
to
stretch.
•
Hand
s - Hold the handgri
ps
firmly to keep your grip
over
rough
surfaces.
Start wi
th
your right wri
st
flat. Th is will help you keep from
accidentally using too much throttl
e-
especially if you need to reach for
the brake suddenl
y.
Also, adjust the handlebars so your hands are even
wi
th
or below your elbows. Th is permits you to use the proper muscles
for preci
se
steering.
RIGHT
WRONG
• Kn
ees-
Keep your knees against the gas tank to help you keep your
balance as the motorcycle turns.
• Feet - Keep your fe.
et
firmly on the footpegs to maintain balance.
D
on't
drag your fe.et.
If
your foot catches on someth ing, you can be
injured and it could affect your control
of
the motorcycle. Keep your fe.
et
near the controls so you can get
to
them quickly if needed. Also, don't
l
et
your toes po int downward - they may get caught between the road
and the footpegs.
• Pos
tur
e - Sit so you can use your arms to steer the motorcycle rather
than to
ho
ld yourself up.
11

Shifting Gears
There is more to shifting gears than simply getting the motorcycle to pick up
speed smoothly. Learning to use the gears correctly when downshifting,
turning, or starting on hills is important for safe motorcycle operation.
The gearshift lever is located in front of the left footrest and is operated by the
left foot. To shift “up” to a higher gear, position your foot under the shift lever
and lift. To downshift, press the shift lever down. The shift lever changes one
gear each time it is lifted or pressed down. Whenever the lever is released,
spring loading returns it to center, where the mechanism resets for the next shift
up or down. A typical gear pattern is 1-N-2-3-4-5. The N is for neutral, which is
selected by either a “half lift” from 1st gear or a “half press” from 2nd gear.
Most motorcycles have five gears, but some have four or six gears.
As your motorcycle increases speed, you will need to shift up to a higher gear.
Shift up well before the engine RPM reaches its maximum recommended speed.
As a general rule, shift up soon enough to avoid over-revving the engine, but
not so soon to cause the engine to lug.
When upshifting, use a 3-step process:
1) roll off the throttle as you squeeze the clutch lever,
2) lift the shift lever firmly as far as it will go,
3) smoothly ease out the clutch and adjust the throttle.
Once the shift is completed, release the shift lever to permit it to reset for the
next shift. You should shift down through the gears with the clutch as you slow
or stop, and can also shift down when you need more power to accelerate.
Make certain you are riding slowly enough when you shift into a lower gear. If
not, the motorcycle will lurch, and the rear wheel may skid. When riding
downhill or shifting into first gear you may need to use the brakes to slow
enough before downshifting safely.
When downshifting, use a 3-step process:
1) roll off the throttle as you squeeze the clutch lever,
2) press the shift lever down firmly,
3) ease out the clutch lever as you adjust the throttle.
Once the shift is completed, release the shift lever to permit it to reset for the
next shift. Rolling on the throttle slightly while smoothly easing out the clutch
can help the engine come up to speed more quickly and make the downshift
smoother. Shifting to a lower gear causes an effect similar to using the brakes.
This is known as engine braking. To use engine braking, shift down one gear at
a time and ease out the clutch through the friction zone between each downshift.
Keep the clutch in the friction zone until the engine speed stabilizes. Then ease
12
 Loading...