

Idaho JBAIDS User manual

JBAIDS
System Manual
The JBAIDS Instrument is controlled for export under the International Traffi c in Arms
Regulations (ITAR), administered by the U.S. Department of State, Directorate of
Defense Trade Controls (DDTC), and may not be exported or transferred to any foreign
national without prior approval of the DDTC.

This document is used solely for the purpose of JBAIDS
Instrument Operation. This document shall not be disclosed outside of the U.S. Government and shall not be
duplicated, used, or disclosed in whole or in part for any
purpose.
JBAIDS System Manual - JRPD-PRT-0001 - Rev 03 - June 1, 2006
© Copyright 2006, Idaho Technology Inc. All rights reserved.
Printed in the United States of America
The information contained in this document is subject to change without notice.
Idaho Technology makes no warranty of any kind with regard to this material, including, but not limited to the implied warranties of merchantability
and fitness for a particular purpose. Idaho Technology shall not be liable for errors contained herein or for incidental consequential damages in
connection with the furnishing, performance or use of this material.
The JBAIDS System, JBAIDS Software, and reagent kits are covered by US Patent Nos. 6,787,338; 6,387,621; 6,245,514; 6,174,670; 6,197,520;
6,303,305; 6,503,720; 6,569,627; and 6,730,501 and their foreign counterparts and other pending patents.
Idaho Technology logo is a trademark of Idaho Technology Inc.
Names of products and brands appearing in this manual are trademarks or registered trademarks of their respective owners.
The purchase of this product allows the purchaser to use it for amplifi cation and detection of nucleic acid sequences for providing human in vitro
diagnostics. No general patent or other license of any kind other than this specifi c right of use from purchase is granted hereby.
.

CUSTOMER AND TECHNICAL SUPPORT
Reach Us On the Web
Idaho Technology’s Web site is – http://www.idahotech.com
For JBAIDS information – https://jbaids.idahotech.com
We strongly encourage users to visit our Web site for answers to frequently
asked questions, updated information and additional insights into operating
the JBAIDS System.
Reach Us By E-mail
Contact Idaho Technology by e-mail in the following areas:
support@idahotech.com - Technical Support
it@idahotech.com - General Support
Reach Us By Phone
Technical support is available during the following times:
8 a.m. to 5 p.m. - Mountain Standard Time
For general and technical support call:
1-800-735-6544 - United States and Canada
(801) 736-6354 - Utah
+1-801-736-6354 - International*
*Note: The “+” represents the U.S. international prefix number needed to place a call from the
user’s country to the United States. This is followed by the country code (“1”).
Reach Us By Fax
To contact Idaho Technology by fax, use the following numbers:
1-801-588-0507 - United States and Canada
+1-801-588-0507 - International
Quick Guides for setting up the instrument
can be found in Appendix C.
< III >JBAIDS Instrument < > System Manual < > REV 3

< IV > JBAIDS Instrument < > System Manual < > REV 3 < V >JBAIDS Instrument < > System Manual < > REV 3

CONTENTS
Customer and Technical Support .........................................................III
Abbreviation of Terms ...........................................................................IX
Instrument Manual Symbols ...................................................................X
Chapter 1: Technical Components of the JBAIDS Instrument ............1
Description of the JBAIDS Program .......................................................................... 1
System Description ................................................................................................... 1
Temperature Control of the Instrument ..................................................................... 5
The Fluorimeter Component ..................................................................................... 5
Equipment Specification ........................................................................................... 7
Chapter 2: Safety Precautions When Working with the
JBAIDS Instrument .......................................................................... 11
Laboratory Use ................................................................................... 12
General Precautions ..............................................................................................12
Safety Precautions .................................................................................................. 12
Decontamination and Cleaning Procedures ............................................................ 13
Sample Carousel Decontamination ......................................................................... 14
CHAPTER 3: Installation and Setup .....................................................17
Set-up Conditions .................................................................................................... 17
Installation of the JBAIDS Instrument .....................................................................17
Installation of the Computer .................................................................................... 19
Installation of JBAIDS Software .............................................................................. 21
Dismantling the JBAIDS Instrument ....................................................................... 22
Sample Capillary Preparation and Loading ............................................................23
Sample Carousel ..................................................................................................... 24
Loading the Carousel .............................................................................................. 25
Chapter 4: JBAIDS Software ................................................................27
Introduction .............................................................................................................. 27
Software Access and Permissions .......................................................................... 28
User Accounts—Common Operating Environment ................................................. 28
Logging in to a Common Operating Environment System ....................................29
Changing Passwords .............................................................................................. 29

Logging Off the Laptop ............................................................................................ 31
Security Manager Tasks ..................................................................... 31
Creating New Users ................................................................................................ 31
Unlocking a User Account ....................................................................................... 35
Add Printers ............................................................................................................. 38
Change Date and Time ........................................................................................... 38
Install Software Upgrades ....................................................................................... 39
Starting JBAIDS Software .................................................................. 39
Starting the Wizard .............................................................................41
Test Report ............................................................................................................. 50
Analysis Mode .....................................................................................53
Understanding the JBAIDS Test Software Window ................................................ 53
The Navigator .......................................................................................................... 54
The Menu Bar and Global Toolbar ......................................................................... 55
Using Toolbar Buttons ............................................................................................. 56
The Work Pane ....................................................................................................... 57
The Module Bar ....................................................................................................... 57
Copying Items ......................................................................................................... 58
Renaming and Deleting Items ................................................................................. 59
Importing and Exporting Files ................................................................................. 59
Importing Selected Files .......................................................................................... 59
Importing a Directory of Files ................................................................................. 60
Exporting JBAIDS Software Files ............................................................................ 61
Creating and Running a Test (Available Only to Advanced Operators) ..................61
Analysis Modules .................................................................................................... 62
Summary of Steps ................................................................................................... 62
Performing a Quantification Analysis ...............................................64
Understanding Sample Crossing Points ................................................................. 64
JBAIDS Quantification Analyses ............................................................................. 64
Qualitative Detection Analysis ........................................................... 65
Controls .................................................................................................................. 65
How Results are Displayed ..................................................................................... 66
Possible Results for Target ..................................................................................... 66
Possible Results for Combined ............................................................................. 67
Concentration Reporting ......................................................................................... 68
Performing a Qualitative Detection Analysis on a
Non-Wizard Run Using Controls .........................................................................71
Performing Absolute Quantification Analysis .................................. 73
Understanding the Automated Method ....................................................................73
Using the Automated Method with Controls ............................................................ 73
Analytical Run ......................................................................................................... 74
Performing the Analysis Using Controls and External Standards
Analytical Run ..................................................................................................... 75
Saving a Standard Curve for External Use .............................................................77
Using Melting Profiles to Identify DNA Products .............................77
How Data is Displayed in a Melting Temperature Analysis ..................................... 78
Types of Melting Temperature Analysis................................................................... 79
< VI > JBAIDS Instrument < > System Manual < > REV 3

JBAIDS Software Tools .....................................................................79
Using Queries to Find Information ......................................................................... 79
Updating the Database ...........................................................................................80
Software Preferences..........................................................................81
Using Chart Preferences .........................................................................................81
Specifying Chart Heading and Label Styles ............................................................ 82
Specifying the Content of Fluorescence Charts ....................................................83
Specifying the Content and Appearance of the Temperature Chart ....................... 83
Specifying the Appearance of Standard Curve Charts ........................................... 84
Specifying the Appearance of Relative Quantification Charts ................................85
Overriding Default Chart Preferences ....................................................................86
Using Sample Preferences .....................................................................................87
Modifying the Sample Preferences for All Analytical Runs ..................................... 87
Overriding Default Sample Preferences .................................................................. 89
Creating a Separate Preferences Item and Making it the Default .......................... 91
Specifying User Preferences ................................................................................... 91
JBAIDS Software Charts ....................................................................92
Print a Chart ............................................................................................................ 92
Export a Chart Image .............................................................................................. 92
Export Chart Data ...................................................................................................93
Copy a Chart Image or Chart Data ......................................................................... 94
Zooming and Panning to View Chart Details .......................................................... 94
Maintenance: Using Self-Diagnostic Tools .......................................94
Performing an Instrument Self-Test ......................................................................... 94
Viewing the Instrument Logs ................................................................................... 95
Viewing Application Error Messages .......................................................................96
Adding an Instrument Manually ............................................................................... 97
Adding an Instrument by Searching ....................................................................... 97
Adding an Instrument During an Analytical Run ..................................................... 98
Connecting to an Instrument ................................................................................... 98
Removing an Instrument ....................................................................................... 100
Instrument Maintenance ........................................................................................ 100
CHAPTER 5: JBAIDS Diagnostic Software .......................................103
Introduction ............................................................................................................ 103
Starting JBAIDS Diagnostic Software ................................................................... 103
Starting the Diagnostic Wizard ........................................................105
In Vitro Diagnostic Statement ................................................................................ 113
Purification Control ................................................................................................ 114
Qualitative Detection Analysis .........................................................114
Controls ................................................................................................................ 115
How Results are Displayed ................................................................................... 115
Possible Results for Control .................................................................................. 116
Possible Results for Target ................................................................................... 117
Possible Results for Combined ............................................................................ 118
Examples of Results ............................................................................................ 118
Change History and Audit Trail Information ...................................122
Revisions ............................................................................................................... 122
< VII >JBAIDS Instrument < > System Manual < > REV 3

Change Notes ....................................................................................................... 123
Generating an Analysis Report ............................................................................. 124
CHAPTER 6: Maintenance and Troubleshooting .............................. 125
Introduction ............................................................................................................ 125
Hardware Troubleshooting .................................................................................... 126
Self-Test and Diagnostic Errors ............................................................................. 126
Software Troubleshooting ...................................................................................... 127
Tool Kit ................................................................................................................... 128
Instrument Overview ............................................................................................. 129
Sample Carousel Cleaning or Replacement .........................................................132
Chamber Fan Blade Replacement ........................................................................ 134
Chamber Fan Motor Replacement ........................................................................ 136
Fan Motor Lubrication ........................................................................................... 139
Serial Cable Receptacle Replacement ................................................................. 141
Case Blower Filter / Retainer Cleaning or Replacement ...................................... 143
Case Blower Replacement .................................................................................... 144
3V Lithium Coin Battery Replacement .................................................................. 147
Power Switch Fuse Replacement ......................................................................... 149
Power Switch Module Replacement ..................................................................... 150
Platter Cleaning ..................................................................................................... 154
APPENDIX A: Fluorimetric Real-time Detection Principles .............161
Polymerase Chain Reaction Basics ...................................................................... 161
Polymerase Chain Reaction .................................................................................. 163
Analysis Methods .................................................................................................. 165
Probes with Fluorescent Dyes Used for Real-Time
Polymerase Chain Reaction .............................................................................. 165
Hydrolysis (TaqMan) Probes ................................................................................. 166
Hybridization Probe ............................................................................................... 167
Understanding Sample Crossing Points ............................................................... 168
Melting Curve Analysis Using the JBAIDS System ............................................... 169
How Melting Curves Work ..................................................................................... 169
Melting Curve Conditions ...................................................................................... 170
Melting Curve Applications .................................................................................... 171
Conditions for Successful PCR Performance .......................................................175
Assay Development .............................................................................................. 175
Assay Parameters and Optimization ..................................................................... 176
Master Mix Set-Up ................................................................................................177
Magnesium Chloride ............................................................................................. 177
APPENDIX B: Instrument Return Procedures ..................................179
Return Materials Instructions .............................................................180
Step 1: Obtain a Return Material Authorization Number .......................................180
Step 2: Decontaminate All Returned Equipment...................................................180
Step 3: Decontamination Labels ........................................................................... 180
Step 4: Packaging and Shipping ...........................................................................180
Decontamination Labels ........................................................................................ 183
< VIII > JBAIDS Instrument < > System Manual < > REV 3

APPENDIX C: Quick Guides for the JBAIDS Instrument .................185
APPENDIX D: Pipetting Basics ..........................................................189
Setting the Volume ................................................................................................189
Sealing and Ejecting Tips ...................................................................................... 190
Forward Pipetting .................................................................................................. 190
Reverse Pipetting .................................................................................................. 191
How Do Air-displacement Pipettes Work? ............................................................ 192
Pipetting Steps ...................................................................................................... 192
Types of Tips used with BioHit mLine ................................................................... 193
APPENDIX E: JBAIDS Instrument Parts List .................................... 195
Glossary of Terms ...............................................................................201
Index .....................................................................................................203
< IX >JBAIDS Instrument < > System Manual < > REV 3

ABBREVIATION OF TERMS
A ...................................amp (ampere)
BLAST..........................basic local alignment search tool
CD-ROM ......................compact disk read-only memory
COE .............................Common Operating Environment
Cp ................................crossing point
DNA .............................deoxyribonucleic acid
dNTP ............................deoxyribonucleotide triphosphate
FRET............................fluorescence resonance energy transfer
ITI .................................Idaho Technology Inc.
IVD ...............................in vitro diagnostic
JBAIDS ........................Joint Biological Agent Identification and Diagnostic System
LED ..............................light emitting diode
μL .................................microliter
nm ................................nanometer
OS ................................operating system
PBS ..............................phosphate-buffered saline
PCR .............................polymerase chain reaction
PPE ..............................personal protective equipment
PTFE ............................polytetrafluoroethylene (Teflon)
RNA .............................ribonucleic acid
SNP..............................single nucleotide polymorphism
Taq ...............................Thermus aquaticus
Tm ................................melting temperature
USB .............................universal serial bus
UV ................................ultraviolet
V ..................................volt
W .................................watt
< X > JBAIDS Instrument < > System Manual < > REV 3
INSTRUMENT MANUAL SYMBOLS
The following symbols can be found throughout this manual. Use the definitions below as a guideline
to their interpretation.
This symbol defines a potentially hot surface. Use caution when working near these
areas to avoid bodily injury. Keep flammables and combustibles at a safe distance.
This symbol warns the user to operate the instrument according to the instructions
provided in this manual. If used otherwise, a potentially hazardous situation could
result.
This symbol highlights user tips to operate the instrument more efficiently.
BIOHAZARD
This symbol defines a Biohazard danger. Use standard laboratory technique when
handling pathogenic material.
This symbol indicates a protected ground terminal. Connect this terminal to ground
before making any electrical connections.
< XI >JBAIDS Instrument < > System Manual < > REV 3

< XII > JBAIDS Instrument < > System Manual < > REV 3 < 1 >JBAIDS Instrument < > System Manual < > REV 3

CHAPTER 1: Technical Components of the JBAIDS Instrument
CHAPTER 1:
TECHNICAL COMPONENTS
OF THE JBAIDS INSTRUMENT
Description of the JBAIDS Program
The Joint Biological Agent Identification and Diagnostic
System (JBAIDS) program was created to provide rapid
positive identification and diagnostic confirmation of biological warfare agents and other pathogens of operational
concern for the four branches of the U.S. Military: U.S.
Army, U.S. Navy, U.S. Air Force, and U.S. Marine Corps.
The JBAIDS instrument was created as a reusable, portable, and modifiable system capable of simultaneous,
reliable identification of multiple biological warfare agents
and pathogens of operational concern and clinical significance. This instrument is configured to support reliable,
quick, and specific identification of biological agents from
various clinical specimens and environmental samples. It
also enhances force protection by providing medical personnel and commanders an expedient means to reliably
and quickly identify naturally occurring or intentional biological threats.
The JBAIDS instrument is a man-portable modified commercial-off-the-shelf system. The instrument
operates in various environmental conditions and passes a 1-meter drop test.
System Description
The JBAIDS instrument detects and identifies various microbes associated with infectious disease
and biological warfare agents. Specific test reagents and DNA sample purification kits that are produced by Idaho Technology are used in conjunction with this instrument for detection of organisms.
The JBAIDS instrument is a field-hardened air thermocycler capable of automatically analyzing samples for the presence of targeted DNA sequences. The instrument combines rapid
thermocycling technology and a real-time fluorimeter to identify test samples. Thermocycling amplifies DNA while the fluorimeter enables real-time detection. It is a rapid, robust, sensitive, and specific method of pathogen detection. The JBAIDS instrument is capable of analyzing 32 samples
(including controls) in less than 40 minutes.
CHAPTER 1: Technical Components of the JBAIDS Instrument
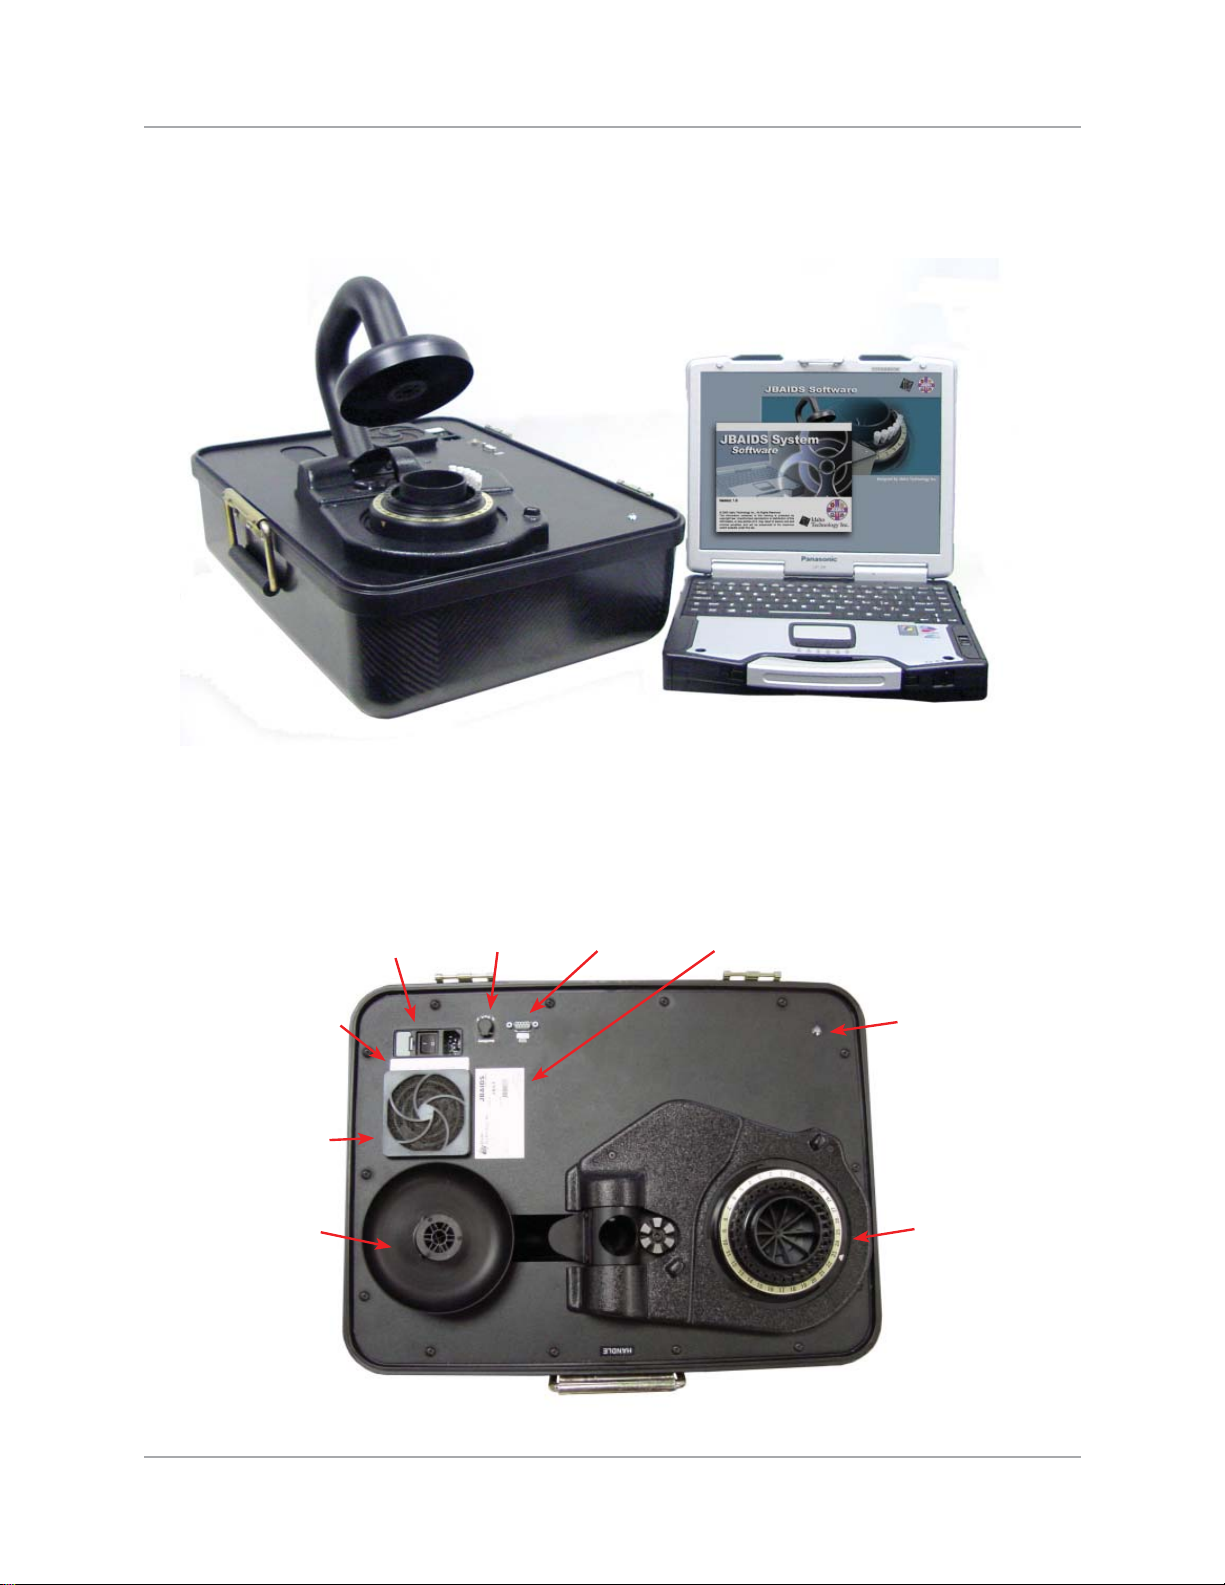
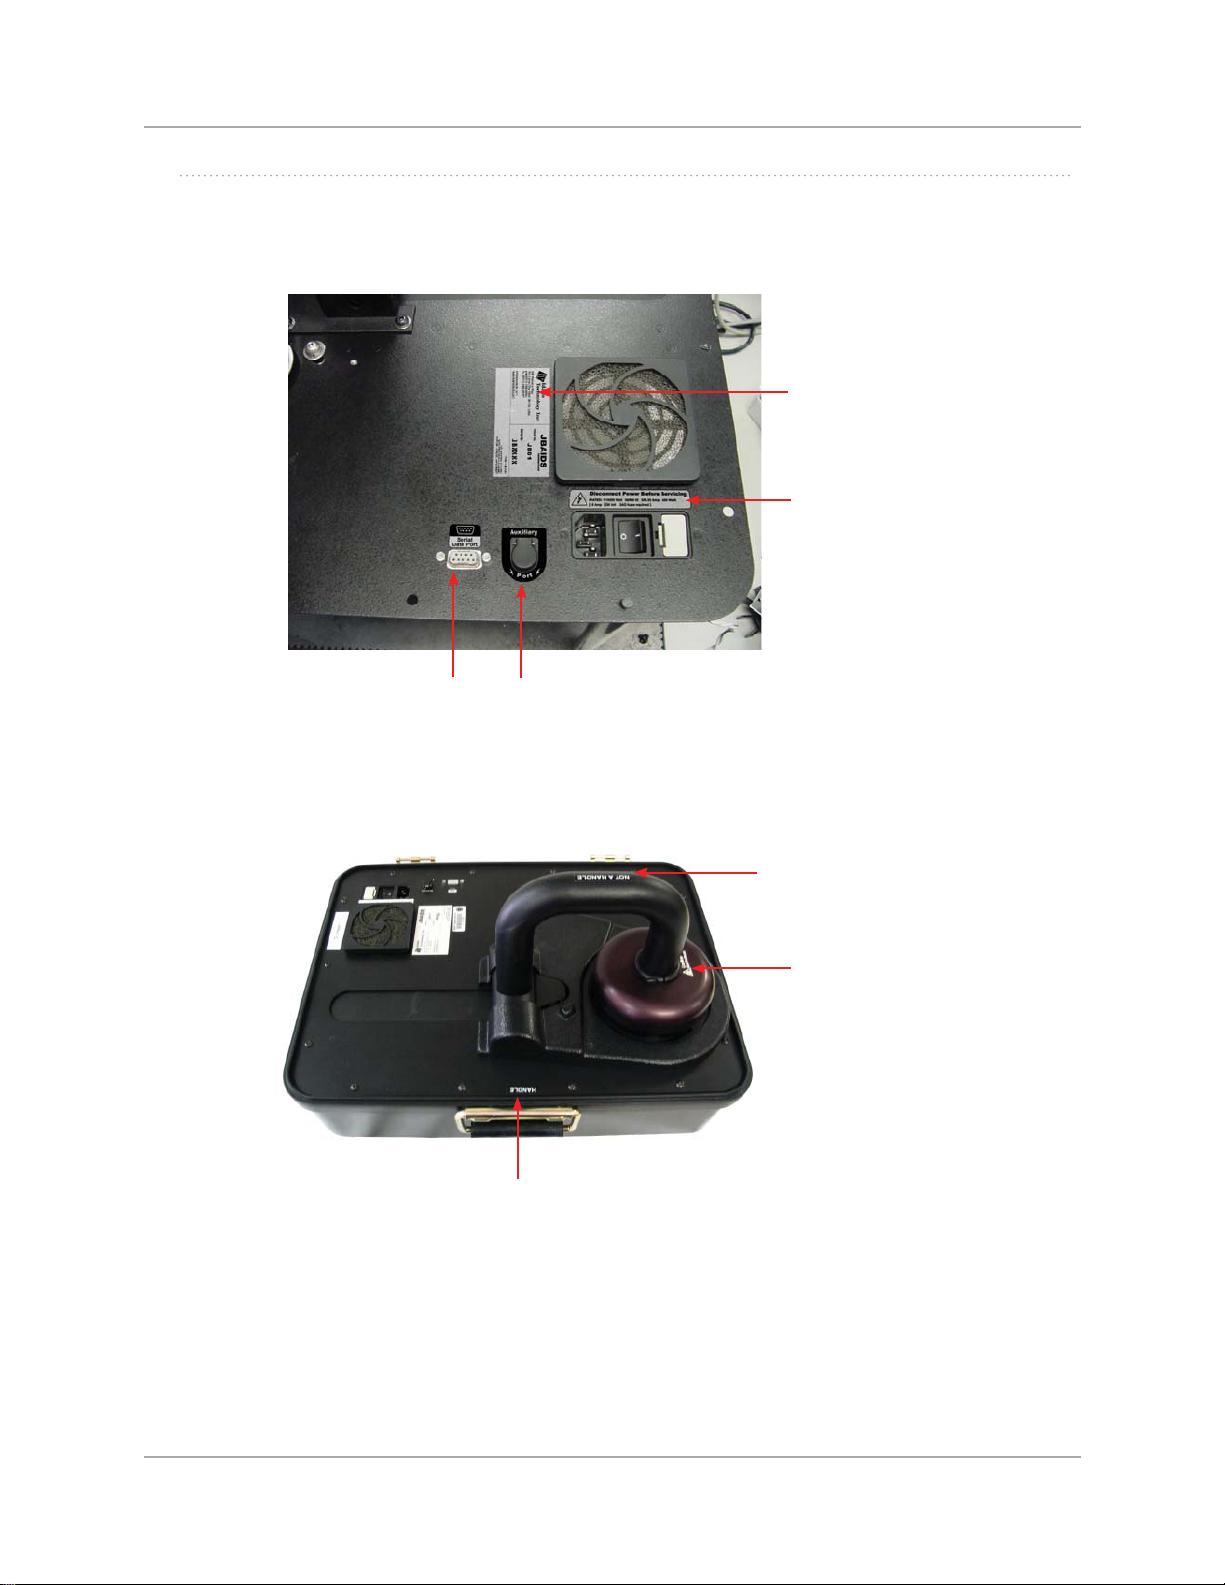
The JBAIDS instrument and laptop.
The instrument’s basic features in transportation position.
Voltage
Rating Label
Air Intake Fan
Heat Duct
Assembly in
Transportation
Position
Power Cord
Socket
and Power
Switch
Auxiliary
Power
Port
Serial
Port Cable
Connection
Serial
Number and
Instrument
Label
Deck LED
Indicator Light
Reaction
Chamber
with Sample
Carousel
< 2 > JBAIDS Instrument < > System Manual < > REV 3
CHAPTER 1: Technical Components of the JBAIDS Instrument
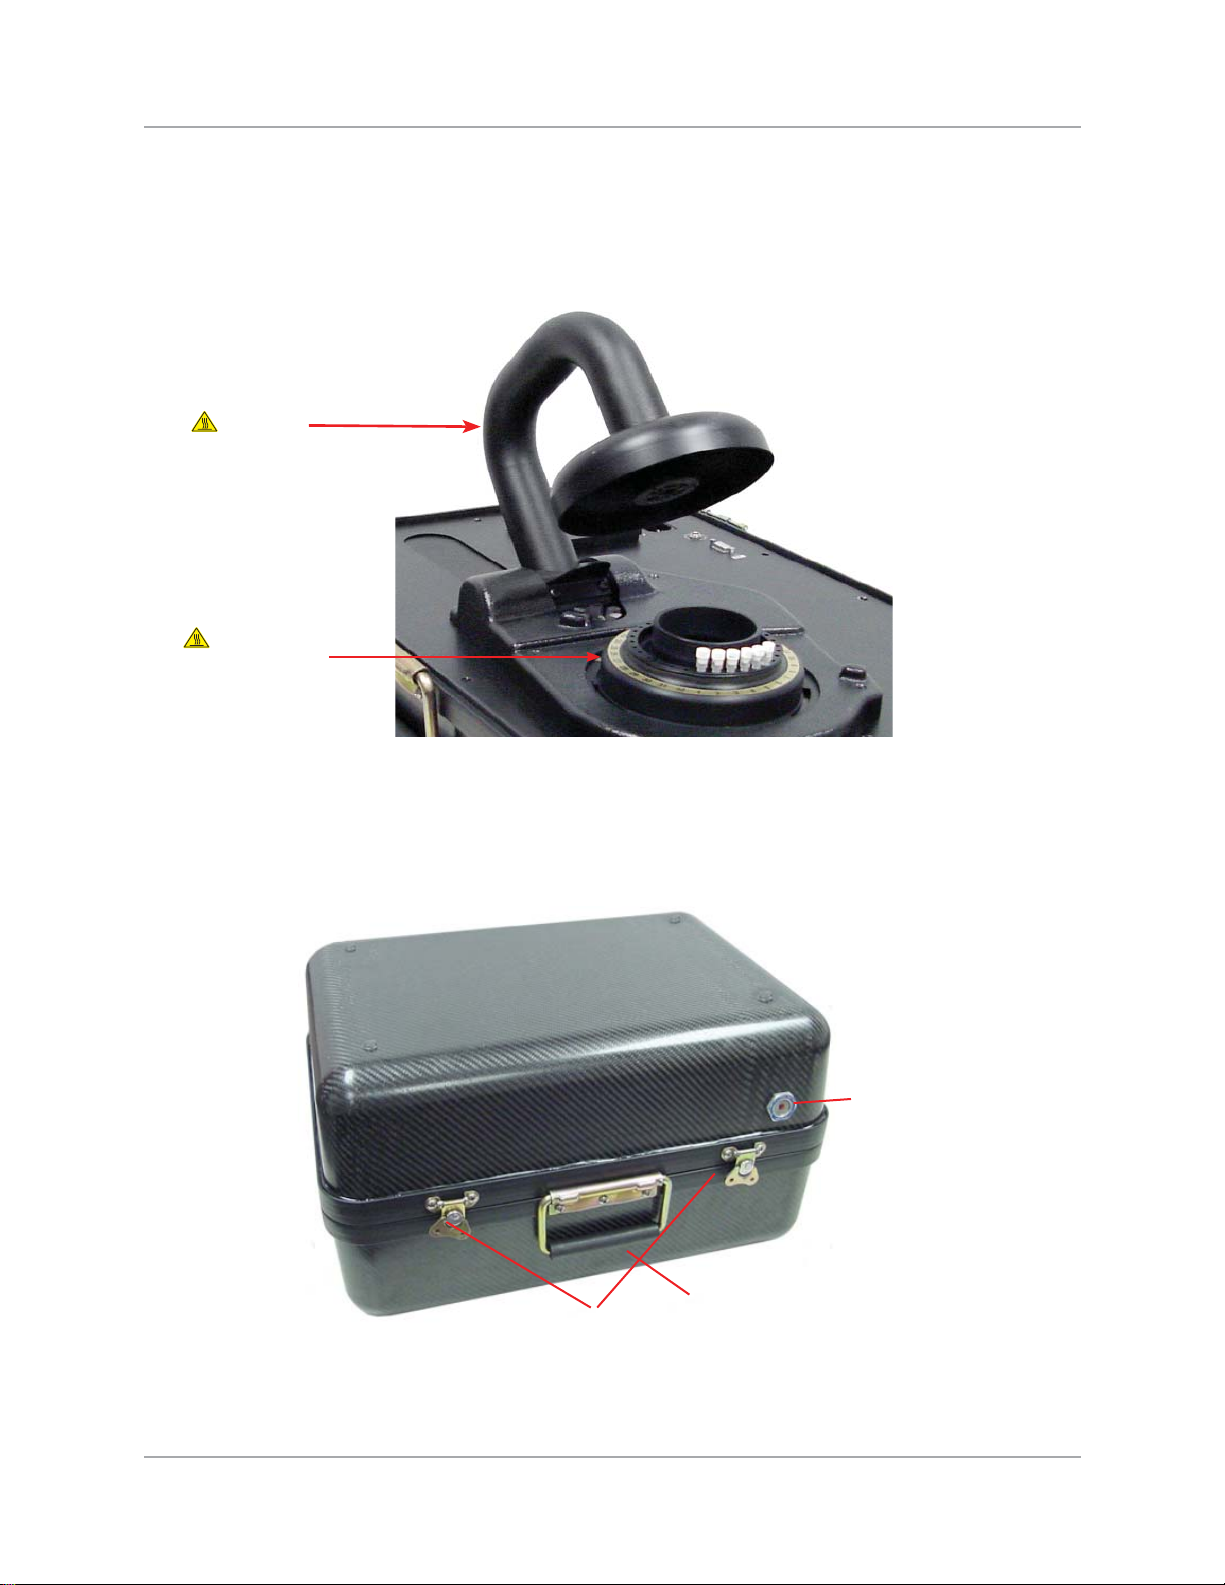
The heat duct assembly with a loaded sample carousel.
Heat Duct
Assembly
Reaction Chamber
with Sample
Carousel
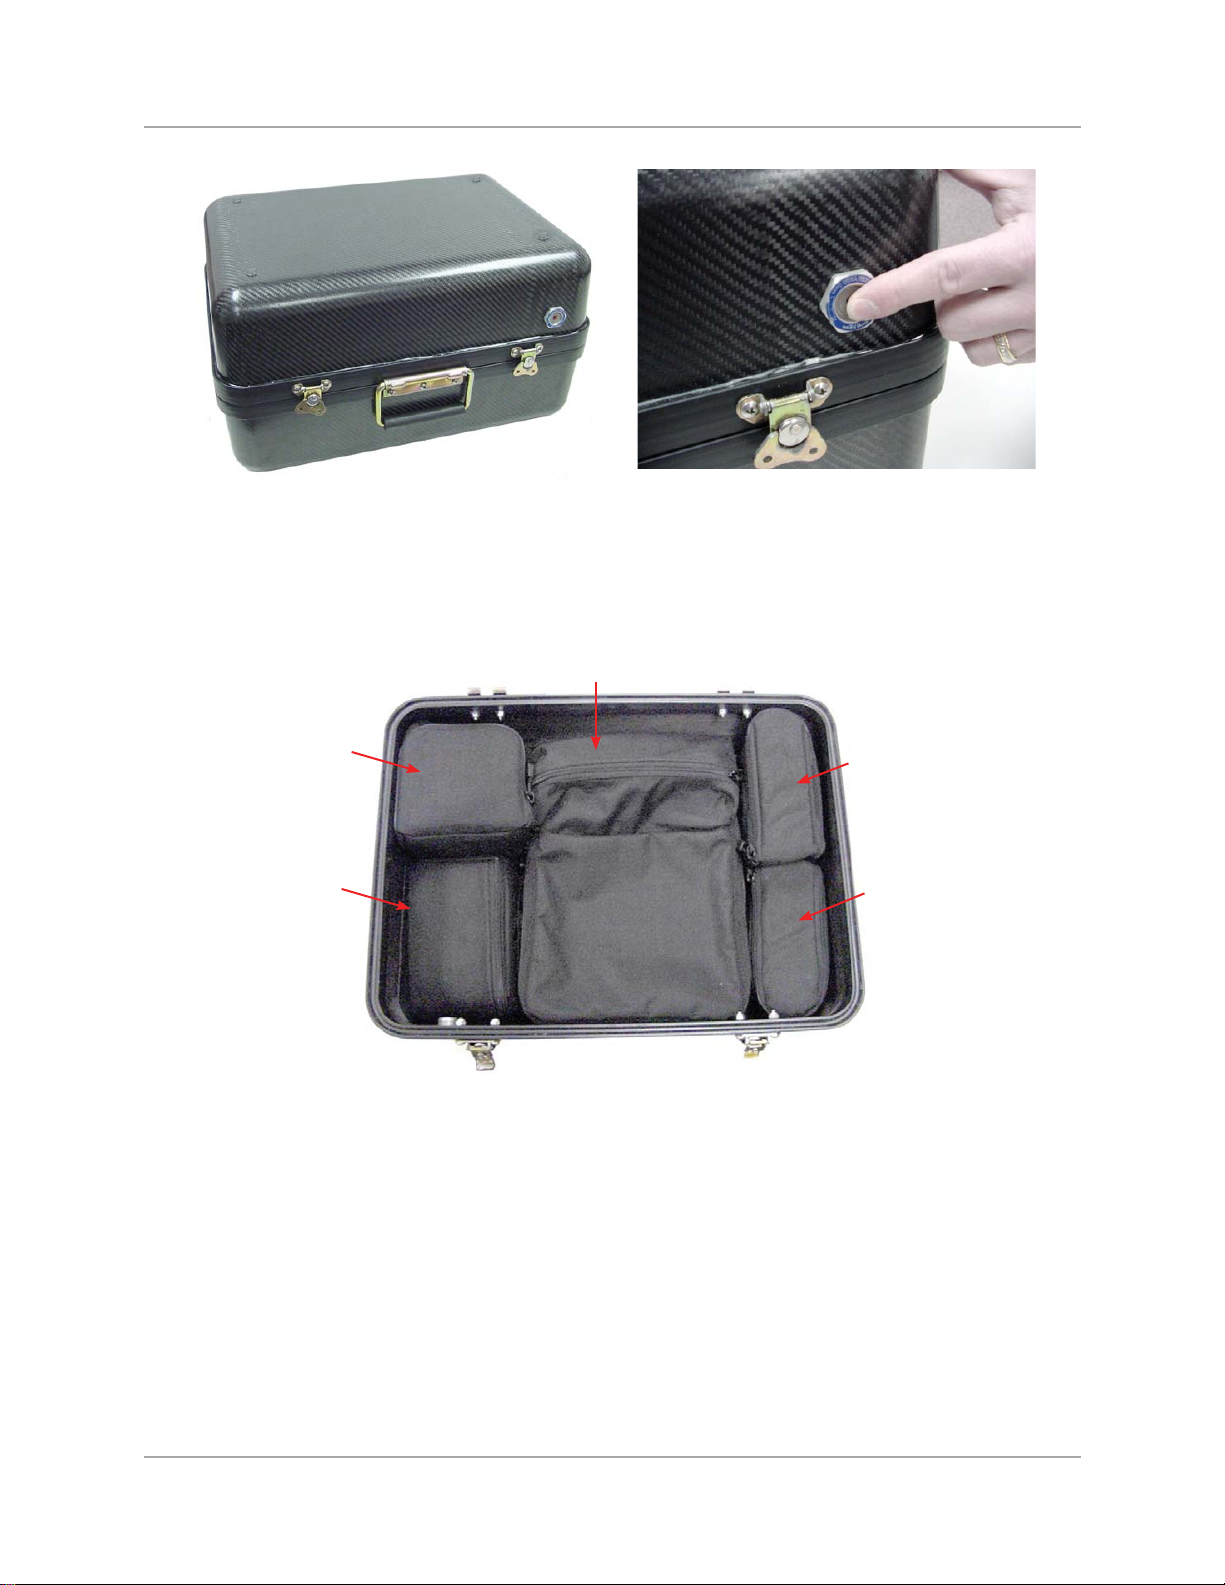
The JBAIDS instrument, laptop computer, centrifuge, serial cable, and cords are securely sealed
inside a waterproof, carbon fiber case.
Pressure
Release Button
Case Handle
Case Locks
< 3 >JBAIDS Instrument < > System Manual < > REV 3
CHAPTER 1: Technical Components of the JBAIDS Instrument
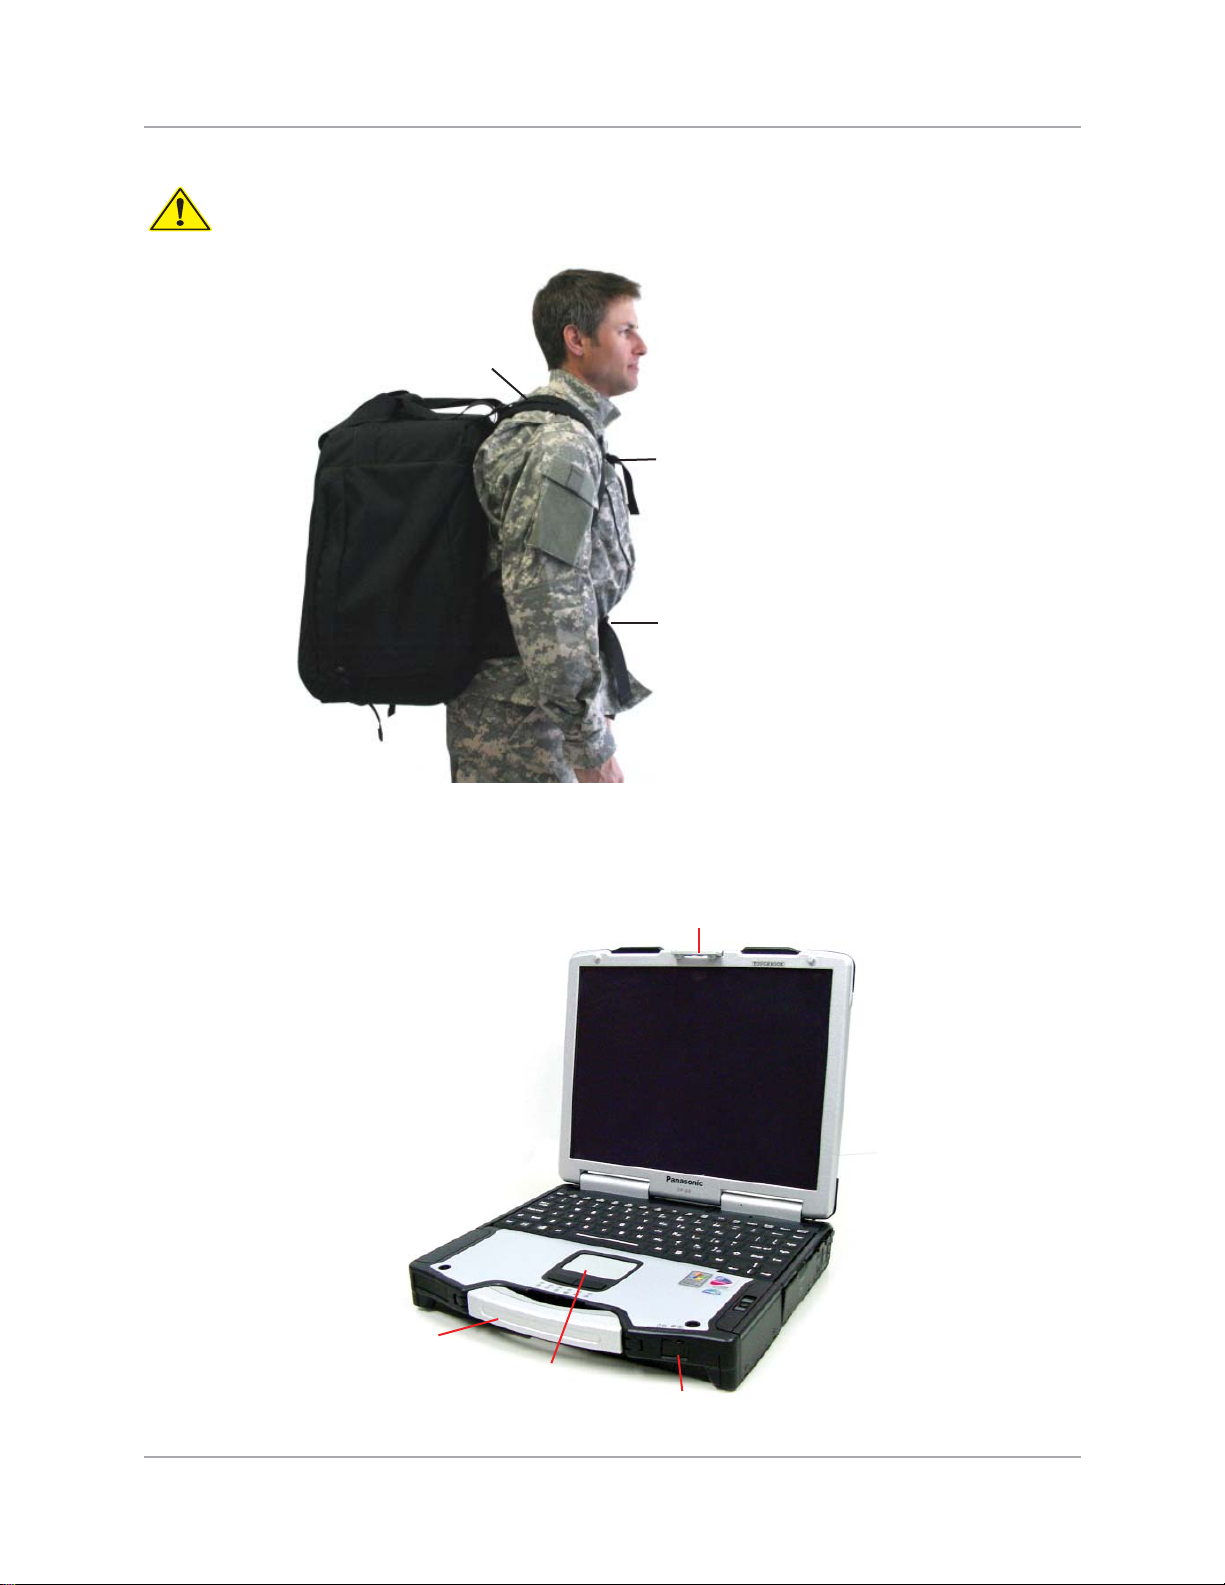
The case easily fits inside a reinforced backpack making transport more convenient and safe.
LIFTING HAZARD: Improper lifting of the instrument could result in a strain injury. Lifts over
3 feet in height require two people.
Padded Shoulder Straps
Adjustable
Chest Strap
Adjustable
Waist Belt
Each instrument comes with a rugged laptop, pre-loaded with software for run and analysis of the
JBAIDS. It has a sealed magnesium alloy case, shock-mounted hard drive, and is moisture and dust
resistant.
Open Latch
Carrying Handle
Touch Pad
Power Switch
< 4 > JBAIDS Instrument < > System Manual < > REV 3

CHAPTER 1: Technical Components of the JBAIDS Instrument
A 1 GB USB flash drive is provided with the laptop for record storage.
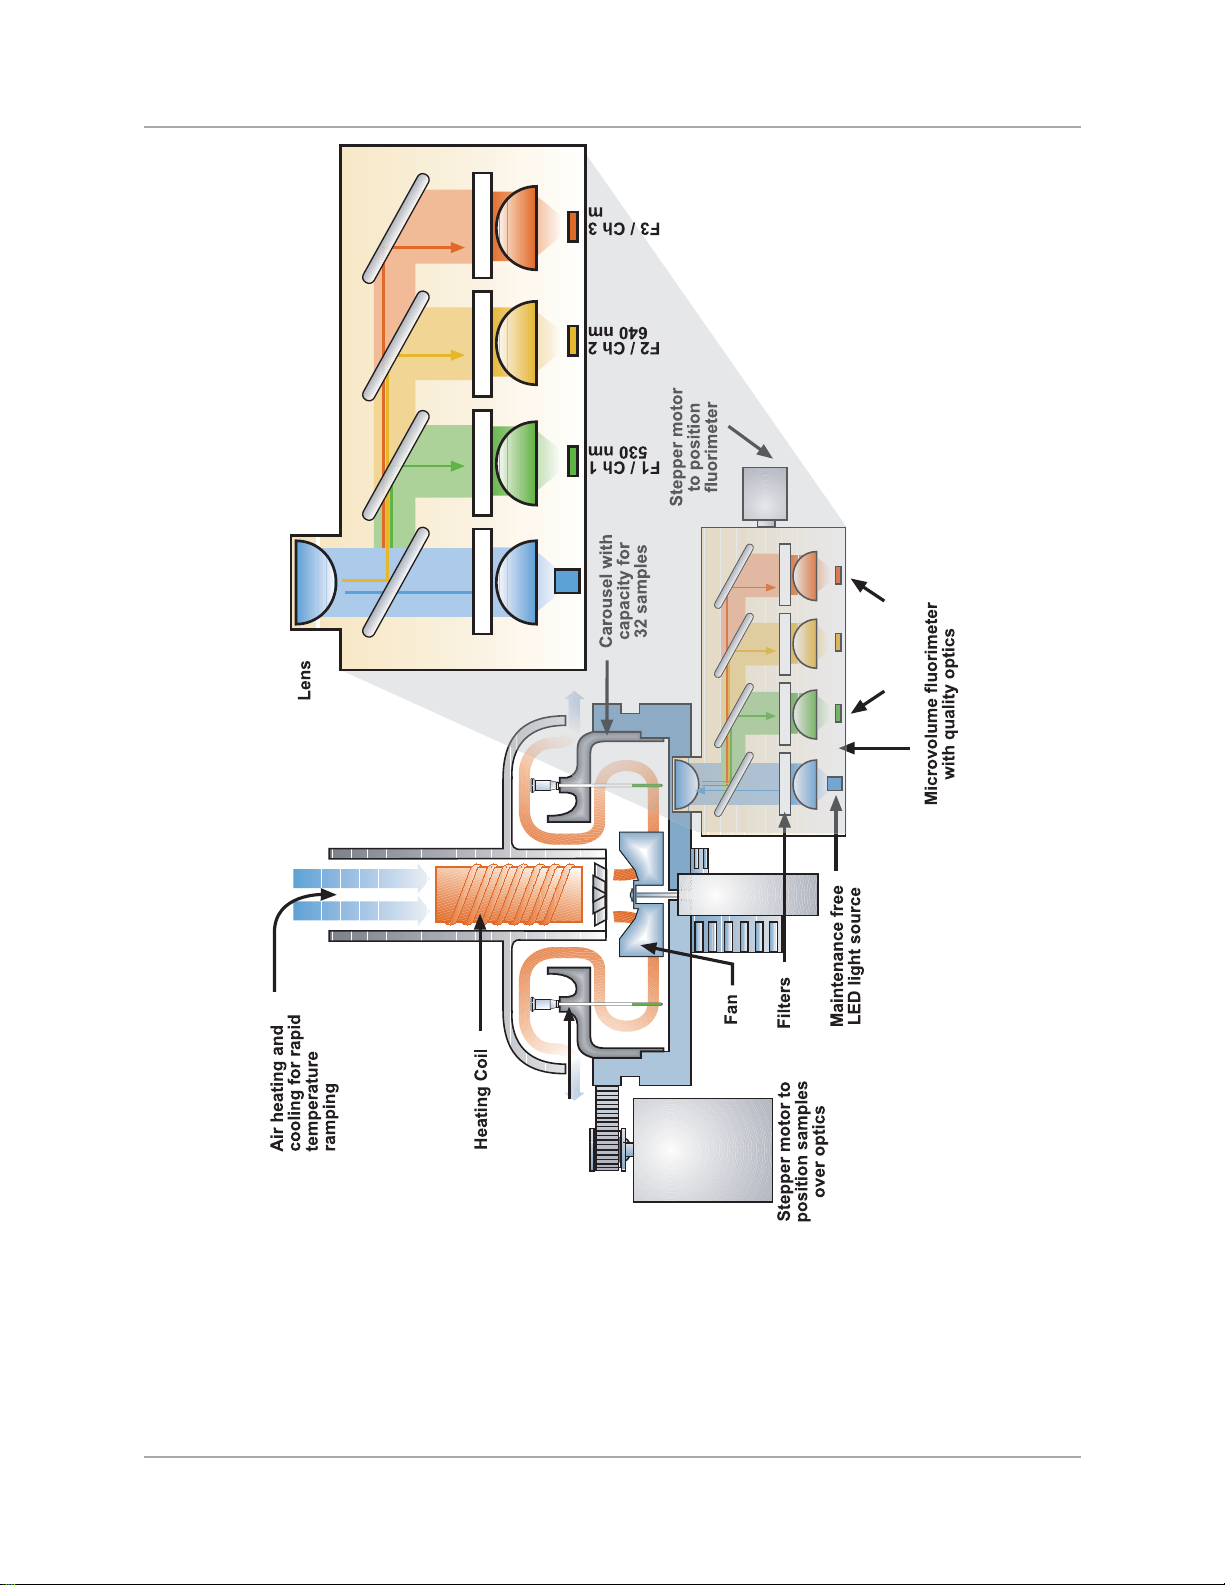
Temperature Control of the Instrument
Temperature control of the cycle chamber is modulated by a temperature sensor in the cycling chamber. Ambient temperature air is driven into the instrument by the intake fan, causing positive pressure to force the air through the heating duct and into the carousel chamber. The air is heated at the
end of the heating duct by a heat coil and dispersed into the chamber by the secondary vortex fan.
Cooling is done in a similar manner by forcing unheated ambient temperature air into the chamber to
cool the samples.
The over temperature sensor in the chamber prevents overheating if the temperature control sensor
fails.
The Fluorimeter Component
A three-channel fluorimeter block is used for the real-time detection of the dyes/probes in each
amplification reaction. The fluorimeter reads and stores data for each sample simultaneously in all
three channels with every fluorescence acquisition. Excitation of each sample is from a light emitting
diode (LED) that is filter tuned and passed through a dichroic mirror at 470 nanometers (nm). The
three detection channels are filter tuned and correspond to 530 nm, 640 nm, and 705 nm respectively.
For fluorescence excitation, the instrument is equipped with an LED light source. This LED, which is
an integral part of the fluorimeter, requires no maintenance and has an extremely long life span.
The fluorimeter provides three channels, which detect emitted light with varying wavelengths.
Because of the high quality optics, the measurement is both extremely fast and sensitive. In a normal amplification run, measurement of a sample takes about 20 milliseconds.
< 5 >JBAIDS Instrument < > System Manual < > REV 3
CHAPTER 1: Technical Components of the JBAIDS Instrument
Detection Channels
705 n
Photodiodes
Sample capillary tube
< 6 > JBAIDS Instrument < > System Manual < > REV 3

CHAPTER 1: Technical Components of the JBAIDS Instrument
Equipment Specification
Specifications for the JBAIDS Instrument
Durability Features
• Meets 810E US Military Transport Standard • Air, land, and sea transportable
• Carbon fiber outside case • Withstands 1-meter drop test
• Resistant to temperature, humidity, shock and
vibration. Air and water tight.
Sample Description
• 32-sample capacity • 5–20 L volume size
• Composite glass/plastic reaction vessel loaded
by centrifugation.
Fluorescence Acquisition
• Three-color optics modules: 530, 640, 705 • Excitation wavelengths from 450-490 nm.
• Acquisition modes: single, step, continuous
Temperature Control
• Range: Ambient temperature to 120°C • Ramp Rate: 0.05–20 ºC/s
Power Supply
• 110/220 V auto-switching power supply unit. • 220/110 V, 50/60 Hz, 7.0/6.0 A, 650 W
[8 A, 230 V, 3AG fuse required]
Dimensions and Weight
• 10.5" (H) x 19.4" (W) x 14.3" (D) • 35.75 lb including instrument, laptop computer,
laptop bag, cords, and DVD drive. Weight does
not include microcentrifuge, tool kit, backpack,
and startup kit.
< 7 >JBAIDS Instrument < > System Manual < > REV 3

CHAPTER 1: Technical Components of the JBAIDS Instrument
Specifications for the Laptop
Durability Features
• Designed using MIL-STD-810F test proce-
dures
• Full magnesium alloy case with handle
• Moisture- and dust-resistant LCD, keyboard
and touch pad
• Vibration and drop-shock resistant design
CPU
• Low Voltage Intel® Pentium® M Processor
1.2 GHz
Storage and Memory
• 40 GB Hard Drive • 256 MB SDRAM
• 1.44 MB Floppy Disk Drive • Combo DVD-ROM/CD-RW Drive
Wireless Local Area Network (LAN)
Intel® PRO/Wireless 2100 network connection 802.1 lb (disabled, see Chapter 3, Installation and
Setup, "Installation of the Computer")
• Sealed port and connector covers
• Shock-mounted, removable hard drive in stainless steel case
• Rugged, dust-resistant hinges
• 1 MB on-die L2 cache
Display
• 13.3" 1024 x 768 (XGA) transmissive, antireflective TFT Active Matrix Color LCD
• Intel® 855GM graphic controller, UMA (Unified
Memory Access) up to 64 MB
Power Supply
• Lithium Ion battery pack (11.1 V, 6.6 Ah)
• Battery charging time: approximately 3 hours/
off, 5.5 hours/on
• Quick access battery/HDD cover for easy
battery replacement
Software
• Windows® 2000 Professional • Setup, Diagnostics, DMI Viewer, On-line
Dimensions and Weight
• 2.3"(H) x 11.8"(W) x 9.5"(D) • 7.94 lb, including battery, FDD, and handle
• External video support up to 1280 x 1024 at
16 million colors (24-bit color depth)
• Battery operation: up to 4 hours (with first battery), up to 10 hours (with second battery)
• AC Adapter: AC 100 V–240 V 50/60 Hz, Auto
Sensing/Switching worldwide power supply
• Pop-up on-screen battery status reporting
Reference Manual, Adobe® Acrobat®
Reader, Panasonic® Battery Monitor
< 8 > JBAIDS Instrument < > System Manual < > REV 3
CHAPTER 1: Technical Components of the JBAIDS Instrument
Labeling
The following labeling is found on the JBAIDS instrument.
Instrument Identification
Label
Power Voltage Label
BACK
Serial Port Label
Auxiliary Port Label
RIGHT
Not a Handle Label
(on Heat Duct Assembly)
FRONT
Caution Hot Surface
(warning label)
Handle Label
LEFT
< 9 >JBAIDS Instrument < > System Manual < > REV 3

CHAPTER 1: Technical Components of the JBAIDS Instrument
< 10 > JBAIDS Instrument < > System Manual < > REV 3
CHAPTER 2: Safety Precautions When Working with the JBAIDS Instrument
CHAPTER 2:
SAFETY PRECAUTIONS WHEN WORKING
WITH THE JBAIDS INSTRUMENT
This symbol defines a potentially hot surface. Use caution when working near these
areas to avoid bodily injury. Keep flammables and combustibles at a safe distance.
BIOHAZARD
This symbol warns the user to operate the instrument according to the instructions
provided in this manual. If used otherwise, a potentially hazardous situation could
result.
This symbol highlights user tips to operate the instrument more efficiently.
This symbol defines a Biohazard danger. Use standard laboratory technique when
handling pathogenic material.
This symbol indicates a protected ground terminal. Connect this terminal to ground
before making any electrical connections.
< 11 >JBAIDS Instrument < > System Manual < > REV 3
CHAPTER 2: Safety Precautions When Working with the JBAIDS Instrument
LABORATORY USE
General Precautions
One of the most important rules of working in a laboratory environment is to avoid contamination.
Some important rules to follow are:
Do not return to a previous area without first ensuring proper decontamination procedures (i.e.,
•
washing and changing protective clothing and gloves).
Use filter tips on pipettes when working with any liquid solution.
•
Use different pipettes for setting up the reactions and for handling the samples.
•
Follow the diagram when establishing a clean, contamination-free working environment.
•
Outside Sample Collection of
Raw Sample
Start Finish
Lab Room
Area 1 Sample Prep
Lab Room
Area 2 Reaction Prep
Lab Room
Area 3 Run Reaction
Safety Precautions
Laboratory Procedures
• Avoid routine exposure to biohazards or potentially infectious material. Exposure can occur by
inhalation, ingestion, or skin absorption.
• Potentially infectious material must be manipulated inside a biosafety laboratory.
• A biosafety cabinet must be used when potentially infectious material is used in procedures that
may create aerosols or splashes. These activities include shaking, blending, and bead-beating.
• The centrifuge cap must be securely in place before starting the centrifuge.
Inhalation
• Minimize exposure by preventing splashes, sprays, or aerosols. Use a biosafety cabinet or other
ventilation devices when possible.
Ingestion
• Never use mouth suction for pipetting or starting a siphon.
• Wash hands often.
Skin Absorption
• Wear personal protective equipment (PPE) when handling potentially infectious material.
• Use extreme caution when using sharp items.
< 12 > JBAIDS Instrument < > System Manual < > REV 3

CHAPTER 2: Safety Precautions When Working with the JBAIDS Instrument
Handling of Biohazard Wastes
• Use universal precautions whenever handling human-source bodily fluids or any sample/specimen that could possibly contain pathogens.
• Place all contaminated waste in a red or orange plastic bag labeled with the biohazard pictogram.
• Kill (i.e., autoclave or treat with 10% bleach [1 part bleach to 9 parts water]) all cultures, stocks,
or live microorganisms before disposal.
• Place materials to be autoclaved in a proper autoclavable container in order to avoid spills and
leaks inside the autoclave and the surrounding area.
Decontamination and Cleaning Procedures
The decontamination and cleaning procedures listed are intended to limit spread of DNA and/
or polymerase chain reaction (PCR) amplicon or biohazards as a result of a broken capillary.
Decontamination is necessary to prevent false-positive readings in subsequent assays. Only decontaminate areas of potential contamination. For instance, if a capillary breaks while in the JBAIDS
reaction chamber, decontaminate the JBAIDS instrument, sample chamber, sample carousel, and
bench top (or other area) surrounding the JBAIDS. If a capillary breaks while loading or unloading
from the sample carousel, decontaminate only the sample carousel and any other potentially contaminated areas.
After a capillary breakage, change gloves and other potentially contaminated PPE. Change gloves
often during decontamination process, especially during the first steps of decontamination and
before touching any clean surface. All personal protective equipment should be disposed of after
decontamination.
Materials
This list provides items that are necessary in a laboratory to keep contamination to a minimum.
• 10% bleach solution in a squeeze or spray bottle (1 part bleach to 9 parts water)
• Distilled water in a squeeze or spray bottle
• DNAZap™, or equivalent DNA degrading system
• Paper towels
• Nylon brush
• Bleach wipes
• Lens cleaner
• Lens paper
< 13 >JBAIDS Instrument < > System Manual < > REV 3

CHAPTER 2: Safety Precautions When Working with the JBAIDS Instrument
Assessment of Risk Related to Capillary Breakage
Warning: It is EXTREMELY IMPORTANT that contamination from broken capillaries be
contained and cleaned IMMEDIATELY. Capillaries that break after PCR can contain large
quantities of target amplicon. This material, although noninfectious, is easily disseminated
by normal human activity. Consequently, very small (molecular) quantities can be amplified
by PCR in future runs, which will then be identified as positive by the JBAIDS instrument.
Treat all broken capillaries as capable of contaminating your area.
If a capillary tube breaks in the sample carousel, take the following precautions to avoid contamination.
• Put on PPE such as gloves and safety shield.
• Stop the run and unplug the instrument before beginning cleanup.
• Ensure no one else uses any potentially contaminated areas or instruments.
• Decontaminate and dispose of the broken capillary using the following steps:
- Dispose of potentially contaminated gloves and put on clean gloves.
- Dispose of the potentially contaminated lab coat and put on a clean lab coat. .
- Clean up broken capillary, discard in capillary containment bin or biohazard sharps waste,
and completely remove capillaries from carousel, if necessary.
- Change gloves.
- Follow decontamination procedures for cleaning affected areas.
WARNING: If the broken capillary contained human source material and/
BIOHAZARD
or sample from a suspected pathogenic source, the risk of biohazard
contamination exists in addition to the DNA amplicon contamination.
Sample Carousel Decontamination
Instrument carousels are interchangeable and disposable. Contact Idaho Technology to obtain
replacement carousels. Idaho Technology recommends replacement of contaminated carousels
to minimize the possible spread of contamination. Also, the decontamination process can
make insertion and removal of capillaries in the carousel more difficult, leading to capillary
breakage and future contamination of the instrument. Therefore, to allow continued use of the
instrument after a broken capillary incident, always maintain at least one spare carousel with the
instrument.
If a spare carousel is not available, the following procedure can be used to decontaminate the carrousel. Obtain a replacement carousel if the decontamination processes fail to eliminate all contamination or if the carousel is damaged.
Place carousel on bench top.
1.
Spray 10% bleach (1 part bleach to 9 parts water) solution on both sides (top and bottom)
2.
of carousel and bench area. Let sit for 10 minutes.
Wipe carousel and bench area with paper towel.
3.
Repeat step 2 and 3 twice, for a total of three wipes.
4.
Spray distilled water on both sides of carousel. In particular, squirt distilled water into the
5.
capillary holes to remove any excess bleach.
Wipe carousel and bench area; dry with a new paper towel.
6.
Spray both sides of carousel with DNAZap, or equivalent product. See product for proper
7.
usage.
< 14 > JBAIDS Instrument < > System Manual < > REV 3

CHAPTER 2: Safety Precautions When Working with the JBAIDS Instrument
Rinse by spraying distilled water on both sides of carousel.
8.
Wipe carousel and bench area dry with a new paper towel. Tap the carousel on your hand
9.
or clean bench top to remove excess distilled water.
10.
Use a new nylon brush to dry out all holes in the carousel. Make sure carousel is dry, as
residual bleach could alter fluorescence readings. If desired, check all carousel holes by
inserting a clean, empty capillary. If insertion and removal of a capillary is difficult for any
hole, repeat rinsing and drying steps.
11.
Discard nylon brush.
Sample Chamber Decontamination
Warning: Be careful not to touch or bump the temperature sensors located
in the sample chamber. Do not wipe bleach on the optics.
1. Remove carousel from instrument and decontaminate carousel by following the procedures
above.
2. Remove the chamber fan by lifting it straight up to remove glass underneath the fan blades.
Decontaminate chamber fan following procedures in "Sample Carousel Decontamination."
3. Remove glass from instrument (including the sample chamber) with a paper towel lightly
moistened with distilled water. You may carefully remove glass from the optics with a moistened paper towel by touching the wet towel to the glass and then disposing of glass and
towel. Be careful not to scratch the optics.
4. Wet a paper towel with 10% bleach (1 part bleach to 9 parts water) and wipe sample chamber and the inside of the heat duct assembly.
5. Repeat bleach step 4 twice with fresh paper towels for a total of three bleach wipes.
6. Wet a paper towel with distilled water and wipe carousel chamber and the inside of the heat
duct assembly. Do not wipe the optics.
7. Repeat distilled water step 6 with a fresh paper towel.
8. Clean the optics of the instrument, if necessary, with lens cleaner and lens paper. Use light
pressure when cleaning the optics.
9. Repeat optics cleaning step 8 with fresh lens paper.
10. Visually check the temperature control sensor to make sure it is straight and not bent to the
side.
JBAIDS Instrument Decontamination
Note: If the sample carousel or chamber has been contaminated, follow the appropriate
decontamination procedures listed before decontaminating the outside of the JBAIDS
instrument.
1. Wet a paper towel with 10% bleach (1 part bleach to 9 parts water) solution and wipe entire
instrument, including the bottom and bench top where the instrument had contact.
2. Repeat step 1 twice with fresh paper towels, for a total of three bleach wipes.
3. Change gloves, then wet a new paper towel with distilled water and wipe entire instrument,
including the bottom and any place the instrument touched the bench top.
4. Repeat distilled water rinse once (step 3).
< 15 >JBAIDS Instrument < > System Manual < > REV 3

CHAPTER 2: Safety Precautions When Working with the JBAIDS Instrument
Decontamination of Bench Tops and Other Areas
1. Spray 10% bleach (1 part bleach to 9 parts water) solution on area of potential contamination. Let stand for 5 minutes.
2. Wipe with paper towel.
3. Repeat steps 1 and 2 twice, for a total of three wipes.
4. Spray area with distilled water.
5. Wipe dry with new paper towel.
6. Spray area with DNAZap, or equivalent product. See product for proper usage.
7. Rinse by spraying area with distilled water and wiping dry.
< 16 > JBAIDS Instrument < > System Manual < > REV 3

CHAPTER 3: Installation and Setup
CHAPTER 3:
INSTALLATION AND SETUP
This section describes how to set up and run the JBAIDS instrument. For replacement parts, see
Appendix E for a list of items and their ITI national stock number (NSN) and part number (if available). Save the boxes and shipping material that accompany these items to ensure that they are
packaged properly when being shipped to different locations.
Installation Requirements
Space and Power Requirements
• 32" x 16" space is needed for setup.
• Standard 110/220 volts AC grounded power source with surge protection is required for operation
Support Equipment Maximum Size and Power Requirements
A set of support equipment that is shipped on a pallet weighs approximately 1,700 lb and is 191 ft3
and requires 22 amps of grounded power. When the entire JBAIDS instrument is set up with all of the
accompanying support equipment, the footprint requires approximately 100 ft2, or five 48" x 30" tables,
plus walking room around the testing area.
Set-up Conditions
For operation, select a clean, well-ventilated area of sufficient size for both the instrument and the
computer. This location should allow unrestricted airflow into the instrument’s air intake.
Since the instrument releases hot air during operation, it is advisable to keep heat sensitive
Caution Hot
or highly flammable items at a safe distance from the instrument.
Installation of the JBAIDS Instrument
To unpack the instrument, set the backpack flat on its harness side.
1. Unsnap the four lock-straps and completely unzip the backpack. Open the backpack and
remove the instrument.
2. Set the instrument on a sturdy flat surface and press the red pressure release button to equalize the pressure inside the instrument case.
< 17 >JBAIDS Instrument < > System Manual < > REV 3
CHAPTER 3: Installation and Setup
3. Open the case by flipping up and turning the case latches counter-clockwise. Remove the top
half of the case. The power and serial cables for the instrument are stored in a pouch in the
top of the instrument case and should be removed for use.
Laptop
Centrifuge
Capillary
Tubes
4. Rotate the heating duct assembly to the operating position.
Lens Cleaner
and Tissues
Power Cords
and Serial
Cables
< 18 > JBAIDS Instrument < > System Manual < > REV 3
 Loading...