

Page 1

ToughArmor
6 x 2.5" SAS / SATA SSD / HDD & Ultra Slim ODD Backplane Cage
1
4
6
Copyright © IC Y DOCK Inte rnational. All Rights Reserved . 650249 VER 1. 0Copyright © IC Y DOCK Inte rnational. All Rights Reserved . 650249 VER 1. 0
Page 2
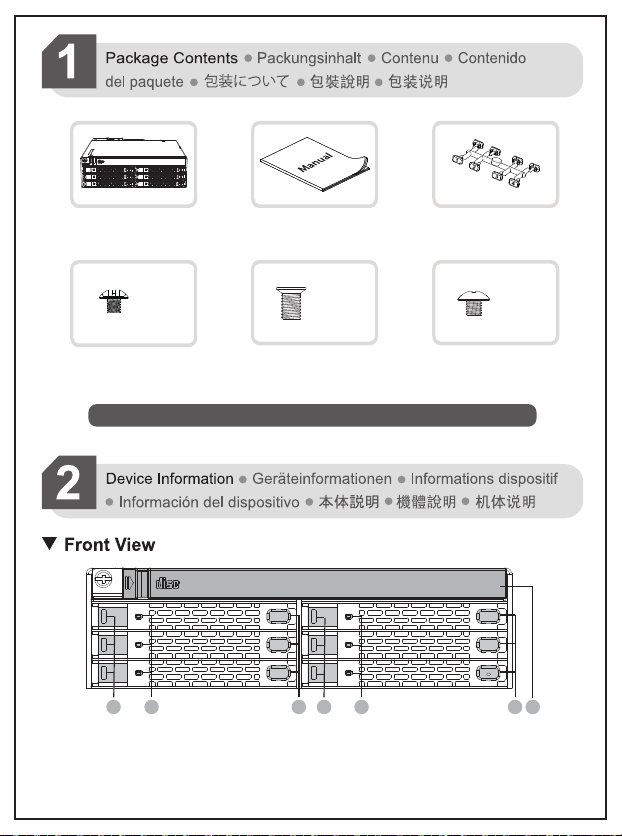
Device
User manual
Drive lD plugs
× 4
2 x M2*2.5 screws for ODD
(2 x screws for spare parts)
24 x M3*4 screws for 2.5" HDD/SSD
(2 x screws for spare parts)
× 26
8 x M3*2.5 screws for device
(2 x screws for spare parts)
Note: Please use the included screws to secure the drive(s).
1
3
5
1
2
1. Drive Tray Ejection B utton1. Drive Tray Ejection B utton
2. LED Indicat or (D evice Power: S olid green light; HDD access: Blinking green light)
3. Slot fo r Dri ve ID Plug
4. Ultra Sl im OD D slo t
3 1 2 3
2
4
6
× 10
4
Page 3

15 Pin Power 3 Pin Fan HeaderFan Speed Switch
2.5" HDD/SSD Installation Installation einer 2.5" HDD/SSD
3
Installation du disque dur/SSD 2.5"
2.5" HDD/SSD取付手順
Instalación de unidad de disco duro o unidad de estado sólido de 2.5"
2.5寸硬盘安装步骤2.5吋硬碟安裝步驟
15 Pin Power 7 Pin SATA7 Pin SATA
3-1
Push the drive tray ejection button to
eject the drive tray.
3-3
Pull the drive tray out from the device.
M3*4 flat head screw
Use the included M3*4 screws to secure
the drive onto the tray, then flip the tray
back to the top side.
3-2
The drive tray latch will pop open once
the drive tray ejection button is pushed.
3-4
2.5"
This device accommodates drives with
up to 7mm height. Please follow the
arrow direction when inserting the 2.5”
drive onto the tray.
3-63-5
Insert the drive tray all the way into the
device.
Page 4

OPTIONAL: Installing Drive ID Plugs
To install Drive ID Plugs, gently twist off the
plug from the Drive ID Plugs mold and insert it
into the drive ID plug slot in front of the tray.
Ultra Slim ODD Installation Optisches Ultra Slim Laufwerk installieren
4
Installation de lecteur de disque optique ultrafin
Ultra Slim ODD
機安裝步驟
スリムタイプ ODD デ
笔记本光驱安装步骤
9.5mm
バイスの取付手順
1
Installation de lecteur
超薄型光碟
4-1
Push
To remove the ODD dust cover, push
the tab to the right to unlatch.
4-2
Remove the ODD bracket from the
device.
4-5
Note: In order to provide sufficient power to device, we suggest to use power
Note: In order to provide sufficient power to device, we suggest to use power
cables that are not shared with other devices.
cables that are not shared with other devices.
4-2
Unscrew the screw on the front panel to
remove the ODD bracket.
4-4
Ultra
Slim ODD
Use two M2*2.5 screws to secure slim
ODD onto the ODD bracket.
4-6
To secure ODD device, tighten the screw
on the front panel.
Page 5

NOTA
1.
2
3. Due to different drive specifications for the drive access signal, some drives may not support the
access LED. If the LED does not function, but the user can read and write to the drive, it falls under
this category. If the LED does not function, and the drive cannot be read or written to, please contact
us for troubleshooting.
4. To utilize the hot swap function, the host must also support hot swap. To check if your host supports
hot swap, please refer to the motherboard or controller card specifications and user manual.
5.
注釋
1. ICY DOCK
2. I
3. Auf Grund unterschiedlicher Spezifikationen kann es , dass manche Laufwerke das
HDD-Zugriffssignal nicht unterstützen. Dieser Fall trifft zu, wenn Sie Lese- und Schreibzugriff auf
das Laufwerk haben, die LED aber kein Zugriffssignal anzeigt. Sollten Sie keinen Lese- und
Schreibzugriff auf das Laufwerk haben und die LED auch nicht funktionieren, so kontaktieren Sie
uns bitte zur Fehlerbehebung.
4. Um Hot Swap zu nutzen muss diese Funktion von dem Host unterstützt werden. Konsultieren Sie
hierfür bitte die Bedienungsanleitung Ihres Mainboards oder Ihrer Controller-Karte.
5.
1. ICY DOCK
2. ICY DOCK ne pourra être tenu responsable de la perte ou dégradation de tout logiciels, matériels ou
données suite à des dommages ou des disfonctionnements de matériels utilisés avec nos produits
ICY DOCK. La responsabilité de ICY DOCK ne pourra être engagées que pour ces propres produits.
3. A cause des différentes spécifications des signaux d'accès, certains disques durs ne supportent
pas l'accès. Si la LED témoin ne s’allume pas, alors le disque dur n’est pas pris en charge,
contactez-nous pour un dépannage.
4. Pour profiter pleinement la fonction Hot-Swap, vérifiez que votre configuration accepte également
la fonction Hot-Swap.
5. Si vous souhaitez obtenir plus d’informations sur nos produits, vennez visiter notre site:
http://www.icydock.fr
Page 6

1. ICY DOCK se reserva el derecho de cambiar las especificaciones técnicas no relacionadas y está
sujeto a cambio sin previo aviso.
2. ICY DOCK no asumirá ninguna responsabilidad por ningún software, hardware o dato almacenado
en los productos ICY DOCK, o que interactúe con estos, que provoque daños o averías. ICY DOCK
solamente asumirá la responsabilidad de reparaciones y tareas de servicio de productos ICY DOCK.
3. Debido a las diferentes especificaciones de las unidades para la señal de acceso a dichas unidades,
algunas de estas puede que no admitan el LED de acceso. Si el LED no funciona pero el usuario
puede realizar operaciones de lectura y escritura en la unidad, dicho LED se encuentra dentro de
esta categoría. Si el LED no funciona y no se pueden realizar operaciones de lectura o escritura
en la unidad, póngase en contacto con nosotros para solucionar el problema.
4. Para utilizar la función de intercambio en caliente, el dispositivo principal también debe admitir esta
función. Para comprobar sea el dispositivo principal admite la función de intercambio en caliente,
consulte las especificaciones y el manual del usuario de la placa base o de la tarjeta controladora.
5. Si tiene alguna pregunta o duda acerca de los productos ICY DOCK, visite nos en el sitio web
http://www.icydock.com
1. 当公司は
2. 当公司はただICY DOCK製品自身と関連している修理だけ責任を負います。いかなるとの他のソフ卜
ウェア、データと関連している故障はその関連している会社と連絡し、修理を協力して下さい。
3. HDD出力信号仕様はメーカーにより異なります。場合によって一部分HDDが本製品のLEDランプに対応
できない場合があります。もしデータの読み書きが問題なければ操作に影響がありません。LEDランプ点
灯しない上読み書きできない場合、問い合わせください。
4. フルでHot-Swap機能を使用する場合、Host側もHot-Swap機能に対応する必要があります。
5. ICY DOCK製品に関するお問い合わせは弊社のホームページ: https://www.icydock.com
へアクセスしてください。
1.本公司保留產品升級與變更之權利,如改版,恕不另行通知。
2.本公司僅負責ICY DOCK產品本身相關的維修。任何跟其它軟體、硬體、硬碟的故障請聯絡其相關
公司協助維修。
3.由於不同廠牌和規格硬碟的存取指示燈信號顯示方式設計會有所不同,部分硬碟可能不支援產品的
指示燈顯示方式。如果指示燈顯示不正常,但硬碟可以正常存取资料,則不影響操作,如果硬碟無
法正常存取,請聯繫我們。
4.若欲完全使用Hot-swap的功能,則主機端也需要支持Hot-swap功能
5.如欲知更多產品資訊,歡迎上網瀏覽本公司網站:https:// www.icy dock.com
。
1.本公司保留产品升级与变更之权利,如改版,恕不另行通知。
2.本公司仅负责ICY DOCK产品本身相关的维修。任何跟其它软件、硬件、硬盘的故障请联络其相关
公司协助维修。
3.由于不同厂牌和规格硬盘的存取指示灯信号显示方式设计会有所不同,部分硬盘可能不支持产品的
指示灯显示方式。如果指示灯显示不正常,但硬盘可以正常读写数据,则不影响运行,如果硬盘无
法正常读写,请联系我们。
4.若欲完全使用Hot-swap的功能,则主机端也需要支持Hot-swap功能。
5.如欲知更多产品资讯,欢迎上网浏览本公司网站:https:// www.icy dock.com
 Loading...