

Page 1

http://www.icybox.de
IB-RD3264+USE2
Quick Start Guide
4-bay RAID System with LCM Panel
English / Deutsch / Français
Page 2
Page 3
3
4-bay RAID System with LCM Panel
IB-RD3264+USE2
http://www.icybox.de
CONTENTS
Package Content .......................................................................................................................5
Front View ................................................................................................................................ 6
Rear View .................................................................................................................................6
Top View ................................................................................................................................. 6
Installing The RAID System ........................................................................................................6
RAID Conguration .................................................................................................................... 9
With LCM Operation ................................................................................................................9
LCM Basic Menu .....................................................................................................................9
With RAID MASTER Operation ................................................................................................ 12
Basic Mode Menu .................................................................................................................. 12
Advance Mode Menu ............................................................................................................. 13
Number of Disks Supporting Each RAID Mode .............................................................................. 14
LED Indicators ........................................................................................................................ 14
Power LED x 1 ...................................................................................................................... 14
RAID Alert LED x 1 ............................................................................................................... 14
HDD LED x 8 ........................................................................................................................ 14
INHALTSVERZEICHNIS
Packungsinhalt ........................................................................................................................ 15
Vorderansicht .......................................................................................................................... 16
Rückansicht ............................................................................................................................ 16
Ansicht von oben ..................................................................................................................... 16
Einrichten des RAID Systems .................................................................................................... 16
RAID Konguration .................................................................................................................. 19
Betreiben mit LCM ................................................................................................................ 19
LCM Basic Menü ................................................................................................................... 19
Betreiben mit RAID MASTER .................................................................................................. 22
Basic Mode Menü .................................................................................................................. 22
Advance Mode Menü ............................................................................................................. 23
Erforderliche Festplattenanzahl Jedes RAID Modus ....................................................................... 24
LED Anzeigen .......................................................................................................................... 24
Ein-/Aus LED x 1 .................................................................................................................. 24
RAID Alarm LED x 1 .............................................................................................................. 24
Festplatten LED x 8 ............................................................................................................... 24
TABLE DES MATIÈRES
Contenu de l'emballage ............................................................................................................ 25
Vue avant ............................................................................................................................... 26
Vue arrière ............................................................................................................................. 26
Vue de dessus ......................................................................................................................... 26
Installation du Système RAID .................................................................................................... 26
Conguration RAID .................................................................................................................. 29
Par l'écran LCD ..................................................................................................................... 29
Menu de base ...................................................................................................................... 29
Le programme RAID MASTER ................................................................................................. 32
Menu Basic Mode .................................................................................................................. 32
Menu Advanced Mode ............................................................................................................ 33
Nombre de disques supportant chaque mode RAID ...................................................................... 34
Voyants LED ........................................................................................................................... 34
Power LED x 1 ...................................................................................................................... 34
LED Alerte RAID x 1 .............................................................................................................. 34
LED des disques x 8 .............................................................................................................. 34
Page 4
Page 5
5
4-bay RAID System with LCM Panel
IB-RD3264+USE2
http://www.icybox.de
This 4-bay RAID System with LCM panel and RAID MASTER (Graphic User Interface) provides massive
storage capacity and advanced RAID conguration options with RAID 0, RAID 1, Span, Clone, RAID 5,
RAID 1+0, and optional HotSpare in a desktop storage device.
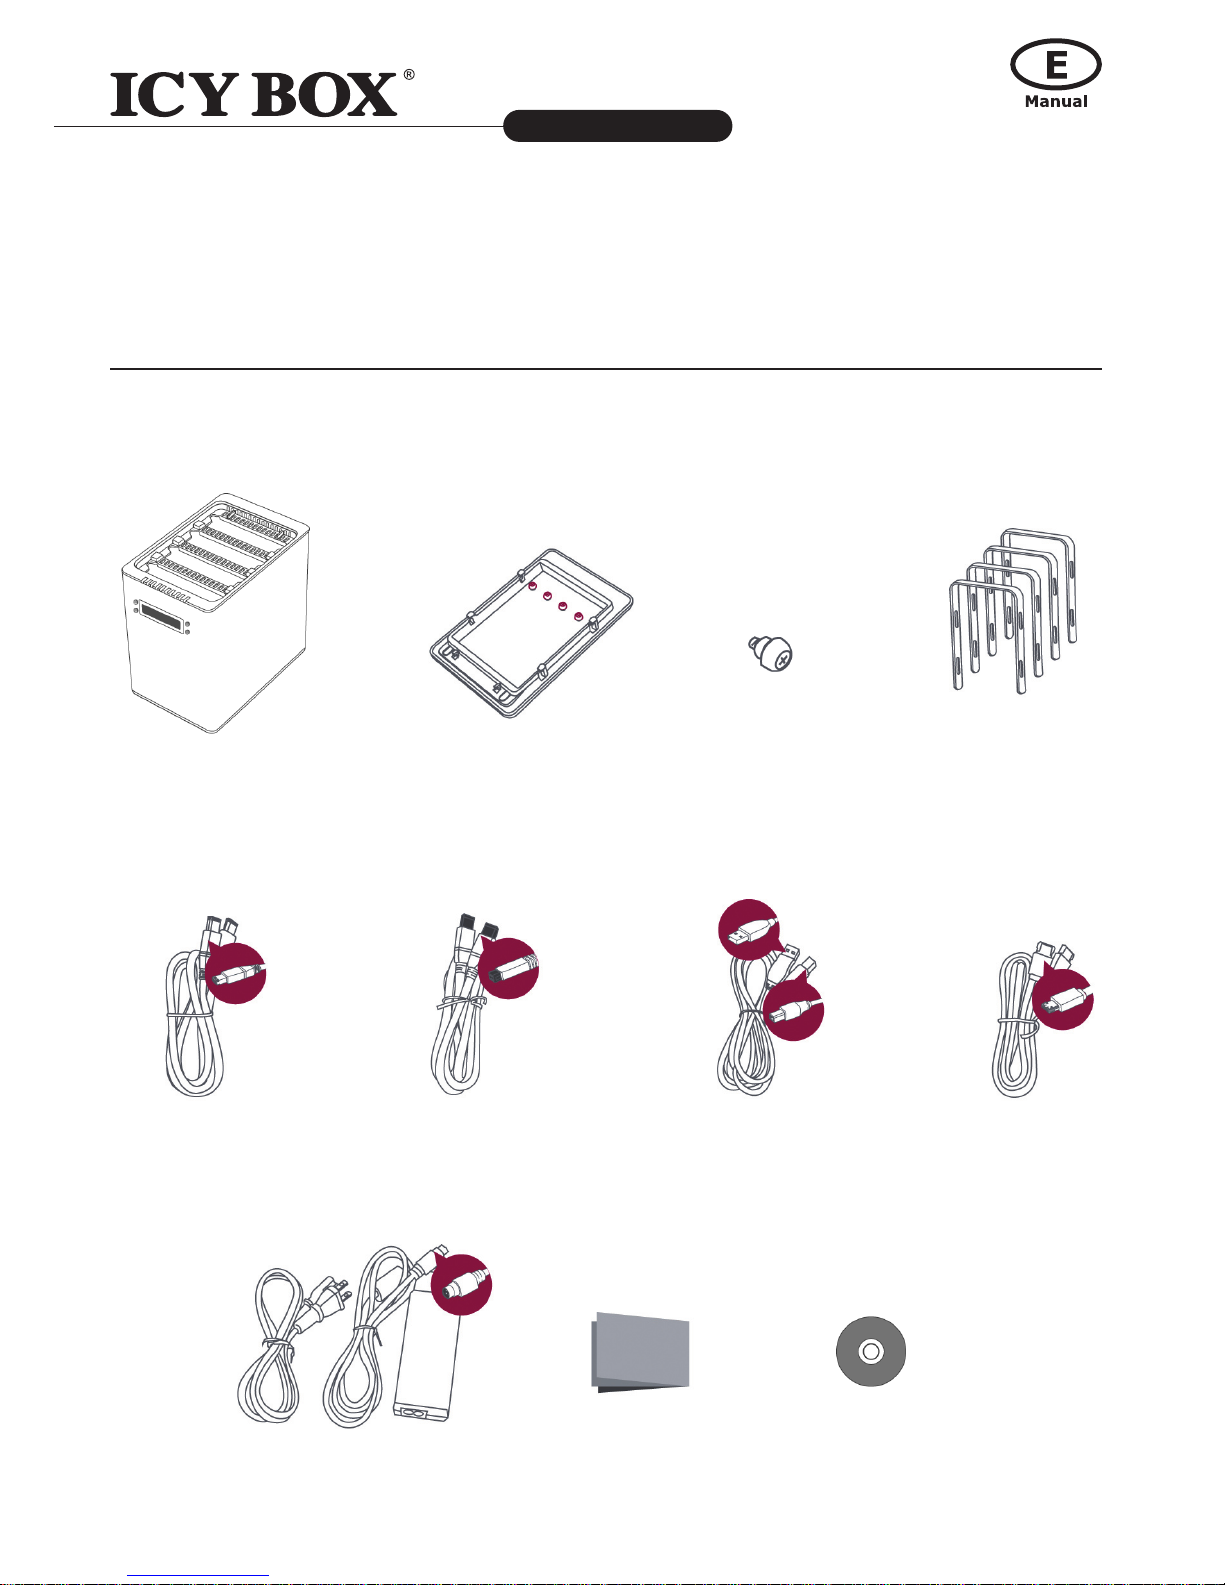
PACKAGE CONTENT
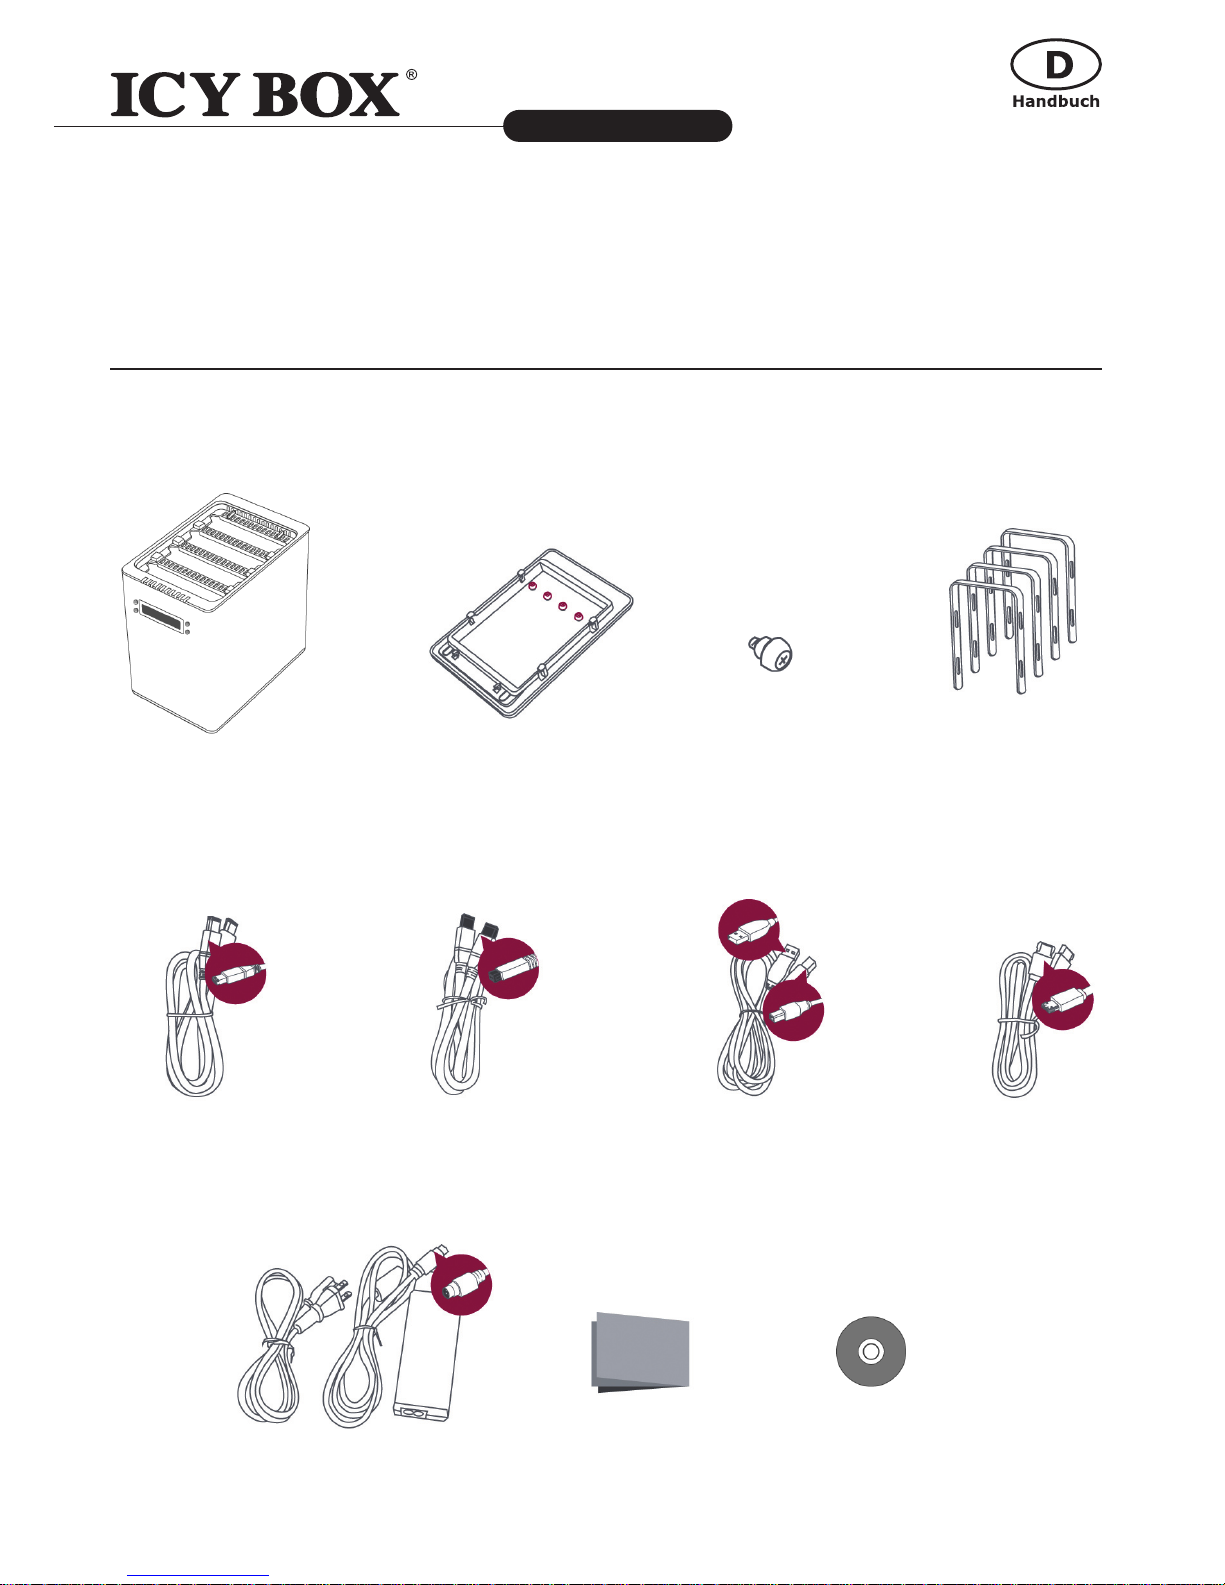
Please check all Package Contents when opening it.
FireWire 400 cable FireWire 800 cable USB Type B to A cable eSATA cable
External power supply
Quick Start Guide
4 handles16 HDD screws4 spare HDD screws
provided on back part of
cover lid
RAID System unit
CD
Page 6
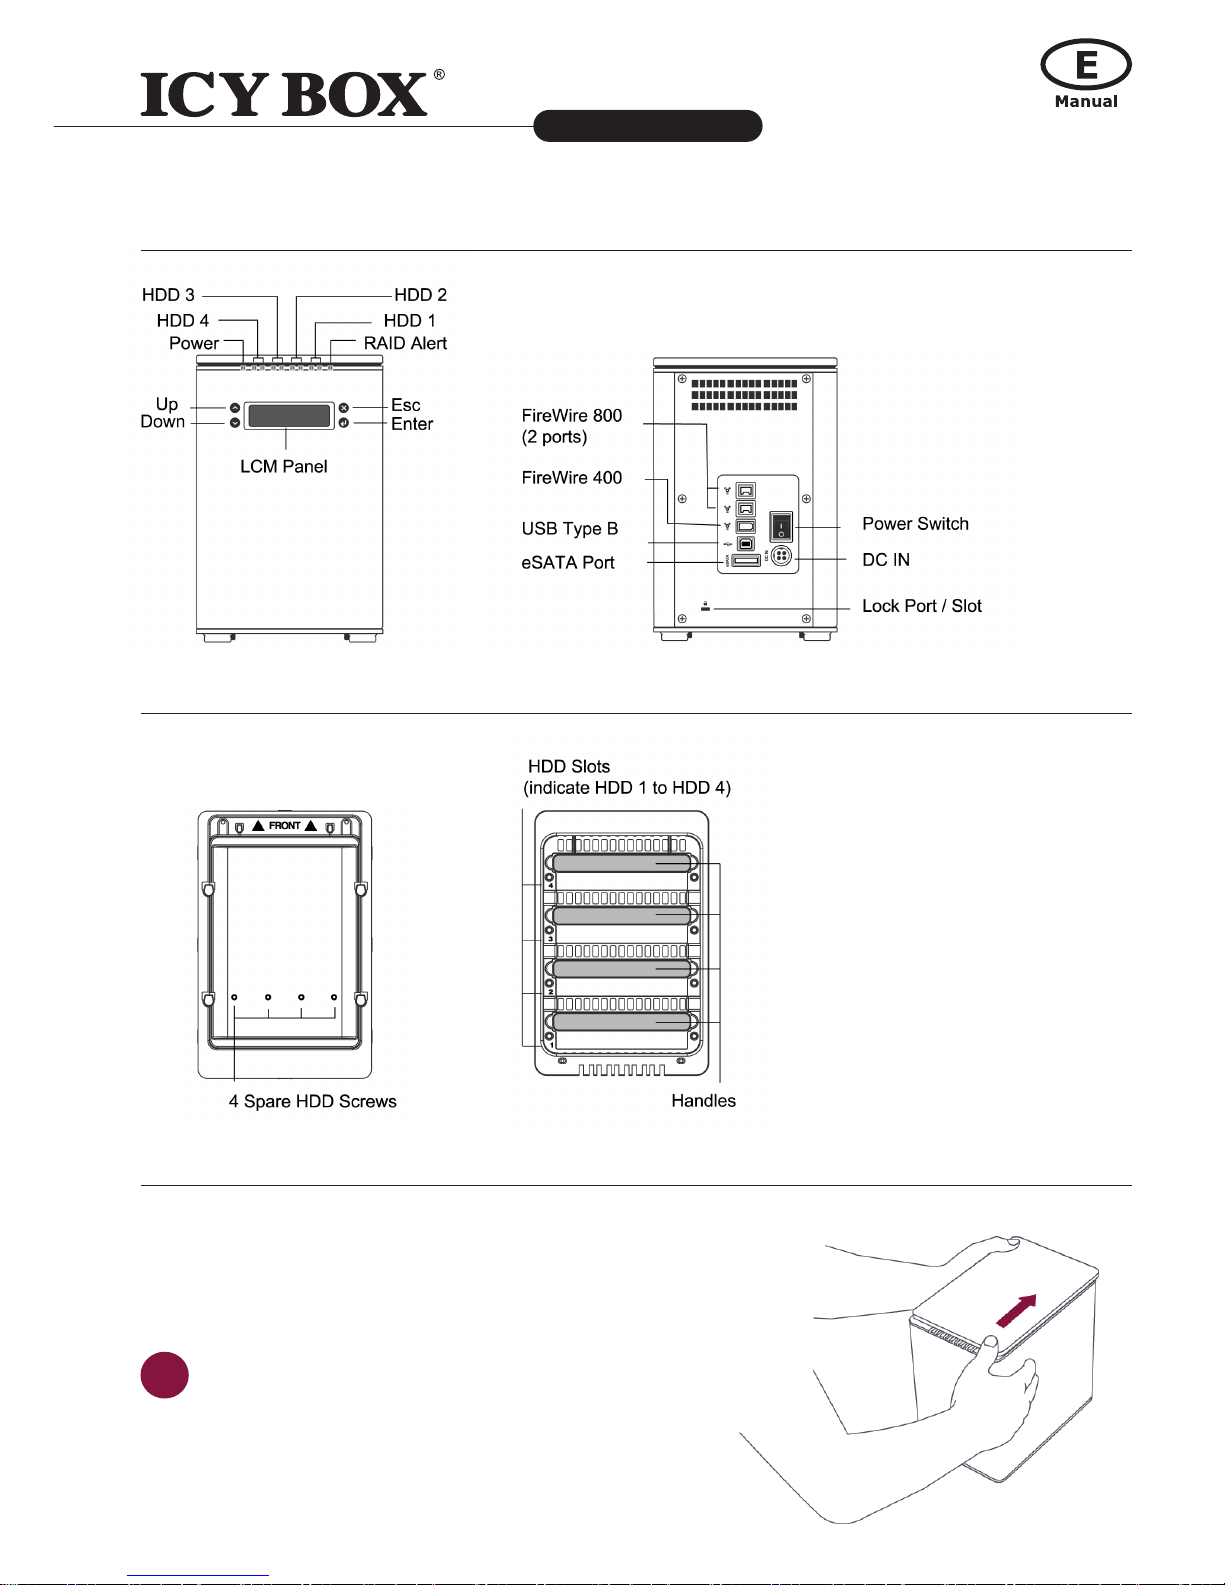
6
4-bay RAID System with LCM Panel
IB-RD3264+USE2
http://www.icybox.de
7
6
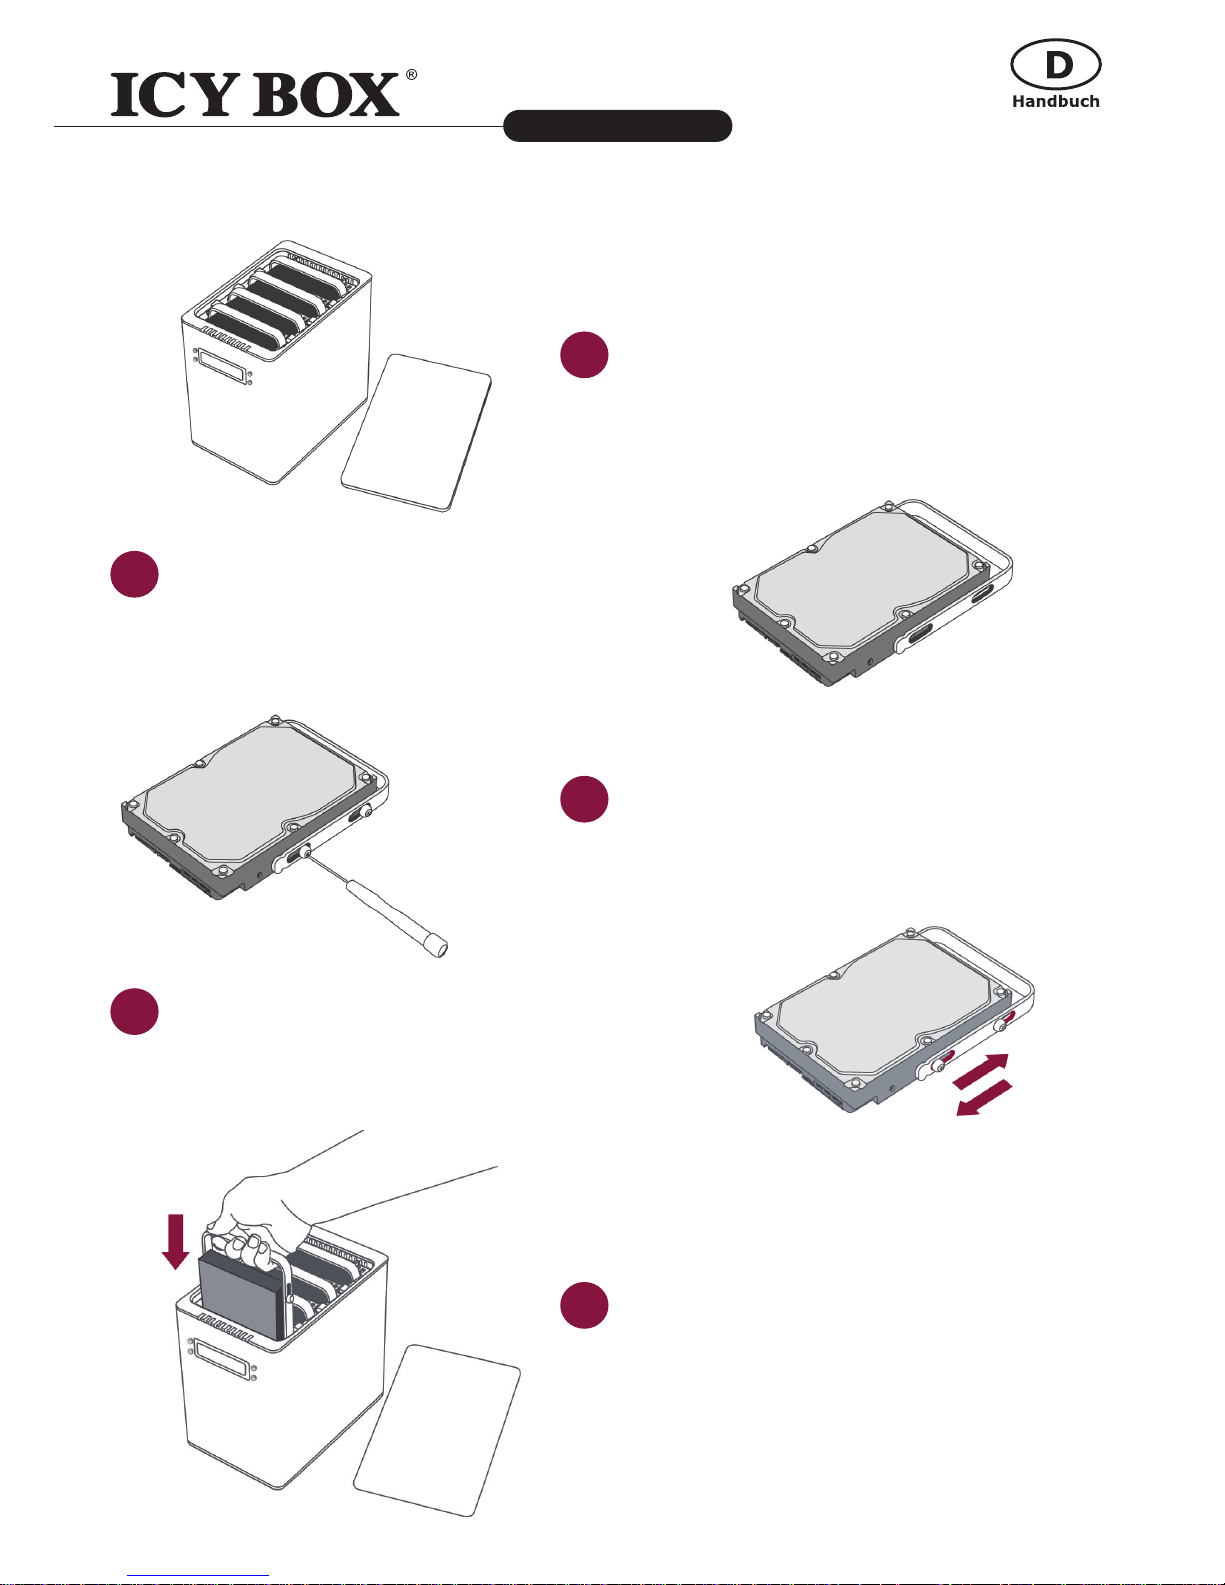
INSTALLING THE RAID SYSTEM
To assemble the RAID System, please follow the steps
listed in the instructions below:
Place the RAID System with its Front View facing
you. Push the lid in the direction away from you,
front to back, using your thumbs.
1
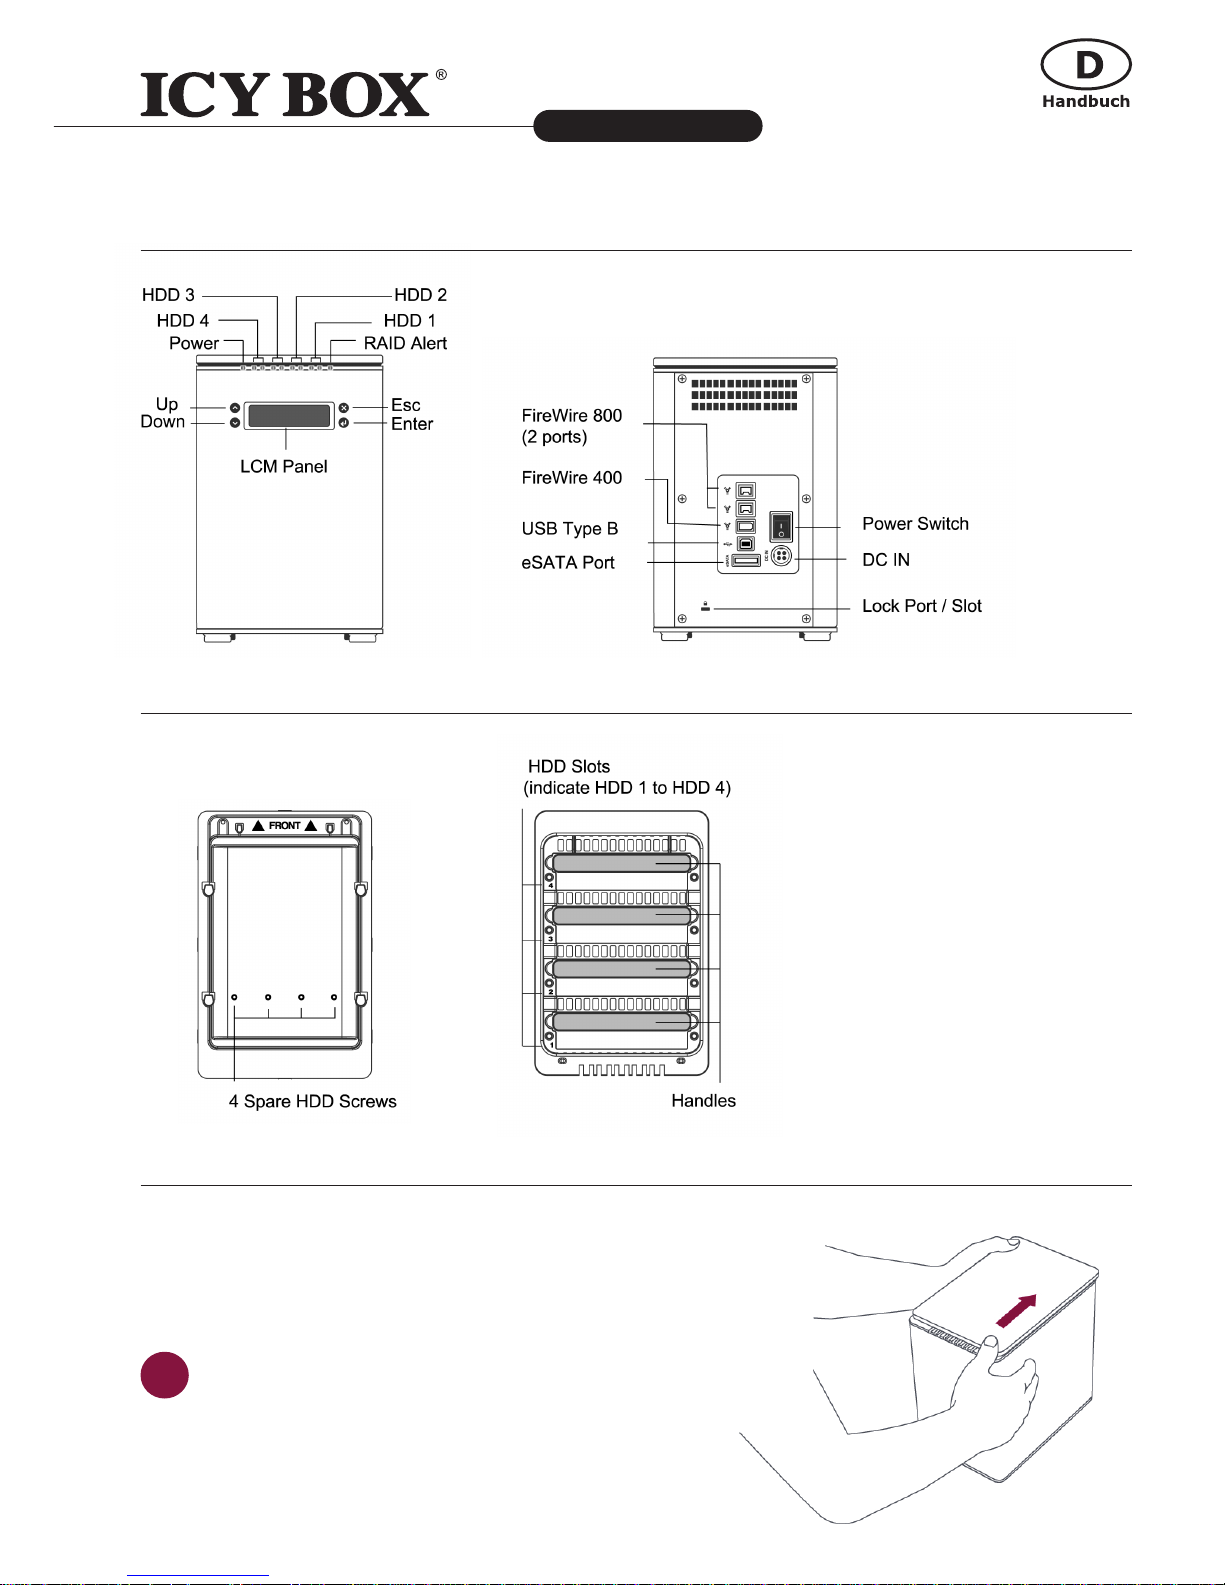
FRONT VIEW / REAR VIEW
TOP VIEW
Page 7
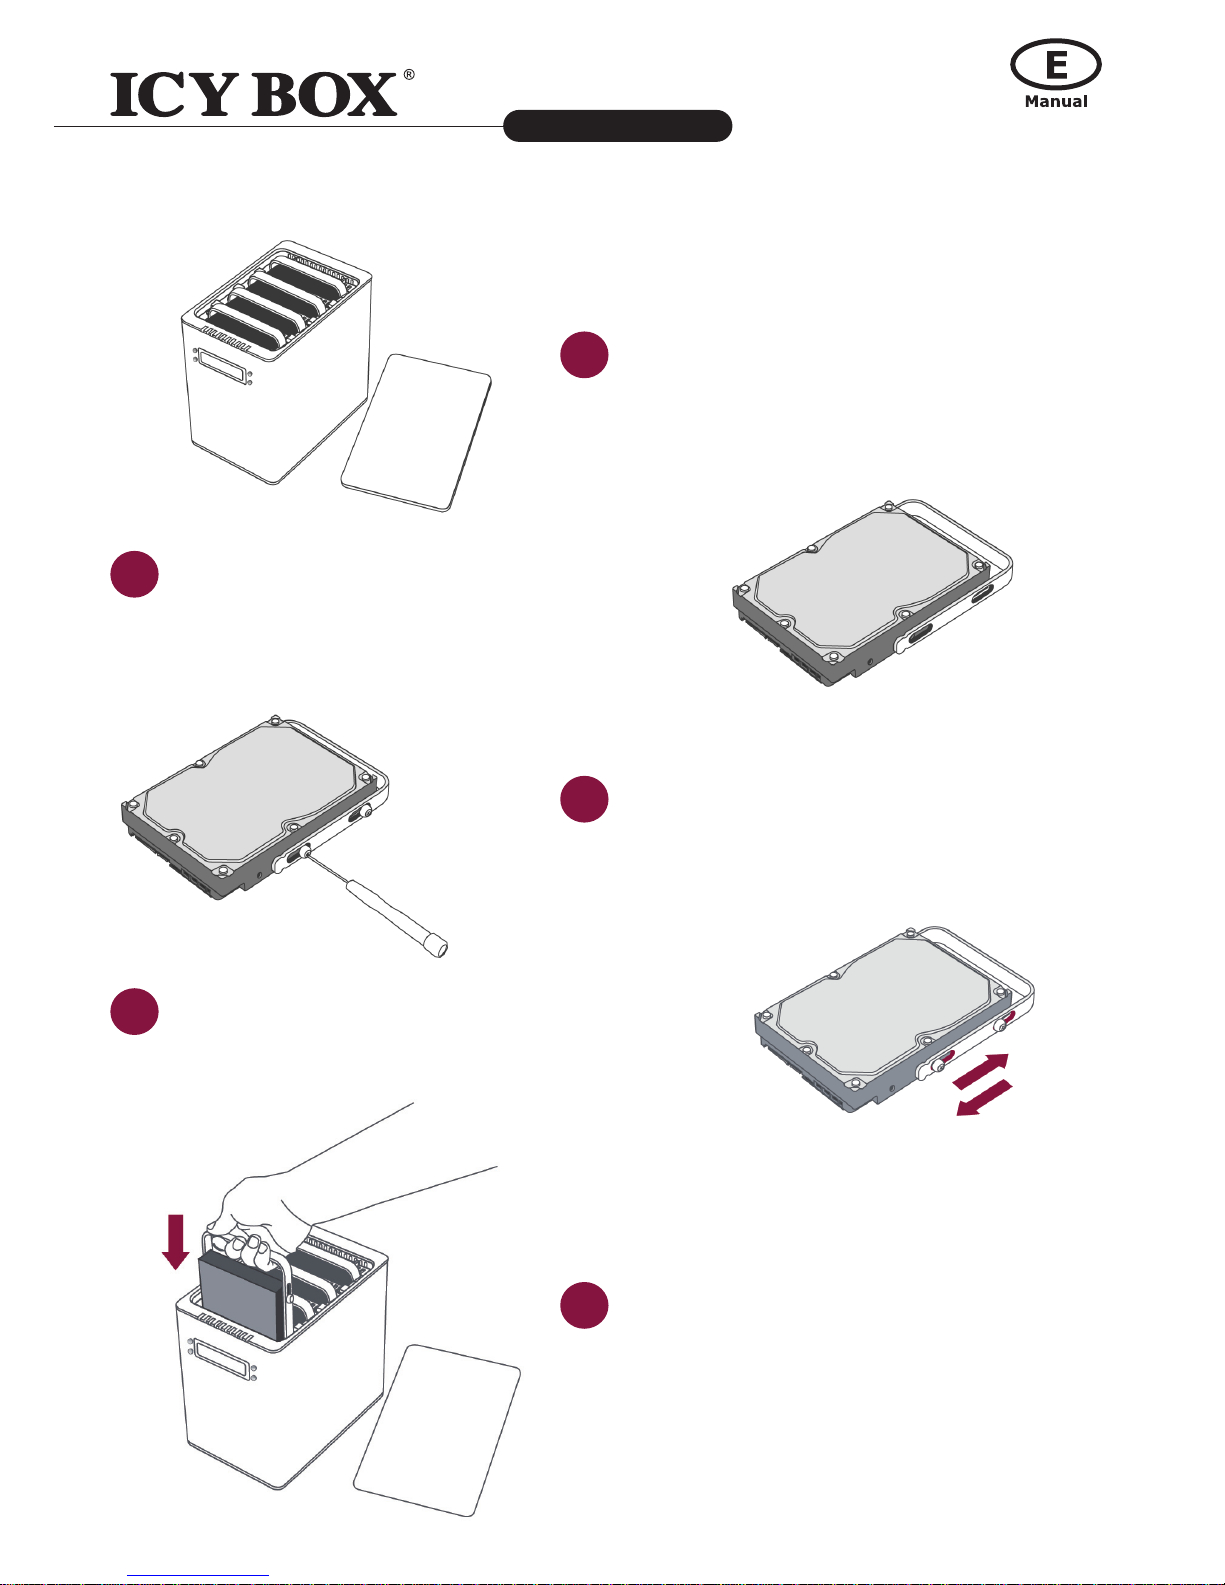
7
4-bay RAID System with LCM Panel
IB-RD3264+USE2
http://www.icybox.de
7
Position the handle to the HDD end, which is
facing away from the interface connectors, and
align it with the screw hole openings.
Finally, test slide the handle to make sure that the
holes glide smoothly on the screw guides. Repeat
the same procedures for the rest of HDDs.
3
5
Take out the handles from the RAID System itself
and locate the HDD screws in the packaging box.
Fasten the handle onto the HDD by inserting and
tightening the screws on both ends of the handle.
Align the handle with the guide rails and slide the
HDD into the indicated slot. Firmly push downward until a "thump" sound is heard. Repeat the
same procedures for the rest of HDDs.
2
4
6
Page 8
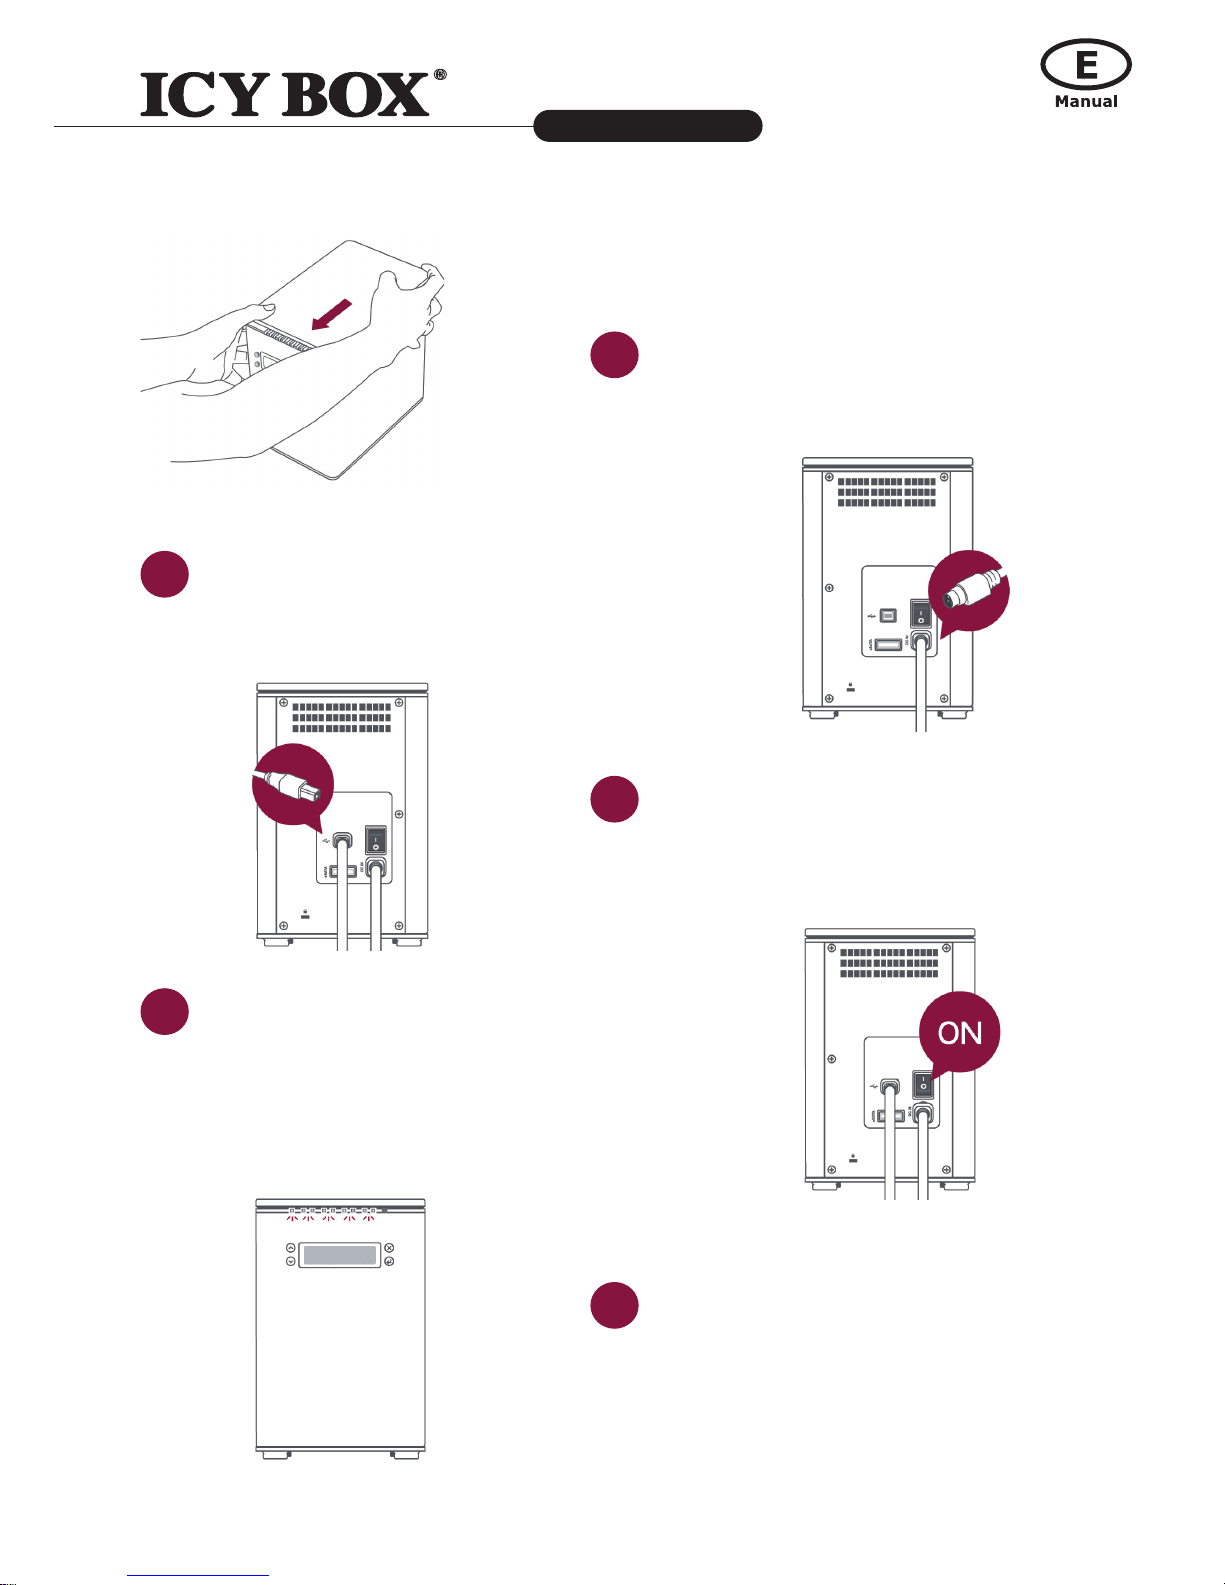
8
4-bay RAID System with LCM Panel
IB-RD3264+USE2
http://www.icybox.de
9
8
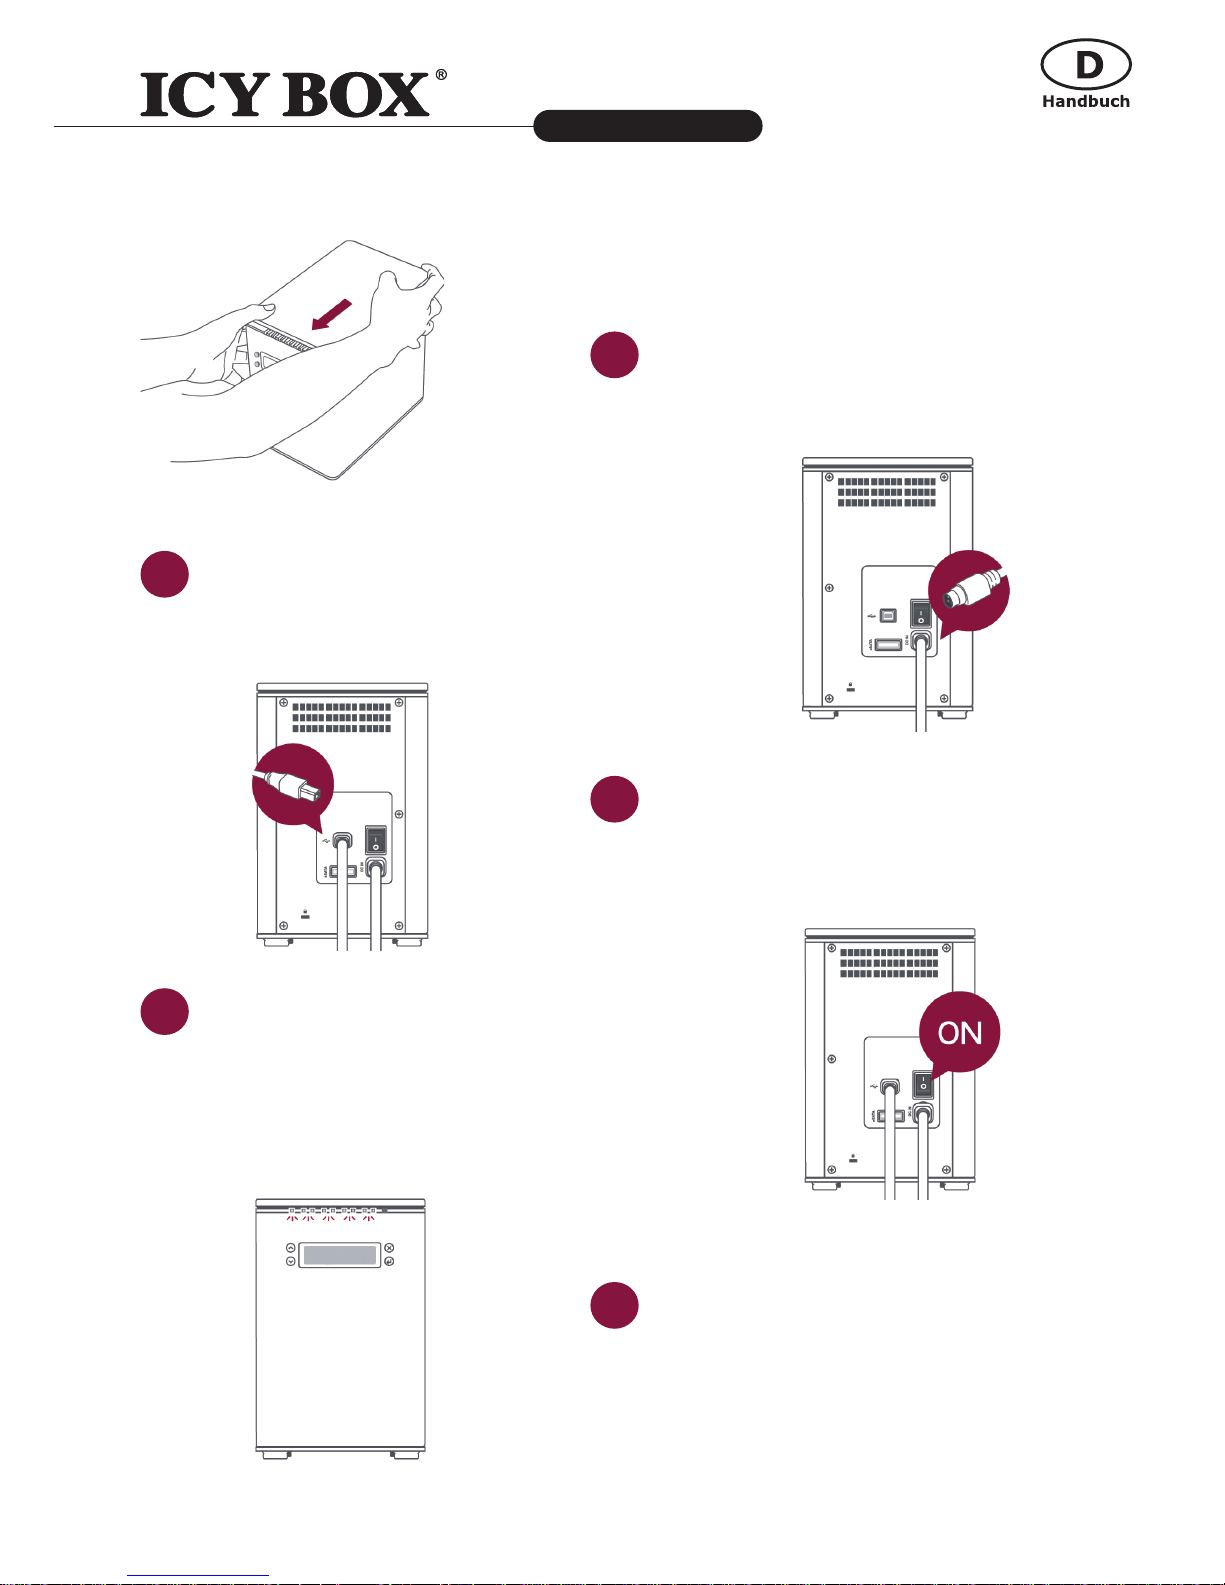
Connect the AC/DC power adapter.
Turn the power switch to the "on" position.
Place RAID System with its Front View facing you
and the top lid on. Push the lid rmly downward
and toward you, back to front.
Insert both ends of the USB 2.0 cable (or eSATA,
FireWire 400, FireWire 800) into the correspondi-
ng port of the RAID System and the host.
When connected, the Power LED light will become
steadily green, and the HDD LED lights will be-
come white and blink about 15 seconds.
7
9
11
8
10
Page 9

9
4-bay RAID System with LCM Panel
IB-RD3264+USE2
http://www.icybox.de
You are now ready to begin using your RAID
System!
12
RAID CONFIGURATION
With LCM Operation
The LCM panel on the RAID System will display basic information for the inserted HDDs, RAID System
itself, and basic RAID function operations. Please use the LCM buttons to operate.
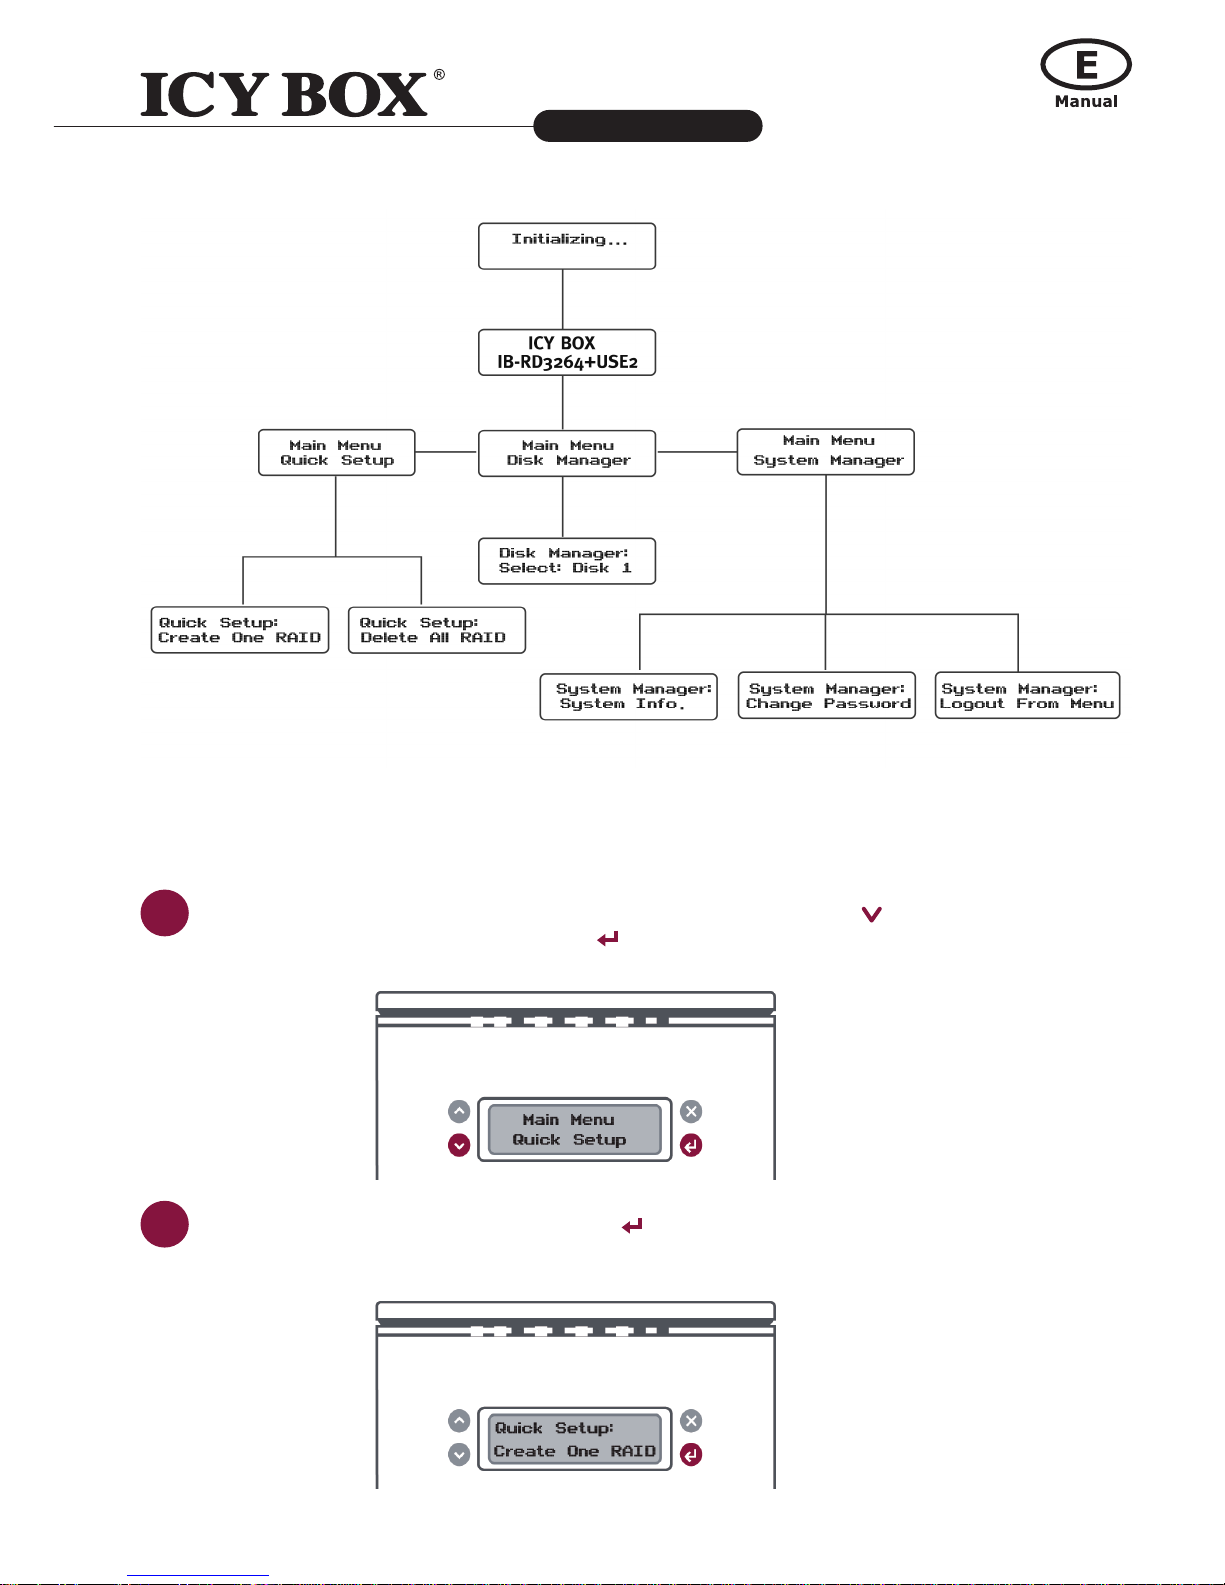
LCM Basic Menu
1. Quick Setup: Enables general basic set up functions.
● Create One RAID: To assign and create the RAID System's inserted
HDDs into a preferred RAID Mode. Also to set up a RAID Mode Password
for this particular RAID mode's HDDs.
● Delete All RAID: To delete the current RAID Mode setup in the RAID System's inserted HDDs.
2. DiskManager:ProvidesbasicinformationofspeciedHDD.
● Select Disk: To retrieve detailed information regarding the selected disk such as model, serial
number, rmware version, total capacity, unused capacity available, and disk status.
3. System Manager: Supplies basic RAID System information,
password and access capabilities.
● System Info: To retrieve detailed information regarding the RAID System
such as rmware version and control number.
● Change Password: To set up or change the password for access to the LCM operations only.
This is not the same as the RAID Mode Password set up via the RAID MASTER and LCM
(Create One RAID).
● Logout From Menu: To esc or exit from the menu.
Page 10
10
4-bay RAID System with LCM Panel
IB-RD3264+USE2
http://www.icybox.de
11
For more information about the LCM Process Tree, please go to the user manual in the provided CD.
If you wish to assign and create the RAID using the LCM only, please follow the steps listed in the in-
structions provided below:
1
Turn "On" the RAID System. Under Main Menu, press Down Button ( )
to select "Quick Setup" and press Enter (
).
2
Select "Create One RAID" and press Enter ( )
Page 11
11
4-bay RAID System with LCM Panel
IB-RD3264+USE2
http://www.icybox.de
3
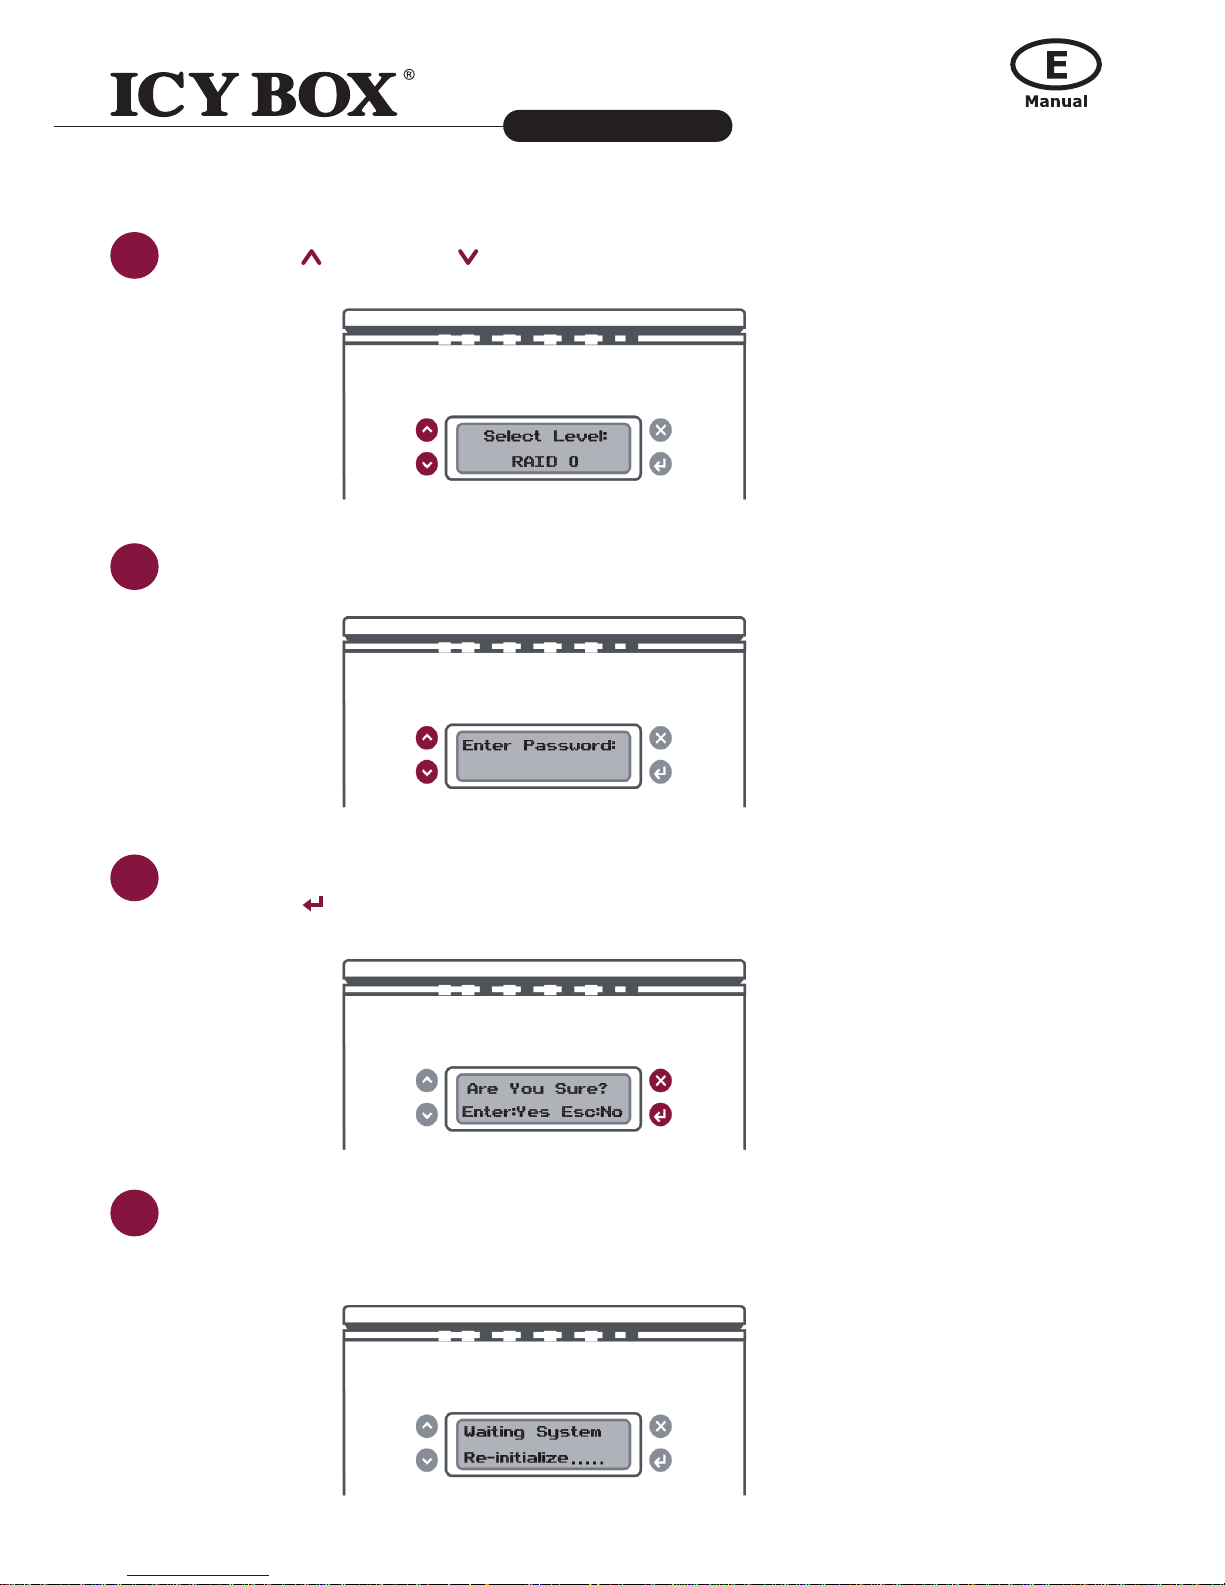
Use the Up ( ) and Down ( ) Buttons to select which RAID Mode to use.
4
Enter the "password".
5
After verifying the "password", it will display "Are You Sure? Enter: Yes Esc: No"
Press Enter (
) to conrm or Esc ( x ) to cancel.
6
Then, the RAID System will begin processing the preferred RAID Mode and display
"Waiting System Re-initialize…". Once completed, the RAID System is ready for usage
under the chosen RAID Mode!
Page 12
12
4-bay RAID System with LCM Panel
IB-RD3264+USE2
http://www.icybox.de
13
With RAID MASTER Operation
The RAID MASTER is a newly-designed GUI Software specically for our 4-bay RAID System. The drivers
of the RAID MASTER for both PC and MAC are provided via CD or our website. It provides a more convenient yet modern way to manage your RAID System.
Please follow the steps listed in the instructions provided below:
1. If using the installation CD, please copy the driver for MAC or PC to your Desktop.
Double click the driver to decompress. Then, open the folder stating "RAID MASTER_vx.xx.xx".
2. Once opened: For MAC, please double click on the "RAID MASTER" to open the program.
For PC, please double click on the icon stating "Setup.exe" to begin set up.
3. Once the installation is completed, the RAID MASTER Menu page should appear.
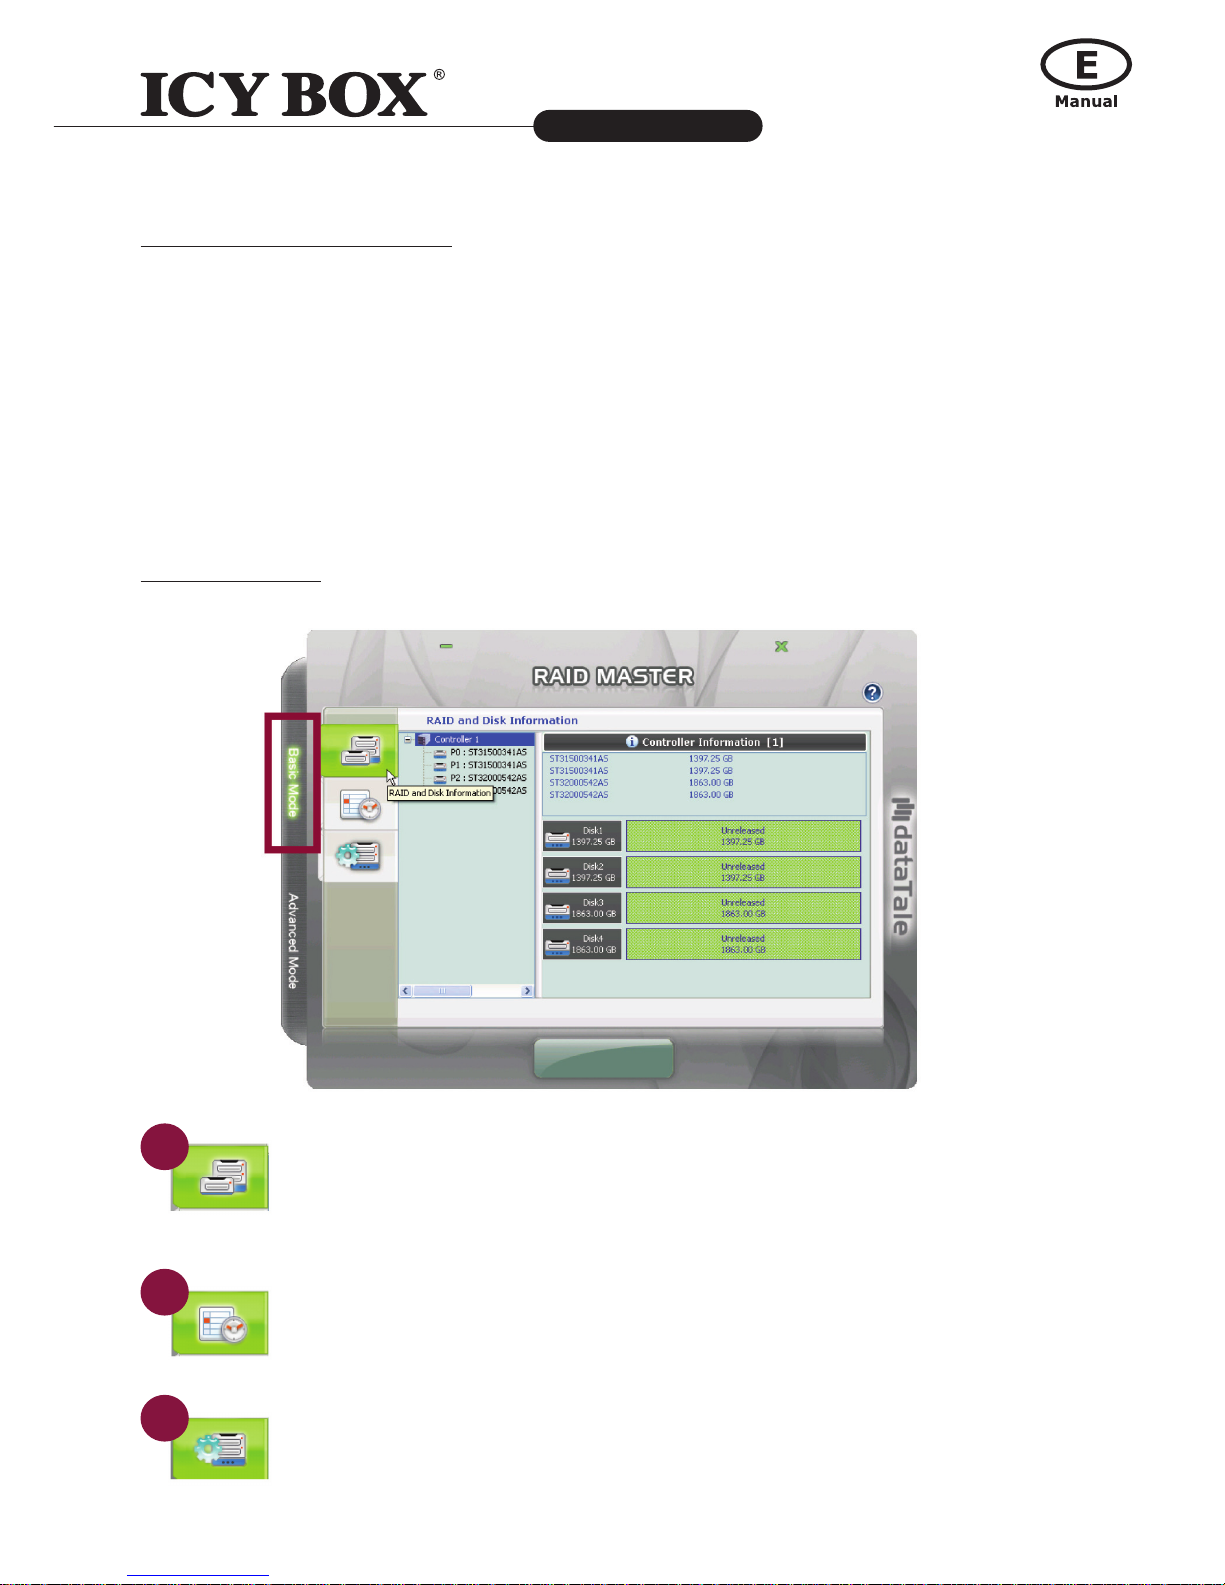
Basic Mode Menu
RAID and Disk Information: Provides the basic information for the RAID System
itself once the RAID System is connected to the host. For example, the Controller
information, serial number for each inserted HDDs, what kind of RAID format is
assigned for each inserted HDDs, and much more.
Event Log: Records all process completed for the RAID System and can be saved
to a text format le.
BasicRAIDConguration:
● Provides the basic RAID Mode setup and conguration.
● Give a place to insert and apply a password to protect any
changes done on the RAID System.
● Shows what type of RAID Mode is setup at the moment for the inserted HDDs.
1
2
3
Page 13
13
4-bay RAID System with LCM Panel
IB-RD3264+USE2
http://www.icybox.de
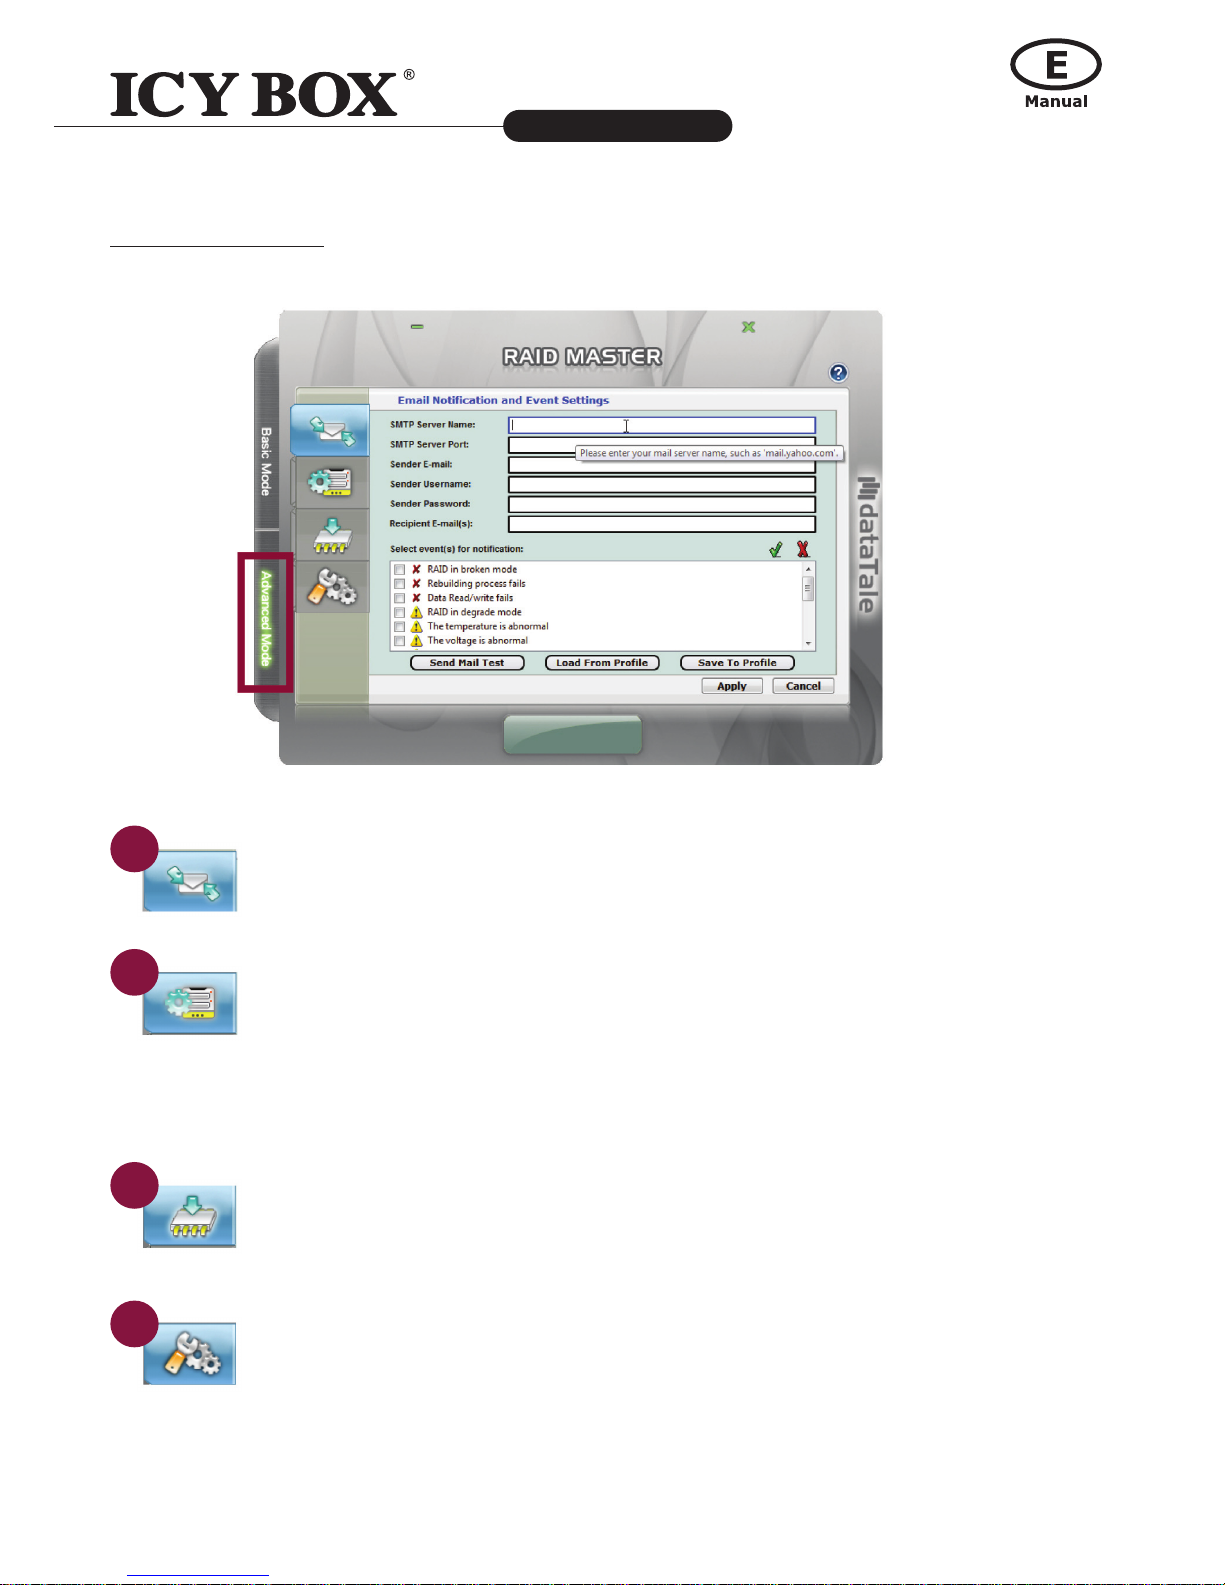
Advance Mode Menu
EmailNotication&EventSetttings: Available to set up Email Notication (such as
events of errors, alert, and change of the RAID System) and Event Settings based on
preference.
AdvancedRAIDConguration:
Similar to Basic RAID conguration with additional options.
● Select which HDDs and their storage capacities.
● Perform a combination of RAID Modes at same time. For example, creating two sets
of RAID 1 or have a combination set of RAID 0 and RAID 1.
● Assign an additional HDD as the Spare to perform Automatic Rebuild when one of
the HDD already in a RAID Mode setup fails (for RAID 1, CLONE, and RAID 5 only.)
Firmware Information: Provides Controller’s rmware information such as product
name, rmware version, manufacturer, and ash number. Also, gives an option to
update the rmware when necessary.
RAID Settings: Allow set up of RAID Standby Timer Settings and RAID Rebuild
Priority Settings based on preference.
For more information about the RAID MASTER operation, please go to the user manual in the
provided CD.
1
2
3
4
Page 14
14
4-bay RAID System with LCM Panel
IB-RD3264+USE2
http://www.icybox.de
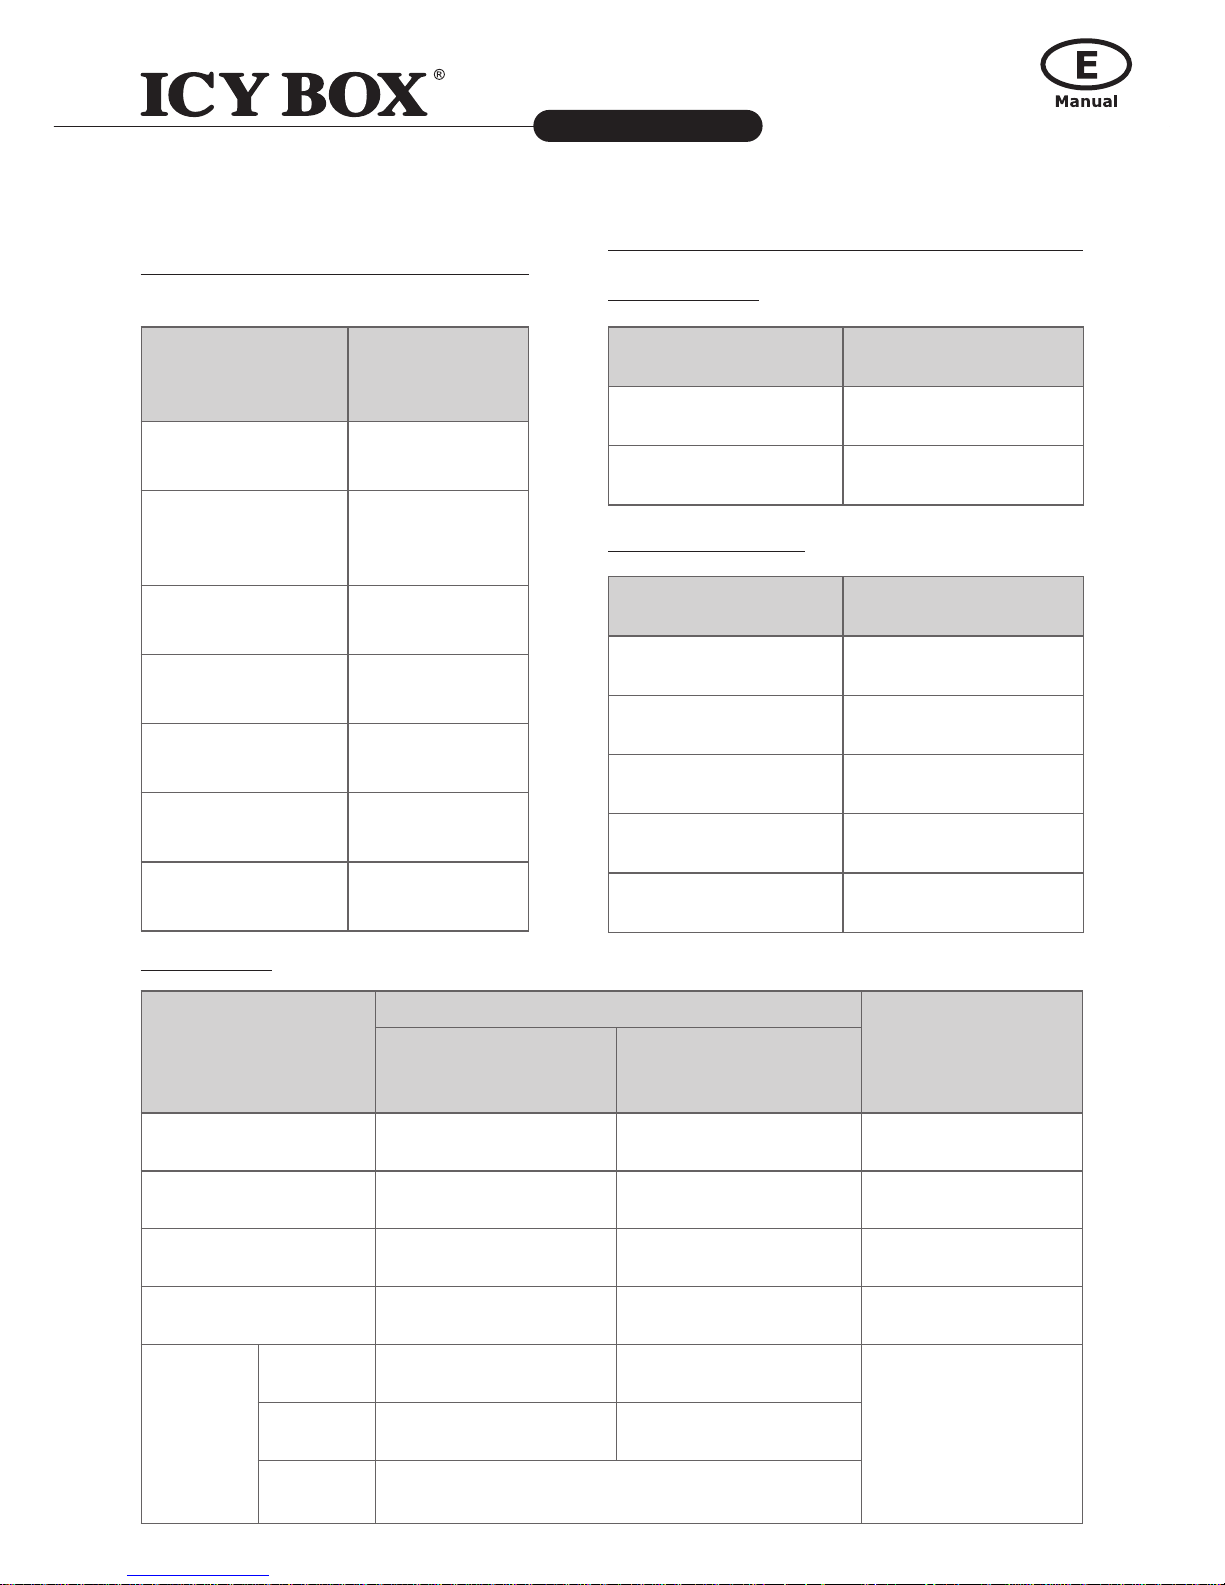
NUMBER OF DISKS SUPPORTING
EACH RAID MODE
RAID Modes
Number of
Disk in RAID
RAID 0 (Striping) 2 to 4
RAID 1
(Mirroring)
2
Span 2 to 4
Clone 2 to 4
RAID 5 3 or 4
RAID 1+0 4
JBOD 1 to 4
LED INDICATORS
Indicators Color
Power on Green
Power off None
Indicators Color
Healthy None
Rebuild Blink Red
Broken Red
Degrade Red
Fan Error Red
Power LED x 1
Indicator
HDD (1, 2, 3, 4)
RAID mode
Left (Connection/
Access)
Right (Health)
Disk not detected None None All modes
Disk detected White None All modes
Disk not healthy White Red All modes
Data access Flash White None All modes
Disk
Rebuild
Source
HDD
White None
RAID 1, RAID 5,
RAID 1+0, Clone
Target
HDD
Flash White Blink Red
RAID
Alert
Blink Red
HDD LED x 8
RAID Alert LED x 1
Page 15
4-fach RAID System mit LCM Panel
IB-RD3264+USE2
http://www.icybox.de
Das 4-Bay RAID System mit LCM Panel und RAID MASTER (Graphic User Interface) bietet größte Spei-
cherkapazität und fortschrittliche RAID Kongurationsauswahl in einem eleganten Desktop-Storagegerät,
wie RAID 0, RAID 1, Span, Clone, RAID 5, RAID 1+0, und optionale HotSpare.
PACKUNGSINHALT
Bitte überprüfen Sie den Packungsinhalt.
FireWire 400 cable FireWire 800 cable USB Type B to A cable eSATA cable
External power supply
Quick Start Guide
4 handles16 HDD screws4 spare HDD screws
provided on back part of
cover lid
RAID System unit
CD
Page 16
16
4-fach RAID System mit LCM Panel
IB-RD3264+USE2
http://www.icybox.de
17
16
EINRICHTEN DES RAID SYSTEM
Bitte führen Sie die nachstehenden Schritte vollständig aus,
um das RAID System einzurichten.
Stellen Sie das RAID System mit der Vorderseite
vor sich hin. Legen Sie die Hand auf den vorderen
und die andere Hand auf den hinteren Rand des
Deckels. Schieben Sie den Deckel mit beiden
Daumen gleichzeitig in Pfeilrichtung.
1
FRONTANSICHT / RÜCKANSICHT
ANSICHT VON OBEN
Page 17
17
4-fach RAID System mit LCM Panel
IB-RD3264+USE2
http://www.icybox.de
17
Legen Sie den Handgriff an die rechte Seite der
Festplatte und bringen Sie die Schraubenlöcher
mit denen der Festplatte in Übereinstimmung.
Bewegen Sie anschließend den Handgriff auf
und ab. Stellen Sie sicher, dass der Handgriff
reibungslos gleiten kann. Wiederholen Sie die
Schritte mit weiteren Festplatten.
3
5
Heben Sie den Deckel ab und nehmen Sie die
Handgriffe aus dem Gehäuse und die FestplattenSchrauben aus der Packung heraus.
Befestigen Sie den Handgriff an der Festplatte,
indem Sie die Schrauben einsetzen und anziehen.
Richten Sie den Handgriff nach der Führungsschiene aus und schieben Sie die Festplatte in
den Slot ein, bis Sie ein "Klick" Ton vernehmen.
Wiederholen Sie dieses Vorgehen mit den anderen
Festplatten.
2
4
6
Page 18
18
4-fach RAID System mit LCM Panel
IB-RD3264+USE2
http://www.icybox.de
19
18
Schließen Sie das Netzteil an das Gehäuse an.
Schalten Sie nun das RAID System ein.
Stellen Sie das RAID System mit der Vorderseite
vor sich hin und legen Sie den Deckel auf das Gehäuse. Schieben Sie den Deckel mit Ihren beiden
Daumen gleichzeitig in Pfeilrichtung.
Schließen Sie die Enden des USB 2.0, eSATA,
FireWire 400 oder FireWire 800 Kabels an die ent-
sprechenden Anschlüsse des RAID Systems und
des Host-Computers an.
Bei Verbindung brennt das Ein-/Aus-Licht konstant grün und die Festplatten LED werden weiß
und blinken für ca. 15 Sekunden auf.
7
9
11
8
10
Page 19
19
4-fach RAID System mit LCM Panel
IB-RD3264+USE2
http://www.icybox.de
Jetzt ist das RAID System zur Nutzung bereit!!
12
RAID KONFIGURATION
Betreiben mit LCM
Der LCM auf dem RAID System zeigt die Grundinformation der eingesetzten Festplatten, des RAID
Systems,und der RAID Grundfunktionen.
Bitte benutzen Sie die LCM Buttons zum Betreiben.
LCM Basic Menü
1. Quick Setup: Aktiviert allgemeine Grundeinstellungen.
● Create One RAID: Um das Raid System zuzuweisen bzw. zu erstellen, können Sie hier die Festplatten in den bevorzugten Raid Modus versetzen und auch ein Passwort für den Raid-Modus
setzen.
● Delete All RAID: löscht alle Einstellungen des RAID Modus im RAID System.
2. DiskManager:bietetdieGrundinformationderspezischenFestplatte.
● Select Disk: ruft die Detailinformaion bezüglich der ausgewählten Festplatte ab, wie Modell,
Seriennummer, Firmware-Version, Gesamtkapazität, freie verfügbare Kapazität,und Festplat-
tenzustand.
3. System Manager: bietet Grundinformation des RAID Systems, Passwort und
Übertragungskapazitäten.
● System Info: ruft die Detailinformation des RAID Systems ab, wie Firmware-Version und
Kontrollenummer.
● Change Password: Das Passwort für den Zugriff auf das Betreiben mit LCM ist hier einzustellen
oder zu ändern. Das Passwort ist nicht gleich mit dem Passwort, das zur Erstellung eines RAID
Modus durch den RAID MASTER und LCM eingestellt wird.
● Logout From Menu: Verlassen Sie das Menü.
Page 20
20
4-fach RAID System mit LCM Panel
IB-RD3264+USE2
http://www.icybox.de
21
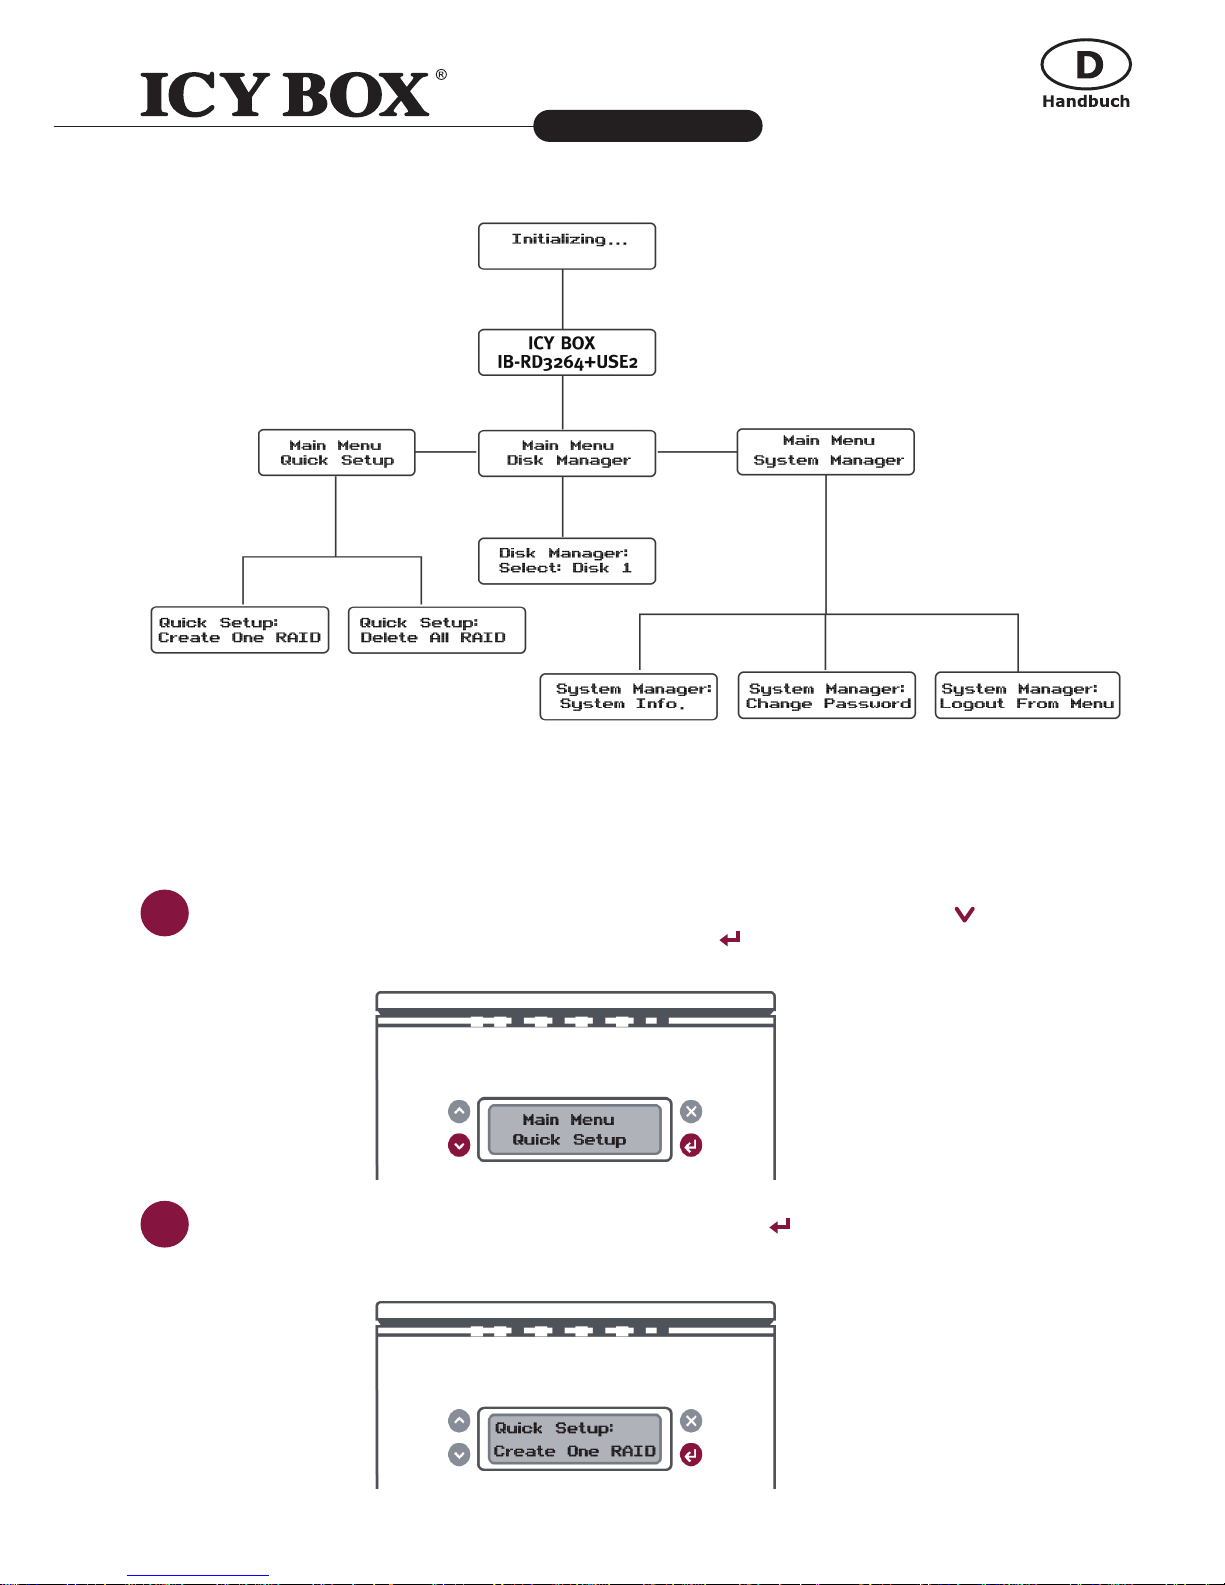
Weitere Informationen über die LCM Baumstruktur, nden Sie im User’s Manual in der beigefügten CD.
Wenn Sie ein RAID Modus nur durch LCM erstellen möchten, bitte folgen Sie die in dieser Anleitungen
vorhandenen Schritte:
1
Schalten Sie das RAID System ein. Unter Main Menu, drücken Sie den Button ( )
wählen Sie "Quick Setup" aus und drücken Sie Enter (
) herab.
2
Wählen Sie "Create One RAID" aus und drücken Sie Enter ( )
Page 21
21
4-fach RAID System mit LCM Panel
IB-RD3264+USE2
http://www.icybox.de
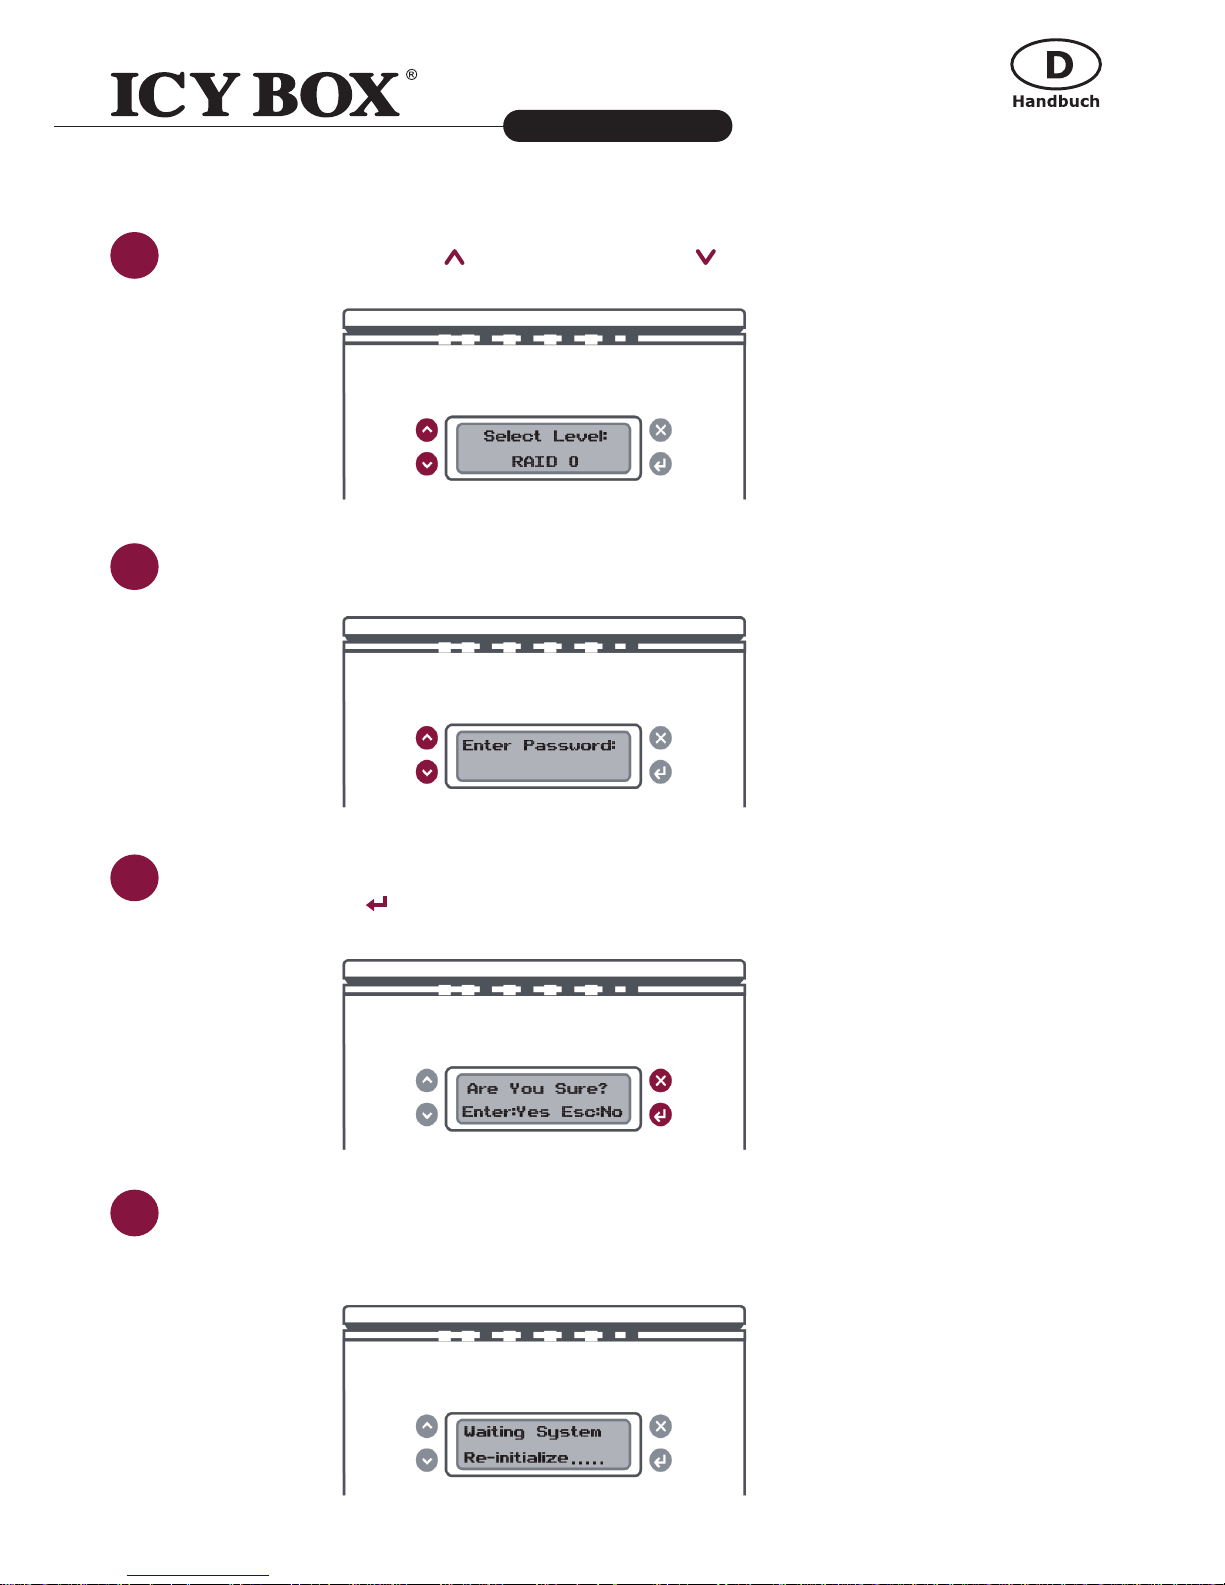
3
Benutzen Sie die Aufwärts ( ) und Abwärtsbuttons ( ) um ein RAID Modus auszuwählen.
4
Geben Sie Ihr "password" ein.
5
Nachdem Ihr "password" überprüft worden ist, wird "Are You Sure?" gezeigt.
Drücken Sie Enter (
) zur Bestätigung, oder Esc ( x ) zum Abbrechen.
6
Danach fängt das RAID System an, den bevorzugten RAID Modus zu verarbeiten und es wird
"Waiting System Re-initialize…" gezeigt. Sobald der Prozess endet, ist das RAID System bereit
unter dem ausgewählten RAID Modus zu benutzen!
Page 22
22
4-fach RAID System mit LCM Panel
IB-RD3264+USE2
http://www.icybox.de
23
Betreiben mit RAID MASTER
Der RAID MASTER ist eine neu erschaffene GUI Software, die für unser 4-Bay RAID System geeignet
ist. Die Treiber des RAID MASTER für PC und MAC werden via CD oder unsere Website geboten. Der
RAID MASTER bietet eine nicht nur praktische sondern auch fortschrittliche Weise, Ihr RAID System zu
verwalten.
Bitte folgen Sie die in dieser Anleitungen vorhandenen Schritte:
1. Wenn Sie die Installation CD benutzen möchten, kopieren Sie bitte den Treiber für MAC oder PC
auf Ihren Desktop. Doppelklicken Sie den Treiber, um ihn zu dekomprimieren. Dann öffnen Sie
den Ordner "RAID MASTER_vx.xx.xx".
2. Sobald der Ordner geöffnet ist, doppelklicken Sie bitte auf "RAID MASTER", um das Programm
anzuwenden. Für PC Benutzer, bitte doppelklicken Sie auf "Setup.exe" zur Anwendung.
3. Sobald die Installation fertig ist, sollte das RAID MASTER Menü gezeigt werden.
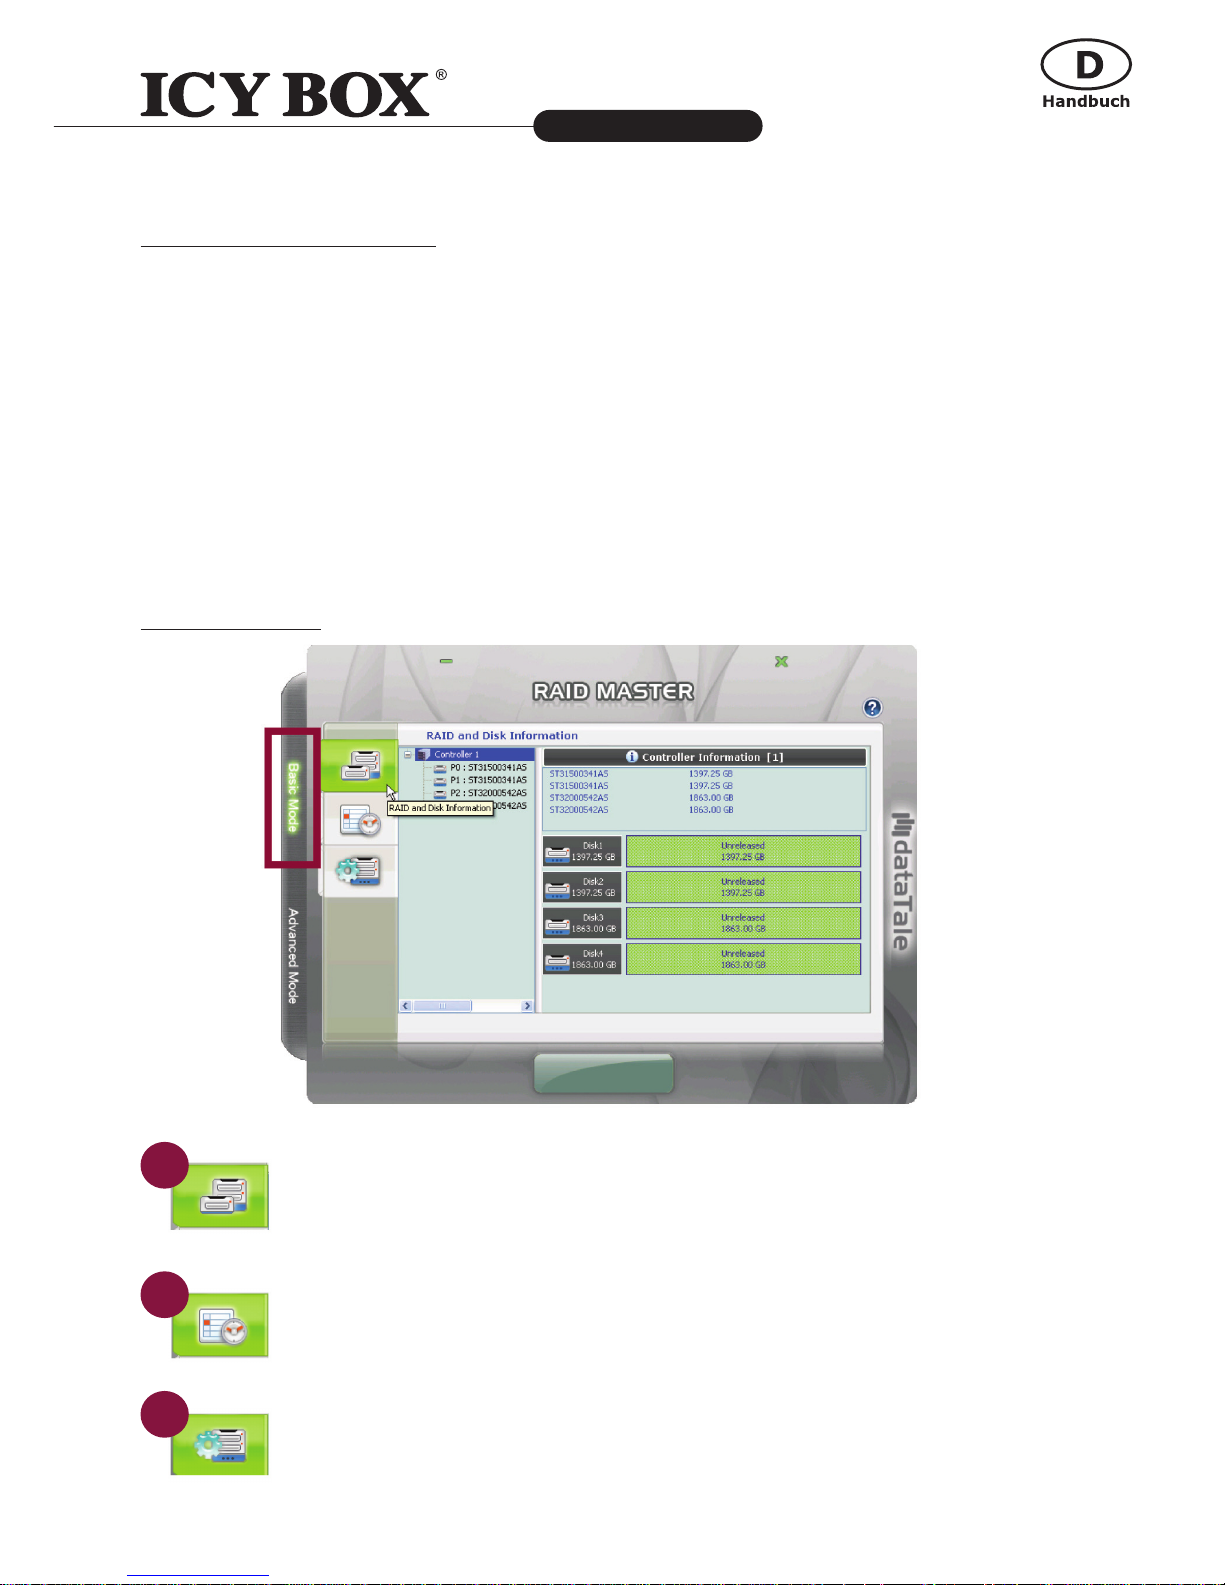
Basic Mode Menü
Informationen zu RAID und Festplatte: bietet die Grundinformation des RAID
Systems bei Verbindung des RAID Systems an dem Host. z.B. die Kontroller Informati-
on, Seriennummern sämtlicher eingesetzten Festplatten, welches RAID Format für jede
eingesetzte Festplatte verwendet wird, usw.
Event Log: nimmt allen ausgeführten Prozess für das RAID System auf und alle Daten
lassen sich ins Text-Format speichern.
BasicRAIDKonguration:
● Bietet die Grundeinstellung des RAID Modus und Konguration.
● Eingabe oder Anmeldung eines Passworts, um jegliche Änderung im RAID
System zu schützen.
● Zeigt die aktuellen Einstellungen des RAID Modus für die eingesetzten Festplatten.
1
2
3
Page 23
23
4-fach RAID System mit LCM Panel
IB-RD3264+USE2
http://www.icybox.de
Advance Mode Menü
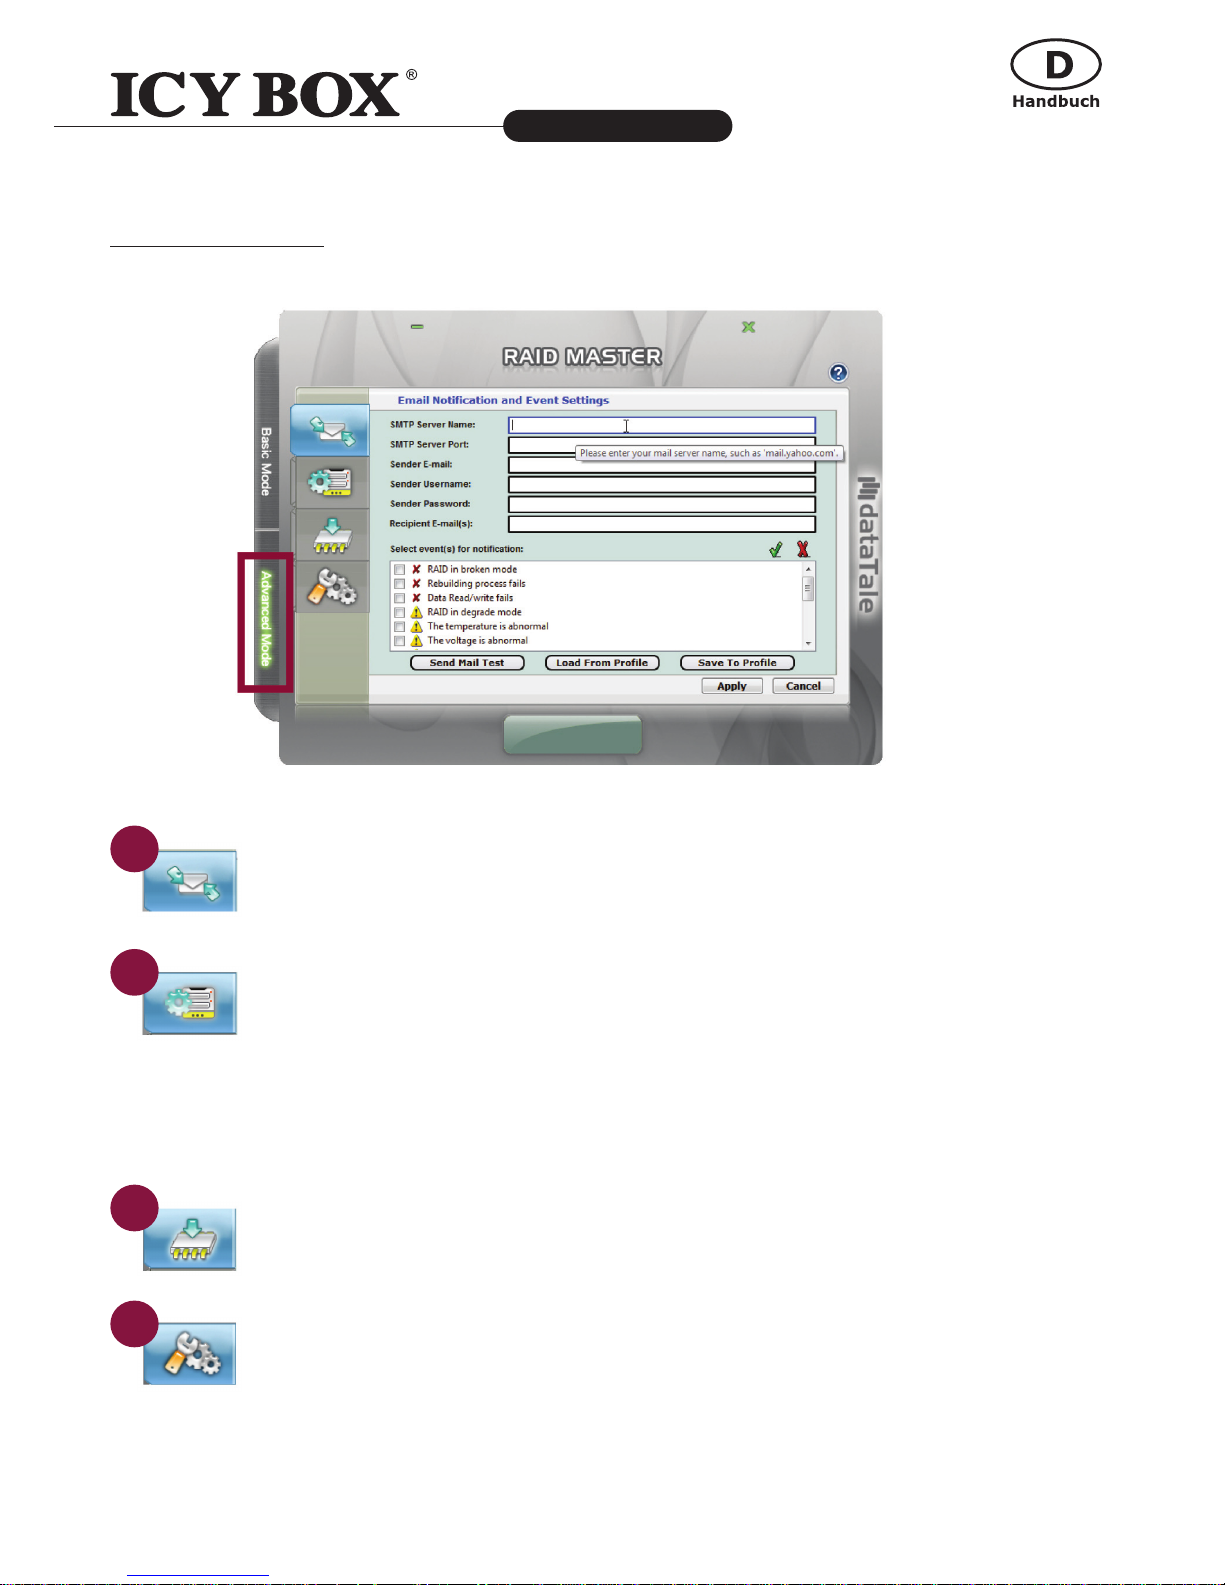
Emailbenachrichtigung und Ereigniseinstellung: Emailbenachrichtigung einzurich-
ten.(z.B Fehler Hinweise, Alarm, und Änderungen des RAID Systems) und Ereigniseinstellungen basierend auf Ihren persönlichen Prioritäten.
AdvancedRAIDKonguration:
ist der RAID Grundkonguration ähnlich und noch mit zusätzlichen Optionen.
● Auswählen der Festplatten und der entsprechenden Kapazitäten.
● Ermöglicht eine gleichzeitige Kombiation von RAID Modus. z. B. 2 Volumen mit
RAID 1 eine Kombination von RAID 0 und RAID 1.
● Bestimmt eine zusätzliche Festplatte als die Spare, um die automatische Wiederherstellung durchzuführen, falls eine schon in einem RAID Modus eingesetzte Festplatte
ausfällt. (nur für RAID 1, CLONE, und RAID 5)
Firmware Information: Bietet die Firmware-Information des Kontrollers, wie Produktname, Firmware-Version, Hersteller, und Flashnummer. Zudem wird eine Option
zum Firmware Update gegebenenfalls angeboten.
RAID Einstellungen: Ermöglicht Setup von RAID Standby Timer Einstellungen und
RIAD Wiederherstellung Prioritäten basierend auf Ihren persönlichen Prioritäten.
Weitere Informationen über das Betreiben mit RAID MASTER, nden Sie im User's Manual in der beigefügten CD.
1
2
3
4
Page 24
24
4-fach RAID System mit LCM Panel
IB-RD3264+USE2
http://www.icybox.de
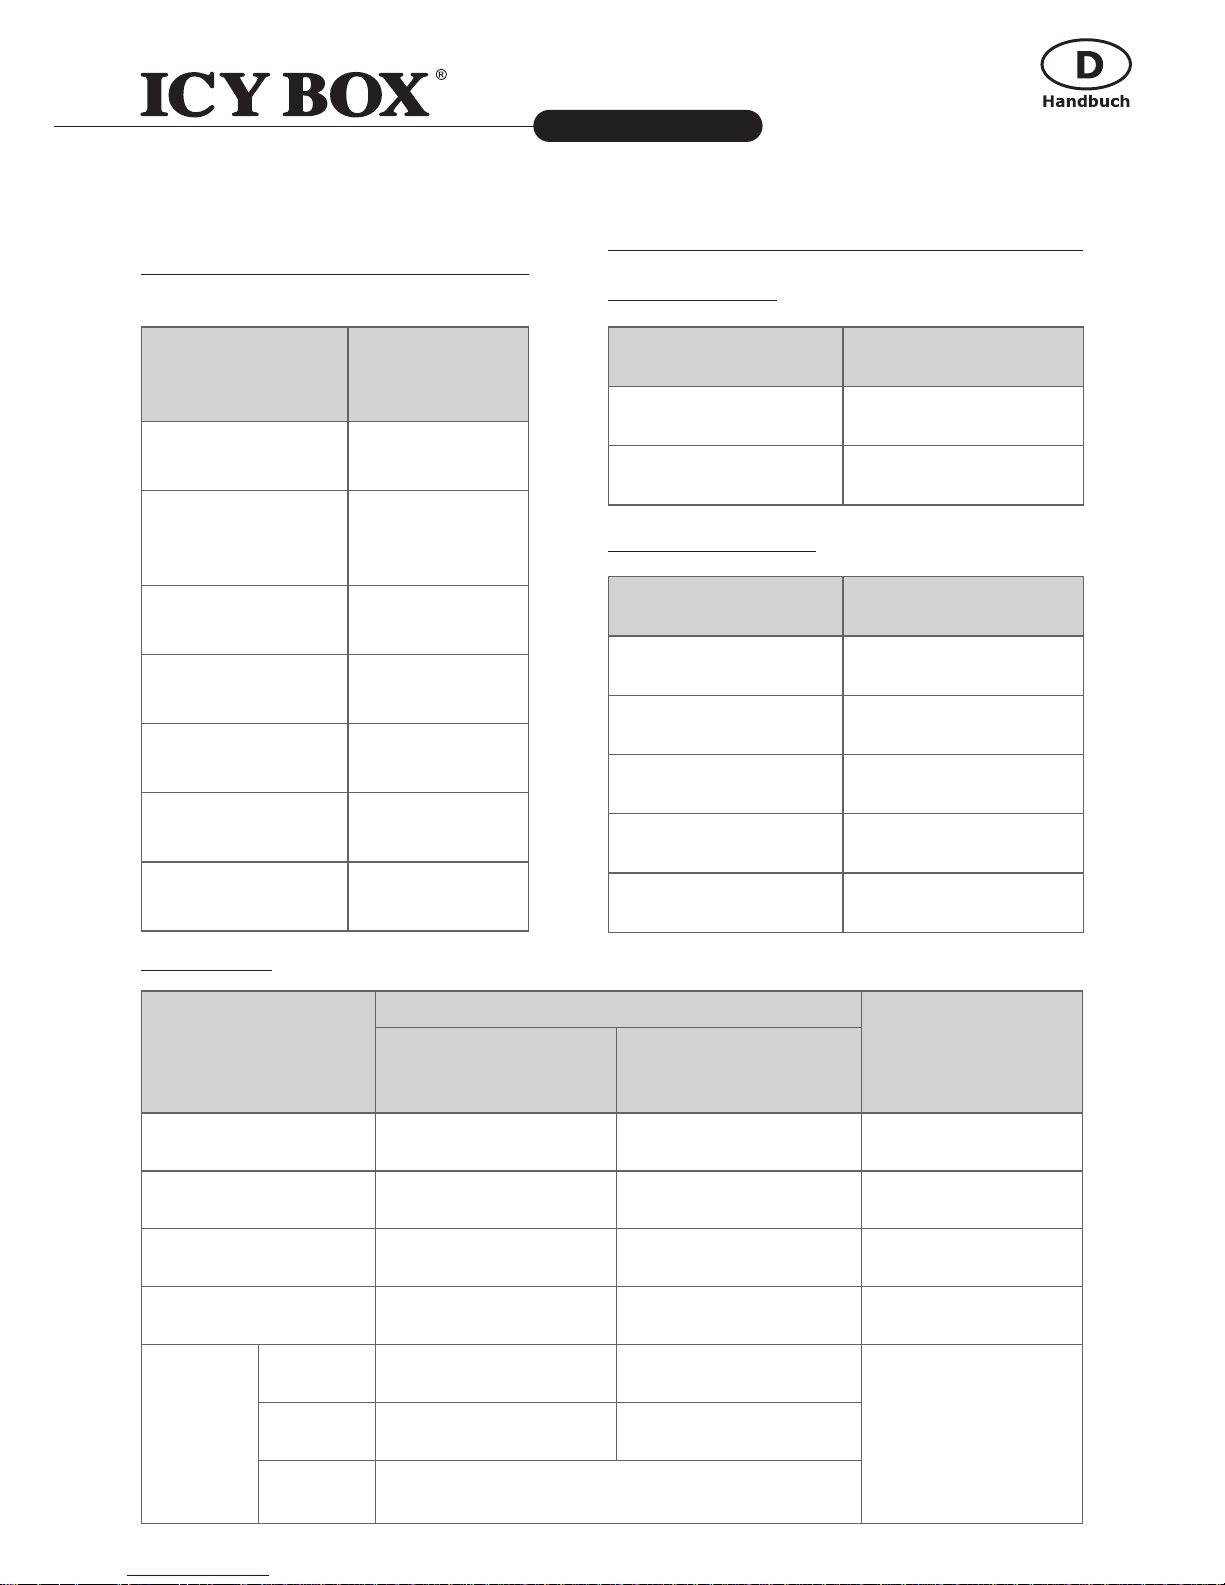
ERFORDERLICHE FESTPLATTENANZAHL JEDES RAID MODUS
RAID Modus
Festplattenanzahl in
RAID
RAID 0 (Striping) 2 bis 4
RAID 1
(Mirroring)
2
Span 2 bis 4
Clone 2 bis 4
RAID 5 3 bis 4
RAID 1+0 4
JBOD 1 bis 4
LED ANZEIGEN
Anzeige Farbe
Power on Grün
Power off Keine
Anzeige Farbe
Healthy Keine
Rebuild Blinken in Rot
Broken
Rot
Degrade
Rot
Fan Error
Rot
Ein/Aus LED x 1
Anzeige
Festplatte (1, 2, 3, 4)
RAID Modus
Links
(Verbindung/
Zugriff)
Rechts (Zustand)
Festplatte nicht
erkannt
None None All modes
Festplatte erkannt White None All modes
Festplatte nicht
normal
White Red All modes
Zugriff auf Daten Flash White None All modes
Festplat-
tenwiederher-
stellung
Quell
Festplatte
White None
RAID 1, RAID 5,
RAID 1+0, Clone
Ziel-
Festplatte
Flash White Blink Red
RAID
Alarm
Blink Red
HDD LED x 8
RAID Alarm LED x 1
Page 25
Système 4-baies RAID avec écran LCD
IB-RD3264+USE2
http://www.icybox.de
25
Ce Système 4-baies RAID avec écran LCD et MASTER RAID (Interface Utilisateur Graphique) fourni une
haute capacité de stockage et une conguration RAID avancée au choix: RAID 0, RAID 1, Span, Clone,
RAID 5, RAID 1+0 ainsi qu’un HotSpare optionnel.
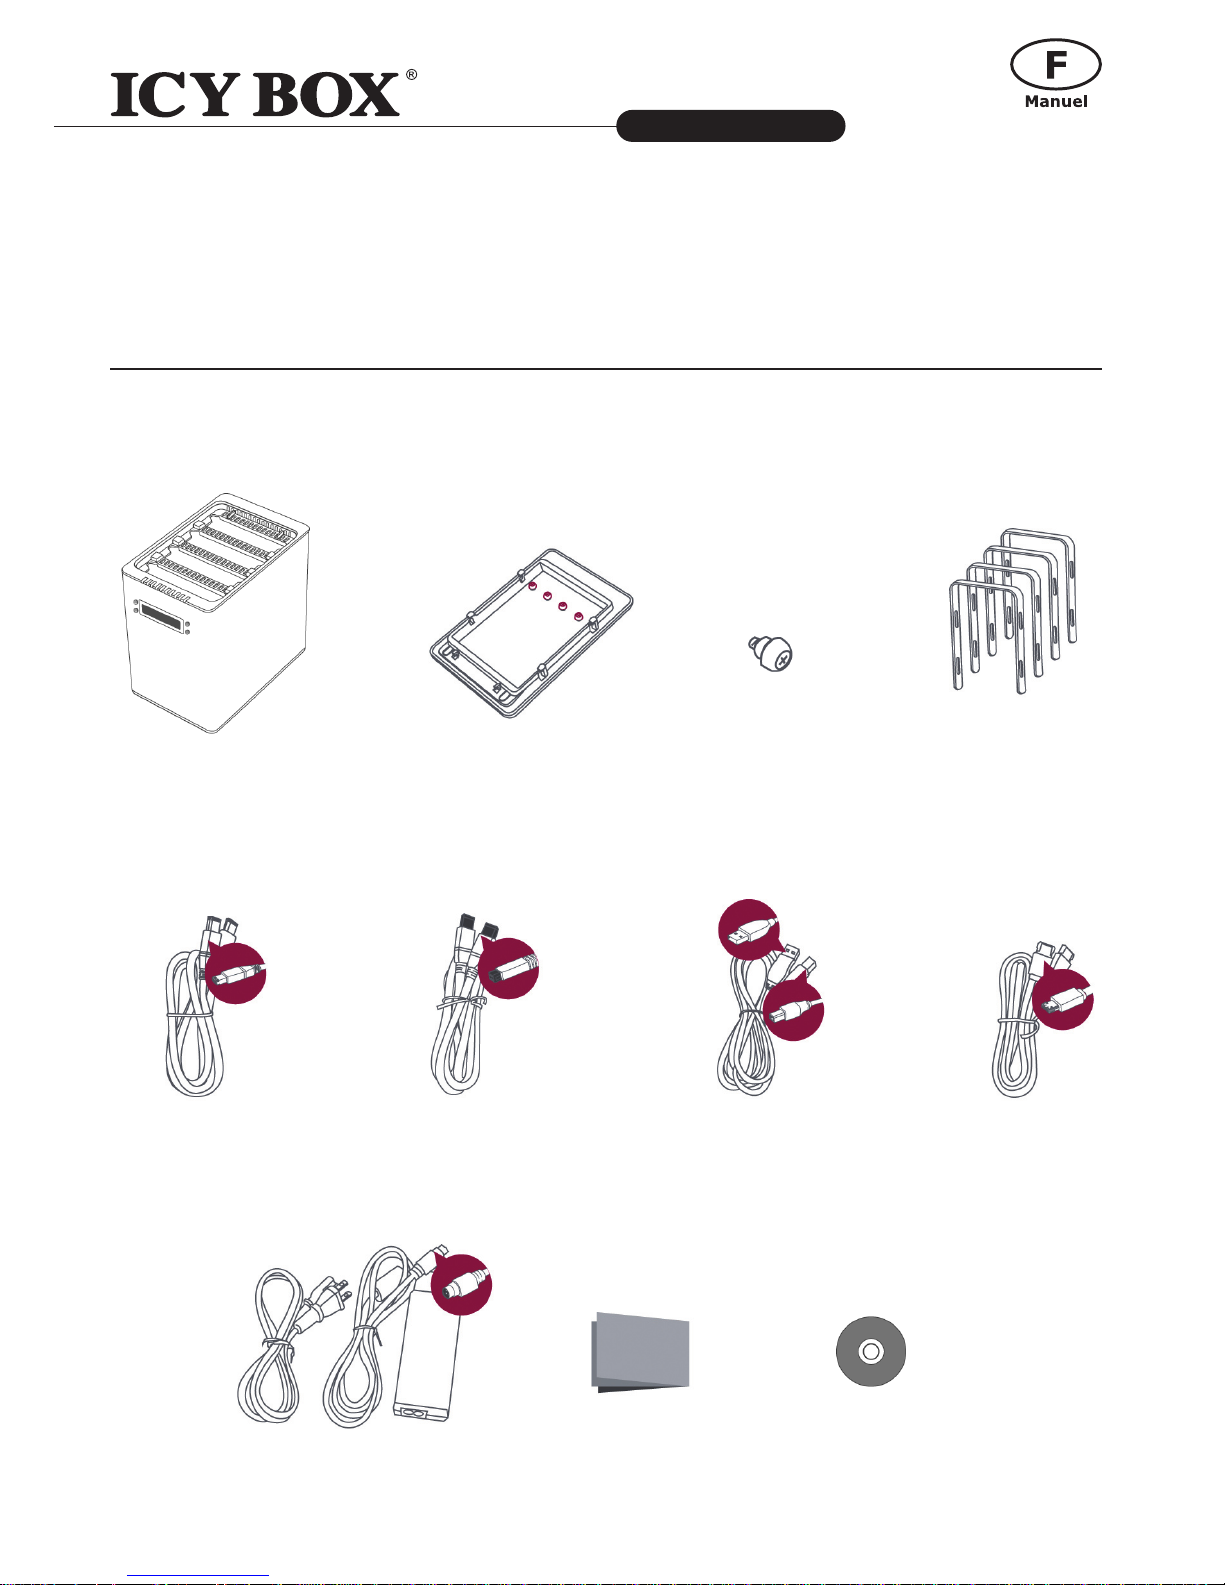
CONTENU DE L’EMBALLAGE
Veuillez vérier l’ensemble de l’emballage.
FireWire 400 cable FireWire 800 cable USB Type B to A cable eSATA cable
External power supply
Quick Start Guide
4 handles16 HDD screws4 spare HDD screws
provided on back part of
cover lid
RAID System unit
CD
Page 26
26
Système 4-baies RAID avec écran LCD
IB-RD3264+USE2
http://www.icybox.de
26
2727
26
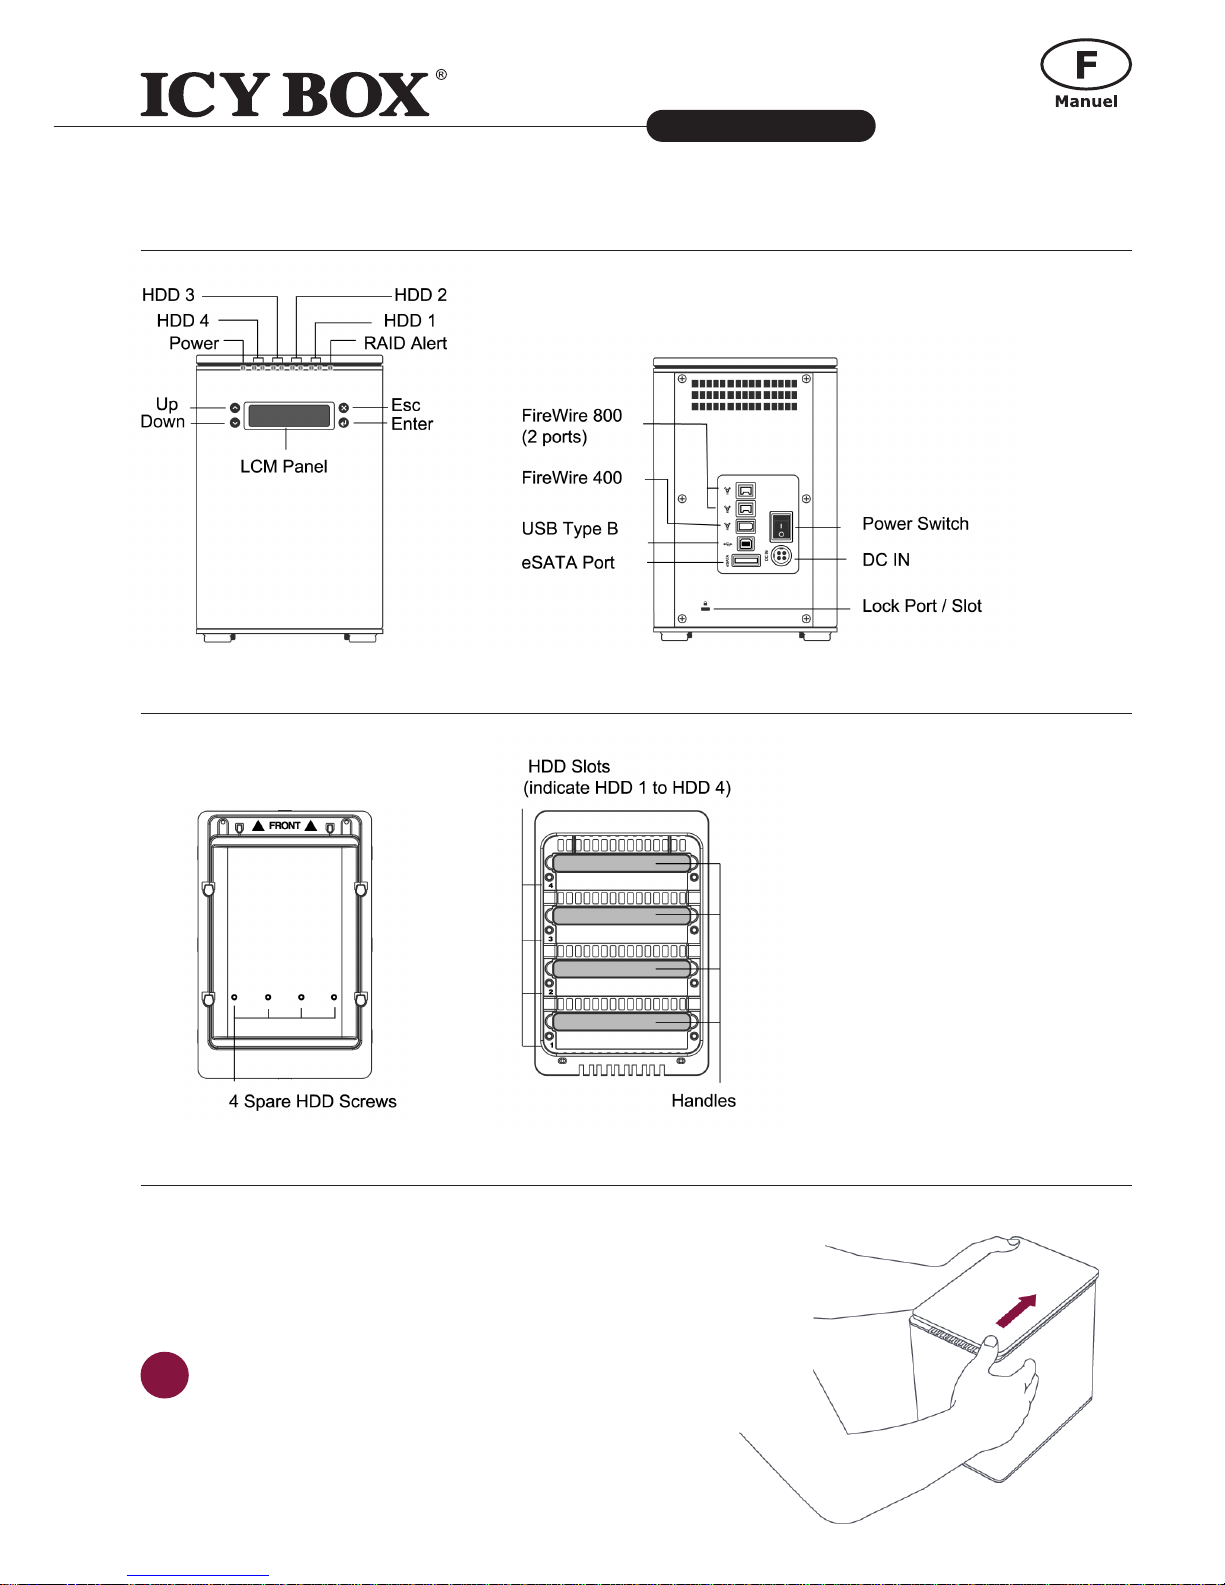
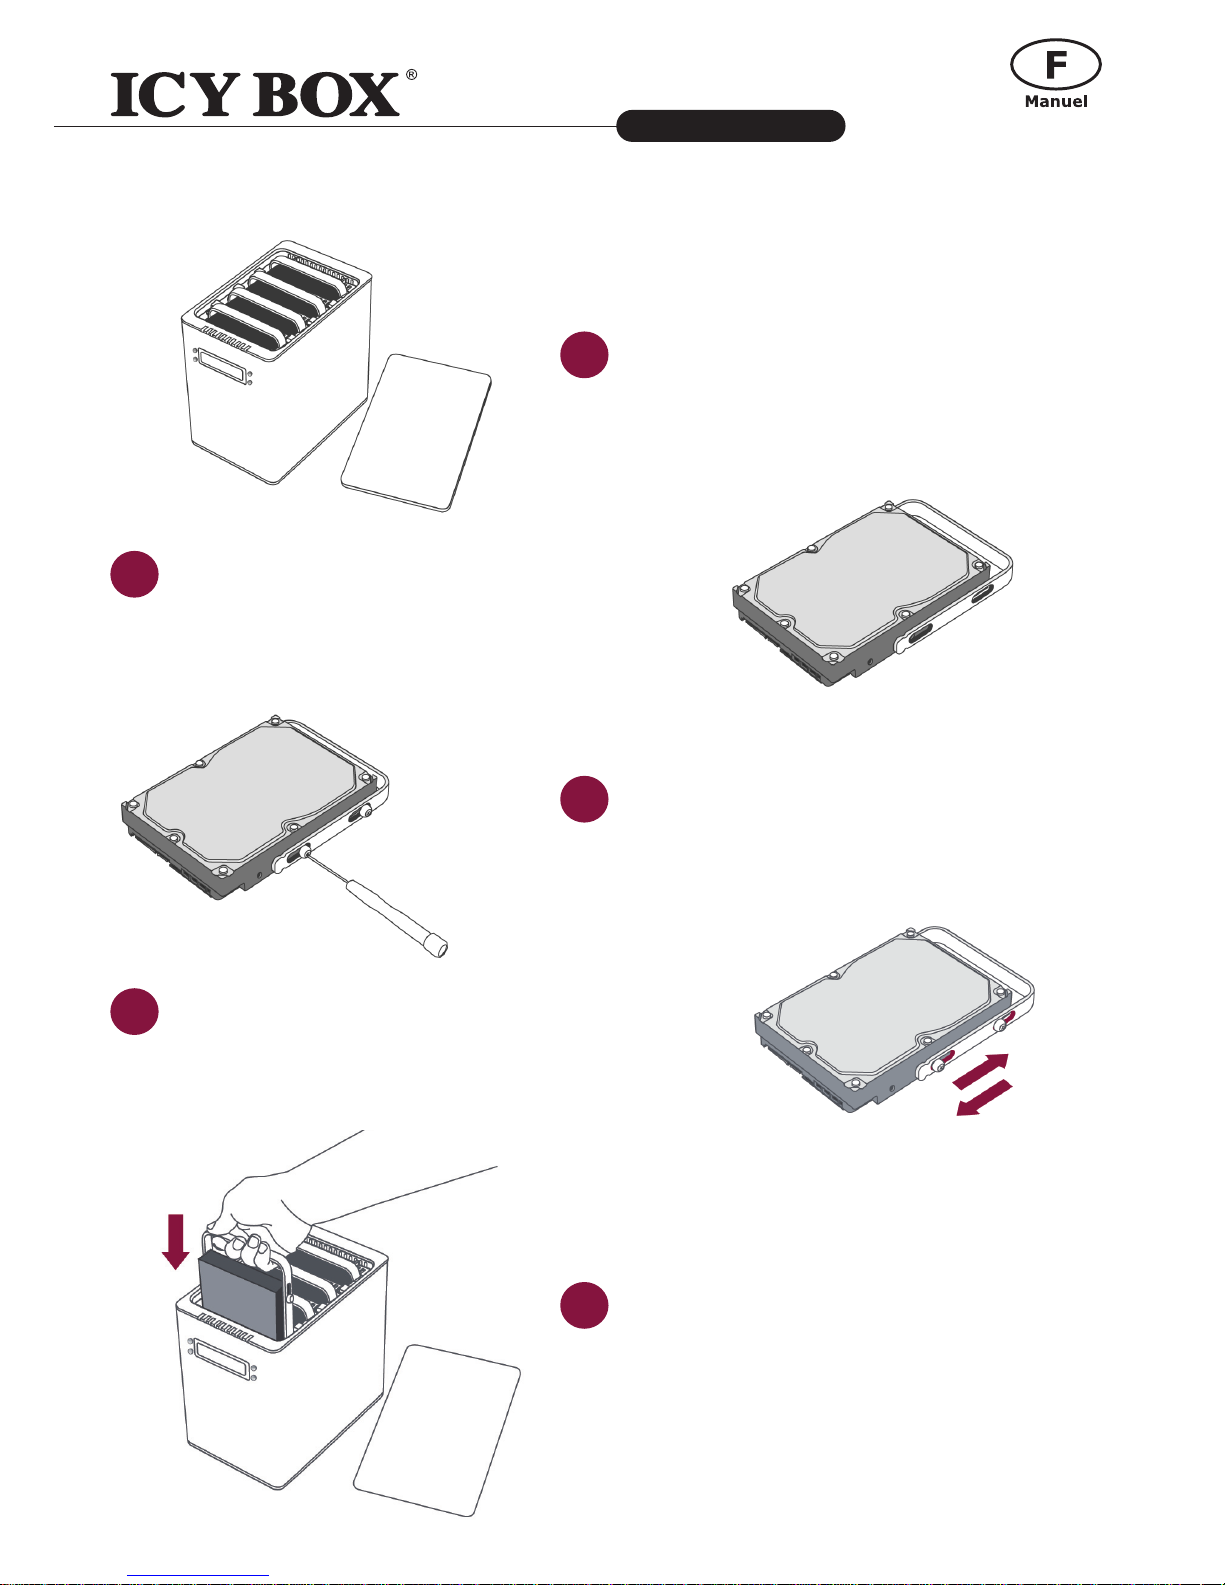
INSTALLATION DU SYSTÈME RAID
Pour assembler votre Système RAID, veuillez suivre les
étapes indiquées dans les instructions ci-après:
Placez le Système RAID face avant, devant vous.
Poussez le couvercle de l’avant vers l’arrière en
utilisant vos pouces.
1
VUE AVANT / VUE ARRIÈRE
VUE DE DESSUS
Page 27
27
Système 4-baies RAID avec écran LCD
IB-RD3264+USE2
http://www.icybox.de
27
27
Positionnez les poignées vers l’avant des disques,
face opposée de ses connecteurs et alignez les
ouvertures en face des pas de vis du disque.
Pour nir, effectuez un test de glisse en maintenant le disque et la poignée pour vous assurer
que celle-ci ne soit pas sur vissée.
3
5
Retirez les poignées du boitier et munissez-vous
des vis pour disques contenues dans l’emballage.
Attachez la poignée sur le disque à l’aide des vis
fournies en serrant jusqu’à leur butée.
Alignez la poignée avec les rails d’insertion et
faites glisser le disque dans l’emplacement indi-
qué. Poussez fermement jusqu’à ce qu’un bruit de
« clic lourd » soit entendu. Répétez cette étape
avec les autres disques.
2
4
6
Page 28
28
Système 4-baies RAID avec écran LCD
IB-RD3264+USE2
http://www.icybox.de
28
2929
28
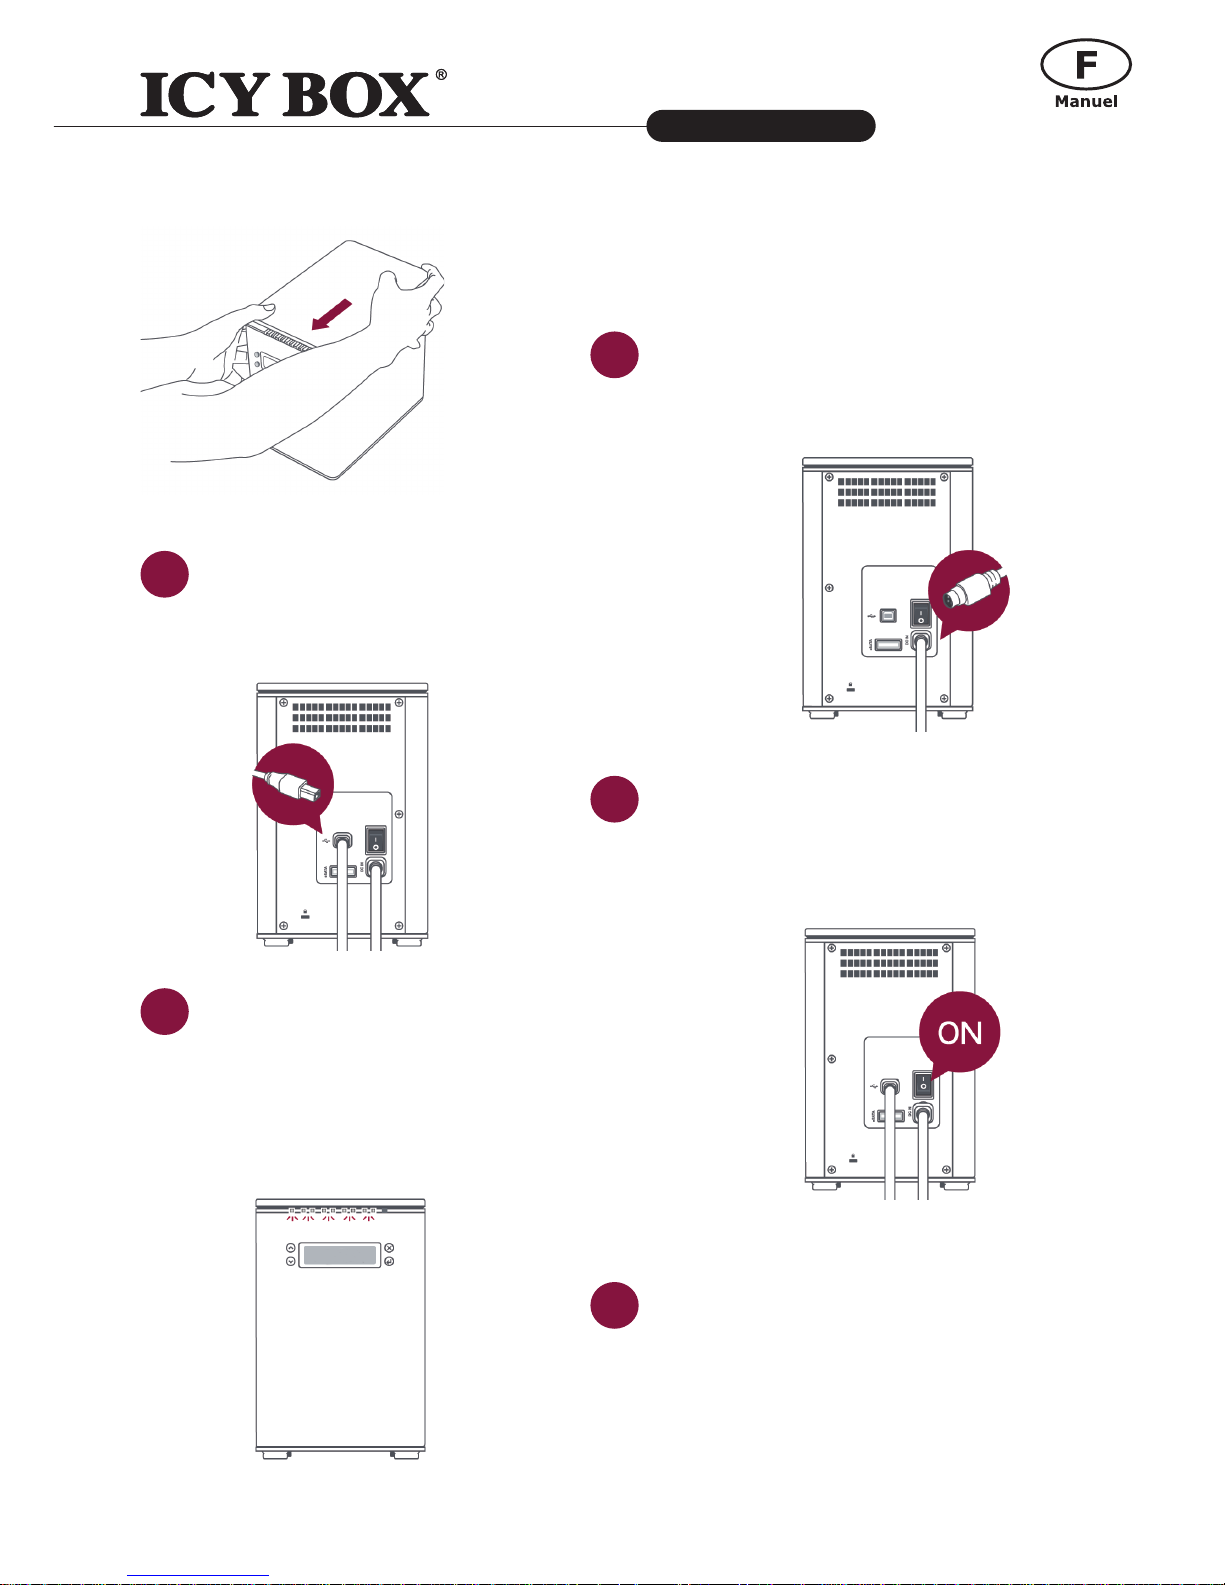
Connectez l’adaptateur secteur.
Mettre l’interrupteur en position « on ».
Placez le Système RAID face avant devant vous et
remettez le couvercle. Appuyez fermement sur les
coins du couvercle en le ramenant vers vous, de
l’arrière vers l’avant.
Reliez les deux extrémités du câble USB 2.0 (ou
eSATA, FireWire 400, FireWire 800) sur le port du
Système RAID correspondant et de l’ordinateur
hôte.
Une fois sous tension, la LED Power s’illuminera
en vert et les LED HDD deviendront blanche en
clignotant pendant 15 secondes.
7
9
11
8
10
Page 29
29
Système 4-baies RAID avec écran LCD
IB-RD3264+USE2
http://www.icybox.de
29
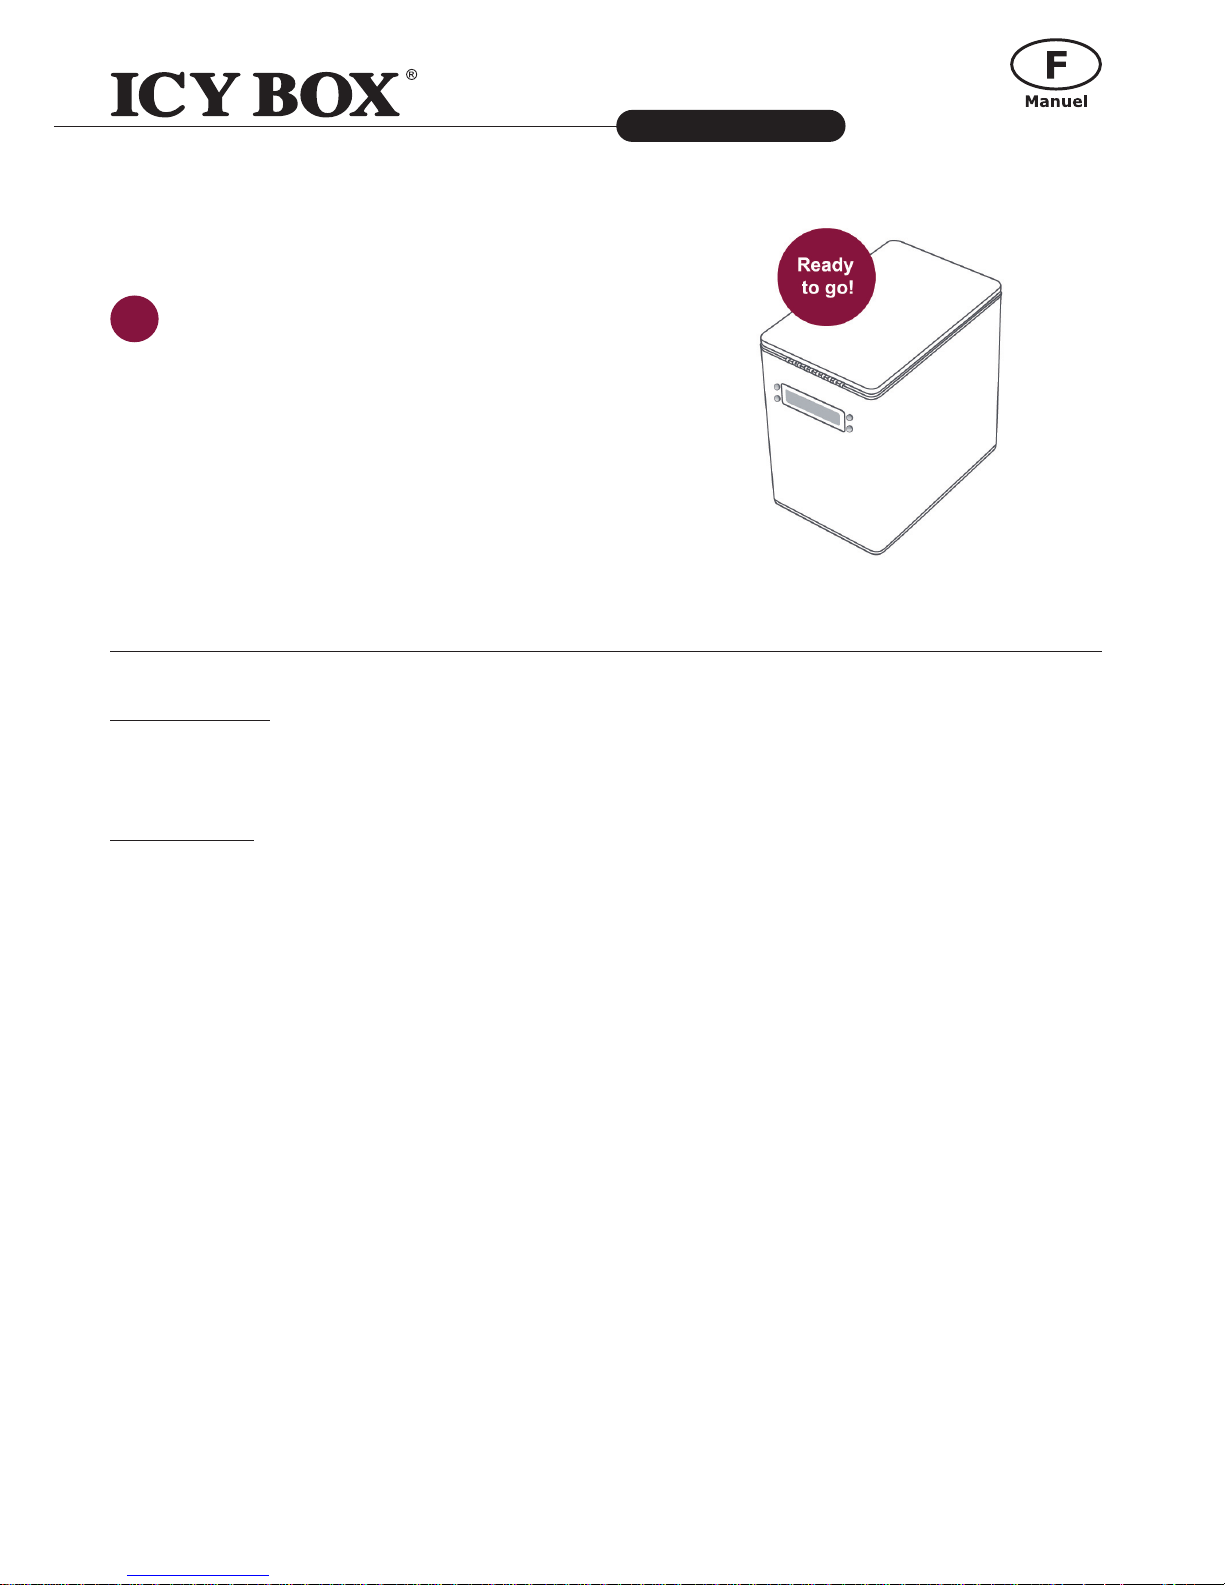
Tout est prêt pour commencer à utiliser votre
Système RAID!
12
CONFIGURATION RAID
Par l’écran LCD
L’écran LCD du Système RAID vous afchera des informations basiques sur les disqus insérés, le système
lui-même et des fonctions RAID de base.
Menu de base
1. Quick Setup: Permet la mise en place des fonctions de base.
● Create One RAID: Pour attribuer et créer des disques insérés dans le Système RAID dans un
mode RAID préféré. Permet également de régler un mot de passe pour un mode RAID spéci-
que.
● Delete All RAID: Pour effacer le mode RAID des disques courant du Système.
2. DiskManager:Fourniuneinformationsimplesurundisquespécié.
● Select Disk: Pour récupérer des informations détaillées sur le disque sélectionné tel que le
modèle, son numéro de série, son rmware, sa capacité utilisée et disponible.
3. System Manager: Afche les informations simples du Système RAID, le mot de passé et de ses
capacités d’accès.
● System Info: Pour récupérer des informations détaillées concernant le Système RAID tel que la
version de rmware et son numéro de contrôle.
● Change Password: Pour régler ou changer le mot de passe d’accès aux fonctions du menu LCD
uniquement. Il n’est pas semblable à celui régler dans le mode RAID dans la section RAID MASTER du menu Create One RAID.
● Logout From Menu: Pour retourner ou sortir du menu principal.
Page 30
30
Système 4-baies RAID avec écran LCD
IB-RD3264+USE2
http://www.icybox.de
30
3131
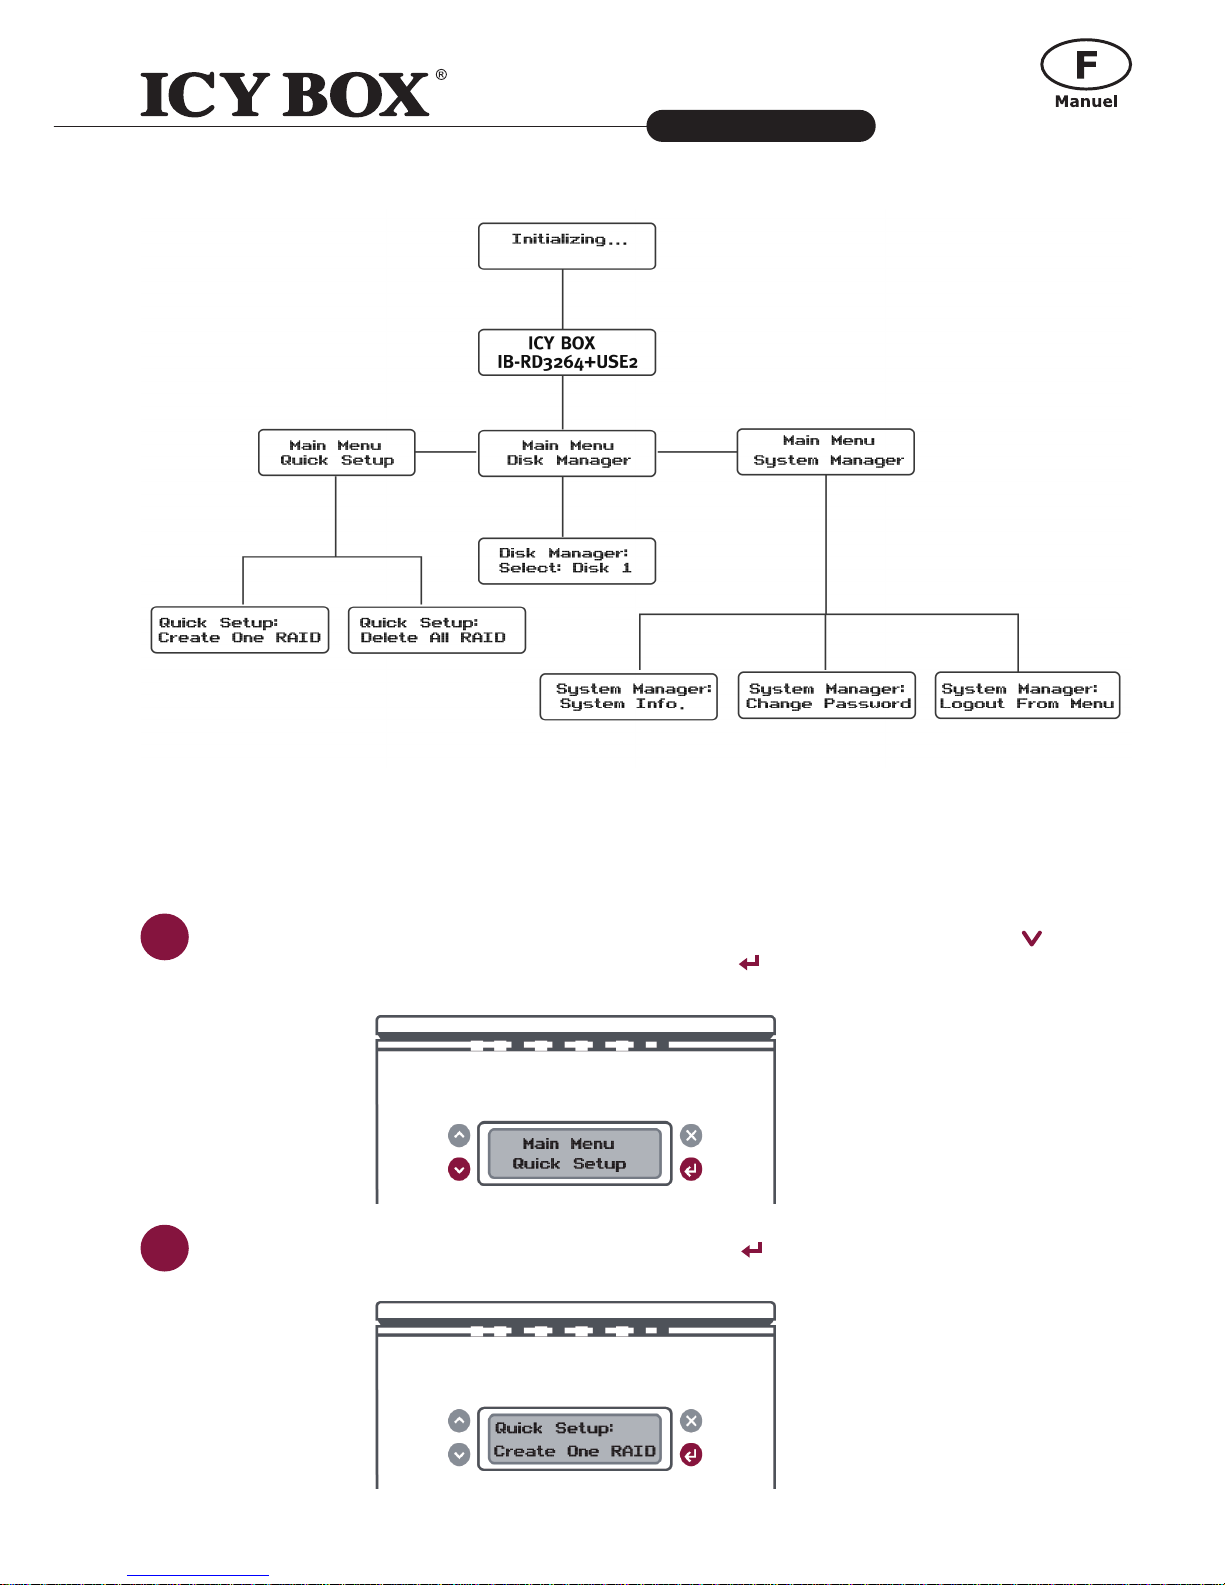
Pour de plus amples informations concernant l’arborescence du Menu, veuillez vous référer au manuel
de l’utilisateur contenu sur le CD fourni.
Si vous souhaitez attribuer ou créer le RAID en utilisant seulement le Menu du LCD, veuillez suivre les
étapes d’installation suivantes:
1
Mettre sous tension le Système RAID. Dans le Main Menu, pressez sur le bouton Bas ( )
pour sélectionner "Quick Setup" et appuyez sur Entrée (
).
2
Sélectionnez "Create One RAID" et appuyez sur Entrée ( ).
Page 31
31
Système 4-baies RAID avec écran LCD
IB-RD3264+USE2
http://www.icybox.de
31
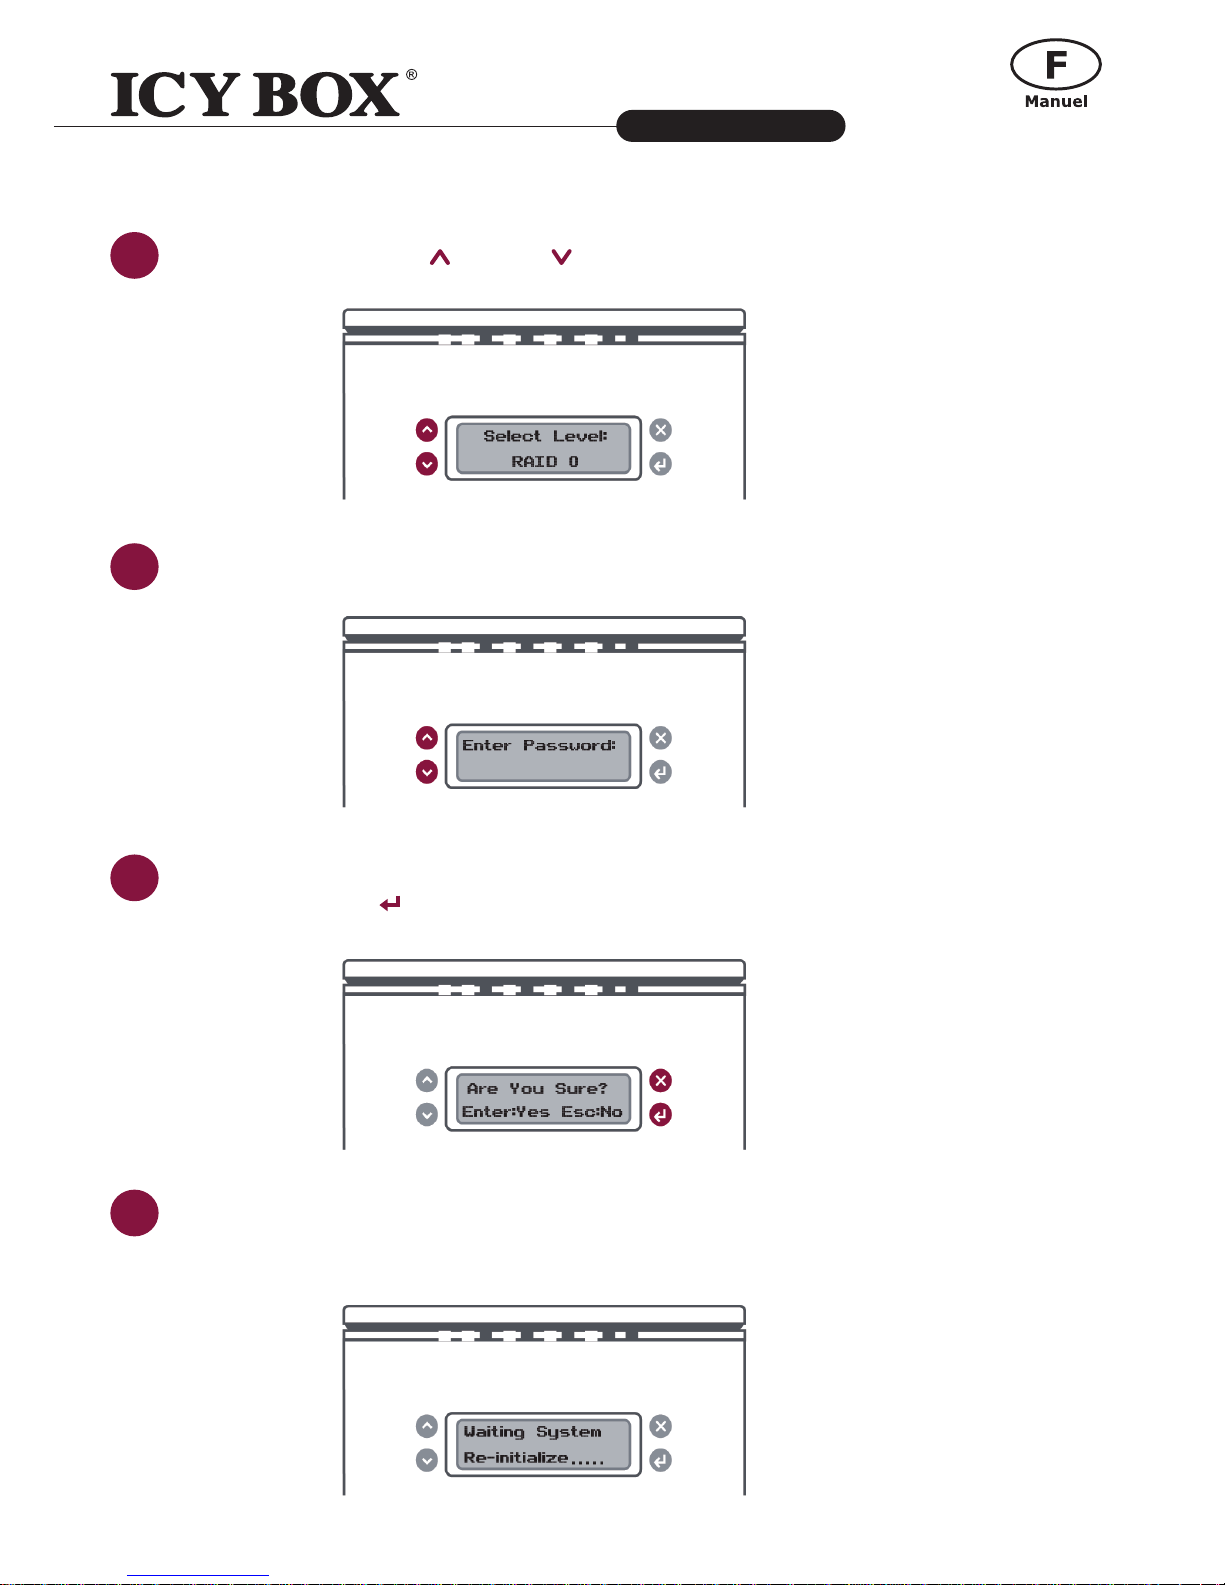
3
Utilisez les boutons Haut ( ) et Bas ( ) pour choisir le mode RAID à utiliser.
4
Tapez le "mot de passe".
5
Après avoir vérié le mot de passe, un message apparaitra : "Are You Sure? Enter: Yes Esc: No".
Appuyez sur Entrée (
) pour conrmer ou Esc ( x ) pour annuler.
6
Alors, le Système RAID entrera dans son mode de fonctionnement choisi et afchera:
"Waiting System Re-initialize…". A la n du processus, le Système RAID est prêt à fonctionner
dans le mode sélectionné!
Page 32
32
Système 4-baies RAID avec écran LCD
IB-RD3264+USE2
http://www.icybox.de
32
3333
Le programme RAID MASTER
Le RAID MASTER est un tout nouveau programme spécialement conçu pour notre Système 4-Baies RAID.
Les pilotes RAID MASTER pour PC et MAC sont fournis sur le CD ou présents sur notre site web. Par
l’intermédiaire d’une interface moderne et agréable, il apporte une plus grande facilité d’utilisation pour
manager et surveiller votre Système RAID.
Pour utiliser le RAID MASTER, veuillez suivre les instructions ci-après :
1. En utilisant le CD d’installation, copiez le pilote pour MAC ou PC sur votre Bureau.
Double cliquez ensuite sur le pilote pour le décompresser. Ouvrez ensuite le dossier
s’intitulant "RAID MASTER_vx.xx.xx".
1. Une fois ouvert: Sur MAC, double cliquez sur "RAID MASTER" pour lancer le programme.
Sur PC, double cliquez sur l’icône "Setup.exe" pour lancer l’installation.
1. A la n de l’installation, la page de menu du RAID MASTER devrait apparaître.
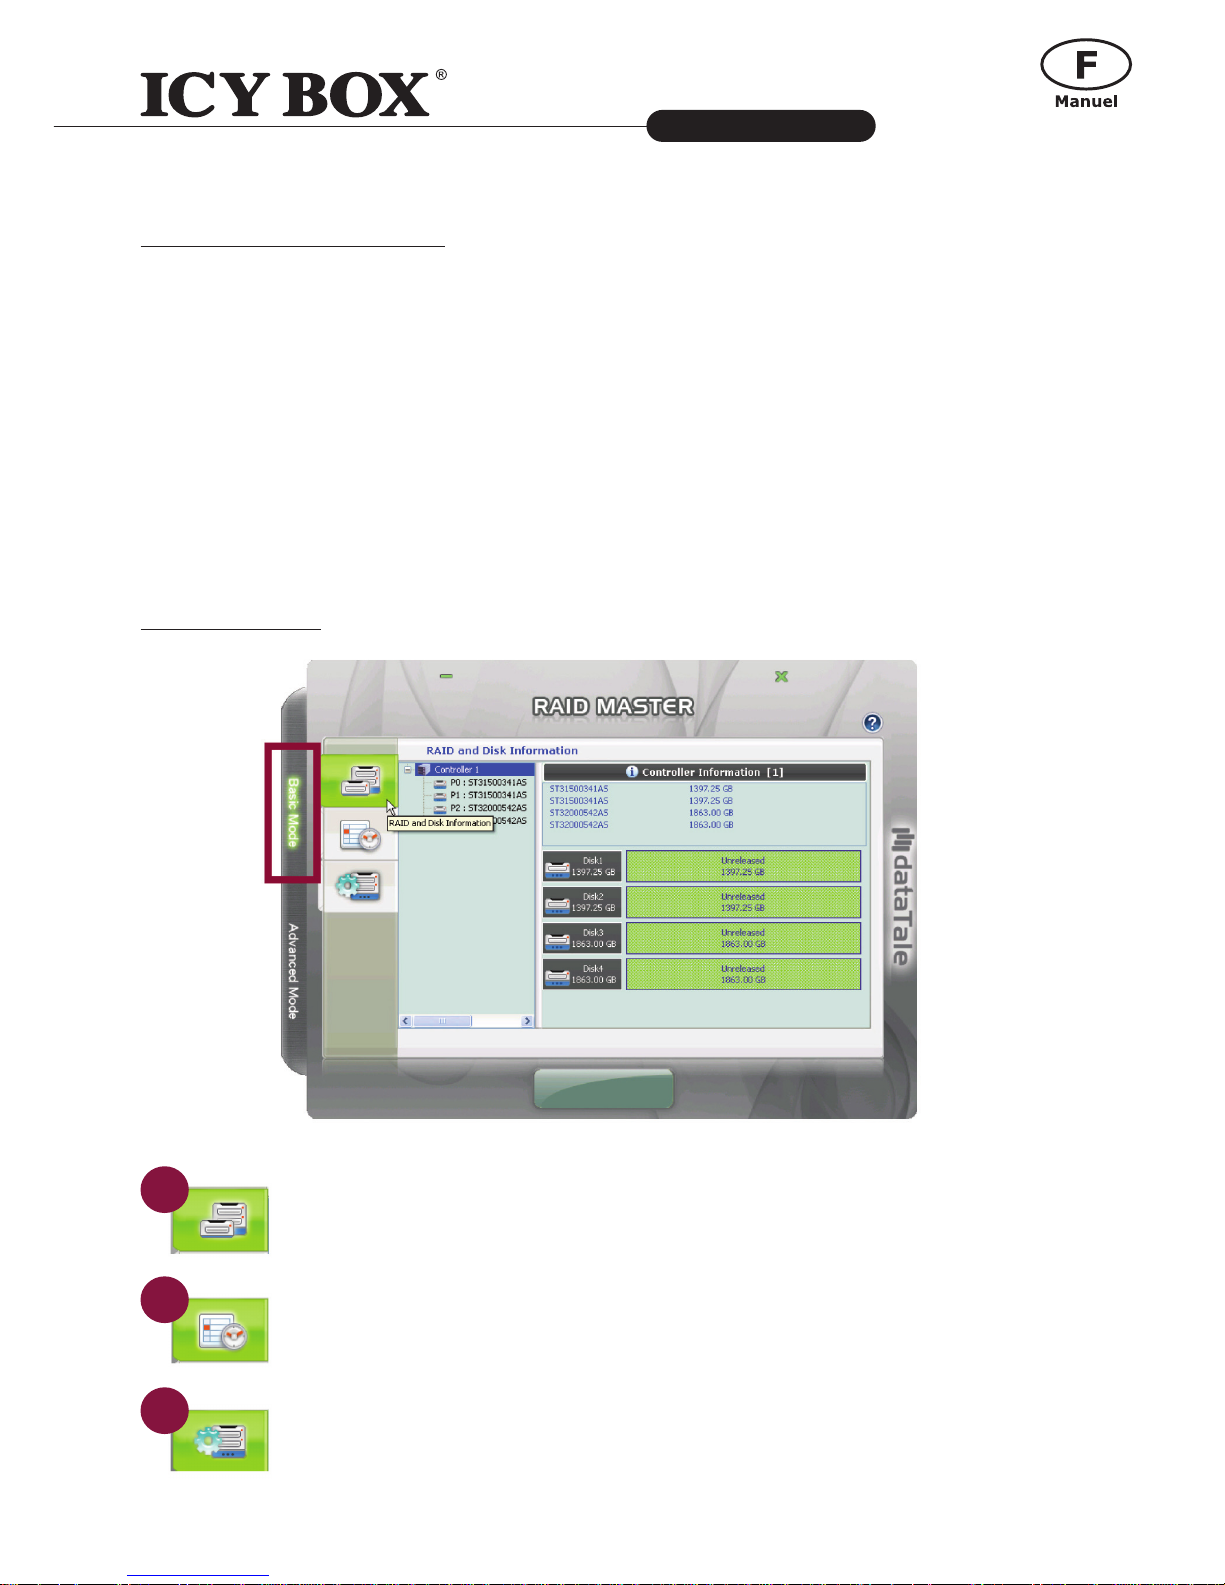
Menu Basic Mode
RAID and Disk Information: Fourni les informations de base du Système RAID
lorsque celui-ci est connecté à un hôte. Par exemple, les informations du contrôleur, le
numéro de série pour chaque disque inséré et bien plus.
Event Log: L’enregistrement des chiers journaux du Système RAID peut être sauvegardé sous forme de chier texte.
BasicRAIDConguration:
● Accès aux réglages de base et à la conguration RAID.
● Donner et active un mot de passe pour se protéger de tout changement
effectué sur le Système RAID.
● Afche le mode RAID en cours de fonctionnement pour les disques insérés.
1
2
3
Page 33
33
Système 4-baies RAID avec écran LCD
IB-RD3264+USE2
http://www.icybox.de
33
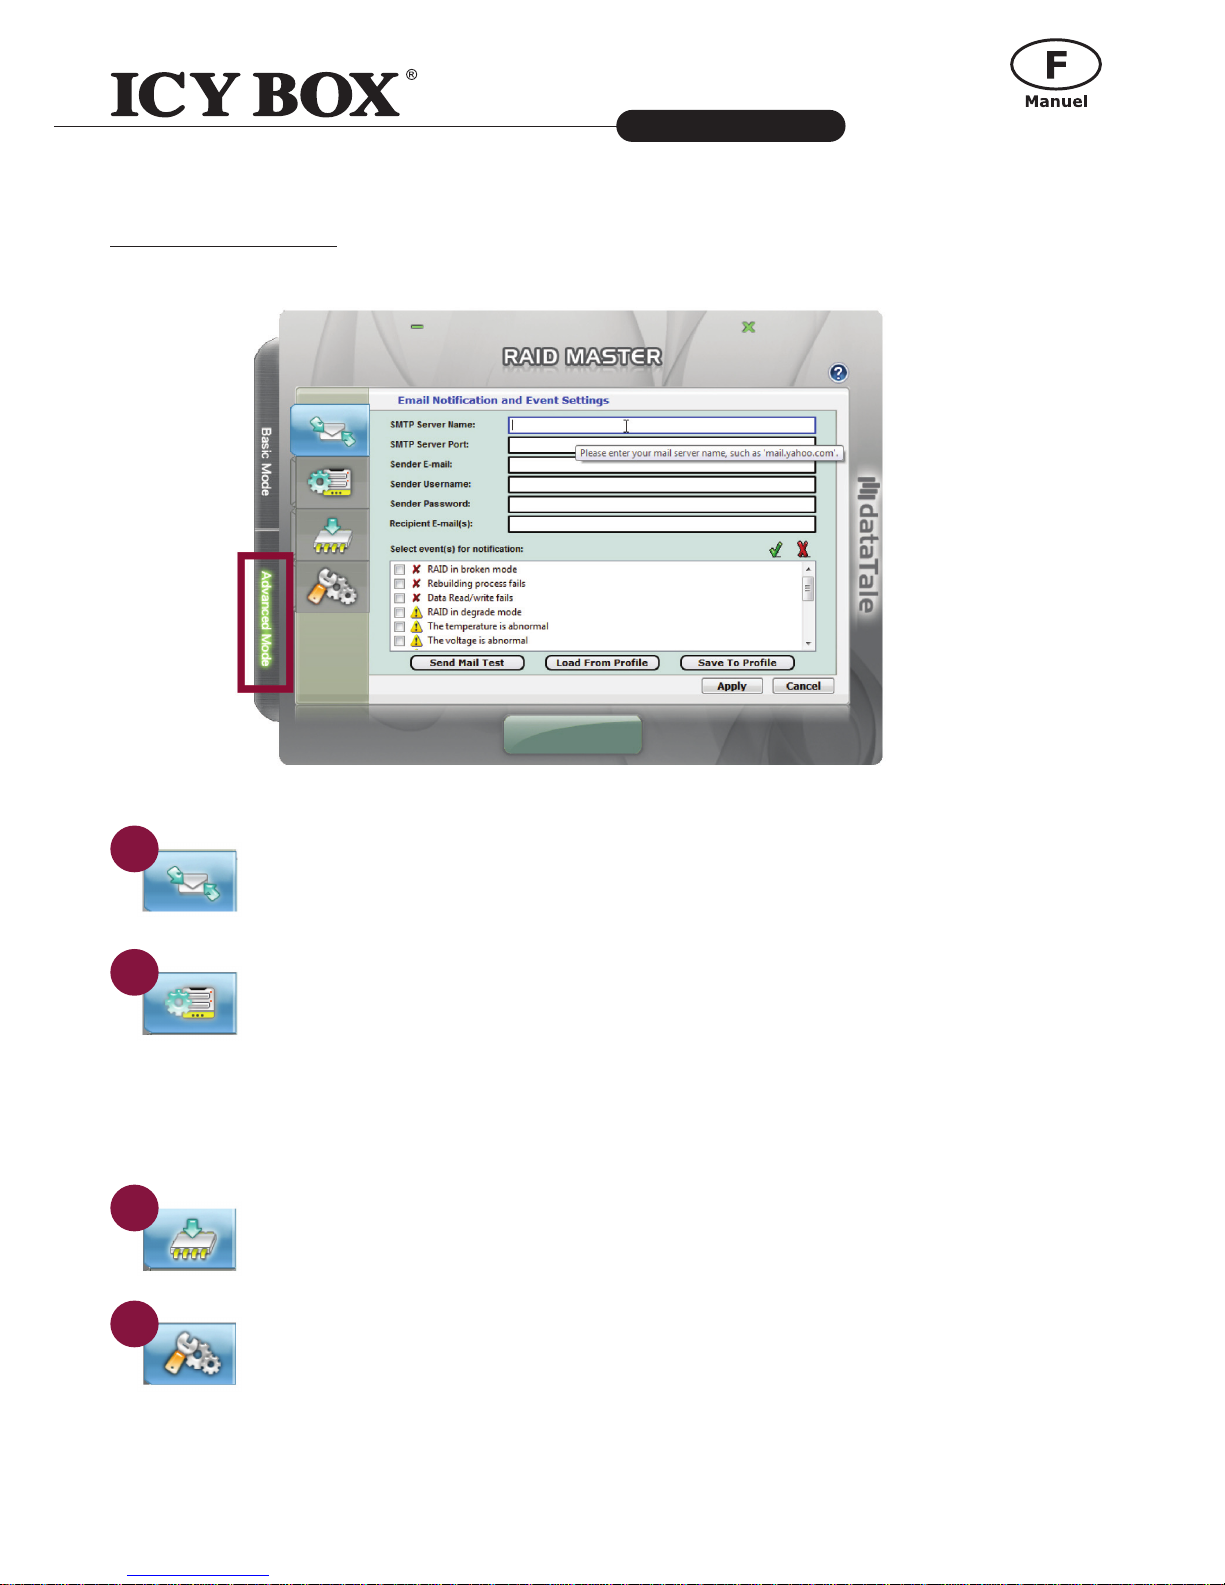
Menu Advanced Mode
EmailNoticationandEventSettings:Permet d’envoyer des notications par mail
(comme un rapport d’erreur, une alerte, un changement du système RAID) basées sur
vos préférences.
AdvancedRAIDConguration:
Similaire à la conguration RAID basique avec des options additionnelles.
● Choix des disques et leurs capacités.
● Combinaison de mode RAID en simultané. Par exemple, créer 2 grappes de disques
RAID 1 ou combiner une grappe de RAID 0 et RAID 1.
● Assigner un disque additionnel comme "Spare" pour effectuer une reconstruction
automatique lorsqu’un disque d’une grappe génère une panne
(pour RAID 1, CLONE et RAID 5 seulement)
Firmware Information: Afche les informations du rmware tel que le nom du
produit, la version, le constructeur. Fourni également une option pour mettre à jour le
microprogramme si nécessaire.
RAID Settings: Vous permet de régler le mode "standby" et les priorités de reconstruction RAID de préférence.
Pour plus d’information concernant les fonction du MASTER RAID, veuillez vous reporter au manuel
d’utilisateur présent sur le CD.
1
2
3
4
Page 34
34
Système 4-baies RAID avec écran LCD
IB-RD3264+USE2
http://www.icybox.de
34
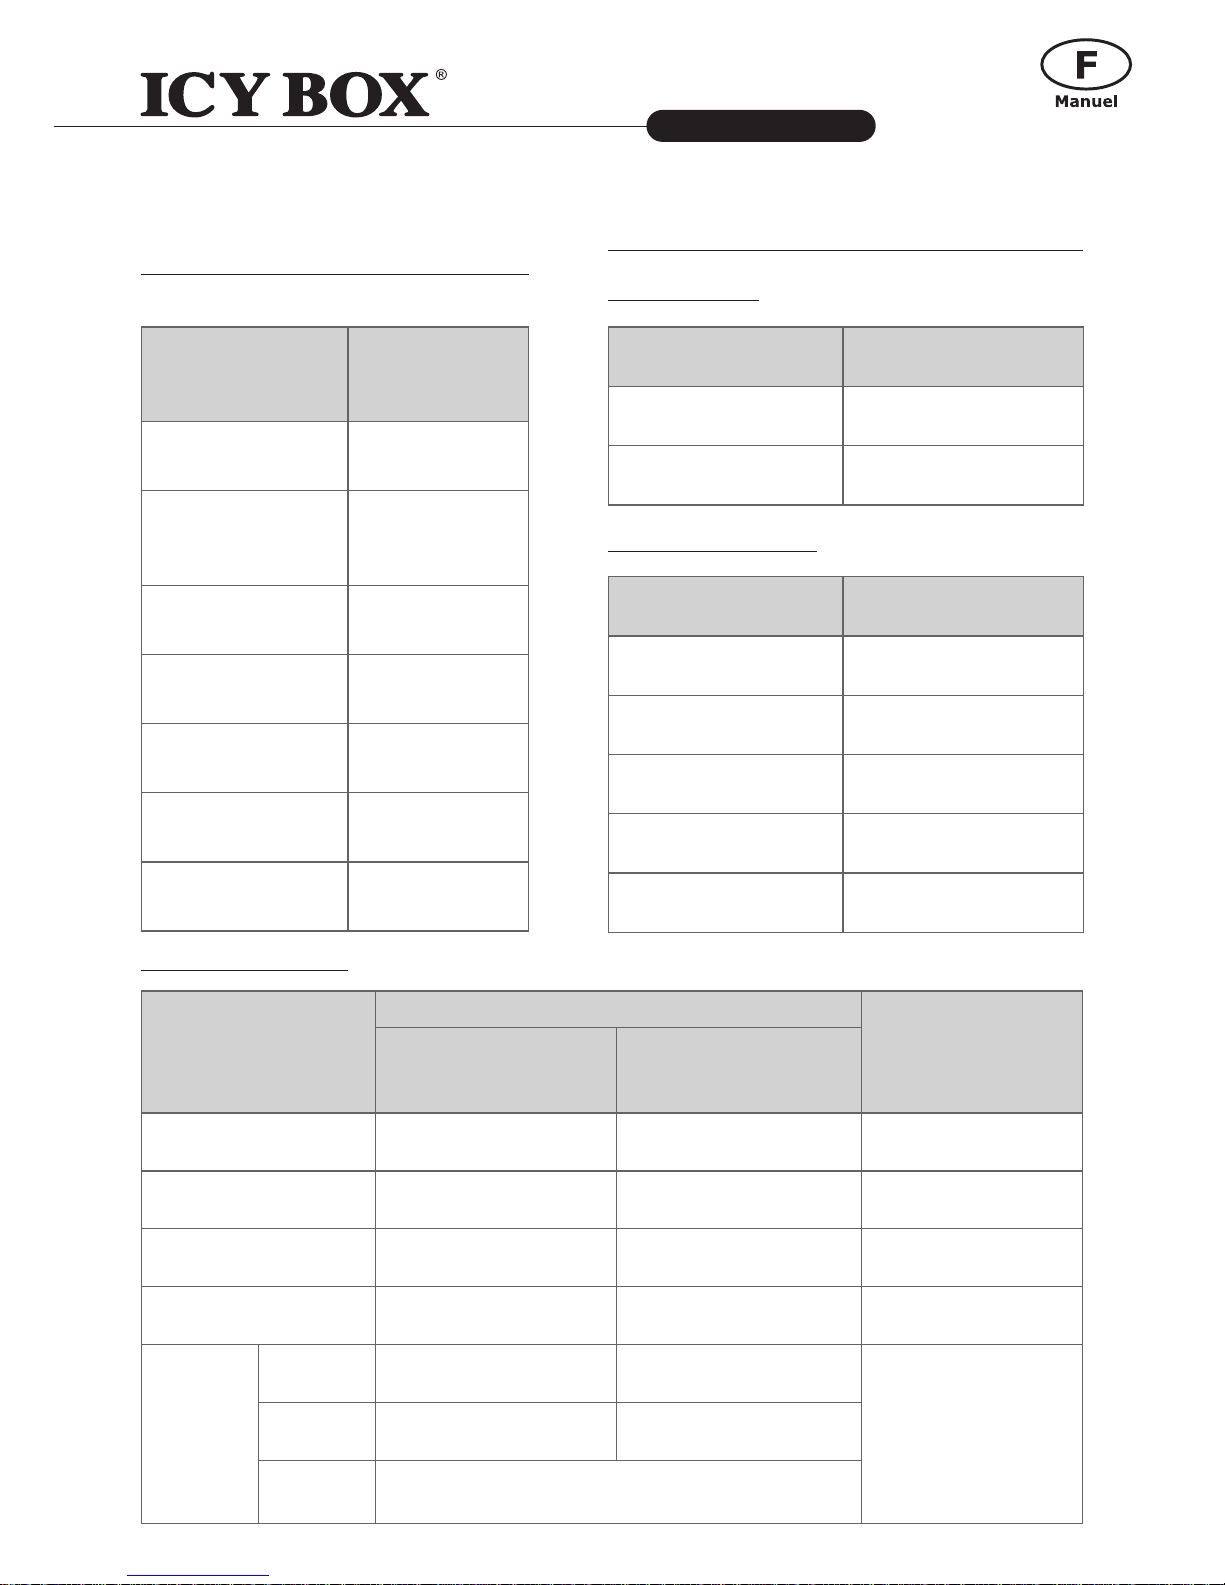
NOMBRE DE DISQUES SUPPORTANT CHAQUE MODE RAID
Modes RAID
Nombre de
disques en
RAID
RAID 0 (Striping) 2 à 4
RAID 1
(Mirroring)
2
Span 2 à 4
Clone 2 à 4
RAID 5 3 ou 4
RAID 1+0 4
JBOD 1 à 4
VOYANTS LED
Etat Couleur
Power on Verte
Power off Eteinte
Etat Couleur
Healthy Keine
Rebuild Rouge intermittent
Broken
Rouge
Degrade
Rouge
Fan error
Clignotement rouge
Power LED x 1
Etat
HDD (1, 2, 3, 4)
Mode RAID
Gauche
(Connexion/
Accès)
Droite (Santé)
Disque non détecté Eteinte Eteinte Tous les modes
Disque détecté Blanche Eteinte Tous les modes
Disque en mauvaise
santé
Blanche Rouge Tous les modes
Accès données Blanc clignotant Eteinte Tous les modes
Recon-
struction
Du Disque
HDD
Source
Blanc clignotant Eteinte
RAID 1, RAID 5,
RAID 1+0, Clone
HDD
Cible
Blanc clignotant
Rouge
intermittent
Alerte
RAID
Rouge intermittent
LED des disques x 8
LED Alerte RAID x 1
Page 35
Page 36

The information contained in this manual is believed to be accurate and reliable. RaidSonic Technology GmbH assumes no
responsibility for any errors contained in this manual. RaidSonic Technology GmbH reserves the right to make changes in the
specifications and/or design of the above mentioned product without prior notice. The diagrams contained in this manual may
also not fully represent the product that you are using and are there for illustration purposes only. RaidSonic Technology GmbH
assumes no responsibility for any differences between the product mentioned in this manual and the product you may have.
© Copyright 2011 by RaidSonic Technology GmbH. All Rights Reserved
 Loading...