

Page 1

Version 1.8.16
Page 2

2
Content
Content............................................................................................................... 2
Introduction ....................................................................................................... 4
What is NAS?.................................................................................................... 4
Samba (Windows)........................................................................................... 4
FTP...............................................................................................................5
NFS .............................................................................................................. 5
More than a NAS ............................................................................................... 5
Printserver..................................................................................................... 6
UPnP-AV........................................................................................................ 7
Bonjour and iTunes Support ............................................................................. 8
Extensibility ................................................................................................... 8
Package content ................................................................................................. 8
Take a look at the IB-NAS2001........................................................................... 9
Front ............................................................................................................... 9
Back.............................................................................................................. 10
Assembly.......................................................................................................... 11
Usage as external Storage drive....................................................................... 11
First come first serve ....................................................................................... 11
How to access the Management Interface........................................................ 12
DHCP controlled Network with automatic DNS update........................................... 12
DHCP controlled Network without automatic DNS update....................................... 13
Not configured Network / Direct Attachment........................................................ 14
Network configured on fix IP-Addresses .............................................................. 14
Using the management interface...................................................................... 17
Logging In...................................................................................................... 18
Management interface structure ........................................................................ 18
Hard disk initialization...................................................................................... 19
Choosing the appropriate file system.................................................................. 19
OS file system accessibility via USB................................................................. 20
File system features ...................................................................................... 20
File system limits.......................................................................................... 20
Disk Utility...................................................................................................... 21
Changing the admin password.......................................................................... 25
Managing users and groups.............................................................................. 25
User Management ........................................................................................... 26
Create a new user......................................................................................... 27
Change User settings .................................................................................... 28
Delete a user ............................................................................................... 28
Assign a single user to one or more groups ...................................................... 29
Remove a single User from one or more Groups................................................ 30
Group Management ......................................................................................... 32
Create a new Group ...................................................................................... 32
Delete a group ............................................................................................. 33
Add one or more Users to a single Group ......................................................... 34
Remove one or more Users from a single Group................................................ 35
File server and share management................................................................... 35
File Server Settings ......................................................................................... 36
Windows Setting........................................................................................... 36
FTP Server Settings....................................................................................... 37
NFS Server Setting ....................................................................................... 37
Guest Access Setting..................................................................................... 37
Share Management.......................................................................................... 39
Creating a new share .................................................................................... 40
Deleting a share ........................................................................................... 40
Page 3

3
Set up Windows, FTP access restrictions for a share........................................... 41
Set up NFS access rights................................................................................ 43
System Settings................................................................................................ 45
Network Setting .............................................................................................. 46
Time Setting................................................................................................... 46
Restart or turn off the IB-NAS2001 remotely ....................................................... 47
System Information ......................................................................................... 47
Disk Usage ..................................................................................................... 48
Network Service ............................................................................................... 49
DHCP Server................................................................................................... 49
Automatic DHCP configuration ........................................................................ 49
Manual DHCP configuration ............................................................................ 50
Printer Server ................................................................................................. 51
Bonjour (including iTunes support)..................................................................... 52
Twonky Media................................................................................................. 52
Install Twonky Media..................................................................................... 52
Enabling/disabling Twonky Media .................................................................... 53
Using Twonky Media...................................................................................... 54
Maintenance ..................................................................................................... 55
Firmware Upgrade ........................................................................................... 55
Save and restore configuration .......................................................................... 56
Save configuration ........................................................................................ 56
Restore Configuration.................................................................................... 57
Resetting to factory settings.............................................................................. 57
USB-Sticks and USB hard discs......................................................................... 58
Supported file systems .................................................................................. 58
USB access via Network ................................................................................... 58
Extensions........................................................................................................ 58
Installation of an application ............................................................................. 59
Mapping shares and Printers ............................................................................ 60
Mapping Windows shares in Windows ................................................................. 60
Mapping the printer in Windows......................................................................... 63
Mapping Windows shares on Mac OS X ............................................................... 66
Mapping the Printer on Mac OS X....................................................................... 67
Mounting Windows shares in Linux..................................................................... 69
Mounting NFS shares in Linux............................................................................ 69
Benchmark Conditions RaidSonic IB-NAS1000, IB-NAS4220-B, IB-NAS2000, IBNAS2001 Firmware
........................................................................................... 70
Page 4

Introduction
What is NAS?
NAS is short for “Network attached Storage”, which is used to name a specialized device
that offers mass storage towards a data network. SOHO NAS like the ICY BOX IBNAS2001 are small devices that simply share data from HDDs to an Ethernet. There are
many approaches; some are using custom shaped methods in offering the storage space
to the network participants. This approach needs special software to be installed on the
network clients and in most cases is limited to one particular operating system.
The ICY BOX IB-NAS2001 has chosen to offer the HDD space in the way common
operating systems are expecting it. This means it uses the same principles (protocols) to
offer HDD-Storage as common file servers are doing it but with less noise, lower power
consumption and in a much simpler way. The main advantage is that, that special
software is unnecessary to access the storage provided, whilst maintaining the maximum
security features, as already offered within the operation system, such as user and group
based access control.
Samba (Windows)
Netzwerk
The samba server implemented in the ICY BOX IB-NAS2001 offers storage in a way
regular Windows shares are doing it (commonly known as SMB or CIFS protocol). Even
Operating systems like MAC OS and Linux are capable of using this kind of network
storage access. It provides a maximum of security by offering the opportunity to limit the
access on users or groups.
4
Page 5
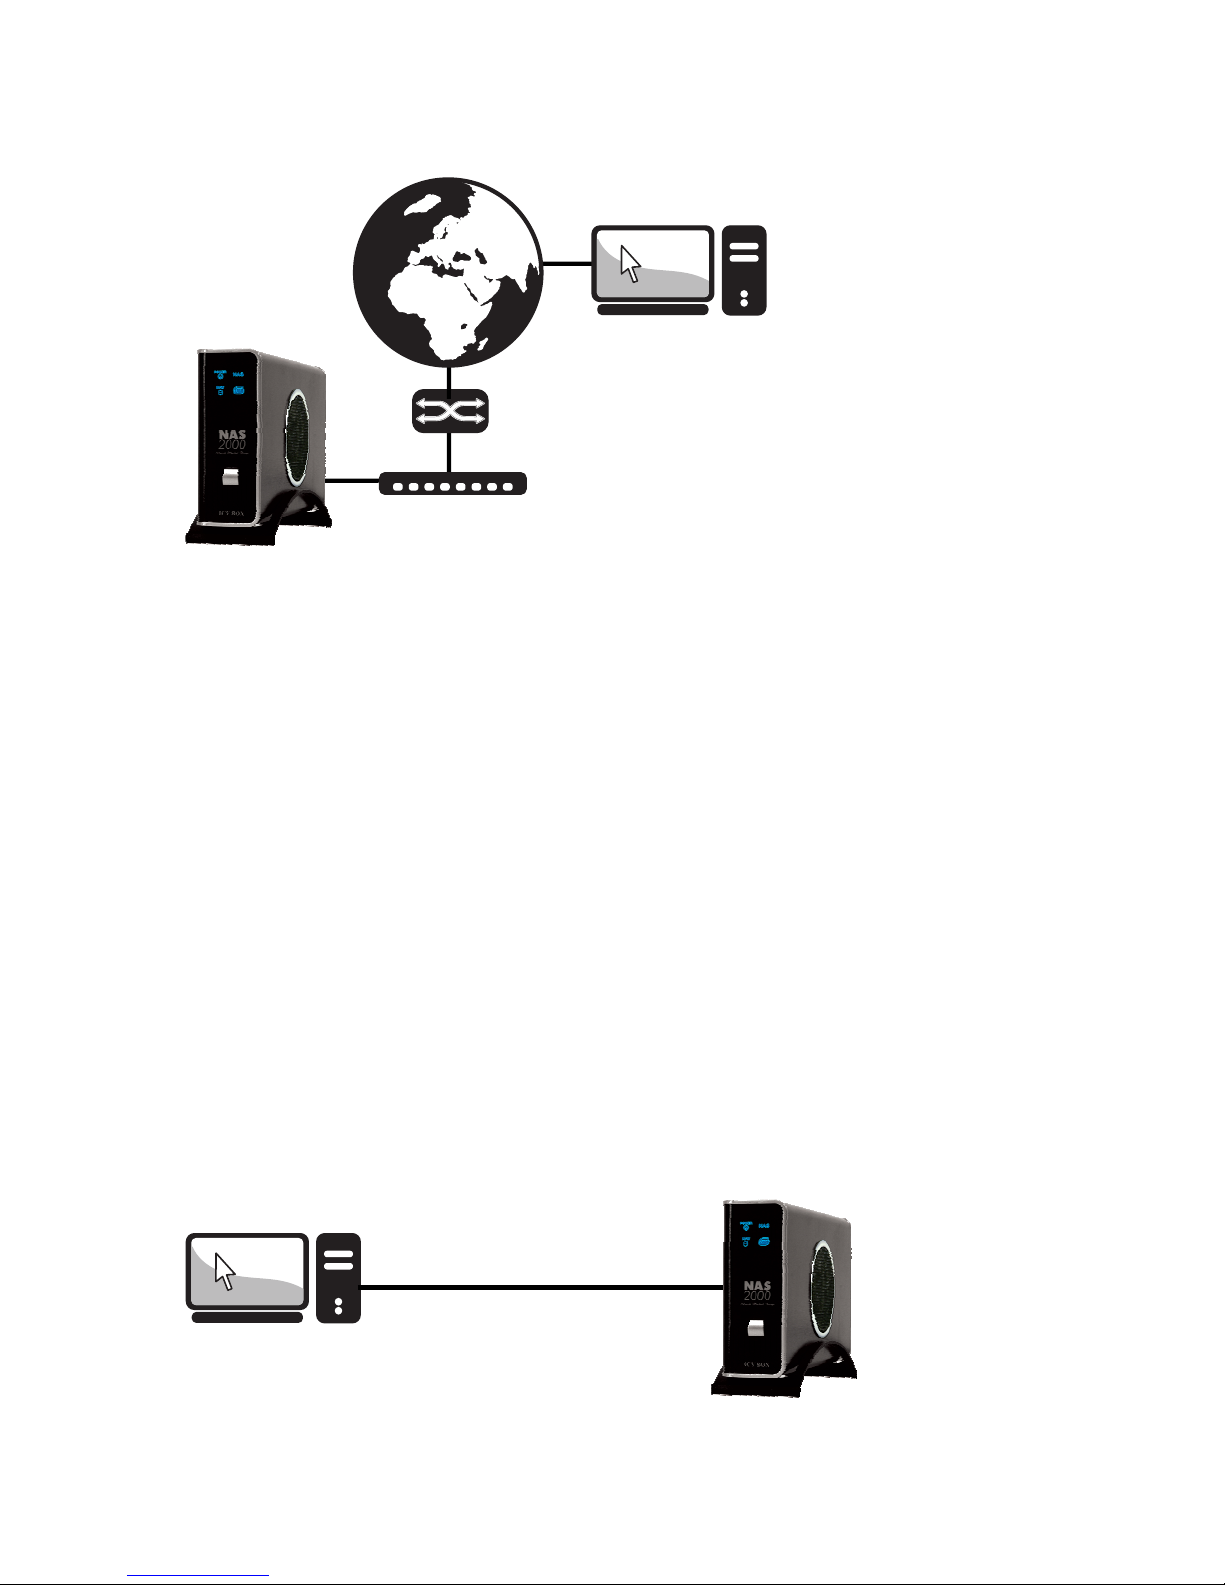
FTP
Netzwerk
Router
The FTP protocol is one of the oldest ways for file transfer in the internet. It is fast and
could easily be used to access the HDD even via the internet. A huge set of different
software clients exists even for exotic operating systems using this simple but fast
protocol. Most internet access routers used in small offices and at home offer a
mechanism called port forwarding (virtual server, etc.) which could be easily used to
expose the ICY BOX IB-NAS2001’s storage to the internet. The FTP protocol offers access
control based on user and groups.
NFS
In the Unix world the NFS protocol is common to share disk space via network. This
protocol could be used to mount natively network storage to all kinds of Unix operating
systems like Linux, Solaris, etc. The NFS protocol is fast but does not provide a User or
Group based access control server sided. Access control is limited to the definition of
singular or a set of IP-Addresses (host addresses).
More than a NAS
The ICY BOX IB-NAS2001 is not only an easy to use network storage device. It is a truly
double functional HDD box. It offers a complete USB 2.0 HDD access chipset, offering
greater flexibility. Users have the option of using it as a NAS where a network connection
is available or connect it via the much faster USB 2.0 Interface in the same way they do
it with a conventional external hard drive. This dual-functional design provides a
maximum of flexibility to access the data on the ICY BOX anytime anywhere.
USB
5
Page 6
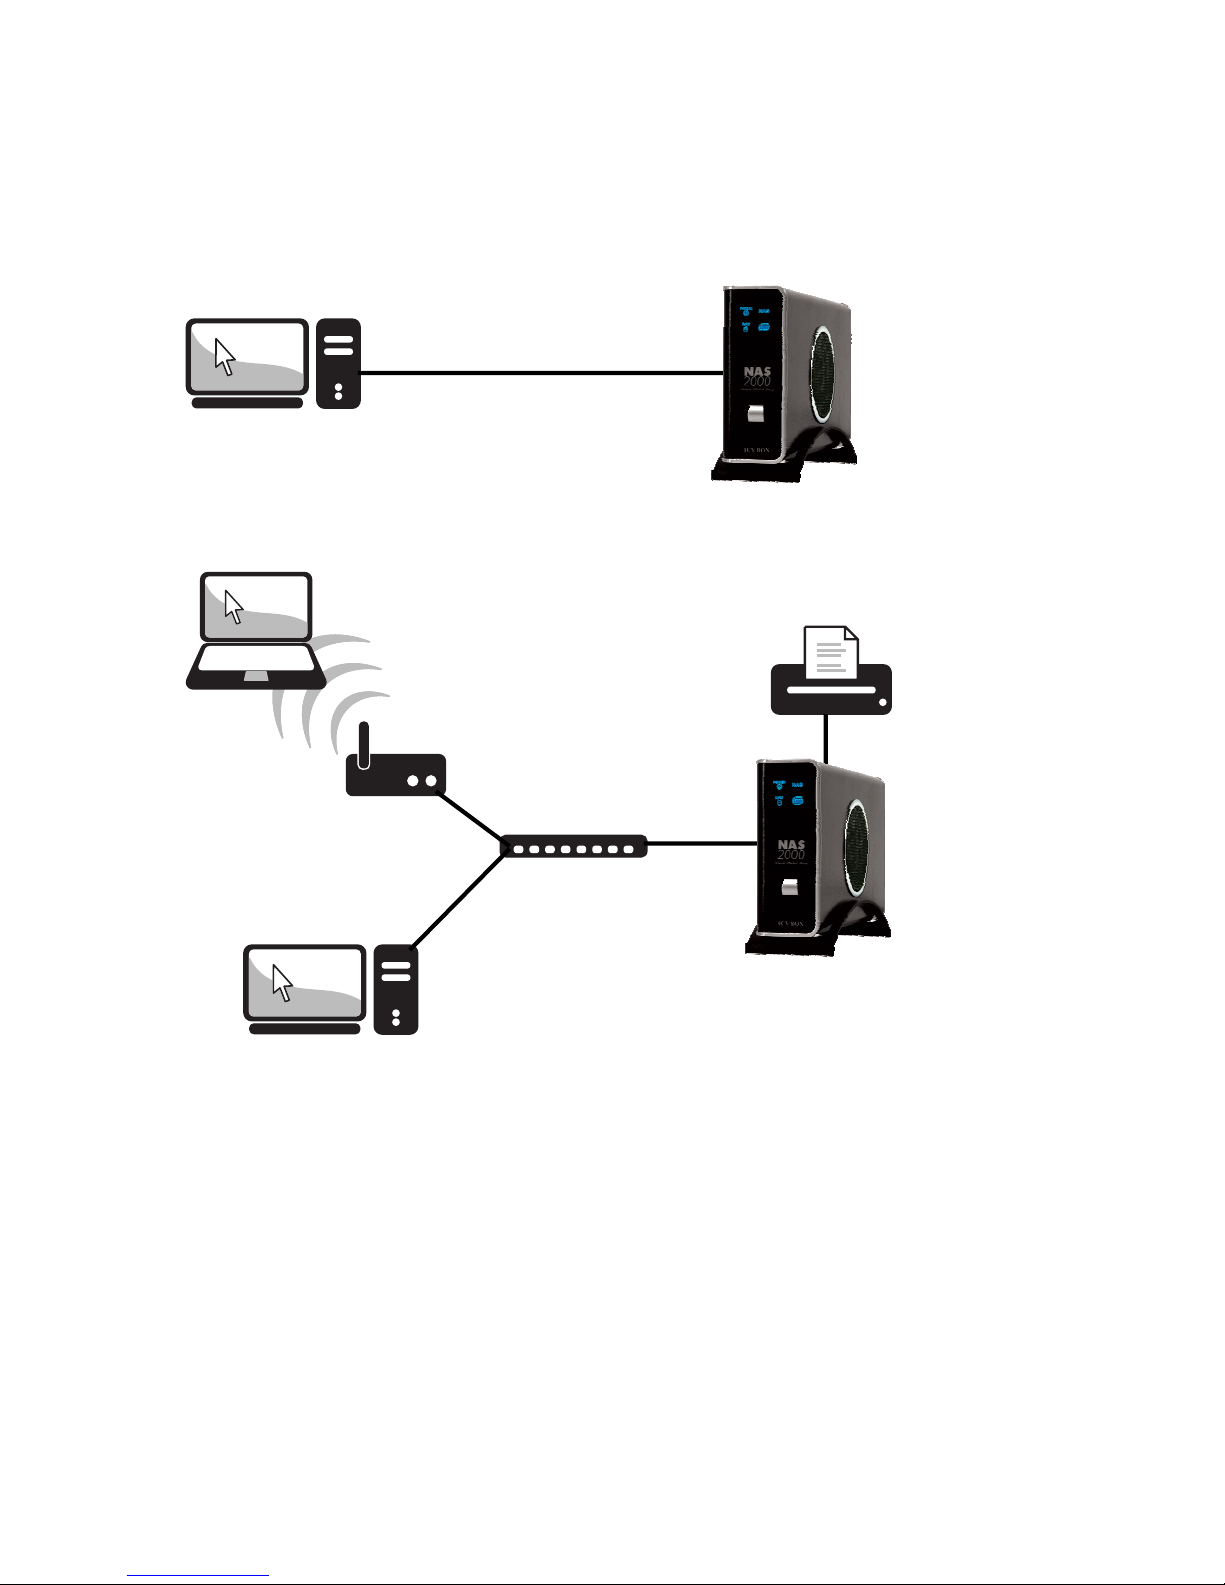
But the IB-NAS2001 is even more. You can print via Network or, if you like to distribute
Musik or Videos via your network at home, the UPnP-AV protocol can do this directly to
your network media player.
And if that still is not enough: The IB-NAS2001 can be additionally extended by other
Applications.
USB
Printserver
Netzwerk
Attach your printer to the IB-NAS2001 and use it via network from different computer
simultaneously.
6
Page 7

UPnP-AV
Netzwerk
The included Twonky Media Server (30 days trial version) adapts this standard to as
many players as possible. The Twonky Media Server has been updated several times a
year so far to ensure compatibility to all new players. Therefore we have chosen to not
implement this software fix in the firmware of the IB-NAS2001 but to give the user to
easily upgrade it when a new version is released. A permanent license can be purchased
from the Website of Twonky Media by following a link from the user interface of Twonky
Media.
7
Page 8
Bonjour and iTunes Support
Netzwerk
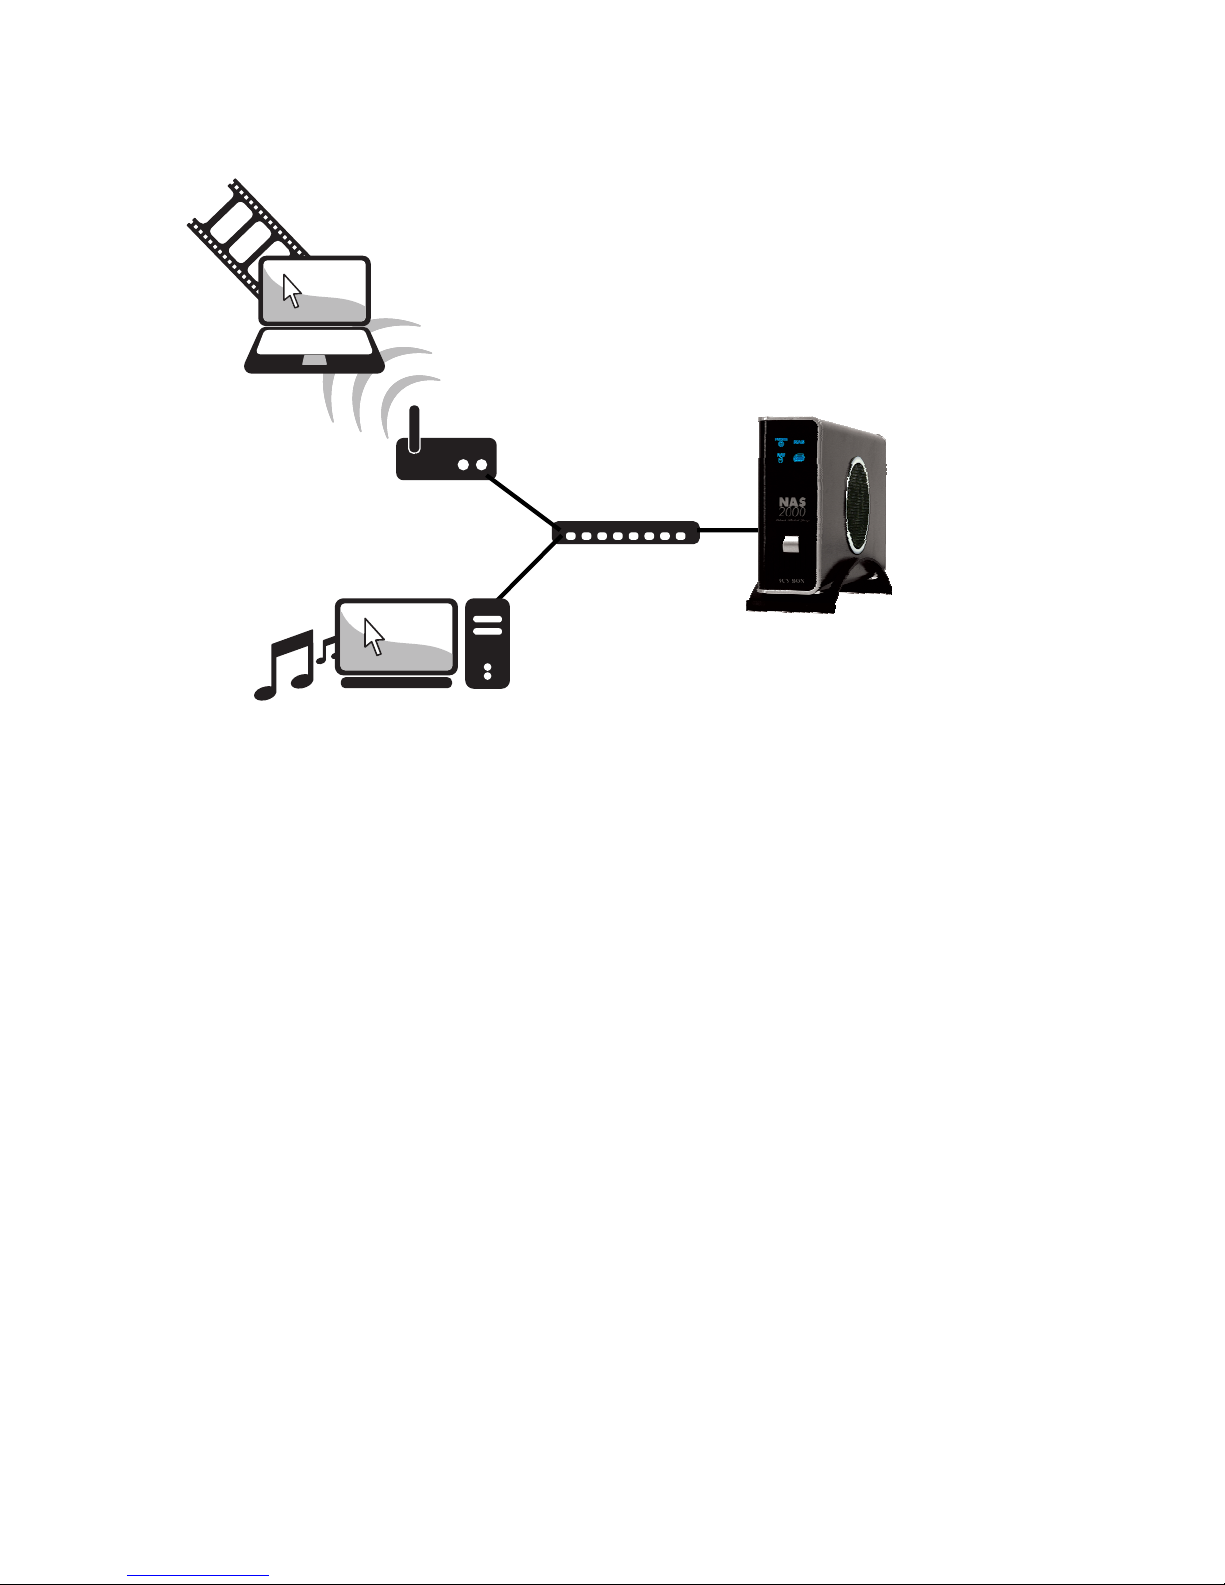
The IB-NAS2001 is able to assign its services via Bonjour, so that MAC computer can
easily be connected to the server functions of the IB-NAS2001. Due to the iTunes
support, multimedia files can be accessed via iTunes from anywhere in the network.
Extensibility
The IB-NAS2001 can arbitrarily extended on applications by installing additional software
packages. In contrast to the closed systems of other manufacturer, the IB-NAS2001 is
future-proof and open to new developments.
Package content
• IB-NAS2001
• CD-ROM
• User guide
• IDE to SATA converter
• RJ-45 Network cable
• USB cable
• Power adaptor
8
Page 9
Take a look at the IB-NAS2001
Front
Fan
Indicator LEDs
On/off switch
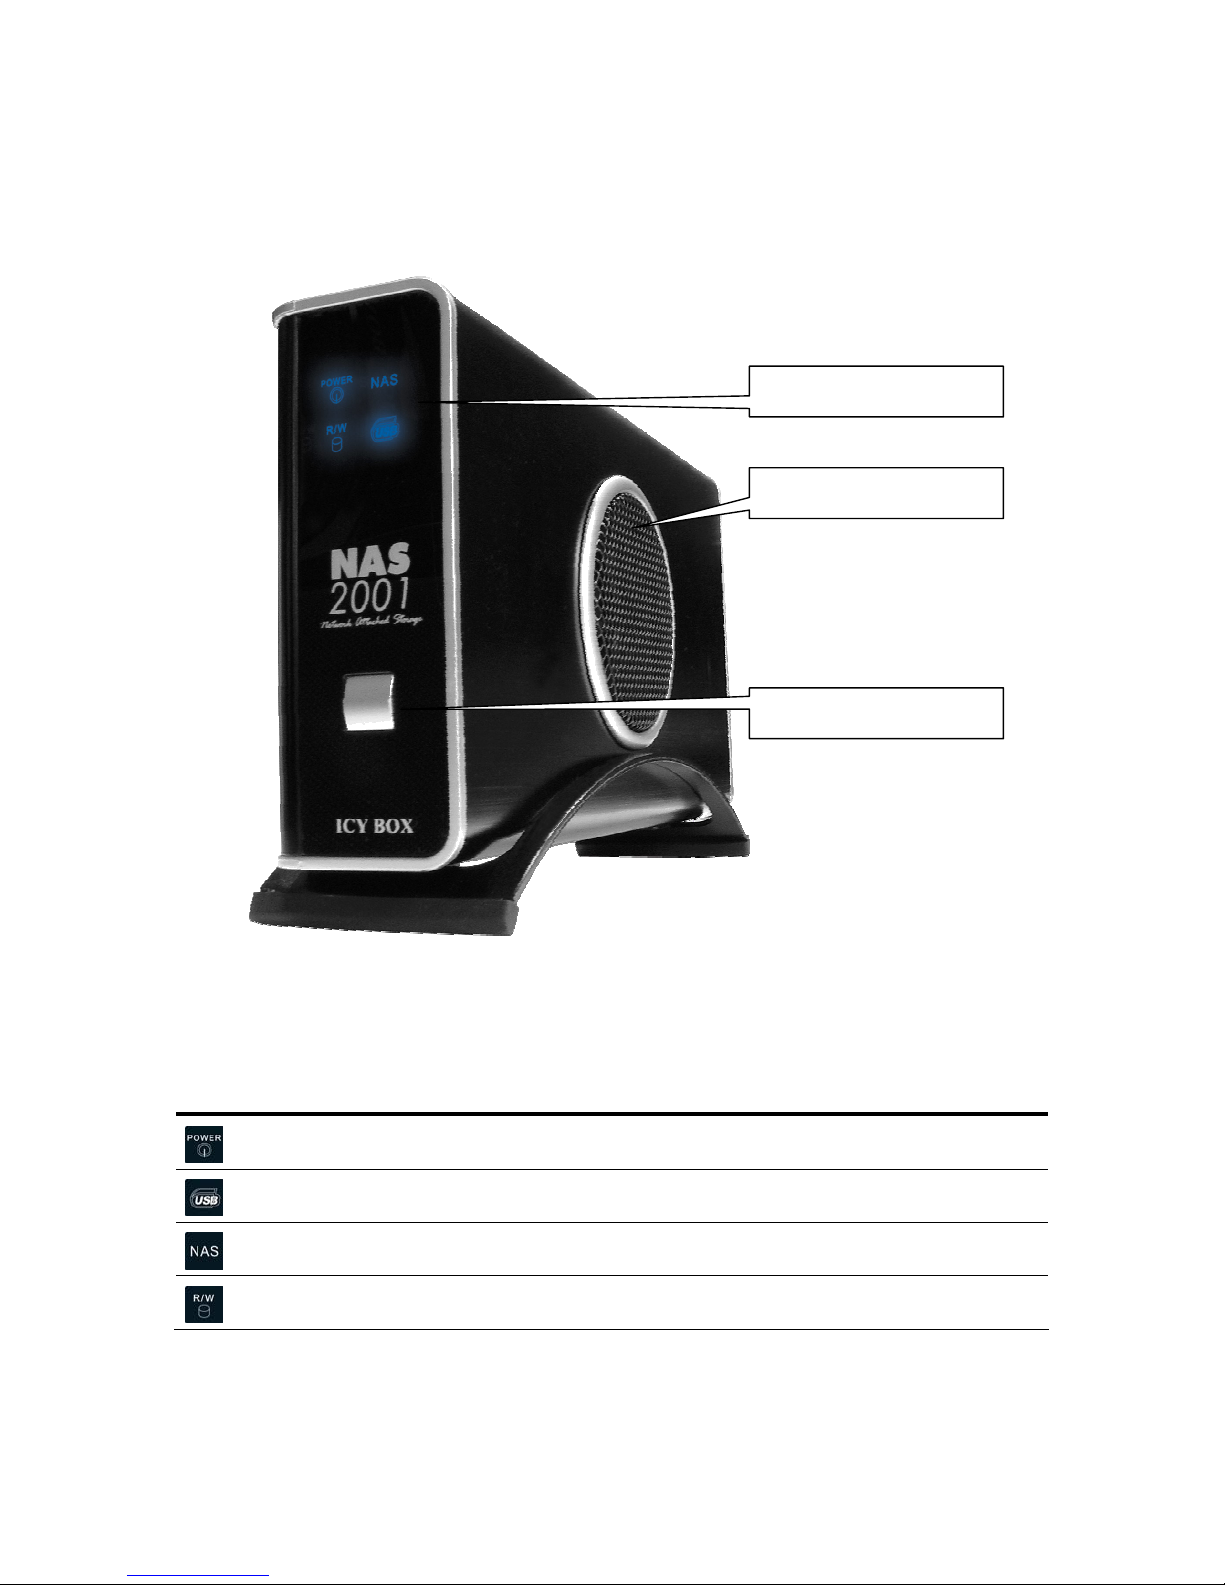
On the front side of the IB-NAS2001 there is the Switch for turning it on and off. Also in
the front in one of the corners are the indicator LEDs located, indicating the most
important operation states.
LED Description
Power supply
USB mode
NAS mode
disk access
9
Page 10
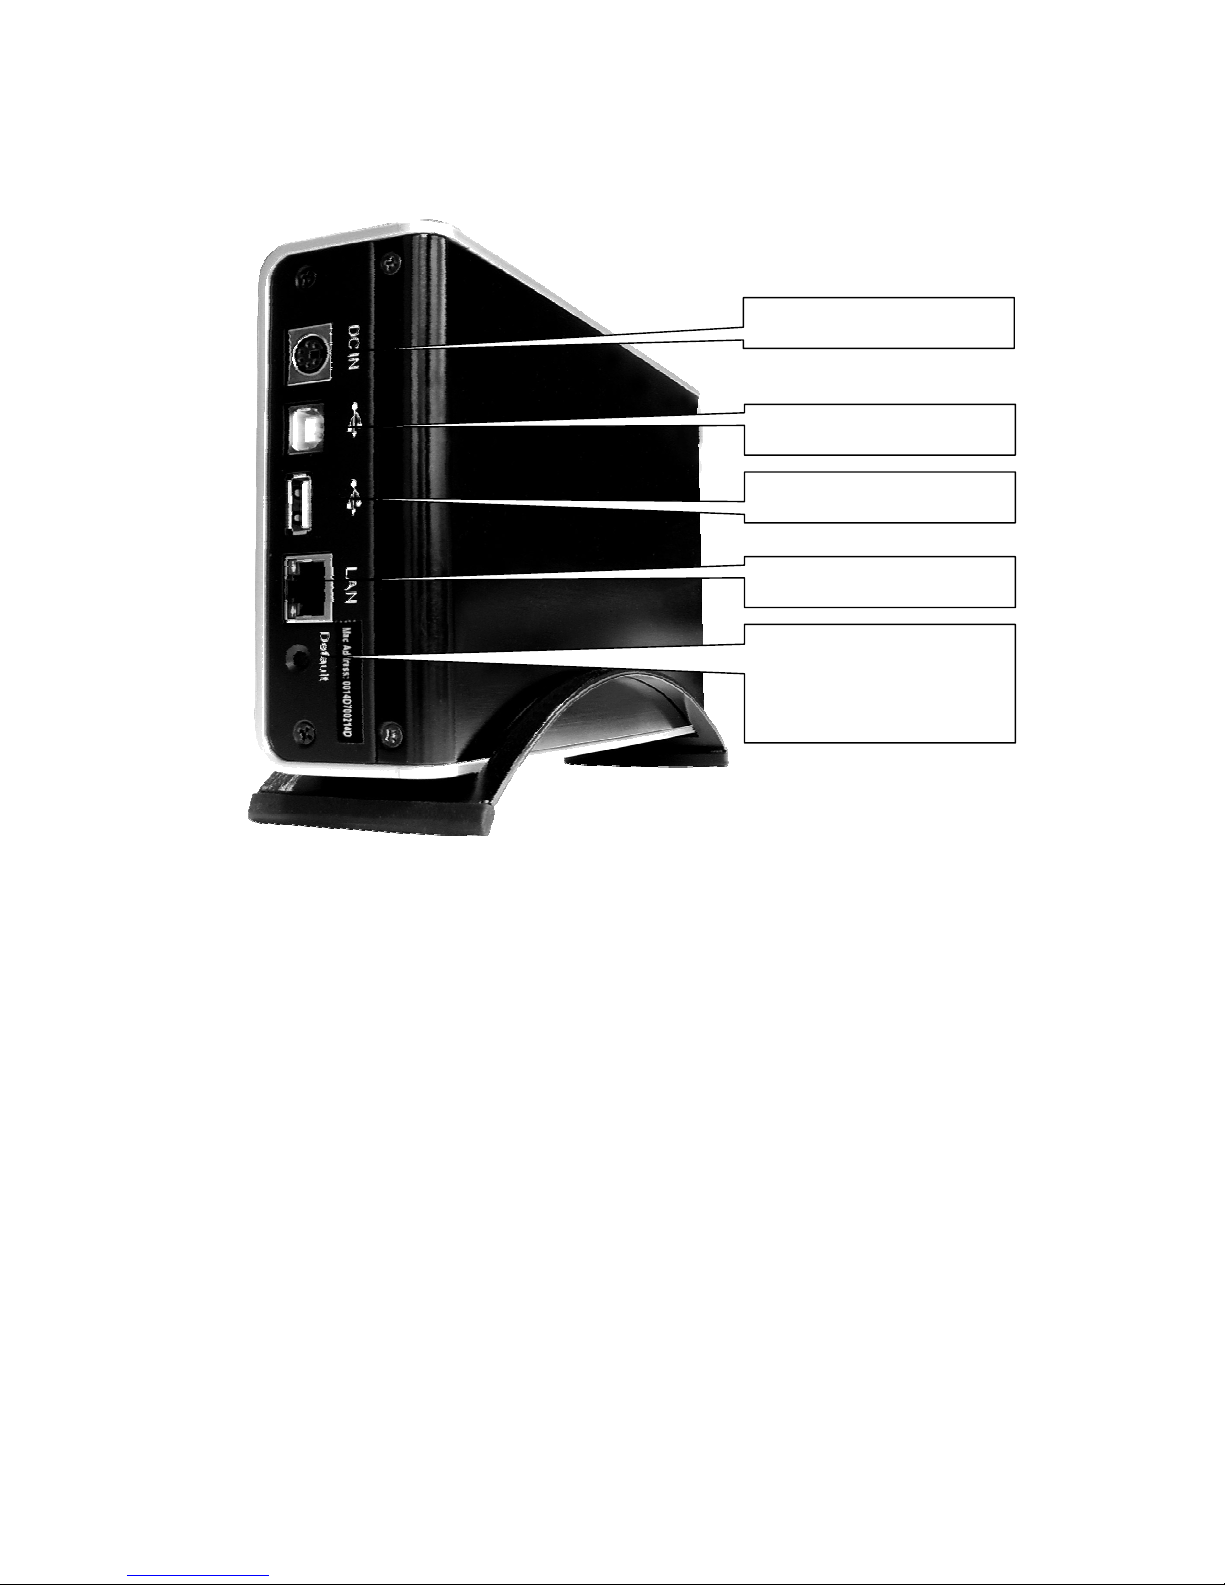
Back
USB interface to PC
USB host interface
Power adaptor connector
Network interface
Button for reset to
factory settings.
Caution: You will loose
all data!
10
Page 11
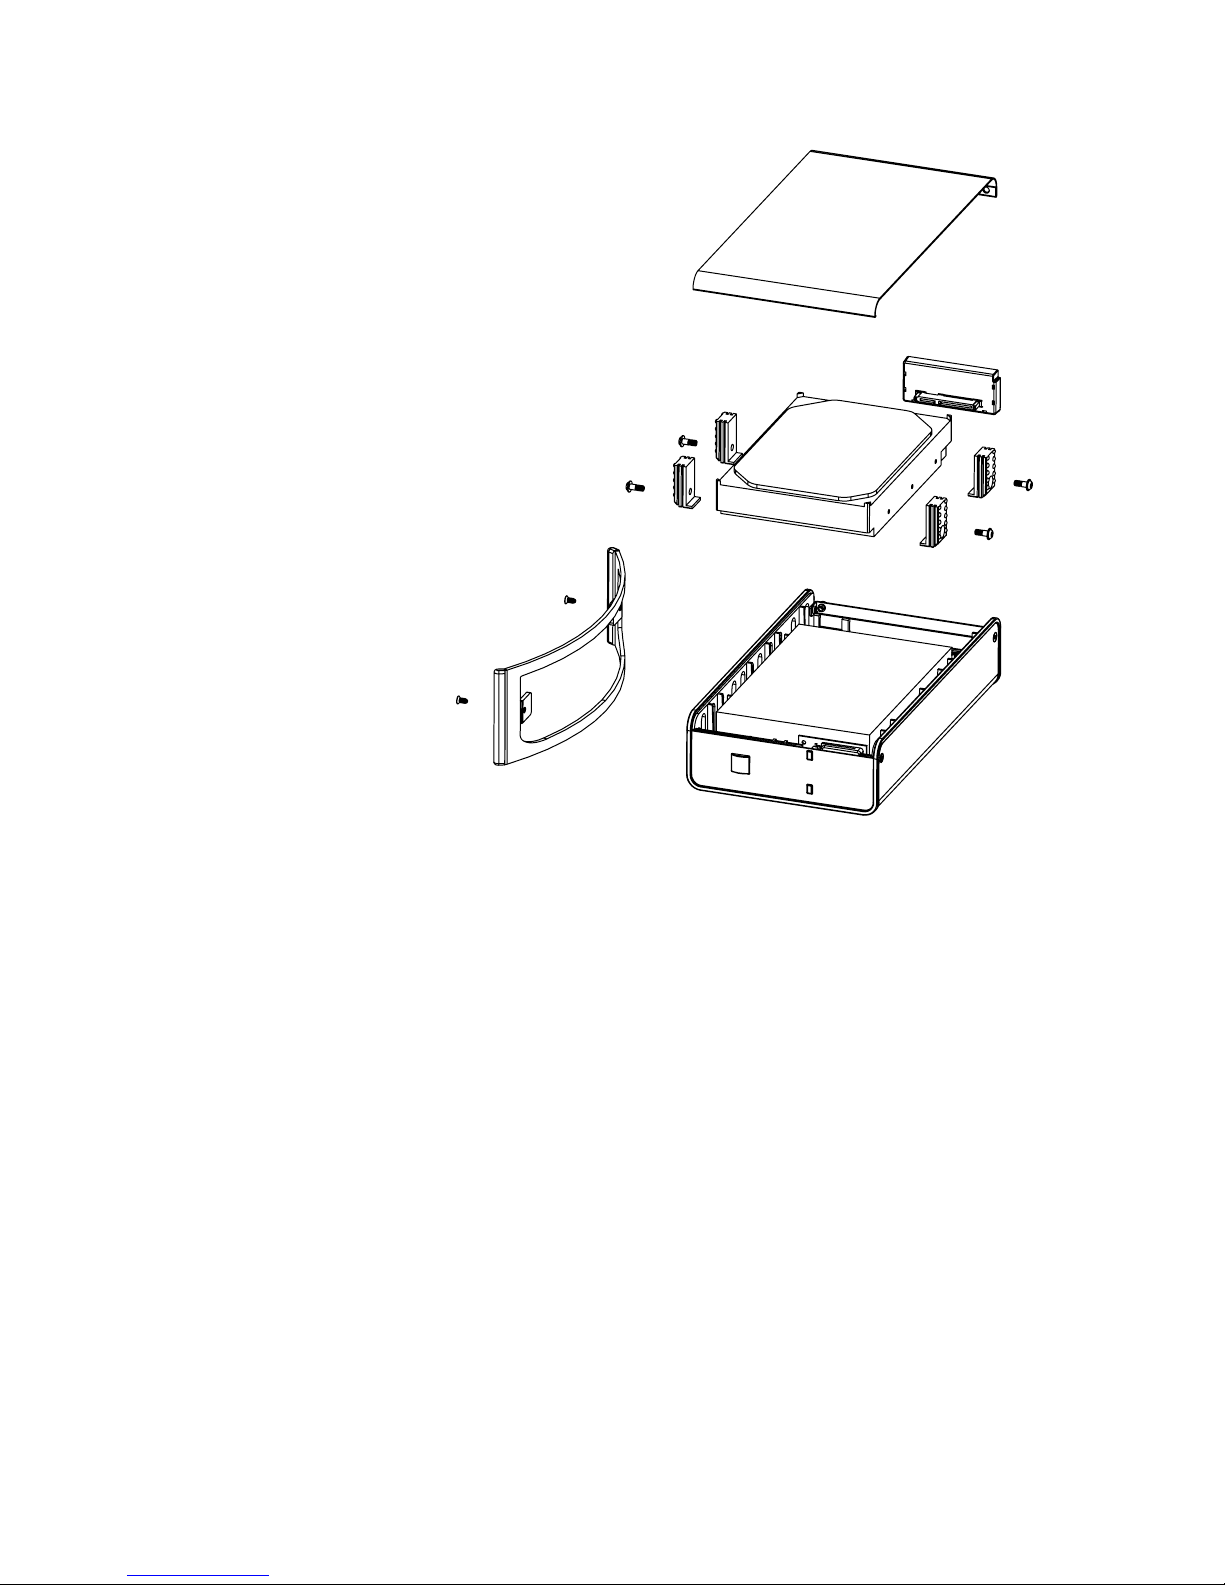
Assembly
1. Unscrew stand
2. Unscrew side cover
3. lift up side cover
4. Screw rubber sockets to hard disk
5. Insert HDD in case
6. Connect
6.1. SATA converter
6.2. IDE Cable and Power cable
7. Replace and screw tight the side cover
8. Replace and screw tight the stand
9. connect to
9.1. USB port of the computer by using
the USB data cable
9.2. Network by connecting the RJ-45
cable to either a computer or a
HUB
Usage as external Storage drive
First come first serve
To use the Icy Box IB-NAS2001 as an external storage enclosure all is required is to
connect to the USB interface of a computer. The decision whether the IB-NAS2001 is
operating as an external storage case or as a NAS is determined by the first come first
serve principle. After turning on the IB-NAS2001 the interface which is connected defines
the operation mode.
Attention: Do not connect the USB and the Network interface at the same time!
Once the IB-NAS2001 is connected to USB and power up it acts as a standard external
hard drive.
Attention: To make sure that the IB-NAS2001 operates appropriate as an
external hard drive and as a NAS it is necessary to initialize and
format the hard drive in the NAS modus as described in chapter
“Hard disk initialization” on page19. This is necessary because the
NAS modus needs 2 additional reserved partitions witch are created
during this procedure. To be able to write on that partition on a
Windows computer the chosen file system of the data partition has to be
FAT32.
11
Page 12

12
If connected to a Windows system the first 2 Partitions created by the NAS setup process
are not visible because the are formatted with a file system windows is not able to use by
default.
Attention: The content of the first two system partitions created by the NAS setup
process must not be changed manually in order to guaranty the
appropriate operation of the IB-NAS2001 in the NAS modus.
To switch between the NAS modus and then external hard drive modus it is first
necessary to turn of the IB-NAS2001, disconnect the old interface, connect the new one
and turn it on again. After that the Modus is chosen in the described way by the first
interface witch is connected at the time of start up.
How to access the Management Interface
The NAS modus is controlled by a web based interface which could be accessed by using
a standard web browser. In a normal network environment this is simply done by
entering “http://icybox” in the address line of the web browser. But whether that works
is determined by the configuration of the network environment.
The following Possibilities are given:
DHCP controlled Network with automatic DNS update
In a DHCP1 controlled Network the ICY BOX IB-NAS2001 is assigned with an IP Address2
by the DHCP server. In case the DHCP server updates this information automatically to
the DNS
3
Server (see RFC 2136). The ICY BOX IB-NAS2001 could be accessed by simply
entering “http://icybox” in the address line of a standard web browser. Continue with
point “Using the management interface” for setting up the IB-NAS2001 on Page 17.
1
DHCP acronym for “dynamic host configuration protocol” names a process witch assigns network parameters to a computer
attached towards a network automatically via a specialized DHCP server. Most DSL routers provide such a service.
2
IP-Address is a 32 bit binary number mostly expressed by a group of four numbers in the Range between 1 and 255
separated by “.” e.g. 169.254.100.100. This is used for addressing hosts in a TCP/IP based Network.
3
DNS is the acronym for “domain name service”. This names a process of assigning internet names to IP Addresses. The DNS
server is comparable to a telephone book. At this server all internet applications look up the referring IP Address for an internet
name. Without that service or when the DHCP server doesn’t know the internet name, the internet name could not be used to
address a host or device. The only chance to get access to that host or device is to use the IP Address directly.
Page 13
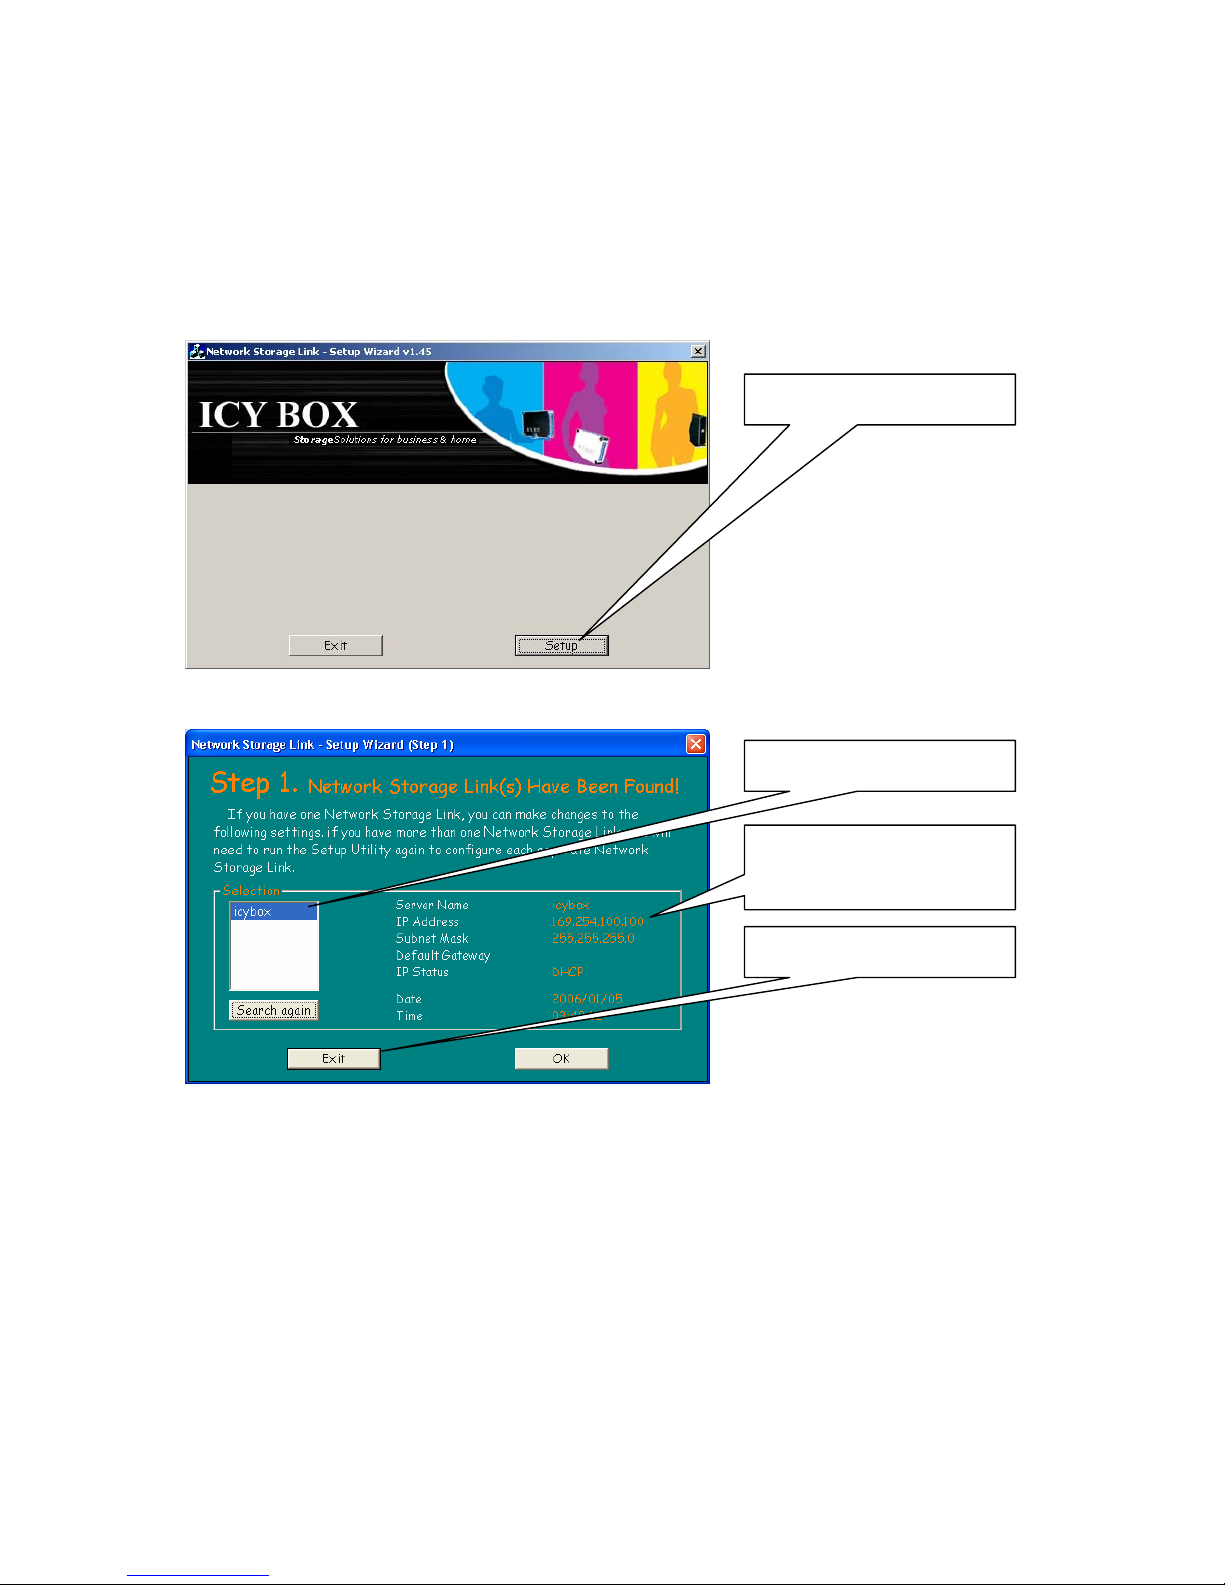
DHCP controlled Network without automatic DNS update
In a DHCP controlled Network environment the IB-NAS2001 gets its IP Address from the
DHCP server. If the DHCP server does not update that information to the DNS server the
necessary name resolution for entering “http://icybox” will not work because the DNS
server has no information about the actual IP Address of the IB-NAS2001. To find out the
IP Address you can turn on the UPnP Support in Windows or use the “SearchNAS.exe”
Program on the CD to find out the IP Address.
Click on „Setup“
Click on “Exit”
The actual IP Address of
the IB-NAS2000 is
displayed
IB-NAS2000 is found
To access the web management surface enter “http://
<IP Address>” in the address line
of the Standard Web browser, where
<IP Address> is the IP Address found by
SearchNAS.exe as described above. Continue with point “Using the management
interface” for setting up the IB-NAS2001 on Page 17.
13
Page 14

Not configured Network / Direct Attachment
If the IB-NAS2001 is attached to a not configured network where no DHCP server
provides the IP configuration (or the IB-NAS2001 is directly attached to the computer)
and the computers are configured to use DHCP (which is default setting) the IB-NAS2001
will activate its own DHCP Server with the default IP Address 192.168.0.1 and will
provide IP Addresses in a range from 192.168.1.2 till 192.168.1.50 with a net mask
4
of
255.255.255.0, which is part of the subnet
5
192.168.1.1-192.168.1.254. In this case the
IB-NAS2001 can be reached by typing “http://192.168.1.1” in the address line of a
standard web browser.
Network configured on fix IP-Addresses
In a network where no DHCP Server is present and all IP-Addresses are configured
manually and fixed for example between 192.168.1.1 and 192.168.1.254 with
255.255.255.0 as net mask, 192.168.1.1 as default gateway
6
and 192.168.1.1 as
DNS server you have to define the IP Address of the IB-NAS2001 also manually.
To configure the IP Address of the IB-NAS2001 to for example 192.168.1.100 please
start the SearchNAS.exe on the CD and proceed as follows:
Attention: If you are unable to run SearchNAS.exe on your computer because you
are not using a Windows operating system please configure the IPAddress of the IB-NAS2001 using the web configuration interface as
described in point “Network Setting” on page 46.
Click on „Setup“
14
4
The net mask defines which part of the IP Address is describing the subnet. Together with the IP Address it is the minimum
necessary part of the network configuration. So it always has to be set appropriate.
5
TCP/IP based networks, as the internet, are structured into different network parts called sub nets. A subnet is built by a set
of IP Adresses all having the same digital beginning. Remember: an IP Address is always interpreted as 32 bit binary number
containing 32 binary digits. IP Adresses of the same subnet all have the left part of these digits in common. How many of those
digits are used to define a subnet is described by the net mask. Computers in the same subnet are able to communicate
directly together. Computers in different subnets need a so called router which connects different subnets and forwards the net
traffic from one subnet into another.
6
In a TCP/IP based Network a computer can send directly data only to other computers in it’s own subnet. To be able to send
data to other computers, a rooter is necessary to link this subnet to the rest of the network and all computers in the subnet
need to know its IP Address because they will send all data for destinations out of their subnet to the rooter to be forwarded.
This IP Address of the router is defined by the default gateway setting.
Page 15
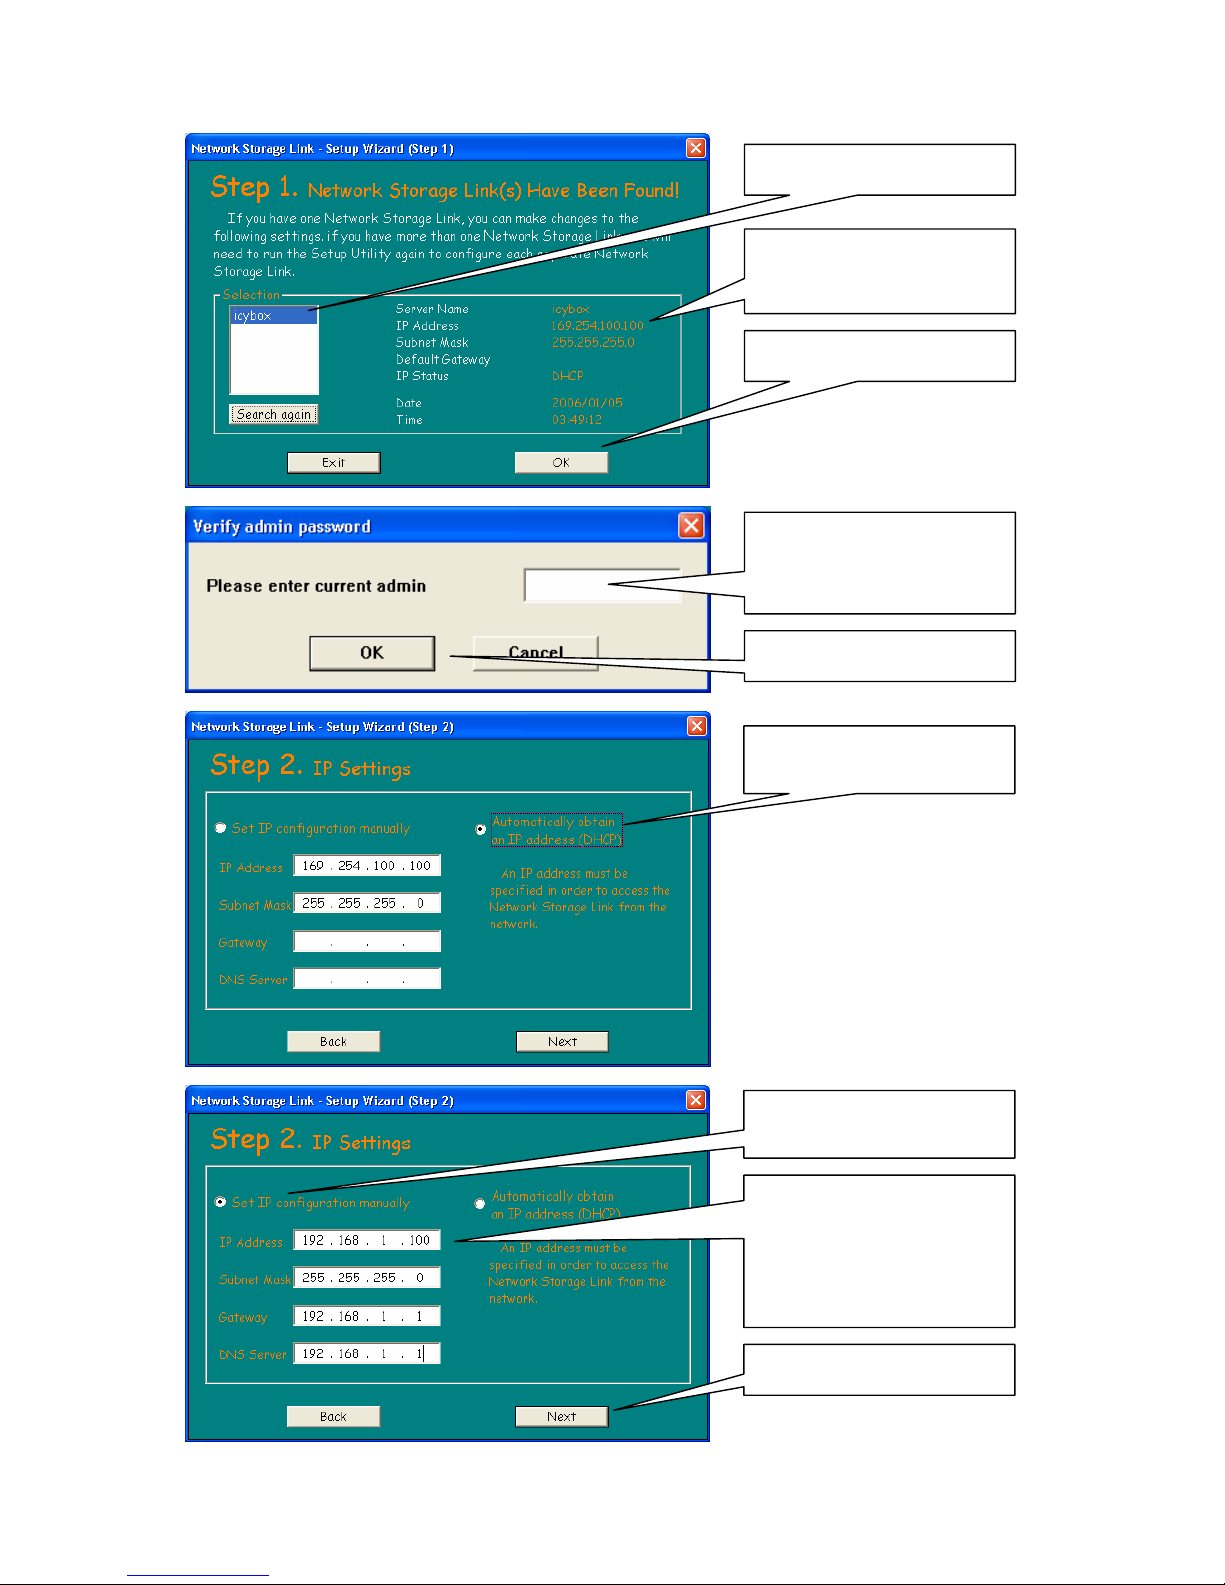
Click on “OK” to continue
The actual IP Address
configuration of the IBNAS2000 is displayed
IB-NAS2000 is found
Click on “OK”.
Enter the password of
the IB-NAS2000. Default
password is “admin”.
The current IP Settings
are displayed.
Click on “Next”
Enter “192.168.1.100” as
IP Address, as subnet
mask “255.255.255.0”
and “192.168.1.1” as
default gateway and as
DNS server
Select “Set IP
configuration manually”
15
Page 16
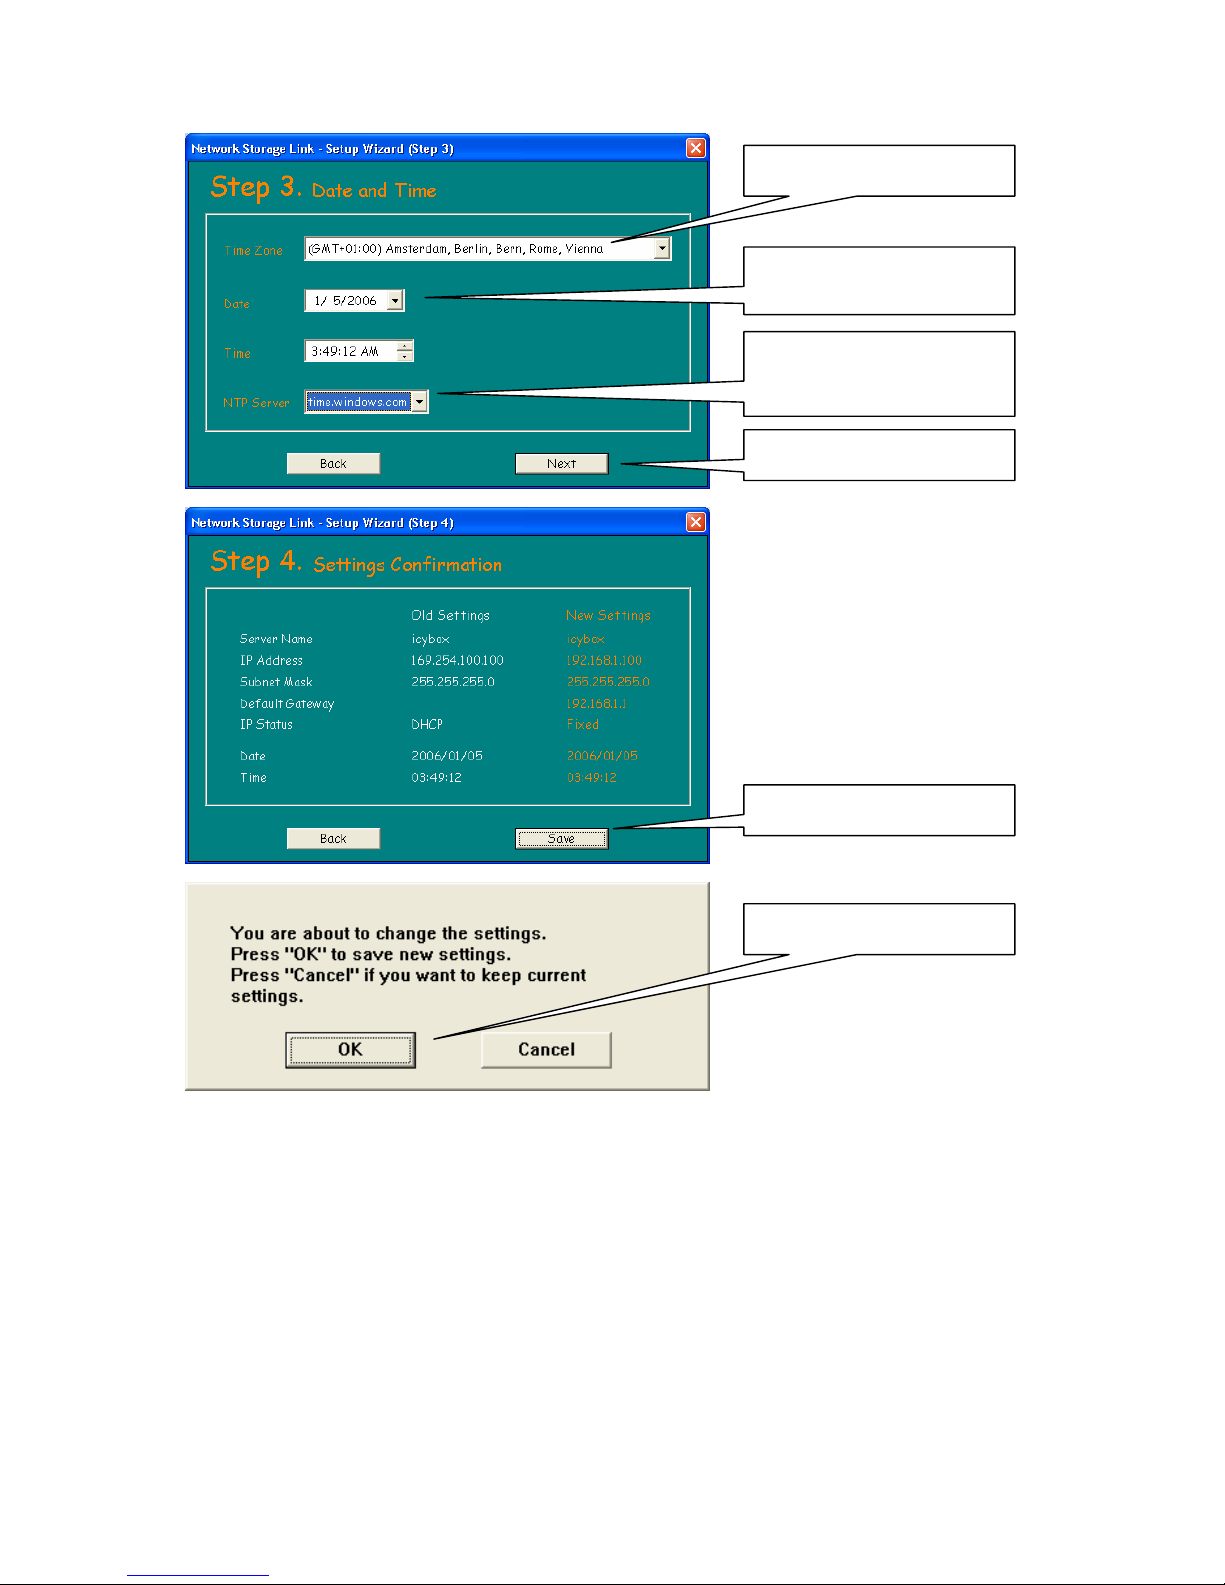
Click on “Next”
… select a time server
(requires an internet
connection)
Set the date and time
manually or …
Select your time zone
Click on “Save”
Click on “OK”
16
Page 17
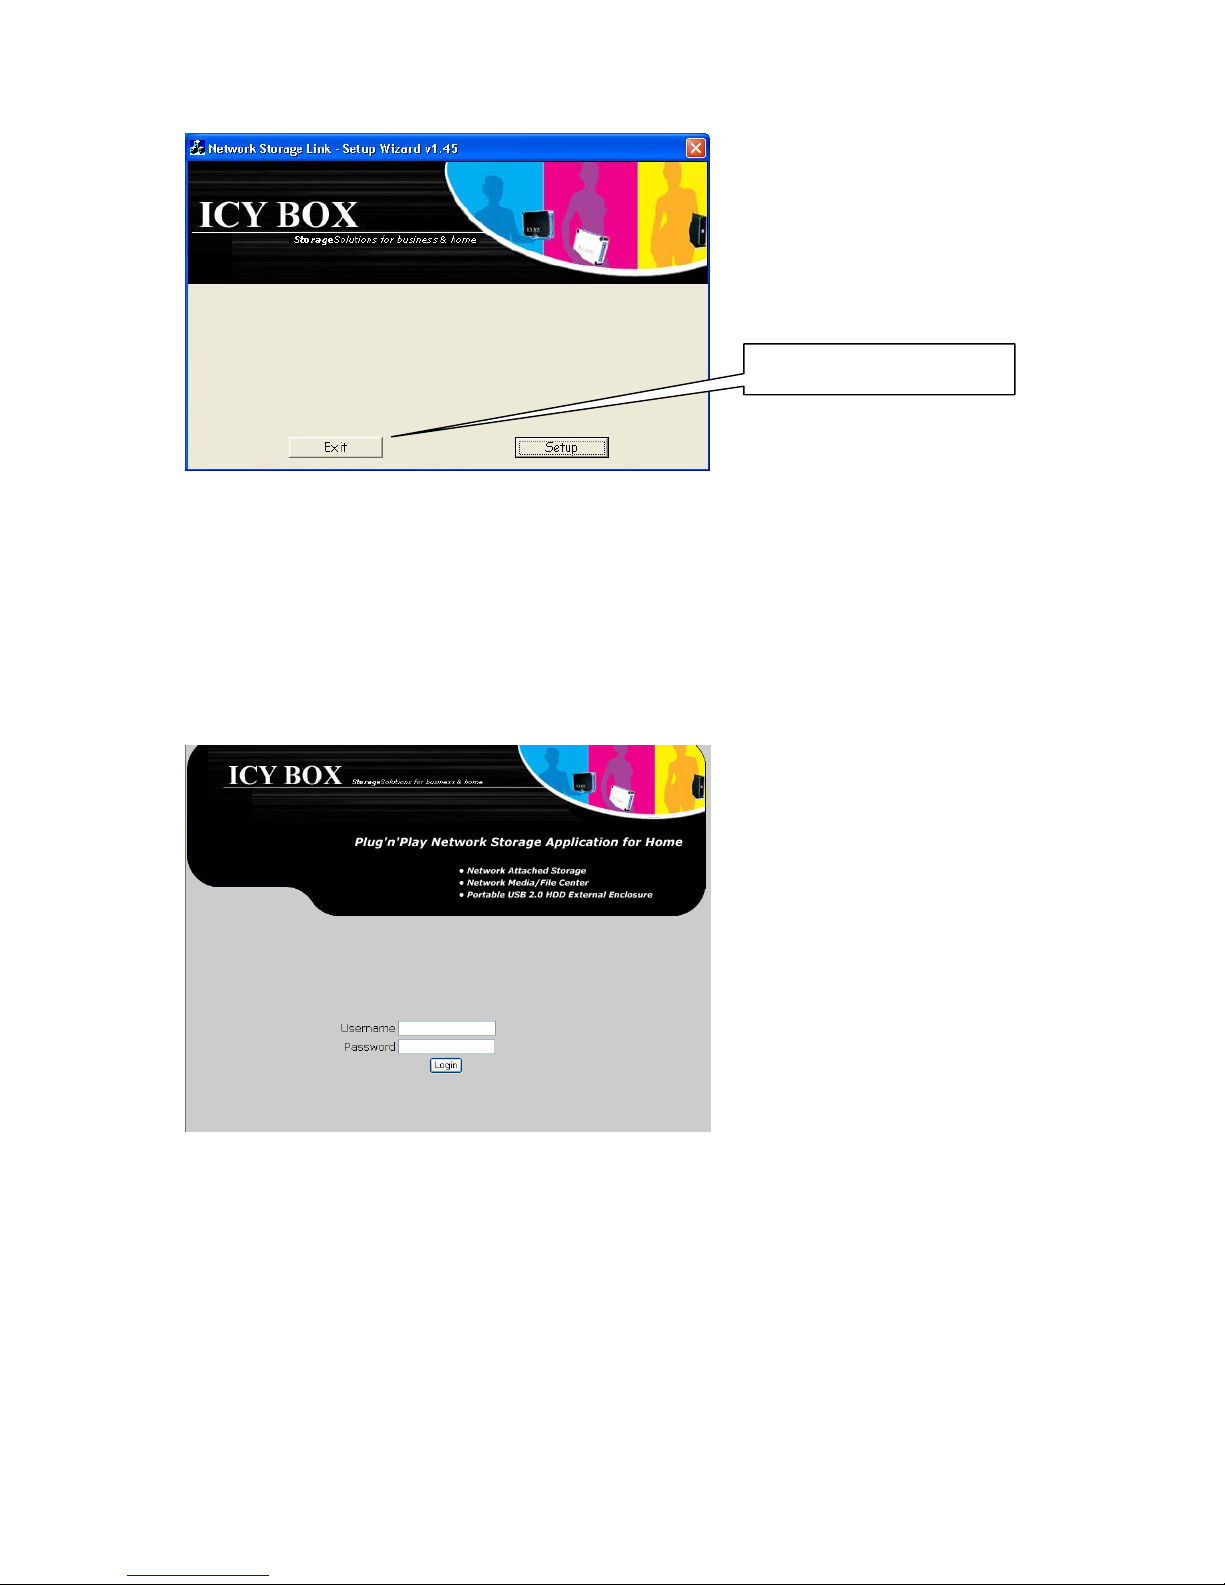
Click on “Exit”
After the procedure, the IB-NAS2001 could be accessed by typing “http://192.168.1.100”
in the address line of the web browser. Continue with point “Using the management
interface” for setting up the IB-NAS2001 on page 17.
Using the management interface
When entering the URL as mentioned in the points above in the address line of the web
browser, for example “http://192.168.1.100” the browser connects to the IB-NAS2001
and displays the management interface of the IB-NAS2001.
17
Page 18

Logging In
This is password protected. The administrative user name is “admin” and the default
password is also “admin”.
Click on “Login”
Enter “admin” as
Password (default
setting)
Enter “admin” as
Username
Management interface structure
After successfully logged in the management surface is displayed. The management
surface is structured in the main menu tab, the sub menu column and the setting’s
space.
In the main menu tab you can choose between the
Main menu tab section Description
Control Panel All settings referring to the administration
Personal Info Basic system information and set up
Logout Logging out
The sub menu column will adapt its content to the selected Main Menu section. In the
Internet Explorer the items in the submenu column will be enlarged displaying subsidiary
Setting’s space
Sub menu Column
Main menu tab
18
Page 19

19
ted in white color when selected.
Hard disk initialization
01 should be the initialization of the hard disk.
This is necessary because the IB-NAS2001 saves some settings in specialized system
e partitions are created and formatted on the hard disk:
tition s (don’t access)
items when selected. On other browsers the menu tree will be displayed showing all
subsidiary items always.
Chosen Items are highligh
The first step in the setup of the IB-NAS20
partitions on the hard disk.
Initializing the hard disk, thre
Partition Description
System par System setting
Swap partition Memory extension (don’t access)
Data partition User data to be shared in the network
Attention: The IB-NAS2001 needs this particular structure of the hard disk in order
to be able to operate as NAS. This structure could not be set up
ry to
Choosing the appropriate file system
7
three different file systems:
m
manually when used as an external storage device via USB. In order to
be able to use the IB-NAS2001 appropriately it is always necessa
proceed this step using the “Disk Utility” dialogue on described on
page 21.
The data partition of the IB-NAS2001 could be set up using
File system Description
EXT2 Linux file syste
EXT3 Linux journaling file system
FAT32 Windows file system
These file systems differ in the native ability of different operating systems to access
them directly via USB mode, in their features and limits. That is the reason why no
e
particular file system is preset for the data partition. Depending on the future use of th
IB-NAS2001 the user has to choose the appropriate one.
7
A file system describes the way an operating systems stores data to a mass storage device. A file system may include
mechanisms for data organization, naming of files, access control, and system crash stability. Since mass storage management
is a very important task to an operating system a file system is deeply related to its abilities. Different operating systems are
orientated to different kinds of file systems and there philosophy.
Page 20

20
OS file system accessibility via USB
File system Operating systems capable accessing via USB
EXT2 • Linux
EXT3 • Linux
FAT32 • Windows (98,NT, ME, 2000, XP, 2003)
• OS X (Mac)
• Linux
File system features
File system Features
EXT2 • write protection
• archive bit
• user level access control
EXT3 • write protection
• archive bit
• user level access control
• quota
8
FAT32 • write protection
• archive bit
• Unicode file names
File system limits
File system
max.
filename
length
allowed
filename
characters
9
max.
pathname
length
max. file
size
10
max. volume
size
EXT2 255 byte any byte
except NUL
no limit
defined
2 TiB 32 TiB
EXT3 255 byte any byte
except NUL
no limit
defined
2 TiB 32 TiB
FAT32 255 byte Unicode except
NUL
no limit
defined
4 GiB 2 TiB
8
A quota is a limit to be set for the maximum disk space a user or group can use.
9
Characters like “/”, “\” or “:” are also not allowed, because they are reserved by the syntax of command line interface shells
of the different operating systems.
10
Gi and Ti represent the IEC standard prefixes, which are the binary equivalent of the referring SI prefix witch means that
instead of using a factor based on 1000 (10
3
) a factor based on 1024 (210) is used. Example: 300 GB = 279,5 GiB
Page 21

Disk Utility
You can find the hard disc initialization settings on:
Control Panel
Maintenance
Disk Utility
Command button for
unmounting the disk
Command button for
refreshing the display
File system selector
Command button for
formatting the disk
The Disk Utility dialogue shows up a table containing the following information:
Column Description
Device name Unix name of the hard disk device
Type File system of data partition
Size Total size of hard disk
Used Size of used area
Mount Point Mount point of data partition in Unix directory tree
Status Mounting status
Format Command button for initializing and formatting the disk
Scandisk Command button for a failure scanning and repairing
function
Umount Command button for unmounting the device
Format Type Select field for file system selection of the data partition
The “Refresh” button causes a refresh of the displayed data if the display should not be
actualized automatically.
21
Page 22
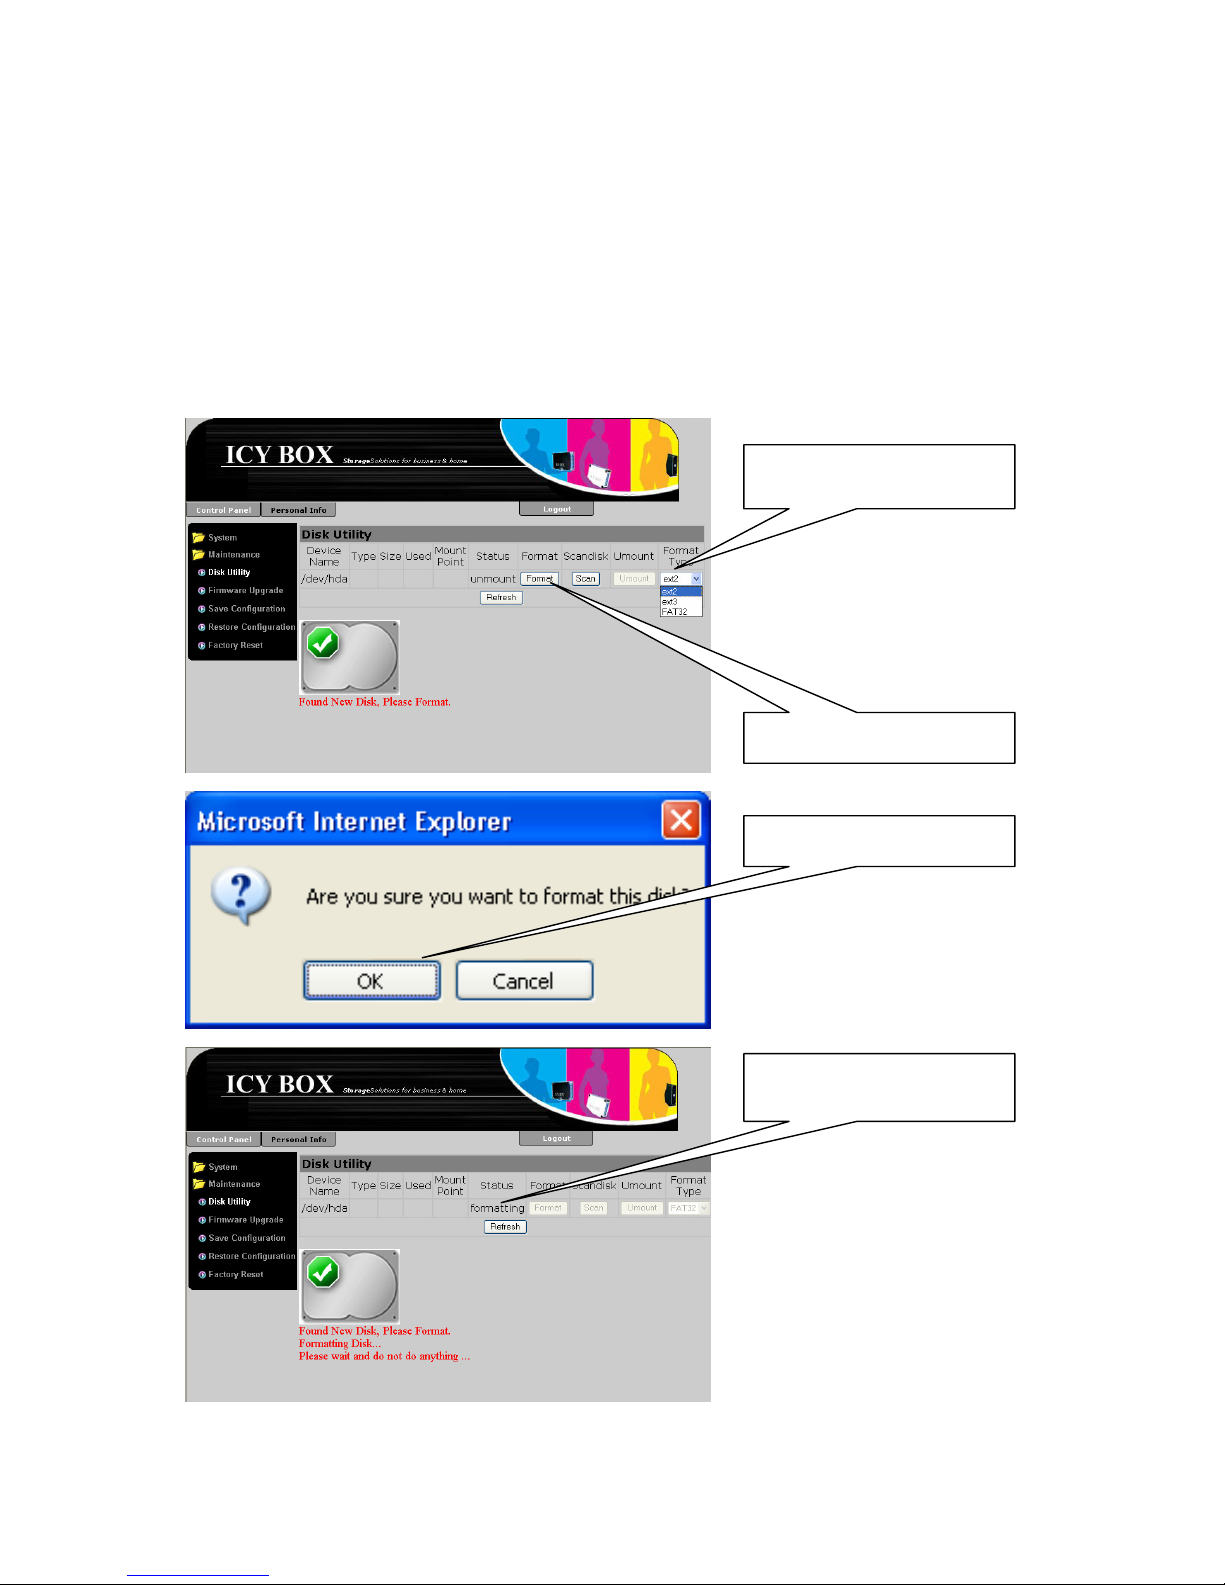
Initializing the hard disk is done in two steps: First choose a file system for the data
partition and second click on “Format” button:
Attention: The choice of the file system has big influence on the features provided
by the NAS. Also important is the fact that not all file system types could
be read by every operating system. This is of great importance when
you plan to use the IB-NAS2001 both as NAS and external storage
device via USB. For details see point “Choosing the appropriate file
system” on page 19.
Attention: Formatting the hard disk will erase all data on the hard disk.
Please save all data on it before proceeding to format it!
Click on “Format” button
Select a file system type,
for example “FAT32”
Click on “OK”
The Status changes to
“formatting”
22
Page 23
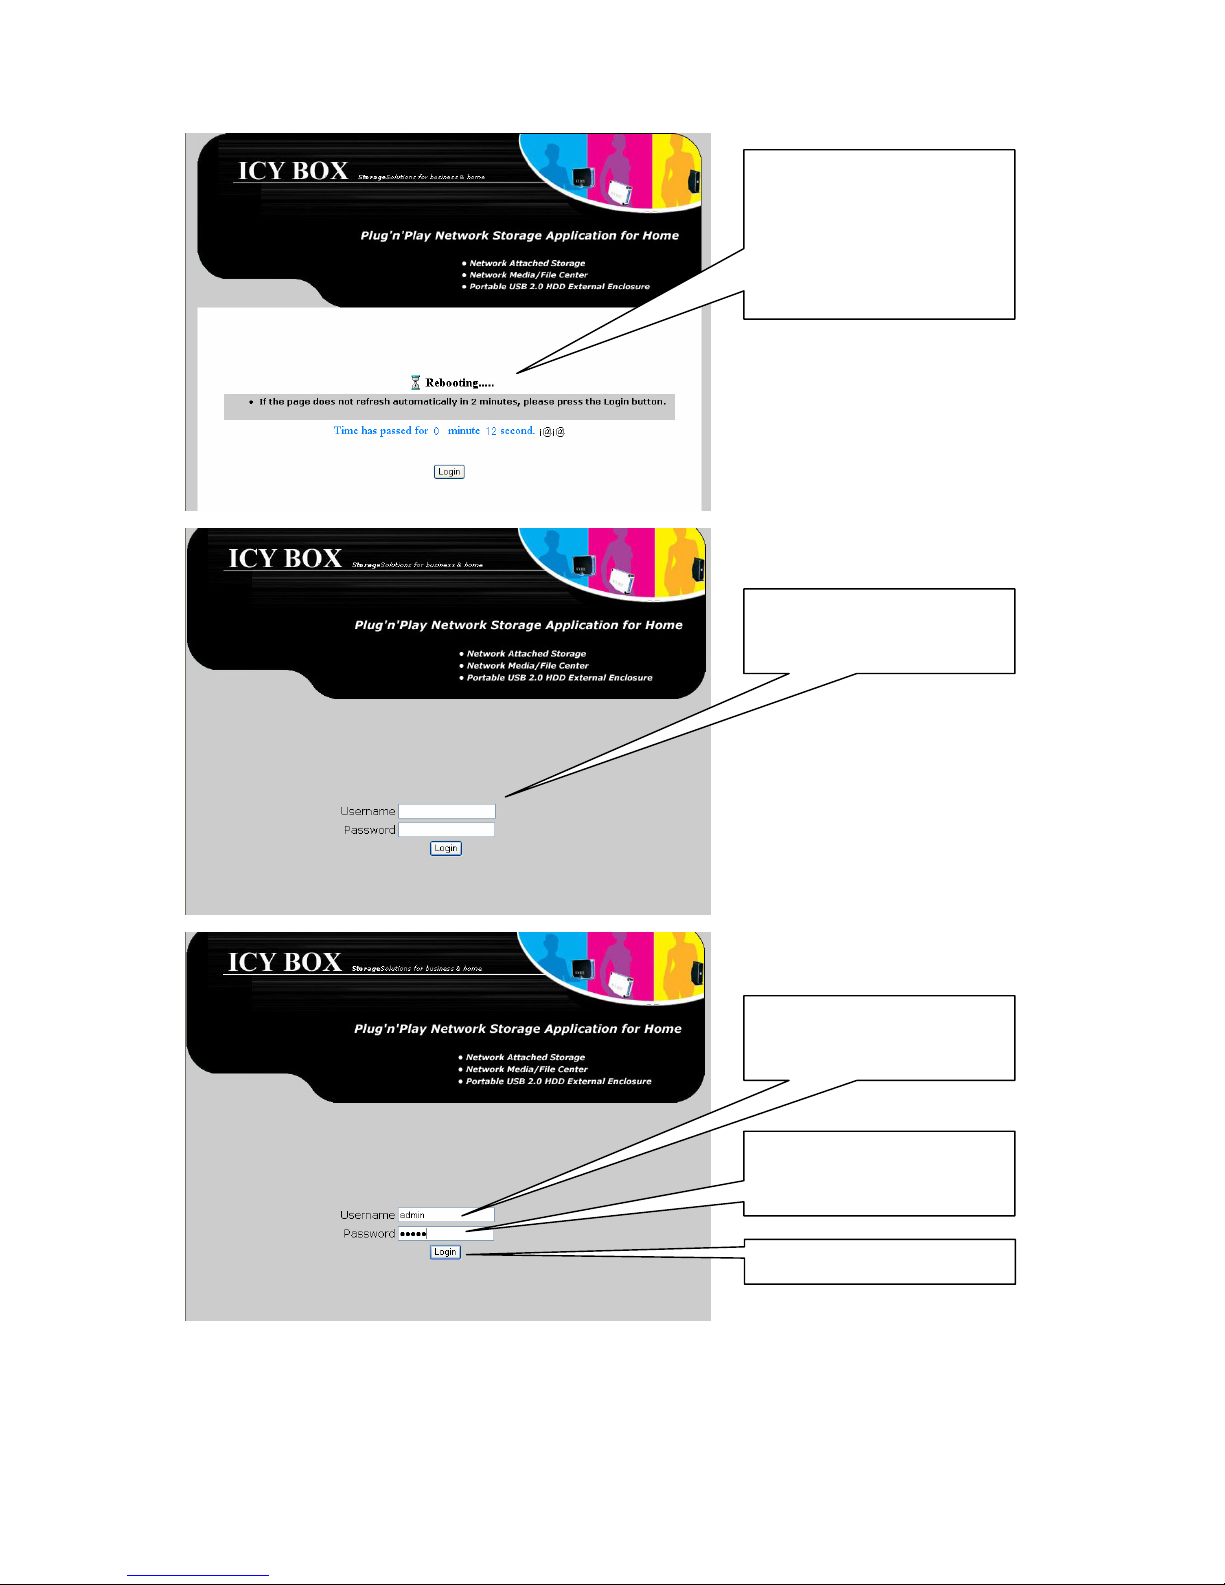
When the formatting
process is completed the
IB-NAS2000 needs to
restart.
Please, do not interrupt
this process!
After the restart it is
necessary to log in again
Click on “Login”
Enter “admin” as
Password (default
setting)
Enter “admin” as
Username
23
Page 24
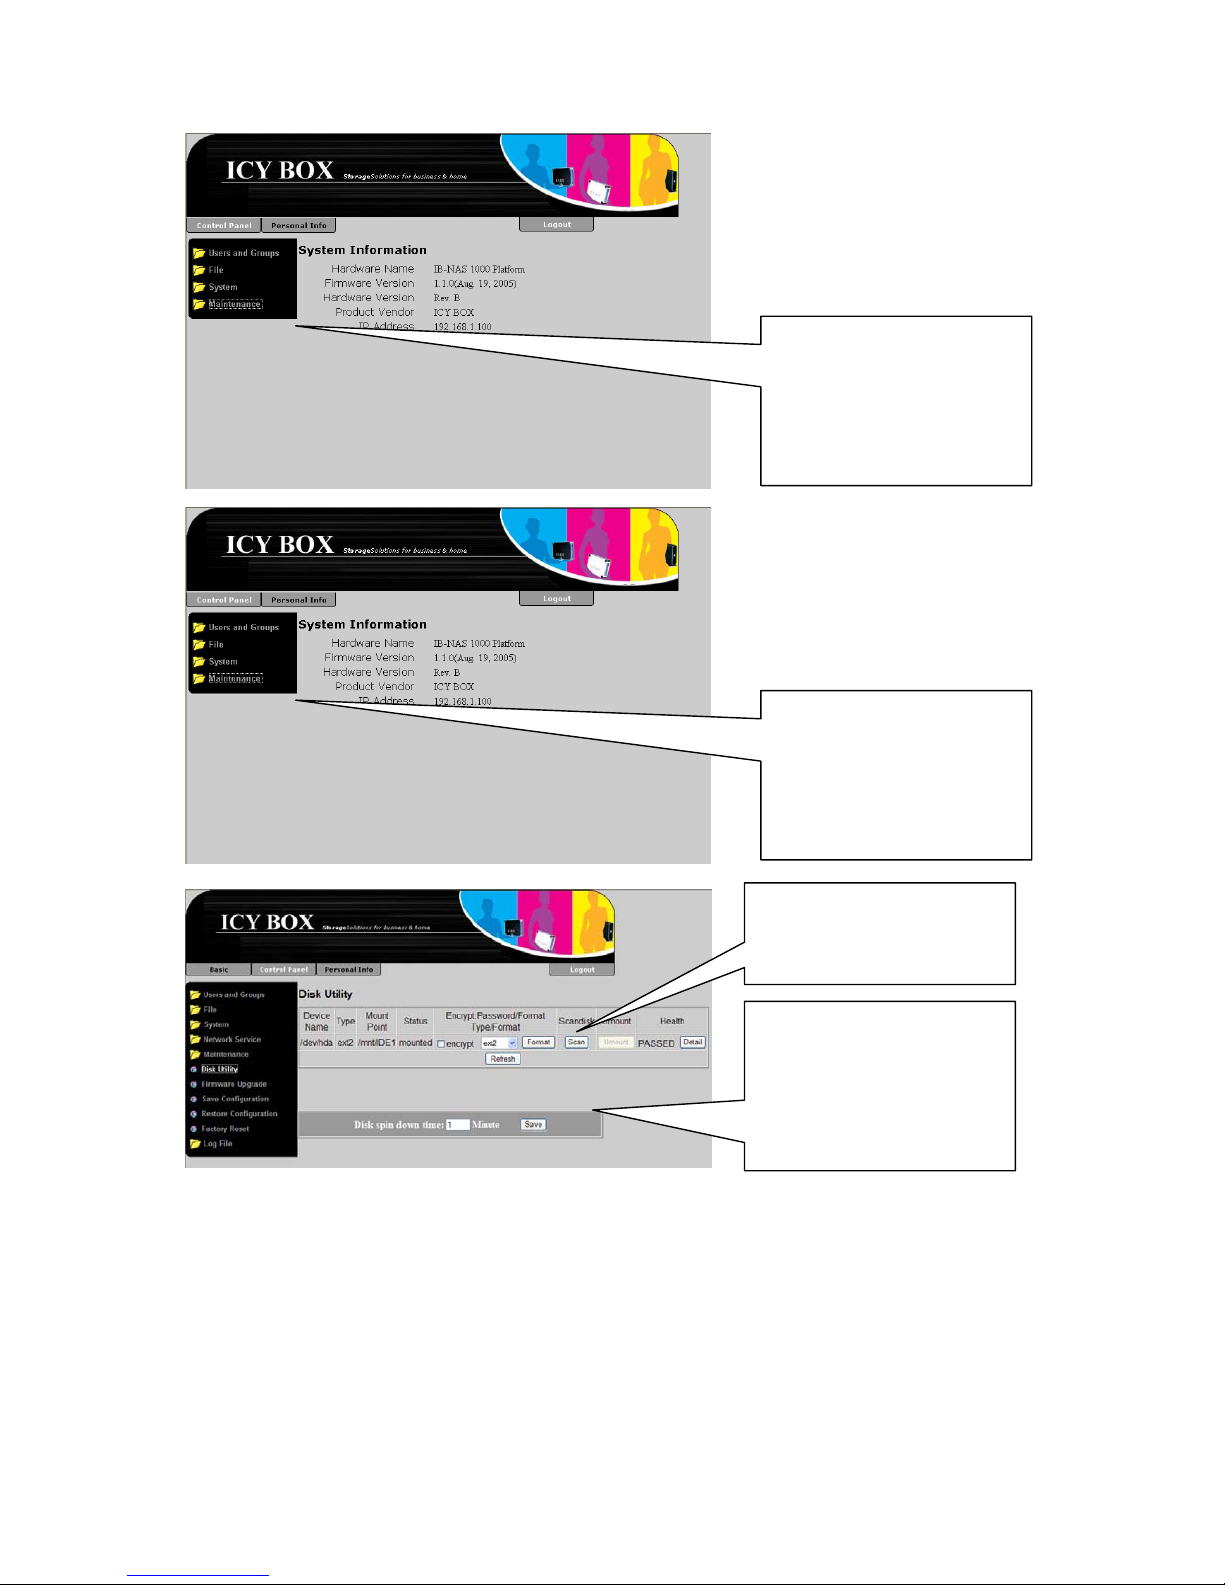
The sub menu column
has now several new
items, which are not
displayed as long as the
hard disk hasn’t been
initialized
Select
Control Panel
Maintainance
Disk Utility
Also can be chosen after
which time of inactivity
the disk is set to an
energy saving mode.
To make this change
effective press “Save”
As you can see the
entries in the Table have
been changed
24
Page 25

Changing the admin password
To change the admin password please select:
Personal Info
Personal Information
Account
Clicking on “Refresh” will
reset the form
Clicking on “Save” will
change the settings
Optional a description to
the admin account could
be entered
The language of the
menus can be changed
here
Enter new admin
password here and
retype it again in the line
below
Managing users and groups
In order to be able to control the Network access on the NAS, the IB-NAS2001 is able to
setup access restrictions user and group definitions. A user is a personal identifier
authenticated by a password. A user can be part of one or more groups. So access rights
can be defined for users or groups.
25
Page 26
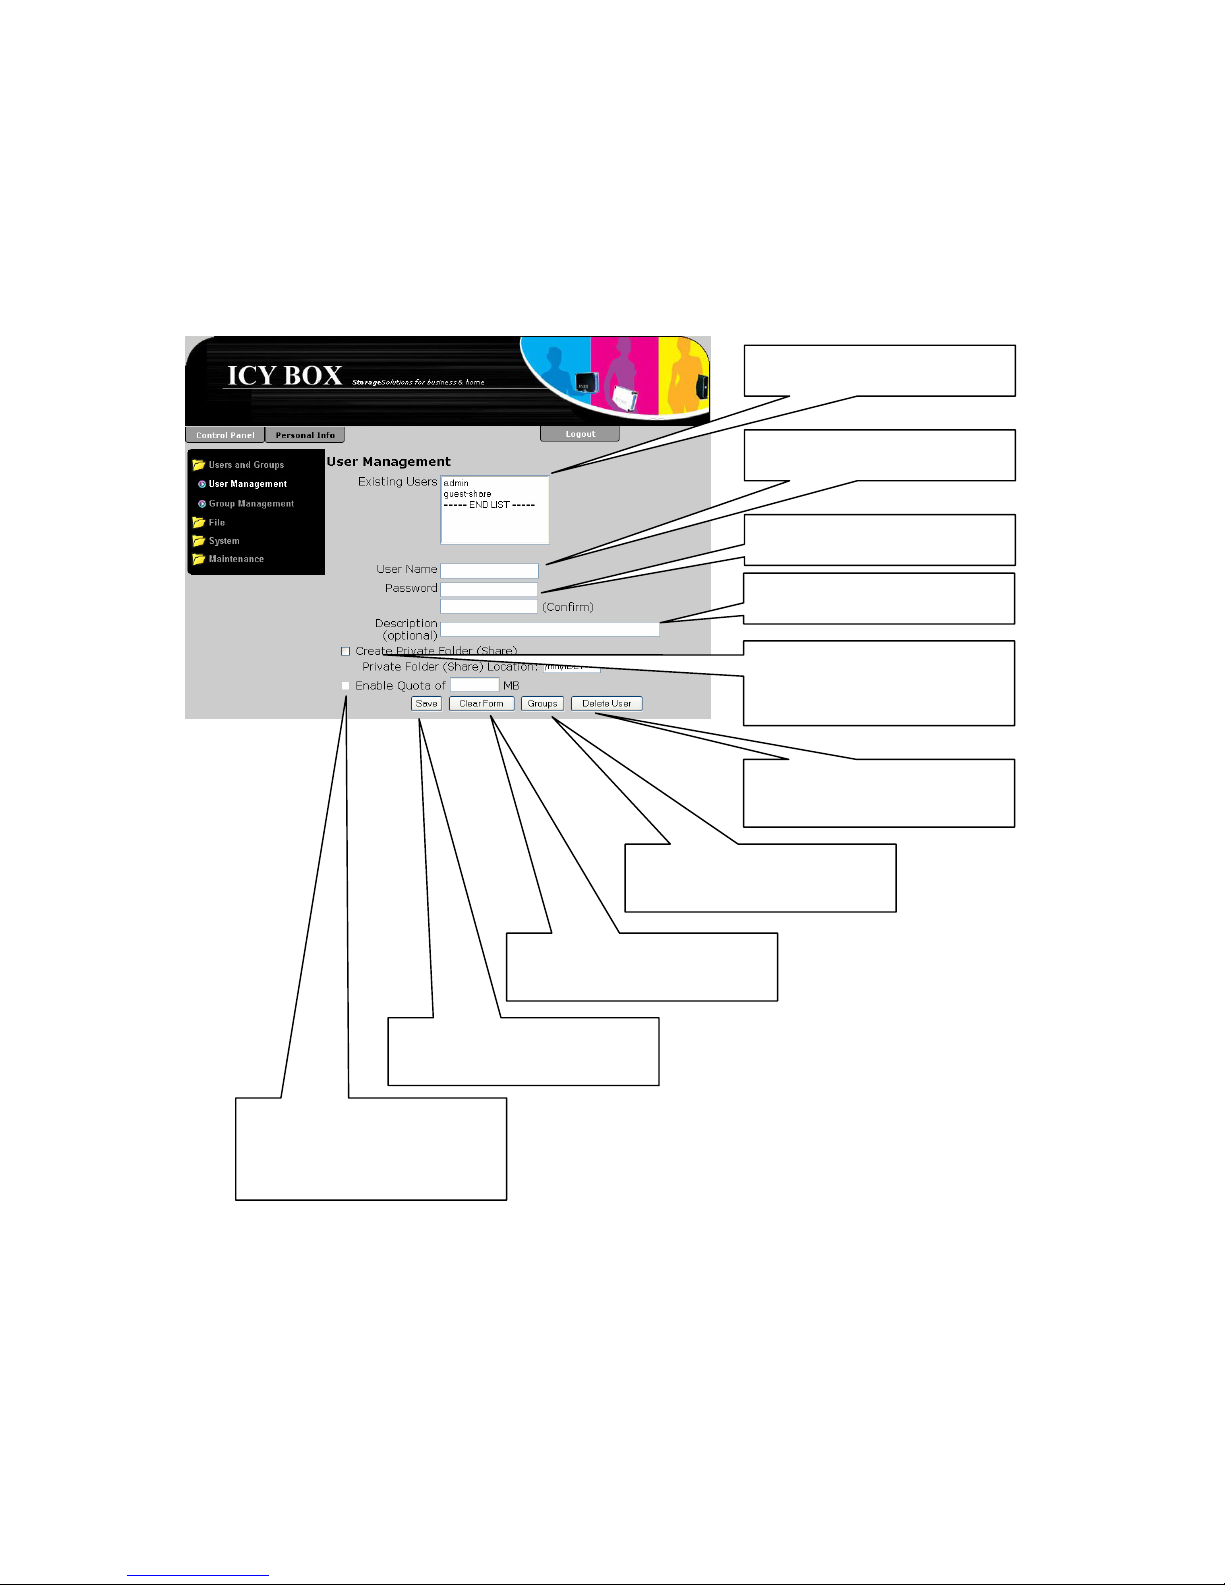
User Management
The user management could be found selecting:
Control Panel
Users and Groups
User Management
Checkmark inducing to
create a private folder
(share)
Control button to delete
user
Control button change to
group membership form
Control button resetting
the form
Control button for saving
changes
Checkmark inducing to
set a quota for the user
and a field defining it
Field for a description
Field for password
Field for user name
List of existing users
26
Page 27

Create a new user
To create a new user simply fill out the form and click the “Save” Button. The next
example shows a procedure setting up a new user with the user name “testuser” and the
password “test”. The user should also have a private folder, which is a special folder just
for his private use, which is only accessible or even displayed by the one who identifies
with that particular username and password. In addition, the disk space that the user can
use should be limited to a maximum of 1000 MByte, so we set a quota
.
Attention: To be able to set a quota the EXT3 file system has to be chosen for the
data partition, because only the EXT3 file system supports that feature.
If the data partition is formatted with EXT2 or FAT32, this option can not
be selected.
Check here to create a
private Folder
Check here to set a
quota and enter the
value in the associated
field
Click on the “Save”
button to save changes
Enter a description
Enter password of the
new user and retype it in
the confirm field
Enter user name of the
new user
After having clicked on the “Save” button the user account and the personal folder is
created. Also the samba network share (expression of the personal folder to the network)
has been created and can be accessed using the username and password which has been
defined. The personal folder and the samba network share have the same name as the
username defined.
27
Page 28
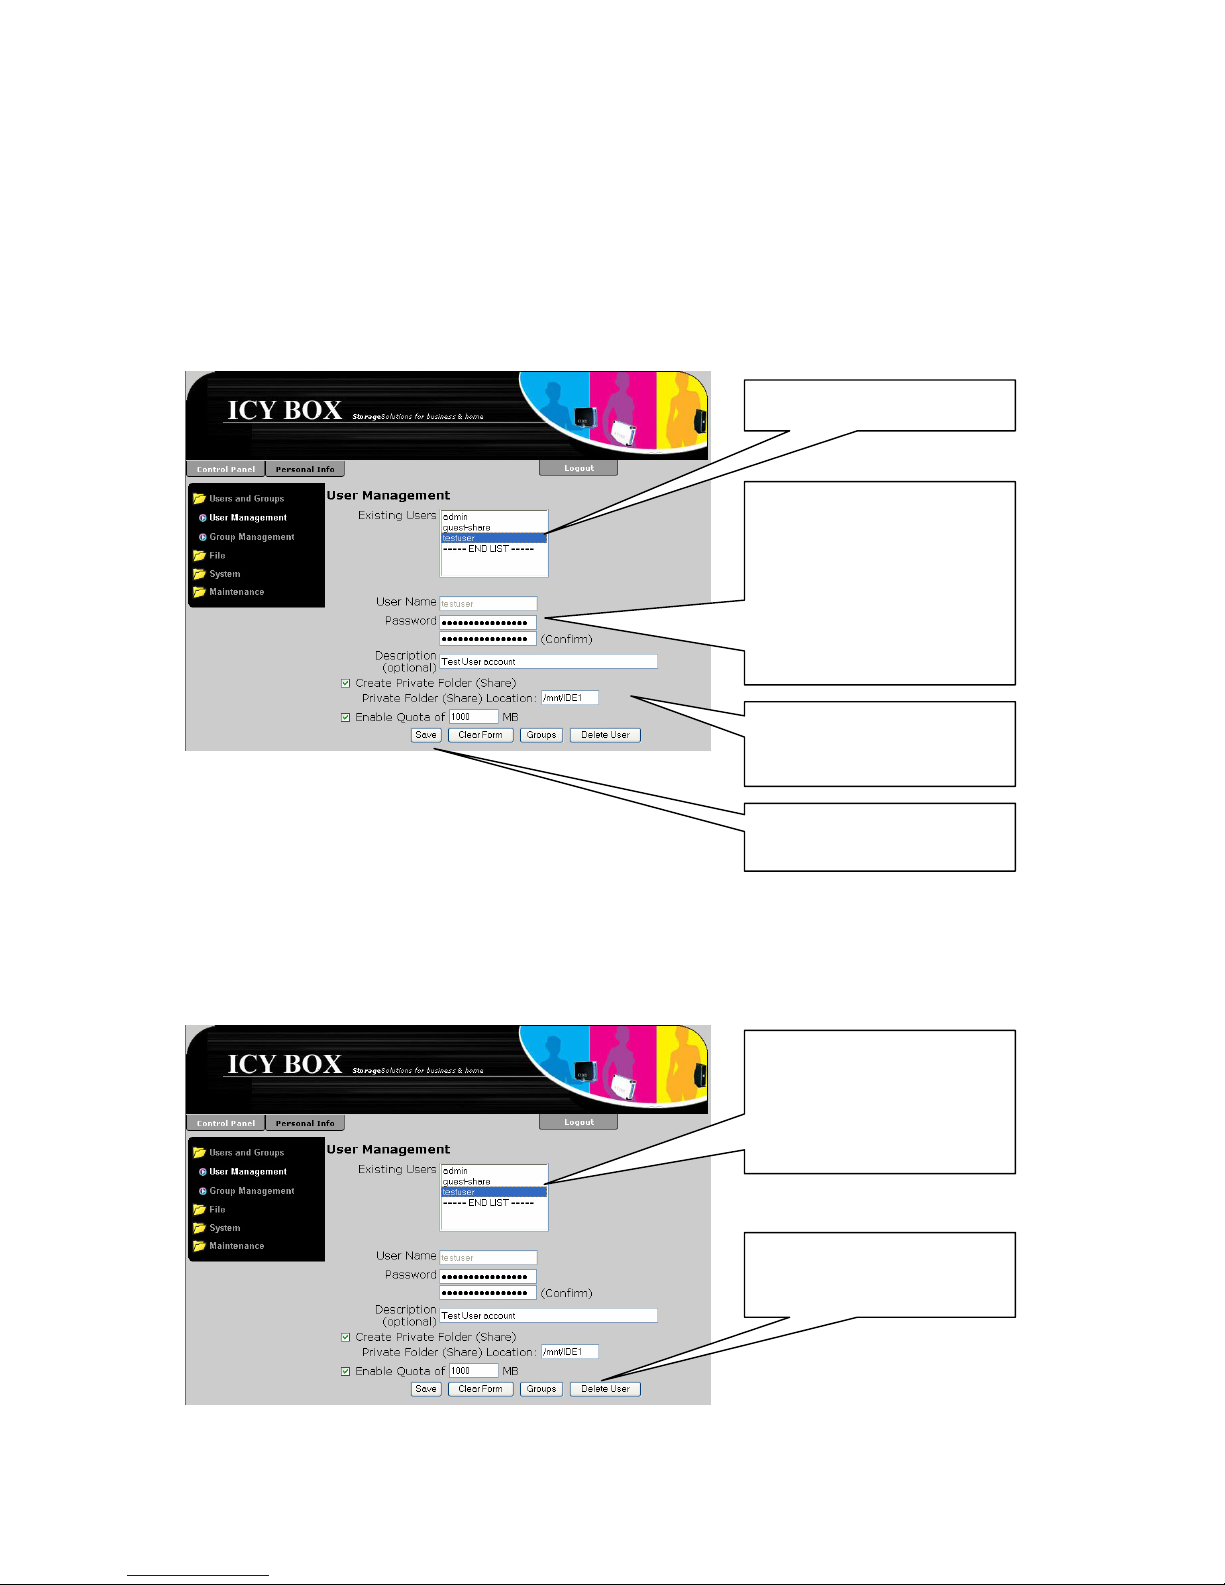
Change User settings
To Change a user setting open the “User Management” form:
Control Panel
Users and Groups
User Management
Then all detailed settings of the user are displayed and can be changed.
Make the desired
changes in the other
fields
Click the “Save” button
to save changes.
The entry in the
“Password” field is
represented by
several . To change
the value enter here the
new password and
retype it in the
“(Confirm)” field
Select an existing user
Delete a user
To delete one or more users, select these users in the “Existing Users” List and click on
the “Delete User” button.
Click the “Delete User”
button to delete the
selected users.
Select an existing user.
If you want to select
more than one hold the
<CTRL> key pressed
while selecting.
28
Page 29
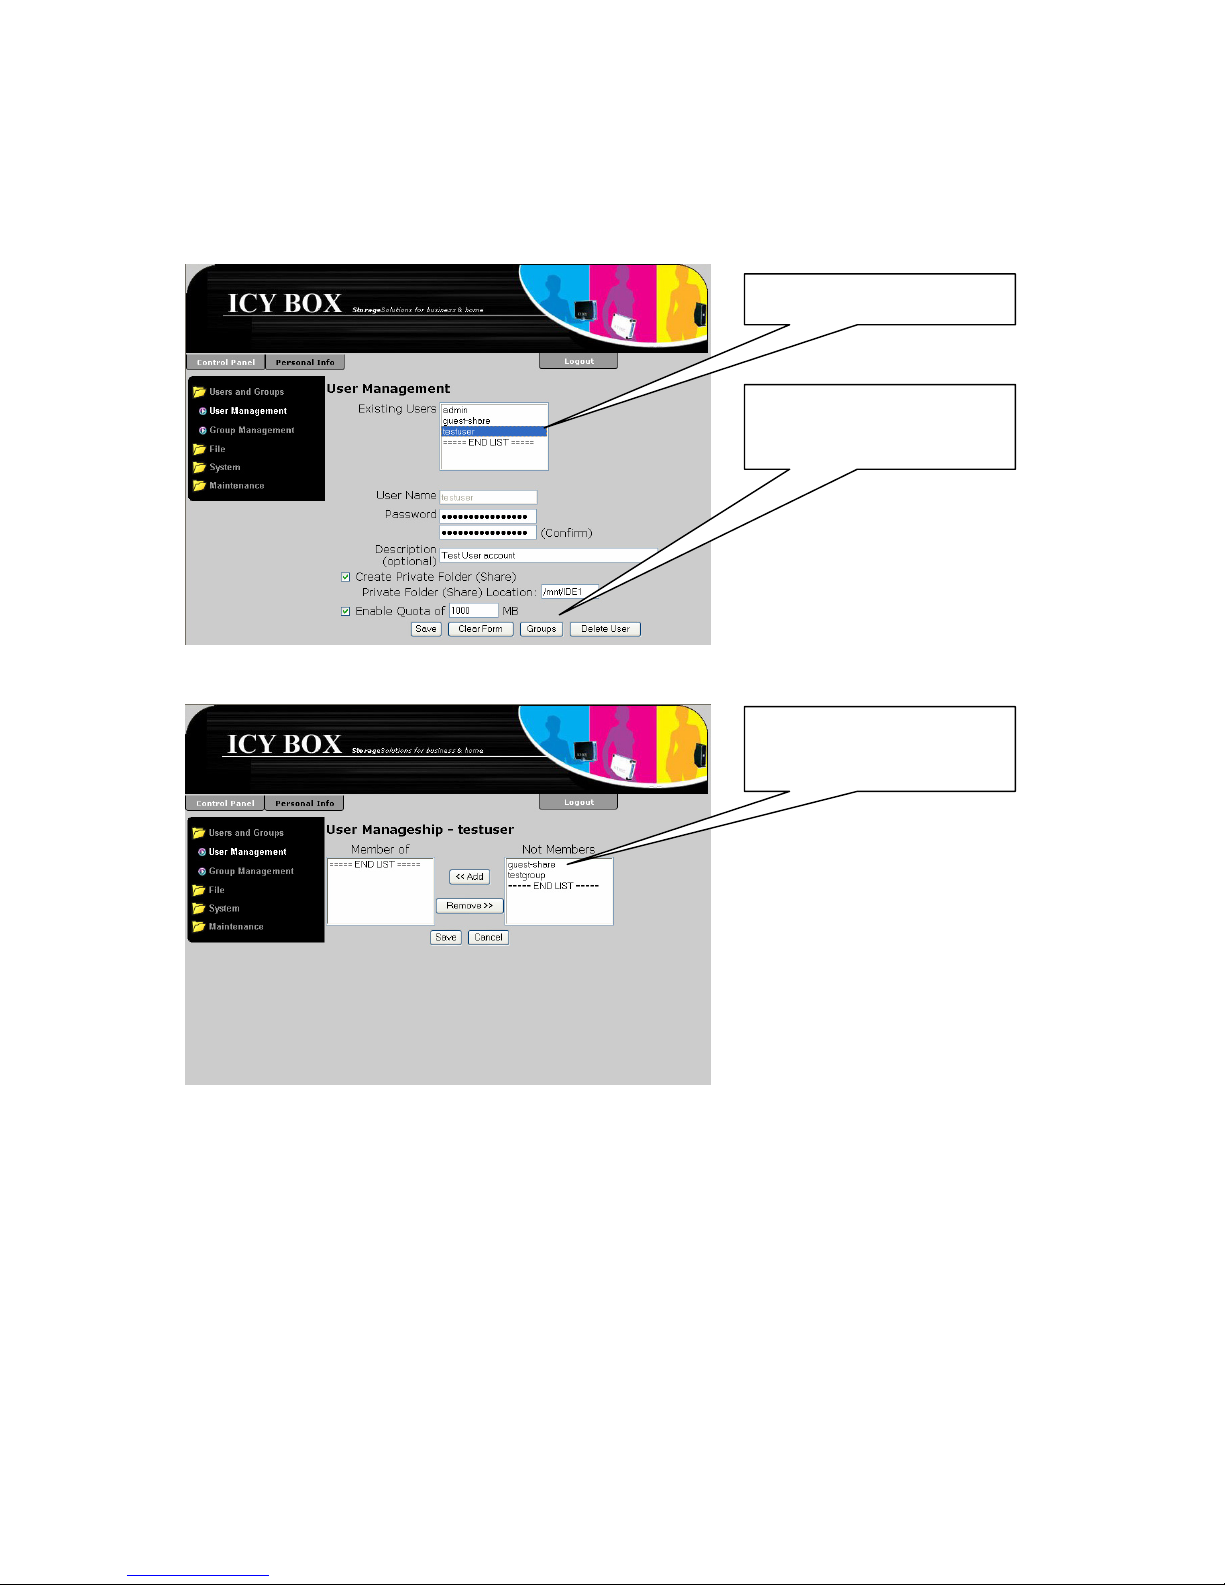
Assign a single user to one or more groups
As you have seen the “User Management” form has a button called groups. If you select
a user in the “Existing Users” list and click on that button a form for adding the selected
user to all existing groups is opened.
Click the “Groups” button
to change to the groups
adding form.
Select an existing user
The group membership form is opened.
Select the group the user
should be added to
29
Page 30
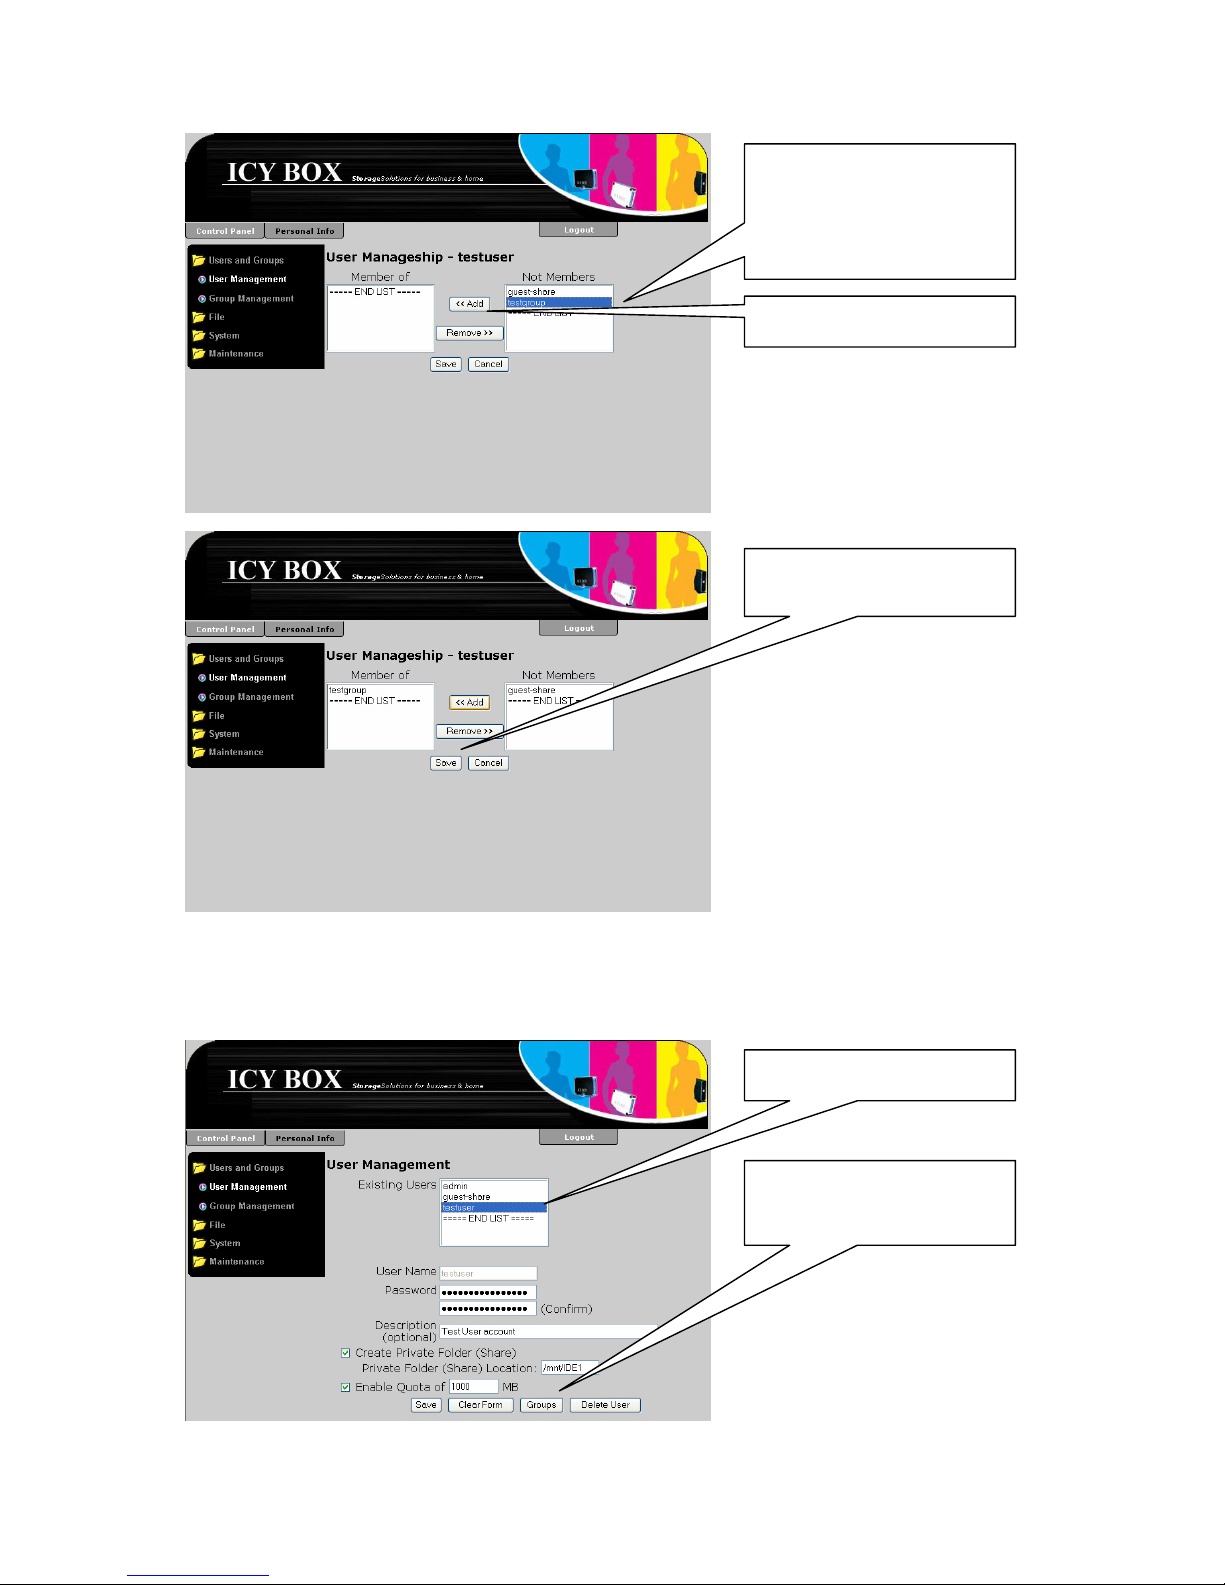
Click on “<<Add” button
Select the group to be
added to. If you want to
select more than one
hold the <CTRL> key
pressed while selecting
Click on “Save” button to
save changes
Remove a single User from one or more Groups
In a similar way a user is removed from one or several groups
Click the “Groups” button
to change to the groups
adding form.
Select an existing user
The group membership form is opened.
30
Page 31
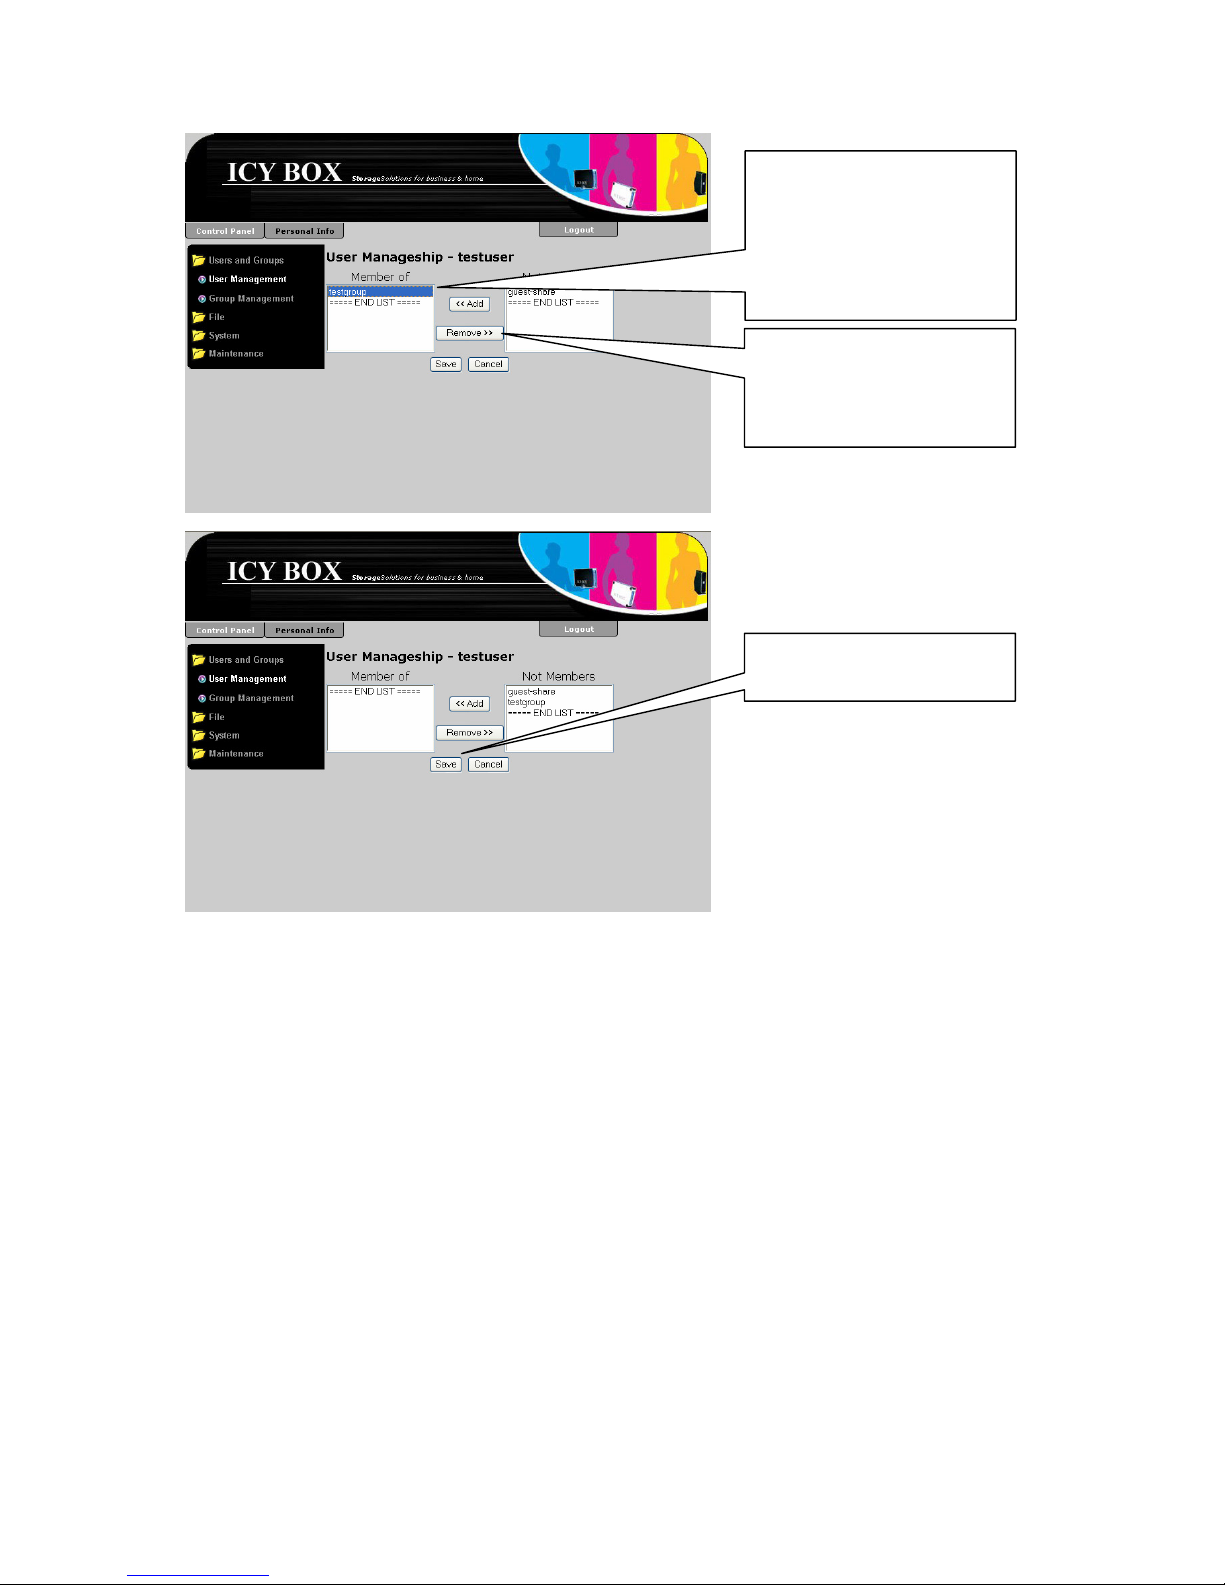
Click on the
“Remove>>” button to
remove the user from
selected groups
Select the group the
User should be removed
from. If you want to
select more than one
hold <CTRL> key
pressed while selecting
Click on “Save” button to
save changes
31
Page 32
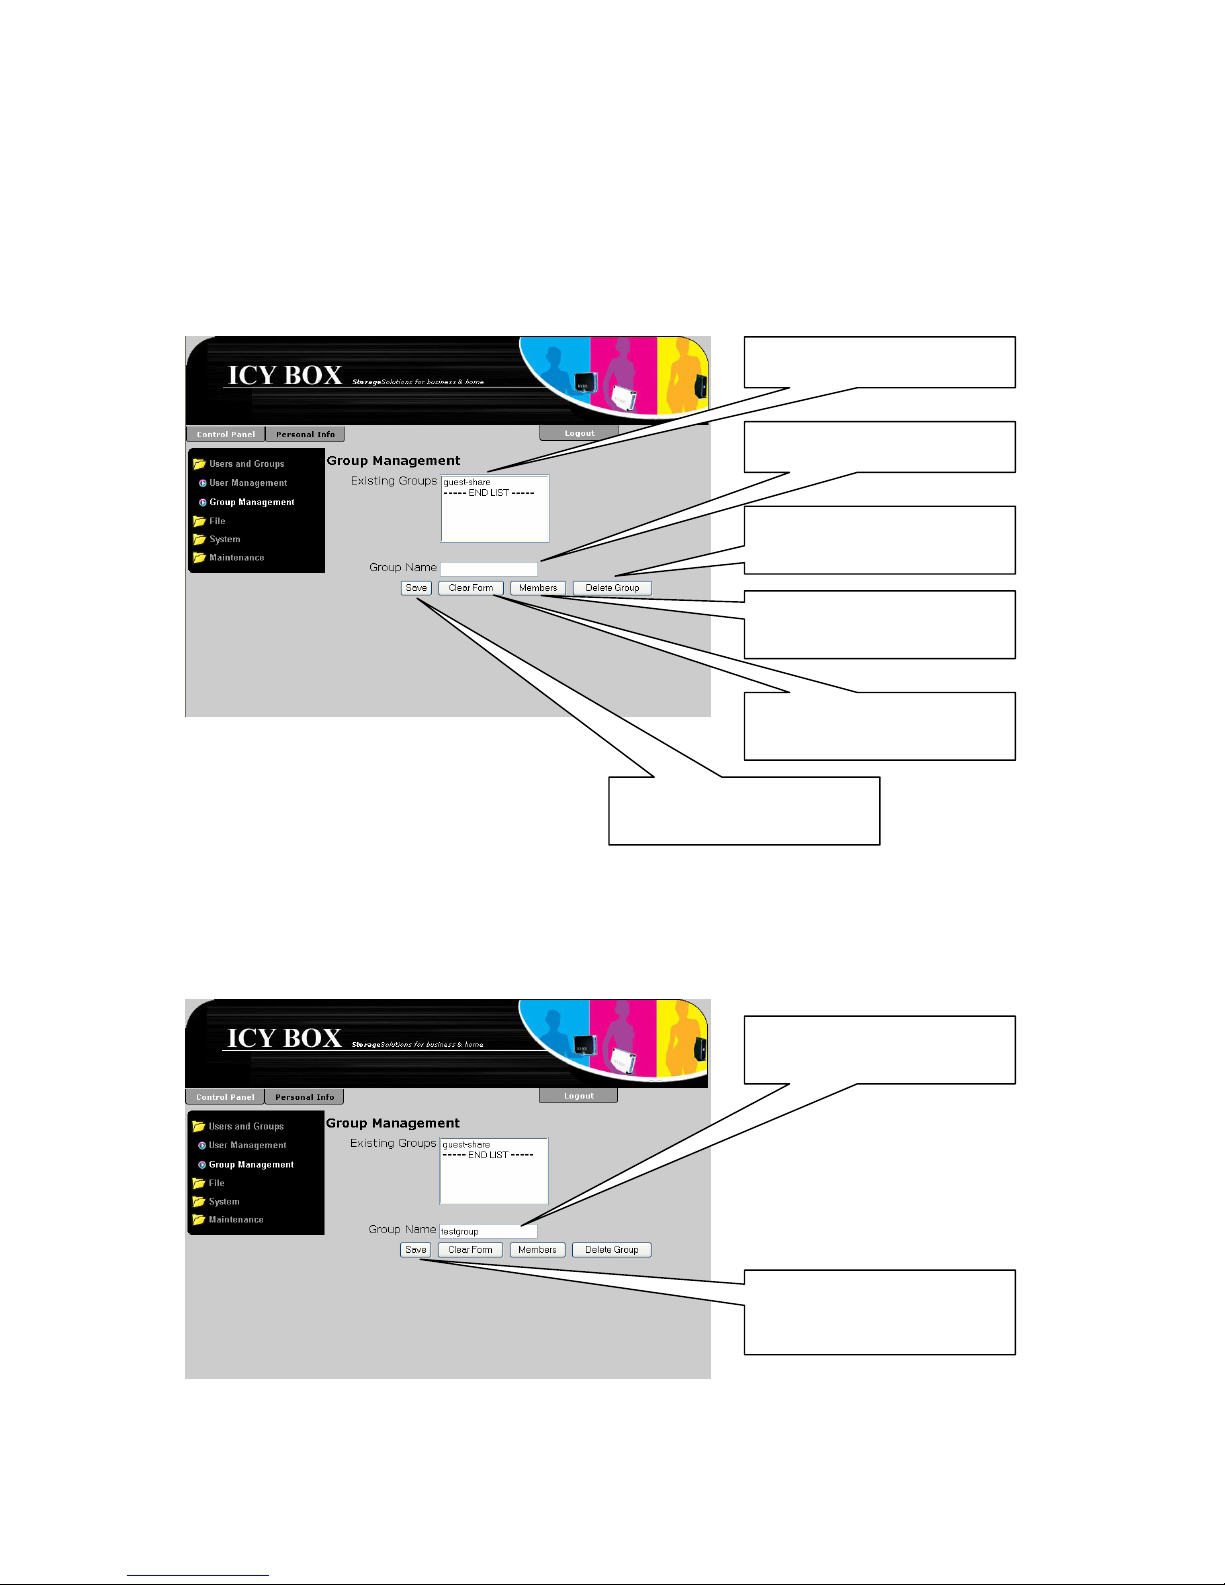
Group Management
The group management could be found selecting:
Control Panel
Users and Groups
Group Management
Control button to change
to members form
Control button to reset
form
Control button to save
changes
Control button to delete
group
Field for group name
List of existing groups
Create a new Group
To create a new group it is just necessary to enter the group name and click on the
“Save” button.
Click on the “Save”
button to create the
group
Enter the group name
here
32
Page 33
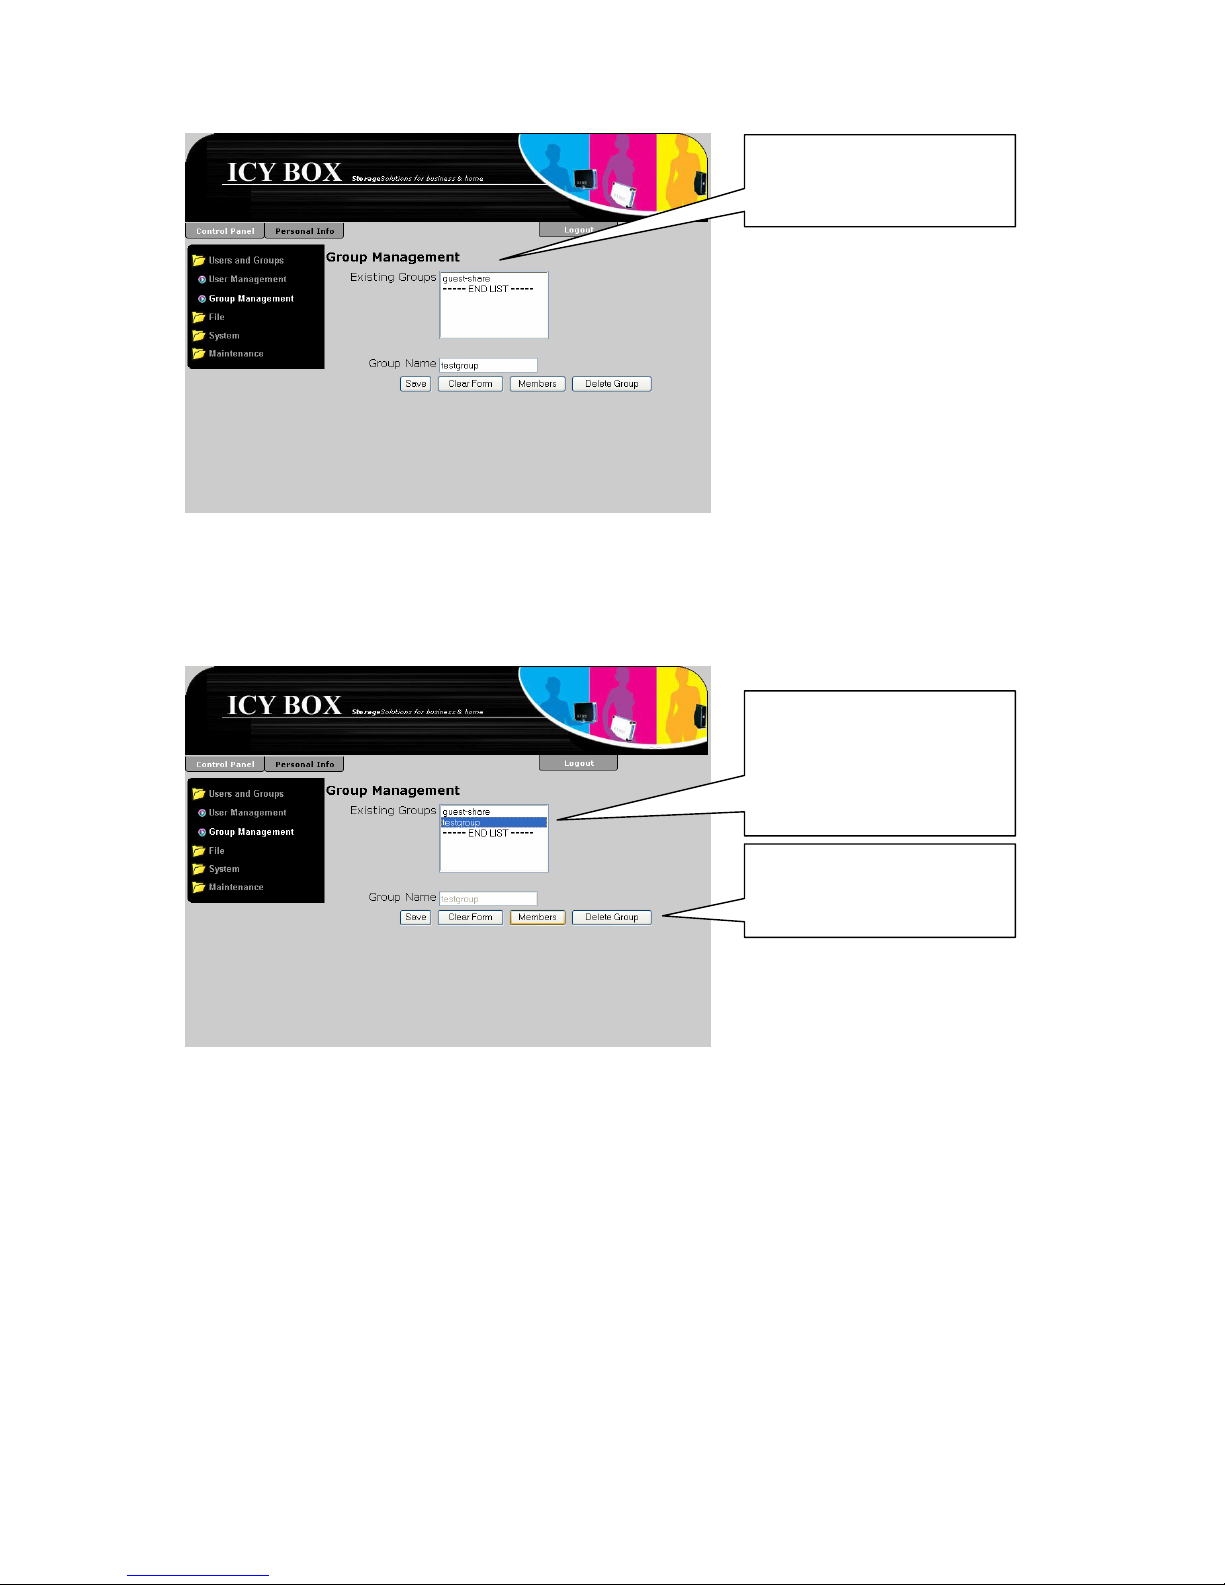
The group is created and
added to the “Existing
Groups” list
Delete a group
To delete one or more groups, mark them in the “Existing Groups” list and click on the
“Delete Group” button.
Click on the “Delete
Group” button to execute
the deletion.
Select the group to be
deleted. If you want to
select more than one
hold <CTRL> key
pressed while selecting.
33
Page 34
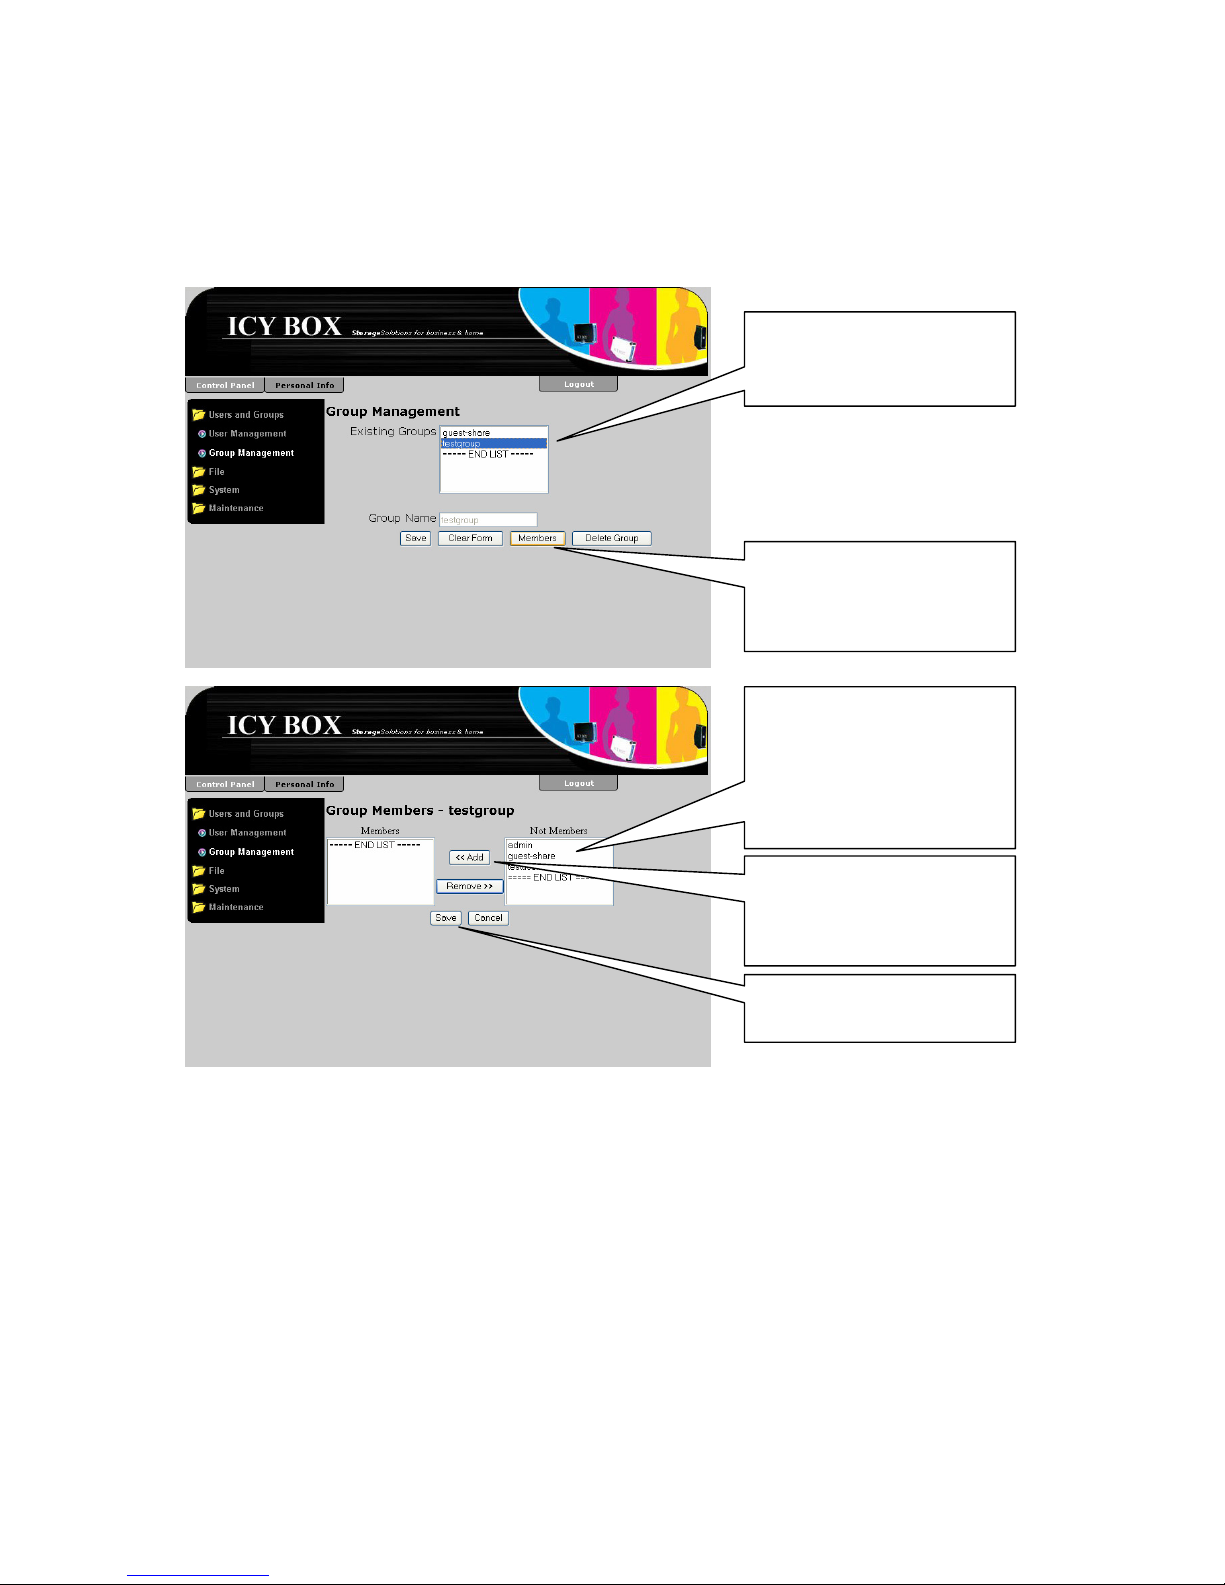
Add one or more Users to a single Group
To add one ore more Users to a Group you do not need to open each User one by one to
add them to a group. When you select the Group you want the users to be added to in
the “Existing Groups” list, click on the “Members” button and select the users you wish to
add to the selected group.
Click on the “Members”
button to change to the
“Group Management”
form.
Select the group you
want the user to be
assigned to.
Select the users you
want to add to the
group. If you want to
select more than one
hold the <CTRL> key
pressed while selecting
Click on the “<<Add”
Button to add the
selected users to the
group.
Click on “Save” to save
changes
34
Page 35

Remove one or more Users from a single Group
To remove one or several user from a particular group you also just have to select the
Group you want the users to be deleted from in the “Existing Groups” list and the “Group
Members” form opens. Select the users you want to remove from the group and click on
the “Remove>>” button.
Select the user the to be
removed from the group
If you want to select
more than one hold
<CTRL> key pressed
while selecting
Click on the
“Remove>>” button
File server and share management
In this section it explains, how the disk space is provided to the network and how this is
controlled. The Web interface divides this management into two logical parts. Global
server settings and share orientated setting.
35
Page 36
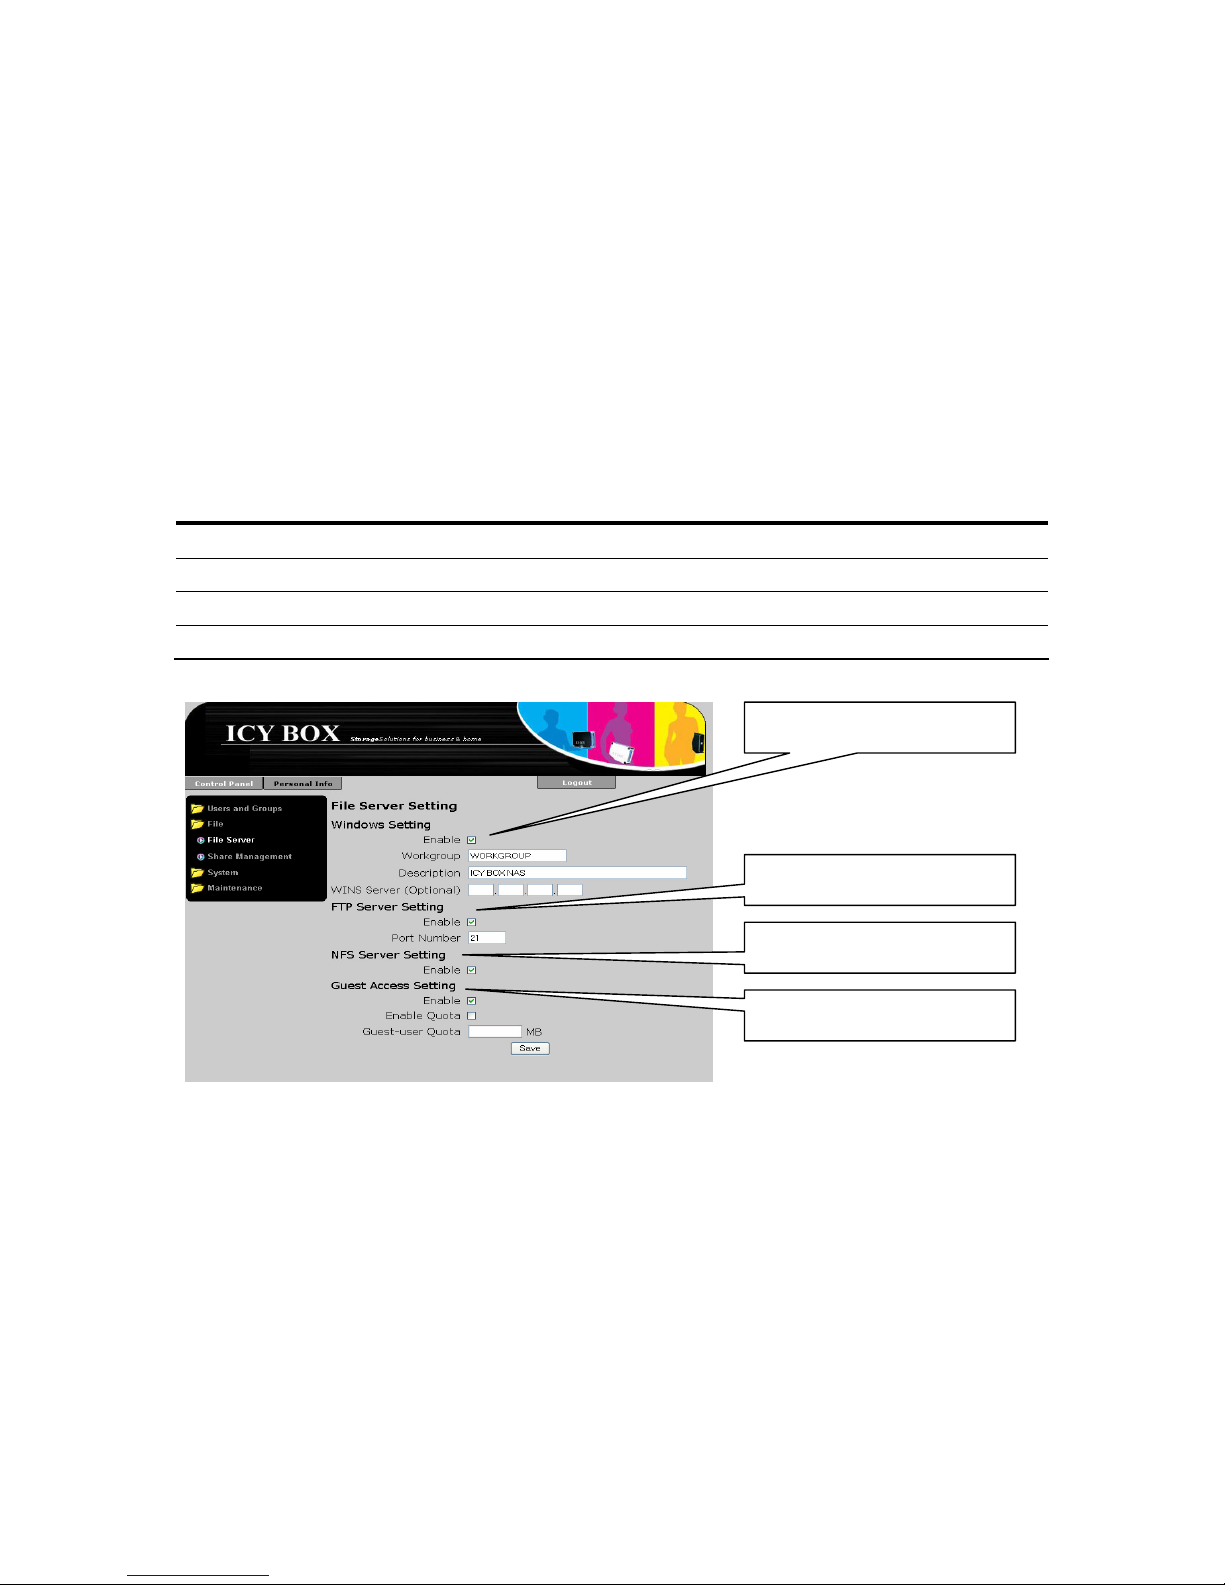
File Server Settings
What is a file server? – A file server offers disk space to a network. The term server used
to name a service offered to the network. As described in point “What is NAS?” (page 4)
the IB-NAS2001 uses 3 different services to provide hard disk space to the network:
Samba (Windows), FTP and NFS. The basic settings regarding these 3 services are done
in the “File Server” item of the “File” submenu.
Control Panel
File
File Server
All three servers could be disabled separately. The “File Server Setting” form is
structured into 4 parts:
Section Description
Windows Setting basic settings for the Samba service
FTP Server Setting basic settings for the FTP service settings
NFS Server Setting basic settings for the NFS service
Guest Access Setting basic settings for the cross services guest account
Samba basic settings
Guest account settings
NFS basic settings
Ftp basic settings
By enabling the “Enable” checkmark for each section the corresponding service is
enabled or disabled. By default all services are enabled to grant a rapid start up.
Windows Setting
As described in point “Samba (Windows)” (page 4) the Samba server provides the
storage for Windows clients, also MAC OS and Linux computers are able to use network
storage via this service. It has the most complex structure and provides the most
features. Therefore the basic settings are a little more extensive, than those for the other
services.
Windows offers possibility to structure network participants in so called “Workgroups”.
Via this identifier – which is just a name – it gives the opportunity to assort logical units
of network participants to give a better overview. This could be set up in the referring
field on the form. Also you can enter a description term which will be displayed when
36
Page 37

37
browsing11 the windows network. If the windows network has a WINS12 server for
providing a network directory, the IP Address could be specified here.
FTP Server Settings
Aside of the possibility to enable or disable the FTP service, the port13 number of that
server could be modified in order to accommodate a possible port forwarding
14
of a
internet access router which uses NAT
15
, for example if it is desired to make two IB-
NAS2001 accessible via port forwarding by an internet access router.
Attention: Changing the FTP servers port from 21 (default) to another value will
cause, that standard FTP client will not be able to access the IBNAS2001 FTP server, except the changed port number is configured in
the FTP client appropriately.
NFS Server Setting
Here the NFS Server can be enabled or disabled.
Guest Access Setting
By default the IB-NAS2001 has a preconfigured account for guest access respectively
anonymous access. This means that via Windows share and FTP there is a guest
folder/share which could be accessed anonymously without a user/password
authentication.
Attention: Leaving the guest access enabled means a high level security risk when
the IB-NAS2001 is exposed to the internet or any public network. This
can lead to malicious abuse. If you expose the IB-NAS2001 to any
public network, it is strongly recommended to disable the Guest
Access.
The reason why the default setting is enabled is to ensure that the IB-NAS2001 is readily
accessible when used the first time.
In addition to enabling and disabling that feature a Quota for that account could be
defined for restricting the quantity of disk used by users accessing the IB-NAS2001 via
guest settings.
11
Browsing signifies here a process of Windows to discover and display network participants.
12
WINS is an acronym for “Windows Internet Naming service”. Windows knows two ways of name resolution (process of
assigning IP addresses to IP Addresses) one is a broadcast based mechanism and the other is WINS, where some network
participants take over the role of a directory server called WINS server, registering names and services of other network
participants.
13
Network participants in a TCP/IP (Internet) based network structure are addressed via IP Addresses, but as you can see a
network participant can offer for example different services. To address different services at a network participant using a
singular IP Address there is a subordinated identifier called port. The port is specified by a number between 0 an 65535. Ports
between 1 and 1024 are so called “well known ports”, which means that in the internet exists a common assignment of services
towards these ports. For example 21 is commonly used for FTP, 80 is commonly used for http (web). This association is not a
must. The port associated with a service can be changed. The other communicating party then must specify the port number
explicitly, if it differs from the common principle. Such a change of port numbers makes sense if a network participant wants to
offer two different services of the same kind using the same IP Address.
14
Port forwarding names a process where a router using NAT associates a port of the external IP Address to a port and IP
Address of an internal network participant and forward all traffic from outside destinated towards that particular external port
towards the defined internal IP Address and port number.
15
NAT is an acronym for network address translation. Most internet access routers at home are using this technique. It is used
when a router has just one public IP Address for accessing the internet but has to connect several computers of a private
network. So the router maps all traffic from the inside of the network to a singular external IP Address by changing the port
number. It therefore uses a mapping list associating the internal IP Addresses and port of a network communication with an
external port. This list is dynamic and the associations are deleted after a certain period of time. A network participant from
outside therefore can’t address an internal one if the communication hasn’t been initiated from the internal partner.
Page 38

38
Attention: To be able to set a quota the EXT3 file system has to be chosen for the
data partition, because only the EXT3 file system supports that feature.
If the data partition is formatted with EXT2 or FAT32, this option can not
be selected.
To save changes been made please click on the “Save” button.
Page 39
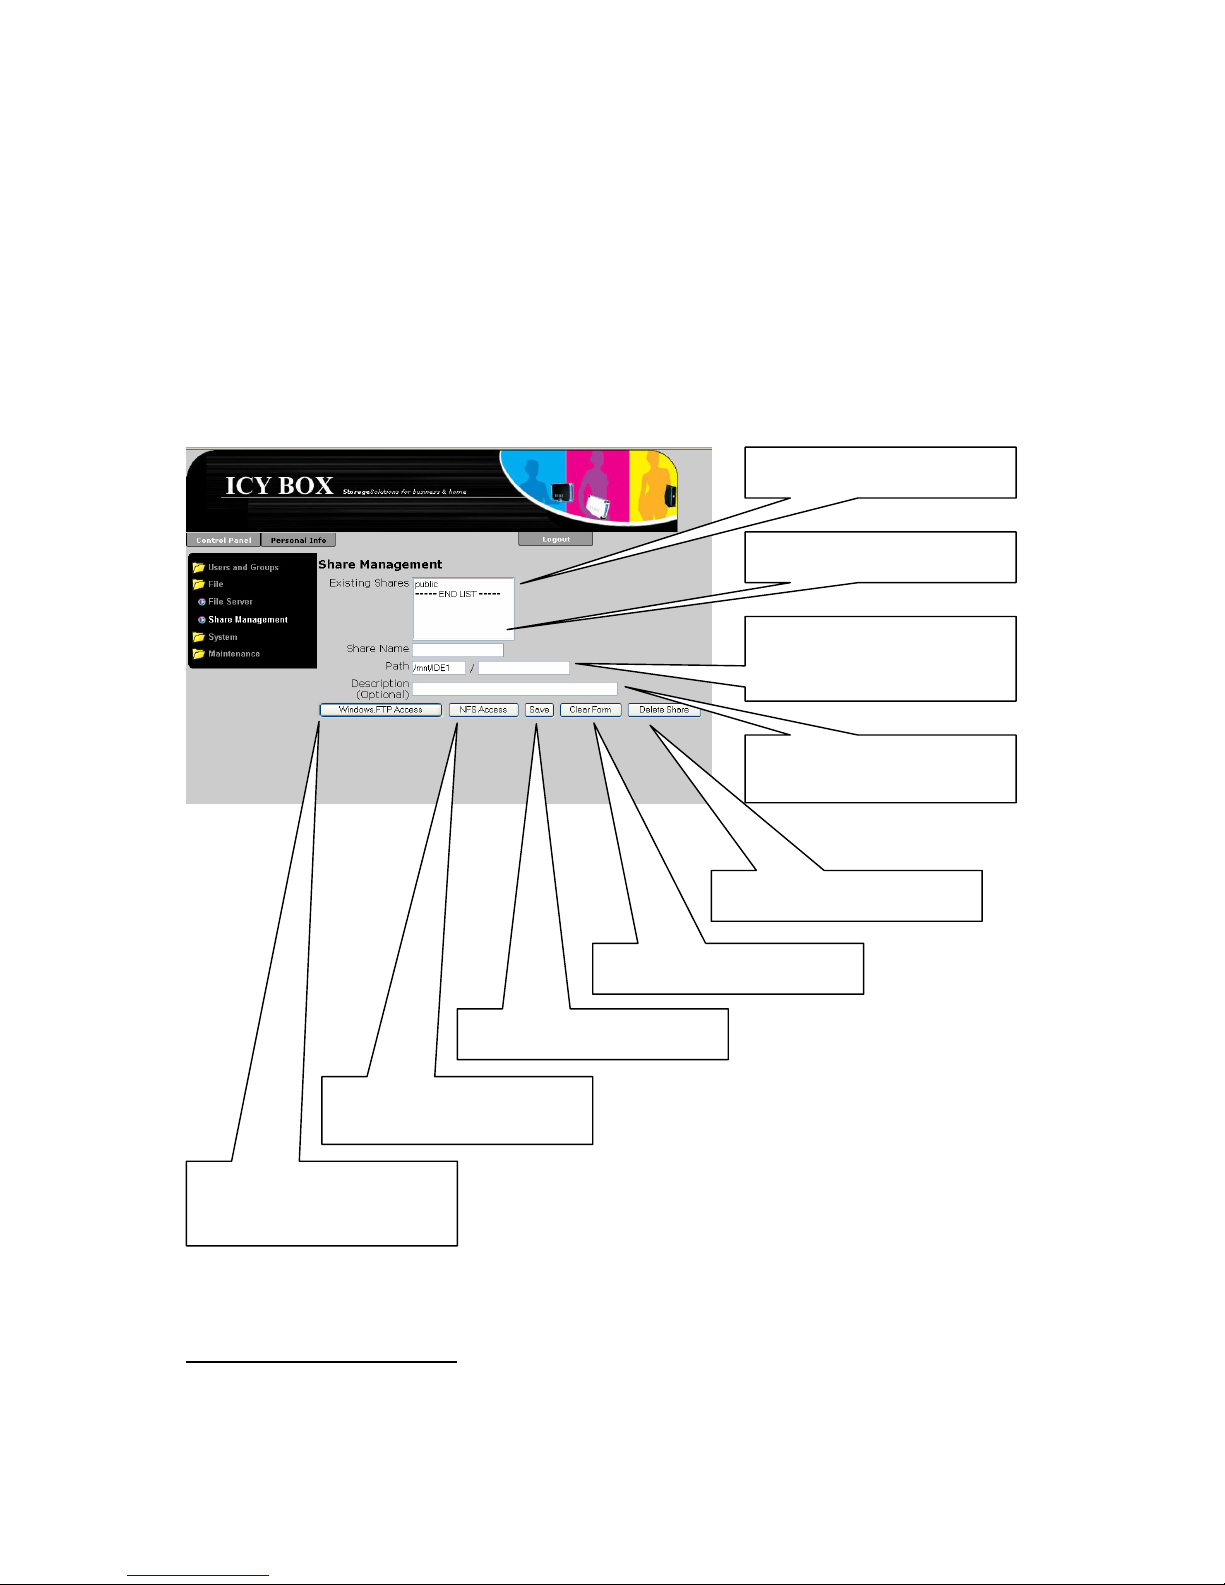
Share16 Management
In this section of the web management surface is defined how the HDD storage is offered
to the network. Here you can create folders, so called shares, and define the access
rights for the different users or groups towards it. For each folder created here the
Windows (Samba), FTP and NFS Access can be defined and restricted.
The share management could be found selecting:
Control Panel
Files
Share Management
Internal path to the
share folder is displayed
here
Button to delete a share
Button resets form
Field to enter an optional
description
Button saves changes
Button to change to NFS
access defining form
Button to change to
Windows and FTP access
defining form
Field for share name
List of existing shares
39
16
The terminology “share” is used for HDD folders made accessible to the network. This terminology is just used in the
Windows/Samba and NFS context. FTP does not use shares to structure the storage offered the Network. How a share is made
accessible to the operating system on client side depends on the operating system. At Windows and MAC each share is
integrated in the local storage treatment like an own drive. Linux integrates in its directory structure at a defined mounting
point. The folder exposed as share is then visible and usable with all it’s contend (directories or files) as an own drive
respectively directory.
Page 40

Creating a new share
To create a new share please enter a share name and click on the “Save” button.
Click on the “Save”
button to save changes
Enter a comment
Enter the new share’s
name
How to set up your computer to access a share on the IB-NAS4220-B is described in
point “Mapping shares and Printers” on page 60.
Deleting a share
To delete a share select the share in the “Existing Shares” list and click on the “Delete
Share” button.
Click on the “Delete”
button
Select the share to be
deleted.
40
Page 41
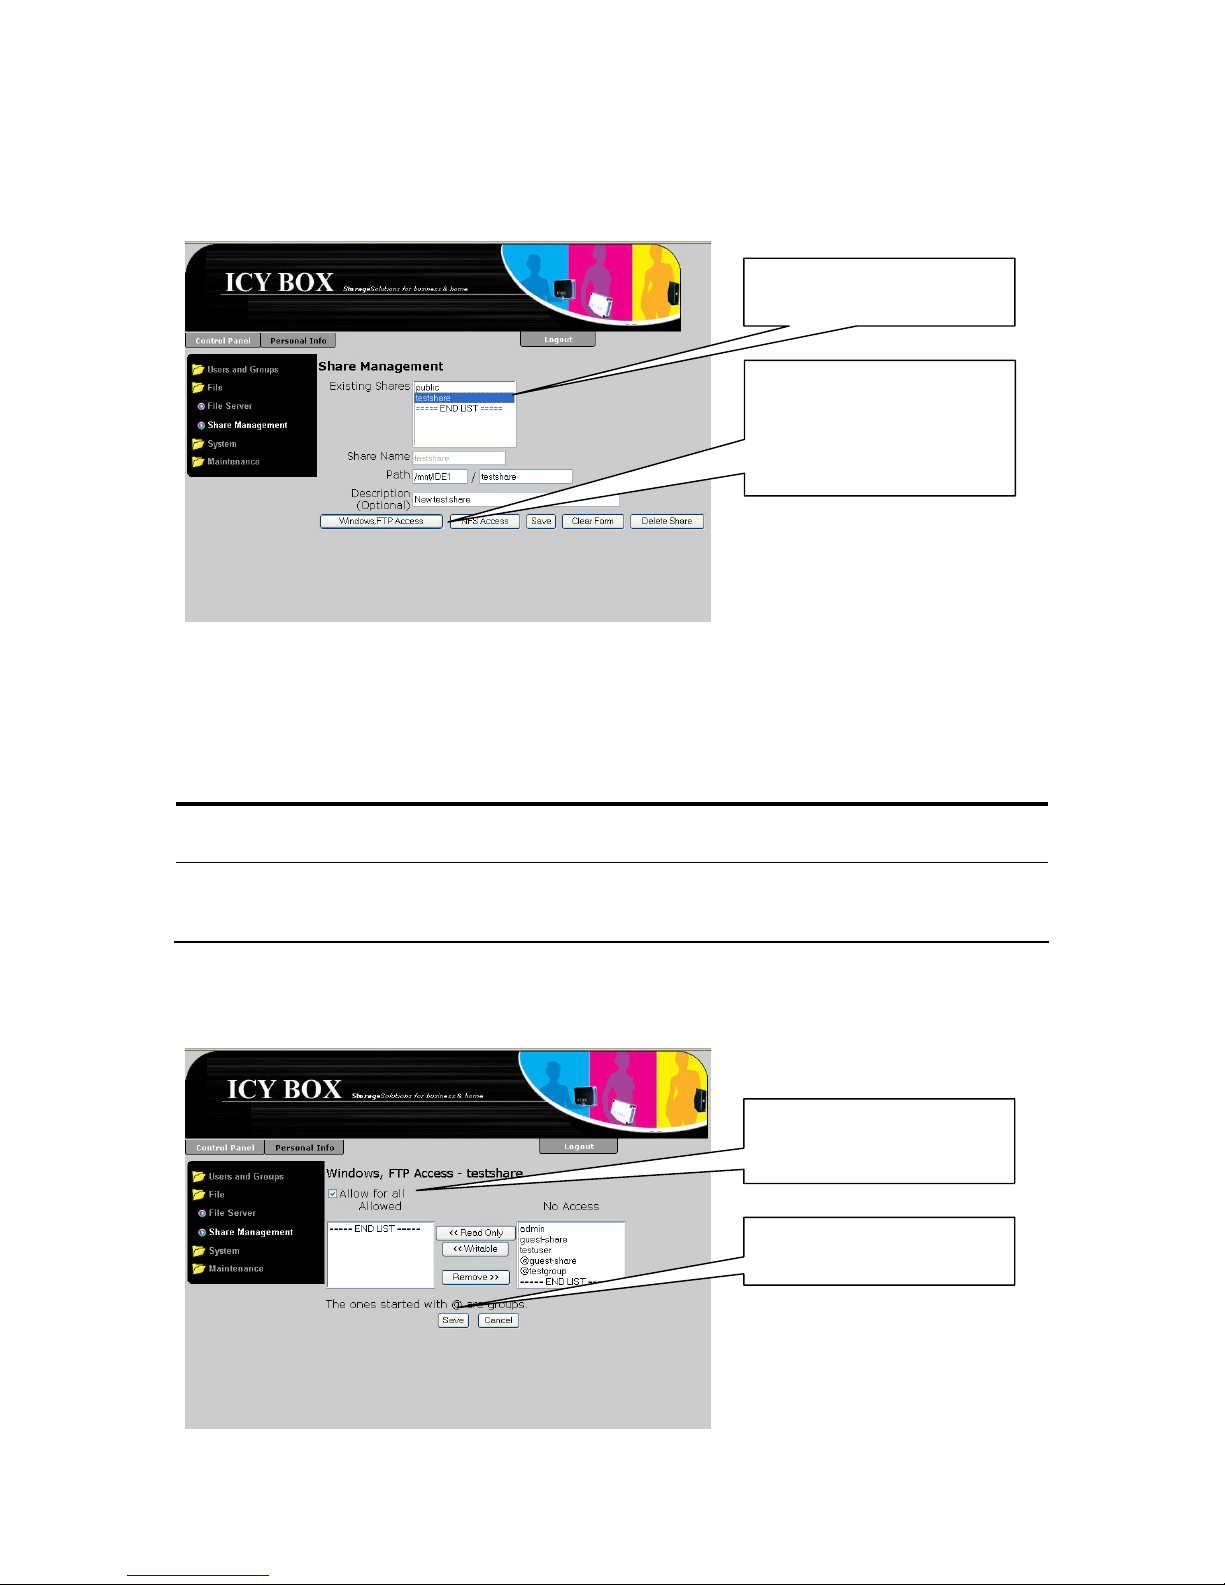
Set up Windows, FTP access restrictions for a share
To set up the Windows and FTP access restrictions for a share, select the share you wish
to restrict in the “Existing Shares” list and change to the Windows and FTP access form.
Click on the
“Windows, FTP Access”
button to change to the
Windows, FTP Access
form
Select the share to be
managed.
There are two major ways of defining the access towards a share. The first is to allow
access for all. Then no access control takes place on the share and everybody can read,
write or even delete data on the share. The second is to define the access rights on user
and group level. There are two different access rights you can give to a user or a group
of users: “Read Only” and “Writable”.
User/group right Description
Read Only The user is only allowed to read or copy a file or directory
on the share
Writable The user is allowed to read, write or delete a file or
directory on the share and also to create new files or
directories
To allow access for everybody, check the “Allow for all” check button and click on the
“Save” button to save this change.
Click on the “Save”
button to save changes
Check the “Access for all
Allowed” button to grant
access to everyone
41
Page 42
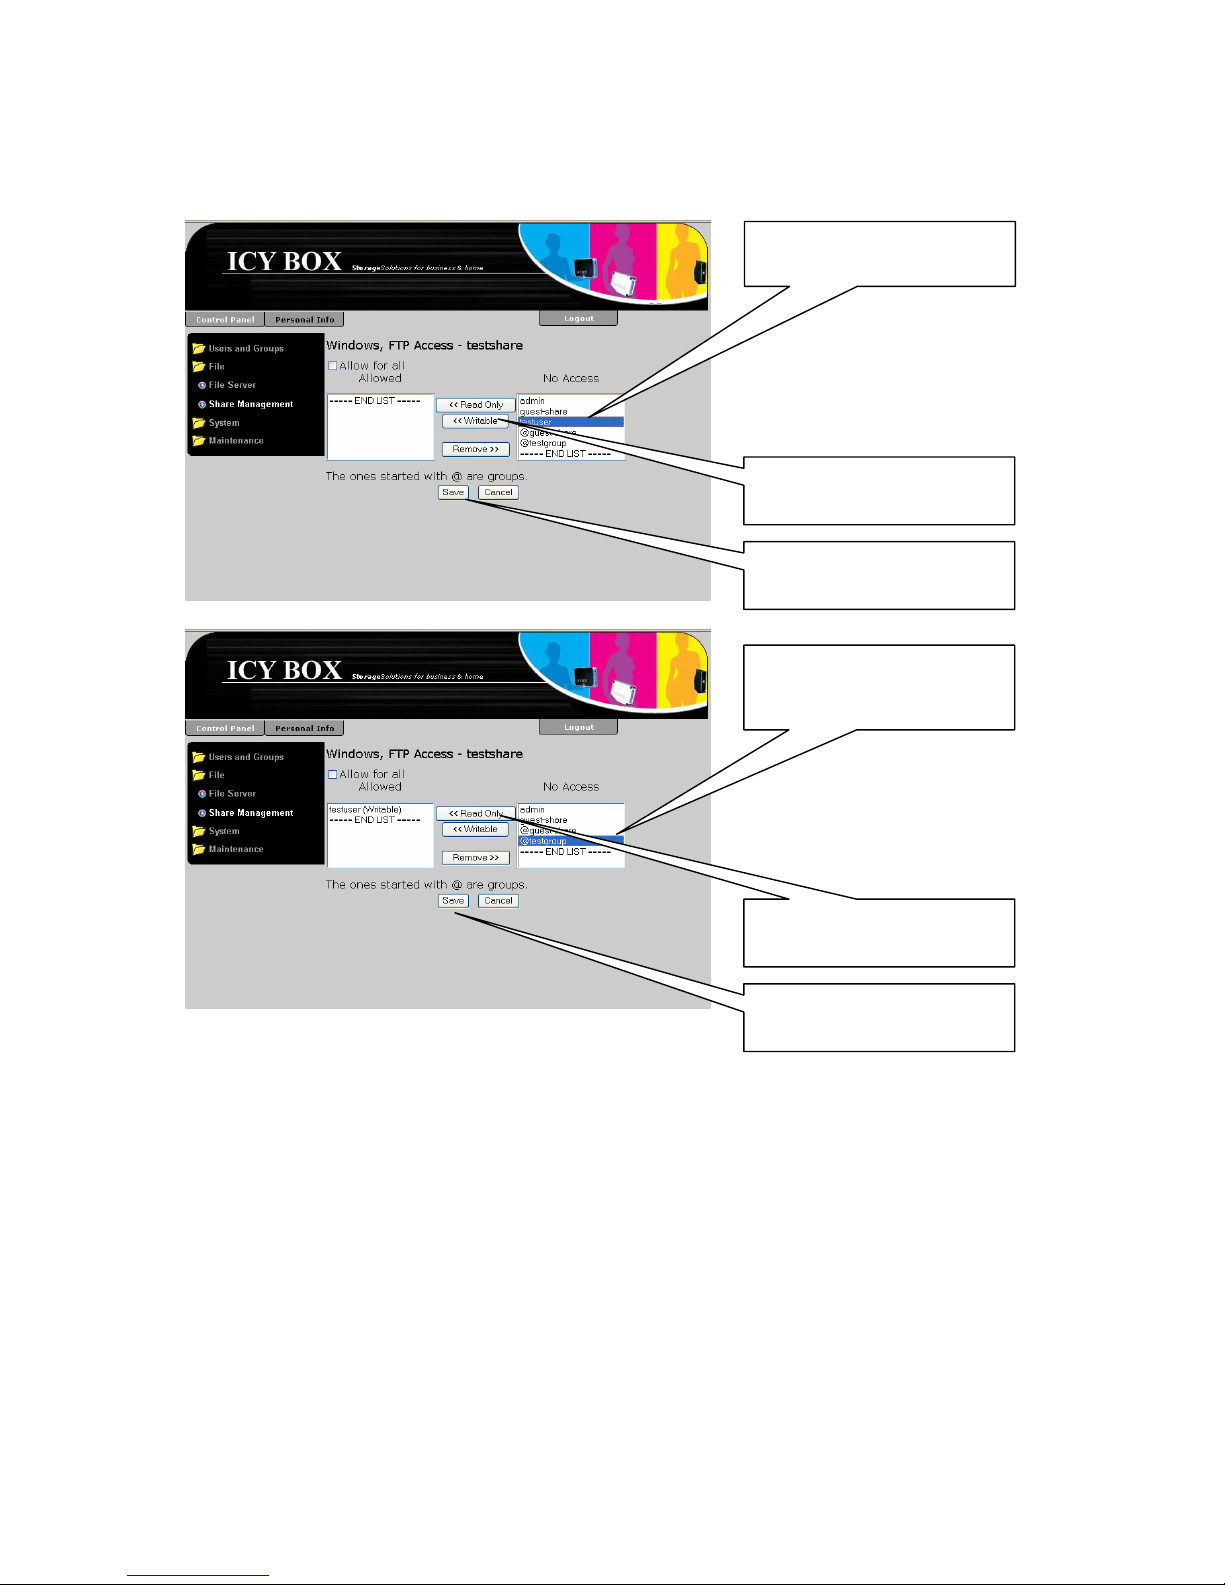
To grant rights on user level select the user or group you want to give rights in the “No
Access” list and whether click on the “<< Read Only” button to give him or it read only
rights or click on the “<<Writable” button to give him or it all rights.
Click on “<<Writable”
button
Click on the “Save”
button to save changes
Select user or group you
want to grant all rights
Click on the
“<<Read Only” button
Click on the “Save”
button to save changes
Select the user or group
you want to grant read
only rights to
To revoke rights from a user or group select the user or group in the “Allowed” list and
click on the “Remove>>” button.
42
Page 43
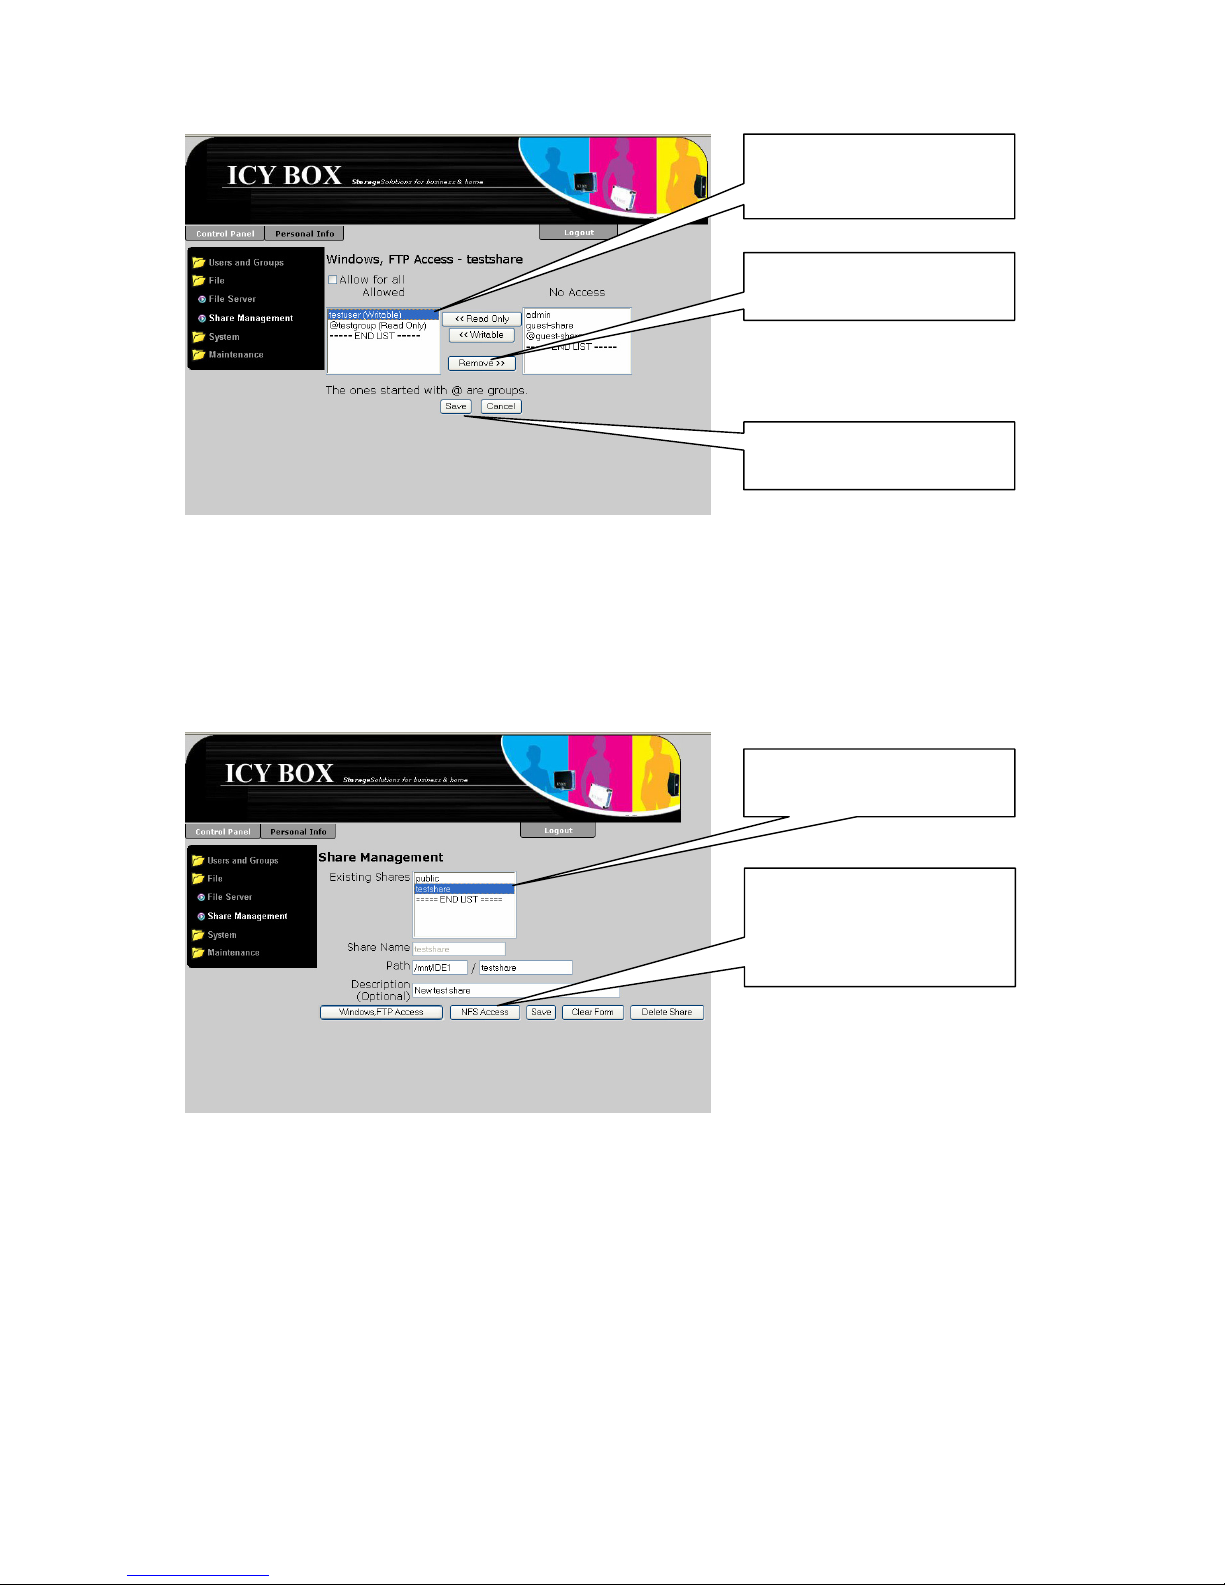
Click on the “Save”
button to save changes
Click on the
“Remove>>” button
Select the user or group
you want to revoke
rights from
How to set up your computer to access a share on the IB-NAS4220-B is described in
point “Mapping shares and Printers” on page 60.
Set up NFS access rights
To access the “NFS Access” form for the NFS access management select the share to be
managed in the “Existing Shares” list and click on the “NFS Access” button.
Click on the
“NFS Access” button to
change to the NFS
Access form
Select the share to be
managed.
In difference to Windows share and FTP access rights are NFS restrictions not based on
users and groups but can only be given to IP Addresses, complete Subnets or simply all
network participants.
Attention: Because anybody who controls a computer can give its computer any IP
Address he wants the NFS server does not grant security on public
networks.
To allow access from all computers select the “Allow for all” check button and click on the
“Save” button.
43
Page 44

Click on the “Save”
button to save changes
Select the „Allow for all“
check button to grant
NFS access to any host
To allow access to a special IP Address or a Subnet select the referring radio button,
enter the values and click on the “Save” button.
Click on “Add” to add the
IP Address to the allowed
Click on the “Save”
button to save changes
Enter the IP Address
To give access to a single
IP Address, select this
radio button
Click on the “Save”
button to save changes
Enter the subnet
definition here
(<net>/<mask>)
To give access to a
complete subnet
Address, select this radio
button
44
Page 45
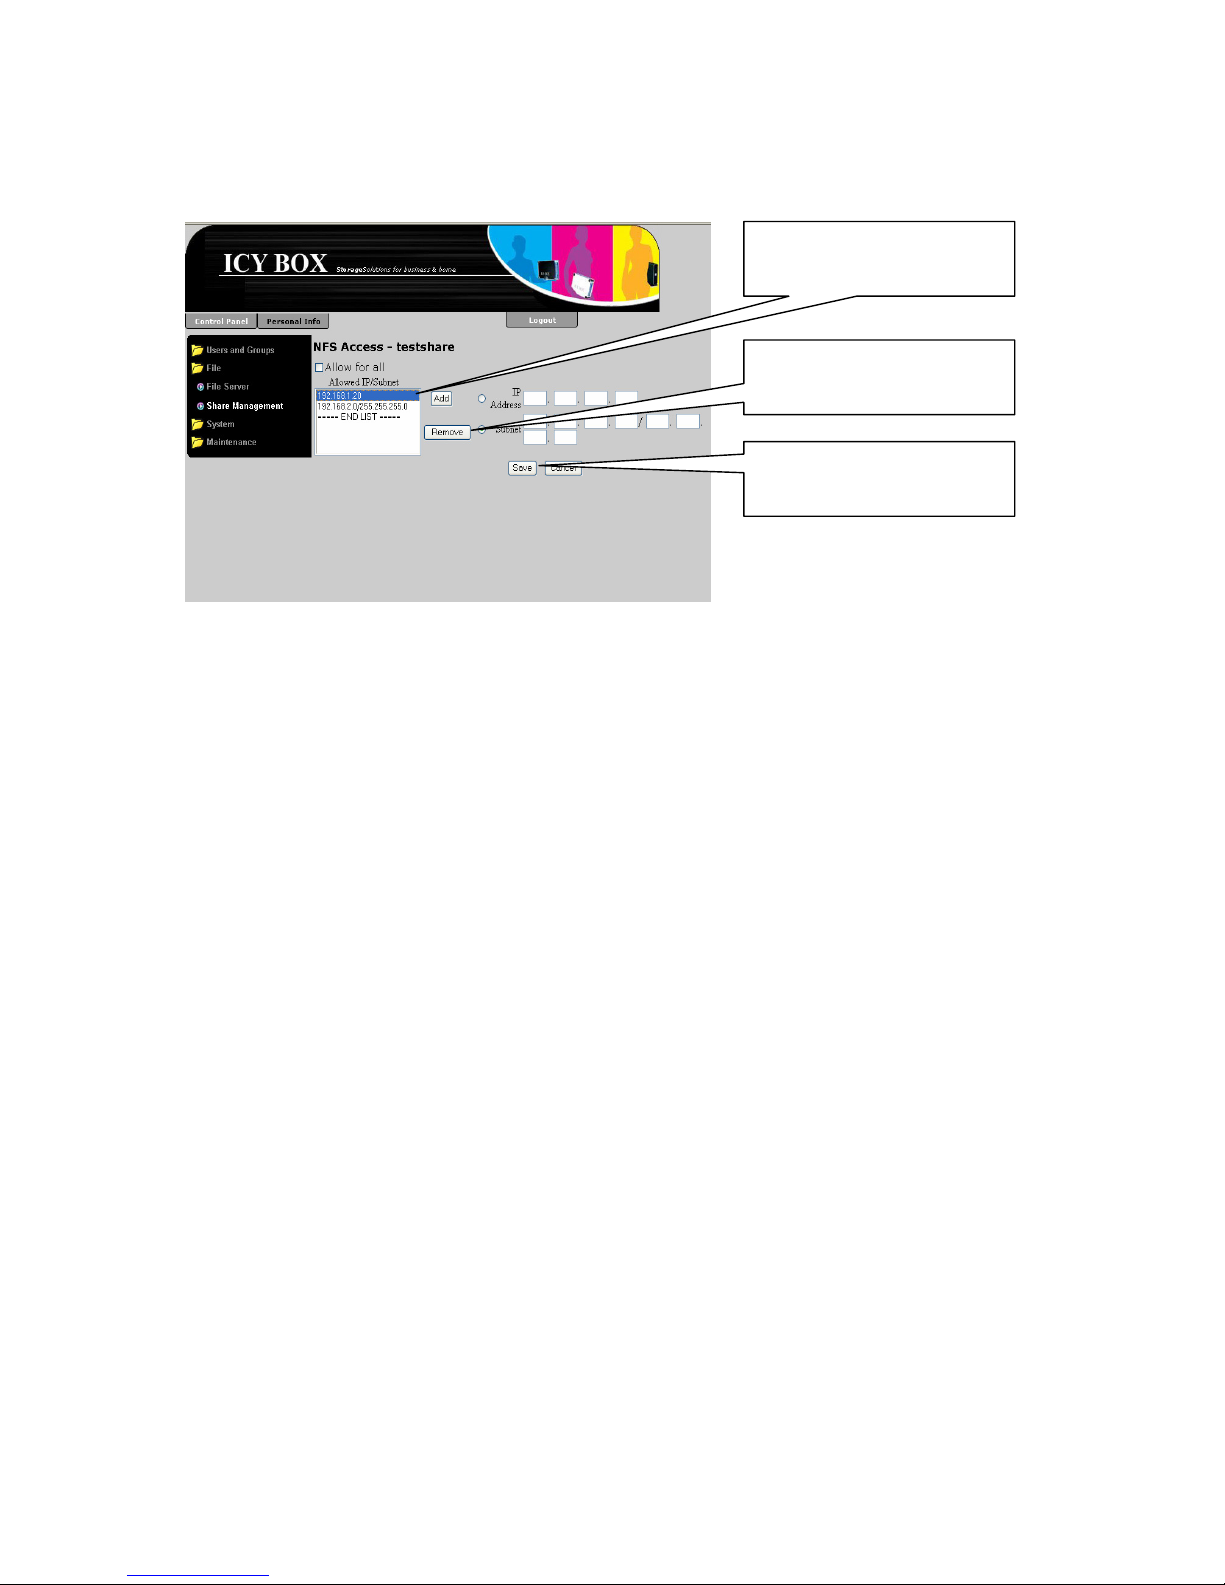
To revoke the rights for singular IP Addresses or subnets select them in the
“Allowed IP/Subnet” list, click on the “Remove” button and click on the “Save” button to
save changes.
Click on the “Save”
button to save changes
Click on the “Remove”
button
Select the IP Address or
Subnet to be revoked
How to set up your computer to access a share on the IB-NAS4220-B is described in
point “Mapping shares and Printers” on page 60.
System Settings
This section describes how to set up a basic system setting like those for network and
time. As described in point “How to access the Management Interface” (page 12) the IBNAS2001 is by default configured to get its IP Address from a DHCP server. In the point
“Network configured on fix IP-Addresses” is also described how the IB-NAS2001 network
and time settings are changed with the SearchNAS.exe tool. These settings can also be
done via the web surface.
The web surface also offers some tools to turn off or restart the IB-NAS2001 on remote
and gather some system information, also described in this section.
45
Page 46
Network Setting
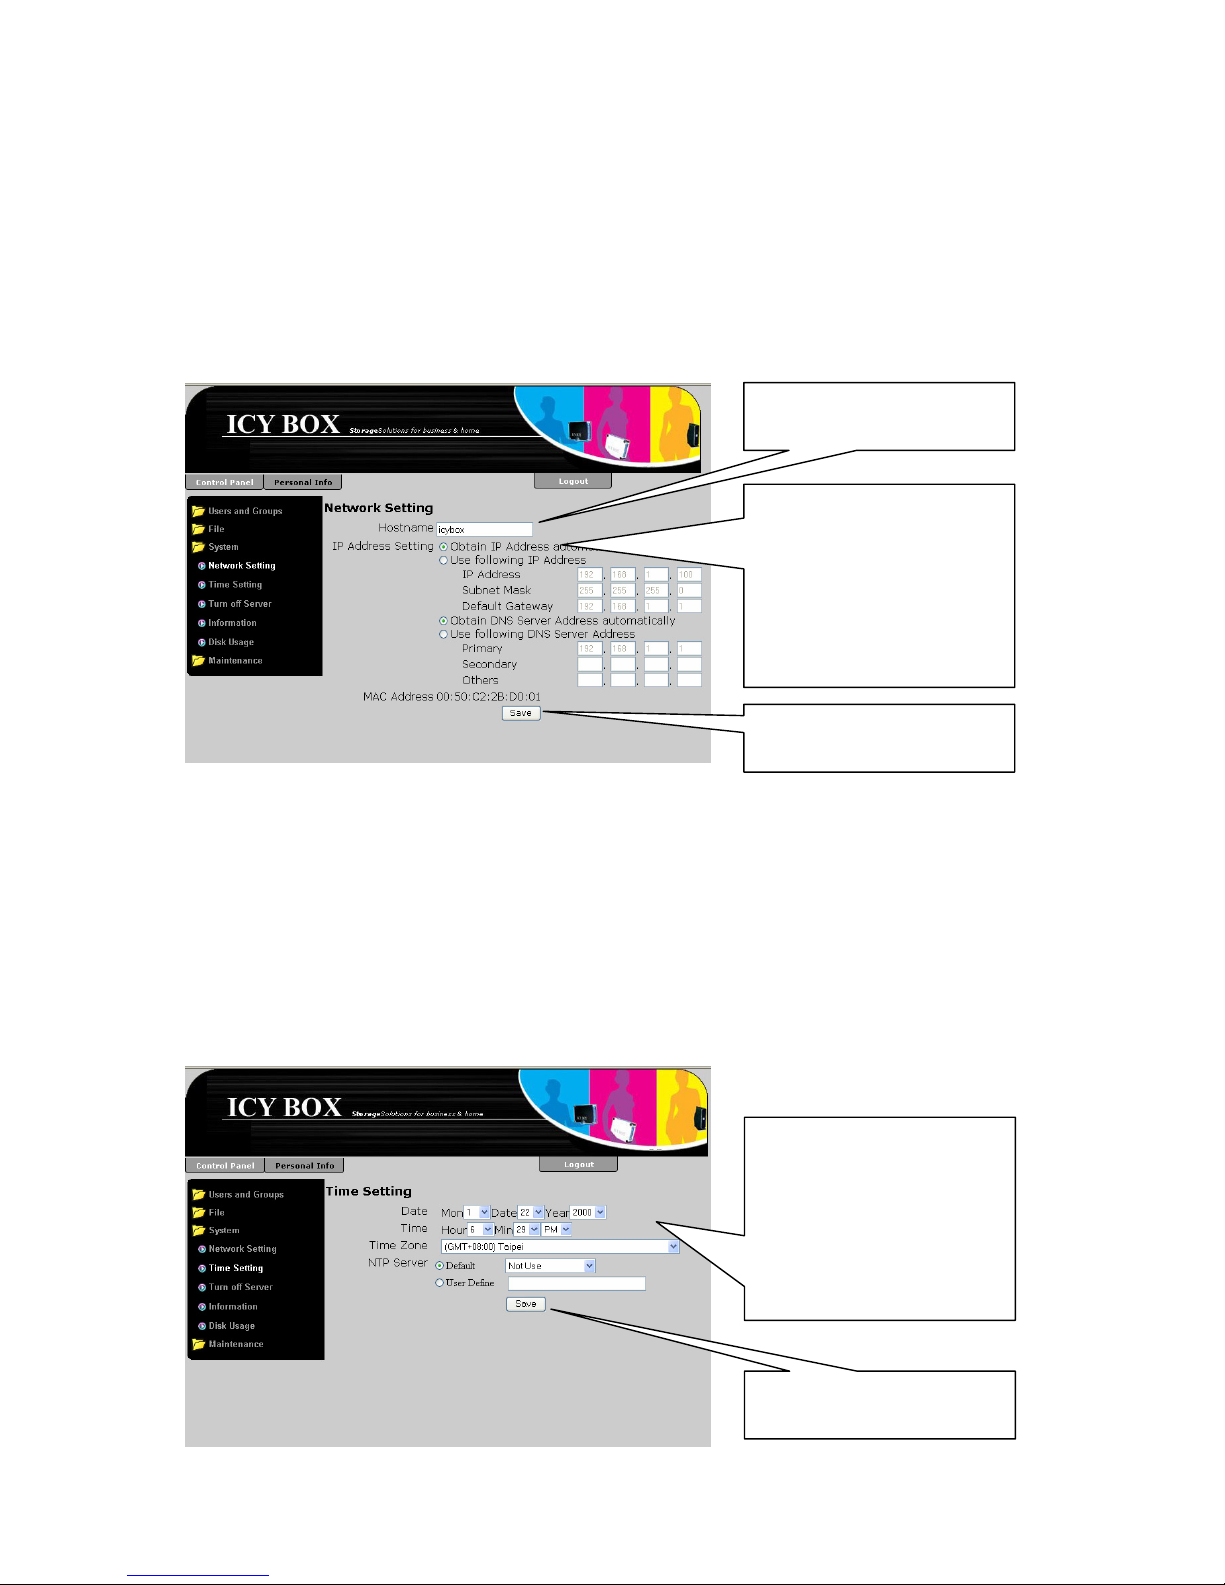
The Network settings as described in point “Network configured on fix IP-Addresses”
(page 14) can also be set via the web surface. Additionally the network name of the IBNAS2001 could be changed there. To access the referring form, please select:
Control Panel
System
Network Setting
46
Change the network
name here
To change the network
settings you can select
and change here all the
values witch have been
already described in
point “
” (page 15)
Network
configured on fix IPAddresses
To save changes click on
the “Save” button
Time Setting
In the same manor the time setting already explained in point “Network configured on fix
IP-Addresses” (page 14) can be changed via web surface. To find the referring form
select:
Control Panel
System
Time Setting
To change the time
settings you can select
and change here all the
values witch have been
already described in
point “
” (page 15)
Network
configured on fix IPAddresses
To save changes click on
the “Save” button
Page 47

Restart or turn off the IB-NAS2001 remotely
In some cases it might be necessary to restart or even turn off the IB-NAS2001. This
could be done via the web interface. To access the referring form, please select:
Control Panel
System
Turn off Server
To restart or turn off the
IB-NAS2000, please click
on the referring button
System Information
To display some basic system information, please select:
Control Panel
System
Information
Some system
information is displayed
47
Page 48

Disk Usage
To get a quick overview of the used and free space please select:
Control Panel
System
Disk Usage
For a brief overview on the usage of the complete disk, select “Summery” as described
below.
If “Summary” is selected
here a short overview of
the usage of the
complete disk is
displayed.
For a detailed listing per user, please select “User” as described below.
If “User” is selected here
a detailed list referring
the user’s disk usage is
displayed.
48
Page 49

49
Network Service
The IB-NAS2001 offers a variety of other Network services such as sharing Pictures,
Music and Videos to the local network, DHCP or Downloading/Sharing files over the
internet. The following Table gives you a quick overview:
Network Service Description
DHCP A DHCP server allows configuring all network devices in a
subnet automatically and centralized.
Printer Server Shares a printer via network.
Bonjour Bonjour is a protocol, which broadcasts a list of services
to other network devices. These devices can than
recognize automatically the services offered by the IB-
NAS2001-B. Mac computers use this protocol mainly.
iTunes support This service offers all music and video content stored in
the directory “music” of the “public” share to all iTunes
programs in the local network.
Twonky Media A UPnP-AV17 server, which allows to broadcast music,
picture and video content to network media players in the
local network. Twonky Media is integrated as 30 days trial
version and can upgraded to a full version by simply
purchasing a license from Twonky Vision.
DHCP Server
A DHCP Server allows centralized configuration of all network devices which are set up to
automatically detain an IP-Address. A network device, which has been set to auto
configuration, looks for a DHCP server during start up and asks this server for an IPAddress. In a home network this service in most cases is provided by the internet access
router (for Example a DSL router). Having two DHCP servers active in a network is
possible but only recommended for professional computer users, knowing exactly what
they are doing.
Attention: Having two DHCP services run in the same network can cause network
failure. Anyone, who does not know how to configure two DHCP servers
correctly, should better deactivate the DHCP Server function of the ICY
BOX, if there is already a DHCP server in the same subnet.
Automatic DHCP configuration
When the IB-NAS2001-B is configured to automatically obtain an IP-Address by DHCP
and it can’t find a DHCP server when starting up, the IB-NAS2001-B assigns itself the
IP-Address 192.168.1.1 with a subnet
18
mask19 255.255.255.0. It also activates
17
UPnP-AV is a standard introduced by Microsoft to allow home entertainment devices to communicate and distribute music,
picture and video data over a local network. By using this protocol a network media player connected to a TV might be able to
access these data stored on the IB-NAS2001.
18
TCP/IP based networks, as the internet, are structured into different network parts called subnets. A subnet is built by a set
of IP Adresses all having the same digital beginning. Remember: an IP Address is always interpreted as 32 bit binary number
containing 32 binary digits. IP Adresses of the same subnet all have the left part of these digits in common. How many of those
digits are used to define a subnet is described by the net mask. Computers in the same subnet are able to communicate
directly together. Computers in different subnets need a so called router which connects different subnets and forwards the net
traffic from one subnet into another.
19
The net mask defines which part of the IP Address is describing the subnet. Together with the IP Address it is the minimum
necessary part of the network configuration. So it always has to be set appropriate.
Page 50
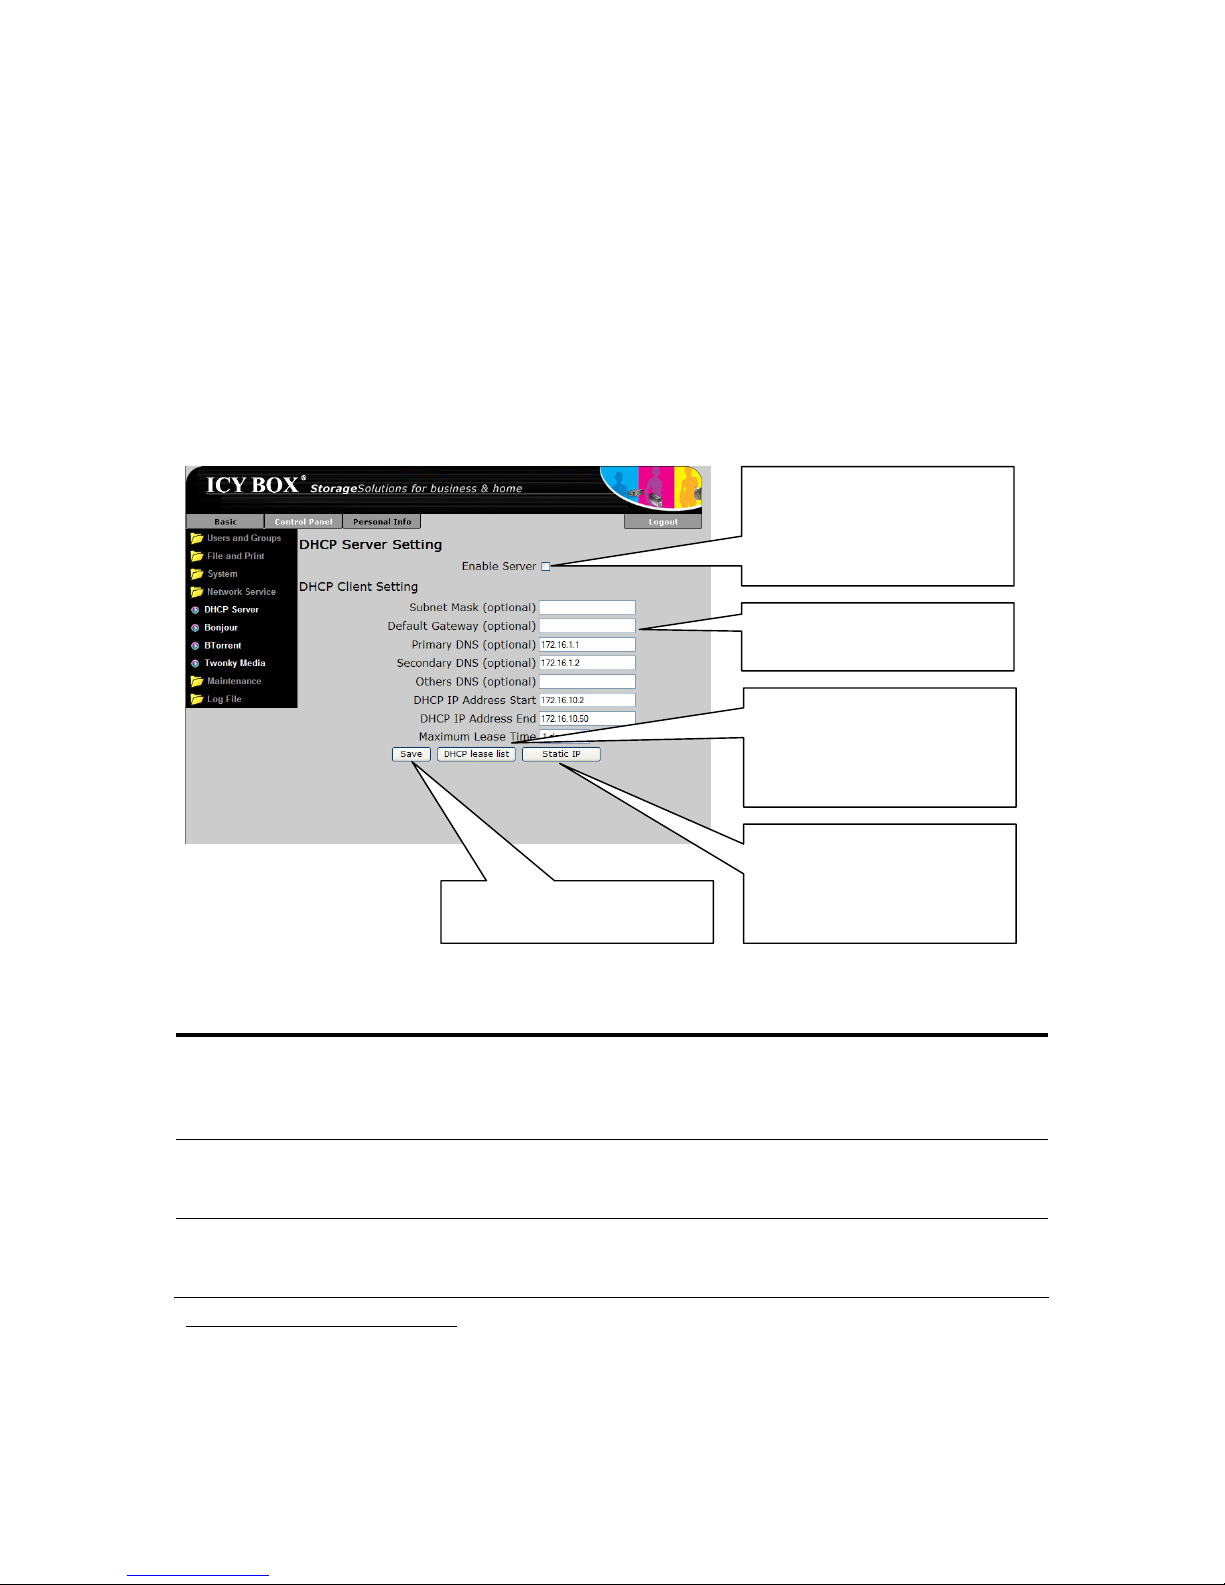
automatically its DHCP Server, distributing IP-Addresses from 192.168.1.2 to
192.168.1.50 with a Maximum Lease Time of 1 day. This behavior ensures an easy auto
configuration of the IB-NAS2001-B in a Network with no auto configuration
infrastructure.
Manual DHCP configuration
To access the manual setup of the DHCP server select:
Control Panel
Network Service
DHCP Server
Clicking on “DHCP lease
list” changes to a list of
already distributed IPAddresses
Click on “Save” to make
changes effective
Clicking on “Static IP”
changes to a dialogue
defining fix IP-Addresses
per MAC address
Here the DHCP server
settings can be changed
By en-/disabling this
checkmark the DHCP
server can be activated
or deactivated
The following settings could be done:
DHCP Setting Description
Subnet Mask If the subnet mask should be different to the one of the
one assigned to the IB-NAS2001-B in point “Network
configured on fix IP-Addresses” on page 14 or in point
“Network Setting” on page 46.
Default Gateway
20
IP-Address of the default gateway. The default gateway in
a home network is mostly the IP-Address of the internet
access router.
Primary DNS
21
IP-Address of the DNS server. The DNS server in a home
network is mostly the IP-Address of the internet access
router.
20
In a TCP/IP based Network a computer can send directly data only to other computers in it’s own subnet. To be able to send
data to other computers, a rooter is necessary to link this subnet to the rest of the network and all computers in the subnet
need to know its IP Address because they will send all data for destinations out of their subnet to the rooter to be forwarded.
This IP Address of the router is defined by the default gateway setting.
21
DNS is the acronym for “domain name service”. This names a process of assigning internet names to IP Addresses. The DNS
server is comparable to a telephone book. At this server all internet applications look up the referring IP Address for an internet
name. Without that service or when the DHCP server doesn’t know the internet name, the internet name could not be used to
address a host or device. The only chance to get access to that host or device is to use the IP Address directly.
50
Page 51
51
DHCP Setting Description
Secondary DNS An alternative DNS server.
Other DNS Another alternative DNS server.
DHCP IP Address Start Start of the range of IP-Addresses which form the pool
out of that the DHCP server distributes the IP-Addresses
to the asking clients.
DHCP IP Address End End of the IP-Address range.
Maximum Lease Time Maximum period of time in which the distributed
IP-Address is valid. Clients normally try to update the IP-
Address at half of this time. The longer this period is the
more likely it is that the DHCP server runs short with
addresses.
Printer Server
To activate or deactivate the printer server please select:
Control Panel
Network Service
Printer Server
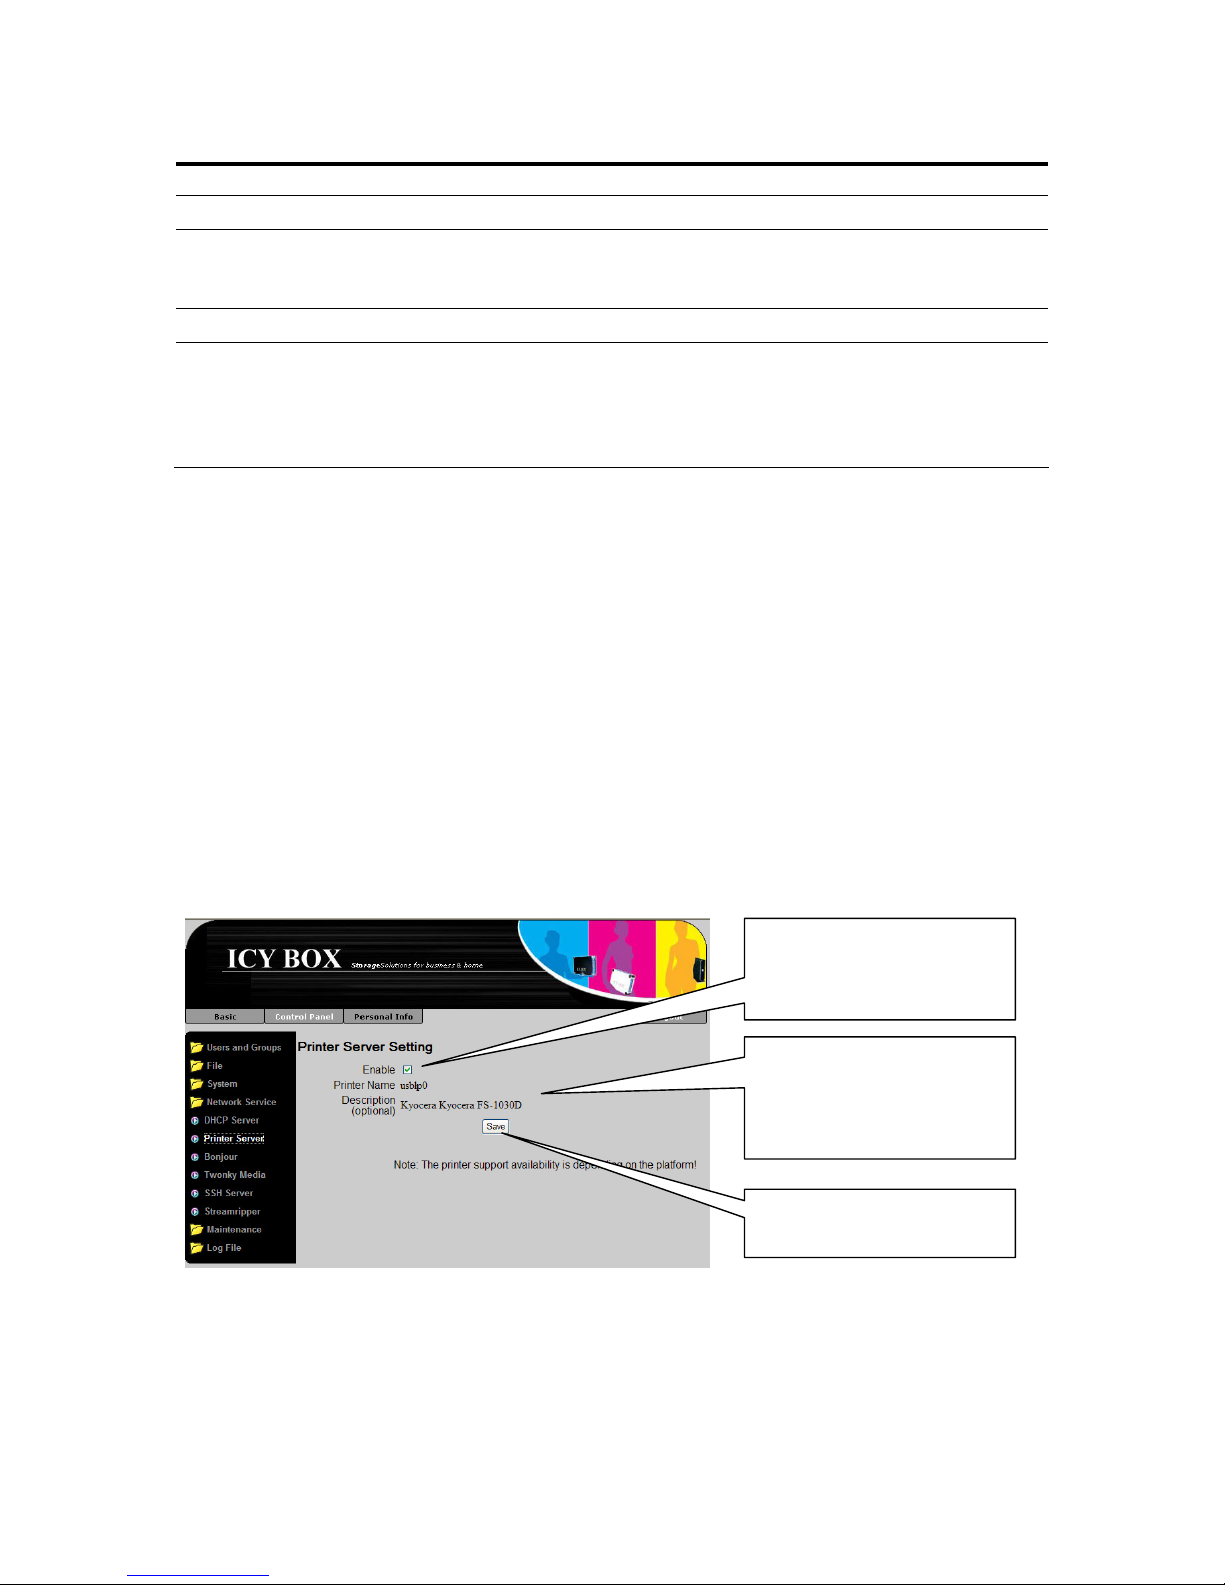
The IB-NAS2001-B is able to share an attached printer to all computers in the local
network. It does not matter if it is connected to the front or rear USB port, but because
the One Touch Backup function only works to USB-Sticks or USB-HDDs connected to the
front interface, it is better to choose the rear USB port to connect the printer. If the
printer is connected and the Printer Server has been enabled, it is possible to print from
any computer connected in the local network on the printer attached to the IBNAS2001-B.
The network name and
the description name of
the printer is displayed
here
To make changes
effective click on “Save”
To enable the printer
server function check
marc here
How to set up your computer to print via the IB-NAS2001-B is described in point
“Mapping shares and Printers” on page 60.
Page 52

Bonjour (including iTunes support)
Bonjour is a protocol to distribute service information among network devices. This
protocol is mainly used by Mac computers. Enabling the support of this protocol simplifies
the use together with Mac computers. If Bonjour is enabled, the iTunes support could be
enabled too. The iTunes support distributes the content of the “music” directory in the
“public” share to all iTunes programs in the local network. So if iTunes is enabled, the
content of the “music” directory in the “public” share can be played directly using iTunes
on any computer in the network.
To activate these services select:
Control Panel
Network Service
Bonjour
To enable iTunes support
check mark here
To make changes
effective click on “Save”
To enable Bonjour check
mark here
Twonky Media
The IB-NAS2001-B includes a 30 days trial version of the Twonky Media server. The
Twonky Media server is a UPnP-AV server. UPnP-AV is a protocol which allows network
media players to communicate with the IB-NAS2001 and access media content stored on
the IB-NAS2001-B, such as music, pictures or video.
Install Twonky Media
The Twonky Media server is not part of the firmware of the IB-NAS2001-B. So it has to
be installed on the IB-NAS2001-B first. The reason why Twonky Media needs to be
installed on the IB-NAS2001-B is, that Twonky Media will be updated several times a
year. This will be done because Twonky Vision adapts this media server to various new
media players each year. In order to keep you up to date you can download the latest
Twonky Media Version from the RaidSonic Homepage:
http://www.raidsonic.de
To install the twonky media server you simply have to copy the “twonkymedia” directory
with all subdirectories to the “applications” directory of the “public” share. You can find a
Twonky Media version on the CD-Rom, which is part of the delivery of the IB-NAS2001.
52
Page 53
If you download the latest version of Twonky Media from the homepage mentioned above
you might have to unpack the downloaded file first to disk of your local computer and
then copy the resulting “twonkymedia” directory to the “applications” directory in the
“public” share of the IB-NAS2001-B.
How to set up your computer to access a share on the IB-NAS2001-B is described in
point “Mapping shares and Printers” on page 60.
Enabling/disabling Twonky Media
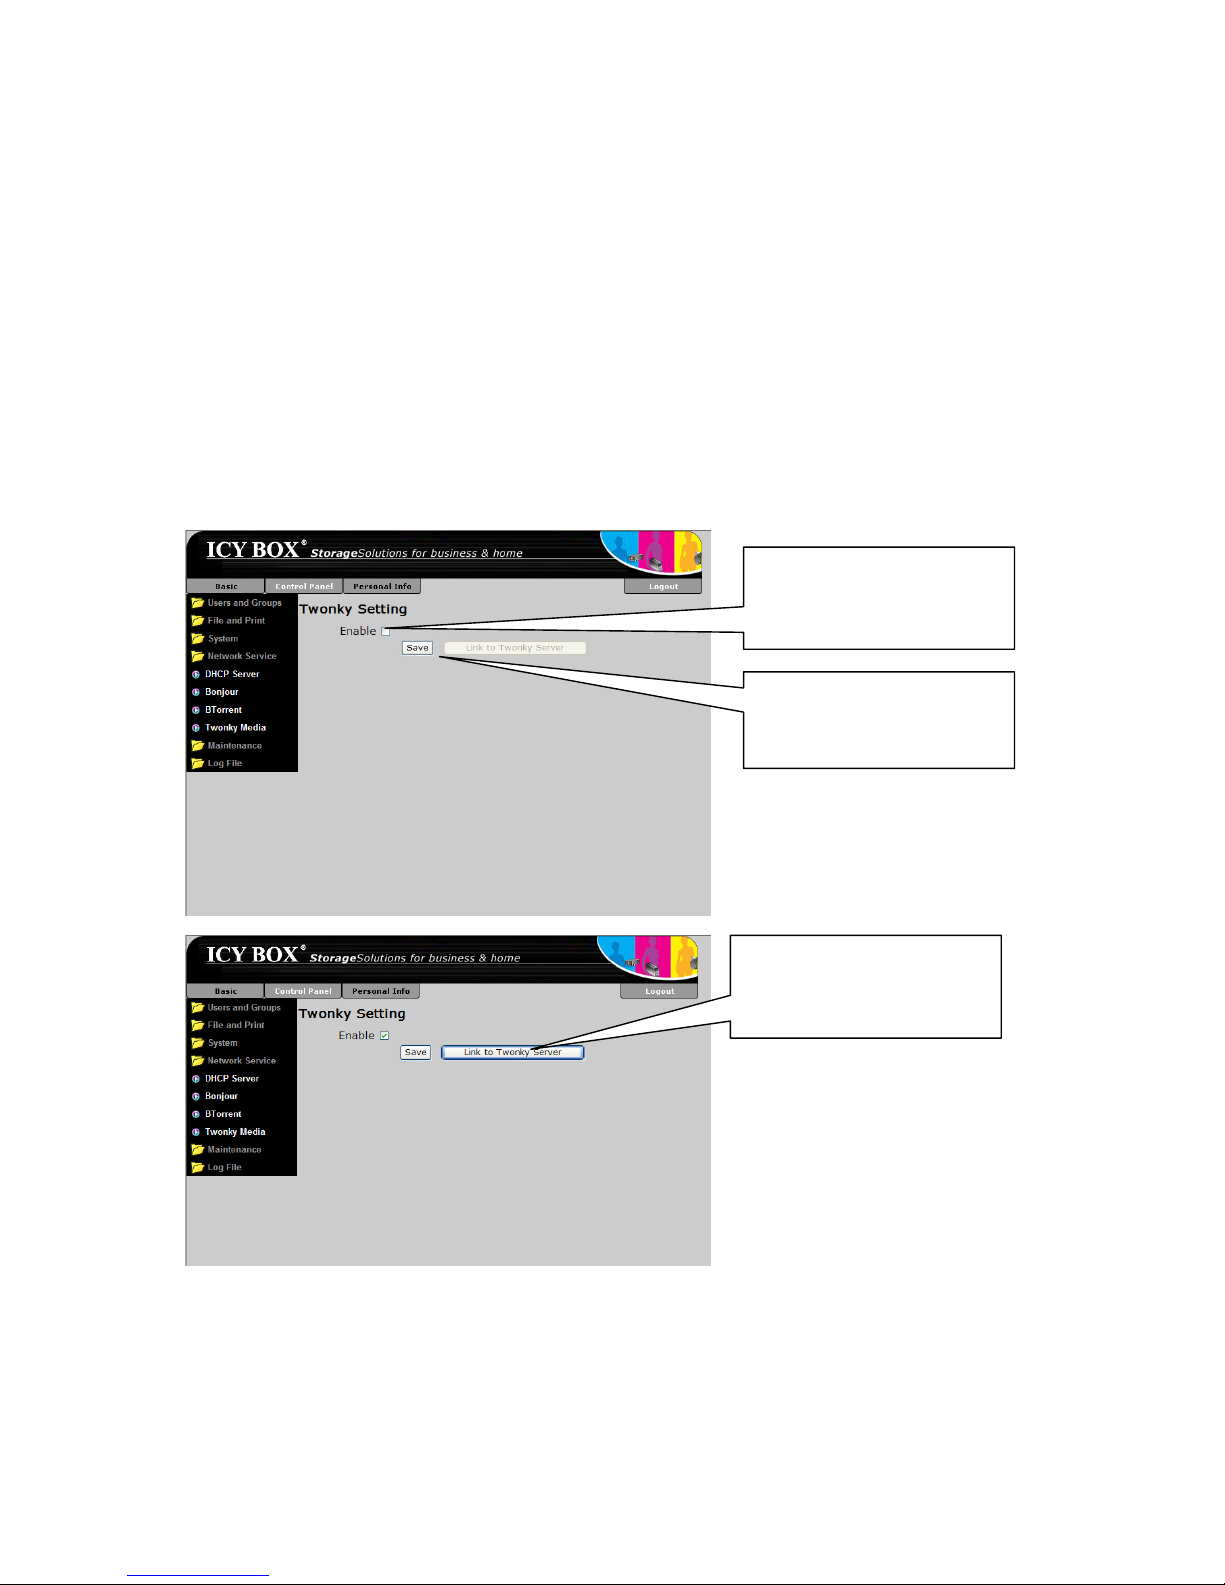
To enable the Twonky Media server select:
Control Panel
Network Service
Twonky Media
… click on “save” to
make the change
effective
To enable the Twonky
Media server click on
“Enable” and …
To change to the Twonky
Media user interface click
on “Link to Twonky
Server
”
53
Page 54
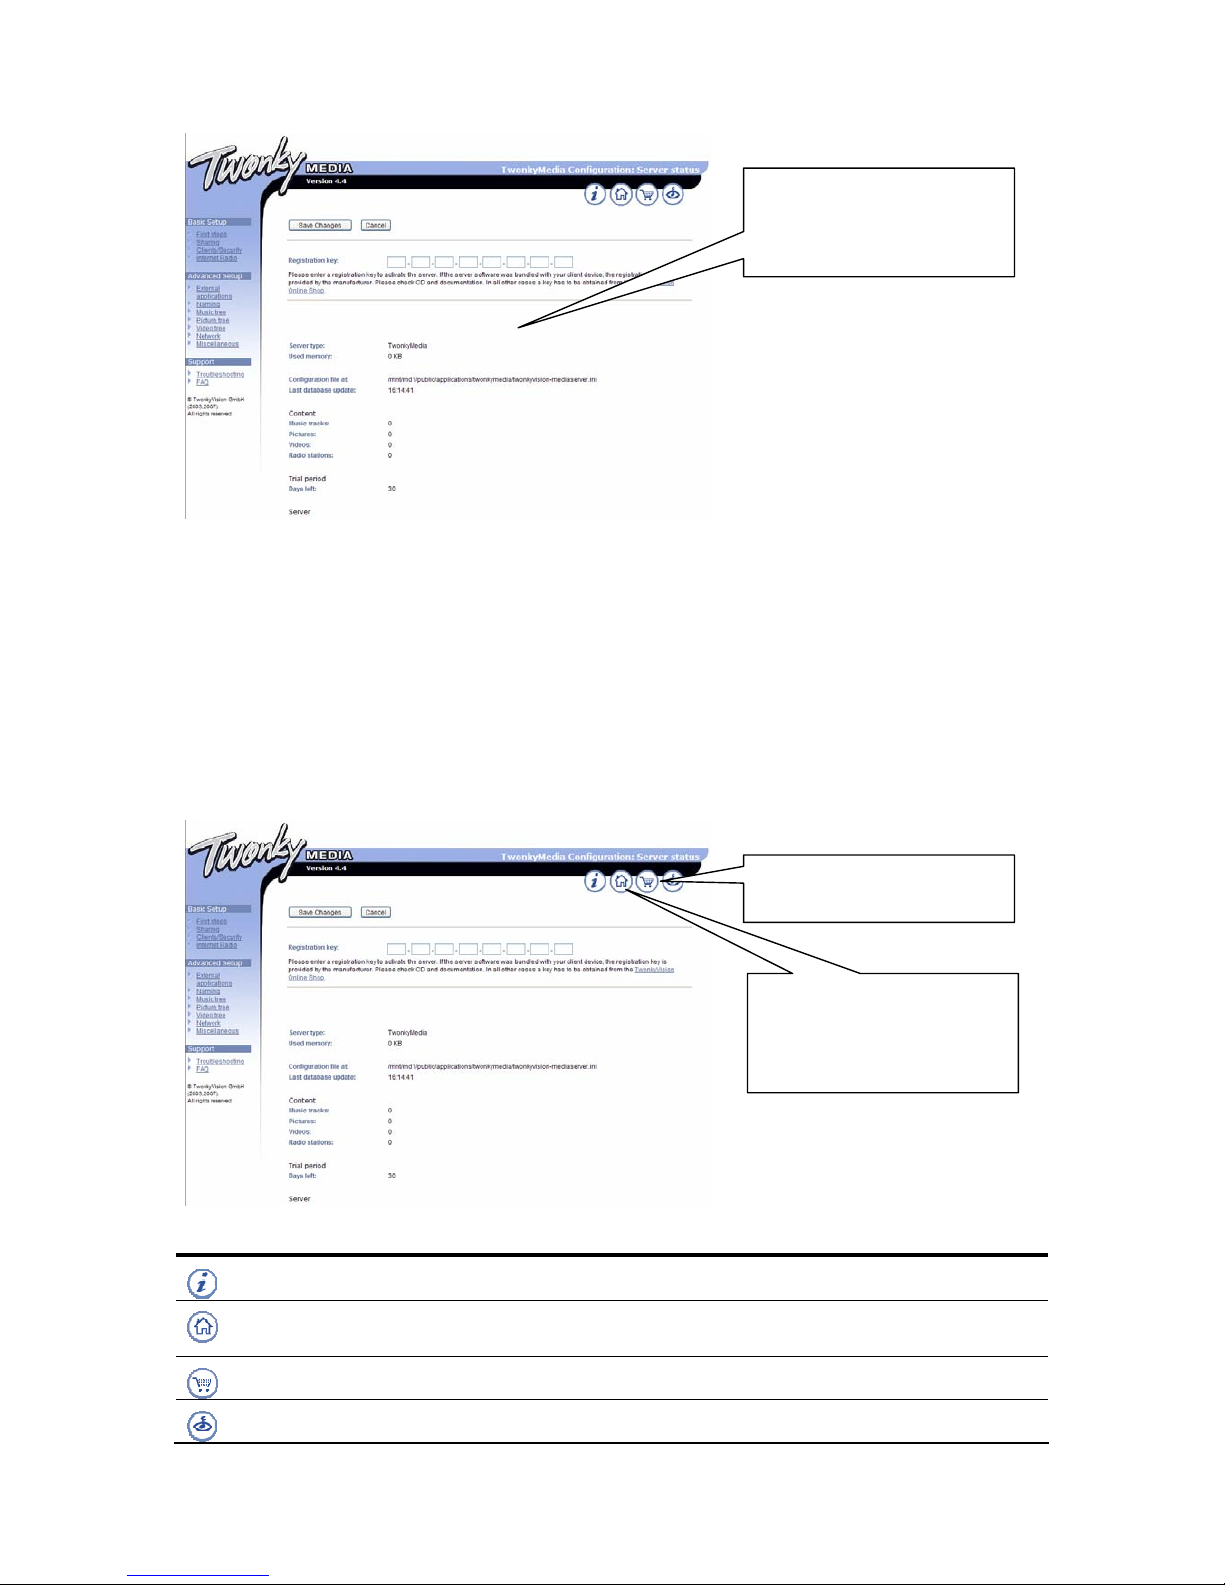
The Twonky Media User
Interface will be
displayed in another
browser window.
Using Twonky Media
At the beginning Twonky Media will scan your complete IB-NAS2001-B for media content,
such as music, pictures or video files. Twonky is preset to work instantly out of the box.
For details on activating, licensing or how to use Twonky Media, pleas visit Twonky
Visions (Manufacturer of Twonky Media) Homepage:
http://www.twonkyvision.com
Or click on the referring symbols of Twonky Medias user interface:
Symbol Description
Information on Server Status
Link to Twonky Vision homepage for details on Twonky
Media
Link to licensing of Twonky Media
Browser based media player
To purchase a license
click here.
To visit Twonky Visions
homepage for details on
the usage of the Twonky
Media server click here
54
Page 55
55
aintenance
enu Maintenance is described. The Maintenance submenu
setup (described already in point “Disk Utility”), firmware
upgrade, save or restore the configuration and a factory reset.
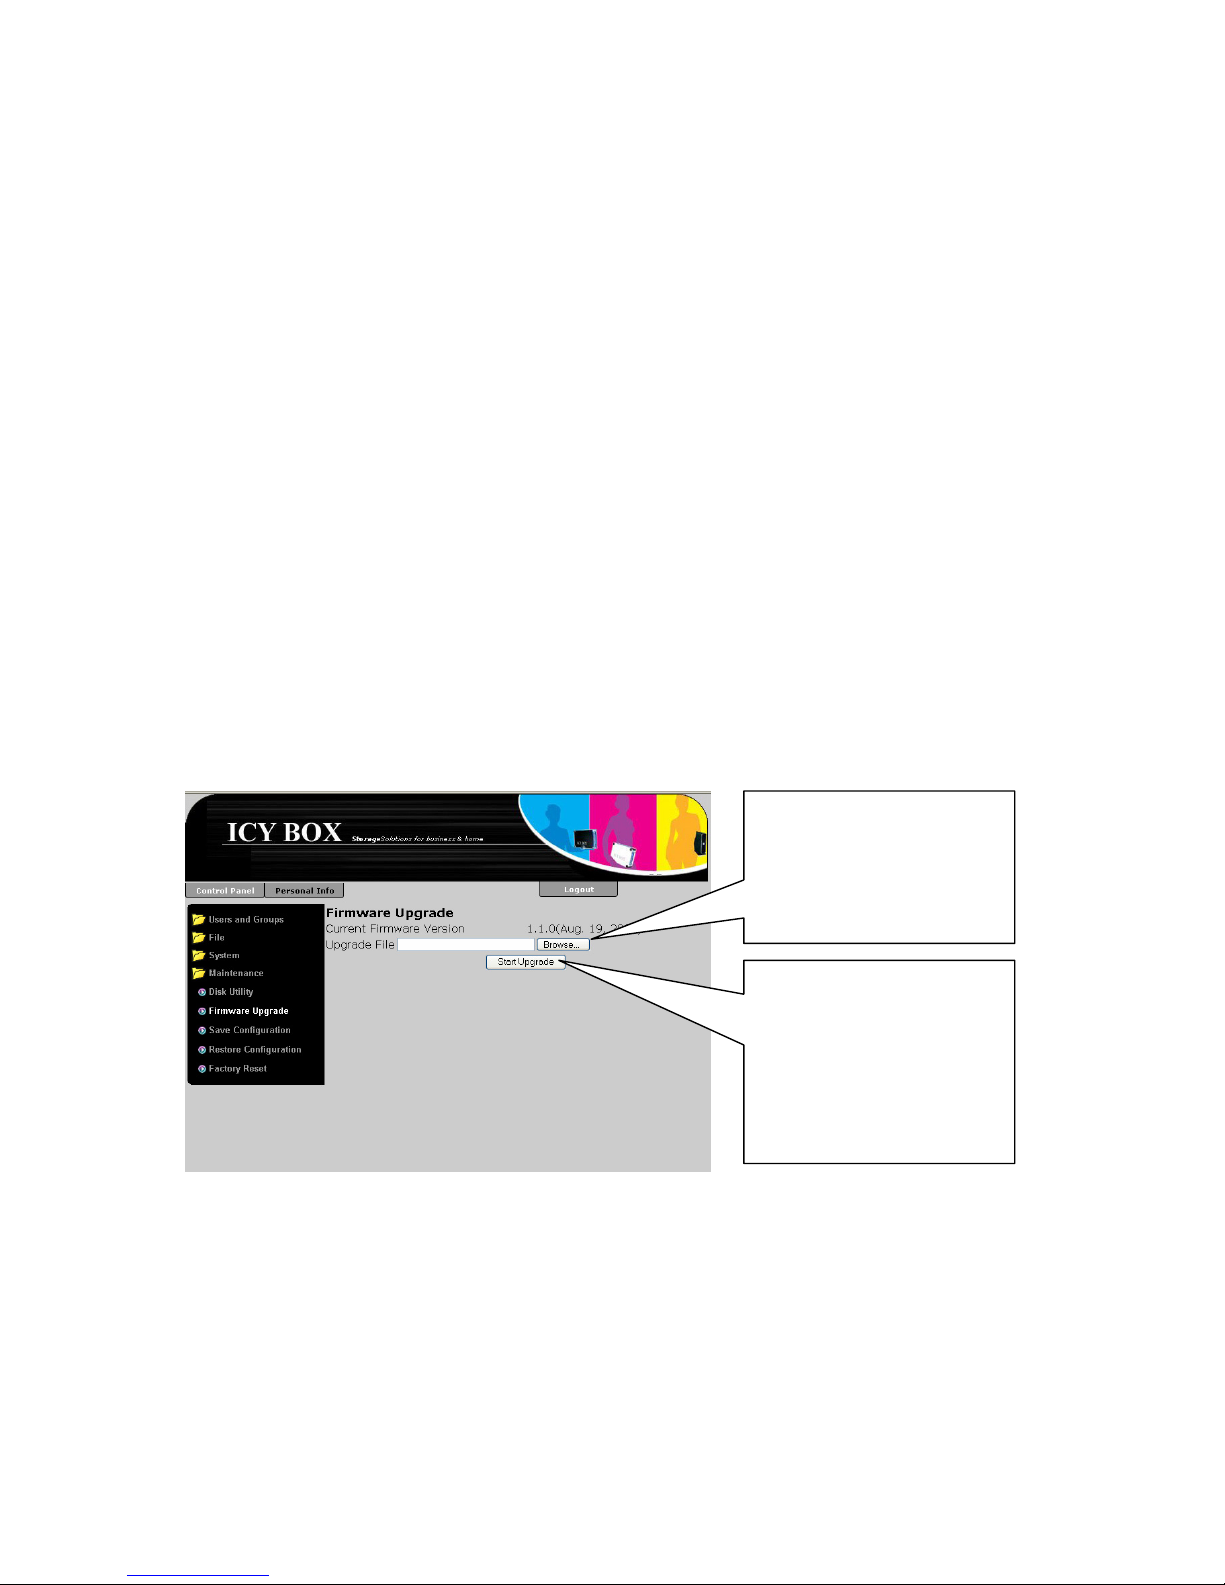
The IB-NAS2001 is constructed to allow a complete upgrade of the firmware. The
found selecting:
Firmware upgrade
The up g the upgrade file, which has to be located on the local
ard disk. By clicking on the “Browse…” button a dialog pops up where you are able to
select the file. When having selected please click on the “Start Upgrade” button and the
on.
supply is not turned off until the upgrade process is complete.
Attention:
When the firmware upgrade process is finished the IB-NAS2001 restarts and the web
browser windows automatically switches to the start form.
M
In this section the subm
bundles tools for the hard disk
Firmware Upgrade
firmware upgrade form can be
Control Panel
Maintenance
grade starts by selectin
h
upgrade process starts by uploading the upgrade file, followed by process of initializati
Attention: The firmware upgrade process might take up to 15 minutes time. This
process must not be interrupted. Please make sure that the power
Please save all data and configuration externally before performing an
upgrade! Pay attention to all remarks along the upgrade file!
Click on the “Browse…”
button to open a file
selecting dialogue to
select the firmware
upgrade file
Click on the
“Start Upgrade” button
to upload the file and
rading
s
start the upg
process, which might
take up to 15 minute
and must not be
interrupted
Page 56
After the restart it is
necessary to log in again
Save and restore configuration
The IB-NAS2001 offers an opportunity to save all settings been made to disk and restore
them if necessary.
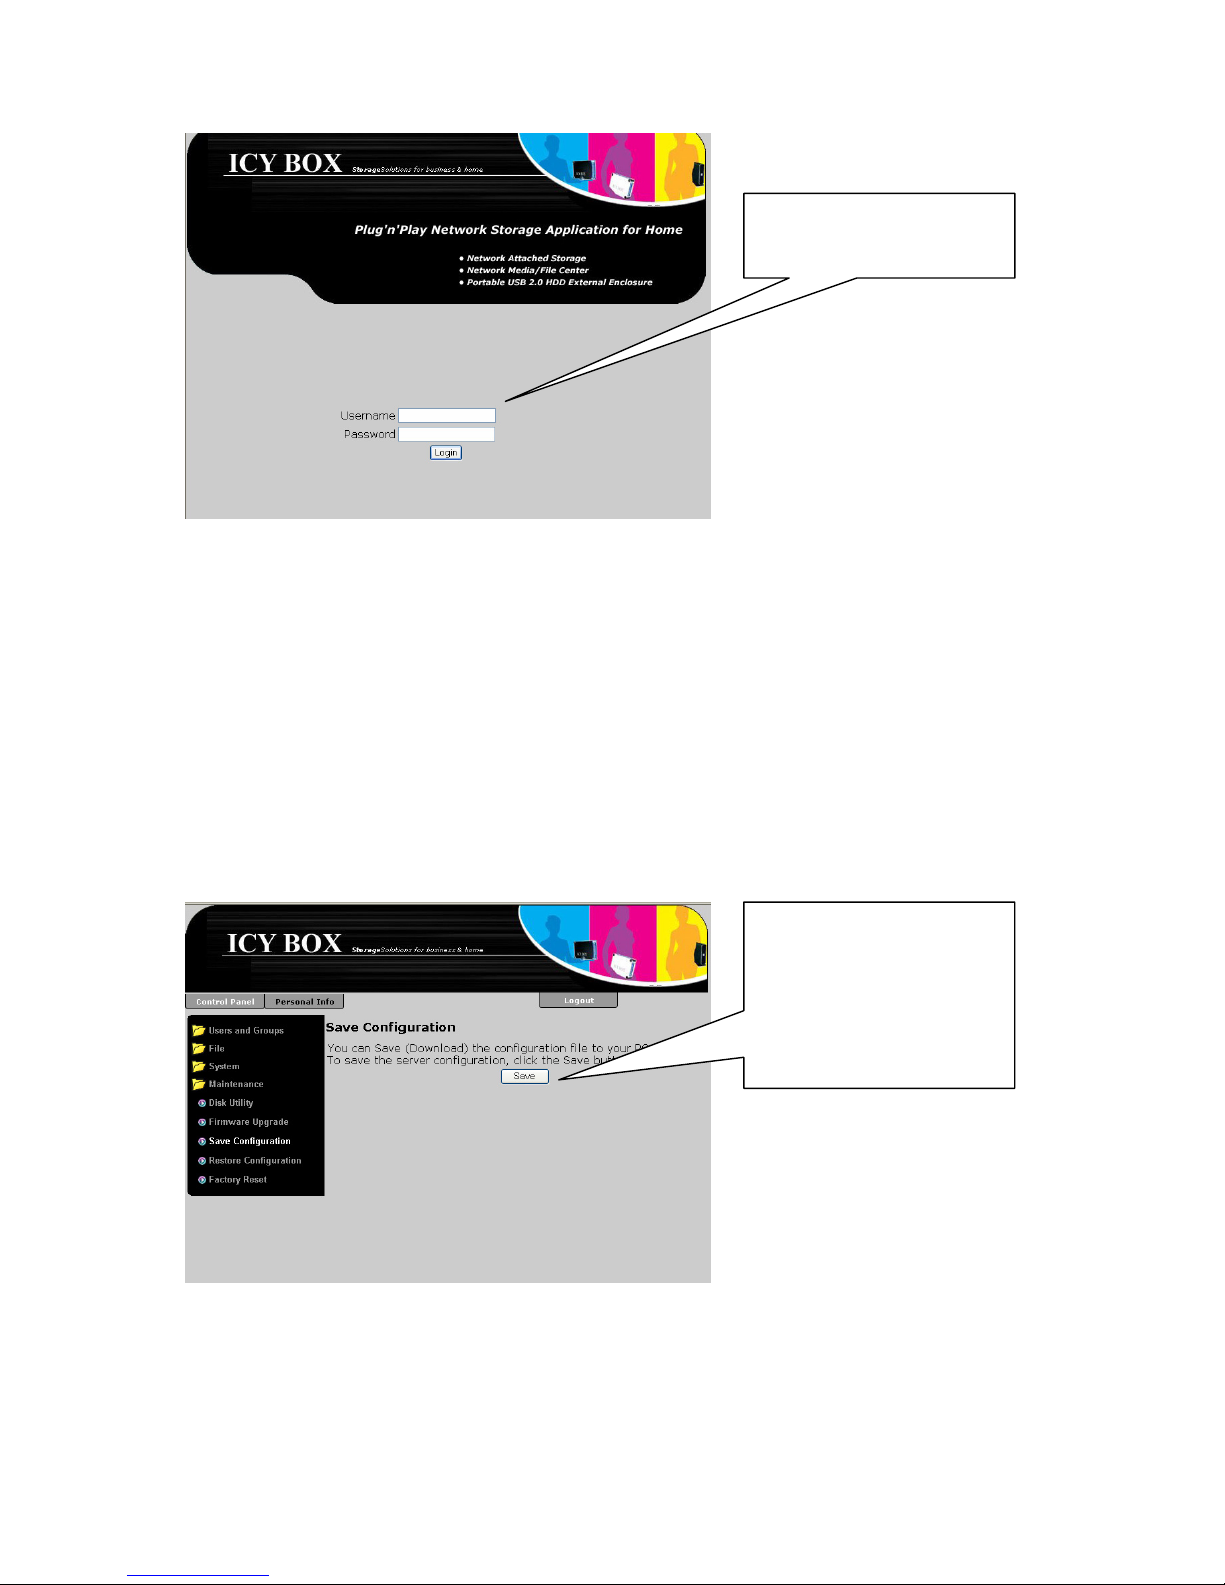
Save configuration
You will find the form for saving the configuration by selecting:
Control Panel
Maintenance
Save Configuration
To save all configuration,
please click on the
“Save” button. A
dialogue is opened where
you can select the path
where the configuration
file should be stored at.
Attention The grant security it makes sense not to store the configuration file on
the IB-NAS2001 itself.
56
Page 57
Restore Configuration
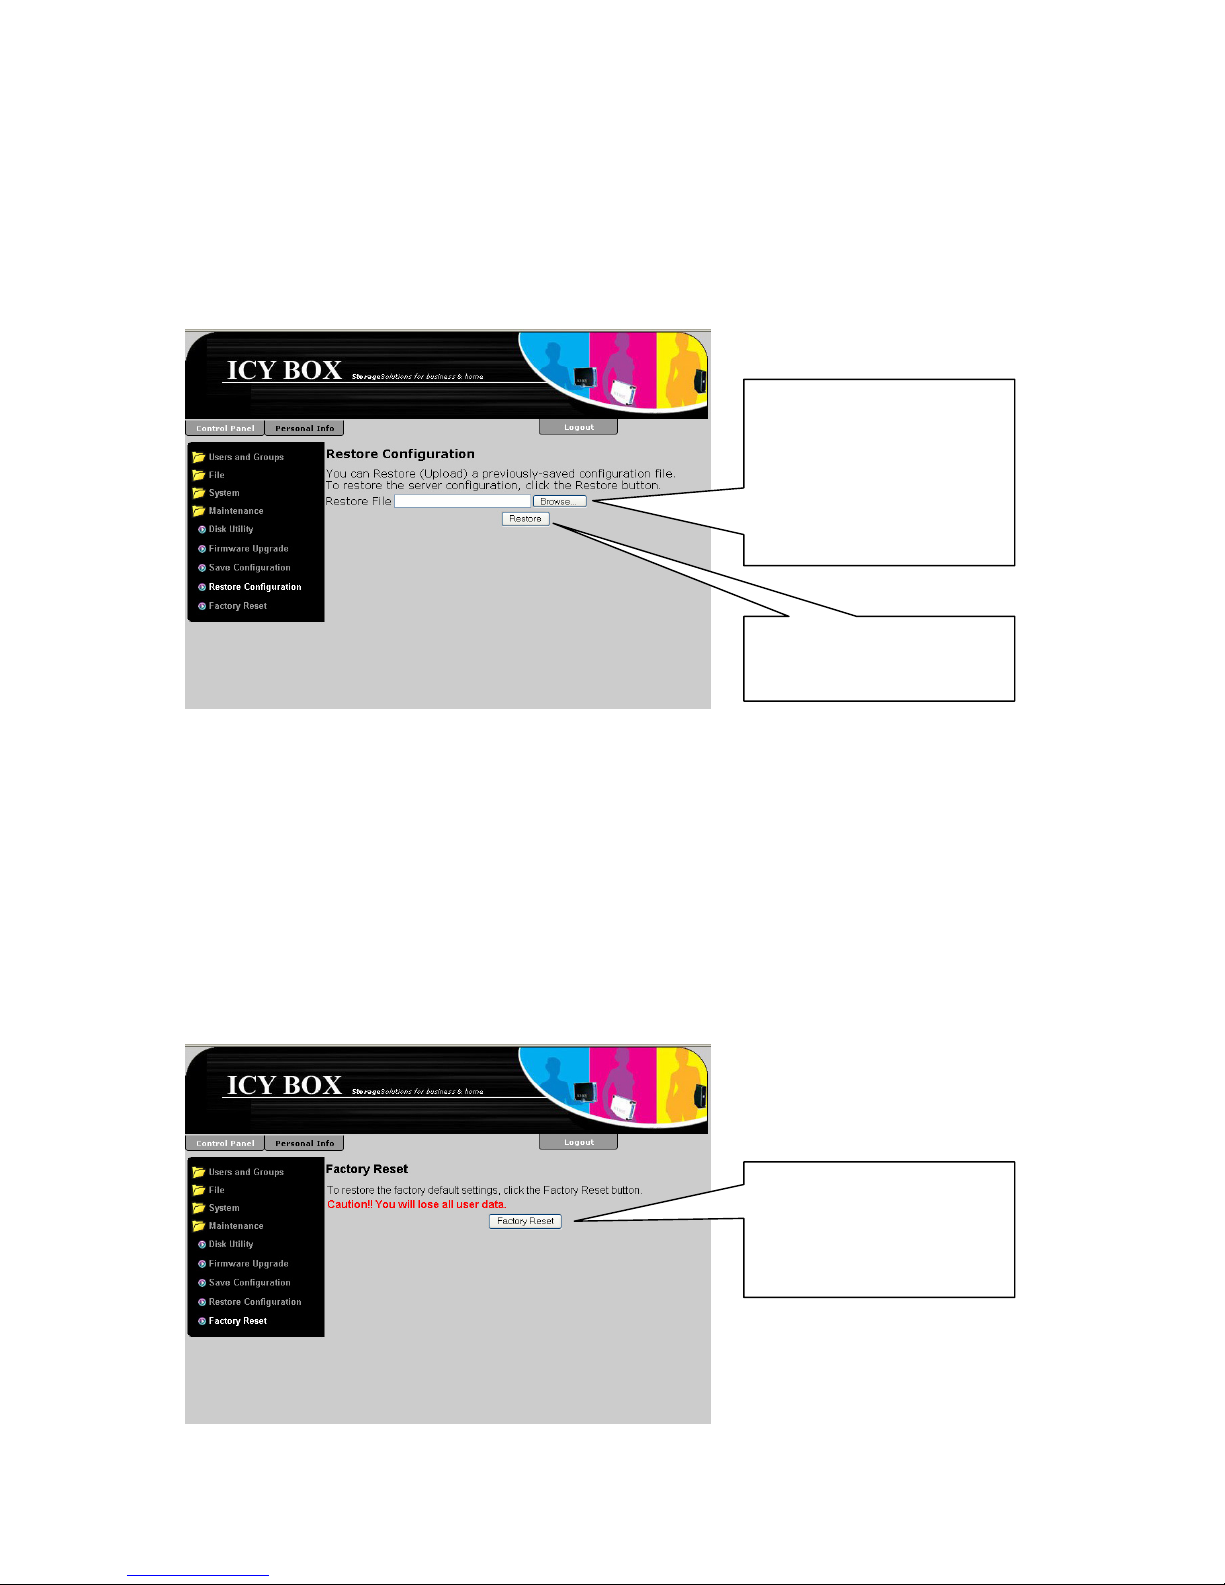
You will find the form for restoring the configuration by selecting:
Control Panel
Maintenance
Restore Configuration
To restore all
configuration, please
click on the “Browse…”
button. A dialogue is
opened where you can
select the configuration
file.
Click on the “Restore”
button to start the
restore process.
Resetting to factory settings
To reset the IB-NAS2001 to all default settings and factory presets you can find the
referring form by selecting:
Control Panel
Maintenance
Factory Reset
Attention: A factory reset may destroy all data on the disk. Please backup all
important data before you proceed resetting.
To reset to factory
settings please click on
the “Factory Reset”
button. Caution: You
will loose all data!
57
Page 58

58
USB-Sticks and USB hard discs
The IB-NAS2001-B can be extended with external USB mass storage devices, such as
USB-Sticks or USB hard discs. The IB-NAS2001-B so far supports up to 2 external
storage devices, since it has 2 USB 2.0 interfaces. If one of these interfaces is already
used for a USB Printer the IB-NAS2001-B supports only one USB mass storage device.
Supported file systems
As on the internal hard discs the IB-NAS2001-B supports EXT2, EXT3 and FAT32 on
external mass storage devices. The IB-NAS2001-B supports only one partition per mass
storage device. If the mass storage device has more than one partition, only the first
partition will be recognized.
USB access via Network
If any USB mass storage device with a compatible file system is attached to any USB
interface of the IB-NAS2001-B it will automatically be recognized and a share containing
the fist partition of the external USB mass storage device will be created and presented
to the network without any password restriction. The name of the share is
“usb
<number>”, where <number> is a number counted up from 1 in the chronological
order of attachment. So the USB mass storage device, which is attached first will become
the share “usb1” and the second “usb2”.
How to set up your computer to access a share on the IB-NAS2001-B is described in
point “Mapping shares and Printers” on page 60.
Extensions
In difference to classical SOHO NAS systems, the IB-NAS2001 can be extended
approximately unlimited. Additional software packages can be installed using the
mechanism described in the following section.
Page 59
Installation of an application
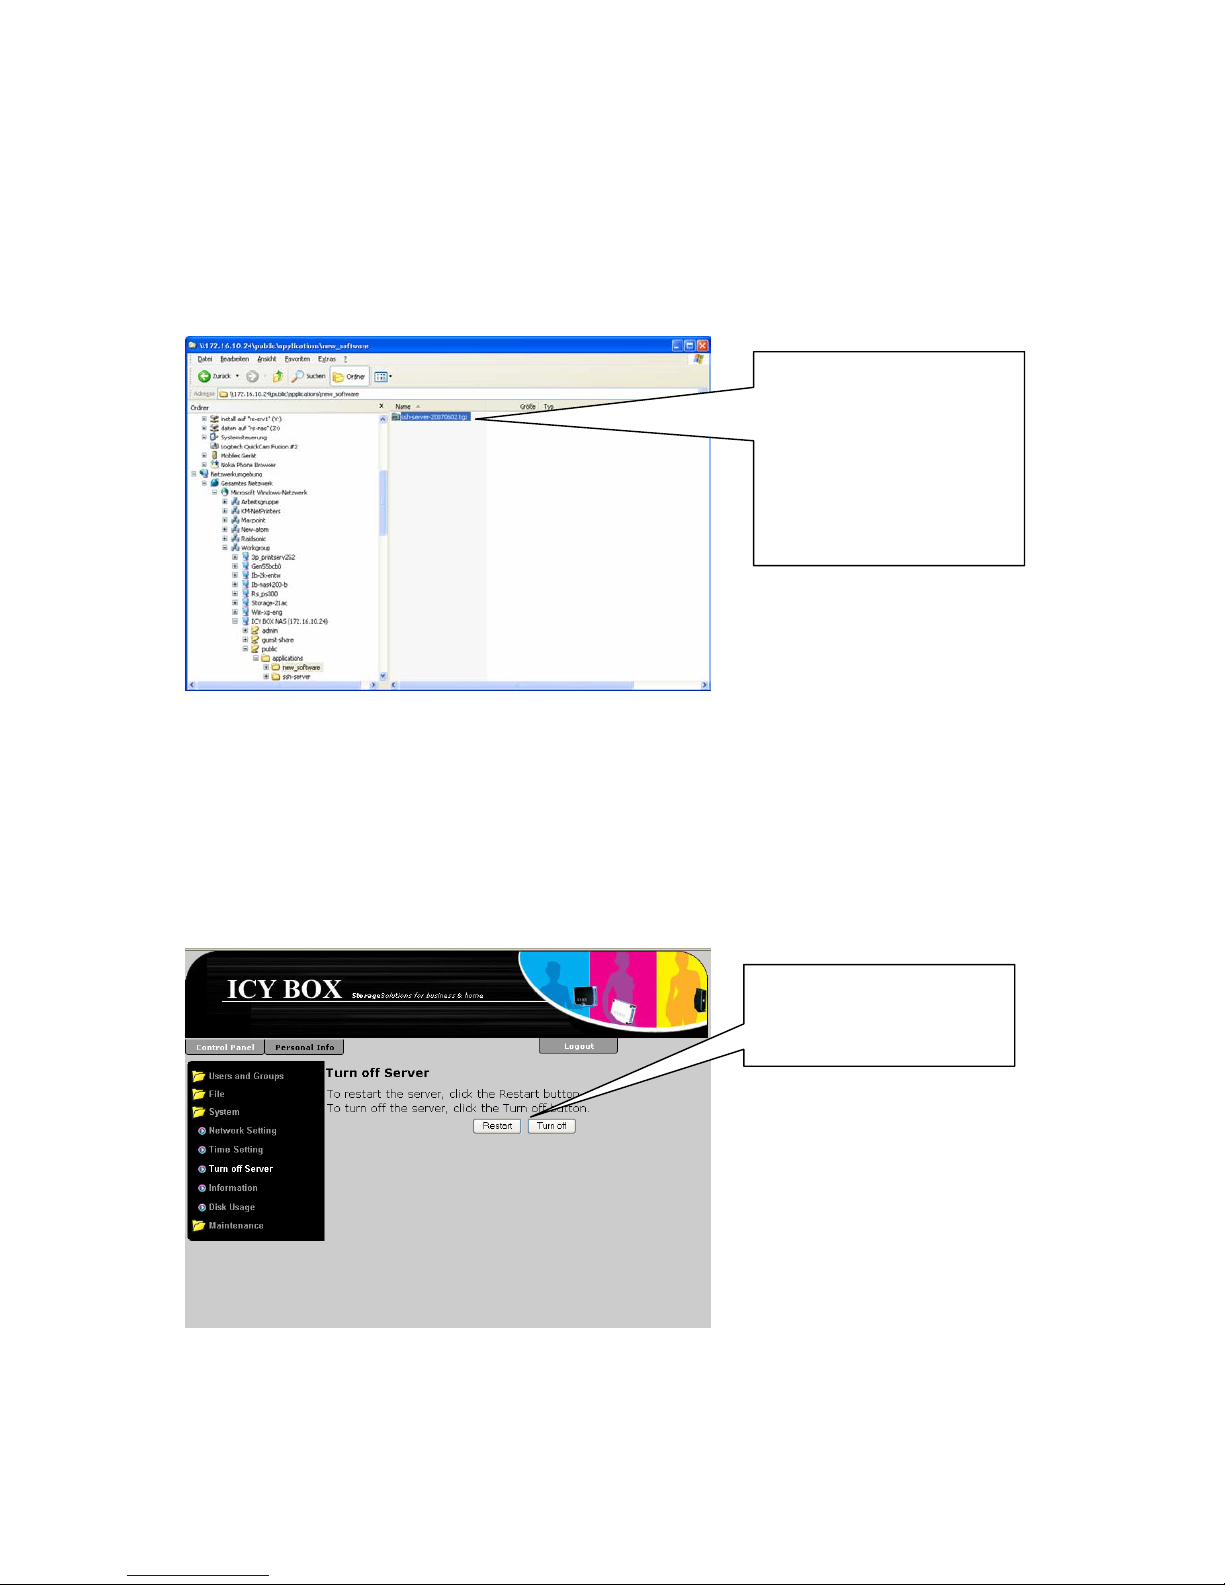
The installation of an application is pretty simple. The referring installation file has just to
be copied in the “new_software” folder in the “applications” folder in the “public” share,
and the IB-NAS has to be rebooted.
Attention: After the upgrade described above the HDD needs to be initialized in
order to grant that the appropriate folders are generated on the HDD.
Copy the installation file
in the „new_software”
folder in the
“applications” folder in
the “public” share and
restart the IB-NAS
afterwards
Attention: After the installation of packages like the SSH server is it possible that
the restart may take longer, because some keys for the strong
encryption have to be generated.
To restart the system is done via the menu item "Turn Off Server":
Control Panel
System
Turn off Server
To restart or turn off the
IB-NAS2000, please click
on the referring button
In most cases, the application will integrate itself in seamlessly in the menu structure of
the management surface. For a detailed description please view the documentation along
the referring application.
59
Page 60
Mapping shares and Printers
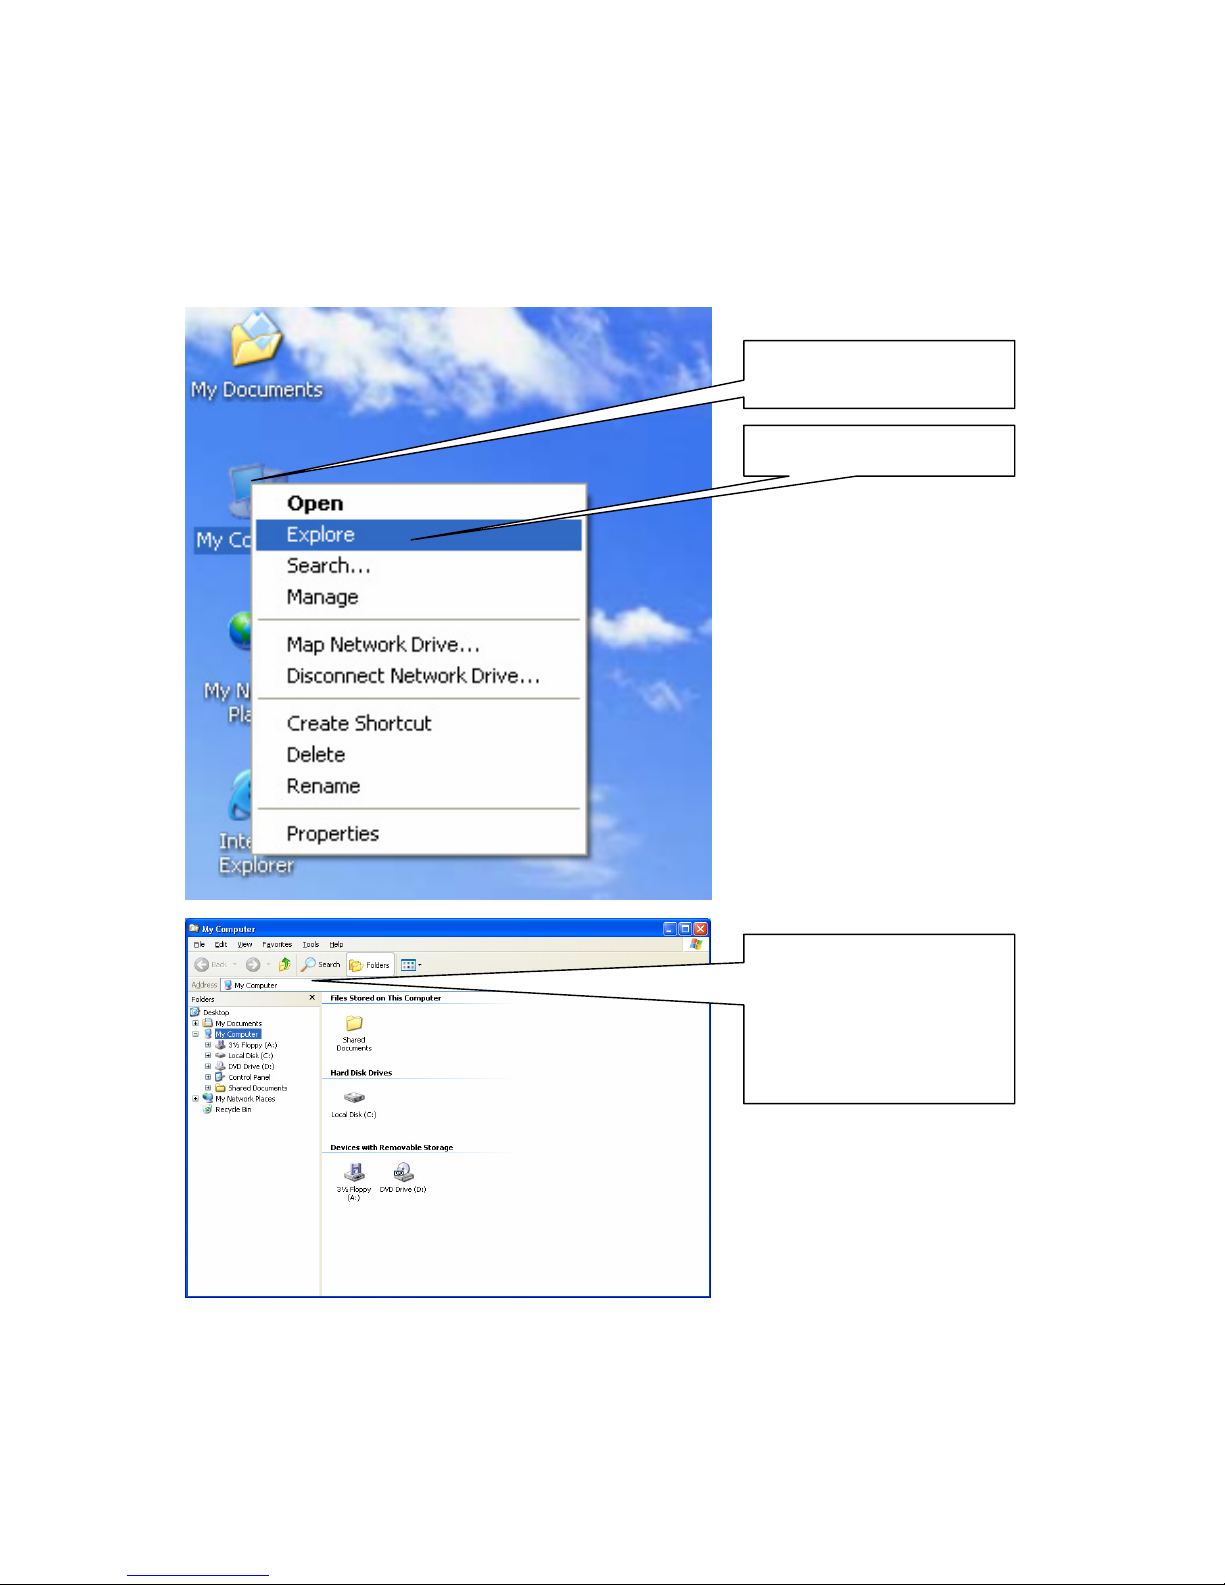
Mapping Windows shares in Windows
To access the IB-NAS2001 shares in windows proceed as described below:
Click on “Explore”
Right click on “My
Computer”
Enter “\\icybox” in the
address line of the
Windows Explorer, where
icybox is the name of the
IP-NAS1000 and hit “”
(Return Key).
60
Page 61
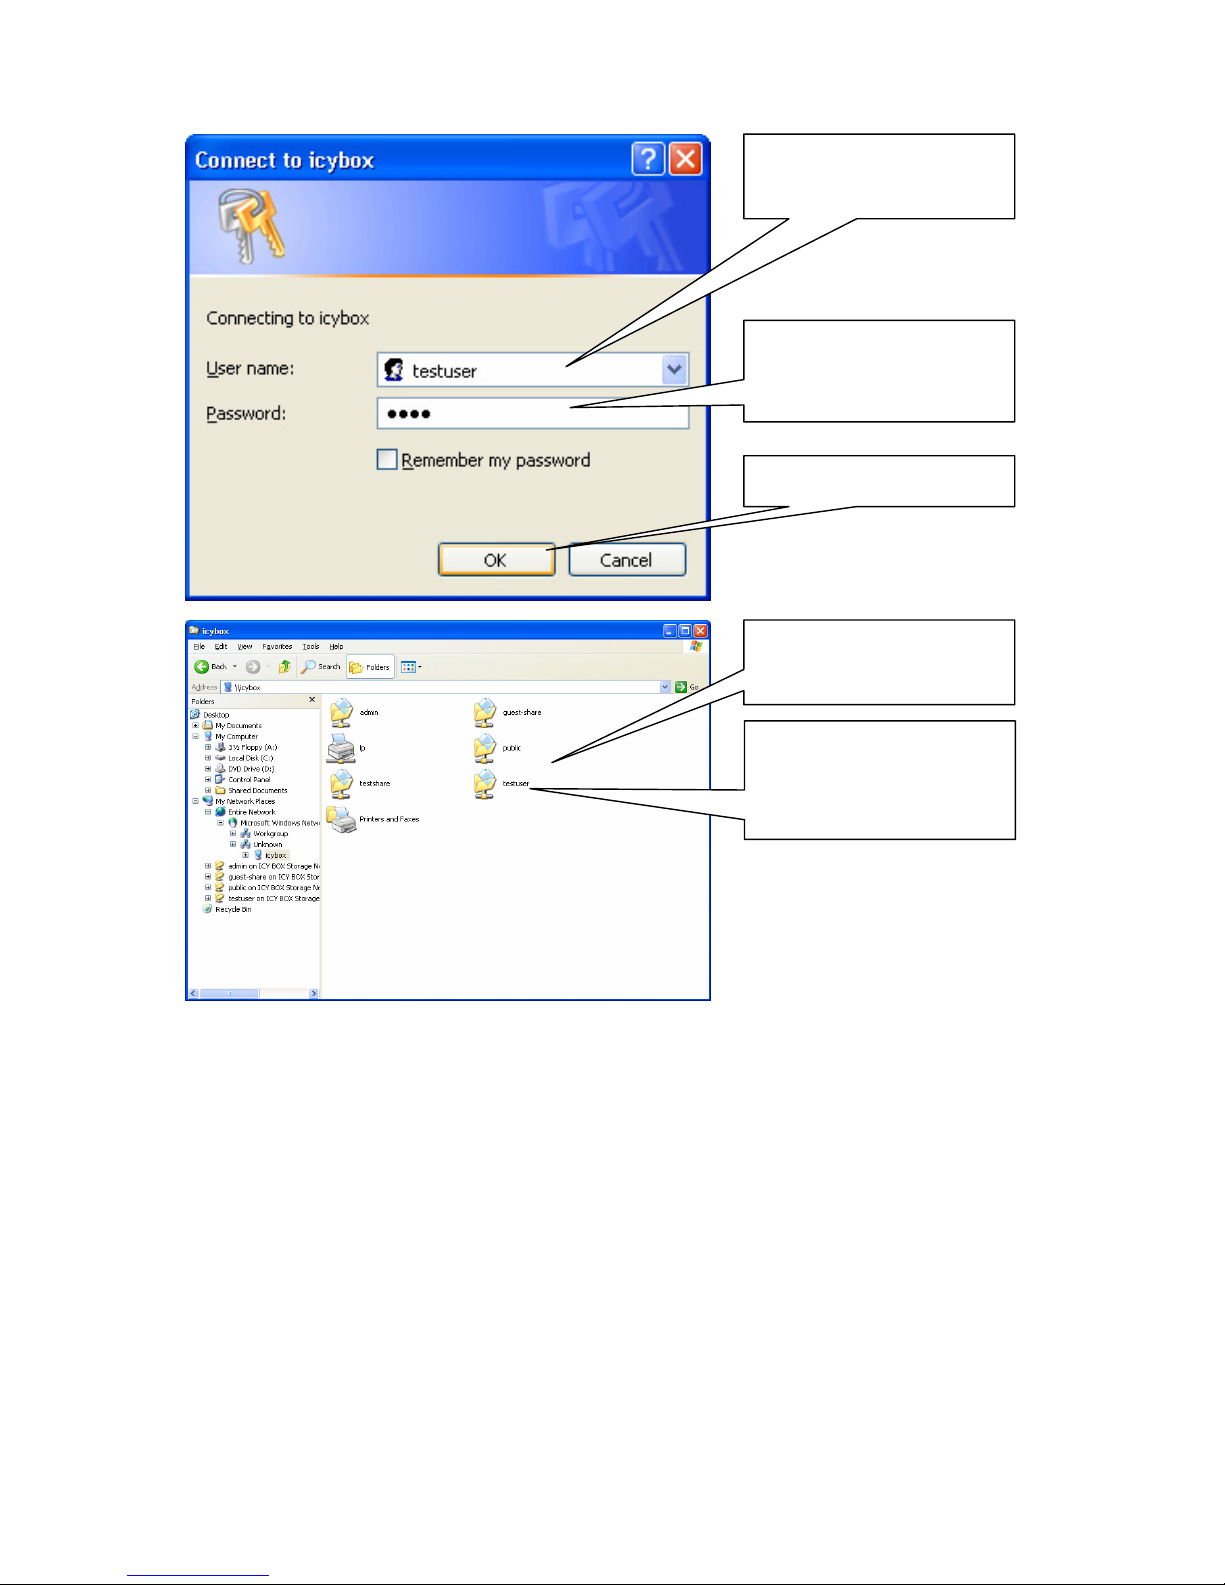
Click on “OK”
Enter the referring
password defined while
creating a new user here
Enter the user name
defined while creating a
new user here
To map this share now
permanently to the local
computer, right click on
it
All shares offered by the
IB-NAS2000 are now
listed here
61
Page 62
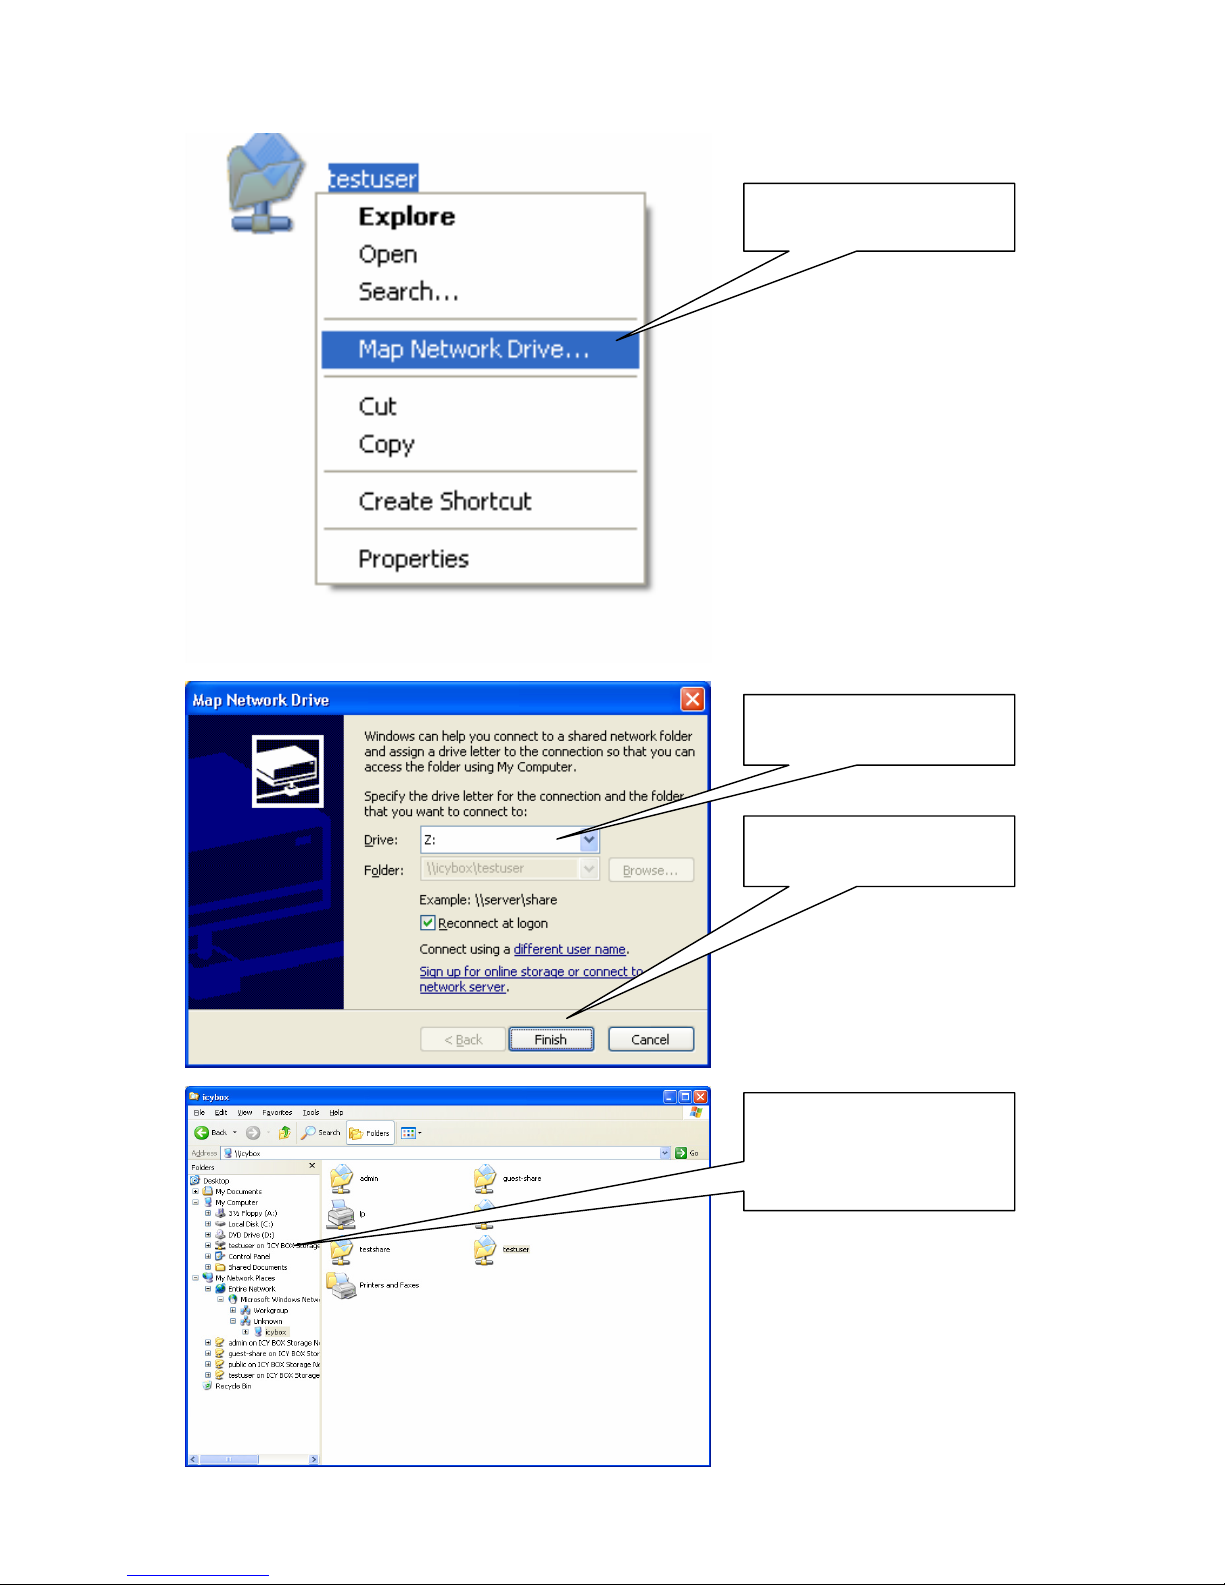
Click on
“Map Network Drive…”
62
From now on you can
find and access the share
here via the Letter
assigned to
Click on “Finish” to
complete the mapping
Select the letter you
want to map the share to
Page 63

63
Mapping the printer in Windows
To map the printer in Windows go Click on “Start” and selec t “Printers and Faxes”.
Select “Add a printer”
Click on “Next >”
Page 64
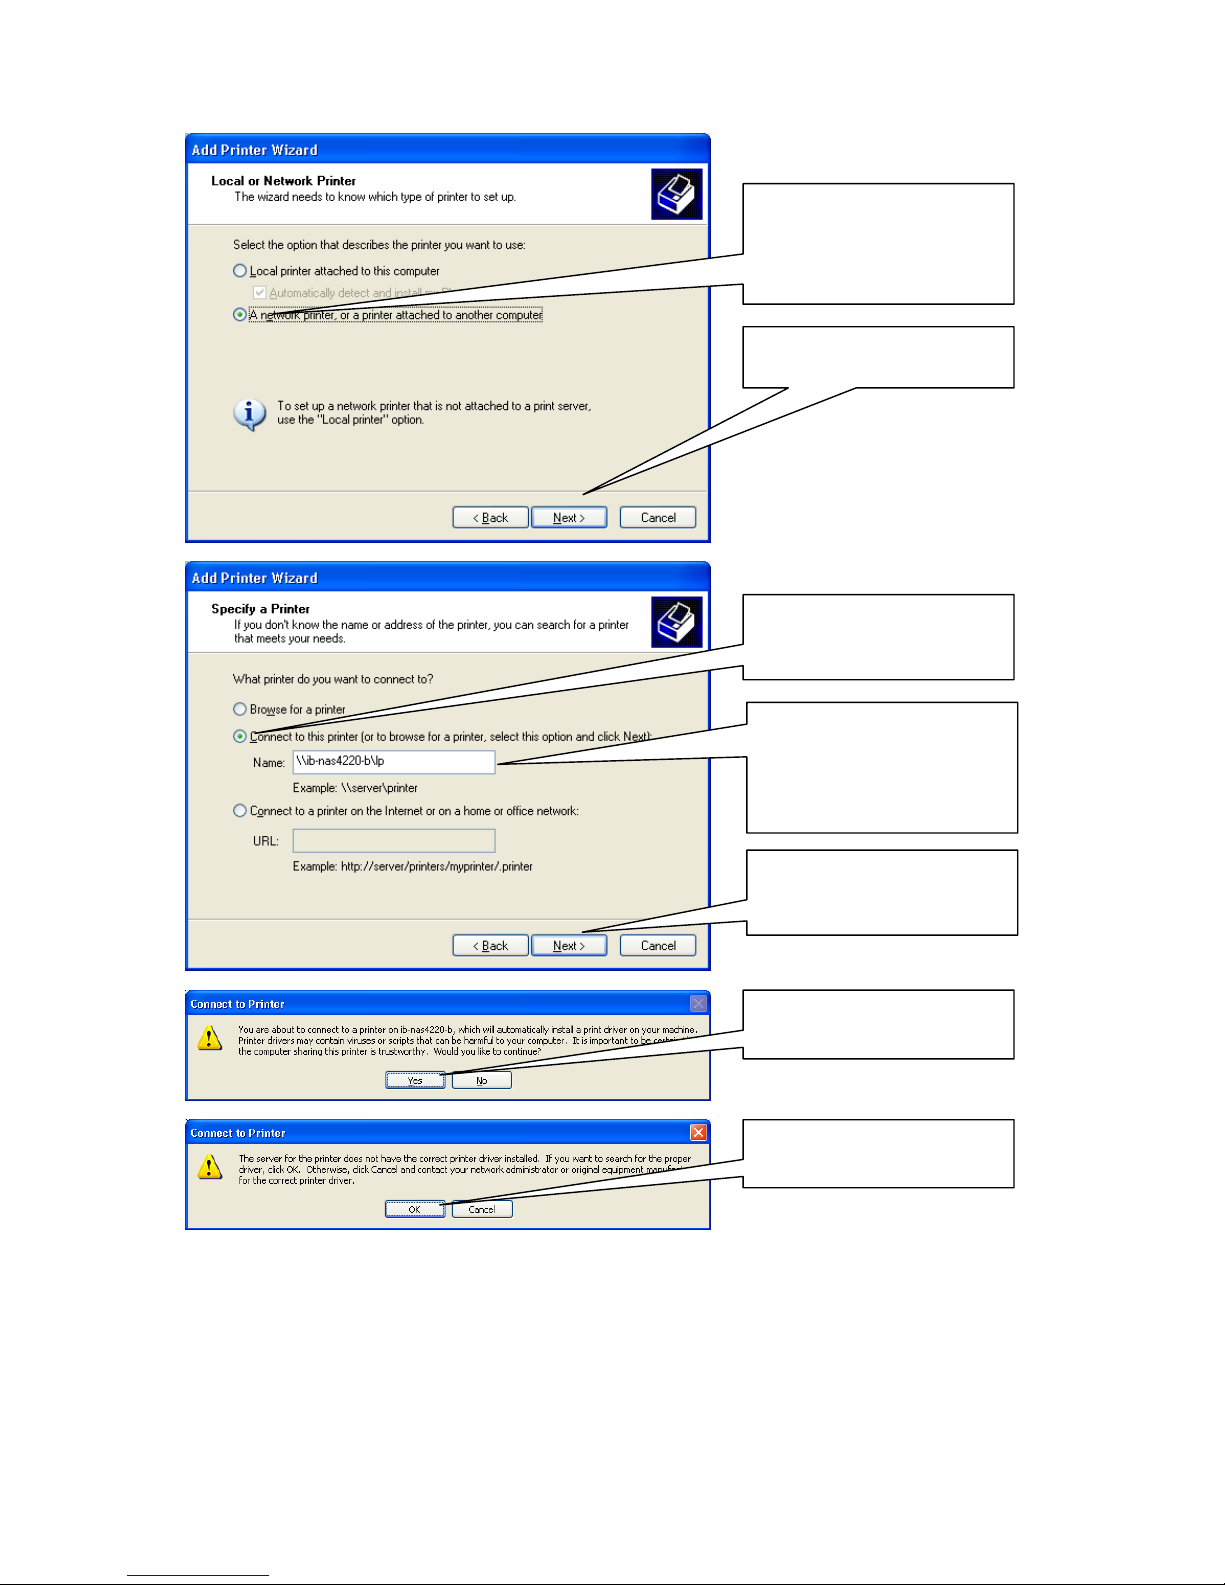
64
Click on “OK”
Click on “Yes”
Select “Connect to this
printer…”
Enter “\\icybox\lp”,
where icybox is the
name of the NAS
Select “Next >”
Sel
printer, or a printer
attached to another
computer”
Click on “Next”
ect “A network
Page 65

65
Now the printer is installed and can be uses as directly attached to the computer. Repeat
this procedure on all computers in your local network and yo nter from
all computers at the same time.
Click on “Finish”
Select a printer from the
dialogue or …
… select “Have Disk…” to
select a driver from a
disc
Click on “OK”
u can use the pri
Page 66
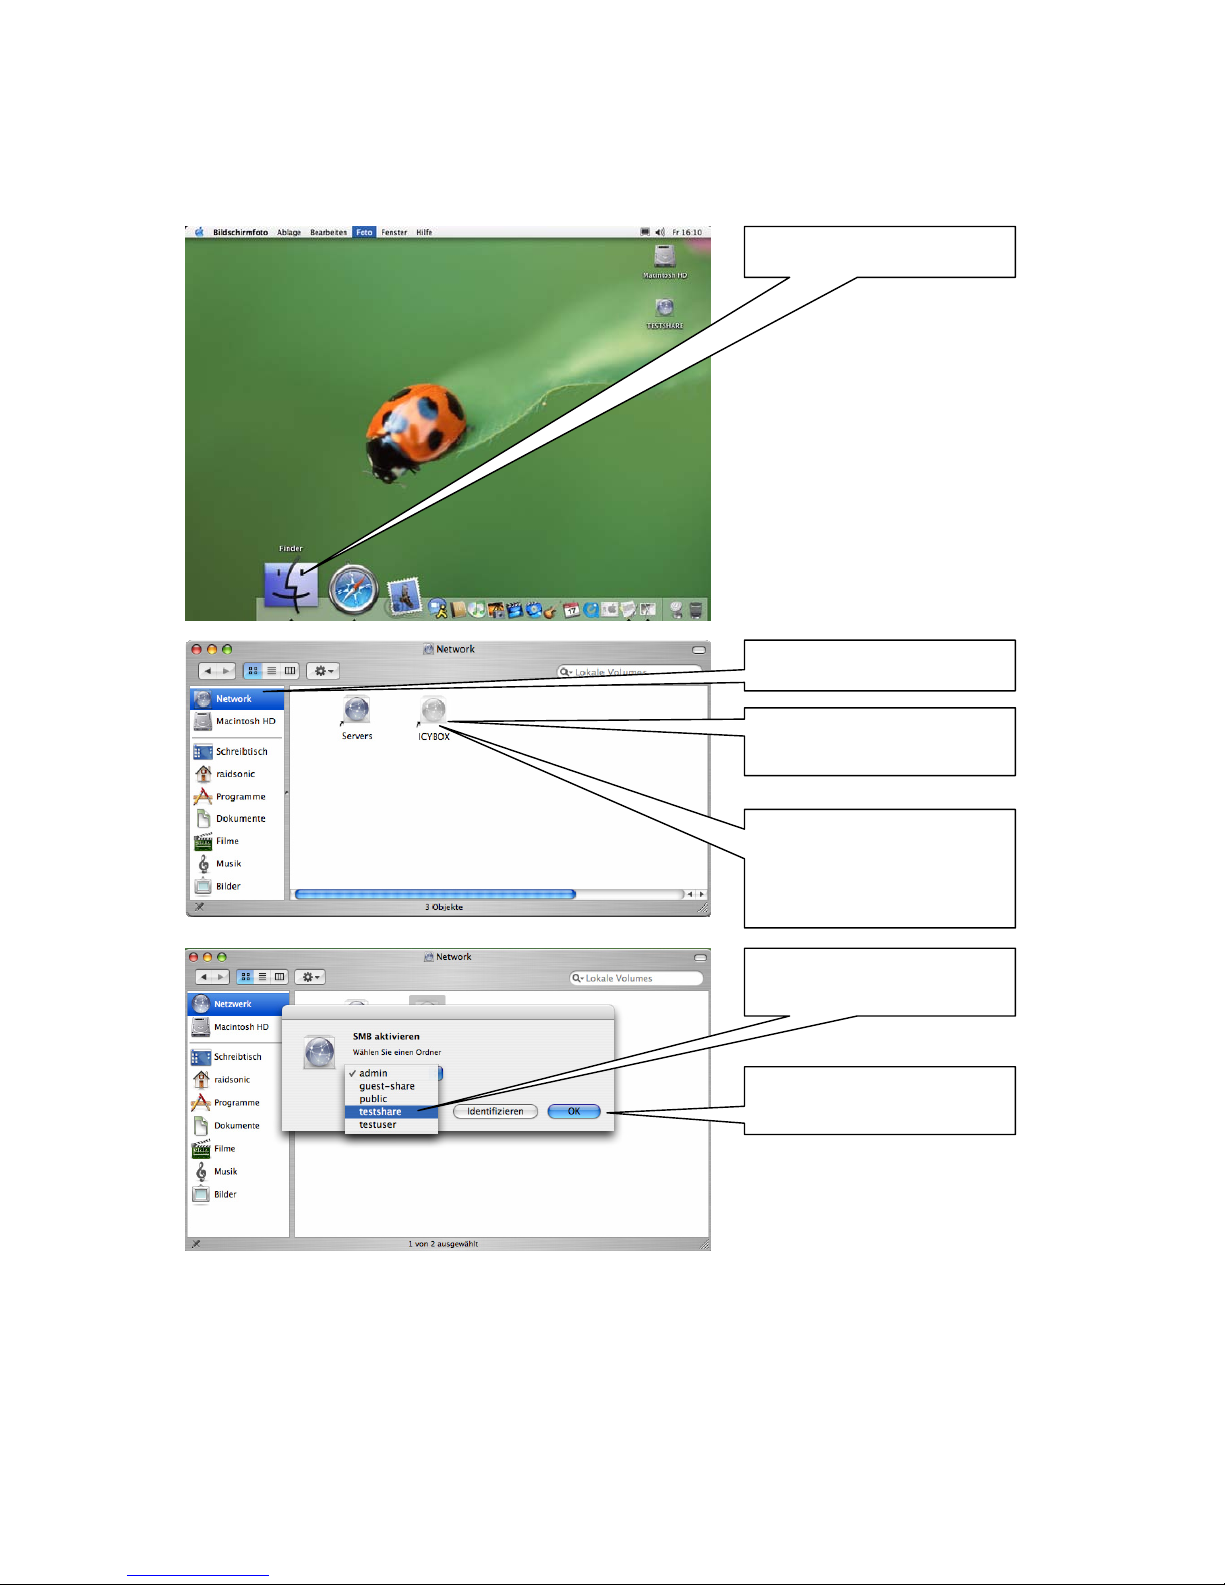
Mapping Windows shares on Mac OS X
To map windows shares on Mac OS X proceed as described below:
Open the Finder
The IB-NAS2001 is
displayed with its name
Double click on
“ICYBOX”, where ICYBOX
it the name of theIBNAS2001
Select “Network”
Click “OK” to complete
the mapping
Select the share you
want to map
66
Page 67

The share is now
accessible on the desk
top
Mapping the Printer on Mac OS X
Open the “Printer Setup Utility” by selecting the Menu “Go” and than “Utilities”:
Open „Printer Setup
Utility“
Click on “Add”
Click on “OK”
67
Page 68

Select the workgroup
name of the
IB-NAS2001, default:
“WORKGROUP”
Select “icybox” where
icybox is the name of
your IB-NAS2001
Select the printer model
Select
“Windows Printing”
Click on “Choose”
Click on “OK”
Enter user name and
password of a user
defined for the
IB-NAS2001
The printer connected
with the IB-NAS2001 is
now added to the
printers of the Mac
68
Page 69

69
Mounting Windows shares in Linux
To mount the windows shares in Linux open a shell and type (<IP Address>= IP Address
of the IB-NAS2001,
<share>=Windows share of the IB-NAS2001, <user>=username,
<pass>= password, <mountpoint>= path of the mount directory):
mount –t smbfs //
<IP Address>/<share> <mountpoint> –o
username=
<user>,password=<pass>
or equivalent is:
smbmount //
<IP Address>/<share> <mountpoint> –o
username=
<user>,password=<pass>
Mounting NFS shares in Linux
To view the possible NFS shares in Linux open a shell and type (<IP Address>= IP
Address of the IB-NAS2001):
showmount –e
<IP Address>
To mount a share open a shell and type (
<IP Address>= IP Address of the IB-NAS2001,
<share>=share of the IB-NAS2001):
mount –t nfs
<IP Address>:<share> <mountpoint>
Page 70

Benchmark Conditions RaidSonic IB-NAS1000, IBNAS4220-B, IB-NAS2000, IB-NAS2001 Firmware
You may conduct internal benchmark testing of the firmware of the models IB-NAS1000,
IB-NAS4220-B, IB-NAS2000 and IB-NAS2001. You may disclose the results of any
benchmark test of the of the firmware of the models IB-NAS1000, IB-NAS4220-B, IBNAS2001 and IB-NAS2000, provided that you comply with the following terms: (1) you
must disclose all the information necessary for replication of the tests, including complete
and accurate details of your benchmark testing methodology, the test scripts/cases,
tuning parameters applied, hardware and software platforms tested, the name and
version number of any third party testing tool used to conduct the testing, and complete
source code for the benchmark suite/harness that is developed by or for you and used to
test both the RaidSonic Products and the competing implementation(s); (2) you must
disclose the date(s) that you conducted the benchmark tests, along with specific version
information for RaidSonic products tested, including the firmware version; (3) your
benchmark testing was performed using all performance tuning and best practice
guidance set forth in the product documentation and/or on RaidSonic support web sites,
and uses the latest updates, patches and fixes available for the RaidSonic product and
the relevant operating systems; (4) it shall be sufficient if you make the disclosures
provided for above at a publicly available location such as a website, so long as every
public disclosure of the results of your benchmark test expressly identifies the public site
containing all required disclosures; and (5) nothing in this provision shall be deemed to
waive any other right that you may have to conduct benchmark testing. The foregoing
obligations shall not apply to your disclosure of the results of any customized benchmark
test of the RaidSonic Product, whereby such disclosure is made under confidentiality in
conjunction with a bid request by a prospective customer, such customer’s application(s)
are specifically tested and the results are only disclosed to such specific customer.
Notwithstanding any other agreement you may have with RaidSonic, if you disclose such
benchmark test results, RaidSonic shall have the right to disclose the results of
benchmark tests it conducts of your products that compete with the RaidSonic Product,
provided it complies with the same conditions above.
Manufactured for:
RaidSonic Technology GmbH
Kurt-Fischer-Straße 50
D-22926 Ahrensburg
Germany
www.raidsonic.de
© 2007 RaidSonic Technology GmbH, Ahrensburg, Germany
70
Page 71
Version D 1.8.13
Page 72

2
Inhalt
Inhalt ................................................................................................................. 2
Einführung.......................................................................................................... 4
Was ist NAS? .................................................................................................... 4
Samba (Windows)........................................................................................... 4
FTP...............................................................................................................5
NFS .............................................................................................................. 5
Mehr als NAS .................................................................................................... 5
Printserver..................................................................................................... 6
UPnP-AV........................................................................................................ 7
Bonjour und iTunes Support ............................................................................. 8
Lieferumfang ...................................................................................................... 8
Das Äußere des IB-NAS2001 .............................................................................. 9
Die Frontansicht ................................................................................................ 9
Rückseite ....................................................................................................... 10
Montage ........................................................................................................... 11
Gebrauch als externes Festplattenlaufwerk...................................................... 11
First come – first serve..................................................................................... 11
Zugriff auf die Managementoberfläche............................................................. 12
DHCP gesteuerte Netzwerkkonfiguration mit automatischem DNS Update................ 12
DHCP gesteuerte Netzwerkkonfiguration ohne automatisches DNS update ............... 13
Nicht konfiguriertes Netzwerk / direkt angeschlossen............................................ 14
Mit festen IP-Adressen konfiguriertes Netzwerk.................................................... 15
Gebrauch der Managementoberfläche .............................................................. 18
Anmelden....................................................................................................... 18
Struktur der Managementoberfläche................................................................... 19
Initialisierung der Festplatte............................................................................ 19
Auswahl des passenden Filesystems................................................................... 20
Fähigkeit der Betriebsysteme auf Filesysteme zuzugreifen .................................. 20
Filesystem Fähigkeiten .................................................................................. 20
Filesystem Begrenzungen............................................................................... 21
Disk Utility...................................................................................................... 21
Ändern des Administrator Kennwortes............................................................. 26
Verwalten von Benutzern und Gruppen ............................................................ 26
Benutzerverwaltung (User Management)............................................................. 27
Einen neuen Benutzer erzeugen...................................................................... 27
Ändern der Benutzereinstellungen................................................................... 29
Einen Benutzer löschen.................................................................................. 29
Einen existierenden Benutzer einer oder mehreren Gruppen zuordnen.................. 30
Einen Benutzer aus einer oder mehreren Gruppen entfernen............................... 32
Gruppenverwaltung (Group Management)........................................................... 33
Eine neue Gruppe anlegen ............................................................................. 34
Eine Gruppe löschen...................................................................................... 35
Einen oder mehrere Benutzer zu einer Gruppe hinzufügen .................................. 36
Einen oder mehrere Benutzer von einer Gruppe entfernen .................................. 37
Fileserver- und Freigabenverwaltung (Share Management) ............................. 37
Fileserver Verwaltung (File Server) .................................................................... 37
Windows Setting........................................................................................... 38
FTP Server Setting ........................................................................................ 39
NFS Server Setting ....................................................................................... 39
Guest Access Setting..................................................................................... 39
Freigabenverwaltung (Share Management) ......................................................... 41
Anlage einer neuen Freigabe (Share)............................................................... 42
Löschen einer Freigabe (Share) ...................................................................... 42
Definition der Windows und FTP Zugangsbeschränkungen für eine Freigabe (Share)43
Page 73

3
NFS Zugriffsrechte verwalten.......................................................................... 45
Systemeinstellungen ........................................................................................ 47
Netzwerkeinstellungen ..................................................................................... 48
Zeiteinstellungen............................................................................................. 48
Neustart oder Ausschalten des IB-NAS2001 ferngesteuert..................................... 49
Systeminformationen ....................................................................................... 50
Festplattenbelegung (Disk Usage)...................................................................... 50
Netzwerk Dienste (Network Service) ............................................................... 51
DHCP Server................................................................................................... 52
Automatische DHCP Konfiguration................................................................... 52
Manuelle DHCP Konfiguration ......................................................................... 53
Printer Server ................................................................................................. 54
Bonjour (einschließlich iTunes Support) .............................................................. 54
Twonky Media................................................................................................. 55
Twonky Media installieren .............................................................................. 55
Aktivieren / Deaktivieren von Twonky Media..................................................... 56
Verwaltung (Maintenance)............................................................................... 57
Firmware-Upgrade........................................................................................... 58
Sichern und Wiederherstellen der Einstellungen ................................................... 59
Sichern der Einstellungen (Save configuration) ................................................. 59
Wiederherstellen der Einstellungen (Restore Configuration)................................. 60
Rücksetzen in den Auslieferungszustand (Factory Reset)....................................... 60
USB-Sticks und USB-Festplatten....................................................................... 61
Unterstützte Dateisysteme ............................................................................. 61
USB Zugriff über das Netzwerk.......................................................................... 61
Erweiterungen.................................................................................................. 61
Installation einer Applikation ............................................................................. 62
Netzlaufwerke und Drucker verbinden ............................................................. 63
Netzlaufwerke (Freigaben) in Windows verbinden................................................. 63
Drucker in Windows verbinden .......................................................................... 66
Windows Freigaben auf MAC OS X verbinden....................................................... 69
Drucker unter Mac OS X einbinden..................................................................... 70
Windows Freigaben unter Linux mounten............................................................ 72
NFS Freigaben unter Linux mounten................................................................... 72
Lizenzbedingungen für Vergleichstests RaidSonic IB-NAS1000, IB-NAS4220-B,
IB-NAS2000 Firmware
...................................................................................... 73
Page 74

Einführung
Was ist NAS?
NAS ist die Abkürzung für “Network Attached Storage” und wird gebraucht um Geräte zu
bezeichnen, die Massenspeicher in einem Netzwerk anbieten. SOHO NAS wie das IBNAS2001 sind kleine Geräte, die Daten von einer Festplatte im Netz zur Verfügung stellen. Es gibt nun einige Ansätze für diese Problemstellung. Einige nutzen spezielle proprietäre Methoden den Speicherplatz im Netzwerk anzubieten. Dieser Ansatz benötigt spezielle Software, die auf den Clients installiert werden muss, was sie in den meisten Fällen
auf ein bestimmtes Betriebsystem beschränkt.
Das IB-NAS2001 hat nun einen Weg gewählt, den die üblichen Betriebssysteme natürlicherweise erwarten. Das heißt, dass es dasselbe Prinzip (Protokoll) verwendet Speicherplatz bereit zu stellen, wie es üblicherweise Fileserver tun, aber leiser, stromsparender
und viel einfacher. Der Hauptvorteil besteht nun darin, dass so keine proprietäre Software zum Zugriff auf die Daten benötigt wird und die betriebssystemeigenen Sicherheitsmechanismen zum Einsatz kommen wie Benutzer und Gruppen basierte Zugangskontrolle.
Samba (Windows)
4
c
Netzwerk
Der Samba Server, der im IB-NAS2001 implementiert ist, bietet Speicher in der Weise
an, wie es reguläre Windows Netzlaufwerke tun (gemeinhin als SMB oder CIFS Protokoll
bekannt). Auch Betriebssysteme wie das MAC OS oder Linux sind in der Lage, auf diese
Art des Netzwerkspeichers zuzugreifen. Das bietet ein Maximum an Sicherheit, durch die
Möglichkeit den Zugriff auf bestimmte Benutzer oder Gruppen zu beschränken.
Page 75

FTP
Netzwerk
Router
Das FTP Protokoll ist eine der ältesten Arten der Dateiübertragung im Internet. Es ist
schnell und bietet einen einfachen Zugriff auf die Festplatte auch über das Internet. Es
existiert eine große Menge an Softwareclients auch für die exotischsten Betriebssysteme,
die dieses einfache aber schnelle Protokoll verwenden. Die meisten Internet Access Router, die in kleinen Netzen und Zuhause zum Einsatz kommen, bieten einen Mechanismus
an, der Port Forwarding (Virtual Server, etc.) genannt wird und auf einfache Weise dazu
verwendet werden kann den Speicherplatz des IB-NAS2001 dem Internet zur Verfügung
zu stellen. Das FTP Protokoll bietet ebenfalls Benutzer und Gruppen basierte Zugriffskontrolle.
NFS
In der Unixwelt ist das NFS Protokoll weit verbreitet um Festplattenplatz im Netzwerk
gemeinsam zu Nutzen. Dieses Protokoll kann dazu verwendet werden um in natürlicher
Weise Netwerkspeicher allen arten von Unix basierten Betriebssystemen zur Verfügung
zu stellen. Die Zugriffskontrolle ist begrenzt auf die Definition von einzelnen oder ganzen
Bereichen von IP-Adressen (Hostadressen).
Mehr als NAS
Das IB-NAS2001 ist nicht nur ein einfach zu bedienendes Netzwerkspeichergerät. Es hat
eine echte Doppelfunktion. Es bietet einen kompletten USB 2.0 Festplattenchipsatz und
somit mehr Flexibilität. Der Anwender hat die Möglichkeit es, wo immer eine Netzwerkinfrastruktur zur Verfügung steht, als NAS zu Nutzen oder es mit Hilfe der viel schnelleren
USB 2.0 Schnittstelle als konventionelles externes Speichergehäuse zu betreiben. Das
doppelfunktionale Design ermöglicht ein Maximum an Flexibilität die Daten auf der ICY
BOX wann immer und wo immer zu nutzen.
USB
5
Page 76

Aber das IB-NAS2001 ist mehr. Sie können via Netzwerk drucken oder, wenn sie Musik,
Bilder oder Videos über ihr Netzwerk zuhause übertragen wollen, dies mit dem UPnP-AV
Protokoll direkt mit ihrem Netzwerkmediaplayer tun.
Und wenn das immer noch nicht reicht: Das IB-NAS2001 kann beliebig um weitere Applikationen erweitert werden.
Printserver
Netzwerk
Sie können ihren Drucker an das IB-NAS2001 anschließen und den Drucker über das
Netzwerk von verschiedenen Computern aus gemeinsam nutzen.
6
Page 77

UPnP-AV
Netzwerk
Der im Lieferumfang enthaltene Twonky Media Server (30 Tage Testversion) passt diesen
Standard an so viele Netzwerkmediaplayer wie möglich an. Der Twonky Media Server
wird von Twonky Vision mehrmals im Jahr auf den neuesten Stand gebracht, um die
Kompatibilität mit möglichst vielen Playern zu gewährleisten. Deshalb ist der Twonky
Media Server nicht fest in der Firmware des IB-NAS2001 integriert, um dem Anwender
die Gelegenheit zu geben, den Server auf die neueste Version aufzurüsten. Eine permanente Lizenz kann auf der Webseite von Twonky Media erworben werden, auf die ein Link
von der Benutzeroberfläche des Twonky Media Servers führt.
7
Page 78

Bonjour und iTunes Support
Netzwerk
Das IB-NAS2001 ist in der Lage seine Netzwerkdienste per Bonjour zu annoncieren, so
dass MAC Computer leichter die Verbindung zum IB-NAS2001 herstellen können. Dank
des iTunes Supports können Multimediadateien von überall im lokalen Netzwerk per iTunes abgespielt werden.
Erweiterbarkeit
Das IB-NAS2001 kann beliebig über das Installieren von weiteren Softwarepaketen um
weiter Applikationen erweitert werden. Im Gegensatz zu geschlossenen Systemen der
meisten anderen Hersteller ist das IB-NAS2001 dadurch zukunftssicher und offen für
neues.
Lieferumfang
• IB-NAS2001
• CD-ROM
• Gebrauchsanleitung
• IDE-SATA Konverter
• RJ-45 Netzwerkkabel
• USB Kabel
• Stromadapter
8
Page 79
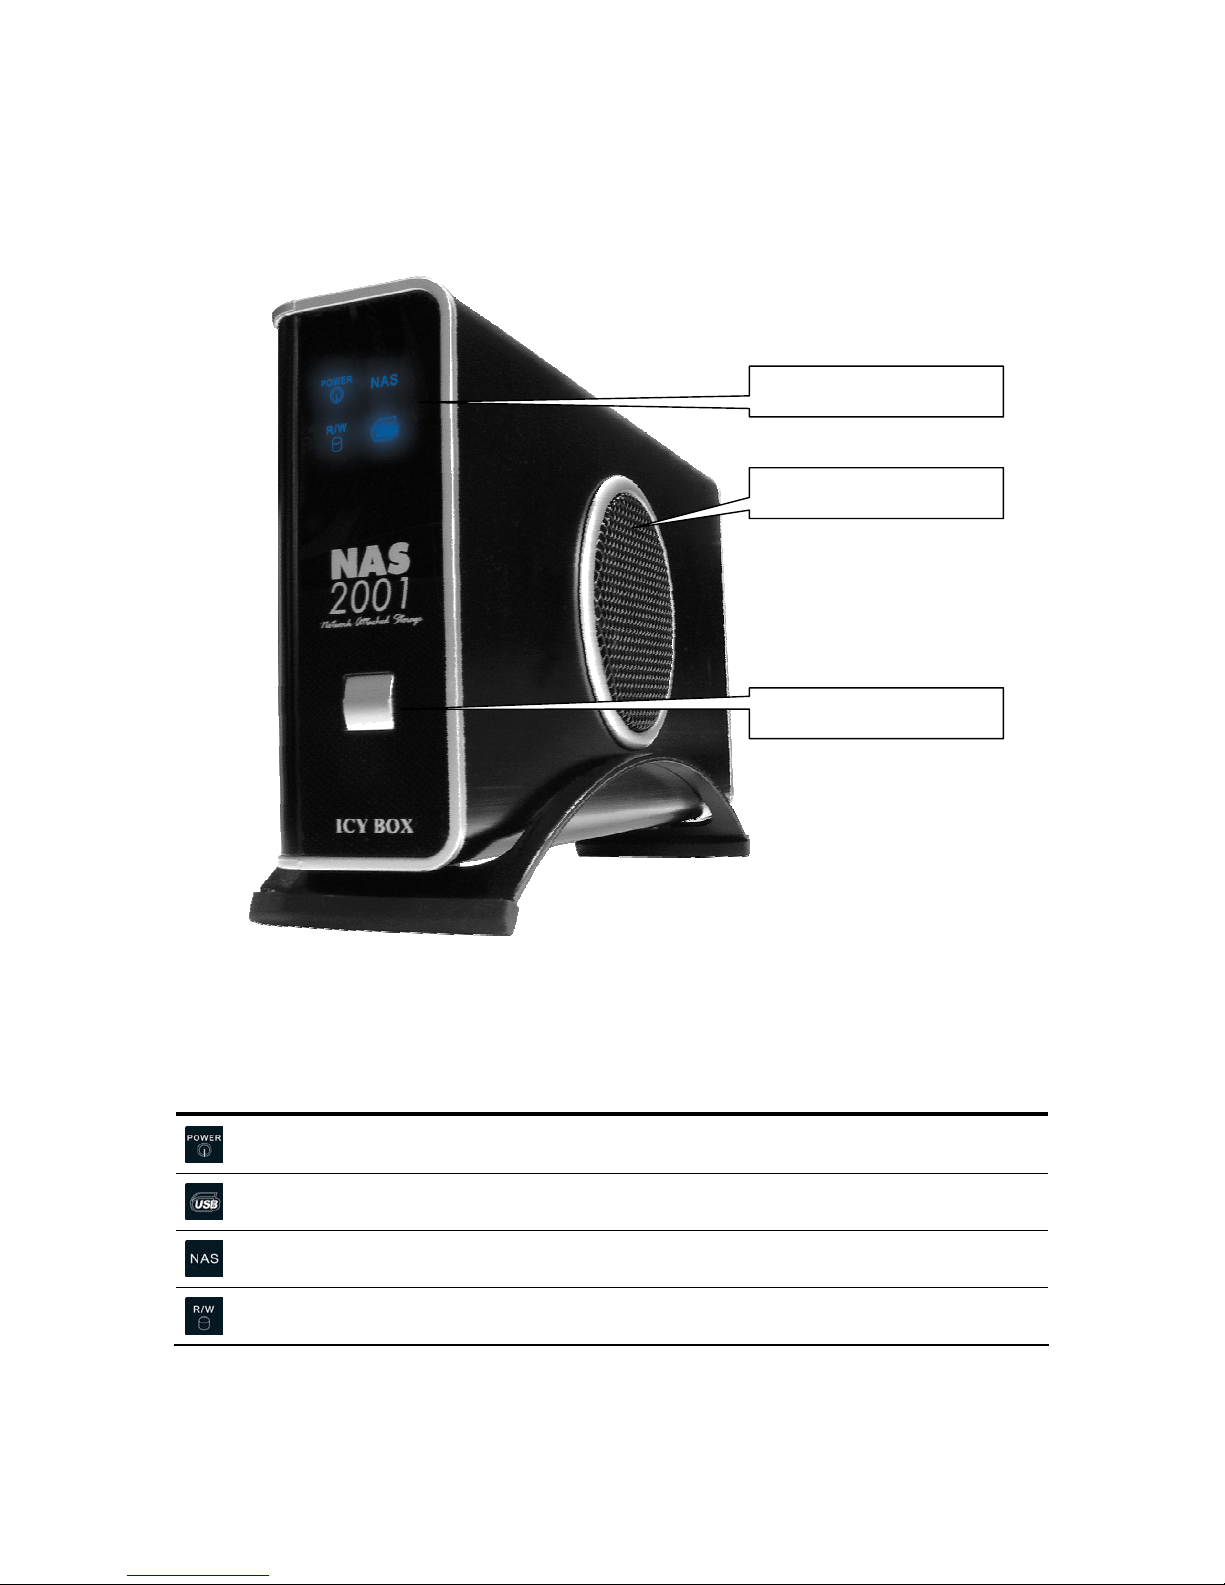
Das Äußere des IB-NAS2001
Die Frontansicht
Lüfter
Anzeige LEDs
Ein-/Ausschalter
Auf der Frontseite des IB-NAS2001 befindet sich der Schalter zum Ein- bzw. Ausschalten
des Geräts. Außerdem noch in einer Ecke die LEDs zur Anzeige der wichtigsten Betriebszustände.
LED Beschreibung
Stromnetz
NAS Modus
USB Modus
Festplattenzugriff
9
Page 80

Rückseite
USB Schnittstelle zum PC
USB Hostschnittstelle
Stromadapteranschluss
Netzwerk Schnittstelle
Knopf zum Rücksetzen in
den Auslieferungszustand. Vorsicht: Alle
Daten gehen verloren!
10
Page 81
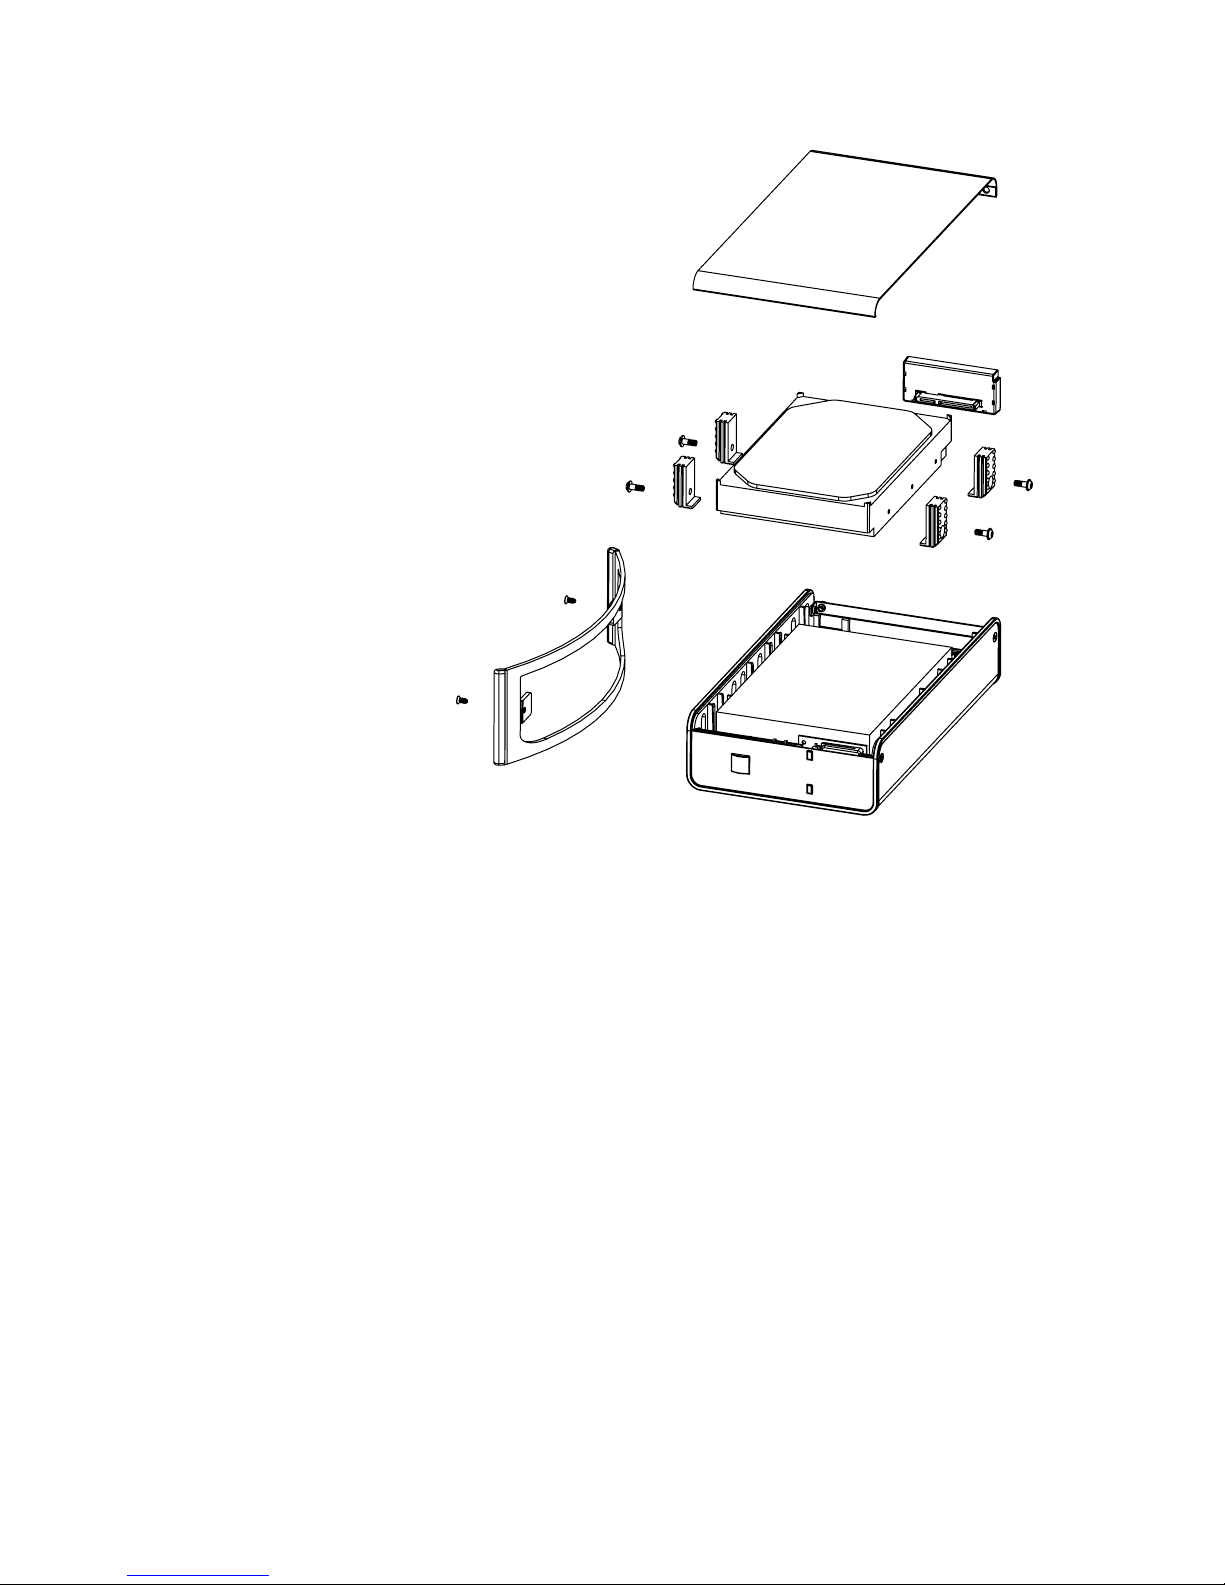
Montage
1. Ständer abschrauben
2. Seitenabdeckung abschrauben
3. Seitenabdeckung abheben
4. Gummihalter an Festplatte schrauben
5. Festplatte in Gehäuse schieben
6. Verbinden:
6.1. SATA Konverter
6.2. IDE Kabel und Stromkabel
7. Seitenabdeckung wieder auf das Gehäuse
schrauben
8. Ständer wieder festschrauben
9. Verbinden mit:
9.1. Dem USB Port eines Computers über das
USB Kabel
9.2. Dem Netzwerk durch Verbindung
des RJ-45 Kabels mit einem
Computer oder einem HUB
Gebrauch als externes Festplattenlaufwerk
First come – first serve
Um das ICY BOX IB-NAS2001 als externes Festplattenlaufwerk zu nutzen muss es lediglich über die USB Schnittstelle angeschlossen und eingeschaltet werden. Ob das IBNAS2001 als externes Festplattengehäuse oder als NAS arbeitet wird dadurch entschieden, welche Schnittstelle angeschlossen ist, wenn das IB-NAS2001 eingeschaltet wird.
Achtung: Nicht die USB und die Netzwerkschnittstelle gleichzeitig verwenden!
Wenn das IB-NAS2001 mit der USB Schnittstelle verbunden ist und eingeschaltet wird,
arbeitet es als externes Festplattengehäuse.
Achtung: Um sicherzustellen, dass das IB-NAS2001 sowohl als externes
Festplattengehäuse und als NAS verwendet werden kann, ist es
notwendig, dass die enthaltene Festplatte im NAS Modus des IBNAS2001 initialisiert und formatiert wird, wie in Punkt
“Initialisierung der Festplatte” auf Seite 19 beschrieben. Das ist
notwendig, weil der NAS Modus 2 zusätzliche reservierte Partitionen benötigt, die während dieses Prozesses angelegt werden. Um mit einem
Windows Computer via auf die Datenpartition schreiben zu können
muss, diese mit FAT32 formatiert sein.
11
Page 82

12
Wenn das IB-NAS2001 mit einem Windows System verbunden ist, sind die ersten beiden
Partitionen, die mit dem NAS Einrichtungsprozess erzeugt werden, nicht sichtbar, da sie
mit einem Dateisystem formatiert sind, dass Windows nicht lesen kann.
Achtung: Der Inhalt der ersten beiden Partitionen, die mit dem NAS Einrichtungs-
prozess erzeugt wurden, darf nicht manuell verändert werden um die
ordnungsgemäße Funktion des IB-NAS2001 im NAS Modus zu gewährleisten.
Um vom NAS Modus zum externen Festplattenmodus und umgekehrt umzuschalten,
muss das IB-NAS2001 zunächst ausgeschaltet werden, dass alte Schnittstellenkabel getrennt werden, dass neue verbunden werden und dann das Gerät wieder eingeschaltet
werden.
Zugriff auf die Managementoberfläche
Der NAS Modus wird über eine Webbasierte Benutzerschnittstelle kontrolliert, die über
einen Standard Webbrowser erreicht werden kann. In einer normalen Netzwerkumgebung kann das über die Eingabe von „http://icybox“ in der Adresszeile des Webbrowsers
erreicht werden. Ob das funktioniert hängt von der Konfiguration dieser Netzwerkumgebung ab.
Die folgenden Möglichkeiten existieren:
DHCP gesteuerte Netzwerkkonfiguration mit automatischem DNS Update
In einer DHCP1 kontrollierten Netzwerkumgebung wird der ICY BOX IB-NAS2001 die IPAdresse
2
über einen DHCP Server zugewiesen. Wenn der DHCP Server diese Information
automatisch beim zuständigen DNS Server
3
einträgt (siehe RFC 2136) kann das IBNAS2001 einfach durch Eingabe von „http://icybox“ in der Adresszeile des Webbrowsers
erreicht werden. Fortsetzung mit „Gebrauch der Managementoberfläche“ auf Seite 18 um
das IB-NAS2001 einzurichten.
1
DHCP ist eine Abkürzung für „dynamic host configuration protocol“ und bezeichnet einen Vorgang, in dem die notwendigen
Netwerkeinstellungen automatisch von einen speziellen DHCP Server zugewiesen werden. Die meisten DLS Router bieten einen
solchen Dienst an.
2
Eine IP-Adresse is eine 32 bit Binärzahl die meistens durch eine Gruppe von vier Dezimalzahlen zwischen 1 und 255 getrennt
durch punkte dargestellt wird. Sie wird zur Adressierung von Rechnern in einem TCP/IP basierten Netzwerk verwendet.
3
DNS ist die Abkürzung für „domain name service“. Das bezeichnet einen Prozess in dem Internet Namen IP-Adressen zugeordnet werden. Der DNS Server kann mit einem Telefonbuch verglichen werden. Bei DNS Server schlagen alle Internet Applikationen die zu einem Internet Namen gehörige IP-Adresse nach. Ohne diesen Dienst oder wenn der DHCP Server den Internet
Namen nicht kennt kann der Internet Name nicht zur Adressierung verwendet werden. Die einzige Chance dann auf ein Gerät
im Netzwerk zuzugreifen ist, direkt die IP-Adresse zu verwenden.
Page 83

DHCP gesteuerte Netzwerkkonfiguration ohne automatisches DNS update
In einem Netzwerk in dem die Netzwerkkonfiguration über einen DHCP Server vergeben
wird bekommt das IB-NAS2001 die IP-Adresse vom DHCP Server zugewiesen. Wenn der
DHCP Server diese Information nicht bei dem zuständigen DNS Server aktualisiert, funktioniert die notwendige Namensauflösung für „http://icybox“ nicht, denn der DNS Server
hat keine Information über die zugehörige IP-Adresse des IB-NAS2001. Um die IPAdresse des IB-NAS2001 herauszufinden, kann man die UVPnP Unterstützung von Windows aktivieren oder das Programm „SearchNAS.exe“ von der beiliegenden CD benutzen.
Auf „Setup“ Klicken
Auf „Exit“ klicken
Die IP-Adresse des IBNAS2000 wird hier angezeigt
IB-NAS2000 gefunden
Um auf die Management Oberfläche zuzugreifen, nun „http://
<IP-Adresse>“ in die Ad-
resszeile des Standard Webbrowsers eingeben, wobei
<IP-Adresse> die IP-Adresse ist
die wie oben gezeigt mit SearchNAS.exe gefunden wurde. Fortsetzung mit „Gebrauch der
Managementoberfläche“ auf Seite 18 um das IB-NAS2001 einzurichten.
13
Page 84

14
Nicht konfiguriertes Netzwerk / direkt angeschlossen
Wenn das IB-NAS2001 an ein nicht konfiguriertes Netzwerk angeschlossen wird, in dem
kein DHCP Server die IP-Konfiguration liefert (oder das IB-NAS2001 direkt an den Computer angeschlossen wird) und die Computer (der Computer) eingestellt sind, die IPAdresse per DHCP zu beziehen (Voreinstellung), dann wird das IB-NAS2001 seinen eigenen DHCP Server aktivieren mit der voreingestellten IP-Adresse 192.168.1.1 und wird IPAdressen aus dem Bereich von 192.168.1.2 bis 192.168.1.50 mit einer Netzwerkmaske
4
255.255.255.0 den an das Netz angeschlossenen Computern zuweisen. Das entspricht
dem Subnetz
5
192.168.1.1-192.168.1.254. In diesem Falle kann das IB-NAS2001 durch
Eingabe von „http://192.168.1.1“ in die Adresszeile des Browsers erreicht werden.
4
Die Netzwerkmaske definiert, welcher Teil der IP-Adresse das Subnetz definiert. Zusammen mit der IP-Adresse ergibt sie die
minimal notwendige Netzwerkkonfiguration für einen Computer zur Teilnahme an einem TCP/IP basierten Netzwerk. Es ist also
zwingend Notwendig, diese Werte regelgerecht zu konfigurieren.
5
TCP/IP basierte Netzwerken wie das Internet sind in sogenannte Subnetze unterteilt. Ein Subnetz wird gebildet durch einen
zusammenhängenden Bereich von IP-Adressen, die alle mit derselben Binärzahl beginnen. Zur Erläuterung: IP-Adressen werden immer als 32 Bit Binärzahl interpretiert, die 32 binäre Ziffern enthält. IP-Adressen desselben Subnetzes haben eine bestimmte Anzahl der linken Binärziffern gemeinsam. Wie viele dieser Binärziffern als Netzwerkadresse interpretiert werden wird
durch die Subnetzmaske oder kurz Netzmaske definiert. Computer desselben Subnetzes können direkt miteinander kommunizieren während Computer aus unterschiedlichen Subnetzen nur über einen Relaisposten den sogenannten Router miteinander
kommunizieren können, der die beiden Subnetze miteinander verbindet und den Netwerkverkehr vom einen in das andere
Subnetz weiterleitet.
Page 85
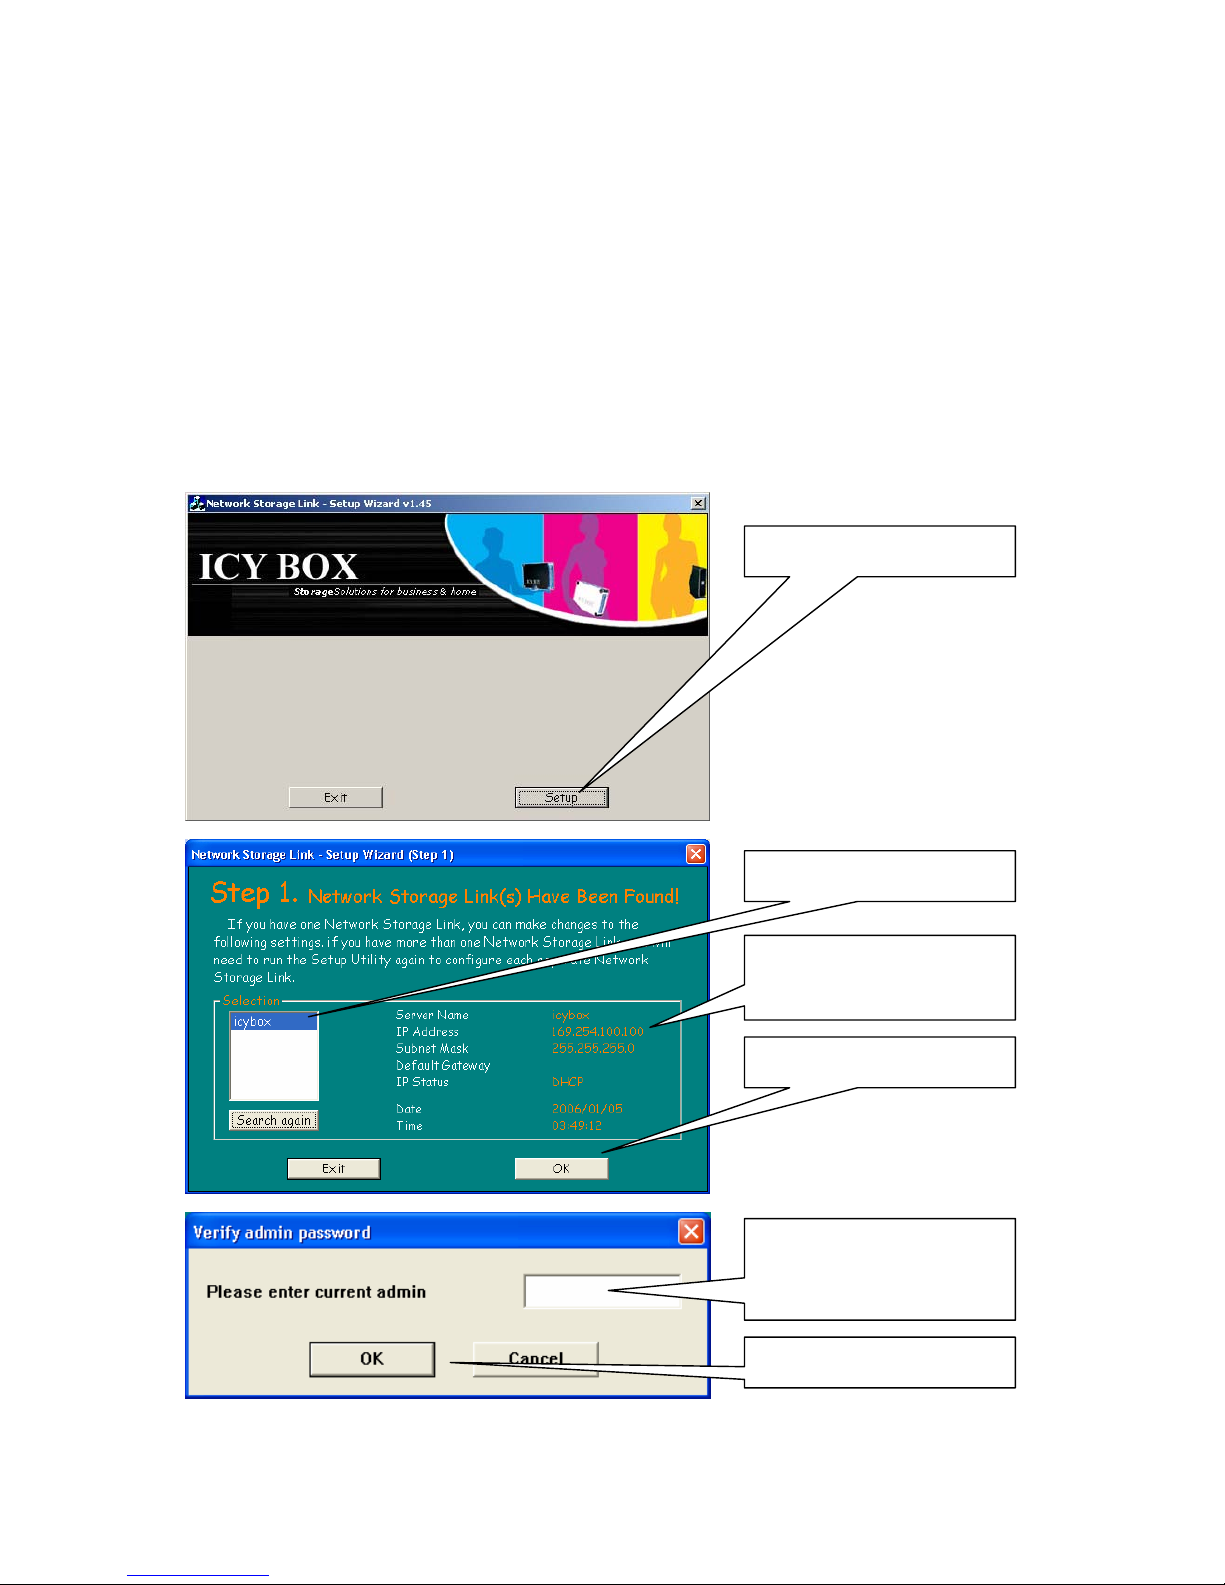
Mit festen IP-Adressen konfiguriertes Netzwerk
In einem Netzwerk, in dem kein DHCP Server zur Verfügung steht und alle IP-Adressen
manuell und fest vergeben sind, zum Beispiel aus einem Bereich zwischen 192.168.1.2
und 192.168.1.254 mit einer Netzwerkmaske von 255.255.255.0 und 192.168.1.1 als
Standardgateway und DNS Server, muss die IP-Adresse etc. des IB-NAS2001 ebenfalls
entsprechend manuell vergeben werden.
Um die IP Adresse des IB-NAS2001 zum Beispiel auf 192.168.1.100 zu konfigurieren verfahre man wie folgt:
Achtung: Wenn SearchNAS.exe nicht angewandt werden kann, da es nur auf Win-
dows Rechnern läuft, kann die IP-Adresse des IB-NAS2001 über die
Webbasiert Managementoberfläche konfiguriert werden wie im Punkt
„Netzwerkeinstellungen“ auf Seite 48 beschrieben.
Auf „Setup“ klicken
Mit „OK“ fortfahren
Die aktuelle IP-AdressKonfiguration wird angezeigt
IB-NAS2000 gefunden
Auf “OK” klicken.
Eingabe des Passwortes
des IB-NAS2000. Default
ist „admin“.
15
Page 86
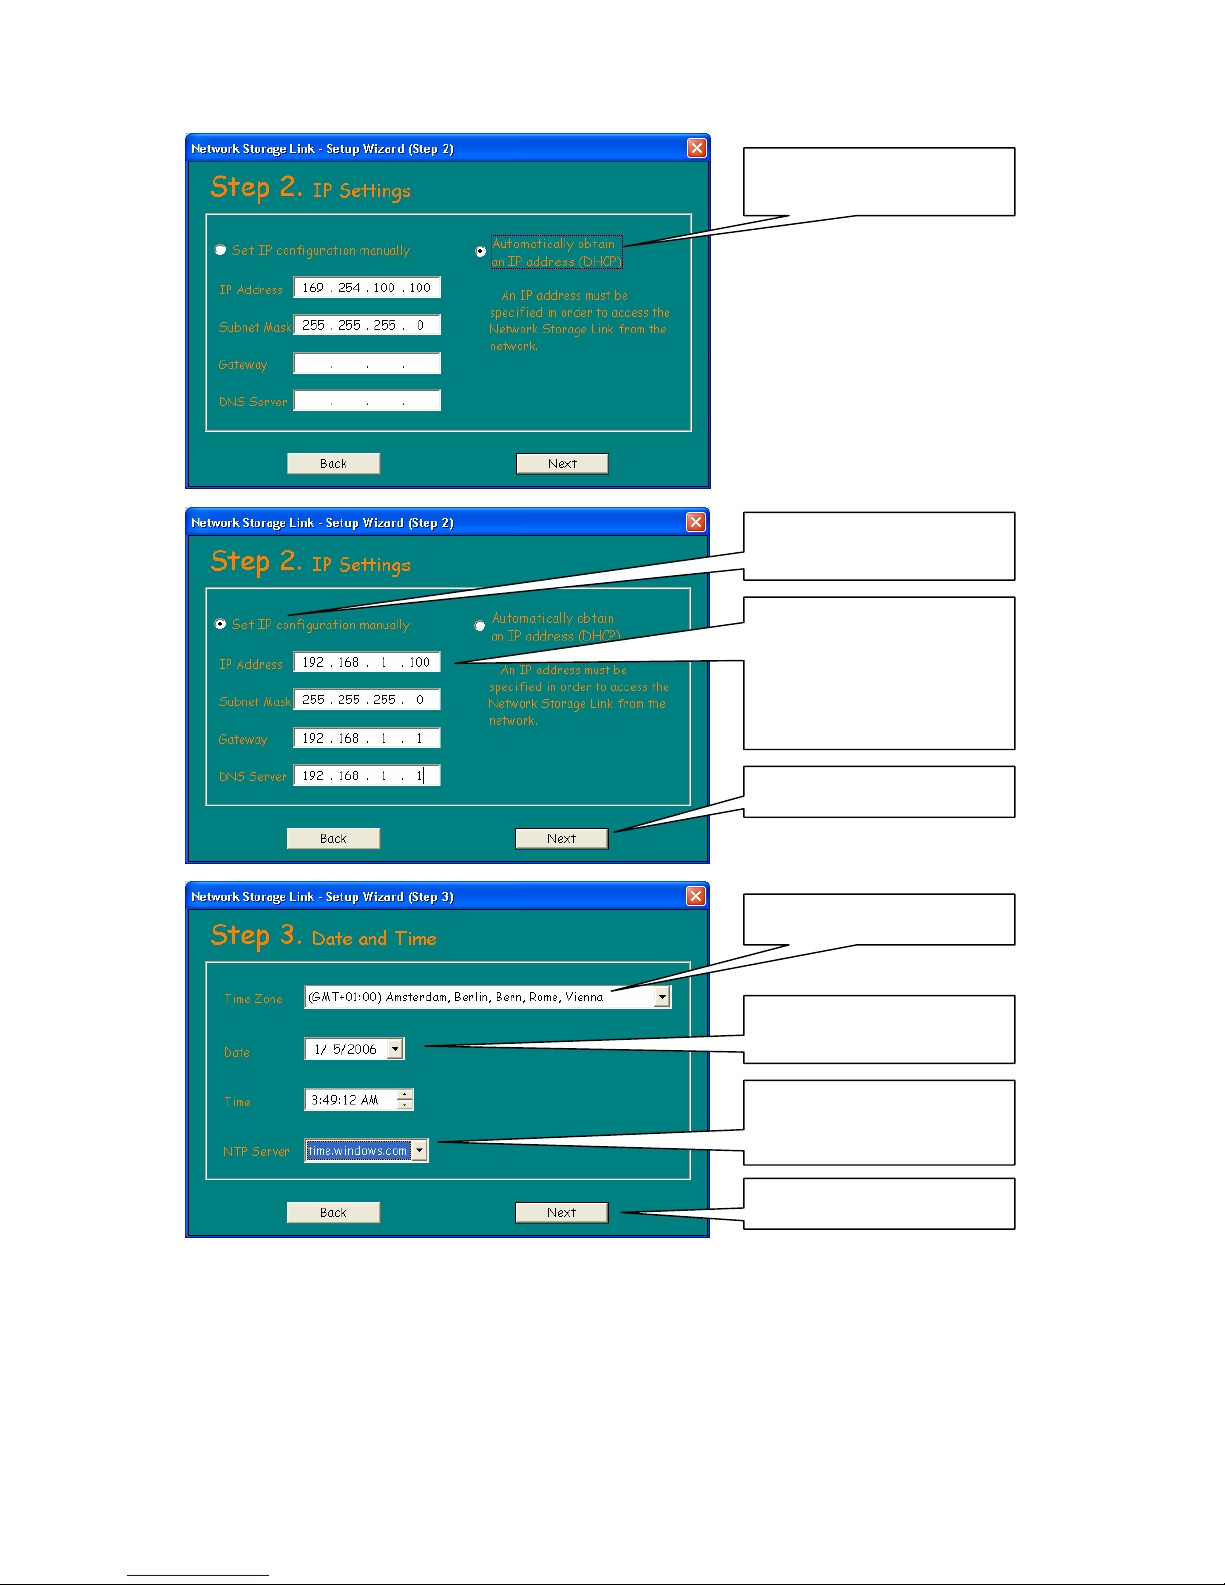
Anzeige der aktuellen IPEinstellungen
Auf „Next“ klicken
“192.168.1.100” bei „IP
Address“ eingeben,
“255.255.255.0” bei
„Subnet Mask und
“192.168.1.1” je bei „Gateway“ u. DNS Server
“Set IP configuration
manually” auswählen
Auf „Next“ klicken
… einen der Zeitserver
wählen (benötigt eine
Internetverbindung)
Zeit/Datum manuell eingeben oder …
Zeitzone wählen
16
Page 87

Auf „Save“ klicken
Auf „OK“ klicken
Auf „Exit“ klicken
Nach diesen Einstellungen kann das IB-NAS2001 durch Eingabe von
„http://192.168.1.100“ in die Adresszeile des Webbrowsers erreicht werden. Fortsetzung
mit „Gebrauch der Managementoberfläche“ auf Seite 18 um das IB-NAS2001 einzurichten.
17
Page 88
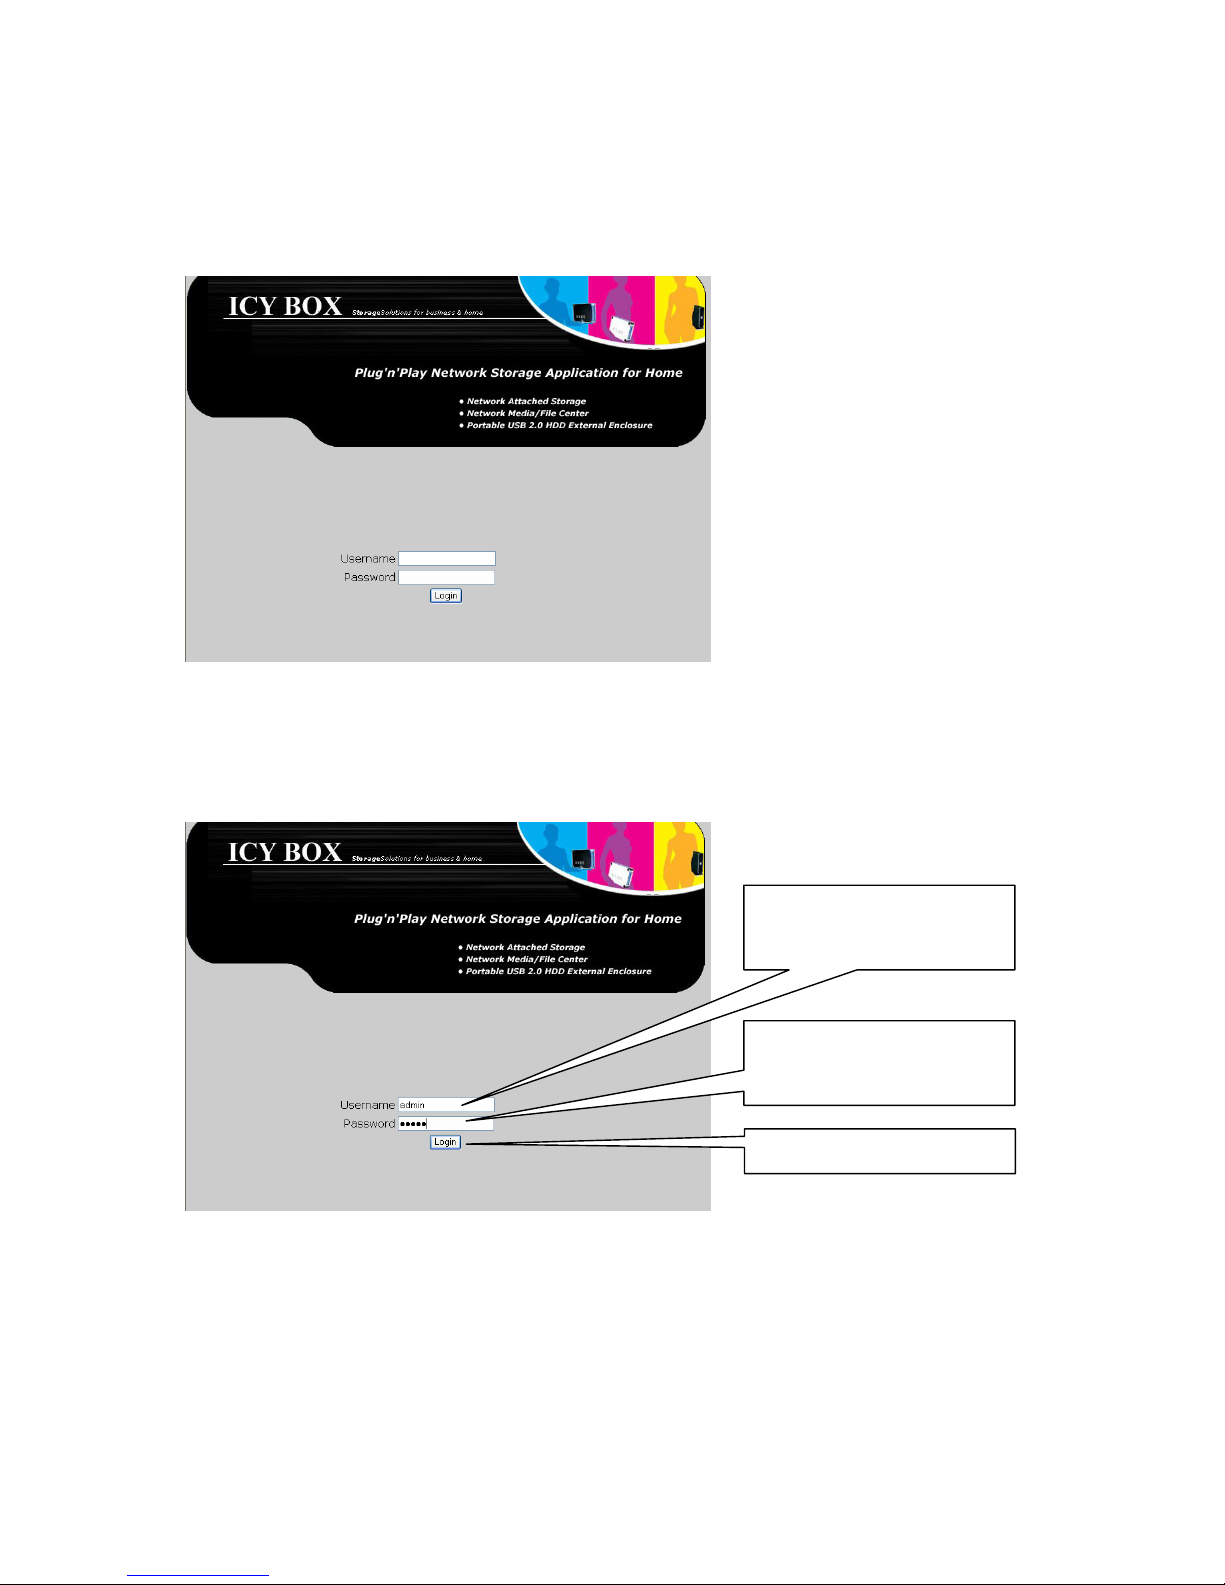
Gebrauch der Managementoberfläche
Wenn die URL wie in den obigen Punkten angegeben in den Webbrowser eingegeben
wird, zum Beispiel „http://192.168.1.100“, verbindet sich der Webbrowser mit dem IBNAS2001 und stellt die Managementoberfläche des IB-NAS2001 dar.
Anmelden
Die Managementoberfläche ist Passwortgeschützt. Der administrative Benutzername ist
„admin“ und das voreingestellte Passwort ist „admin“.
Auf „Login“ klicken
„admin“ bei „Password“
eingeben (Voreinstellung)
„admin“ bei „Username“
eingeben
18
Page 89

Struktur der Managementoberfläche
Nach erfolgreicher Anmeldung wird die Managementoberfläche angezeigt. Die Managementoberfläche gliedert sich in die Hauptmenüzeile, die Untermenüspalte und den Konfigurationsbereich.
Konfigurationsbereich
Untermenüspalte
Hauptmenüzeile
In der Hauptmenüzeile kann unter den folgenden Punkten gewählt werden
Auswahl Hauptmenüzeile Beschreibung
Control Panel Alle Einstellungen bezüglich der Administration
Personal Info Grundlegende Systeminformationen und -einstellungen
Logout Abmelden
Die Untermenüzeile wird ihren Inhalt der Auswahl bei der Hauptmenüzeile anpassen. In
der Darstellung des Internet Explorers können die Menüpunkte erweitert werden um untergeordnete Einträge sichtbar zu machen. In anderen Browsern wird der Submenübaum
immer vollständig angezeigt.
Ausgewählte Menüeinträge werden durch weiße Farbe hervorgehoben.
Initialisierung der Festplatte
Der erste Schritt bei der Konfiguration des IB-NAS2001 sollte die Initialisierung der Festplatte sein. Das ist notwendig, weil das IB-NAS2001 einen Teil der Einstellungen in speziellen Systempartitionen auf der Festplatte speichert, die erst noch angelegt werden
müssen.
Bei der Initialisierung werden drei Partitionen auf der Festplatte erzeugt und formatiert:
Partition Beschreibung
Systempartition Systemeinstellungen (nicht verändern)
Swappartition Erweiterung des Hauptspeichers (nicht verändern)
Datenpartition Nutzdaten, die im Netz zur Verfügung stehen sollen
19
Page 90

20
Achtung: Das IB-NAS2001 benötigt diese besondere Struktur der Festplatte um
ordnungsgemäß als NAS funktionieren zu können. Diese Struktur kann
nicht manuell erzeugt werden, wenn das IB-NAS2001 als externes Festplattengehäuse arbeitet. Um das IB-NAS2001 in korrekter Weise als
NAS verwenden zu können, müssen die notwendigen Schritte über den
„Disk Utility“ Dialog wie auf Seite 21 Beschrieben ausgeführt werden.
Auswahl des passenden Filesystems
6
Die Datenpartition des IB-NAS2001 kann mit drei verschiedenen Filesystemen erzeugt
werden:
Filesystem Beschreibung
EXT2 Linux Filesystem
EXT3 Linux journaling Filesystem
FAT32 Windows Filesystem
Diese Filesysteme unterscheiden sich in der grundlegenden Fähigkeit der verschiedenen
Betriebssysteme auf diese Zugriff nehmen zu können (wenn das IB-NAS2001 im externen Festplattenmodus betrieben wird), ihre Fähigkeiten und Begrenzungen. Das ist auch
der Grund, warum kein bestimmtes Filesystem voreingestellt ist. In Abhängigkeit der
zukünftigen Anwendung des IB-NAS2001 muss das passende Filesystem ausgewählt
werden.
Fähigkeit der Betriebsysteme auf Filesysteme zuzugreifen
Filesystem Zugriffsfähig im USB Modus
EXT2 • Linux
EXT3 • Linux
FAT32 • Windows (98, NT, ME, 2000, XP, 2003)
• OS X (Mac)
• Linux
Filesystem Fähigkeiten
Filesystem Fähigkeiten
EXT2 • Schreibschutz
• Archive Bit
• Zugriffskontrolle auf Benutzerebene
EXT3 • Schreibschutz
• Archive Bit
• Zugriffskontrolle auf Benutzerebene
• Quota
7
6
Ein Filesystem definiert die Art wie ein Betriebssystem Daten auf einem Massenspeicher ablegt. Ein Filesystem kann Mechanismen zu Datenorganisation, Benennung von Dateien, Zugriffskontrolle und Absturzsicherheit des Betriebssystems beinhalten.
Da das Management von Massenspeichern eine grundlegende Aufgabe von Betriebssystemen ist, steht ein Filesystem in engem
Zusammenhang mit dessen Grundfunktionen. Die verschiedenen Betriebssysteme ordnen sich den verschiedenen Arten der
Filesystemen und ihrer jeweiligen Philosophie zu.
7
Eine Quota ist ein Limit dass einem Benutzer oder Gruppe bei der Benutzung der Festplattenkapazität gesetzt werden kann.
Page 91

21
Filesystem Fähigkeiten
FAT32 • Schreibschutz
• Archive Bit
• Unicode Dateinamen
Filesystem Begrenzungen
Filesystem
max. Länge Filname
erlaubte Zeichen beim Filenamen
8
max. Pfadlänge
max. Filegröße
9
max.
Größe
EXT2 255 byte jedes Byte au-
ßer NUL
kein Limit
definiert
2 TiB 32 TiB
EXT3 255 byte jedes Byte au-
ßer NUL
kein Limit
definiert
2 TiB 32 TiB
FAT32 255 byte jedes Byte au-
ßer NUL
kein Limit
definiert
4 GiB 2 TiB
Disk Utility
Die Einstellungen für die Festplatten Initialisierung finden sich unter:
Control Panel
Maintenance
Disk Utility
Kommando Button zum
Festplatte inaktivieren
Kommando Button zur
Anzeige Aktualisierung
Filesystem Auswahl
Kommando Button zum
Festplatte formatieren
Der „Disk Utility“ Dialog zeigt eine Tabelle die die folgenden Informationen enthält:
Spalte Beschreibung
Device name Unix Name des Festplattengerätes
8
Zeichen wie „/“ , „\“ oder „:“ sind nicht erlaubt, da sie Für die Syntax der Kommandozeilenschnittstellen der verschiedenen
Betriebssystemen reserviert sind.
9
Gi und Ti sind Präfixe (Skalierungsfaktoren) nach IEC Standart. Sie sind das auf eine 2er Basis bezogene Äquivalent der entsprechenden, auf eine 10er Basis bezogenen SI Präfixe. Statt in Schritten von 1000 (10
3
) skalieren sie in Schritten von 1024
(2
10
). Beispiel: 300 GB = 279,5 GiB
Page 92
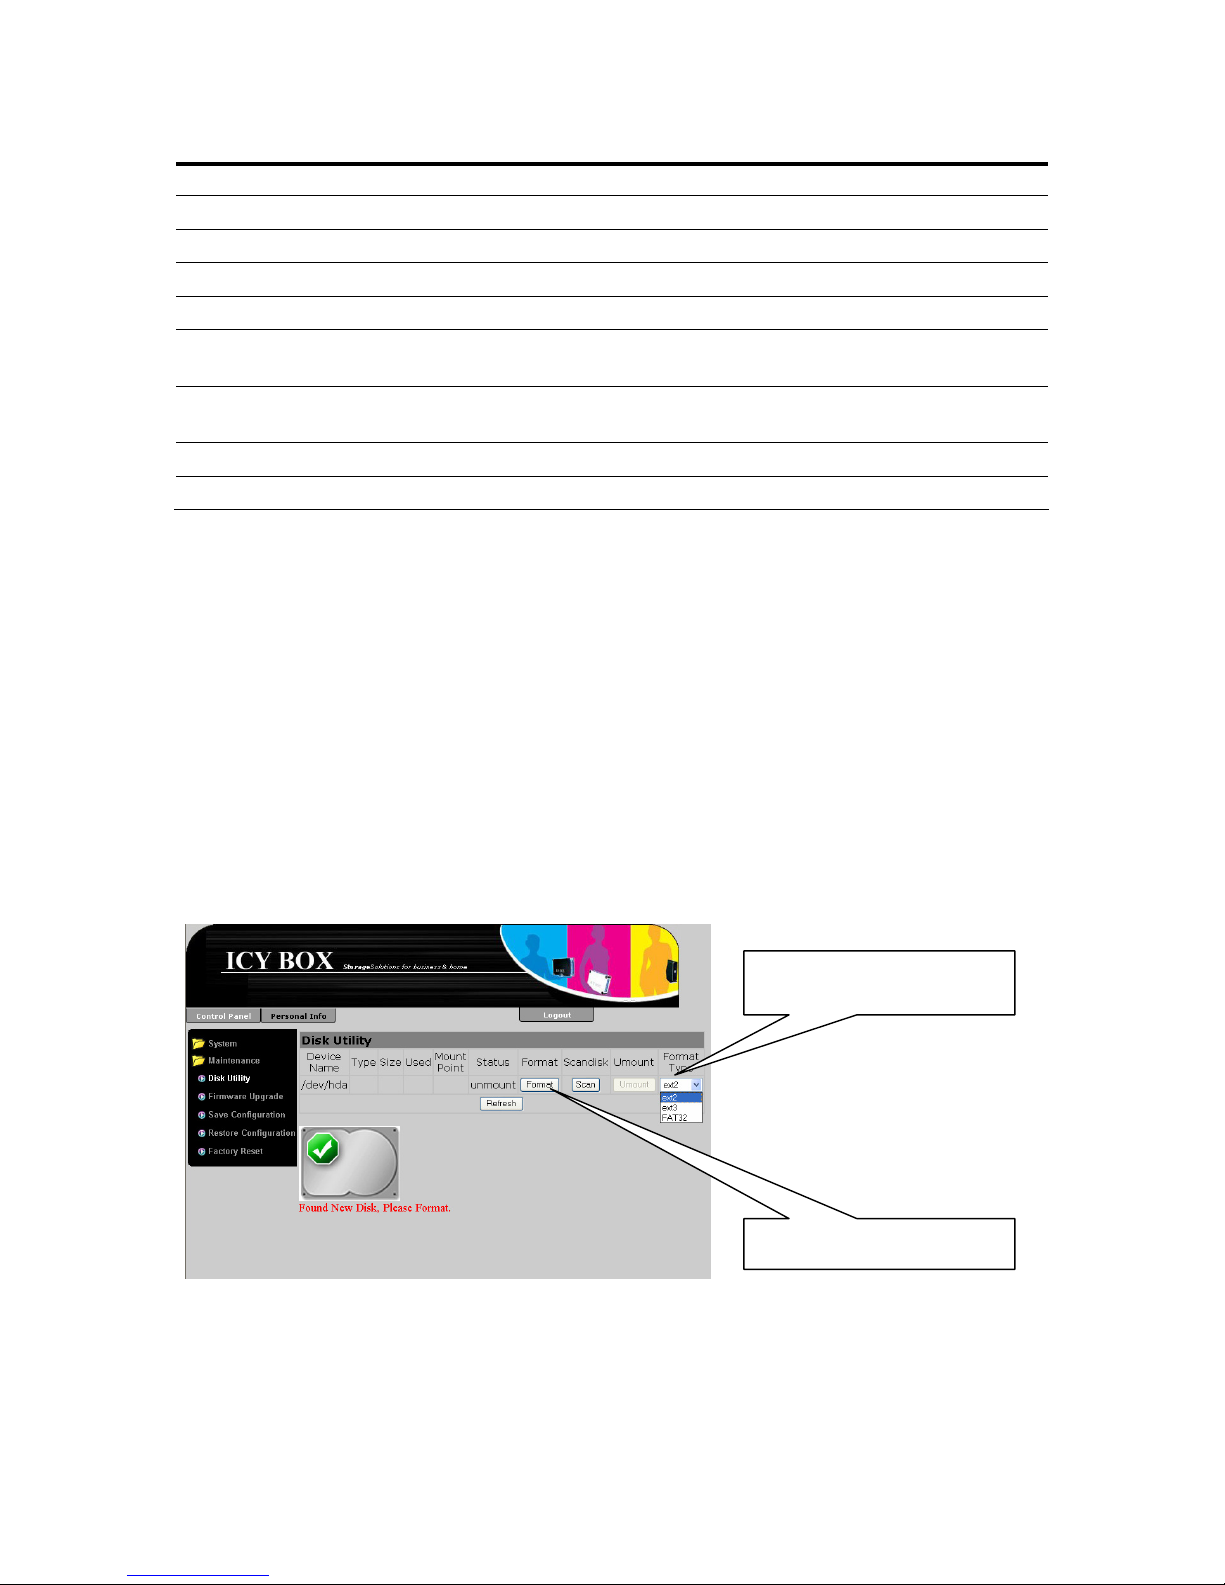
22
Spalte Beschreibung
Type Filesystem der Datenpartition
Size Größe der Festplatte
Used Größe des benutzten Anteils
Mount Point Mount Point der Datenpartition im Unix Verzeichnisbaum
Status Festplattenstatus
Format Kommando Button zum initialisieren und formatieren der
Festplatte
Scandisk Kommando Button zum überprüfen und reparieren der
Festplatte
Umount Kommando Button zum inaktivieren der Festplatte
Format Type Auswahlfeld für das Filesystem der Datenpartition
Der „Refresh“ Button löst eine Aktualisierung des Inhalts des Konfigurationsbereichs aus.
Das Initialisieren der Festplatte wird in zwei Schritten getan. Erst das Filesystem für die
Datenpartition im entsprechenden Auswahlfeld wählen und anschließend auf den „Format“ Button klicken:
Achtung: die Auswahl des Filesystems hat großen Einfluss auf die Fähigkeiten, die
das IB-NAS2001 als NAS hat. Außerdem ist von Bedeutung, dass nicht
jedes Filesystem von jedem Betriebssystem im USB Modus gelesen werden kann. Das ist von großer Bedeutung, wenn geplant ist, dass IBNAS2001 sowohl als externe Festplatte als auch als NAS verwenden wollen. Weitere Details dazu im Punkt „Auswahl des passenden Filesystems“
auf Seite 20.
Achtung: Das Formatieren der Festplatte löscht alle Daten darauf. Deshalb
eventuell darauf vorhandene Daten vorher sichern!
Auf „Format“ klicken
Auswahl des Filesystems
z. B. „FAT32“
Page 93
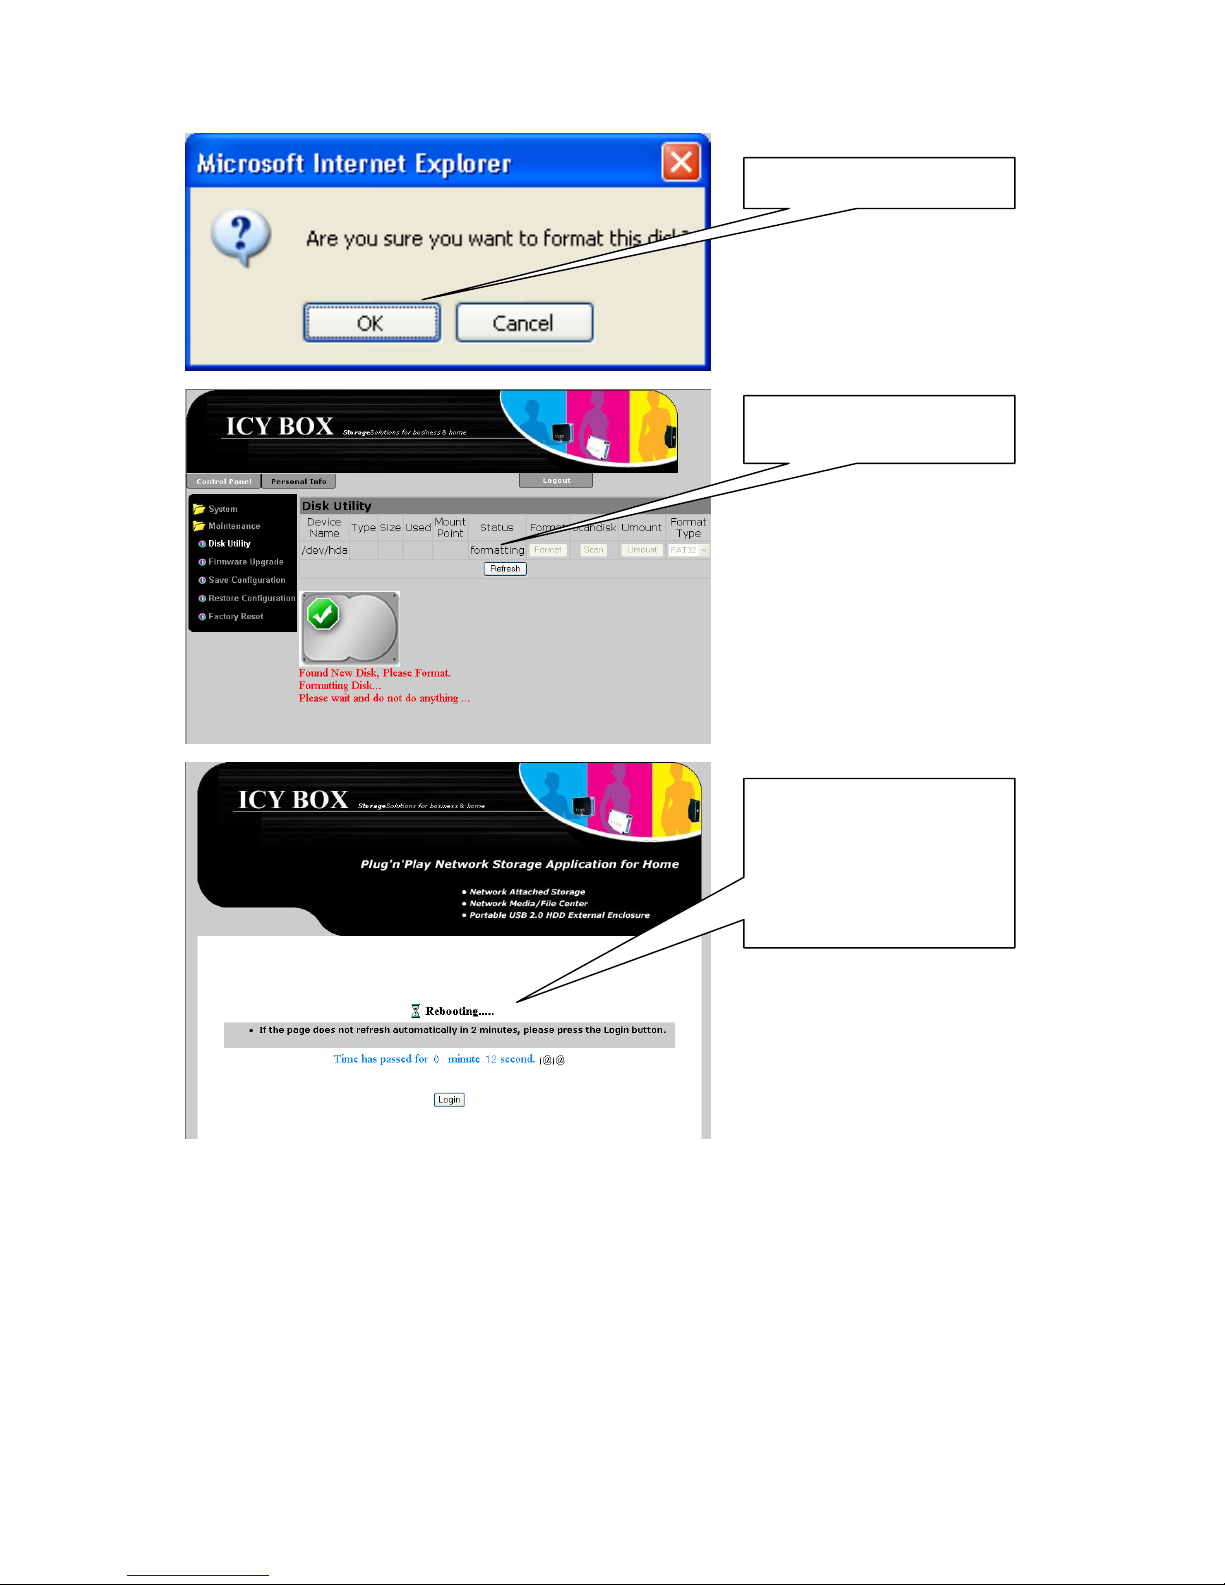
Auf “OK” klicken
Der Status wechselt auf
„formatting“
Wenn die Formatierung
beendet ist, muss das
IB-NAS2000 neu starten.
Bitte diesen Prozess
nicht unterbrechen!
23
Page 94
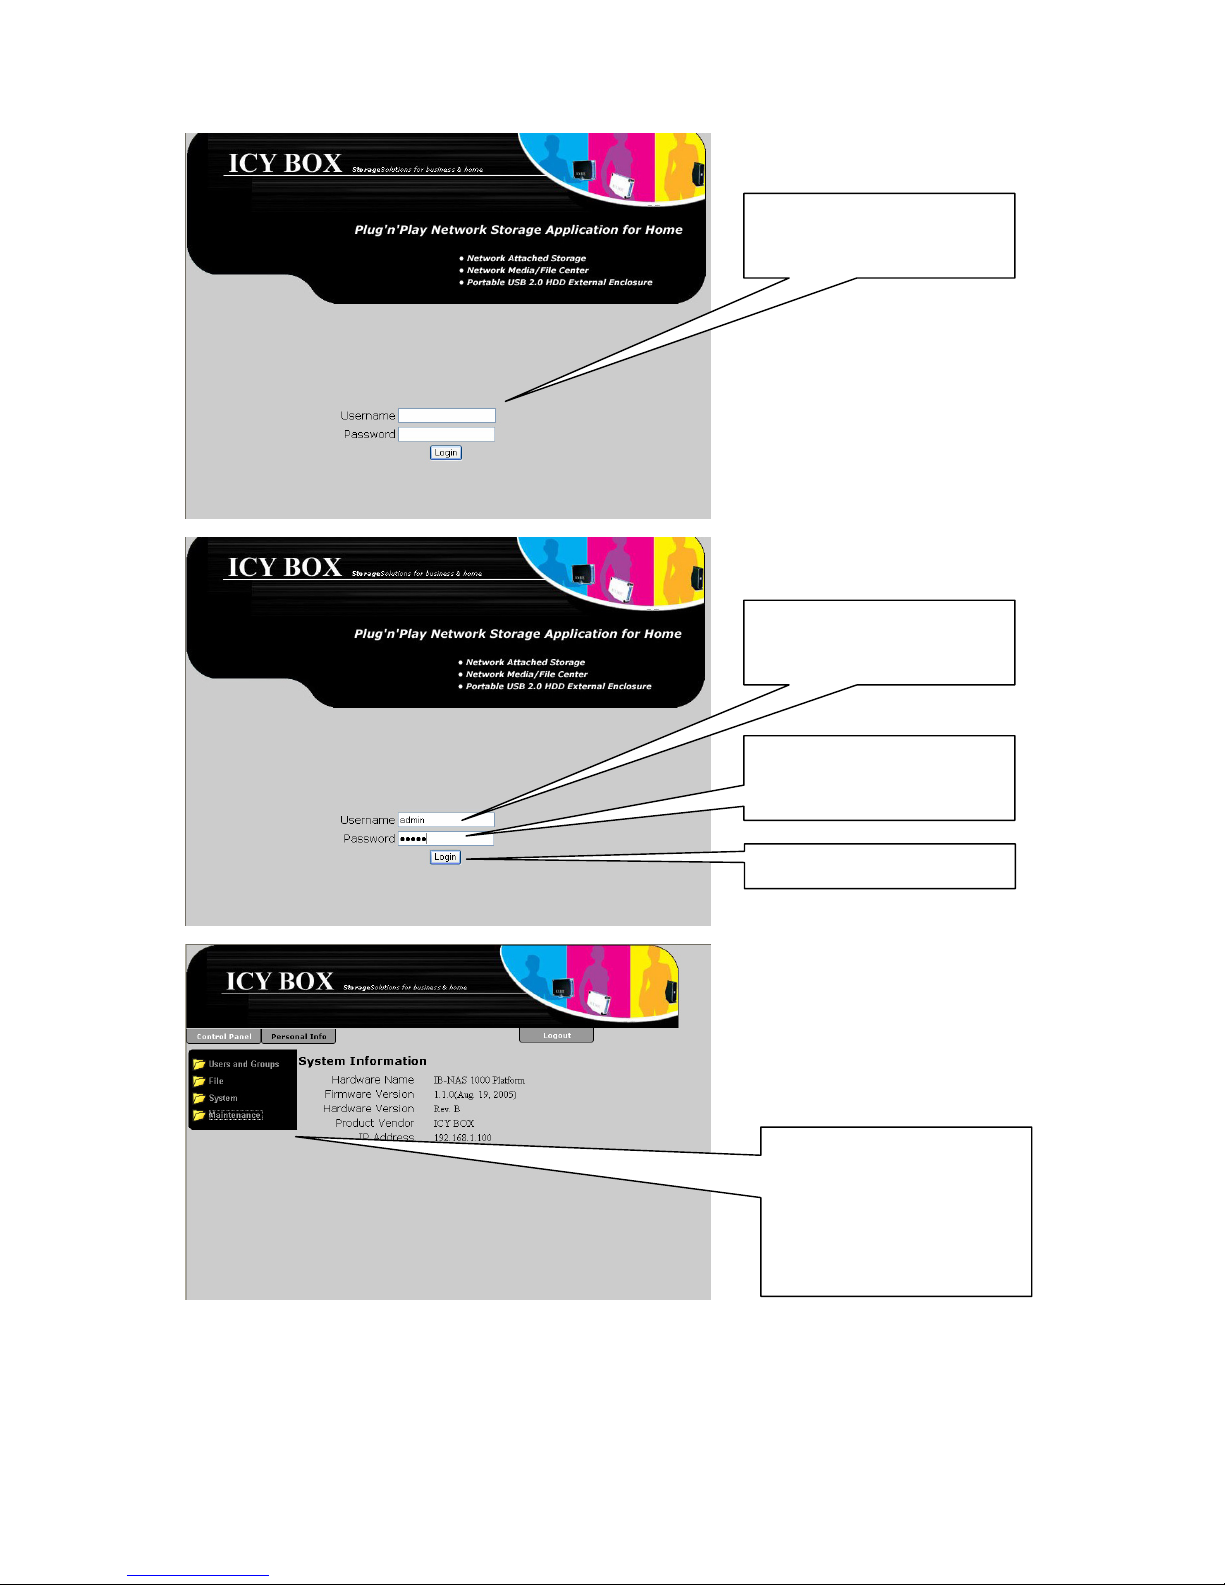
Nach dem Neustart ist
eine erneute Anmeldung
notwendig
Auf „Login“ klicken
„admin“ als Passwort
eingeben (Voreinstellung)
„admin“ als „Username“
eingeben
Die Untermenüspalte hat
mehrere neue Einträge,
die nicht angezeigt werden, solange die Festplatte nicht initialisiert ist
24
Page 95

Nun wähle man:
Control Panel
Maintainance
Disk Utility
Außerdem kann bestimmt werden, nach
welcher Zeit der Inaktivität die Festplatte in einen Energiesparmodus
versetzt wird
Wie man sehen kann
haben sich die Einträge
in der Tabelle geändert.
25
Page 96
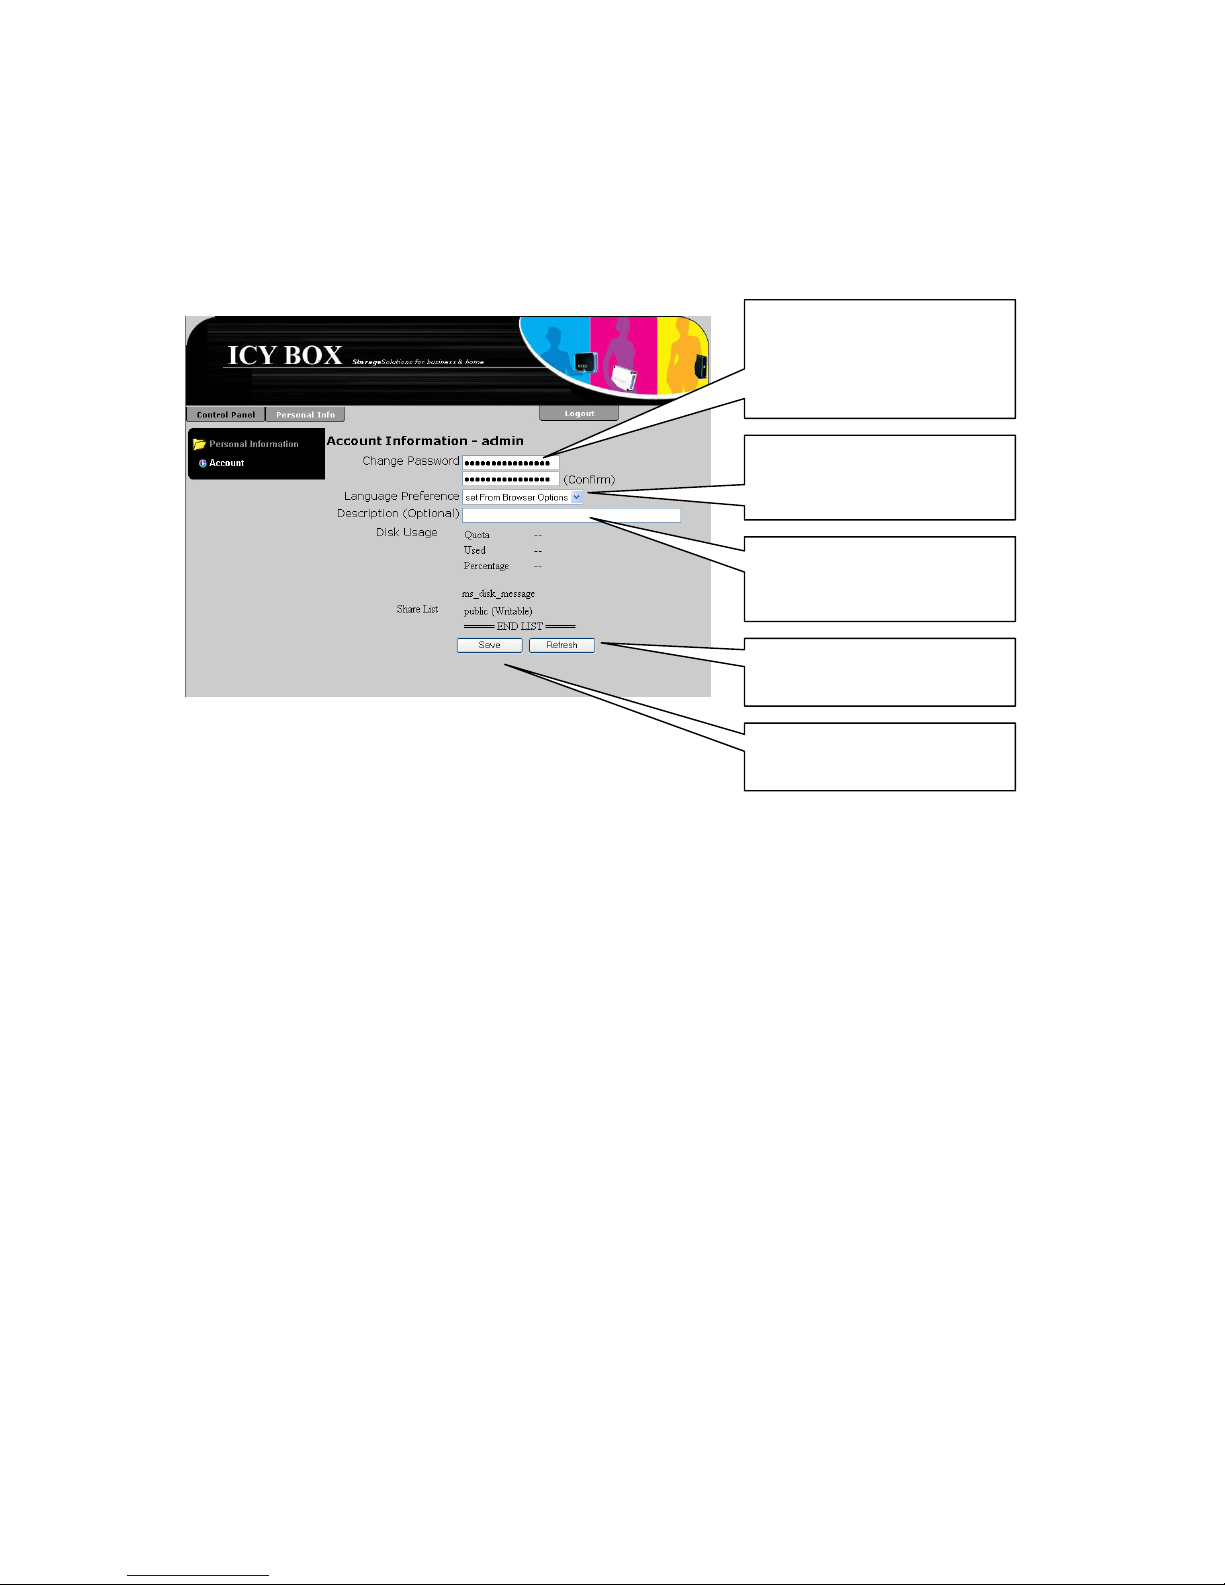
Ändern des Administrator Kennwortes
Um das Administratorkennwort zu ändern wähle man:
Personal Info
Personal Information
Account
„Refresh“ setzt das Formular zurück
„Save“ nimmt die Änderungen vor.
Eine optionale Beschreibung kann hier eingegeben werden
Die Sprache der Menüs
kann hier ausgewählt
werden
Eingabe und Bestätigung
durch erneute Eingabe
des neuen Kennwortes
hier
Verwalten von Benutzern und Gruppen
Um den Zugriff aus dem Netzwerk zu beschränken ist das IB-NAS2001 in der Lage Beschränkungen für Benutzer und Gruppen einzurichten. Ein Benutzer ist ein persönlicher
Bezeichner, der über ein Kennwort identifiziert wird. Ein Benutzer kann Mitglied von einer
oder mehreren Gruppen sein. Zugriffsrechte können also für Benutzer und Gruppen definiert werden
26
Page 97
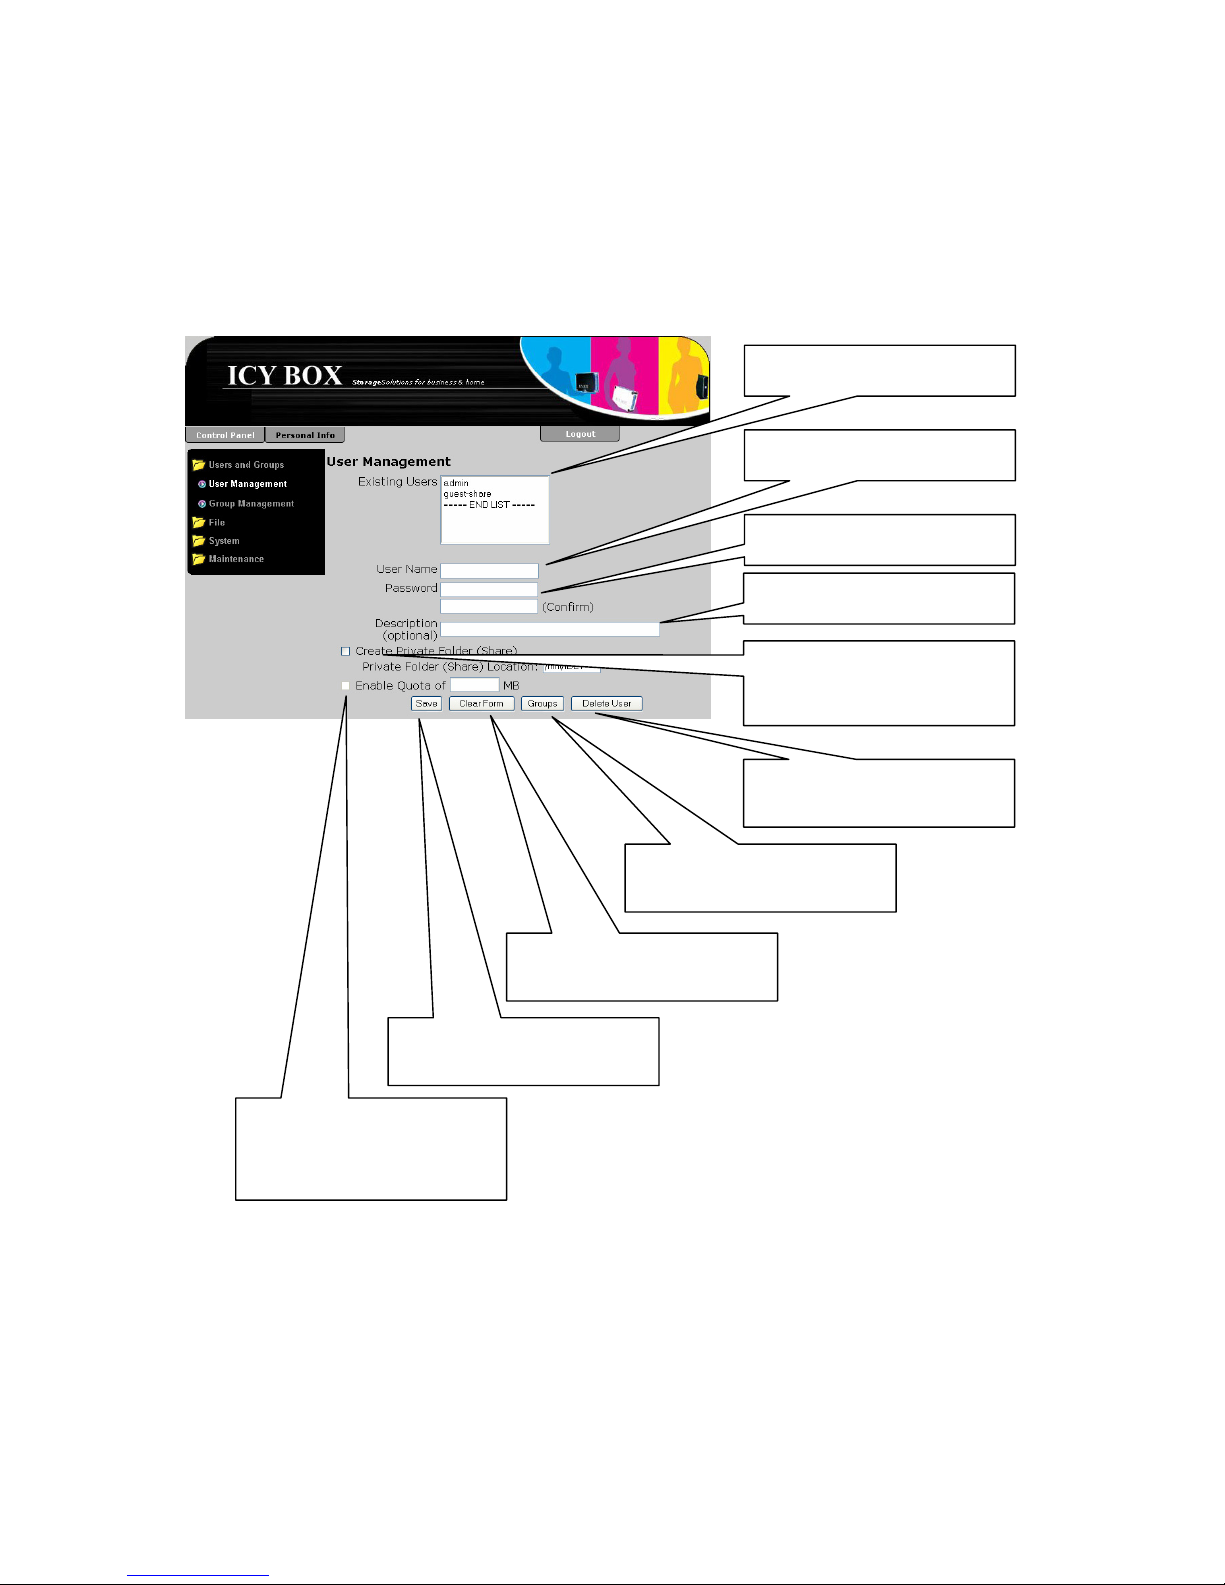
Benutzerverwaltung (User Management)
Die Benutzerverwaltung findet man unter:
Control Panel
Users and Groups
User Management
Veranlasst Erzeugung
eines persönlichen Netzlaufwerks
Button zum Löschen des
Benutzers
Wechsel zum Gruppenverwaltungsdialog
Rücksetzen des Formulars
Button zum Ausführen
der Änderungen
Veranlasst das setzen
einer Quota und ein Feld
zur Eingabe der Größe
Für Kurzbeschreibung
Eingabe Passwort
Eingabe Benutzernahme
Existierende Benutzer
Einen neuen Benutzer erzeugen
Um einen neuen Benutzer zu erzeugen, muss lediglich das leere oben beschriebene Formular ausgefüllt werden und auf den „Save“ Button geklickt werden. Das nachfolgende
Beispiel zeigt die Vorgehensweise um einen Benutzer mit dem Benutzernamen „testuser“
und dem Kennwort „test“ anzulegen. Der Benutzer soll außerdem ein privates Netzlaufwerk erhalten. Das ist ein privater Ordner, der im Netz zur Nutzung freigegeben wird,
und auf den nur unter Verwendung des zugehörigen Benutzernamens und Kennworts
zugegriffen werden kann. Außerdem soll der gesamte Festplattenplatz, der vom Benutzer
27
Page 98
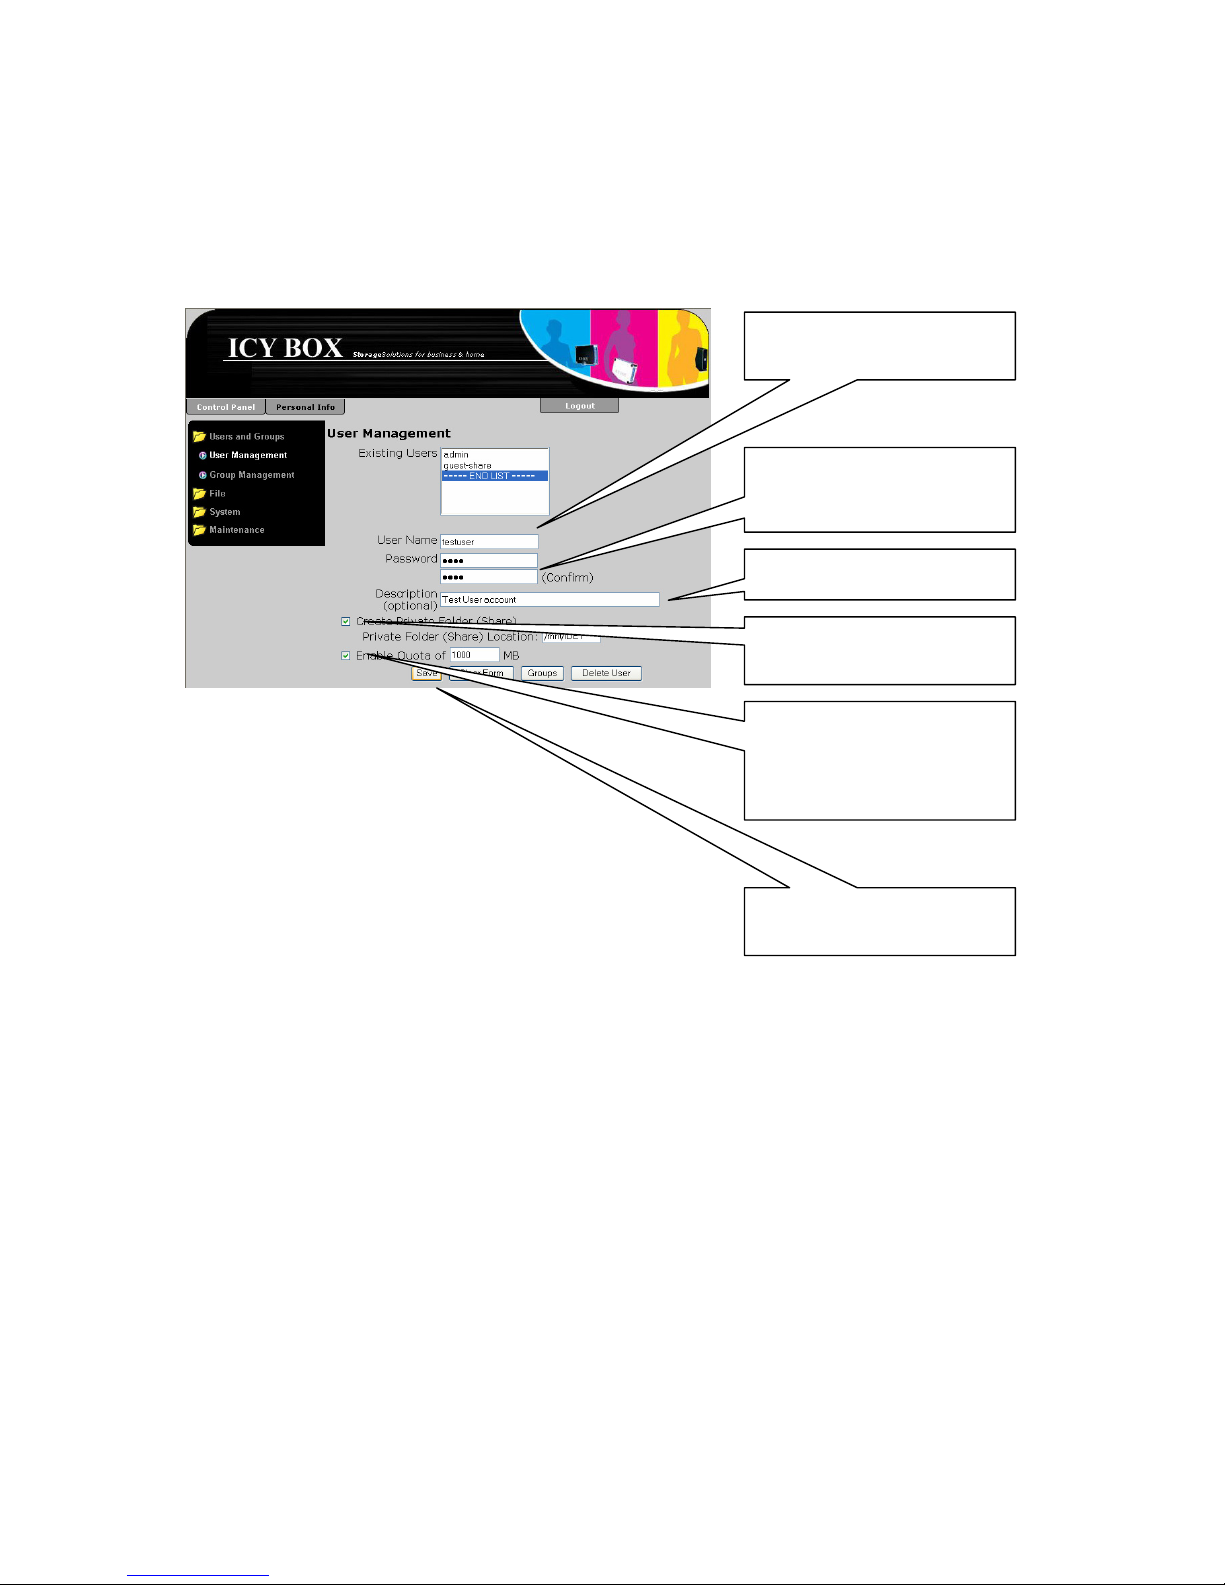
in Anspruch genommen werden kann auf 1000 MByte begrenzt werden, durch setzen
einer Quota
.
Achtung: Um eine Quota setzen zu können, muss die Datenpartition mit dem
EXT3 Filesystem formatiert sein, da nur dieses Filesystem dieses Merkmal unterstützt. Wenn die Datenpartition mit EXT2 oder FAT32 formatiert wurde, steht diese Auswahl nicht zur Verfügung.
Hier auswählen für einen
persönlichen Ordner
Hier auswählen für eine
Quota und die Größe im
entsprechenden Feld
dahinter angeben
Auf „Save“ klicken um
den Benutzer anzulegen
Für eine Beschreibung
Hier das Kennwort „test“
eingeben und die Eingabe wiederholen
Hier den Benutzernamen
„testuser“ eingeben
Nach dem Klicken auf den „Save“ Button werden der Benutzer und der zugehörige persönliche Ordner angelegt. Ebenso wird die Samba Freigabe erzeugt (Abbildung des persönlichen Ordners im Netz) und kann nun einzig unter Verwendung des zugehörigen Benutzernamens und Kennworts, das zuvor definiert wurde, verwendet werden. Der persönliche Ordner und die Samba Freigabe haben denselben Namen wie der zugehörige
Benutzername.
28
Page 99
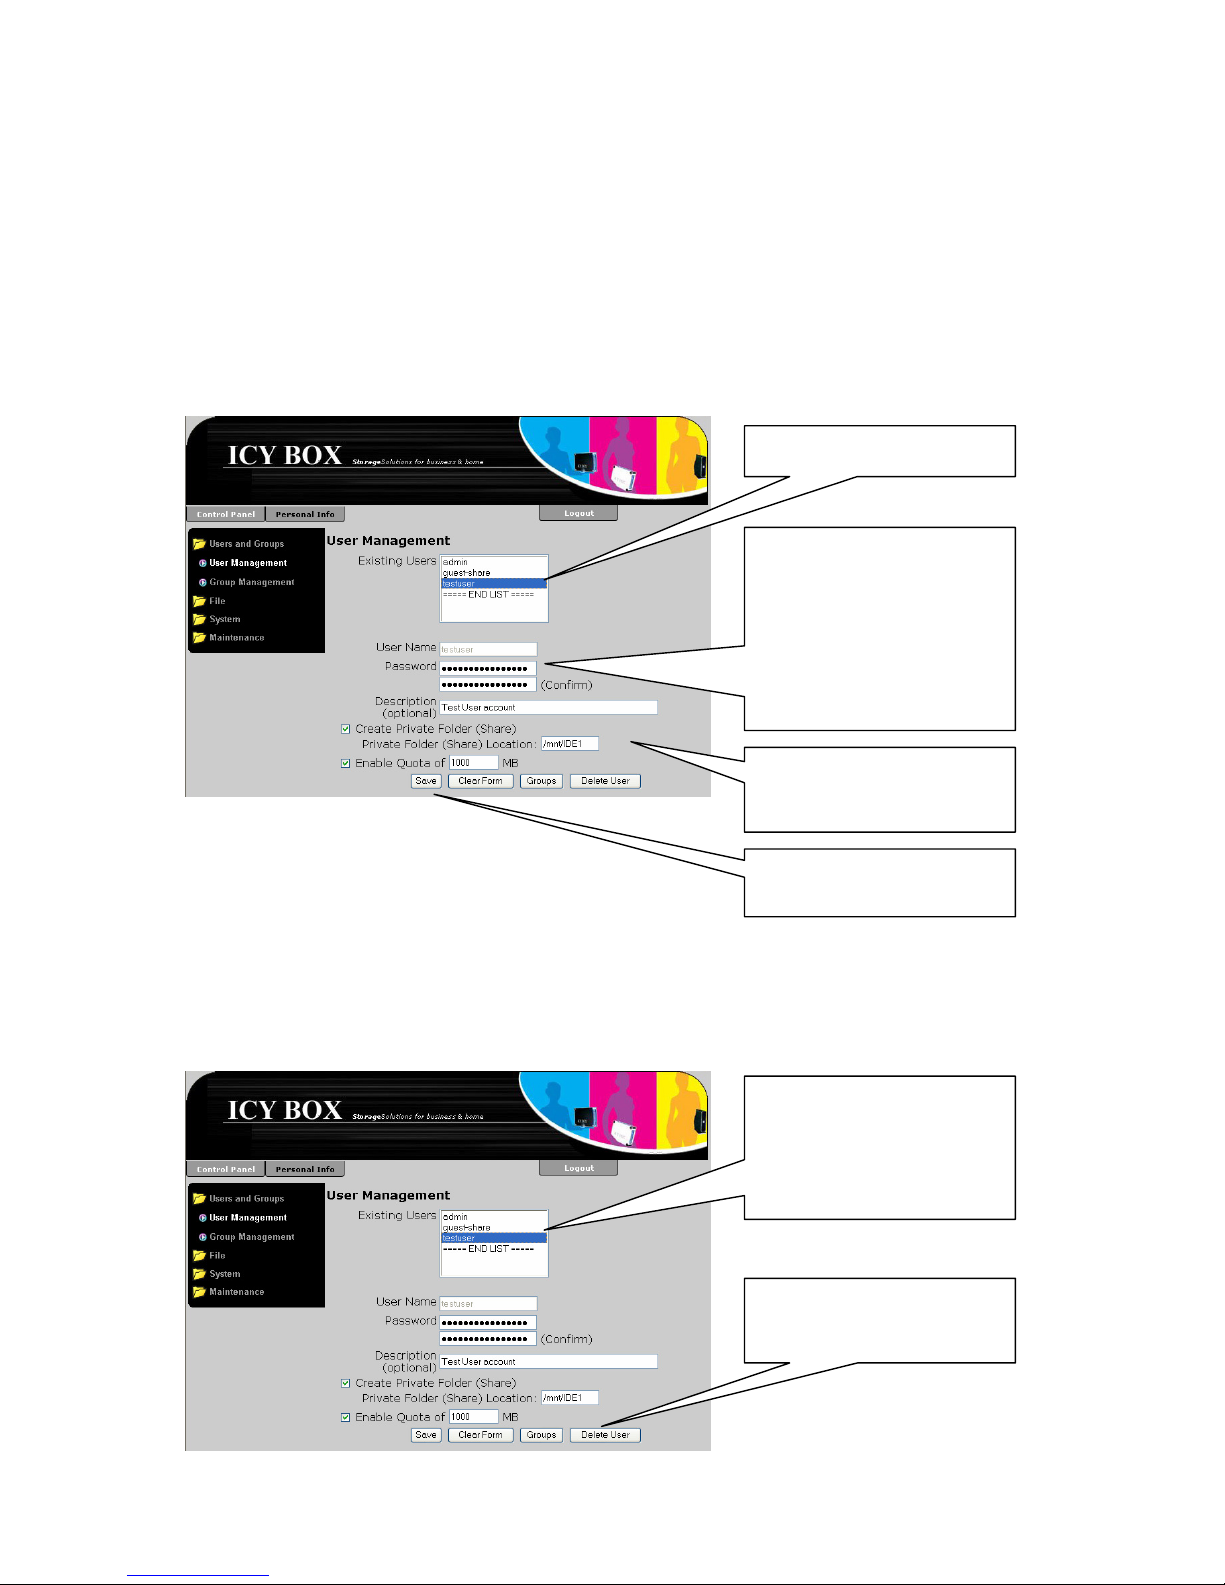
Ändern der Benutzereinstellungen
Um die Benutzereinstellungen zu ändern öffnen Sie die Benutzerverwaltung (User Management):
Control Panel
Users and Groups
User Management
Wenn der ensprechende Benutzer ausgewählt wird werden alle zugehörigen Einstellungen
angezeigt und können geändert werden.
Hier können weitere Änderungen vorgenommen
werden
Mit „Save“ werden die
Änderungen ausgeführt
Der Eintrag im „Password“ Feld wurde durch
einige ersetzt. Um
es zu ändern hier einfach
das neue Kennwort eingeben im „(Confirm)“
Feld wiederholen
Auswahl des Benutzers
Einen Benutzer löschen
Um einen Benutzer zu löschen wählt man diesen aus und klick auf den „Delete User“ Button.
Mit „Delete User“werden
die ausgewählten Benutzer gelöscht
Hier wird der zu löschende Benutzer ausgewählt.
Mit halten der <Strg>
Taste können mehrere
gewählt werden
29
Page 100

Einen existierenden Benutzer einer oder mehreren Gruppen zuordnen
Wie bereits erläutert kennt das Formular für die Benutzerverwaltung einen Button
„Groups“. Durch Auswahl eines Benutzers und klicken auf diesen Button gelangt man zu
einem Formular zum hinzufügen dieses Benutzers zu bereits existierenden Gruppen.
Mit „Groups“ gelangt
man zu dem Formular
zum Zuordnen
Benutzer auswählen
Das Zuordnungsformular wird geöffnet.
Liste der existierenden
Gruppen
30
 Loading...