

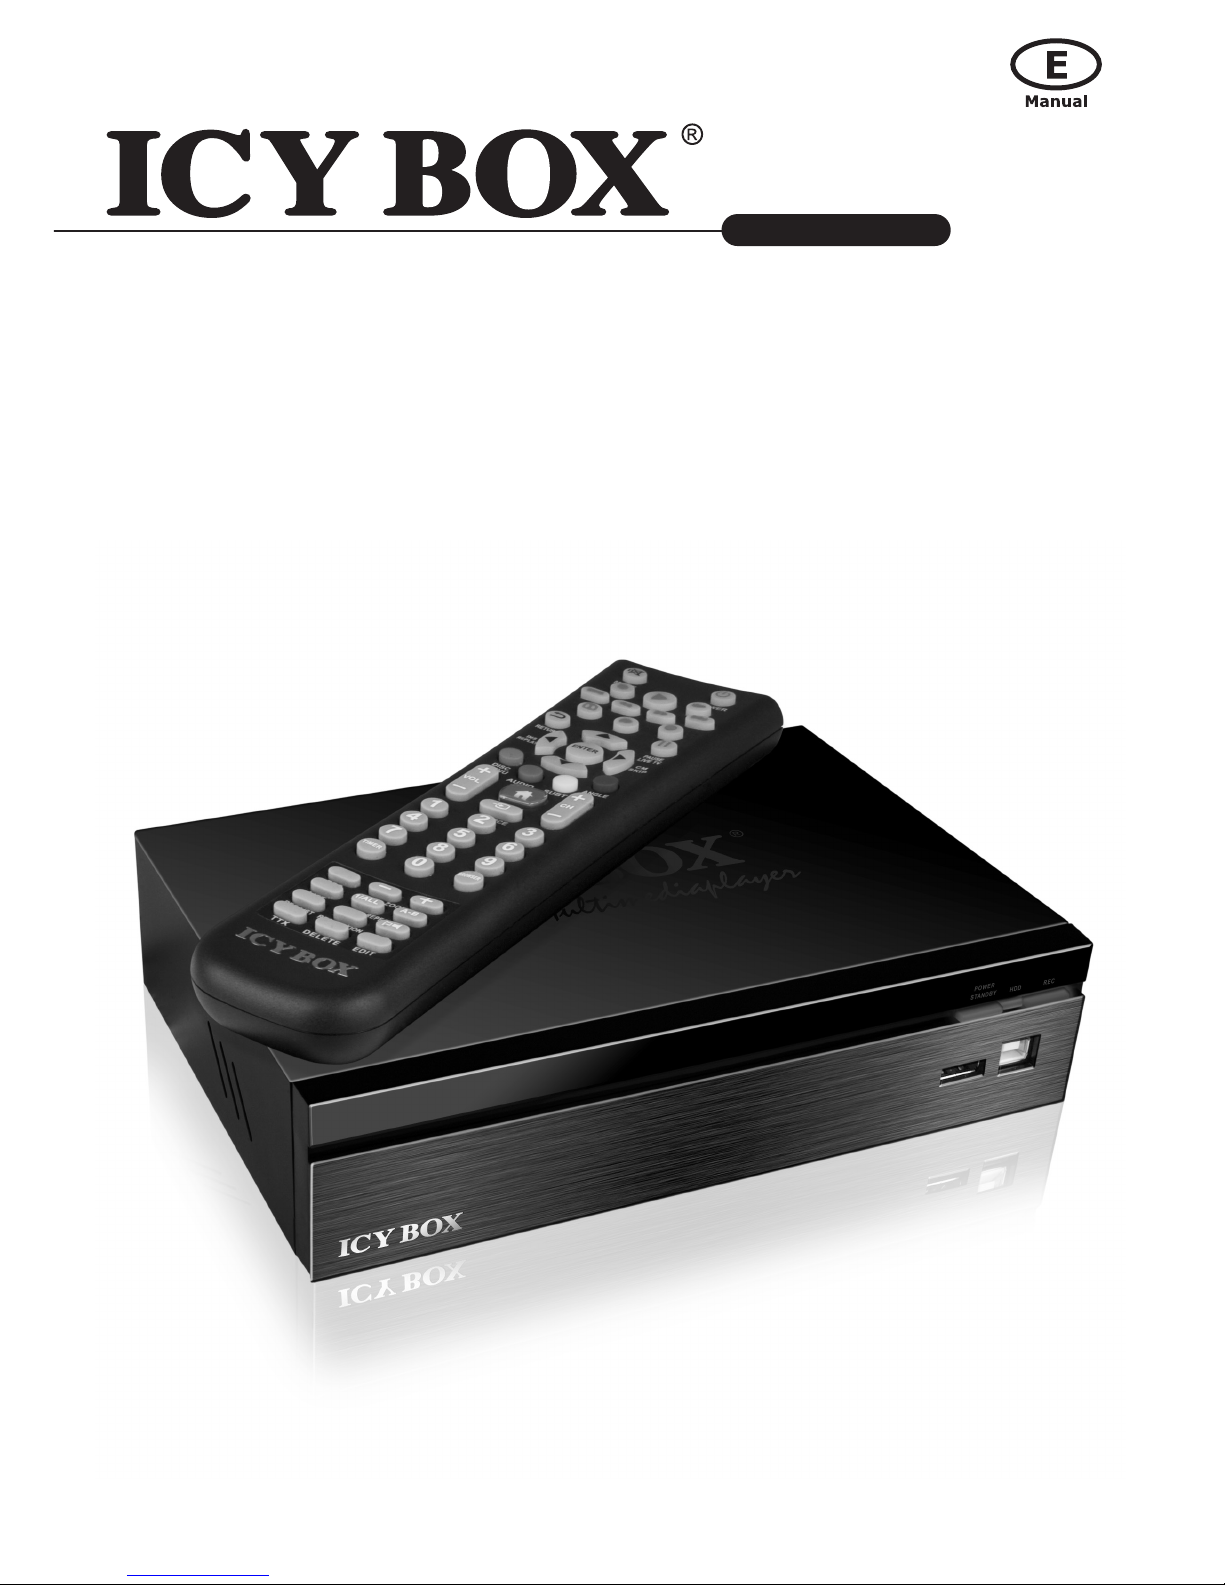
Icy Box IB-MP3012 User Manual
http://www.icybox.de
IB-MP3012 series
Media Player and DTV Receiver
Manual

Media Player and DTV Receiver
IB-MP3012 series
http://www.icybox.de
TABLE OF CONTENTS
1. INTRODUCTION .....................................................................................................................................4
1.1 PREFACE ...........................................................................................................................................4
1.2 PACKING LIST ....................................................................................................................................4
1.3 MISCELLANEOUS ................................................................................................................................4
1.3.1 Usage cautions .........................................................................................................................4
1.3.2 Power ......................................................................................................................................5
1.3.3 Radio interference/compatibility ..................................................................................................5
1.3.4 Repair .....................................................................................................................................5
1.3.5 Disposing of the player ..............................................................................................................5
1.3.6 Broadband internet ...................................................................................................................5
1.3.7 Wireless home network ..............................................................................................................5
1.3.8 Audio/Video formats ..................................................................................................................5
1.3.9 Others .....................................................................................................................................5
2. PRODUCT OVERVIEW .............................................................................................................................6
2.1 PANEL FRONT SIDE .............................................................................................................................6
2.2 PANEL BACK SIDE ..............................................................................................................................7
2.3 REMOTE CONTROL ..............................................................................................................................8
2.5 HDD INSTALLATION ..........................................................................................................................10
3. GENERAL CONNECTIONS ......................................................................................................................11
3.1 POWER CONNECTION........................................................................................................................11
3.2 CONNECTING TO A PC .......................................................................................................................11
3.3 A/V CONNECTION ............................................................................................................................. 12
3.3.1 Composite Connection .............................................................................................................12
3.3.2 A/V IN Connection ..................................................................................................................12
3.3.3 Component Connection ............................................................................................................ 13
3.3.4 HDMI Connection ....................................................................................................................13
3.3.5 Digital Audio Device Connection (cables not included) ..................................................................14
3.4 CONNECTING AN USB DEVICE TO IB-MP3012.......................................................................................14
3.4.1 Connecting a USB Device (like USB stick or USB HDD) .................................................................14
3.5 ETHERNET CONNECTION ...................................................................................................................15
3.5.1 LAN Ethernet Connection .........................................................................................................15
3.5.2 WLAN Ethernet Connection (WiFi USB dongle not included)........................................................... 15
3.6 DTV CONNECTION ............................................................................................................................15
3.7 POWER ON / OFF .............................................................................................................................. 16
3.8 MENU LANGUAGE ............................................................................................................................. 16
3.9 HDD FORMAT ................................................................................................................................... 16
4. READY TO USE ..................................................................................................................................... 16
4.1 SETUP MENU....................................................................................................................................16
4.1.1 Menu Language ...................................................................................................................... 16
4.1.2 Video System .........................................................................................................................16
4.1.3 Aspect Ratio ........................................................................................................................... 16
4.1.4 TV Region ..............................................................................................................................16
4.1.5 Channel Scan ......................................................................................................................... 16
4.1.6 Time ..................................................................................................................................... 16
5. MAIN MENU .........................................................................................................................................17
5.1 DTV/AV IN ....................................................................................................................................... 17
5.1.1 Pause Live TV/ Time-Shifting ....................................................................................................17
5.1.2 One Touch Recording ..............................................................................................................17
5.1.3 Timer Recording .....................................................................................................................17
5.1.4 EPG / Timer recording .............................................................................................................18

Media Player and DTV Receiver
IB-MP3012 series
http://www.icybox.de
TABLE OF CONTENTS
5.1.5 Watch the Recordings .............................................................................................................. 18
5.1.6 Video Setup ...........................................................................................................................18
5.2. SETUP ............................................................................................................................................18
5.2.1 System .................................................................................................................................. 18
5.2.2 TV ........................................................................................................................................19
5.2.3 REC ......................................................................................................................................19
5.2.4 Video ....................................................................................................................................19
5.2.5 Audio .................................................................................................................................... 20
5.2.6 Photo .................................................................................................................................... 21
5.2.7 Subtitle .................................................................................................................................21
5.2.8 Net ....................................................................................................................................... 21
5.3. BROWSER / MULTIMEDIA JUKEBOX .................................................................................................... 24
5.3.1 Playback the media files........................................................................................................... 24
5.3.2 The browser page ................................................................................................................... 24
5.3.2.1 HDD............................................................................................................................. 24
5.3.2.2 Movie ........................................................................................................................... 24
5.3.2.3 Music ........................................................................................................................... 27
5.3.2.4 Photo ...........................................................................................................................27
5.3.2.5 All ...............................................................................................................................28
5.3.2.6 Edit the media files ........................................................................................................ 28
5.3.2.7 Rename ........................................................................................................................28
5.3.2.8 Delete ..........................................................................................................................28
5.3.2.9 Playlist .........................................................................................................................29
5.3.2.10 Playlist type ................................................................................................................29
5.3.2.11 Search........................................................................................................................ 30
5.3.2.12 History ....................................................................................................................... 30
5.3.2.13 iPod ........................................................................................................................... 30
5.3.2.14 File Copy ....................................................................................................................30
6. SETUP THE IP ADDRESS ....................................................................................................................... 31
6.1 SETUP THE IP ADDRESS FOR PC MANUALLY ......................................................................................... 31
6.1.1 Setup the share folder on PC ....................................................................................................32
6.1.2 Browse and play the media on your PC ...................................................................................... 32
6.1.3 My Shortcuts .......................................................................................................................... 32
6.1.4 UPnP player ...........................................................................................................................32
6.2 THE SETUP FOR WINDOWS XP ........................................................................................................... 33
6.2.1 Windows Media Player 11 Setup (on Windows XP/Vista) ...............................................................33
6.2.2 Import the media files on Windows Media Player 11 .....................................................................34
6.2.3 Browse through UPnP ..............................................................................................................34
6.3 NAS FUNCTION ................................................................................................................................ 34
6.3.1 Enabling NAS function .............................................................................................................34
6.3.2 Access NAS function ................................................................................................................ 34
7. APPENDIX .............................................................................................................................................35
7.1 MAINTENANCE .................................................................................................................................35
7.2 FREQUENTLY ASKED QUESTIONS........................................................................................................ 36
7.3 SPECIFICATION ................................................................................................................................ 38
7.4 COPYRIGHTS AND TRADEMARKS ........................................................................................................ 39
7.4.1 Trademarks ............................................................................................................................39
7.4.2 Warranty ............................................................................................................................... 39
7.5 GPL STATEMENT ...............................................................................................................................40
Media Player and DTV Receiver
IB-MP3012 series
http://www.icybox.de
4
1. INTRODUCTION
1.1 Preface
IB-MP3012 is a powerful media player and DTV receiver which truly decodes, playback and outputs High Denition 1080p
in the market. Through the USB 2.0 port and the HDMI interface, IB-MP3012 playbacks the HD MPEG2, HD VC-1, HD
AVC/H.264 movie or transport stream from the USB ash drive or hard disk drive to HDTV screen. The DTV receiver function provides the advanced TV function including Time-shifting and recording. The Network function allows you to browse
the video le in your PC or NAS which is in your room and play it on TV in the living room.
Feature Highlights:
• Decode and output High Denition 1080p video and Photo.
• Support mainstream formats of HD video including MPEG-2, VC-1, H.264/AVC and RMVB HD.
• Watch DVB-T program with Pause Live TV and timer recording function.
• Within the next generation interface—HDMI 1.3 output.
• Ethernet port supports Network player function.
• High performance video playback. Experience uent playback control like Zoom out/in,
Pan the picture, Fast Forward, Fast Reverse, Slow-motion.
• Fully supports the subtitle format. Dynamically change the subtitle display by remote control.
• Photo playback via HD. Supports Up to 4 mega-pixel photo les, 16X Zoom in, 3-direction rotation.
• Slide show mode with 8 kinds of transition effect. Background music playback is supported.
• Rich types of music le. The playback function includes Fast Forward, Fast Reverse, Repeat,
• Shufe and Shufe Repeat.
• Within USB 2.0 port, plug-and-play the USB Flash Drive*, USB Mobile Hard Disk Drive*, USB
• Card Reader*, USB DVD-ROM*, USB Wi-Fi Dongle*.
• Supports all most all formats of HDD (3,5" up to 2 TB) and has the most interchangeability.
• Easy to use and intuitive control. Change to setup menu at any time even in media playing to
provide the uent control.
*not included
1.2 Packing List
Part Quantity
One IB-MP3012 media player 1
One power adapter 1
One remote control unit 1
Two AAA batteries 1
One mini jack to RCA composite cable 1
One RCA YPbPr cable 2
One HDD Quick Installation Guide 1
This User’s Manual 1
Note:
The actual contents in the package might be different from the packing list in this manual (depends on version).
1.3 Miscellaneous
This player’s design and manufacture has your safety in mind. In order to safely and effectively use this player, please
read the following before usage.
1.3.1 Usage cautions
User should not modify this player. The environmental temperature should be within +5° C ~ +35° C.

Media Player and DTV Receiver
IB-MP3012 series
http://www.icybox.de
5
1.3.2 Power
The player’s power voltage: DC 12 V.
When using this player, please connect the supplied AC adapter or AC adapter cable to the player’s power jack. When
placing the adapter cable, make sure it cannot get damaged or be subject to pressure. To reduce the risk of electric shock,
unplug the adapter rst before cleaning it. Never connect the adapter to the player in a humid or dusty area. Do not
replace the adapter or cable’s wire or connector.
1.3.3 Radio interference/compatibility
- If not properly shielded, almost all electronic devices will get radio interference. Under some conditions,
your player might get interference.
- The design of this player has followed the FCC/CE standard, and has followed the following rules:
(1) This player may not cause harmful interference;
(2) This player could accept some interference received including interference that may cause undesired operation.
1.3.4 Repair
If the player has a problem, you should take it to an appointed repair center and let the specialists do the repair, never
repair the player yourself, you might damage the player or endanger yourself or your data.
1.3.5 Disposing of the player
When you dispose of the player, be sure to dispose it appropriately. Some countries may regulate disposal of electrical
device, please consult with your local authority.
1.3.6 Broadband internet
Make sure that you have broadband internet access to use the internet functions of the product.
The IB-MP3012 is a Network media adapter and requires some knowledge about network issues, in order to connect the
MP-3012 perfectly to your home network. Make sure the perfect conguration of your network components before you
start-up the IB-MP3012.
The Internet service provider can charge extra fees for exceeding a certain limit of transferred data.
1.3.7 Wireless home network
The performance in a wireless home network is dependent upon the location of the wireless network devices and the
structure of the building.
1.3.8 Audio/Video formats
If you encounter problems while playing your media les, please check the utilised media formats. Due to the very large
number of different media formats and codec’s, ICY BOX cannot guarantee the compatibility of the IB-MP3012 with every
available media format (depends on used Video-/Audio bit rate and decoding software).
1.3.9 Others
• When using this player, please do not let the player come into contact with water or other liquid, if water is acciden-
tally spilled on the player, please use a dry cloth to absorb the spillage.
• Electronic products are vulnerable, when using please avoid shaking or hitting the player, and do not press the but-
tons too hard.
• Do not let the player come into contact with water or other liquid.
• Do not disassemble the player, repair the player or change the design of the player, any damage done will not be
included in the repair policy.
• Do not press the buttons of the player too hard.
• Avoid hitting the player with hard object, avoid shaking the player, and stay away from magnetic elds.
• During electrostatic discharge and the strong electromagnetic eld, the product will malfunction, and then unplug the
power cable and the product will return to normal performance next time it is powered on.
• The IB-MP3012 is not designed or intended to, and may not be used to violate any copyrights or other IP (Intellectual
Property) rights. Each user of IB-MP3012 may only use it in connection with materials legally owned by or licensed to
the user and only extend such ownership or license rights that will permit such use.
Media Player and DTV Receiver
IB-MP3012 series
http://www.icybox.de
7
6
2. PRODUCT OVERVIEW
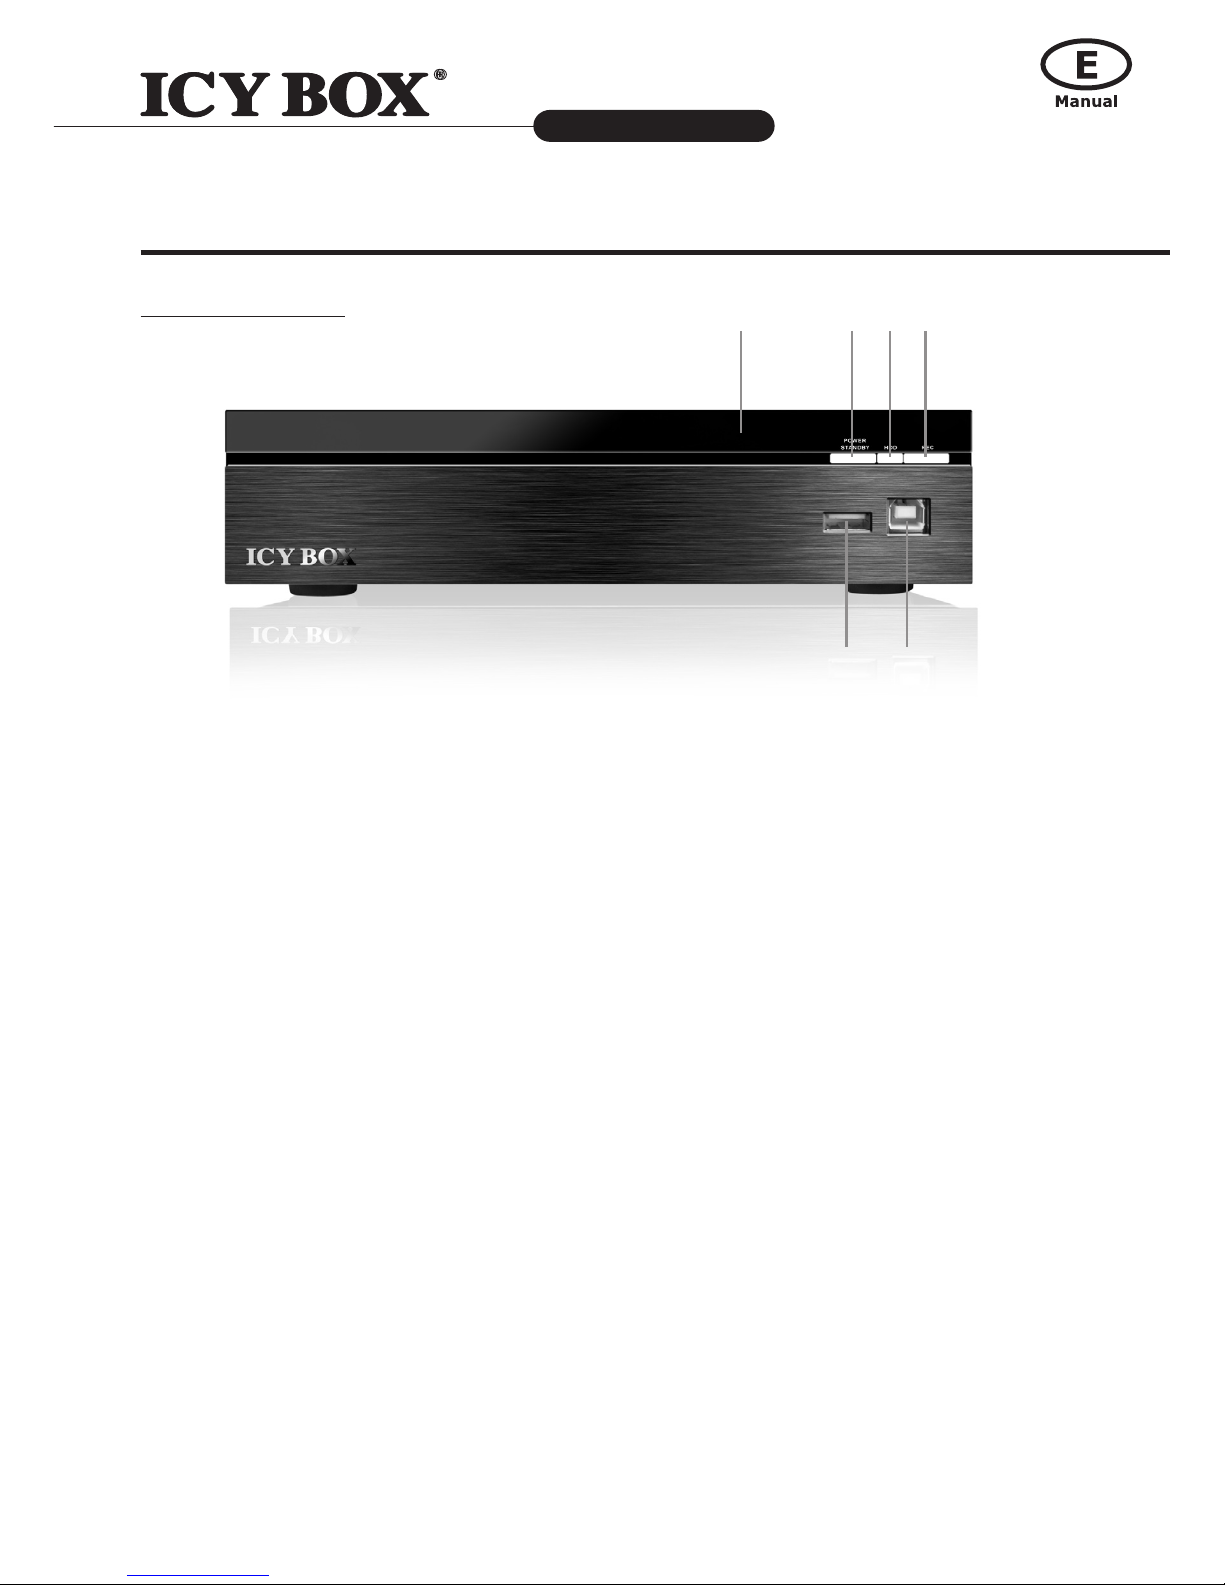
2.1 Panel front side
1. POWER/STANDBY button:
Press it to standby or wake up this player. It lights blue when power on.
2. HDD indicator:
It lights when the HDD has read/write action.
3. REC button:
Press it to record. It lights while recording.
4. IR sensor:
The IR sensor is in the front panel. Make sure that there are no
obstacles between remote controller and the front panel.
5. USB port:
This USB 2.0 type A socket is for the external USB Flash Disk,
USB Mass Storage, USB DVD-ROM or USB Wi-Fi Dongle.
6. PC-Link:
Plug in the PC-Link cable to transfer the data from PC to internal HDD.
Attention: USB port and PC-Link can’t plug in at the same time or the player can’t be started.
Attention:
USB port and PC-Link can’t plug in at the same time or the player can’t be started.
1. 2. 3.4.
5. 6.
7
Media Player and DTV Receiver
IB-MP3012 series
http://www.icybox.de
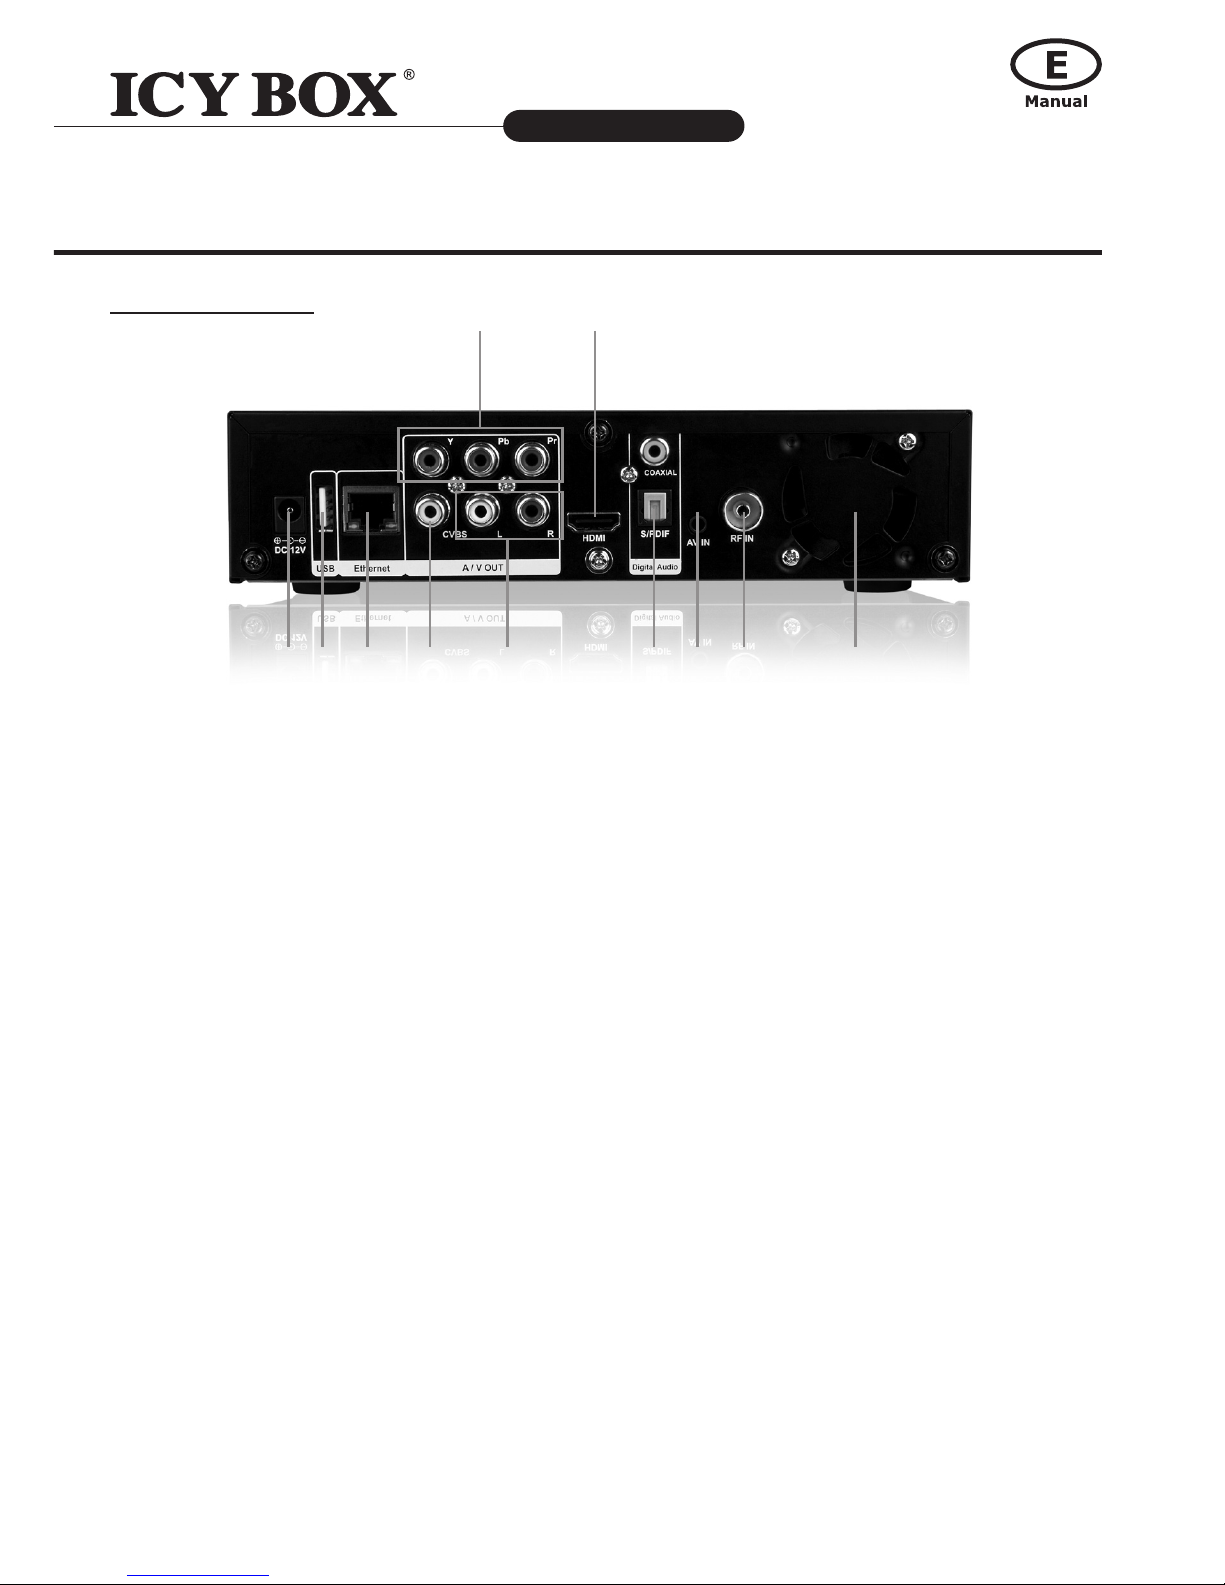
1. HDMI output:
This port is to connect with HDMI receiver or HDMI TV set.
2. YPbPr:
This port is for the YPbPr input of TV set. Use the bundled phone jack to RCA jack cable to connect.
3. VIDEO (CVBS):
This port is for the CVBS input of TV set.
4. AUDIO L/R:
These ports are the analog stereo audio channels to the input of TV set.
If the HDMI is connected, then you don’t need to connect AUDIO L/R.
5. S/PDIF:
This is the Coaxial & TOSLINK (optical) digital output for audio.
6. Ethernet port:
This is the Ethernet port for the sharing through Local Network.
7. USB port:
This USB 2.0 type A socket is for the external USB Flash Disk, USB Mass Storage, USB DVD-ROM
or USB Wi-Fi Dongle.
8. DC IN:
It connects the DC input of the Power Adapter.
9. AV IN:
This port is for the CVBS input from a source device like i.e. set top box, VCR for recording.
10. RF IN:
This is the antenna (not included) input for TV reception.
11. FAN:
The FAN is in this area and keeps it clear.
1.2.
3. 4. 5.6.7.8. 9.
2.2 Panel Back side
10. 11.
8
Media Player and DTV Receiver
IB-MP3012 series
http://www.icybox.de
9
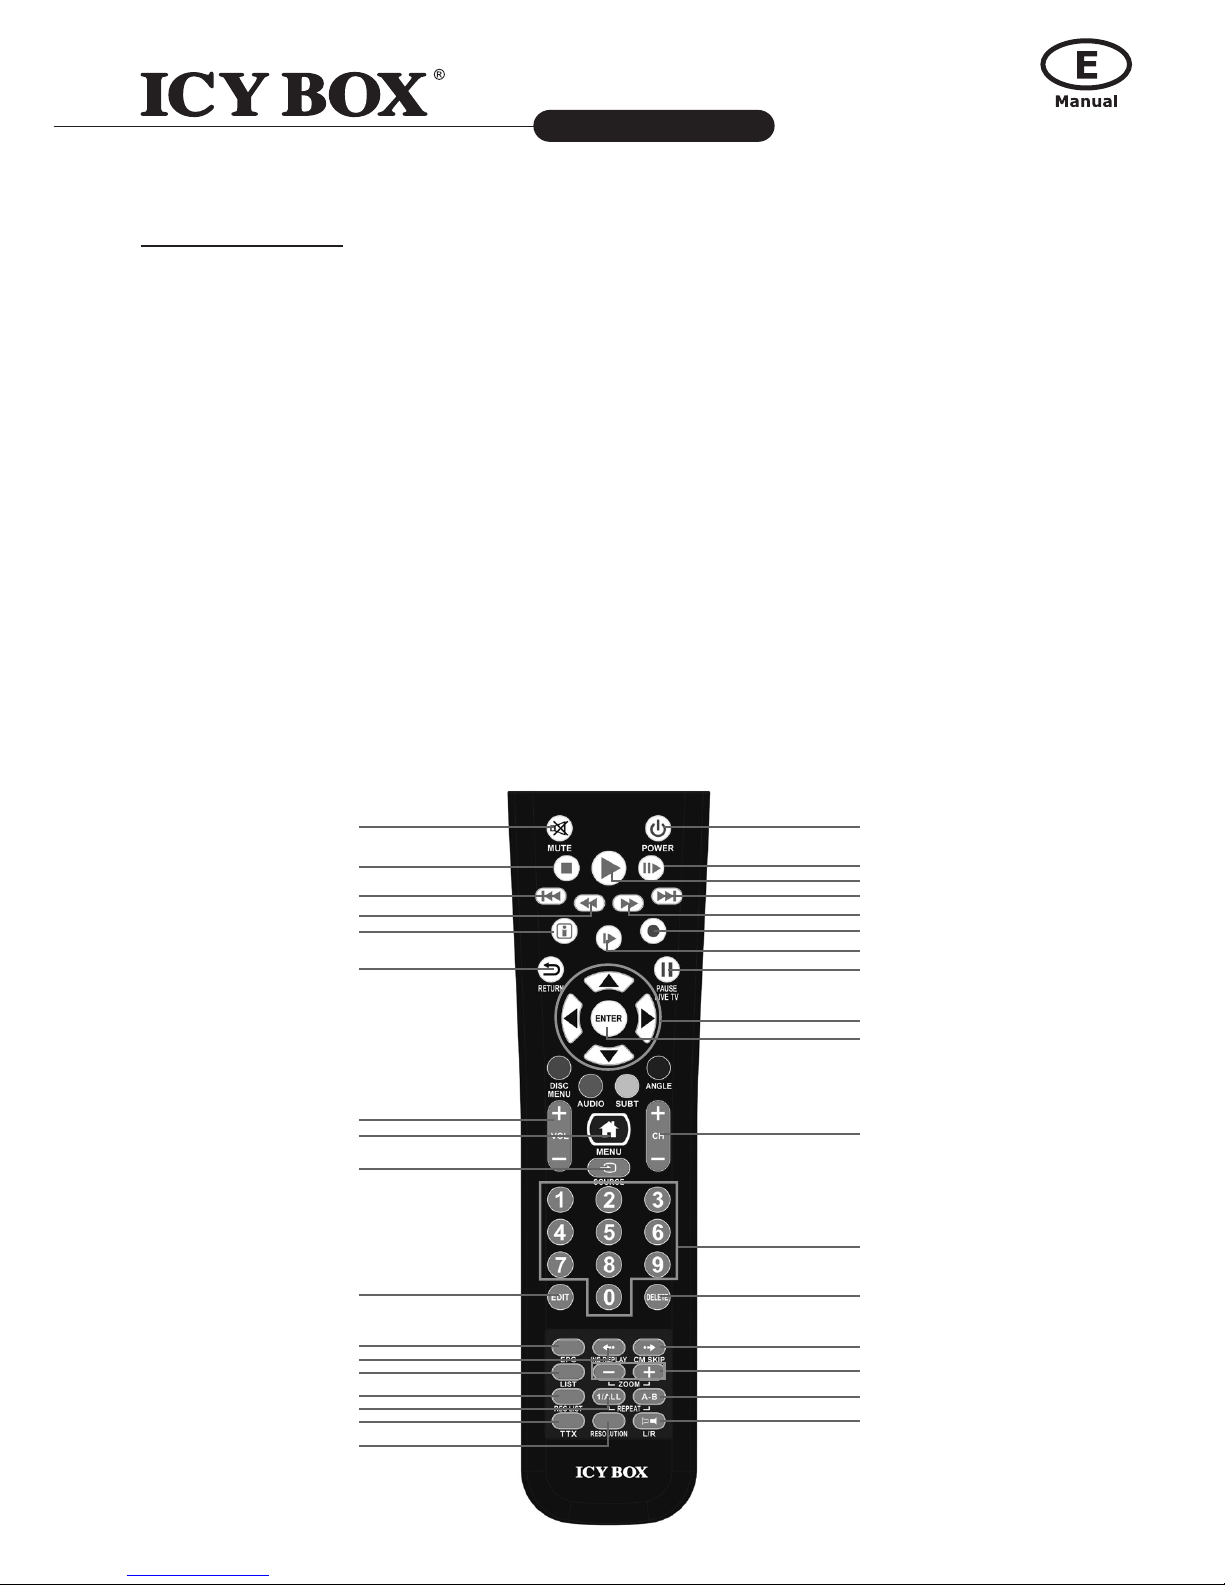
2.3 Remote Control
First time usage of Remote control:
Install the batteries before using the remote control!
To install the remote control batteries:
Slide the battery cover off the back of the remote control.
Install two AAA size batteries. Match the + and – symbols on the batteries to the symbols on the battery compartment.
Slide the battery cover on to the remote control until the lock snaps.
Caution: Never throw batteries into a re.
Note:
• Be sure to use AAA size alkaline batteries.
• Dispose of batteries in a designated disposal area.
• Batteries should always be disposed of with the environment in mind. Always disposes batteries in accordance with
applicable laws and regulations.
• If the remote control does not operate correctly, or if the operating range becomes reduced, replace batteries with
new ones.
• When necessary to replace batteries in the remote control, always replace both batteries with new ones. Never mix
battery types or use new and used batteries in combination.
• Always remove the batteries from the remote control if they are dead or if the remote control is not to be used for an
extended period of time. This will prevent battery acid from leaking into the battery compartment.
• All procedures in this manual can be carried out using the remote control buttons.
See the following for details on each button and its function:
1
5
4
2
3
6
7
8
9
10
11
12
13
14
15
16
17
18
19
20
21
22
23
24
25
26
27
28
29
30
31
32
33
34

9
Media Player and DTV Receiver
IB-MP3012 series
http://www.icybox.de
No. Button Function
1 POWER Press to enter standby mode or wake up.
2 MUTE Press to mute audio output, and press again to resume.
3 STOP Press to stop playback.
4 PLAY Press to begin playback.
5 PAUSE/STEP
Press to pause the current playback. Press again to step to the next frame. Press
the PLAY button to resume playback.
6 NEXT Press to view the next le / page down/up.
7 PREVIOUS Press to view the previous le / page down/up.
8 FR Press to fast rewind the current playback. Press repeatedly to select speeds.
9 FF Press to fast forward the current playback. Press repeatedly to select speeds.
10 INFO Press to hide or display the information bar during playback.
11 SLOW
Press to play back in slow motion. Press the PLAY button to resume regular playback.
12 REC Press to record DTV or A/V in
13 RETURN Press to return to the previous screen while navigating menus.
14 PAUSE LIVE TV start the time-shifting function
15 Navigational buttons Press the arrow buttons to select menu options,
16 ENTER Press the ENTER button to conrm a selection.
17 VOL- /VOL+ Press to decrease / increase the volume.
18 MENU Press to open the setup menu.
19 SOURCE Press to choose DTV/AV in as the video source.
20 CH +/- Press to change DTV channel.
21 Numeric buttons Press to enter numeric input when changing settings.
22 EDIT Press to open the edit menu while browsing the le.
23 DELETE Press to delete the le or character.
24 EPG Press to open EPG window (Electronic Program Guide).
25 INS REPLAY
Press to go backward 5 seconds of video in Time-shifting mode and backward 7
seconds of the current playback, which suitable for sport programs.
26 CM SKIP Press to jump ahead 5 seconds of video in Time-shifting mode.
27 LIST Press to display DTV program list.

10
Media Player and DTV Receiver
IB-MP3012 series
http://www.icybox.de
11
28 ZOOM IN/OUT Press to zoom in/out the image (photo or video).
29 REC LIST Press to browse the video recording.
30 REPEAT 1/ALL Press to repeat one or all titles.
31 REPEAT A-B
Press to repeat from point A to point B. The rst click will mark point A and the
second will mark point B, and then it will repeat from A to B.
32 TTX Press to open the DTV teletext.
33 RESOLUTION Press to switch between NTSC, PAL, 480P, 576P, 720P, 1080I, and 1080P.
34 L/R Press to change Right/Left audio channel removal.
Function keys
Video playback
DVD menu
File browser Network function
Red/DISC MENU Open DVD menu N/A Refresh list
Green/AUDIO Change audio Ch Edit / Reject Edit
Yellow/SUBT
Open subtitle
menu
Switch to thumbnail
preview
N/A
Blue/ANGLE Change angle Return to main menu Return to main menu
2.5 HDD Installation
This player supports 3.5" internal HDD (Hard Disk Drive).
To open the case and install the HDD please refer to the quick installation guide sheet within the package content.
If the HDD is a fresh one, the manual format is required. Press "MENU" key and enter setup to format the HDD.
Navigate to System and select "HDD Format" to format. The next window will ask the amount of time-shifting buffer.
Increase/decrease the capacity to increase/decrease the buffer, or use the default capacity. Please refer to the DTV/AV
in section for the meaning of time-shifting.

11
Media Player and DTV Receiver
IB-MP3012 series
http://www.icybox.de
3. GENERAL CONNECTIONS
3.1 Power Connection
• Follow the picture and connect the AC adaptor to the player's DC IN jack;
• Follow the picture and plug in the AC adaptor to the power outlet.
• Switch the power button at the front panel on.
3.2 Connecting to a PC
(1) Make sure the player is powered on;
(2) Plug in the squarish connector of the USB cable to this player's USB DEVICE port;
(3) Plug in the rectangular connector of the USB cable to computer.
In this way, you can manage content on the built-in HDD of the player on your local PC.
12
Media Player and DTV Receiver
IB-MP3012 series
http://www.icybox.de
13
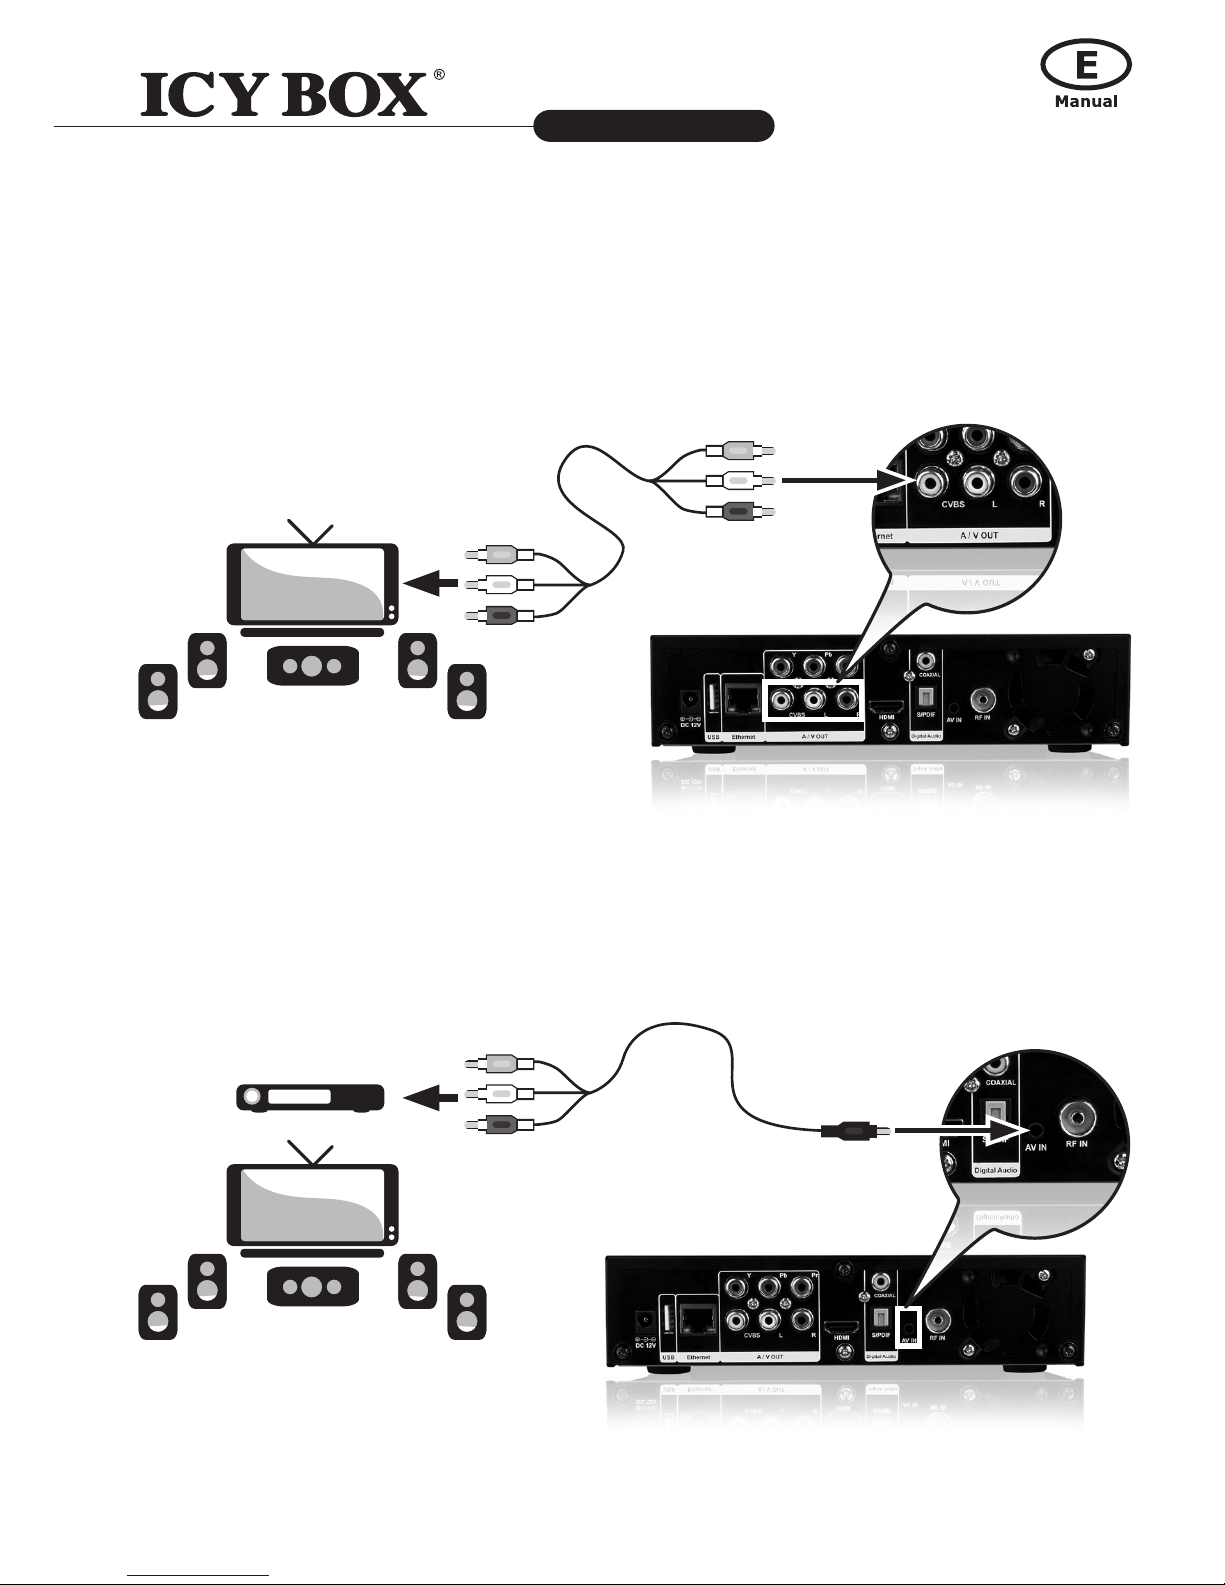
3.3 A/V Connection
3.3.1 Composite Connection
(1) Follow the picture and plug in the 3 color connector to the player's A/V OUT jack;
(2) Follow the picture and plug in the 3 color connector to the TV's A/V IN jack.
In this way, you can enjoy the content in the player on TV or other display devices.
A/V IN Connection
(1) Follow the picture and plug in the 3.5 mm jack to the player’s A/V IN jack;
(2) Follow the picture and plug in the 3 color connector to the A/V OUT jack of the TV/IPTV Set-Top Box (STB)/VCR.
In this way, you can record TV programs from the TV/IPTV Set-Top Box/VCR.
STB
13
Media Player and DTV Receiver
IB-MP3012 series
http://www.icybox.de
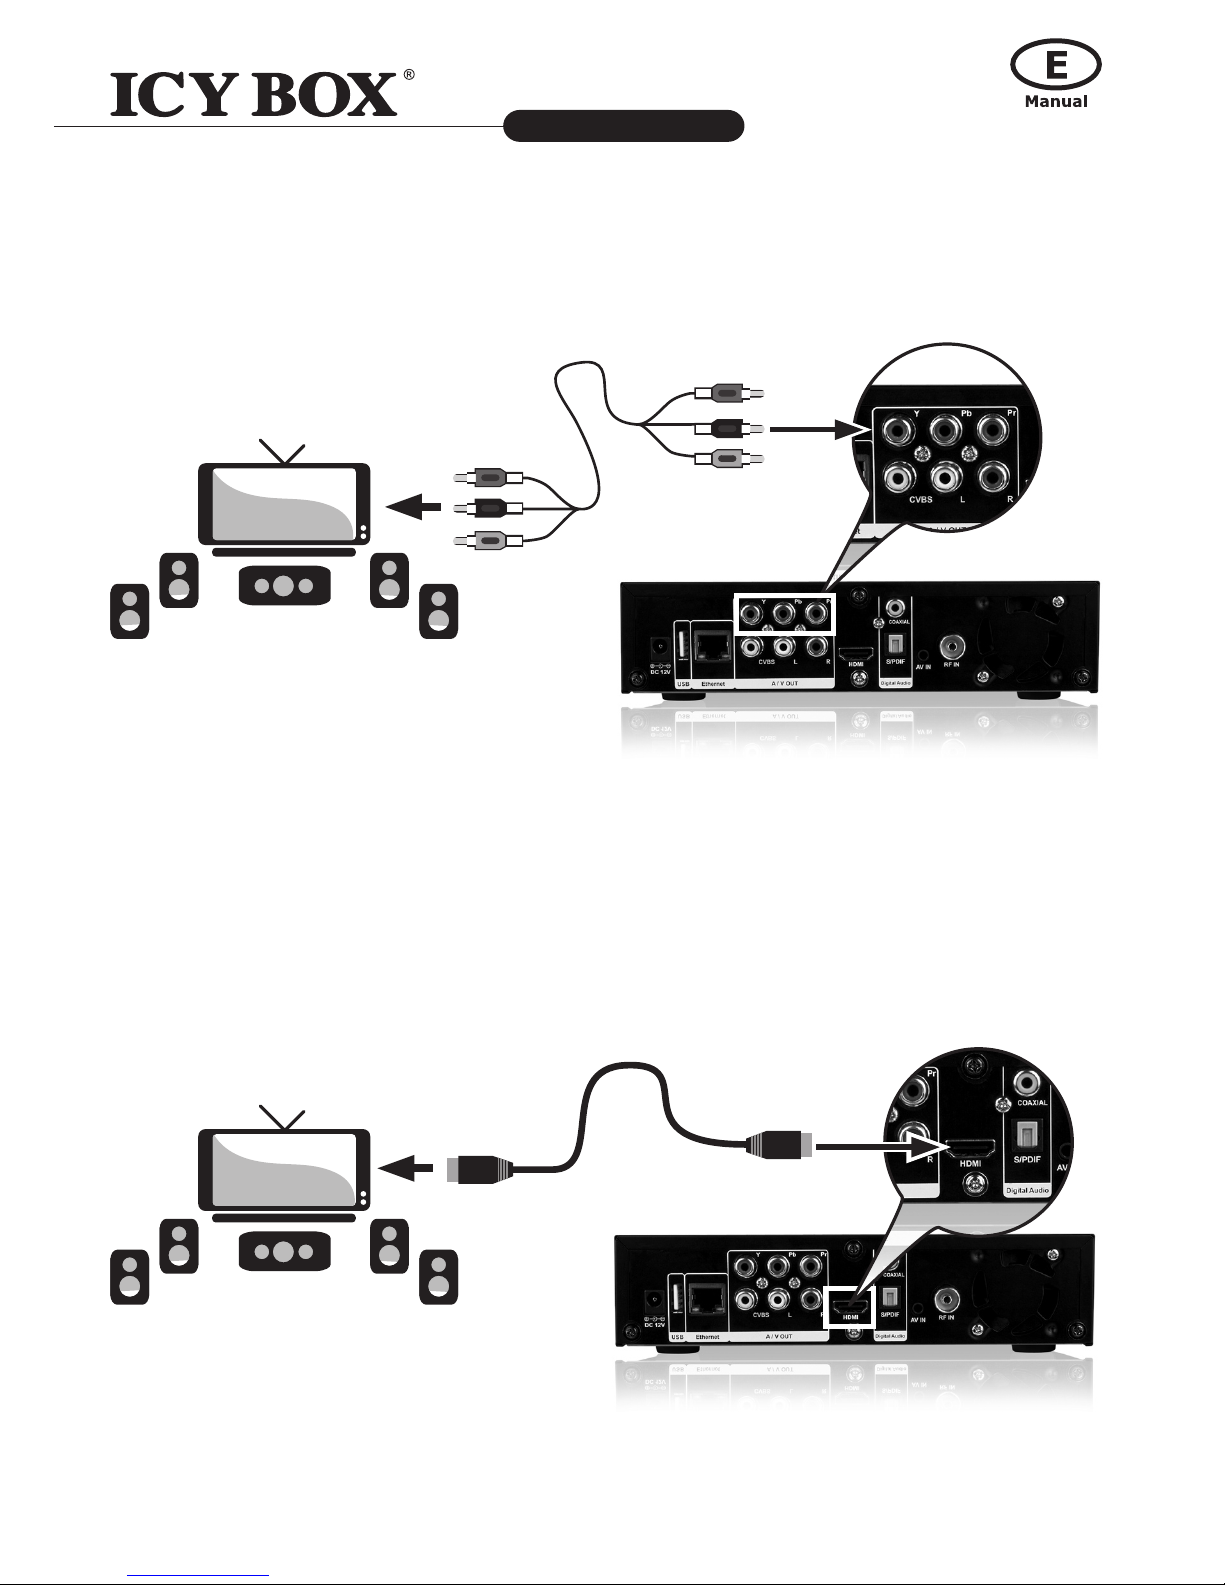
3.3.4 HDMI Connection
(1) Follow the picture and plug one connector on your HDMI cable (not included) to the player's HDMI jack;
(2) Follow the picture and plug the other connector on your HDMI cable to the TV's HDMI jack.
In this way, you can have the highest quality video and audio via a single cable.
3.3.3 Component Connection
(1) Follow the picture and plug in the 3 color connector to the player's Component jack;
(2) Follow the picture and plug in the 3 color connector to the TV's Component jack.
Audio Connection while using component Video out:
First method: use the audio output from the A/V OUT jack;
Second method: use the audio output from the S/PDIF Optical jack.
In this way, you can also enjoy videos, music, and photos in the player on TV.
14
Media Player and DTV Receiver
IB-MP3012 series
http://www.icybox.de
15
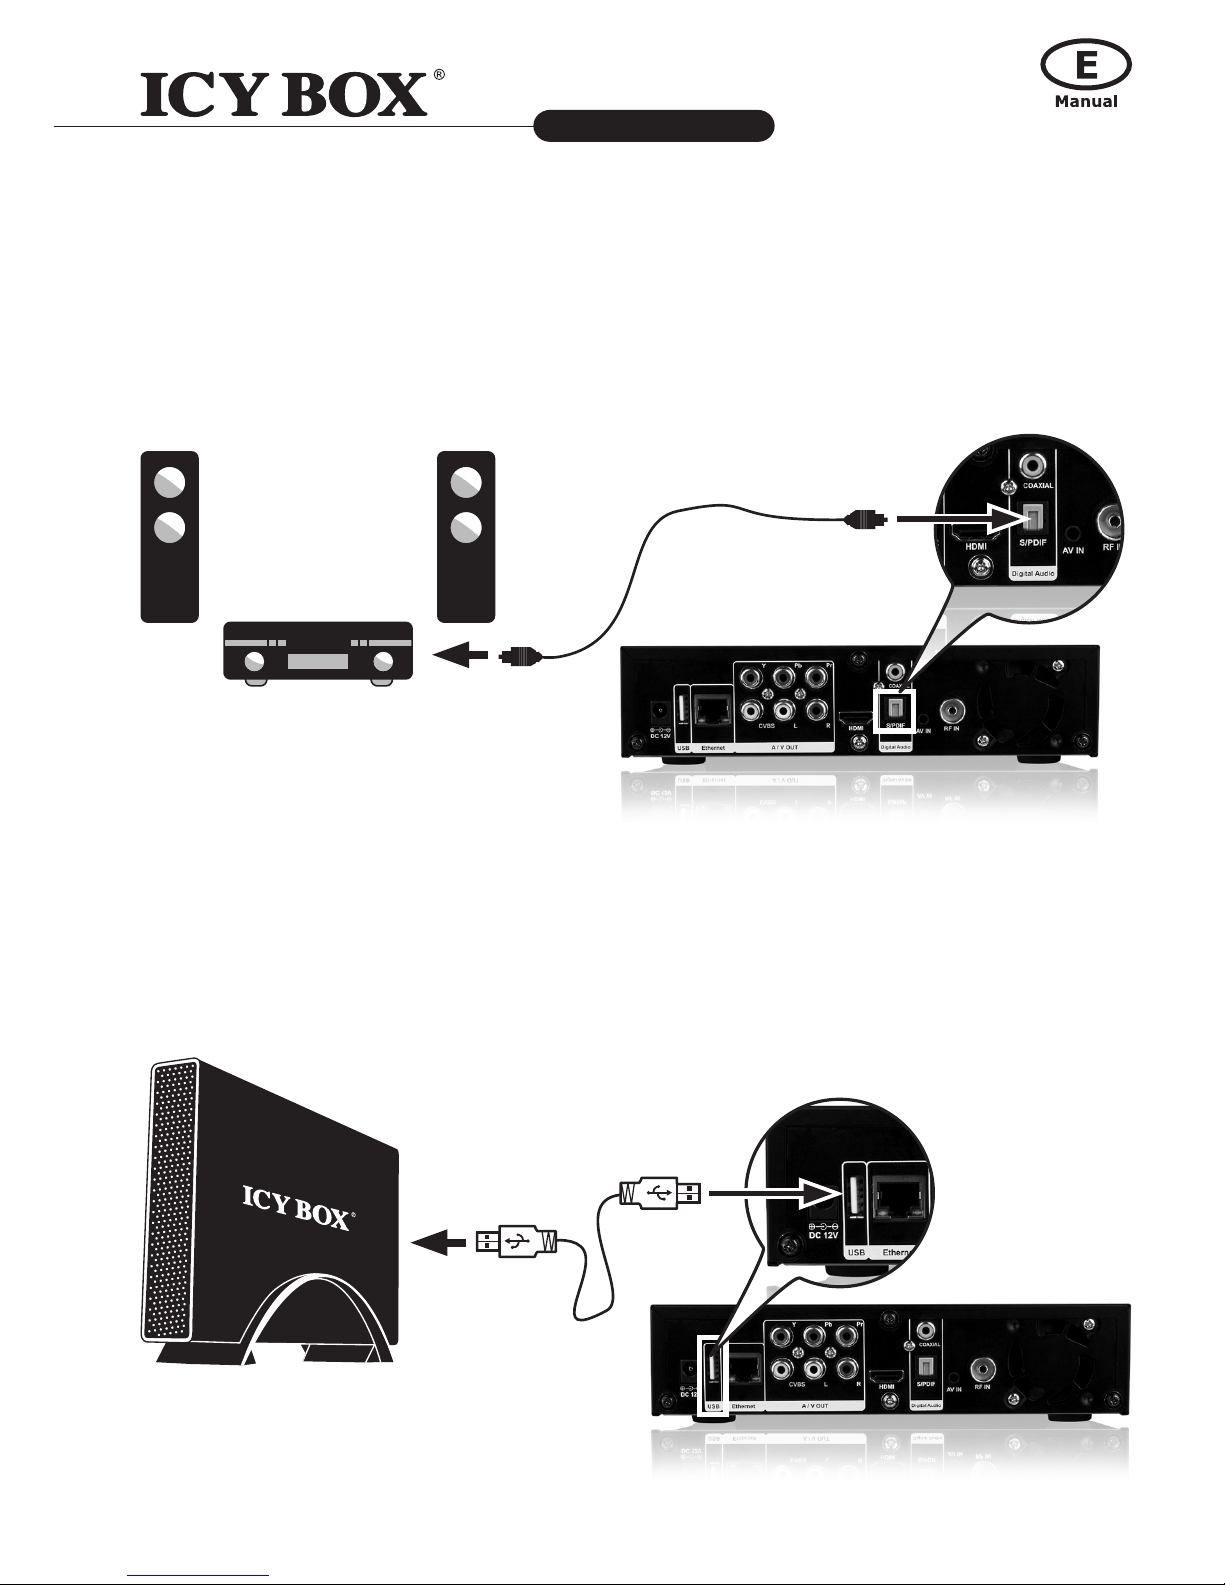
3.4 Connecting an USB Device to IB-MP3012
3.4.1 Connecting a USB Device (like USB stick or USB HDD)
Make sure the player is powered on.
Plug in USB HUB, USB Enclosure and USB Pen Drive, USB DVD-ROM to one of the USB host ports of this player.
In this way, you can browse contents on the USB device.
3.3.5 Digital Audio Device Connection (cables not included)
(1) Please plug in the Toslink connector on your optical ber or
coaxial connector to the player’s S/PDIF optical/coaxial jack (not supplied).
(2) Follow the picture and plug in the other connector on your optical ber/coaxial
cable to the digital audio device (not supplied).
 Loading...