

Page 1
Manual IB-DK2401AC
USB 3.0 Display and Multi Port Docking Station
Handbuch IB-DK2401AC
USB 3.0 Anzeige- und Multiport Docking Station
Manuel Série IB-DK2401AC
Écran et station d‘accueil multi-ports USB 3.0
Manuale della IB-DK2401AC
Stazione docking multi-porta USB 3.0 con adattatore multi-display
Manual Serie IB-DK2401AC
Estación de acoplamiento multipuertos y para monitores USB 3.0
Εγχειρίδιο χρήσης IB-DK2401AC
Σταθμός αγκύρωσης οθόνης και πολλαπλών θυρών USB 3.0
Instrukcja obsługi IB-DK2401AC
Stacja dokująca do wyświetlaczy i wieloportowa USB 3.0
Руководство IB-DK2401AC
10-портовый концентратор USB 3.0
Manual de Utilização Série IB-DK2401AC
Docking Station para monitor e multiportas, com interface USB 3.0
Manuál IB-DK2401AC Series
Dokovací stanice USB 3.0 na displej a s více porty
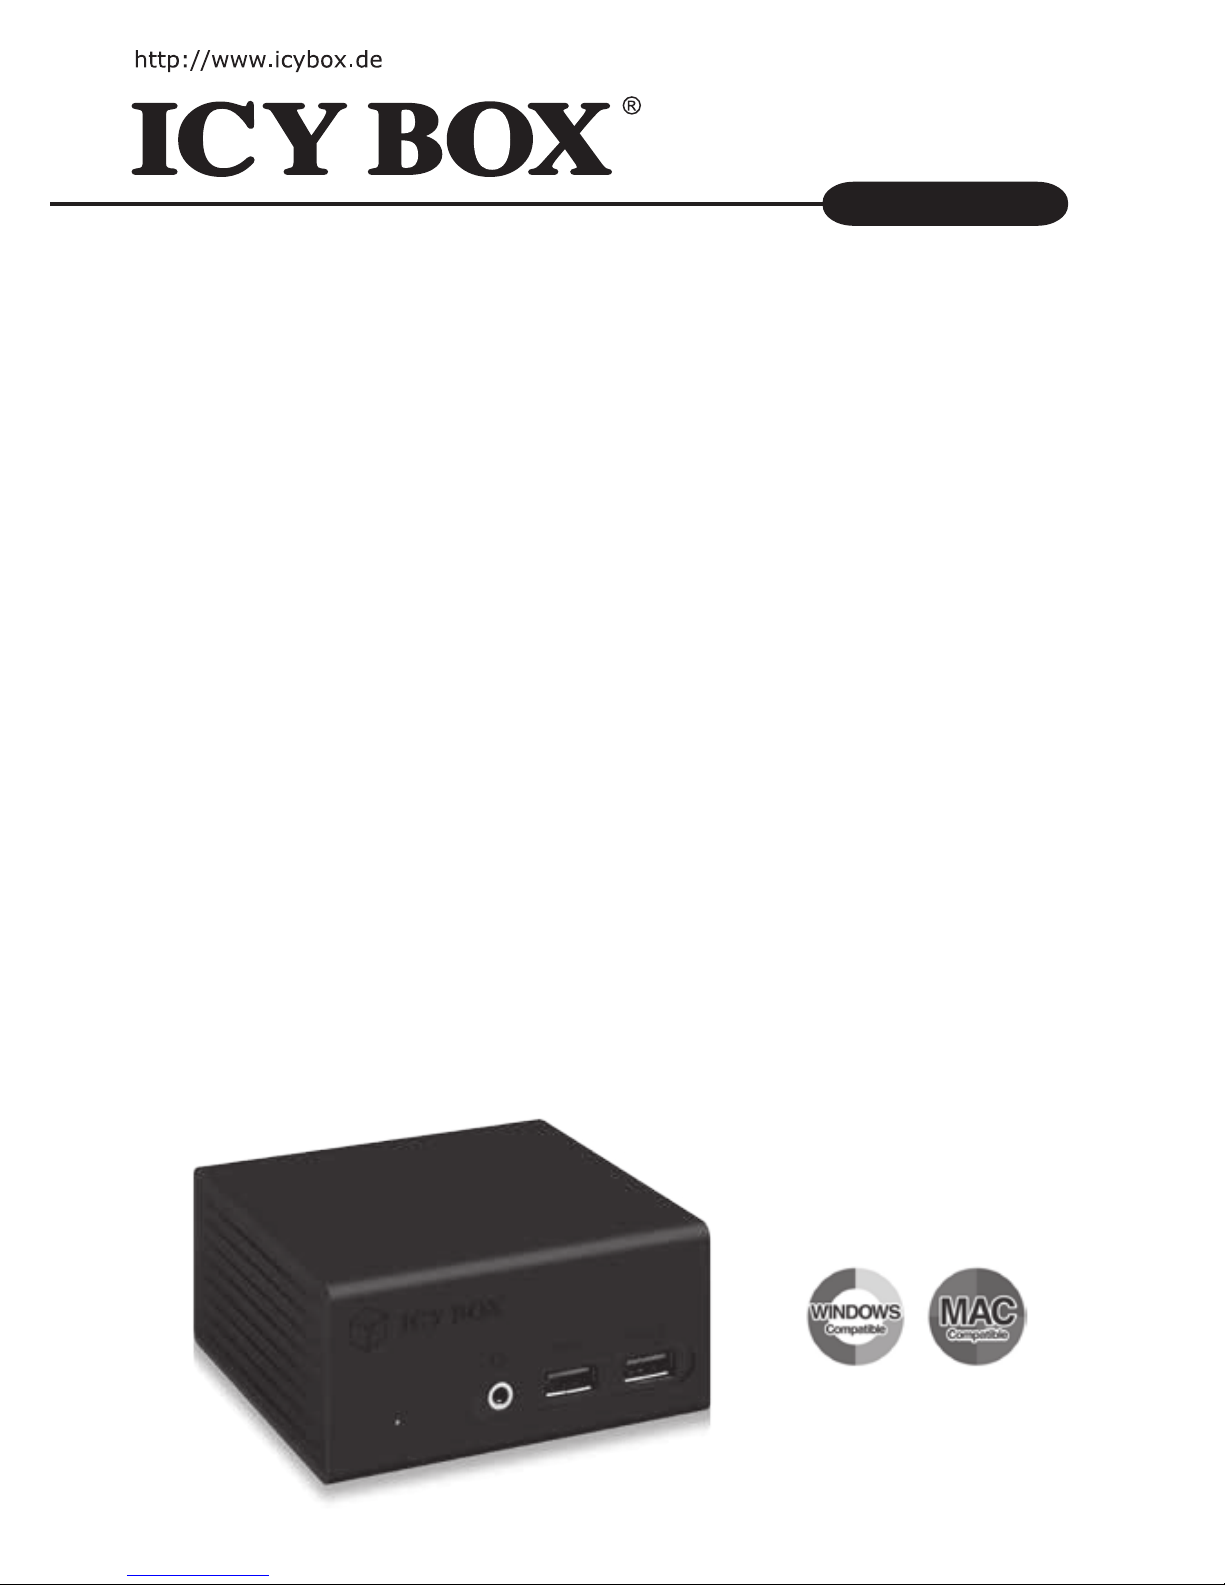
IB-DK2401AC
Page 2
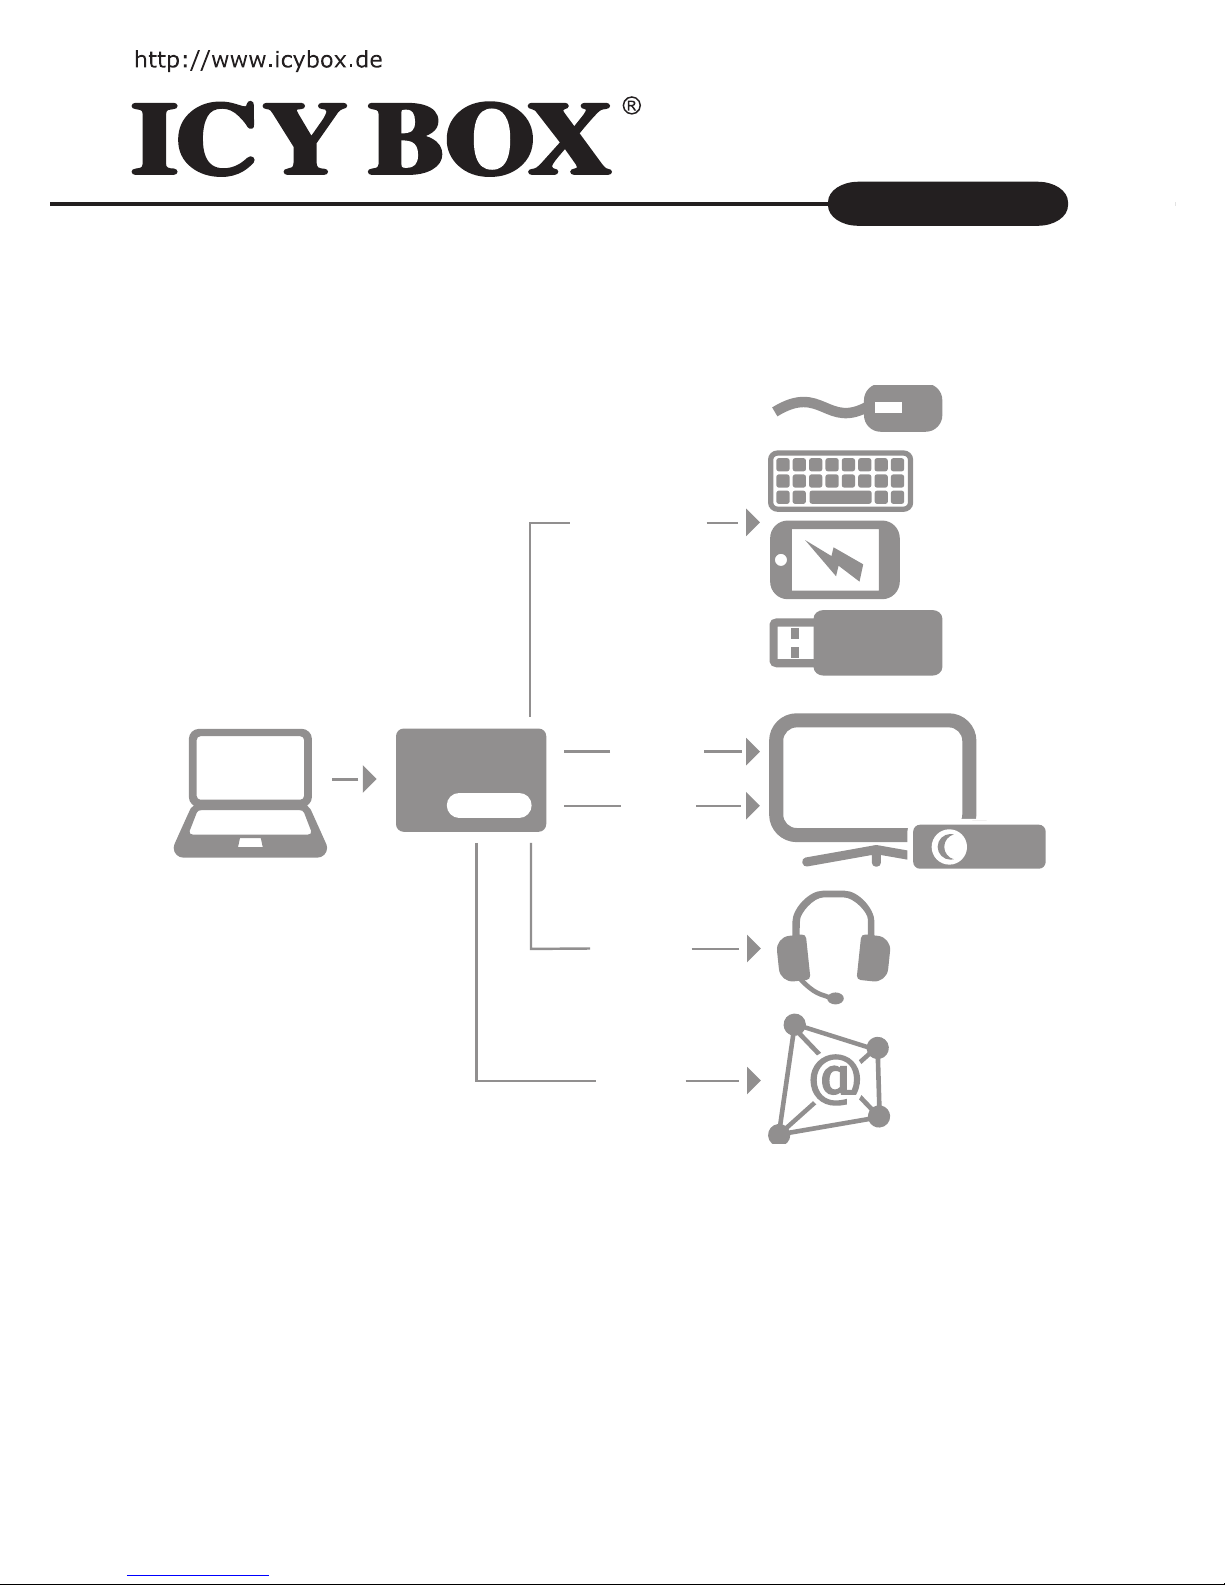
Package content
IB-DK2401AC, USB 3.0 cable, power supply, CD (driver for Windows and Mac), quick installation guide
IB-DK2401AC
Connection Diagram
USB 3.0
Audio
VGA
HDMI
RJ45
IB-DK2401AC
Page 3
Note
* When using the HDMI® and the DVI connector simultaneously,
the HDMI® connector will not be able to reach 4K resolutions.
** BC 1.2 charging mode only available in self-powered mode.
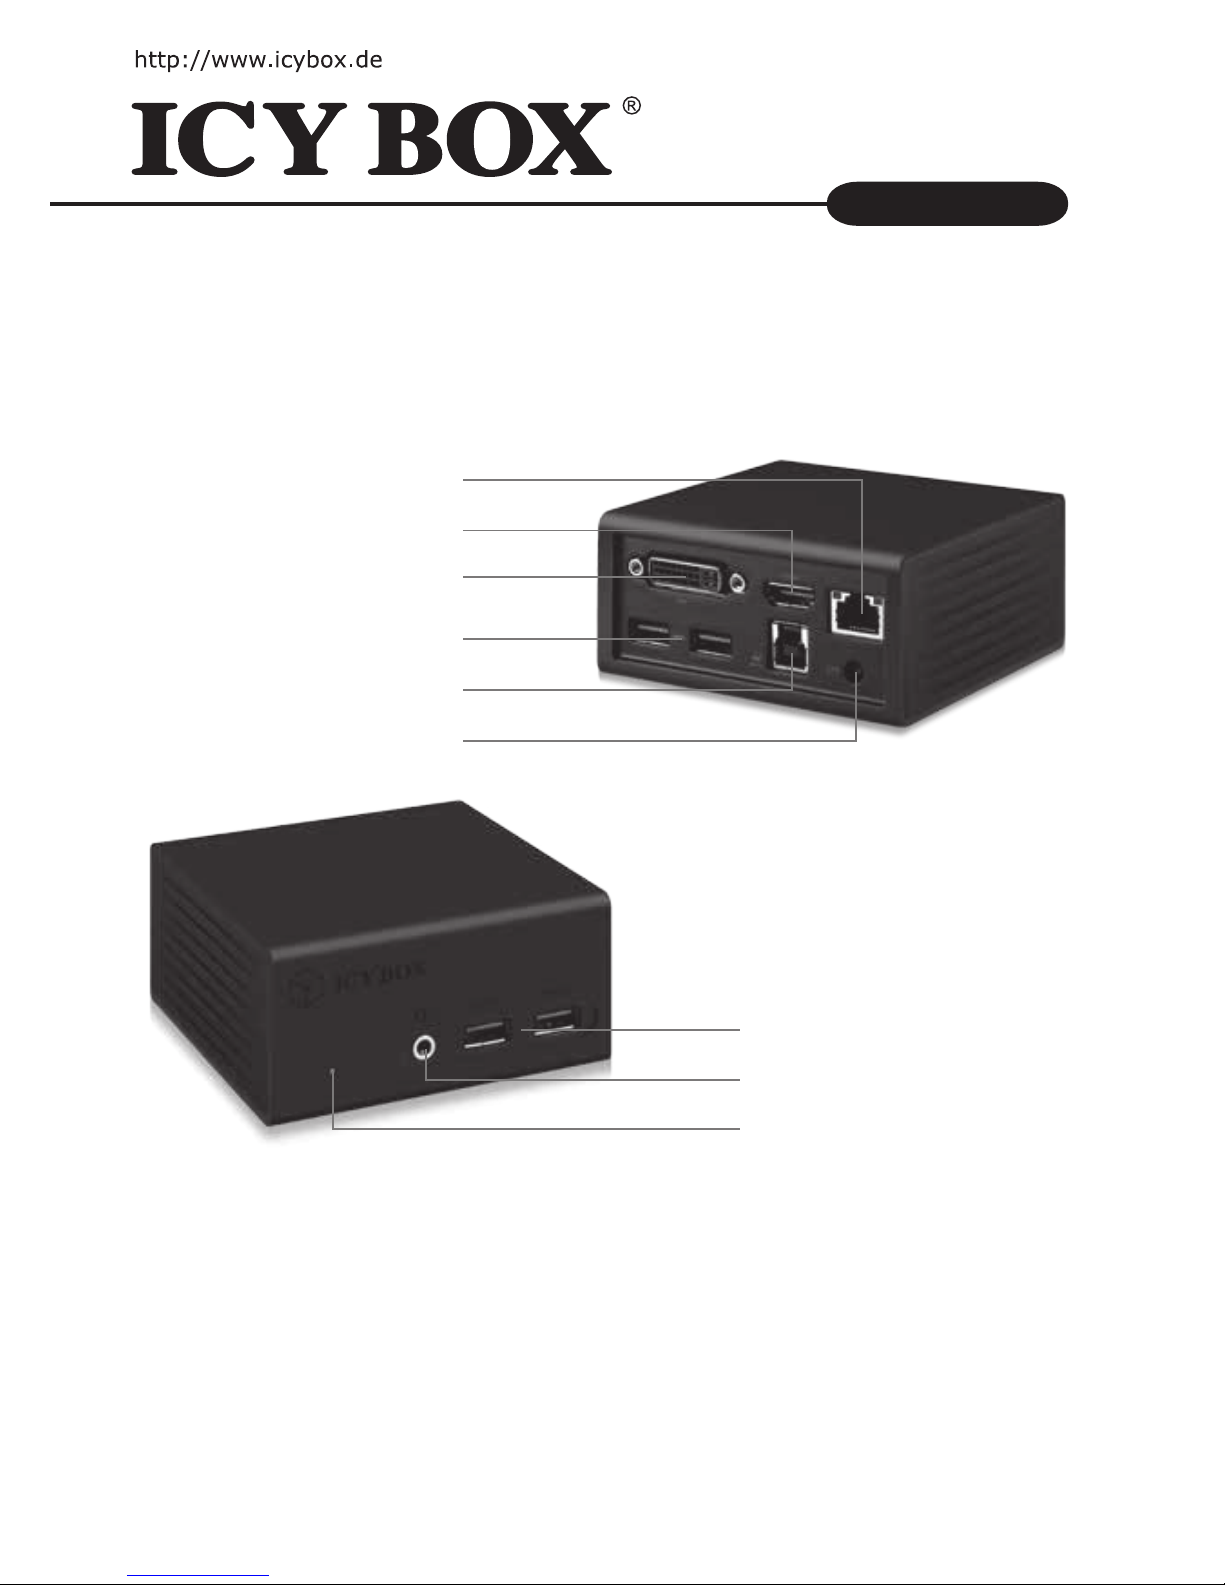
IB-DK2401AC
Combo audio port
2x USB 3.0 charge port **
USB 3.0 host interface
Power LED
2x USB 3.0
Power connector
DVI port
HDMI
®
connector *
RJ45 Ethernet port
Product Overview
Page 4

IB-DK2401AC
Description
The USB 3.0 Display and Multi Port Docking Station is designed for extra connectivity demands. With
the docking station you can extend the connection of a Computer to more display and USB peripherals,
Ethernet network, speaker and microphone through one USB cable.
1. Install the Driver
* Caution: Do not connect the adapter to your computer before installing the driver from the deliver-
ed CD or from the download area of http://www.raidsonic.de.
Windows >7:
A. Insert the CD into the CD ROM drive.
B. The installer program will run automatically.
C. Click on “Run Setup.exe”.
D. Follow the instructions and nish the driver installation.
E. Connect the adapter to a USB port on the PC.
F. Restart the PC.
G. The IB-DK2401AC is ready to be used.
MAC OS X >10.8:
A. Insert the CD into the CD ROM drive.
B. Run the le Mac_driver\ driver.dmg by double click.
C. Follow the instructions and nish the driver installation.
D. Connect the adapter to a USB port on the mac.
E. Restart the mac.
F. The IB-DK2401AC is ready to be used.
2. Connection to Monitor/Projector
Connect the USB 3.0 cable to your notebook / PC and connect your monitor / projector to the HDMI®
or DVI port.
Please setup your display settings accordingly to your operating system and requirements. For detailed
information of your operating system, see the corresponding operation manual and description of your
operating system.
NOTE: When using the HDMI® and the DVI connector simultaneously,
the HDMI® connector will not be able to reach 4K resolutions
USB 3.0 BC 1.2 charging mode only available in self-powered mode.
Page 5

IB-DK2401AC
Beschreibung
Die USB 3.0 Multiport Docking Station wurde zur Anschlusserweiterung Ihres Computersystems entwickelt. Mit der Docking Station können Sie über nur eine USB 3.0 Schnittstelle Ihres Notebooks oder
PC’s weitere Anzeigeeinheiten, USB Geräte, Ethernet Netzwerk, Lautsprecher und Mikrofon verwenden.
1. Installieren Sie den Treiber
*Achtung: Installieren Sie bitte zuerst den Treiber mithilfe der beiliegenden Treiber CD-ROM oder
laden Sie die aktuellen Treiber unter http://www.raidsonic.de herunter. Schließen Sie erst nach der
Installation die Docking Station an ihr System an!
Windows >7:
A. Legen Sie die CD in ihr CD ROM Laufwerk
B. Starten Sie „Run Setup.exe“
C. Folgen Sie den Anweisungen und Beenden Sie die Installation
D. Starten Sie ihren PC neu
E. Verbinden Sie die Dockingstation mit ihrem PC
F. Fertig! Sie können den IB-DK2401AC nun verwenden.
MAC OS X >10.8:
A. Legen Sie die CD in ihr CD Rom Laufwerk
B. Starten Sie Datei Mac_driver\ driver.dmg
C. Folgen Sie den Anweisungen
D. Verbinden Sie die Dockingstation mit Ihrem Mac
E. Starten Sie ihren Mac neu
F. Fertig! Sie können die IB-DK2401AC nun verwenden.
2. Monitor / Projektor verbinden
Verbinden Sie das USB 3.0 Kabel mit ihrem Notebook und anschließend den Monitor/Projektor mit
einem HDMI® oder DVI Kabel. Nun navigieren Sie unter Windows und Mac in die Einstellungen/Bilschir-
mauösung und stellen die Auösung und Monitoreigenschaften nach ihren Wünschen ein.
Zur optimalen Einstellung Ihrer Anzeigeeinheiten gehen Sie bitte entsprechend Ihres Betriebssystems
und Bedürfnissen vor. Genauere Informationen entnehmen Sie bitte dem Handbuch und Beschreibungen ihres Betriebssystems.
Hinweis: Werden beide Videoanschlüsse (HDMI® und DVI) gleichzeitig verwendet,
steht die 4K Auösung für den HDMI® Anschluss nicht zur Verfügung.
Die BC 1.2 Ladespezikation steht nur zur Verfügung, wenn die
IB-DK2401AC nicht per USB mit dem Rechner verbunden ist.
Page 6

IB-DK2401AC
Description
L‘ensemble écran et station d‘accueil multi-ports USB 3.0 est conçu pour les besoins de connectivités
supplémentaires. Grâce à la station d‘accueil, vous pouvez étendre la connexion d‘un ordinateur à
d‘avantage de périphériques d‘achage et USB, réseau Ethernet, haut-parleur et microphone via un
câble USB.
1. Installation du pilote
* Attention: Ne pas brancher l‘adaptateur à votre ordinateur avant d‘installer le pilote à partir du CD
fourni ou de la zone de téléchargement à l‘adresse http://www.raidsonic.de.
Windows >7:
A. Insérez le CD dans le lecteur de CD ROM.
B. Le programme d‘installation s‘exécutera automatiquement.
C. Cliquez sur « Run Setup.exe ».
D. Suivez les instructions et terminez l‘installation du pilote.
E. Connectez l‘adaptateur à un port USB du PC.
F. Redémarrez le PC.
G. L‘IB-DK2401AC est prêt à l‘emploi.
MAC OS X >10.8:
A. Insérez le CD dans le lecteur de CD ROM.
B. Exécutez le chier Mac_driver\ driver.dmg en double-cliquant dessus.
C. Suivez les instructions et terminez l‘installation du pilote.
D. Connectez l‘adaptateur à un port USB du MAC.
E. Redémarrez le MAC.
F. L‘IB-DK2401AC est prêt à l‘emploi.
2. Raccordement au moniteur/projecteur
Branchez le câble USB 3.0 à votre notebook / PC et connectez votre moniteur / projecteur au port
HDMI® ou DVI.
Veuillez congurer les paramètres de votre moniteur selon votre système d‘exploitation et votre conguration requise. Pour plus d‘informations sur votre système d‘exploitation, reportez-vous à son manuel de fonctionnement et à sa description.
Page 7

IB-DK2401AC
Descrizione
La stazione docking multi-porta USB 3.0 con adattatore multi-display risponde alle esigenze di connettività extra. Con la stazione docking è possibile estendere per mezzo di un cavo USB la connessione
di un computer a più di una periferica USB e display, alla rete Ethernet, agli speaker e al microfono.
1. Installazione dei driver
* Attenzione: non collegare l’adattatore al PC prima di installare i driver dal CD fornito o dall’area di
download all’indirizzo http://www.raidsonic.de.
Windows >7:
A. Inserire il CD nel CD ROM.
B. Il programma di installazione si avvia automaticamente.
C. Fare clic su “Run Setup.exe”.
D. Seguire le istruzioni e nire l’installazione dei driver.
E. Collegare l’adattatore alla porta USB del PC.
F. Riavviare il PC.
G. IB-DK2401AC è pronto all’uso.
MAC OS X >10.8:
A. Inserire il CD nel CD ROM.
B. Eseguire il le Mac_driver\ driver.dmg facendo doppio clic su di esso.
C. Seguire le istruzioni e nire l’installazione dei driver.
D. Collegare l’adattatore alla porta USB del MAC.
E. Riavviare il MAC.
F. IB-DK2401AC è pronto all’uso.
2. Collegamento al monitor/proiettore
Collegare il cavo USB 3.0 al notebook/PC ed il monitor/proiettore alla porta HDMI® o DVI.
Congurare il monitor in base ai propri requisiti e al proprio sistema operativo.
Per ulteriori informazioni sul proprio sistema operativo, consultare il rispettivo manuale d’uso e la
descrizione del sistema operativo.
Page 8

IB-DK2401AC
Descripción
Estación de acoplamiento multipuertos y para monitores USB 3.0 se ha diseñado para satisfacer la
necesidad de conexiones adicionales. Con la estación de acoplamiento es posible ampliar la conexión
de un ordenador para otra pantalla y periféricos USB, red Ethernet, altavoz y micrófono a través de
un cable USB.
1. Instalación del controlador
* Precaución: No conectar el adaptador al ordenador antes de instalar el controlador desde el CD
suministrado o desde la zona de descargas en http://www.raidsonic.de.
Windows >7:
A. Introduzca el CD en la unidad CD ROM.
B. El programa del instalador se ejecutará automáticamente.
C. Haga clic en “Run Setup.exe”.
D. Siga las instrucciones hasta que concluya la instalación del controlador.
E. Conecte el adaptador a un puerto USB del PC.
F. Reinicie el PC.
G. El IB-DK2401AC ya está listo para comenzar a utilizarlo.
MAC OS X >10.8:
A. Introduzca el CD en la unidad CD ROM.
B. Haga doble clic en el archivo Mac_driver\ driver.dmg para ejecutarlo.
C. Siga las instrucciones hasta que concluya la instalación del controlador.
D. Conecte el adaptador a un puerto USB del MAC.
E. Reinicie el MAC.
F. El IB-DK2401AC ya está listo para comenzar a utilizarlo.
2. Conexión a un monitor/proyector
Conecte el cable USB 3.0 al portátil/PC y su monitor/proyector al puerto HDMI® o DVI.
Adapte la conguración de su monitor al sistema operativo en ejecución o conforme a los requisitos. Si
necesita más información sobre su sistema operativo, consulte el manual de funcionamiento correspondiente y la descripción de su sistema operativo.
Page 9

IB-DK2401AC
Descrição
A Docking Station para monitor e multiportas, com interface USB 3.0, está concebida para exigências
de conectividade acrescidas. A Docking Station permite-lhe aumentar a conexão de um computador a
vários periféricos de monitor e USB, rede Ethernet, altifalantes e microfone através de um cabo USB.
1. Instalar o controlador
* Atenção: não ligue o adaptador ao seu computador antes de instalar o controlador a partir do CD
fornecido ou a partir da área de transferências de http://www.raidsonic.de.
Windows >7:
A. Insira o CD na unidade de CD-ROM.
B. O programa de instalação irá executar-se automaticamente.
C. Clique em “Run Setup.exe”.
D. Observe as instruções e termine a instalação do controlador.
E. Ligue o adaptador a uma porta USB no PC.
F. Reinicie o PC.
G. O IB-DK2401AC está pronto a ser usado.
MAC OS X >10.8:
A. Insira o CD na unidade de CD-ROM.
B. Execute o cheiro Mac_driver\ driver.dmg clicando duas vezes nele.
C. Observe as instruções e termine a instalação do controlador.
D. Ligue o adaptador a uma porta USB no MAC.
E. Reinicie o MAC.
F. O IB-DK2401AC está pronto a ser usado.
2. Conexão ao monitor/projetor
Ligue o cabo USB 3.0 ao seu computador portátil/PC e ligue o seu monitor/projetor à porta HDMI® ou DVI.
Congure as denições do seu monitor de acordo com o seu sistema operativo e com os requisitos do
mesmo. Para informações mais pormenorizadas sobre o seu sistema operativo, consulte o respetivo
manual de instruções e a descrição do seu sistema operativo.
Page 10

IB-DK2401AC
Opis
Stacja dokująca do wyświetlaczy i wieloportowa USB 3.0 jest przeznaczona do podłączania dodatkowych urządzeń. Umożliwia podłączanie do komputera większej liczby wyświetlaczy i peryferiów USB,
sieci Ethernet, głośników i mikrofonu przez jeden kabel USB.
1. Instalacja sterownika
* Przestroga: Nie podłączać adaptera do komputera przed zainstalowaniem sterownika z dołączonej
płyty CD lub z obszaru pobierania http://www.raidsonic.de.
Windows >7:
A. Włożyć płytę CD do napędu CD-ROM.
B. Program instalacyjny uruchomi się automatycznie.
C. Kliknąć „Uruchom Setup.exe”.
D. Postępować zgodnie z instrukcjami i zakończyć instalację sterownika.
E. Podłączyć adapter do portu USB komputera PC.
F. Ponownie uruchomić komputer PC.
G. Stacja IB-DK2401AC jest gotowa do użytku.
MAC OS X >10.8:
A. Włożyć płytę CD do napędu CD-ROM.
B. Uruchomić plik Mac_driver\ driver.dmg przez dwukrotne kliknięcie.
C. Postępować zgodnie z instrukcjami i zakończyć instalację sterownika.
D. Podłączyć adapter do portu USB komputera MAC.
E. Ponownie uruchomić komputer MAC.
F. Stacja IB-DK2401AC jest gotowa do użytku.
2. Podłączanie do monitora/projektora
Podłączyć kabel USB 3.0 do noteboooka / PC i podłączyć monitor / projektor do portu HDMI® lub DVI.
Skongurować ustawienia monitora odpowiednio do systemu operacyjnego i wymagań. Szczegółowe
informacje o systemie operacyjnym są zawarte w odpowiedniej instrukcji i opisie systemu operacyj-
nego.
Page 11

IB-DK2401AC
Popis
Dokovací stanice USB 3.0 na displej a s více porty je určena ke splnění zvláštních požadavků na možnosti připojení. S touto dokovací stanicí lze pomocí jednoho USB kabelu rozšířit možnosti připojení
počítače na více displejů a USB periferií, síť Ethernet, reproduktor a mikrofon.
1. Instalace ovladače
* Varování: Adaptér nepřipojujte k počítači před instalací ovladače z přiloženého CD nebo z oblasti ke
stažení na stránkách http://www.raidsonic.de.
Windows >7:
A. Vložte CD do jednotky CD-ROM.
B. Instalační program se spustí automaticky.
C. Klikněte na „Spustit Setup.exe“.
D. Postupujte podle pokynů a dokončete instalaci ovladače.
E. Připojte adaptér k počítači pomocí USB portu.
F. Restartuje počítač.
G. IB-DK2401AC je připraveno k použití.
MAC OS X >10.8:
A. Vložte CD do jednotky CD-ROM.
B. Dvojím kliknutím spusťte ovladač Mac_driver\ driver.dmg
C. Postupujte podle pokynů a dokončete instalaci ovladače.
D. Připojte adaptér k počítači pomocí USB portu.
E. Restartuje počítač.
F. IB-DK2401AC je připraveno k použití.
2. Spojení s monitorem/projektorem
Připojte kabel USB 3.0 k notebooku / PC a připojte monitor / projektor k portu HDMI® nebo DVI.
Nastavte monitor v souladu s operačním systémem a požadavky. Podrobné informace o operačním
systému viz odpovídající návod k použití a popis vašeho operačního systému.
Page 12

IB-DK2401AC
Περιγραφή
Ο σταθμός αγκύρωσης οθόνης και πολλαπλών θυρών USB 3.0 έχει σχεδιαστεί για πρόσθετες ανάγκες
συνδεσιμότητας. Με τον σταθμό αγκύρωσης, μπορείτε να επεκτείνετε τη σύνδεση ενός υπολογιστή σε
περισσότερα περιφερειακά οθόνης και USB, δίκτυο Ethernet, ηχείο και μικρόφωνο μέσω ενός καλωδίου
USB.
1. Εγκατάσταση του προγράμματος οδήγησης
* Προσοχή: Μη συνδέσετε τον προσαρμογέα στον υπολογιστή σας προτού εγκαταστήσετε το
πρόγραμμα οδήγησης από το παρεχόμενο CD ή από την περιοχή στοιχείων λήψης της σελίδας http://
www.raidsonic.de.
Windows >7:
A. Εισαγάγετε το CD στη μονάδα CD ROM.
B. Το πρόγραμμα εγκατάστασης θα εκτελεστεί αυτόματα.
Γ. Κάντε κλικ στο αρχείο “Run Setup.exe”.
Δ. Ακολουθήστε τις οδηγίες και ολοκληρώστε την εγκατάσταση του
προγράμματος οδήγησης.
E. Συνδέστε τον προσαρμογέα σε μια θύρα USB του υπολογιστή.
ΣΤ. Κάντε επανεκκίνηση του υπολογιστή.
Ζ. Το IB-DK2401AC είναι έτοιμο για χρήση.
MAC OS X >10.8:
A. Εισαγάγετε το CD στη μονάδα CD ROM.
B. Εκτελέστε το αρχείο Mac_driver\ driver.dmg κάνοντας διπλό κλικ.
Γ. Ακολουθήστε τις οδηγίες και ολοκληρώστε την εγκατάσταση του
προγράμματος οδήγησης.
Δ. Συνδέστε τον προσαρμογέα σε μια θύρα USB του υπολογιστή.
E. Κάντε επανεκκίνηση του υπολογιστή.
ΣΤ. Το IB-DK2401AC είναι έτοιμο για χρήση.
2. Σύνδεση σε οθόνη/προβολέα
Συνδέστε το καλώδιο USB 3.0 στον φορητό υπολογιστή / επιτραπέζιο υπολογιστή και συνδέστε την
οθόνη / τον προβολέα σας στη θύρα HDMI® ή DVI.
Ορίστε τις ρυθμίσεις της οθόνης σας ανάλογα με το λειτουργικό σύστημα και τις απαιτήσεις σας. Για
αναλυτικές πληροφορίες για το λειτουργικό σύστημα που διαθέτετε, ανατρέξτε στο αντίστοιχο εγχειρίδιο
χρήσης και την περιγραφή του λειτουργικού συστήματός σας.
Page 13

IB-DK2401AC
Описание
Дисплей и многопортовая док-станция USB 3.0 обеспечивают дополнительные возможности для
подключения. С помощью док-станции можно подключить компьютер к большему количеству
дисплеев и внешних устройств USB, к сети Ethernet, колонкам и микрофону, используя всего
один USB-кабель.
1. Установка драйвера
*Осторожно! Не подключайте адаптер к компьютеру перед установкой драйвера с
предоставленного компакт-диска или загруженного с сайта http://www.raidsonic.de.
Windows >7:
A. Вставьте компакт-диск в дисковод для компакт-дисков.
В. Автоматически запустится программа установки.
С. Нажмите файл «Run Setup.exe».
D. Выполните инструкции и завершите установку драйвера.
Е. Подключите адаптер к USB-порту компьютера.
F. Перезагрузите компьютер.
G. Устройство IB-DK2401AC готово к использованию.
MAC OS X >10.8:
A. Вставьте компакт-диск в дисковод для компакт-дисков.
В. Двойным щелчком запустите файл Mac_driver\ driver.dmg
C. Выполните инструкции и завершите установку драйвера.
D. Подключите адаптер к USB-порту компьютера.
E. Перезагрузите компьютер.
F. Устройство IB-DK2401AC готово к использованию.
2. Подключение к монитору/проектору
Присоедините кабель USB 3.0 к ноутбуку/ПК и подключите монитор/проектор к порту HDMI® или DVI.
Настройте монитор в соответствии с вашей операционной системой и требованиями. Для
получения более подробной информации о вашей операционной системе см. ее описание в
соответствующем руководстве пользователя.
Page 14

© Copyright 2014 by RaidSonic Technology GmbH. All Rights Reserved
The information contained in this manual is believed to be accurate and reliable. RaidSonic Technology GmbH
assumes no responsibility for any errors contained in this manual. RaidSonic Technology GmbH reserves the
right to make changes in the specications and/or design of the above mentioned product without prior notice.
The diagrams contained in this manual may also not fully represent the product that you are using and are
there for illustration purposes only. RaidSonic Technology GmbH assumes no responsibility for any dierences
between the product mentioned in this manual and the product you may have.
The terms HDMI and HDMI High-Denition Multimedia Interface, and the HDMI Logo are
trademarks or registered trademarks of HDMI Licensing LLC in the United States and other countries
 Loading...