

Page 1
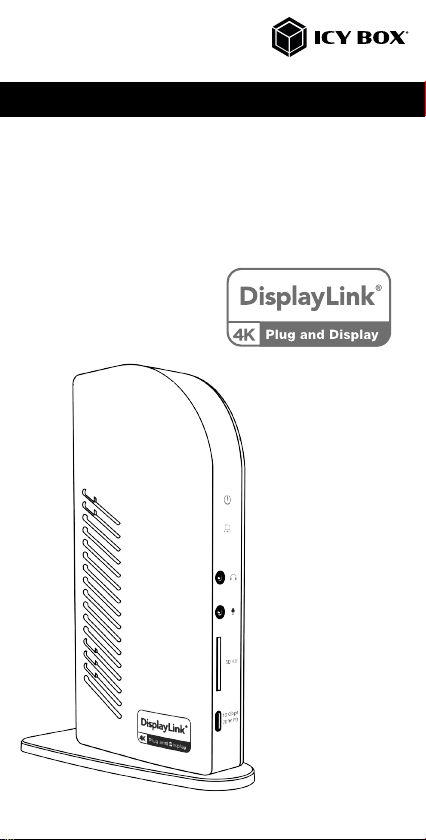
Manual IB-DK2256AC
DisplayLink® DockingStation with triple video output
DisplayLink® DockingStation mit dreifacher Videoausgabe
Handbuch IB-DK2256AC
Page 2

Page 3
Handbuch IB-DK2256AC
Sicherheitshinweise IB-DK2256AC
Zur Vermeidung körperlicher Schäden, sowie von Sach-, Geräteschäden
und Datenverlust beachten Sie bitte folgende Hinweise:
Warnstufen
Signalwort und Sicherheitszeichen kennzeichnen die Warnstufe und geben einen
sofortigen Hinweis auf Wahrscheinlichkeit, Art und Schwere der Folgen, wenn die
Maßnahmen zur Vermeidung der Gefahr nicht befolgt werden.
GEFAHR
WARNUNG
VORSICHT
ACHTUNG
1. Gefahren durch elektrische Spannung
WARNUNG
• vor Benutzung Betriebsanleitung lesen
• vor Arbeiten am Gerät, Spannungsfreiheit sicherstellen
• Kontaktschutzblenden nicht entfernen
• Kontakt mit Spannungsführenden Komponenten vermeiden.
• Steckkontakte nicht mit spitzen und metallischen Gegenständen berühren
• Verwendung nur in dafür vorgesehenen Umgebungen
• Gerät ausschließlich mit Typenschildkonformen Netzteil betreiben!
• Gerät/Netzteil fern von Feuchtigkeit, Flüssigkeit, Dampf und Staub halten
• Eigenständige Modifikationen sind unzulässig
• Gerät nicht während eines Gewitters anschließen
• Geben Sie Ihr Gerät im Reparaturfall in den Fachhandel
2. Gefahren während Montage (wenn vorgesehen)
VORSICHT
• vor Montage, Betriebsanleitung lesen
• Kontakt mit scharfen Kanten oder spitzen Bauteilen vermeiden
• Bauteile nicht mit Gewalt zusammensetzen
• geeignetes Werkzeug verwenden
• nur gegebenenfalls mitgeliefertes Zubehör und Werkzeug verwenden
3. Gefahren durch Wärmeentwicklung
ACHTUNG
• externe Erwärmung vermeiden und Luftaustausch zulassen
warnt vor einer unmittelbar gefährlichen Situation, die
zum Tod oder zu schweren Verletzungen führen wird.
warnt vor einer möglicherweise gefährlichen
Situation, die zum Tod oder zu schweren Verletzungen
führen kann.
warnt vor einer möglicherweise gefährlichen Situation, die zu leichten Verletzungen führen kann.
warnt vor einer möglichen Situation, die zu Sach- und
Umweltschäden führen und den Betriebsablauf stören
kann.
Kontakt mit elektrisch leitenden Teilen
Lebensgefahr durch Stromschlag
Scharfkantige Bauteile
Finger- oder Handverletzungen bei Zusammenbau
(wenn vorgesehen) möglich
Mangelhafte Belüftung des Geräts/Netzteils
Überhitzung und Ausfall des Geräts/Netzteils
Page 4
Handbuch IB-DK2256ACSicherheitshinweise IB-DK2256AC
• Lüfter-Auslass und passive Kühlkörper freihalten
• direkte Sonneneinstrahlung auf Gerät/Netzteil vermeiden
• ausreichend Umgebungsluft für Gerät/Netzteil sicherstellen
• keine Gegenstände auf dem Gerät/Netzteil abstellen
4. Gefahren durch Kleinstteile und Verpackung
WARNUNG
• Kleinteile, Zubehör für Kinder unzugänglich verwahren
• Plastiktüten und Verpackung für Kinder unzugänglich verwahren/entsorgen
• Kleinteile und Verpackungen nicht in Kinderhände geben
5. Möglicher Datenverlust
ACHTUNG
• Unbedingt Hinweise in der Bedienungsanleitung/Schnellinstallationsanleitung beachten
• Produkt nur verwenden, wenn Spezifikationen erfüllt sind
• Datensicherung vor Inbetriebnahme durchführen
• Datensicherung vor Anschluss neuer Hardware durchführen
• dem Produkt beiliegendes Zubehör verwenden
6. Reinigung des Gerätes
ACHTUNG
• vor Reinigung, das Gerät außer Betrieb nehmen
• aggressive bzw. scharfe Reinigungs- und Lösungsmittel sind ungeeignet
• nach der Reinigung sicherstellen, dass keine Restfeuchtigkeit vorhanden ist
• Reinigung der Geräte am besten mit trockenem Antistatiktuch durchführen
7. Entsorgung des Gerätes
Umweltverschmutzung, Wiederverwertung nicht möglich
ACHTUNG
Dieses auf dem Produkt und der Verpackung angebrachte Symbol
zeigt an, dass dieses Produkt nicht mit dem Hausmüll entsorgt werden
darf. In Übereinstimmung mit der Richtlinie über Elektro- und Elektronik-Altgeräte (WEEE) darf dieses Elektrogerät und ggf. enthaltene
Batterien nicht im normalen Hausmüll oder dem Gelben Sack entsorgt werden. Wenn Sie dieses Produkt und ggf. enthaltene Batterien
entsorgen möchten, bringen Sie diese bitte zur Verkaufsstelle zurück
oder zum Recycling-Sammelpunkt Ihrer Gemeinde.
Die enthaltenen Batterien müssen vor Rückgabe vollständig entladen sein. Treffen Sie
Vorsorge, um die Batterien vor Kurzschluss zu schützen (z.B. durch das Isolieren der
Kontaktpole mit Klebeband).
Bei Fragen kontaktieren Sie gerne unseren Support unter [email protected]
oder besuchen Sie unsere Internetseite www.icybox.de.
Erstickungsgefahr
Lebensgefahr durch Ersticken oder Verschlucken
Datenverlust bei Inbetriebnahme
Unwiederbringlicher Datenverlust möglich
Schädigende Reinigungsmittel
Kratzer, Farbveränderungen, Feuchteschäden oder
Kurzschluss am Gerät
Mögliche Umweltbelastung durch Bestandteile,
Recyclingkreislauf unterbrochen
Page 5
Handbuch IB-DK2256AC
Safety information IB-DK2256AC
Please read carefully the following information to prevent injuries, damage to material and device as well as data loss:
Warning levels
Signal words and safety codes indicate the warning level and provide immediate
information in terms of the probability of occurrence as well as the type and severity
of the consequences if the measures to prevent hazards are not complied with.
DANGER
WARNING
CAUTION
IMPORTANT
1. Risk of electrical shock
WARNING
• Read the operating instructions prior to use
• Make sure the device has been de-energised prior to working on it
• Do not remove contact protection panels
• Avoid contact with conducting parts
• Do not bring plug contacts in contact with pointed and metal objects
• Use in intended environments only
• Operate the device using a power unit meeting the specifications of the type plate only!
• Keep the device/power unit away from humidity, liquid, vapour and dust
• Do not modify the device
• Do not connect the device during thunderstorms
• Approach specialist retailers if you require repairs
2. Hazards during assembly (if intended)
CAUTION
• Read the operating instructions prior to assembly
• Avoid coming into contact with sharp edges or pointed components
• Do not force components together
• Use suitable tools
• Use potentially enclosed accessories and tools only
3. Hazards caused by a development of heat
IMPORTANT
• Prevent externally heating up components and ensure an exchange of air
Warns of a directly hazardous situation causing
death or serious injury.
Warns of a potentially hazardous situation that may
cause death or serious injury.
Warns of a potentially hazardous situation that may
cause minor injury.
Warns of a potential situation that may cause material or environmental damage and disrupt operative
processes.
Contact with parts conducting electricity
Risk of death by electrical shock
Sharp components
Potential injuries to fingers or hands during assembly
(if intended)
Insufficient device/power unit ventilation
Overheating and failure of the device/power unit
Page 6
Handbuch IB-DK2256AC
Safety information IB-DK2256AC
• Do not cover the fan outlet and passive cooling elements
• Avoid direct sunlight on the device/power unit
• Guarantee sufficient ambient air for the device/power unit
• Do not place objects on the device/power unit
4. Hazards caused by very small parts and packaging
WARNING
• Keep small parts and accessories away from children
• Store/dispose of plastic bags and packaging in an area that is inaccessible to children
• Do not hand over small parts and packaging to children
5. Potential data loss
IMPORTANT
• Always comply with the information in the operating instructions/quick installation guide
• Exclusively use the product once the specifications have been met
• Back up data prior to commissioning
• Back up data prior to connecting new hardware
• Use accessories enclosed with the product
6. Cleaning the device
Harmful cleaning agents
IMPORTANT
• Disconnect the device prior to cleaning
• Aggressive or intense cleaning agents and solvents are unsuitable
• Make sure there is no residual moisture after cleaning
• We recommend cleaning devices using a dry, anti-static cloth
7. Disposing of the device
Environmental pollution, unsuitable for recycling
IMPORTANT
This icon on product and packaging indicates that this product must
not be disposed of as part of domestic waste. In compliance with the
Waste Electrical and Electronic Equipment Directive (WEEE) this electrical device and potentially included batteries must not be disposed
of in conventional, domestic waste or recycling waste. If you would
like to dispose of this product and potentially included batteries, please
return it to the retailer or your local waste disposal and recycling point.
The included batteries must be completely discharged before return. Take precaution to protect the
batteries from short circuits (e.g. by insulating the contact poles with adhesive tape).
If you have any questions, please do not hesitate to contact our support at
[email protected] or visit our website at www.icybox.de.
Risk of suffocation
Risk of death by suffocation or swallowing
Data lost during commissioning
Potentially irreversible data loss
Scratches, discolouration, damage caused by moisture
or short circuit in the device
Potential environmental pollution caused by
components, recycling circle interrupted
Page 7
Manual IB-DK2256AC
Package content
1x IB-DK2256AC, 1x power supply, 1x power cable (EU), 1x USB Type-C® to Type-C®
cable (100 cm), 1x USB Type-C® to Type-A adapter, 1x quick installation guide
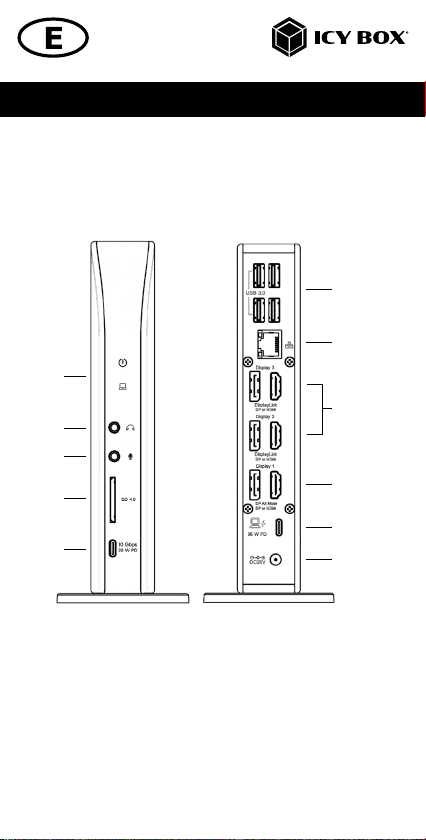
View
6
7
1
2
3
4
5
1. LED for power (blue), LED for link (green)
2. Headphone interface
3. Microphone interface
4. SD 4.0 card reader
5. USB 3.2 Gen 2 Type-C® data interface, Power Delivery up to 20 W
6. 4x USB 3.2 Gen 2 Type-A data interface
7. R J45 Ethernet interface / Gigabit
8. DisplayLink® HDMI® and DisplayPort™ 2 and 3 interfaces (4K)
9. DP Alt Mode HDMI® and DisplayPort™ 1 interfaces (4K)
10. USB 3.2 Gen 2 Type-C® host interface, Power Delivery up to 96 W
11 . Power jack, DC 20 V/6.75 A, 135 W
8
9
10
11
Page 8
Manual IB-DK2256AC
DisplayPort
™
Alt Mode
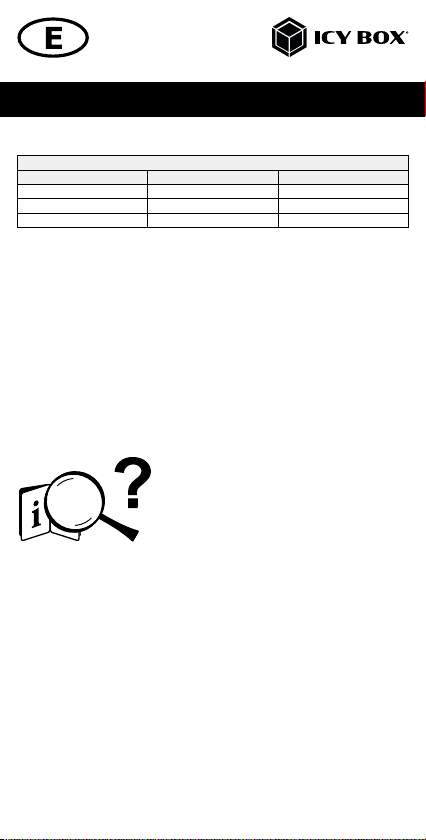
Legacy USB standards Current USB standards Data transfer rate
USB 3.0 = USB 3.1 (Gen 1) = USB 3.2 Gen 2 = 5 Gbit/s
USB 3.1 = USB 3.1 (Gen 2) = USB 3.2 Gen 2 = 10 Gbit/s
USB 3.2 (Gen 2x2) = USB 3.2 Gen 2x2 = 20 Gbit/s
System requirements
• USB Type-C
• Installed DisplayLink® (Synaptics) driver
• Power Delivery, DP Alt Mode and/or DisplayLink® driver support (depending on your demands)
• The maximum resolution of 4K@60 Hz (HDMI® / DisplayPort™ 1) only via
Type-C® DP Alt Mode supported host computers
• The device is compatible with Thunderbolt™ 3 / 4 equipped computers
®
USB Type-C
Not all USB Type-C
standard. Some ports might only provide data transfer without supporting Power
Delivery or DP Alt Mode over USB.
Computer
To use this dock to its full potential, ensure that the host USB Type-C
computer supports USB Power Delivery and DP Alt Mode or Thunderbolt™ 3 / 4.
Please consult your host PC documentation or contact the PC manufacturer to
confirm compatibility with these technologies. For safety, check whether the host
PC Bios Version is the latest and confirm compatibility with USB Type-C
Delivery and/or DP Alt Mode before application.
Attention!
In case your computer supports only the DP Alt Mode protocol and the
DisplayLink® driver is not installed:
- Only the HDMI
manual
USB version information
®
enabled Windows® / macOS® / Chrome OS™ computer
®
host ports support the full functionality of the USB Type-C®
USB Type- C
Important!
This ICY BOX product requires the usage of DisplayPort™ Alt Mode
technology over the USB Type-C™ connector. Not all computers,
notebooks or tablets with a USB Type-C™ interface support the
DisplayPort™ Alt Mode.
Please check the specifications of your computer system as
well as its USB Type-C™ interface or use the ICY BOX product with a
Thunderbolt™ 3 connector.
®
/ DisplayPort™ 1 (4K) interfaces can be used.
™
USB Type- C
≠
®
port of your
™
®
Power
Page 9
Manual IB-DK2256AC
In case your computer does not support the DP Alt Mode protocol and
only has USB 3.2 Gen 2 and the DisplayLink® driver installed:
- Only the HDMI® / DisplayPort™ 2 (4K) and HDMI® / DisplayPort™ 3 (4K)
interfaces can be used.
In case your computer supports both, the DP Alt Mode protocol and USB
3.2 Gen 2 with installed DisplayLink® driver:
- The HDMI® / DisplayPort™ 1 (4K), the HDMI® / DisplayPort™ 2 (4K) and HDMI® /
DisplayPort™ 3 (4K) interfaces can be used.
Starting up
Installation of the driver!
Caution: Do not connect the DockingStation to your computer before installing the
driver from the download area of:
https://www.synaptics.com/products/displaylink-graphics/downloads
1. Select your operating system and download the correct driver from the
webpage mentioned above.
2. Click on the executable file of the related version.
3. Follow the instructions and finish the driver installation.
4. Connect the DockingStation to a supported USB Type-C® or USB Type-A
port on the PC.
5. Restart the PC.
6. The IB-DK2256AC is ready for use.
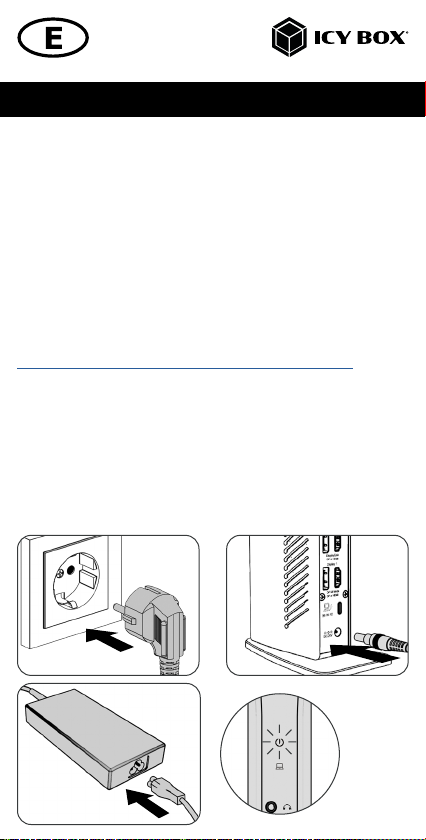
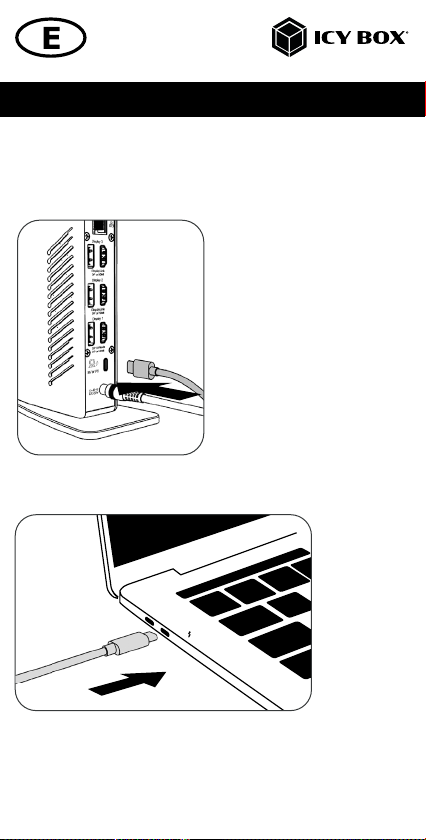
1. Plug in the power supply.
Page 10
Manual IB-DK2256AC
The device is now powered on!
2. Connect the USB Type-C® plug of the supplied data cable to the host Type-C®
interface of the DockingStation.
3. Connect the delivered USB Type-C® to Type-C® cable (or the included Type-A
adapter) to the DockingStation and to a supported computer (at least USB 3.2 Gen 2).
Note!
When using a computer without Power Delivery support via a USB Type-C® port or
using a USB Type-A port (via adapter), please note the following:
Information about the attached USB Type-C® to Type-A adapter:
For a better connection compatibility with host computers that only have a USB 3.2
Gen 2 Type-A interface, we have added an additional USB Type-C ® to Type-A
adapter.
Page 11
Manual IB-DK2256AC
Should you wish to use this adapter on your computer, please note the following
technical restriction when using the DockingStation via a Type-A port:
In this case the Type-A interface does in no way support DP Alt Mode via HDMI® /
DisplayPort™ 1 interfaces and Power Delivery which is a prerequisite for the Power
Delivery charging option. This means the DockingStation cannot be used to charge
the computer.
To use this dock to its full potential, ensure that the host USB Type-C® port of your
computer supports USB 3.2 Gen 2, DP Alt Mode and USB Power Delivery.
Please consult your host PC documentation or contact the PC manufacturer to confirm compatibility with these technologies. For safety reasons, please check whether
the host PC Bios Version is the latest and confirm compatibility with USB Type-C®
Power Delivery, DP Alt Mode and USB 3.2 Gen 2 before application.
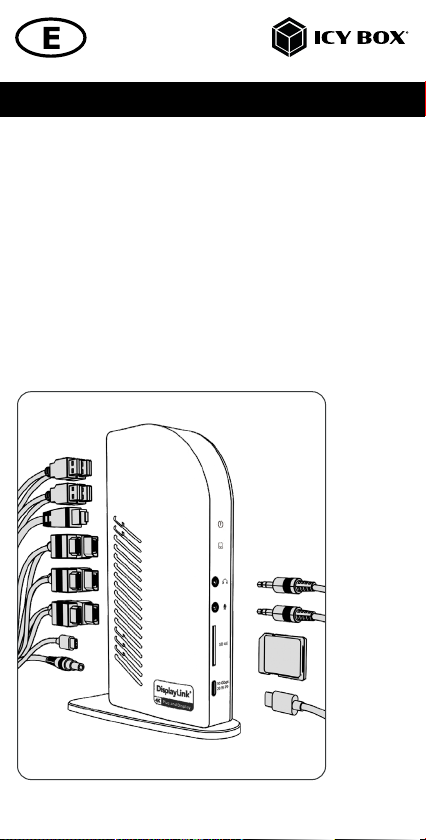
4. Connect your devices to the appropriate interfaces of the dock
Page 12
Manual IB-DK2256AC
Use of memory card slots
SD card
Insert the SD card into the SD card slot with the bevelled corner first. The golden pins
of the card must be directed to the left.
Displays
Please set up your display settings according to your operating system and
requirements. For detailed information see the corresponding operation manual and
description of your operating system.
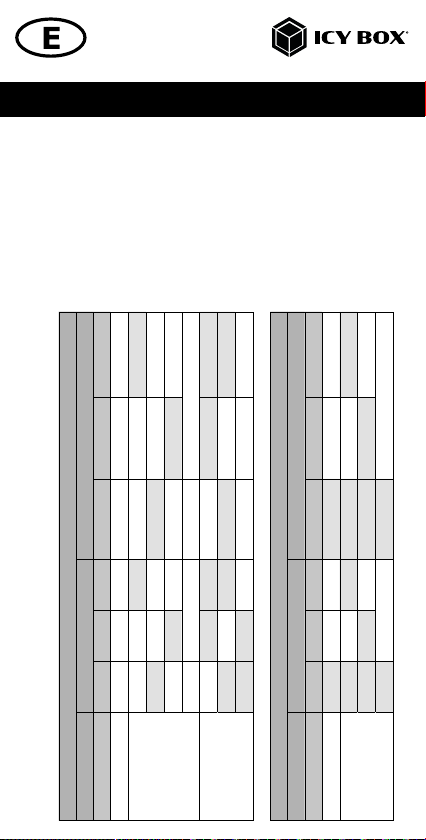
3840x2160@60 Hz
, DP 1.4 HBR3), maximum resoluons
®
, only Display 2 and Display 3), maximum resoluons
®
DP Alt Mode + DisplayLink
®
✓ ✓ 3840x2160@60 Hz 3840x2160@60 Hz
Inputs (plug-in) Output
✓ ✓ ✓ 3840x2160@60 Hz 3840x2160@60 Hz 3840x2160@60 Hz
✓ ✓ 3840x2160@60 Hz 3840x2160@60 Hz
✓ ✓ 3840x2160@60 Hz 3840x2160@60 Hz
✓ 3840x2160@60 Hz
✓ 3840x2160@60 Hz
✓ ✓ 3840x2160@60 Hz 5120x2880@60 Hz (DP only)
✓ 3840x2160@60 Hz
Inputs (plug-in) Output
✓
✓ ✓ 3840x2160@60 Hz 3840x2160@60 Hz
✓ 3840x2160@60 Hz
✓ 5120x2880@60 Hz (DP only)
Number of displays Display 1 Display 2 Display 3 Display 1 Display 2 Display 3
Video matrix (Host PC = USB Type-C
Triple video output
Supported video resolutions
Dual video output
Single video output
Number of displays Display 1 Display 2 Display 3 Display 1 Display 2 Display 3
Video matrix (Host PC = USB 3.2 Gen 2 DisplayLink
Dual video output
Single video output
Page 13
Manual IB-DK2256AC
Windows® display configuration
NOTE: The screenshots might vary slightly with the operating system.
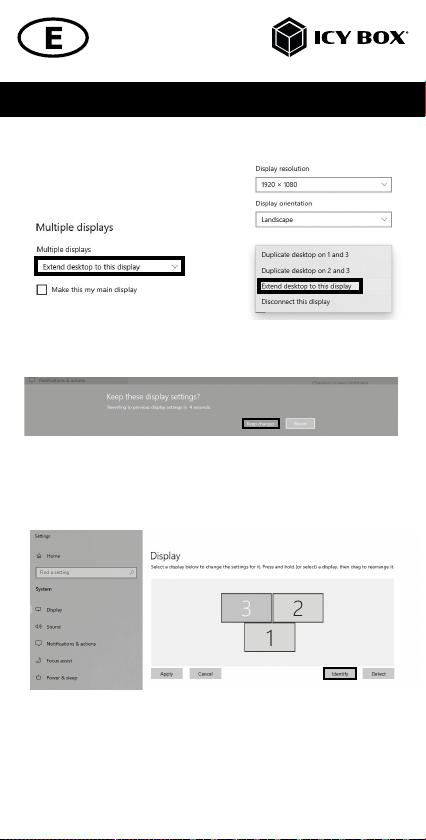
Arrange your displays
Once the extra monitors are connected, they can be configured to either mirror
mode, extended mode or be configured to the setting of the primary display.
e.g: extending your monitors
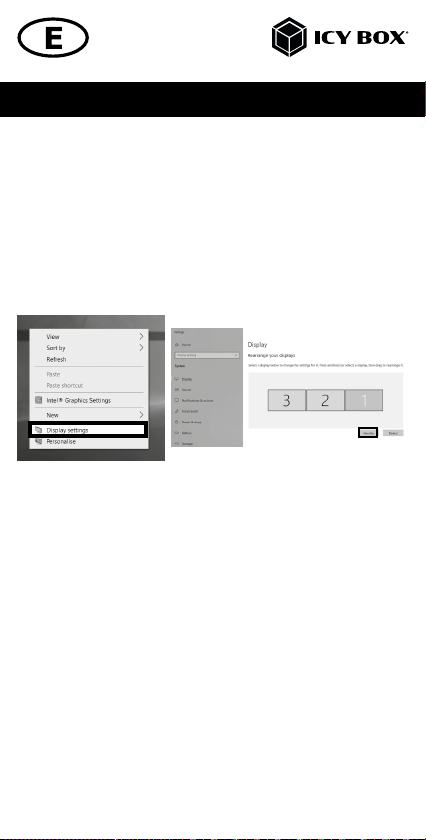
- Position the mouse anywhere on the Windows® desktop
- Right-click and select Display settings to bring up the configuration window.
- Refer to the Display configuration section
- Identify your monitors by clicking the Identify button.
- Select the relevant monitor for the following settings by clicking the identified
monitor symbol
Page 14
Manual IB-DK2256AC
- Select Multiple displays > Extend desktop
to this display if you wish to extend a monitor.
1.
2.
- Click Keep changes to confirm and exit.
3.
- Once the setting is completed, simply drag and drop the application icons to
arrange your monitors.
(However, some applications may not support the display on the extended desktop).
Page 15
Manual IB-DK2256AC
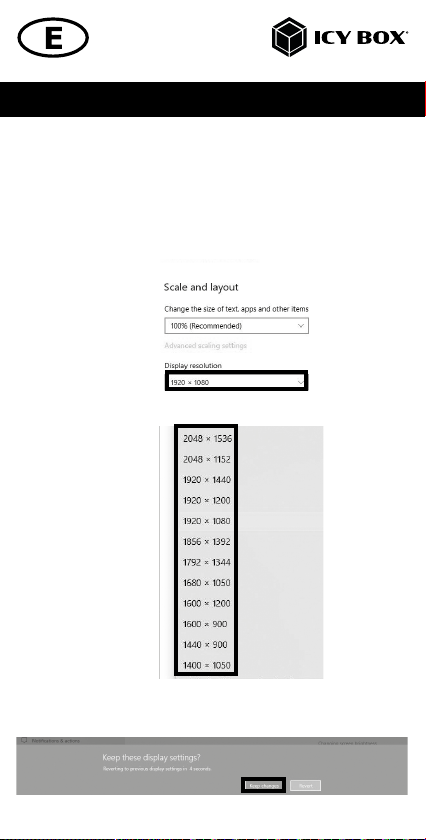
Setting the right resolution and frequency of your displays
There are two possibilities to choose the resolution of the selected monitor:
1. Standard
- Identify your monitors by clicking the Identify button.
- Select the relevant monitor by clicking the identified monitor symbol.
- Click on Display resolution
1.
- Choose the right resolution from the drop-down menu. Refer to the
video matrix table!
2.
- Click Keep changes to confirm and exit.
Page 16
Manual IB-DK2256AC
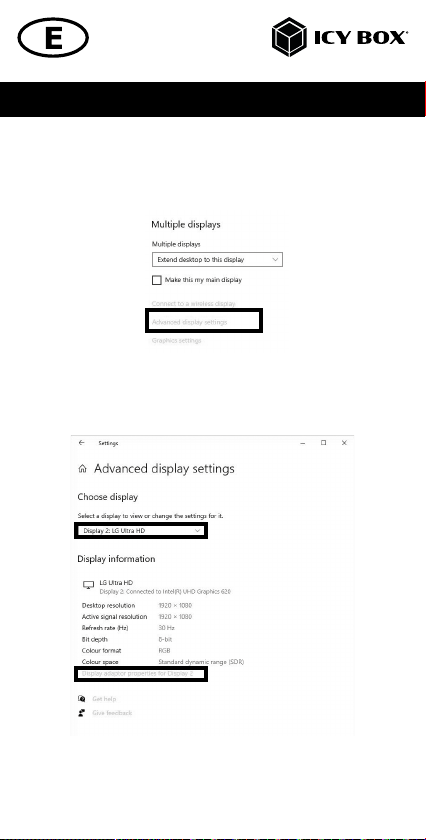
2. Advanced display settings
- Identify your monitors by clicking the Identify button.
- Click on Advanced display settings
1.
A new page opens up
- Select the relevant monitor by clicking Choose display
- Click on Display adaptor properties for Display X
2.
3.
Page 17

Manual IB-DK2256AC
A new window opens up
- Click on List All Modes
4.
A new window opens up
- Click on a valid mode according to your demands.
Repeat for each attached monitor if necessary.
Page 18
Manual IB-DK2256AC
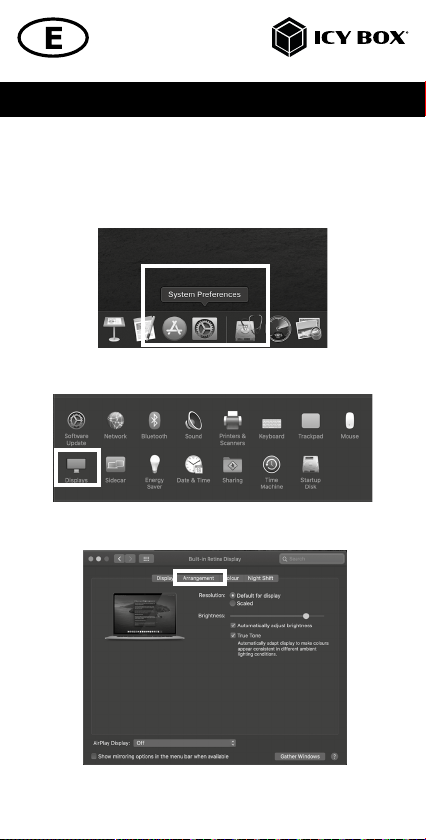
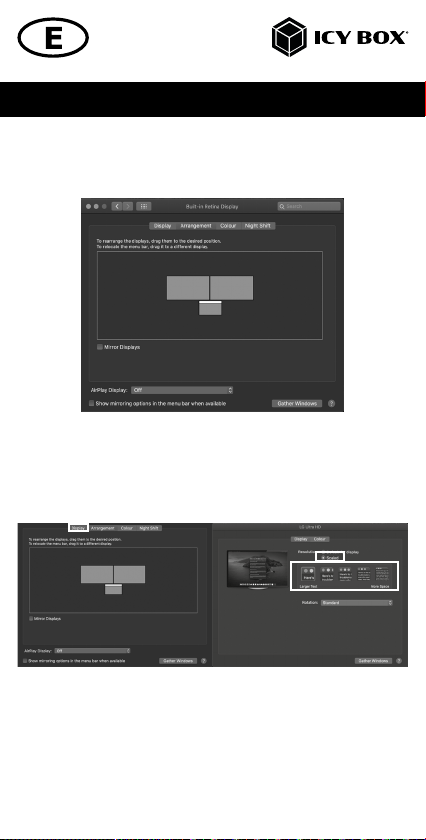
macOS® Display configuration
Once the extra monitors are connected, they can be configured to mirror mode or
extend mode.
- Click on System Preferences
- Click on Displays
A new window opens up
- Click Arrangement
Page 19
Manual IB-DK2256AC
- Select the corresponding monitor symbol by clicking and holding the
symbol of the monitor that shall be placed in order to do the positioning.
To set up scaled resolutions of the monitor displays, click the Display tab. In
the window that now opens for the respective display, you can set your desired
resolutions separately. Select the option Scaled and then select the appropriate size
in the field below.
Page 20
Manual IB-DK2256AC
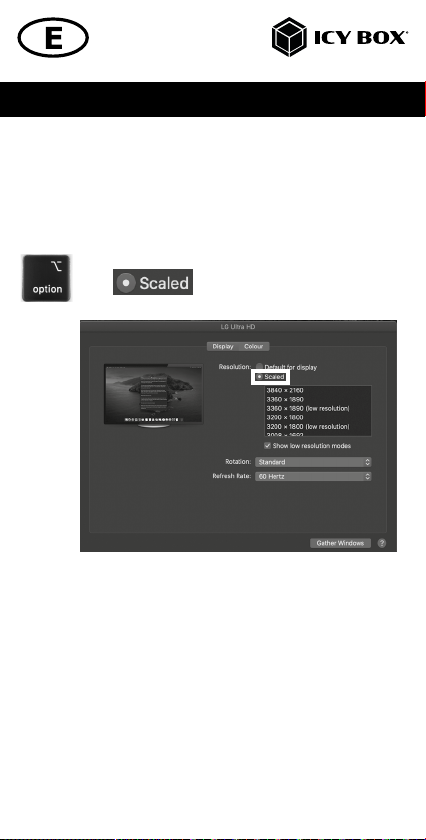
Advanced display settings
Hold down the option key and click on Scaled again and an advanced menu for
setting resolution and repetition frequency opens.
Please select your preferred settings here.
+
Repeat for each attached monitor if necessary.
Page 21
Handbuch IB-DK2256AC
Verpackungsinhalt
1x IB-DK2256AC, 1x externes Netzteil, 1x Stromkabel (EU), 1x USB Type-C® zu Type-C®
Kabel (100 cm), 1x USB Type-C® zu Type-A Adapter, 1x Schnellinstallationsanleitung
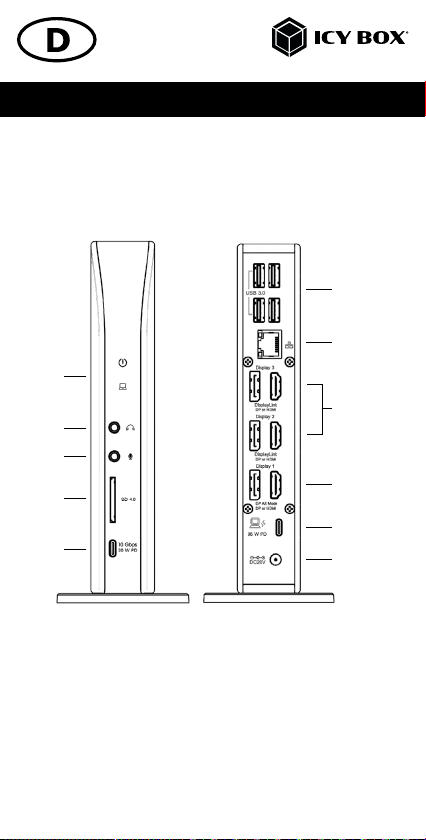
Ansicht
6
7
1
2
3
4
5
1. LED für Betrieb (blau), LED für Verbindung (grün)
2. Kopfhörerbuchse
3. Mikrofonbuchse
4. SD 4.0 Kartenleser
5. USB 3.2 Gen 2 Type-C® Datenschnittstelle, Power Delivery bis zu 20 W
6. 4x USB 3.2 Gen 2 Type-A data interface
7. R J45 Ethernet Schnittstelle / Gigabit
8. DisplayLink® HDMI® und DisplayPort™ 2 and 3 Schnittstellen (4K)
9. DP Alt Mode HDMI® und DisplayPort™ 1 Schnittstellen (4K)
10. USB 3.2 Gen 2 Type-C® Hostschnittstelle, Power Delivery bis zu 96 W
11 . Netzteilanschluss, DC 20 V/6,75 A, 135 W
8
9
10
11
Page 22
Handbuch IB-DK2256AC
DisplayPort
™
Alt Mode
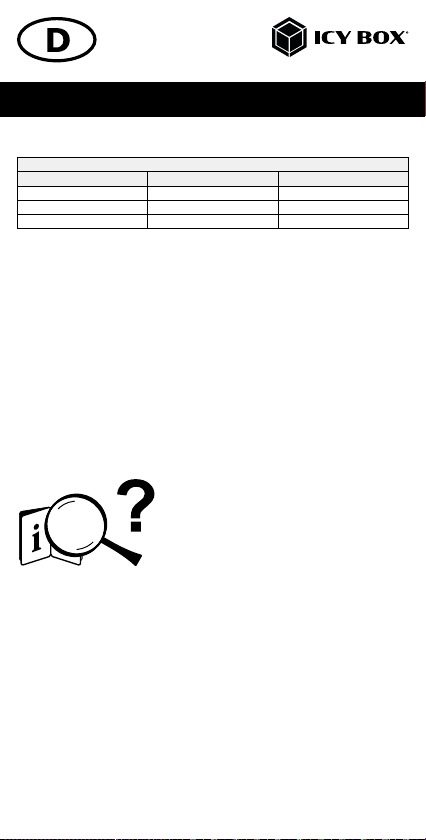
Bisherige USB Standards Aktuelle USB Standards Datenübertragungsrate
USB 3.0 = USB 3.1 (Gen 1) = USB 3.2 Gen 2 = 5 Gbit/s
USB 3.1 = USB 3.1 (Gen 2) = USB 3.2 Gen 2 = 10 Gbit/s
USB 3.2 (Gen 2x2) = USB 3.2 Gen 2x2 = 20 Gbit/s
Anforderungen
• USB Type-C®-fähiger Windows® / macOS® / Chrome OS™ Computer
• Installierter DisplayLink® (Synaptics) Treiber
• Power Delivery, DP Alt Mode und/oder DisplayLink® Treiberunterstützung
(abhängig von Ihren Anwendungsbedürfnissen)
• Die maximale Auflösung von 4K@60 Hz (HDMI® / DisplayPort™ 1) nur über
Type-C® DP Alt Mode unterstützte Hostcomputer
• Das Gerät kann auch an Thunderbolt™ 3 / 4 unterstützten Computern
verwendet werden
USB Type-C®
Nicht alle USB Type-C® Schnittstellen am Markt unterstützen den vollen Funktionsumfang des USB Type-C® Standards. Einige Schnittstellen ermöglichen unter
Umständen lediglich Datenübertragung, aber eventuell keine Videoübertragung
oder Stromversorgung über USB.
Computer
manual
Um das volle Potential der IB-DK2256AC ausschöpfen zu können, vergewissern
Sie sich, dass Ihre Host USB Type-C® Schnittstelle den DP Alt Mode und USB Power
Delivery, oder Thunderbolt™ 3 / 4 Type-C® unterstützt
Achtung!
Sollte Ihr Computer lediglich das DP Alt Mode Protokoll unterstützen und
kein DisplayLink® Treiber installiert sein:
- so stehen nur die HDMI® / DisplayPort™ 1 (4K) Anschlüsse zur Verfügung
Sollte Ihr Computer das DP Alt Mode Protokoll nicht unterstützen und
lediglich über USB 3.2 Gen 2 und den installierten DisplayLink® Treiber
verfügen:
- so stehen die HDMI® / DisplayPort™ 2 (4K) und die HDMI® / DisplayPort™ 3 (4K)
Anschlüsse zur Verfügung.
USB Versionshinweis
USB Type- C
Wichtig!
Dieses ICY BOX Produkt verwendet den USB Type-C™ Anschluss und
nutzt die DisplayPort™ Alt Mode Technologie.
Nicht alle Computer, Notebooks oder Tablets mit USB Type-C™
Schnittstelle unterstützen auch den DisplayPort™ Alt Mode.
Bitte überprüfen Sie die Spezifikationen Ihres Computersystems
und dessen USB Type-C™ Schnittstelle oder nutzen Sie das ICY BOX
Produkt an einem Thunderbolt™ 3 Anschluss.
™
USB Type- C
≠
™
Page 23
Handbuch IB-DK2256AC
Sollte Ihr Computer sowohl das DP Alt Mode Protokoll als auch USB 3.1
Gen 1 mit installiertem DisplayLink® Treiber unterstützen:
- so stehen die HDMI® / DisplayPort™ 1 (4K), die HDMI® / DisplayPort™ 2 (4K) und
die HDMI® / DisplayPort™ 3 (4K) Anschlüsse zur Verfügung:
Inbetriebnahme — Installieren Sie den Treiber!
Achtung: Laden Sie bitte zuerst die aktuellen Treiber unter
https://www.synaptics.com/products/displaylink-graphics/downloads
herunter. Schließen Sie erst nach dieser Installation die DockingStation an Ihren
Computer an!
1. Wählen Sie Ihr Betriebssystem und laden Sie den richtigen Treiber von der
obigen Webseite herunter.
2. Klicken Sie auf die ausführbare Datei der entsprechenden Version
3. Folgen Sie den Anweisungen und schließen Sie die Installation ab
4. Starten Sie Ihren PC neu
5. Verbinden Sie die DockingStation mit Ihrem PC über eine unterstützte USB
Type-C® Schnittstelle
6. Fertig! Sie können die IB-DK2256AC nun verwenden.
Hinweis!
Chrome OS™: Die DisplayLink®-Treiber sind bereits unter Chrome OS™ vorinstalliert.
Inbetriebnahme
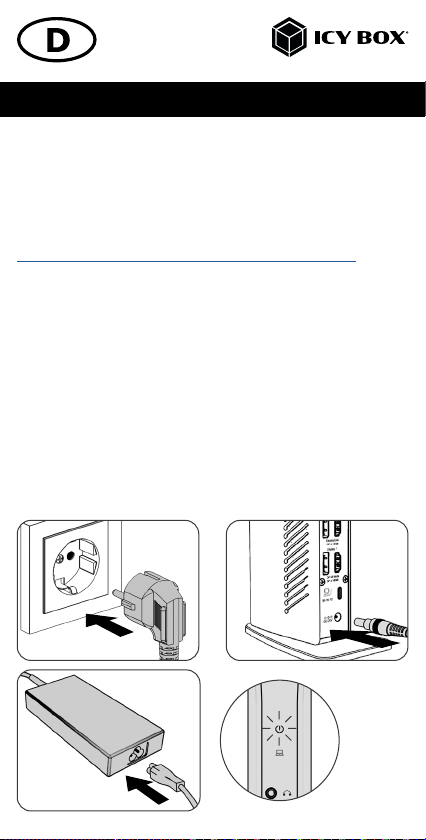
1. Verbinden Sie das Netzteil.
Page 24
Handbuch IB-DK2256AC
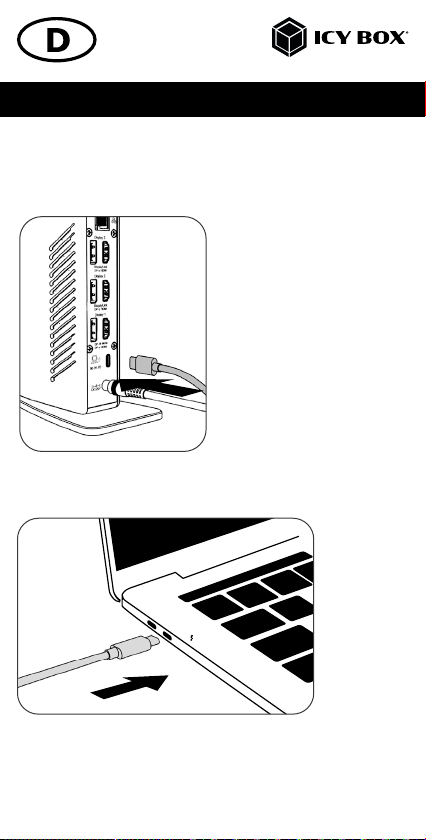
Das Gerät ist nun eingeschaltet!
2. Verbinden Sie den USB Type-C® Stecker des mitgelieferten Datenkabels mit der
Host Type-C® Schnittstelle der DockingStation.
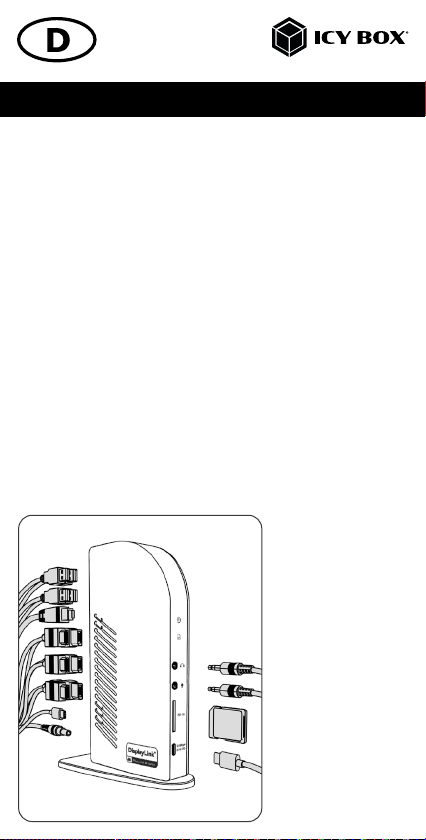
3. Verbinden Sie das mitgelieferte USB Type-C® auf Type-C® Kabel (oder den
mitgelieferten Type-A Adapter) mit der DockingStation und mit einem unterstützten
Computer (mindestens USB 3.2 Gen 2).
Hinweis!
Wenn Sie einen Computer ohne Power Delivery Unterstützung über einen USB
Type-C® Anschluss oder über einen USB Type-A Anschluss (via Adapter) verwenden, beachten Sie bitte folgendes:
Page 25
Handbuch IB-DK2256AC
Informationen über den angeschlossenen USB Type-C® zu Type-A Adapter:
Für eine bessere Anschlusskompatibilität mit Hostcomputern, die nur über eine
USB Type-A Schnittstelle verfügen, haben wir einen zusätzlichen USB Type-C® auf
Type-A Adapter hinzugefügt.
Sollten Sie diesen Adapter an Ihrem Computer verwenden, beachten Sie bitte
die folgende technische Einschränkung, wenn Sie die DockingStation über einen
Type-A-Anschluss verwenden:
Eine USB Type-A Schnittstelle unterstützt in keiner Weise den DP Alt Mode über die
HDMI® / DisplayPort™ 1 Schnittstellen und die Power Delivery Funktion, welche Voraussetzung für die Power Delivery Ladeoption ist. Die DockingStation kann in dieser
Konstellation dann nicht zum Aufladen des Computers verwendet werden.
Um den vollen Funktionsumfang dieser DockingStation nutzen zu können, stellen Sie
sicher, dass der Host USB Type-C® Anschluss Ihres Computers USB Type-C® USB
3.2 Gen 2, DP Alt Mode und Power Delivery und unterstützt.
Bitte nehmen Sie die Dokumentation Ihres Computers zur Hilfe oder kontaktieren
Sie den Hersteller Ihres Computers, um die Kompatibilität mit diesen Technologien
zu bestätigen. Überprüfen Sie sicherheitshalber, ob die Bios-Version des Host-PCs
auf dem neuesten Stand ist und stellen Sie sicher, dass die Kompatibilität mit USB
Type-C® Power Delivery, DP Alt Mode und USB 3.2 Gen 2 gegeben ist.
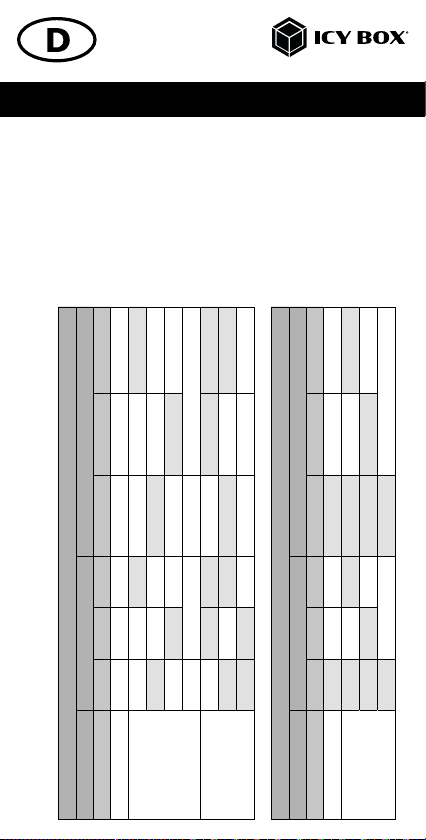
4. Schließen Sie Ihre Peripheriegeräte an die entsprechenden Schnittstellen an.
Page 26
Handbuch IB-DK2256AC
Verwendung des Speicherkartenschachts
SD Karte
Schieben Sie die SD Karte mit der abgeschrägten Ecke voran in den SD-Kartenschacht.
Die goldenen Kontaktpunkte zeigen dabei nach links.
Monitore
Zur optimalen Einstellung Ihrer Anzeigeeinheiten gehen Sie bitte entsprechend Ihres
Betriebssystems und Ihrer Bedürfnisse vor. Genauere Informationen entnehmen Sie bitte
dem Handbuch und den Beschreibungen Ihres Betriebssystems.
3840x2160@60 Hz
, DP 1.4 HBR4), maximale Auösungen
®
, nur Display 2 und Display 3), maximale Auösungen
®
✓ 3840x2160@60 Hz
DP Alt Mode + DisplayLink
®
✓ ✓ 3840x2160@60 Hz 3840x2160@60 Hz
✓ 3840x2160@60 Hz
✓
✓ ✓ 3840x2160@60 Hz 3840x2160@60 Hz
✓ 3840x2160@60 Hz
✓ 5120x2880@60 Hz (nur DP)
Anschlüsse (plug-in) Ausgabe
✓ ✓ ✓ 3840x2160@60 Hz 3840x2160@60 Hz 3840x2160@60 Hz
Anzahl der Monitore Display 1 Display 2 Display 3 Display 1 Display 2 Display 3
Videomatrix (Host PC = USB Type-C
Unterstützte Videoauflösungen
Dreifache Videoausgabe
✓ ✓ 3840x2160@60 Hz 3840x2160@60 Hz
✓ ✓ 3840x2160@60 Hz 3840x2160@60 Hz
Zweifache Videoausgabe
✓ ✓ 3840x2160@60 Hz 5120x2880@60 Hz (nur DP)
✓ 3840x2160@60 Hz
Einfache Videoausgabe
Videomatrix (Host PC = USB 3.2 Gen 2 DisplayLink
Anschlüsse (plug-in) Ausgabe
Anzahl der Monitore Display 1 Display 2 Display 3 Display 1 Display 2 Display 3
Zweifache Videoausgabe
Einfache Videoausgabe
Page 27
Handbuch IB-DK2256AC
Windows® Konfiguration der Anzeigeeinheiten
Hinweis: Die Screenshots können je nach Betriebssystem leicht variieren.
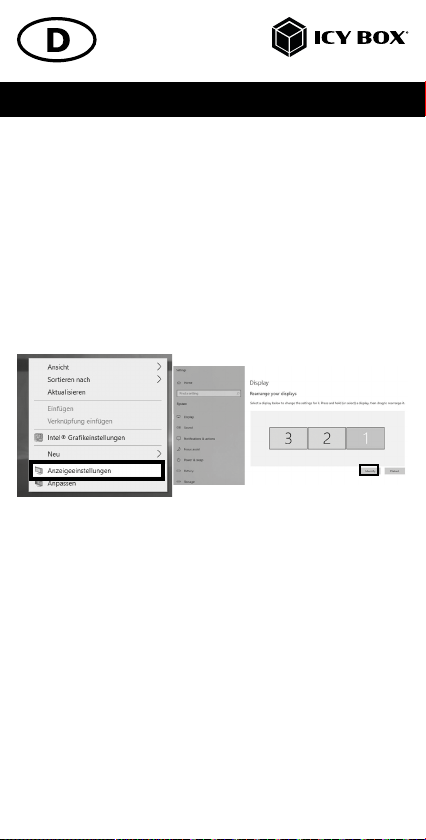
Monitore anordnen
Sobald zusätzliche Monitore angeschlossen sind, können sie entweder auf den
Spiegelmodus, den Erweiterungsmodus oder die Einstellung der Primäranzeige
konfiguriert werden.
z.B.: Erweiterung Ihrer Monitore
- Positionieren Sie die Maus an einer beliebigen Stelle auf dem Windows®-Desktop
- Klicken Sie mit der rechten Maustaste und wählen Sie Anzeigeeinstellungen,
um das Konfigurationsfenster aufzurufen
- Verwenden Sie den Abschnitt Anzeige
- Identifizieren Sie Ihre Monitore, indem Sie auf die Schaltfläche Identifizieren klicken.
- Wählen Sie den entsprechenden Monitor für die folgenden Einstellungen aus,
indem Sie auf das Symbol des identifizierten Monitors klicken.
Page 28
Handbuch IB-DK2256AC
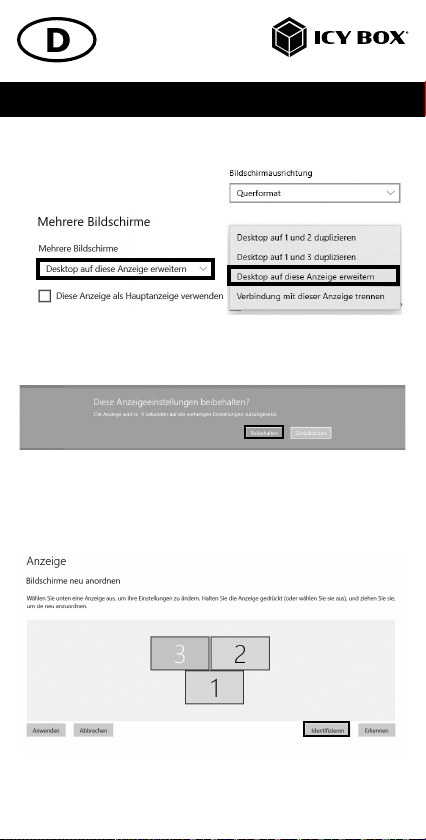
- Wählen Sie Mehrere Bildschirme >
Desktop auf diese Anzeige erweitern,
wenn Sie einen Monitor erweitern möchten.
1.
3.
- Klicken Sie zum Bestätigen und Beenden auf Einstellungen Beibehalten.
- Sobald die Einstellungen abgeschlossen sind, ziehen Sie einfach die Monitor-
symbole per Drag & Drop, um Ihre Monitore anzuordnen. (Einige Anwendungen
unterstützen jedoch möglicherweise nicht die Anzeige auf dem erweiterten Desktop).
2.
Page 29
Handbuch IB-DK2256AC
Einstellung der richtigen Auflösung und Frequenz Ihrer Anzeigen
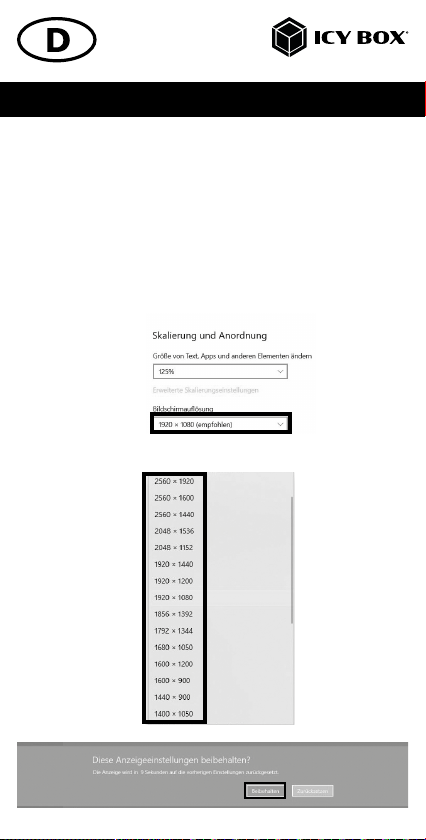
Es gibt zwei Möglichkeiten zur Auswahl der Auflösung des ausgewählten Monitors:
1. Standard Anzeigeeinstellungen
- Identifizieren Sie Ihre Monitore, indem Sie auf die Schaltfläche Identifizieren
klicken.
- Wählen Sie den betreffenden Monitor durch Klicken auf das Symbol für den
identifizierten Monitor aus.
- Klicken Sie auf Bildschirmauflösung
1.
- Wählen Sie die gewünschte Auflösung aus dem Dropdown-Menü.
2.
- Klicken Sie zum Bestätigen und Beenden auf Einstellungen Beibehalten.
- Click Keep changes to confirm and exit.
3.
Page 30
Handbuch IB-DK2256AC
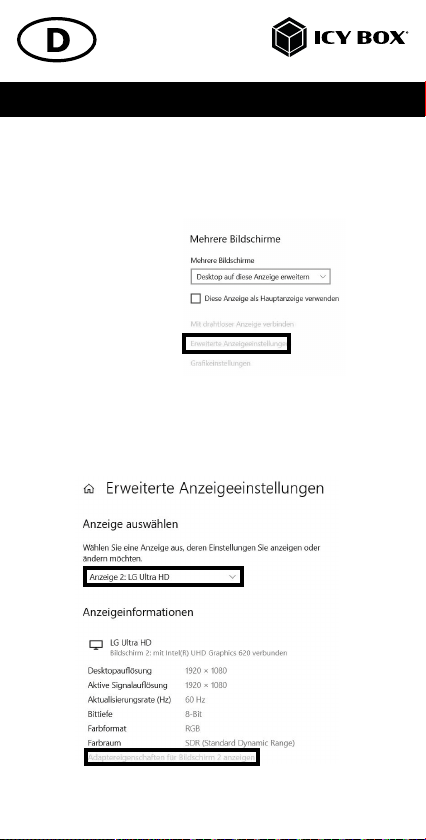
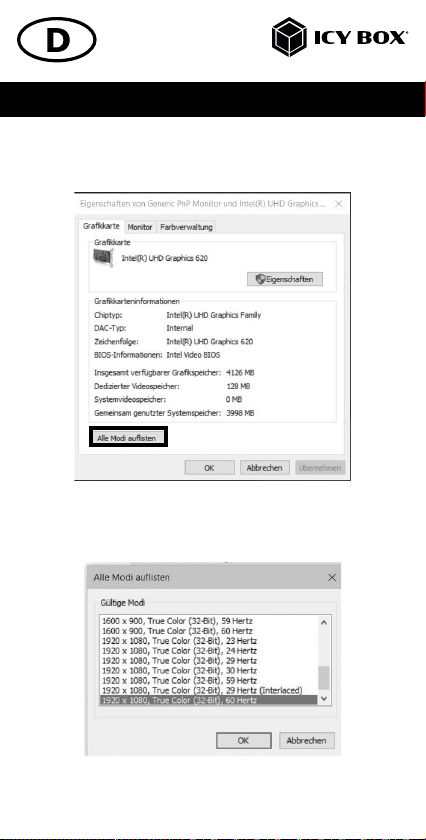
2. Erweiterte Anzeigeeinstellungen
- Identifizieren Sie Ihre Monitore, indem Sie auf die Schaltfläche Identifizieren
klicken.
- Klicken Sie auf Erweiterte Anzeigeeinstellungen
1.
Eine neue Seite öffnet sich
- Wählen Sie den entsprechenden Monitor aus, indem Sie auf
Anzeige auswählen klicken.
- Klicken Sie auf Adaptereigenschaften für Bildschirm X anzeigen
2.
3.
Page 31
Handbuch IB-DK2256AC
Es öffnet sich ein neues Fenster
- Klicken Sie auf Alle Modi auflisten
4.
Es öffnet sich ein neues Fenster
- Klicken Sie auf den gewünschten Modus entsprechend Ihrer Anforderung.
Wiederholen Sie dies bei Bedarf für jeden angeschlossenen Monitor.
Page 32
Handbuch IB-DK2256AC
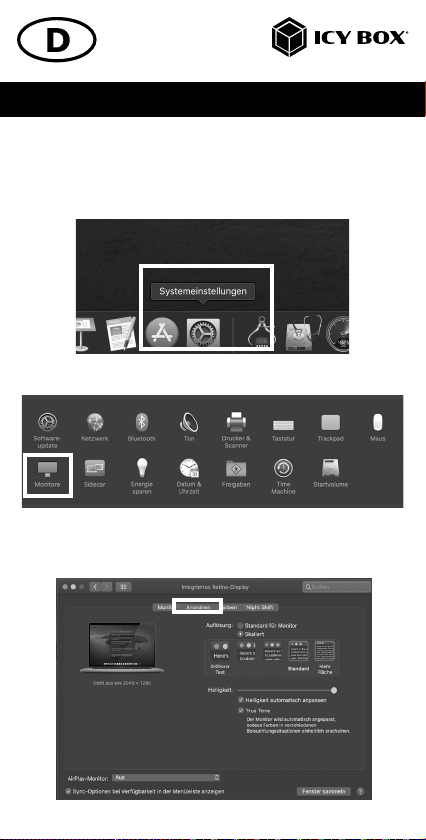
macOS® Konfiguration der Anzeigeeinheiten
- Klicken Sie auf Systemeinstellungen
- Klicken Sie auf Monitore
Es öffnet sich ein neues Fenster
- Klicken Sie auf Anordnen
Page 33
Handbuch IB-DK2256AC
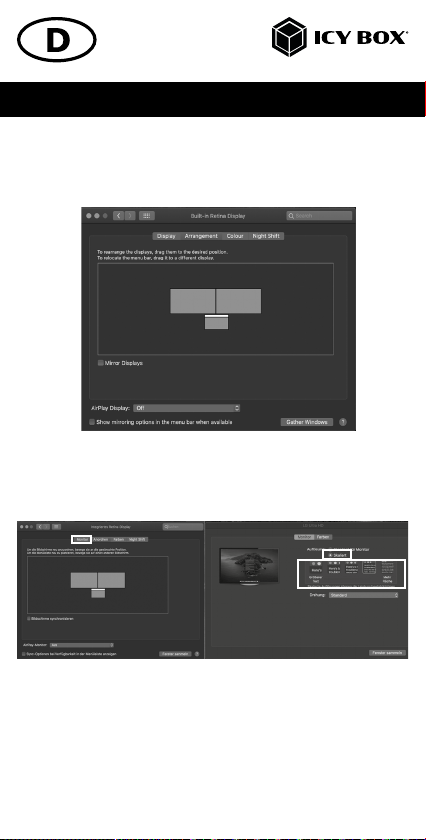
- Wählen Sie das entsprechende Monitorsymbol, indem Sie auf das Symbol des zu
platzierenden Monitors klicken und halten, um die Anordnung vorzunehmen.
Um skalierte Auflösungen der Monitoranzeigen vorzunehmen, klicken Sie den Reiter
Monitor. In dem sich nun öffnenden Fenster der jeweiligen Anzeige können Sie
separat Ihre gewünschten Ansichten einstellen.
Wählen Sie die Option Skaliert und dann die entsprechende Größe im Feld
darunter.
Page 34

Handbuch IB-DK2256AC
Erweiterte Anzeigeeinstellungen
Detailliertere Einstellungen können Sie wie folgt vornehmen:
Halten Sie die Option Taste gedrückt und klicken Sie erneut auf Skaliert
und ein erweitertes Menü zur Einstellung von Auflösung und Wiederholfrequenz
öffnet sich. Wählen Sie hier bitte Ihre gewünschten Einstellungen aus.
+
Wiederholen Sie dies bei Bedarf für jeden angeschlossenen Monitor.
Page 35

Page 36

Nos produits et emballages se recyclent, ne les jetez pas!
Trouvez où les déposer sur le site www.quefairedemesdechets.fr
© Copyright 2023 by RaidSonic Technology GmbH. All Rights Reserved.
The information contained in this manual is believed to be accurate and reliable. RaidSonic Technology GmbH assumes no responsibility for any errors contained in this manual.
RaidSonic Technology GmbH reserves the right to make changes in the specifications and/
or design of the above-mentioned product without prior notice. The diagrams contained in
this manual may also not fully represent the product that you are using and are there for
illustration purposes only. RaidSonic Technology GmbH assumes no responsibility for any
differences between the product mentioned in this manual and the product you may have.
DisplayLink® is the registered trademark of DisplayLink Corp. in the EU, the US, and other
countries. DisplayPort™ and the DisplayPort™ logo are trademarks owned by the Video Electronics Standards Association (VESA®) in the United States and other countries. The terms
HDMI® and HDMI® High-Definition Multimedia Interface, and the HDMI® logo are trademarks or registered trademarks of HDMI® LA, Inc. in the United States and other countries.
Apple and macOS are registered trademarks of Apple Computer Inc. Microsoft, Windows
and the Windows logo are registered trademarks of Microsoft Corporation.
 Loading...