

Icy Box IB-DK2241AC User Manual

IB-DK2241AC
Manual IB-DK2241AC
USB 3.0 display and multi port docking station
Handbuch IB-DK2241AC
USB 3.0 Anzeige- und Multiport Docking Station
Manuel IB-DK2241AC
Écran et station d‘accueil multi-ports USB 3.0
Manuale IB-DK2241AC
Stazione docking multi-porta USB 3.0 con adattatore multi-display
Manual IB-DK2241AC
Estación de acoplamiento multipuertos y para monitores USB 3.0
Manual IB-DK2241AC
Docking Station para monitor e multiportas, com interface USB 3.0
Instrukcja IB-DK2241AC
Stacja dokująca do wyświetlaczy i wieloportowa USB 3.0
Ručník IB-DK2241AC
Dokovací stanice USB 3.0 na displej a s více porty
Εγχειρίδιο IB-DK2241AC
Σταθμός αγκύρωσης οθόνης και πολλαπλών θυρών USB 3.0
Руководство IB-DK2241AC
Σταθμός αγκύρωσης οθόνης και πολλαπλών θυρών USB 3.0
http:\\www.icybox.de
Manual IB-DK2241AC
Package content
IB-DK2241AC, USB 3.0 cable, power supply,
CD (driver for Windows and Mac), manual
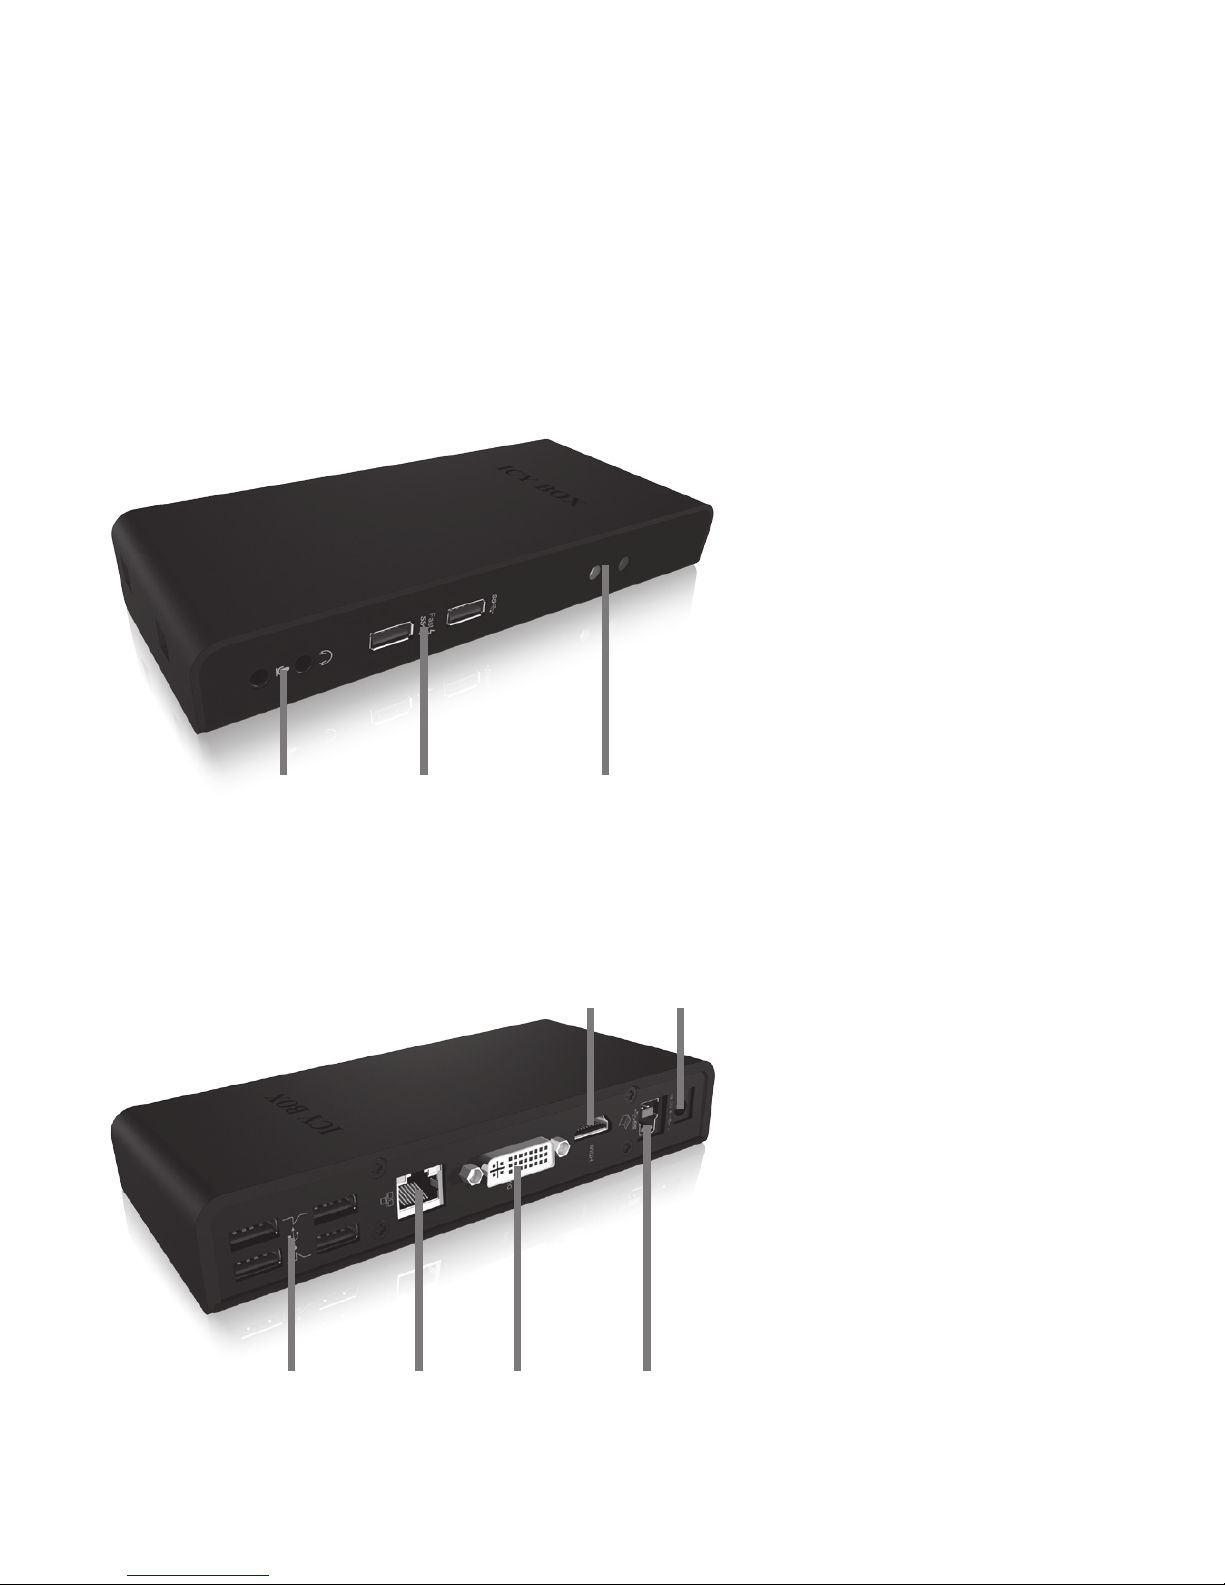
Product Overview
1. Audio in/out
2. 1x USB 3.0 port
1x USB 3.0 fast charging port
3. LED for Power and
USB connected
4. 4x USB 2.0 port
5. RJ45 Ethernet port
6. DVI-I port
7. HDMI port
8. USB 3.0 (Type B)
9. Power connector
5.
1. 2. 3.
4. 6.
7.
8.
9.

USB 3.0 Host Computer
USB 2.0
USB 3.0
USB 3.0
charging port
DVI-I / HDMI
EthernetAudio in/out
Connection diagram

EN
IB-DK2241AC
USB 3.0 Display and multi port docking station
Display and Port replicator with Fast Phone Charger
Description
The USB 3.0 Display and Multi Port Docking Station is designed for extra
connectivity demands.
With the docking station you can extend the connection of a Computer to
more display and USB peripherals, Ethernet network, speaker and microphone through one USB cable.
1. Install the Driver
* Caution: Do not connect the adapter to your computer before installing
the driver from the delivered CD or from the download area of
http://www.raidsonic.de.
Windows 7/8/8.1:
A. Insert the CD into the CD ROM drive.
B. The installer program will run automatically.
C. Click on “Run Setup.exe”.
D. Follow the instructions and nish the driver installation.
E. Connect the adapter to a USB port on the PC.
F. Restart the PC.
G. The IB-DK2241AC is ready to be used.
MAC OS X 10.9:
A. Insert the CD into the CD ROM drive.
B. Run the le Mac_driver\ driver.dmg by double click.
C. Follow the instructions and nish the driver installation.
D. Connect the adapter to a USB port on the mac.
E. Restart the mac.
F. The IB-DK2241AC is ready to be used.
2. Connection to Monitor/Projector
Connect the USB 3.0 cable to your notebook / PC and connect your monitor
/ projector to the HDMI or DVI port.
Please setup your display settings accordingly to your operating system and
requirements.
For detailed information of your operating system, see the corresponding
operation manual and description of your operating system.

DE
IB-DK2241AC
USB 3.0 Anzeige- und Multiport Docking Station
Anzeige- und Anschlussreplikator mit schneller Telefonladefunktion
Beschreibung
Die USB 3.0 Multiport Docking Station wurde zur Anschlusserweiterung
Ihres Computersystems entwickelt. Mit der Docking Station können Sie
über nur eine USB 3.0 Schnittstelle Ihres Notebooks oder PC’s weitere Anzeigeeinheiten, USB Geräte, Ethernet Netzwerk, Lautsprecher und Mikrofon
verwenden.
1. Installieren Sie den Treiber
*Achtung: Installieren Sie bitte zuerst den Treiber mithilfe der beiliegen-
den Treiber CD-ROM oder laden Sie die aktuellen Treiber unter
http://www.raidsonic.de herunter. Schließen Sie erst nach der Installation
die Docking Station an ihr System an!
Windows 7/8/8.1
A. Legen Sie die CD in ihr CD ROM Laufwerk
B. Starten Sie „Run Setup.exe“
C. Folgen Sie den Anweisungen und Beenden Sie die Installation
D. Starten Sie ihren PC neu
E. Verbinden Sie die Dockingstation mit ihrem PC
F. Fertig! Sie können den IB-DK2241AC nun verwenden.
MAC OS X 10.9
A. Legen Sie die CD in ihr CD Rom Laufwerk
B. Starten Sie Datei Mac_driver\ driver.dmg
C. Folgen Sie den Anweisungen
D. Verbinden Sie die Dockingstation mit Ihrem Mac
E. Starten Sie ihren Mac neu
F. Fertig! Sie können die IB-DK2241AC nun verwenden.
2. Monitor / Projektor verbinden
Verbinden Sie das USB 3.0 Kabel mit ihrem Notebook und anschließend
den Monitor/Projektor mit einem HDMI oder DVI Kabel. Nun navigieren Sie
unter Windows und Mac in die Einstellungen/Bilschirmauösung und stellen
die Auösung und Monitoreigenschaften nach ihren Wünschen ein.
Zur optimalen Einstellung Ihrer Anzeigeeinheiten gehen Sie bitte entsprechend Ihres Betriebssystems und Bedürfnissen vor. Genauere Informationen entnehmen Sie bitte dem Handbuch und Beschreibungen ihres
Betriebssystems.
 Loading...