

Icy Box IB-373U3 User Manual
IB-373U3IB-373U3IB-373U3
Manual IB-373U3
External enclosure for 3,5" HDDs
Handbuch IB-373U3
Externes Gehäuse für 3,5" Festplatten
Manuel Série IB-373U3
Boîtier externe aux disques durs 3,5"
Manuale della IB-373U3
Contenitore esterno per disco sso per dischi da 3,5"
Manual Serie IB-373U3
Carcasa externa para discos duros 3,5"
Εγχειρίδιο Χρήσης IB-373U3
Εξωτερική θήκη για οδηγούς σκληρού δίσκου 3,5"
Instrukcja obsługi IB-373U3
Obudów zewnętrznych na dyski 3,5"
Руководство IB-373U3
Внешний контейнер (кейс) для 3,5" харддиска
Instruções Série IB-373U3
Caixa externa para discos 3,5"
Manuál IB-373U3
Externí box pro 3,5" pevné disky
1. Model – HDD – Interface - Colour
Model HDD Host Colour
IB-373U3 SATA III USB 3.0 Black
2. Package contents
IB-373U3, Manual, USB 3.0 cable, Power Adapter
3. Key Features
• External case for 1x 3.5" SATA HDD/SSD
• USB 3.0 Host Interface 5 Gbit/s with UASP Support
• Supports SATA III up to 6 Gbit/s
• Supports: Windows & Mac OS
• Backwards compatible with USB 2.0
• AC Power Adapter (100 –240 V), 12 V / 2 A, 24 W
4. HDD Installation
During the HDD assembly all cabling has to be disconnected from the computer.
5. Application
5.1 The external HDD can be connected to or disconnected from the computer via
USB cable without shutting down the computer.
5.2 Please await the end of read/write operations before disconnecting the HDD to
avoid data lost.
5.3 A new HDD must rst be initialised, partitioned and formatted by the operation
system to be displayed by the system.
5.4 If the hard disc isn’t recognised instantly by the operating system please check:
- if the driver software is installed (USB),
- if the HDD is initialised, partitioned and formatted.
1. Modèle - Disque dure – Interface - Couleur
Modèle HDD Host Couleur
IB-373U3 SATA III USB 3.0 Noir
2. Contenui de la livraison
IB-373U3, manuel, Câble USB 3.0, Adaptateur
3. Spécialités principales
• Boîtier externe pour HDD/SSD 3.5" SATA
• USB 3.0 Host 5 Gbit/s et UASP
• Supporte SATA III 6 Gbit/s
• Supporte: Windows & MAC
• Rétrocompatible avec USB 2.0
• Adaptateur (100 –240 V), 12 V / 2 A, 24 W
4. Installation HDD
Devant l’installation ou la désinstallation d’un disque dur il faut débrancher tous câbles
de connexion à l’ordinateur.
5. Application
5.1 Le boîtier externe peut être connecté directement à l’ordinateur en utilisant le
câble USB. Le disque dur peut être branché ou débranché de l’ordinateur pendant
l’exploitation normale de l’ordinateur.
5.2 Attendez le complètement des écritures et des lectures avant de déconnecter un
boîtier branché à l’ordinateur pour éviter une perte de données.
5.3 Avant tout, un disque dur nouvel doit être initialisé, partitionné, et formaté par le
système d’exploitation pour être indiqué par le système.
5.3 Si le disque dur n‘est pas reconnu immédiatement par le système, vériez le
suivant:
- si le logiciel de pilotes est installé (USB),
- si le disque dur est initialisé, partitionné, et formaté.
1. módulo - disco duro – interfaz - Color
Módulo HDD Host Color
IB-373U3 SATA III USB 3.0 Negro
2. Contenido del embalaje
IB-373U3, manual, Cable USB 3.0, Fuente de alimentación
3. Característica
• Caja para discos duros/SSD 3.5" SATA
• USB 3.0 Host 5 Gbit/s y UASP
• Soporta SATA III 6 Gbit/s
• Soporta: Windows & Mac
• Compatible con USB 2.0
• Fuente de alimentación (100 –240 V), 12 V / 2 A, 24 W
4. Ensamblaje de disco duro
Antes de instalar o desinstalar un disco duro se debe desdesconectar los cables de
conexión / alimentación al ordenador.
5. Aplicación
5.1 Se puede conectar la carcasa directamente por el cable USB. Se puede conectar o
desconectar el disco duro del ordenador durante la operación normal
5.2 Espere el n de escrituras y lecturas antes de desenchufar una caja conectada del
ordenador para evitar pérdidas de datos.
5.3 En primer lugar, un nuevo dicso duro debe estár inicializado, compartimentado y
formateado por el sistema operativo para estar indicado por el sistema.
5.4 Repita la coneción y compruebe en caso de que el disco duro no sea reconocido
de inmediato por el sistema e examine lo siguiente:
- si el programa de control está instalado (USB),
- si el disco duro está inicializado, compartimentado y formateado.
1. Modell - Festplatte (HDD) - Anschluss - Farbe
Modell HDD Host Farbe
IB-373U3 SATA III USB 3.0 Schwarz
2. Verpackungsinhalt
IB-373U3, externes Netzteil, USB 3.0 Kabel, Handbuch
3. Merkmale
• Festplattengehäuse für 1x 3,5" SATA Festplatte/SSD
• USB 3.0 Hostanschluss 5 Gbit/s mit UASP Support
• Unterstützt SATA III bis zu 6 Gbit/s
• Unterstützt: Windows & MAC
• Abwärts kompatibel mit USB 2.0
• Netzteil (100 –240 V), 12 V / 2 A, 24 W
4. Festplattemontage
Beim Ein- und Ausbau der Festplatte müssen alle Kabelverbindungen zum Computer
gelöst werden.
5. Anwendung
5.1 Die externe Festplatte kann im laufenden Betrieb des Rechners an diesen via USB
Kabel angeschlossen oder von diesem getrennt werden.
5.2 Bitte das Ende von Schreib- und Lesevorgängen abwarten bevor eine angeschlos-
senes Gehäuse vom Rechner getrennt wird, um Datenverlust zu vermeiden.
5.3 Eine neue Festplatten muss vom Betriebssystem erst initialisiert, partitioniert und
formatiert werden, um vom System angezeigt zu werden.
5.4 Wenn die Festplatte nicht sofort vom System erkannt wird bitte prüfen:
- ob die Treibersoftware installiert ist (USB),
- ob die Festplatte initialisiert, partitioniert und formatiert ist.
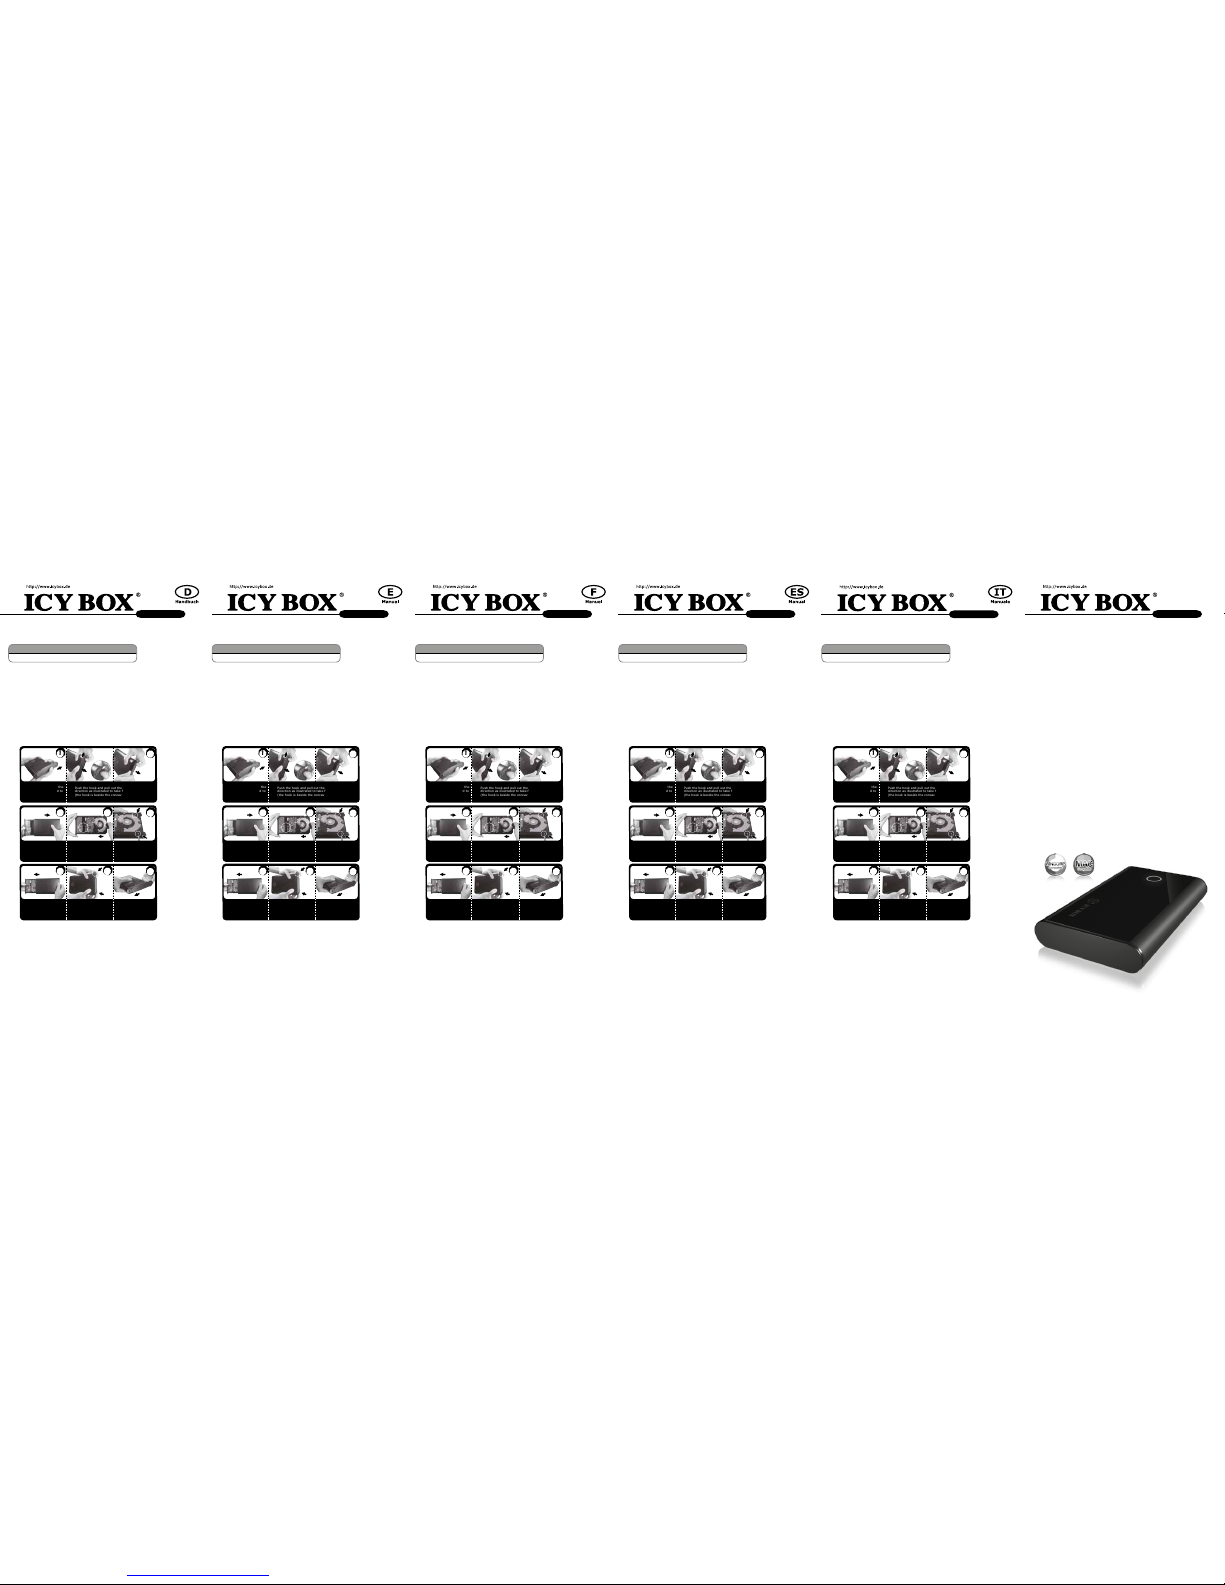
Push the hook and pull out the front panel in the
direction as illustrated to take front panel out
(the hook is beside the concave rectangular)
Push the top cover in the
direction as illustrated to
take it out.
2
1
Install HDD in the direction as
illustrated. Please connect the
ports between HDD and PCBA
tightly. (as circle showed)
Turn the back of product
body,
then pull out the
aluminum case.
(Notice:
don’t touch the PCBA)
Lock screws on both
sides of
HDD firmly.
(Notice: don’t touch
the PCBA)
5
43
Turn the back of product
body.
Replace the front panel
with hook
and push two sides
tightly.
(the concave rectangular
is in the
circle as illustrated)
Replace the aluminum
case
in the direction as
illustrated.
(Notice: don’t
touch the PCBA)
Replace the top cover and
push it in the direction as
illustrated.
8
76
IB-373U3 IB-373U3
1. Modello – HDD - Extern collegamento - Colour
Modello HDD Host Colour
IB-373U3 SATA III USB 3.0 Nero
2.Contenuto della confezione
IB-373U3, manuale, Cavo USB 3.0, adattatore di alimentazione
3. Caratteristiche
• Cassetto per hard disk/SSD SATA 3.5"
• USB 3.0 Host 5 Gbit/s e UASP
• Supporta SATA III 6 Gbit/s
• Supporta: Windows & Mac
• Retrocompatibile con USB 2.0
• Adattatore di alimentazione (100 –240 V), 12 V / 2 A, 24 W
4. HDD installazione
Staccare tutti i cavi di connessione con il computer durante il montaggio e lo smontaggio del disco sso.
5. Applicazione
5.1 Il contenitore esterno può essere collegato direttamente al computer tramite il
cavo USB. Il disco sso può essere collegato o staccato dal computer durante il funzionamento di quest’ultimo.
5.2 Attendere la ne di funzioni di lettura e di scrittura prima di staccare un contenitore esterno collegato al computer, per evitare perdite di dati.
5.3 Ogni nuovo disco sso deve venir inizializzato, partizionato e formattato dal drive,
prima di poter essere indicato dal sistema.
5.4 Se il disco sso non viene riconosciuto subito dal sistema, vericare:
- se il software di drive relativo è installato (USB),
- se il disco sso è stato inizializzato, partizionato e formattato.
Push the hook and pull out the front panel in the
direction as illustrated to take front panel out
(the hook is beside the concave rectangular)
Push the top cover in the
direction as illustrated to
take it out.
2
1
Install HDD in the direction as
illustrated. Please connect the
ports between HDD and PCBA
tightly. (as circle showed)
Turn the back of product
body,
then pull out the
aluminum case.
(Notice:
don’t touch the PCBA)
Lock screws on both
sides of
HDD firmly.
(Notice: don’t touch
the PCBA)
5
43
Turn the back of product
body.
Replace the front panel
with hook
and push two sides
tightly.
(the concave rectangular
is in the
circle as illustrated)
Replace the aluminum
case
in the direction as
illustrated.
(Notice: don’t
touch the PCBA)
Replace the top cover and
push it in the direction as
illustrated.
8
76
IB-373U3
IB-373U3 IB-373U3 IB-373U3 IB-373U3 IB-373U3
1. Model - twardy dysk – interface - Kolor
Model HDD Interface Kolor
IB-373U3 SATA III USB 3.0 czarny
2. Zawarcie pudełka
IB-373U3, podręcznik obsługi, Kabel USB 3.0, Zasilacz
3. Szegoły
• Obudów zewnętrznych na dyski SATA 3.5" HDD/SSD
• USB 3.0 Host 5 Gbit/s i UASP
• Zgodność z SATA III 6 Gbit/s
• Zgodność z : Windows & Mac
• Kompatybilny z USB 2.0
• Zasilacz (100-240 V ), 12 V / 2 A, 24 W
4. Instalacja twardego dysku
Przy wlaczeniu i wylaczeniu twardego dysku musza byc wszystkie kable odlaczone.
5. Aplikacje
5.1 Dysk zewnętrzny może zostać podłączony do komputera poprzez kabel USB.
Nawet jeśli odłączysz go lub podłączysz w czasie działania komputera, nic się nie
stanie (Hot Plug).
5.2 Prosze poczekac az bedzie skonczone czytanie lub pisanie na dysk za nim zostanie
odlaczany od komputera, zeby zapobiedz utraceniu danych
5.3 Nowy dysk twardy musi najpierw byc przez system z formatowany i initializowany
zostac.
5.4 Jeżeli napęd nie zostanie rozpoznany przez komputer, proszę sprawdzić:
- czy są zainstalowane sterowniki dla USB,
- upewnij się, że dysk jest initializowany, z formatowany i partyciowany.
1. Μοντέλο - Οδηγός σκληρού δίσκου (HDD) – Διεπαφή
Μοντέλο HDD Διεπαφή Χρώμα
IB-373U3 SATA III USB 3.0 μαύρος
2. Περιεχόμενο συσκευασίας
IB-373U3, Εγχειρίδιο, Καλώδιο USB 3.0, Τροφοδοτικό
3. Κύρια χαρακτηριστικά
• Εξωτερική Θήκη για Οδηγούς Σκληρού Δίσκου SATA 3.5" HDD/SSD
• USB 3.0 Host 5 Gbit/s και UASP
• Υποστηρίζει SATA III 6 Gbit/s HDD
• Υποστηρίζει: Windows & Mac
• Συμβατό με USB 2.0
• Τροφοδοτικό (100 –240 V), 12 V/2 A, 24 W
4. Εγκατάσταση σκληρού δίσκου
Πριν από την τοποθέτηση ή την εξαγωγή του σκληρού δίσκου πρέπει να αποσυνδεθούν
όλα τα καλώδια από τον υπολογιστή.
5. Εφαρμογή
5.1 Ο εξωτερικός σκληρός δίσκος μπορεί να συνδεθεί στον υπολογιστή ή να
αποσυνδεθεί από αυτόν με ένα καλώδιο USB,
5.2 Παρακαλούμε περιμένετε την ολοκλήρωση των διαδικασιών ανάγνωσης/εγγραφής,
πριν αποσυνδέσετε το σκληρό δίσκο, για να αποφύγετε απώλεια δεδομένων.
5.3 Ένας νέος σκληρός δίσκος πρέπει πρώτα να αρχικοποιηθεί, να διαμεριστεί και να
μορφοποιηθεί από το λειτουργικό σύστημα για να προβληθεί από το σύστημα.
5.4 Εάν ο σκληρός δίσκος δεν αναγνωριστεί αμέσως από το λειτουργικό σύστημα,
παρακαλούμε ελέγξτε τα εξής:
- eάν έχει εγκατασταθεί το λογισμικό οδήγησης (USB),
- eάν ο σκληρός δίσκος έχει αρχικοποιηθεί, διαμεριστεί και μορφοποιηθεί.
1. Модель - харддиск (HDD) - хост интерфейс - Цвет
Модель HDD Хост-интерфейс Цвет
IB-373U3 SATA III USB 3.0 черный
2. Содержание упаковки
IB-373U3, Руководство, Кабель USB 3.0, адаптер питания
3. Основные признаки
• Внешний контейнер для 3.5" SATA HDD/SSD
• USB 3.0 внешний интерфейс 5 Гбит/с / с и UASP
• Поддерживает SATA III 6 Гбит
• поддерживает: Windows & Mac
• Совместимый с USB 2.0
• адаптер питания (100 –240 В), 12 B / 2 A, 24 W
4. Монтаж харддиска
Перед монтажем и демонтажем харддиска необходимо отсоединить все кабеля от
сети, а также от компьютера.
5. Применение
5.1 "Харддиск может быть, по необходимости, подключен к работающему
компьютеру (ПК) или отключен от него (поддерживается "горячая"" замена
дисков)."
5.2 Дождитесь окончания процессов сканирования или записи данных и только
потом отсоедините устройство от ПК, чтобы предотвратить потерю данных!
5.3 Новый харддиск необходимо сначала инициализировать, форматировать и
потом разбить по необходимости на части (партиции), чтобы он был без проблем
найден операционной системой.
5.4 Если харддиск не будет сразу узнан операционной системой, то проверьте:
- yстановлен ли нужный драйвер (USB),
- был ли харддиск инициализирован, форматирован и партиционирован (разбит на части)
1. Modelo – Disco rígido (HDD) – Ligação – Cor
Modelo HDD Host Cor
IB-373U3 SATA III USB 3.0 negro
2. Conteúdo da embalagem
IB-373U3, manual, Cabo USB 3.0, Alimentação AC
3. Características
• Caixa para 3.5" SATA HDD/SSD
• Taxa de transferência: USB 3.0 com até 5 Gbit/s e UASP
• Compatível SATA III 6 Gbit/s
• Compatível com: Windows & Mac
• Compatível com USB 2.0
• Alimentação AC (100-240V), 12V / 2 A, 24 W
4. Montagem do disco rígido
Ao instalar e remover o disco rígido, assegure-se de que todas as ligações dos cabos
ao computador são desapertadas.
5. Utilização
5.1 O disco rígido externo pode ser ligado (ao) ou desligado do computador, com este
em funcionamento, através do cabo USB.
5.2 Por favor, aguarde que terminem os processos de leitura e de escrita antes de
desligar a caixa do computador para evitar perder os dados.
5.3 Um novo disco rígido só deve ser inicializado, compartimentado e formatado a
partir do sistema operativo para ser indicado pelo sistema.
5.4 Se o disco rígido não for imediatamente reconhecido pelo sistema, verique o
seguinte:
- se o software da driver está instalado (USB),
- se o disco rígido foi inicializado, compartimentado e formatado.
1. Model – Pevný disk (HDD) – Připojení - Barva
Model HDD Propojení Barva
IB-373U3 SATA III USB 3.0 černý
2. Obsah balení
IB-373U3, manuál, USB 3.0 kabel, Napájení AC
3. Vlastnosti
• Externí box pro 3.5" SATA HDD/SSD
• USB 3.0 port 5 Gbit/s a UASP
• Podporuje SATA III 6 Gbit/s
• Podporuje:Windows & Mac
• Kompatibilní s USB 2.0
• Napájení AC (100-240 V), 12V / 2 A, 24 W
4. Montáž pevného disku
Při montáži a demontáži pevného disku musejí být všechna kabelová spojení k počítači
odpojena.
5. Použití
5.1 Externí pevný disk se může připojit k počítači během provozu pomocí USB kabelu
nebo se takto odpojit.
5.2 Před odpojení disku do počítače vyčkejte ukončení zápisu a načítání dat, abyste
tak zabránili jejich případné ztrátě.
5.3 Operační systém musí nový pevný disk nejprve inicializovat, nastavit jeho segmenty a naformátovat ho a poté může být systémem zobrazen.
5.4 V případě, že není pevný disk okamžitě systémem identikován, prověřte:
- je-li inicializován software řídicího programu (USB),
- je-li provedeno inicializování, nastavení segmentů a naformátování pevného disku.
Push the hook and pull out the front panel in the
direction as illustrated to take front panel out
(the hook is beside the concave rectangular)
Push the top cover in the
direction as illustrated to
take it out.
2
1
Install HDD in the direction as
illustrated. Please connect the
ports between HDD and PCBA
tightly. (as circle showed)
Turn the back of product
body,
then pull out the
aluminum case.
(Notice:
don’t touch the PCBA)
Lock screws on both
sides of
HDD firmly.
(Notice: don’t touch
the PCBA)
5
43
Turn the back of product
body.
Replace the front panel
with hook
and push two sides
tightly.
(the concave rectangular
is in the
circle as illustrated)
Replace the aluminum
case
in the direction as
illustrated.
(Notice: don’t
touch the PCBA)
Replace the top cover and
push it in the direction as
illustrated.
8
76
© Copyright 2015 by RaidSonic Technology GmbH. All Rights Reserved
The information contained in this manual is believed to be accurate and reliable. RaidSonic Technology GmbH
assumes no responsibility for any errors contained in this manual. RaidSonic Technology GmbH reserves the
right to make changes in the specications and/or design of the above mentioned product without prior notice.
The diagrams contained in this manual may also not fully represent the product that you are using and are
there for illustration purposes only. RaidSonic Technology GmbH assumes no responsibility for any dierences
between the product mentioned in this manual and the product you may have.
 Loading...