

Page 1

PRT-KLCS
Protege Touchsense LCD Keypad
User Manual
Page 2

2 PRT-KLCS Protege Touchsense LCD Keypad | April 2014
The specifications and descriptions of products and services contained in this document were correct at the
time of printing. Integrated Control Technology Limited reserves the right to change specifications or withdraw
products without notice. No part of this document may be reproduced, photocopied, or transmitted in any form
or by any means (electronic or mechanical), for any purpose, without the express written permission of
Integrated Control Technology Limited. Designed and manufactured by Integrated Control Technology Limited.
Protege® and the Protege® Logo are registered trademarks of Integrated Control Technology Limited. All other
brand or product names are trademarks or registered trademarks of their respective holders.
Copyright © Integrated Control Technology Limited 2003-2013. All rights reserved.
Publication Date: April 2014
Page 3

PRT-KLCS Protege Touchsense LCD Keypad | April 2014
3
Contents
Introduction ___________________________________________________________________ 4
Document Conventions ________________________________________________________________ 4
Operations ____________________________________________________________________ 5
Visual Display _________________________________________________________________________ 5
Keypad Function ______________________________________________________________________ 5
Audible Feedback _____________________________________________________________________ 6
Indicator Lights _______________________________________________________________________ 6
Logging into the Keypad ________________________________________________________ 7
Logging Off ___________________________________________________________________________ 7
Arming / Disarming _____________________________________________________________ 8
Delay Times __________________________________________________________________________ 8
Arming an Area________________________________________________________________________ 8
Stay Arming an Area ___________________________________________________________________ 9
Force Arming an Area __________________________________________________________________ 9
Bypassing Zones in an Area ___________________________________________________________ 10
Disarming an Area ____________________________________________________________________ 10
Silencing and Canceling Alarms ________________________________________________________ 11
Trouble Display _______________________________________________________________ 12
Viewing System Troubles ______________________________________________________________ 12
Alarm Memory ________________________________________________________________ 13
Events _______________________________________________________________________ 14
Viewing Events _______________________________________________________________________ 14
Additional Features ____________________________________________________________ 15
Offline Menu Access __________________________________________________________________ 15
Offline Door Unlock ___________________________________________________________________ 15
Disabling / Enabling the Audible Output _________________________________________________ 16
Panic Alarms _________________________________________________________________________ 16
Fire Alarms/Smoke Detector Reset _____________________________________________________ 16
Contact ______________________________________________________________________ 17
Page 4
4 PRT-KLCS Protege Touchsense LCD Keypad | April 2014
Introduction
The Protege System is an advanced technology security system specifically designed to enhance the
functionality of security, building automation and access control by providing a complete integrated solution with
local monitoring and offsite communication.
The Protege Touch Sense LCD Keypad provides a sleek, user friendly interface to the Protege Integrated
System. The Protege Touch Sense LCD keypad is equipped with a touch sensitive ergonomic keypad and an
LCD display, allowing you to have complete control of your security and access control system.
All the actions performed in your system will be executed and displayed through the keypad. Before using your
Protege Integrated Alarm and Access Control System, we highly recommend you read this manual carefully and
have your security professional or property manager explain basic system operation to you.
Optional Protege management software is available and is recommended to enhance your productivity when
using the Protege System. For more information visit the ICT website or ask your System Administrator.
Document Conventions
Indicates a warning or cautionary message
i
Indicates an important note or advisory information
Indicates a hint or suggestion
[TEXT]
Bold text enclosed in brackets is used to show a section number or address of a programmable
option or information on programming shortcut sequences
Page 5
PRT-KLCS Protege Touchsense LCD Keypad | April 2014
5
Operations
The following section provides you with the information needed to familiarize yourself with keypad before
carrying out basic operations.
Visual Display
The keypad features a rich 32 character LCD (Liquid Crystal Display).
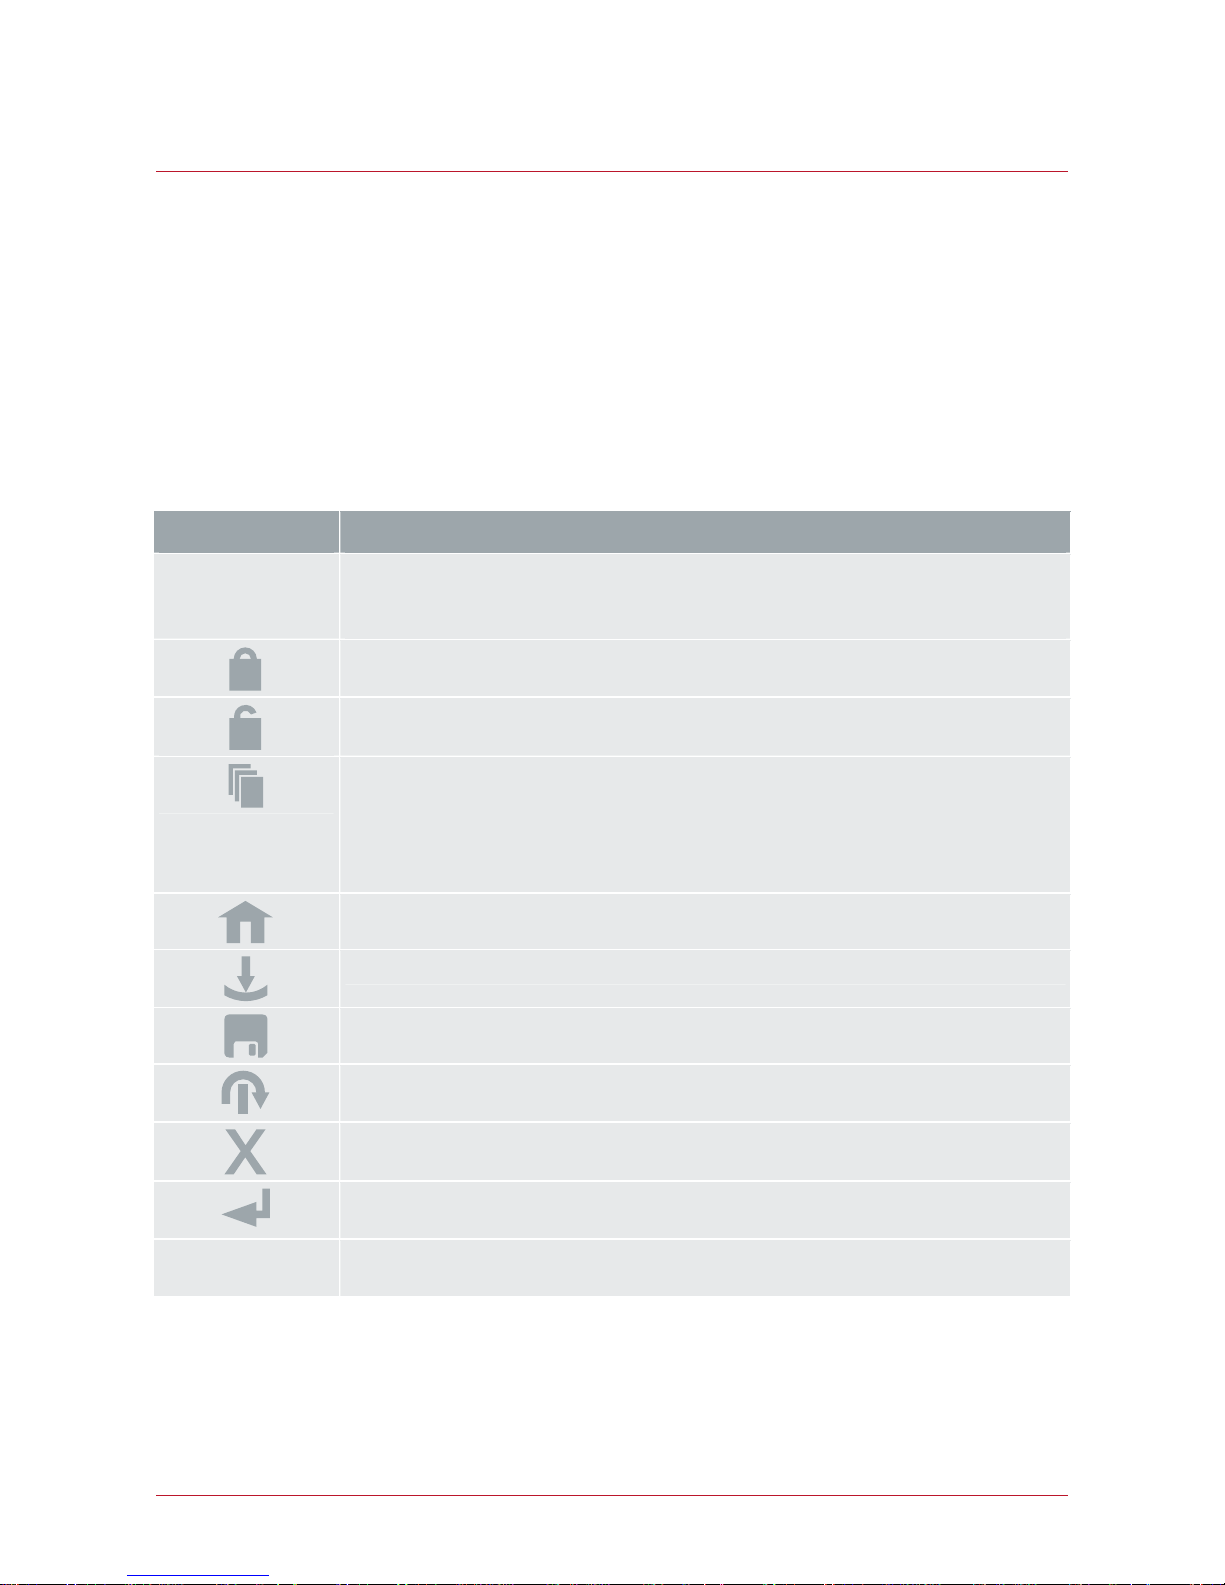
Keypad Function
The Protege Touch Sense Keypad has 23 keys. In some cases, the primary functions of these keys vary based
on the action being performed.
Key Function
0-9 The primary function of these keys is to enter user codes.
When controlling devices, the [1] key turns the device on, [2] key turns the device off and
the [3] key will latch the device in the on state.
The [ARM] key is used to start the arming process for an area.
The [DISARM] key is used to silence alarms, disarm the area and cancel an arming
sequence.
The [MENU] key is used to access the menu and can be followed by menu shortcut
selection key(s), that represent a menu item.
When the [MENU] key is held for 2 seconds, the keypad will recognize it as the
[FUNCTION] key.
The [FUNCTION] key can be programmed to unlock a door.
The [STAY] key is used to start the stay arming process for an area.
The [FORCE] key is used to force arm an area.
The [MEMORY] key will take a user directly to the memory view menu.
The [BYPASS] key can be pressed when a zone is breached during an arming process
to bypass the displayed zone.
The [CLEAR] key will log off the user currently logged on the keypad. When pressed
while not logged in the display will be refreshed.
The [ENTER] key is used to confirm an action on the keypad, acknowledge memory and
alarm information and move to the next programming screen.
ARROW KEYS The arrow keys are used to scroll the menu, move the focus of a program window to the
next screen, and move the cursor when programming or editing values.
Page 6
6 PRT-KLCS Protege Touchsense LCD Keypad | April 2014
Audible Feedback
When a key is pressed, a short audible tone is generated. Other tones are generated when certain functions are
used.
Confirmation Tone
When an operation has been successfully completed, the keypad generates a sequence of four audible tones.
Rejection Tone
When the system times out or when an operation is incorrectly entered, they keypad generates an audible tone
for three seconds.
i
If required, audible tones can be silenced by pressing and holding the [CLEAR] key for 3 seconds.
This option must be enabled by your security professional or system administrator.
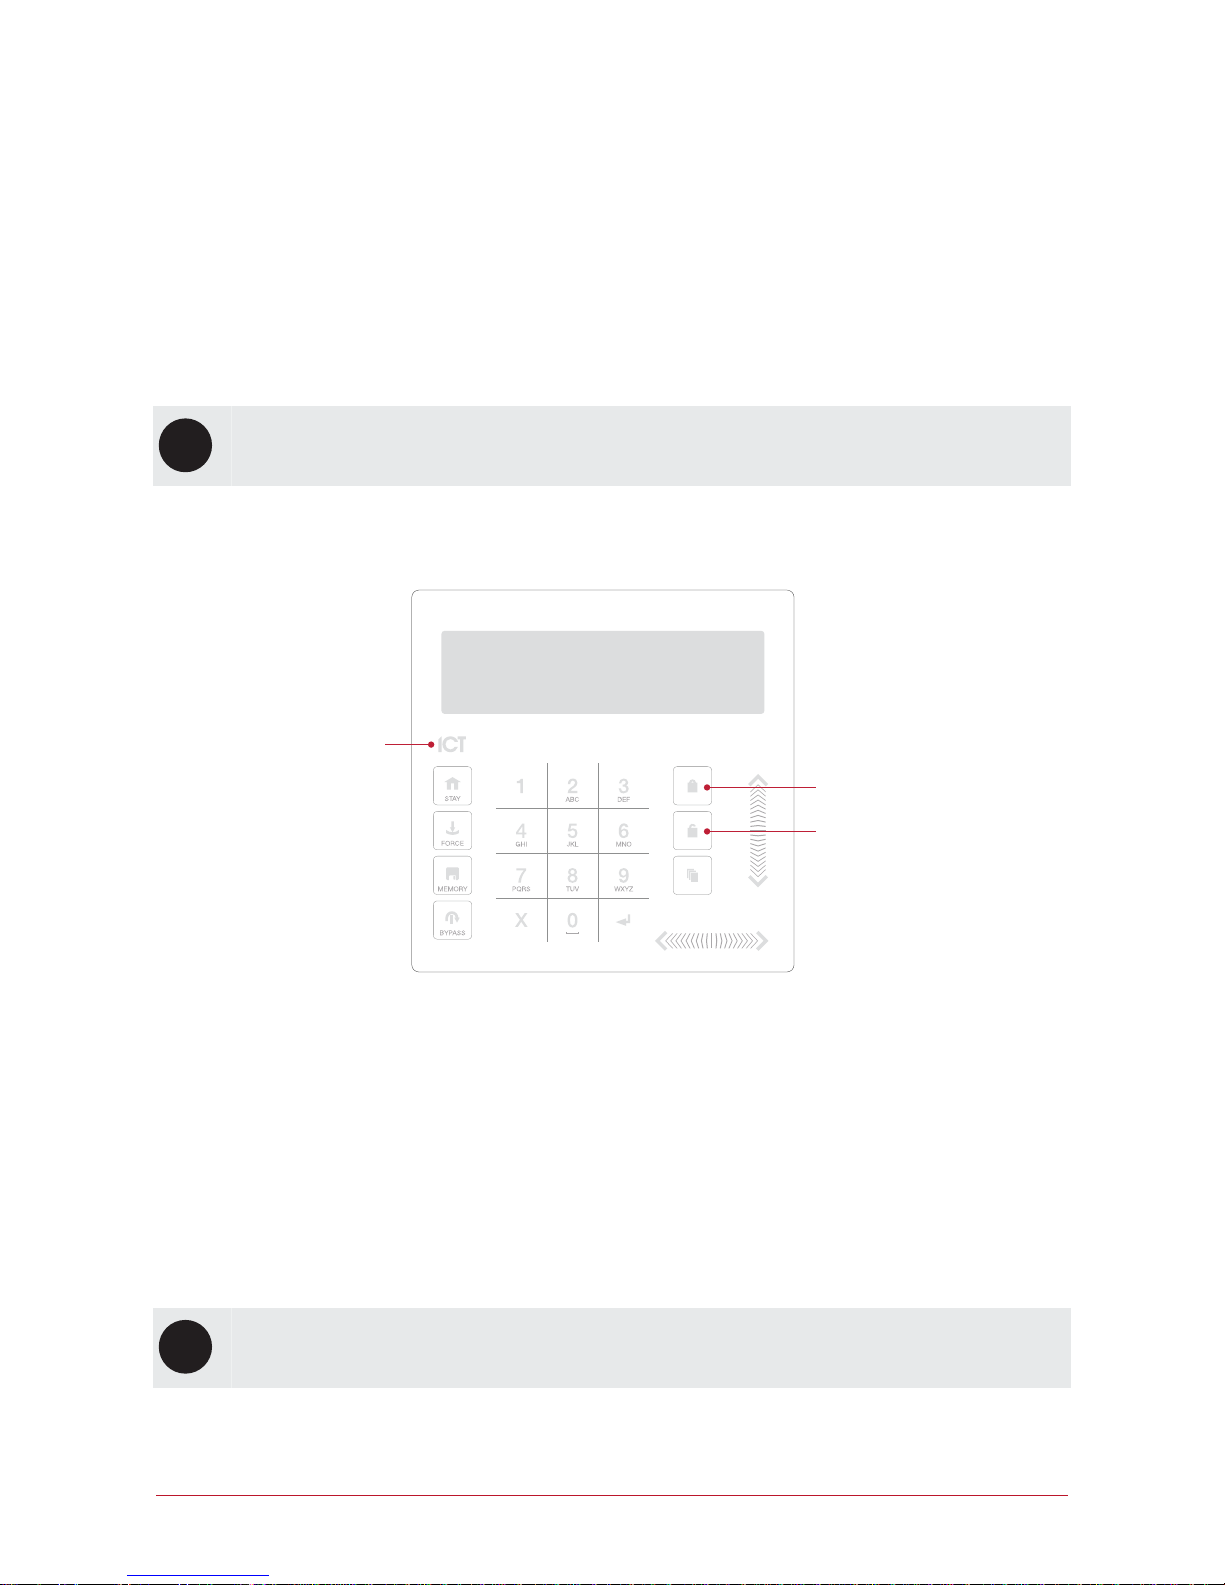
Indicator Lights
Power / Trouble
Indicator
Armed / Alarm
Indicator
Disarmed Indicator
Power/Trouble Indicator
When the Power/Trouble Indicator is FLASHING, it is showing that a trouble condition is present
When ON, the system is powered and operating normally
If there is a complete power failure this indicator will be OFF
Disarmed Indicator
When the Disarmed Indicator is ON, the system is disarmed.
Armed/Alarm Indicator
When the Armed/Alarm Indicator is FLASHING the system is in alarm and your user code needs to be entered
to silence the alarm. When ON, the system is armed.
i
Indication of the system status and the operation of the indicators are programmable and may not
function as above. Verify the operation with your installer.
Page 7

PRT-KLCS Protege Touchsense LCD Keypad | April 2014
7
Logging into the Keypad
To logon, enter your [USER CODE] and press [ENTER].
Enter user
code: ******
To restart the entry process, press [CLEAR].
Once a valid code is entered you are presented with a welcome screen.
Good Evening
J Smith
If your user record is programmed to view alarm memory, an alarm memory message is shown before you
are taken to the area control menu.
Warehouse
is DISARMED
i
If the Lock Keypad On Excess Attempts option has been enabled by your installer, the keypad will
lock if a user code has been entered incorrectly more than three times. The time that the keypad will
be locked for will vary depending on your installation.
If this option is not enabled, the keypad will not lock no matter how many times an incorrect user code
has been entered.
i
Before attempting to access any of the programming menus from the Protege Touch Sense LCD
Keypad, you will need to logon with your user code. The default Master code to gain access to your
system is [123456]. For security reasons, this code should always be changed after initial setup is
complete.
Logging Off
You are automatically logged off if no key press has been detected for the time programmed by your installer, or
if the [CLEAR] key is pressed while you are logged on.
Page 8

8 PRT-KLCS Protege Touchsense LCD Keypad | April 2014
Arming / Disarming
To take full advantage of your Protege Keypad, we recommend that you familiarize yourself with the different
arming methods.
Delay Times
Entry Delay
Setting an entry delay time for the area allows you to have time to disarm the area before the area generates an
alarm.
Exit Delay
The exit delay time for the area allows you to exit the area once the arming of the area has begun without
triggering an alarm. When an area is in exit delay, you should leave the area.
The configuration of the exit and entry delay beepers is determined by your installation. Please verify the
operation with your security professional or property manager.
Arming an Area
To Arm an Area, navigate to [MENU, 1] on your keypad. If you have access to more than one area, you can
scroll through the list using the [UP] and [DOWN] keys.
Warehouse
is DISARMED
When the appropriate area has been found, press [ARM] to enable the zones in the area.
Warehouse
Enabling zone(s)
The system then checks that the zones closed and are ready to be armed.
Warehouse
Checking zone(s)
If all the zones are ready, the area goes into exit delay.
Warehouse
in EXIT delay
Once the exit delay time has elapsed, the area is armed.
Warehouse
Armcomplete
Page 9

PRT-KLCS Protege Touchsense LCD Keypad | April 2014
9
Stay Arming an Area
Stay Arming is an option that must be enabled by your installer.
This method of arming allows you to remain in the area while it's partially armed. Stay zones are zones that are
bypassed when the system is stay armed. For example, if you are working late and the stay option is enabled,
you can arm a portion of the building to protect the windows and doors without arming other zones.
Office
is DISARMED
Press [STAY] to enable the normal zones in the area and bypass the stay zones.
Office
Enabling zone(s)
The system then checks the zones in the area are closed.
Office
Checking zone(s)
If all the zones are closed, the arming process completes.
Office
Arm complete
The area then goes into exit delay.
Office
in EXIT delay
Once the exit delay time has elapsed, the area is stay armed.
Office
is STAY
Force Arming an Area
Force Arming is an option that must be enabled by your installer.
Force Arming allows you to arm the system without waiting for all the zones in the system to close.
Force arming is commonly used when a motion detector is protecting an area that is occupied by a keypad. For
example, if the motion detector has been programmed as a force zone, the system will allow you to arm even if
the zone is open.
From the Arm/Disarm menu you will be shown the area(s) associated with the keypad and its current status.
Select the area you want to force arm.
Office
is DISARMED
Press [FORCE] to enable the zones in the area.
Office
Enabling zone(s)
Page 10

10 PRT-KLCS Protege Touchsense LCD Keypad | April 2014
The system then checks the zones in the area are closed, automatically skipping any open zones that can
be force armed.
Office
Checking zone(s)
If all the zones are closed, the arming process completes.
Office
Arm complete
Once the zones have been armed, the area goes into exit delay.
Office
in EXIT delay
Once the exit delay time has elapsed, the area is force armed.
Office
is FORCE ARMED
Bypassing Zones in an Area
Bypassing allows you to program the alarm system to ignore certain zones the next time the an area is arming
or until the bypass is disabled. For example, you may wish to bypass certain zones when workers are
renovating part of a building
i
The bypass settings of a zone are removed when all the areas the zone is assigned to are disarmed. If
the bypass is a latched bypass, the bypass settings remain until removed manually.
Select the Bypass Zones menu by pressing [MENU,7,1].
Press the [RIGHT] key to search for a zone using the zone reference (for example, 000008).
Use the [UP] key to scroll to the next zone.
Warehouse PIR
is not BYPASSED
Press [1] to bypass the zone, press [3] to latch bypass the zone, and press [2] to remove the bypass
setting.
Warehouse PIR
is BYPASSED
Disarming an Area
Select [MENU, 1], and find the area you want to disarm.
Warehouse
is ARMED
If an entry zone is triggered, the area will go into entry delay.
Warehouse
in ENTRY delay
Page 11

PRT-KLCS Protege Touchsense LCD Keypad | April 2014
11
Press [DISARM].
Warehouse
is DISARMING
When the area is disarmed, you can enter.
Warehouse
is DISARMED
Silencing and Canceling Alarms
When an area is in alarm, it can be silenced.
Warehouse
in ALARM
Press [DISARM].
Warehouse
is DISARMING
When the area is disarmed, the alarm stops.
Warehouse
is DISARMED
Page 12

12 PRT-KLCS Protege Touchsense LCD Keypad | April 2014
Trouble Display
The Protege system continually monitors system devices and trouble conditions.
i
Trouble conditions are cleared automatically by the system. If required, these can be programmed by
your installer to require acknowledgment. It is recommended that you inform your property manager or
security company immediately if a trouble condition occurs.
Viewing System Troubles
Select the trouble view menu by pressing [MENU,5,2].
Press the [ENTER] key to view any trouble conditions that have occurred.
*Battery*
The system or a
Use the [RIGHT] and [LEFT] keys to view the full details of the trouble condition and the action that should
be taken.
In this example, the full trouble message shown is "The system or a component of it has a battery problem.
Call service tech."
If the trouble requires acknowledgment, press [ENTER].
Press [ENTER] to
acknowledge
To view the next trouble condition (if any are present) press [DOWN].
Press [] to show
next item
Once finished, press [MENU] to exit the view mode.
Press [MENU] to
exit view mode
Page 13

PRT-KLCS P
rotege Touchsense LCD Keypad | April 2014
13
Alarm Memory
Alarms can be stored in the event log and in the alarm memory of the area the alarm was activated in.
This option must be enabled by your installer.
Viewing Alarm Memory
Select the Alarm Memory menu by pressing [MENU, 5, 1]. Use the [UP] and [DOWN] keys to view the areas.
If the area has alarms in its memory, the keypad generates a rejection tone and displays the memory
message.
Warehouse
*Alarms In Mem*
To view the first item stored in the alarm memory press the [ENTER] key.
Had alarm on
Roller Door
The area that the alarm occurred in is then shown. If a tamper alarm has occurred, the first line states that it
was a 24
HR al
arm.
in AREA
Warehouse
If the Acknowledge Alarm Memory option has been enabled by your installer, press the [ENTER] key to
acknowledge the alarm and remove
it from the list.
We recommend you always take note of the alarm before acknowledging or clearing the alarm memory
Press [ENTER] to
acknowledge
Press the [DOWN] key to view the next item stored in the alarm memory.
Press [] to show
next item
Once finished, press the [MENU] key to exit the view mode.
Press [MENU] to
exit view mode
Page 14

14 PRT-KLCS Protege Touchsense LCD Keypad | April 2014
Events
Events are logged for all actions that are performed on the Protege system and can be viewed from the keypad.
Events are presented in plain text.
To manage your system effectively and get detailed, exception and custom reports direct to your
desktop, ask your security professional about Protege software.
Viewing Events
Select the Review menu by pressing [MENU,3,1].
Press the [UP] key to view the previous event, and press the [DOWN] key to view the next event.
Wed 13:27:41 Use
r OFFLINE USER L
The keypad shows the first 32 characters of the event. Press the [RIGHT] key to show the following lines for
the event.
In this example, the full event shown is "Wed 13:27:41 User OFFLINE USER Logged In At KP039" which
tells us that offline menu access was made on Keypad 39 at 1:27pm on Wednesday.
Page 15

PRT-KLCS Protege Touchsense LCD Keypad | April 2014
15
Additional Features
The Keypad supports additional features that can enhance the management of your installation.
The following features need to be enabled by your installer before they can be used.
Offline Menu Access
Offline menu options provide access to certain functions without the needing to log into the keypad. Pressing
the [MENU] key while logged out displays the offline menu.
Automation Menu
To control automation points press [MENU,1].
Warehouse Lights
is OFF4
Use the [UP] and [DOWN] keys to select the automation point you want to control.
Press the [1] key to turn the point on for the period defined by your installer, the [2] key to turn the point off,
or the [3] key to latch the point on.
Trouble View
To view troubles from the offline menu press [MENU,2].
Event View
To view events from the offline menu, press [MENU,3].
Information Menu
To view system information, press [MENU,4].
Use the [UP] and [DOWN] keys to scroll through the following information:
BIOS Application version number
BOOT Application version number
Database version
Keypad serial number
Memory capacity
The letter indicates the location of the memory that is in use. This will be blank or I for internal, and E for
extended.
The current time
The current date
The current day of the week
Offline Door Unlock
Holding the [MENU] key for 2 seconds puts the keypad into FUNCTION mode. This mode can be used to
unlock a door that is associated with the keypad without needing to login.
Page 16

16 PRT-KLCS Protege Touchsense LCD Keypad | April 2014
Disabling / Enabling the Audible Output
Disabling the audible tone on your keypad will prevent the beeper from generating any notifications for alarms,
exit delay, or entry delay. This also disables rejection, confirmation and key press tones.
Disabling the Audible Output
To disable the audible output, press and hold [CLEAR].
The keypad will generate one long audible tone (rejection tone) to signify that the audible output has been
disabled.
Enabling the Audible Output
To enable the audible output, press and hold [CLEAR].
The keypad will generate four audible tones to indicate that the audible output has been enabled.
Panic Alarms
The Protege system provides three panic alarms that are immediately generated after two specific buttons are
pressed and held for three seconds. Based on your needs, these panic alarms may generate audible alarms
(sirens or bells) or silent alarms, and communicate specific messages to your monitoring station or property
manager.
Press and hold [1] and [3] for the panic alarm.
Press and hold [4] and [6] for a medical alarm.
Press and hold [7] and [9] for a fire alarm.
Fire Alarms/Smoke Detector Reset
Fire Alarms
When a fire alarm occurs, the keypad emits three audible tones at 2 second intervals until it is reset by entering
a valid user code. If the zone is a delay fire zone, there is a 30 second delay before the system contacts the
security company or property manager, preventing the reporting of false alarms. If there is no fire condition, we
recommend you contact your property manager or security company immediately to avoid an unnecessary
response.
A delayed fire zone is automatically canceled if the smoke detector is reset within 30 seconds. Pressing any key
on the keypad during the first 30 seconds will silence the alarm for 90 seconds.
Smoke Detector Reset
Depending on your installation, you may be required to reset a smoke detector following a fire alarm.
To reset smoke detectors from a keypad, press [CLEAR] and [ENTER] together for 3 seconds.
Page 17

PRT-KLCS Protege Touchsense LCD Keypad | April 2014
17
Contact
Integrated Control Technology welcomes all feedback.
Please visit our website (http://www.ict.co) or use the contact information below.
Integrated Control Technology
P.O. Box 302-340
North Harbour Post Centre
Auckland
New Zealand
11 Canaveral Drive
Albany
North Shore City 0632
Auckland
New Zealand
Phone: +64-9-476-7124
Toll Free Numbers:
0800 ICT 111 (0800 428 111) - New Zealand
1800 ICT 111 (1800 428 111) - Australia
1855 ICT 9111 (1855 428 9111) - USA/Canada
Email: sales@incontrol.co.nz or support@incontrol.co.nz
Web: www.ict.co
Page 18

 Loading...