

Page 1

i-800
Product
Information Guide
Page 2
This guide contains helpful information
that enables you to enjoy all of the features
of your phone.
Page 3

Introduction
Thank you for purchasing the color DECT BT phone. Your new
DECT (Digital Enhanced Cordless Telecommunications) can
connect to an iPhone with Bluetooth function, which enables you
to make calls through cell phone lines and landline. Enjoy these
additional features, as well:
Large displays and accessible menus.
Color display - Customizable with wallpapers and .
iPhone charger - Charge an iPhone using a port on your new
phone.
Contacts list - Your personal phonebook of up to 200 listings,
arranged alphabetically.
Phonebook synchronization - You can download the
phonebook from iPhone and review it via your DECT phone.
DECT handset controls iPhone music playing
Speakerphone - Enjoy handsfree conversations.
12 rings tones and sleep mode - Sleep mode automatically
switches the phone to the minimum volume at night.
Alarm clock
Personal cordless network - Connect up to five
your base. Each handset can access up to four additional base
units in order to extend your
Because we are committed to continuous quality improvement,
specifications and features may vary without prior notice.
Certain services, such as Caller ID, are available only if provided by
your local telephone network.
total wireless coverage.
brightness
handsets to
2
Page 4

Warnings
Your has been carefully designed to give you
DECT BT phone
years of safe, reliable performance. As with all electrical
equipment, however, there are a few basic precautions that you
should take to avoid hurting yourself or damaging the unit:
Read the instructions in this handbook carefully. Be sure to save it for
!
future reference.
!
Read and follow all warning and instruction labels on the equipment
itself.
!
Be sure to use only the switching power supply in the package, and
ensure that your power source matches the rating listed for it. If you
are not sure, check with your dealer or with your local power
company.
!
Avoid strong shocks. Don't use the switching power supply if it has
received any hard knocks or looks damaged in any way; immediately
contact an authorised service center.
!
Hold your handset firmly. Otherwise it may fall and be damaged.
!
Do not operate the phone in an explosive atmosphere.
!
Do not use the phone near water, or spill liquid of any kind on it. If
you think that liquid has penetrated the phone, immediately unplug
it, dry it with a soft, clean cloth and contact your dealer.
!
Respect the environmental conditions. All of the parts of this
equipment are designed for indoor use only. Never expose them to
extremely hot or cold temperatures. Don't expose the cordless
telephone to excessive vibrations or dusty, rainy places.
!
Never try to disassemble or service the equipment by yourself (aside
from the routine maintenance described in this handbook). Doing so
immediately voids the warranty, and you can cause damage
requiring extensive repair work. Always contact your local dealer for
assistance.
!
Handle the batteries properly. Particularly, strictly follow the
directions stated in this guide.
!
Never use the phone with non-suitable batteries, and charge them
only with the supplied base. The use of any non-genuine parts can
create hazards, electric shocks and other risks, and voids the
warranty.
!
In case of problems, please refer to this information guide or contact
your dealer or the nearest official service center. Every service
operation not provided by official service centers voids the warranty.
!
The phone cannot be used to place calls, including emergency calls,
under these conditions: during power failure, if batteries are
defective or depleted, or if the keypad is locked.
!
Do not use this phone near emergency medical equipment
people with implanted electrical devices, such as pacemakers
Additionally, radio signals between the handset and the base can
interfere with hearing aids, causing strong noise.
or near
.
3
Page 5

Contents
Chapter 1: Getting Started
Features List
7
9
Phone Layout
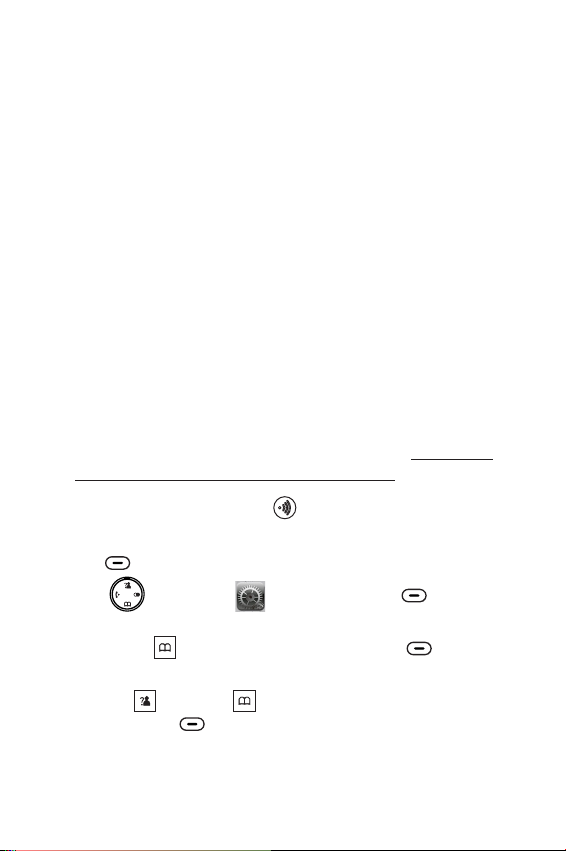
Key Functions
10
Handset Screen
12
13
Package Contents
Connecting
14
Installing the Battery
14
Charging
15
16
Turning On or Off the Phone
16
Registering a New Handset
Deactivating a Handset
17
18
Choosing the Dialing Mode
Setting Date & Time
18
Chapter 2: Bluetooth and Remote Control
20
Pairing with an iPhone
20
Connecting an iPhone
22
Disconnecting an iPhone
23
Removing a Paired iPhone
Remote Control for Music
24
Chapter 3: Basic Functions
26
Making a Call
28
Receiving a Call
29
Using the Speakerphone
29
Adjusting the Volume
Muting a Call
29
4
Page 6

30
Last Number Redial
30
Flash Signal
Using a Pause
30
31
Out of Range Indicator
31
Locking the Keypad
32
Paging
32
Temporary Tone-Dial Switchover
33
Intercom
33
Transferring Calls between Handsets
34
Three-way Conference Calling
Chapter 4: Display and Sound
Brightness
35
Wallpaper
35
Handset Name
36
Ring Setting
37
Key Tone
38
Power Off Tone
38
Charging Tone
39
Chapter 5: Call Logs
40
Incoming Calls
42
Dialed Calls List
Chapter 6: Contacts
43
Storing Contact Entries
Character Map
44
Reviewing or Dialing a Number in Contacts
45
Speed Dial
46
5
Page 7

46
Editing or Deleting Contacts
Download Phonebook from the iPhone
47
Chapter 7: Settings
48
Changing the Handset & Base PIN
Selecting a Base
50
51
Resetting the Handset or the Base
52
Auto Answer
53
Auto-Lock
Language
53
54
Version Information
Flash Time
54
Chapter 8: Date and Time
Date Format
55
Time Format
55
56
Alarm
57
Sleep Mode
58
Chapter 9: Menu Structure
Chapter 10: Additional Information
60
Troubleshooting
Technical Specifications
62
6
Page 8

Chapter 1: Getting Started
Features List
Color DECT BT Phone
1.8G/1.9G and 2.4G DECT
Charging cradle for iPhone4S/4/3GS/3G
Bluetooth connection
Receives and makes landline and cell phone calls
Rotated charging cradle
Reduce cellphone radiation
2 iPhones can sync. connect to the base
Call switch between DECT phone and your iPhone
DECT handset controls iPhone music playing
Touch keys on the handset and base
2.2" TFT large color display
Contact list (
& cell2
Phonebook synchronization
Call log ( )
Up to five handsets
Up to four bases one handset
12 polyphonic and three monophonic ring tones
Four
Three-way conference calling
Call transfer
Call hold
Languages options
Adjustable voice volume (5 levels)
Adjustable brightness ( )
Handsfree speakerphone
High definition stereo speakers
Key tones (selectable)
200 entries for landline, each 500 entries for cell1
)
30 missed, 30 answered, 20 dialed
can be registered with one base
can be registered with
ringer volume levels
14 levels
7
Page 9

Auto answering (selectable)
selectable wallpapers
4
Call duration display
Internal calling
Password protection
Mute function
Real clock (12-hour or 24-hour)
Keypad lock
Redial, Flash, Pause
Preparation dialing
Sleep mode selection
Alarm
Landline
FSK/DTMF Caller ID
Incoming call indicator
Private/Out of area notification
Message waiting notification
electable dialing mode
S
Selectable Flash time
8
Page 10
Phone Layout
Handset
Earpiece
Navigation
keys
Select key
iPhone key
Touch keys
Charging pins
Base
Charging
cradle
(for DECT)
Power on
/off button
Charging
indicator
LCD Screen
( inches)2.2
Back key
Speaker key
Microphone
Charging
Bluetooth LED
1 2
Loudspeaker
Battery
compartment
cover
cradle
(for iPhone)
Base bolt
Page key
Power jack
AUX jack
USB jack
Telephone line jack
9
Page 11
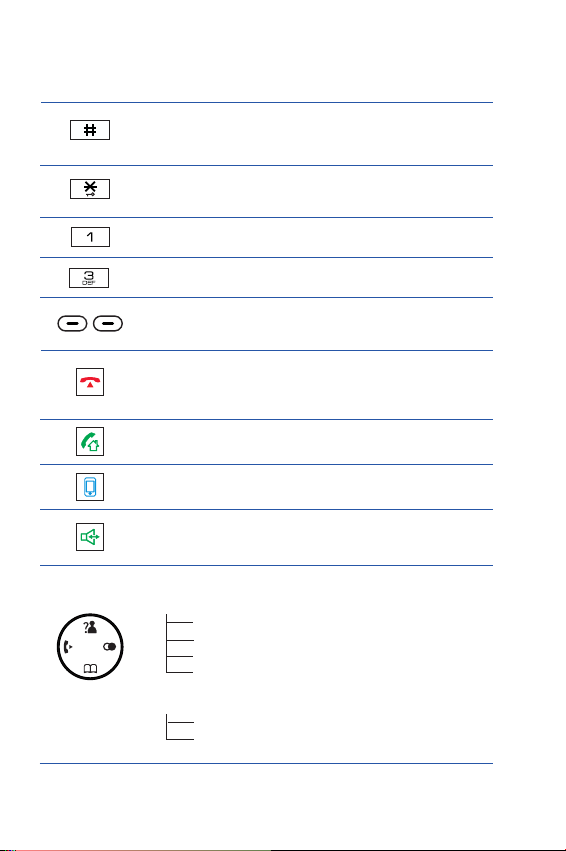
Key Functions
Press to enter # or to switch between upper case and
lower case letters in the English mode.
Decrease the treble volume during music playing.
Press and hold to turn on the keypad lock function.
Decrease the bass volume during music playing.
Increase the bass volume during music playing.
Increase the treble volume during music playing.
Select keys: Press to perform the function listed above
the key.
While navigating through menus, briefly press it to
cancel your input and return to the main screen. During
a call, briefly press it to end the call.
Press to place and answer landline calls.
Press to place and answer iPhone calls.
Press to activate the speakerphone for handsfree
operation during a call.
Press to scroll up or down when browsing menus.
In standby mode:
During use:
Left: Press to place an internal call.
Right: Press to review outgoing calls list.
Up: Press to view incoming calls list.
Down: Press to review contacts.
Up: Increases earpiece volume.
Down: Decreases earpiece volume.
10
Page 12
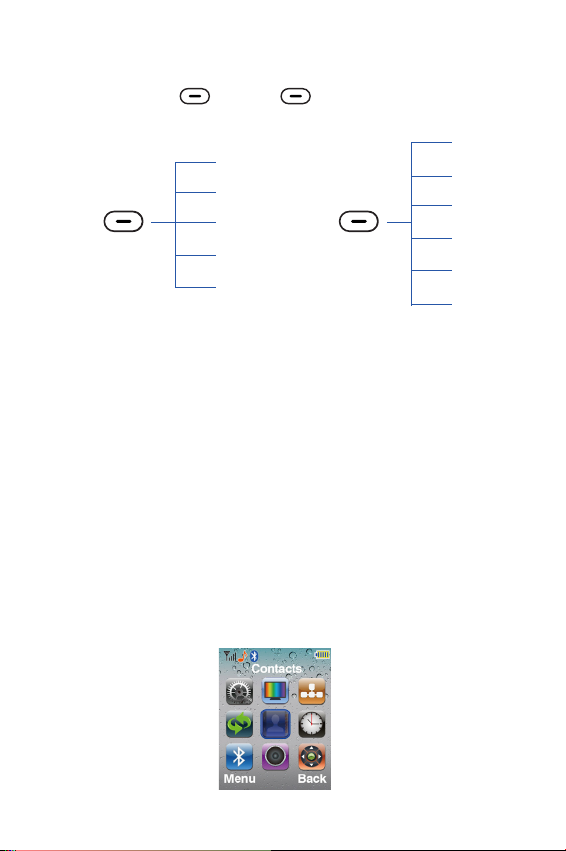
Select Keys
Press the left or right button to initiate the function
shown above it, on the display.
Remote
Left:
Remote
Back
Cancel
Delete
Pause
Redial
Select
Save
Option
OK
Menu
Menu
Select
OK
Save
Option
Enter the remote control for music mode.
Return to the previous menu.
Cancel your setting.
Clear digits or characters.
Insert a pause while dialing a number.
Redial the last-dialed number.
Select the highlighted menu item.
Save a contact number.
List options during a call.
Confirm a selection.
Enter the main menu:
Right:
Back
Cancel
Pause
Redial
Delete
11
Page 13
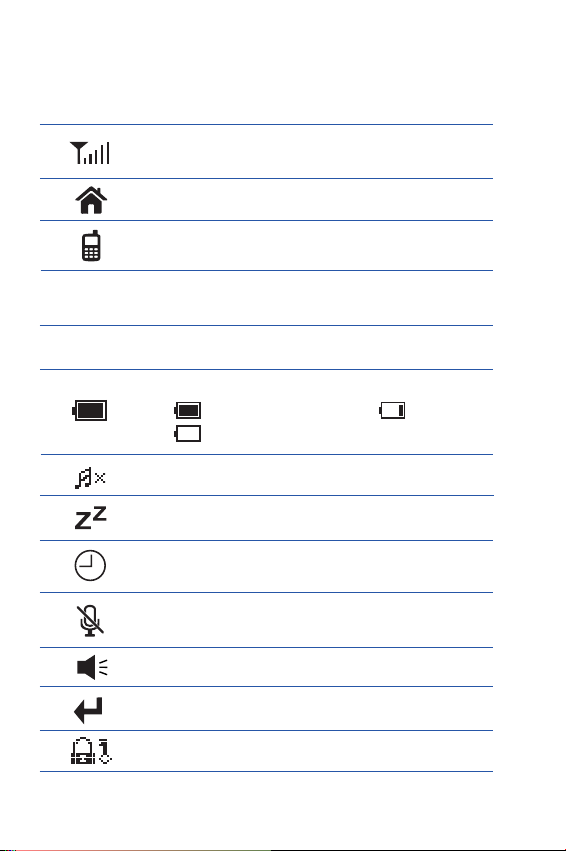
Handset Screen
The screen shows various icons.
Signal strength. The greater the number of
bars, the stronger the signal.
The landline is engaged.
The cellphone line is engaged.
Indicates the case in which letters will be
AZ
or
az
entered (upper case or lower case).
12
0-9
Indicates that only digits can be entered.
Battery charge level.
Fully charged status Low battery
Very low battery warning
Ringer volume is deactivated.
Sleep mode is activated.
Alarm clock is set.
The microphone is temporarily muted during a
conversation.
Speakerphone is enabled.
There are one or more missed calls.
Keypad is locked.
Page 14
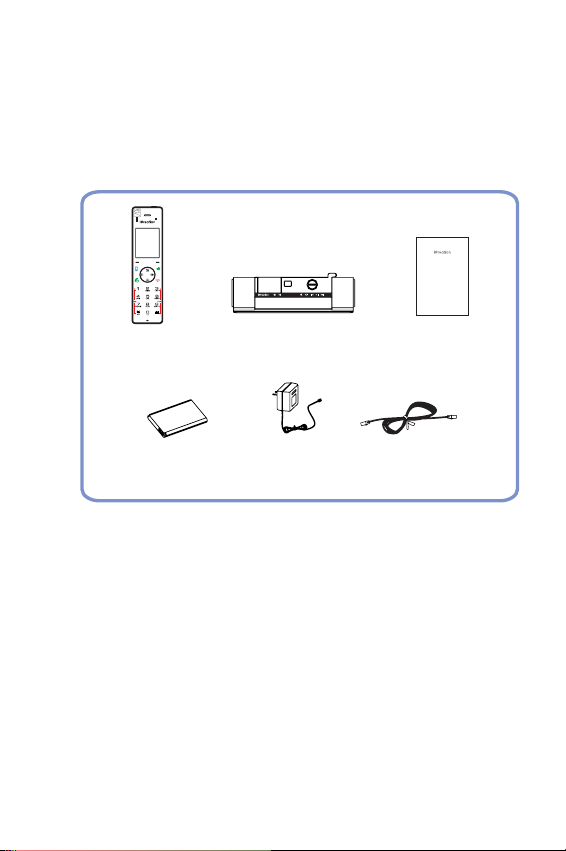
Package Contents
Once you have unpacked your phone, make sure that you have
all of these parts. If any component is missing or broken, please
call your dealer.
i-800
Handset
1 2
Base with
iPhone charger
Product
Information Guide
Information
guide
Li-ion Battery
pack
Switching power
supply
Line cord
*The shapes of the plug varies according to each country's specification.
13
Page 15
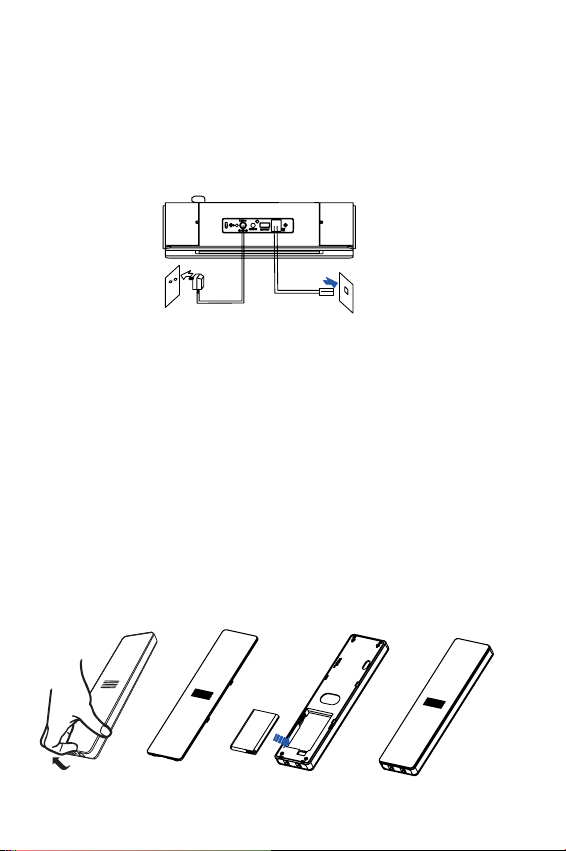
Connecting
Connect the plug of the power supply to the power jack of the base,
1
and then plug the power supply into a standard AC wall outlet.
Connect one end of the phone line cord to the phone line jack on the
2
base, and then connect the other end to a standard phone wall outlet.
To AC wall outlet
To phone wall
outlet
Installing the Battery
Rechargeable Li-ion battery pack (1000mAh) comes with your phone.
Install the batteries before use.
Break the battery cover off
1
picture below
Insert new battery as indicated.
2
Replace the battery cover and snap it into place.
3
.
14
from the position indicated in the
Page 16
Notes:
Do not insert or take out the battery when there is power
supply connected.
Replace battery if it doesn't recover its full storage capacity
after recharging.
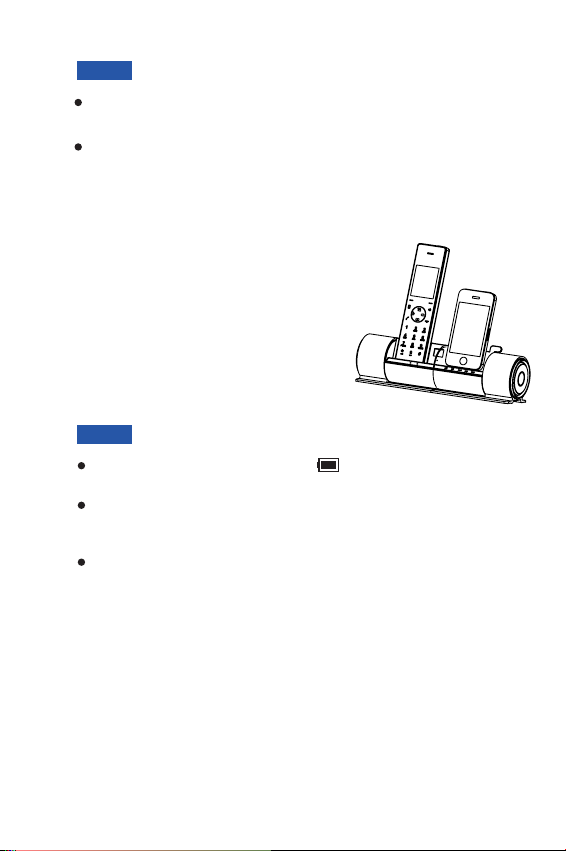
Charging
DECT Phone & iPhone
Before initial operation, fully charge
the DECT phone for 15 hours or
more.
To charge the DECT phone or iPhone,
simply place it on the base.
Notes:
When charging, the bars in scroll
indicator on the handset lights on
You can adjust the visual angle of the iPhone according to
your needs (from degrees to degrees).
bolt according to the thickness of your iPhone.
Nothing appears on the screen when the battery power is
very low. Fully charge the handset before use.
70 85 Adjust the base
.
Other Mobile Phones
To charge some other mobile phones, plug the connector in the
USB port on the base, then plug the other connector in the port
of your mobile phone.
and the charging
15
Page 17
Turning On or Off the Phone
When you place the handset (DECT phone) on the base, it
automatically turns on.
To turn on the handset (when it's off), press the Power on/off
button on the top of the handset.
To turn off the handset, press and hold this button until
appears. Then press to confirm, appears.
off? OK Goodbye!
Power
Registering a New Handset
To share your phone line with other people, you can register up
to 5 handsets to your base. To do this, assign a new number to
each handset that you register. The supplied handset is already
registered with the number 1, appearing as . For security
reasons, the registration procedure can only be performed by
people who are close to your base and know the
PIN.
Please note that this PIN cannot be modified.
1
On the base, press and hold on the rear of the base for
about three seconds, and then release the button.
Press to display the main menu items.
2
Press to choose , and then press
3
Select
4
Press to choose , then press
Select
5
Press or to choose the base number that
you want. Press to search the base. The
display shows a series of characters.
beneath
.
Down Register
.
Up Down
Menu
beneath
Handset
Select
1
REGISTER
beneath
beneath
16
Page 18
Press to confirm. The display asks you
6
to enter the AC (the authentication code is ). Enter this
code and press .
If the registration is successful, a confirm tone occurs and
7
the new handset shows the handset number (e.g. ).
Note:
To extend radio coverage, a handset can be registered to up
to 4 different base units. A base can be used with up to 5
handsets, and one base can connect to only one handset at
a time.
beneath
Select
beneath
0000
Select
1
Deactivating a Handset
If necessary, you can clear a handset’s registration, but you
cannot deactivate the handset that you are using.
1
Press to display the main menu items.
Press to choose , then press .
2
Enter the current base PIN (the default is ) and press
3
Press or to choose , then
4
press . " " appears. Use the
keypad to press the handset number for which you want to
clear the registration, then press . A confirm
tone occurs, and the handset cannot be used anymore with
the base.
beneath
beneath
Up Down Release handset
beneath
Menu
Base
.
OK
Select H Desub ?
beneath
beneath
0000
OK
Select
17
Page 19
Choosing the Dialing Mode
Your phone can be set to pulse dialing (rotary), or tone dialing
(DTMF). To change the dialing mode:
1
Press to display the main menu items.
Press to choose , then press .
2
Enter the current base PIN (the default is ) and press
3
Press to choose , then press
4
Select
Press or to choose or , then
5
press to confirm.
beneath
beneath
Down Dial mode
. The current setting appears.
Left Right DTMF PULSE
beneath
OK
.
Menu
Save
Base
beneath
0000
Select
beneath
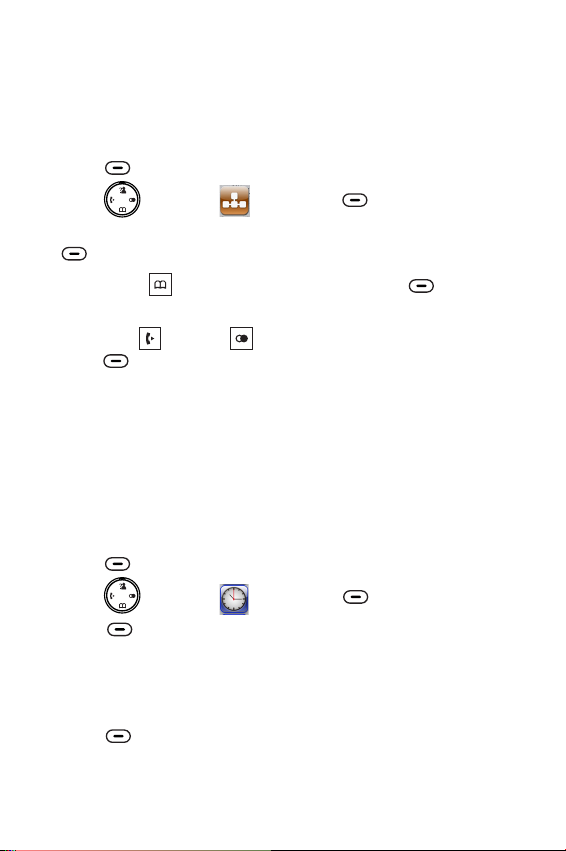
Setting Date & Time
Your phone can display the current date and time.
You must set the correct date and time to indicate when calls or
messages are received.
beneath
Menu
Date and time
Select Set Clock
Select
beneath
Select
Press to display the main menu items.
1
Press to choose , then press .
2
Press to choose . The current
3
settings are displayed:
Using the keypad, enter the current date and time (four digits
4
for each, as explained below in the notes).
Press to save the setting.
5
beneath
beneath
18
Page 20

Notes:
If you selected in the menu, enter
the time in 12h format and use or to select
or .
AM PM
12-HOUR Time format
Up Down
When setting the month, you can enter 1 digit or 2 digits at a
time, but it is displayed in 2-digit format. (For example: For
August, you can enter 8 or 08 in the month field, but the
display shows "08".)
After the time setting, press beneath to set the
date. During the date setting, press to switch to time
Select
Left
setting.
If your service uses the FSK standard,
the date and time is
automatically set when you receive a call to this unit.
19
Page 21

Chapter 2: Bluetooth and Remote Control
Pairing with an iPhone
To use an iPhone with your DECT phone, you must first pair
and connect the iPhone with the DECT phone.
Turn on the Bluetooth feature of your iPhone. Click ,
1
, and , then the iPhone searches for
General Bluetooth OFF
available devices.
2
Press to display the main menu items.
3
Press to choose , then press .
Press to choose . The LCD
4
shows , and the Bluetooth LED flashes.
5
When the iPhone finds , click to connect it
with the base. When the iPhone is successfully connected,
Connected
beneath
Please wait...
beneath
displays.
Menu
Bluetooth
Select Add device
i-800 Not Paired
Connecting an iPhone
All Bluetooth-paired devices are stored in the Device list, and
only devices in the list can establish a Bluetooth connection
with the DECT phone. Although seven iPhones can be paired
with the DECT phone, only two iPhones can be connected to
the base and be engaged in a call at one time.
Method 1: Using the iPhone
Click , , . If the Bluetooth feature
Settings General Bluetooth
1
is switched off, click to switch it on.
Click to the right of to connect the
2
Not Connected i-800
iPhone to the DECT phone. When the connection is
successful, appears.
Connected
OFF
beneath
Settings
Select
20
Page 22

Method 2: Using the DECT Phone Menu
1
Press to display the main menu items.Menubeneath
Press to choose , then press .
2
3
Press to choose press
Down Device list,
.
Select
The display shows all devices that have been paired before.
4
Press or to choose the desired device,
Up Down
press .
5
Press to choose . When the
beneath
beneath
connection is successful, appears to the right of
on the iPhone screen.
i-800
Bluetooth
Select
Select Connect
Connected
beneath
Select
beneath
Method 3: Quick Connection
1
When no device is connected with the DECT phone, press
on the DECT phone.
The display shows all devices that have been paired before.
2
Press or to choose the desired device,
Up Down
press to complete the connection.
When the connection is successful, appears to
3
beneath
the right of on the iPhone screen.
Notes:
If you switch off the Bluetooth function on the iPhone then
switch on, you must connect it again.
To ensure your calling quality, you are recommended to use
the iPhone within a distance of 3 meters with the DECT
base.
Select
Connected
i-800
21
Page 23

Disconnecting an iPhone
1
Press to display the main menu items.
Press to choose , then press .
2
Press to choose , press
3
Select
The display shows all devices that have been paired before.
4
Press or to choose the desired device,
press .
5
Press to choose . Then a
prompt tone occurs and appears to the right
of on the iPhone screen.
beneath
Down Device list
.
Up Down
beneath
i-800
beneath
Menu
Bluetooth
Select
Select Disconnect
Not Connected
beneath
Select
beneath
22
Page 24

Removing a Paired iPhone
If you already have the maximum of seven paired iPhones in
the Device list and you want to add another iPhone, you must
first delete a paired iPhone.
1
Press to display the main menu items.
Press to choose , then press .
2
3
Press to choose , and then press
beneath
The display shows all devices that have been paired. Press
4
Up Down
and then press .
Press to choose , and then press
5
beneath
Press to confirm. After successful
operation, a confirm tone occurs.
6
In your iPhone, delete the DECT Bluetooth information. Click
Forget Device
beneath
Down Device list
Select
or to choose the one you want to remove,
Down Remove
Select Remove ? iPhone
on the right side of , then click .
Reminder
Some of Instant Messenger, such as Viber, Skype,
Fring, Im+, Nettalk...... may not well support
Bluetooth protocol, please check with relevant
providers and update the software to use i-800
properly.
Thanks!
Menu
Bluetooth
.
beneath
. The display shows .
beneath
appears. Click it to delete.
Select
Select
i-800 Forget this Device
beneath
Select
23
Page 25

Remote Control for Music
This feature allows you to control iPhone music playing via your
handset or base.
Method 1: Using the Handset
1
Insert your iPhone on the charging cradle of the base, then
use it to play music.
2
Press to display the main menu items.
Press to choose , then press
3
to enter the following interface.
beneath
Menu
Remote
beneath
Select
LCD display
Press to play, press it again to pause.
Up Down
Press or to adjust the volume.
Furthermore, press or to adjust the
Press or to adjust the treble volume.
During the playing, press to replay the current track,
press it twice to play the previous track, press to get
the next one.
When the playlist appears on the iPhone screen, use and
to scroll up and down and select the track.
Press to exit.
24
Left
Corresponding keys
bass volume.
Right
Page 26

Method 2: Using the Base
Insert your iPhone on the charging cradle of the base, then use
it to play music.
Press to play, press it again to pause.
During the music playing, press and to adjust the
volume.
During the playing, press to replay the current track, press
it twice to play the previous track, press to get the next one.
Notes:
iPod player on your iPhone is necessary to support this
feature.
To control the music playing, Bluetooth is unnecessary.
25
Page 27

Chapter 3: Basic Functions
Making a Call
When you dial, up to 25 digits appear on the screen.
You can place your calls in two ways:
Traditional Mode
Pick up the handset and press to engage the line. You
1
hear a dial tone, and appears.
Dial a telephone number. The number appears on the
2
screen. When you hear your called party, speak with a
normal voice.
3
To end the call, press or place the handset on the base.
High-featured Mode
This procedure is more convenient and reliable,:because you
can check the number as you enter it
Enter a telephone number. Press and hold to insert a
1
pause if necessary. Check the number on the display.
If you make a mistake, correct it by using
2
Delete
3
.
When the number correctly appears, press to dial it out
through a landline.
Or press to dial through your iPhone.
Note: The DECT phone must first be connected to the
iPhone via Bluetooth.
Bluetooth
section.
For more details please refer to
beneath
26
Page 28

Call Switching between the DECT Phone and an iPhone
During a call, you can switch between your DECT phone and
your iPhone.
1
During a cell line call using the DECT phone, click
on the display of the iPhone, then click . The
call switches to the iPhone.
To switch back, click on the iPhone. The call
2
switches back to the DECT phone.
Note:
To use this feature, the DECT phone must be paired and
connected to the iPhone beforehand. For more details,
please refer to section.Bluetooth
Options during a call
During a call, you can press beneath , and then
select to put the call or hold, or select to enter
Hold Contacts
the Contacts list.
Option
27
Page 29

Receiving a Call
When a call is received, the phone rings and " "
appears on the screen. indicates a landline call or
indicates a cellphone line call. If the incoming call can be
identified (i.e. The caller's information is transmitted) you also
see the caller's number.
Press to answer a landline call or press to answer a
cell line call when your iPhone is charging. Or if the handset is
on the base and you have activated the " "
function (See page 52 for details), simply pick it up to answer
the call. During conversation, the screen shows the elapsed
time.
To end the call, press or replace the handset on the base.
Note:
The caller is identified only if your telephone network
caller's network supports the service.
still hide his/her number.
Incoming Call
Auto Answer
and the
However, a caller can
28
Page 30

Using the Speakerphone
During a call, you can turn on the speakerphone that is built into
the handset. You can simply put your handset on a surface (e.g.
a desk) and enjoy the comfort of a handsfree conversation.
To turn on the speakerphone
appears.
To turn off the speakerphone
, press during a call.
, press . disappears.
Adjusting the Volume
During a conversation, press the or key to adjust the
earpiece volume (or the handsfree speakerphone volume).
There are five levels, which are shown by the bars of .
When the last bar is red, .
the volume is at its maximum level
Up Down
Muting a Call
During a conversation, you can temporarily mute the
microphone so that the party on the other end of the line cannot
hear you. You can still hear the other party.
converse privately with someone near you.
To mute your microphone
conversation: appears.
To unmute the microphone
disappears.
, press the during the
, press the ,
This enables you to
Right
Right
29
Page 31

Last Number Redial
Your phone allows you to quickly redial the last dialed number.
Pick up the handset and press to engage the line. Then
press to dial the last-dialed number.Redialbeneath
Flash Signal
If your phone service includes call waiting or conference call
services, you can use to initiate these functions
details please contact your telephone company. Additionally, if
you are connected to an extension line (PABX), you can use
to transfer a call to another extension.
initiate any of these functions
To , press while the line is
engaged.
. For further
Using a Pause
A pause is useful when you access an interactive voice
response system, such as an automated banking system. A
pause provides a delay of 3 seconds.
After you dial a number and press , if you need to insert a 3second pause, press .Pausebeneath
30
Page 32

Out of Range Indicator
The bars to the right of show the signal strength received
from the base. If you are too far from the base, the radio signal
might become too weak for the phone to access the telephone
line. In these conditions you can't make or receive phone calls,
and turns red and " " appears.Searching...
Locking the Keypad
This function is useful to avoid accidentally pressing keys when
you are carrying your handset. If you activate keylock, all keys
are inhibited except and .
In this condition, when a call comes in, you can answer the call
by pressing or . When the call ends, the keys are locked
again.
To lock the keys
To unlock the keys press the power on button on the top of the
handset or press and hold again, then
from the display.
, press and hold until appears.
,
disappears
31
Page 33

Paging
You can page the handset from the base by making the handset
ring with a special ring. It's useful to locate a lost handset or call
the user who currently has the handset.
To send the paging signal
base. All handsets registered with the base ring for 15 seconds.
To stop the paging signal before 15 seconds have passed
press or any keys on the handset.
Note:
If a call comes in while the handset is being paged, the
handset stops the paging operation and starts ringing
normally.
, briefly press , located on the
Temporary Tone-Dial Switchover
If you are using pulse dialing because your telephone line
doesn't support tone dialing, you might not be able to access
certain external services (e.g. automatic call centers, voice
mailboxes, interactive telephone systems etc.), because they
need tone dialing. You can avoid this limitation and access them
anyway by doing this:
Pick up the handset and press to engage the line.
1
Press and hold until " " is displayed: your DECT phone
2
is temporarily in the tone dial mode.
3
Enter the number of the service that you need to access.
When you hang up, the phone automatically returns to the
4
pulse mode.
-
,
32
Page 34

Intercom
If you connected more than one handset to a base (you can
connect up to 5 handsets to the same base), you can have a
conversation between two people using two different handsets.
Pick up the handset and press . The screen display
1
shows " " ( is your handset number).
INT x -> x
2
Press the number of the handset that you want to contact
(from 1 to 5). The called handset starts to ring.
3
If the called party can answer your call, he/she can press
and start talking. You can see the handset number of
the called party on your screen.
At the end of the conversation, press .
4
Left
Transferring Calls between Handsets
If you have more than one handset registered to the same
base, you can transfer an outside call between the handsets.
When you are connected to an external call, press
1
and the number of the handset that you want to contact
1 to 5).
If the called party can answer your call, he/she can press
2
and start talking.
3
If you want to cancel the transfer before the called party
answers, press . The call transfer is cancelled.
Left
Left
(from
33
Page 35

Three-way Conference Calling
When you have an external call and an intercom call in
progress, you can set up a three-way conference call, like this:
Press beneath to set up a three-way conference
call.
Confer
34
Page 36

Chapter 4: Display and Sound
Brightness
This adjustment enables you to optimize the visibility of the
display by changing its brightness according to environmental
conditions.
1
Press to display the main menu items.
Press to choose , then press .
2
3
Press again to choose . The
current setting appears.
Press repeatedly to choose among the available
4
levels, then press .
beneath
beneath
Menu
Display
Select Brightness
beneath
Select
beneath
14
Select
Wallpaper
Press to display the main menu items.
1
Press to choose , then press .
2
Press or to choose , then press
3
display.
Press to choose among pre-defined wall paper
4
images, then press beneath .
beneath
Up Down Wallpaper
beneath
Menu
Display
beneath
Select
. The current setting appears on the
4
OK
Select
35
Page 37

Handset Name
1
Press to display the main menu items.
2
Press to choose , then press .
3
Press or to choose , then
press .
4
Press or to choose " ", press
Select
5
Enter the name, up to characters long that you want to
assign to the handset, and then press .
6
Press . The handset name appears.
To deactivate this feature, access the menu
7
and choose " ", press .
beneath
Up Down Handset name
beneath
Up Down ON
.
Menu
Display
Select
11
beneath
Handset name
OFF Select
beneath
beneath
Save
Select
beneath
36
Page 38

Ring Setting
You can select unique cell, landline and internal call ring tones
and volumes. There are 15 ringtones, and four volume levels.
You can also turn off the ringer.
Press to display the main menu items.
1
Press to choose , then press .
2
Press to choose , or press
3
Up Down PSTN ringtone INT
ringtone Select
4
Press or to select the ring tone that you
like. Each time you press or , the handset
sounds with the selected ring.
5
Press to save the ring tone setting and
enter the ring volume setting.
6
Press or to choose the volume level that
you want. Each time you press or , the
handset sounds with the selected volume.
7
Press to save the settings and return to
the previous menu.
Notes:
If you turn off the ringer, when a call comes in, only the
incoming call message appears on the display.
You can also turn the PSTN ring off/on by long pressing
when the line is not engaged.
beneath
or to choose or
, then press .
Left Right
Left Right
beneath
beneath
beneath
Menu
Sound
Select Cell ringtone
beneath
Left Right
Select
Left Right
Select
beneath
Select
37
Page 39

Key Tone
Every time that you press a key, your handset acknowledges it
with a key tone. You can disable the key tones.
1
Press to display the main menu items.
Press to choose , then press .
2
3
Press or to choose , then press
4
Press or to choose " " to activate this
feature or choose " " to deactivate it, press
Select
Note:
For normal use, we recommend that you leave the key tones
enabled. This makes the phone easier to use.
beneath
Up Down Key tone
beneath
Up Down ON
.
Select
Menu
Sound
.
OFF
beneath
Select
beneath
Power Off Tone
When you turn off the handset, it generates a tone. You can
disable the tone.
1
Press to display the main menu items.
Press the navigation keys to choose , then press
2
Press or to choose , then
3
press .
Press or to choose " " to activate this
4
feature or choose " " to deactivate it, and then press
beneath
beneath
beneath
Up Down Power off tone
beneath
Up Down ON
Select
Select
.
Menu
.
Select
OFF
Sound
38
Page 40

Charging Tone
Every time you place the handset on the base, a tone occurs.
This tone confirms that the handset is charging. You can switch
the tone or .ON OFF
Press to display the main menu items.
1
2
Press to choose , then press .
3
Press or to choose , then
press .
4
Press or to choose " " to activate this
feature or choose " " to deactivate it, and then press
beneath
Note:
For normal use, we recommend that you leave the charging
tone enabled. This makes the phone easier to use and
avoids the risk In
this case
unnoticed.
beneath
Up Down Charging tone
beneath
Up Down ON
Select
, the handset would not charge and it might go
Menu
Sound
Select
OFF
.
improper placement in the chargi
beneath
Select
ng cradle.
39
Page 41

Chapter 5: Call Logs
Incoming Calls
When you receive a call and you subscribe to your network
provider’s caller ID service, if the caller's information is
transmitted from the network on which the call was made (and
the caller doesn't hide it), the caller's phone number is
displayed. Additionally, you miss calls " " followed
by the number of missed calls (01, 02, etc.) and the icon
appears.
The last 30 received (or missed) calls are stored in the
Answered calls Missed calls
back the numbers, delete them or store them in the contacts
list. To view the numbers, you can access the
list (or list).
Missed calls
list (or list), and you can call
Reviewing or Dialing a Number in the Incoming Calls List
Press to display the main menu items.
1
Press to choose , then press .
2
3
Press to access . The list
of incoming calls appears. Numbers received via a landline
appear with , and numbers received via cellphone line
appear with .
Scroll through the relevant calls list using or
4
beneath date and time
appear.
5
To dial a number through your landline, press or dial it
through your iPhone using .
beneath
beneath
until you find the desired number, and then press
Select
Menu
Call logs
Select Incoming calls
. The that you received the call
Missed calls
Answered calls
beneath
Up Down
Select
40
Page 42

Notes:
At step 3, if the list is empty, " " appears.
Missed calls xx OK
When " " appears, you can press the key
No record.
to access the Incoming Calls list.
If the caller has his name and number not be
, " " appears on the screen and in the list.Private
sent
Out of area
" " appears and is stored in the incoming call list
specified that
when someone calls from an area where the telephone
company does not offer identification services or name and
number delivery to your region.
Incoming Calls Options
You can save or delete a number in the missed calls list, as
follows:
Find the desired number in the incoming calls list.
1
Press to display the call information.
2
Press to display the option menus.
3
4
Press or to choose the desired option:
beneath
beneath
Up Down
Add to contacts
contacts list. If the number is longer than 16 digits, you can
store only first 16 digits of the number.
Delete
-
Delete all
(a prompt confirms your intent). Press
to confirm or to exit without deleting the
entries.
Select
Select
-
allows you to save the number in the
deletes the selected number.
-
allows you to delete the whole incoming calls list
beneath
Cancel
beneath
Select
41
Page 43

Dialed Calls List
The last 20 dialed calls are stored in the list. You
can review, redial, delete and save these numbers.
Dialed Calls
1
Press to display the main menu items.
2
Press to choose , then press .
Press or to choose , then press
3
beneath
Up Down Dialed calls
beneath
Menu
Call logs
beneath
Select
. The last dialed number appears on the
Select
screen.
4
Up Down
Press or to find the desired number, press
Select
beneath
.
Press to dial it via your landline or dial it via your iPhone
using .
5
Press to display the option menus.
6
Press or to choose the desired option:
beneath
Up Down
Add to contacts
contacts list. If the number is longer than 16 digits, only the
first 16 digits are stored.
Delete
-
Delete all
prompt confirms your intent). Press to
confirm or to exit without deleting the
entries.
Select
-
allows you to save the number in the
deletes the selected number.
-
allows you to delete the entire dialed calls list (a
beneath
Cancel
beneath
Select
Note:
At step 3, if the list is empty, " " appears.No record.
42
Page 44

Chapter 6: Contacts
You can store frequently used numbers so that you can easily
make a call without having to remember or enter the phone
number. You can store up 200 entries in your contact list.
Storing Contact Entries
Method 1: Using the Contacts Menu
Press to display the main menu items.
1
Press to choose , then press
2
beneath to choose .
Press or to choose , then
3
press .
Enter a name. For additional details, please see the
4
Character Map
"".
Press to move the cursor to the number field, then
5
enter the appropriate phone number (up to 16 digits). Press
and hold to insert a pause if necessary.
Press to highlight the ring type number at the right
6
of , then press or to select a ring to
associate with the number.
7
Use the same method to associate a picture with this
number, press to confirm.
beneath
Select Home
Up Down New number
beneath
Down
Down
beneath
Menu
Select
Select
Left Right
beneath
Save
Contacts
Notes:
az
At step 5, or changes to . This indicates that you
can only enter digits.
If you make a mistake while entering a number or name,
press to clear the last character. You can
also use or to navigate to incorrect
characters, then press to clear them.
AZ
beneath
Left Right
Delete
0-9
beneath
Delete
43
Page 45

Method 2: In Standby Mode
Enter a phone number, then press .
1
Complete storage by starting from Step 4 in the last
2
paragraph of .
Method 1
beneath
Save
Character Map
To enter a specific alphanumeric character, press the relevant
key according to the following table: once for the first character,
twice for the second and so on.
Key
0
1
2
3
4
5
6
7
8
9
Characters in the displayed order
$
Notes:
To delete letters, use .
Deletebeneath
If you want to shift the case while entering letter, press .
When entering the same letter twice or a different letter on
the same key, wait for a few seconds for the cursor to move
automatically, and then select the next letter.
44
5
Page 46

Reviewing or Dialing a Number in Contacts
You can search stored contacts by entering the first characters
of their names (alphabetic search). You can also scroll through
the entire list without accessing the menu.Contacts
Method 1: Alphabetic Search
1
Press to display the main menu items.
Press to choose , then press
2
beneath to choose .
Press to access .
3
Enter the first few letters of the name by using the
4
alphanumeric keys, and press . The
details appear.
Press to dial the number through your landline or dial it
5
through your iPhone with .
Method 2: Searching by Scrolling the Contacts List
Press beneath . The entire list appears in
1
alphabetical order.
Repeatedly press or to scroll to the desired
2
entry.
Press to view the details of the selected
3
entry.
Press to dial the number through your landline or dial it
4
through your iPhone with .
beneath
Select Home
beneath
Menu
beneath
Select
Select View
Contacts
Up Down
Selectbeneath
Contacts
beneath
Select
45
Page 47

Speed Dial
You can store up to 9 speed dial numbers on the numeric
keypad (1~9), so you can easily dial the numbers by pressing
and holding the associated numeric key.
Storing Speed Dial Numbers
1
Press to display the main menu items.
2
Press to choose , then press
beneath to choose .
Press or to choose , then press
3
Repeatedly press or to select the desired
4
location ( ~ ), and then press
Modify
You can press or to scroll to the desired
5
entries, and then press .
Press again to confirm.
6
Dialing a Speed Dial Number
Press and hold the numeric key (1~9), then press to dial the
number through your landline or dial it through your iPhone
using .
beneath
Select Home
Up Down Speed dial
beneath
KEY 1 KEY 9
.
beneath
Menu
beneath
Select
Select
.
Up Down
Up Down
Select
beneath
Contacts
Select
beneath
Editing or Deleting Contacts
You can edit or delete a number in the contacts, as follows:
1
Find the desired number in the contacts.
2
Press to view the details of the selected
entry.
46
Selectbeneath
Page 48

3
Press to display the option menus.
Press or to choose the desired option:
4
Edit
Delete
beneath
Up Down
-
allows you to edit the selected entry.
-
deletes the selected entry.
Delete all
Select
-
deletes all of the contact entries.
Download Phonebook from the iPhone
Up to 2 cell phonebooks can be downloaded to your DECT
phone via Bluetooth wireless technology. Each downloaded
phonebook can store up to 500 entries. You can access any
phonebook entry and use it to make a call on the landline or
either of two iPhones.
Make sure that the iPhone is already connected to the DECT
1
phone with Bluetooth, and place your iPhone next to the
telephone base during the downloading.
2
Press beneath to display the main menu items.
Press beneath to choose , then press
3
Down Cell 1 Cell 2
or to choose or .
If available, press to choose , then press
4
beneath . The contacts from the iPhone is updated
on the DECT phone.
After that, you can review the iPhone's contacts via your
5
DECT phone.
Menu
Contacts
Select Up
Down Update
Select
Important Note:
Since the speed of Bluetooth transmission is limited, the
process of contacts downloading may last for several minutes.
If there is an incoming call when contacts downloading is in
progress, the downloading is terminated. You have to repeat
above operations.
47
Page 49

Chapter 7: Settings
Changing the Handset & Base PIN
Base and handset PINs are required to protect your phone
against unauthorized use. They are set to at the factory.
You can change the PINs as follows:
Handset PIN
1
Press to display the main menu items.
2
Press to choose , then press .
3
Press to choose .
Enter the current PIN code, then press .
4
Enter the new four-digit PIN, and press .
5
6
Enter the new PIN code again to confirm it, then press
beneath
Note:
At step 4, if you enter the wrong PIN, your phone generates
a warning sound.
beneath
beneath
OK
Menu
Select PIN code
to save the setting.
Handset
0000
beneath
beneath
beneath
Select
OK
OK
48
Page 50

Base PIN
1
Press to display the main menu items.
2
Press to choose , then press .
3
The handset prompts you to enter the current base PIN code
beneath
(the default PIN is ). Use the numeric keys to enter the
code and press .
4
5
6
Up Down Change PIN
Press or to choose , then press
beneath
Select
Enter the new four-digit PIN, and press .
Enter the new PIN code again to confirm it, then press
beneath
OK
Menu
Base
0000
beneath
OK
.
to save the setting.
beneath
beneath
OK
Select
49
Page 51

Selecting a Base
Your handset can be used with up to 4 base units, provided that
it has been registered with them. This menu option enables you
to select which base you want to use:
Press to display the main menu items.
1
Press to choose , then press .
2
3
Press or to choose , then
press .
Press or to select the base, then press
4
5
Press .
Notes:
If the selected base has not been registered with your
handset, " " appears.
At step 4, if you select " ", handset finds the first
available unit as you move around.
beneath
Up Down Select base
beneath
Up Down
beneath
appears to the right of the selected base.
Not registered
Select
Menu
Handset
Select
.
beneath
Best base
Select
50
Page 52

Resetting the Handset or the Base
If you reset the handset or the base, all of the user-selectable
features restore to the factory settings: When resetting the
handset, the incoming and outgoing lists will be erased, but the
Contacts and Flash time do not reset.
The handset and base can be reset independently
for the following purposes:
If you have made many wrong settings and you want to
restore the handset to the factory presets.
If the phone shows logical malfunctions (incorrect symbols
on the display, incorrect behavior, etc.), the problem can be
caused by a switching power supply noise or an electrostatic
spike that can temporarily alter the memory of the internal
microprocessor. Resetting could solve the problem.
. It is useful
Resetting the Handset
Press to display the main menu items.
1
Press to choose , then press .
2
3
Press or to choose , then
press .
The handset asks you to enter the current handset PIN code
4
(the default PIN is ). Use the numeric keys to enter and
press . " " appears. Press
OK
5
Press .
beneath
Up Down Reset handset
beneath
beneath beneath
to confirm.
Menu
Handset
Select
0000
OK Reset ?
beneath
Select
51
Page 53

Resetting the Base
1
Press to display the main menu items.
2
Press to choose , then press .
The handset prompts you to enter the current base PIN code
3
(the default PIN is ). Use the numeric keys to enter the
PIN, and then press .
4
Press or to choose , then press
B Reset ? OK
" " appears. Press to confirm.
5
Press .
6
Notes:
Be careful! When you reset the handset, you will lose any
data stored in it (e.g. Numbers in the incoming and outgoing
lists). Jot them down before resetting the handset.
Resetting the base does not affect the handsets registered to
the base.
beneath
Menu
Base
0000
beneath
OK
Up Down Base reset
beneath
Select
.
beneath
beneath
Select
Auto Answer
You can answer a call by simply picking up the handset from
the base, without pressing any key.
Press to display the main menu items.
1
2
Press to choose , then press .
3
Press or to choose , then
press .
Press or to choose " " to activate this
4
beneath
Up Down Auto answer
beneath
Up Down ON
feature or choose " " to deactivate it, press
Select
.
Menu
Handset
Select
OFF
beneath
52
Select
beneath
Page 54

Auto-Lock
When you have activated this feature, some time (about 25
seconds) later if no operation is taken, the keypad will be autolocked. Then you need to press the power on button on the top
of the handset to unlock it.
Press to display the main menu items.
1
2
Press to choose , then press .
3
Press or to choose , then press
Press or to choose " " to activate this
4
feature or choose " " to deactivate it, press
Select
beneath
Up Down Auto-Lock
beneath
Up Down ON
.
Select
Menu
Handset
.
OFF
beneath
Select
beneath
Language
You can change the language used to display the menu
messages. There are multiple languages available.
Press to display the main menu items.
1
Press to choose , then press .
2
3
Press or to choose , then press
Press or to select the language that you
4
want, press .
beneath
Up Down Language
beneath
Up Down
Menu
Handset
Select
. The current language appears.
beneath
Select
beneath
Select
53
Page 55

Version Information
Press to display the main menu items.
1
Press to choose , then press .
2
3
Press or to choose , then press
Hardware version, HS EMC code and Software version
information appear.
beneath
Up Down Version Info
beneath
Menu
Handset
beneath
. The current Handset model number,
Select
Select
Flash Time
During a conversation, allows you to access special services
offered by your telephone network or to transfer a call to
another extension if you are connected to a PABX (Private
Automatic Branch of eXchange).
If your key does not work properly, you need to adjust the
Flash time, as follows:
1
Press to display the main menu items.
2
Press to choose , then press .
You are prompted to enter the current base PIN code (the
3
default PIN is ). Use the numeric keys to enter and
press .
Press to access . The current
4
setting appears.
5
Press or to choose the desired flash time,
then press . You can choose from 100ms,
120ms, 300ms or 600ms.
beneath
beneath
beneath
Left Right
Menu
0000
OK
Select Flash time
beneath
Base
Save
beneath
Select
54
Page 56

Chapter 8: Date and Time
Date Format
If you have set the date, you can choose the date format.
1
Press to display the main menu items.
Press to choose , then press .
2
3
Press to choose , then press
beneath
MM/DD DD/MM MM-DD
( , and ).
4
Press or to highlight the format that you
prefer, then press .
Time Format
If you have set the time, you can choose the time format.
Press to display the main menu items.
1
2
Press to choose , then press .
Press or to choose , then press
3
hour 24-hour
4
Press or to highlight the format that you
prefer, then press .
beneath
Down Date format
Select
Up Down
beneath
Up Down Time format
beneath
and ).
Up Down
Menu
Date and time
. Three different date formats appear,
beneath
Menu
Date and time
Select 12-
. Two different time formats appear, (
beneath
Select
Select
beneath
beneath
Select
Select
55
Page 57

Alarm
You can set an alarm to ring once or ring in regular intervals
about every 10 minutes.
Activating the Alarm Feature
Press to display the main menu items.
1
2
Press to choose , then press .
3
Press to choose .
Press or to choose " ", and then press
4
5
Use the numeric keys to enter the time using the HH:MM
format.
6
Press to save the alarm time setting.
Press the or to select the ring type.
7
Press to save the setting and return to
8
the previous menu.
When the alarm sounds, press to stop it
9
or press to let it ring again after 10
minutes.
beneath
beneath
Up Down ON
beneath
beneath
Left Right
Deactivating the Alarm Feature
1
Perform steps 1 through 3 from the last section, and then
choose " ", and then press .OFF Selectbeneath
Menu
Date and time
Select Alarm
.
Select
Select
beneath
Select
beneath
Snooze
beneath
beneath
Stop
Select
Notes:
If you selected in the menu, enter
the time in 12h format and use the or to
select or .
AM PM
appears on the screen.
56
12-HOUR Time format
Up Down
Page 58

Sleep Mode
This feature enables you to not be disturbed by the ring tone at
night. If the sleep mode is activated, the ring volume
automatically switches to volume level 1 during the period of
time that you set.
Press to display the main menu items.
1
2
Press to choose , then press .
3
Press to choose , then press
beneath
Press or to choose " " to activate this
4
feature or choose " " to deactivate it, press
Select
5
If you choose " ", enter the period of time that you define
as sleep mode time, in 24-Hour format, and then press
beneath
Note:
beneath
Down Sleep mode
Select
Up Down ON
to confirm.
OK
appears on the screen.
Menu
Date and time
beneath
.
OFF
ON
.
Select
beneath
57
Page 59

Chapter 9: Menu Structure
Bluetooth
Add device
Device list
Display
Brightness
Wallpaper
Handset name
Sound
Cell ringtone
PSTN ringtone
INT ringtone
Key tone
Power off tone
Charging tone
Call logs
Incoming calls
Dialed calls
58
Contacts
Home
Cell 1
Cell 2
Page 60

Handset
Base
Date and time
PIN code
Register
Select base
Reset handset
Auto answer
Auto-Lock
Language
Version Info
PIN:
(0000)
Set Clock
Date format
Time format
Alarm
Sleep mode
Flash time
Dial mode
Release handset
Change PIN
Base reset
Remote
59
Page 61

Chapter 10: Additional Information
Troubleshooting
Symptom Solution
The handset doesn't
turn on.
Try charging the handset for a few
minutes, then remove it from the
base. If it still doesn't turn on, check
the battery installation.
If these efforts are unsuccessful, try
replacing the batteries.
Contact an authorized service
center.
The handset works, but
it doesn't access the
base unit.
The handset works and
it accesses the base unit,
but no dial tone is
The handset works
perfectly, but a beep
occurs during phone
calls.
There is noise and audio
interference during
phone calls.
The handset works
perfectly, but it doesn't
ring with incoming calls.
60
Check the connection of the
switching power supply.
Try registering the handset to the
base.
Check the connection of the phone
line cord.
Check the batteries charge and
charge them if necessary.
Get closer to the base unit. If you
can access more base units, try
selecting a closer one.
Select another ring level.
Page 62

Symptom Solution
The handset can only
receive calls. The keypad
locked.
Press and hold .
The phone doesn't work
properly with some special
services or if it is connected
to an exchange extension
(PABX).
The battery charge level is
very low.
Logical malfunctioning in
the handset or base unit.
Disable Bluetooth in the
iPhone and then enable it
again, the disconnected
Bluetooth connection
between the base and the
iPhone cannot be
automatically resumed.
If there are interference
signals near or iPhone was
taken away from the base
(longer than 10 meters)
ever, the phone may lose
the connection with iPhone.
Check the Flash time and set it
properly.
Clean the charging pins, and if
the problem is still not solved,
replace the batteries.
Try resetting the handset or the
base.
Due to differences in each
iPhone's software, so it is normal
for some iPhone that the
Bluetooth connection cannot be
automatically resumed. If in this
case, please establish the
Bluetooth connection manually
(See P20~ P21 "Connecting an
iPhone").
Switch off Bluetooth feature on
iPhone, then switch it on again.
/ Power off the base and then
power on.
61
Page 63

Technical Specifications
Frequency Range
Channels
RF Carrier Power
Modulation
Frequency Stability
Charging time
Ambient temperature
Humidity
Size (mm)
Power supply
1.88~1.90GHz
120 Duplex channels
<250mW
GFSK
< 50 KHz±
15 hours
Normal: 15 ~ 35 , Extreme: 0 ~ 40℃℃ ℃℃
0%~90%
Base: 255 x 74 x 67; Handset: 178.5 x 47 x 13
Base input: 7.5V, 2A
Handset input: Li-ion 1000mAh
;
? Design and specifications are subject to change without notice.
62
Page 64

 Loading...