

Page 1

DVR Installation Manual
11/13/2013
V1.0
DVR-Flex4/8/16E
Page 2

Table of Contents
WORKFLOW ...................................................................................................................................................................... 3
INSTALLATION WORKSHEET ...................................................................................................................................... 4
Default DVR Login ............................................................................................................................................................................. 4
NETWORK SETUP ............................................................................................................................................................ 5
SMTP SETTINGS ............................................................................................................................................................... 7
Network Port Setup ........................................................................................................................................................................... 8
Router Settings .................................................................................................................................................................................. 8
USER SETTINGS ................................................................................................................................................................ 9
Changing Admin Password ................................................................................................................................................................ 9
RECORDING SETUP ....................................................................................................................................................... 10
Encoding Settings ............................................................................................................................................................................ 10
Motion Recording Setup (optional) ................................................................................................................................................. 11
ALARM INPUT SETUP ................................................................................................................................................... 12
CONFIGURE I-VIEW NOW ENTRY DELAYS ............................................................................................................. 13
TEST SETTINGS .............................................................................................................................................................. 13
© 2013 I-View Now, LLC. All Rights Reserved.
ICRealtime Flex4/8/16E Installation Guide rev 1.0 Page 2
Page 3

Workflow
1. Network Setup: Setting a Static IP, enabling external access via port forwarding
a. LAN Setup: static IP address assigned by site IT staff
b. Port Setup: forward ports to allow Device commands to be sent from I-View Now
2. Configure SMTP email: This will be used to communicate alerts and alarms to I-View Now. The SMTP server and
SMTP ID provided on the “Installer Data” Worksheet will be used here
3. User Setup: Change the default administrator password. I-View Now will be using this password to log into the
device. I-View Now suggests using the suggested password on the “Installer Data” worksheet.
4. Recording Setup: The DVR will be set to record by schedule or by events. Event recording will only record when
either a motion or alarm event is detected. Scheduled recordings occur during the scheduled time.
5. Alarm Input Setup: Here the technician will be setting up the alarm inputs on the back of the DVR to perform
two actions: 1) Trigger recording on all connected cameras. And most importantly, 2) Send SMTP (email) alert to
I-View Now upon the event of an alarm.
6. Motion Detection Setup: activate video motion recording for desired cameras.
7. Configure I-View Now Entry Delay: Entry delay is configured through the I-View Now portal.
8. Test: Here you will test the individual inputs on the DVR as they are connected to your alarm panel relays or
other input devices. It is recommended that you test all inputs for functionality and to ensure the proper
configuration has been setup in the I-ViewNow portal.
9. Trouble Shooting: This section is provided to help the technician troubleshoot common problems encountered
while installing S series DVR’s.
© 2013 I-View Now, LLC. All Rights Reserved.
ICRealtime Flex4/8/16E Installation Guide rev 1.0 Page 3
Page 4
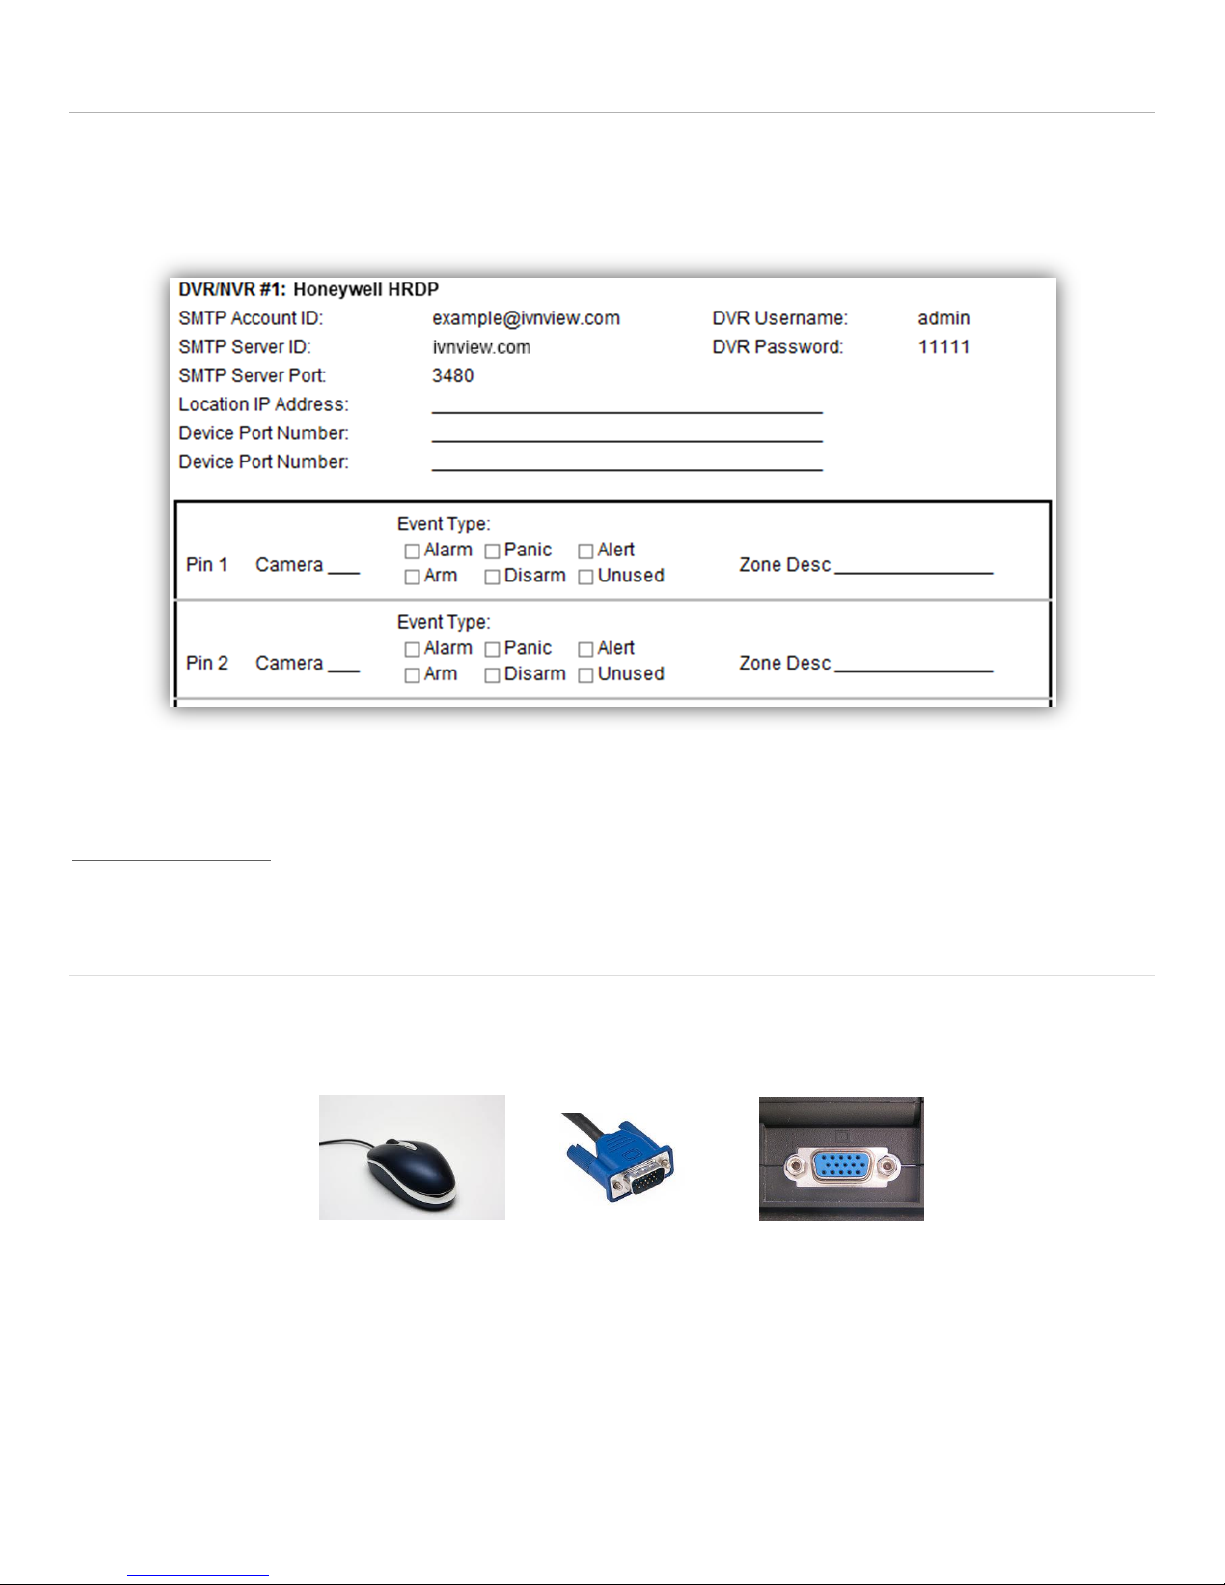
Installation Worksheet
USB Mouse
VGA Cable
VGA Port
The I-View Now Portal will provide an Installation Worksheet after entering the DVR make and model into the system.
This sheet will contain configuration information for the DVR’s notifications area, and provides a form to fill in details
about the site setup (alarms, zone names). An example worksheet is printed below.
You will need to retrieve the IP address while on-site. Either ask the customer/IT department for the IP address, or visit
http://whatismyip.org while on-site for the correct address.
Default DVR Login
Plug a monitor into the VGA output on the DVR. Also, plug the mouse provided with the DVR into the front side USB port
of the DVR unit. The default password is admin. Be aware that the Menu’s presented in this manual can vary slightly
depending on the exact model and firmware version.
User Name: admin
Password: admin
© 2013 I-View Now, LLC. All Rights Reserved.
ICRealtime Flex4/8/16E Installation Guide rev 1.0 Page 4
Page 5

Network Setup
This is the Main Menu
This is the Settings Menu from which
most device programming will be
initiated
After logging into the device for the first time, the first setting that should be changed is the IP address. The DVR
requires a static internal IP address because one or more communication ports will have to be forwarded to it from the
firewall/router on site.
Right Click anywhere
Login with User: admin Pass: admin
Click Main Menu
From the Main Menu click Settings
From the Settings Menu click Network
Continued Next Page…
ICRealtime Flex4/8/16E Installation Guide rev 1.0 Page 5
© 2013 I-View Now, LLC. All Rights Reserved.
Page 6

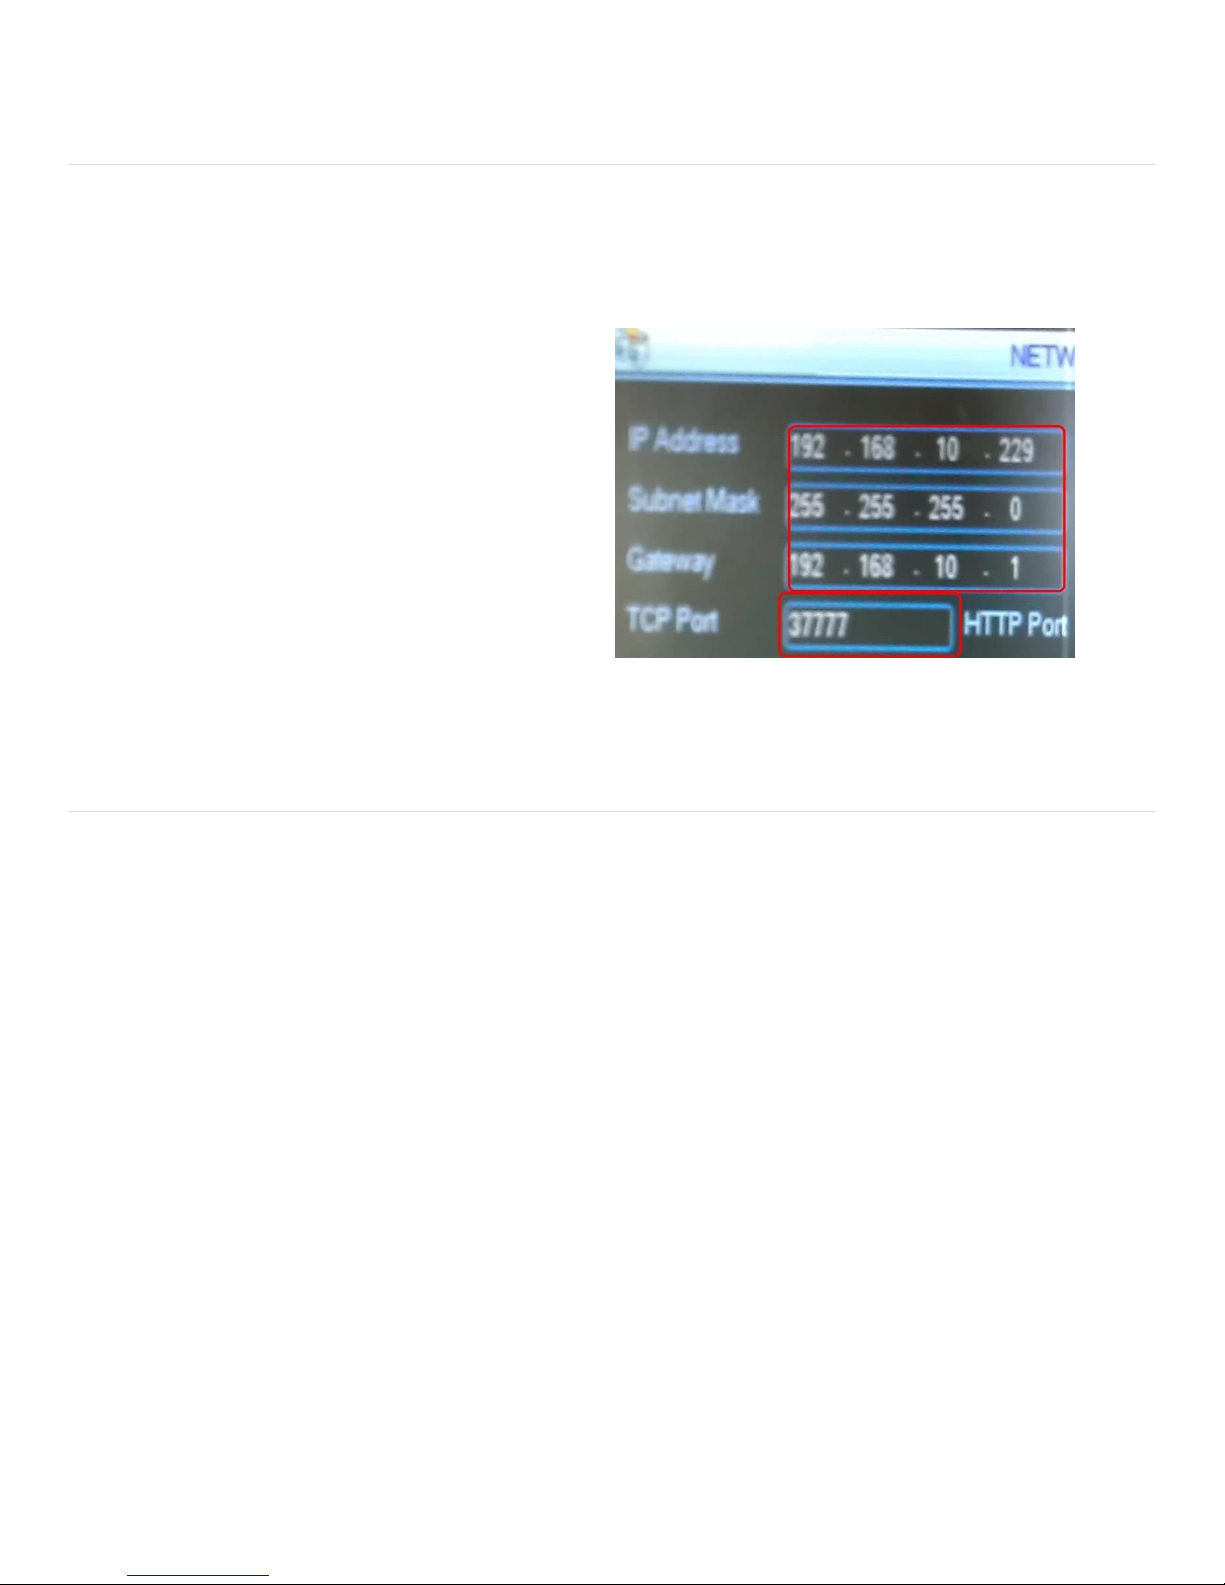
This is the general network settings interface. All
network settings programming is initiated from this
interface.
Get an available Internal Static IP
Address from the Site’s IT staff
Also ask for the default gateway(router
address) and subnet mask.
Uncheck DHCP
Enter the IP Address
Enter the Gateway Address
For the DNS server either ask the Site’s
IT staff for a preferred DNS server or
just use the Google public DNS server
at 8.8.8.8 and 8.8.4.4
If the default TCP port 37777 is already
in use it can be changed here as well
Set Max Connections to 10(this
determines the number of concurrent
connections that the device allows,
and 10 is the maximum)
Click save to ensure no settings are lost before proceeding
ICRealtime Flex4/8/16E Installation Guide rev 1.0 Page 6
© 2013 I-View Now, LLC. All Rights Reserved.
Page 7

SMTP Settings
Network settings can be reached
from the settings menu
Email Setup Interface. Reachable through
Network Settings interface
This section describes how to set up SMTP (email) on the DVR to allow Alarm notifications to be sent to I-View Now.
Navigate back to the general network settings interface
Under the advanced settings submenu use the scroll bar
to scroll down to EMAIL.
Double click EMAIL to enter EMAIL setup
Enter ivnview.com for the SMTP server
Enter 3480 for the Port
For Sender, Enter the SMTP ID from the Installer’s
Worksheet.
For Receiver, Enter the SMTP ID from the Installer’s
Worksheet.
Yes, Sender and Receiver are the same
Ensure Enable SSL is NOT Checked
Set Event interval to 5
Click Test
Click OK
Test Failure can occur if the SMTP Server, SMTP Port,
SSL/TLS, DNS, or Firewall settings are incorrect. This
Test will not verify that the Sender and Receiver are
correct. It just verifies connectivity to the I-View Now
SMTP Server.
© 2013 I-View Now, LLC. All Rights Reserved.
ICRealtime Flex4/8/16E Installation Guide rev 1.0 Page 7
Page 8
The TCP Port Setting Can be found in
the Network Settings interface
Network Port Setup
I-View Now utilizes one of the device’s network ports. The TCP port, which has a default of 37777, must be forwarded
from the Router/firewalls external interface to the DVR’s static internal address. Ideally, this port can be left as the
default value, but on a network where this external port is already in use. It may be necessary to change them. In the I-
View Now Portal, the TCP Port should be set as the Video port.
If the ports must be changed
Navigate back to the Network Setup
Enter the new TCP Port number
Click OK to save settings
Router Settings
Router settings must be examined on a case by case basis. I-View Now requires one port to be forwarded to the Device.
This can be done Either through port forwarding or NAT (Network Address Translation) depending on what the
installation site’s router supports. With either of these router features, any unused/unfiltered External Port can be
forwarded to the TCP Port(also referred to as the video port). For example External Port 9000 could be forwarded to the
DVR on port 37777 internally. In this case, the default TCP port on the DVR itself could be left alone.
The other approach would be to forward external ports to the DVR using the same External Port and Internal Port. In
this case, the ports must be set on the DVR through Network Settings. Common ports used for forwarding the HTTP port
are 1024, 1025, 1026, 1027 or 8080. Common ports used for forwarding the Video/TCP port are 8010, 8011, 9000, and
9010.
For any of these situations it is the External IP Address and External Port numbers that must be entered into the I-View
Now “Installer’s Portal.”
Note: Any ports used must be unblocked in any firewall devices (typically just the router).
© 2013 I-View Now, LLC. All Rights Reserved.
ICRealtime Flex4/8/16E Installation Guide rev 1.0 Page 8
Page 9
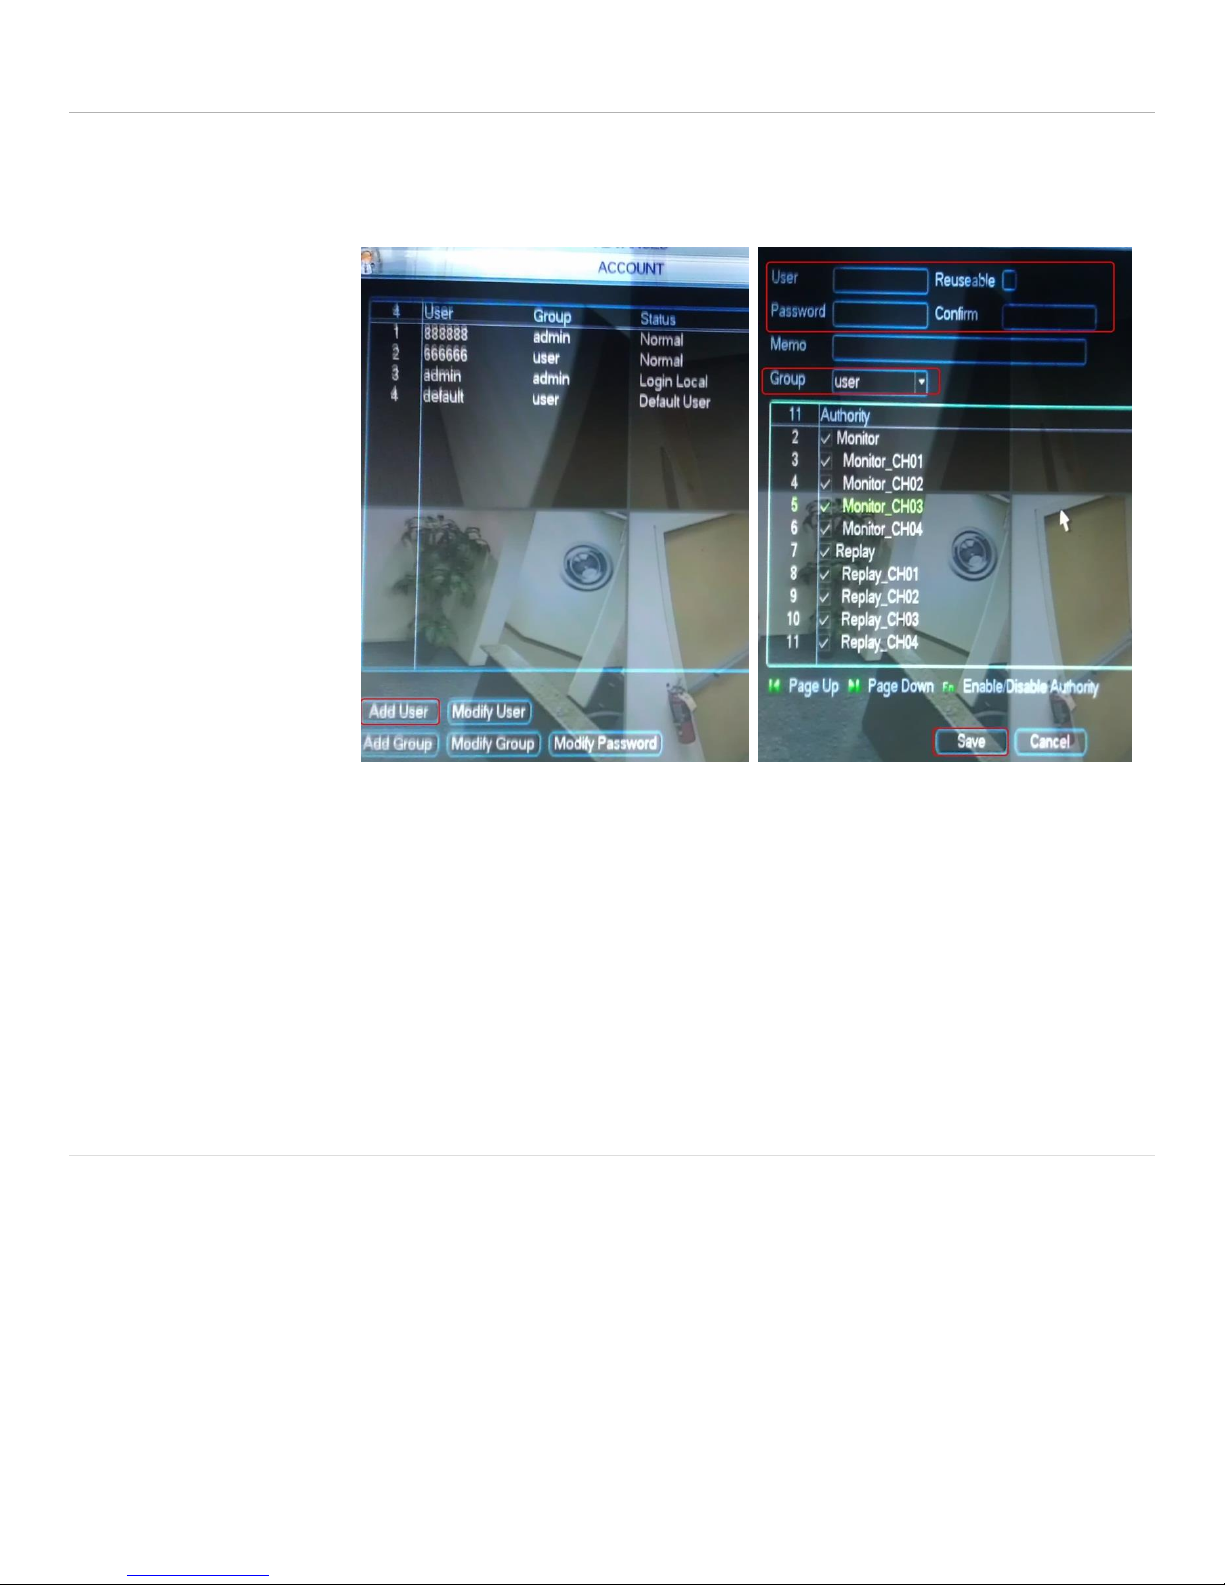
User Settings
Clicking Add user will bring you to the
interface on the right
User Setup interface
This section instructs the tech on how to setup a user account for customer usage. The reason for setting up a separate
account is not to lock them out of the DVR, it is to prevent them from making changes to the DVR that would inhibit the
DVR’s use with I-ViewNow.
Navigate to the
Advanced Menu
Click the account icon
Click Add User
Enter the desired user
name
Enter the desired
password
Enter the password
again to confirm
Select Group User
This process can be
repeated for more
additional users if
necessary
Changing Admin Password
Groups are denoted by a dash next to their name. Users have no dash.
Click on the ‘admin’ user(login local)
Change the password to the password provided by the dealer’s web portal
Confirm change
Click OK
Click Save
ICRealtime Flex4/8/16E Installation Guide rev 1.0 Page 9
© 2013 I-View Now, LLC. All Rights Reserved.
Page 10
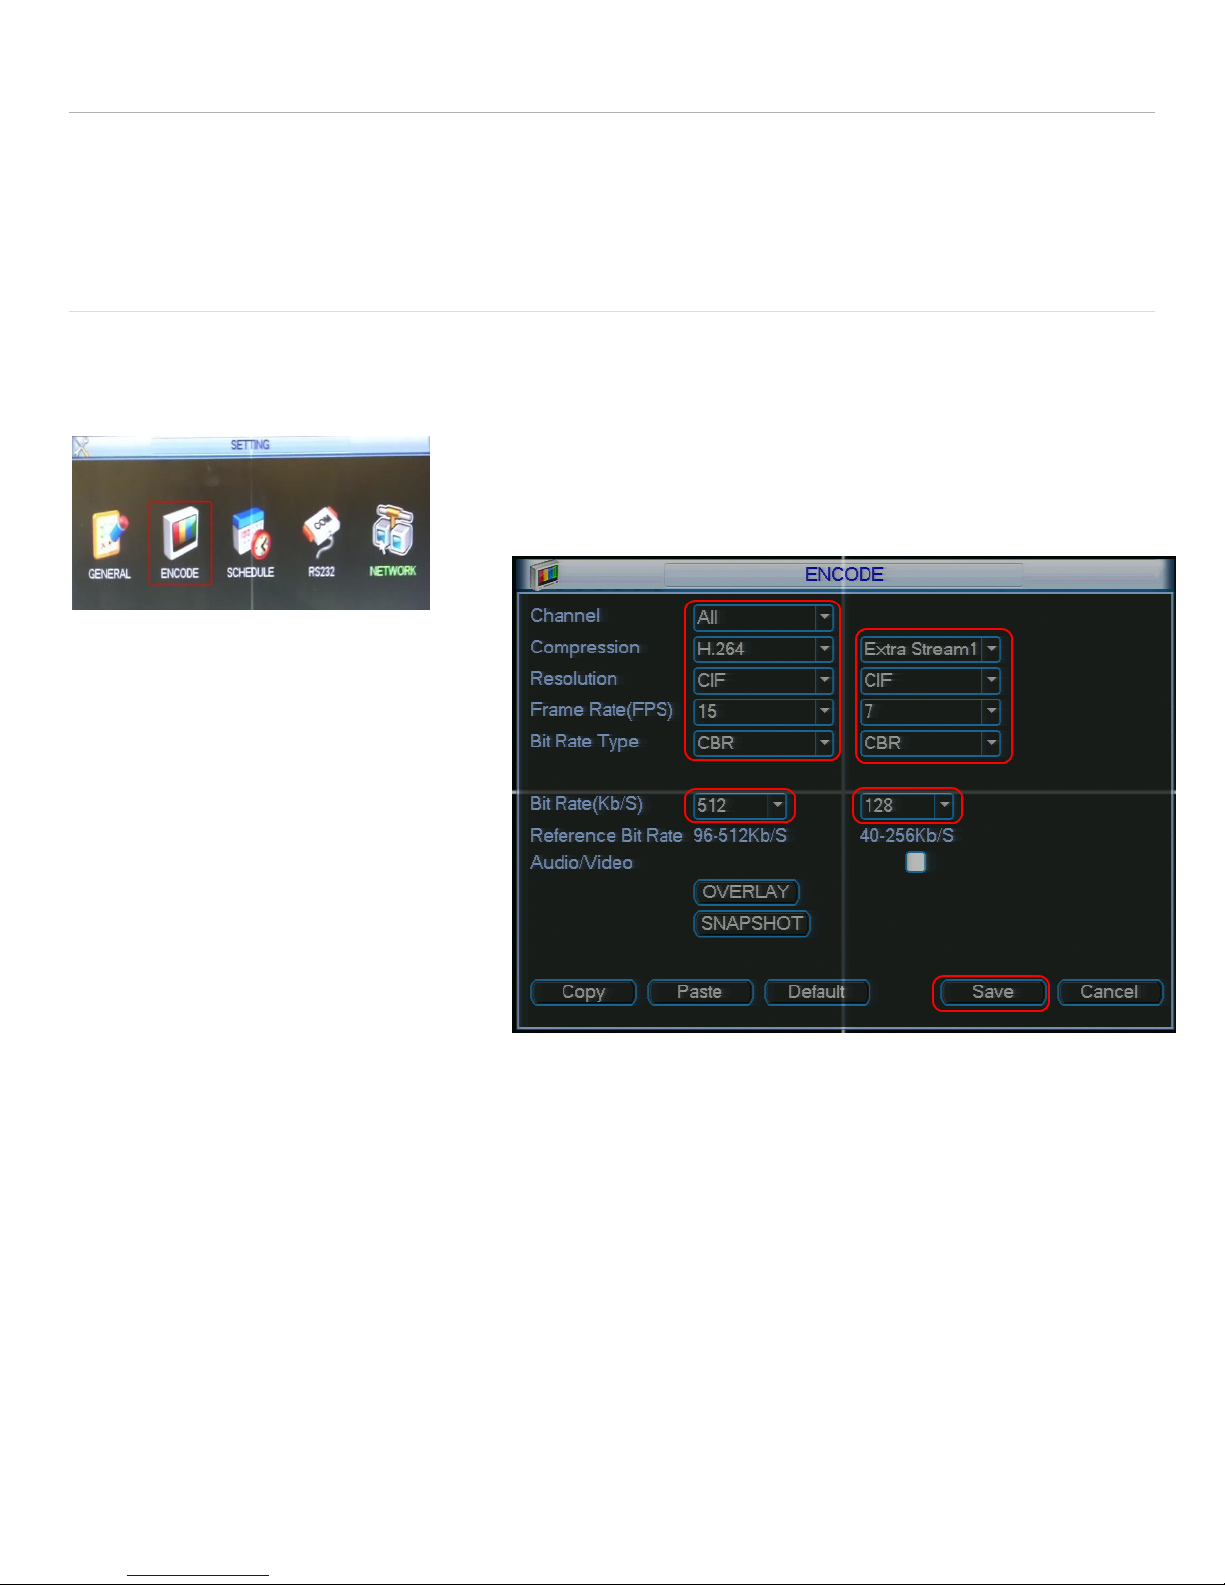
Recording Setup
The FlexE DVR records video VIA 2 different stream types. I-ViewNow utilizes Extra Stream1 to stream live video from
the DVR. I-ViewNow can uses the main recording stream to retrieve Pre-Event Video Clips.
Encoding Settings
The Encoding setup determines format of the video record onto the DVR. For clips to be decoded properly the frame
rate must be set to 15 FPS on the recording channel being utilized. I-View Now suggests setting up all recording channels
in this manner to avoid any potential issues when upgrading or adding cameras to the system.
Navigate to the Settings Menu
Select Encode
Select Channel All
Set Compression H.264
Set Resolution CIF
Set Extra Stream Resolution CIF
Set FPS 15
Set Extra Stream FPS 7
Set both Bit Rate Type to CBR
Set Regular Stream Bit Rate to 512
Set Extra Stream Bit rate to 128
Click OK
© 2013 I-View Now, LLC. All Rights Reserved.
ICRealtime Flex4/8/16E Installation Guide rev 1.0 Page 10
Page 11

Motion Recording Setup (optional)
Motion recording can be configured for any desired camera, but it is not mandatory for the I-ViewNow System. At a
minimum I-View Now requires Alarm event recording to be enabled even if motion recording is enabled because it is
possible for an alarm event to occur when there is no motion on the correlating camera.
From the Settings Menu
Click the Detect Icon
For each Camera
Set Event Type Motion Detection
Set Channel 1
Set Sensitivity 3(suggested)
Click Select region
Selecting the bounding boxes
Can be utilized to exclude areas from
Motion detection
Set record channel to record the channel
Motion was triggered on. IE Channel 2
Should record channel 2
© 2013 I-View Now, LLC. All Rights Reserved.
ICRealtime Flex4/8/16E Installation Guide rev 1.0 Page 11
Page 12

Alarm Input Setup
Alarm inputs are to be configured to send SMTP notification to I-View Now whenever an alarm event occurs. I-View Now
suggests recording on all camera channels whenever an alarm event is detected.
From the Main Setup Menu
Click the alarm Icon
Select event Type Local Alarm
Select Alarm In All
Check the Enable Box
Set Type Normal Open
Set anti-dither 5
Set Latch 5
Check Send Email
Check record channel
Check all Channels
Optionally check buzzer
Checking buzzer makes the DVR
Beep when an alarm input is fired
© 2013 I-View Now, LLC. All Rights Reserved.
ICRealtime Flex4/8/16E Installation Guide rev 1.0 Page 12
Page 13

Configure I-View Now Entry Delays
Entry Delays are configurable through the I-View Now Dealer Portal. Log in to configure.
Test Settings
Once the DVR has been properly configured and the necessary settings entered into the i-viewnow.com portal, it is a
good idea to test each alarm input on the DVR by triggering the corresponding device on your alarm panel.
If relay 1 is connected to input 1 on the DVR and it is supposed to trigger when a panic button is pushed, ensure not only
that the DVR has received the signal. Also ensure that the I-ViewNow.com portal has received the signal and correctly
identifies the type of alarm.
© 2013 I-View Now, LLC. All Rights Reserved.
ICRealtime Flex4/8/16E Installation Guide rev 1.0 Page 13
 Loading...