

PM-4324 User’s Manual v1.03 Last Revised: Feb. 2021 Page: 1
Copyright © ICP DAS Co., Ltd. All Rights Reserved. www.icpdas.com E-mail: service@icpdas.com

Chapter 1 Introduction .................................... 4
1.1. PM-4324 introduction ........ 4
1.2. Caution ............................. 5
1.2.1. Danger .............................. 5
1.3. Warning ............................ 5
1.4. Product Warranty &
Customer Support ............. 5
1.4.1. Limitation of Warranty ....... 6
Chapter 2 Specifications ................................. 7
2.1 Specifications.................... 7
2.2 Naming Rules ................... 9
....................................................................... 9
Chapter 4 Wiring Diagrams ........................... 14
4.1 Connection ...................... 14
4.2 Wiring .............................. 16
Chapter 5 Relay output & LED Indicator ........ 18
5.1 Relay ............................... 18
5.2 LED Indicator .................. 18
Chapter 6 Modbus-RTU communication ........ 19
6.1.1 SW1-SW6 setting .......... 19
6.2 Modbus-RTU setting ....... 22
6.2.1 Specifications .................. 22
6.2.2 Modbus Register ............. 24
Chapter 7 CANopen communication ............. 44
Chapter 3 Installation .................................... 10
3.1 Inspection ....................... 10
3.2 Safety ............................. 10
3.2.1 Dimension and Latch ...... 10
3.2.2 Mounting and Dismounting
....................................... 12
3.2.3 CT’s installation steps ..... 13
PM-4324 User’s Manual v1.03 Last Revised: Feb. 2021 Page: 2
Copyright © ICP DAS Co., Ltd. All Rights Reserved. www.icpdas.com E-mail: service@icpdas.com
7.1 CANopen setting ............. 44
7.2 CANopen Protocol ........... 46
7.2.1 SDO Introduction ............. 47
7.2.1.1 Upload SDO Protocol ...... 47
7.2.1.2 Download SDO Protocol .. 49

7.2.1.3 Abort SDO Transfer Protocol
....................................... 52
7.2.2 PDO Introduction ............ 55
7.2.2.1 PDO COB-ID Parameters 55
7.2.2.2 Transmission Type.......... 56
7.2.2.3 PDO Communication Rule
....................................... 57
7.2.3 NMT Introduction ............ 59
7.2.3.1 Module Control Protocol . 59
7.2.3.2 Error Control Protocol ..... 61
7.2.4 Special Functions for
PM-4324-CPS ................. 62
7.2.4.1 Power Meter Data Table .. 62
7.2.5 Object Dictionary of
PM-4324-CPS ................. 64
7.2.5.1 Communication Profile Area
........................................ 64
7.2.5.2 Manufacturer Specific
Profile Area ..................... 71
Appendix: Questions & Answers ............. 77
PM-4324 User’s Manual v1.03 Last Revised: Feb. 2021 Page: 3
Copyright © ICP DAS Co., Ltd. All Rights Reserved. www.icpdas.com E-mail: service@icpdas.com

Chapter 1 Introduction
1.1. PM-4324 introduction
ICP DAS offers PM-4324 family in a full range of Single-phase and Three-phase smart
power meters for power monitoring. The products offer a rich feature set combined with
easy-to-integrate communications.
With its high accuracy (<0.5%, PF=1), the PM-4324 series products can be applied both
on low voltage primary side and/or medium/high voltage secondary side and enable the
users to obtain in real time the reliable and accurate energy consumption readings from
the monitored equipments while in operation. These compact size and cost effective
Power Meters are equipped with revolutionary wired clip-on CT (various types support
input current up to 400A) and standard Modbus communication RS-485 protocol for
easy deployment. It works with input voltages ranging 10V ~ 500V, supporting a wide
range of applications.
Features:
True RMS Power Measurements
Energy Analysis for 3P4W-3CT, 3P3W-2CT, 3P3W-3CT, 1P2W-1CT, 1P3W-2CT
Current Measurements Up to 400 A with Different CT Ratio
Voltage Measurements Up to 500 V
Clip-on CT for Easy Installation
W Accuracy Better than 0.5% (PF=1)
Supports RS-485, Ethernet Interface
Supports Modbus RTU, Modbus TCP protocols.
Supports 2-Power Relay Output (Form A)
Total Harmonic Distortion (THD)
PM-4324 User’s Manual v1.03 Last Revised: Feb. 2021 Page: 4
Copyright © ICP DAS Co., Ltd. All Rights Reserved. www.icpdas.com E-mail: service@icpdas.com

1.2. Caution
1.2.1. Danger
The meter contains hazardous voltages, and should never be disassembled. Failing to
follow this practice will result in serious injury or death. Any work on or near energized
meters, meter sockets, or other metering equipment could induce a danger of electrical
shock. It is strongly recommended that all work should be performed only by qualified
industrial electricians and metering specialist. ICP DAS assumes no responsibility if
your electrical installer does not follow the appropriate national and local electrical
codes.
1.3. Warning
ICP DAS assumes no liability for any damage resulting from the use of this product. ICP
DAS reserves the right to change this manual at any time without notice. The
information furnished by ICP DAS is believed to be accurate and reliable. However, no
responsibility is assumed by ICP DAS for its use, not for any infringements of patents or
other rights of third parties resulting from its use.
1.4. Product Warranty & Customer Support
ICP DAS warrants all products free from defects in material and workmanship for a
period of one year from the date of shipping. During the warranty period, we will, at our
position, either repair or replace any product that proves to be defective. To report any
defect, please contact :+886-3- 597-3366 or service@icpdas.com.
Please have the model, serial number and a detailed problem description available
when you call. If the problem concerns a particular reading, please have all meter
readings available. When returning any merchandise to ICP DAS, a return SN. is
required.
PM-4324 User’s Manual v1.03 Last Revised: Feb. 2021 Page: 5
Copyright © ICP DAS Co., Ltd. All Rights Reserved. www.icpdas.com E-mail: service@icpdas.com

1.4.1. Limitation of Warranty
This warranty does not apply to defects resulting from unauthorized modification,
misuse, or use for reason other than electrical power monitoring. The supplied meter is
not a user-serviceable product.
PM-4324 User’s Manual v1.03 Last Revised: Feb. 2021 Page: 6
Copyright © ICP DAS Co., Ltd. All Rights Reserved. www.icpdas.com E-mail: service@icpdas.com
Model
PM-4324
PM-4324-MTCP
PM-4324-CPS
AC Power Measurement
Wiring
1P2W-1CT, 1P3W-2CT, 3P3W-2CT, 3P3W-3CT and 3P4W-3CT
Measurement Voltage
10 ~ 500 V (CAT III)
Measurement Current
CT Φ10 mm (60 A); CTΦ16 mm (100 A); CTΦ24 mm (200 A);
CTΦ36m (300 A); CTΦ36m (400 A)
Measurement Frequency
50-60 Hz
W Accuracy
Better than 0.5% (PF:1)
Starting Current
>0.03A ( 60A ), >0.05A (100A ), >0.09A( 200A )
Power Parameter
Measurement
True RMS voltage (Vrms), True RMS current (Irms), Active Power (kW), Active Energy
(kWh), Apparent Power (kVA), Apparent Energy (kVAh),
Reactive Power (kVAR), Reactive Energy (kVARh), Power Factor (PF), Frequency(Hz)
Data Update Rate
1 Second
Communication
RS-485
Protocol
Modbus-RTU
-
Baud rate
9600,19200 (default), 38400,
115200; DIP Switch Selectable
Data
format
N,8,1 (default); N,8,2; E,8,1; E,8,2;
O,8,1; O,8,2
Isolation
3000 VDC
-
Bias
Resistor
No (Usually supplied by the
RS-485 Master. Alternatively, add
a tM-SG4 or SG-785)
Ethernet
Protocol
-
Modbus TCP
CANoepn
Protocol
CANopen
Alarm Output
Power Relay
Form A (Normal Open) x 2; Relay Contact Voltage Range: 5 A @ 250 VAC (47 ~ 63Hz),
5 A @ 30 VDC
Chapter 2 Specifications
2.1 Specifications
PM-4324 User’s Manual v1.03 Last Revised: Feb. 2021 Page: 7
Copyright © ICP DAS Co., Ltd. All Rights Reserved. www.icpdas.com E-mail: service@icpdas.com

Aux Power
Input Range
+100 ~ +240 VAC
+100 ~ +240 VAC
+100 ~ +240 VAC
Power Consumption
6 W
Dimensions (W x L x H)
237 mm x 52 mm x 134 mm
Environment
Operating Temperature
-20 ~ +70 °C
Storage Temperature
-25 ~ +80 °C
Field Wiring Terminal Markings:
3.81mm (For Measurement Current and Communication): Use Copper Conductors Only,
wires range 16-26 AWG, torque value 3.0 lb-in.
5.08mm (For Measurement Voltage, Aux Power and Alarm Output):
Use Copper Conductors Only, wires range 12-24 AWG, torque value 7.0 lb-in.
7.62mm: Use Copper Conductors Only, wires range 12-24 AWG, torque value 4.5 lb-in.
PM-4324 User’s Manual v1.03 Last Revised: Feb. 2021 Page: 8
Copyright © ICP DAS Co., Ltd. All Rights Reserved. www.icpdas.com E-mail: service@icpdas.com
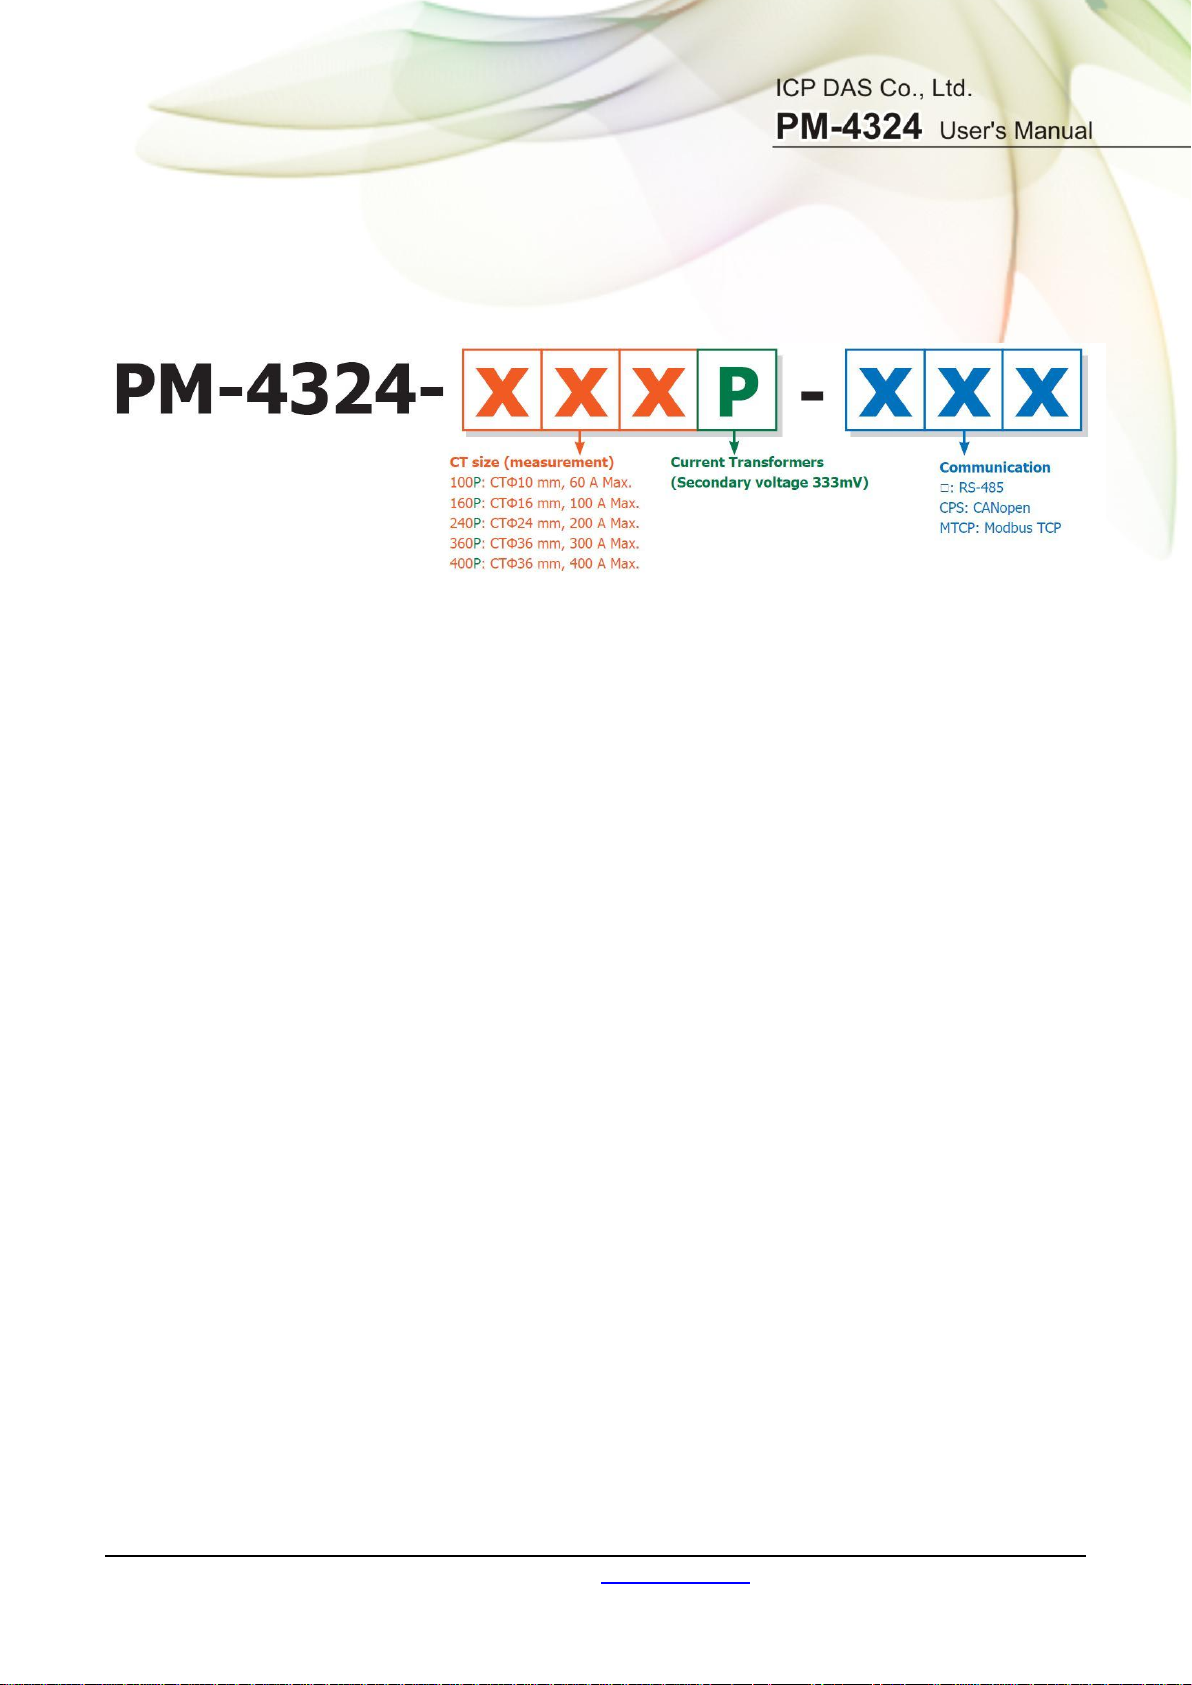
2.2 Naming Rules
PM-4324 User’s Manual v1.03 Last Revised: Feb. 2021 Page: 9
Copyright © ICP DAS Co., Ltd. All Rights Reserved. www.icpdas.com E-mail: service@icpdas.com

Chapter 3 Installation
3.1 Inspection
The instrument is no longer safe when,
a) Shows clear signs of damage
b) Does not work
c) Long storage under extreme conditions
d) Damage during shipment
3.2 Safety
Please use the soft dry clothes to clean the instrument.
Please do not use any chemical or detergent or volatile solvents to clean the instrument,
in order to avoid any possibility of the cover damage.
3.2.1 Dimension and Latch
PM-4324 User’s Manual v1.03 Last Revised: Feb. 2021 Page: 10
Copyright © ICP DAS Co., Ltd. All Rights Reserved. www.icpdas.com E-mail: service@icpdas.com

Products come with external split type clip-on CT’s. Disconnect the CT’s or use
other CT’s is highly prohibited.
Please read this operation manual carefully before using.
Please re-confirm the measure position.
PM-4324 series can be installed as rail mounting mode or embedded, no need to
drill a hole or screw to fix it (rail mounting width can up to the length of 35 mm).
Meter auxiliary power is +100 ~ +240 VAC.
PM-4324 User’s Manual v1.03 Last Revised: Feb. 2021 Page: 11
Copyright © ICP DAS Co., Ltd. All Rights Reserved. www.icpdas.com E-mail: service@icpdas.com
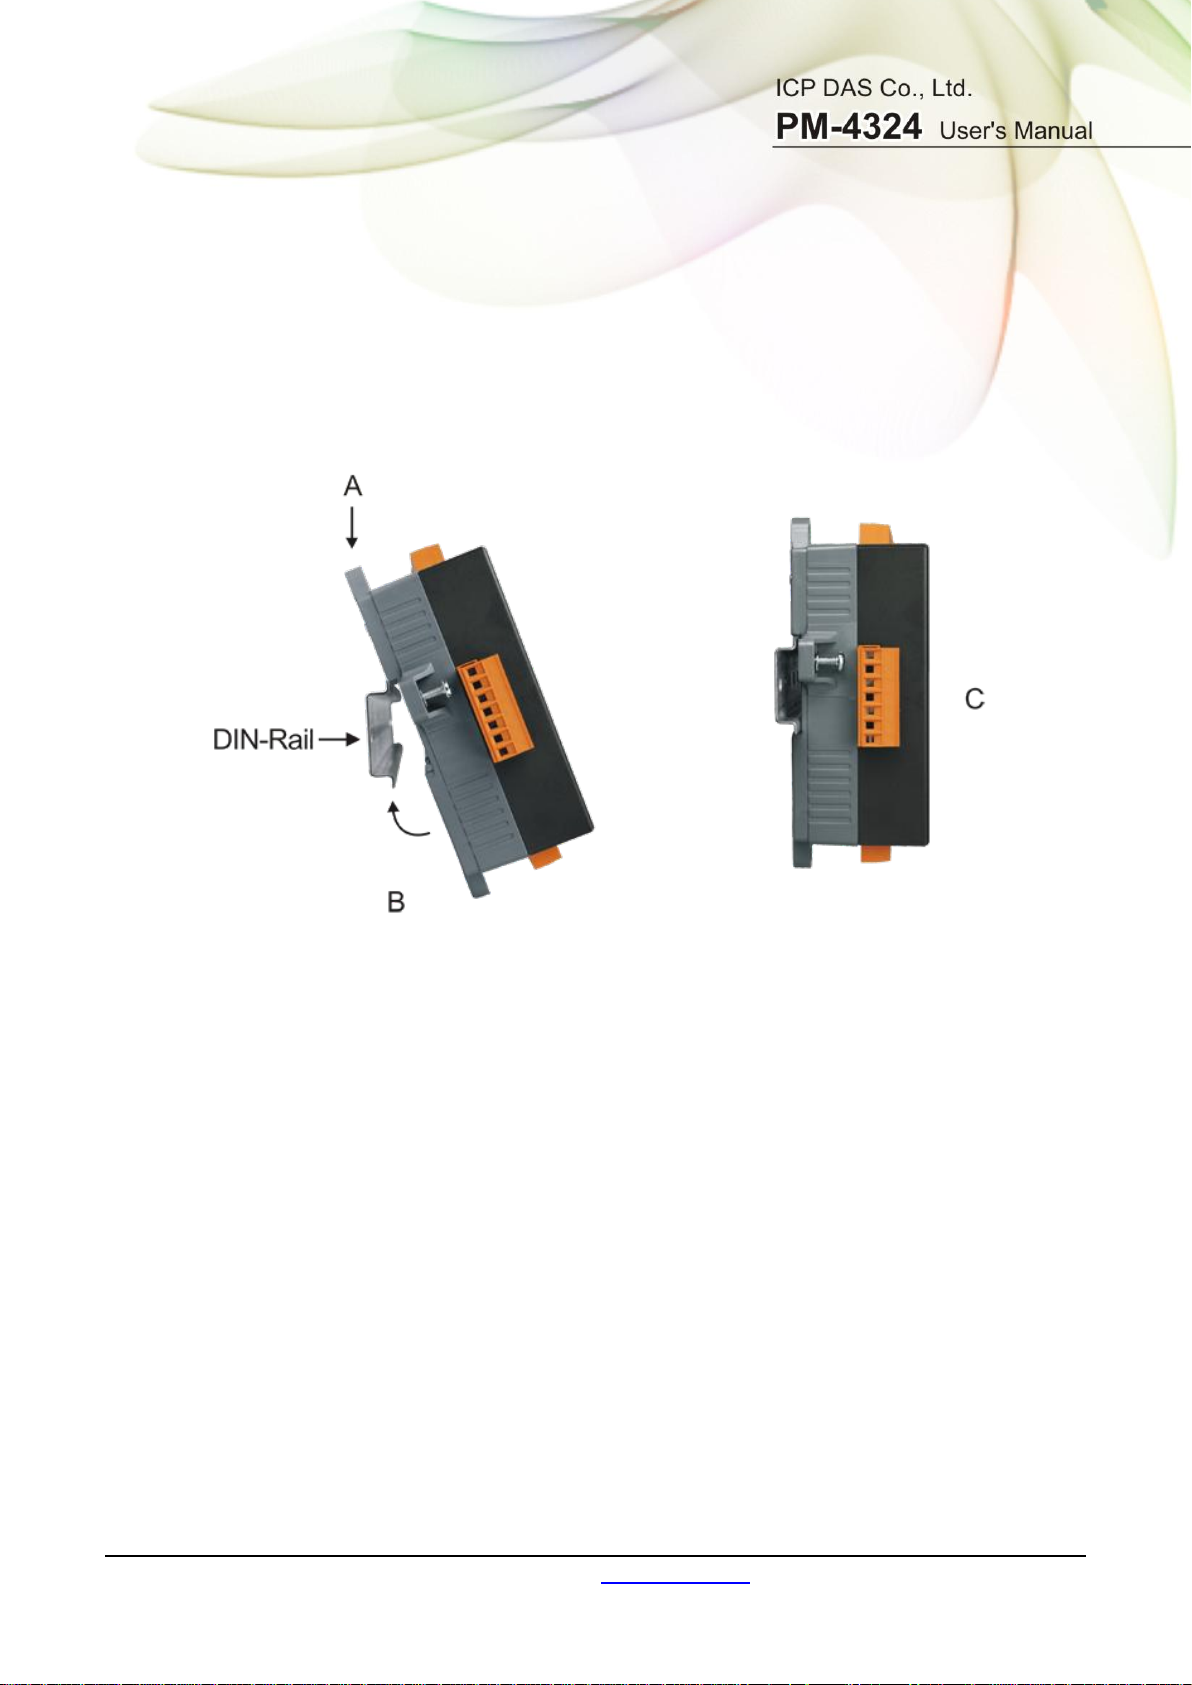
3.2.2 Mounting and Dismounting
Mounting
Assembly: Place the PM-4324 on the DIN-Rail. Push the front of the PM-4324
toward the mounting surface until it audibly snaps into place.
Dismantling: Pull out the latch and then remove the PM-4324 from the DIN-Rail.
Wire Disconnection
1. Open the CT clip to detach the CT, do not remove the CT terminal lines if
possible
Note: if you need to remove the terminal lines, always detach the CT before
removing the CT terminal lines. Otherwise the CT may develop open-circuit
secondary voltages which may be hazardous to personnel or damaging to the
CT or equipment connected in the secondary circuit.
2. Disconnect the voltage input wires from terminals and wrap the wire tips with
plastic tape.
3. Disconnect the communication wires from terminal.
4. Disconnect the auxiliary power from terminal and wrap the wire tip with plastic
tape.
PM-4324 User’s Manual v1.03 Last Revised: Feb. 2021 Page: 12
Copyright © ICP DAS Co., Ltd. All Rights Reserved. www.icpdas.com E-mail: service@icpdas.com
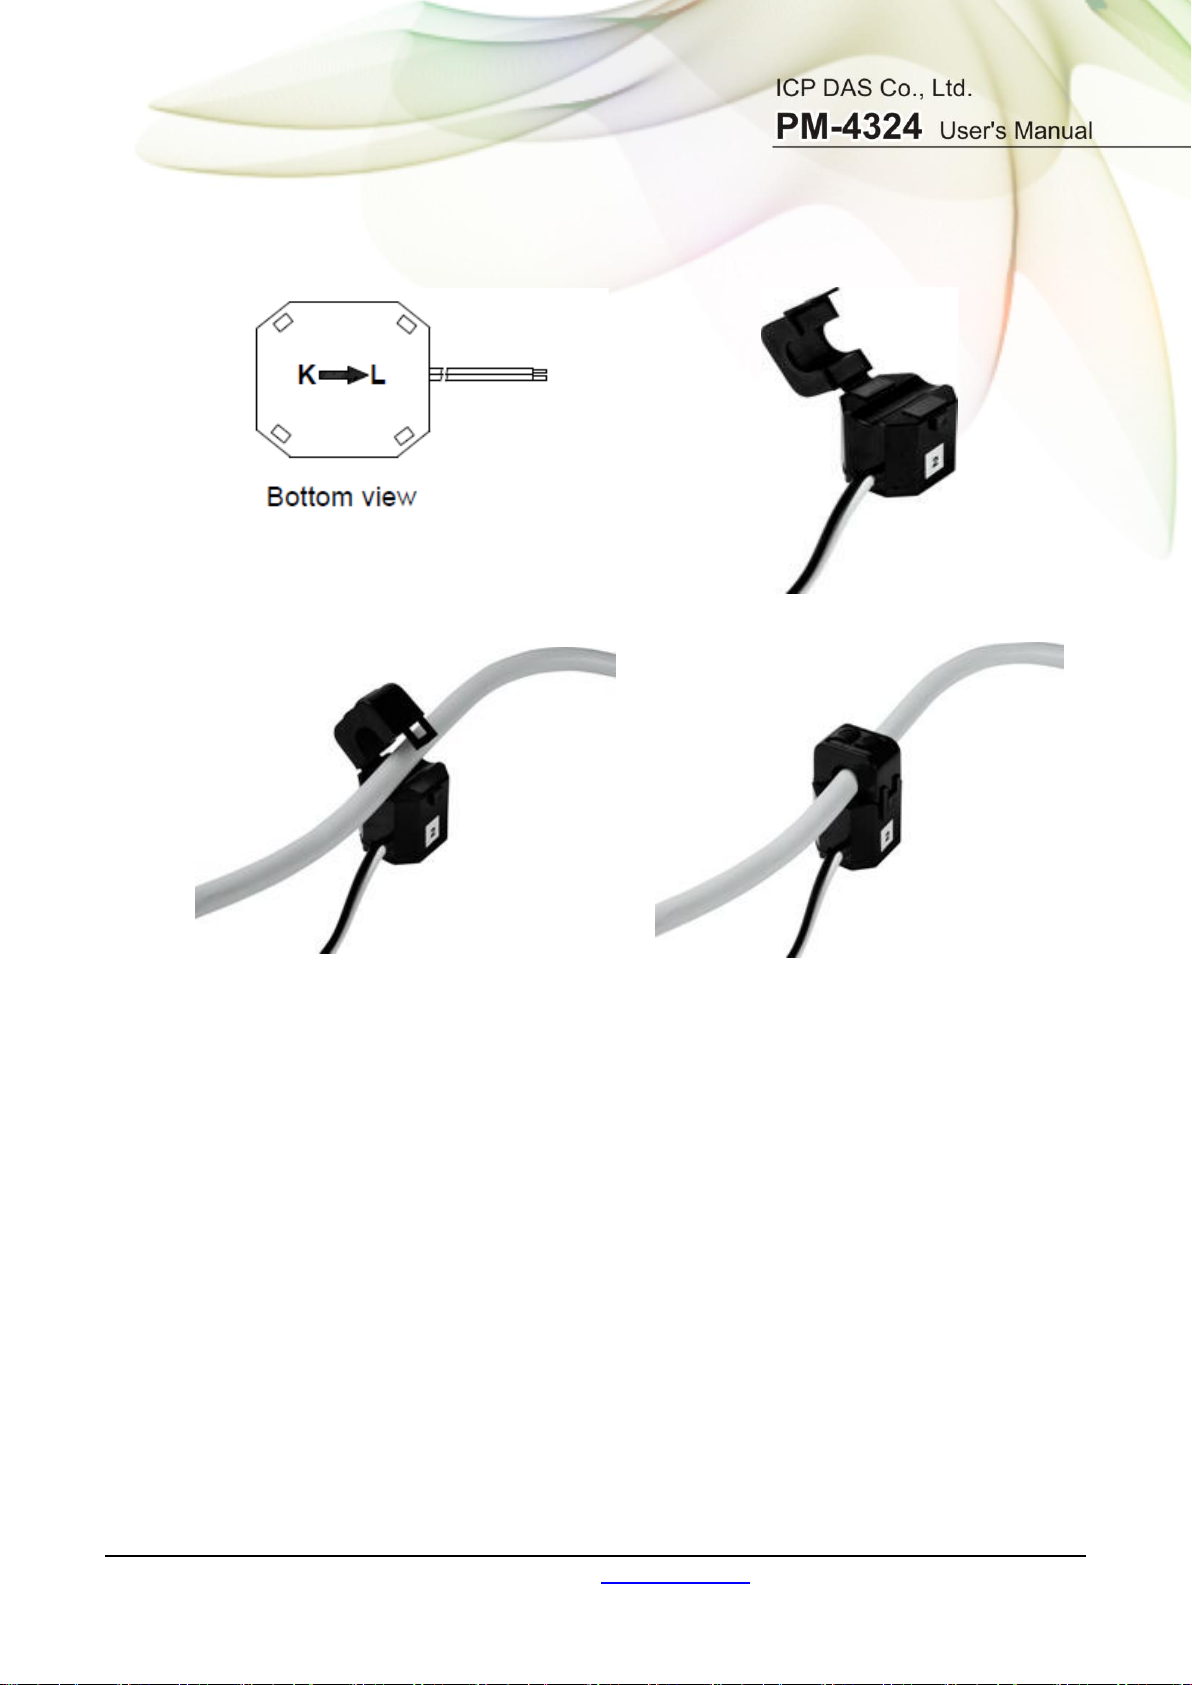
At the bottom of the CT, there is a
“K→L” mark.
Open the CT clip.
Make sure the power current
direction follow the “K→L” mark on
the CT and then close the CT clip.
Installation steps finished.
3.2.3 CT’s installation steps
PM-4324 User’s Manual v1.03 Last Revised: Feb. 2021 Page: 13
Copyright © ICP DAS Co., Ltd. All Rights Reserved. www.icpdas.com E-mail: service@icpdas.com
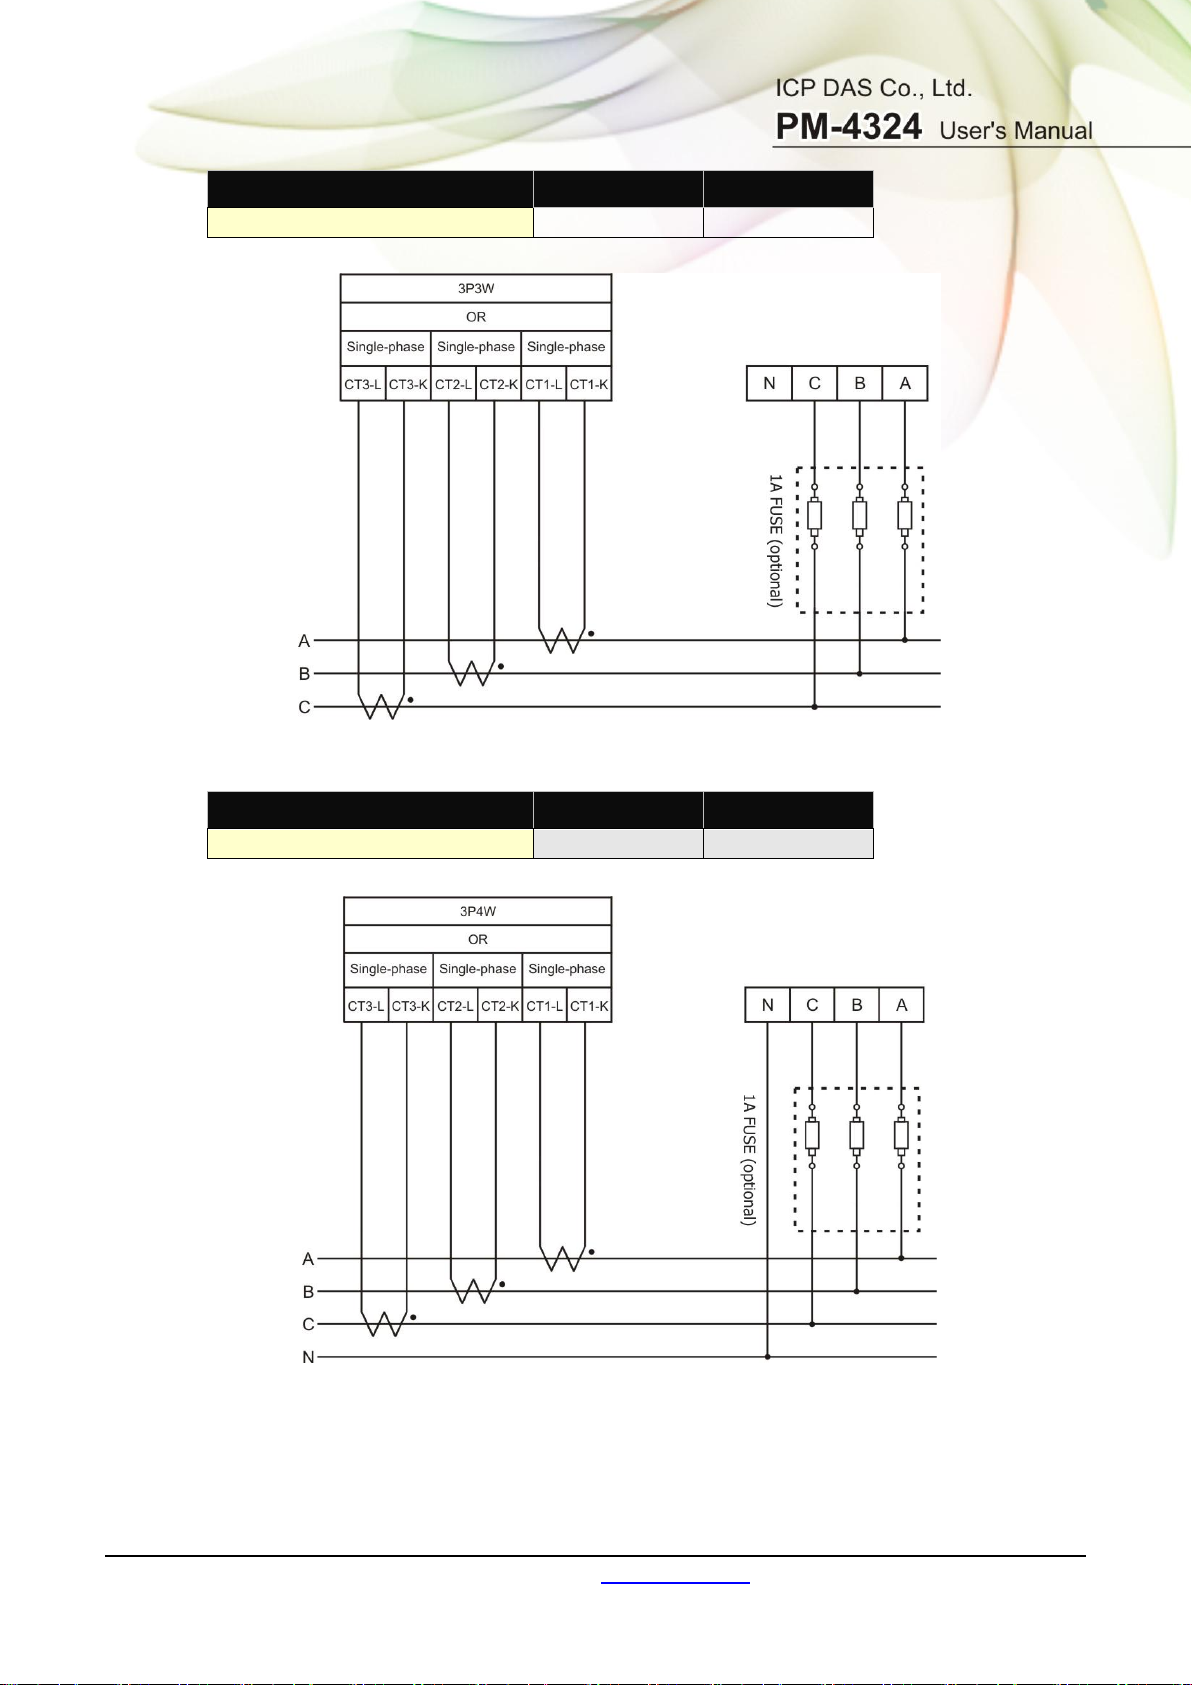
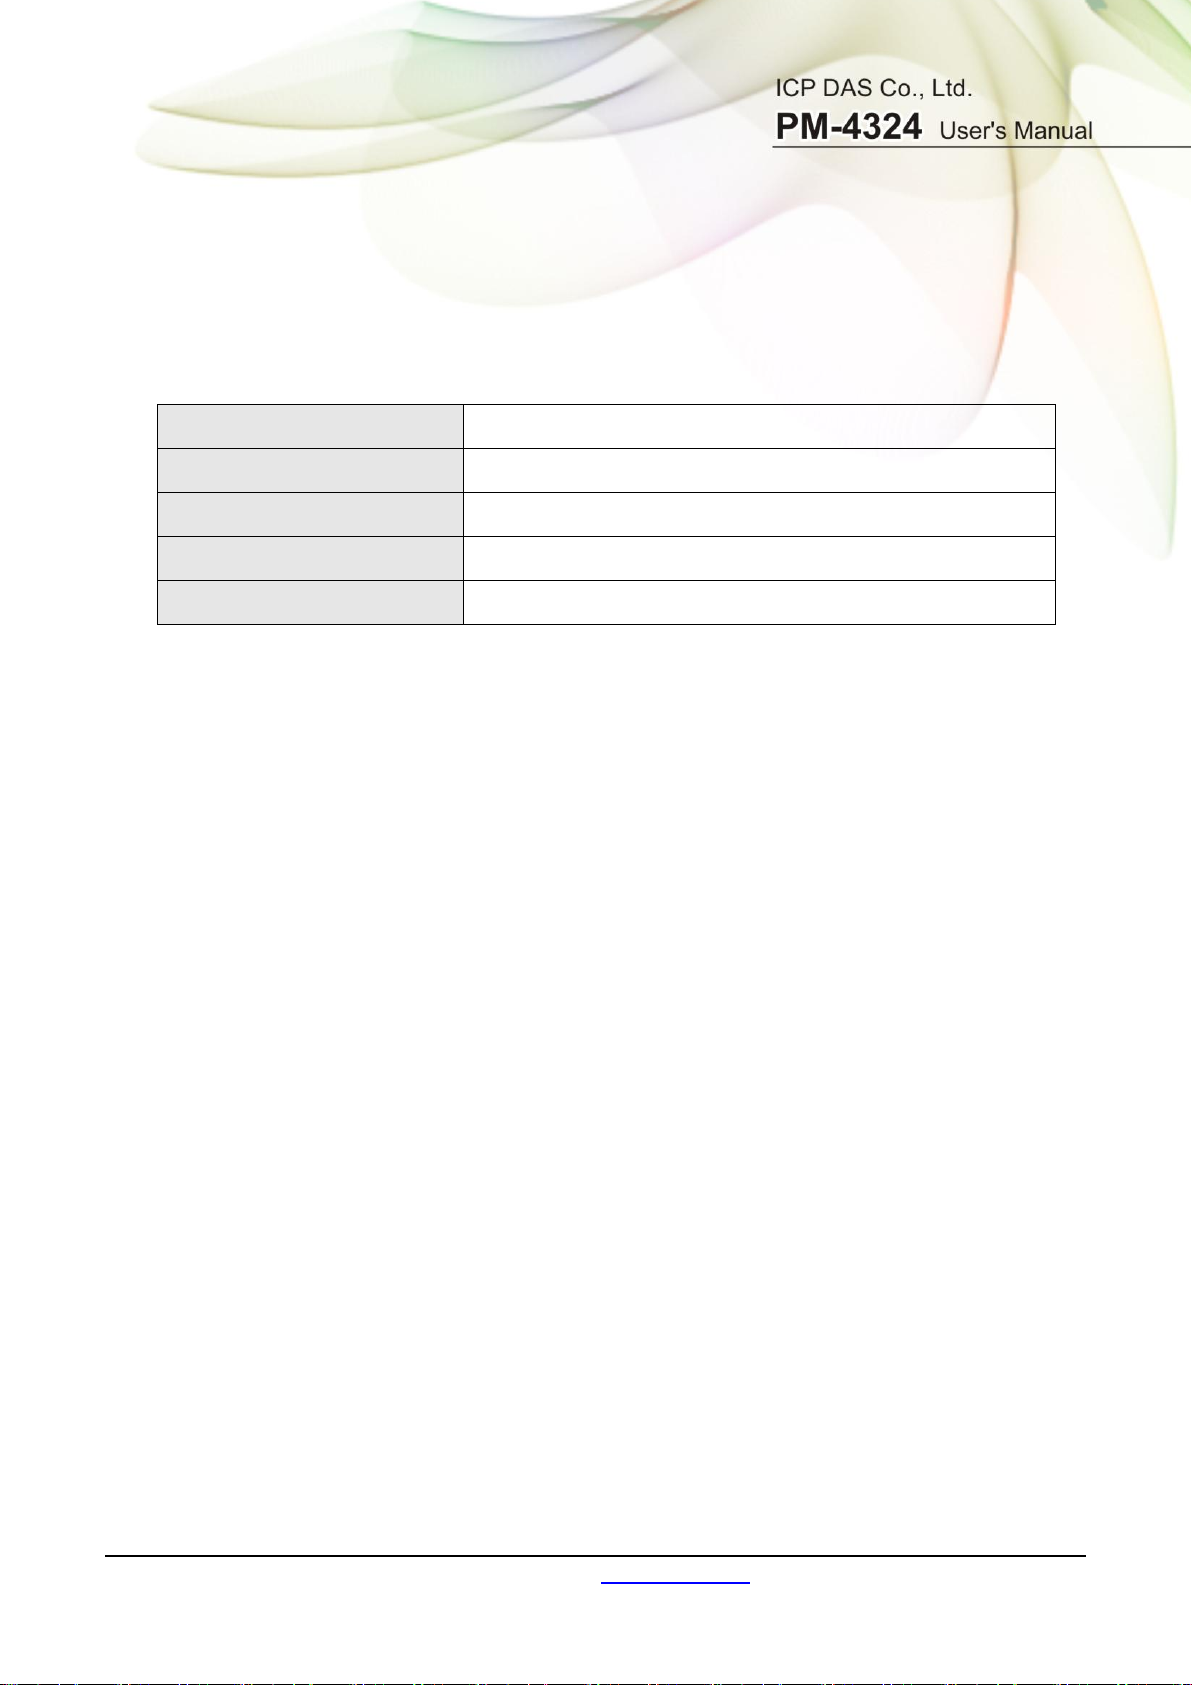
Chapter 4 Wiring Diagrams
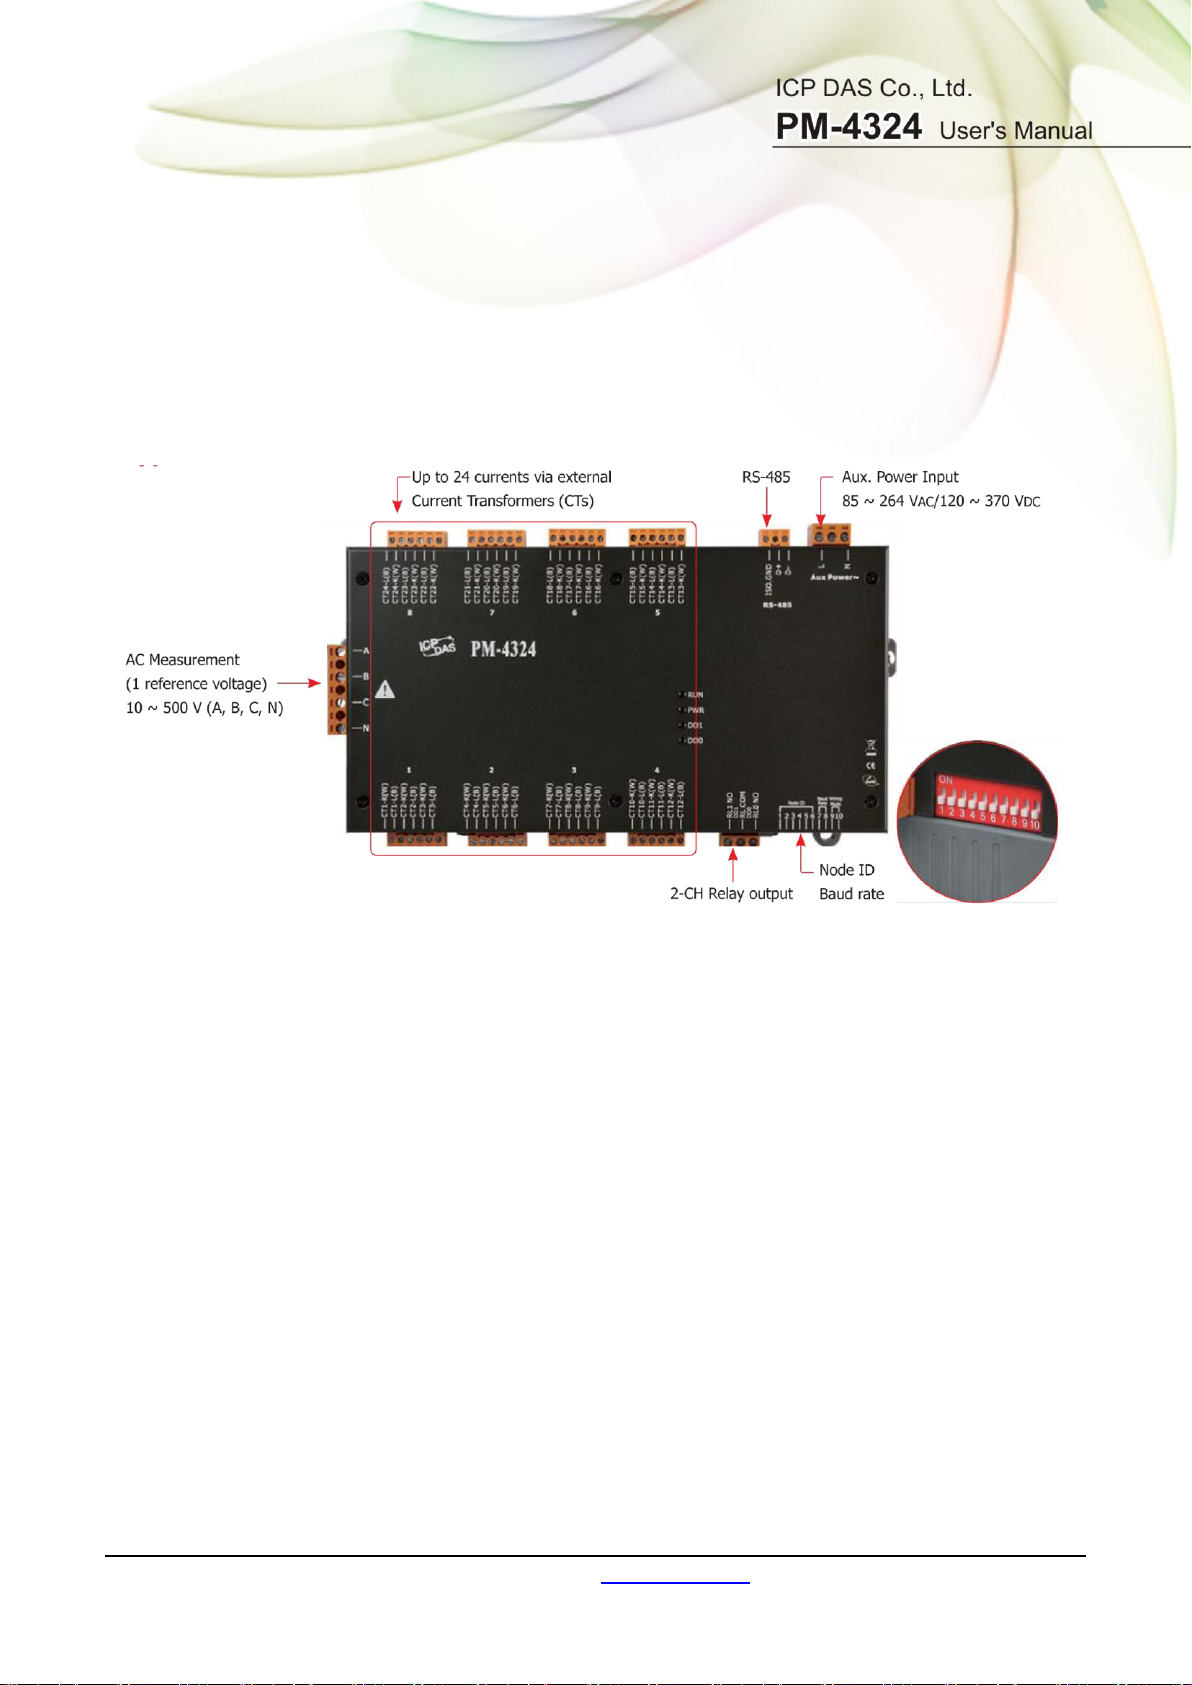
4.1 Connection
Please firstly check the current input terminal, and then in white black, white black,
white black wire sequences (CT1-K, CT1-L, CT2-K, CT2-L, CT3-K, CT3-L). Then
connect the CT’s, and close the CT clip. Make sure the arrow direction sign on CT’s
follows current flow direction(K→L)
Note: it must be in the same direction.
Connect the voltage input terminal N C B A. for PM-4324, in the three phase order
as follows on N C B A.
Attention please!! For 3P3W-2CT, connect in N C A phase sequence, do not
connect phase B (Check the diagram).
PM-4324 User’s Manual v1.03 Last Revised: Feb. 2021 Page: 14
Copyright © ICP DAS Co., Ltd. All Rights Reserved. www.icpdas.com E-mail: service@icpdas.com
Voltage Input
1. PM-4324 series: Input Voltage up to 500V.
For any higher Input Voltage large than 500V, please add the PT (power transformer), and Change PT
RATIO setup.
2. Confirm the RST (ABC) phase sequence.
Current Input
1. The external CT’s are fragile, please handle with care.
2. The current input of PM-4324 series is in mA range. Only the ex-factory attached CT’s can be used.
The other CT’s, for example, from panel will damage the instrument due to its large current (around
5A)
3. When more than one smart meter (PM-4324 series) are installed, please do not disconnect the CT
with its original meter and mix use with each other. Since each set of smart meter (PM-4324 series)
and its attached split type clip-on CT are calibrated set by set. The mix use may cause wrong
measurements.
4. To install CT’s correctly, please ensure the CT lines sequences is right before clip the CT’s onto the
power cable of the monitoring equipment. (Detail will be found in next section)
5. When measuring the current, the secondary circuit of a CT should never be
opened when a load is passing through its primary. Make sure you always open
the CT clip to detach the CT before removing the terminal lines. Otherwise, it will cause severe
injury.
6. Please handle with extra care, especially when the operation space of CT’s is limited.
7. The current direction must follow K-L marked on CT’s.
8. Please select the right size CT’s for different size of monitoring equipment cables:
power cable diameter <Φ10 use 60A CT,Φ10~Φ16 use 100A CT,Φ16~Φ24 use 200A CT,
,Φ36 use 300A CT,Φ36 use 400A CT
9. The maximum current value cannot exceed the CT rating
PM-4324 User’s Manual v1.03 Last Revised: Feb. 2021 Page: 15
Copyright © ICP DAS Co., Ltd. All Rights Reserved. www.icpdas.com E-mail: service@icpdas.com
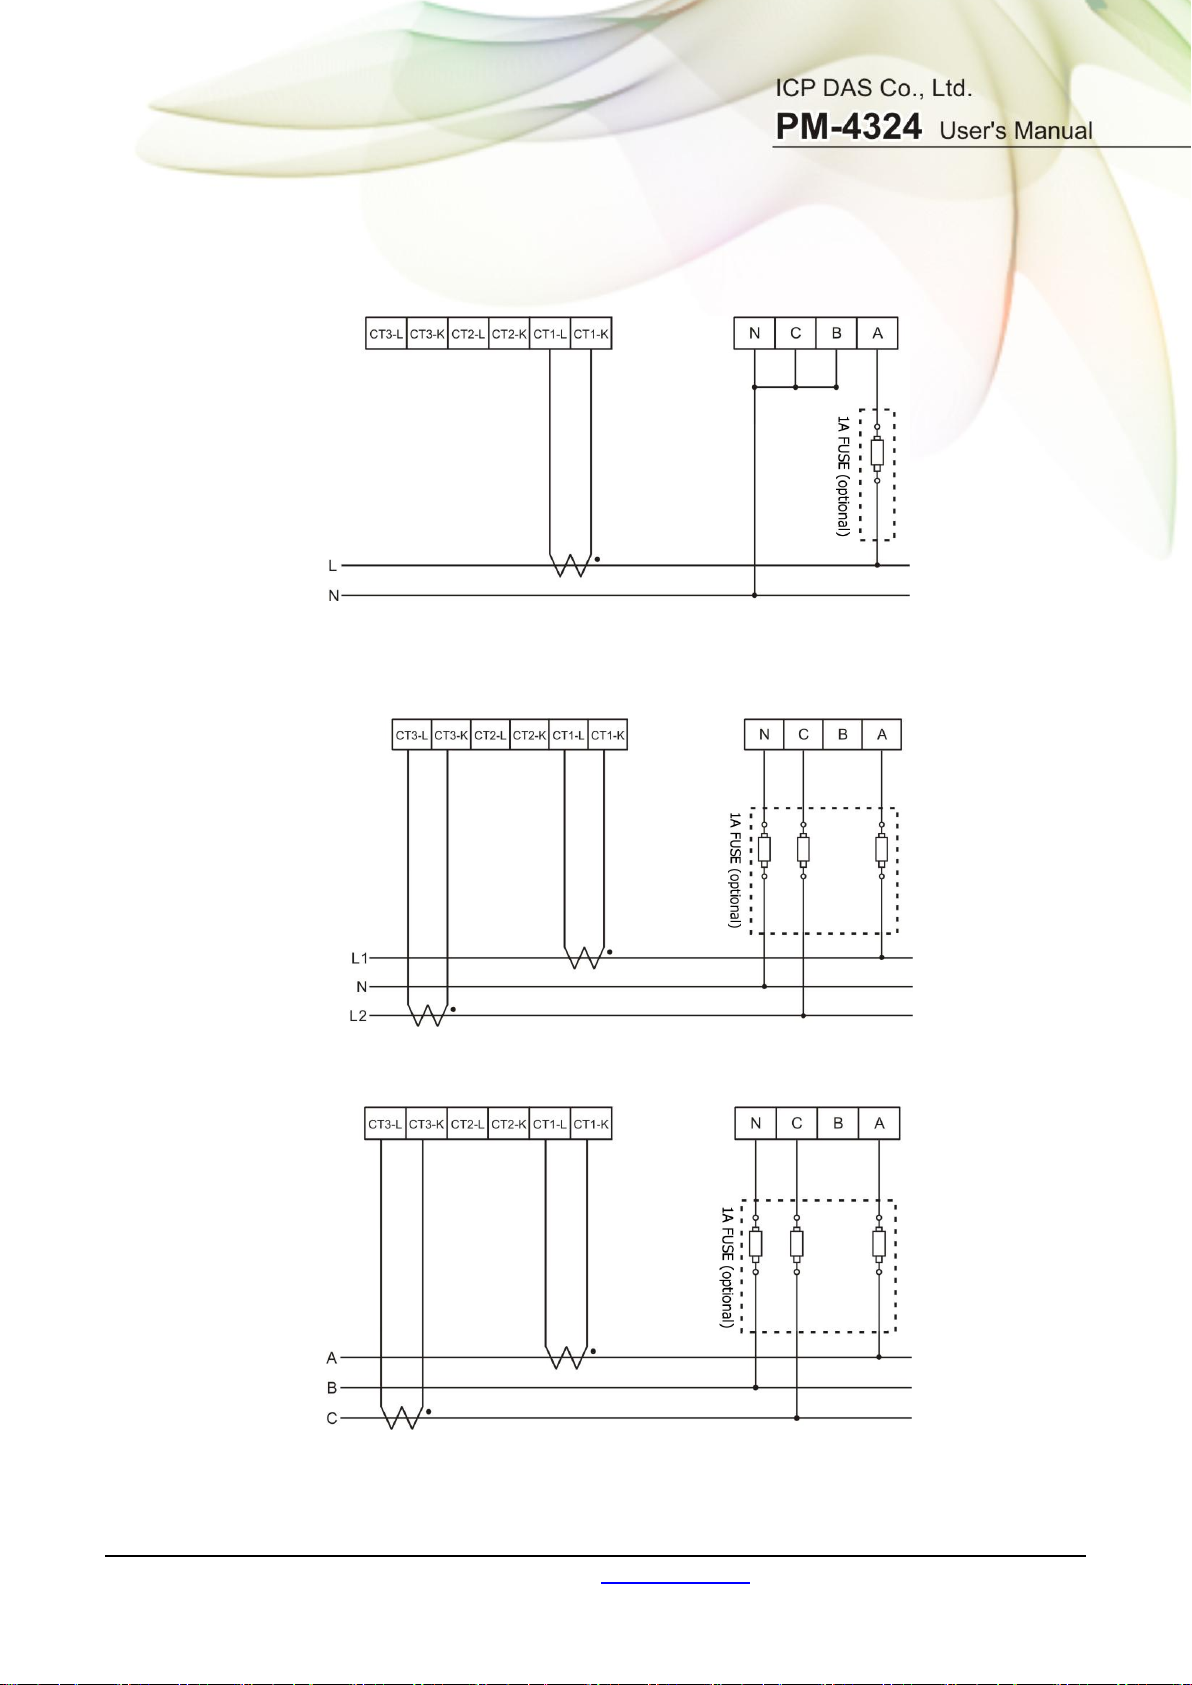
4.2 Wiring
1P2W-1CT (PM-4324)
1P3W-2CT (PM-4324)
3P3W-2CT (PM-4324)
3P3W-3CT (PM-4324)
PM-4324 User’s Manual v1.03 Last Revised: Feb. 2021 Page: 16
Copyright © ICP DAS Co., Ltd. All Rights Reserved. www.icpdas.com E-mail: service@icpdas.com
DIP switch: Wiring mode
SW 9
SW 10
3P3W-3CT
OFF
ON
DIP switch: Wiring mode
SW 9
SW 10
3P4W-3CT
ON
ON
3P4W-3CT (PM-4324)
PM-4324 User’s Manual v1.03 Last Revised: Feb. 2021 Page: 17
Copyright © ICP DAS Co., Ltd. All Rights Reserved. www.icpdas.com E-mail: service@icpdas.com
Relay type
Power Relay, Form A (SPST N.O.)
Operating Voltage Range
250 VAC/30 VDC
Max. Load Current
5 A at 25 °C
Operate Time
6 ms
Release Time
3 ms
Chapter 5 Relay output & LED Indicator
5.1 Relay
5.2 LED Indicator
The PM-4324 has 4 LED to indicate the unit power status, RS-485 communication, and
power data calculation.
RUN: Green, light up after RS-485 ready. LED will flash when the unit is processing
RS-485 communication.
PWR: Red, Power on LED always on.
DO0: Green. LED DO0 will light up, when DO0 is “ON”.
DO1: Green. LED DO1 will light up, when DO1 is “ON”.
PM-4324 User’s Manual v1.03 Last Revised: Feb. 2021 Page: 18
Copyright © ICP DAS Co., Ltd. All Rights Reserved. www.icpdas.com E-mail: service@icpdas.com
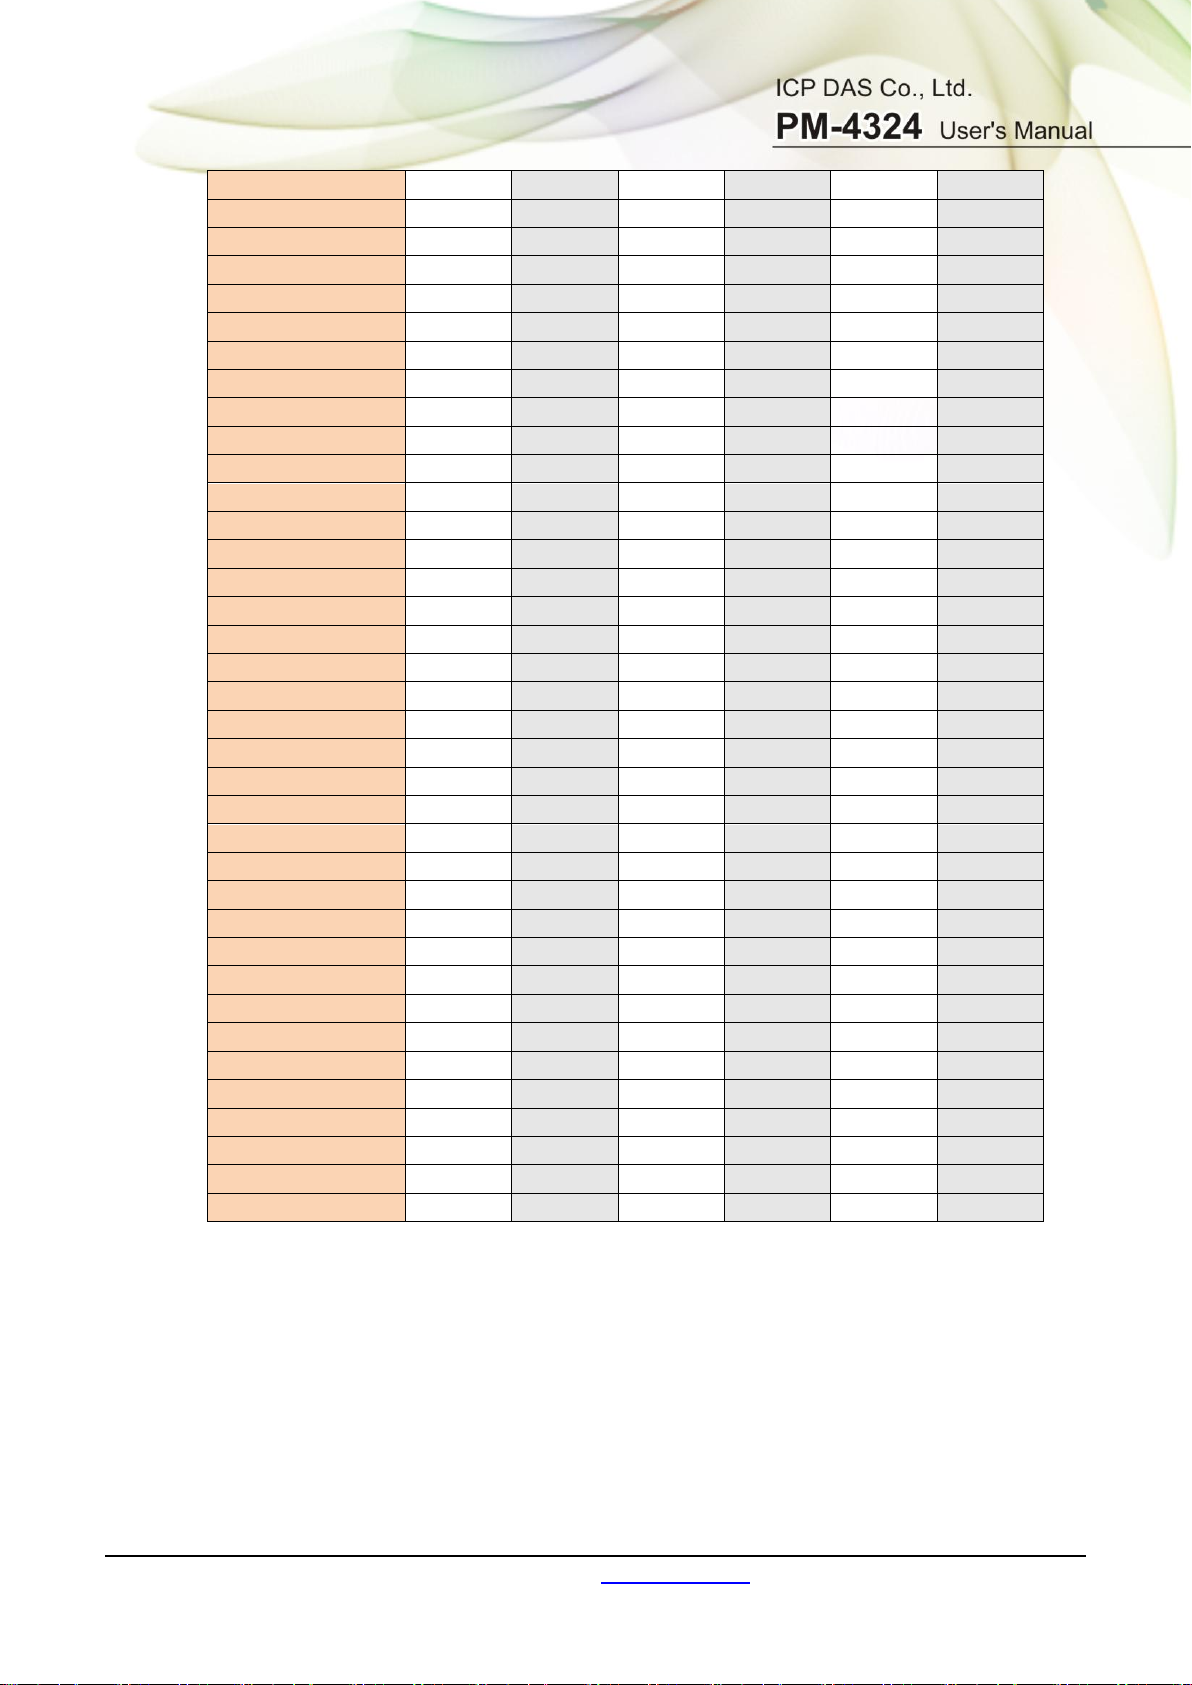
Modbus Address
SW 1
SW 2
SW 3
SW 4
SW 5
SW 6
1
OFF
OFF
OFF
OFF
OFF
OFF
2
ON
OFF
OFF
OFF
OFF
OFF
3
OFF
ON
OFF
OFF
OFF
OFF
4
ON
ON
OFF
OFF
OFF
OFF
5
OFF
OFF
ON
OFF
OFF
OFF
6
ON
OFF
ON
OFF
OFF
OFF
7
OFF
ON
ON
OFF
OFF
OFF
8
ON
ON
ON
OFF
OFF
OFF
9
OFF
OFF
OFF
ON
OFF
OFF
10
ON
OFF
OFF
ON
OFF
OFF
11
OFF
ON
OFF
ON
OFF
OFF
12
ON
ON
OFF
ON
OFF
OFF
13
OFF
OFF
ON
ON
OFF
OFF
14
ON
OFF
ON
ON
OFF
OFF
15
OFF
ON
ON
ON
OFF
OFF
16
ON
ON
ON
ON
OFF
OFF
17
OFF
OFF
OFF
OFF
ON
OFF
18
ON
OFF
OFF
OFF
ON
OFF
19
OFF
ON
OFF
OFF
ON
OFF
20
ON
ON
OFF
OFF
ON
OFF
21
OFF
OFF
ON
OFF
ON
OFF
22
ON
OFF
ON
OFF
ON
OFF
23
OFF
ON
ON
OFF
ON
OFF
24
ON
ON
ON
OFF
ON
OFF
25
OFF
OFF
OFF
ON
ON
OFF
26
ON
OFF
OFF
ON
ON
OFF
27
OFF
ON
OFF
ON
ON
OFF
Chapter 6 Modbus-RTU communication
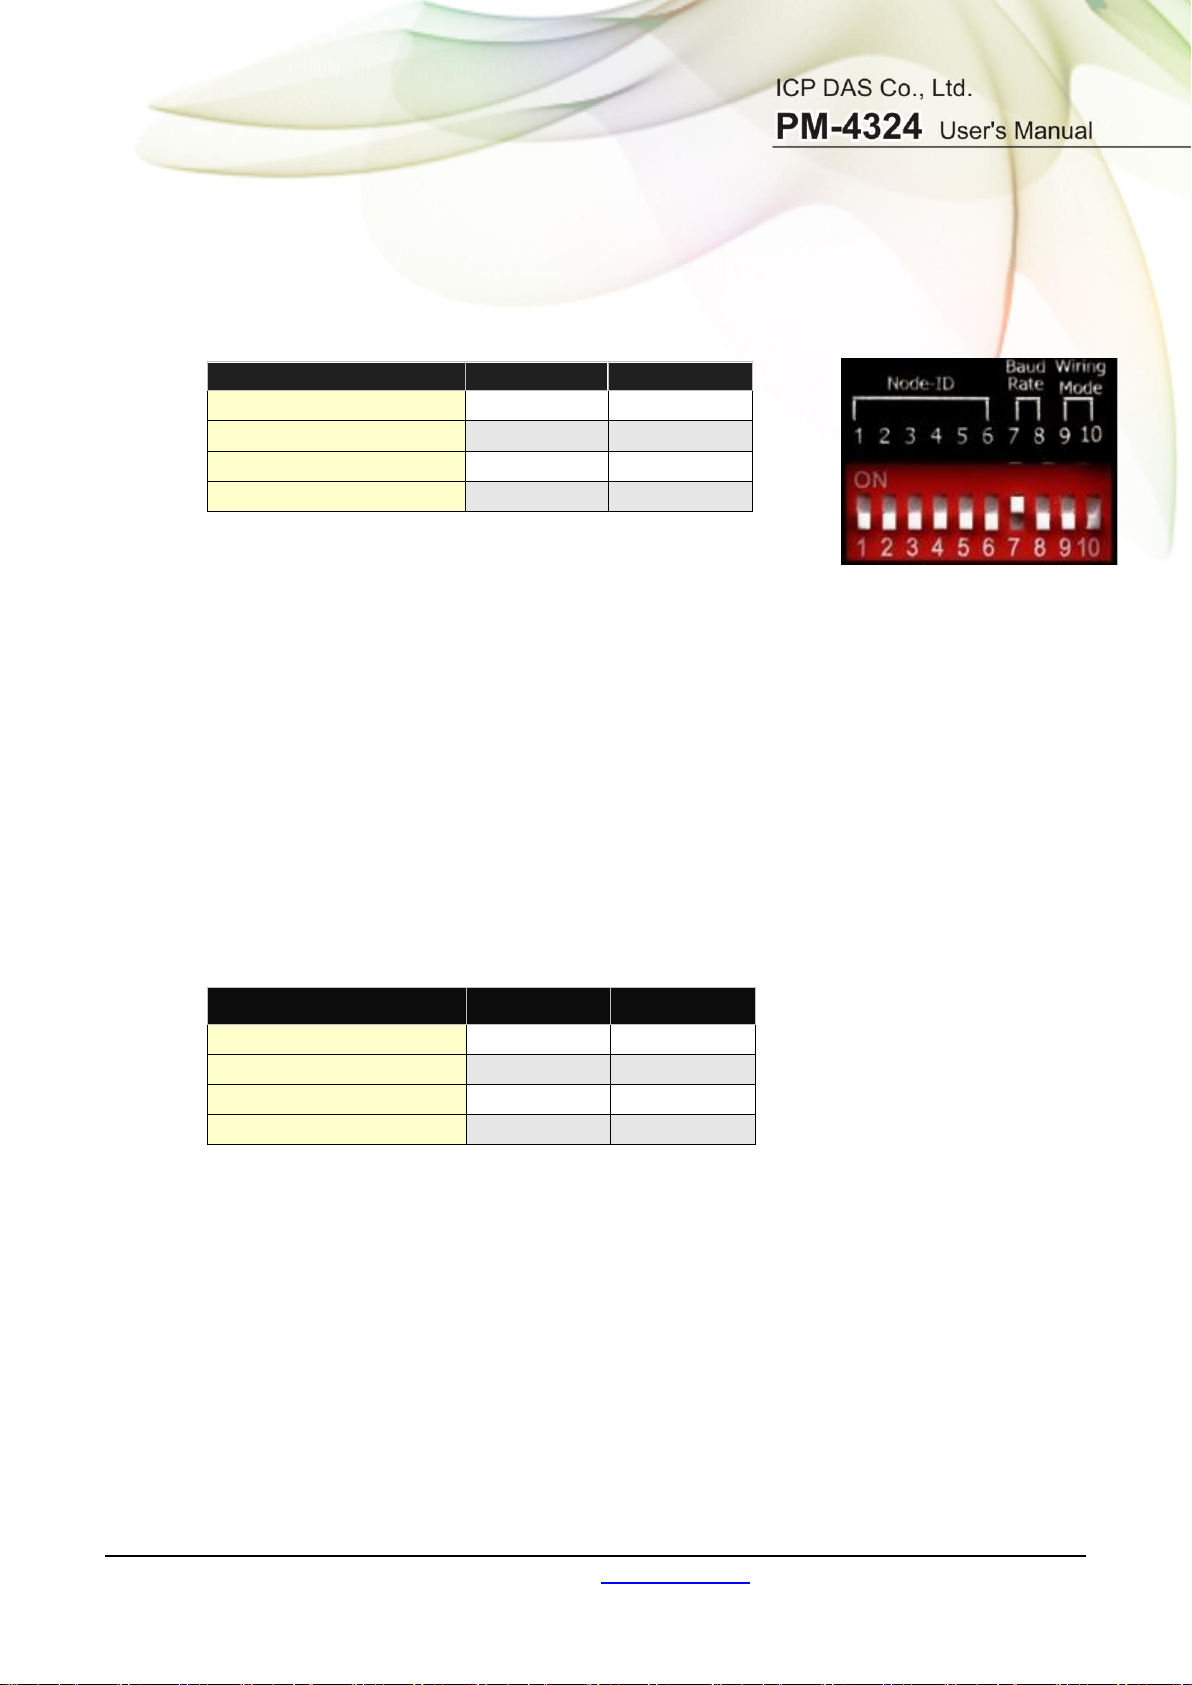
6.1 RS-485 setting
Default setting for RS-485: 19200, n, 8, 1
DIP switch (SW1-SW6) is used for Modbus address setting, default is 1, i.e.
all OFF
For example: Modbus address is 10,find the table of DIP switch 1-6 is
ON, OFF, OFF, ON, OFF, OFF
6.1.1 SW1-SW6 setting
Setting Modbus-RTU address for communication (1-64)
PM-4324 User’s Manual v1.03 Last Revised: Feb. 2021 Page: 19
Copyright © ICP DAS Co., Ltd. All Rights Reserved. www.icpdas.com E-mail: service@icpdas.com
28
ON
ON
OFF
ON
ON
OFF
29
OFF
OFF
ON
ON
ON
OFF
30
ON
OFF
ON
ON
ON
OFF
31
OFF
ON
ON
ON
ON
OFF
32
ON
ON
ON
ON
ON
OFF
33
OFF
OFF
OFF
OFF
OFF
ON
34
ON
OFF
OFF
OFF
OFF
ON
35
OFF
ON
OFF
OFF
OFF
ON
36
ON
ON
OFF
OFF
OFF
ON
37
OFF
OFF
ON
OFF
OFF
ON
38
ON
OFF
ON
OFF
OFF
ON
39
OFF
ON
ON
OFF
OFF
ON
40
ON
ON
ON
OFF
OFF
ON
41
OFF
OFF
OFF
ON
OFF
ON
42
ON
OFF
OFF
ON
OFF
ON
43
OFF
ON
OFF
ON
OFF
ON
44
ON
ON
OFF
ON
OFF
ON
45
OFF
OFF
ON
ON
OFF
ON
46
ON
OFF
ON
ON
OFF
ON
47
OFF
ON
ON
ON
OFF
ON
48
ON
ON
ON
ON
OFF
ON
49
OFF
OFF
OFF
OFF
ON
ON
50
ON
OFF
OFF
OFF
ON
ON
51
OFF
ON
OFF
OFF
ON
ON
52
ON
ON
OFF
OFF
ON
ON
53
OFF
OFF
ON
OFF
ON
ON
54
ON
OFF
ON
OFF
ON
ON
55
OFF
ON
ON
OFF
ON
ON
56
ON
ON
ON
OFF
ON
ON
57
OFF
OFF
OFF
ON
ON
ON
58
ON
OFF
OFF
ON
ON
ON
59
OFF
ON
OFF
ON
ON
ON
60
ON
ON
OFF
ON
ON
ON
61
OFF
OFF
ON
ON
ON
ON
62
ON
OFF
ON
ON
ON
ON
63
OFF
ON
ON
ON
ON
ON
64
ON
ON
ON
ON
ON
ON
PM-4324 User’s Manual v1.03 Last Revised: Feb. 2021 Page: 20
Copyright © ICP DAS Co., Ltd. All Rights Reserved. www.icpdas.com E-mail: service@icpdas.com
Baud Rate
SW 7
SW8
9600 bps
OFF
OFF
19200 bps (Default)
ON
OFF
38400 bps
OFF
ON
115200 bps
ON
ON
Wiring
SW 9
SW 10
Software setting
OFF
OFF
3P3W-2CT
ON
OFF
3P3W-3CT
OFF
ON
3P4W-3CT
ON
ON
SW7-SW8 setting
PM-4324:For Baud Rate Setting
Add the Bias Resistor on RS-485 Network for stable signal
The RS-485 master is required to provide the bias for PM-4324 series. Otherwise, the tM-SG4
or SG-785 should be added to provide the bias. All ICP DAS controllers and converters provide
the bias.
SW9-SW10 setting
PM-4324:Select the different wiring mode
(Please select the Software setting, if 1P2W-1CT or 1P3W-2CT is used)
PM-4324 User’s Manual v1.03 Last Revised: Feb. 2021 Page: 21
Copyright © ICP DAS Co., Ltd. All Rights Reserved. www.icpdas.com E-mail: service@icpdas.com
Protocol
Modbus-RTU
Transmission
Specifications
Bits per Byte:
1 start bit
8 data bits, least significant bit sent first
None Parity
1 stop bits
Error Check:
Cyclical Redundancy Check (CRC)
Baud Rate
9600, 19200 (Default), 38400, 115200
Modbus slave address
1-64 (Default = 1)
Code
MODBUS_ name
Description
01h
Read Coils
Read boolean values of read/write location
05h
Write Single Coil
Set one boolean value of read/write location
0Fh
Write Multiple Coil
Set boolean values of read/write location
03h
Read Holding Registers
Read the contents of read/write location
06h
Write Single Register
Set the content of one read/write location
10h
Write Multiple Registers
Set the contents of read/write location
04h
Read Input Registers
Read the contents of read only location
6.2 Modbus-RTU setting
6.2.1 Specifications
Modbus Function Code:01h, 03h, 04h, 05h, 06h, 0Fh, 10h
Note: the max. data reading of Function 03 and Function04 is 125 registers
Data format
Integer:16 bits with sign, each with 1 register
Unsigned Integer:16 bits without sign, each with 1 register
Float:IEEE 754 Format ,each with 2 registers,
Low Word is first priority while transmit
PM-4324 User’s Manual v1.03 Last Revised: Feb. 2021 Page: 22
Copyright © ICP DAS Co., Ltd. All Rights Reserved. www.icpdas.com E-mail: service@icpdas.com
Data Hi Word,
Hi Byte
Data Hi Word,
Lo Byte
Data Lo Word,
Hi Byte
Data Lo Word,
Lo Byte
SEEE EEEE
EMMM MMMM
MMMM MMMM
MMMM MMMM
1 2 3
4
Data Low Word,
High Byte
Data Low Word,
Low Byte
Data High Word,
High Byte
Data High Word,
Low Byte
1 2 3
4
Data High Word,
High Byte
Data High Word,
Low Byte
Data Low Word,
High Byte
Data Low Word,
Low Byte
1 2 3
4
Data Low Word,
High Byte
Data Low Word,
Low Byte
Data High Word,
High Byte
Data High Word,
Low Byte
IEEE 754 Format
Definition of the floating format of the Bits
Value = (- 1)S x (1.M) x 2
S represents the sign bit where 1 is negative and 0 is positive
E is the two’s complement exponent with an offset of 127.
i.e. an exponent of zero is represented by 127, an exponent of 1 by 128 etc.
M is the 23-bit normal mantissa. The highest bit is always 1 and,
therefore, is not stored.
Transfer sequence (Float)
E -127
0 < E < 255
Transfer sequence (Inverse Integer)
Transfer sequence (Integer)
PM-4324 User’s Manual v1.03 Last Revised: Feb. 2021 Page: 23
Copyright © ICP DAS Co., Ltd. All Rights Reserved. www.icpdas.com E-mail: service@icpdas.com
Parameter name
Modbus Register
Len
Data
Type
Range
Default
value
Comment
Modicom
Format
Hex
DO 0
04097
0x1000
Word
Byte
0 = OFF
1 = ON
0
DO 1
04098
0x1001
Word
Byte
0 = OFF
1 = ON
0
DO 0
Power On Value
04113
0x1010
Word
Byte
0 = OFF
1 = ON
0
DO 1
Power On Value
04114
0x1011
Word
Byte
0 = OFF
1 = ON
0
Parameter name
Modbus Register
Len
Data
Type
Range
Default
value
Units
Comment
Modicom
Format
Hex
PT_Ratio
44097
0x1000
Word
UInt
1-65535
100
0.01 CT_Ratio_1
44098
0x1001
Word
UInt
1-65535
1
For Submeter1
CT_Ratio_2
44099
0x1002
Word
UInt
1-65535
1
For Submeter2
CT_Ratio_3
44100
0x1003
Word
UInt
1-65535
1
For Submeter3
CT_Ratio_4
44101
0x1004
Word
UInt
1-65535
1
For Submeter4
CT_Ratio_5
44102
0x1005
Word
UInt
1-65535
1
For Submeter5
CT_Ratio_6
44103
0x1006
Word
UInt
1-65535
1
For Submeter6
CT_Ratio_7
44104
0x1007
Word
UInt
1-65535
1
For Submeter7
CT_Ratio_8
44105
0x1008
Word
UInt
1-65535
1
For Submeter8
Default Frequency
44106
0x1009
Word
UInt
0x0055: Auto
0x0064: 50Hz
0x0078: 60Hz
0x0055
Re-power the
module after
setting
6.2.2 Modbus Register
Modbus Module #1 – Coil: Relay Value
Modbus Module #2 – Holding Register : System Parameter Setting
PM-4324 User’s Manual v1.03 Last Revised: Feb. 2021 Page: 24
Copyright © ICP DAS Co., Ltd. All Rights Reserved. www.icpdas.com E-mail: service@icpdas.com
Wiring Mode
44107
0x100A
Word
UInt
1: 1P2W
2: 1P3W
3: 3P3W2CT
4: 3P3W3CT
5: 3P4W3CT
5
Only work when
SW9-SW10 is all
off
Set Energy to Zero
44108
0x100B
Word
UInt
1: submeter1
2: submeter2
3: submeter3
4: submeter4
5: submeter5
6: submeter6
7: submeter7
8: submeter8
0x0055: ALL
Only Write
Reset to Factory
Settings
44109
0x100C
Word
UInt
0x0055
Only Write,
Re-power the
module after
setting
Parity
44110
0x100D
Word
UInt
0: None
1: Odd Parity
2: Even Parity
0
Only work for
RS-485
Interface
Stop Bit
44111
0x100E
Word
UInt
1: 1 stop bit
2: 2 stop bits
1
Only work for
RS-485
Interface
Energy Absolute
Accumulated Mode
44113
0x1010
Word
UInt
0: Enable
1: Disable
0
Harmonic Phase
Select 1
44114
0x1011
Word
UInt
0: Disable
1: Phase A
2: Phase B
3: Phase C
0
For Submeter1
Harmonic Phase
Select 2
44115
0x1012
Word
UInt
0: Disable
1: Phase A
2: Phase B
3: Phase C
0
For Submeter2
PM-4324 User’s Manual v1.03 Last Revised: Feb. 2021 Page: 25
Copyright © ICP DAS Co., Ltd. All Rights Reserved. www.icpdas.com E-mail: service@icpdas.com

Harmonic Phase
Select 3
44116
0x1013
Word
UInt
0: Disable
1: Phase A
2: Phase B
3: Phase C
0
For Submeter3
Harmonic Phase
Select 4
44117
0x1014
Word
UInt
0: Disable
1: Phase A
2: Phase B
3: Phase C
0
For Submeter4
Harmonic Phase
Select 5
44118
0x1015
Word
UInt
0: Disable
1: Phase A
2: Phase B
3: Phase C
0
For Submeter5
Harmonic Phase
Select 6
44119
0x1016
Word
UInt
0: Disable
1: Phase A
2: Phase B
3: Phase C
0
For Submeter6
Harmonic Phase
Select 7
44120
0x1017
Word
UInt
0: Disable
1: Phase A
2: Phase B
3: Phase C
0
For Submeter7
Harmonic Phase
Select 8
44121
0x1018
Word
UInt
0: Disable
1: Phase A
2: Phase B
3: Phase C
0
For Submeter8
Display Voltage
44122
0x1019
Word
UInt
0: Automatic
1: Show as Vln
2: Show as Vll
0
Refer to Q15
PM-4324 User’s Manual v1.03 Last Revised: Feb. 2021 Page: 26
Copyright © ICP DAS Co., Ltd. All Rights Reserved. www.icpdas.com E-mail: service@icpdas.com

Parameter name
Modbus Register
Len
Data
Type
Range
Default
value
Units
Comment
Modicom
Format
Hex
Wiring Type
30513
0x0200
Word
UInt
9: 1P2W
10: 1P3W
11: 3P3W2CT
12: 3P3W3CT
13: 3P4W3CT
14: 3P3W2CT
(HW)
15: 3P3W3CT
(HW)
16: 3P4W3CT
(HW)
13
(HW):set
wiring by
hardware Dip
Switch
Phase Sequence
30514
0x0201
Word
UInt
0: Negative
(ACB)
1: Positive
(ABC)
Only work
when
3P4W3CT
Model Name
30515
0x0202
Word
UInt
4324: PM-4324
4324
Model Type
30516
0x0203
Word
UInt
0x0001: 50Hz
0x0002: 60Hz
0x0002
Firmware Version
30517
0x0204
Word
BCD
0x0100
Ver. 1.0
Modbus Module #3 - Input Register : System Information
PM-4324 User’s Manual v1.03 Last Revised: Feb. 2021 Page: 27
Copyright © ICP DAS Co., Ltd. All Rights Reserved. www.icpdas.com E-mail: service@icpdas.com

Parameter
name
Modbus Register
Len
Data Type
Range
Units
Comment
Modicom Format
Hex
V_a
34353-34354
0x1100-
0x1101
DWord
Float Volt
For CT_1
I_a
34355-
34356
0x1102-
0x1103
DWord
Float Amp
kW_a
34357-
34358
0x1104-
0x1105
DWord
Float kW
kvar_a
34359-
34360
0x1106-
0x1107
DWord
Float kvar
kVA_a
34361-
34362
0x1108-
0x1109
DWord
Float kVA
PF_a
34363-
34364
0x110A-
0x110B
DWord
Float
kWh_a
34365-
34366
0x110C-
0x110D
DWord
Float
kvarh_a
34367-
34368
0x110E-
0x110F
DWord
Float
kVAh_a
34369-
34370
0x1110-
0x1111
DWord
Float
V_b
34371-
34372
0x1112-
0x1113
DWord
Float Volt
For CT_2
I_b
34373-
34374
0x1114-
0x1115
DWord
Float Amp
kW_b
34375-
34376
0x1116-
0x1117
DWord
Float kW
kvar_b
34377-
34378
0x1118-
0x1119
DWord
Float kvar
kVA_b
34379-
34380
0x111A-
0x111B
DWord
Float kVA
PF_b
34381-
34382
0x111C-
0x111D
DWord
Float
kWh_b
34383-
34384
0x111E-
0x111F
DWord
Float
kvarh_b
34385-
34386
0x1120-
0x1121
DWord
Float
kVAh_b
34387-
34388
0x1122-
0x1123
DWord
Float
V_c
34389-34390
0x1124-0x1125
DWord
Float
Volt
For CT_3
I_c
34391-34392
0x1126-0x1127
DWord
Float
Amp
kW_c
34393-34394
0x1128-0x1129
DWord
Float
kW
kvar_c
34395-34396
0x112A-0x112B
DWord
Float
kvar
kVA_c
34397-34398
0x112C-0x112D
DWord
Float
kVA
PF_c
34399-34400
0x112E-0x112F
DWord
Float
kWh_c
34401-34402
0x1130-0x1131
DWord
Float
kvarh_c
34403-34404
0x1132-0x1133
DWord
Float
kVAh_c
34405-34406
0x1134-0x1135
DWord
Float
V_avg
34407-34408
0x1136-0x1137
DWord
Float
Volt
I_avg
34409-34410
0x1138-0x1139
DWord
Float
Amp
kW_tot
34411-34412
0x113A-0x113B
DWord
Float
kW
kvar_tot
34413-34414
0x113C-0x113D
DWord
Float
kvar
kVA_tot
34415-34416
0x113E-0x113F
DWord
Float
kVA
Modbus Module #4 - Input Register :Power value (Float) for Submeter1
PM-4324 User’s Manual v1.03 Last Revised: Feb. 2021 Page: 28
Copyright © ICP DAS Co., Ltd. All Rights Reserved. www.icpdas.com E-mail: service@icpdas.com

PF_tot
34417-34418
0x1140-0x1141
DWord
Float
kWh_tot
34419-34420
0x1142-0x1143
DWord
Float
kvarh_tot
34421-34422
0x1144-0x1145
DWord
Float
kVAh_tot
34423-34424
0x1146-0x1147
DWord
Float
Freq_a
34425-34426
0x1148-0x1149
DWord
Float
45~65
Hz
For CT_1
Freq_b
34427-34428
0x114A-0x114B
DWord
Float
45~65
Hz
For CT_2
Freq_c
34429-34430
0x114C-0x114D
DWord
Float
45~65
Hz
For CT_3
Freq_max
34431-34432
0x114E-0x114F
DWord
Float
45~65
Hz
VTHD
34459-34460
0x116A-0x116B
DWord
Float
0~4
Phase set by
Harmonic Phase
Select 1 Register
ITHD
34461-34462
0x116C-0x116D
DWord
Float
0~4
Bi_Positive
_kWh
34463-34464
0x116E-0x116F
DWord
Float
Bi_Negative
_kWh
34465-34466
0x1170-0x1171
DWord
Float
Bi_Net
_kWh
34467-34468
0x1172-0x1173
DWord
Float
Bi_Total
_kWh
34469-34470
0x1174-0x1175
DWord
Float
Note:
The definition of bi-direction energy registers :
Bi_Positive_kWh: = Sum( absolute( all channel's positive kWh in every sec.))
Bi_Negative_kWh: = Sum( absolute( all channel's negative kWh in every sec.))
Bi_Net_kWh: = Sum( all channel's kWh in every sec. )
Bi_Total_kWh: = Sum( absolute( all channels kWh in every sec. ))
PM-4324 User’s Manual v1.03 Last Revised: Feb. 2021 Page: 29
Copyright © ICP DAS Co., Ltd. All Rights Reserved. www.icpdas.com E-mail: service@icpdas.com

Parameter
name
Modbus Register
Len
Data Type
Range
Units
Comment
Modicom Format
Hex
V_a
34609-34610
0x1200-
0x1201
DWord
Float Volt
For CT_4
I_a
34611-
34612
0x1202-
0x1203
DWord
Float Amp
kW_a
34613-
34614
0x1204-
0x1205
DWord
Float kW
kvar_a
34615-
34616
0x1206-
0x1207
DWord
Float kvar
kVA_a
34617-
34618
0x1208-
0x1209
DWord
Float kVA
PF_a
34619-
34620
0x120A-
0x120B
DWord
Float
kWh_a
34621-
34622
0x120C-
0x120D
DWord
Float
kvarh_a
34623-
34624
0x120E-
0x120F
DWord
Float
kVAh_a
34625-
34626
0x1210-
0x1211
DWord
Float
V_b
34627-
34628
0x1212-
0x1213
DWord
Float Volt
For CT_5
I_b
34629-
34630
0x1214-
0x1215
DWord
Float Amp
kW_b
34631-
34632
0x1216-
0x1217
DWord
Float kW
kvar_b
34633-
34634
0x1218-
0x1219
DWord
Float kvar
kVA_b
34635-
34636
0x121A-
0x121B
DWord
Float kVA
PF_b
34637-
34638
0x121C-
0x121D
DWord
Float
kWh_b
34639-
34640
0x121E-
0x121F
DWord
Float
kvarh_b
34641-
34642
0x1220-
0x1221
DWord
Float
kVAh_b
34643-
34644
0x1222-
0x1223
DWord
Float
V_c
34645-34646
0x1224-0x1225
DWord
Float
Volt
For CT_6
I_c
34647-34648
0x1226-0x1227
DWord
Float
Amp
kW_c
34649-34650
0x1228-0x1229
DWord
Float
kW
kvar_c
34651-34652
0x122A-0x122B
DWord
Float
kvar
kVA_c
34653-34654
0x122C-0x122D
DWord
Float
kVA
PF_c
34655-34656
0x122E-0x122F
DWord
Float
kWh_c
34657-34658
0x1230-0x1231
DWord
Float
kvarh_c
34659-34660
0x1232-0x1233
DWord
Float
kVAh_c
34661-34662
0x1234-0x1235
DWord
Float
V_avg
34663-34664
0x1236-0x1237
DWord
Float
Volt
I_avg
34665-34666
0x1238-0x1239
DWord
Float
Amp
kW_tot
34667-34668
0x123A-0x123B
DWord
Float
kW
kvar_tot
34669-34670
0x123C-0x123D
DWord
Float
kvar
kVA_tot
34671-34672
0x123E-0x123F
DWord
Float
kVA
Modbus Module #5 - Input Register :Power value (Float) for Submeter2
PM-4324 User’s Manual v1.03 Last Revised: Feb. 2021 Page: 30
Copyright © ICP DAS Co., Ltd. All Rights Reserved. www.icpdas.com E-mail: service@icpdas.com

PF_tot
34673-34674
0x1240-0x1241
DWord
Float
kWh_tot
34675-34676
0x1242-0x1243
DWord
Float
kvarh_tot
34677-34678
0x1244-0x1245
DWord
Float
kVAh_tot
34679-34680
0x1246-0x1247
DWord
Float
Freq_a
34681-34682
0x1248-0x1249
DWord
Float
45~65
Hz
For CT_4
Freq_b
34683-34684
0x124A-0x124B
DWord
Float
45~65
Hz
For CT_5
Freq_c
34685-34686
0x124C-0x124D
DWord
Float
45~65
Hz
For CT_6
Freq_max
34687-34688
0x124E-0x124F
DWord
Float
45~65
Hz
VTHD
34715-34716
0x126A-0x126B
DWord
Float
0~4
Phase set by
Harmonic Phase
Select 2 Register
ITHD
34717-34718
0x126C-0x126D
DWord
Float
0~4
Bi_Positive
_kWh
34719-34720
0x126E-0x126F
DWord
Float
Bi_Negative
_kWh
34721-34722
0x1270-0x1271
DWord
Float
Bi_Net
_kWh
34723-34724
0x1272-0x1273
DWord
Float
Bi_Total
_kWh
34725-34726
0x1274-0x1275
DWord
Float
Note:
The definition of bi-direction energy registers :
Bi_Positive_kWh: = Sum( absolute( all channel's positive kWh in every sec.))
Bi_Negative_kWh: = Sum( absolute( all channel's negative kWh in every sec.))
Bi_Net_kWh: = Sum( all channel's kWh in every sec. )
Bi_Total_kWh: = Sum( absolute( all channels kWh in every sec. ))
PM-4324 User’s Manual v1.03 Last Revised: Feb. 2021 Page: 31
Copyright © ICP DAS Co., Ltd. All Rights Reserved. www.icpdas.com E-mail: service@icpdas.com

Parameter
name
Modbus Register
Len
Data Type
Range
Units
Comment
Modicom Format
Hex
V_a
34865-34866
0x1300-
0x1301
DWord
Float Volt
For CT_7
I_a
34867-
34868
0x1302-
0x1303
DWord
Float Amp
kW_a
34869-
34870
0x1304-
0x1305
DWord
Float kW
kvar_a
34871-
34872
0x1306-
0x1307
DWord
Float kvar
kVA_a
34873-
34874
0x1308-
0x1309
DWord
Float kVA
PF_a
34875-
34876
0x130A-
0x130B
DWord
Float
kWh_a
34877-
34878
0x130C-
0x130D
DWord
Float
kvarh_a
34879-
34880
0x130E-
0x130F
DWord
Float
kVAh_a
34881-
34882
0x1310-
0x1311
DWord
Float
V_b
34883-
34884
0x1312-
0x1313
DWord
Float Volt
For CT_8
I_b
34885-
34886
0x1314-
0x1315
DWord
Float Amp
kW_b
34887-
34888
0x1316-
0x1317
DWord
Float kW
kvar_b
34889-
34890
0x1318-
0x1319
DWord
Float kvar
kVA_b
34891-
34892
0x131A-
0x131B
DWord
Float kVA
PF_b
34893-
34894
0x131C-
0x131D
DWord
Float
kWh_b
34895-
34896
0x131E-
0x131F
DWord
Float
kvarh_b
34897-
34898
0x1320-
0x1321
DWord
Float
kVAh_b
34899-
34900
0x1322-
0x1323
DWord
Float
V_c
34901-34902
0x1324-0x1325
DWord
Float
Volt
For CT_9
I_c
34903-34904
0x1326-0x1327
DWord
Float
Amp
kW_c
34905-34906
0x1328-0x1329
DWord
Float
kW
kvar_c
34907-34908
0x132A-0x132B
DWord
Float
kvar
kVA_c
34909-34910
0x132C-0x132D
DWord
Float
kVA
PF_c
34911-34912
0x132E-0x132F
DWord
Float
kWh_c
34913-34914
0x1330-0x1331
DWord
Float
kvarh_c
34915-34916
0x1332-0x1333
DWord
Float
kVAh_c
34917-34918
0x1334-0x1335
DWord
Float
V_avg
34919-34920
0x1336-0x1337
DWord
Float
Volt
I_avg
34921-34922
0x1338-0x1339
DWord
Float
Amp
kW_tot
34923-34924
0x133A-0x133B
DWord
Float
kW
kvar_tot
34925-34926
0x133C-0x133D
DWord
Float
kvar
kVA_tot
34927-34928
0x133E-0x133F
DWord
Float
kVA
Modbus Module #6 - Input Register :Power value (Float) for Submeter3
PM-4324 User’s Manual v1.03 Last Revised: Feb. 2021 Page: 32
Copyright © ICP DAS Co., Ltd. All Rights Reserved. www.icpdas.com E-mail: service@icpdas.com

PF_tot
34929-34930
0x1340-0x1341
DWord
Float
kWh_tot
34931-34932
0x1342-0x1343
DWord
Float
kvarh_tot
34933-34934
0x1344-0x1345
DWord
Float
kVAh_tot
34935-34936
0x1346-0x1347
DWord
Float
Freq_a
34937-34938
0x1348-0x1349
DWord
Float
45~65
Hz
For CT_7
Freq_b
34939-34940
0x134A-0x134B
DWord
Float
45~65
Hz
For CT_8
Freq_c
34941-34942
0x134C-0x134D
DWord
Float
45~65
Hz
For CT_9
Freq_max
34943-34944
0x134E-0x134F
DWord
Float
45~65
Hz
VTHD
34971-34972
0x136A-0x136B
DWord
Float
0~4
Phase set by
Harmonic Phase
Select 3 Register
ITHD
34973-34974
0x136C-0x136D
DWord
Float
0~4
Bi_Positive
_kWh
34975-34976
0x136E-0x136F
DWord
Float
Bi_Negative
_kWh
34977-34978
0x1370-0x1371
DWord
Float
Bi_Net
_kWh
34979-34980
0x1372-0x1373
DWord
Float
Bi_Total
_kWh
34981-34982
0x1374-0x1375
DWord
Float
Note:
The definition of bi-direction energy registers :
Bi_Positive_kWh: = Sum( absolute( all channel's positive kWh in every sec.))
Bi_Negative_kWh: = Sum( absolute( all channel's negative kWh in every sec.))
Bi_Net_kWh: = Sum( all channel's kWh in every sec. )
Bi_Total_kWh: = Sum( absolute( all channels kWh in every sec. ))
PM-4324 User’s Manual v1.03 Last Revised: Feb. 2021 Page: 33
Copyright © ICP DAS Co., Ltd. All Rights Reserved. www.icpdas.com E-mail: service@icpdas.com

Parameter
name
Modbus Register
Len
Data Type
Range
Units
Comment
Modicom Format
Hex
V_a
35121-35122
0x1400-
0x1401
DWord
Float Volt
For CT_10
I_a
35123-35124
0x1402-
0x1403
DWord
Float Amp
kW_a
35125-35126
0x1404-
0x1405
DWord
Float kW
kvar_a
35127-35128
0x1406-
0x1407
DWord
Float kvar
kVA_a
35129-35130
0x1408-
0x1409
DWord
Float kVA
PF_a
35131-35132
0x140A-
0x140B
DWord
Float
kWh_a
35133-35134
0x140C-
0x140D
DWord
Float
kvarh_a
35135-35136
0x140E-
0x140F
DWord
Float
kVAh_a
35137-35138
0x1410-
0x1411
DWord
Float
V_b
35139-35140
0x1412-
0x1413
DWord
Float Volt
For CT_11
I_b
35141-35142
0x1414-
0x1415
DWord
Float Amp
kW_b
35143-35144
0x1416-
0x1417
DWord
Float kW
kvar_b
35145-35146
0x1418-
0x1419
DWord
Float kvar
kVA_b
35147-35148
0x141A-
0x141B
DWord
Float kVA
PF_b
35149-35150
0x141C-
0x141D
DWord
Float
kWh_b
35151-35152
0x141E-
0x141F
DWord
Float
kvarh_b
35153-35154
0x1420-
0x1421
DWord
Float
kVAh_b
35155-35156
0x1422-
0x1423
DWord
Float
V_c
35157-35158
0x1424-0x1425
DWord
Float
Volt
For CT_12
I_c
35159-35160
0x1426-0x1427
DWord
Float
Amp
kW_c
35161-35162
0x1428-0x1429
DWord
Float
kW
kvar_c
35163-35164
0x142A-0x142B
DWord
Float
kvar
kVA_c
35165-35166
0x142C-0x142D
DWord
Float
kVA
PF_c
35167-35168
0x142E-0x142F
DWord
Float
kWh_c
35169-35170
0x1430-0x1431
DWord
Float
kvarh_c
35171-35172
0x1432-0x1433
DWord
Float
kVAh_c
35173-35174
0x1434-0x1435
DWord
Float
V_avg
35175-35176
0x1436-0x1437
DWord
Float
Volt
I_avg
35177-35178
0x1438-0x1439
DWord
Float
Amp
kW_tot
35179-35180
0x143A-0x143B
DWord
Float
kW
kvar_tot
35181-35182
0x143C-0x143D
DWord
Float
kvar
kVA_tot
35183-35184
0x143E-0x143F
DWord
Float
kVA
Modbus Module #7 - Input Register :Power value (Float) for Submeter4
PM-4324 User’s Manual v1.03 Last Revised: Feb. 2021 Page: 34
Copyright © ICP DAS Co., Ltd. All Rights Reserved. www.icpdas.com E-mail: service@icpdas.com

PF_tot
35185-35186
0x1440-0x1441
DWord
Float
kWh_tot
35187-35188
0x1442-0x1443
DWord
Float
kvarh_tot
35189-35190
0x1444-0x1445
DWord
Float
kVAh_tot
35191-35192
0x1446-0x1447
DWord
Float
Freq_a
35193-35194
0x1448-0x1449
DWord
Float
45~65
Hz
For CT_10
Freq_b
35195-35196
0x144A-0x144B
DWord
Float
45~65
Hz
For CT_11
Freq_c
35197-35198
0x144C-0x144D
DWord
Float
45~65
Hz
For CT_12
Freq_max
35199-35200
0x144E-0x144F
DWord
Float
45~65
Hz
VTHD
35227-35228
0x146A-0x146B
DWord
Float
0~4
Phase set by
Harmonic Phase
Select 4 Register
ITHD
35229-35230
0x146C-0x146D
DWord
Float
0~4
Bi_Positive
_kWh
35231-35232
0x146E-0x146F
DWord
Float
Bi_Negative
_kWh
35233-35234
0x1470-0x1471
DWord
Float
Bi_Net
_kWh
35235-35236
0x1472-0x1473
DWord
Float
Bi_Total
_kWh
35237-35238
0x1474-0x1475
DWord
Float
Note:
The definition of bi-direction energy registers :
Bi_Positive_kWh: = Sum( absolute( all channel's positive kWh in every sec.))
Bi_Negative_kWh: = Sum( absolute( all channel's negative kWh in every sec.))
Bi_Net_kWh: = Sum( all channel's kWh in every sec. )
Bi_Total_kWh: = Sum( absolute( all channels kWh in every sec. ))
PM-4324 User’s Manual v1.03 Last Revised: Feb. 2021 Page: 35
Copyright © ICP DAS Co., Ltd. All Rights Reserved. www.icpdas.com E-mail: service@icpdas.com

Parameter
name
Modbus Register
Len
Data Type
Range
Units
Comment
Modicom Format
Hex
V_a
35377-35378
0x1500-
0x1501
DWord
Float Volt
For CT_13
I_a
35379-35380
0x1502-
0x1503
DWord
Float Amp
kW_a
35381-35382
0x1504-
0x1505
DWord
Float kW
kvar_a
35383-35384
0x1506-
0x1507
DWord
Float kvar
kVA_a
35385-35386
0x1508-
0x1509
DWord
Float kVA
PF_a
35387-35388
0x150A-
0x150B
DWord
Float
kWh_a
35389-35390
0x150C-
0x150D
DWord
Float
kvarh_a
35391-35392
0x150E-
0x150F
DWord
Float
kVAh_a
35393-35394
0x1510-
0x1511
DWord
Float
V_b
35395-35396
0x1512-
0x1513
DWord
Float Volt
For CT_14
I_b
35397-35398
0x1514-
0x1515
DWord
Float Amp
kW_b
35399-35400
0x1516-
0x1517
DWord
Float kW
kvar_b
35401-35402
0x1518-
0x1519
DWord
Float kvar
kVA_b
35403-35404
0x151A-
0x151B
DWord
Float kVA
PF_b
35405-35406
0x151C-
0x151D
DWord
Float
kWh_b
35407-35408
0x151E-
0x151F
DWord
Float
kvarh_b
35409-35410
0x1520-
0x1521
DWord
Float
kVAh_b
35411-35412
0x1522-
0x1523
DWord
Float
V_c
35413-35414
0x1524-0x1525
DWord
Float
Volt
For CT_15
I_c
35415-35416
0x1526-0x1527
DWord
Float
Amp
kW_c
35417-35418
0x1528-0x1529
DWord
Float
kW
kvar_c
35419-35420
0x152A-0x152B
DWord
Float
kvar
kVA_c
35421-35422
0x152C-0x152D
DWord
Float
kVA
PF_c
35423-35424
0x152E-0x152F
DWord
Float
kWh_c
35425-35426
0x1530-0x1531
DWord
Float
kvarh_c
35427-35428
0x1532-0x1533
DWord
Float
kVAh_c
35429-35430
0x1534-0x1535
DWord
Float
V_avg
35431-35432
0x1536-0x1537
DWord
Float
Volt
I_avg
35433-35434
0x1538-0x1539
DWord
Float
Amp
kW_tot
35435-35436
0x153A-0x153B
DWord
Float
kW
kvar_tot
35437-35438
0x153C-0x153D
DWord
Float
kvar
kVA_tot
35439-35440
0x153E-0x153F
DWord
Float
kVA
Modbus Module #8 - Input Register :Power value (Float) for Submeter5
PM-4324 User’s Manual v1.03 Last Revised: Feb. 2021 Page: 36
Copyright © ICP DAS Co., Ltd. All Rights Reserved. www.icpdas.com E-mail: service@icpdas.com

PF_tot
35441-35442
0x1540-0x1541
DWord
Float
kWh_tot
35443-35444
0x1542-0x1543
DWord
Float
kvarh_tot
35445-35446
0x1544-0x1545
DWord
Float
kVAh_tot
35447-35448
0x1546-0x1547
DWord
Float
Freq_a
35449-35450
0x1548-0x1549
DWord
Float
45~65
Hz
For CT_13
Freq_b
35451-35452
0x154A-0x154B
DWord
Float
45~65
Hz
For CT_14
Freq_c
35453-35454
0x154C-0x154D
DWord
Float
45~65
Hz
For CT_15
Freq_max
35455-35456
0x154E-0x154F
DWord
Float
45~65
Hz
VTHD
35483-35484
0x156A-0x156B
DWord
Float
0~4
Phase set by
Harmonic Phase
Select 5 Register
ITHD
35485-35486
0x156C-0x156D
DWord
Float
0~4
Bi_Positive
_kWh
35487-35488
0x156E-0x156F
DWord
Float
Bi_Negative
_kWh
35489-35490
0x1570-0x1571
DWord
Float
Bi_Net
_kWh
35491-35492
0x1572-0x1573
DWord
Float
Bi_Total
_kWh
35493-35494
0x1574-0x1575
DWord
Float
Note:
The definition of bi-direction energy registers :
Bi_Positive_kWh: = Sum( absolute( all channel's positive kWh in every sec.))
Bi_Negative_kWh: = Sum( absolute( all channel's negative kWh in every sec.))
Bi_Net_kWh: = Sum( all channel's kWh in every sec. )
Bi_Total_kWh: = Sum( absolute( all channels kWh in every sec. ))
PM-4324 User’s Manual v1.03 Last Revised: Feb. 2021 Page: 37
Copyright © ICP DAS Co., Ltd. All Rights Reserved. www.icpdas.com E-mail: service@icpdas.com

Parameter
name
Modbus Register
Len
Data Type
Range
Units
Comment
Modicom Format
Hex
V_a
35633-35634
0x1600-
0x1601
DWord
Float Volt
For CT_16
I_a
35635-35636
0x1602-
0x1603
DWord
Float Amp
kW_a
35637-35638
0x1604-
0x1605
DWord
Float kW
kvar_a
35639-35640
0x1606-
0x1607
DWord
Float kvar
kVA_a
35641-35642
0x1608-
0x1609
DWord
Float kVA
PF_a
35643-35644
0x160A-
0x160B
DWord
Float
kWh_a
35645-35646
0x160C-
0x160D
DWord
Float
kvarh_a
35647-35648
0x160E-
0x160F
DWord
Float
kVAh_a
35649-35650
0x1610-
0x1611
DWord
Float
V_b
35651-35652
0x1612-
0x1613
DWord
Float Volt
For CT_17
I_b
35653-35654
0x1614-
0x1615
DWord
Float Amp
kW_b
35655-35656
0x1616-
0x1617
DWord
Float kW
kvar_b
35657-35658
0x1618-
0x1619
DWord
Float kvar
kVA_b
35659-35660
0x161A-
0x161B
DWord
Float kVA
PF_b
35661-35662
0x161C-
0x161D
DWord
Float
kWh_b
35663-35664
0x161E-
0x161F
DWord
Float
kvarh_b
35665-35666
0x1620-
0x1621
DWord
Float
kVAh_b
35667-35668
0x1622-
0x1623
DWord
Float
V_c
35669-35670
0x1624-0x1625
DWord
Float
Volt
For CT_18
I_c
35671-35672
0x1626-0x1627
DWord
Float
Amp
kW_c
35673-35674
0x1628-0x1629
DWord
Float
kW
kvar_c
35675-35676
0x162A-0x162B
DWord
Float
kvar
kVA_c
35677-35678
0x162C-0x162D
DWord
Float
kVA
PF_c
35679-35680
0x162E-0x162F
DWord
Float
kWh_c
35681-35682
0x1630-0x1631
DWord
Float
kvarh_c
35683-35684
0x1632-0x1633
DWord
Float
kVAh_c
35685-35686
0x1634-0x1635
DWord
Float
V_avg
35687-35688
0x1636-0x1637
DWord
Float
Volt
I_avg
35689-35690
0x1638-0x1639
DWord
Float
Amp
kW_tot
35691-35692
0x163A-0x163B
DWord
Float
kW
kvar_tot
35693-35694
0x163C-0x163D
DWord
Float
kvar
kVA_tot
35695-35696
0x163E-0x163F
DWord
Float
kVA
Modbus Module #9 - Input Register :Power value (Float) for Submeter6
PM-4324 User’s Manual v1.03 Last Revised: Feb. 2021 Page: 38
Copyright © ICP DAS Co., Ltd. All Rights Reserved. www.icpdas.com E-mail: service@icpdas.com

PF_tot
35697-35698
0x1640-0x1641
DWord
Float
kWh_tot
35699-35700
0x1642-0x1643
DWord
Float
kvarh_tot
35701-35702
0x1644-0x1645
DWord
Float
kVAh_tot
35703-35704
0x1646-0x1647
DWord
Float
Freq_a
35705-35706
0x1648-0x1649
DWord
Float
45~65
Hz
For CT_16
Freq_b
35707-35708
0x164A-0x164B
DWord
Float
45~65
Hz
For CT_17
Freq_c
35709-35710
0x164C-0x164D
DWord
Float
45~65
Hz
For CT_18
Freq_max
35711-35712
0x164E-0x164F
DWord
Float
45~65
Hz
VTHD
35739-35740
0x166A-0x166B
DWord
Float
0~4
Phase set by
Harmonic Phase
Select 6 Register
ITHD
35741-35742
0x166C-0x166D
DWord
Float
0~4
Bi_Positive
_kWh
35743-35744
0x166E-0x166F
DWord
Float
Bi_Negative
_kWh
35745-35746
0x1670-0x1671
DWord
Float
Bi_Net
_kWh
35747-35748
0x1672-0x1673
DWord
Float
Bi_Total
_kWh
35749-35750
0x1674-0x1675
DWord
Float
Note:
The definition of bi-direction energy registers :
Bi_Positive_kWh: = Sum( absolute( all channel's positive kWh in every sec.))
Bi_Negative_kWh: = Sum( absolute( all channel's negative kWh in every sec.))
Bi_Net_kWh: = Sum( all channel's kWh in every sec. )
Bi_Total_kWh: = Sum( absolute( all channels kWh in every sec. ))
PM-4324 User’s Manual v1.03 Last Revised: Feb. 2021 Page: 39
Copyright © ICP DAS Co., Ltd. All Rights Reserved. www.icpdas.com E-mail: service@icpdas.com

Parameter
name
Modbus Register
Len
Data Type
Range
Units
Comment
Modicom Format
Hex
V_a
35889-35890
0x1700-
0x1701
DWord
Float Volt
For CT_19
I_a
35891-35892
0x1702-
0x1703
DWord
Float Amp
kW_a
35893-35894
0x1704-
0x1705
DWord
Float kW
kvar_a
35895-35896
0x1706-
0x1707
DWord
Float kvar
kVA_a
35897-35898
0x1708-
0x1709
DWord
Float kVA
PF_a
35899-35900
0x170A-
0x170B
DWord
Float
kWh_a
35901-35902
0x170C-
0x170D
DWord
Float
kvarh_a
35903-35904
0x170E-
0x170F
DWord
Float
kVAh_a
35905-35906
0x1710-
0x1711
DWord
Float
V_b
35907-35908
0x1712-
0x1713
DWord
Float Volt
For CT_20
I_b
35909-35910
0x1714-
0x1715
DWord
Float Amp
kW_b
35911-35912
0x1716-
0x1717
DWord
Float kW
kvar_b
35913-35914
0x1718-
0x1719
DWord
Float kvar
kVA_b
35915-35916
0x171A-
0x171B
DWord
Float kVA
PF_b
35917-35918
0x171C-
0x171D
DWord
Float
kWh_b
35919-35920
0x171E-
0x171F
DWord
Float
kvarh_b
35921-35922
0x1720-
0x1721
DWord
Float
kVAh_b
35923-35924
0x1722-
0x1723
DWord
Float
V_c
35925-35926
0x1724-0x1725
DWord
Float
Volt
For CT_21
I_c
35927-35928
0x1726-0x1727
DWord
Float
Amp
kW_c
35929-35930
0x1728-0x1729
DWord
Float
kW
kvar_c
35931-35932
0x172A-0x172B
DWord
Float
kvar
kVA_c
35933-35934
0x172C-0x172D
DWord
Float
kVA
PF_c
35935-35936
0x172E-0x172F
DWord
Float
kWh_c
35937-35938
0x1730-0x1731
DWord
Float
kvarh_c
35939-35940
0x1732-0x1733
DWord
Float
kVAh_c
35941-35942
0x1734-0x1735
DWord
Float
V_avg
35943-35944
0x1736-0x1737
DWord
Float
Volt
I_avg
35945-35946
0x1738-0x1739
DWord
Float
Amp
kW_tot
35947-35948
0x173A-0x173B
DWord
Float
kW
kvar_tot
35949-35950
0x173C-0x173D
DWord
Float
kvar
kVA_tot
35951-35952
0x173E-0x173F
DWord
Float
kVA
Modbus Module #10 - Input Register :Power value (Float) for Submeter7
PM-4324 User’s Manual v1.03 Last Revised: Feb. 2021 Page: 40
Copyright © ICP DAS Co., Ltd. All Rights Reserved. www.icpdas.com E-mail: service@icpdas.com

PF_tot
35953-35954
0x1740-0x1741
DWord
Float
kWh_tot
35955-35956
0x1742-0x1743
DWord
Float
kvarh_tot
35957-35958
0x1744-0x1745
DWord
Float
kVAh_tot
35959-35960
0x1746-0x1747
DWord
Float
Freq_a
35961-35962
0x1748-0x1749
DWord
Float
45~65
Hz
For CT_19
Freq_b
35963-35964
0x174A-0x174B
DWord
Float
45~65
Hz
For CT_20
Freq_c
35965-35966
0x174C-0x174D
DWord
Float
45~65
Hz
For CT_21
Freq_max
35967-35968
0x174E-0x174F
DWord
Float
45~65
Hz
VTHD
35995-35996
0x176A-0x176B
DWord
Float
0~4
Phase set by
Harmonic Phase
Select 7 Register
ITHD
35997-35998
0x176C-0x176D
DWord
Float
0~4
Bi_Positive
_kWh
35999-36000
0x176E-0x176F
DWord
Float
Bi_Negative
_kWh
36001-36002
0x1770-0x1771
DWord
Float
Bi_Net
_kWh
36003-36004
0x1772-0x1773
DWord
Float
Bi_Total
_kWh
36005-36006
0x1774-0x1775
DWord
Float
Note:
The definition of bi-direction energy registers :
Bi_Positive_kWh: = Sum( absolute( all channel's positive kWh in every sec.))
Bi_Negative_kWh: = Sum( absolute( all channel's negative kWh in every sec.))
Bi_Net_kWh: = Sum( all channel's kWh in every sec. )
Bi_Total_kWh: = Sum( absolute( all channels kWh in every sec. ))
PM-4324 User’s Manual v1.03 Last Revised: Feb. 2021 Page: 41
Copyright © ICP DAS Co., Ltd. All Rights Reserved. www.icpdas.com E-mail: service@icpdas.com

Parameter
name
Modbus Register
Len
Data Type
Range
Units
Comment
Modicom Format
Hex
V_a
36145-36146
0x1800-
0x1801
DWord
Float Volt
For CT_22
I_a
36147-36148
0x1802-
0x1803
DWord
Float Amp
kW_a
36149-36150
0x1804-
0x1805
DWord
Float kW
kvar_a
36151-36152
0x1806-
0x1807
DWord
Float kvar
kVA_a
36153-36154
0x1808-
0x1809
DWord
Float kVA
PF_a
36155-36156
0x180A-
0x180B
DWord
Float
kWh_a
36157-36158
0x180C-
0x180D
DWord
Float
kvarh_a
36159-36160
0x180E-
0x180F
DWord
Float
kVAh_a
36161-36162
0x1810-
0x1811
DWord
Float
V_b
36163-36164
0x1812-
0x1813
DWord
Float Volt
For CT_23
I_b
36165-36166
0x1814-
0x1815
DWord
Float Amp
kW_b
36167-36168
0x1816-
0x1817
DWord
Float kW
kvar_b
36169-36170
0x1818-
0x1819
DWord
Float kvar
kVA_b
36171-36172
0x181A-
0x181B
DWord
Float kVA
PF_b
36173-36174
0x181C-
0x181D
DWord
Float
kWh_b
36175-36176
0x181E-
0x181F
DWord
Float
kvarh_b
36177-36178
0x1820-
0x1821
DWord
Float
kVAh_b
36179-36180
0x1822-
0x1823
DWord
Float
V_c
36181-36182
0x1824-0x1825
DWord
Float
Volt
For CT_24
I_c
36183-36184
0x1826-0x1827
DWord
Float
Amp
kW_c
36185-36186
0x1828-0x1829
DWord
Float
kW
kvar_c
36187-36188
0x182A-0x182B
DWord
Float
kvar
kVA_c
36189-36190
0x182C-0x182D
DWord
Float
kVA
PF_c
36191-36192
0x182E-0x182F
DWord
Float
kWh_c
36193-36194
0x1830-0x1831
DWord
Float
kvarh_c
36195-36196
0x1832-0x1833
DWord
Float
kVAh_c
36197-36198
0x1834-0x1835
DWord
Float
V_avg
36199-36200
0x1836-0x1837
DWord
Float
Volt
I_avg
36201-36202
0x1838-0x1839
DWord
Float
Amp
kW_tot
36203-36204
0x183A-0x183B
DWord
Float
kW
kvar_tot
36205-36206
0x183C-0x183D
DWord
Float
kvar
kVA_tot
36207-36208
0x183E-0x183F
DWord
Float
kVA
Modbus Module #11 - Input Register :Power value (Float) for Submeter8
PM-4324 User’s Manual v1.03 Last Revised: Feb. 2021 Page: 42
Copyright © ICP DAS Co., Ltd. All Rights Reserved. www.icpdas.com E-mail: service@icpdas.com

PF_tot
36209-36210
0x1840-0x1841
DWord
Float
kWh_tot
36211-36212
0x1842-0x1843
DWord
Float
kvarh_tot
36213-36214
0x1844-0x1845
DWord
Float
kVAh_tot
36215-36216
0x1846-0x1847
DWord
Float
Freq_a
36217-36218
0x1848-0x1849
DWord
Float
45~65
Hz
For CT_22
Freq_b
36219-36220
0x184A-0x184B
DWord
Float
45~65
Hz
For CT_23
Freq_c
36221-36222
0x184C-0x184D
DWord
Float
45~65
Hz
For CT_24
Freq_max
36223-36224
0x184E-0x184F
DWord
Float
45~65
Hz
VTHD
36251-36252
0x186A-0x186B
DWord
Float
0~4
Phase set by
Harmonic Phase
Select 8 Register
ITHD
36253-36254
0x186C-0x186D
DWord
Float
0~4
Bi_Positive
_kWh
36255-36256
0x186E-0x186F
DWord
Float
Bi_Negative
_kWh
36257-36258
0x1870-0x1871
DWord
Float
Bi_Net
_kWh
36259-36260
0x1872-0x1873
DWord
Float
Bi_Total
_kWh
36261-36262
0x1874-0x1875
DWord
Float
Note:
The definition of bi-direction energy registers :
Bi_Positive_kWh: = Sum( absolute( all channel's positive kWh in every sec.))
Bi_Negative_kWh: = Sum( absolute( all channel's negative kWh in every sec.))
Bi_Net_kWh: = Sum( all channel's kWh in every sec. )
Bi_Total_kWh: = Sum( absolute( all channels kWh in every sec. ))
PM-4324 User’s Manual v1.03 Last Revised: Feb. 2021 Page: 43
Copyright © ICP DAS Co., Ltd. All Rights Reserved. www.icpdas.com E-mail: service@icpdas.com

Modbus Address
SW 1
SW 2
SW 3
SW 4
SW 5
SW 6
1
OFF
OFF
OFF
OFF
OFF
OFF
2
ON
OFF
OFF
OFF
OFF
OFF
3
OFF
ON
OFF
OFF
OFF
OFF
4
ON
ON
OFF
OFF
OFF
OFF
5
OFF
OFF
ON
OFF
OFF
OFF
6
ON
OFF
ON
OFF
OFF
OFF
7
OFF
ON
ON
OFF
OFF
OFF
8
ON
ON
ON
OFF
OFF
OFF
9
OFF
OFF
OFF
ON
OFF
OFF
10
ON
OFF
OFF
ON
OFF
OFF
11
OFF
ON
OFF
ON
OFF
OFF
12
ON
ON
OFF
ON
OFF
OFF
13
OFF
OFF
ON
ON
OFF
OFF
14
ON
OFF
ON
ON
OFF
OFF
15
OFF
ON
ON
ON
OFF
OFF
16
ON
ON
ON
ON
OFF
OFF
17
OFF
OFF
OFF
OFF
ON
OFF
18
ON
OFF
OFF
OFF
ON
OFF
19
OFF
ON
OFF
OFF
ON
OFF
20
ON
ON
OFF
OFF
ON
OFF
21
OFF
OFF
ON
OFF
ON
OFF
22
ON
OFF
ON
OFF
ON
OFF
23
OFF
ON
ON
OFF
ON
OFF
24
ON
ON
ON
OFF
ON
OFF
25
OFF
OFF
OFF
ON
ON
OFF
26
ON
OFF
OFF
ON
ON
OFF
27
OFF
ON
OFF
ON
ON
OFF
28
ON
ON
OFF
ON
ON
OFF
29
OFF
OFF
ON
ON
ON
OFF
Chapter 7 CANopen communication
7.1 CANopen setting
Default setting for CANopen: Baud rate:125 K b.p.s. , Node ID:1
DIP switch (SW1-SW6) is used for Node ID setting, default is 1, i.e. all OFF
For example: Node ID is 10,find the table of DIP switch 1-6 is
ON, OFF, OFF, ON, OFF, OFF
SW1-SW6 setting
Setting CANopen Node ID for communication (1-64)
PM-4324 User’s Manual v1.03 Last Revised: Feb. 2021 Page: 44
Copyright © ICP DAS Co., Ltd. All Rights Reserved. www.icpdas.com E-mail: service@icpdas.com

30
ON
OFF
ON
ON
ON
OFF
31
OFF
ON
ON
ON
ON
OFF
32
ON
ON
ON
ON
ON
OFF
33
OFF
OFF
OFF
OFF
OFF
ON
34
ON
OFF
OFF
OFF
OFF
ON
35
OFF
ON
OFF
OFF
OFF
ON
36
ON
ON
OFF
OFF
OFF
ON
37
OFF
OFF
ON
OFF
OFF
ON
38
ON
OFF
ON
OFF
OFF
ON
39
OFF
ON
ON
OFF
OFF
ON
40
ON
ON
ON
OFF
OFF
ON
41
OFF
OFF
OFF
ON
OFF
ON
42
ON
OFF
OFF
ON
OFF
ON
43
OFF
ON
OFF
ON
OFF
ON
44
ON
ON
OFF
ON
OFF
ON
45
OFF
OFF
ON
ON
OFF
ON
46
ON
OFF
ON
ON
OFF
ON
47
OFF
ON
ON
ON
OFF
ON
48
ON
ON
ON
ON
OFF
ON
49
OFF
OFF
OFF
OFF
ON
ON
50
ON
OFF
OFF
OFF
ON
ON
51
OFF
ON
OFF
OFF
ON
ON
52
ON
ON
OFF
OFF
ON
ON
53
OFF
OFF
ON
OFF
ON
ON
54
ON
OFF
ON
OFF
ON
ON
55
OFF
ON
ON
OFF
ON
ON
56
ON
ON
ON
OFF
ON
ON
57
OFF
OFF
OFF
ON
ON
ON
58
ON
OFF
OFF
ON
ON
ON
59
OFF
ON
OFF
ON
ON
ON
60
ON
ON
OFF
ON
ON
ON
61
OFF
OFF
ON
ON
ON
ON
62
ON
OFF
ON
ON
ON
ON
63
OFF
ON
ON
ON
ON
ON
64
ON
ON
ON
ON
ON
ON
PM-4324 User’s Manual v1.03 Last Revised: Feb. 2021 Page: 45
Copyright © ICP DAS Co., Ltd. All Rights Reserved. www.icpdas.com E-mail: service@icpdas.com

Baud Rate
SW 7
SW8
125 K bps(Default)
OFF
OFF
250 K bps
ON
OFF
500 K bps
OFF
ON
1M bps
ON
ON
Wiring
SW 9
SW 10
Software setting
OFF
OFF
3P3W-2CT
ON
OFF
3P3W-3CT
OFF
ON
3P4W-3CT
ON
ON
SW7-SW8 setting
PM-4324-CPS:For CANopen Baud Rate Setting
SW9-SW10 setting
PM-4324-CPS:Select the different wiring mode
(Please select the Software setting, if 1P2W-1CT or 1P3W-2CT is used)
7.2 CANopen Protocol
The CANopen is a kind of network protocols evolving from the CAN bus, used on car
control system in early days, and has been greatly used in various applications, such as
vehicles, industrial machines, building automation, medical devices, maritime
applications, restaurant appliances, laboratory equipment & research.
PM-4324 User’s Manual v1.03 Last Revised: Feb. 2021 Page: 46
Copyright © ICP DAS Co., Ltd. All Rights Reserved. www.icpdas.com E-mail: service@icpdas.com

7.2.1 SDO Introduction
7.2.1.1 Upload SDO Protocol
Initiate SDO Upload Protocol
Before transferring the SDO segments, the client and server need to communicate
with each other by using the initiate SDO upload protocol. Via the initiate SDO upload
protocol, the SDO client will inform the SDO server what object the SDO client wants to
request. As well, the initiate SDO upload protocol is permitted to transmit up to four
bytes of data. Therefore, if the data length of the object, which the SDO client can read,
is equal to or less than the permitted data amount, the SDO communication will be
finished only by using the initial SDO upload protocol, i.e. if the data upload is less
enough to be transmitted in the initiate SDO upload protocol, then the upload SDO
segment protocol will not be used. The communication process of this protocol is shown
as follows.
ccs: client command specified
2: initiate upload request
scs: server command specified
2: initiate upload response
n : Only valid if e = 1 and s = 1, otherwise 0.
If valid, it indicates the number of bytes in d that do not contain data. Bytes [8-n, 7]
do not contain segment data.
e: transfer type
PM-4324 User’s Manual v1.03 Last Revised: Feb. 2021 Page: 47
Copyright © ICP DAS Co., Ltd. All Rights Reserved. www.icpdas.com E-mail: service@icpdas.com

0: normal transfer
1: expedited transfer
If the e=1, it means that the data of the object are equal or less than 4 bytes, and
only initiate SDO upload protocol is needed. If e=0, the upload SDO segment
protocol is necessary.
s: size indicator
0: Data set size is not indicated.
1: Data set size is indicated.
m: multiplexer
It represents the index/sub-index of the data to be transfer by the SDO. The first
two bytes are the index value and the last byte is the sub-index value.
d: data
e=0, s=0: d is reserved for further use.
e=0, s=1: d contains the number of bytes to be uploaded, and byte 4 contains the
least significant bit, and byte 7 contains the most significant bit.
e=1, s=1: d contains the data of length 4-n to be uploaded, the encoding depends
on the type of the data referenced by index and sub-index.
e=1, s=0: d contains unspecified number of bytes to be uploaded.
x: not used, always 0
reserved: reserved for further use , always 0
Upload SDO Segment Protocol
When the upload data length is over 4 bytes, the upload SDO segment protocol will be
needed. After finishing the transmission of the initiate SDO upload protocol, the SDO
client will start to upload the data. The upload SDO segment protocol will comply with
the process shown below.
PM-4324 User’s Manual v1.03 Last Revised: Feb. 2021 Page: 48
Copyright © ICP DAS Co., Ltd. All Rights Reserved. www.icpdas.com E-mail: service@icpdas.com

ccs: client command specified
3: upload segment request
scs: server command specified
0: upload segment response
t: toggle bit.
This bit must alternate for each subsequence segment that is uploaded. The first
segment will have the toggle bit set to 0. The toggle bit will be equal for the
request and response message.
c : indicates whether where are still more segments to be uploaded
0: more segments to be uploaded.
1: no more segment to be uploaded.
seg-data: It is at most 7 bytes of segment data to be uploaded.
The encoding depends on the type of the data referenced by index and sub-index.
n: It indicates the number of bytes in seg-data that do not contain segment data.
Bytes [8-n, 7] do not contain segment data. n = 0 if no segment size is indicated.
x: not used, always 0
reserved: reserved for further use , always 0
7.2.1.2 Download SDO Protocol
Initiate SDO Download Protocol
The download modes are similar to the upload modes, but different in some
parameters of the SDO messages. They are also separated into two steps. If the
download data length is less than 4 bytes, the download action will finish in the
download initialization protocol. Otherwise, the download segment protocol will be
needed. These two protocols are shown below.
PM-4324 User’s Manual v1.03 Last Revised: Feb. 2021 Page: 49
Copyright © ICP DAS Co., Ltd. All Rights Reserved. www.icpdas.com E-mail: service@icpdas.com

ccs: client command specified
1: initiate download request
scs: server command specified
3: initiate download response
n: Only valid if e = 1 and s = 1, otherwise 0.
If valid, it indicates the number of bytes in d that do not contain data. Bytes [8-n, 7]
do not contain segment data.
e: transfer type
0: normal transfer
1: expedited transfer
If the e=1, it means that the data of the object are equal or less than 4 bytes, and
only initiate SDO download protocol is needed. If e=0, the download SDO segment
protocol is necessary.
s: size indicator
0: Data set size is not indicated.
1: Data set size is indicated.
m: multiplexer
It represents the index/sub-index of the data to be transfer by the SDO. The first
two bytes are the index value and the last byte is the sub-index value.
d: data
e=0, s=0: d is reserved for further use.
e=0, s=1: d contains the number of bytes to be downloaded, and byte 4 contains
the least significant bit, and byte 7 contains the most significant bit.
e=1, s=1: d contains the data of length 4-n to be downloaded, the encoding
depends on the type of the data referenced by index and sub-index.
e=1, s=0: d contains unspecified number of bytes to be downloaded.
x: not used, always 0
reserved: reserved for further use , always 0
PM-4324 User’s Manual v1.03 Last Revised: Feb. 2021 Page: 50
Copyright © ICP DAS Co., Ltd. All Rights Reserved. www.icpdas.com E-mail: service@icpdas.com

Download Segment Protocol
ccs: client command specified
0: download segment request
scs: server command specified
1: download segment response
seg-data: It is at most 7 bytes of segment data to be downloaded.
The encoding depends on the type of the data referenced by index and sub-index.
n: It indicates the number of bytes in seg-data that do not contain segment data.
Bytes [8-n, 7] do not contain segment data. n = 0 if no segment size is indicated.
c: It indicates whether there are still more segments to be downloaded.
0:more segments to be downloaded.
1:no more segments to be downloaded.
t: toggle bit
This bit must alternate for each subsequent segment that is downloaded. The first
segment will have the toggle-bit set to 0.The toggle bit will be equal for the request
and the response message.
x: not used, always 0
reserved: reserved for further use , always 0
PM-4324 User’s Manual v1.03 Last Revised: Feb. 2021 Page: 51
Copyright © ICP DAS Co., Ltd. All Rights Reserved. www.icpdas.com E-mail: service@icpdas.com

7.2.1.3 Abort SDO Transfer Protocol
In some conditions, the SDO client or SDO server will terminate the SDO
transmission. For example, the value of entries that users want to modify does not exist
or is read-only, even users wouldn’t continue the uncompleted SDO protocol under
some special situations. When these conditions occur, both the client and the server
can be activated to send the Abort SDO Transfer message. The Abort SDO Transfer
protocol is shown below.
cs: command specified
4: abort transfer request
x: not used, always 0
m: multiplexer
It represents index and sub-index of the SDO
d: contains a 4-byte “Abort Code” about the reason for the abort.
PM-4324 User’s Manual v1.03 Last Revised: Feb. 2021 Page: 52
Copyright © ICP DAS Co., Ltd. All Rights Reserved. www.icpdas.com E-mail: service@icpdas.com

Abort Code
Description
0503 0000h
Toggle bit not alternated.
0504 0000h
SDO protocol timed out.
0504 0001h
Client/server command specified not valid or unknown.
0504 0002h
Invalid block size (block mode only).
0504 0003h
Invalid sequence number (block mode only).
0504 0004h
CRC error (block mode only).
0504 0005h
Out of memory.
0601 0000h
Unsupported access to an object.
0601 0001h
Attempt to read a write only object.
0601 0002h
Attempt to write a read only object.
0602 0000h
Object does not exist in the object dictionary.
0604 0041h
Object cannot be mapped to the PDO.
0604 0042h
The number and length of the objects to be mapped would exceed
PDO length.
0604 0043h
General parameter incompatibility reason.
0604 0047h
General internal incompatibility in the device.
0606 0000h
Access failed due to an hardware error.
0607 0010h
Data type does not match, length of service parameter does not
match
0607 0012h
Data type does not match, length of service parameter too high
0607 0013h
Data type does not match, length of service parameter too low
0609 0011h
Sub-index does not exist.
0609 0030h
Value range of parameter exceeded (only for write access).
0609 0031h
Value of parameter written too high.
0609 0032h
Value of parameter written too low.
0609 0036h
Maximum value is less than minimum value.
0800 0000h
General error.
0800 0020h
Data cannot be transferred or stored to the application.
0800 0021h
Data cannot be transferred or stored to the application because of
local control.
0800 0022h
Data cannot be transferred or stored to the application because of
the present device state.
0800 0023h
Object dictionary dynamic generation fails or no object dictionary
is present (e.g. object dictionary is generated from file and
PM-4324 User’s Manual v1.03 Last Revised: Feb. 2021 Page: 53
Copyright © ICP DAS Co., Ltd. All Rights Reserved. www.icpdas.com E-mail: service@icpdas.com

generation fails because of an file error).
PM-4324 User’s Manual v1.03 Last Revised: Feb. 2021 Page: 54
Copyright © ICP DAS Co., Ltd. All Rights Reserved. www.icpdas.com E-mail: service@icpdas.com

Bit Number
Value
Meaning
31(MSB)
0
PDO exits (PDO is valid)
1 PDO does not exist (PDO is not valid)
30 0 RTR allowed on this PDO
1 No RTR allowed on this PDO
29 0 11-bit ID (CAN 2.0A)
1 29-bit ID (CAN 2.0B)
28-11
0
If bit 29=0
X If bit 29=1: 28-11 bits of 29-bit COB-ID
10-0(LSB)
X
10-0 bits of COB-ID
Number of PDO
Default COB-ID
Bit10~Bit7
(Function Code)
Bit6~Bit0
TxPDO1
0011
Node-ID
TxPDO2
0101
Node-ID
TxPDO3
0111
Node-ID
TxPDO4
1001
Node-ID
RxPDO1
0100
Node-ID
RxPDO2
0110
Node-ID
RxPDO3
1000
Node-ID
RxPDO4
1010
Node-ID
7.2.2 PDO Introduction
7.2.2.1 PDO COB-ID Parameters
Before the real-time data are transmitted by the PDO, it is necessary to check the
COB-ID parameter of this PDO in the PDO communication objects. This parameter
setting controls the COB-ID of the PDO communication, which is in 32 bits, and each bit
with its meaning is given in the table follow.
Note: PM-4324-CPS supports CAN 2.0A only.
In the following table, it’s regarding the default PDO COB-ID parameters.
PM-4324 User’s Manual v1.03 Last Revised: Feb. 2021 Page: 55
Copyright © ICP DAS Co., Ltd. All Rights Reserved. www.icpdas.com E-mail: service@icpdas.com

Transmission
Type
PDO Transmission Method
cyclic
acyclic
synchronous
Asynchronous
RTR only
0
O
O
1-240 O O
241-251
----------------------------Reserved-----------------------------------
252
O O
253
O
O
254
O
255
O
Note:
1. Users can also define the PDO COB-ID by themselves. Actually, all COB-ID can be
defined by users except the reserved COB-ID described in the table of the section
3.1. It is important to avoid the conflict with the defined COB-ID used in the same
node.
2. The PDO COB-ID parameters cannot be changed if the PDO is valid (bit 31 =0).
7.2.2.2 Transmission Type
The transmission type is one of the several parameters defined in PDO
communication objects with sub-index 02. Each PDO has its own transmission type.
The transmission type can indicate the transmission or reception character for its
corresponding PDO. The following table describes the relationship between the value of
the transmission type and the PDO character. For example, if users used transmission
type 0 for the first TxPDO, the CANopen device will follow the rule of the acyclic and
synchronous PDO transmission.
Note:
The transmission type 1-240 indicates how many SYNC objects the TxPDO will be
triggered. The RxPDO is always triggered by the following SYNC upon reception of
data independent of the transmission types 0-240.
The transmission type 252 and 253 are only used for TxPDO. The transmission
type 252 means that the data is updated (but not sent) immediately after reception
of the SYNC object. For these two transmission types, the PDO is only transmitted
on remote transmission requests.
For the transmission types 254 and 255, the event timer will be used in the TxPDO.
PM-4324 User’s Manual v1.03 Last Revised: Feb. 2021 Page: 56
Copyright © ICP DAS Co., Ltd. All Rights Reserved. www.icpdas.com E-mail: service@icpdas.com

The PDO, including the DI value, will be sent when the DI value is changed. And
both transmission types will directly trigger an update of the mapped data when
receiving the RxPDO.
7.2.2.3 PDO Communication Rule
The PDO related objects are indicated from index 0x1400 to 0x1BFF. For the
PM-4324-CPS, RxPDO communication objects are not used. The ranges of the TxPDO
communication objects and the mapping objects are from index 0x1800 to index 0x1813
and from index 0x1A00 to index 0x1A27 respectively. Moreover, each PDO
communication object has its own PDO mapping object.
For example, the first TxPDO communication object is stored in the entry with index
0x1800, and the corresponding mapping object is stored in an entry with index 0x1A00.
The object with index 0x1801 and the object with index 0x1A01 are a group, and so on.
Therefore, before users access the practical data via PDO communication, each
parameter for the PDO communications and mapping objects must be controlled.
Besides, only PDO communications can be used in the NMT operational state.
Users can use the NMT module control protocol to change the NMT state of the
PM-4324-CPS. It is described in the section 8.3.3. Besides, during communication via
the PDO messages, the data length of the PDO message must match with the PDO
mapping object. If the data length ‘L’ of the PDO message exceeds the total bytes ‘n’ of
the PDO mapping object entries, only the first 'n' bytes of the PDO message are used by
the PDO consumer. If ‘L’ is less than 'n', the PDO message will not be disposed by the
PDO consumer, and an Emergency message with error code 8210h will be transmitted
to the PDO producer. The PDO communication set is shown as follows.
PM-4324 User’s Manual v1.03 Last Revised: Feb. 2021 Page: 57
Copyright © ICP DAS Co., Ltd. All Rights Reserved. www.icpdas.com E-mail: service@icpdas.com

COB-ID: the default PDO COB-ID, or the PDO COB-ID defined by users
L: the data length about how many bytes the PDO message has
PDO-msg: the real-time data or the data which can be mapped into the PDO mapping
objects
PM-4324 User’s Manual v1.03 Last Revised: Feb. 2021 Page: 58
Copyright © ICP DAS Co., Ltd. All Rights Reserved. www.icpdas.com E-mail: service@icpdas.com

7.2.3 NMT Introduction
7.2.3.1 Module Control Protocol
The NMT communication set can be applied for changing the NMT slave status.
The following figure shows how to change the different NMT statuses for the
PM-4324-CPS.
Start Remote Node Protocol
cs: NMT command specified
1: start
Node ID: the node ID of the NMT slave device
Stop Remote Node Protocol
cs: NMT command specified
2: stop
Node ID: the node ID of the NMT slave device
PM-4324 User’s Manual v1.03 Last Revised: Feb. 2021 Page: 59
Copyright © ICP DAS Co., Ltd. All Rights Reserved. www.icpdas.com E-mail: service@icpdas.com

Enter Pre-Operational Protocol
cs: NMT command specified
128: enter PRE-OPERATIONAL
Node ID: the node ID of the NMT slave device
Reset Node Protocol
cs : NMT command specified
129: Reset_Node
Node ID : the node ID of the NMT slave device
PM-4324 User’s Manual v1.03 Last Revised: Feb. 2021 Page: 60
Copyright © ICP DAS Co., Ltd. All Rights Reserved. www.icpdas.com E-mail: service@icpdas.com

Reset Communication Protocol
cs: NMT command specified
130: Reset_Communication
Node ID: the node ID of the NMT slave device
7.2.3.2 Error Control Protocol
Error Control Protocol is a kind of the solution to check whether the CANopen
device is still alive or not. And its related objects include 0x100C and 0x100D. The
0x100C is the guard time, and the 0x100D is the life time factor. The node life time is the
guard time multiplied by the life time factor. The Node Guarding timer of the
PM-4324-CPS will start to count after receiving the first RTR message for the guarding
identifier. The communication set of the Error Control protocol is displayed below.
t: toggle bit
The value of this bit will be alternatively changed between two consecutive responses
from the NMT slave. After the Node Guarding protocol becomes active, the value of
the toggle-bit of the first response will be 0.
PM-4324 User’s Manual v1.03 Last Revised: Feb. 2021 Page: 61
Copyright © ICP DAS Co., Ltd. All Rights Reserved. www.icpdas.com E-mail: service@icpdas.com

No.(PDO)
COB-ID
Data
Length
D0~D3
D4~D7
1
0x180+Node-ID
8
kW(Kw_a)_CT1
kWh_a_CT1
2
0x280+Node-ID
8
kW(Kw_b)_CT2
kWh_b_CT2
3
0x380+Node-ID
8
kW(Kw_c)_CT3
kWh_c_CT3
4
0x480+Node-ID
8
kW(Kw_tot)_M1
kWh_tot_M1
5
--- 8 kW(Kw_a)_CT4
kWh_a_CT4
6
--- 8 kW(Kw_b)_CT5
kWh_b_CT5
7
--- 8 kW(Kw_c)_CT6
kWh_c_CT6
8
--- 8 kW(Kw_tot)_M2
kWh_tot_M2
9
--- 8 kW(Kw_a)_CT7
kWh_a_CT7
10
--- 8 kW(Kw_b)_CT8
kWh_b_CT8
11
--- 8 kW(Kw_c)_CT9
kWh_c_CT9
12
--- 8 kW(Kw_tot)_M3
kWh_tot_M3
13
--- 8 kW(Kw_a)_CT10
kWh_a_CT10
14
--- 8 kW(Kw_b)_CT11
kWh_b_CT11
15
--- 8 kW(Kw_c)_CT12
kWh_c_CT12
16
--- 8 kW(Kw_tot)_M4
kWh_tot_M4
17
--- 8 kW(Kw_a)_CT13
kWh_a_CT13
18
--- 8 kW(Kw_b)_CT14
kWh_b_CT14
19
--- 8 kW(Kw_c)_CT15
kWh_c_CT15
20
--- 8 kW(Kw_tot)_M5
kWh_tot_M5
s: the state of the NMT Slave
4: STOPPED
5: OPERATIONAL
127: PRE_OPERATIONAL
7.2.4 Special Functions for PM-4324-CPS
7.2.4.1 Power Meter Data Table
The PM-4324-CPS Manufacturer in the Specific Profile Area defines some entries,
which are used for the power meter data. The objects with index 0x3200~0x3203 will
map to the PDOs as below table. The D0 to D7 represent the CANopen message from
Data0 to Data7.
PM-4324 User’s Manual v1.03 Last Revised: Feb. 2021 Page: 62
Copyright © ICP DAS Co., Ltd. All Rights Reserved. www.icpdas.com E-mail: service@icpdas.com

No.(PDO)
COB-ID
Data
Length
D0~D3
D4~D7
21
--- 8 kW(Kw_a)_CT16
kWh_a_CT16
22
--- 8 kW(Kw_b)_CT17
kWh_b_CT17
23
--- 8 kW(Kw_c)_CT18
kWh_c_CT18
24
--- 8 kW(Kw_tot)_M6
kWh_tot_M6
25
--- 8 kW(Kw_a)_CT19
kWh_a_CT19
26
--- 8 kW(Kw_b)_CT20
kWh_b_CT20
27
--- 8 kW(Kw_c)_CT21
kWh_c_CT21
28
--- 8 kW(Kw_tot)_M7
kWh_tot_M7
29
--- 8 kW(Kw_a)_CT22
kWh_a_CT22
30
--- 8 kW(Kw_b)_CT23
kWh_b_CT23
31
--- 8 kW(Kw_c)_CT24
kWh_c_CT24
32
--- 8 kW(Kw_tot)_M8
kWh_tot_M8
33
--- 8 Volt(V_a)_CT1
Amp(I_a)_CT1
34
--- 8 Volt(V_b)_CT2
Amp(I_b)_CT2
35
--- 8 Volt(V_c)_CT3
Amp(I_c)_CT3
36
--- 8 Volt(V_avg)_M1
Amp(I_avg)_M2
37
--- 8 Volt(V_a)_CT4
Amp(I_a)_CT4
38
--- 8 Volt(V_b)_CT5
Amp(I_b)_CT5
39
--- 8 Volt(V_c)_CT6
Amp(I_c)_CT6
40
--- 8 Volt(V_avg)_M2
Amp(I_avg)_M2
PM-4324 User’s Manual v1.03 Last Revised: Feb. 2021 Page: 63
Copyright © ICP DAS Co., Ltd. All Rights Reserved. www.icpdas.com E-mail: service@icpdas.com

Idx
Sidx
Description
Type
Attr
Default
1000h
0h
device type
UNSIGNED 32
RO
---
1001h
0h
error register
UNSIGNED 8
RO
---
1003h
0h
largest sub-index supported for
“predefine error field”
UNSIGNED 8
RO
0h
1h
actual error (the newest one)
UNSIGNED 32
RO
--- … … … … --- 5h
actual error (the oldest one)
UNSIGNED 32
RO
---
1005h
0h
COB-ID of Sync message
UNSIGNED 32
RW
80h
1008h
0h
manufacturer device name
VISIBLE_STRING
RO
1009h
0h
manufacturer hardware version
VISIBLE_STRING
RO
---
100Ah
0h
manufacturer software version
VISIBLE_STRING
RO
---
100Ch
0h
guard time
UNSIGNED 16
RW
0
100Dh
0h
life time factor
UNSIGNED 8
RW
0
1014h
0h
COB-ID of EMCY
UNSIGNED 32
RW
80h+Node-ID
1015h
0h
Inhibit time of EMCY
UNSIGNED 16
RW
0
1018h
0h
largest sub-index supported for
“identity object”
UNSIGNED 8
RO
1
1h
vender ID
UNSIGNED 32
RO
---
7.2.5 Object Dictionary of PM-4324-CPS
7.2.5.1 Communication Profile Area
The following tables are regarding each entry of the communication profile area is
defined in PM-4324-CPS. For the convenient purpose, all communication entries are
divided into several tables. They are “General Communication Entries”, “TxPDO
Communication Entries”, and “TxPDO Mapping Communication Entries”.
Please note that in the table header with “Idx”, “Sidx” and “Attr” represent “index”,
“sub-index”, and “attribute” respectively. The sign “---” in the default field means that the
default is not defined or can be defined conditionally by the firmware built in
PM-4324-CPS. In the table, the number accompanying letter “h” indicates that this value
is in the hex format.
General Communication Entries
PM-4324 User’s Manual v1.03 Last Revised: Feb. 2021 Page: 64
Copyright © ICP DAS Co., Ltd. All Rights Reserved. www.icpdas.com E-mail: service@icpdas.com

Idx
Sidx
Description
Type
Attr
Default
1200h
0h
largest sub-index supported
for “server SDO parameter”
UNSIGNED 8
RO
2 1h
COB-ID form client to server
(RxSDO)
UNSIGNED 32
RO
600h+Node-ID
2h
COB-ID form server to clien
t(TxSDO)
UNSIGNED 32
RO
580h+Node-ID
Idx
Sidx
Description
Type
Attr
Default
1800h
0
largest sub-index supported
for “receive PDO parameter”
UNSIGNED 8
RO
5
1 COB-ID used by PDO (Tx)
UNSIGNED 32
RW
180h+Node-ID
2 transmission type
UNSIGNED 8
RW
FFh
3 inhibit time
UNSIGNED 16
RW
0 4
Reversed
… … … 5
event timer
UNSIGNED 16
RW
0
1801h
0
largest sub-index supported
for “receive PDO parameter”
UNSIGNED 8
RO
5
1 COB-ID used by PDO (Tx)
UNSIGNED 32
RW
280h+Node-ID
2 transmission type
UNSIGNED 8
RW
FFh
3 inhibit time
UNSIGNED 16
RW
0 4
Reversed
… … … 5
event timer
UNSIGNED 16
RW
0
1802h
0
largest sub-index supported
for “receive PDO parameter”
UNSIGNED 8
RO
5
1 COB-ID used by PDO (Tx)
UNSIGNED 32
RW
380h+Node-ID
2 transmission type
UNSIGNED 8
RW
FFh
3 inhibit time
UNSIGNED 16
RW
0 4
Reversed
… … … 5
event timer
UNSIGNED 16
RW
0
1803h
0
largest sub-index supported
for “receive PDO parameter”
UNSIGNED 8
RO
5
1 COB-ID used by PDO (Tx)
UNSIGNED 32
RW
480h+Node-ID
2 transmission type
UNSIGNED 8
RW
FFh
SDO Communication Entries
TxPDO Communication Entries
PM-4324 User’s Manual v1.03 Last Revised: Feb. 2021 Page: 65
Copyright © ICP DAS Co., Ltd. All Rights Reserved. www.icpdas.com E-mail: service@icpdas.com

3 inhibit time
UNSIGNED 16
RW
0 4
Reversed
… … … 5
event timer
UNSIGNED 16
RW
0
1804h
0
largest sub-index supported
for “receive PDO parameter”
UNSIGNED 8
RO
5
1 COB-ID used by PDO (Tx)
UNSIGNED 32
RW
80000000h
2 transmission type
UNSIGNED 8
RW
FFh
3 inhibit time
UNSIGNED 16
RW
0 4
Reversed
… … … 5
event timer
UNSIGNED 16
RW
0 … … … … … …
1827h
0
largest sub-index supported
for “receive PDO parameter”
UNSIGNED 8
RO
5
1 COB-ID used by PDO (Tx)
UNSIGNED 32
RW
80000000h
2 transmission type
UNSIGNED 8
RW
FFh
3 inhibit time
UNSIGNED 16
RW
0 4
Reversed
… … … 5
event timer
UNSIGNED 16
RW
0
Idx
Sidx
Description
Type
Attr
Default
1A00h
0
largest sub-index
UNSIGNED 8
RO
2 1
read Kw_a CT1
INTEGER 32
RW
3200 0120h
2 read kWh_a CT1
INTEGER 32
RW
3201 0120h
1A01h
0
largest sub-index
UNSIGNED 8
RO
2 1
read Kw_b CT2
INTEGER 32
RW
3200 0220h
2 read kWh_b CT2
INTEGER 32
RW
3201 0220h
1A02h
0
largest sub-index
UNSIGNED 8
RO
2 1
read Kw_c CT3
INTEGER 32
RW
3200 0320h
2 read kWh_c CT3
INTEGER 32
RW
3201 0320h
1A03h
0
largest sub-index
UNSIGNED 8
RO
2 1
read Kw_tot Meter1
INTEGER 32
RW
3200 0420h
2 read kWh_tot Meter1
INTEGER 32
RW
3201 0420h
1A04h
0
largest sub-index
UNSIGNED 8
RO
2 1
read Kw_a CT4
INTEGER 32
RW
3200 0520h
2 read kWh_a CT4
INTEGER 32
RW
3201 0520h
TxPDO Mapping Communication Entries
PM-4324 User’s Manual v1.03 Last Revised: Feb. 2021 Page: 66
Copyright © ICP DAS Co., Ltd. All Rights Reserved. www.icpdas.com E-mail: service@icpdas.com

1A05h
0
largest sub-index
UNSIGNED 8
RO
2 1
read Kw_b CT5
INTEGER 32
RW
3200 0620h
2 read kWh_b CT5
INTEGER 32
RW
3201 0620h
1A06h
0
largest sub-index”
UNSIGNED 8
RO
2 1
read Kw_c CT6
INTEGER 32
RW
3200 0720h
2 read kWh_c CT6
INTEGER 32
RW
3201 0720h
1A07h
0
largest sub-index
UNSIGNED 8
RO
2 1
read Kw_tot Meter2
INTEGER 32
RW
3200 0820h
2 read kWh_tot Meter2
INTEGER 32
RW
3201 0820h
1A08h
0
largest sub-index
UNSIGNED 8
RO
2 1
read Kw_a CT7
INTEGER 32
RW
3200 0920h
2 read kWh_a CT7
INTEGER 32
RW
3201 0920h
1A09h
0
largest sub-index
UNSIGNED 8
RO
2 1
read Kw_b CT8
INTEGER 32
RW
3200 0A20h
2 read kWh_b CT8
INTEGER 32
RW
3201 0A20h
1A0Ah
0
largest sub-index
UNSIGNED 8
RO
2 1
read Kw_c CT9
INTEGER 32
RW
3200 0B20h
2 read kWh_c CT9
INTEGER 32
RW
3201 0B20h
1A0Bh
0
largest sub-index
UNSIGNED 8
RO
2 1
read Kw_tot Meter3
INTEGER 32
RW
3200 0C20h
2 read kWh_tot Meter3
INTEGER 32
RW
3201 0C20h
1A0Ch
0
largest sub-index
UNSIGNED 8
RO
2 1
read Kw_a CT10
INTEGER 32
RW
3200 0D20h
2 read kWh_a CT10
INTEGER 32
RW
3201 0D20h
1A0Dh
0
largest sub-index
UNSIGNED 8
RO
2 1
read Kw_b CT11
INTEGER 32
RW
3200 0E20h
2 read kWh_b CT11
INTEGER 32
RW
3201 0E20h
1A0Eh
0
largest sub-index
UNSIGNED 8
RO
2 1
read Kw_c CT12
INTEGER 32
RW
3200 0F20h
2 read kWh_c CT12
INTEGER 32
RW
3201 0F20h
1A0Fh
0
largest sub-index
UNSIGNED 8
RO
2 1
read Kw_tot Meter4
INTEGER 32
RW
3200 1020h
2 read kWh_tot Meter4
INTEGER 32
RW
3201 1020h
1A10h
0
largest sub-index
UNSIGNED 8
RO
2 1
read Kw_a CT13
INTEGER 32
RW
3200 1120h
2 read kWh_a CT13
INTEGER 32
RW
3201 1120h
PM-4324 User’s Manual v1.03 Last Revised: Feb. 2021 Page: 67
Copyright © ICP DAS Co., Ltd. All Rights Reserved. www.icpdas.com E-mail: service@icpdas.com

1A11h
0
largest sub-index
UNSIGNED 8
RO
2
1 read Kw_b CT14
INTEGER 32
RW
3200 1220h
2 read kWh_b CT14
INTEGER 32
RW
3201 1220h
1A12h
0
largest sub-index
UNSIGNED 8
RO
2
1 read Kw_c CT15
INTEGER 32
RW
3200 1320h
2 read kWh_c CT15
INTEGER 32
RW
3201 1320h
1A13h
0
largest sub-index
UNSIGNED 8
RO
2
1 read Kw_tot Meter5
INTEGER 32
RW
3200 1420h
2 read kWh_tot Meter5
INTEGER 32
RW
3201 1420h
1A14h
0
largest sub-index
UNSIGNED 8
RO
2
1 read Kw_a CT16
INTEGER 32
RW
3200 1520h
2 read kWh_a CT16
INTEGER 32
RW
3201 1520h
1A15h
0
largest sub-index
UNSIGNED 8
RO
2
1 read Kw_b CT17
INTEGER 32
RW
3200 1620h
2 read kWh_b CT17
INTEGER 32
RW
3201 1620h
1A16h
0
largest sub-index
UNSIGNED 8
RO
2
1 read Kw_c CT18
INTEGER 32
RW
3200 1720h
2 read kWh_c CT18
INTEGER 32
RW
3201 1720h
1A17h
0
largest sub-index
UNSIGNED 8
RO
2
1 read Kw_tot Meter6
INTEGER 32
RW
3200 1820h
2 read kWh_tot Meter6
INTEGER 32
RW
3201 1820h
1A18h
0
largest sub-index
UNSIGNED 8
RO
2
1 read Kw_a CT19
INTEGER 32
RW
3200 1920h
2 read kWh_a CT19
INTEGER 32
RW
3201 1920h
1A19h
0
largest sub-index
UNSIGNED 8
RO
2
1 read Kw_b CT20
INTEGER 32
RW
3200 1A20h
2 read kWh_b CT20
INTEGER 32
RW
3201 1A20h
1A1Ah
0
largest sub-index
UNSIGNED 8
RO
2
1 read Kw_c CT21
INTEGER 32
RW
3200 1B20h
2 read kWh_c CT21
INTEGER 32
RW
3201 1B20h
1A1Bh
0
largest sub-index
UNSIGNED 8
RO
2
1 read Kw_tot Meter7
INTEGER 32
RW
3200 1C20h
2 read kWh_tot Meter7
INTEGER 32
RW
3201 1C20h
PM-4324 User’s Manual v1.03 Last Revised: Feb. 2021 Page: 68
Copyright © ICP DAS Co., Ltd. All Rights Reserved. www.icpdas.com E-mail: service@icpdas.com

1A1Ch
0
largest sub-index
UNSIGNED 8
RO
2 1
read Kw_a CT22
INTEGER 32
RW
3200 1D20h
2 read kWh_a CT22
INTEGER 32
RW
3201 1D20h
1A1Dh
0
largest sub-index
UNSIGNED 8
RO
2 1
read Kw_b CT23
INTEGER 32
RW
3200 1E20h
2 read kWh_b CT23
INTEGER 32
RW
3201 1E20h
1A1Eh
0
largest sub-index
UNSIGNED 8
RO
2
1 read Kw_c CT24
INTEGER 32
RW
3200 1F20h
2 read kWh_c CT24
INTEGER 32
RW
3201 1F20h
1A1Fh
0
largest sub-index
UNSIGNED 8
RO
2 1
read Kw_tot Meter8
INTEGER 32
RW
3200 2020h
2 read kWh_tot Meter8
INTEGER 32
RW
3201 2020h
1A20h
0
largest sub-index
UNSIGNED 8
RO
2 1
read V_a CT1
INTEGER 32
RW
3202 0120h
2 read I_a CT1
INTEGER 32
RW
3203 0120h
1A21h
0
largest sub-index
UNSIGNED 8
RO
2 1
read V_b CT2
INTEGER 32
RW
3202 0220h
2 read I_b CT2
INTEGER 32
RW
3203 0220h
1A22h
0
largest sub-index
UNSIGNED 8
RO
2 1
read V_c CT3
INTEGER 32
RW
3202 0320h
2 read I_c CT3
INTEGER 32
RW
3203 0320h
1A23h
0
largest sub-index
UNSIGNED 8
RO
2 1
read V_avg Meter1
INTEGER 32
RW
3202 0420h
2 read I_avg Meter1
INTEGER 32
RW
3203 0420h
1A24h
0
largest sub-index
UNSIGNED 8
RO
2 1
read V_a CT4
INTEGER 32
RW
3202 0520h
2 read I_a CT4
INTEGER 32
RW
3203 0520h
1A25h
0
largest sub-index
UNSIGNED 8
RO
2 1
read V_b CT5
INTEGER 32
RW
3202 0620h
2 read I_b CT5
INTEGER 32
RW
3203 0620h
1A26h
0
largest sub-index
UNSIGNED 8
RO
2 1
read V_c CT6
INTEGER 32
RW
3202 0720h
2 read I_c CT6
INTEGER 32
RW
3203 0720h
PM-4324 User’s Manual v1.03 Last Revised: Feb. 2021 Page: 69
Copyright © ICP DAS Co., Ltd. All Rights Reserved. www.icpdas.com E-mail: service@icpdas.com

1A27h
0
largest sub-index
UNSIGNED 8
RO
2 1
read V_avg Meter2
INTEGER 32
RW
3202 0820h
2 read I_avg Meter2
INTEGER 32
RW
3203 0820h
PM-4324 User’s Manual v1.03 Last Revised: Feb. 2021 Page: 70
Copyright © ICP DAS Co., Ltd. All Rights Reserved. www.icpdas.com E-mail: service@icpdas.com

Idx
Sidx
Description
Type
Attr
Default
3200h
0
largest sub-index supported for
“kW”
UNSIGNED 8
RO
32
1 kW(Kw_a) (Meter 1)
INTEGER32
RO
0 2
kW(Kw_b) (Meter 1)
INTEGER32
RO
0
3 kW(Kw_c) (Meter 1)
INTEGER32
RO
0
4 kW(Kw_tot) (Meter 1)
INTEGER32
RO
0 … … … … --- 29
kW(Kw_a) (Meter 8)
INTEGER32
RO
0 30
kW(Kw_b) (Meter 8)
INTEGER32
RO
0 31
kW(Kw_c) (Meter 8)
INTEGER32
RO
0 32
kW(Kw_tot) (Meter 8)
INTEGER32
RO
0
3201h
0
largest sub-index supported for
“kWh”
UNSIGNED 8
RO
32
1 kWh_a (Meter 1)
INTEGER32
RO
0 2
kWh_b (Meter 1)
INTEGER32
RO
0 3
kWh_c (Meter 1)
INTEGER32
RO
0 4
kWh_tot (Meter 1)
INTEGER32
RO
0 … … … … --- 29
kWh_a (Meter 8)
INTEGER32
RO
0 30
kWh_b (Meter 8)
INTEGER32
RO
0 31
kWh_c (Meter 8)
INTEGER32
RO
0 32
kWh_tot (Meter 8)
INTEGER32
RO
0
3202h
0
largest sub-index supported for
UNSIGNED 8
RO
32
7.2.5.2 Manufacturer Specific Profile Area
In the following table, there is information about some special functions for the
PM-4324-CPS. The index from 0x3200 to 0x3209 records the power meter
measurement parameters. The number of these entries will be automatically updated
when the PM-4324-CPS boot up. 0x320A is meter parameters information. 0x320B
stores three meter parameters including Meter Ratio, PT Ratio and RT Ratio. PT Ratio
means potential transformer ratio, the default value is 100 and the unit is 0.1. RT Ratio
means current transformer ratio, the default value is 1 and the unit is 1.
PM-4324 User’s Manual v1.03 Last Revised: Feb. 2021 Page: 71
Copyright © ICP DAS Co., Ltd. All Rights Reserved. www.icpdas.com E-mail: service@icpdas.com

“Volt”
1 Volt(V_a) (Meter 1)
INTEGER32
RO
0 2
Volt(V_b) (Meter 1)
INTEGER32
RO
0 3
Volt(V_c) (Meter 1)
INTEGER32
RO
0 4
Volt(V_avg) (Meter 1)
INTEGER32
RO
0 … … … … --- 29
Volt(V_a) (Meter 8)
INTEGER32
RO
0 30
Volt(V_b) (Meter 8)
INTEGER32
RO
0 31
Volt(V_c) (Meter 8)
INTEGER32
RO
0 32
Volt(V_avg) (Meter 8)
INTEGER32
RO
0
3203h
0
largest sub-index supported for
“Amp”
UNSIGNED 8
RO
32
1 Amp(I_a) (Meter 1)
INTEGER32
RO
0 2
Amp(I_b) (Meter 1)
INTEGER32
RO
0 3
Amp(I_c) (Meter 1)
INTEGER32
RO
0 4
Amp(I_avg) (Meter 1)
INTEGER32
RO
0 … … … … --- 29
Amp(I_a) (Meter 8)
INTEGER32
RO
0 30
Amp(I_b) (Meter 8)
INTEGER32
RO
0 31
Amp(I_c) (Meter 8)
INTEGER32
RO
0 32
Amp(I_avg) (Meter 8)
INTEGER32
RO
0
3204h
0
largest sub-index supported for
“kvar”
UNSIGNED 8
RO
32
1 kvar(kvar_a) (Meter 1)
INTEGER32
RO
0 2
kvar(kvar_b) (Meter 1)
INTEGER32
RO
0 3
kvar(kvar_c) (Meter 1)
INTEGER32
RO
0 4
kvar(kvar_tot) (Meter 1)
INTEGER32
RO
0 … … … … --- 29
kvar(kvar_a) (Meter 8)
INTEGER32
RO
0 30
kvar(kvar_b) (Meter 8)
INTEGER32
RO
0 31
kvar(kvar_c) (Meter 8)
INTEGER32
RO
0 32
kvar(kvar_tot) (Meter 8)
INTEGER32
RO
0
3205h
0
largest sub-index supported for
“kVA”
UNSIGNED 8
RO
32
1 kVA(Kva_a) (Meter 1)
INTEGER32
RO
0 2
kVA(Kva_b) (Meter 1)
INTEGER32
RO
0
PM-4324 User’s Manual v1.03 Last Revised: Feb. 2021 Page: 72
Copyright © ICP DAS Co., Ltd. All Rights Reserved. www.icpdas.com E-mail: service@icpdas.com

3 kVA(Kva_c) (Meter 1)
INTEGER32
RO
0 4
kVA(Kva_tot) (Meter 1)
INTEGER32
RO
0 … … … … --- 29
kVA(Kva_a) (Meter 8)
INTEGER32
RO
0 30
kVA(Kva_b) (Meter 8)
INTEGER32
RO
0 31
kVA(Kva_c) (Meter 8)
INTEGER32
RO
0 32
kVA(Kva_tot) (Meter 8)
INTEGER32
RO
0
3206h
0
largest sub-index supported for
“PF”
UNSIGNED 8
RO
32
1 PF_a (Meter 1)
INTEGER32
RO
0 2
PF_b (Meter 1)
INTEGER32
RO
0 3
PF_c (Meter 1)
INTEGER32
RO
0 4
PF_tot (Meter 1)
INTEGER32
RO
0 … … … … --- 29
PF_a (Meter 8)
INTEGER32
RO
0 30
PF_b (Meter 8)
INTEGER32
RO
0 31
PF_c (Meter 8)
INTEGER32
RO
0 32
PF_tot (Meter 8)
INTEGER32
RO
0
3207h
0
largest sub-index supported for
“kVAh”
UNSIGNED 8
RO
32
1 kVAh_a (Meter 1)
INTEGER32
RO
0 2
kVAh_b (Meter 1)
INTEGER32
RO
0 3
kVAh_c (Meter 1)
INTEGER32
RO
0 4
kVAh_tot (Meter 1)
INTEGER32
RO
0 … … … … --- 29
kVAh_a (Meter 8)
INTEGER32
RO
0 30
kVAh_b (Meter 8)
INTEGER32
RO
0 31
kVAh_c (Meter 8)
INTEGER32
RO
0 32
kVAh_tot (Meter 8)
INTEGER32
RO
0
3208h
0
largest sub-index supported for
“kvarh”
UNSIGNED 8
RO
32
1 kvarh_a (Meter 1)
INTEGER32
RO
0 2
kvarh_b (Meter 1)
INTEGER32
RO
0 3
kvarh_c (Meter 1)
INTEGER32
RO
0 4
kvarh_tot (Meter 1)
INTEGER32
RO
0 … … … … ---
PM-4324 User’s Manual v1.03 Last Revised: Feb. 2021 Page: 73
Copyright © ICP DAS Co., Ltd. All Rights Reserved. www.icpdas.com E-mail: service@icpdas.com

29
kvarh_a (Meter 8)
INTEGER32
RO
0 30
kvarh_b (Meter 8)
INTEGER32
RO
0 31
kvarh_c (Meter 8)
INTEGER32
RO
0 32
kvarh_tot (Meter 8)
INTEGER32
RO
0
3209h
0
largest sub-index supported for
“Frequency”
UNSIGNED 8
RO
32
1 Freq_a (Meter 1)
INTEGER32
RO
0 2
Freq _b (Meter 1)
INTEGER32
RO
0 3
Freq _c (Meter 1)
INTEGER32
RO
0 4
Freq _avg (Meter 1)
INTEGER32
RO
0 … … … … --- 29
Freq_a (Meter 8)
INTEGER32
RO
0 30
Freq _b (Meter 8)
INTEGER32
RO
0 31
Freq _c (Meter 8)
INTEGER32
RO
0 32
Freq _avg (Meter 8)
INTEGER32
RO
0
320Ah
0
largest sub-index supported for
object
UNSIGNED 8
RO
2
1 VTHD
(Phase set by
Harmonic Phase
Select Register)
INTEGER32
RO
2
ITHD
(Phase set by
Harmonic Phase
Select Register)
INTEGER32
RO
320Bh
0
largest sub-index supported for
object
UNSIGNED 8
RO
12
1 PT Ratio
UNSIGNED 16
RW
100
2 CT1 Ratio
UNSIGNED 16
RW
1 3
CT2 Ratio
UNSIGNED 16
RW
1 … … … … --- 9
CT8 Ratio
UNSIGNED 16
RW
1
10
Software Wiring
(Only work when SW9-SW10 is all off)
1: 1P2W
2: 1P3W
UNSIGNED 16
RW
5
PM-4324 User’s Manual v1.03 Last Revised: Feb. 2021 Page: 74
Copyright © ICP DAS Co., Ltd. All Rights Reserved. www.icpdas.com E-mail: service@icpdas.com

3: 3P3W2CT
4: 3P3W3CT
5: 3P4W3CT
11
Energy Absolute Accumulated
Mode
0: Enable
1: Disable
UNSIGNED 16
RW
0
12
Display Voltage
0: Automatic
1: Show as Vln
2: Show as Vll
UNSIGNED 16
RW
0
320Ch
0
largest sub-index supported for
object
UNSIGNED 8
RO
8
1 H Phase Select1
0: Disable
1: Phase A
2: Phase B
3: Phase C
UNSIGNED 16
RW
0
… … … …
---
8 H Phase Select8
0: Disable
1: Phase A
2: Phase B
3: Phase C
UNSIGNED 16
RW
0
320Dh
0
largest sub-index supported for
object
UNSIGNED 8
RO
10
1 Set Meter1 Energy Zero
UNSIGNED 16
RW
0x0055
… … … …
--- 8
Set Meter8 Energy Zero
UNSIGNED 16
RW
0x0055
9 Set All Meter Energy Zero
UNSIGNED 16
RW
0x0055
10
Default Frequency
0x0055: Auto
0x0064: 50Hz
0x0078: 60Hz
UNSIGNED 16
RW
0x0055
PM-4324 User’s Manual v1.03 Last Revised: Feb. 2021 Page: 75
Copyright © ICP DAS Co., Ltd. All Rights Reserved. www.icpdas.com E-mail: service@icpdas.com

Application Object
The users can write the object the value 65766173h to object with index 1010h and
subindex 1 to save the application setting, or write the value 64616F6Ch to object with
index 1011h and subindex 1 and reboot the module to load the factory default.
PM-4324 User’s Manual v1.03 Last Revised: Feb. 2021 Page: 76
Copyright © ICP DAS Co., Ltd. All Rights Reserved. www.icpdas.com E-mail: service@icpdas.com

Appendix: Questions & Answers
Q1. Can we use the other 5A CT’s (like 600/5) to directly connect to the input current
terminals of PM-4324 series?
No, because the input current is only mA size on PM-4324 series,definitely not to
directly use other 5A CT’s to connect and apply(like100/5…), It could causes the fetal
damages. Users can use the PM-4324 series attached split type clip-on CT to connect
the other CT’s secondary test 5A current.
Q2. If I want to replace the failed split type clip-on CT, can I just detach it? Anything I
should pay more attention to?
In any circumstance, please make sure the CT had been disconnected with the power
cable of monitoring equipments before the CT lines detach from the terminals of the
smart meter. Otherwise, it will cause the severe injury.
Q3. If the turn point of the split type clip-on CT has broken, or inner Ferrite-core has
broken, how to settle this condition?
The measure data will be not accuracy as before, please do not use any more.
You need the new CT.
Q4. If multiple set of meters being installed,Can I detach the CT’s and mix use with
each other?
Please do not mix use,because each set of smart meter(PM-4324 series) and its
attached split type clip-on CT are calibrated set by set. The mix use may cause the
wrong measurements.
Q5. What problem is while the measured readings of the power consumption(kw)is
negative?
(1) First check the current input end – line terminal, (check the connection should be
CT1-K, CT1-L, CT2-K, CT2-L, CT3-K, CT3-L
), base on white black, white black,
white black follow the sequence order
(2) Check the field current direction(K→L)is same as the inner arrow direction of the
split type clip-on CT.
(3) Confirm the RST (ABC) phase sequence.
PM-4324 User’s Manual v1.03 Last Revised: Feb. 2021 Page: 77
Copyright © ICP DAS Co., Ltd. All Rights Reserved. www.icpdas.com E-mail: service@icpdas.com

Q6. What does negative kW on a motor/pump mean?
Confirm the pump running at full load. Or are the readings taken at "idle" (negative kW, low
power factor)?
Q7. PC and meter cannot make the connection with RS-485?
(1) Confirm the Modbus Address, default is 1.
(2) Confirm the Band Rate, default is 19200.
(3) Confirm the stop bit, default is 1.
(4) Confirm the RS-485 connection, make sure the D+/D- is right.
(5) Confirm the RS-485 master have to provide the bias for PM-4324 series. Otherwise,
the tM-SG4 or SG-785 should be added to provide the bias. All ICP DAS controllers
and converters provide the bias.
Q8. What the power cable diameter (mm) of the monitoring equipments should be for
the various CT’s?
Power cable diameter <Φ10 use 60A CT,Φ10~Φ16 use 100A CT,Φ16~Φ24 use
200A CT,Φ36 use 300A CT,Φ36 use 400A CT
Q9. Regarding to the split type clip-on CT’s, if the wire is not long enough?
Φ10, Φ16, Φ24, Φ36 split type CT,the standard length is 4M.
For special length, please contact ICP DAS.
Q10. How to measure the current large than 400A?
PM-4324 User’s Manual v1.03 Last Revised: Feb. 2021 Page: 78
Copyright © ICP DAS Co., Ltd. All Rights Reserved. www.icpdas.com E-mail: service@icpdas.com

The CT of PM-4324 maximum range is 400A. If the target is more than 400A, we suggest
the solution as follow.
For example the target is to measure maximum 800A current. We can measure big CT
output and set a CT Ratio.
Note:
A. Primary CT accuracy will influence the measurement.
B. Even primary CT output current max is 5A, please don’t wire to PM-4324 and PM-4324P
directly.
You need to choose primary current Transformers, please refer to
http://www.omega.com/pptst/MFO_RCT.html
PM-4324 User’s Manual v1.03 Last Revised: Feb. 2021 Page: 79
Copyright © ICP DAS Co., Ltd. All Rights Reserved. www.icpdas.com E-mail: service@icpdas.com

Current
transformer
CT Ratio
(PM-4324P)
Current
transformer
CT Ratio
(PM-4324P)
50A CT
10:1
400A CT
80:1
60A CT
12:1
800A CT
160:1
100A CT
20:1
1000A CT
200:1
200A CT
40:1
1200A CT
240:1
Q11. Can I use CT's that I currently own with PM-4324 Power Meter?
You can use CT's that you currently own with PM-4324P (without CTs) Power Meter.
The CT inputs of the PM-4324P can handle a maximum of 333mV of AC current.
PM-4324P's current ratio is always full scale to 5A. CT ratio can be set internally to work
with up to 1200 amp CTs.
Adding current transformer (333mV Output CTs) has the effect of reducing the measured
current by the CT ratio (let's say 40:1 for 200A CT as example). So a current of 200A
becomes 5A. Since the meter sees 5A, many of the measurements it reports will be low
by a factor of 4 unless they are scaled up by 4.
Note:
A. Please use low phase angle error CTs: essential for accurate power and energy
measurements. (Example: phase error <2°)
B. Accuracy may be 5% or greater without calibration with power Meter.
C. Primary CT accuracy will influence the measurement.
D. PM-4324P only for external 333mV Output CTs.
Safe: burden resistor built-in, 333 mVac voltage output at rated full scale current, no
shorting blocks needed.
E. This meter requires external CT(s) to operate:
1P2W-1CT requires 1 CT per meter.
3P3W-2CT/1P3W-2CT requires 2 CTs per meter.
3P4W-3CT/3P3W-3CT requires 3 CTs per meter.
Q12. What is the difference between line to line voltages to line to ground voltage?
On a three phase wye connected system line to line voltages will be the voltages between
the terminals A - B, B - C, A - C. On a three phase wye connected system line to ground
voltages will be the voltages between the terminals A - N, B - N, C - N. To calculate the line
to ground voltages divide the line voltage by the square root of three which equals 1.73. An
PM-4324 User’s Manual v1.03 Last Revised: Feb. 2021 Page: 80
Copyright © ICP DAS Co., Ltd. All Rights Reserved. www.icpdas.com E-mail: service@icpdas.com

example, on a 380 volt wye system, line to line voltage is 380 volts and line to ground
voltage is 380/1.73 = 220 volts
Q13. How about the harmonic (THD) analysis capability?
PM-4324 User’s Manual v1.03 Last Revised: Feb. 2021 Page: 81
Copyright © ICP DAS Co., Ltd. All Rights Reserved. www.icpdas.com E-mail: service@icpdas.com

The number of harmonics N that can be analyzed within the 2.8 kHz pass band is the whole
number of 2800/f. The absolute maximum number of harmonics accepted by the Energy
Metering IC is 63.
N = [2800/f], N ≤ 63
Q14. How to measure the Voltage large than 500V?
For service voltage above 600 Vac, voltage transformers (PTs) are used to step down the
voltage to a lower range that will work with a PM-4324 meter.
Selecting a Transformer:
Selecting the right voltage transformer is simple. Review the following
considerations to determine the best fit for your application.
Input Voltage:
Select a transformer that will operate on the supply voltage available at your facility
(Example: PRI. Voltage 720V; SEC. Voltage 120V). Check the connection diagram
(three-phase Y and delta; phase sequence) to ensure compatibility.
Adding potential transformers has the effect of reducing the measured line voltage by the PT
ratio (let's say 6:1 for this example). So a voltage of 720 Vac becomes 120 Vac. Since the
meter sees 120 Vac, many of the measurements it reports will be low by a factor of 6 unless
they are scaled up by 6.
Frequency:
If you are operating in the United States, you will most likely be operating on 60 Hz. However
should you need a 50 Hz rated transformer.
Accuracy: Transformer (PT) accuracy (Example: 1% or 3%) will influence the measurement.
Rated Output (VA): Example: 150 VA (50VA per phase).
Q15. How to set up [Display Voltage] register value to correctly display line to ground
voltage or line to line voltage?
PM-4324 User’s Manual v1.03 Last Revised: Feb. 2021 Page: 82
Copyright © ICP DAS Co., Ltd. All Rights Reserved. www.icpdas.com E-mail: service@icpdas.com

Line to Ground Voltage
Line to Line Voltage
3P3W-2CT
[Display Voltage] = 1 (Show as Vln)
[Display Voltage] = 0 (Automatic)
3P3W-3CT
[Display Voltage] = 0 (Automatic)
[Display Voltage] = 2 (Show as Vll)
3P4W-3CT
[Display Voltage] = 0 (Automatic)
[Display Voltage] = 2 (Show as Vll)
The voltage [V_x] register in Modbus register table can be used to show line-to-ground
voltage or line-to-line voltage value by setting [Display Voltage] register value. According to
different wiring types, it is required to set different [Display Voltage] value. If the voltage is not
displayed as expected value, please refer to the table below and check if the setting value is
set accurately.
PM-4324 User’s Manual v1.03 Last Revised: Feb. 2021 Page: 83
Copyright © ICP DAS Co., Ltd. All Rights Reserved. www.icpdas.com E-mail: service@icpdas.com
 Loading...