

ICPDAS iCAM-721F User Manual
iCAM-721F
3 MP IR Bullet Network
Camera
User’s Manual
Version 1.01

Warranty
All products manufactured by ICP DAS are under warranty regarding defective
materials for a period of one year, starting from the date of delivery to the original
purchaser.
Warning
ICP DAS CO., LTD. assumes no liability for damages consequent to the use of this
product. ICP DAS CO., LTD. reserves the right to change this manual at any time
without notice. The information furnished by ICP DAS CO., LTD. is believed to be
accurate and reliable. However, no responsibility is assumed by ICP DAS CO., LTD.
for its use, or for any infringements of patents or other rights of third parties resulting
from its use.
Copyright and Trademark Information
© Copyright 2017 by ICP DAS CO., LTD. All rights reserved worldwide.
Trademark of Other Companies
The names used for identification only maybe registered trademarks of their
respective companies.
License
The user can use, modify and backup this software on a single machine. The user
may not reproduce, transfer or distribute this software, or any copy, in whole or in part.
Technical Service:
Please contact local agent or email problem-report to service@icpdas.com .
For more product information, please refer to www.icpdas.com .
Technique: Cony Yu; Translation & Edition: Eva Li; R&D Dept., ICP DAS CO., LTD.
Latest edited by: Eva Li; V. 1.0, 08/2017

Contents
Contents
Contents 3
Read Me First! 7
Important Notes .................................................................................................................. 7
1 Introduction 7
1.1 Hardware Overview ...................................................................................................... 9
1.2 Specifications .............................................................................................................. 10
2 Installation and Setup 13
2.1 Install microSD Card .................................................................................................. 13
2.2 Connecting Camera to Network ................................................................................. 14
2.3 Configuring Camera via CAM FINDER .................................................................... 15
2.3.1 Use CAM FINDER to Assign IP Address ................................................... 17
2.3.2 Open the Web-based UI of the Camera ....................................................... 20
3 Live View UI Settings 23
3.1 Quick Access Buttons ............................................................................................... 25
3.2 Camera Live View UI Setting Tools ......................................................................... 26
4 Setup 29
4.1 System Setup ............................................................................................................. 30
4.1.1 Information Tab ........................................................................................... 31
4.1.2 Time Tab ...................................................................................................... 32
4.1.3 Security Tab ................................................................................................. 34
4.1.4 Maintenance Tab .......................................................................................... 36
4.1.5 System Log Tab ........................................................................................... 38
4.2 Network Setup .......................................................................................................... 39
4.2.1 General Tab .................................................................................................. 40
4.2.2 DDNS Tab ................................................................................................... 42
4.2.3 Multicast Tab ............................................................................................... 43
4.2.4 IP Filter Tab ................................................................................................. 45
4.2.5 WISE Tab .................................................................................................... 46
4.3 Video & Audio Setup ................................................................................................ 47
4.3.1 Stream Tab ................................................................................................... 48
4.3.2 Video Tab ..................................................................................................... 51
4.3.3 Audio Tab .................................................................................................... 55
4.3.4 Privacy Mask Tab ........................................................................................ 56
4.3.5 ROI Tab ........................................................................................................... 58
4.4 Event Setup ............................................................................................................... 60
iCAM-721F User’s Manual ICP DAS 3

Contents
4.4.1 Motion Tab .................................................................................................. 61
4.4.2 Video Tab ..................................................................................................... 63
4.4.3 Snapshot Tab ............................................................................................... 68
4.4.4 GPIO Tab ..................................................................................................... 73
4.5 Local Storage Setup .................................................................................................. 74
4.5.1 Local Storage Tab ........................................................................................ 75
4.5.2 Playback Tab ................................................................................................ 76
5 Appendix 77
5.1 Firmware Upgrade and Trouble Shooting ................................................................... 77
5.2 How to let camera to do Hardware Reset ................................................................... 87
iCAM-721F User’s Manual ICP DAS 4

Revision History
Doc. Version
Revision Description
Date
1.0
Initial Official Release:
1. For Chapter 1, features, hardware picture and specifications.
2. Add Section 2.2 about how to install microSD card into the camera.
3. Add Section 4.3.5 WISE Tab for communicating the camera with the
WISE controller to perform a WISE Surveillance Solution.
4. For Chapter 3, modify the “Live View” button related descriptions.
5. For Chapter 1 to 5, modify its description for more detail and clear.
6. Add section 5.2 about the hardware reset.
2017/08/10
Contents
iCAM-721F User’s Manual ICP DAS 5

Read Me First!
Read Me First!
Important Notes
This User Manual is intended for administrators and users of the iCAM-760D Dual Lens
Panoramic Dome Network Camera, including instructions for using and managing the camera
on your network. The use of surveillance devices may be prohibited by law in your country or
area. It is therefore the user’s responsibility to ensure that the operation of such devices is legal
before installing this unit for its intended use.
Before the Dome Network Camera is installed, carefully read and follow all the safety and
operating instructions to avoid damage due to faulty assembly and installation. This also
ensures that the device is used properly as intended.
Heed All Warnings
Do not drop or hit the device.
Sensitive electronics inside the camera are vulnerable to excessive impact.
Do not install the device under high temperature (less than 45C) environment.
Excessive heat could damage the equipment.
Do not cover device with any object or install it in a poorly ventilated vicinity.
Overheating could damage the camera.
Do not expose the device to rain or moisture. Do not touch the power connection with
wet hand.
Risk of short circuit, electric shock, or fire
Do not damage the power cord or leave it under pressure.
Risk of fire or circuit electric shock
To reduce the risk of electric shock or damage, do not remove the front or back cover.
There is no user-serviceable parts inside. Misusage, improper, or negligent handling could
damage the device. Refer to qualified service personnel from our distibutor/dealer for any
device related trouble shooting need.
Do not continue to operate the device if it appears to malfuntion.
Contact qualified service personnel from our distibutor/dealer for help.
Installation of the product should be made by qualified service personnel or system
installers from our distibutor/dealer.
iCAM-721F User’s Manual ICP DAS 6

1 Introduction
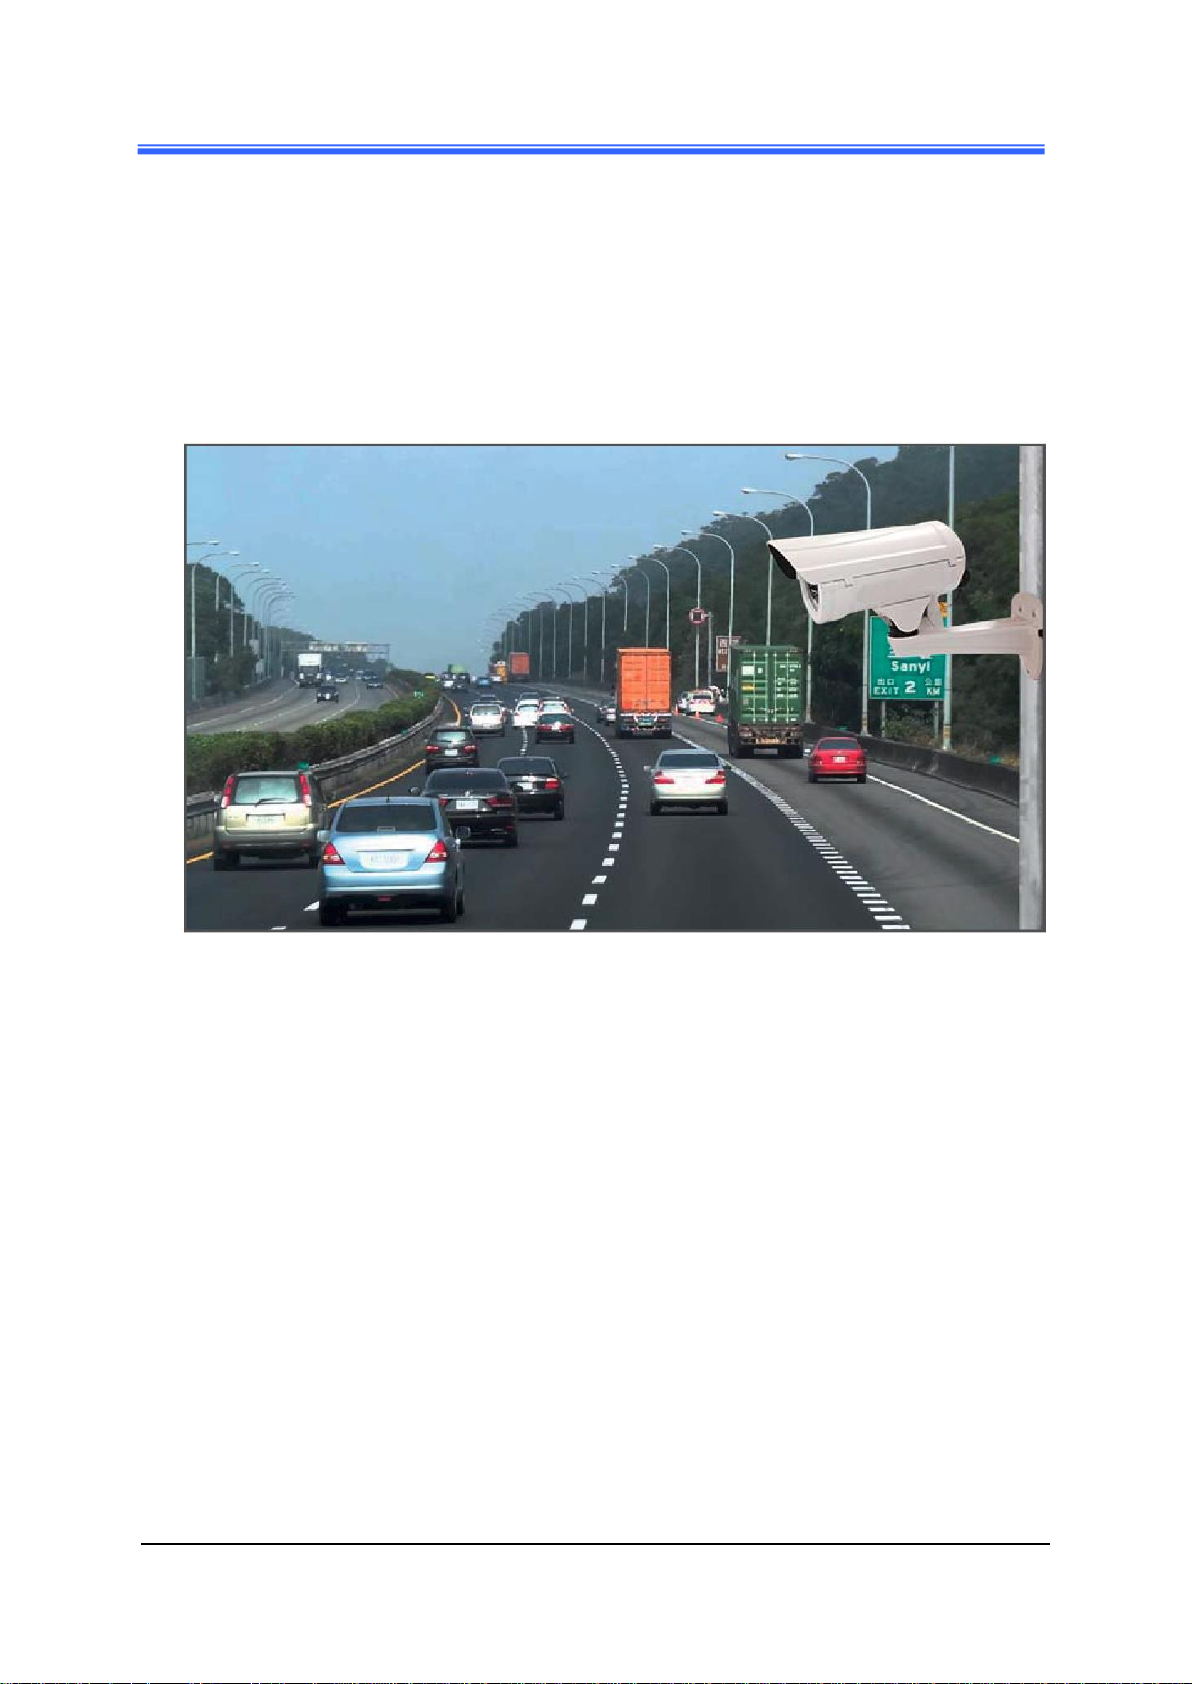
iCAM-721F is a professional bullet camera offering 1080p Full HD resolution
with super image quality up to 30 fps. Featuring 3-Megapixel resolution and
high-performance H.264/MPEG-4/MJPEG compression technology, the
iCAM-721F offers extra-smooth video and wide coverage.
iCAM-721F employs many advanced features to allow users to fully utilize the
high definition video. Focus on a region of interest (ROI) in the camera view to
enhance image quality. It also saves the cost of network and backend storage
without network bandwidth of video streaming.
Aimed at outdoor surveillance, iCAM-721F is furnished with a fixed-iris lens, a
removable IR-cut filter, 15-meter IR illuminators, Wide Dynamic Range
(WDR), and multi-functional environment profile image settings for superior
image quality around the clock. Moreover, the IP67-rated housing protects
against rain and dust and ensures functional operation in all types of weather
conditions.
Chapter 2
With other advanced features such as motion detection, 802.3af compliant PoE,
ONVIF Compliant for interoperability, built-in microSD/microSDHC/
microSDXC card slot for storage, two-way audio, and digital input/output for
alarm, the iCAM-721F is an all-in-one bullet network camera for detailed
surveillance in outdoor environments.
Features:
6 mm Fixed-Focal, Fixed-Iris Lens
3-Megapixel CMOS Sensor
30 fps@1080p Full HD
Removable IR-cut Filter for Day & Night Function
Built-in IR Illuminators, Eff ective up to 15 Meters
Real-time H.264, MPEG-4, and MJPEG Compression
ROI (Region of Interest) for Enhancement of Image Quality
Low Lux for Night Vision
WDR Enhancement for Visibility in Extremely Bright or Dark
Environments
Two-way Audio Communication
iCAM-721F User’s Manual ICP DAS 7
Chapter 2
Built-in microSD card slot, support microSDHC/microSDXC 64GB or
above
Weather-proof IP67-rated Housing
Built-in 802.3af Compliant PoE
ONVIF Compliant for interoperability
iCAM-721F User’s Manual ICP DAS 8

1.1 Hardware Overview
iCAM-721F
Dimensions
Chapter 2
Cable Connections:
iCAM-721F User’s Manual ICP DAS 9

1.2 Specifications
Model
iCAM-721F
System Information
CPU
Multimedia SoC (System-on-Chip)
NOR Flash
16 MB
RAM
512 MB
Camera Features
Image Sensor
1/3” Progressive CMOS sensor in 2048 x 1536
resolution
Maximum Resolution
2048x1536, 3 MP
Lens Type
Fixed-Focal ( M12*0.5)
Focal Length
f = 6 mm
Aperture
F1.6 ,Fixed-Iris
Field of View
48.8°(H); 36.6°(V); 61°(D)
Shutter Time
1 sec. to 1/1,000,000 sec.
WDR Technology
WDR Enhanced
Day/Night
Removable IR-cut filter for day & night function
Minimum Illumination
1.5 Lux @F1.2 (Color);
0.001 Lux @F1.0 (B/W)
IR Illuminators
Built-in IR illuminators, effective up to 15 meters; High
Power IR LED x 4
On-board Storage
Built-in microSD card slot,
support microSDHC/microSDXC 64GB or above
Video
Compression
H.264 / MJPEG / MPEG-4
Maximum Frame Rate
15 fps at 2048x1536
30 fps at 1920x1080
30 fps at 1600x1200, 1280x960, 1280x720,
800x600, 640x480, 720x405
30 fps at 720x405 (Mobile)
Maximum Streams
3 simultaneous streams
S/N Ratio
Above 39 dB
Dynamic Range
100 dB
Video Streaming
Adjustable resolution, quality and bitrate
ROI (Region of Interest) for Enhancement of Image
Quality
Image Settings
Adjustable image size, quality and bitrate
Configurable brightness, saturation, exposure control,
Chapter 2
iCAM-721F User’s Manual ICP DAS 10

Chapter 2
Model
iCAM-721F
sharpness, contrast, white balance, auto shutter
control,
auto gain control, noise reduction, EV luminance
control,
flip & mirror, privacy masks, time stamp, text overlay
Audio
Audio Capability
Audio input/output (full duplex)
Compression
G.711u
Interface
External microphone input
Effective Range
5 meters
Network
Users
Live viewing for up to 10 clients
Protocols
HTTP, HTTPS, TCP/IP, IPv4, UDP, SMTP, FTP, DHCP,
DDNS, NTP, DNS, ARP, RTSP, RTP, UPnP,
ONVIF(Profile S), Multicast
Protection
Multiple user access levels with password protection,
IP address filtering
Interface
10 Base-T/100 BaseTX Ethernet(RJ-45)
ONVIF
Ver. 2.2
Intelligent Video
Motion Detection
Ten-windows video motion detection
Alarm and Event
Alarm Triggers
Video motion detection, manual trigger,
digital input, periodical trigger, system boot,
recording notification
Alarm Events
Event notification using digital output, HTTP, SMTP,
FTP and NAS server
File upload via HTTP, SMTP, FTP and NAS server
General
Connectors
RJ-45 cable connector for Network/PoE connection
Audio input
Audio output
Video output * 1
Digital input * 1
Digital output * 1
Power Input
IEEE 802.3af PoE
DC 12V
Power Consumption
IR ON Max. 12W (PoE)
IR OFF Max. 5W (PoE)
Dimensions
Ø :200 L x 81H x 81W mm
iCAM-721F User’s Manual ICP DAS 11

Chapter 2
Model
iCAM-721F
Weight
Net: 350g
Casing
Weather-proof IP67-rated housing
Safety Certifications
CE, FCC Class B, LVD
Operating Temperature
Starting : -10°C ~ 50°C
Working : -40°C ~ 50°C
Operating Humidity
10% ~ 80%
System Requirements
Operating System
Microsoft Windows 10/8/Vista/XP
Web Browser
Mozilla Firefox 7 ~ 52,
Internet Explorer 7 ~ 11
Other Players
VLC: 1.1.11 or above
iCAM-721F User’s Manual ICP DAS 12
Chapter 2
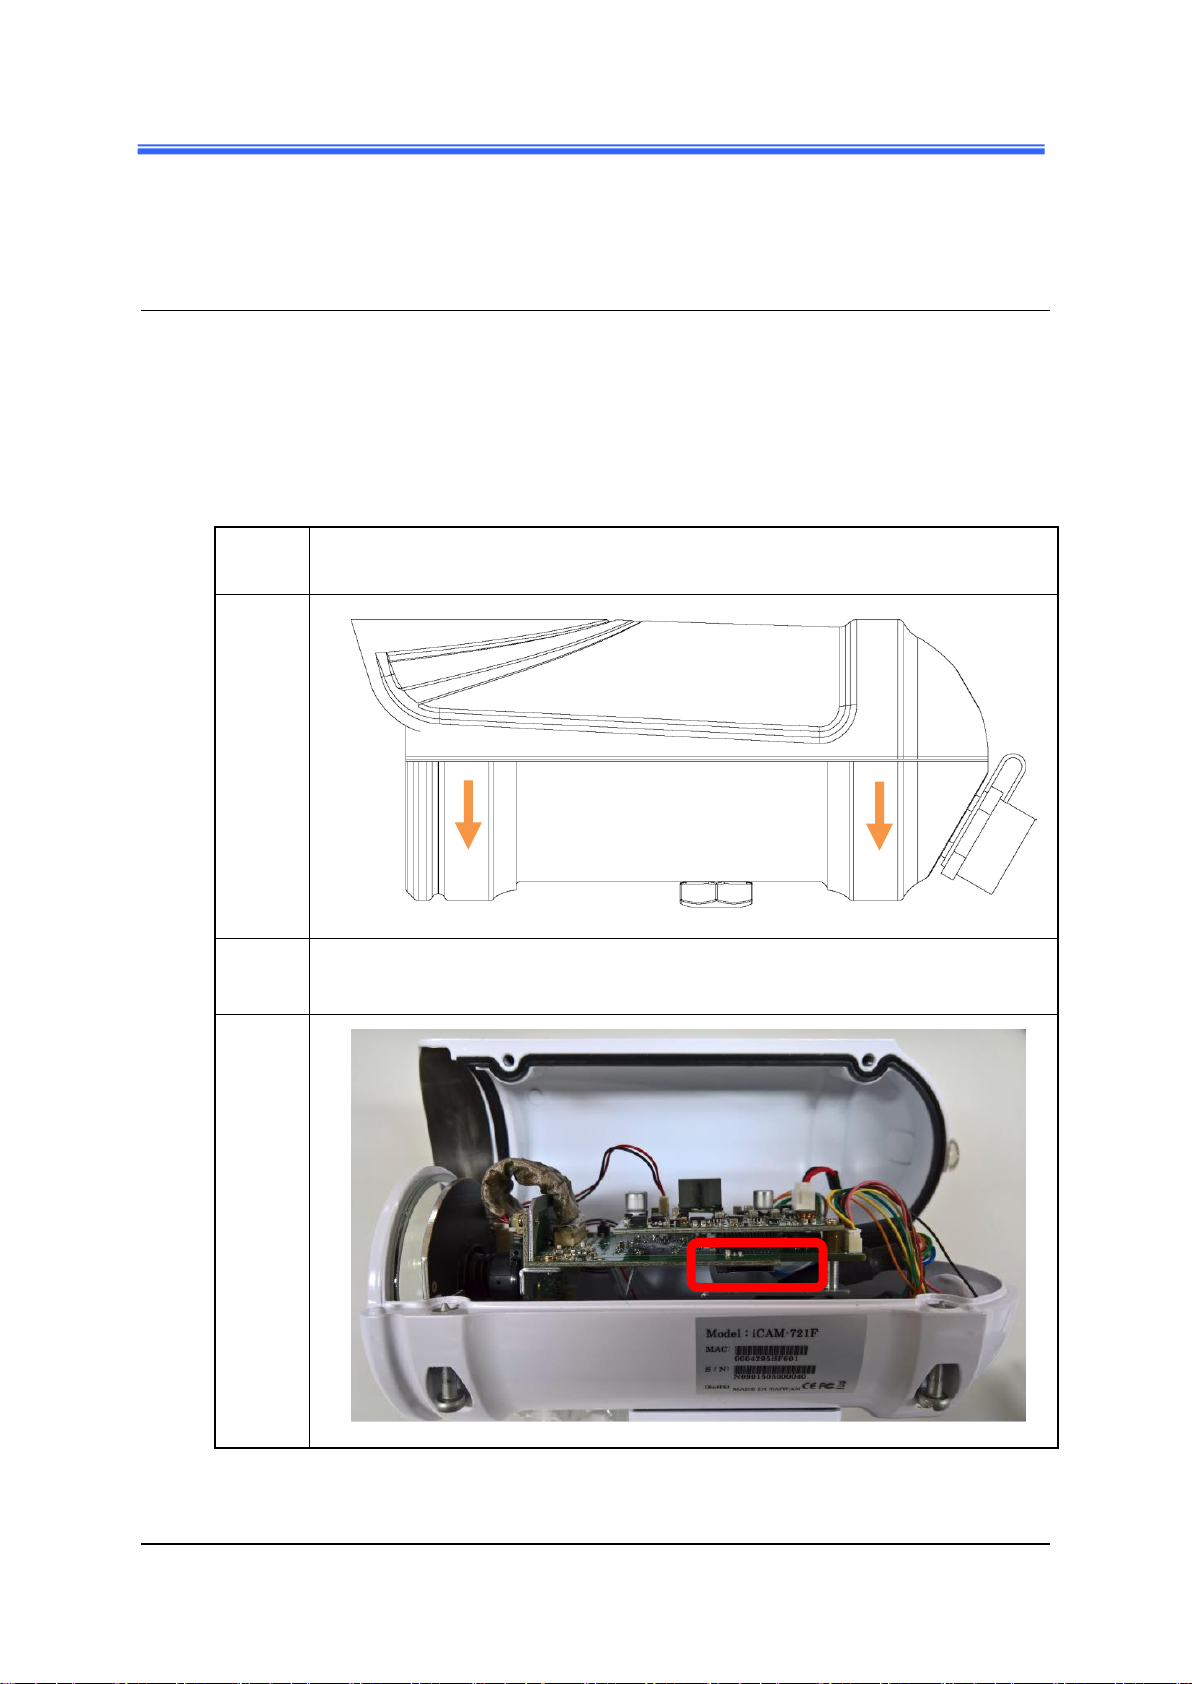
Step 1
Loose the 2 screws of the cover, and open the cover.
Step 2
Find the microSD card slot as the following picture. Insert the microSD card
into the slot. Finally, put the cover back to the camera.
2 Installation and Setup
2.1 Install microSD Card
The iCAM-721F built-in microSD card slot supports microSDHC/microSDXC 64 GB or
above for local storage application.
The user can prepare a microSD card to install into the camera via the following steps.
iCAM-721F User’s Manual ICP DAS 13
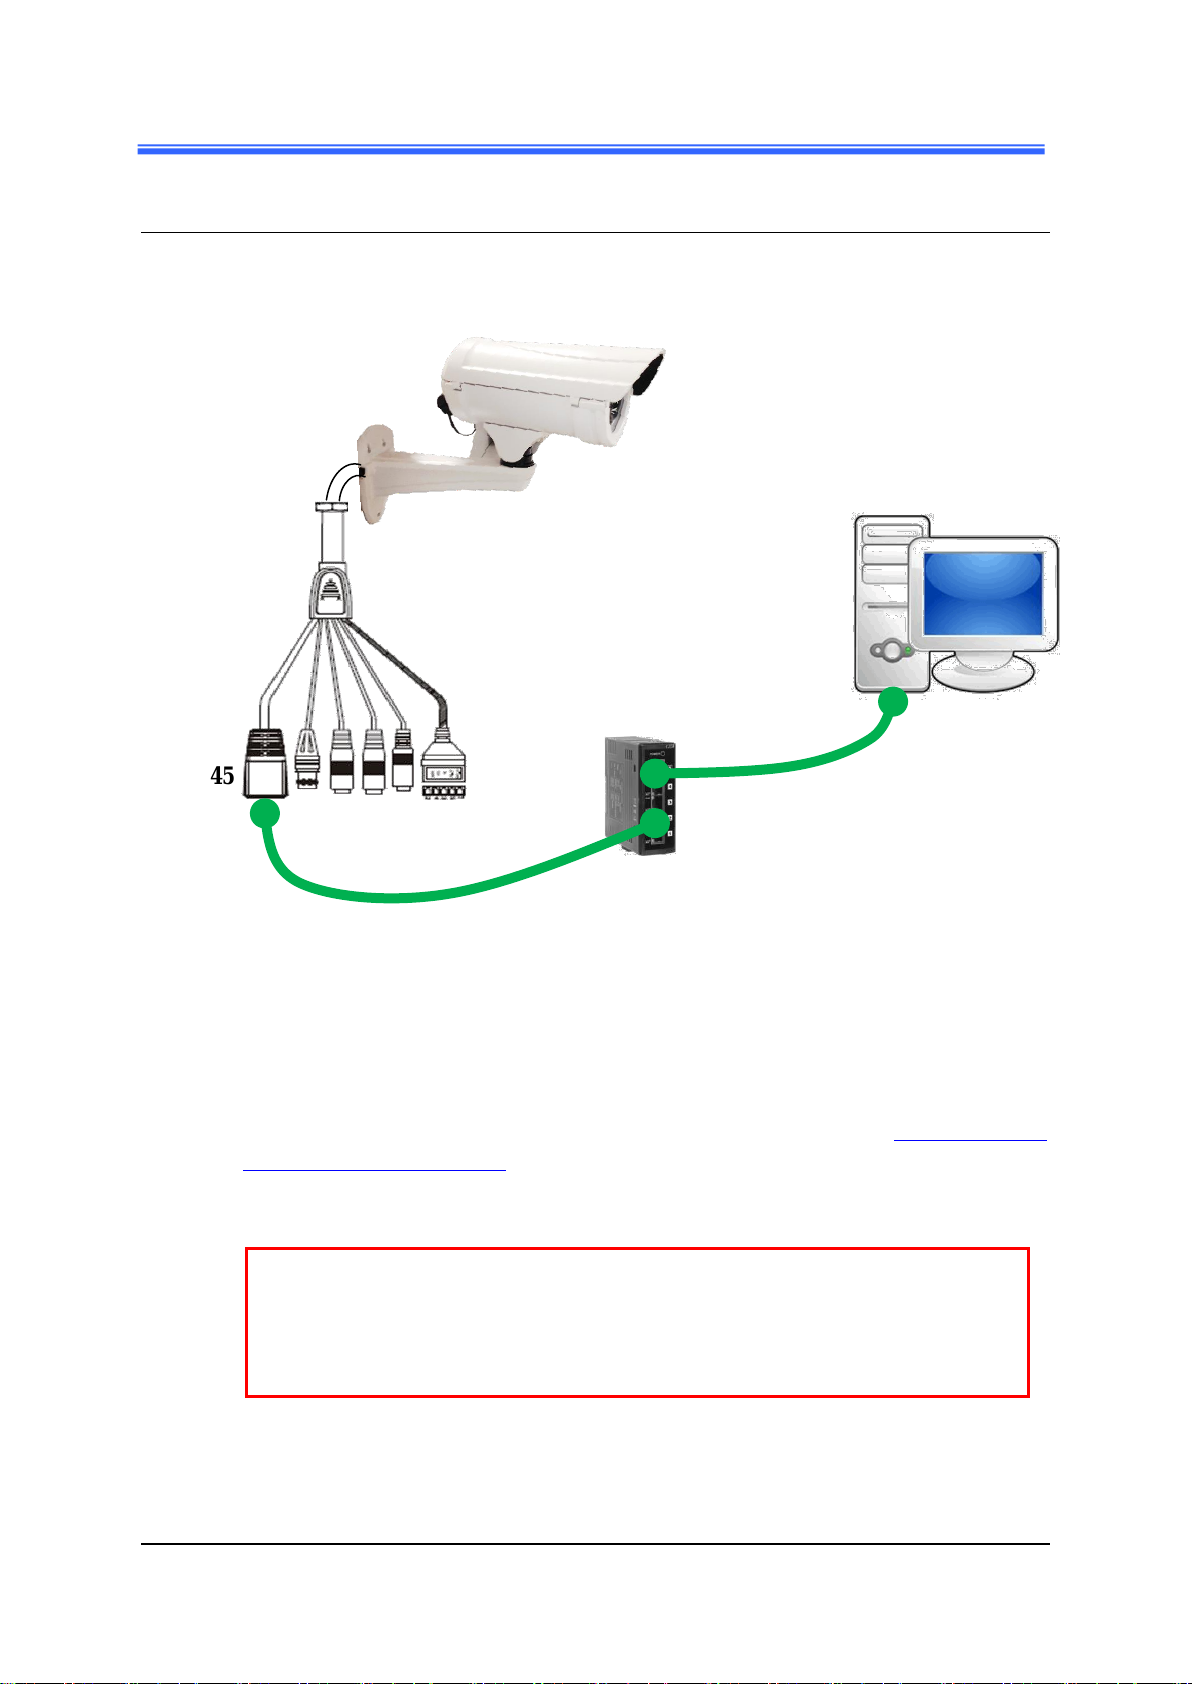
RJ45
PC/Notebook
iCAM-721F
①
②
PoE Switch
2.2 Connecting Camera to Network
Chapter 2
1) Be sure that your PC or laptop has connected to your local Ethernet network.
2) Be sure that IP Camera has connected to your local networking via the LAN port
(RJ45) on the cable. For this PoE model, user can use PoE Switch as power supply.
3) Use CAM FINDER software utility in CD to set up the camera (see 2.3 Configuring
Camera via CAM FINDER), or directly set up the camera via the Microsoft IE
browser using the following default IP information:
IP: 192.168.255.2 (Default Username/Password: admin/admin)
Submask: 255.255.0.0
Gateway address: 192.168.0.1
DNS Server address: 8.8.8.8
iCAM-721F User’s Manual ICP DAS 14

NOTE
1. In order to ensure CAM FINDER utility has the best compatibility with
Camera, kindly please ask for distributor/dealer’s help to get the latest
version downloading.
2. In order to ensure Camera will be assigned IP Address properly, please
confirm the following things.
Always consult your network administrator in order to avoid using a
previously assigned IP address.
Check if the Camera is powered on and correctly connected to the
network.
In order to connect to the Web-based user interface of the camera, the
host PC must be in the same subnet. For more information about
subnets, please consult your network administrator.
2.3 Configuring Camera via CAM FINDER
The user can configure iCAM by default IP address or via the software utility.
The default IP Address configuring: see 2.2 Connecting Camera to Network
The software utility CAM FINDER is in the attached Software Package CD.
The CAM FINDER is used to find and configure network cameras on the LAN.
This utility is useful for conveniently configuring the network settings of the
device, or for finding a device once the network settings have been modified.
Chapter 2
The CAM FINDER programs are located in the Software iCAM CD provided
together with the device. Please insert the CD into the PC CD-ROM Drive, open
the folder “Software_Utility” and then “CAM FINDER”. Launch the CAM
FINDER setup file “setup.exe” and complete the installation step by step.
iCAM CD Path: \Software_Utility\Cam Finder\
The latest version of the CAM FINDER software program is available on the
iCAM product website:
http://wise.icpdas.com/products/iCAM.html
Or directly download from the following FTP path:
http://ftp.icpdas.com/pub/cd/iCAM/Software_Utility/Cam Finder/
iCAM-721F User’s Manual ICP DAS 15
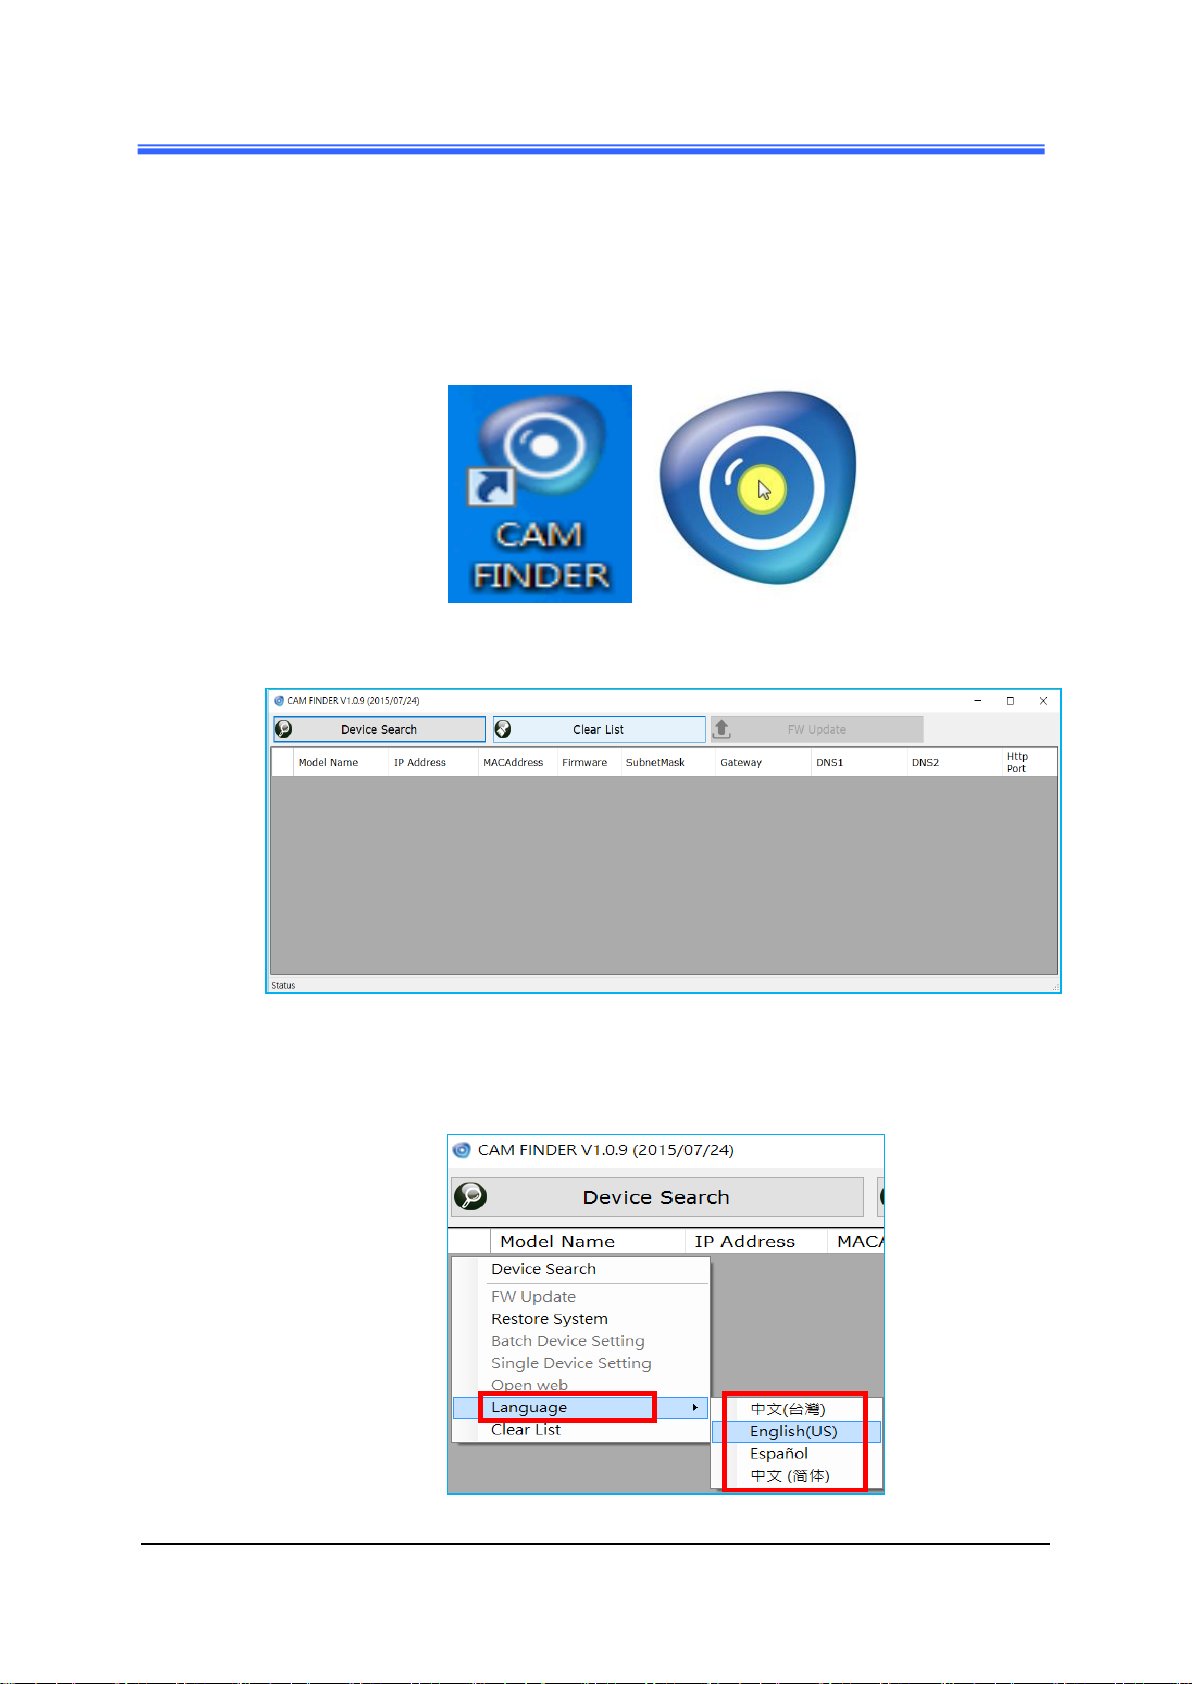
Once CAM FINDER has been successfully installed on the PC/notebook,
double click the CAM FINDER icon on the Desktop of PC
or choose “Start>All Programs>CAM FINDER” path
to run the software.
The CAM FINDER window is showing as the following picture.
If want to change the software language, please click the right key of mouse on
the gray area and select the [Language] to choose one language from the
[Traditional Chinese], [English], [Spanish] and [Simplified Chinese].
Chapter 2
iCAM-721F User’s Manual ICP DAS 16
Chapter 2
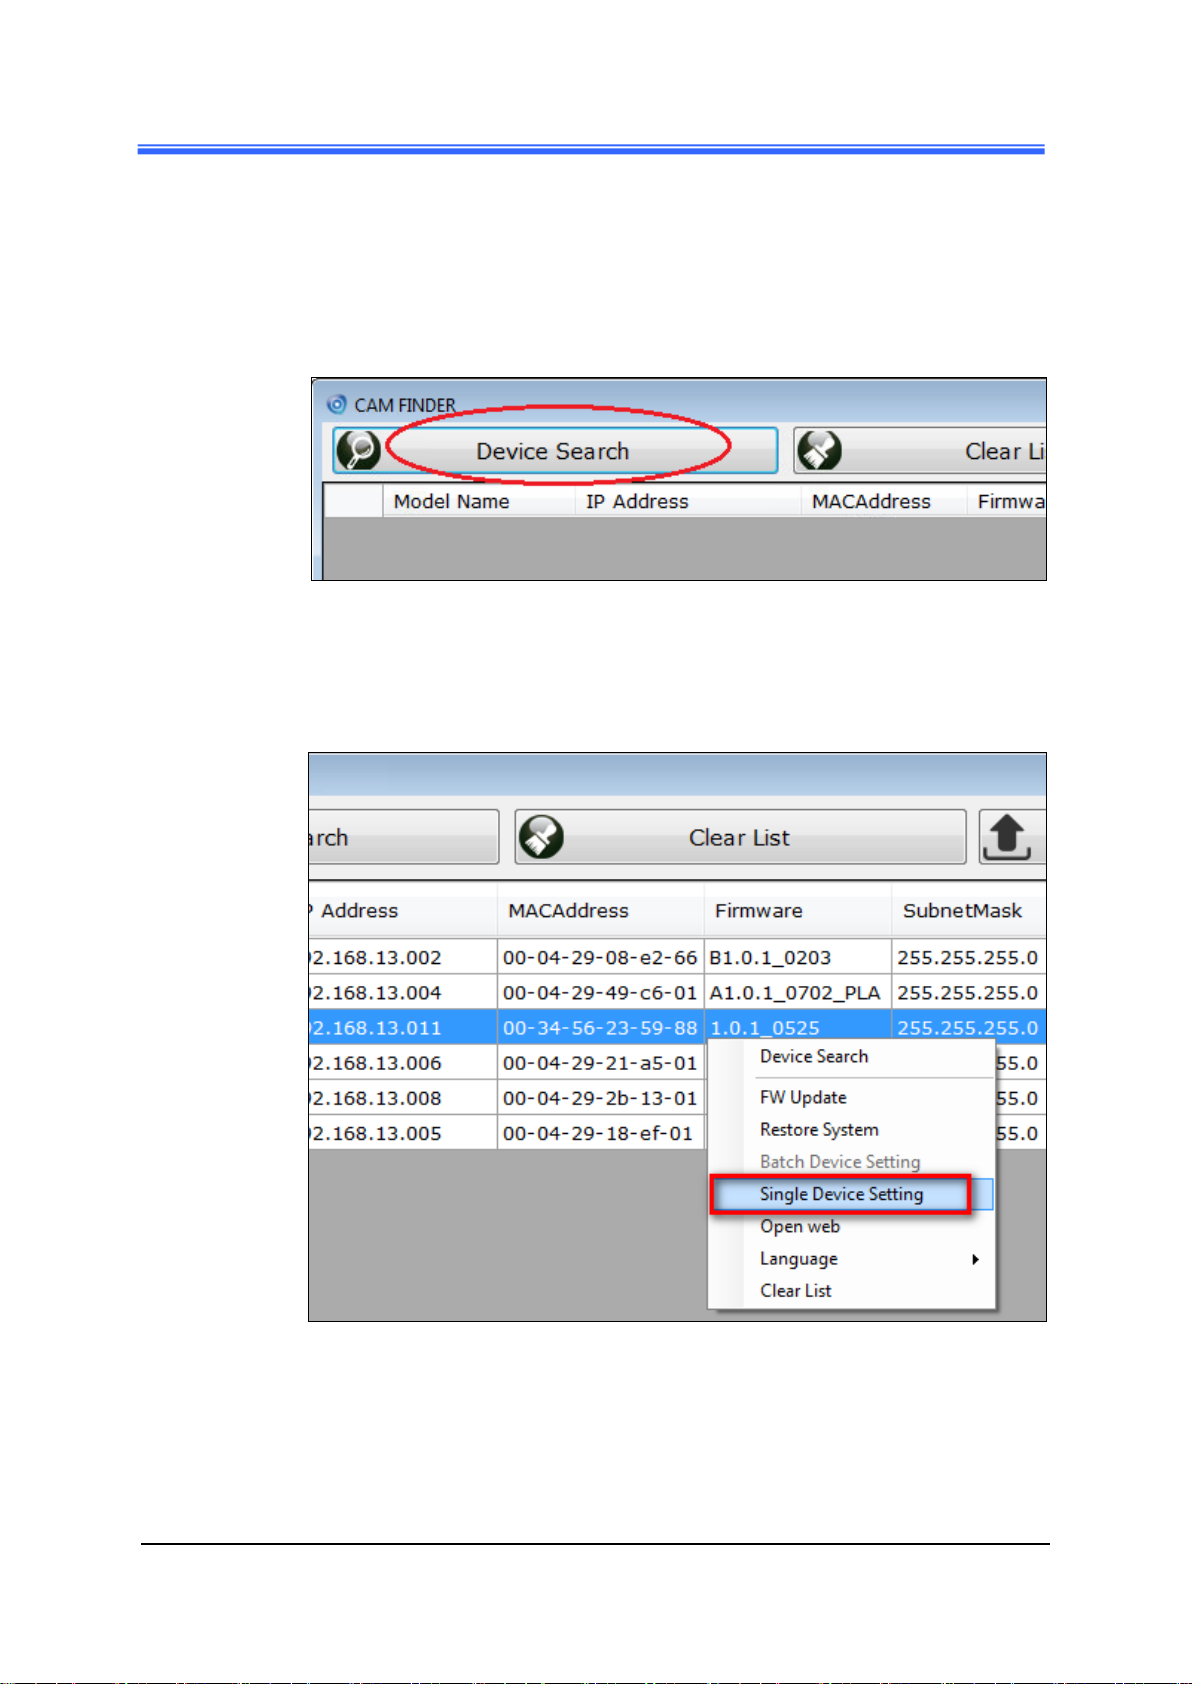
2.3.1 Use CAM FINDER to Assign IP Address
1. Click the [Device Search] to search the camera on the network.
2. Under your selected item, double-click the left Mouse button or Right-click
the Mouse button to open the Property Page of the [Single Device Setting].
iCAM-721F User’s Manual ICP DAS 17

Chapter 2
3. Check [Static IP address] item to select the network connection method of the
camera.
4. After modifying the camera properties, click [Set] button to save and enable the
configuration modifications.
iCAM-721F User’s Manual ICP DAS 18
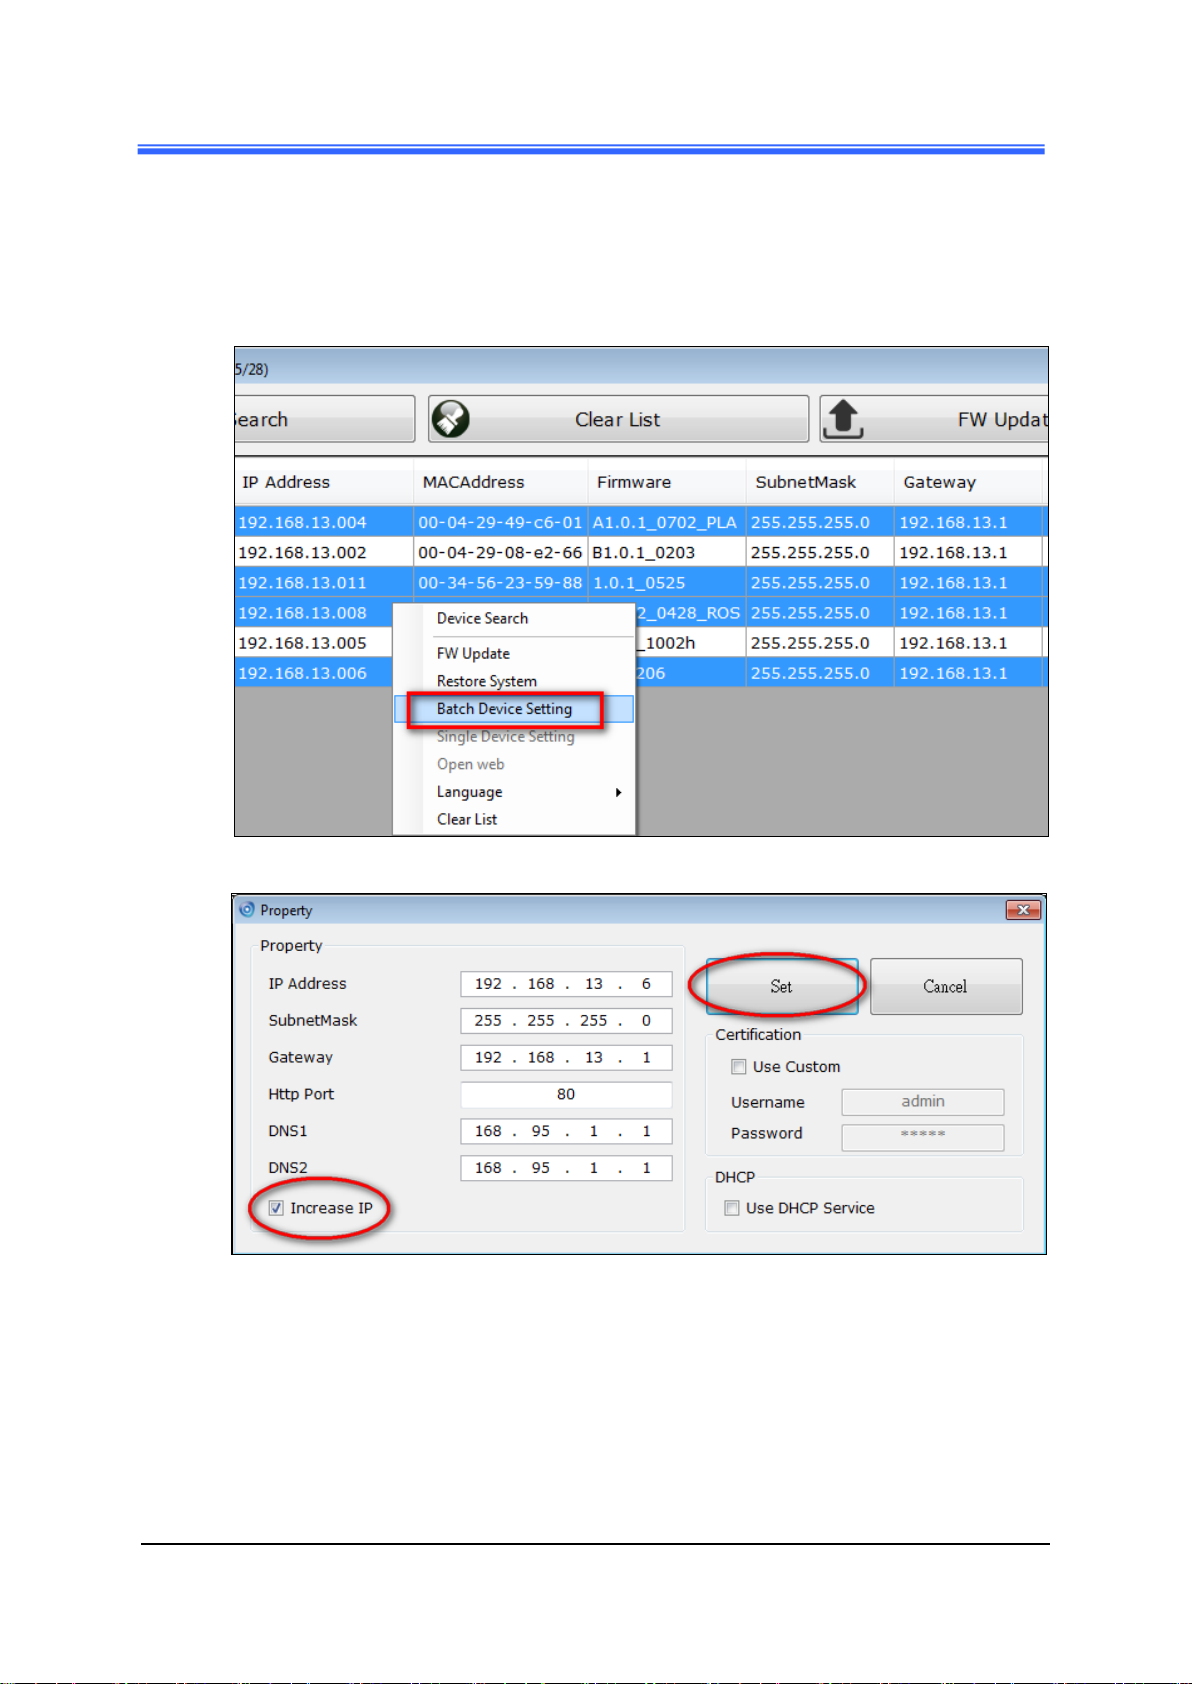
Chapter 2
5. This Utility can batch modify IP address automatically. Use “Ctrl” or “Shift” key on
the keyboard to choose several Camera Devices. Then click the [Batch Device
Setting] to configure them together.
iCAM-721F User’s Manual ICP DAS 19
Chapter 2
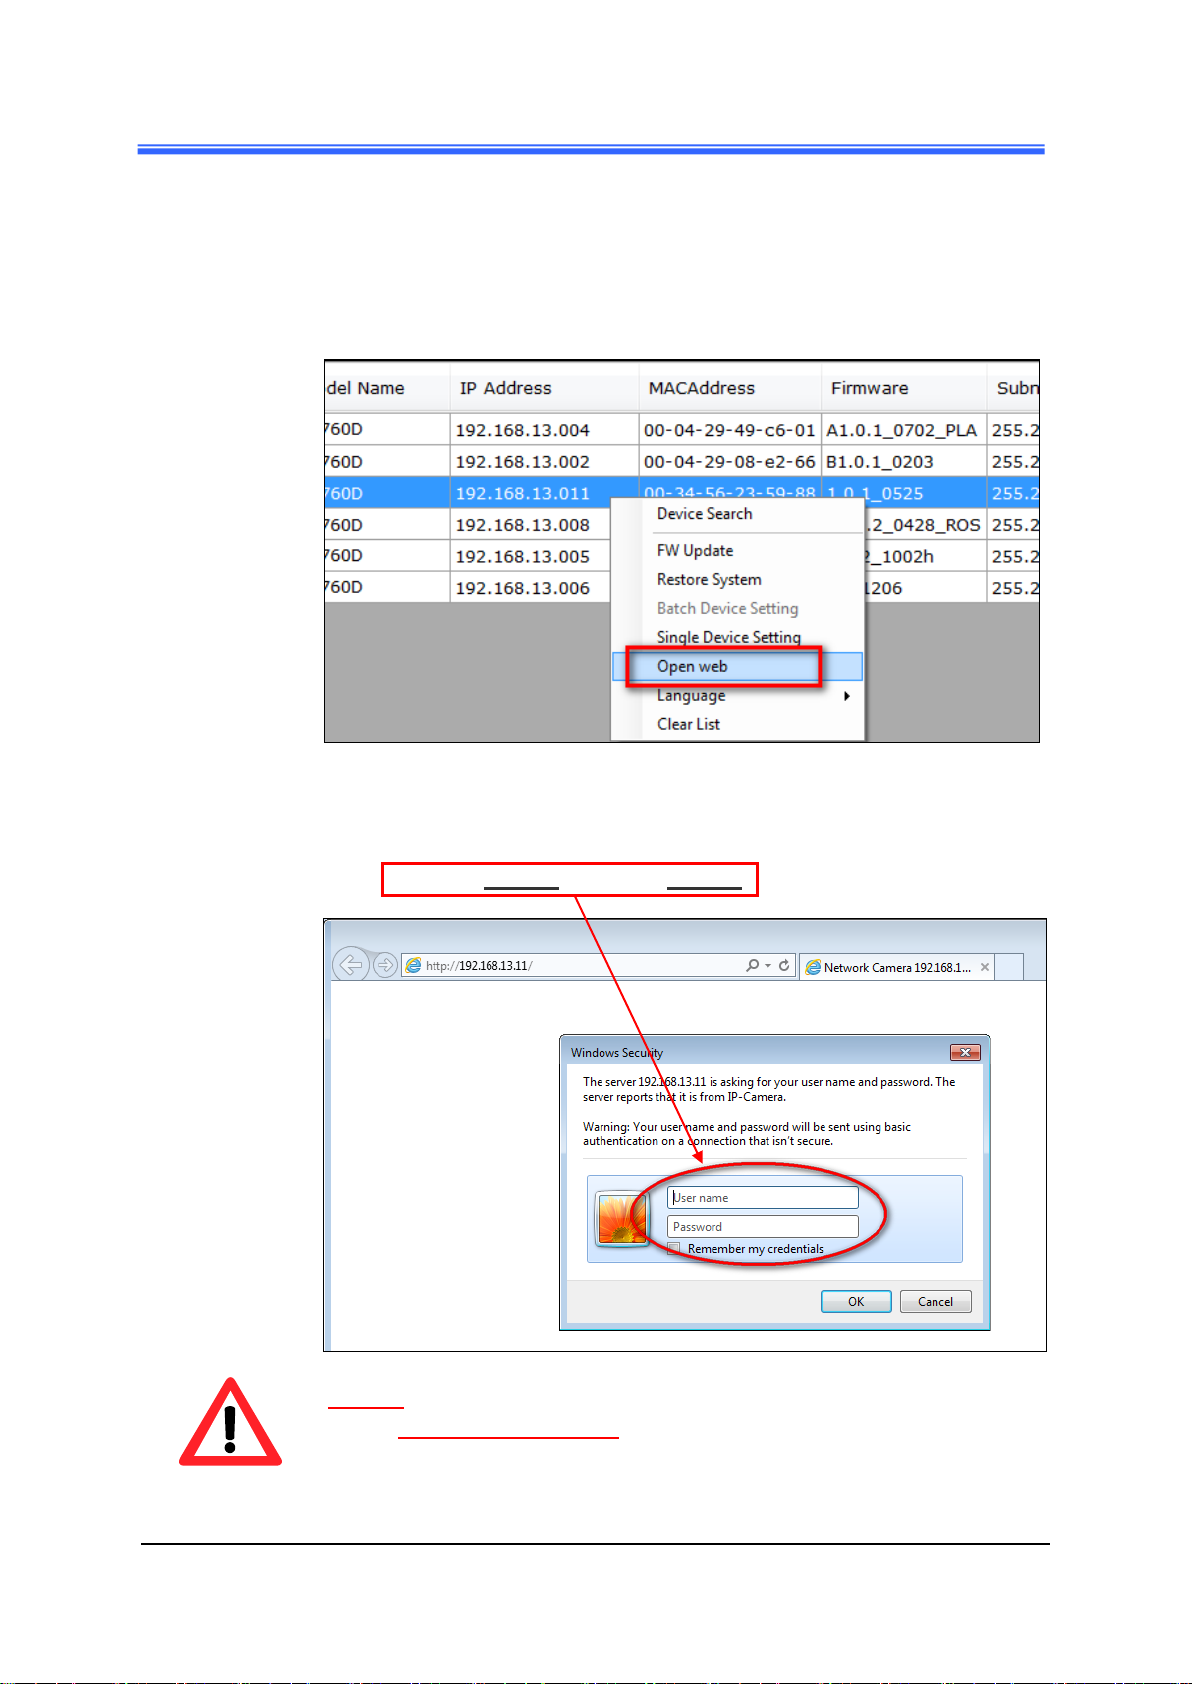
2.3.2 Open the Web-based UI of the Camera
1. To access the Web-based UI of the selected unit, run the [Open Web] on the
select item from the CAM Finder software window.
2. Manual input the username and password for the login authentication of
camera webpage. For the first time login of setting or using, please use the
default username admin, password admin .
NOTE:
Use of Microsoft IE browser is recommended as it offers a better
compatibility.
iCAM-721F User’s Manual ICP DAS 20
Chapter 2
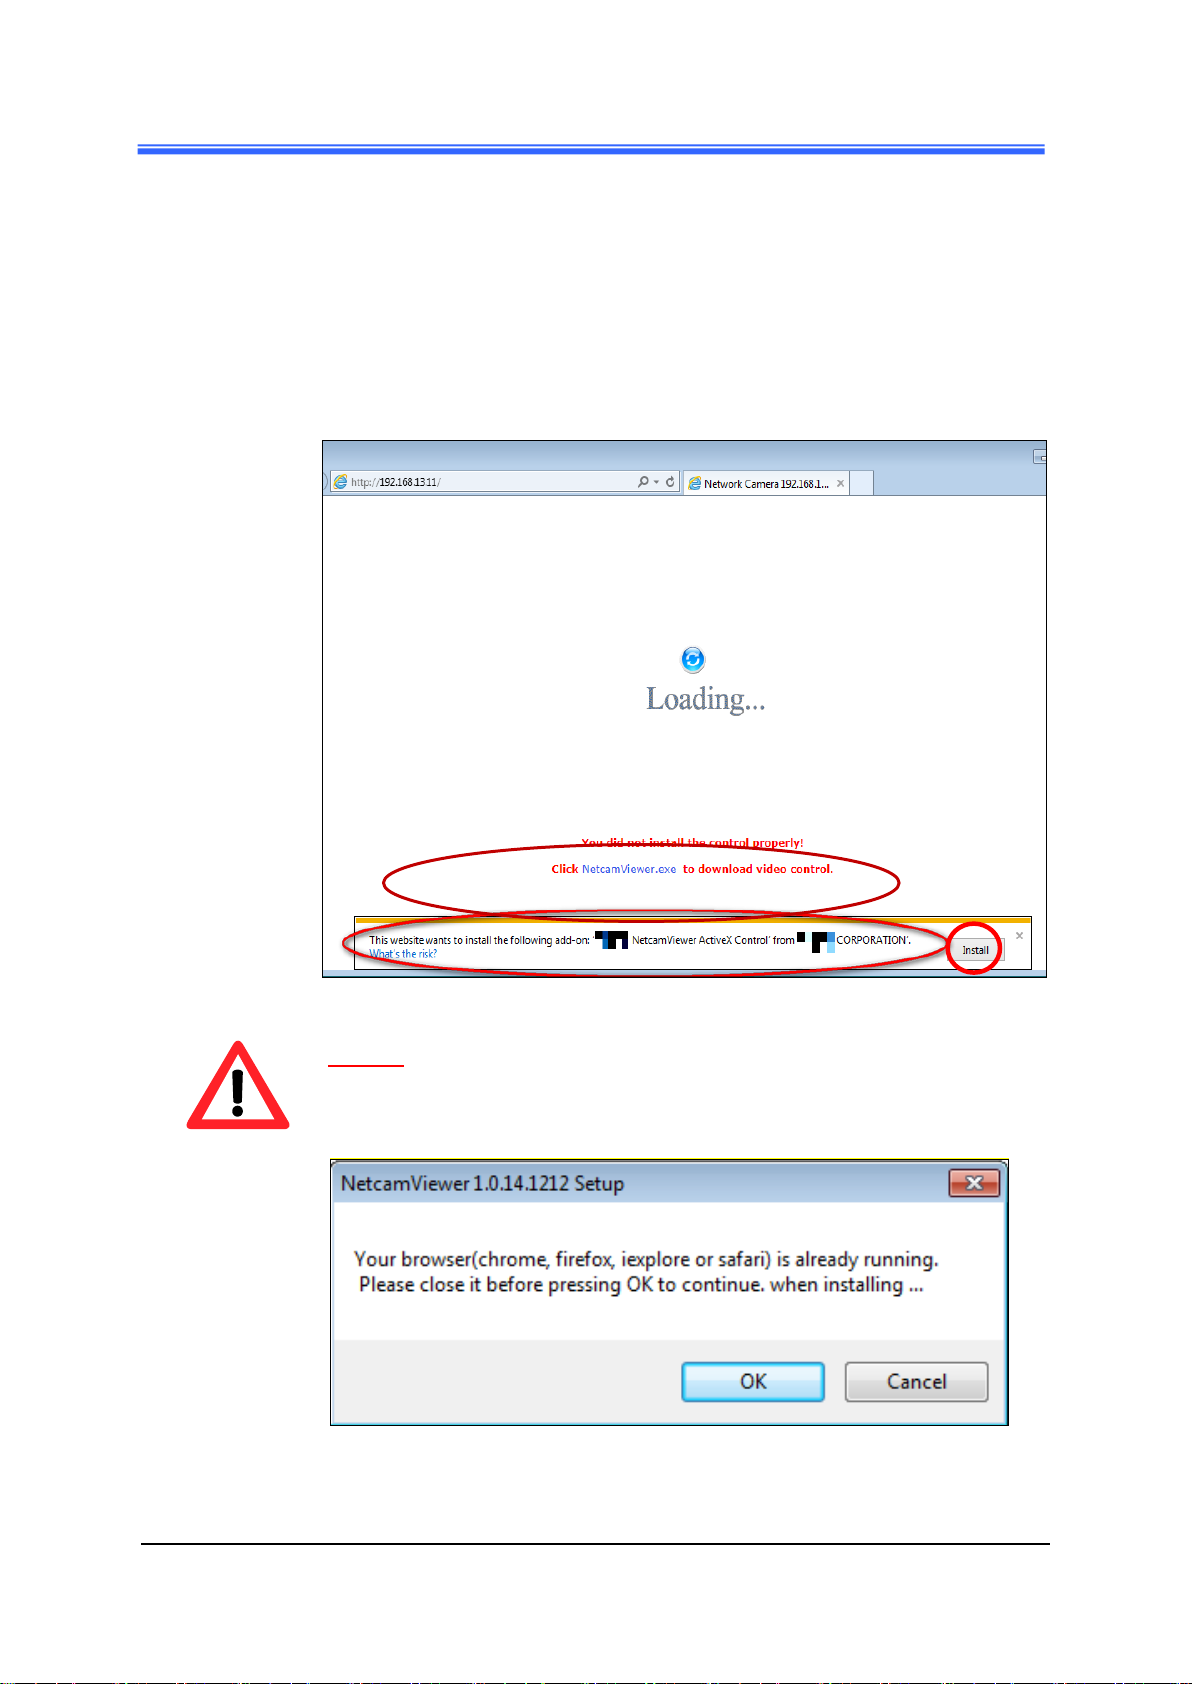
3. For first time user, there will be a prompt to install the NetcamViewer and
allow the ActiveX control. Comply with the ActiveX installation as they are
needed to view the video stream and some other operations.
Besides, use of Microsoft IE browser is recommended as it offers a better
compatibility.
Please click the NetcamViewer hyper-link to download and install it.
NOTE:
Please also note to close all browser applications before NetcamViewer
web component installation.
iCAM-721F User’s Manual ICP DAS 21
4. If the camera and browser components have been configured correctly, the
default Web browser will open to the Live View page of the selected camera.
* Username and password is required. (Default is admin / admin)
Verify and Complete the Installation from Your Browser
If your IE Browser can’t get the ActiveX download properly, you may have
to temporarily lower your security settings to perform a one-time-only
installation of the ActiveX component onto your workstation, as described
below:
1. From the IE Browser menu, select
[Internet Options] -> [Security] -> [Custom Level]
2. Set the security level to Low and click [OK].
3. Don’t forget to restore the security level after the ActiveX installation.
Chapter 2
iCAM-721F User’s Manual ICP DAS 22
3 Live View UI Settings
In this chapter, you may change and reconfigure the Camera Live View UI (User
Interface) to suit your need via PC/notebook.
First, open the Camera Web UI by the below steps, or refer to Chapter 2.3.2
Camera Live View UI Setting Tools for detail descriptions.
1) Execute your Web Browser and then manually enter the Camera Device’s IP
address gotten via CAM FINDER utility.
NOTE
For the first time user, there will be a prompt to install the ActiveX control.
Conply with the ActiveX installation as it is needed to view the video stream
and some other operations.
Use of Microsoft IE browser is recommended as it offers a better
compatibility.
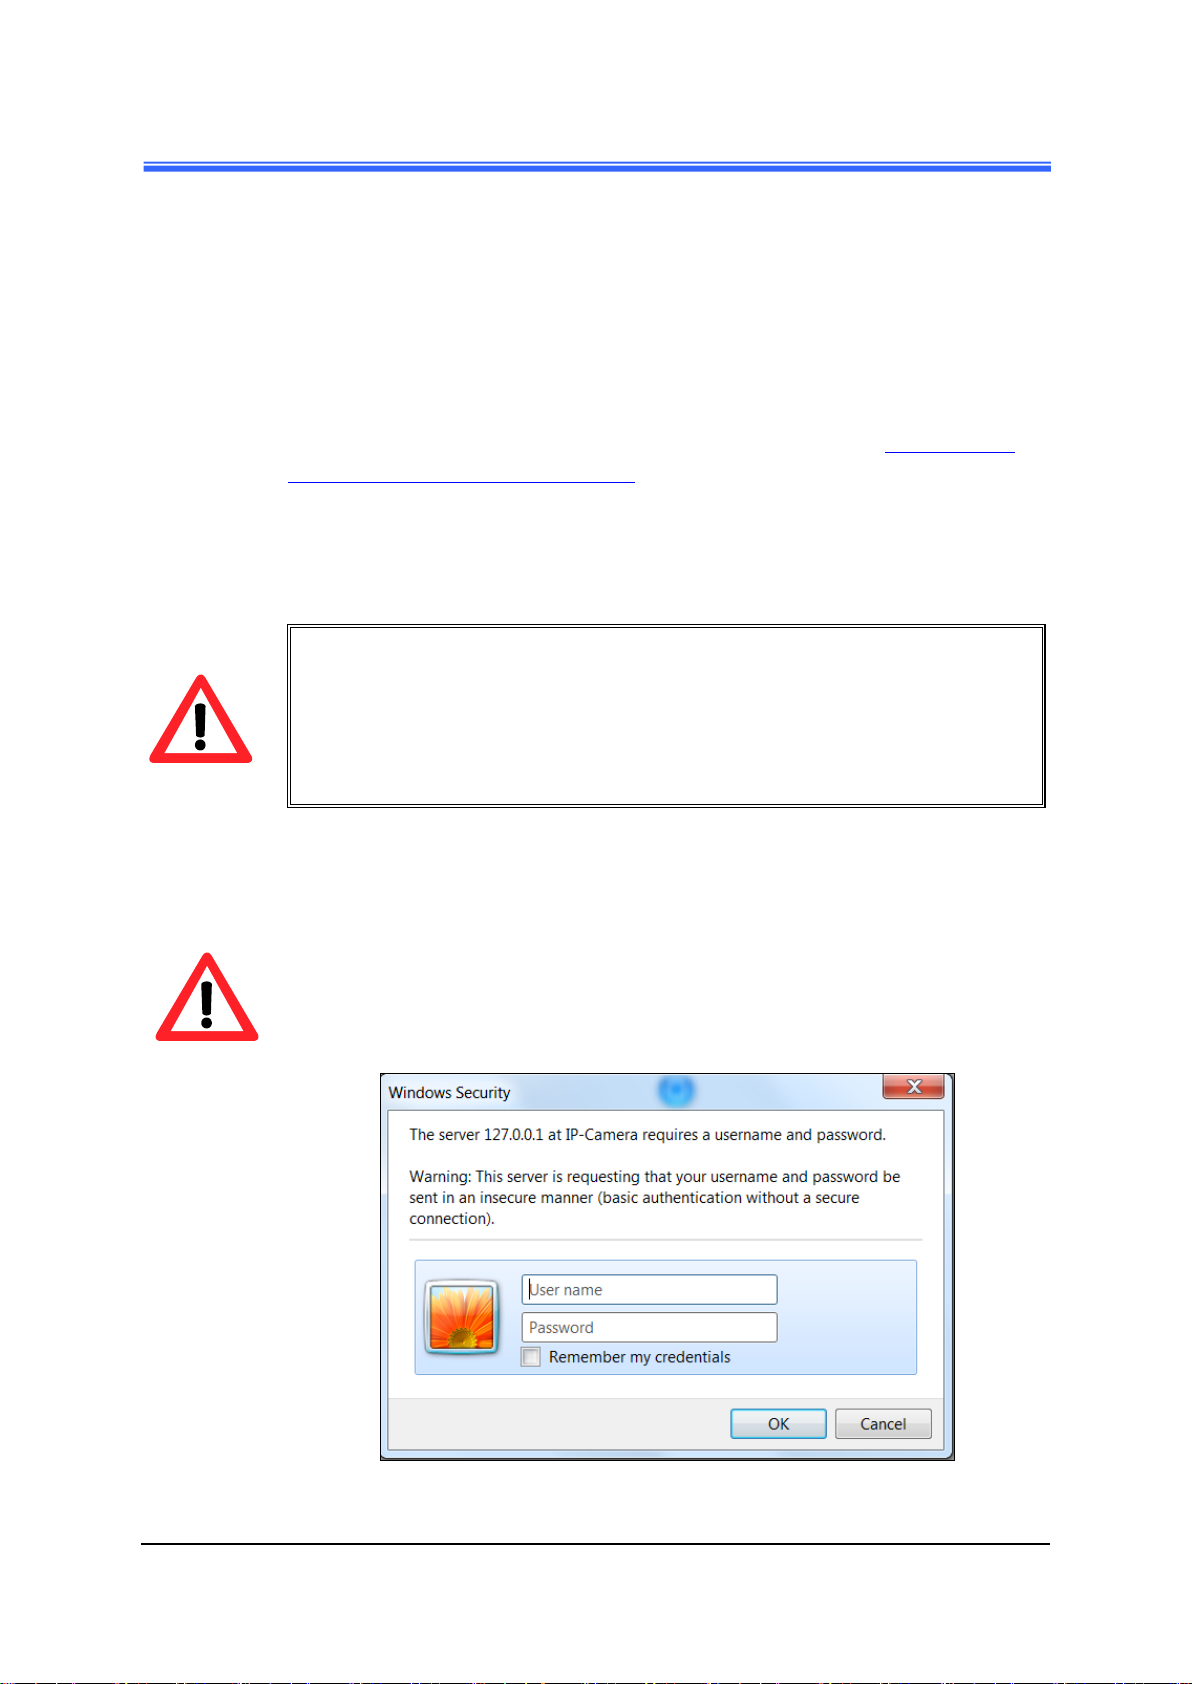
2) Then the “Windows Security” dialog displays. Enter a username and
password. You may enter “admin” for both. Click OK button when
completed.
(Note that same Browser with different version or different vendor Browser
will behave different dialog window. Below picture is belonging to IE
Browser’s diagram.)
iCAM-721F User’s Manual ICP DAS 23

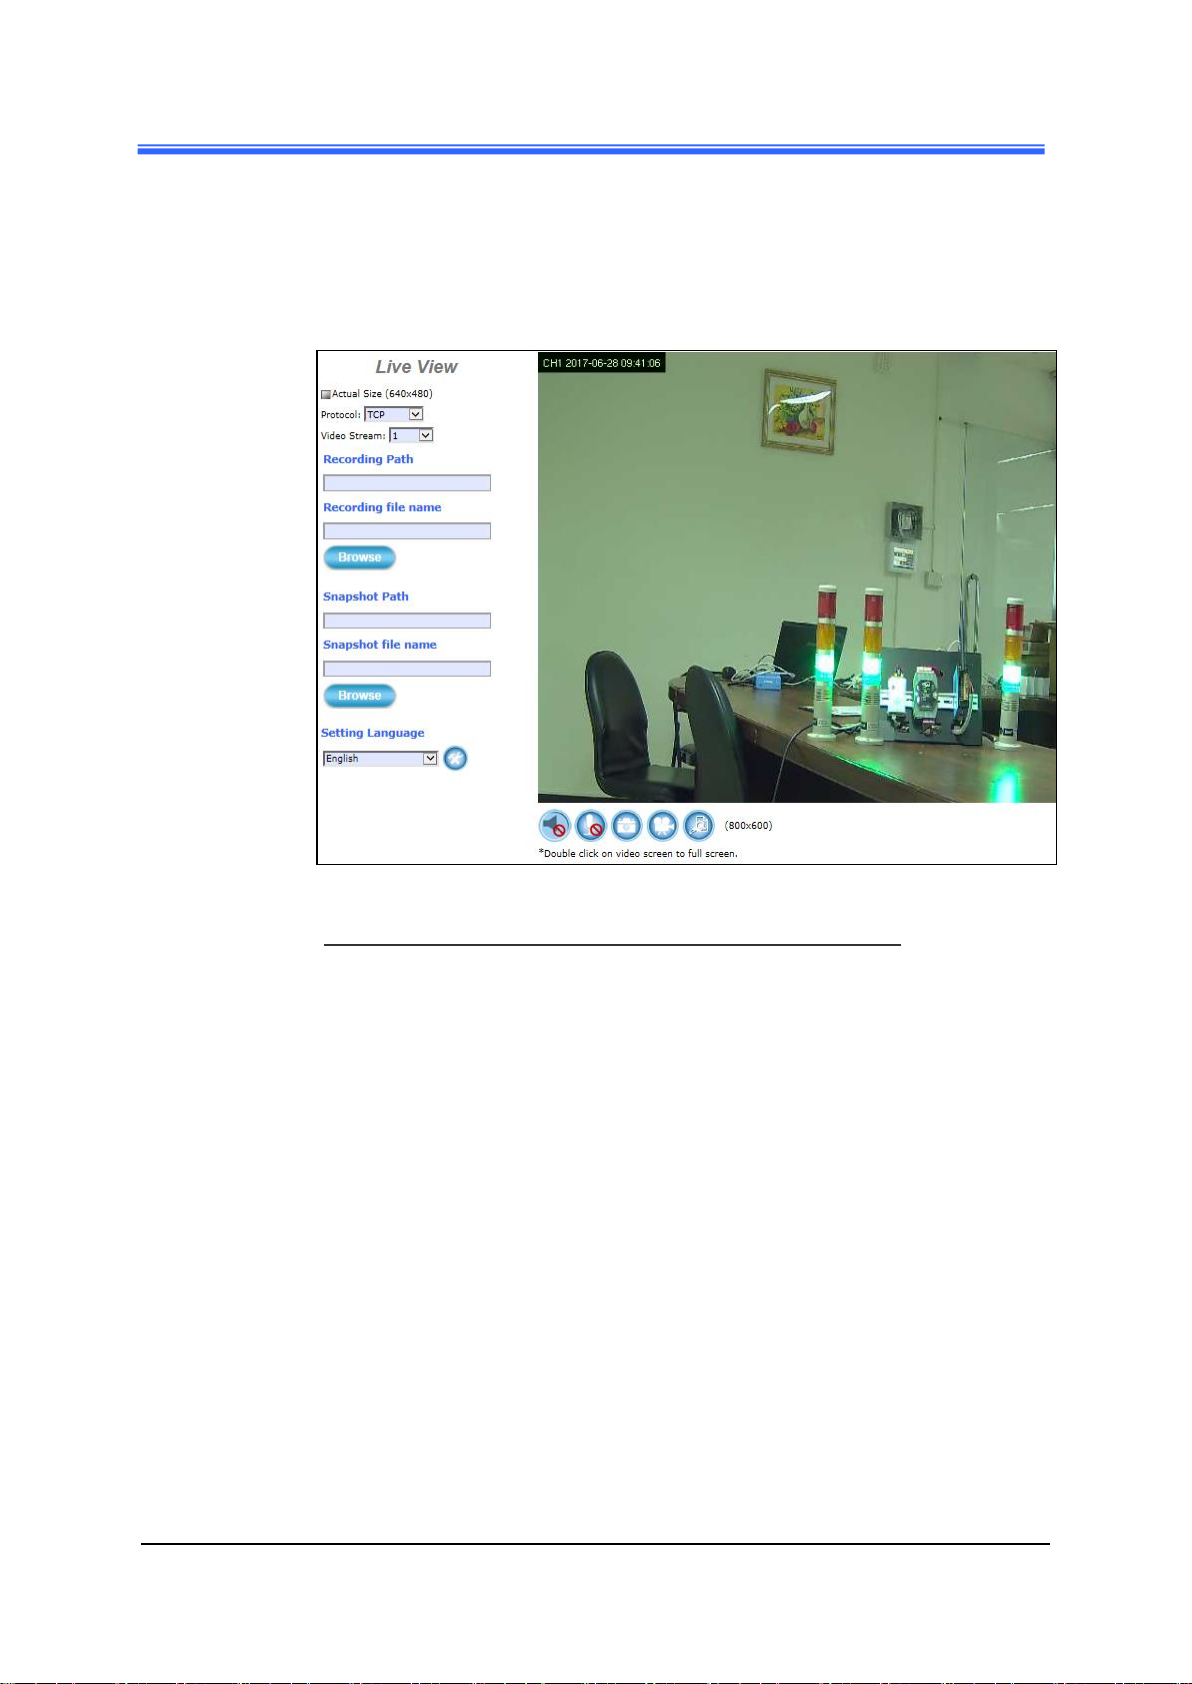
3) The “Live View” setting window will then display offering all the necessary
set up tools for changing the live view reconfigurations. The functions of
each of these tools are explained in the following sections.
iCAM-721F User’s Manual ICP DAS 24
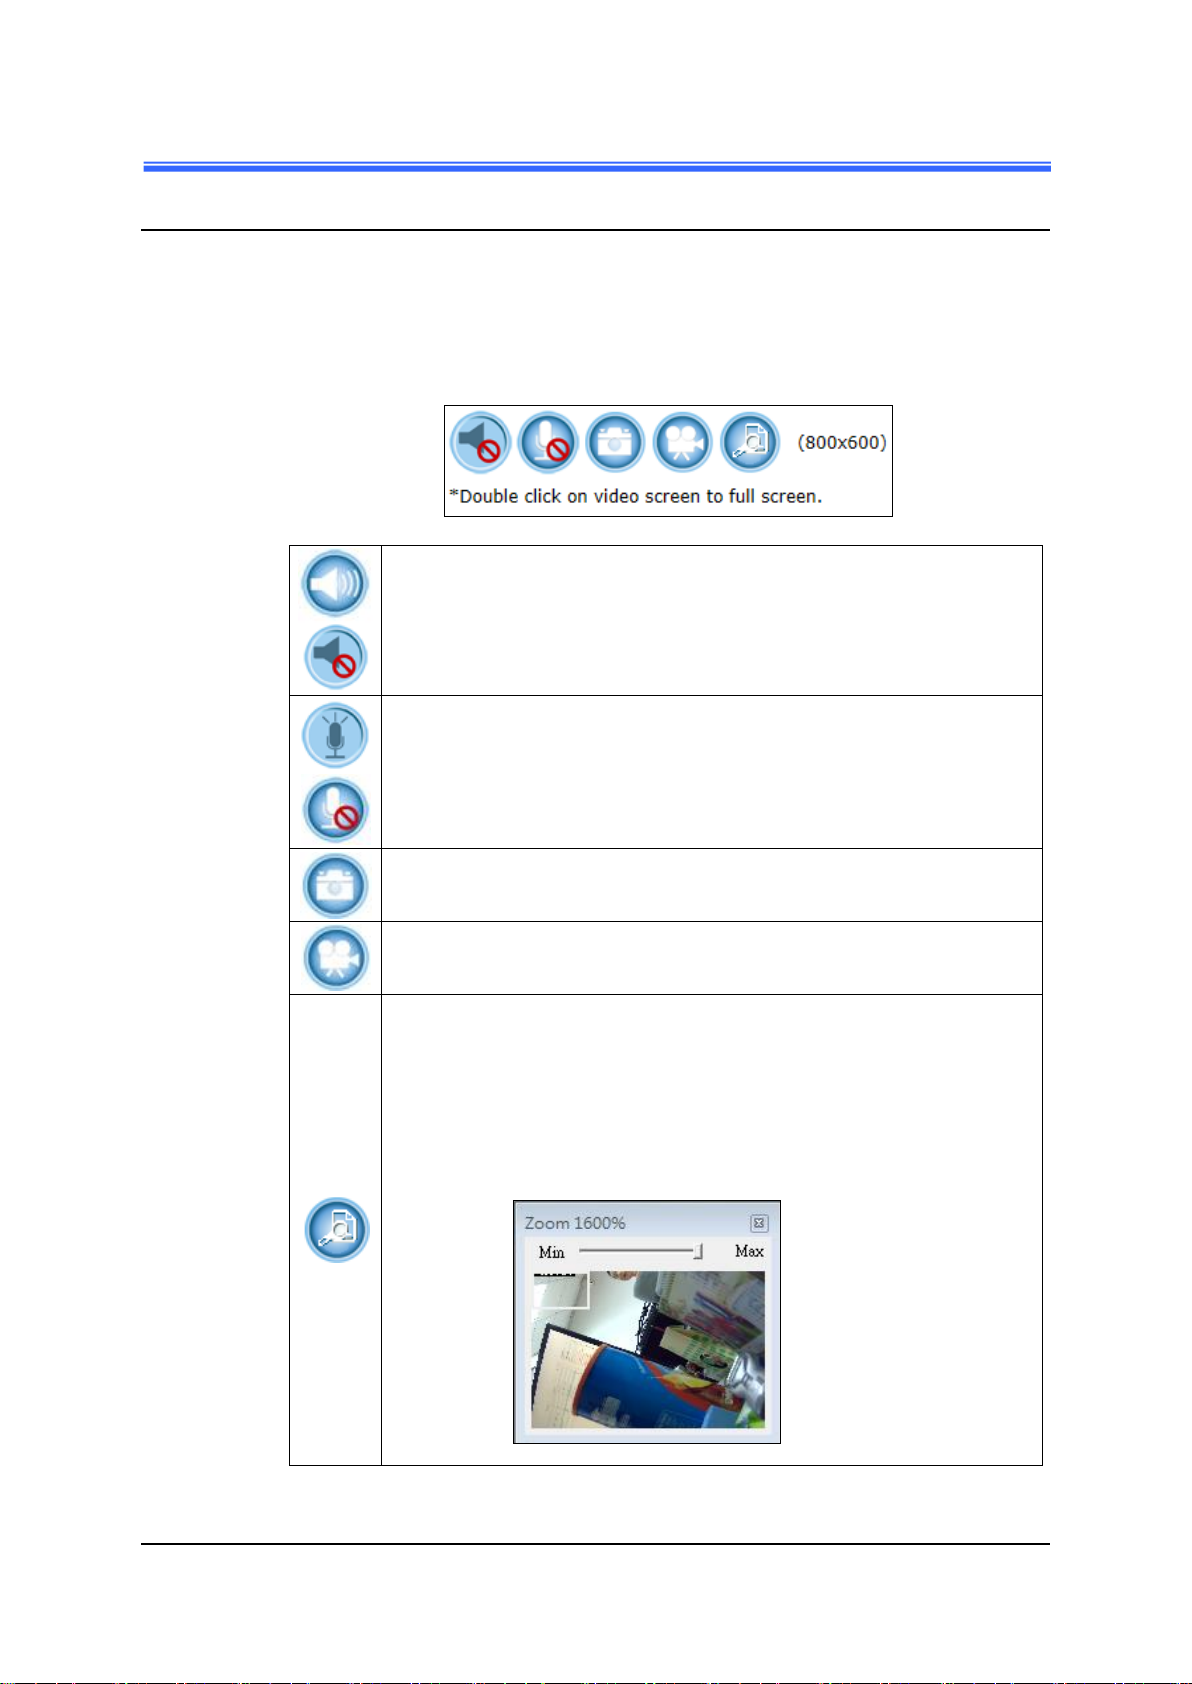
Mute: Click this button to turn on/off the Windows speaker of
the host computer/NB. If turn it to the “Mute” status,
the ActiveX will not let the IP CAM voice stream
output to the Speaker of the PC/NB.
Chatting: Click this button to enable/disable Chatting function
to someone facing the network Camera from the
computer. For ideal voice reception, the distance of the
person on view, should be kept within 2 meters from
the Camera.
Snapshot: Click this button to capture still images taken from the
Camera and save them in the host computer/NB.
Record: Click this button to record live video clips from the
Camera into your computer/NB.
Digital Zoom: Digital “zoom in” & “zoom out” to the particular
area of the live view; and the particular area also could
be moved wherever you want to see. To display the
whole live view into full screen mode, double click the
mouse left button on the video; and press “ESC” key
on the keyboard could exit full screen view.
3.1 Quick Access Buttons
The following buttons provide the basic interactive functions between the
Camera and the host computer as described below.
iCAM-721F User’s Manual ICP DAS 25
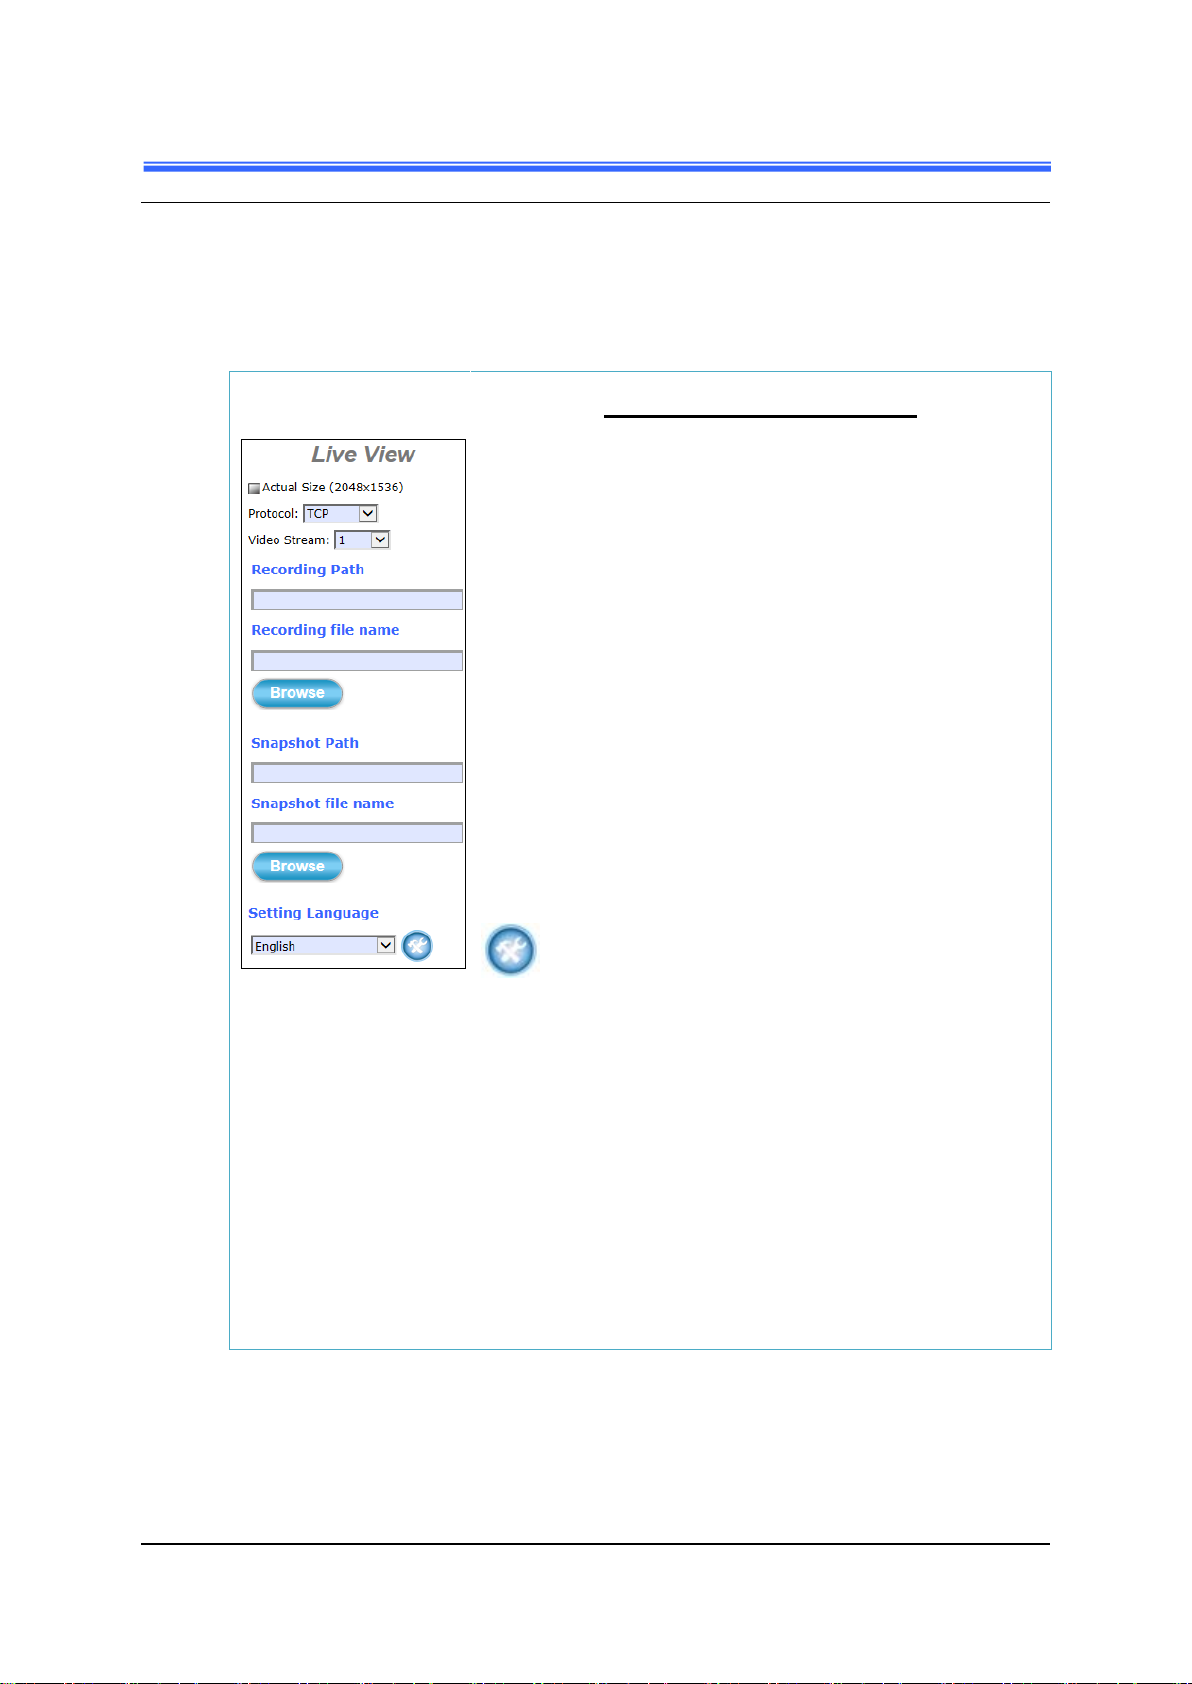
Figure 3-4 Camera Live
View Reconfiguration Tools
Overview of Live View UI
Actual Size / Protocol / Video Stream:
Choice the size, protocol and video stream.
Recording Path / Recording file name:
Specify a storage destination path for the video and define
a base filename for the video you are going to record.
Snapshot Path / Snapshot file name:
Specify a storage destination path for the snapshot images
and define a base filename for the snapshots you are going
to capture.
Setting Language:
Select the default language of the user-interface.
Setup button:
Click Setup button can change or update more Camera
settings, including Video & Audio, System, Network,
Event, Local Storage and Remote Storage.
3.2 Camera Live View UI Setting Tools
The Live View UI setting tools (the below figure) offer a variety of methods in
changing the live view configurations of the Camera.
iCAM-721F User’s Manual ICP DAS 26
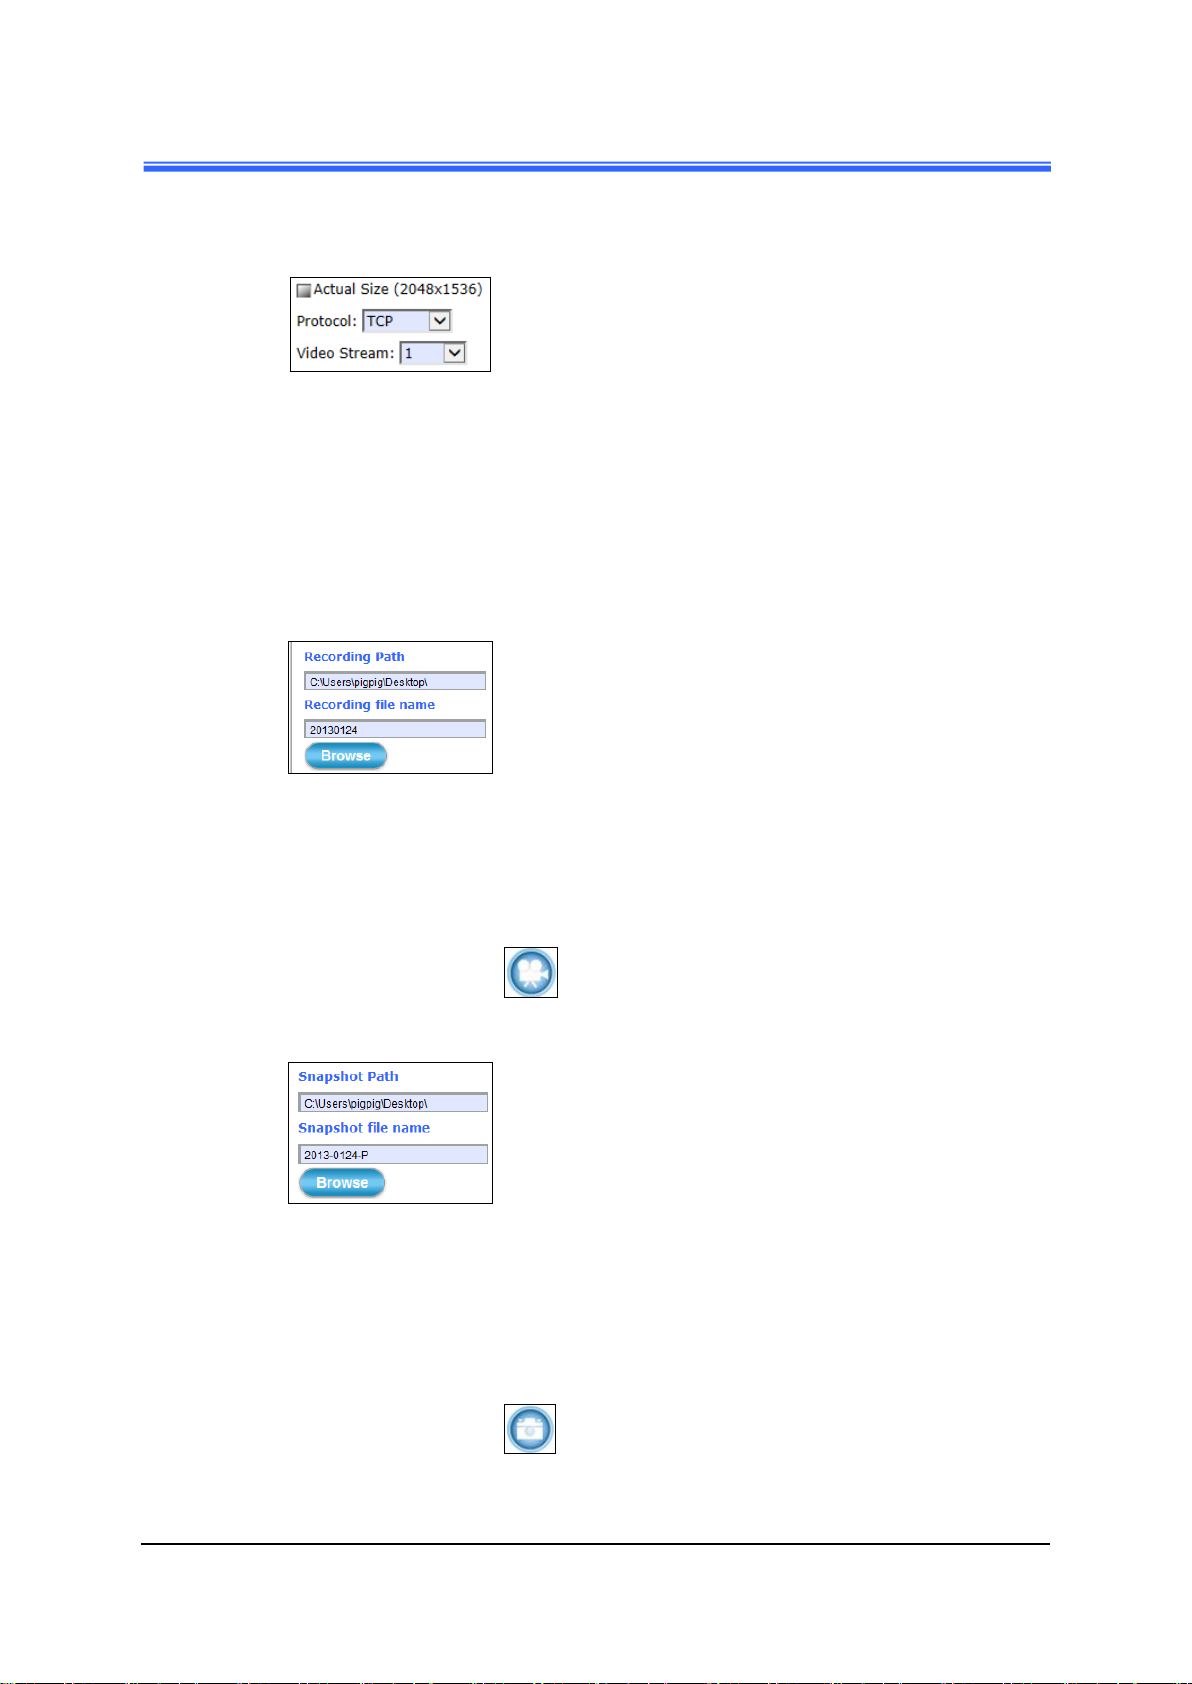
Actual Size: Check to show the live view display
resolution in actual size (2048 x 1536). The
default is in “uncheck” status (800 x 600).
Protocol: Option for TCP, UDP or HTTP
transmission protocol with H.264/MPEG4
streaming is available.
Video Stream: Two simultaneous streaming is
supported for live viewing.
Browse: Click Browse button to define Recording
Path and Recording Filename for the video
you are preparing to record.
Recording Path: Specify a storage destination path for
the video you are going to record.
Recording file name: Define a base filename for the
video recordings you are going to take.
EX: set as “office123”. It will auto-expand
date & time for each saved video filename
as “office123 _20170510_102808.avi”.
: To start recording, click the Recording
button in the Quick Access Button area.
Browse: Click Browse button to define Snapshot
Path and Snapshot Filename for the
snapshots you are preparing to capture.
Snapshot Path: Specify a storage destination path for
the snapshot images you are preparing to
capture.
Snapshot file name: Define base filename for the
snapshots you going to capture.
EX: set as “night456”. It will auto-expand
date & time for each saved snapshot file as
“night456 _20170510_102808.jpg”.
: To start capturing snapshots, click the
Snapshot button in the Quick Access
Button area.
Actual Size / Protocol / Video Stream:
Recording / Snapshot:
iCAM-721F User’s Manual ICP DAS 27
 Loading...