

Page 1
Installation
Instructions
• Safety Labeling and Rules
• Installation Requirements
• Location/Clearances
• Air Distribution
• Wiring
• Ductwork Connections
• Start-Up
• Operation
• Maintenance
• Inspection
• Hoisting/Rigging
3 thru 7-1/2 Ton
Belt Drive Models
Electric Cool & Heat
Printed in U.S.A. 513 01 1302 00 10/23/01
Page 2
I Installation Instructions Combination Units I
1. Safety Labeling And Signal Words
DANGER,WARNING AND CAUTION
The signal words DANGER, WARNING and CAUTION are
used to identify levels of hazard seriousness. The signal
word DANGER is only used on product labels to signify an
immediate hazard. The signal words WARNING and CAU-
TION will be used on product labels and throughout this
manual and other manuals that may apply to the product.
SIGNALWORDS
DANGER - Immediate hazards which WILL result in severe
personal injury or death.
WARNING - Hazards or unsafe practices which COULD re-
sult in severe personal injury or death.
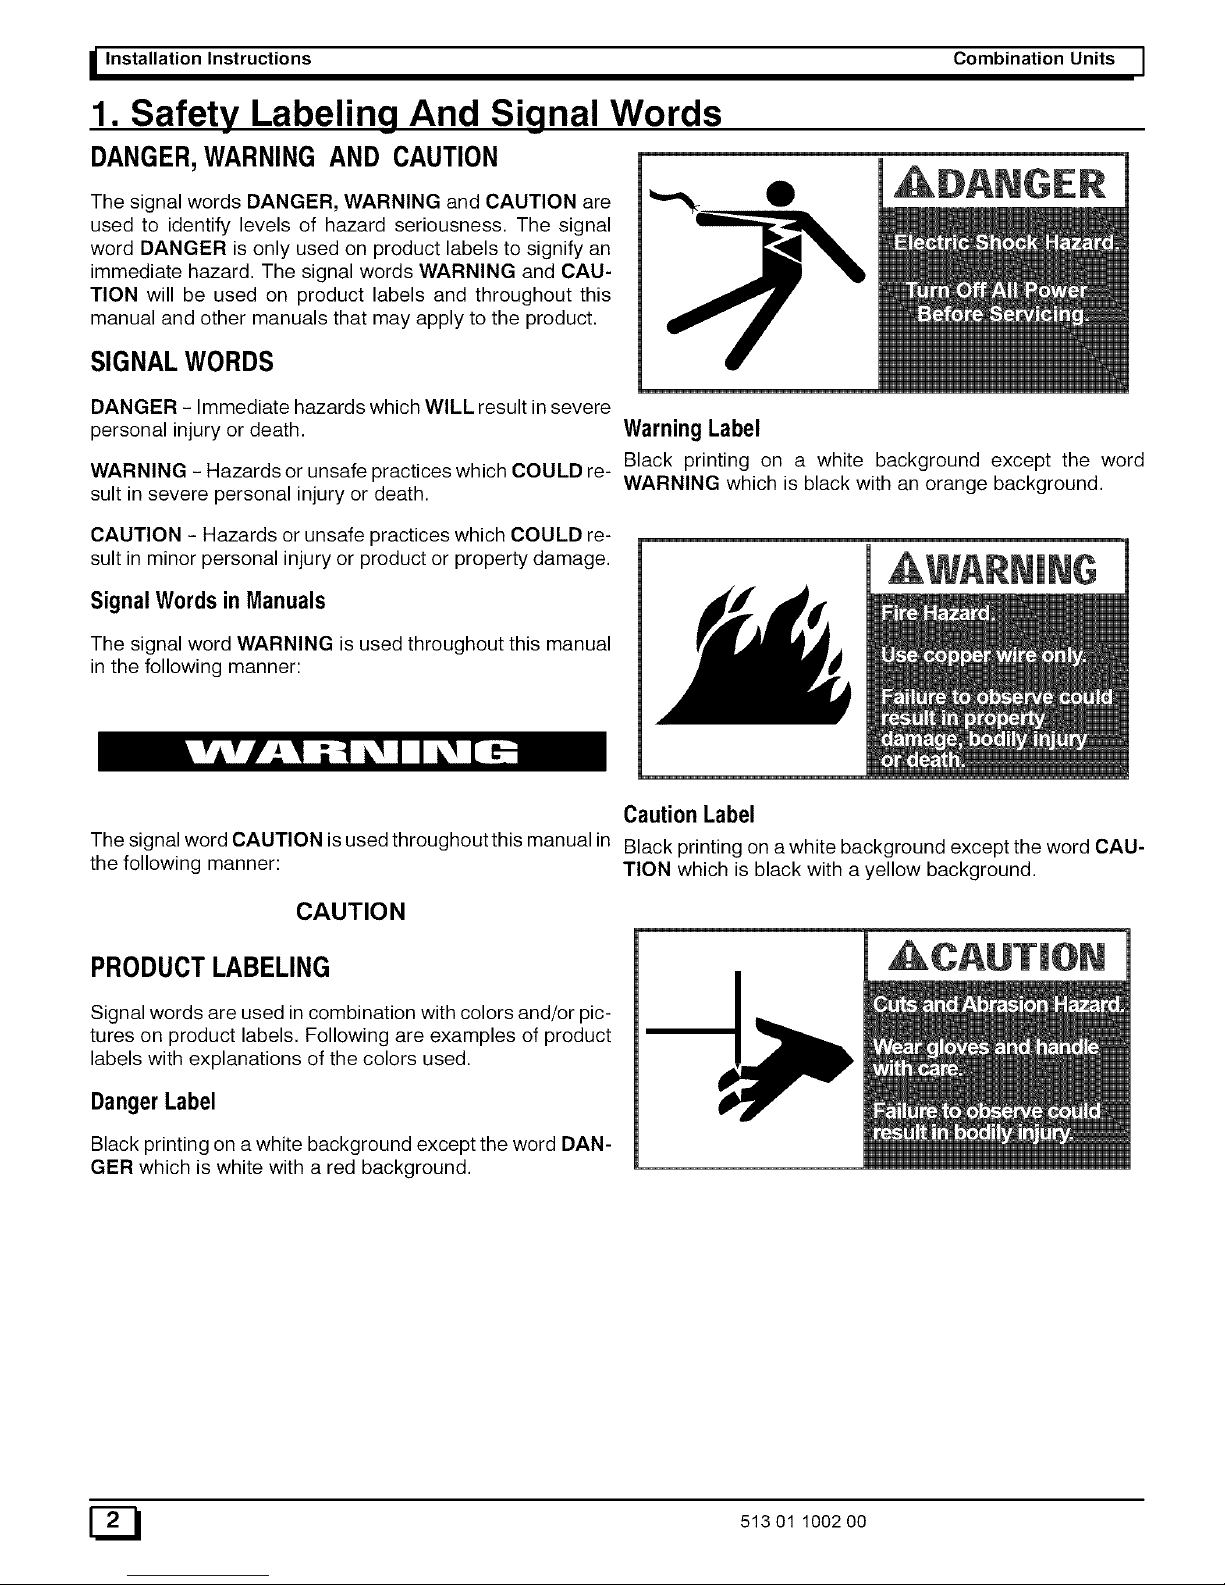
Warning Label
Black printing on a white background except the word
WARNING which is black with an orange background.
CAUTION - Hazards or unsafe practices which COULD re-
sult in minor personal injury or product or property damage.
Signal Wordsin Manuals
The signal word WARNING is used throughout this manual
in the following manner:
Caution Label
The signal word CAUTION is used throughoutthis manual in Black printing on awhite background except the word CAU-
the following manner: TION which is black with a yellow background.
CAUTION
PRODUCTLABELING
Signal words are used incombination with colors and/or pic-
tures on product labels. Following are examples of product
labels with explanations of the colors used.
DangerLabel
Black printing on a white background except the word DAN-
GER which is white with a red background.
E_ 513 01 1002 O0
Page 3
I Combination Units Installation Instructions I
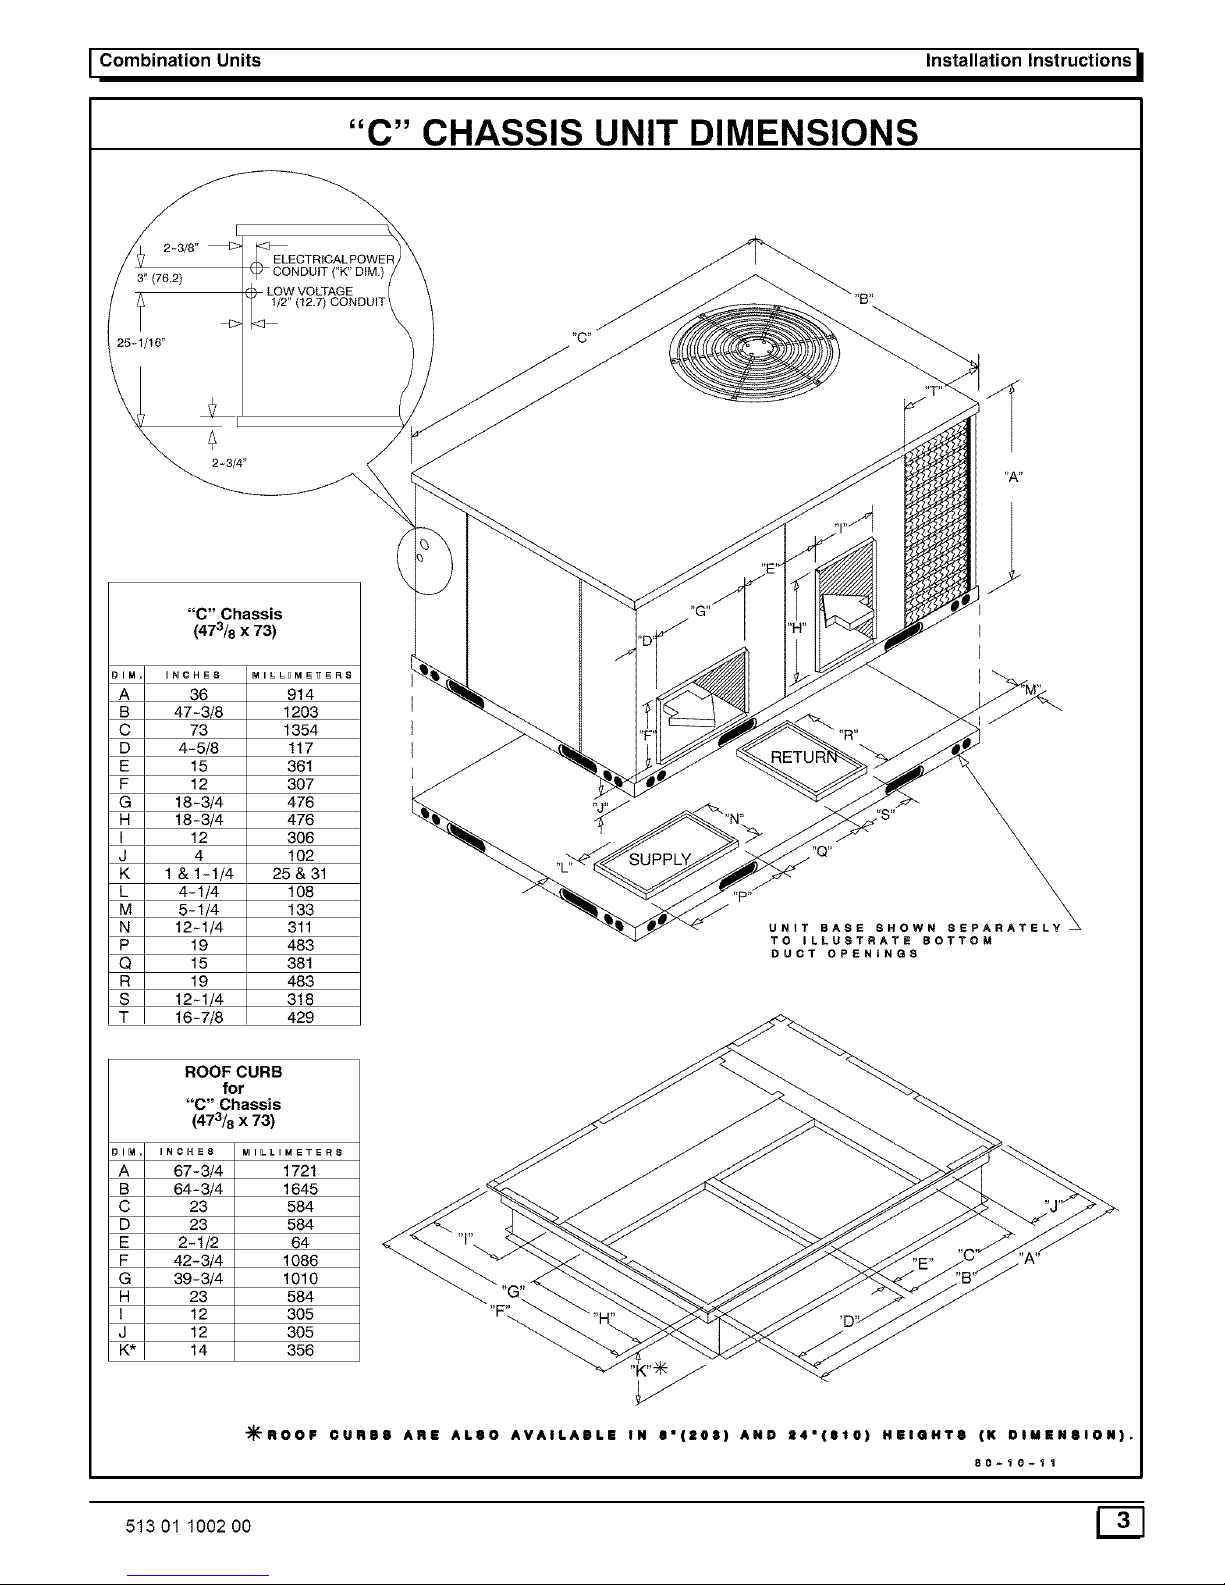
"C" CHASSIS UNIT DIMENSIONS
2-3/8"
3" (76.2)
) LOW VOLTAGE
1/2" (12.7) CONDUIT
"C" Chassis
(473/8 x 73)
DIM= ONCH_8 MILLOMETERS
A 36 914
B 47-3/8 1203
C 73 1354
D 4-5/8 t17
E 15 36t
F 12 307
G 18- 3/4 476
H 18- 3/4 476
I 12 306
J 4 102
K 1&1-1/4 25&31
L 4-1/4 108
M 5-1/4 133
N 12-1/4 311
P 19 483
Q 15 38t
R 19 483
S 12-1/4 318
T 16 - 7/8 429
ROOF CURB
for
"C" Chassis
(473/8 x 73)
DIM. INCH'8 MILLIMETER8
A 67-3/4 172t
B 64-3/4 1645
C 23 584
D 23 584
E 2-t/2 64
F 42-3/4 1086
G 39-3/4 1010
H 23 584
I 12 305
J 12 305
K* 14 356
"C"
UNIT BASE SHOWN SEPARAT
TO ILLUSTRATE BOTTOM
DUCT OPENINGS
_)_ROOF OURB8 ARE AL80 AVAILABLE IN I'(105) AND E4"(elo) HEIGHT8 (K DIMEN81ON).
80-10-11
513 01 1002 00
Page 4
_ Installation Instructions
2. Safe Installation Requirements
Installation or repairs made by unqualified per-
sons can result in hazards to you and others.
Installation MUST conform with local building
codes or, in the absence of local codes, with the
National Electrical Code NFPA70-1990 or in Can-
ada the CSA C.22.1 - Canadian Electrical Code
Part 1.
The information contained in this manual is in-
tended for use by a qualified service technician
familiar with safety procedures and equipped
with the proper tools and test instruments.
Failure to carefully read and follow all instruc-
tions inthis manual can result in furnace malfunc-
tion, property damage, personal injury and/or
death.
NOTE: It is the personal responsibility and obligation of the
customer to contact a qualified installer to ensure that the
installation is adequate and conforms to governing codes
and ordinances.
3. Locating the Unit
The unit is designed for outdoor installation only. The unit
may be installed on a concrete mounting base at ground lev-
el, or on a rooftop with an adequate platform or if using as a
downflow model, with a roof curb.
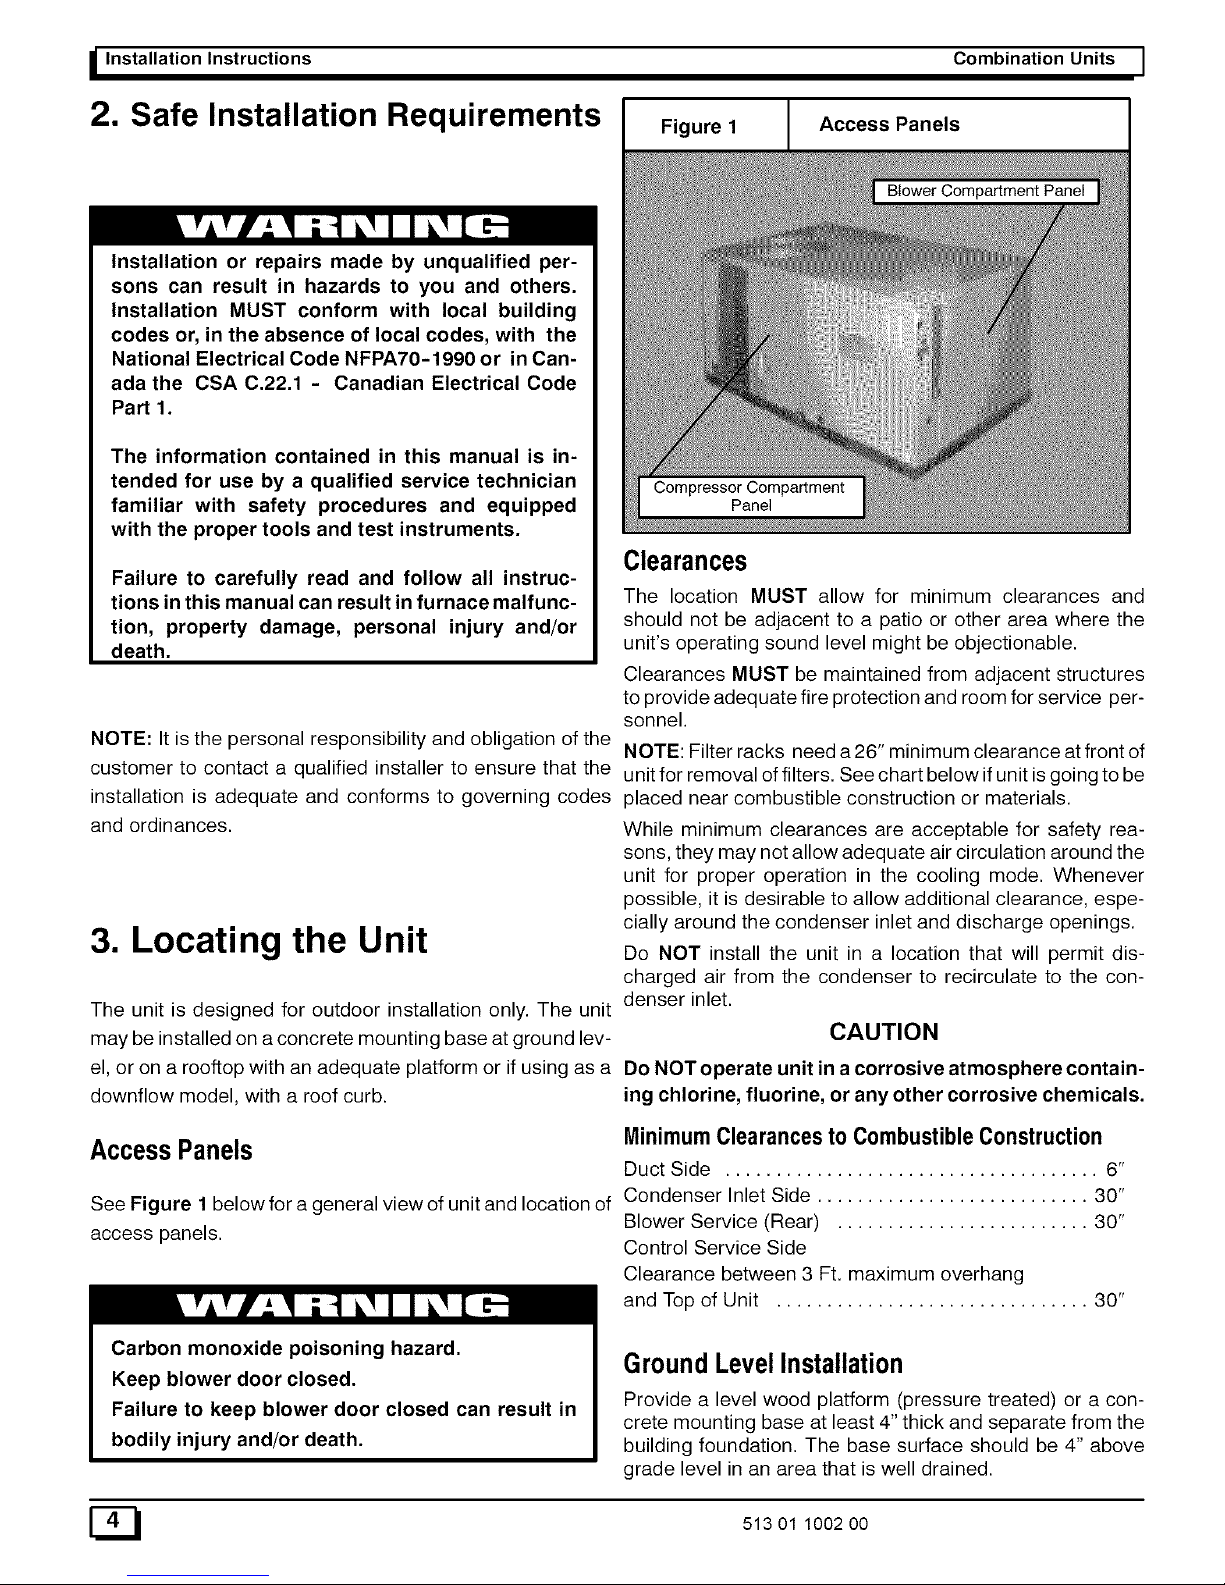
AccessPanels
See Figure 1 below for a general view of unit and location of
access panels.
Figure 1
Clearances
Combination Units I
Access Panels
The location MUST allow for minimum clearances and
should not be adjacent to a patio or other area where the
unit's operating sound level might be objectionable.
Clearances MUST be maintained from adjacent structures
to provide adequate fire protection and room for service per-
sonnel.
NOTE: Filter racks need a 26" minimum clearance at front of
unit for removal offilters. See chart below if unit isgoing to be
placed near combustible construction or materials.
While minimum clearances are acceptable for safety rea-
sons, they may not allow adequate air circulation around the
unit for proper operation in the cooling mode. Whenever
possible, it is desirable to allow additional clearance, espe-
cially around the condenser inlet and discharge openings.
Do NOT install the unit in a location that will permit dis-
charged air from the condenser to recirculate to the con-
denser inlet.
CAUTION
Do NOT operate unit in a corrosive atmosphere contain-
ing chlorine, fluorine, or any other corrosive chemicals.
MinimumClearances to CombustibleConstruction
Duct Side ..................................... 6"
Condenser Inlet Side ........................... 30"
Blower Service (Rear) ......................... 30"
Control Service Side
Clearance between 3 Ft. maximum overhang
and Top of Unit ............................... 30"
Carbon monoxide poisoning hazard.
Keep blower door closed.
Failure to keep blower door closed can result in
bodily injury and/or death.
Ground LevelInstallation
Provide a level wood platform (pressure treated) or a con-
crete mounting base at least 4" thick and separate from the
building foundation. The base surface should be 4" above
grade level in an area that is well drained.
E_ 513 01 1002 O0
Page 5

I Combination Units
CAUTION
Unit will NOT operate properly unless it is installed level
front to rear and side to side.
RooftopInstallation
The existing roof structure MUST be adequate to support the
weight of the unit or the roof MUST be reinforced. Check the
weight of the unit in relation to the roof structure and local
building codes or ordinances and reinforce if necessary.
The unit MUST besituated to provide safe access for servic-
ing. Support for the unit MUST be level and may consist of a
platform or a combination of platform and roof beams or
curb. The platform may be constructed of combustible mate-
rial (wood only), or covered with Class A, B or C roof cover-
ing.
Hoisting
The unit should be hoisted with two lifting slings. Attach the
slings to rigging shackles that have been hooked through
holes in the base rail.
Figure 2
Installation Instructions
Blockoff Plate
(Return Air Compartment)
Screw
Place a short piece of 2x4 between unit and sling near the
top edge to protect unit from damage. Two spreader bars
MUST be used to keep slings from possibly crushing the
sheet metal or damaging the unit. Make sure equipment is
adequate for weight of unit, and that slings will not allow unit
to shift. Refer to Figure 18, last page of these instructions for
illustrated rigging instructions.
DownflowConversion
I Figure 3
Blockoff Plate Removed
(Return Air Compartment)
These units are adaptable to downflow use. To convert to
downflow use, follow these steps:
1. Remove the blockoff plates found in the return air
compartment and the supply air compartment. See
Figure 2 and Figure 3.
NOTE: Blockoff plate in the supply air compartment only
contains one screw. If reinstalling plate, back part of plate
MUST fit into mating dimples on flange. To reinstall, slant
plate into dimples, then put plate into position and fasten with
screw.
2. Install the removed plates on the horizontal return and
supply air openings.
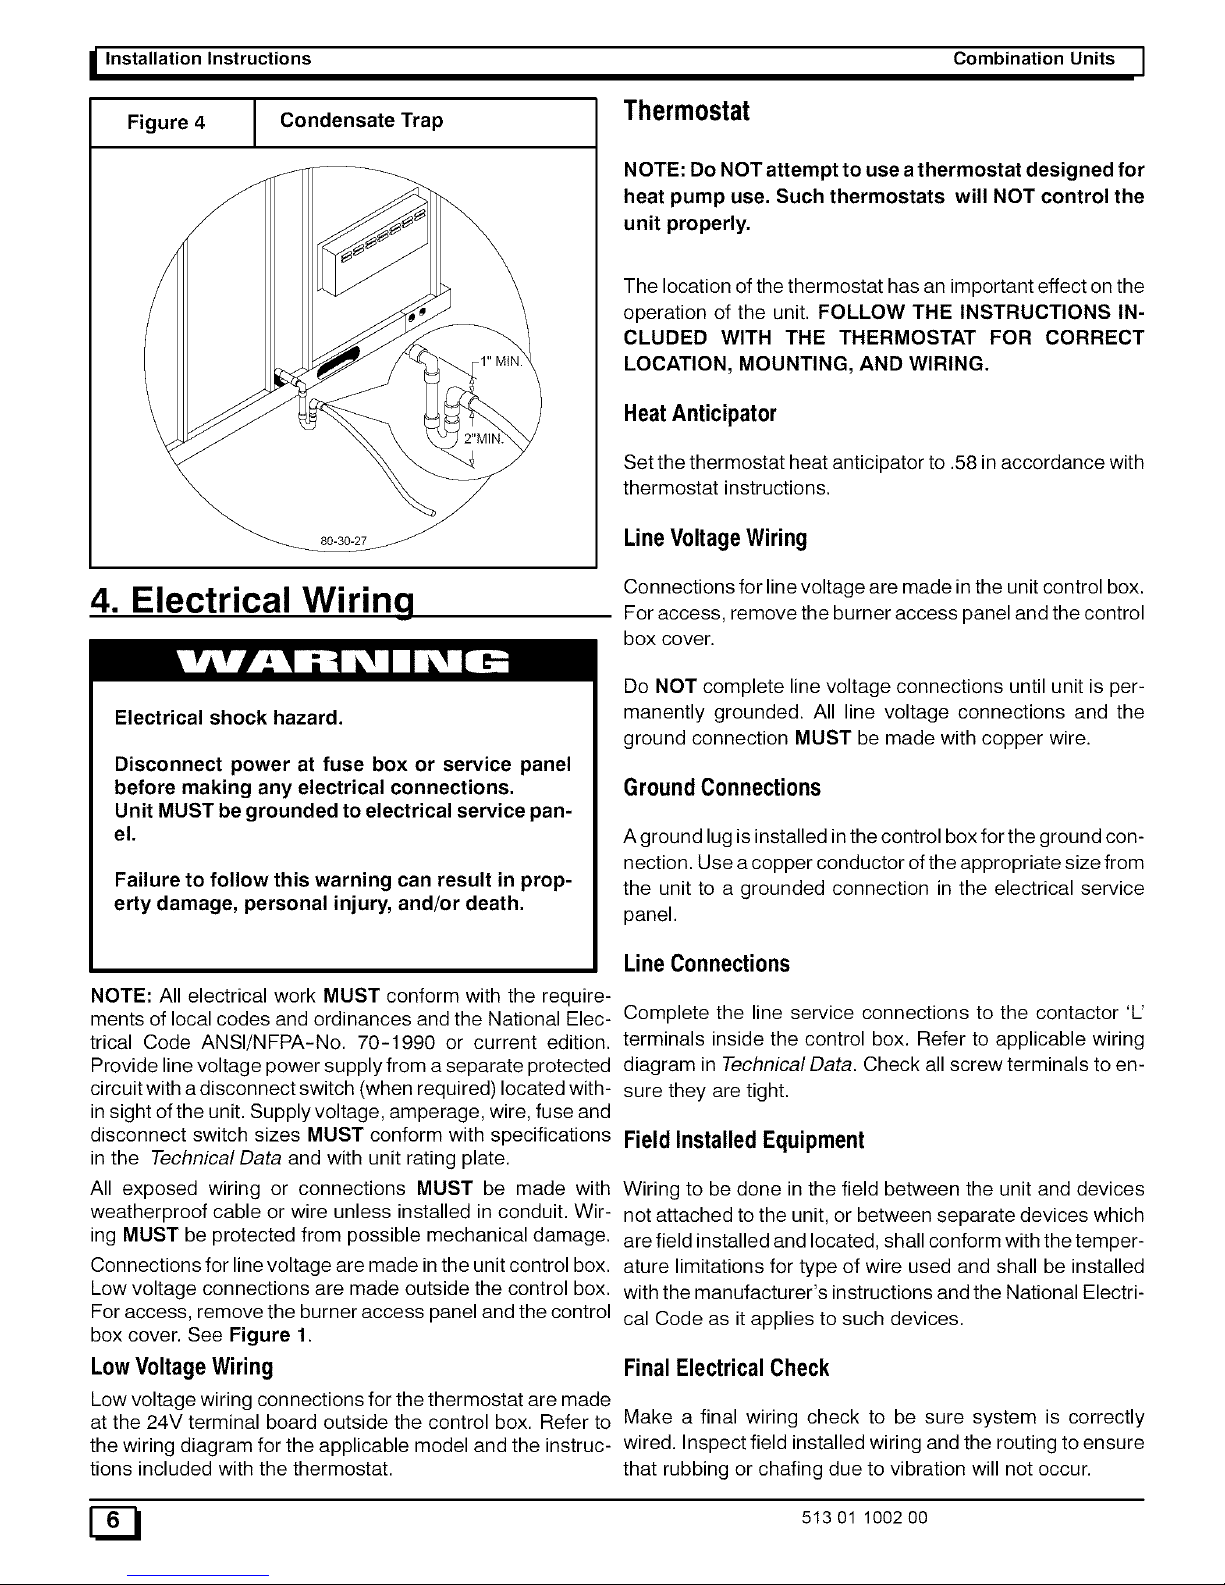
CondensateTrap
3. Install roof curb on your building. Be sure to follow all
directions included with curb and all applicable build- A condensate trap MUST be installed as near the unit as
ing codes, possible for proper drainage. Condensate trap MUST
have proper height and fall as shown in Figure 4.
4. Install unit on the appropriate roof curb. Condensate Drain
NOTE: It is the installer's personal responsibility to follow all A 3/4" O.D. condensate drain connection is located at the
local codes and ordinances and instructions contained here- front end of the unit. A 3/4" drain line MUST be installed if
in, as well as instructions included with accessory items required by local codes or location of unit, and run to an open
when installing unit. drain or other suitable disposal point.
513 01 1002 00 E_]
Page 6
I Installation Instructions
Figure 4 Condensate Trap
80-30-27
Thermostat
Combination Units I
NOTE: Do NOT attempt to use a thermostat designed for
heat pump use. Such thermostats will NOT control the
unit properly.
The location of the thermostat has an important effect on the
operation of the unit. FOLLOW THE INSTRUCTIONS IN-
CLUDED WITH THE THERMOSTAT FOR CORRECT
LOCATION, MOUNTING, AND WIRING.
HeatAnticipator
Set the thermostat heat anticipator to .58 in accordance with
thermostat instructions.
LineVoltageWiring
4. Electrical Wiring
Connections for line voltage are made in the unit control box.
For access, remove the burner access panel and the control
box cover.
Electrical shock hazard.
Disconnect power at fuse box or service panel
before making any electrical connections.
Unit MUST be grounded to electrical service pan-
el.
Failure to follow this warning can result in prop-
erty damage, personal injury, and/or death.
NOTE: All electrical work MUST conform with the require-
ments of local codes and ordinances and the National Elec-
trical Code ANSI/NFPA-No. 70-1990 or current edition.
Provide line voltage power supply from a separate protected
circuit with a disconnect switch (when required) located with-
in sight of the unit. Supply voltage, amperage, wire, fuse and
disconnect switch sizes MUST conform with specifications
in the Technical Data and with unit rating plate.
All exposed wiring or connections MUST be made with
weatherproof cable or wire unless installed in conduit. Wir-
ing MUST be protected from possible mechanical damage.
Connections for line voltage are made inthe unit control box.
Low voltage connections are made outside the control box.
For access, remove the burner access panel and the control
box cover. See Figure 1.
LowVoltage Wiring
Low voltage wiring connections for the thermostat are made
at the 24V terminal board outside the control box. Refer to
the wiring diagram for the applicable model and the instruc-
tions included with the thermostat.
Do NOT complete line voltage connections until unit is per-
manently grounded. All line voltage connections and the
ground connection MUST be made with copper wire.
GroundConnections
A ground lug is installed in the control box for the ground con-
nection. Use a copper conductor of the appropriate size from
the unit to a grounded connection in the electrical service
panel.
Line Connections
Complete the line service connections to the contactor 'L'
terminals inside the control box. Refer to applicable wiring
diagram in Technical Data. Check all screw terminals to en-
sure they are tight.
FieldInstalled Equipment
Wiring to be done in the field between the unit and devices
not attached to the unit, or between separate devices which
are field installed and located, shall conform with the temper-
ature limitations for type of wire used and shall be installed
with the manufacturer's instructions and the National Electri-
cal Code as it applies to such devices.
FinalElectrical Check
Make a final wiring check to be sure system is correctly
wired. Inspect field installed wiring and the routing to ensure
that rubbing or chafing due to vibration will not occur.
E_ 513 01 1002 00
Page 7
I Combination Units Installation Instructions
5. Air Distribution System
Ductwork
NOTE: The total heat loss from the structure as expressed in
total Btu/hr(Kw) MUST be calculated by manufacturer's
method or in accordance with "A.S.H.R.A.E. Guide" or
"Manual N - Load Calculations" published by the Air Condi-
tioning Contractors ofAmerica or in Canada H.R.A.I. "Manu-
al N". The total heat loss calculated should be equal to or
less than the unit heating capacity, output based on D.O.E.
test procedures, steady state efficiency times input.
Ductwork, supply registers, and return air grilles MUST be
designed and sized to handle the greater of the units heating
or cooling airvolume requirements. If the unit isconnected to
an existing system, the ductwork MUST be checked to make
sure it is adequate. Extra runs or larger duct sizes may have
to be installed. Use only non-combustible type insula-
tion on supply plenum or supply ductwork within 6
feet(2m) of unit,
Maximum recommended velocity in supply trunk ducts is
1000 feet (305m) per minute and 800 feet (244m) per minute
in return trunk ducts. Velocity in branches should not exceed
800 feet (244m) per minute supply and 600 feet (183m) per
minute in the return.
Ductwork installed outdoors should have a minimum of 2"
(50.8mm) of fiberglass insulation and a weatherproof vapor
barrier. It should also be protected against damage. Caulk
and flashing, or other means adequate to provide a perma-
nent weather seal should be used.
Ductwork installed in attics or other areas exposed to out-
side temperatures should be installed with a minimum of 2"
(50.8mm) fiberglass insulation and have an indoor type va-
por barrier.
The use of flexible, non-combustible connectors between
main trunk ducts and supply and return air plenums is rec-
ommended to minimize vibration transmission.
NOTE: Connect supply and return air plenums to unit in a
manner that will allow the top of the unit to be removed with-
out removing plenums. Plenums MUST be individually
sealed to unit casing.
Filters
CAUTION
Do NOT operate the unit without all filters in place.
All air MUST pass through a filter before entering the unit.
Electronic air cleaner, optional filter racks, or other accessi-
ble filter arrangements MUST be installed in the return air
ductwork.
NOTE: Ifthe unit has an economizer or any other type of out-
door air damper, disposable filters MUST be used in the in-
ternal filter racks.
For replacement filter sizes and instructions, see Air Filters.
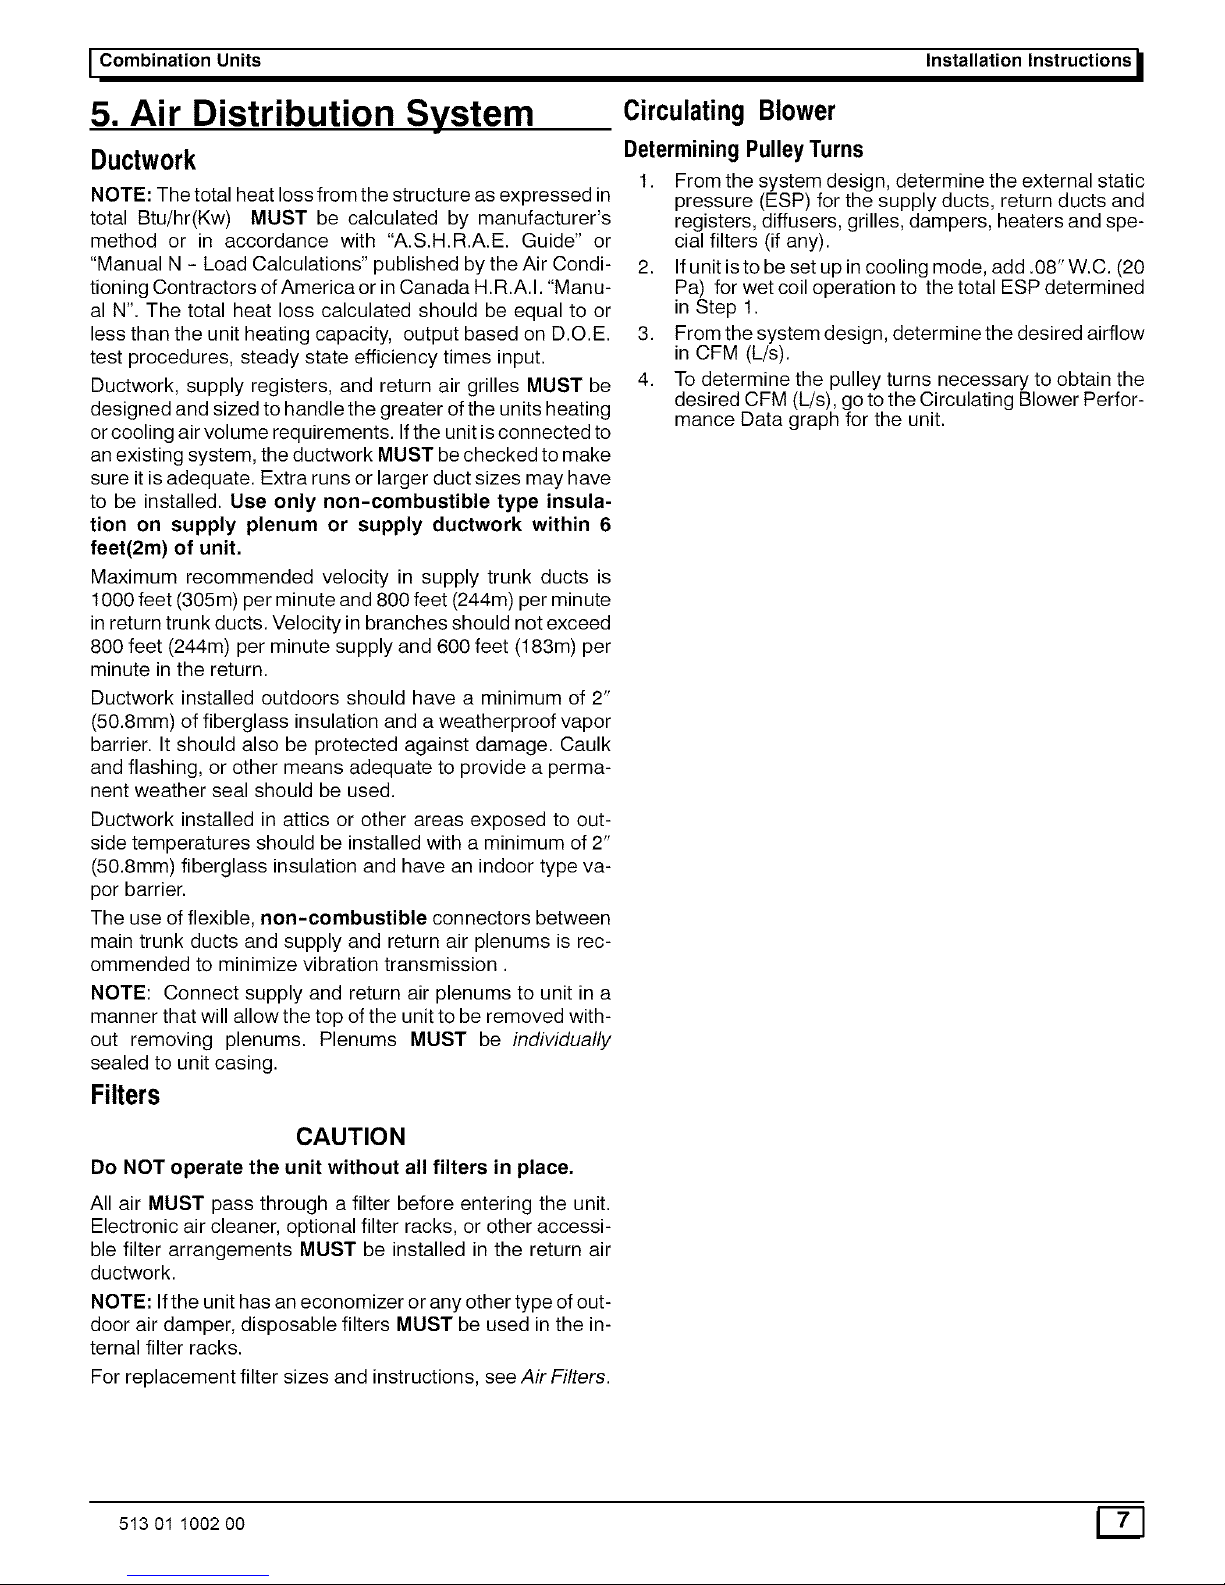
Circulating Blower
DeterminingPulleyTurns
1. From the system design, determine the external static
pressure (ESP) for the supply ducts, return ducts and
registers, diffusers, grilles, dampers, heaters and spe-
cial filters (if any).
2. If unit isto be set up in cooling mode, add .08" W.C. (20
Pa) for wet coil operation to the total ESP determined
in Step 1.
3. From the system design, determine the desired airflow
in CFM (L/s).
4. To determine the pulley turns necessary to obtain the
desired CFM (L/s), go to the Circulating Blower Perfor-
mance Data graph for the unit.
513 01 1002 00 [_]
Page 8
_ Installation Instructions Combination Units I
Figure 5 Circulating Blower Performance Data - 3 Ton Units 208 Volts
1100 1200 1300 1400
CFM
780
720
U)
1--
660
600 rr"
0
540 I--
0
=E
48O
420
360
300
1500
NOTES: 1)MaximummotorWattsis787Watts.2)Maximumblowerspeedist400RPM. 3)__ntactfact_ryf_rapp_icati_nsrequiring_perati_n_utsidesta_dardco__ing_perating
range.4)Airflowdata is basedondrycoilwithfilters. 5) Puneyturnsreferstoturnsout.Inother words,0turnsisa narrowersheavethan5turns.67)BlowerspeedMUSTbesetto
givethe correctair temperaturerise throughtheunit as markedonthe RatingPlateon inthe TechnicalSupportManual
EXTERNALSTATICPRESSUREIN INCHESWATERCOLUMN
. :2 -:4 -:6 -:8 - 1.0
NUMBER = I I , I _ I I I , I I
OFTURNS CFM WATTS RPM CFM WATTS RPM CFM WATTS RPM CFM WATTS RPM CFM WATTS RPM
0
t
2
3
4
5 1615 433 724
1587 478 804
1446 419 766
1301 375 727
1614 552 880
1418 470 844
1206 399 809
1421 535 920
t183 448 888
RPMWtTH.75 HP 909 878
STD PULLEY
842 807 768 730
I FACTORYSETTINGTURNSOPEN
.75HP
STD PULLEY 5
E_ 513 01 1002 O0
Page 9

I Combination Units Installation Instructions
Figure 6 Circulating Blower Performance Data - 3 Ton Units 230 / 460 Volts
d 1
0.9
o3
LU
•"r" 0.8-
O
Z
0.7-
U.I
n" 0.6-
:3
O3
O3 0.5-
ILl
n-
I:1. 0.4-
0.3-
_j 0.2-
<_
Z 0.1-
n"
LLI
LU
; ES.P,VSO:i @o TU_S
9OO
900
840
780
720
O3
8°o
600 n-
O
54O I-
0
48O
420
360
, Standard Cooling Operation Range ,
I I I I I
, , , , , , , , , , , , , , , , , , 300
tooo tt'oo 12'oo 13oo 14oo tsoo
CFM
NOTES: 1)MaximummotorWattsis808Watts.2)Maximumblowerspeedist400RPM. 3)__ntactfact_ryf_rapp_icati_nsrequiring_perati_n_utsidesta_dardco__ing_perating
range.4)Airflowdata isbasedondry coilwithfilters. 5) Puneyturnsreferstoturnsout. Inother words,0turns isa narrowersheavethan5turns.67)BlowerspeedMUSTbesetto
givethe correctair temperaturerisethroughthe unit as markedon the RatingPlateon inthe TechnicalSupportManual
EXTERNALSTATICPRESSUREIN INCHESWATERCOLUMN
, :2 -:4 -:6 -:8 - 1.0
NUMBER I I I , I = I I I , I I
OFTURNS CFM WATTS RPM CFM WATTS RPM CFM WATTS RPM CFM WATTS RPM CFM WATTS RPM
0
t
2
3
4
5 1604 467 727
1599 520 807
1455 467 769
1316 418 730
1420
1623 594 885 1264
1453 52t 848
1222 442 811
1032 393 772
575 925
509 891
RPMWtTH.75 HP 915 883
STD PULLEY
846 8O9
771
732
I FACTORYSETTINGTURNSOPEN
.75HP
STD PULLEY 5
513 01 1002 O0 E_]
Page 10

_ Installation Instructions Combination Units I
Figure 7 Circulating Blower Performance Data - 4 Ton Units 208 Volts
NOTES:
1.
2.
3.
4.
5.
6.
7.
0
w
:£
o
==
uJ
t_
uJ
.J
z
w
X
w
l
&9
&8
0.7
0.6
0.5
0.4
0.3
0.2
0.1
I
o _
1200 1300 1400
CHART
I
1500 1600 t700 t800 1900
CFM
t000
930
860
790
72O
650
580
510
440
370
300
2OOO
F-
0
F.-
0
Maximum motor Watts is 928 Watts.
Airflow based on dry coil, horizontal flow, with filters.
For downflow SCFM, use a .15 static drop.
Pulley turns refer to turns out. I.E. 0 turns is a narrower sheave than 5 turns.
For applications requiring operation in shaded areas, contact the factory.
Maximum blower wheel speed is 1400 RPM.
The blower speed MUST be set to give the correct air temperature rise through the unit as marked on the Rating Plate or
Technical Support Manual.
TABLE
NO.
OF
TURNS
0
1
2
3
4
5
EXTERNAL STATIC PRESSURE IN INCHES W.C.
.2 .4 .6 .8 1.0
WIlL WIlL WIlL WIlL
W RPM CFM RPM CFM W RPM RPM CFM W
1851 750 952 960
1691 645 913 920
867 1513 546 871
822
777
CFM W CFM W
1567 649
1359 548
1778 620
1631 530
1716 518 774 1460 461
1587 456 725
TURNS/RPM CONVERSION TABLE
PULLEY TURNS 0 1 2 3 4 5
OPEN
RPM WITH.75 HP 950 910 870 825 780 730
STD PULLEY
WHL
RPM
W=Wa_s
UNIT FACTORY SETTING TURNS OPEN
PGB048D .75 HP STD PULLEY ...... 3.5
PGB048F .75 HP STD PULLEY ....... 2
[_ 513 01 1002 00
Page 11

I Combination Units Installation InstructionsI
Figure 8 Circulating Blower Performance Data - 4 Ton Units 230/460/575 Volts
O
NOTES:
1.
2.
3.
4.
5.
6.
7.
09
W
0
==
uJ
t_
09
09
uJ
o=
09
.J
z
w
X
w
f
0.9
0.8
0.7
0.6
0.5
0.4
0.3
0.2
0.1
0
f200
CHART
_F M Standard Cooling Operating Range
I URN _,,,_,_.
_ 4 TU ...... _: ...............
I I
I I
71 T : - i b_S
I
1000
930
86O
79O
72O
650
580
510
440
370
300
1300 1400 1500 1600 1700 1800 1900 2000
CFM
09
I==
t_
0
0
5;
Maximum motor Watts is 962 Watts.
Airflow based on dry coil, horizontal flow, with filters.
For downflow SCFM, use a .15 static drop.
Pulley turns refer to turns out. I.E. 0 turns is a narrower sheave than 5 turns.
For applications requiring operation in shaded areas, contact the factory.
Maximum blower wheel speed is 1400 RPM.
The blower speed MUST be set to give the correct air temperature rise through the unit as marked on the Rating Plate or
Technical Support Manual.
TABLE
NO.
OF
TURNS
O
1
2
3
4
5
EXTERNAL STATIC PRESSURE IN INCHES W.C.
.2 .4 .6 .8 1.0
WIlL WIlL WIlL WIlL
W RPM CFM RPM CFM W RPM RPM CFM W
1873 800 959 965
1706 698 919 925
870 1512 600 874
825 1317 519 829
778
CFM W CFM W
1588 708
1381 609
1788 673
1646 593
1727 574 776 1469 520
1593 522 728
TURNS/RPM CONVERSION TABLE
PULLEY TURNS 0 1 2 3 4 5
OPEN
RPM WITH.75 HP 960 920 875 825 780 730
STD PULLEY
WHL
RPM
W=Wa_s
UNIT FACTORY SETTING TURNS OPEN
PGB048D .75 HP STD PULLEY ...... 3.5
PGB048F .75 HP STD PULLEY ....... 2
513 01 1002 O0
Page 12

_ Installation Instructions Combination Units I
Figure 9 Circulating Blower Performance Data - 5 Ton Units 208 Volts
CHART
_gOperating Range
t400
1290
t180
t070
0
740 F.
0
630
520
410
300
1500 t600 1700 1800 t900 2000 2100 2200 2300 2400 2500
CFM
NOTES:
1. Maximum motor Watts is 1486 Watts.
2. Airflow based on dry coil, horizontal flow, with filters.
3. For downflow SCFM, use a .15 static drop.
4. Pulley turns refer to turns out. I.E. 0 turns is a narrower sheave than 5 turns.
5. For applications requiring operation in shaded areas, contact the factory.
6. Maximum blower wheel speed is 1400 RPM.
7. The blower speed MUST be set to give the correct air temperature rise through the unit as marked on the Rating Plate or
Technical Support Manual.
TABLE
NO.
OF
TURNS
0
1
2
3
4
5
EXTERNAL STATIC PRESSURE IN INCHES W.C.
.2 .4 .6 .8 1.0
WIlL WIlL WIlL WIlL WIlL
CFM W RPM CFM W RPM CFM W RPM CFM W RPM CFM W RPM
2240 1302 1153 2087 1213 1163 1914 1118 1174
2192 1196 1127 2028 1109 1137 1846 1017 1145
2199 1064 1074 2032 987 1082 1834 903 1089
2255 1018 1025 2098 945 1031 1916 868 1037
2132 875 982 1962 811 986 1761 742 991
1992 732 938 1814 671 942
TURNS/RPM CONVERSION TABLE
PULLEY TURNS 0 1 2 3 4 5
OPEN
RPM WITH 1 HP 1145 1120 1080 1035 990 945
STD PULLEY
W = Watts
FACTORY SETTING TURNS OPEN
1 HP STD PULLEY ........ 2.5 I
[_ 513 01 1002 00
Page 13

I Combination Units Installation Instructions
Figure 10 Circulating Blower Performance Data - 5 Ton Units 230/460/575 Volts
0.9
LL!
0 0.8
g
w 0.7
0.6
0.5
0,,
0.4
0.3
.J 0.2
Z
0.1
LJJ
p-
X 0
uJ
I I
--------r--
CHART
Standard Cooling Operating Range
t500
1400
t300
L t200
p.
L 1100 P
L 1000
0
L900 S
L800
L 700
600
500
1500 t600 1700 1800 t900 2000 2100 2200 2300 2400 2500
CFM
NOTES:
1. Maximum motor Watts is 1454 Watts.
2. Airflow based on dry coil, horizontal flow, with filters.
3. For downflow SCFM, use a .15 static drop.
4. Pulley turns refer to turns out. I.E. 0 turns is a narrower sheave than 5 turns.
5. For applications requiring operation in shaded areas, contact the factory.
6. Maximum blower wheel speed is 1400 RPM.
7. The blower speed MUST be set to give the correct air temperature rise through the unit as marked on the Rating Plate or
Technical Support Manual.
TABLE
NO.
OF
TURNS
0
1
2
3
4
5
EXTERNAL STATIC PRESSURE IN INCHES W.C.
.2 .4 .6 .8 1.0
WIlL WIlL WIlL WIlL WIlL
CFM W RPM CFM W RPM CFM W RPM CFM W RPM CFM W RPM
2312 1282 1179 2149 1195 1186 1974 1105 1193
2211 1192 1147 2037 1106 1153 1837 1017 1158
2248 1097 1087 2077 1021 1091 1879 940 1096
2256 1019 1037 2096 950 1042 1912 880 1046
2161 905 990 1991 843 993 1788 777 996
2029 771 944 1848 712 946
TURNS/RPM CONVERSION TABLE
PULLEY TURNS 0 1 2 3 4 5
OPEN
RPM WITH 1 HP 1175 1145 1090 1045 1000 950
STD PULLEY
W = Watts
I
FACTORY SETTING TURNS OPEN I
I
1 HP STD PULLEY ........ 2.5
513 01 1002 O0 _f_
Page 14

I Installation Instructions Combination Units I
I Standard Cooling Operating Range I
1700
1600
1500
1400
r_
1300
i119oo
O
'1000
9OO
800
7OO
2100 2300 2500 2700 2900 3100
CFM
NOTES: 1)MaximummotorWattsis1538Watts.2) Maximumblowerspeedis 1400RPM.3)Contactfactoryforapplicationsrequiringoperationoutsidestandardcoolingoperat-
ingrange.4)Airflowdataisbasedondrycoilwithfilters. 5) Pulleyturnsreferstoturnsout. Inother words,0turnsisa narrowersheavethan5turns. 6)BlowerspeedMUSTbesetto
givethe correctair temperaturerise throughtheunit as markedonthe RatingPlateon inthe TechnicalSupportManual
EXTERNALSTATICPRESSUREININCHESWATERCOLUMN
.2 .4 .6 .8 1.0
NUMBER
OFTURNS CFM WATTS RPM CFM WATTS RPM CFM WATTS RPM CFM WATTS RPM CFM WATTS RPM
0 2820 1538 1239 2682 1460 1242 2534 1380 1246 2372 1298 1249
t 2707 1361 1198 2558 1283 1200 2399 1207 1203 2231 1133 1205
2 2584 1213 1154 2429 1145 1156 2262 1077 1158
3 2441 1081 1108 2278 1011 t110
4 2348 976 1061
5 221t 863 1014
NOTE: For enteringairflow correctionfactorsand voltagecorrectionfactorsfor coolingand heating,see page7.
WilloperateatratedESPineitherhorizontalordownflowductposition.
PULLEYTURNS
OPEN O
RPMWITH 2 HP
STD PULLEY 1245
1
1202
2 3
1t57 1111
4
1064
5
1017
I
FACTORYSETTINGTURNSOPEN
2HP
STD PULLEY 2
[_ 513 01 1002 O0
SPECIFICATIONS SUBJECT TO CHANGE WITHOUT NOTICE
Page 15

I Combination Units Installation Instructions
1 i 1700
[Standard CoolingOperatingRange]
(1) 0.9 1600
W
r.) 0.8 1500
Z
ILl 0.7 1400 (/)
I--
"-_ 0.6 1300
€.0
uJ O.5 1200 Pr
Pr
o. 0
0.4 1100 I-
_ 0
0.3 1000
2100 2300 2500 2700 2900
9OO
8OO
7OO
3100
CFM
NOTES: 1)MaximummotorWattsis1582Watts.2) Maximumblowerspeedis 1400RPM.3)Contactfactoryforapplicationsrequiringoperationoutsidestandardcoolingoperat-
ingrange.4)Airflowdataisbasedondrycoilwithfilters. 5) Pulleyturnsreferstoturnsout. Inother words,0turnsisa narrowersheavethan5turns. 6)BlowerspeedMUSTbesetto
givethe correctair temperaturerise throughtheunit as markedonthe RatingPlateon inthe TechnicalSupportManual
.2
EXTERNALSTATICPRESSUREININCHESWATERCOLUMN
.4 .6 .8
NUMBER
OFTURNS CFM WATTS RPM CFM WATTS RPM CFM WATTS RPM CFM WATTS RPM
0 2733 1505 1250 2588 1428 1253 2430 t346 1255
t 2730 1404 1205 2583 1327 1207 2422 1248 1209 2250 1t72 1211
2 2609 1263 1159 2450 1191 1161 2281 1121 1163
3 2464 1122 11t2 2300 1055 1114
4 2373 1013 1065 2199 953 1067
5 2239 910 1017
NOTE: Foren_ring airflow corre_ionfactors and voltagecorre_ionfacto_ _rcooling and heating,see page7.
Winoper_e _ r_ed ESPin eitherhorizontalordownflow du_ position.
1.0
CFM WATTS RPM
2251 1255 1258
PULLEYTURNS
O
OPEN
RPMWITH 2 HP
1255
STD PULLEY
1
1210
2
1165
3
1115
4
1070
5
1020
I
FACTORYSETTINGTURNSOPEN
2HP
STD PULLEY 2
513 01 1002 00
SPECIFICATIONS SUBJECT TO CHANGE WITHOUT NOTICE
Page 16

_ Installation Instructions
-.:t=m-,]--t=,A==:! = =.],,=,Jill
230, 460 VOLT
1.4
Combination Units I
2200
0.8
o_
uJ
n,
n
_ 0.6
I--
I--
o_
,_ 0.4
iii
1.2
0.2
_,,,_,,_s _'_'_''_'_" _
|
o i
1600 1800
|
i
i
2000
2000
1800
O9
I--
1 600 j-
n"
1400 0
0
:E
1200
IOO0
I I I I I 800
2200 2400 2600 2800 3000 3200
AIRFLOW (SCFM) DRY COIL WITH FILTER
NOTES:1)MaximummotorWattsis 2158Wattsat208V,and2246Wattsat230-460V.2) Maximumblowerspeedis1400RPM.3)Contact
factoryforapplicationsrequiringoperationoutsidestandardcoolingoperatingrange.4)Airflowdataisbasedondrycoilwithfilters. 5) Pulley
turnsreferstoturnsout. Inotherwords,0turnsisanarrowersheavethan5turns.6)BlowerspeedMUSTbesettogivethecorrectairtempera-
turerisethroughtheunitas markedonthe RatingPlate.7)Add0.05 in. ESPfor 208volt operation.
EXTERNALSTATICPRESSUREININCHESWATERCOLUMN
TURNS .2 A .6 .8 1.0 1.2
VOLT OPEN CFM WATT RPM CFM WATT RPM CFM WATT RPM CFM WATT RPM CFM WATT RPM CFM WATT RPM
S
O 2996 2246 1345 2654 2077 1355
1 3095 2107 1295 2885 1992 t297 2571 1825 1300 2473 1775 1305
230/ 2 3041 1890 t240 2802 1772 1242 2578 1649 t245 2241 1487 1253 2091 1403 1255
460 3 3127 t850 1180 2812 1667 1t90 2599 1564 1192 2333 1436 1t95 1978 1281 1196 1873 1188 1200
4 2993 t590 1126 2752 1492 1t33 2478 1376 1136 2228 1228 1t40 1895 1096 1142 1754 1043 1145
5 2826 t355 1075 2574 1232 t080 2339 1161 1082 2097 1056 t085 1750 923 1088 1647 873 1090
tVOL,,OE PO'L *,U..SOP .0t, 2' 3 , ,
230- 460 RPMWITH2 HPSTD PULLEY t344 1299 1245 1191 1136 t082
*FactorySettingTurnsOpen
[_ 513 01 1002 O0
Page 17

I Combination Units Installation Instructions
6. Adjustable Belt Drive Blower
Personal injury hazard.
Use extreme care during the following proce-
dures and obey Safety Information.
Failure to do so may result in personal injury.
I
The following safety rules MUST always be followed when
working near belt drive.
Always Turn The Power Off
Turn the power to the unit OFF before you begin work-
ing on it.
Always Wear Protective Clothing
NEVER wear loose or bulky clothes, such as neckties,
exposed shirttails, loose sleeves, or lab coats around
belt drives. Wear gloves while inspecting sheaves to
avoid nicks, burrs, or sharply worn pulley edges.
The blower speed is changed by adjusting the variable
speed pulley mounted on the blower motor.
Ifthe blower speed needed is different than the speed of the
blower as shipped, follow the steps below to change the I
blower speed. Before changing the blower speed, read the
I
above safety rules first.
5. Turn electric power OFF.
6. Remove the side blower access panel (see Figure 1
on Page 4)
10. Loosen set screw(s) on the outer half of the adjustable
pulley.
The unit has one of two different types of adjustable
pulleys (see Figure 12 and Figure 13).
Figure 12 Adjustable Pulley (Keyway Type)
This keyway pulley has a removable key and two keyways cut through
the threads of the pulley hub. The keyways limit this type of pulley to
half turn adjustments.
Adjustable Pulley (Threaded Keys)Figure 13
Figure 11 I Motor Mount Assembly
Adjustable
Pulley
Motor Mount
Bolts (4)
__ Adjustment
Bolt
1054584
7.
8.
Loosen the four motor mount bolts.
Turn the motor adjustment bolt counterclockwise until
the belt is slack enough to come off easily (see
Figure 11).
9. Remove the belt. Do NOT pry off belt.
This type of pulley has non-removable threaded keys that ride on the
threads of the pulley shaft. This allows a full 360 °range of adjustment.
11. Remove key if unit has a keyway type pulley.
12. To set the blower for a desired CFM (L/s), first turn the
outer half of the adjustable pulley clockwise until it
meets the inner half of the pulley.
13. Turn the outer half of the adjustable pulley counter-
clockwise the correct number of turns to obtain the de-
sired CFM (L/s).
NOTE: To increase the blower speed, turn the outer half of
the adjustable pulley clockwise. To decrease the blower
513 01 1002 00 Ff_
Page 18
_ Installation Instructions
speed, turn the outer half of the adjustable pulley counter-
clockwise.
14. Replace key if unit has keyway type pulley.
15. Tighten set screw(s).
16. Put on belt.
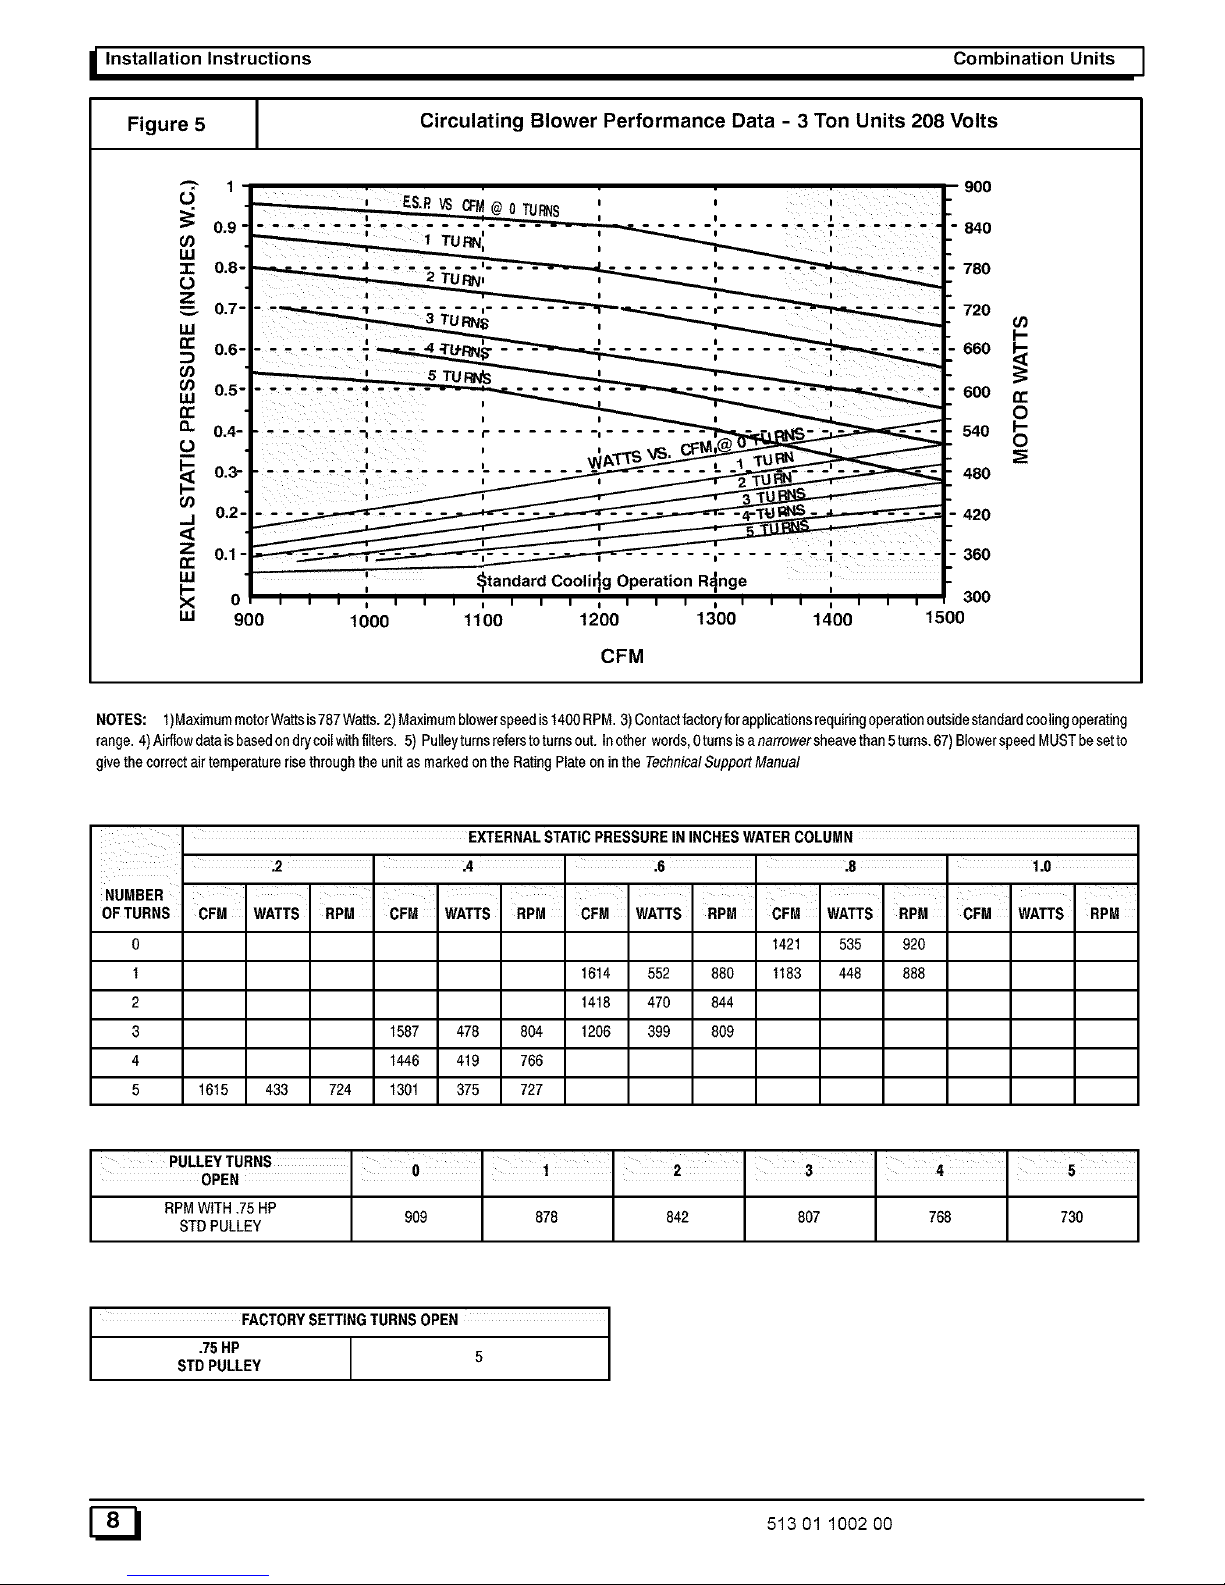
Figure 14 Checking Tension and Deflection
Belt Tension Chart
MODEL POUNDS TENSION
FOR 1/4" DEFLECTION
7-1/2 ton 3.5 - 4
6-1/3 ton 3 - 3.5
5 Ton 2.5 - 3
3 & 4 Ton 2 - 2.5
1054584
17. Turn motor adjustment bolt clockwise until the belt has
enough tension at the proper deflection. Use one of
the commercially available belt tension gauges to set
the correct tension at the proper deflection (see
Figure 14).
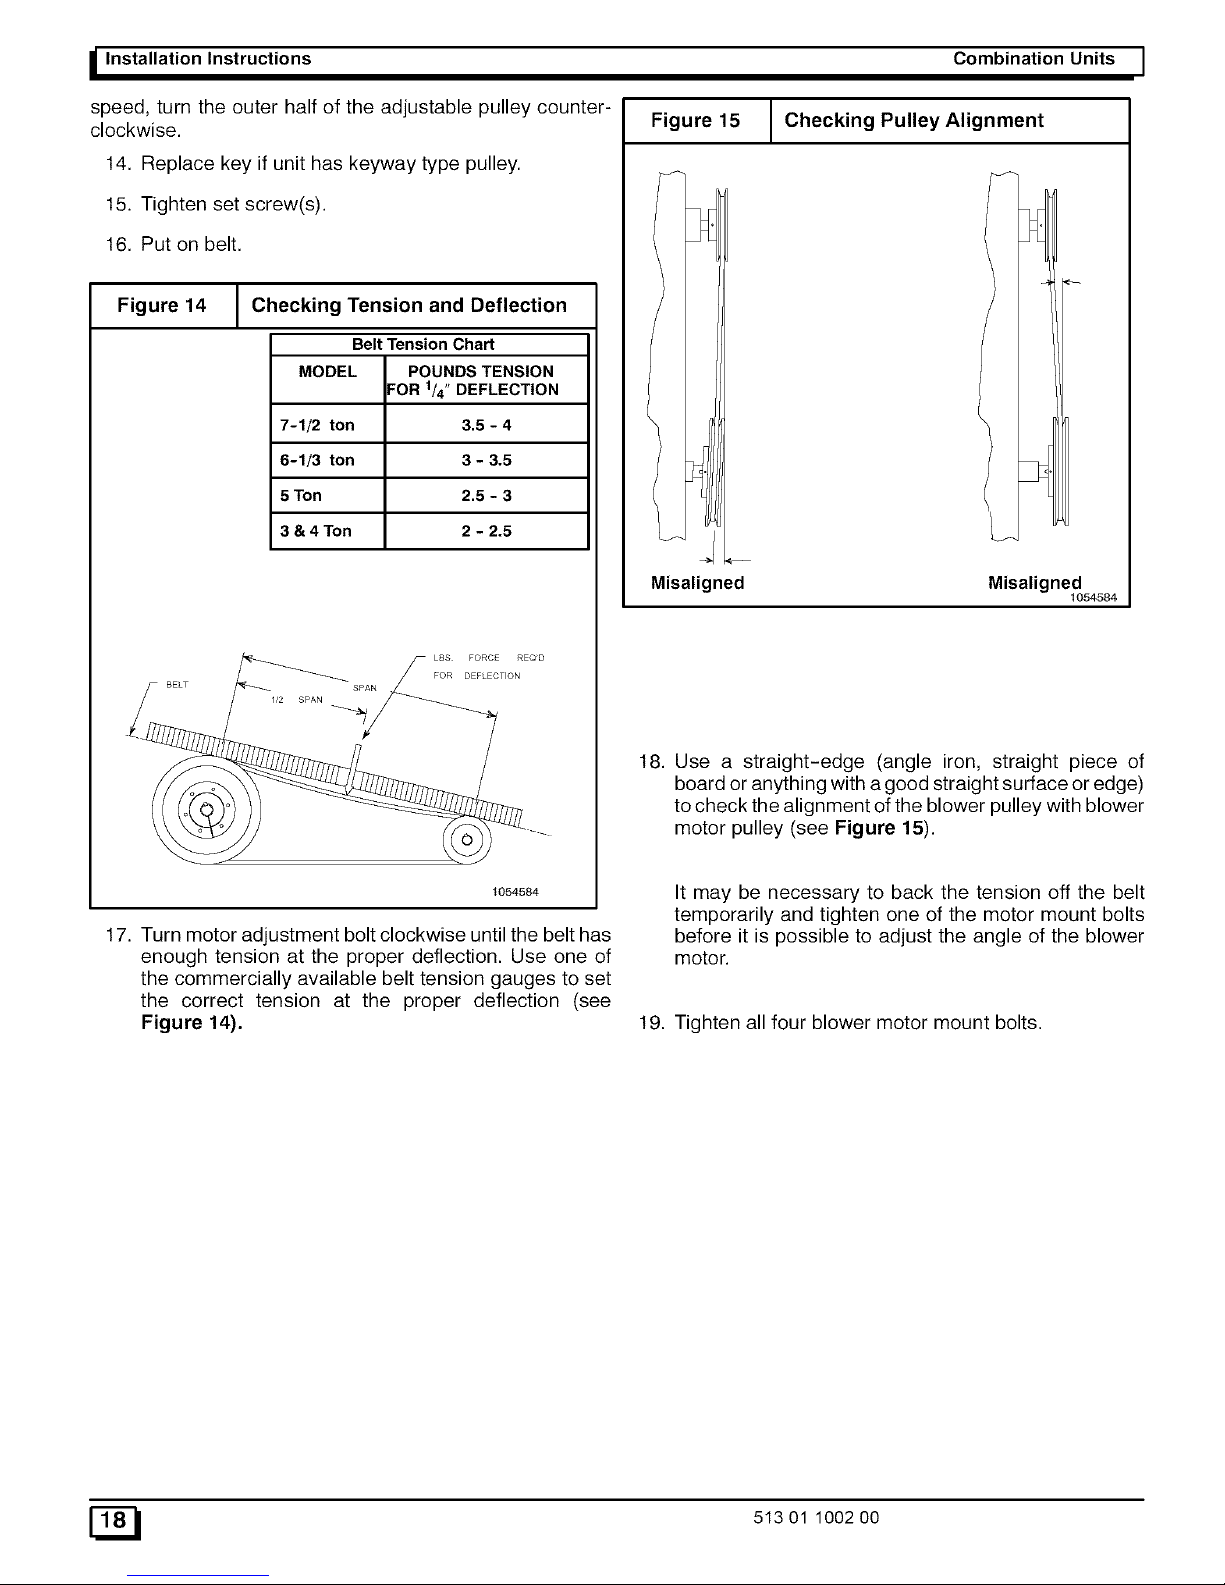
Figure 15
Combination Units
I Checking Pulley Alignment
Misaligned Misaligned
1054584
18. Use a straight-edge (angle iron, straight piece of
board or anything with a good straight surface or edge)
to check the alignment of the blower pulley with blower
motor pulley (see Figure 15).
It may be necessary to back the tension off the belt
temporarily and tighten one of the motor mount bolts
before it is possible to adjust the angle of the blower
motor.
19. Tighten all four blower motor mount bolts.
[_ 513 01 1002 O0
Page 19

I Combination Units Installation InstructionsI
7. Economizer
The purpose of an economizer is to: economizers or on the actuator motor of three-position
economizers.
• Provide cool outside air to the conditioned space dur-
ing the cooling cycle to minimize the use of the com-
pressors.
• Bring outside air into the conditioned space to meet
minimum fresh air requirements whenever the circula-
tion blower is running.
Figure 16 Downflow Economizer 1
Theoryof Operation
The economizer has two sets of dampers that are mechani-
cally linked together. The fresh air dampers regulate the in-
take of outside air and the return air dampers regulate the
flow of return air (see Figure 16). When the fresh air damp-
ers modulate open, the linkage causes the return air damp-
ers to modulate closed.
The economizer is controlled by a logic module which field
connects to the unit controls through a plug harness. The
logic module also controls the compressor staging based on
the thermostat input.
The minimum opening position of the fresh air dampers is
field adjustable. It is set on the logic module of modulating
The enthalpy sensor is factory installed on the fresh air
dampers of the economizer. The enthalpy change-over
point is adjustable on the logic module.
A discharge air sensor is field installed in the blower inlet.
The discharge air sensor keeps the discharge air above
56°F (13.3°O).
A positive pressure is created when the fresh air dampers
open and the return dampers close. This pressure must be
vented or the air will not circulate properly. This is the func-
tion of the barometric relief damper. A positive pressure
forces thebarometric relief damper to swing open.
The fresh air dampers open to the minimum position for out-
side air whenever the circulation blower is ON.
When the thermostat is in the FAN AUTO position, the fresh
air dampers will close completely whenever heating or cool-
ing is not called for.
If Using a2- StageThermostat
On a call for cooling, ifthe economizer outdoor air sensor de-
termines that the outside air is cool enough (and in the case
of an enthalpy sensor, dry enough), the fresh air dampers
will modulate open and the return air dampers will modulate
closed.
If the conditioned space is not being maintained at the se-
lected temperature, the thermostat will make Y2 and call for
second stage cooling by energizing the economizer logic
module at the low voltage terminal board. This energizes Y1
and contactor which energizes the condenser fan and com-
pressor for cooling to assist the economizer.
NOTE FOR 6-1/3 UNITS ONLY: Contactor C2 cannot be
energized to operate compressor 2 while the economizer is
still energized since Circuit 1 is activating the economizer
and Circuit 2 is activating compressor 1.
If the thermostat is still calling for cooling and the outside air
warms to above the setting for economizer operation:
A. The economizer dampers will close to the minimum
position for outside air and remain there.
B. Contactor Cl will remain energized and compressor 1
will continue to run.
C. Conctactor C2 will close and compressor 2 will start.
If Using a Single- Stage Thermostat
When using a single stage thermostat, all steps as outlined
above will be followed with the exception of the following:
The compressor will only be energized when the outside air
reaches a temperature above the preset limit of the econo-
mizer. When ambient conditions are NOT suitable for econo-
mizer operation, ONLY the compressor will run, and the
economizer will NOT be energized.
513 01 1002 00 _f_
Page 20

I Installation Instructions Combination Units I
8. Start-up Procedure
tion and be damaged. It is therefore necessary to check for
proper rotation.
CAUTION
Electrical shock, fire and/or explosion hazard.
Use extreme care during all of the following
checks and procedures.
Make sure Electric Power and is turned OFF as
instructed in appropriate steps.
Failure to follow this warning can result in prop-
erty damage, personal injury, and/or death.
Check the unit's operation as outlined in the following
instructions.
Blower and Phasing Check
1. Shut OFF electric power at unit disconnect.
2. Check to see that clean, properly sized air filters are
installed.
3. Check to see that everything inside the unit is clear and
ready to operate safely. Ensure that there are no ob-
jects in, on or around the motor, belt or blower wheel.
Do NOT operate the unit with the compressor(s) run-
ning until proper blower rotation has been confirmed by
running the following test.
7. Set thermostat fan switch to ON. The circulating air
blower should come ON.
.
Shut OFF electric power at unit disconnect and visual-
ly observe the direction of the blower rotation as it
slows down. Do NOT put hands or any other object in,
on or around the belt, motor or blower wheel. If blower
wheel rotation is the same as the directional arrow on
the blower housing, proceed to the next step.
CAUTION
If blower rotation is incorrect, shut electric power OFF at
unit disconnect and reverse any two supply wires at
field connections ONLY. Do NOT reverse the blower
and/or compressor leads or rewire any internal wiring.
After rewiring is done, repeat blower rotation check to
ensure that blower rotation is now correct.
9. If blower rotation iscorrect, reset thermostat fan switch
to AUTO.The circulating air blower should go OFF.
Nothing should be running.
10. Shut OFF electric power at unit disconnect.
4. Set thermostat Heat-Cool selector to OFF.
5. Set thermostat fan switch to AUTO.
Moving parts hazard.
Do NOT put hands or any other object in, on or
around the motor, belt or blower wheel. Ensure
that there are no objects in, on or around the mo-
tor, belt or blower wheel before turning electric
power on.
Failure to follow this warning can result in prop-
erty damage, personal injury, and/or death.
,
Turn ON electric power. Nothing should start running.
If any unusual arcing, odors or noises are encoun-
tered, shut OFF electric power immediately and check
for wiring errors.
NOTE: The circulation blower motor and compressor(s) are
three phase and are factory synchronized for proper rota-
tion. Even if the circulation blower motor comes on and air
seems to be circulating, it is possible that the blower motor
rotation isincorrect due to improperphasmg. The scroll com-
pressor(s) (if equipped) will run backwards under this condi-
Cooling Checks
The compressors have afive minute anti-cycle delay that is
activated whenever the compressors turn off. For instance, if
the unit is manually shut off when the compressors are run-
ning and the unit is turned back ontwo minutes later, it will be
an additional three minutes before the compressors will re-
start.
CAUTION
Do NOT operate the unit with the compressor(s) run-
ning until proper blower rotation has been confirmed
during the Blower and Phasing Check in the previous
section. If the phasing is incorrect, the scroll compres-
sor(s) (if equipped) will run backwards and they will be
damaged.
1. Be sure that electric power is OFF.
2. To check cooling Stage 1, place jumper wires across
low voltage terminal board terminals R to G, R to Y1.
3. Turn electric power ON. Check to see that the follow-
ing occurs:
a. Compressor 1 - ON
b. Condenser fan motor(s) - ON
c. Circulation air blower - ON with correct rotation
and adequate airflow from ductwork.
[_ 513 01 1002 00
Page 21

I Combination Units
4. Shut OFF electric power at unit disconnect.
5. To check cooling Stage 2, remove jumper wires from
Y1 and place it on Y2.
NOTE: Allow 5 minutes between Steps 4 and 6.
.
Turn ON electric power. Check to see that the following
occu rs:
a. Compressors 1 & 2 - ON
b. Condenser fan motor(s) - ON
c. Circulation air blower - ON
NOTE: IfY2 only is jumpered, condenser fans will not come
on.
7. Shut OFF electric power at unit disconnect. Begin tim-
ing the five minutes for the anti-cycle delay.
8. Remove jumpers from low voltage terminal board.
9. Set Thermostat to COOL and temperature to call for
Cooling.
10. Turn ON electric power. At the end of the five minute
anti-cycle delay, the unit should start and run.
11. Shut OFF electric power at unit disconnect.
12. Replace all service access panels.
9. Operation And Maintenance
Electrical shock hazard.
Turn off electric power supply at disconnect
switch or service panel before removing any ac-
cess or service panel from unit.
Failure to follow this warning can result in prop-
erty damage, personal injury, and/or death.
Installation Instructions
Turning Off the Unit
Heating
1. Set thermostat selector to OFF and fan switch to
AUTO.
2. If electric heat is running at time of shut-down, wait 2.5
minutes then shut OFF electric power supply at dis-
connect switch or service panel. (No wait is necessary
ifelectric heat was not running within 2.5 minutes prior
to shut-down.)
Cooling
1. Set thermostat selector to OFF and fan switch to
AUTO.
2. To shut the unit down completely, shut OFF electric
power supply at disconnect switch or service panel.
Starting the Unit After Shutdown
Heating
1. Set the thermostat to OFF.
4. Turn ON electric power.
5. Set thermostat to desired temperature and set selec-
tor to HEAT. Unit will come on and operate automati-
cally under control of the thermostat.
Cooling
CAUTION
To prevent possible damage to the compressor(s), do
NOT operate on cooling when outdoor temperature is
below 35°F (2°C).
NOTE: An optional low ambient kit is available that allows
the unit to operate at temperatures down to 0°F (-18°C).
1. Turn ON electric power.
2. Set thermostat to desired temperature and set system
switch to COOL. The unit will come on and operate au-
tomatically under control of the thermostat.
Close all doors and windows. The unit may run contin-
uously for several hours or longer on the initial run be-
cause of residual heat and moisture in the building.
This is normal for any air conditioning system.
Thermostat Fan Switch Operation
The circulating air blower will run continuously with the fan
selector switch in the ON position. When the fan selector
switch is in the AUTO position, the blower will run during
each heating or cooling cycle.
513 01 1002 00 r_
Page 22

_ Installation Instructions
Adjusting Room Temperatures
If the temperature in individual rooms is not as desired, bal-
ance the system by adjusting the dampers in the branch
ducts (see Figure 16). Adjust a little at a time and wait a day
after each change to judge the effect. Once the dampers are
adjusted for normal weather conditions, it is best to leave
them that way. Compensate for temporary weather changes
by adjusting the thermostat setting.
Figure 17 Typical Branch Duct Dampers
Monthly Maintenance and Inspection
Checks
Air Filters (Factory Installed)
CAUTION
Do NOT operate unit without all air filters installed in the
unit.
Dirty filters are the most common cause of compressor fail-
ures and inadequate heating and cooling performance.
Combination Units I
1. Remove filter access panel.
2. Remove the bottom filters.
.
The front of the center rail is attached to the unit by a
keyhole/screw connection. Unhook the front of the
center rail, swing it down approximately four inches
(100mm), and hook the keyhole on the screw pro-
vided.
4. Remove the bottom filters.
5. Replace bottom filters, center rail, and top filters.
6. Replace filter access panel.
Cooling Season Checks (Monthly)
Condenser Coil
Keep the condenser inlet and outlet area clean and free of
leaves, grass clippings and other debris. Grass should be
kept short in front of the condenser inlet. Shrubbery MUST
be trimmed back so it is no closer than 30 inches (762 mm) to
condenser coil.
Condensate Drain
Check for condensate drainage. Clean as required.
Annual Maintenance and Inspection
Electrical Shock, Fire and Explosion Hazards.
Turn off electric power supply at disconnect
switch or service panel before removing any ac-
cess or service panel from unit.
Failure to follow this warning can result in prop-
erty damage, personal injury, and/or death.
Inspect filters at least monthly and replace or clean as re- The annual inspection should include cleaning as required
quired, to ensure efficient operation of the unit.
Washable filters may be cleaned by soaking in mild deter- NOTE: All bearings are sealed and no lubrication is re-
gent and rinsing with cold water. Install filters so that the ar- quired.
rows on the side point in the direction of air flow.
Filter racks are accessible through the filter access panel. Circulating Air Blower
Disposable Replacement Filters
To replace disposable filters:
Visually inspect the blower wheel for accumulations of dirt or
lint. Clean the compartment and the blower wheel. If accu-
mulation is excessive on blower wheel or does not remove
easily, it will be necessary to remove the blower assembly.
[_ 513 01 1002 00
Page 23

60
0
8
o
o
o
@
RIGGINGINSTRUCTIONS
A WARNING
FAILURE TO FOLLOW THESE INSTRUCTIONS
CAN RESULT IN PROPERTY DAMAOE,
E_ODILY INJURY OR DEATH_
ALL PANELS MUST BE IN PLACE WHEN RIGGING AND LIFTING.
HOOK RIGGING SHACKLES THROUGH HOLES IN BASE RAIL, AS SHOWN IN DETAIL A.
USE SPREADER BARS, WHEN RIGGING, TO PREVENT UNIT DAMAGE.
BE SURE RIGGING AND SHACKLES ARE SUFFICIENT TO HANDLE WEIGHT LISTED BELOW.
SPREADER BARS
DETAIL A
HEIGHT
WIDTH
Unit Size (ton)
3
3-1/2
4
5
6-1/3
7-1/2
Weight (Ibs)
560
570
590
630
710
715
"1'1
m,
c
t,..
o
m,
o
m
(3
o
3
C
m,
¢e
o
2
t_
m
Page 24

INTERNATIONAL COMFORT PRODUCTS
LIMITED WARRANTY CERTIFICATE
For Cooling & Heating Products
SAVE THIS CERTIFICATE. It gives you specific legal rights, and you may also have other rights which may vary from state to state and
province to province.
If your unit needs servicing, contact a qualified dealer or qualified service technician of your choice. When requesting service, please have the model
and serial number from each unit in your heating and/or cooling system readily available. If your dealer needs assistance, the distributor is available to
provide support and we, in turn, support its efforts.
Fill in the installation date and model and serial numbers of the unit inthe space provided below and retain this Limited Warranty for your files.
GENERAL TERMS
Subject to the conditions and limitations stated herein, during the term of this Limited Warranty, we will provide a replacement for any functional
component part (as defined below) of your unit found to be defective in materials or workmanship. The term ofthis Limited Warranty is five years from
installation on Residential Products and one year from installation on Commercial Products. Except as otherwise stated in the "Additional Terms"
section, this Limited Warranty covers only the original purchaser and subsequent transferees, and only while the unit remains at the site of the original
installation (except for mobile home installations), and onty if the unit is installed inside the continental United States, Puerto Rico, Alaska, Hawaii or
Canada. In addition, the Limited Warranty applies only if the unit is installed and operated inaccordance with the printed instructions accompanying the
unit, and in compliance with alt applicable installation and building codes and good trade practices. As used in this Limited Warranty, "installation"
means the original installation of the unit.
TH ERE ARE EXCEPTIONS to this Limited Warranty as described on the reverse side of this page. All replacement parts will be warranted for the
unused portion of the warranty coverage period on the unit. The partto be replaced must be returned by the dealer to a distributor that sells products for
International Comfort Products, in exchange for the replacement part. In lieu of providing a replacement part, we may, at our sole option, refund to you
an amount equal tothe distributor's component purchase price from us,or provide to you acredit equal to that amount to be applied toward the purchase
of any new unit that we distribute. Ifa credit for a new unit is given in tieu of a replacement part, the rating plate from the unit being replaced must be
submitted on a warranty claim, and you r dealer must make the unit being replaced available to our distributor for disposition. As acondition towarranty
coverage, the unit must receive yearly maintenance, as described in the owner's manual, by a dealer. Satisfactory proof of yearly service by adealer
may be required.
"Functional component parts" include only the following: blower motor, unit-mounted sensors & timers, condenser motor, evaporator coil, condenser
coil, condenser fan, capacitor, transformer, single-phase strip heat elements, expansion device, reversing valve, solenoid valve, service valve,
electronic and electro-mechanical control board, ignitor, ignition module, draft inducer assembly, burner pilot, gas valve, limit control, pressure switch,
relays and contactors, blower wheel, interlock switch, crosslighter, pilot shield, gas & oil burners, oil pump assembly, accumulators and factory installed
driers and strainers.
This Limited Warranty DOES NOT COVER any labor, material, refractory chambers, oii nozzles, refrigerant, refrigerant inspection and refrigerant
reclaiming, freight and/or handling charges associated with any repair or replacement and such charges will be your responsibility.
Toestablish the installation date for any purpose under this Limited Warranty, you must retain the original records that can establish the installation date
ofyour unit. Ifyou donot providesuchdocumentsthe start dateoftheterm ofthis LimitedWarrantywillbe based uponthedate ofunit manufacture, ptus
thirty (30) days. In establishing that the required yearly service has occurred, you must furnish proof of yearly service by a qualified service technician.
This Limited Warranty does not cover: (a) failure or damages caused by accident, abuse, negligence, misuse, riot, fire, flood, or Acts of God (b)
damages caused by operating the unit where there is a corrosive atmosphere containing chlorine, fluorine, or any other damaging chemicals (other
than those found in a normal residential environment) (c) damages caused by an unauthorized alteration or repair of the unit affecting its stability or
performance (d) damages caused by improper matching or application of the unit or the unit's components (e) damages caused by failing to provide
proper maintenance and service to the unit in accordance with this Limited Warranty Certificate and the printed instructions originally provided with the
unit (f) any expenses incurred for erecting, disconnecting, or dismantling the unit (g) parts or supplies used in connection with service or maintenance,
such as refrigerant, refractory chambers, oil nozzles, filters, or belts (h) damage, repairs, inoperation or inefficiency resulting from faulty installation or
application (i) electricity or fuel costs or any increase in electricity or fuel cost whatsoever including additional or unusual use of supplemental electric
heat (j) units which have not had the required yearly maintenance described elsewhere in this limited warranty.
In no event shall we be liable for any incidental, consequential, or special damages or expenses in connection with any use or failure of this unit.
We have not made. do not make. and hereby disclaim any implied condition or implied warranty of fitness for a particular use or purpose, and
anv implied condition or implied warrantv of merchantabilitv, to the fu Ilest extent allowed bv law. We make no express or implied warranties
except as stated in this Limited Warrantv certificate.
No one is authorized to change this Limited Warranty or to create for us any other obligation or liability in connection with this unit. Any implied
warranties shall last for the term of the expressed warranty contained herein. Some states and provinces do not allow the exclusion or limitation of
incidental orconsequential damages or do not allow limitations onhow long an implied warranty or condition lasts, so the above limitations or exclusions
may not apply to you. The provisions of this Limited Warranty are in addition to and not amodification of or subtraction from any statutory warranties and
other rights and remedies provided by law.
Please refer to reverse side of this page for additional terms.
Model No.
Serial No. Date Installed
Effective on units installed After July 1, 2002,
USA: International Comfort Products Corporation (USA) • 650 Hell-Quaker Avenue *P.O. Box 128 • Lewisburg, Tennessee 37091 • (931-270-4100)
CANADA: International Comfort Products division of UTC Canada Corporation • 6060 Burnside Court, Unit 1, Mississauga, Ontario L5T 2T5
(905-795-8113).
Manufacturers of Airquest, Arcoaire, Clare, Comfortmaker, Dettson, Hell, Keeprite, Lincoln, Tempstar and other quality brand name private label
products.
Part No. 401 06 1010 18 (Orig. 8/9/2002)
Page 25

ADDITIONAL TERMS FOR RESIDENTIAL APPLICATIONS ONLY
The Additional Terms for the components listed below are in addition to, and subject to, the General Terms on the reverse side of this page.
Warranty coverage is limited to parts that fail due to defect in materials or workmanship during the specified term.
CENTRAL GAS & OIL FURNACE HEAT EXCHANGERS*
Gas Model Series: C9MPV. HgMPV. TgMPV. CgMPT. H9MPT. T9MPT. C9MPD. HgMPD. TgMPD: Limited Lifetime Warranty on heat exchangers. If
a heat exchanger on one of these furnaces fails due to defect in the part, we will provide a replacement part or, at our option, credit toward the purchase
of a new furnace manufactured by us. This additional Limited Warranty runs only to the original purchaser, and tasts only for as tong as the originat
purchaser tives in the home where the furnace is initially installed.** Itis not transferable to any subsequent owner. Ifthe furnace was not installed inthe
home owned by the original purchaser, if the original purchaser setls the home to a subsequent owner, or if proof of originat purchase cannot be
provided, then the limited warranty is only for 20 years from the date of original installation.
Gas Model Series: GDL. GNL. TNE. TDE. NTC7. NDC7. NTP6. NDP6. TDE. NTV6. VNE: A replacement heat exchanger will be provided for any
heat exchanger that fails in one of these furnaces due to defect for 25 years from the originat date of installation.
Gas Model Series: NTC6. GNE. GDE. NDN6. NTG3. NDN3. FBF. NBF. NDF. NTN3. NTN6. NNE. N9MPI. N9MP2. FUH: A replacement heat
exchanger witt be provided for any heat exchanger that faits in one of these furnaces due to defect for 20 years from original date of installation.
Oil Model Series: OLR(105, 160, 182), OCF, OLE OUF, NOLE NOUF, OLB, OHB, ODH, FLO, MBO, LBO, NOMF: Limited Lifetime Warranty on
heat exchangers. Ifa heatexchangerononeofthesefurnacesfailsduetodefectinthepart, wewitl provide a replacement part or, at our option, credit
toward the purchase of a new furnace manufactured by us. This additional Limited Warranty runs only to the original purchaser, and tasts only for as
long as the original purchaser lives in the home where the furnace is initially installed.** It is not transferable to any subsequent owner. If the furnace
was not installed in the home of the original purchaser, if the original purchaser sells the home to a subsequent owner, or if proof of original purchase
cannot be provided, then the limited warranty is only for 20 years from the date of original installation.
Oil Fired Floor Furnace: NFO: A replacement heat exchanger witl be provided for any heat exchanger that faits due to defect for 10 years from
installation with the following limitation: during the sixth through tenth year, any credit toward your purchase of a component or toward the purchase of
any new unit wilI be in an amount equal to the distributor's purchase price reduced by 20 percent for each year after the fifth year.
ADDITIONAL TERMS FOR OIL FURNACE APPLICATIONS ONLY
1) OIL BURNERS - A replacement for 5 years from date of original installation for Oil Burner Parts.
2) OPTIONAL ACCESSORIES AND FUNCTIONAL PARTS: A replacement for 5 years from date of original installation. (Refractory and
oil nozzles not included)
GAS/ELECTRIC PACKAGED UNITS HEAT EXCHANGERS
Model series: PGAD. PGAA. PGMD. PGME. PGF. GPFM. PGC. GPCM: A replacement for 10 years from original date of installation.
COMPRESSORS:*
1) Premium Model Units: HAC0. HAC2. HAC4. CAC0. CAC2. CAC4. KAC0. TCA0. TCA2. TCA4. HHP0. HHP2. HHP4. CliP0. CliP2. CliP4.
TCH0. TCH2. TCH4. PGME. PYMC. PHAD. PGAD. PA95. PAPC. PAK. APK: Tothe original purchaser a replacement for 10 years from original date
of installation, only if the unit is installed with factory matched coils, except air conditioner condensing units with a nominal SEER of 10 may be matched
with evaporator coils of the same nominal tonnage regardless of manufacturer and in accordance to factory recommendations. This limited 10-year
warranty is not transferable to any subsequent owner. HOWEVER, if the unit was not installed in the home owned by the original purchaser, if the
purchaser sells the home to a subsequent owner, or if proof of original purchase cannot be provided, then the limited warranty is only for 5years from the
original date of installation.**
2) All Other Models: Air Conditioners. Heat PumPs. & Combination Gas/Electric Units: NAC0. NAC2. NHP0. NHP2. AO. A2. HO. H2. PGF.
PGC, GPFM, GPCM, PAE APFM, PHE HPFM, PGAA, PGMD, PA55, PH55, PAPA, PYPA: A replacement for 5 years from date of original
installation, onty if: (a) air conditioner condensing units with SEER rating in the range of 10 to 11 SEER are matched with evaporator coils of the same
nominal tonnage regardless of manufacturer and in accordance to factory recommendations, or (b) heat pump condensing units are used with factory
matched coils, unless written approval to do otherwise is obtained from manufacturer.
ADDITIONAL TERMS FOR COMMERCIAL APPLICATIONS ONLY
For purposes of this warranty a commercial application is one in which: the product has over 5 tons nominal cooling capacity, or is designed
for operation with 3 phase electrical power, or is installed in a commercial establishment such as a beauty or hair salon, hospital, school,
restaurant, church, hotel etc..
3-Phase Models: PGF, GPFM, GPF, PGAD, PGME, PGB, PGMG, PGMF, PGS, PGE, APE, PAE, PAB, PAMD, PAS, PAl=,APFM, APF, PHB, PHE,
PYMD, HPB, PHS, CAC, ACC, CAE, ACE, CHC, HCC, CHE, HCE:
The additional Terms of the components listed below are in addition to and subject to the General Terms on the reverse side of this page.
1) GAS FIRED HEAT EXCHANGERS (ALL MODELS):* A replacement for 10 years from date of originat installation.
2) COMPRESSORS (ALL MODELS):* A replacement for 5 years from date of original installation.
3) OPTIONAL ACCESSORIES AND FUNCTIONAL COMPONENT PARTS (ALL MODELS):*
A replacement for 1 year from date of original installation.
4) COMMERCIAL OIL MODELS: OLR210, OLR350, OTF210, AMT3, AMT4, AMP3: Ten(10) Year Limited Warranty on heat exchangers.
*To receive advantage of your limited warranty, you must provide proof of yearly service by a qualified service technician.
**To receive advantage of your warranty, you must retain the original records that can establish the installation date and proof of purchase of the unit.
MINI SPLITS:
Summary - Mini Splits Warranted for one (1) year on all replacement parts.
Additional terms for Mini Splits:
The additional Terms of the components listed below are in addition to, and subject to, the General Terms on the reverse side of this page.
1) Compressors (All Models): A replacement compressor wili be provided for atIcompressors that faii due to defect for 5 years from date of original
installation.
2) Optional Accessories and Functional Components Parts (All Models):
A replacement part will be provided for alt parts that fail due to defect for one (1) year from date of original installation.
Failu re to maintain the equipment through annual maintenance bya qualified service technician shall void the warranty. Proof of service wili berequired
with ati warranty claims. Proof of purchase and installation date must be submitted with ali claims.
 Loading...