

IconTime P400 User Manual
TotalPass® P400
User Guide

Copyright © 2020 IconTime. All rights reserved.
Reproduction of this document in whole or in part is strictly prohibited. This document may
contain typographical or copy errors. TotalPass, IconTime, the IconTime logo, and all other
IconTime product names mentioned in this document are registered trademarks of IconTime.
IconTime
9000 SW Gemini Drive, Bldg. 8
Beaverton, OR 97008
Contact Support: 1-800-847-2232 #1
Contact Sales: 1-800-847-2232 #3
www.icontime.com

Table of Contents
Chapter 1: Getting Familiar with Your Time Clock ...........................................................................................7
Everything you need to get your time clock up and running: ................................................................................................ 7
System Requirements ................................................................................................................................................................................. 8
Features ............................................................................................................................................................................................................... 8
Available TotalPass Upgrades ................................................................................................................................................................ 8
Connection / Setup ...................................................................................................................................................................................... 9
Logging In ............................................................................................................................................................................................................ 9
Support and Troubleshooting .............................................................................................................................................................10
Integration with Payroll ............................................................................................................................................................................10
Register your Time Clock ........................................................................................................................................................................ 10
Navigating the Time Clock Software ......................................................................................................................................................10
Home Page .........................................................................................................................................................................................................11
Lists Menu ..........................................................................................................................................................................................................11
Reports Menu ...................................................................................................................................................................................................11
Payroll Menu ......................................................................................................................................................................................................11
Files Menu ..........................................................................................................................................................................................................12
Settings Menu .................................................................................................................................................................................................12
Help Menu .........................................................................................................................................................................................................12
Chapter 2: Setting Your Time Clock Preferences .......................................................................................... 13
Setting Your Pay Preferences ..................................................................................................................................................................... 13
Setting Your Overtime Preferences ........................................................................................................................................................ 14
Setting Your Punch Preferences ............................................................................................................................................................... 14
Setting Your Device Preferences .............................................................................................................................................................. 16
Setting Your Alert Preferences (Requires Upgrade) ......................................................................................................................17
Alert Setup ....................................................................................................................................................................................................... 18
Creating Custom Fields .................................................................................................................................................................................. 18
Chapter 3: Setting Up Your Employees ........................................................................................................... 20
Employee List ......................................................................................................................................................................................................20
Make Employees Inactive.......................................................................................................................................................................20
Customizing the Columns .....................................................................................................................................................................20
Time Remaining Before Overtime .....................................................................................................................................................20
Adding Employees ............................................................................................................................................................................................. 21
Employee Information ............................................................................................................................................................................... 21
Employee Settings ..................................................................................................................................................................................... 21
Entry Method .................................................................................................................................................................................................. 21
Lunch Time Deduction ............................................................................................................................................................................ 22
Delete Employee’s Punches ..................................................................................................................................................................22
© 2020 IconTime. All rights reserved. Page 3

Chapter 4: Clocking In and Out ......................................................................................................................... 23
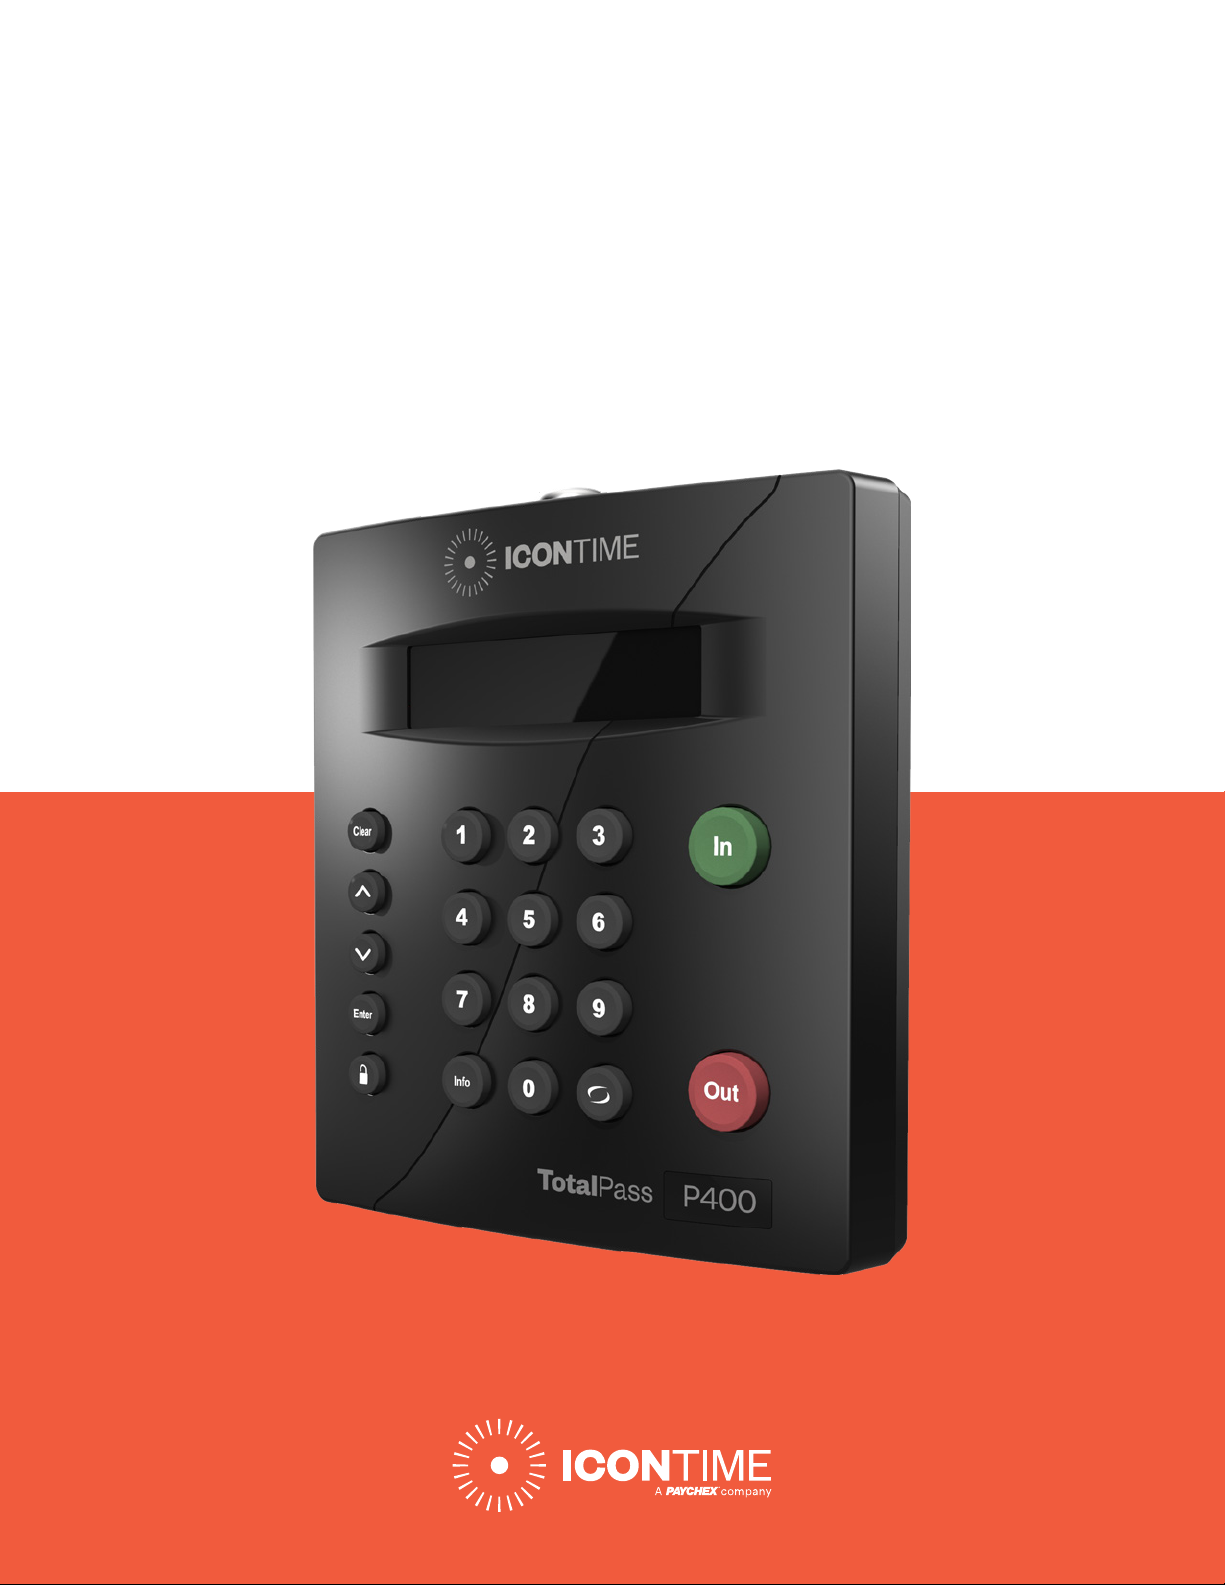
Time Clock Keypad Functions ................................................................................................................................................................. 23
Punching In and Out ......................................................................................................................................................................................... 23
Keypad PIN Entry ........................................................................................................................................................................................ 24
Proximity Badge Entry..............................................................................................................................................................................24
Web Punch Entry ......................................................................................................................................................................................... 24
Tracking Paid Breaks .................................................................................................................................................................................... 24
To transfer out of the break department and back to work: .............................................................................................. 24
Chapter 5: Generating Reports......................................................................................................................... 25
Reports Overview ............................................................................................................................................................................................. 25
Adding a Punch...................................................................................................................................................................................................25
Adding Non-Work Hours (Holiday and Non-Worked) .................................................................................................................. 26
Editing a Punch ................................................................................................................................................................................................... 27
Using Batch Edits............................................................................................................................................................................................... 27
Viewing Additional Reporting Details .................................................................................................................................................... 27
Using the Attendance Report .................................................................................................................................................................... 28
Using the Timecard Report ......................................................................................................................................................................... 29
Chapter 6: Sending to Payroll ...........................................................................................................................30
Create Payroll Export File .............................................................................................................................................................................30
QuickBooks Export Payroll process........................................................................................................................................................ 31
Configuring Payroll ...........................................................................................................................................................................................32
QuickBooks Online Configuration ........................................................................................................................................................... 32
Chapter 7: Alternate Employee Entry Options ..............................................................................................34
Using Proximity Badges .................................................................................................................................................................................34
Assigning Proximity Badges to an Employee ..............................................................................................................................34
Punching In/Out Using Proximity Badges ....................................................................................................................................34
Web Punch Entry (Web Punch License purchase required).......................................................... 35
Locking the Time Clock Terminal Keypad ................................................................................................................................... 35
Setting Up Your Employees for Web Punch ................................................................................................................................35
Punching In/Out Using Web Punch .................................................................................................................................................. 35
Clocking In/Out using GPS Location Tracking ........................................................................................................................... 36
IP Address Restriction.............................................................................................................................................................................. 37
Setting Authorized IP Addresses by Employee .........................................................................................................................37
Running Reports with Web Punch ..................................................................................................................................................... 38
Chapter 8: Maintaining Your Time Clock ....................................................................................................... 39
Creating a Data Backup ................................................................................................................................................................................39
Data Backup from the Software Interface ....................................................................................................................................39
Data Backup to a USB Flash Drive ....................................................................................................................................................39
Restore Time Clock Data Backup ...........................................................................................................................................................40
© 2020 IconTime. All rights reserved. Page 4

Restore a Time Clock Data Backup from the Software Interface ..................................................................................40
Restore a Time Clock Data Backup from a USB Flash Drive ............................................................................................40
Removing Data from Your Time Clock .................................................................................................................................................. 41
Updating Your Time Clock ............................................................................................................................................................................ 41
Updating Your Time Clock from the Software Interface ....................................................................................................... 41
Updating Your Time Clock Using a USB Flash Drive ..............................................................................................................42
Auto-Update .................................................................................................................................................................................................. 42
Resetting Your Time Clock Password ...................................................................................................................................................43
Changing Your Time Clock Software Interface Password ..................................................................................................43
Resetting the Software Interface Password ...............................................................................................................................43
Resetting the Supervisor Mode Security Code ............................................................................................................................. 44
Chapter 9: Time Clock Terminal Supervisor Mode ..................................................................................... 45
Log Into Supervisor Mode ............................................................................................................................................................................ 45
Parent Clock Supervisor Mode Settings .............................................................................................................................................45
View IP Address ...........................................................................................................................................................................................45
Network Settings ............................................................................................................................................................................................... 45
LAN Settings .................................................................................................................................................................................................. 45
Wi-Fi Settings ................................................................................................................................................................................................46
Assign Badges ..............................................................................................................................................................................................46
Set Date/Time...............................................................................................................................................................................................46
View Serial # ..................................................................................................................................................................................................46
View Version # .............................................................................................................................................................................................. 47
Download Backup ....................................................................................................................................................................................... 47
Restore Backup ...........................................................................................................................................................................................47
Enable Upgrade............................................................................................................................................................................................ 47
Reset Password ........................................................................................................................................................................................... 47
Erase All Memory ........................................................................................................................................................................................ 47
Download Log .............................................................................................................................................................................................. 47
Chapter 10: Connecting to the Clock .............................................................................................................. 48
Wi-Fi Connection ............................................................................................................................................................................................... 48
Connecting Using the Clock Interface ........................................................................................................................................... 48
Connecting Using a WPS Button ........................................................................................................................................................49
Connecting Using a WPS with PIN .....................................................................................................................................................49
Connect to the Wireless Network .....................................................................................................................................................50
Connecting Using the Software Interface ....................................................................................................................................50
Ethernet Connection ................................................................................................................................................................................50
Chapter 11: Software Upgrades ........................................................................................................................ 52
Enabling Software Upgrades ...................................................................................................................................................................... 52
Employee Capacity Upgrades ...................................................................................................................................................................52
© 2020 IconTime. All rights reserved. Page 5

Benefit Tracking Upgrade ............................................................................................................................................................................ 53
Benefit Tracking and Accruals ........................................................................................................................................................... 53
Enhanced Overtime Preferences ...................................................................................................................................................... 53
Revision Zones..............................................................................................................................................................................................53
Enhanced Overtime Preferences ...................................................................................................................................................... 53
Non-Worked Hours and Benefit Time (Vacation, Sick, Personal) ......................................................................................... 53
Customizing Benefit Accrual Rules .................................................................................................................................................. 54
Accrual Summary Report ............................................................................................................................................................................ 55
Revision Zones ................................................................................................................................................................................................... 55
Email Alerts Upgrade ..................................................................................................................................................................................... 56
Outgoing Email Settings (SMTP Server) ..............................................................................................................................................56
Common SMTP Server Settings .............................................................................................................................................................. 58
Chapter 12: Configure for Remote Access ..................................................................................................... 59
System Requirements ....................................................................................................................................................................................59
Step 1: Set Up the TotalPass on the Local Network ...................................................................................................................... 59
Step 2: Router Configuration ...................................................................................................................................................................... 59
Assign a Static IP Address to the Time Clock ...........................................................................................................................60
Set Up Port Forwarding on the Router ............................................................................................................................................60
Step 3: Connect to Your TotalPass Clock over the Internet ...................................................................................................... 61
Remote Connection Frequently Asked Questions ........................................................................................................................ 62
Troubleshooting Remote Connection Problems ............................................................................................................................ 62
Standard Remote Connection Setup Diagram ................................................................................................................................64
Connect Clocks Remotely with Multi-clock Diagram ..................................................................................................................64
Warranty Information ......................................................................................................................................... 65
FCC Part 15 ............................................................................................................................................................ 67
© 2020 IconTime. All rights reserved. Page 6

Chapter 1: Getting Familiar with Your Time Clock
Everything you need to get your time clock up and running:
Connecting your time clock and logging in for the first time
How to get help
Navigating through the software
Welcome
Thank you for choosing IconTime. We appreciate your business.
Our mission is to provide our customers with quality products and excellent customer service. We pride ourselves on being
innovators in the time and attendance industry, developing products that are easy to install, simple to operate, and reliable.
The TotalPass P400 system offers breakthrough web-enabled technology that brings the simplicity of embedded software to your time and attendance system, without requiring Internet access.
This guide will help you set up the clock and use the many features to automate time and attendance,
streamline your payroll process, and generate reports that provide insight into labor costs.
© 2020 IconTime. All rights reserved. Page 7

System Requirements
For Network Access to the Time Clock
• Any Web browser on PC, Mac, tablet, or smartphone
• An available Ethernet port or wireless network
• Remote Internet access also requires Internet and port forwarding to port 9844 or port 80.
For Direct Connection to the Time Clock
• Use any Web browser on a PC or Mac where the time clock is directly connected to the computer.
• USB port on Windows PC or Ethernet port on Windows PC or Mac
Payroll Export Utilities
• Paychex Flex, SurePayroll, Paychex Preview, Paycom, Paylocity, ADP Workforce Now,
and QuickBooks Online exports are compatible with all operating systems.
• Windows Vista or above required for QuickBooks Plug-in* and the ADP Export.
* Only available with QuickBooks desktop versions.
Internet Connection Required for the following functionality:
• Email alerts, backups, or payroll reports
• Connecting multiple time clocks together
• Accessing the time clock from more than 1 computer (Network connection required)
Features
The TotalPass P400 was designed to streamline the time and attendance and payroll process. The TotalPass
software is built into the time clock and provides a wealth of features to save you time and improve accuracy.
• Capacity of 25 employees and upgradeable to 250 employees
• Pre-assigned employee PIN numbers included. Optional upgrades include Custom PIN Entry
(4-9 digits), Proximity Badges (sold separately), and Web Punch (sold separately).
• Configurable for remote Internet access
• Paid break tracking
• Export to QuickBooks, ADP, Paychex Flex, Paychex Preview, SurePayroll, Paycom, or CSV
• Automatic lunch time deduction
• Timecard, Attendance reports
• Enter Holiday and NonWorked Hours for one or more employees
Available TotalPass Upgrades
Benefit Tracking and Accruals
This upgrade allows you to automatically calculate vacation, sick, and personal time off.
© 2020 IconTime. All rights reserved. Page 8

Customize accrual rates and tracking per employee for maximum policy flexibility.
Upgrade Employee Capacity
Expand your system with your business; upgrade the employee capacity from
the standard 25 employees to 50, 100, or 250 employees.
Employee Web Punch Entry
Provide employees with a contact-free option to punch In / Out using a web browser on their computer, smart phone, or tablet.
Web Punch Entry licenses are available in sets of 5 and can be re-assigned to new employees
as needed. The time clock has a maximum capacity of 50 Web Punch licenses.
Email Alerts Upgrade
Automatically email you alerts as employees come and go, before they accumulate overtime,
and more. It also allows the Timecard report and backups to be emailed to one or more
recipients. The email server settings have to be configured for emails to be sent out.
Advanced Pack Upgrade
The Advanced Pack upgrade includes:
• Additional capacity to accommodate another of 25 employees, bringing the total system capacity to 50
• Department tracking and reports
• Supervisor logins, permission levels, and employee assignments
• Track notes by the punch, employee, or department
• Customized reports
• Customized employee ID (PIN) numbers
• Customized system prompts
• Employee input fields
• Connect multiple time clocks using the Multi-Clock feature
• Employee Web browser entry (for 5 Web Punch Licenses)
Connection / Setup
Refer to the TotalPass Quick Start Guide for instructions on setting up your employee
time clock’s connection and logging into your time clock for the first time.
Logging In
To log in and view employee information and punch details, enter the time clock’s assigned
Internet Protocol (IP) address into your internet browser address field.
You must enter the address exactly as displayed below. For example, if the assigned address is
192.168.2.103, enter that text directly into the address field, preceded with http://.
© 2020 IconTime. All rights reserved. Page 9

Note: If you are logging in using USB, navigate to http://totalpass.
timeclock or enter http://172.20.20.1 as the IP address.
Support and Troubleshooting
For your convenience, troubleshooting tips and how-tos can be found on
our technical support site at www.support.icontime.com.
This system includes a 30-day trial of our TotalPass P400 Customer Care Pack which includes unlimited
telephone, email, and remote assistance support. Support can be reached Monday through Friday from
7:30am to 4:30pm (PST) at (800) 847-2232 option 1 or via email at support@icontime.com.
Integration with Payroll
Built-in Exports
Your time clock includes a Paychex Flex, Paychex Preview, SurePayroll, Paycom, Paylocity, ADP Workforce
Now, QuickBooks Online, and QuickBooks (Pro, Premier, Enterprise) export formats. It also includes a CSV
Export option used for viewing time clock data in Excel or importing into other third-party payroll programs.
Desktop Installed Export Utilities
Exporting time clock data to PC versions of QuickBooks or ADP requires the
installation of an export utility program. Select the appropriate link below.
• QuickBooks – www.icontime.com/software/QB_Plug-in_Import.exe
• ADP – www.icontime.com/software/ADP_Export_1.0.12.exe
Register your Time Clock
The first time you log in to your time clock you will be prompted to register it. Register your time clock
to ensure that you receive email notification of free software updates, your manufacturer’s
1-year hardware warranty, and 30 days of free technical support.
Navigating the Time Clock Software
The time clock interface is designed to allow you to quickly and easily complete your tasks and
run your reports. In this section you will learn how to navigate through your time clock application.
Application navigation is done through six distinct menus: Home, Lists, Reports, Files, Settings, and
Help. Moving your cursor over each icon displays the individual drop-down menu items.
© 2020 IconTime. All rights reserved. Page 10
Home Page
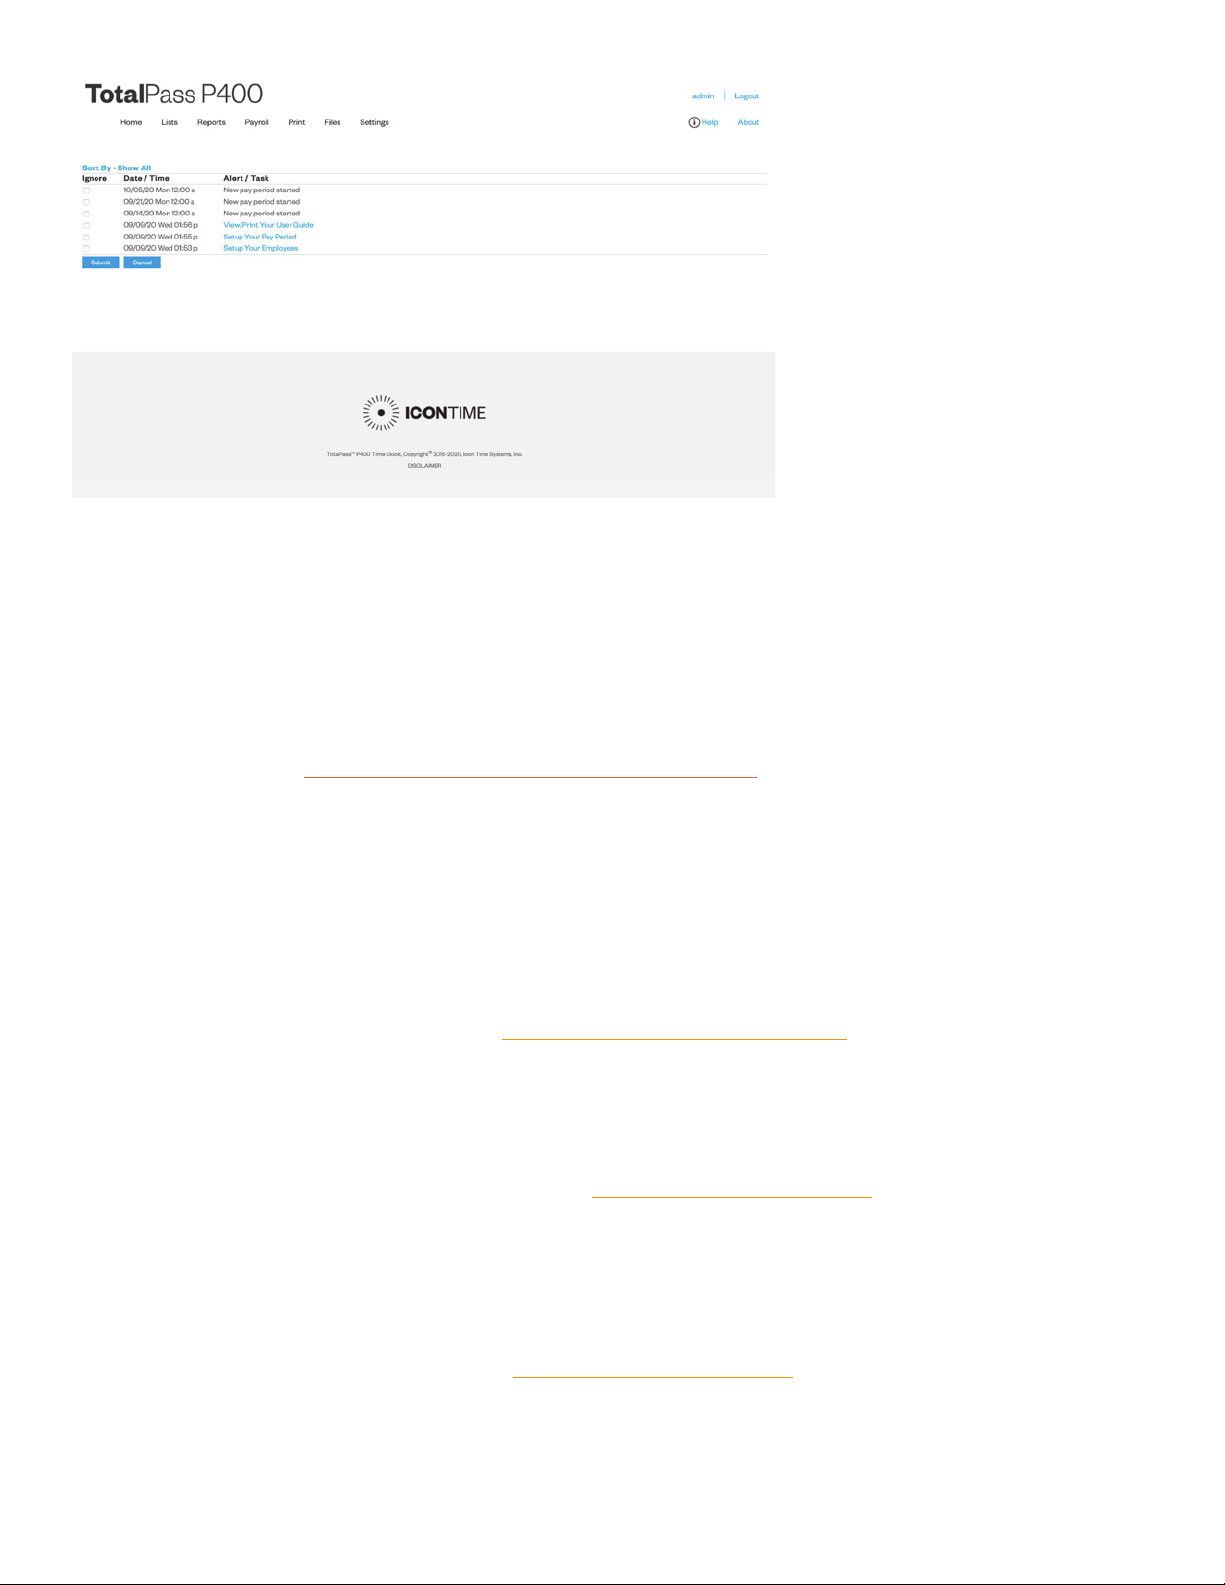
When you first log into your time clock application, the Home page displays automatically. The
Home page provides a quick glance at the activity on your time clock, including notifications of
custom alerts. The Home page also contains helpful links to configure your software.
Current Alerts
The Home page displays important system alerts and time clock activity alerts. For instructions on customizing
your alert settings, refer to “Setting Your Alert Preferences (Requires Upgrade)” in Chapter 2.
When you no longer want to be notified of a particular task or alert, check the box next to that
item in the IGNORE column, and click Submit. If you would like to see past alerts, click Show
All. To view the details of the alert, click the alert link in the ALERT/TASK list.
Lists Menu
Use the Lists menu for adding, modifying or deleting employees, departments, supervisors,
or enabling or disabling additional time clocks connected to the system.
For instructions on setting up employees, refer to: “Chapter 3: Setting Up Your Employees”.
Reports Menu
Your time clock comes with four reports that make it quick and easy to get the information you need to
complete your work and process payroll. Use the Reports menu to access the reports. For additional
information on generating and customizing reports, Refer to ”Chapter 5: Generating Reports”.
Payroll Menu
The Payroll menu allows you to create exports of your time clock data to be imported you’re your
payroll program for streamlining payroll day. In addition, within the Payroll menu, find options to email
the timecards to individual employees or as one report, to a manage. For additional information
on sending your time clock data to payroll, Refer to ”Chapter 5: Generating Reports”.
© 2020 IconTime. All rights reserved. Page 11

Files Menu
Use the Files menu to back up data, restore data back-ups, Delete Old Punches, and update your employee time clock.
Settings Menu
Use the Settings menu to customize your payroll, overtime, punch, device, and alert preferences. Before running
any reports, set your preferences as described in Chapter 2: Setting Your Time Clock Preferences.
Help Menu
The Help menu gives you quick access to the Help Center and to view the About Your Clock page for your time clock.
© 2020 IconTime. All rights reserved. Page 12
Chapter 2: Setting Your Time Clock Preferences
Before accurate reports can be generated and employee punch details are calculated
correctly, you must set your time clock rules and preferences:
Set up your pay period and overtime rules
Set up punch rounding
Set up Alert Preferences
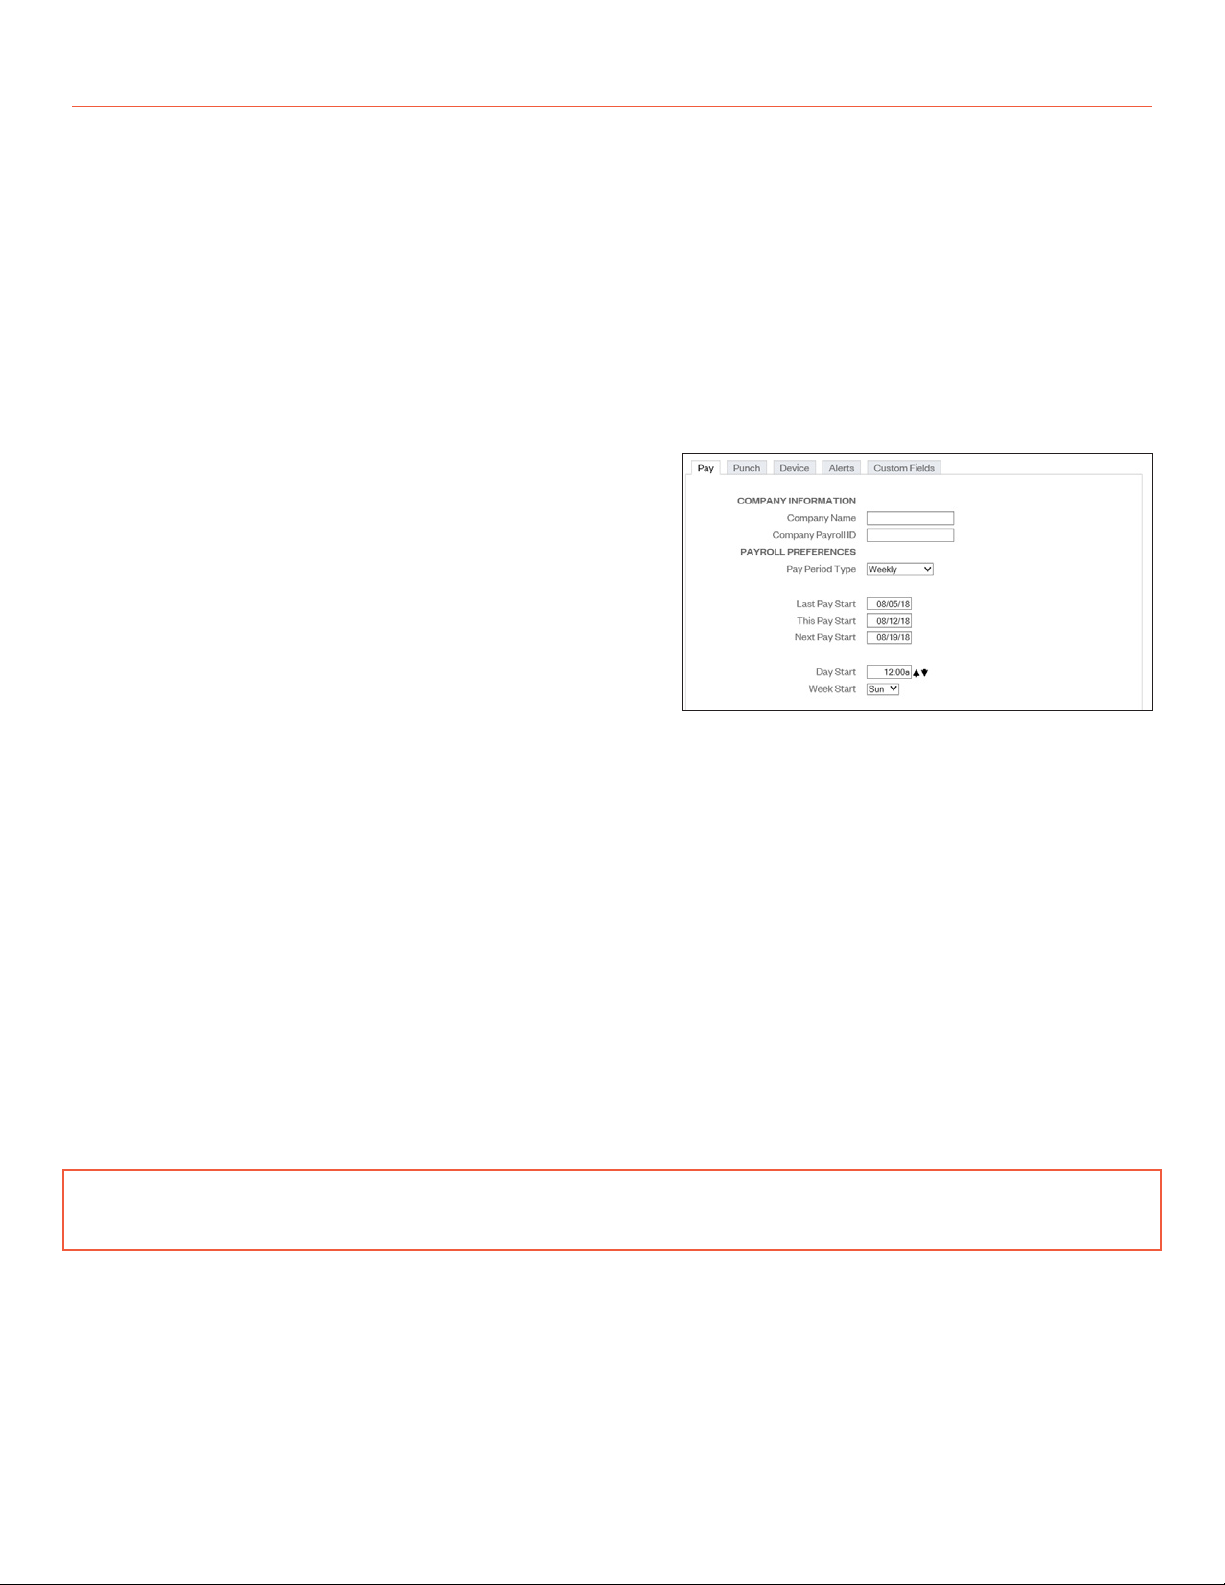
Setting Your Pay Preferences
There are two ways to access your Pay Preferences:
• Click Setup Your Pay Period in the Alert/Task list
• Select Preferences from the Settings menu.
Follow the instructions below to set your Pay Preferences.
• Complete the Company Name field and, if applicable,
the Company Payroll ID field. These will be used
when emailing time.
• Select the applicable option from the Pay Period Type drop-down menu:
o Weekly - Employees are paid once per week
o Bi-Weekly - Employees are paid every two weeks
o Semi-Monthly - Employees are paid twice per month
o Monthly - Employees are paid once per month
• If you select the semi-monthly pay period, two additional date fields display that must be completed.
o Type the first day of the month that your pay period begins in the Start Semi-Monthly on field.
o Type the second day of the month that your pay period begins in the and on field.
• Click in the Last Pay Start field to open the calendar and select the date that your previous pay period started.
Tip: Use the << and >> arrows to select the year. Use the
< and > arrows to select the month.
• Click in the This Pay Start field to open the calendar and select the date that your current pay period started.
• Click in the Next Pay Start field to open the calendar and select the date that your next pay period will start.
• Type the time of day that your workday begins in the Day Start field. You only need to modify
this setting if your company has a 24-hour work schedule and needs to accommodate
© 2020 IconTime. All rights reserved. Page 13

overnight shifts; it is recommended that this setting remain at 12:00am.
• Select the day of the week that your work week begins from the Week Start drop-down
menu. The company’s weekly overtime calculations are based on this setting.
Setting Your Overtime Preferences
Your Overtime Preference settings are on the Pay tab under Payroll Preferences. The TotalPass
comes with two levels of daily and weekly overtime and consecutive day overtime.
Follow the instructions below to set your Overtime Preferences.
1. To set daily overtime rules, type the number of
hours an employee must work in one day before
they receive overtime pay in the Day OT1 After
and the Day OT2 After fields as required. If your
company does not pay daily overtime, type 99.
2. To set weekly overtime rules, type the number of
hours an employee must work in one week before
they receive overtime pay in the Week OT1 After
and the Week OT2 After fields as required. If your
company does not pay weekly overtime, type 99.
Note: Overtime (OT1) is calculated at time-and-a-half (1.5) the rate of pay and
double overtime (OT2) is calculated at two times the rate of pay (2.0).
With the Benefit Tracking Upgrade, these rates can be customized.
3. To set consecutive day overtime rules, change the Consecutive Day OT drop-down menu to Yes. This
option will pay OT1 and/or OT2 on the seventh consecutive day of work, regardless of hours worked
during the work week. This rule is most commonly used by unions and in California. If your company
does not pay consecutive day overtime, change the Consecutive Day OT drop-down menu to No.
Note: Making a change to the overtime options prompts the time clock to restart.
Doing so will make the time clock unavailable until the clock fully reboots.
Click Submit to save your settings and return to the Home page.
Setting Your Punch Preferences
Select Settings | Preferences and click on the Punch tab. The Punch Preferences section displays.
Note: The rounding rule selected affects all punches system wide. The
original punch time remains unchanged on the employee time card.
The punch(shift) hours round according to the rounding rules set.
© 2020 IconTime. All rights reserved. Page 14

Follow the instructions below to set your Punch Preferences.
• Select the applicable rounding type from the Rounding Type
drop-down menu.
• None (No Rounding): Accumulates 100%
of all time registered on the clock.
• 15 Minute (7/8 Rounding): Rounds and calculates punches to the nearest quarter
hour (15 minutes). The split occurs in the middle of each quarter hour.
To illustrate: An In punch of 7 minutes 59 seconds rounds back
An In punch of 8 minutes 00 seconds rounds forward
Example: An In punch of 7:52 a.m. would calculate as 7:45 a.m.
An In punch of 7:53 a.m. would calculate as 8:00 a.m.
• 15 Minute Slant (10/5 In, 5/10 Out): Quarter hour rounding similar to above except the break point
occurs on the 5th minute or 10th minute depending on whether it is an In punch or an Out punch.
To illustrate: An In punch of 4 minutes 59 seconds rounds back
An In punch of 5 minutes 00 seconds rounds forward
An Out punch of 9 minutes 59 seconds rounds back
An Out punch of 10 minutes 00 seconds rounds forward
Example: An In punch at 7:49 a.m. would calculate as 7:45 a.m.
An In punch at 7:50 a.m. would calculate as 8:00 a.m.
An Out punch at 4:49 p.m. would calculate as 4:45 p.m.
An Out punch at 4:50 p.m. would calculate as 5:00 p.m.
• 10th Hour: Rather than rounding the punch hours, this selection calculates
punches from the tenth hour point and advances each six minutes.
To illustrate: An In punch from :00 minutes after the hour to :05 after the hour
rounds to the top of the hour (.0).
An In punch from :30 minutes after the hour to :35 minutes
after the hour rounds to .5.
© 2020 IconTime. All rights reserved. Page 15

Example: An In punch at 7:30 a.m. would calculate at 7.5 a.m.
An Out punch at 4:05 p.m. would calculate as 4.0 p.m.
• The Automatic Punches become IN at field automatically makes the next punch an In punch after
a determined number of hours. This option is convenient if an employee forgets to punch Out.
This option is only used when an employee entry method is set to Automatic. Refer
to Chapter 3: Setting Up Your Employees, for additional information.
• Check the Flag edits on reports checkbox to flag manually edited punches
on reports. If checked, all edited punches are marked with E.
• Type the number of minutes in Reject Like Punches within to reject the same type of
punch at the time clock, within the minutes specified. The second punch is ignored.
• Click Submit to save your settings and return to the Home page.
Note: Making a change to the rounding options will prompt the time clock to restart.
Doing so will make the time clock unavailable until the clock fully reboots.
Setting Your Device Preferences
Select Settings | Preferences and click on the Device tab to
go to the Device Preferences screen. Important information
such as your Database Version, Software Version, and time
clock serial number will appear at the top of this section
Follow the instructions below to set your Device Preferences.
• Select to display minutes on your
reports in decimal or hh:mm (minutes)
format from the Calculated Time Format drop-down menu.
• Check the Hide Employee PIN checkbox to hide employee PINs (ID numbers) at the time
clock terminal, preventing coworkers from viewing another employee’s PIN.
• Type a unique 6-digit security code in the Supervisor Code field to secure the employee time clock.
Important: You need this code to access Supervisor Mode on the employee
time clock. The default supervisor code is 00 00 00.
• Check the Lock Keypad checkbox to lock the keypad and prevent keypad entry of
employee ID numbers (PIN) at the employee time clock. Use this option if you purchased
proximity badges and you do not want employees using the keypad.
• Check the Use Daylight Savings checkbox if you want the time clock
to automatically adjust time for daylight savings.
• Select the default time frame to view the Attendance Report screen from the Default Attendance Report To
drop-down menu.
© 2020 IconTime. All rights reserved. Page 16

• Select the default time frame to view the Timecards Report screen from the Default Timecard Report To
drop-down menu.
• Type the number of minutes to refresh the alerts on the Home page in the Refresh Home
Page Every field. If your system runs slow, type a larger number for the refresh time.
• Use Popup Windows for Edits includes 3 options:
• Yes - have a separate pop-up window display when editing a punch in a report screen.
• Yes with Batch Edits – uses the pop-up window described above. Report will not refresh with
each change submitted. You must refresh the page to see the report with the edited punches.
• No
• Check the Show total hours at the clock checkbox to display the
employee’s total daily hours after the employee punches out.
• Click Submit to save your settings and return to the Home page.
Multi-clock Preferences: Multi-clock refers to multiple time clocks connected together to share
one database. For additional information on setting up multi-clock preferences, refer to
Chapter 13: Multi-clock Configuration.
Setting Your Alert Preferences (Requires Upgrade)
• Select Settings | Preferences and click on the Alert tab
to setup the alert notices displayed on the Home page.
The Home page updates based on your time setting
for the Check Alerts Every field described below.
• Type the least amount of hours an employee can work
per shift in the Alert Low Hours at field. If an employee
works fewer hours than is specified, an alert generates.
To disable this alert, set the alert value to 0.
• Type the amount of hours an employee can work per shift in the Alert High Hours at field. If an employee
works a shift more than the hours specified, an alert generates. To disable this alert, set the alert value to 99.
• Type the maximum amount of hours an employee can work per shift in the Maximum Punch Time
at field. If an employee works a shift more than the hours specified, an alert generates and the
hours stop accumulating for that given shift. To disable this alert, set the alert value to 99.
• Alert Day Overtime OT at triggers an alert before employees reach daily overtime
by using the daily overtime value that you set under Overtime Preferences.
Example: If you have Day OT1 set to 8 hours and Alert Day Overtime OT set to 2 hours, an
alert posts to the Home page when the employee reaches 6 hours worked for the day.
• Alert Week Overtime OT at triggers an alert before employees reach weekly overtime
by using the weekly overtime value that you set under Overtime Preferences.
© 2020 IconTime. All rights reserved. Page 17
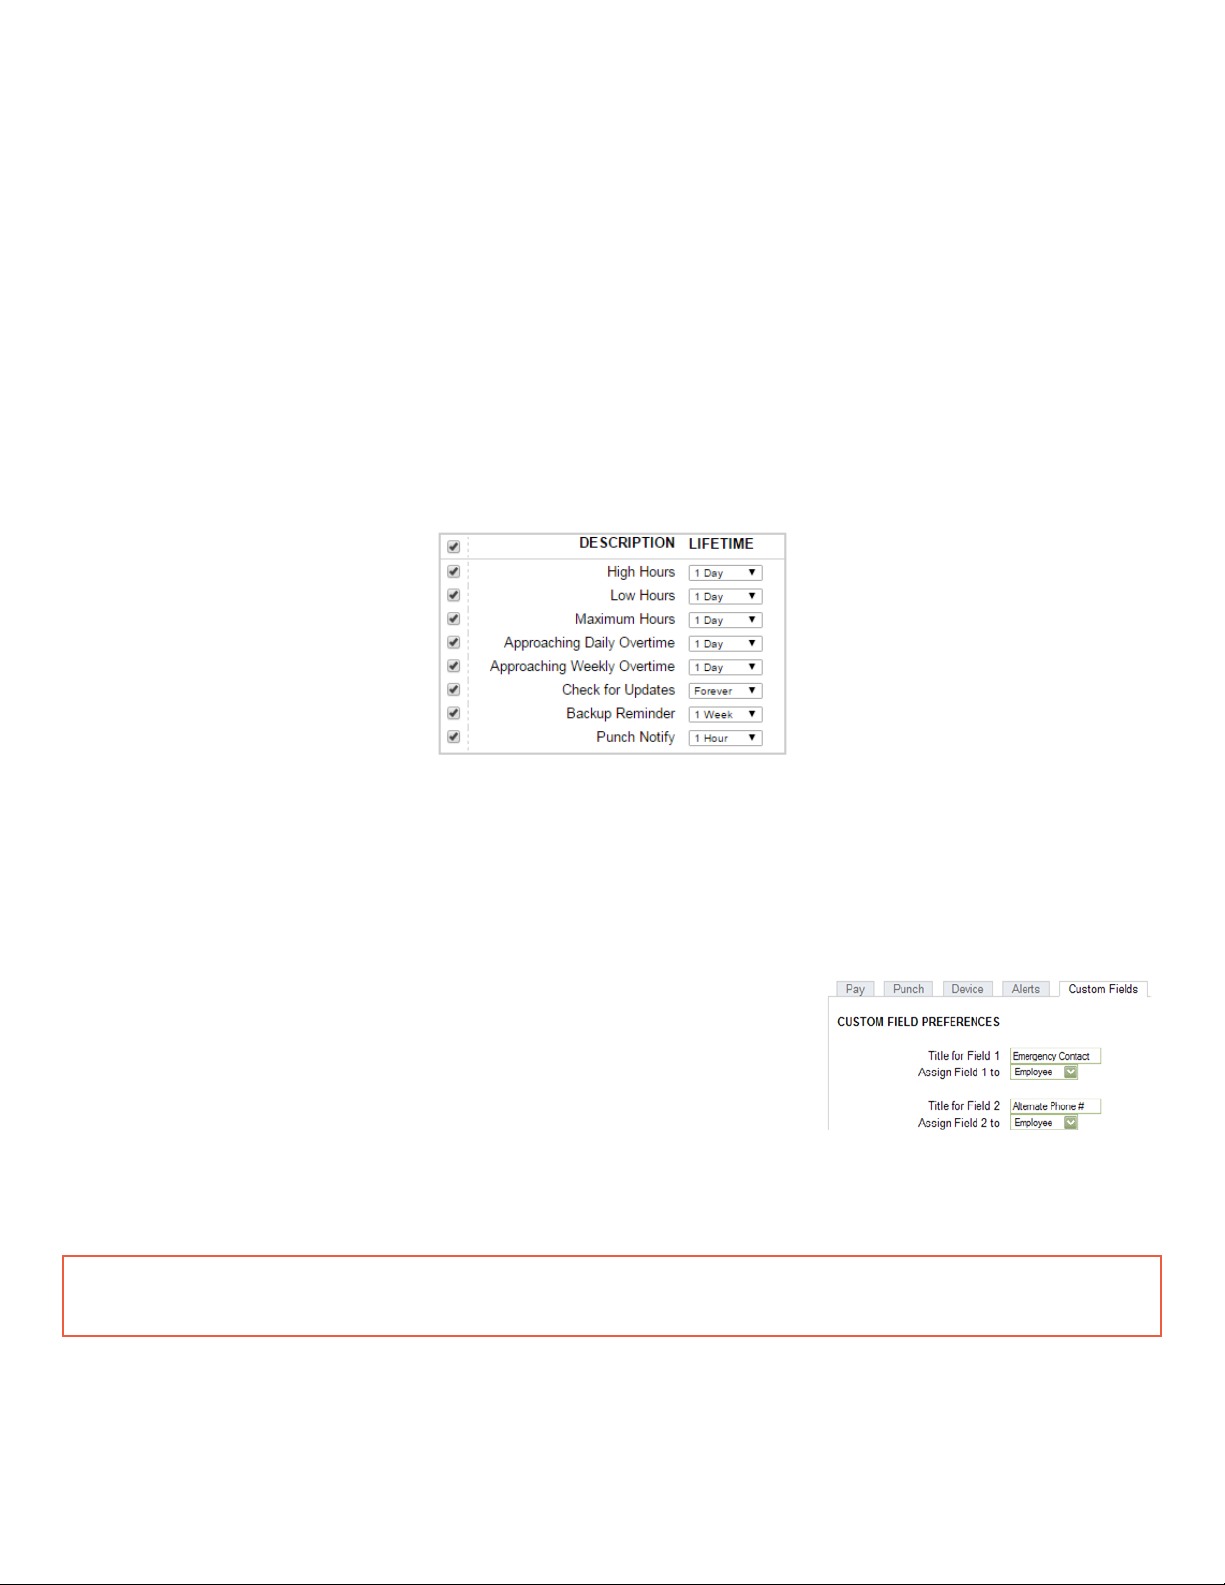
Example: If you have Week OT1 set to 40 hours and Alert Week Overtime OT set to 8 hours, an
alert posts to the Home page when the employee reaches 32 hours worked for the week.
• Type the number of minutes to check alerts in the Check Alerts Every field. New alerts are
checked and posted to the Home page based on the time entered here. To maximize system
speed and performance, we recommend setting this value to 10 minutes or more.
• Click Submit to save your settings and return to the Home page.
For additional Alert configuration, select Settings | Alert Setup.
Alert Setup
Using the Alert Preferences set earlier, select Settings | Alerts Setup, and follow
the instructions below to set up Home page and email alerts.
Using the Alert Preferences set earlier, select Settings | Alerts Setup, and follow
the instructions below to set up Home page and email alerts.
• Enabling/Disabling Alerts: To disable an alert, deselect the checkbox in the far left
column. This prevents the alert from being posted on the Home page
• Lifetime: Use the drop-down menus under the Lifetime column to select the amount of time the
alert remains on the Home page. After that time, the alert is automatically removed.
Creating Custom Fields
TotalPass offers 10 additional fields for tracking static information in Custom Fields.
In addition, Timecard Reports can be filtered based on the Custom Field
values assigned to an employee with Labor Distribution Reports.
Examples:
• Location
• Account
• Part-Time / Full-Time Status
ADP Export: Use the Custom Field to track the employee’s ADP Payroll ID. Refer to the ADP
Export User Guide installed with the ADP Payroll Export for instructions.
Custom Fields values can be added to the following locations.
• System: These fields display on the bottom of the Custom Fields page.
© 2020 IconTime. All rights reserved. Page 18

• Employee: These fields display on the bottom of each employee’s Edit Employee page.
• Department: These fields display on the bottom of the Edit a Department page
Follow the instructions below to set your Custom Fields.
• Type the title for the custom information in the Title for Field X field (X being the field number).
• Select where this custom field should display from the Assign Field X to drop-down menu (X being the field number).
• Click Submit to save your settings and return to the Home page.
• Go to the new custom field on the page specified and enter information as needed.
• For additional information on generating reports based on the custom field value
assigned to an employee, refer to Chapter 6: Generating Reports.
© 2020 IconTime. All rights reserved. Page 19
Chapter 3: Setting Up Your Employees
After setting up your pay period and other preferences, set up the employees in the system.
Adding employees
Setting up automatic lunch deductions
TotalPass P400 comes with a 25-employee limit and can be upgraded to handle up to 250 employees.
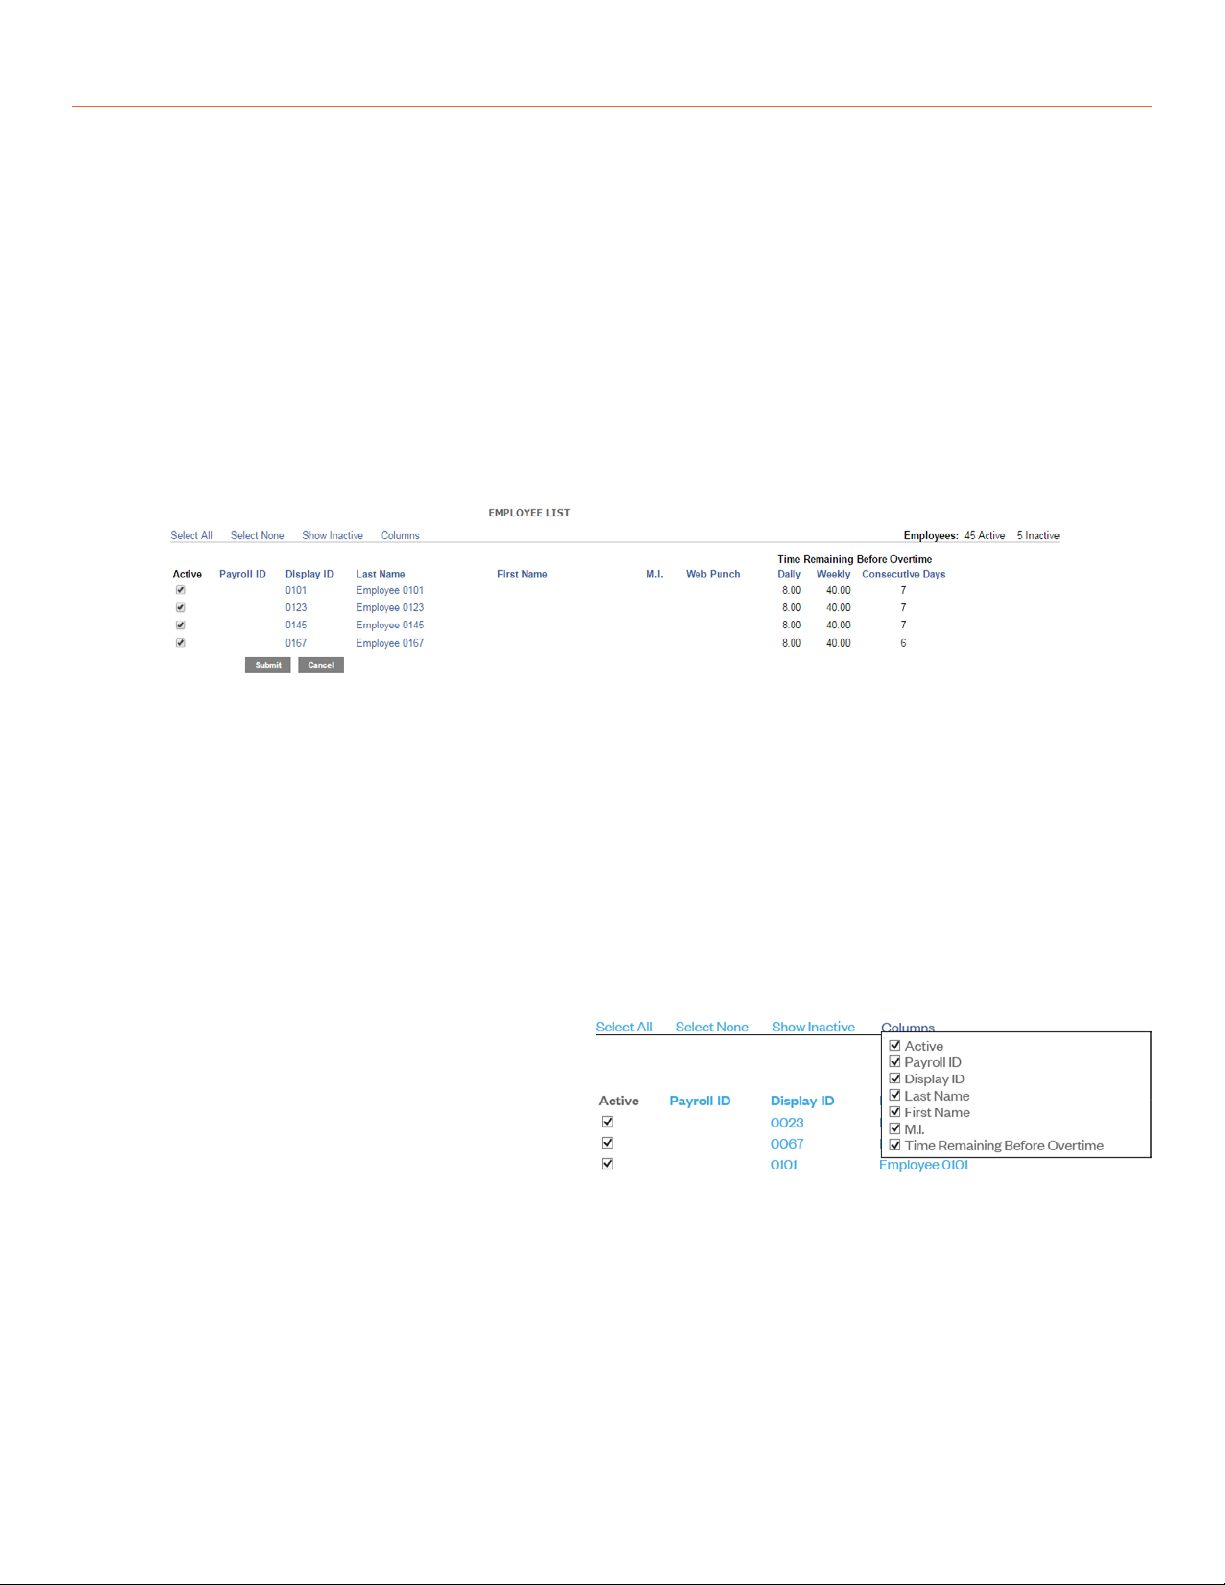
Employee List
A list of your employees and their ID numbers are in the Lists Menu under Employees.
Click on the column header to sort by that particular column.
Make Employees Inactive
Making an employee inactive removes them from the Employee List and hides the employee
data from the reports. Their punch data remains stored in the time clock.
• To make an employee inactive, deselect the checkbox in the far left column, click Submit.
• To select all employees, and make them active, click on Select All.
• To make all employees inactive, click Select None.
• To show inactive employees, click on the Show Inactive option.
Customizing the Columns
• Select the Columns link to hide or show
columns on the Employee List.
• Click on the column header to
sort by a particular column.
Time Remaining Before Overtime
• The Daily column displays the number of hours left in the day before the employee starts earning daily overtime.
• The Weekly column displays the number of hours left in the week
before the employee starts earning weekly overtime.
• The Consecutive Days column displays the number of days left in the work week before the employee
starts earning consecutive day overtime (when this option is enabled in Pay Preferences).
© 2020 IconTime. All rights reserved. Page 20

To edit employee information, click the employee ID number in the Display
ID column. This displays the Edit an Employee screen.
Adding Employees
To add your employees individually, select an employee or one of the available
employee slots. Follow the instructions below to set up an employee.
Employee Information
• Payroll ID: (Optional) Enter the employee’s payroll ID # provided by the payroll
company. This Payroll ID will be used when generating payroll exports.
Note: This field is not required to be completed when using the
QuickBooks Plug-in or ADP Export Utility.
• First Name: Enter the employee’s first name.
• Middle Initial: Enter the first initial of the employee’s middle name.
• Last Name: Enter the employee’s last name.
• Display Name: Enter the name that the employee will see at the clock and on reports.
Note: Timecard Reports are sorted by Display Name.
• Address: Enter the employee’s address. This field is optional.
Employee Settings
• PIN/Badges: The employee PIN number is used to clock In or Out at the time clock.
• Active: All employees default to an active status. Deselect this checkbox to
make the employee inactive and to hide their name from reports.
• Track Paid Breaks: Select this box to track the employees time spent in their Paid Breaks.
• Wage: Specify a wage the employee is paid.
Entry Method
This option determines the procedure for punching in and out by the employee at the
employee time clock. Select the desired method from the drop-down menu.
Review the description of the time clock entry methods below and choose your entry method.
• Validated: The employee is required to either punch in or out at the employee time clock. The correct
option blinks on the time clock display. The employee is required to press the correct key at that time.
Example: If an employee forgets to punch out the day before, they will be required to punch
out first before they can punch in for their current shift. The punch information can be edited
© 2020 IconTime. All rights reserved. Page 21
 Loading...