

Page 1
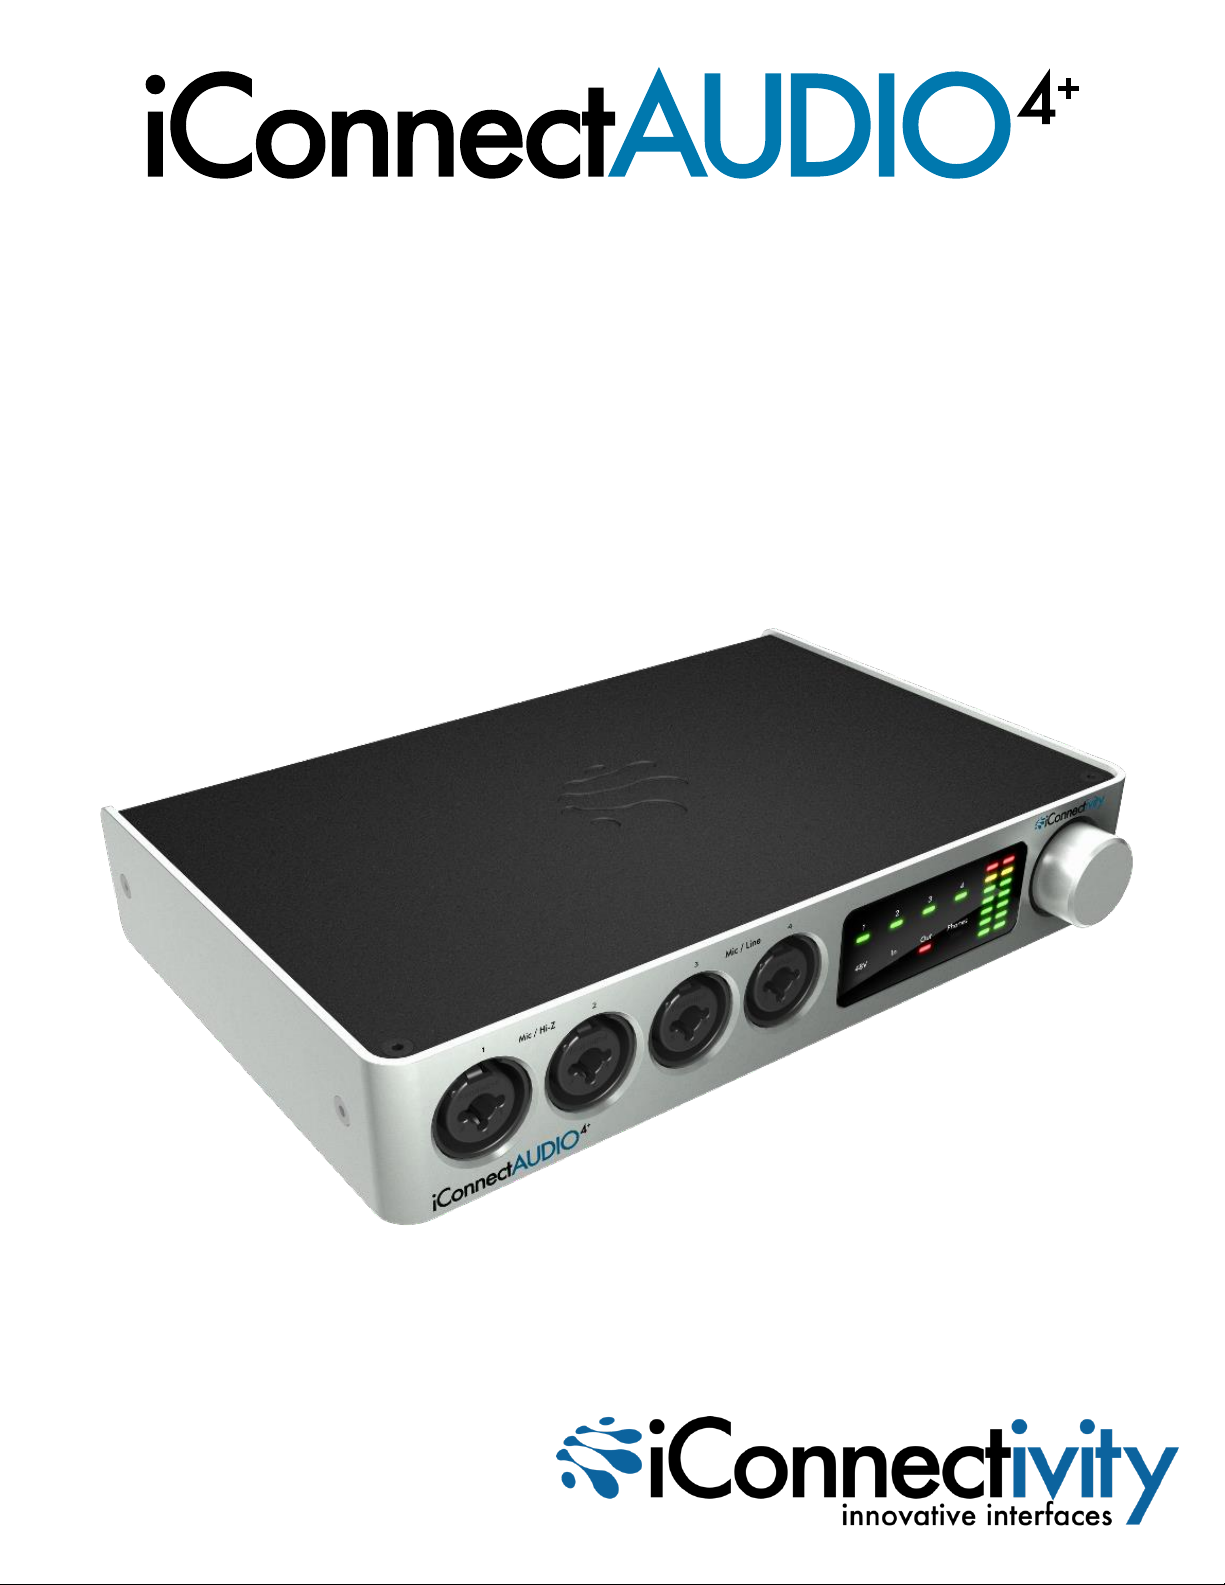
Owner’s Manual
v.1.1
Page 2

2
Interference with other electrical devices Radios and
televisions placed nearby may experience reception
interference. Operate this unit at a suitable distance from
radios and televisions.
Indoor use only To avoid the risk of electrocution and/or
damage to other connected equipment, this equipment must
not be used under wet or high moisture conditions. All
interconnecting cabling must also be indoors. Should
moisture suddenly increase, immediately disconnect power
to the equipment.
Power sources Ensure that correctly rated power outlets
are used with the supplied power supply.
Heat Keep this equipment away from all heat sources.
Ensure that sufficient ventilation and/or heat dissipation is
provided for the equipment and all connected devices.
Packaging Keep all packaging materials away from
children. Properly dispose of unwanted packaging.
Handling To avoid breakage, do not apply excessive force
to the switches, connectors or directly to the equipment. Do
not apply excessive bending force to the cables. Use the
connector casings of cables to attach and detach cables
from their receptacles to avoid damage to the cable and/or
its receptacles.
Ingestion Do not ingest the packaging, equipment,
attachments, or accessories. Do not ingest paint or removed
parts from the equipment or accessories. If this occurs,
immediately seek medical attention.
Care If the exterior becomes dirty, wipe with a clean, dry
cloth. Do not use liquid cleaners such as benzene or
thinner, or cleaning compounds or flammable polishes.
Keeping foreign matter out of your equipment Never set
any container with liquid in it near this equipment. If liquid
gets into the equipment, it could cause electrical damage,
breakdown, fire, or electrical shock. Be careful not to let
metal objects get into the equipment.
Keep this manual After reading this manual, please save it
for later reference.
Notice regarding disposal (EU only) Disposal of this
product, package, or cables must be done in an approved
manner. Do not discard this product, package, or cables
along with ordinary household waste. Disposing in the
correct manner will prevent harm to human health and
potential damage to the environment. Since the correct
method of disposal will depend on the applicable laws and
regulations in your locality, please contact your local
administrative body for details.
FCC (USA)/IC (Canada) Regulation Warning
This equipment has been tested and found to comply with
the limits for a Class B digital device, pursuant to Part 15 of
the FCC Rules. These limits are designed to provide
reasonable protection against harmful interference in a
residential installation. This equipment generates, uses,
and can radiate radio frequency energy and, if not installed
and used in accordance with the instructions, may cause
harmful interference to radio communications. However,
there is no guarantee that interference will not occur in a
particular installation. If this equipment does cause harmful
interference to radio or television reception, which can be
determined by turning the equipment off and on, the user is
encouraged to try to correct the interference by one or
more of the following measures:
- Adjust the receiving antenna
- Increase the separation between the equipment and
receiver
- Connect the equipment into an outlet on a circuit different
from that to which the receiver is connected
- Consult the dealer or an experienced radio/TV technician
for assistance
Unauthorized changes or modifications to this system can
void the user's authority to operate this equipment.
Important notice to consumers
This product has been manufactured according to strict
specifications and voltage requirements that are applicable
in the country in which it is intended that this product
should be used. If you have purchased this product via the
Internet, through mail order, and/or via a telephone sale,
you must verify that this product is intended for use in the
country in which you reside.
WARNING
Use of this product in any country other than that for which
it is intended could be dangerous and could invalidate the
manufacturer’s or distributor’s warranty. Please also retain
your receipt as proof of purchase; otherwise, your product
may be disqualified from the manufacturer’s or distributor’s
warranty.
CAUTION
Always keep children and pets under constant adult
supervision. The packaging, equipment, and included
accessories are not toys and must be kept out of reach of
children and pets. Use only under constant adult
supervision.
v.1.1
Page 3

3
Warranty
iPad, iPhone, and iPod touch are trademarks of Apple Inc., registered in the US and
other countries.
“Made for iPod,” “Made for iPhone,” and “Made for iPad” mean that an electronic
accessory has been designed to connect specifically to iPod, iPhone, or iPad,
respectively, and has been certified by the developer to meet Apple performance
standards. Apple is not responsible for the operation of this device or its compliance
with safety and regulatory standards. Please note that the use of this accessory with
iPod, iPhone, or iPad may affect wireless performance.
iConnectAUDIO4+ and iConnectivity are trademarks of iKingdom Corp. Features of
this product are protected under patent pending. For more details see
http://www.iConnectivity.com/patents.
iConnectivity warrants to the original purchaser that this unit is free of defects in
materials and workmanship under normal use and maintenance for a period of one (1)
year from the date of original purchase. The warranty applies only to registered
iConnectivity users that register their product(s) within fourteen (14) days of time of
original purchase. To register iConnectivity products, visit iConnectivity.com. If the unit
qualifies for warranty service during the one (1) year period, it will be repaired, or
replaced, at iConnectivity’s option, at no charge, when returned prepaid to the
iConnectivity Technical Service Center with proof of purchase – the sales receipt may
be used for this purpose. Installation labor is not covered under this warranty.
All replacement parts, whether new or re-manufactured, assume as their warranty
period for only the remaining time of this warranty. This warranty does not apply to
damage caused by improper use, accident, abuse, improper voltage service, fire, flood,
lightning, or other acts of God, or if the product was altered or repaired by anyone other
than iConnectivity Technical Service Center. Consequential and incidental damages are
not recoverable under this warranty.
Some regions do not allow the exclusion or limitation of incidental or consequential
damages, so the above limitation or exclusion may not apply. This warranty gives you
specific legal rights, and you may also have other rights, which vary from state to state.
No portion of this warranty may be copied or duplicated without the expressed written
permission of iConnectivity. THIS WARRANTY IS NOT TRANSFERRABLE.
For warranty service please contact iConnectivity.
Compatibility
Please visit www.iConnectivity.com/support for the latest compatibility requirements, as
they are subject to change.
v.1.1
Page 4

4
Table of Contents
Warranty ......................................................................................................................... 3
Compatibility ................................................................................................................. 3
........................................................................................................................................ 6
What’s in the Box .......................................................................................................... 6
Quick Start Guide .......................................................................................................... 7
IMPORTANT NOTES............................................................................................................12
Windows Driver Installation ....................................................................................... 13
Interactive Display....................................................................................................... 15
Viewing Modes ....................................................................................................................15
Basic Operation ...................................................................................................................15
Rotary Knob Push functions ..............................................................................................16
LED Meter Levels ................................................................................................................16
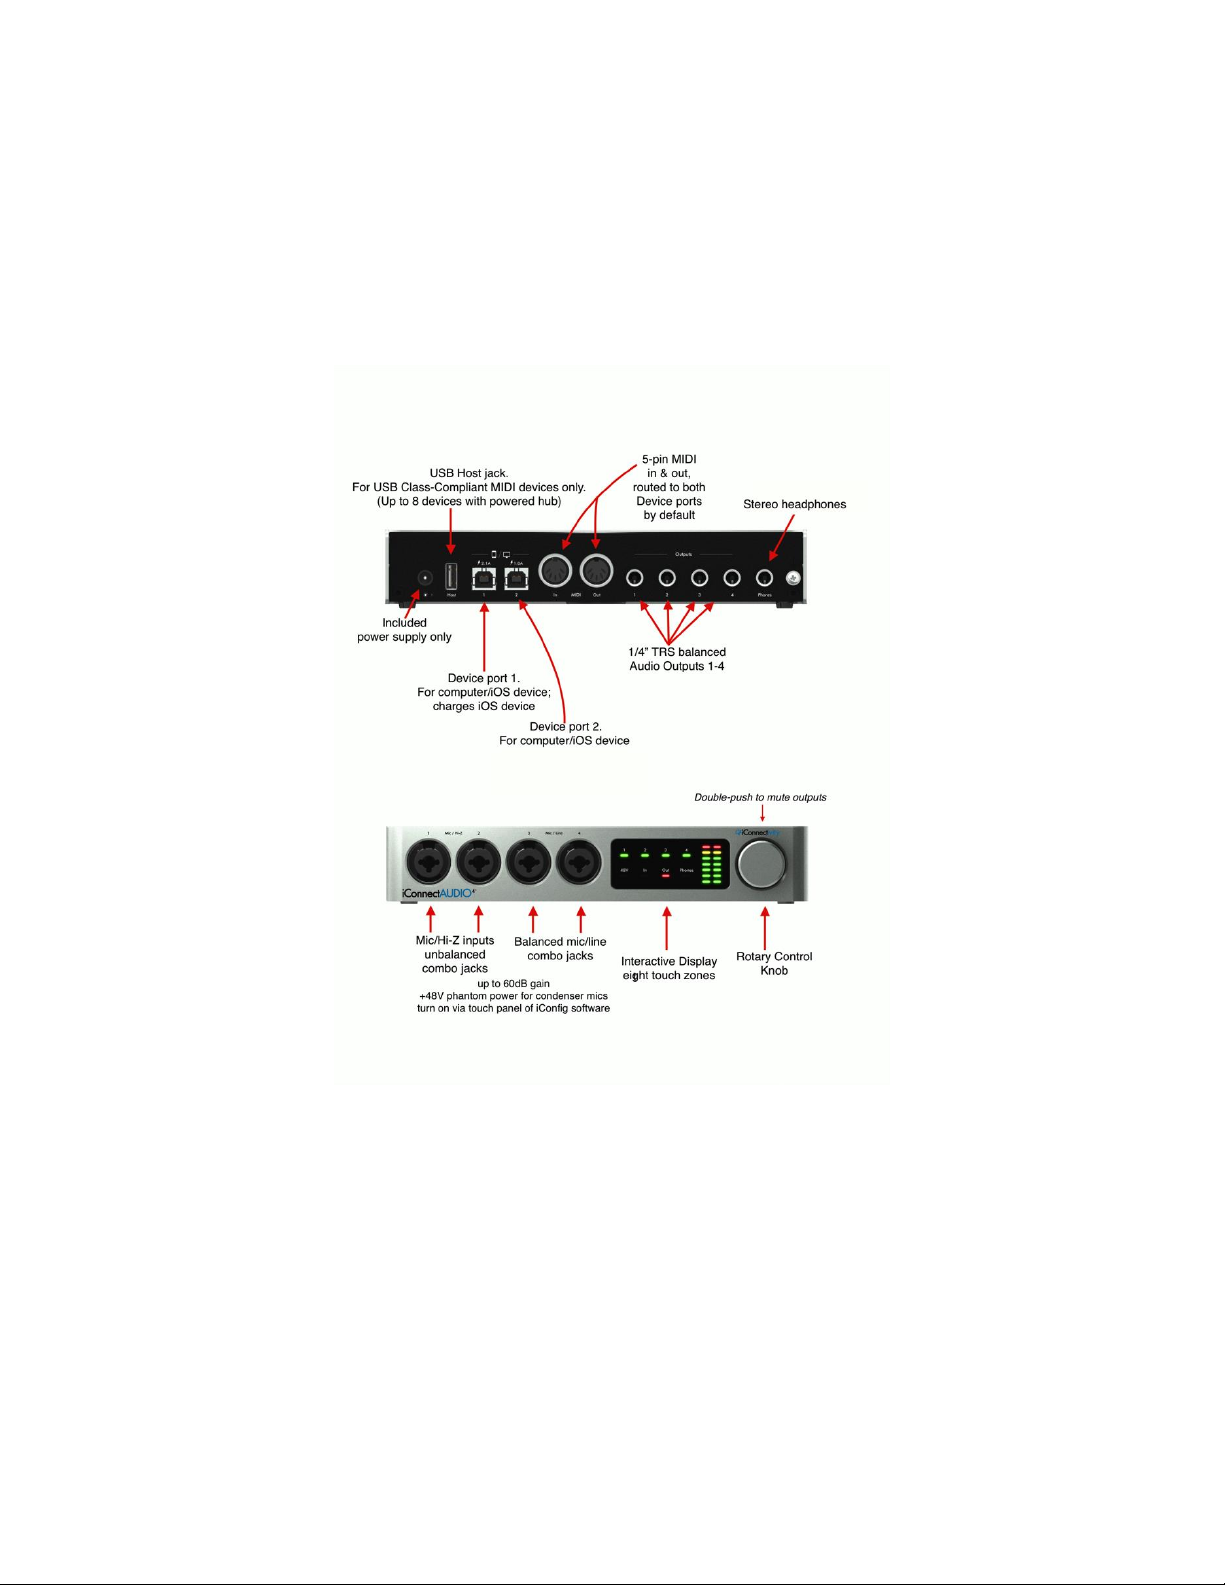
The iConnectAUDIO4+ hardware ............................................................................... 17
Front Panel ..........................................................................................................................17
Rear Panel ...........................................................................................................................18
iConfig Software .......................................................................................................... 20
Launching iConfig ...............................................................................................................20
Device Menu ........................................................................................................................21
Device Info ...........................................................................................................................22
Audio Patchbay ...................................................................................................................23
Audio Mixer .........................................................................................................................25
Audio Info ............................................................................................................................27
MIDI Info ...............................................................................................................................30
MIDI Port Routing ................................................................................................................32
MIDI Channel Remap...........................................................................................................33
MIDI Controller Data Filter ..................................................................................................33
MIDI Controller Data Remap ...............................................................................................34
Troubleshooting .......................................................................................................... 35
Specifications .............................................................................................................. 36
Audio ....................................................................................................................................36
MIDI ......................................................................................................................................36
Contact iConnectivity ................................................................................................. 37
v.1.1
Page 5

5
Thank you for purchasing the iConnectAUDIO4+ Audio + MIDI Interface. Your
iConnectAUDIO4+ is the most flexible interface available, integrating iOS devices
with today’s professional multiple-computer set-ups and traditional MIDI
hardware.
Here are its major features:
• Multi-host Device ports enable up to two computer devices (Mac/PC/iOS) at the
same time
• Audio passThru™ routes audio digitally between computer devices
• Host port for connecting up to eight MIDI peripherals (with Class-compliant
devices connected to a powered hub)
• 4 XLR - ¼" Combo analog inputs, each with individual +48V phantom power
toggle (two are balanced mic/line, two are unbalanced mic/ instrument)
• 4 ¼" TRS balanced analog outputs
• ¼" stereo headphone output with independent mix
• 1 x 1 5-pin MIDI DIN in/out
• iConfig software (Mac, Windows) for easy audio mixing/routing, and MIDI
routing/processing; set-ups stored in FLASH memory on the device
• Onboard audio mixer/patchbay.
• Front panel control of all input/output levels and +48V phantom power
• High-resolution audio - up to 24-bit/96kHz AD/DA conversion
• USB audio and MIDI Class-Compliant
• Charges an iOS device.
v.1.1
Page 6

6
What’s in the Box
• The iConnectAUDIO4+
• One Lightning-to-iConnectivity USB-B inline connection cable to connect the interface
to an iOS device that uses this connector. (iConnectivity 30-pin Connection Cable sold
separately.)
• One USB-A to USB-B cable to connect the interface to a Mac or PC computer.
• iConnectAUDIO4+ power supply. Please use only the included iConnectivity 12V/3A
(36W) center positive supply, or you risk damaging the device. This adapter operates
over a range of 100-240V/50 or 60Hz, so it can be used internationally with wall plug
adapters.
Please contact your dealer or iConnectivity directly if any of these items were not
included in the packaging.
v.1.1
Page 7
7
Quick Start Guide
By default your iConnectAUDIO4+ is pre-configured to work with Digital Audio
Workstation (DAW) software. All the interface’s audio inputs are routed to the computer
device(s) for recording, not directly to the audio outputs; you won’t hear anything if,
say, you plug in a mic without going through your audio/music software.
Furthermore, all the audio ins and outs are set all the way down, and need to be
raised. This Quick Start Guide will show you how to get sound running in and out of
your interface as simply as possible.
Audio hookup – connecting a Mac, PC, or iOS device
1. Connect a Mac or PC to USB Device Jack 1, using the supplied USB-A to USB-B
cable. *
2. Connect your powered monitors or power amp and speakers to Analog Out Jacks
1&2.
3. Connect the included iConnectivity power supply and plug it into the wall.
* For the purposes of a sound check, you can substitute an iOS device using the Lightning-to-
iConnectivity cable, and then skip to “Using the Interactive Display” a few paragraphs down
(there is no software to configure). But it’s important to install the iConfig software on a
computer (step 2 just below).
Software
v.1.1
Page 8

8
1. If you’re using a Mac or iOS device, no driver is required. For Windows, please
download the driver and install it. (Installation is straightforward, but for details please
see here.)
2. Download and install the iConfig Software to a Mac or PC. This will ensure that your
interface’s firmware is up to date, and allow access to all its functions and configuration
options.
3. Select the iConnectAUDIO4+ as the audio output device in your DAW (or other audio
software).
4. Play some test audio, preferably in a loop. You may not hear anything until you bring
up the output level.
Sound check - adjusting the output level
There are two ways to adjust the output level: directly on the front panel Interactive
Display, or using the iConfig software’s Audio Mixer.
Using the Interactive Display:
1. Touch the region centered around Out on the bottom row, selecting the output level
for adjustment. The LED will turn green, for Signal Level mode, indicating that the LED
meters are displaying the signal level.
You could also touch Out a second time to toggle the display into Gain Set mode, which
is like showing the position of a volume control (the Rotary Knob is continuous, so
otherwise you wouldn’t know where it is). The LEDs then turn red, and the meters go
between green and red to show the gain level. An additional touch toggles back to
Signal Level mode.
2. Touch the regions centered around 1 or 2 on the top row (they should be linked for
stereo), selecting Analog Outs 1&2 for adjustment. Their LEDs will turn green if you’re in
Signal Level mode, or red if you’re in Gain Set mode.
3. Turn the rotary Knob clockwise to increase the level and counterclockwise to
decrease it.
v.1.1
Page 9
9
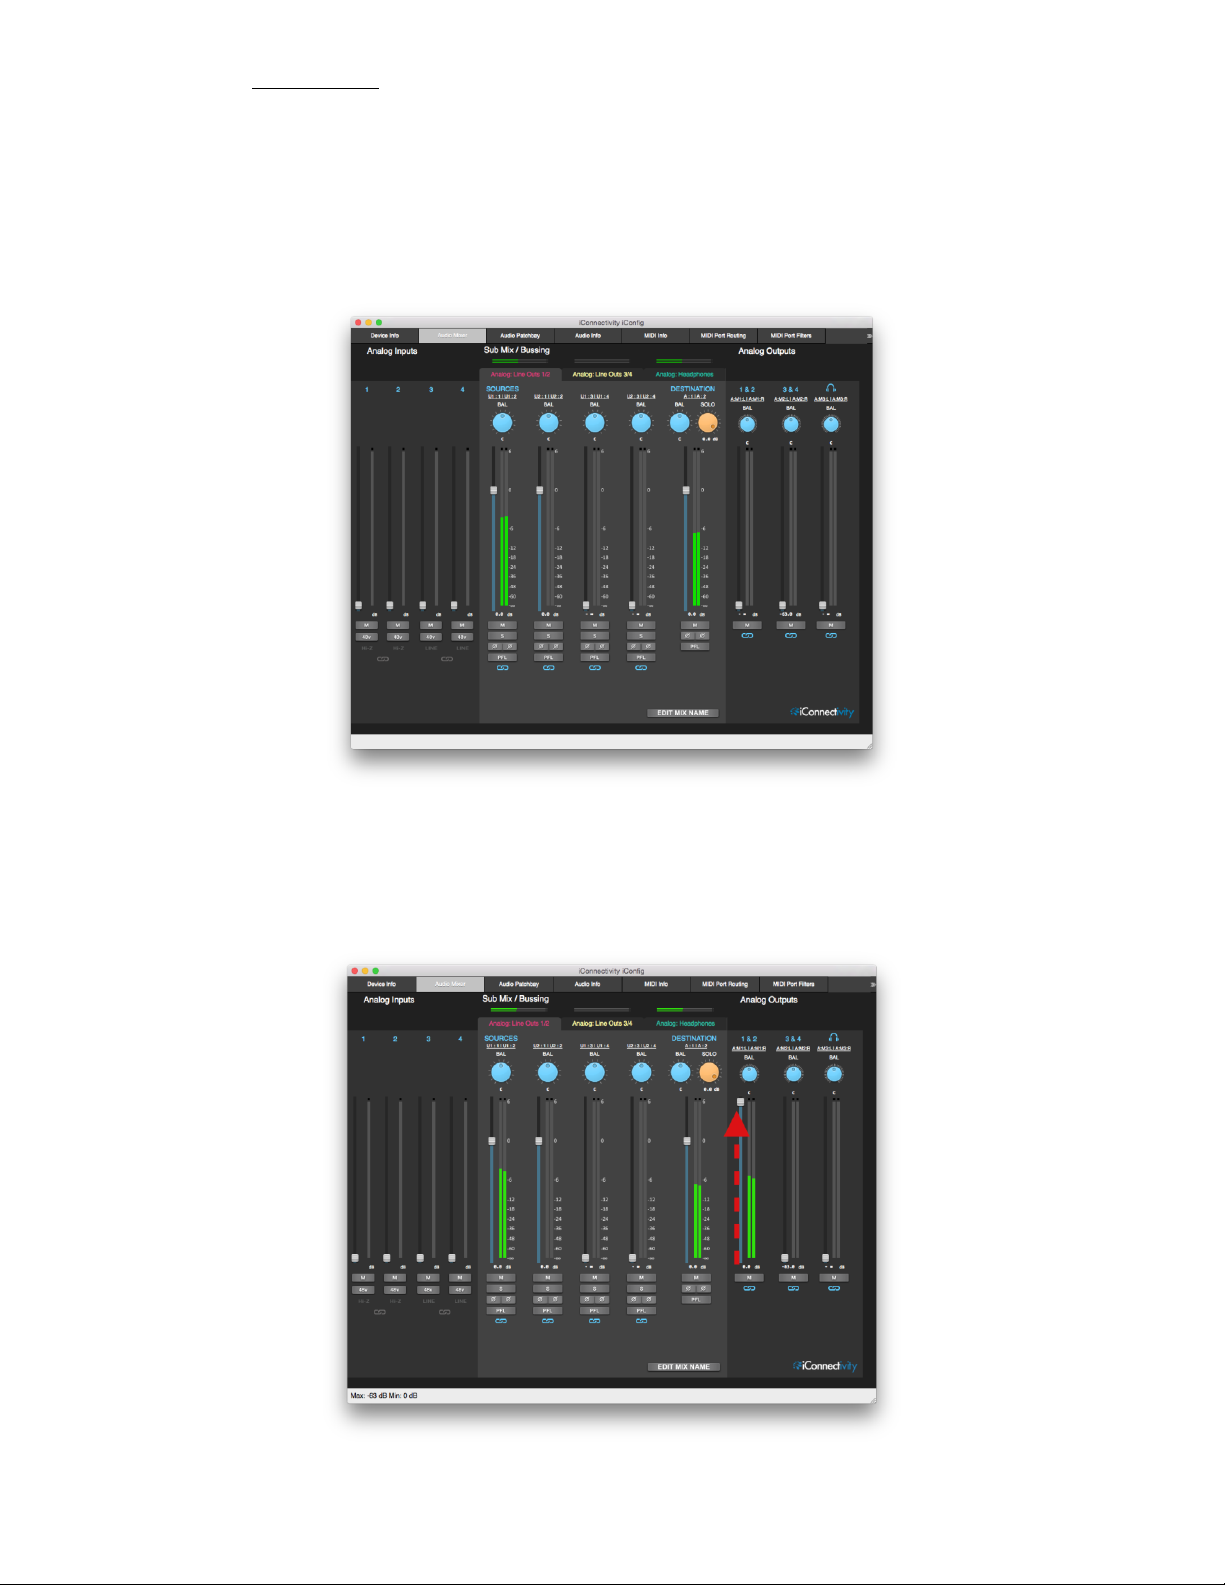
Using the Audio Mixer:
1. Launch iConfig. If you have other iConnectivity interfaces connected, select the
iConnectAUDIO4+ in the Device Selection dialog.
2. Select the Audio Mixer tab. Mix A, the first of the available mixes in the Sub
Mix/Bussing section, should be selected. The mixer should look like the following screen
capture:
3. Bring up the Analog Outputs 1 & 2 fader (they’re linked for stereo). You should now
see three sets of stereo meters moving in the Audio Mixer. If you select Analog Outs
1&2 in Signal Level mode in the Interactive Display, the LED meters on the hardware
will match the onscreen ones.
v.1.1
Page 10

10
Adding a second computer device
1. Simply connect the second computer device USB Device Jack 2.
If it’s a Windows computer, install the driver as per the Software instructions above.
With Mac OS X or Windows, select the iConnectAUDIO4+ as the audio interface in your
audio software. There’s no software to install or configure in iOS devices.
If both computer devices are iOS so there’s no iConfig software with an Audio Mixer,
use the apps’ level controls to balance their relative levels. Otherwise, the second
computer device appears in the Audio Mixer channel strip to the right of the first one;
iConfig is already set up.
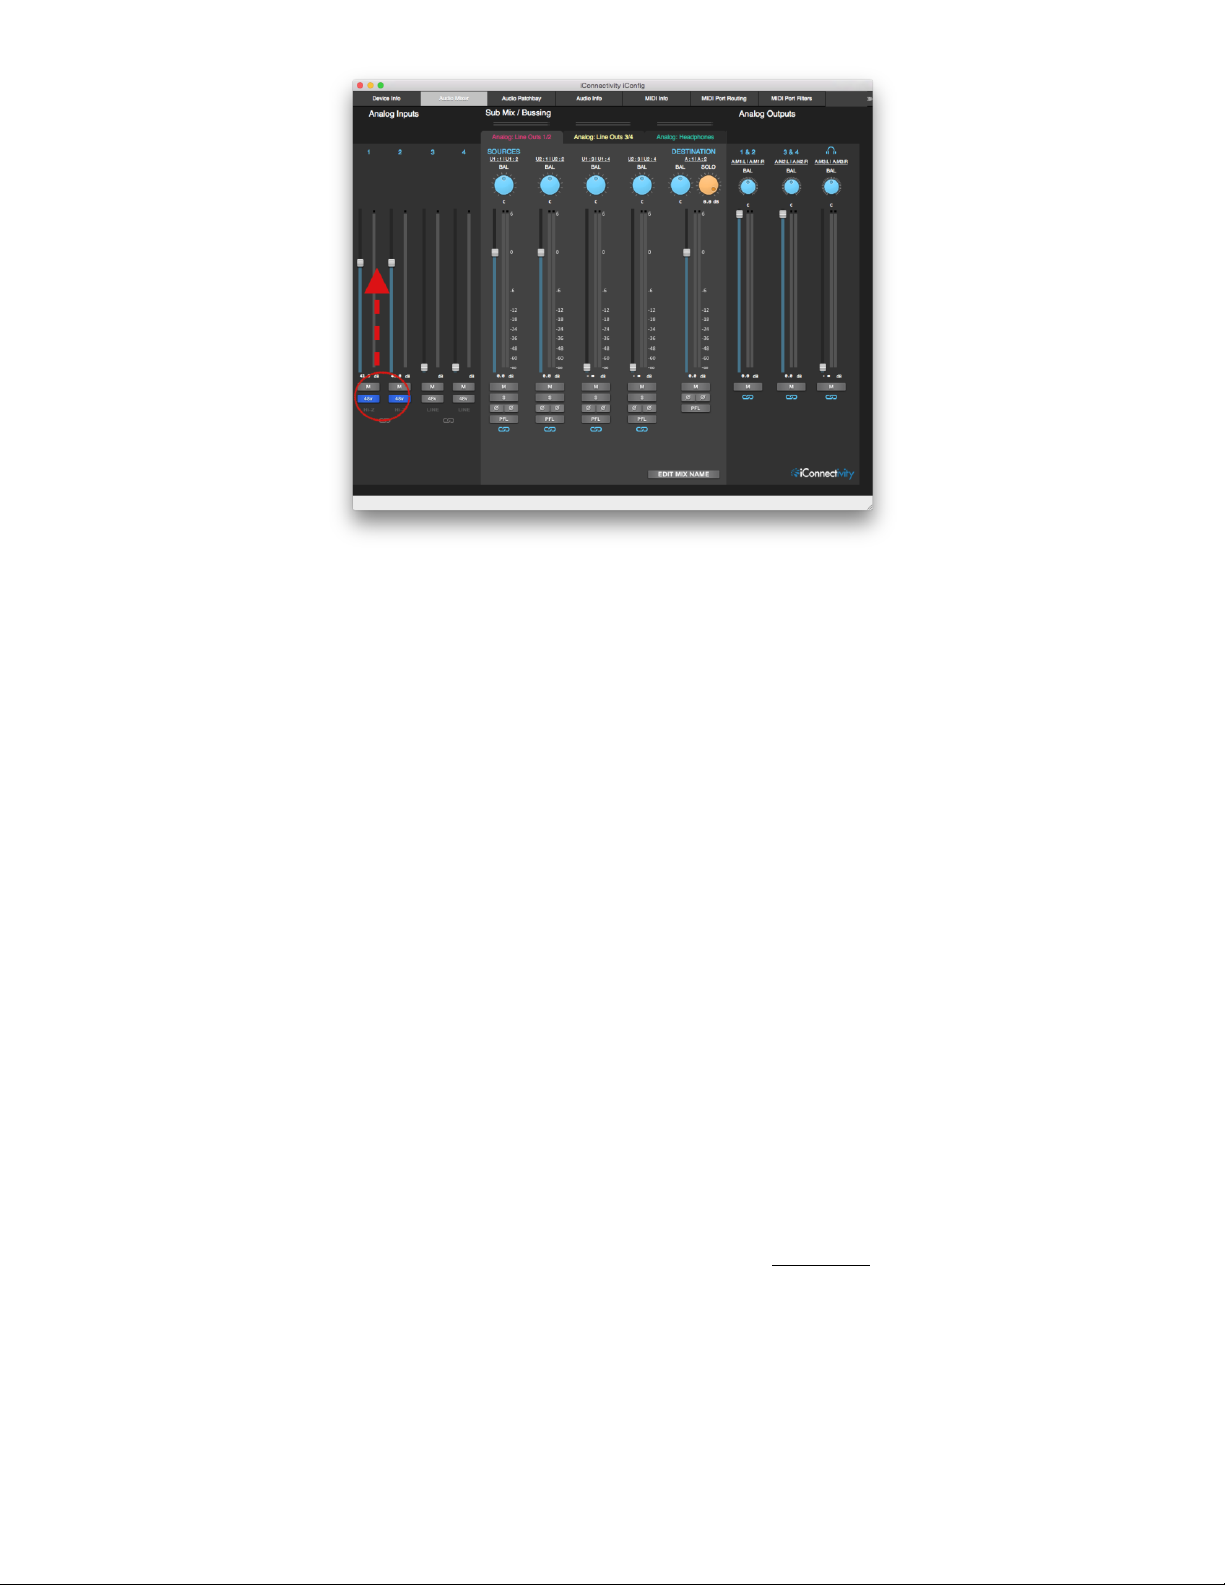
Recording audio
1. The four Analog In Jacks on the front panel are routed to the first four inputs of both
computer devices, i.e. to the USB1 and USB2 Device Jacks. DAWs and iOS devices
will see them as available inputs to tracks for recording.
All four combo Analog In jacks accept mics; Inputs 1&2 accept unbalanced Hi-Z
instruments on ¼" plugs; and Inputs 3&4 accept balanced line signals on ¼" TRS plugs.
2. Enable +48V phantom power for condenser mics (only condenser mics!) on any or all
four Analog In jacks, and adjust the input levels. This can be done with the Interactive
Display, or in the iConfig Analog Mixer.
- Here Analog Input channels 1&2 have phantom power turned on, and their faders
have been raised:
v.1.1
Page 11
11
- To enable phantom power for Analog Inputs 1&2 in Interactive Display, simply touch
the 48V touch zone on the bottom row, then 1 and 2 on the top row.
- To adjust the gain levels for Analog Inputs 1&2 on the Interactive Display, touch In on
the bottom row, and 1 and/or 2 on the top row (depending on whether they’re
independent sources or a stereo pair). Then use the Rotary Knob to adjust the levels.
Subsequent touches of In on the bottom row toggle between Gain Set and Signal Level
modes (as discussed above when we set the output level).
MIDI
The iConnectAUDIO4+ has one input/output pair of 5-pin MIDI DIN jacks, a single USB
Host jack (for MIDI devices with USB connection instead of 5-pin), and MIDI is routed to
and from both computer devices connected to the USB Device jacks.
Use a powered USB hub to connect up to eight USB MIDI devices to the USB Host
jack, otherwise it supplies enough power for a single MIDI device plugged in directly.
There are 29 16-channel MIDI Ports available to be routed between those physical
connections – 464 MIDI channels.
By default, every possible MIDI Port is routed from every device to every other device; if
a device supports multiple Ports, they’re all accessible. The only exception is multiport
USB MIDI Devices, which must be enabled in the iConfig’s MIDI Info tab.
v.1.1
Page 12

12
IMPORTANT NOTES
• No additional drivers are required for Mac or iOS, Windows driver available here. Set-
up instructions here.
• No Mac or iOS drivers needed. The iConnectAUDIO4+ is USB class-compliant, so it’s
recognized automatically by Mac OS X and iOS for applications to pass audio and MIDI
as soon as you connect it to either of the unit’s two Device ports.
• IF YOU HEAR NOTHING FROM YOUR SPEAKERS OR HEADPHONES: please
check that levels are turned up, either using the Interactive Touch Display or Audio
Mixer tab in the iConfig software. This is explained in the Quick Start Guide. In addition,
check that the output source you’re monitoring is routed correctly in the Audio Patchbay
tab.
• The default 16-bit/44.1kHz setting ensures compatibility with iOS software that doesn’t
operate at higher rates, but it can be changed up to 24-bit/96kHz in the iConfig
software’s Audio Info tab.
v.1.1
Page 13

13
Windows Driver Installation
Yes. ↓
Next. ↓
Next. ↓
Desktop icon is optional. ↓
Accept the agreement. ↓
Visual Studio Redistributable installed if
needed. ↓
Next. ↗︎
Finish.
Download the Windows drivers here. You will see the following dialogs.
v.1.1
Page 14

14
The Start Menu after installing the Windows driver and the iConnectivity iConfig
software.
v.1.1
Page 15

15
Interactive Display
The iConnectAUDIO4+’s Interactive Display makes it simple to view and adjust analog
input and output levels, enable/disable 48V phantom power for condenser mics, and
perform various utility functions without using the iConfig software.
It consists of a capacitance touch panel with eight touch zones and dual 8-stage LED
meters; and a Rotary Control Knob that also performs various functions when it’s
pushed/double-pushed.
Viewing Modes
There are two viewing modes. Successive touches of a bottom row touch zone (except
48V) toggles between the two.
- Signal Level mode, indicated by a green bottom row LED. The LED meters display
VU (the signal level).
- Gain Set mode, indicated by a red bottom row LED. This is like showing the position
of a volume control (the Rotary Knob is continuous, so otherwise you wouldn’t know
where it is).
The 48V touch zone has no effect on the viewing mode, since it’s an on/off function
rather than a level setting.
Basic Operation
1. Touch the region centered around one of the four functions on the bottom row to
select it: 48V, In, Out, or Phones.
2. Touch numbers 1 through 4 on the top row to select that analog input or output for
adjustment (or to turn 48V phantom power on/off).
3. Turn the Rotary Knob to adjust the In, Out, or Phones level.
Example: adjust the level of Analog Outs 1&2, which are connected to your powered
monitors.
v.1.1
Page 16

16
FUNCTION
ROTARY KNOB PUSH COMMAND
Mute all outputs
Double push
Save all settings to internal memory
Single push
Power down
Push and hold until each meter shows a single red
and a single amber LED
Power up
Single push (when powered down)
Bootloader mode (for manual firmware updates)
Push and hold until each meter shows a single red
LED, then release
Reset
Push and hold until all LEDs turn off, then release
1. Touch “Out” on the bottom row.
- The LED turns green (Signal Level mode); you may want to touch it again to toggle it
to Gain Set mode.
2. Touch “1” and “2” on the top row (or either one if they’re configured as a stereo pair,
as they are by default).
3. Turn the Rotary Knob to adjust the level.
Rotary Knob Push functions
LED Meter Levels
v.1.1
Page 17

17
The iConnectAUDIO4+ hardware
Front Panel
1 & 2 Analog In Jacks 1& 2
XLR - ¼" Combo unbalanced mic/line/instrument inputs.
Connect Hi-Z instrument inputs (electric guitars, basses, etc.) with ¼" plugs; they go
through a -20dB pad, with a gain range of -20dB to +40dB in 1dB increments.
Connect microphones with XLR plugs. The gain range is 60dB in 1dB increments.
3 & 4 Analog In Jacks 3 & 4
XLR - ¼" Combo balanced mic/line inputs.
Connect line-level inputs (synthesizers, DJ rigs, etc.); they go through a -20dB pad, with
a gain range of -20dB to +40dB in 1dB increments.
Connect microphones with XLR plugs. The gain range is 60dB in 1dB increments.
5 Interactive Display
6 Rotary Control Knob
(Full details here) Easy capacitive touch interface lets you adjust, view, and store
analog audio levels, and turn +48V phantom power on/off for condenser mics.
v.1.1
Page 18

18
Rear Panel
7 Power Jack
Please use only the supplied iConnectivity 12V/3A (36W) center positive transformer, or
you risk damaging the device.
This adapter operates over a range of 100-240V/50 or 60Hz, so it can be used
internationally with wall plug adapters.
8 USB A Host Jack
This USB 2.0 jack supports up to eight 16-channel MIDI Ports, divided among up to
eight USB MIDI Class-Compliant devices.
Connect, for example, a MIDI keyboard controller via its USB MIDI port instead of using
5-pin DIN cables. Up to 500mA – the USB power standard – is provided, enough to
power a single device. Or connect up to eight USB MIDI devices via a powered USB
hub.
Note: this jack is dedicated to USB MIDI – it’s not a standard USB jack.
9 USB 1 Device Jack
Use the included iConnectivity USB-B to USB-A cable to connect the interface to a Mac
or PC computer, or the included iConnectivity USB-B-to-Lightning cable to connect an
iOS device.
This jack supplies 2.1A to charge an iOS device.
10 USB 2 Device Jack
Use the included iConnectivity USB-B to USB-A cable to connect the interface to a Mac
or PC computer, or the included iConnectivity USB-B-to-Lightning cable to connect an
iOS device.
This jack supplies 1A of power to an iOS device - usually enough to keep it charged,
and it may change a smaller iOS device (depending on the size and usage).
11 & 12 MIDI DIN In & Out
These jacks accept 5-pin MIDI DIN plugs for standard MIDI hardware. MIDI is
transmitted at the standard MIDI rate (31.25 Kbps).
v.1.1
Page 19

19
12, 13, 14, 15 Analog Out Jacks 1 – 4
¼" balanced TRS outputs.
The output is 13dBu/11dBV, a very high level, so please use caution to avoid
overloading subsequent equipment in the signal path.
Normally Analog Outs 1 & 2 would be connected to a stereo amp and speakers (or
powered monitors). In a live application you could use Analog Outs 3 & 4 for a FOH
(front of house) mix, or they might go to a second set of speakers or stereo effects unit
in a studio.
17 – Headphone Jack
For stereo headphones with a ¼" plug.
16 – Security lock port (right side)
v.1.1
Page 20

20
iConfig Software
iConfig, the included software program for Mac and Windows provides access to the
set-up and routing features in your iConnectAUDIO4+, and it controls additional
iConnectivity interfaces connected to your system.
The active settings snapshot is stored in the interface’s onboard flash memory; please
see the Device drop-down menu in the following screen shot. It can be copied into the
iConfig software for editing (the “Restore from FLASH” command).
iConfig works the same on Mac and Windows.
Launching iConfig
When you have multiple iConnectivity interfaces connected to your computer, the
Device Selection dialog will appear; simply select the one to be configured. If you have
only the iConnectAUDIO4+, it will be selected automatically in the dialog without
intervention.
v.1.1
Page 21

21
Device Menu
Switch Devices – Brings up the Device Selection dialog, allowing you to choose a
different iConnectivity interface to be configured.
All the following have a confirmation dialog so you have a chance to cancel before the
operation:
Save Current Settings – Write the current iConfig settings to the iConnectAUDIO4+’s
flash memory.
Restore Settings from Memory – Transfers the current snapshot from the
iConnectAUDIO4+’s flash memory into iConfig.
Restore to Factory Defaults – Removes all user changes to the iConnectAUDIO4+’s
configuration.
Reset – All digital devices can get “confused” and require resetting.
Reset to Bootloader Mode – When the device restarts it will be in Bootloader Mode,
ready to receive firmware changes. This lets you load specific firmware files.
Upgrade Firmware – Checks whether your firmware is current. If not, it installs it from
www.iConnectivity.com.
Reread Settings – Refreshes the application screen.
v.1.1
Page 22

22
Device Info
This displays information about the connected audio interface(s), including the firmware
version. Note that the Device Name field can be edited, so you can give your interface a
custom name.
v.1.1
Page 23

23
Audio Patchbay
This is a routing matrix with source audio busses across the horizontal axis and
destination busses on the vertical axis. Think of it as “from” (audio sources into the
patchbay) and “to” (destinations).
Available Sources and Destinations: USB1 and USB2 (digital Audio Channels from
the two Device Jacks); Analog (the four Analog Ins and four Analog Outs); the Analog
Mixer (which controls the Analog Ins and Outs); and – only when enabled (see four
paragraphs below) – the USB1 and USB2 mixers.
Operation —There is one simple principle to bear in mind when routing audio in the
iConnectAUDIO4+: each Destination bus may have only one Source.
Just as a physical jack doesn’t accommodate two plugs, the Audio Patchbay will not
allow connections that make no sense.
v.1.1
Page 24

24
Click on the appropriate spot on the matrix to make or sever a routing connection. Click
on any bus’ name in the Source or Destination areas to condense its view (in this case
“Analog Mixer” is condensed, while the Analog outputs above it aren’t):
USB mixer Destination Busses – The USB Mixers seen in the following screen shot
are disabled in the iConnectAUDIO4+’s factory default set-up. Since most DAWs and
other software programs have mixing built in (and the factory default is intended for use
with DAWs), they aren’t needed.
When you do need the USB1 and USB2 Mixer, for example in a live situation, the way
to enable them is to select 2, 4, or 6 (anything other than 0) “Mixes to outputs on USB1
[and/or USB2] domain” under the Mixer Information disclosure triangle in the Audio Info
tab.
v.1.1
Page 25

25
Audio Mixer
Audio Mixer overview: The Analog Inputs and Analog Outputs sections – on the
darker grey background – are master faders for the iConnectAUDIO4+’s Analog Ins,
Analog Outs, and Headphones. While the Analog Inputs are “hardwired” directly to their
faders, the Source for each Analog Output channel is selectable from a drop-down
menu.
These Source choices include the Destinations of the three Mixes – A, B, and C — in
the Sub Mix/Bussing section in the middle, shown on a lighter grey background.
In turn, the Sources available to Mix A, B, and C channels depend on the Mixer
Information settings in the Audio Info tab, and also on the way the Audio Patchbay is
configured. Mixes A, B, and C can all have multiple Destinations, and they can share
them.
Audio Mixer operation:
- Click on “EDIT MIX NAME” (as shown above) to rename the A, B, and/or C mixes; the
default names are simply Line Outs 1/2, Line Outs 3/4, and Headphones. These names
appear as SRC (Sources) for the Analog Output channels.
- To select a Source or Destination, click on the underlined white text to get a pop-up
checklist:
v.1.1
Page 26

26
- Double-click most faders and the BAL (Balance) knobs to set them to 0.
- The rest of the controls are as follows:
v.1.1
Page 27

27
Audio Info
This is the iConnectAUDIO4+’s information and settings screen. As soon as you make a
change, you will have the opportunity to commit your edits to the interface or to cancel:
Audio Information
Number of audio ports (fixed) – 3: two USB Device ports for computer devices, one 4x4
analog port.
Number of buffered audio frames and Sync factor value: as with every device that
processes digital audio, audio goes into a buffer before it is processed, and it takes a
small fraction of a second for audio to fill the buffer as it streams through. This latency is
compensated for with the Sync factor value parameter so that incoming and outgoing
audio is in sync.
The larger the audio frame buffer, the longer this takes, but the lower the strain is on the
device; conversely, smaller buffers lower the processing latency and require more
computing horsepower.
The default settings offer low latency and solid audio performance. However, you may
wish to experiment with faster settings; or if you hear glitches, increase the buffer.
Audio Configuration – the sample rate and bit depth setting. This defaults to the CD-
standard 16-bit/44100Hz setting to ensure compatibility with all iOS software. Higher bit
and (to a lesser degree) sample rates can offer higher sound quality in some
applications, but they use more processing resources.
v.1.1
Page 28

28
Audio Configuration
1 2 3 4 5
6
Frequency
44100 Hz
48000 Hz
96000 Hz
44100 Hz
48000 Hz
96000 Hz
Bit Depth
16 bits
24 bits
Max USB Audio Channels
16
12
16
12
Option 1 Mixer Max. Sources
8 6 8
6
Option 1 Mixer Max Destinations
6 4 6
4
Option 2 Mixer Max Sources
6 4 6
4
Option 2 Max Mixer Destinations
8 6 8
6
Clocking Sources
1 – Internal Clocking
2 – Computing device connected to USB Jack 1
3 – Computer device connected to USB Jack 2
The following Audio Configuration Table shows the processing footprints for every
possible configuration.
Mixer Information
Mixer Configuration — There are two options: 8 input Buses per Mixer, 6 mix Buses
(the default); and vice versa, as shown below. This comes down to a choice between
more sources and more destinations.
v.1.1
Page 29

29
Enabling USB mixer Destination Busses – The USB Mixers are not enabled in the
iConnectAUDIO4+’s factory default set-up. Since most DAWs and other software
programs have mixing built in (and the factory default is intended for use with DAWs),
they aren’t needed.
When you do need the USB1 or USB2 Mixers, for example in a live situation, the way to
enable them is to select 2, 4, or 6 (anything other than 0) “Mixes to outputs on USB1
[and/or USB2] domain” as shown below:
Port Information - On the two USB Device Jacks, enable/disable Mac/PC and/or iOS
support; and set the maximum number of input and output channels available (when
they’re enabled in the Mixer Information section).
The number of Analog Jacks is fixed, of course: 6 outputs (4 Analog Out Jacks + 2 for
Headphone Jacks 1&2); and Analog In Jacks 1-4.
Note that the names of the devices can be edited.
v.1.1
Page 30

30
MIDI Info
MIDI Information: Summary MIDI information about the iConnectAUDIO4+’s physical
ports, as well as the 29 total 16-channel MIDI Ports available for routing.
Maximum Ports on multi-port USB Devices (default: 4): Multi-port USB MIDI devices
have more than one 16-channel Port. For example, some controllers may have an
additional MIDI In or Out Port available, and modern DAWs can usually access any
number of them. This setting allows up to eight Ports.
Routing between ports on multi-port USB Devices (default: off): Multi-port USB MIDI
devices have more than one 16-channel port.
Running Status on DIN ports (defaults to off) – Running status is a way of reducing the
amount of MIDI data that must be sent. It works by assuming that the first part of the
v.1.1
Page 31

31
MIDI message - the status byte that identifies what it is (for example a note) – remains
the same until further notice. Running status must be implemented correctly by the
receiving device to work; we recommend enabling it only if you can confirm that this is
the case.
Port Information: MIDI in and out for each physical connection – the 5-pin DIN I/O
jacks, the two USB Device Jacks, and up to eight MIDI devices connected to the USB
Host Jack (if you’re using a powered hub) – has its own line in this section.
Each one can have its Input and Output enabled or disabled, and the names are
editable.
An additional drop-down menu, Reserved, is available for devices connected to the
USB Host jack (remember, these must be USB MIDI Class-Compliant devices). In this
case an M-Audio USB O2 MIDI keyboard is connected; its name appears automatically
to be reserved, which means it will occupy USB Host Jack Port 1 every time it’s
restarted.
However, this works for a single M-Audio USB O2; there would be no way to
differentiate between multiple O2s (or multiples of any device).
v.1.1
Page 32

32
MIDI Port Routing
There is a total of 29 16-channel MIDI Ports available to be routed between the
iConnectAUDIO4+’s physical connections. This routing matrix enables this feature
By default, every possible MIDI Port is routed from every device to every other device; if
a device supports multiple Ports, they’re all accessible to it (for example, a modern
DAW should be able to access every Port as soon as the interface is connected). The
only exception is multiport USB MIDI Devices, which must be enabled in the iConfig’s
MIDI Info tab.
Source Ports are on the left, listed vertically, and Port Routes (destinations) are on the
right. Please check our online video tutorials for specific applications.
v.1.1
Page 33

33
MIDI Channel Remap
For each MIDI port, this matrix is for remapping – changing - entire MIDI channels to
different ones, or just various data types (Pitch Bend, Channel Pressure, etc.).
Remap Type (top left) selects whether to modify the input going to or the output coming
from each port.
Port is the familiar list of the16-channel MIDI ports available on the iConnectAUDIO4+:
the USB Device Jacks, USB Host Jack, and 5-pin DIN.
In the screen capture above, incoming MIDI data to USB Device Jack 2 is being
remapped as follows: Pitch Bend data on Channel 3 and Channel Pressure data on
Channel 2 are being changed to Channel 1.
MIDI Controller Data Filter
v.1.1
Page 34

34
For each MIDI port, this matrix is for filtering (removing from the datastream) any MIDI
controller on any of the 16 MIDI channels.
Filter Type (top left) selects whether to modify the input going to or the output coming
from each port.
Port is the familiar list of the16-channel MIDI ports available on the iConnectAUDIO4+:
the USB Device Jacks, USB Host Jack, and 5-pin DIN.
In the screen capture above, MIDI Continuous Controller 7 (Main Volume) data to USB
Device Jack 1 from the MIDI DIN port is being filtered from Channels 1-6 and 16.
The entire list of 127 MIDI controllers is available for filtering under the drop-down menu
in the Controller ID column.
MIDI Controller Data Remap
For each MIDI port, this matrix is for remapping (converting) any MIDI controller on any
of the 16 MIDI channels to a different one. The entire list of 127 MIDI controllers is
available as a Source and a Destination under the drop-down menu s.
Remap Type (top left) selects whether to modify the input going to or the output coming
from each port.
Port is the familiar list of the16-channel MIDI ports available on the iConnectAUDIO4+:
the USB Device Jacks, USB Host Jack, and 5-pin DIN.
In the screen capture above, MIDI Continuous Controller 7 (Main Volume) data to USB
Device Jack 1 from the MIDI DIN port is being converted to MIDI Continuous Controller
11 (Expression) – but only on MIDI channels 1 through 7.
v.1.1
Page 35

35
Troubleshooting
No sound from speakers or headphones connected to the interface
Please check that levels are turned up in the Audio Mixer tab in the iConfig software. In
addition, check that the output source you’re monitoring is routed correctly in the Audio
Patchbay tab.
MIDI is not being received by the expected destination
Please check the routing in the iConfig software MIDI Port Routing tab.
No sound from an iOS device’s speaker/earphones/microphone
The iOS device automatically uses the iConnectAUDIO4+ when it is connected. This
deactivates the built-in speaker, usually the built-in mic, and often the headphones
and/or headset mic when it is plugged into the iOS devices 1/8" TRRS jack.
iOS device’s battery isn’t charging
USB Device Jack 1 will charge an iOS device. USB Device Jack 2 will keep an iOS
device charged or almost charged, or it may charge a smaller iOS device (depending on
usage).
Printer, mouse, computer keyboard, etc. doesn’t work in USB Host Jack
This jack is only for USB MIDI devices.
USB Host Jack won’t power MIDI devices
This USB-standard jack provides enough power for a single MIDI device. Up to eight
additional devices are supported with a powered USB hub only.
v.1.1
Page 36

36
Specifications
Audio
Digital Performance
24-bit resolution
A-D Dynamic Range:102dB (Single-ended)
D-A Dynamic Range:106dB
Supported sample rates: 44.1 kHz, 48 kHz, and 96 kHz
Microphone Inputs
Gain: 0- 60 dB (1 dB steps)
Frequency Response: 20 Hz - 20kHz
SNR: 110dB (1kHz, 1.2 Vrms, BW: 22Hz-22kHz, A-weighting, Unity Gain)
THD+N: -99 dB (1kHz, 1.2 Vrms, BW: 22Hz-22kHz, A-weighting, Unity Gain)
Line Inputs (Balanced)
Frequency Response: 20 Hz - 20kHz
SNR: 111 dB (1kHz, 10 Vrms, BW: 22Hz-22kHz, A-weighting)
THD+N: -99 dB (1kHz, 1.2 Vrms, BW: 22Hz-22kHz, A-weighting)
Maximum input level: 11 Vrms, 23 dBu, 21 dBV (1kHz, BW: 22Hz-22kHz, A-weighting,
1% THD+N, SNR=116 dB)
Instrument Inputs
Frequency Response: 20 Hz - 20kHz
SNR: 95 dB (1kHz, 5 Vrms, BW: 22Hz-22kHz, A-weighting)
THD+N: -92 dB (1kHz, 5 Vrms, BW: 22Hz-22kHz, A-weighting)
Maximum input level: 10 Vrms, 22 dBu, 20 dBV (1kHz, BW: 22Hz-22kHz, A-weighting,
1% THD+N, SNR= 94 dB)
Line Outputs
Maximum Output Level: 13 dBu, 11 dBV, 3.6 Vrms
SNR: 115 dB (1kHz, BW: 22Hz-22kHz, A-weighting)
THD+N: -112 dB (1kHz, BW: 22Hz-22kHz, A-weighting)
Headphone
SNR: 100 dB (1kHz, BW: 22Hz-22kHz, A-weighting)
THD+N: -100 dB (1kHz, BW: 22Hz-22kHz, A-weighting)
Power output into 30 Ohms per channel: 73 mW per channel
MIDI
5-pin MIDI DIN I/O
29 16-channel MIDI ports
Up to 10 MIDI ports (160 channels) per computer device
Supports up to eight USB MIDI devices (via powered hub)
Features of iConnectAUDIO4+ are patent pending. For more details see www.iConnectivity.com/patents.
Product features are subject to change.
iPad, iPhone, and iPod touch are trademarks of Apple Inc., registered in the U.S. and other countries.
iConnectivity, iConnectMIDI, iConnectAUDIO, and passThru are trademarks of iKingdom Corp. Copyright (c)
iKingdom Corp. 2014
Powered USB hub not included
v.1.1
Page 37

37
Contact iConnectivity
wwwiConnectivity.com
support@iConnectivity.com
+1 403.457.1122
Monday to Friday 9:00 am to 5:00 pm (Mountain Time)
iConnectivity
#100, 925 26th Street NE
Calgary, AB T2A 6K8
Canada
v.1.1
Page 38

 Loading...