

Page 1

N1630
User manual
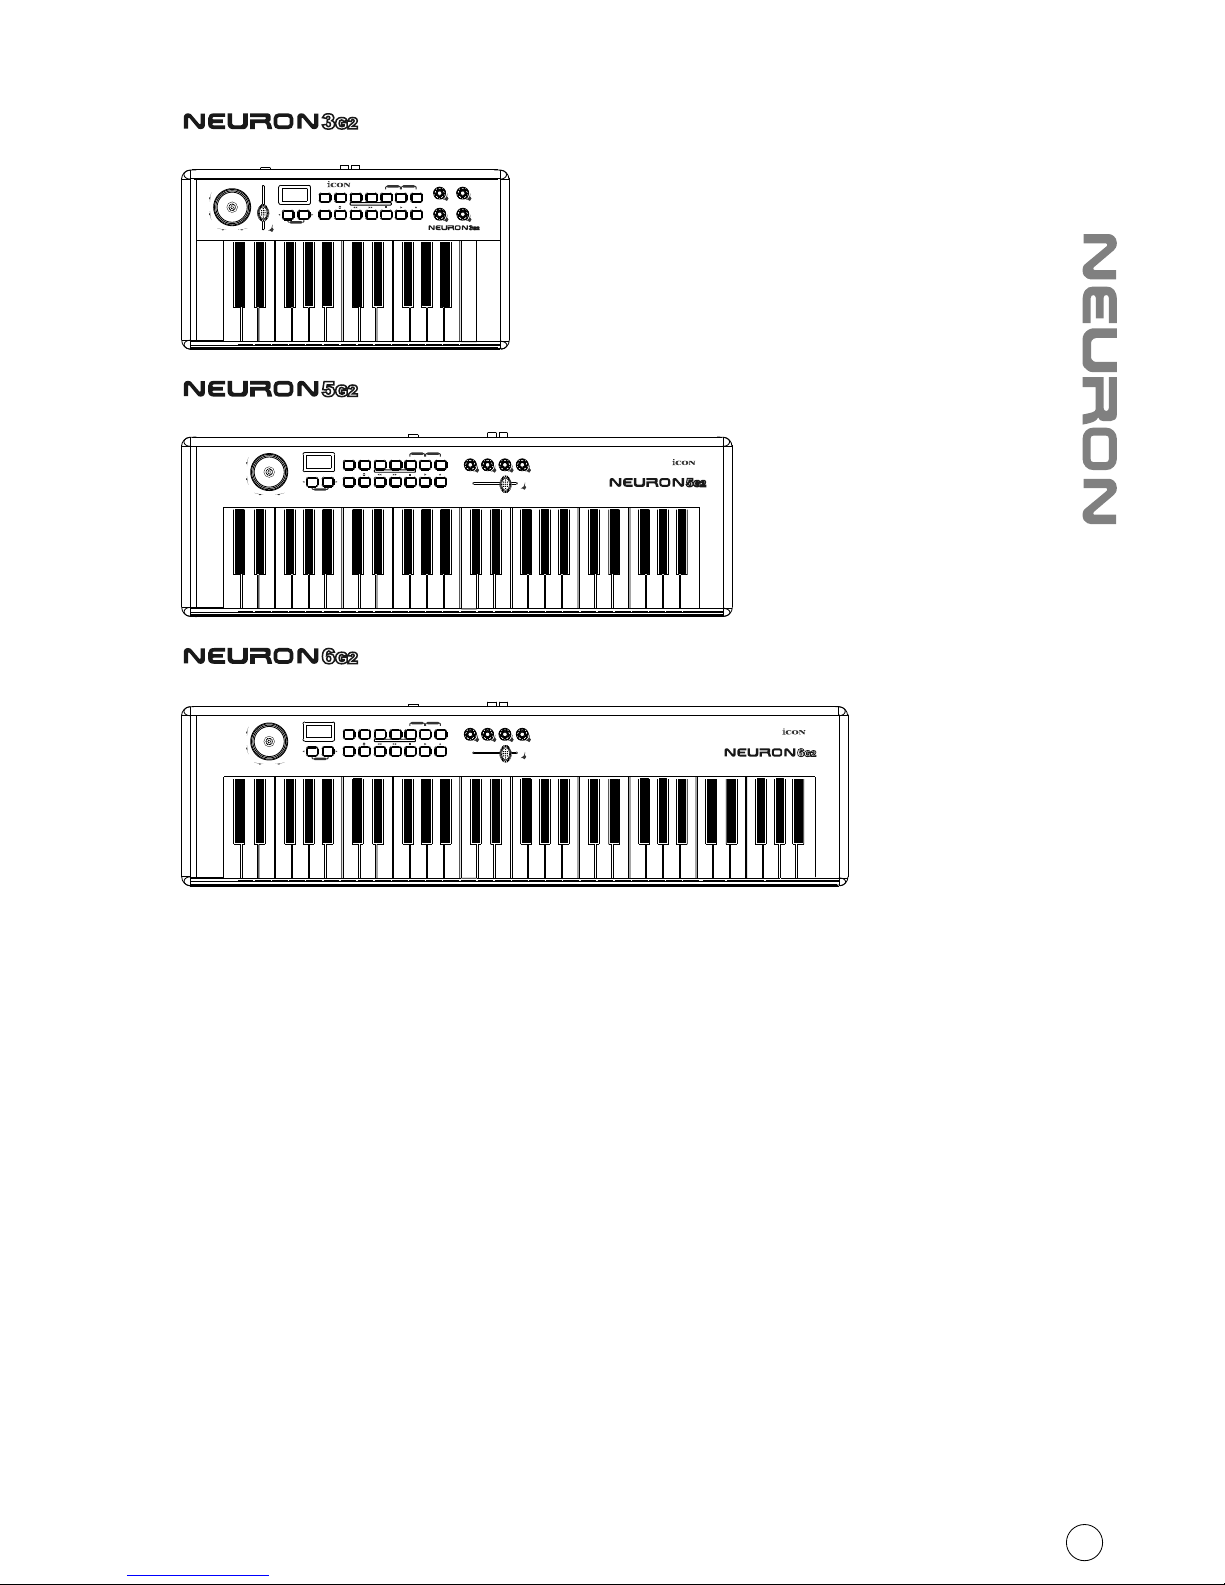
Neuron 3 G2 / Neuron 5 G2 / Neuron 6 G2
25/49/61-note velocity-sensitive piano-action
USB MIDI controller keyboard.
Page 2
WARNING: To reduce the risk of fire or electric shock, do not expose this unit to
rain or moisture
Important Safety Instructions
1. Read this manual thoroughly before using this unit.
2. Keep this manual for future reference.
3. Take notice of and comply with all warnings included in the user's manual or indicated
on the appliance.
4. Follow all instructions included in this manual.
5. Do not expose this unit to rain or moisture. Avoid having water or other liquids spilled
on this unit.
6. When cleaning the cabinet or other parts of this appliance, use only a dry or slightly
damp soft cloth.
7. Do not block any ventilation openings or interfere with the proper ventilation of this unit.
Install in accordance with the manufacturer's instructions.
8. Do not use or store near any heat sources such as radiators, heat registers, stoves, or
other heat-producing appliances.
9. Do not interfere with the safety purpose of the polarized or grounding-type plug. A
polarized plug has two blades with one wider than the other. A grounding-type plug h
as two blades and a third grounding prong. These are designated for your safety. If the
provided plug does not fit into your outlet, consult an electrician.
10. Protect the power cord from being walked on or otherwise damaged by items placed
on or against them. Particular attention should be given to the plugs, receptacles, and
the point where the cord exits the appliance.
11. To avoid the risk of electrical shock, do not touch any exposed wiring while the unit is
in operation.
12. Only use attachments/accessories specified by the manufacturer.
13. Unplug this unit and all connected electrical equipment during lightning storms or when
left unused a long period of time.
14. Refer all servicing to qualified service personnel. Servicing is required when the
appliance has been damaged in any way or fails to operate normally.
Page 3
Introduction
What's in the package
Features
Front Panel Layout
Getting Started
Connecting your Neuron G2 controller system
TM
Installing iMap Software for Windows
TM
Assigning MIDI functions with iMap
Appendix A
Appendix B
Appendix G
Control buttons layout
Rear panel layout
TM
iMap Software for Mac OS X
TM
iMap Neuron G2 software panel
Firmware upgrade
Restore the factory default settings
Vel. Curve
Services
Specifications
Appendix C
Appendix D
Appendix E
Appendix F
2
1
1
3-4
4-5
6
6-7
7
8-9
10
10-11
12
12
13
14
15
16-17
18-19
20
21
22
23-25
26
Contents
Page 4
Introduction
Please write your serial number here for future reference:
Purchased at:
Date of purchase:
Thank you for purchasing the ICON Neuron G2 USB MIDI controller keyboard. We sincerely
trust this product will provide years of satisfactory service, but if anything is not to your
complete satisfaction, we will endeavor to make things right.
In these pages, you'll find a detailed description of the features of the Neuron G2, as well as
a guided tour through its front and side panels, step-by-step instructions for its setup and
use, and full specifications.
You'll also find a warranty card enclosed - please don't forget to fill it out and mail it so that
you can receive online technical support at: www.icon-global.com. And so we can send you
updated information about these and other ICON products in the future. As with most
electronic devices, we strongly recommend you retain the original packaging. In the unlikely
event the product must be returned for servicing, the original packaging (or reasonable
equivalent) is required.
With proper care and adequate air circulation, your Neuron G2 will operate without any
trouble for many years. We recommend that you record your serial number in the space
provided below for future reference.
What's in the package?
Neuron 3 G2 / Neuron 5 G2 / Neuron 6 G2 - 25/49/61-note
velocity-sensitive piano-action USB MIDI controller keyboard x 1
CD x 1
Quick Start Guide x 1
USB 2.0 cable x 1
App software – iMap (Mac & Windows)
User manual & QSG
DAW software – Samplitude 11 silver ICON edition
1
Page 5
Features
25-note velocity-sensitive piano-action USB MIDI controller keyboard.
PITCH BEND
MOD
Transpose
Octave
Advanced Zone1/Range1 Zone2/Range2
+
-
Reset
f1
Vel.
Curve
Enter9765432 810RecallSaveMaxMin
Bank
MSB
Bank
LSB
Ctrl
Assign
Chan
Assign
Zone 2
Chan
Zone 1
Chan
Glob
Chan
Program Mute Layer
PanicSnapShot
e1 e2
e3 e4
PITCH BEND
MOD
Transpose
Octave
Advanced Zone1/Range1 Zone2/Range2
+
-
Reset
e1 e2 e3 e4
f1
Vel.
Curve
Enter9765432 810RecallSaveMaxMin
Bank
MSB
Bank
LSB
Ctrl
Assign
Chan
Assign
Zone 2
Chan
Zone 1
Chan
Glob
Chan
Program Mute Layer
PanicSnapShot
49-note velocity-sensitive piano-action USB MIDI controller keyboard.
PITCH BEND
MOD
Transpose
Octave
Advanced Zone1/Range1 Zone2/Range2
+
-
Reset
e1 e2 e3 e4
f1
Vel.
Curve
Enter9765432 810RecallSaveMaxMin
Bank
MSB
Bank
LSB
Ctrl
Assign
Chan
Assign
Zone 2
Chan
Zone 1
Chan
Glob
Chan
Program Mute Layer
PanicSnapShot
61-note velocity-sensitive piano-action USB MIDI controller keyboard.
Velocity-sensitive piano style keyboard
Combined pitch/modulation joystick
4 assignable rotary knobs for setting MIDI CC
1 assignable fader
3-segment LED screen
Octave up/down buttons
Transpose up/down buttons
Multi velocity curves available for selection
14 midi function buttons including 6 assignable transport buttons
Additional programming functions on keybed
20 non-volatile memory locations
Midi output jack
Expression & sustain pedal TRS connectors
Mackie control build-in for Cubase, Nuendo, Samplitude, Logic Pro and Abelton Live.
Mackie HUI protocol built-in for Pro Tools 9.
TM
iMap software included for easy mapping of MIDI functions
Class-compliant with Windows XP, Vista (32-bit), Windows 7 (32-bit & 64-bit), and
Mac OS X (IntelMac)
USB 2.0 high speed connectivity
2 different colors including Black and Silver
Firmware upgrade via USB cable
●
●
●
●
●
●
●
●
●
●
●
●
●
●
●
●
●
●
●
2
●
Page 6
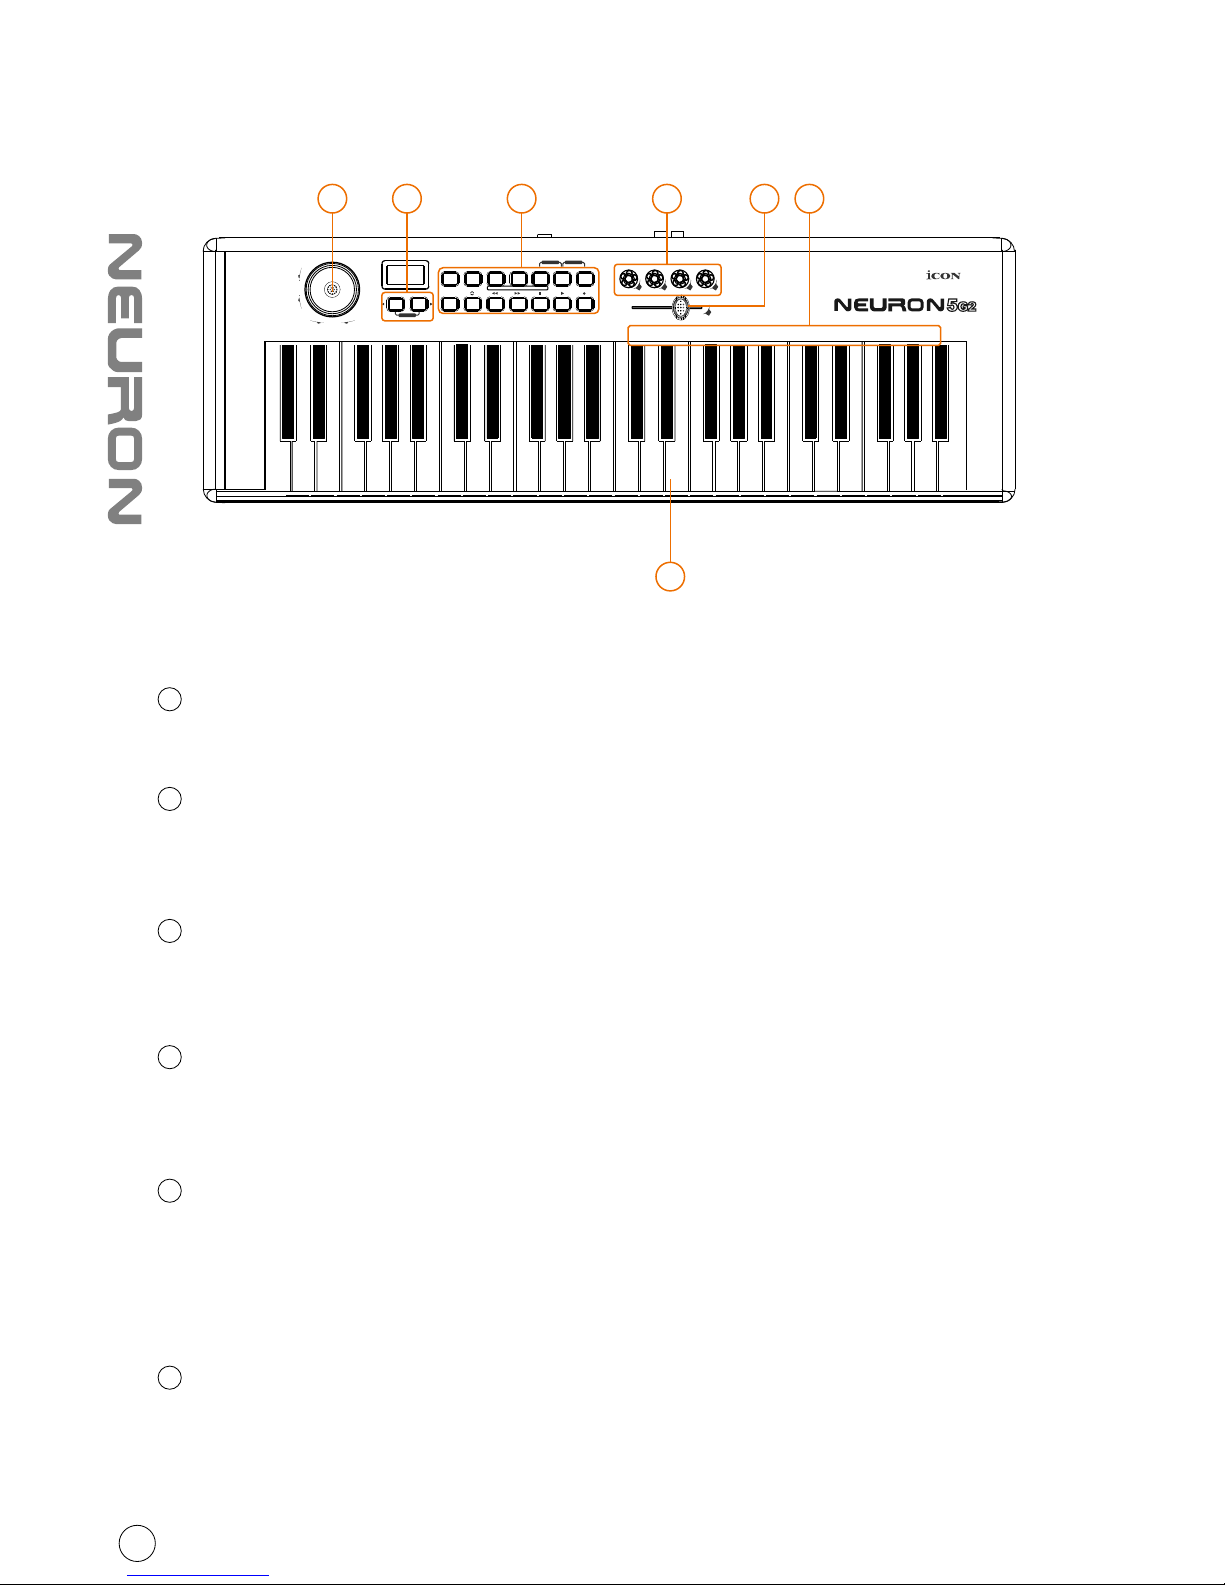
Front Panel Layout
25/49/61-note key switches
25/49/61-note velocity-sensitive piano-action key switches
Modulation & pitch bend joystick
Vertically: Adjusts the modulation effect.
Horizontally: Adjusts the pitch bend. It will return to “center” when released
Control Buttons
Control, set, and activate the features of Neuron.
(Tip: Please refer to Appendix A for Mackie Control and HUI protocol functions)
Control buttons on the keybed
Neuron also uses some of the key switches to control, set and activate some
features of Neuron.
Knobs
The four rotary encoder knobs are generally used for controlling the track pan
position, aux send levels and EQ of your DAW. You may also preset them to adjust
specific parameters within plug-ins and virtual instruments.
(Tip: Please refer to Appendix A for Mackie Control and HUI protocol functions)
Fader
Programmable fader slide to adjust linear MIDI parameters such as volume or
TM
change the midi message with iMap software.
(Tip: Please refer to Appendix A for Mackie Control and HUI protocol functions)
1
2
3
4
5
6
3
PITCH BEND
MOD
Transpose
Octave
Advanced Zone1/Range1 Zone2/Range2
+
-
Reset
e1 e2 e3 e4
f1
Vel.
Curve
Enter9765432 810RecallSaveMaxMin
Bank
MSB
Bank
LSB
Ctrl
Assign
Chan
Assign
Zone 2
Chan
Zone 1
Chan
Glob
Chan
Program Mute Layer
PanicSnapShot
1
72 3 5 6 4
Page 7
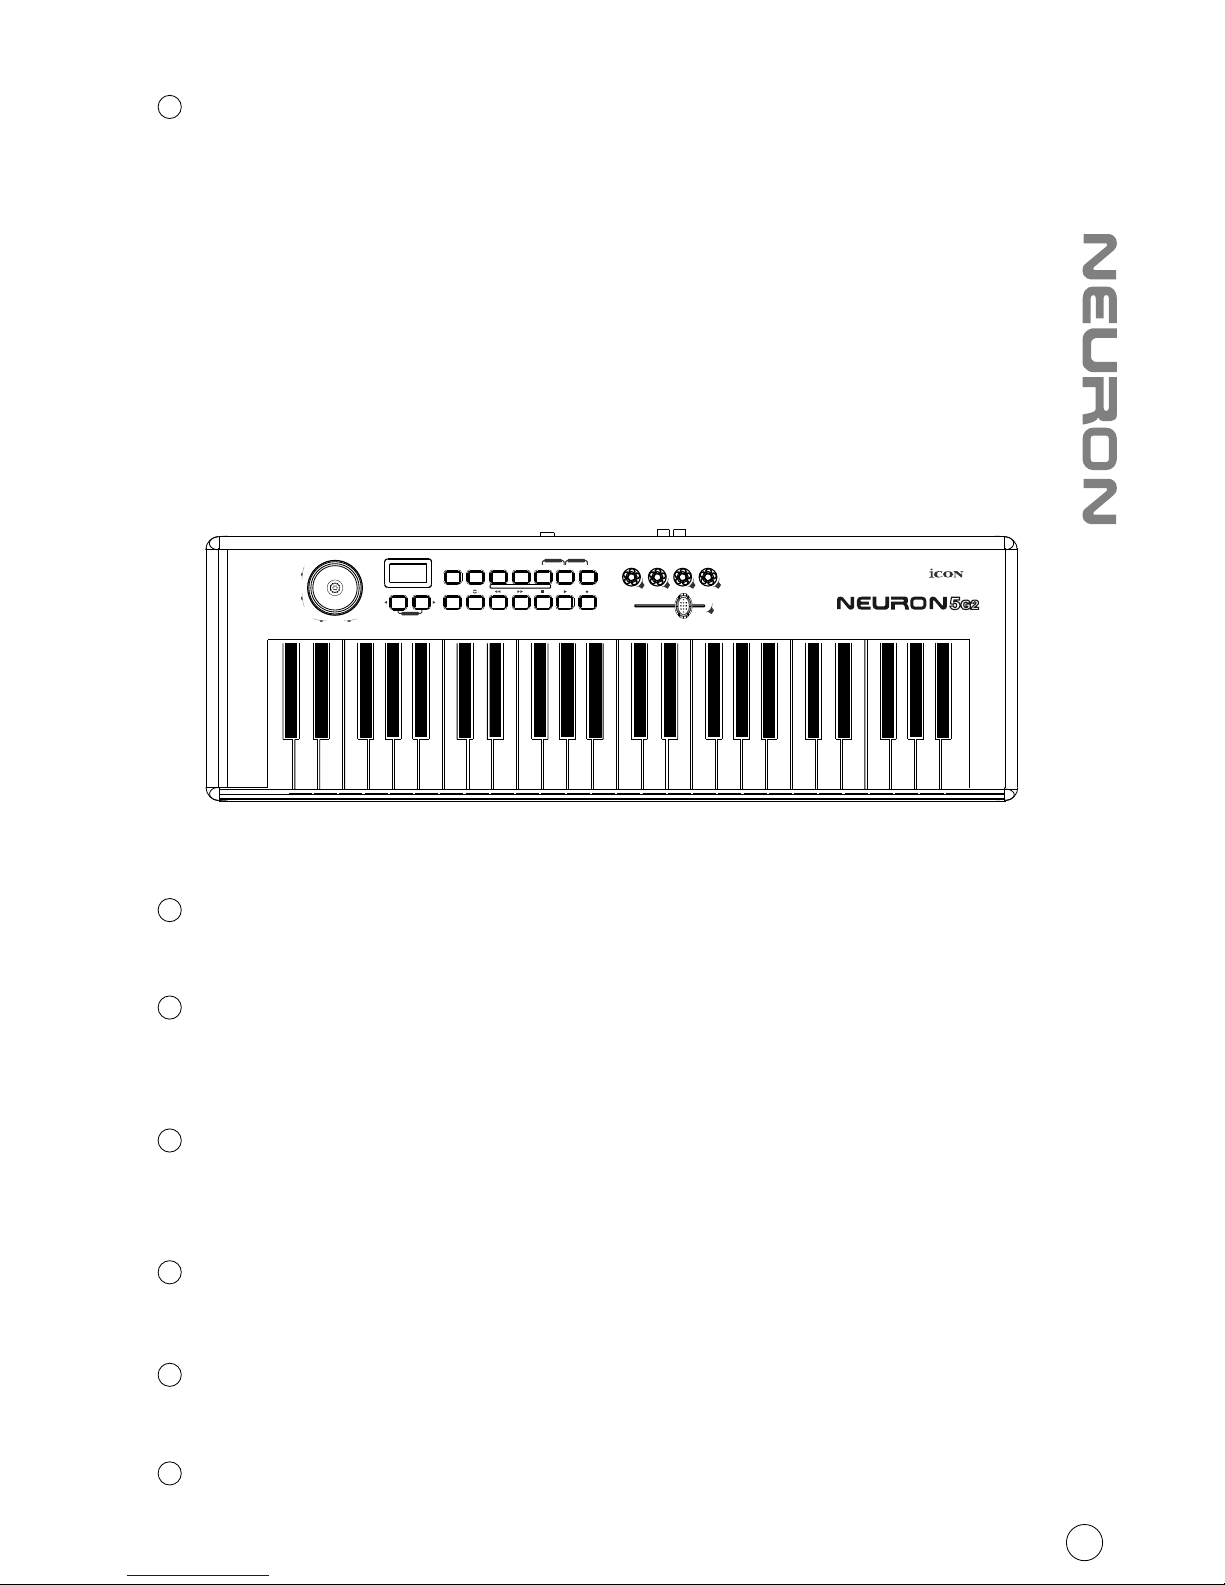
7
Transpose/Octave Buttons
Raises or lowers the pitches played on your keyboard.
Octave: Press the “Right” arrow button to raise the pitch
Press the “Left” arrow button to lower the pitch
Transpose: Hold down the “Right” & “Left” arrow buttons together and tap the
key that represents the interval you would like to shift relative to Middle C.
Control buttons layout
Advanced
Press the “Advanced” button to control the functions on the key switches.
Zone 1 / Range 1
Press and hold: Set the first zone of your keybed
Press once: Activate the first zone of your keybed
Zone 2 / Range 2
Press and hold: Set the Second zone of your keybed
Press once: Activate the Second zone of your keybed
Program
Press the Program button to change the patch to a different sound.
Mute
Mute your Neuron G2.
Layer
Switch between the two layers for the knobs.
1
2
3
4
5
6
4
PITCH BEND
MOD
Transpose
Octave
Advanced Zone1/Range1 Zone2/Range2
+
-
Reset
e1 e2 e3 e4
f1
Vel.
Curve
Enter9765432 810RecallSaveMaxMin
Bank
MSB
Bank
LSB
Ctrl
Assign
Chan
Assign
Zone 2
Chan
Zone 1
Chan
Glob
Chan
Program Mute Layer
PanicSnapShot
Page 8

+ / - buttons
Use the “+” key to scroll towards higher values, or use the “-” key for lower values.
Glob Chan
Set the keybed (no zone setting allowed) global channel from 01 to 16.
Zone 1 Chan
Set the “Zone 1 keybed” midi channel from 01 to 16.
Chan Assign
Set the midi channel to the controllers such as fader, encoders & MMC buttons.
Ctrl Assign
Assign the CC number to the controllers such as fader, encoders & MMC buttons.
Bank LSB and Bank MSB
Bank MSB/LSB settings are used to change banks on sound modules or softsynths
that use more than one bank.
Min and Max
Set the “Minimum” and “Maximum” values of a controller such as fader or knob.
Vel. Curve
Select the available velocity curve of your keybed. For the different velocity
curve diagrams, please refer to P.14
Save and Recall
Save and recall settings from the 20 non-volatile memory locations. Mackie
Control protocol is stored in memory location 21 and HUI is stored in memory
location 22.
(Tip: Please refer to Appendix A for Mackie Control and HUI protocol functions)
0-9 and Enter
Numerical buttons and enter for input confirmation
Reset
Reset your keyboard settings to factory default.
7
8
9
10
11
12
13
14
15
16
5
17
Page 9
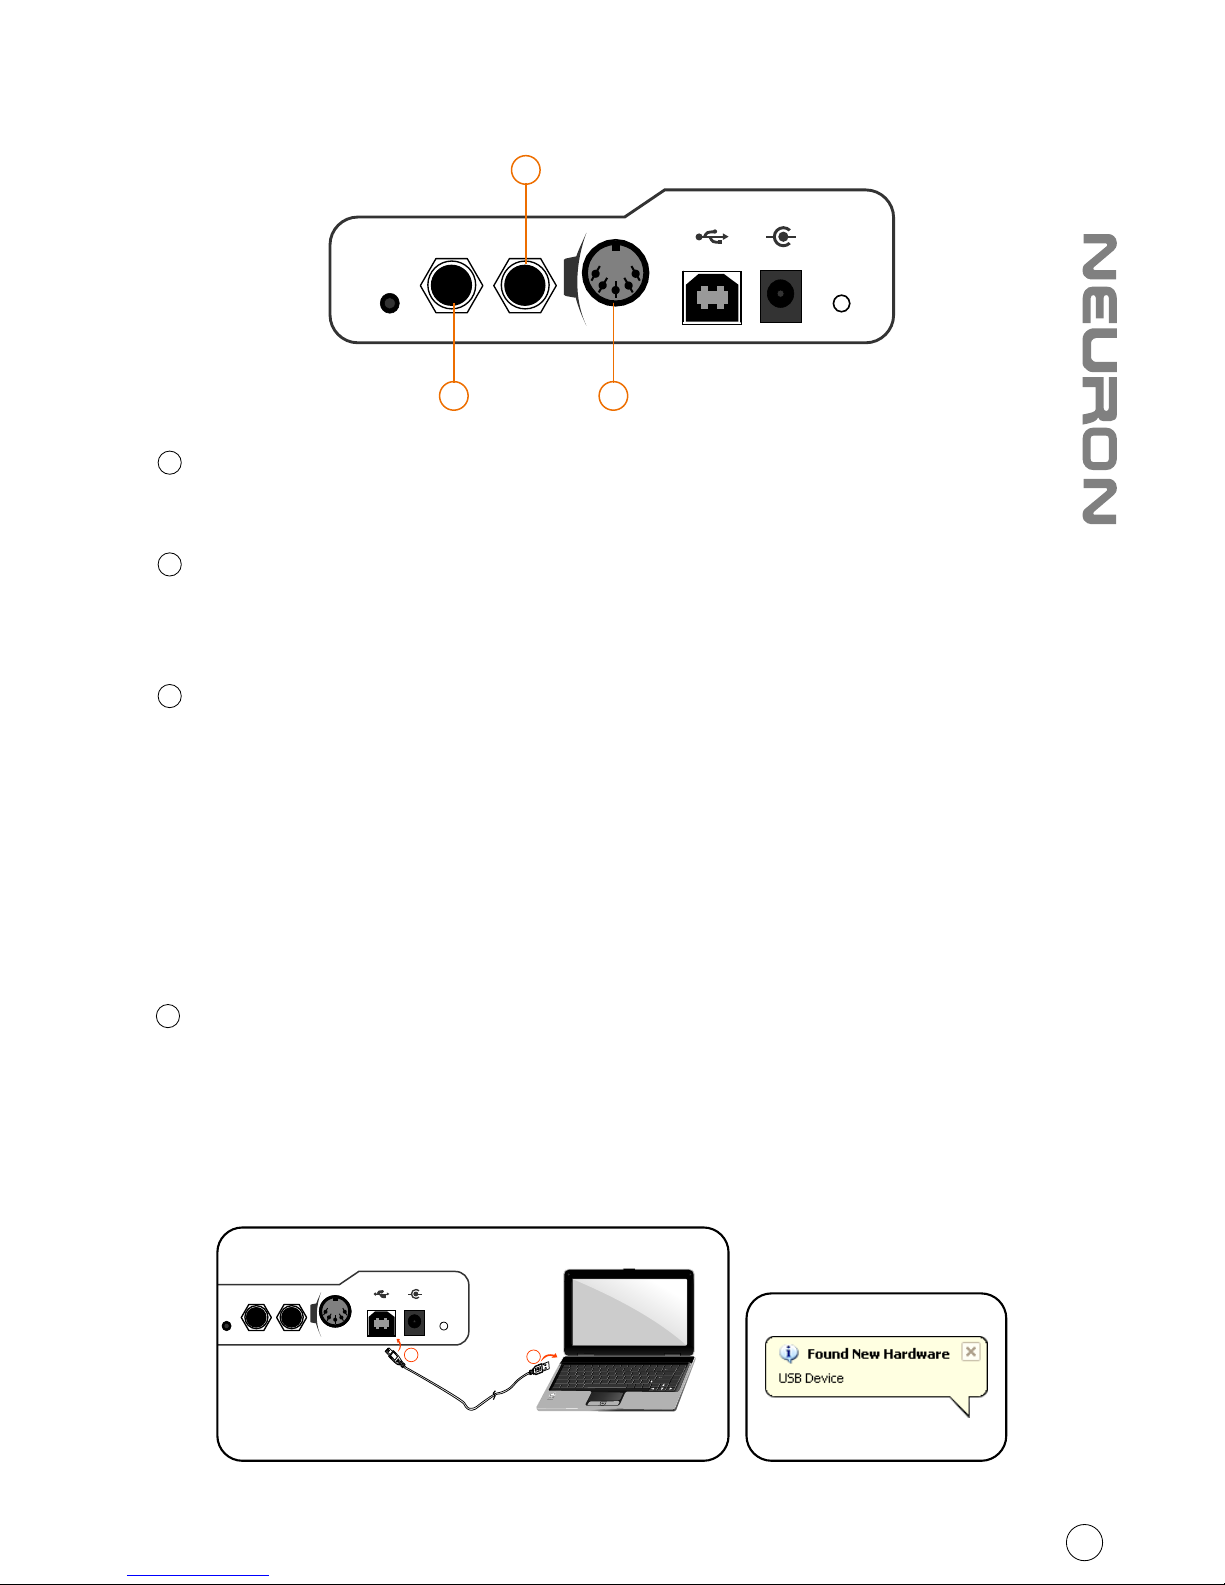
Rear panel layout
Expression Pedal Input
A standard expression pedal can be connected via this 1/4” input.
Sustain Pedal Input
This 1/4” jack can be used to connect a momentary footswitch, like a piano's
sustain pedal. (ICON SPD-01)
Midi Out Port
Use the MIDI Out terminal to connect an external synthesizer or sound module.
1
2
3
Getting Started
Connecting your Neuron G2 controller system
1
Connect the Neuron G2 to your Mac/PC via the USB port.
Choose a USB port on your Mac/PC and insert the wide (flat) end of the USB
cable. Connect the cable's small jack end to the Neuron G2. Your Mac/PC
should automatically “see” the new hardware and notify you that it is ready
to use.
Diagram 1 Diagram 2
b
Expr Sustain
MIDI
Out
USB
+
-
12V DC
Esc
F1
F2
F3
F4
F5
F6
F7F8F9
F10
F11
F12
Prtsc
sysrq
pause
Break
Lns
Del
Home
Pgup
PgDN
End
$
~
`
!
1
··
2
3
4
5
677890
))*
—-+
=
#¥%*#
#
QWERTYUIO
P
{
}
|
ASDFGHJKL
:
;
ZXCVBNM<>
?
Tab
CapsLook
Shift
Ctrl
Alt AltGr
Ctrl
Backspace
[
]
|
Enter
Shift
intel
a
6
Expr Sustain
MIDI
Out
USB
+
-
12V DC
2
31
Page 10

Set the Neuron G2's Mackie Control mode (or HUI mode) for your DAW
or make your own midi mapping for memory locations 1-20
Launch the iMap software and select the Mackie Control mode (or HUI mode)
according to your DAW in the “Control Mode” pull down menu.
Or in User Defined mode, set your preferred midi function for each controller
for memory locations 1-20.
Press the “MIDI Devices” button to select the Neuron G2 as the MIDI input and
output device. Press the “Send Data” button to upload the settings.
DAW setup
Dependent on what mode you have set your Neuron G2 with iMap, please set
your DAW as followings:
User Define mode: Select Neuron G2 as your MIDI In and Out device at your DAW.
Mackie Control mode: Add “Mackie Control” device and select Neuron G2 at
the MIDI In & Out sections.
HUI mode: Add “HUI” device and select Neuron G2 at the MIDI In & Out sections.
2
3
TM
iMap Software for Mac OS X
TM
Please follow the procedures below step-by-step to launch your iMap
software to Mac OS X
1
Insert the Utility CD in your CD-Rom and double click “Neuron G2 iMap” icon.
Tips: By “drag and drop” the “Neuron G2 iMap” icon into the “Applications”
folder, you could create a “iMap” shortcut on your Mac's desktop.
7
Page 11

TM
Installing iMap Software for Windows
TM
Please follow the procedures below step-by-step to install your iMap
software.
1
2
Turn on your PC.
Diagram 1
Insert the Utility CD in your CD-Rom
After you have inserted the CD into
your CD-Rom, an installation screen
should appear as shown in diagram
TM
1; click "iMap installation".
(Note: If the installation screen not
appear automatically go to the CD
folder and double click on "Setup")
3
Setup Wizard appear
Setup wizard appears, please click
"Next"
4
Choose Install Location
Choose your preferred install
TM
location for iMap or use the
default location and click "Next"
5
Select shortcut
Select the start menu folder in
which you would like to create
TM
the iMap shortcut. Then click
"Next"
Diagram 3
Diagram 2
Diagram 4
8
Page 12

6
Create a shortcut on your desktop
Please untick the box if you do
not want to place a shortcut icon
TM
on your desktop for iMap ,
otherwise click "Next"
7
TM
iMap started to install
TM
The iMap installation has now
started, wait for it to finish. Then
click "Finish"
8
Installation finished
Click "Finish" to complete the
TM
iMap software installation.
Diagram 5
Diagram 6
Diagram 7
9
Page 13

TM
Assigning MIDI functions with iMap
TM
You can use iMap to assign the MIDI functions of your Neuron G2 easily.
Note: If your Neuron G2 is not connected to
your Mac/PC, a message of "There are no
MIDI input devices" will appear. Please
connect Neuron G2 to your Mac/PC with
the provided USB cable.
TM
iMap Neuron G2 software panel
Control Mode:
Mackie Control: Select “Mackie Control” for Mackie control protocol
HUI: Select “HUI” for HUI control protocol
User Defined: Set your own midi settings for all the controllers.
(Tip: Please refer to Appendix A for Mackie Control and HUI protocol functions)
(Note: In “Mackie Control” & “HUI” modes, settings are fixed)
Memory
Set the different settings for the 20 available memory slots on your Neuron.
(Note: It is only possible to transfer one memory setting at a time to your Neuron G2)
1
2
10
3 2 14 10 1 2
11
9
7
5
6
8
13
Page 14

Velocity Curve
Select the available velocity curve of your keybed. For the difference velocity
curve diagram, please refer to P.14
Glob Chan
Set the keybed (no zone setting allowed) global channel from 01 to 16.
Layer button
You may have 2 different “Layers” settings for the four control knobs.
Assign MIDI functions to the knobs (User define mode only)
Select your desired MIDI functions for the knob.
Assign MIDI functions to the fader (User define mode only)
Select your desired MIDI functions for the fader.
Assign MIDI functions to the MMC button (User define mode only)
Select your desired MIDI functions for the MMC button
“Save file” button
Click this button to save your current settings for the Neuron G2. The file is
an “.neuron” file.
“Load file” button
Click this button to load a previously saved “.neuron” setting file for your Neuron G2.
“Send Data” button
TM
Click this button to upload the iMap software settings to your Neuron G2 via
USB connection.
(Note: You must have connected your Neuron G2 to your Mac/PC, otherwise the settings
upload will not be successful.)
“MIDI Devices” button
Click this button, a MIDI device select window will
appear as shown in diagram 1. Please select “ICON
Neuron G2” for the MIDI Out Devices.
“Firmware Upgrade” button
Click this button to enter into the firmware upgrade window for Neuron G2.
Please refer to P.12 for the firmware upgrade procedure.
Diagram 1
3
4
5
6
7
8
9
10
11
12
13
11
Page 15
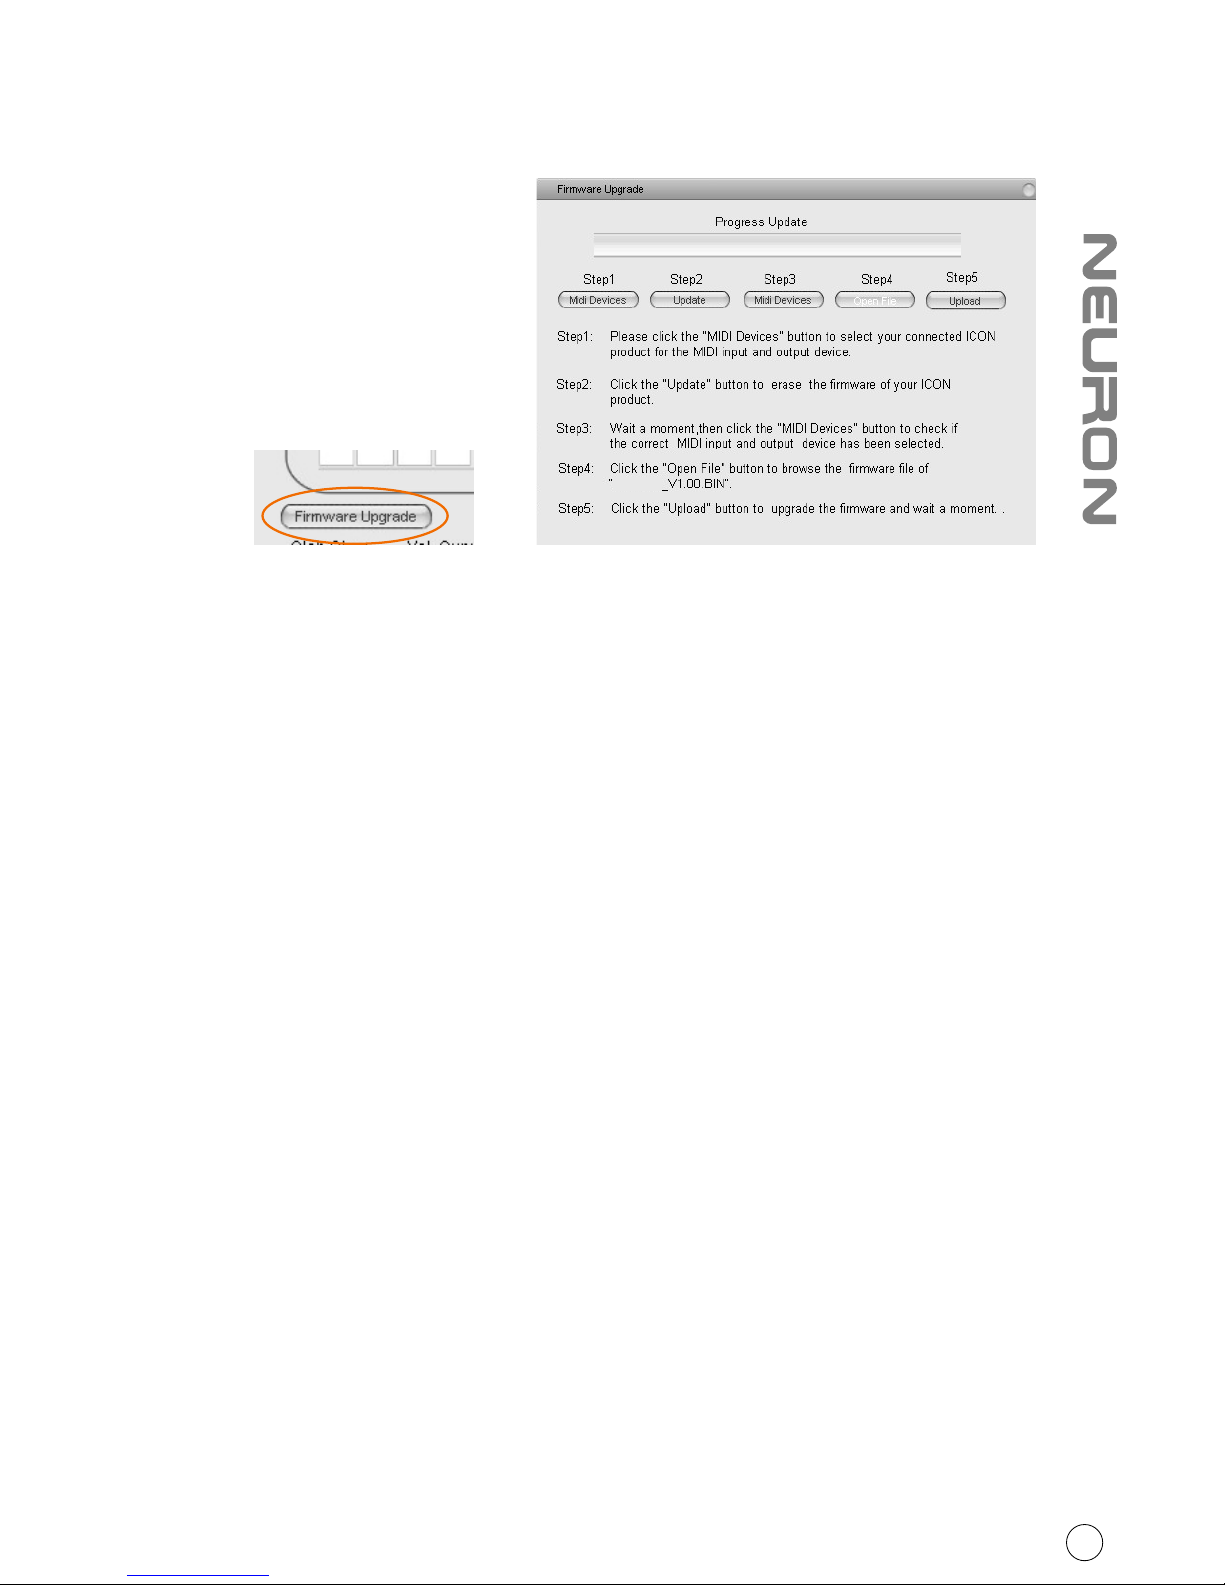
Firmware upgrade
Diagram 2Diagram 1
Step 1: Connect the ICON product using a USB connection. Press the “MIDI
Device” button at the top to select your connected ICON product as the
“MIDI In and Out” device at the pull-down menu.
Note: If your connected ICON product model name does not appear on the
pull-down menu, select “USB Audio” as the MIDI In and Out device.
Step 2: Click the “Update” button.
Step 3: Press the “MIDI Device” button at the top to select your connected
ICON product as the “MIDI In and Out” device at the pull-down menu.
Step 4: Click the “Open File” button to browse the new firmware file.
Step 5: Click the “Upload” button to upload the firmware.
Warning:The firmware upload process “MUST” be completed and not be interrupted
during the file uploading, otherwise the firmware may not be rewritten again.
Restore the factory default settings
To restore your Neuron G2 settings to factory default, simply import the
“Factory Default” setting file into your Neuron G2 with the original setting
of the iMap software.
12
Neuron G2
Page 16

440(L) X 244(W) X 57(H)
17.32”(L) x 9.6”(W) x 2.24”(H)
NR3 G2
NR5 G2
NR6 G2
Specifications
13
Connector:
Power supply:
Current consumption (USB ):
USB connector
12V/350mA DC
100mA or less
Weight
Dimensions
771(L) X 244(W) X 57(H)
30.35”(L) x 9.6”(W) x 2.24”(H)
936.4(L) X 244(W) X 57(H)
36.87”(L) x 9.6”(W) x 2.24”(H)
3.4kg
5.45kg
6.35kg
Page 17

Vel. Curve
F1- presets all contact with the pads to a value of 60.
F2-presets all pads to 120.
F3-presets all pads to 127, their maximum value, at all times.
C1 C2
C3
C4
C5
C6
C7 C8
14
Page 18

Appendix A
Mackie Control mode function table
Layer 1
Layer 2
Fader
Master volume
Encoder 1
Encoder 2
Encoder 3
Encoder 4
“Loop“ button
"<<" button
">>" button
"Stop button"
"Play button"
"Rec button"
Channel 1 volume
Channel 2 volume
Channel 3 volume
Channel 4 volume
Activate the loop function
Activate the rewind function
Activate the fast forward function
Activate the stop function
Activate the play function
Activate the record function
Channel 1 pan
Channel 2 pan
Channel 3 pan
Channel 4 pan
/
/
/
/
/
/
/
Mackie HUI mode function table
Layer 1
Layer 2
Fader
Master volume
Encoder 1
Encoder 2
Encoder 3
Encoder 4
“Loop“ button
"<<" button
">>" button
"Stop button"
"Play button"
"Rec button"
Channel 1 volume
Channel 2 volume
Channel 3 volume
Channel 4 volume
Activate the loop function
Activate the rewind function
Activate the fast forward function
Activate the stop function
Activate the play function
Activate the record function
Channel 1 pan
Channel 2 pan
Channel 3 pan
Channel 4 pan
/
/
/
/
/
/
/
15
Page 19

Appendix B
Function button
Function Descriptions
Zone 1/Range 1 (Press once)
Activate Zone 1 of your key bed
Activate Zone 2 of your key bed
Zone 2/Range 2 (Press once)
Zone 1/Range 1 (Press & hold)
Set the zone 1 range of your key
bed by play the first & last keynote of
the zone range
Zone 2/Range 2 (Press & hold)
Set the zone 2 range of your key bed
by play the first & last keynote of the
zone range
Zone 1/Range 1 + Program
Set the zone 1's program number
Zone 2/Range 2 + Program
Set the zone 2's program number
Program
Set the program number of your keyboard
Mute
Mute your keyboard
Layer
Switching between the 2 layers of the
fourcontrol knobs
+
Scrolling upward of a particular
function's value
-
Scrolling downward of a particular
function's value
Loop
Activate the loop function of your DAW
Rewind
Activate the rewind function of your DAW
Fast Forward
Activate the fast forward function
of your DAW
Stop
Activate the stop function of your DAW
Play
Activate the play function of your DAW
Record
Activate the record function of your DAW
Snap Shot (Program + Mute)
Send an entire set of MIDI commands
of the controllers value at once
Panic (Mute + Layer)
Stop everything of your controllers
Reset (Zone1/Rang1 + Zone2
/Range 2 + Program)
Reset the setting of your keyboard
to factory default
Advanced
Activate to select function on the
key switch such as "Glob Chan"
Glob Chan (Advanced + Keyswitch)
Select the Glob channel value
from 01-16 of your keyboard
Zone 1 Chan (Advanced + Keyswitch)
Select the channel number
from 01-16 of zone 1
Zone 2 Chan (Advanced + Keyswitch)
Select the channel number
from 01-16 of zone 2
16
Page 20

Chan Assign (Advanced + Keyswitch)
Select the channel number from 01-16
for all the controllers such as knobs,
MMC buttons & fader
Ctrl Assign (Advanced + Keyswitch)
Select the CC number from 001-127 for
all the controllers such as knobs, MMC
buttons & fader
Bank LSB (Advanced + Keyswitch)
Least Significant Byte. Typically, these
are CC numbers 32-63. More advanced
control is available with this group, if
you need it.
Bank MSB (Advanced + Keyswitch)
Most Significant Byte. Typically, these are
CC numbers 0-31. Most of the standard
MIDI functions you might want will be in
this category. Also part of an RPN or NRPN,
with possible values from 0-127.
Min (Advanced + Keyswitch)
Adjust the minimum value of a
controllers such as knob or fader
Max (Advanced + Keyswitch)
Adjust the maximum value of a controllers
such as knob or fader
Vel.Curve (Advanced + Keyswitch)
Select the 7 avaliable velocity curve for
the keyboard
Save (Advanced + Keyswitch)
Save the setting of your keyboard to the
20 memory slots
Recall (Advanced + Keyswitch)
Recall the saved settings from the 20
momory slots
Numerical digit 0-9
(Advanced + Keyswitch)
Numerical digits 0-9 for input value
at difference function
Enter (Advanced + Keyswitch)
Enter to confirm your input
17
Page 21

Appendix C
Chart C1 -
General MIDI Instruments - Program Change Numbers
MIDI Data Tables
18
Page 22

Chart C2 - General MIDI Note Numbers
Chart C3 - General MIDI Drums Note Assignments
35
36
37
38
39
40
41
42
43
44
45
46
47
48
49
50
MIDI
Note
Drum
Sound
Acoustic Bass Drum
Bass Drum 1
Side Stick
Acoustic Snare
Hand Clap
Electric Snare
Low Floor Tom
Closed Hi-hat
High Floor Tom
Pedal Hi-Hat
Low Tom
Open Hi-Hat
Low-Mid Tom
Hi-Mid Tom
Crash Cymbal 1
High Tom
51
52
53
54
55
56
57
58
59
60
61
62
63
64
65
66
Ride Cymbal 1
Chinese Cymbal
Ride Bell
Tambourine
Splash Cymbal
Cowbell
Crash Cymbal 2
Vibraslap
Ride Cymbal 2
Hi Bongo
Low Bongo
Mute Hi Conga
Open Hi Conga
Low Conga
High Timbale
Low Timbale
67
68
69
70
71
72
73
74
75
76
77
78
79
80
81
High Agogo
Low Agogo
Cabasa
Maracas
Short Whistle
Long Whistle
Short Guiro
Long Guiro
Claves
Hi Wood Block
Lo Wood Block
Mute Cuica
Open Cuica
Mute Triangle
Open Triangle
MIDI
Note
Drum
Sound
MIDI
Note
Drum
Sound
19
Page 23
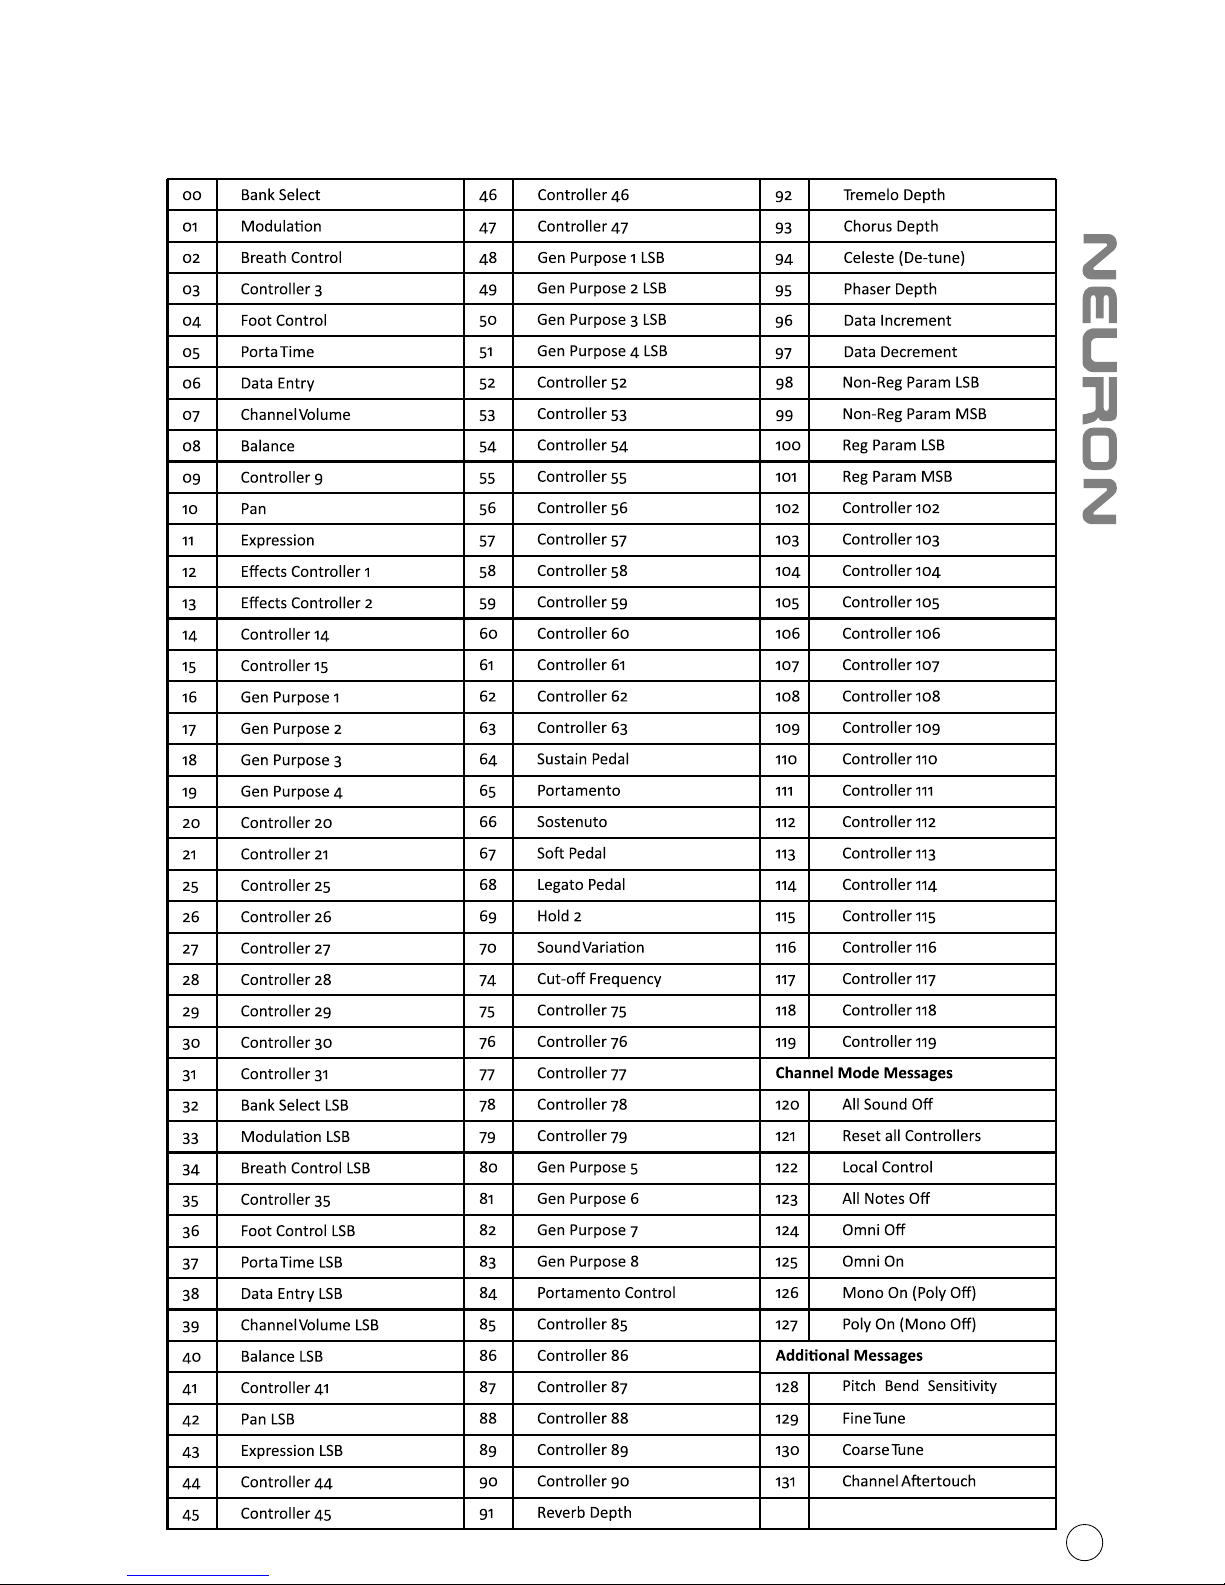
Appendix D
General MIDI Controller Numbers (MIDI CC'S)
20
Page 24

Appendix E
Function Table
This table indicates which controllers can be used to operate the various
features of Neuron. A check mark " " indicates that the controller will
work with the selected function while an "X" indicates that the button
cannot be used.
Neuron 3
Neuron 5
Neuron 6
25-Keys
+/- buttons
Control
buttons
Select between 2 Layer
21
Page 25

Appendix F
Hexadecimal Conversion Chart
22
Page 26

Appendix G
Terms you will use when operating Neuron G2
CC – MIDI controller message or control change. CCs are designated by a
MIDI CC number. For example MIDI CC number 7, is used for volume control.
Numbers 0-63 are continuous controllers, each with a range of values from
0-127, while CC's 64-95 are switches, that is ON/OFF controls, and 96-127
are unassigned parameters and global mode controls.
Channels - Just like cable television, a lot of possible MIDI information
going out to one or more receivers via a wire. Channels are 1 thru 16.
Chorus - a de-tuned swirling sound.
Device ID - A number which identifies each unit linked by MIDI, for the
purpose of sending and receiving System Exclusive messages. Neuron has
a fixed device ID of Neuron 3 G2 – 35, Neuron 5 G2 – 23 amd Neuron 6 G2 - 22.
Expression - varying how loud or soft a sound is, so it doesn't sound
mechanical or flat.
General MIDI - an agreed-upon set of CC numbers that affects General MIDI
synthesizers and drum machines. There are 128 General MIDI synth sounds
in a set, covering acoustic instruments, commonly used synth sounds, drums
and percussion, and sound effects. There is also an agreed-upon Keymap for
the keyboard activation of percussion sounds.
Global channel – used to send all MIDI messages everywhere, all the time!
(except SysEx messages). Also channels 1 thru 16.
Keymap - each key on a MIDI keyboard has a CC number assigned to it. If you
want, you can assign a particular function to a key on the keyboard, instead of
a slider, knob, or pad. The keymap is essential to playing General MIDI drum and
percussion sounds via the keyboard.
Linear functions – These are MIDI parameters that have a range of values. For
instance, volume has a range from total silence (0) to full on (127). Many synth
filter and envelope settings, or effects like reverb and chorus, use linear controls.
The term comes from visualizing the range of values along a number line. Faders
and knobs are usually used to control these kinds of CC's
LSB - Least Significant Byte. Typically, these are CC numbers 32-63. More
advanced control is available with this group, if you need it.
23
Page 27

MIDI - Musical Instrument Digital Interface. A way to use numbers to control all
kinds of synthesizer and computer programs using a system of hexidecimal (8-bit)
numbers. Neuron uses only standard decimal number equivalents.
MIDI Machine Control (MMC) – MIDI equivalents of old-fashioned analog tape
recorder controls, like Rewind, Fast Forward, Stop, Play and Record. Neuron has
dedicated MMC controls on the front panel.
Modulation - taking a steady, even tone, and making it waver, like a violinist's
vibrato, or even as wide and slow as a siren.
MSB - Most Significant Byte. Typically, these are CC numbers 0-31. Most of the
standard MIDI functions you might want will be in this category. Also part of an
RPN or NRPN, with possible values from 0-127.
Non-Linear functions – These are MIDI parameters that have only two settings,
ON or OFF. They are binary, not linear. A pad can be used for these CC's, as well
as a footswitch.
NRPN - non-registered program number. A fancy name for a number that does
not have a set MIDI function. MIDI implementation charts show which numbers
are available for special functions.
Panning - the location of a sound in a stereo field, from hard left through the
center to hard right.
Pitchbend - Just like strings on a guitar, the keyboard notes can be “bent” up or
down. Neuron uses a joystick for this function.
POLY/MONO modes- POLY mode means that multiple notes triggered from a
keyboard will sound. Usually goes with OMNI mode. MONO mode means that
only one note at a time can be triggered from the keyboard.
Range - how far up and down the keyboard a zone extends. Octave and Transpose
functions can affect what notes actually come out of a given Zone, with a given Range.
Reverb - ambience, like music played in a large cathedral or a tiled room. This is
not the same as echo/delay, which is a repeating sound.
RPN - Registered Program Number. A fancy name for a number that has a set, or
registered function via MIDI. MIDI Implementation charts are lists of these numbers.
Rx - controls whether a device can receive a MIDI message, or not.
24
Page 28

System Common message - a MIDI message for all MIDI devices, such as tuning,
song select, timeclock sync, and sequence start.
System Exclusive message (SysEx)- a MIDI message that is tied to a device ID.
Only the device whose ID matches the ID number of the sending device will
“see” this message. Used differently by different manufacturers for different
special features of their particular hard/software.
Tx - controls whether a device can transmit a MIDI message, or not.
Velocity Curve - this function allows you to select which type of envelope the
MIDI sounds will generate. In basic terms, it controls how fast the note starts,
how fast it decays, how long it sustains, whether it rises or falls in volume while
the key is held, and how fast it releases. Each keyboard that has multiple velocity
curves to choose from will have a chart that shows the characteristics of the
various options.
Volume - loudness, or the lack of it!
Zone - a pre-selected part of a keyboard, which will only control what has been
assigned to it.
25
Page 29

Services
If your Neuron G2 needs servicing, follow these instructions.
2. Keep this owner's manual. We don't need it to repair the unit.
3. Pack the unit in its original packaging including end card and box. This is very
important. If you have lost the packaging, please make sure you have packed
the unit properly. ICON is not responsible for any damage that occurs due to
non-factory packing.
4. Ship to the ICON tech support center or the local return authorization.
U.S. OFFICE:
ICON Digital Corporation
8001 Terrace Ave., Suite 201
Middleton, WI, 53562
USA
ASIA OFFICE:
ICON (Asia) Corp.
Unit 807-810, 8/F., Sunley Centre,
No. 9 Wing Yin Street, Kwai Chung, NT.,
Hong Kong.
5. For additional update information please visit our website at:
www.icon-global.com
1. Ensure the problem is not related to operation error or external system devices.
26
Page 30

info@icon-global.com
www.icon-global.com
NRG2 PD3V100-E
 Loading...