

Page 1
P1503-01
Page 2

SB-100™ Employee Time Clock User Guide
Icon Time Systems
Automated Time and Attendance Solutions for Small Businesses
EPM DIGITAL SYSTEMS, INC., An Oregon Corporation
ICON TIME SYSTEMS is a registered subsidiary of EPM Digital Systems, Inc.
Notice:
The information contained in this document is subject to change without notice.
ICON TIME SYSTEMS MAKES NO WARRANTY OF ANY KIND WITH REGARD TO
THIS MATERIAL, INCLUDING, BUT NOT LIMITED TO, THE IMPLIED WARRANTIES
OF MERCHANTABILITY AND FITNESS FOR A PARTICULAR PURPOSE. ICON TIME
SYSTEMS shall not be liable for errors contained herein or for incidental consequential
damages in connection with the furnishing, performance, or use of this material.
This document contains proprietary information that is protected by copyright. All rights
are reserved. No part of the document may be photocopied, reproduced, or translated
to another language without the prior written consent of EPM Digital Systems, Inc.
Copyright (C) EPM DIGITAL SYSTEMS, INC. 2003-2005
SB-100™ Employee Time Clock is a trademark of EPM Digital Systems, Inc.
All other trademarks belong to their respective owners.
Icon Time Systems
15201 NW Greenbrier Parkway, Suite A1
Beaverton, Oregon 97006
971-249-1700
Printed in U.S.A. January 2003-2005
Page 3

SB-100™User Guide
Table of Contents
Overview ........................................................................................ 1
Time Clock Organization................................................................. 2
Keypad Functions............................................................................. 3
Accessing Supervisor Mode .............................................................4
Time Clock Setup ............................................................................ 5
Employee Setup (Optional).............................................................. 7
Reports ........................................................................................... 8
Editing Punches ..............................................................................10
Appendix ....................................................................................... 11
Testing Your Printer
Troubleshooting
Tips
Page 4

1
Overview
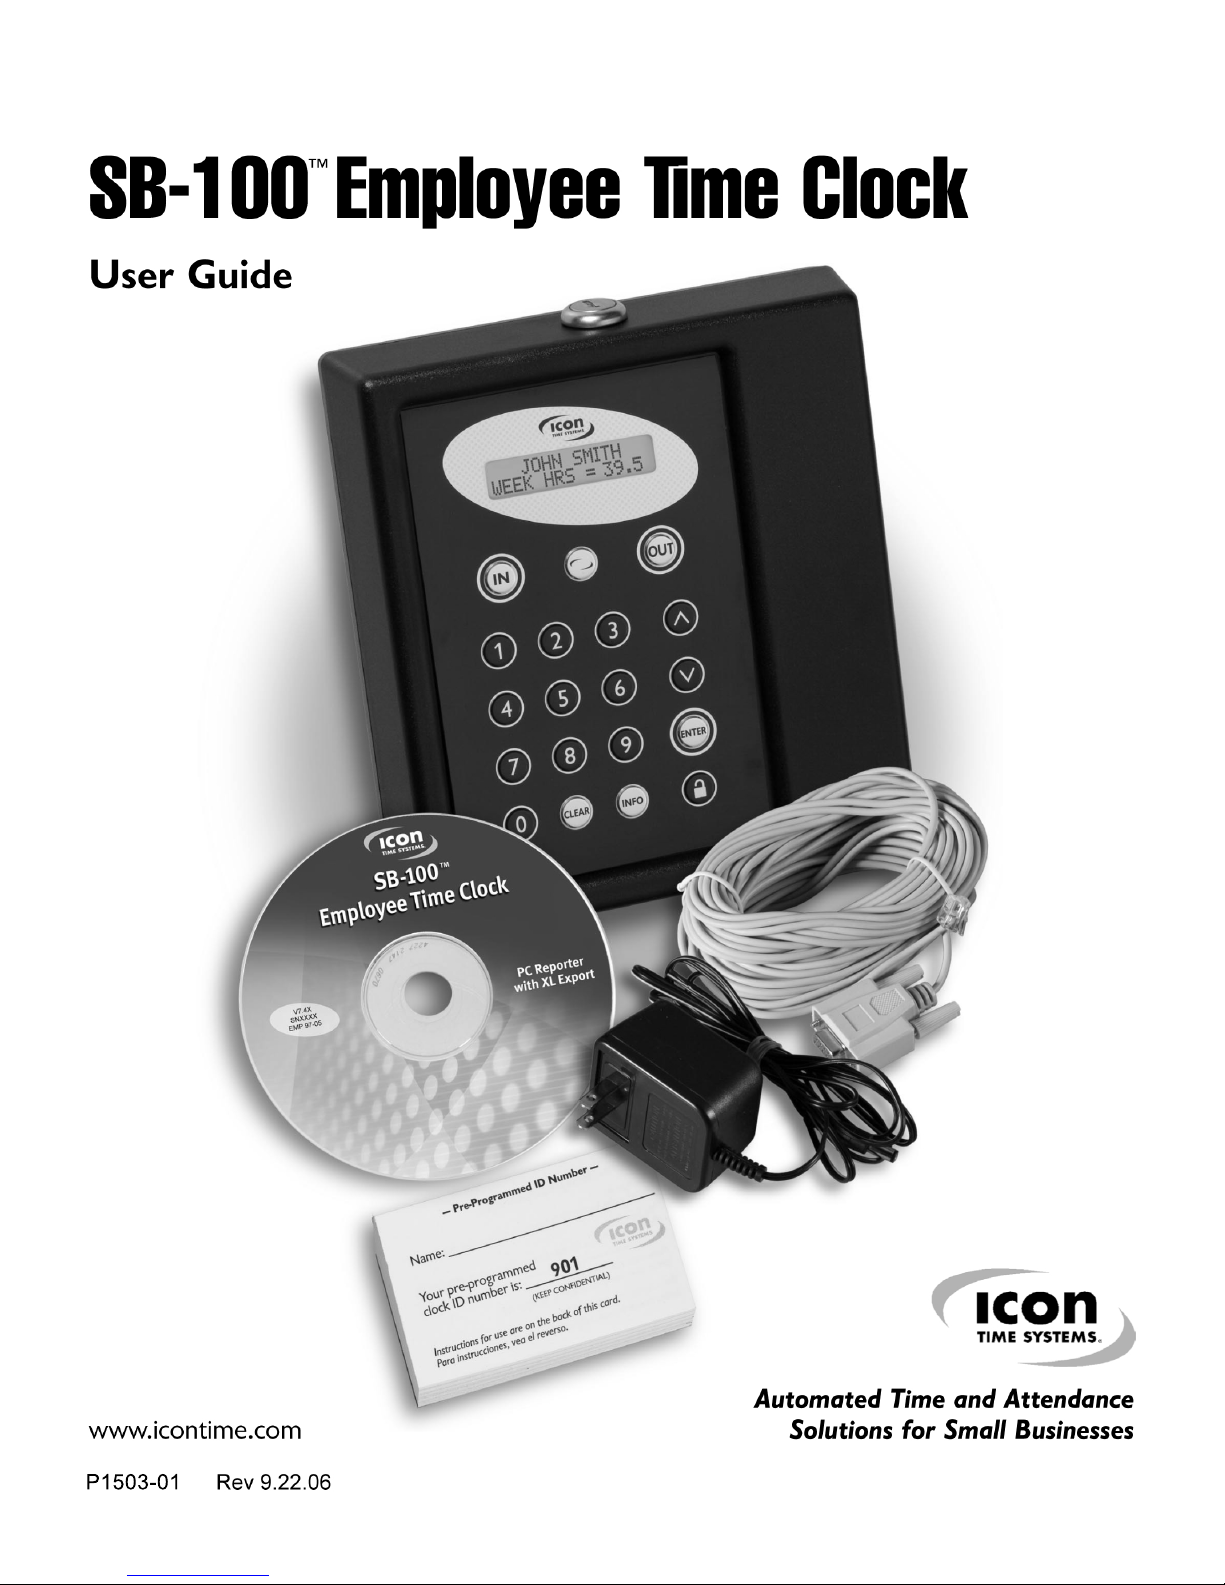
Thank you for purchasing the SB-100™ Employee Time
Clock
designed to automate employee time collection
without extensive set-up or training. The SB-100 works
with or without a PC and is ready to go, out of the box, in
just five minutes! No Hassle -- No Fuss -- just plug it in and
the Time Clock starts recording your employees' time.
Enjoy the convenience of having automatically calculated
standard hours, overtime hours and gross wages. Never
again add up another timecard or timesheet!
The SB-100 comes with:
• AC Adapter
• PC Option Cable
• Pre-programmed Employee ID Cards
• Software CD
•
Wall Mount Kit - includes mounting bracket and case keys
• Quick Start Guide
AC Adapter - Powers up the Time Clock.
PC Option Cable - Connects the Time Clock to your PC.
This allows you to print and view reports through your PC.
Pre-programmed Employee ID Cards - The SB-100
comes pre-programmed with 50 employee ID numbers
and pre-printed ID cards. Hand each employee a unique
ID card, and they will use this number to clock in and out.
(The employee ID card also contains instructions to assist
the employee with learning the clock in/out process.)
Software CD - PC Reporter Software - Assists you with
the use of your Time Clock. Allows you to print and view
reports through your computer. (You cannot edit reports
with PC Reporter.)
Wall Mount Kit - Conveniently mount the Time Clock
anywhere; includes a wall mounting bracket and case keys.
Always make sure the Time Clock is mounted within five
feet of an electrical outlet.
Quick Start Guide - Step by step instructions on how to
set-up your Time Clock. Please read the Quick Start
Guide before going any further.
Page 5

2
Time Clock Organization
The SB-100 presents employee punches as in/out groups
known as “punch pairs.” Each pair consists of the date,
in-time and out-time. The Time Clock maintains employee
records in alphabetical order with each employee's
punches sorted chronologically.
CALCULATIONS
SB-100 calculates all punches to 1/100th of an hour. If
“Rounding Rules” are selected the Time Clock will round
the time of day punched, not the final calculation. The
Time Clock uses rules that you configure to indicate how
you wish hourly information to be calculated.
REPORTS
Reports may be printed at ANY TIME and AS MANY
TIMES as you want, without your data being harmed.
Reports can be sent directly to your dot matrix printer or
compatible laser printer. You can also connect your Time
Clock to your PC and print reports through your
Windows based PC, just by installing the enclosed PC
Reporter software. Please note, when printing reports
through your PC with the PC Reporter software, you
may not edit reports— only print them.
EMPLOYEE USE
Your SB-100 Employee Time Clock is ready to use out of
the box with 50 pre-programmed employee ID numbers—
and is ready for clocking in (see Quick Start Guide). Icon
Time Systems recommends that you assign names and pay
rates to each employee for easier-to-read reports and
labor costing. To enter a punch at the Time Clock,
an employee
enters their three-digit ID number, then
presses IN or OUT.
When punching out, employees
can view their hours worked for that punch pair, and
their total for the week.
EXCEPTION PUNCHES
Exception punches are caused by missed sign-ins and
sign-outs. The Time Clock automatically marks missed
punches, for a supervisor to edit at a later time.
STARTING NEW PAY PERIODS
The SB-100 automatically maintains your current and last
payroll in memory. When a new pay period begins, the
Time Clock will sort and group your punch pairs for payroll reporting. You do not have to be present for this
process; it happens automatically! After a new pay period
begins you may receive your payroll reports by printing
timecards from the “Last Pay” period menu.
Page 6

3
Keypad Functions
FUNCTION
Key
Only used when
the Time Clock is
upgraded to a PC
based Time Clock
IN & OUT
Keys
Employees enter their
three-digit ID number
and press “IN” to
clock in. Employees
enter their three-digit
ID number and press
“OUT” to clock out
INFO
Key
Only used when
the Time Clock is
upgraded to a PC
based Time Clock
SUPERVISOR
MODE Key
Allows supervisor to
access the Time
Clock for supervisor
functions
ENTER
Key
Allows the supervisor
to select menus in
supervisor mode
UP & DOWN
Keys
Allows the
supervisor to scroll
through menus in
supervisor mode
CLEAR
Key
When pressed,
returns the user to
the previous screen
Page 7

4
Accessing Supervisor Mode
Supervisor Mode allows
supervisors to print reports,
edit punches, and configure
the Time Clock. The SB-100
comes with a default security
code of 00 00 00.
To enter Supervisor Mode:
• Press in the bottom right hand corner of
your keypad.
• Enter “00 00 00”.
• The Time Clock will display “SUPERVISOR MODE”.
To easily navigate through Supervisor Mode, remember
these key definitions:
will scroll you through the main menu.
To access a menu item, press ENTER.
When the menu item is flashing, will let you scroll
through all the choices in that menu.
ENTER: The “ENTER” key is used to advance to the
next step of a menu operation. Use to find the
menu item you desire. Then use ENTER to accept it.
CLEAR: The “CLEAR” key is used to return to the
previous step, much like a backspace. When you have
completed your work and wish to exit Supervisor Mode,
press CLEAR until your screen returns to reading the
time of day, and “ENTER ID NUMBER” is displayed on
the bottom line.
• Once in Supervisor Mode, use to manually scroll
through the Time Clock menu and choose your menu item.
OR:
• Use the SB-100 “Quick Pick” Menu - The Quick Pick
Menu allows you to enter a Quick Pick Code to jump
directly to that menu item. (See following paragraph.)
QUICK PICK CODES
Easily access the supervisor functions you regularly use
with the Quick Pick option. At the supervisor prompt,
enter any of the Quick Pick codes listed below to jump
directly to the desired function.
Reports
10 -
Daily Attendance Report—See who's in and who's out.
20 - Exception Report— Reports missed or late punches.
Timecard Reports
30 - This pay one employee — Print a timecard for one
employee for the current pay period.
31 - This pay all employees— Print timecards for all
employees for the current pay period.
32 - Last pay one employee — Print a timecard for one
employee from the last pay period.
33 - Last pay all employees — Print a timecard for all
employees from the last pay period.
40–55 - Time Clock Setup— Set-up overtime, warnings
and lunches.
60 - Employee Setup— Add hourly wages or employees’
names to the Time Clock.
70 - Punch Editing— Allows you to edit incorrect or
missed punches.
Use to scroll through the
Time Clock menu.
Enter Quick Pick code and jump
directly to that function.
Page 8

5
Time Clock Setup
You can customize your SB-100 with the following
functions under the SETUP TIME CLOCK menu. To
change these values, enter Supervisor Mode and use the
navigation keys , ENTER, and CLEAR as
described above—or enter the Quick Pick code to go
directly to that function.
WEEK START (Quick Pick 40)
For calculation of weekly overtime, the Time Clock must
know when your accounting week begins. You may set
this value to SUN, MON, TUE, WED, THU, FRI, or SAT.
Typically this is set at SUN.
WEEK OT (Quick Pick 41)
If you use weekly overtime at your business, you may set
the Time Clock to begin logging weekly overtime after
1 to 99 hours worked per week (40 hours is most
common). SET THIS VALUE TO “0” TO DISABLE
WEEKLY OVERTIME CALCULATIONS.
DAY OT (Quick Pick 42)
If you use daily overtime at your business you may set
the Time Clock to begin logging daily overtime after
1 to 24 hours worked a day (8 hours is most common).
SET THIS VALUE TO “0” TO DISABLE DAILY
OVERTIME CALCULATIONS.
WARNING HI (Quick Pick 43)
The Warning Hi parameter warns of hours worked in
excess of the amount you choose. Enter the hours an
employee can work within one punch pair without
triggering an entry in the exception report. 14 hours suits
most businesses. SET THIS VALUE TO “0” TO DISABLE
WARNING CALCULATION. The warning flag is a
very useful tool, and your exception reports will not
operate without it. It is strongly recommended that you
set this option.
WARNING LO (Quick Pick 44)
This function reports as exceptions all punch pairs whose
hours are below the less-than-warning amount set.
Less-than-warning is set like the Warning Hi command above.
ROUNDING (Quick Pick 45)
The SB-100 has the ability to compute your employees'
hours worked to 1/100th of an hour. If you desire some
grace period, the Time Clock provides you with three
values for this rule:
a) 15M—15 minute centered rounding, from 8 minutes
before to 7 minutes after each quarter hour.
b) 10th—Tenth of hour computation; no rounding.
c) NONE—Compute hours to 1/100th of an hour.
TIME FORMAT (Quick Pick 46)
You may configure your Time Clock to display time in
am/pm (12HR) or 24-hour format (24HR).
AUTO LUNCH (Quick Pick 47)
The SB-100 will automatically deduct a lunch after an
employee has worked more than a set amount of hours
per punch. This screen has two parameters to be set
(only one blinks at a time). Once the first item is set, press
ENTER to advance to the second item. SET THESE
VALUES TO “0” TO DISABLE AUTO LUNCH.
a) LUNCH—Enter the number of minutes you wish the
lunch deduction to last.
b) AT ___ HR—Enter the number of hours required
before the lunch deduction occurs.
DAYLIGHT SAVINGS (Quick Pick 48)
You may choose to have the SB-100 automatically fall
back/spring forward at 2:00am on the last Sunday of
October and the first Sunday of April. If employees are
working at 2:00am, the Time Clock will sign them out and
then sign them back in to avoid crediting or debiting any
hours. Values are YES or NO.
CLOCK ID (Quick Pick 49)
Should you have multiple SB-100 locations, you may
distinguish each Time Clock with its own ID number. This
number appears on all reports printed from the Time
Clock. Values are 1 to 99.
Page 9

6
PAY TYPE (Quick Pick 50)
The SB-100 automatically starts your payroll
using monthly, semi-monthly (starting on the 1st and
16th of each month), bi-weekly, or weekly formats.
After selecting the proper pay type, press ENTER to
set the current pay start date. Once this is set, the Time
Clock will automatically start each pay period.
SUPERVISOR CODE # (Quick Pick 51)
The Time Clock uses a six-digit code to access Supervisor
Mode. To enter a new code number, and replace the
existing one, press ENTER to start the display blinking,
then type in your new code number. You may change
your code as often as you wish. The default code
is 00 00 00.
PRINTER TYPE (Quick Pick 52)
The SB-100 will directly communicate with all EPSON FX
/ IBM Proprinter compatible dot matrix printers. It will
also support laser printers compatible with the Hewlett
Packard Laser Jet II. Both printer types must use a parallel
interface. Select LASER for laser printing, or DOTMX for
dot matrix. Or you can choose to print through your PC
by installing the enclosed PC Reporter software.
PERSONNEL REPORT (Quick Pick 53)
This report prints each employee's ID, name and
hourly wage.
SET DATE & TIME (Quick Pick 54)
The SB-100 will automatically adjust your date and time
for the month, leap year, and day light savings time. You
should seldom need to change the time or date. Should
you change the time while employees are punched-in on
the Time Clock, it will automatically punch them out at the
old time and back in at the new time. This will avoid the
need for any corrections in the Time Clock's reports.
To change the system time:
Use to scroll the Month, Day, Year, Day of Week,
Hour, and Minute. Pressing ENTER advances you from
one field to another. Pressing CLEAR returns the cursor
to its prior location.
SHOW OPTIONS (Quick Pick 55)
This feature shows the version of SB-100 Employee Time
Clock software being used on this machine.
Page 10

7
Employee Setup
(Optional)
EMPLOYEE SETUP (Quick Pick 60)
The SB-100 comes pre-programmed with Employee ID
Numbers so you do not need to add them to the system.
If you wish, you may edit the names and assign hourly pay
rates to further customize your system.
1) Enter Supervisor Mode and select Employee Setup.
2) Enter the three-digit ID number for the employee you
wish to edit. may be used to scroll through an
alphabetical list if you do not know the employee's
ID number.
3) Use to scroll through the alphabet and spell
the employee's name as you wish it to appear on the
screen and reports. Press ENTER to step forward to the
next letter and press CLEAR to backspace if you make an
error. Pressing for an extended period will
rapidly scroll through the alphabet. After the last letter
is selected, the Time Clock will display the Pay
Rate screen.
4) Enter the pay rate for this employee. You may use the
number keys to speed this process.
The following Employee ID's come pre-programmed
in the SB-100™ Employee Time Clock:
001 023 045 067 089
101 123 145 167 189
201 223 245 267 289
301 323 345 367 389
401 423 445 467 489
501 523 545 567 589
601 623 645 667 689
701 723 745 767 789
801 823 845 867 889
901 923 945 967 989
Page 11

8
Reports
PRINT ATTENDANCE (Quick Pick 10)
The daily attendance report allows you to get a chronological
list of each day's punches. This is valuable for checking
employee attendance and to monitor approaching
overtime. This report gives you daily labor costs and can
be used to track labor costs throughout the day.
To print using your printer:
1) Turn on your printer and align the paper to the start
of the page.
2) Enter Supervisor Mode and press once
to display PRINT ATTENDANCE.
3) You will be prompted to select the date you wish to
print for (press and ENTER to select).
To print using your PC:
1) Do not enter Supervisor Mode. Leave the Time Clock
in “ Enter ID Number” mode.
2) Connect your Time Clock to your PC to
automatically start the PC Reporter software.
If the PC reporter does not start up automatically
when you connect your Time Clock to the PC,
you may manually start the program by going to
the Windows Start Menu - Start Programs - Icon
Time Systems - PC Reporter.
3) Click the Attendance button on the PC Reporter
screen menu.
4) Press Run Report to output your report.
PRINT EXCEPTIONS (Quick Pick 20)
The exception report aids you in identifying missed
punches. This report will print all punch pairs in memory
that do not fit the minimum and maximum number of
hours you have set in the “WARNING” rules trigger.
Print Exceptions also provides a quick-edit function that
allows edits for each exception punch pair.
To print an exception report using your printer:
1) Turn on your printer and align the paper to the start of
the page.
2) Enter Supervisor Mode and press twice to display
PRINT EXCEPTIONS.
3) Choose whether to print your exceptions (we
recommend printing exceptions).
a) Print Report - YES
—Print all exceptions in the Time Clock
b) Print Report - NO
—Do not print exceptions, go to the next step
4) Choose whether to Quick-Edit your exception punches.
a) Quick Edit - YES
—Begin exception report editing
b) Quick Edit - NO
—Do not use Quick-Edits at this time
The Quick-Edit function will allow you to edit each
exception punch in the order they were printed on the
exception report. The name of the employee who is
being edited is shown on the screen before each punch
pair is edited. After each punch pair is edited you will
automatically advance to the next exception punch pair.
If you do not wish to edit the displayed punch pair, press
CLEAR to skip to the next exception. For information on
the punch pair edit procedure, see “Editing Punches” in
this user guide.
To print an exception report using your PC:
1) Do not enter Supervisor Mode. Leave the Time Clock
in “ENTER ID NUMBER” mode.
2) Connect your Time Clock to your PC to start the
PC Reporter software.
3) Click the Exception button on the PC Reporter
screen menu.
4) Press Run Report to output your report.
Page 12

9
PRINT TIMECARDS (Quick Picks 30-33)
30 - This pay one employee —Print a timecard for one
employee for the current pay period.
31 - This pay all employees— Print timecards for all
employees for the current pay period.
32 - Last pay one employee —Print a timecard for one
employee from the last pay period.
33 - Last pay all employees —Print a time for all employees
from the last pay period.
The Time Clock automatically starts each pay
period. When a new pay period starts, you will see “PAY
STARTED” on the screen the first time you enter
Supervisor Mode after a new pay start. Before printing
out timecards for payroll, we recommend running an
Exception Report to catch any required edits.
When printing timecards for payroll, it is usually easier to
wait until the new pay period has begun, then print your
timecards by using the “Last” payroll option. Using this
method, you do not have to be present at the end of a pay
period in order to print out your reports.
Note: Reports may be printed at ANYTIME AND AS MANY
TIMES as you want, without harming or changing your data.
To print timecards using your printer:
1) Turn on your printer and align the paper to the start of
the page.
2) Enter Supervisor Mode and press three times to
display PRINT TIMECARDS.
3) Choose a pay period:
a)
This Pay— Prints and totals punches for this pay period
b) Last Pay—Prints and totals punches for the last
pay period
4)
Choose to print a single timecard or to print all timecards:
a) One Empl.— Print one timecard only (you will be
prompted for which employee)
b)
All Empl.— Print a timecard for every employee
5) If you choose to print for all employees you will be
asked to choose the format:
a) Full Page—one page per employee
b) Compact—multiple employees per page
c)
Summary —only total hours shown for each employee
To print timecards using your PC:
1) Do not enter Supervisor Mode. Leave Time Clock in
“Enter ID Number” mode.
2) Connect your Time Clock to your PC to start the
PC Reporter software.
3) Click the Timecard button on the PC Reporter
screen menu.
4) Press Run Report to output your report.
Page 13

10
Editing Punches
EDIT PUNCHES (Quick Pick 70)
You may edit punches within the last two pay periods.
Edited punches show “*E” on the right margin of reports.
To edit a punch:
1) Enter Supervisor Mode and select EDIT PUNCHES.
2) Enter the ID number for the employee to be edited.
will scroll alphabetically through the employee
list if you do not know the employee's ID.
3) Enter the three-digit reference number for the punch
pair you wish to edit. The reference number is printed
on reports under the column named {REF#}. By
entering the REF#, you will go directly to editing your
punch pair. You may also use to scroll
chronologically from the most recent to oldest punch
pair for the employee. When you see the punch pair
you wish to edit, press ENTER.
4) Press ENTER if you do not need to change the punch
pair's date; or press to change the date.
Press ENTER once you have set the date to your
desired value.
5) Press ENTER twice if you do not need to change the
“in”- time, otherwise use . Note that the AM/PM
indicator changes as you scroll past noon or midnight.
Press ENTER to edit the minutes in a similar fashion.
6) Press ENTER twice if you do not need to change the
“out”-time. If the screen shows “*** --:--” the punch pair is
not punched-out. To assign a punch-out time use
. If the “out”-time already has a value (the punch
pair is punched-out), edit its time in a similar fashion. The
Time Clock will re-total the punch hours automatically.
7) Use “Insert a Break” to split the punch pair into two
new pairs. For example, if a punch pair was from 8:00a
to 5:00p, you can use “Insert a Break” to create two
punch pairs from 8:00a to 12:00p and 1:00p to 5:00p.
a) INSERT A BREAK— NO
- If no need to insert a break, go to Step 8
b) INSERT A BREAK—YES
- Insert a break for this punch pair
If you choose YES:
i)
The break “start” and “end” time will be shown and
will default to the “in”-time of the punch pair. Use
to scroll the start time. ENTER will move you
to the minutes and then on to the break “end” time.
ii) Follow the same approach as above to change
the break “end” time.
iii) Upon pressing ENTER, the screen will display
“BREAK INSERTED” and skip past Step 8 (below)
to complete this punch pair's edit.
8) The Time Clock will ask if you wish to delete this
punch pair. Press ENTER if you do not wish to delete
this punch pair. If you do wish to delete this pair, use
to scroll to YES, then press ENTER.
Page 14

Appendix
Testing Your Printer or PC Interface
Before you print reports, please use the following steps to
test communication between your Time Clock and printer
or between the Time Clock and PC. This should be done
after there are a few punches entered in the Time Clock.
Most dot matrix and laser printers, and also a small set of
inkjet printers, can be used to print reports. If your
printer's
user guide states that it REQUIRES the use of a
Windows
Based PC, then it is not compatible with the
SB-100.
If you are unsure if your printer fits these
specifications, you may print reports through your PC by
installing the included PC Reporter software
.
To test reports using a compatible printer:
1) With your printer turned off, use a parallel printer
cable (usually provided with your printer) to connect
your printer to the broad 25-pin connector on the
bottom left side of the Time Clock case.
2) Turn the printer on.
3) Enter Supervisor Mode in the Time Clock by
pressing in the bottom right-hand corner, and then
enter your supervisor code. The screen should read
“Supervisor Mode”
4) Type “31” and press ENTER twice to begin
printing timecards.
Troubleshooting
The Time Clock will try three times to communicate with
your printer. After each unsuccessful try it will display
“Printer Error” on the screen and ask you to “Press any
key to continue.” After each key press it will try to print
again. If unsuccessful after three tries, the TimeCalculator
will return to ENTER ID NUMBER mode. If this occurs
during your printer test, check that your printer has
paper, is turned on, and that the cable is connected to the
Time Clock and to the printer.
If the Time Clock displays “REPORT COMPLETE,” but no
report is generated on your printer, you may have a faulty
printer, or a WindowsPC Only printer. Change your
printer type, as instructed in the previous Time Clock
Setup (Quick Pick 52), and try again; or use the included
PC Reporter software to print reports from your PC.
TIPS
• Run Exception Reports weekly. Staying on top of
your missed punches day by day will make generating
payroll easy.
• Occasionally print a Personnel Report and save it in a
secure place. This provides you with a handy reference
of employees and pay rates.
• Do not print out your timecards until a new pay period
has started. Then print your timecards by “Last Pay” to
get your payroll reports (Quick Pick #33).
For technical support and for more information on this
product, please visit www.icontime.com.
11
Page 15

EPM DIGITAL SYSTEMS, INC., An Oregon Corporation
ICON TIME SYSTEMS is a registered subsidiary of EPM Digital Systems, Inc.
15201 NW Greenbrier Parkway, Suite A1
Beaverton, Oregon 97006
www.icontime.com
971-249-1700
ONE-YEAR LIMITED WARRANTY
ICON TIME SYSTEMS PRODUCTS
ICON TIME SYSTEMS will repair and exchange parts for your unit free of charge in the U.S.A. in the event of a defect in
materials or workmanship, as follows:
PART S
New or comparable rebuilt parts in exchange for defective parts for one (1) year beginning on the date of delivery.
LABOR
Mail-in service for one (1) year beginning on the date of delivery.
SERVICE
To request warranty service, ICON TIME SYSTEMS must be contacted within the warranty period. If ICON TIME SYSTEMS
decides a product requires service, ICON TIME SYSTEMS will issue a Return Material Authorization Number (RMA).
Products must be shipped back to ICON TIME SYSTEMS adequately insured, in their original packaging or equivalent, with a
copy of the purchase receipt, and shipping charges prepaid. Risk of loss or damage during shipping to ICON TIME SYSTEMS
is the sender's responsibility. Return shipping costs of the repaired or replaced unit will be paid by ICON TIME SYSTEMS.
This warranty is extended only to the original purchaser. A purchase receipt or other proof of date of original purchase will
be required before warranty work is rendered.
This warranty only covers failures due to defects in materials or workmanship that occur during normal use. It does not cover
failures due to damage which occurs in shipment, or failures which are caused by products not supplied by ICON TIME SYSTEMS,
or failures which result from accident, misuse, abuse, neglect, mishandling, misapplication, alteration, faulty installation,
modification or service by anyone other than a factory service center, or damage that is attributable to acts of God.
There are no other express warranties except as listed above.
ICON TIME SYSTEMS SHALL NOT BE LIABLE FOR INCIDENTAL OR CONSEQUENTIAL DAMAGES RESULTING FROM
THE USE OF THIS PRODUCT, OR ARISING OUT OF ANY BREACH OF THIS WARRANTY. DURATION OF IMPLIED
WARRANTIES, IF ANY, IS LIMITED TO ONE (1)YEAR. Some states do not allow the exclusion of limitation of incidental or
consequential damages, or limitations on how long an implied warranty lasts, so the above exclusions or limitations may not
apply to you.
This warranty gives you specific legal rights and you may also have other rights that vary from state to state.
If a problem with your ICON TIME SYSTEMS unit develops during the warranty period, contact ICON TIME SYSTEMS
SERVICE DIVISION, 15201 NW Greenbrier Parkway, Suite A1, Beaverton, Oregon 97006.
SB-100™ Employee Time Clock Stand-Alone User Guide
Page 16

 Loading...