

Page 1
BATTERY CHARGING
IMPORTANT: Battery charging caution
Ensure the guide tabs on the battery pack are correctly
aligned with the guide rails inside the charger adapter. This
illustration is for the BC-160.
OPTIONS
D BATTERY PACKS
• BP-232H li-ion battery pack
Voltage: 7.4 V, Capacity: 2200 mAh (minimum), 2350 mAh (typical)
Battery life: Approximately 14 hours*
• BP-232N li-ion battery pack
Voltage: 7.4 V, Capacity: 1900 mAh (minimum), 2000 mAh (typical)
Battery life: Approximately 12 hours*
• BP-230N li-ion battery pack
Voltage: 7.4 V, Capacity: 950 mAh (minimum), 980 mAh (typical)
Battery life: Approximately 7.35 hours*
* When the Power Save function is ON, and the operating
periods are calculated under the following conditions:
TX:RX:standby = 5:5:90
• BP-240, BP-261 battery case
BP-240: For AAA (LR03) × 6 alkaline
BP-261: For AA (LR6) × 6 alkaline
L BP-240 and BP-261 have IPX4 waterproof protection. When
in use, the transceiver’s waterproof rating meets IPX4.
D DC CABLES
• CP-23L cigarette lighter cable
Used when charging battery packs through a 12 V cigarette
lighter socket. For use with the BC-119N, BC-160, or BC-171.
• OPC-515L, OPC-656 dc power cables
Used when charging battery packs using a 13.8 V DC power
source instead of the power adapter.
OPC-515L: For the BC-119N, BC-160, BC-171
OPC-656: For the BC-121N, BC-197
D CHARGERS
• BC-119N desktop charger + AD-106 charger adapter
+ BC-145S power adapter
To rapidly charge the battery packs.
Charging time: Approximately 3.5 hours for the BP-232H.
L
A power adapter may be supplied, depending on the charger’s version.
• BC-121N multi-charger + AD-106 charger adapter +
BC-157S
To rapidly charge up to 6 battery packs simultaneously. AD-106s
(6 pieces) are required. A power adapter or a DC power source
must be purchased separately.
Charging time: Approximately 3.5 hours for the BP-232H.
• BC-197 multi-charger + AD-122 charger adapter +
BC-157S
To rapidly charge up to 6 battery packs simultaneously. AD-122s
(6 pieces) are required. A power adapter or a DC power source
must be purchased separately.
Charging time: Approximately 3.5 hours for the BP-232H.
• BC-160 desktop charger + BC-145S power adapter
To rapidly charge the battery packs.
Charging time: Approximately 3.5 hours for the BP-232H.
L A power adapter may be supplied, depending on the charger’s version.
1-1-32 Kamiminami, Hirano-ku, Osaka 547-0003, Japan
ac adapter
ac adapter
Tabs
Guide rail
• BC-171 desktop charger + BC-147S power adapter
For regularly charging of battery packs.
Charging time: Approximately 4 hours for the BP-230N.
Approximately 11.5 hours for the BP-232H.
L A power adapter may be supplied, depending on the charger’s version.
D BELT CLIPS
• MB-93 swivel belt clip
• MB-94, MB-94R belt clip
Alligator-type belt clip.
• MB-96N, MB-96F leather belt hanger
D ANTENNAS
• FA-SC56VS, FA-SC57VS, FA-SC73US stubby antennas
Shorter VHF or UHF antennas.
FA-SC56VS: 150–162 MHz FA-SC57VS: 160–174 MHz
FA-SC73US: 450–490 MHz
• FA-SC25V, FA-SC55V, FA-SC25U, FA-SC57U
flexible antennas
VHF or UHF antennas.
FA-SC25V: 136–150 MHz FA-SC55V: 150–174 MHz
FA-SC25U: 400–430 MHz FA-SC57U: 430–470 MHz
• FA-SC61VC/FA-SC61UC cut antennas
FA-SC61VC: 136–174 MHz FA-SC61UC: 380–520 MHz
D OTHERS
• SP-13 earphone
Provides clear receive audio in noisy environment.
• AD-52 earphone adapter
Provides clear receive audio in noisy environment.
• HM-131SC, HM-159SC speaker-microphone
Combination speaker-microphone that provides convenient
operation while hanging the transceiver from your belt.
- The HM-131SC does not have any waterproof protection.
-
The HM-159SC is dust-protection and water resistance.* When it is
connected, the transceiver’s waterproof rating is equivalent to IP54.
• HM-169 speaker-microphone
Rugged type speaker-microphone.
• HM-170GP speaker-microphone
GPS speaker-microphone for BIIS mode operation.
• VS-1SC vox/ptt case + HS-94, HS-95, HS-97 headset
VS-1SC: VOX/PTT switch box for hands-free operation.
HS-94: Ear-hook type HS-95: Neck-arm type
HS-97: Throat microphone
The VS-1SC meets IPX4* requirment for splash resistance.
When it is connected, the transceiver corresponds to IPX4.
• MB-130 vehicle charger bracket
Vehicle mounting bracket for the BC-160 battery charger.
* Once these items have been dropped, dust-protection and water
resistance or the IP rating cannot be guaranteed because of
possible damage to these cases or the waterproof seal.
– 4 –
A7212D-1EU-3 Printed in Japan
© 2015–2018 Icom Inc.
INSTRUCTIONS
VHF dPMR HANDHELD TRANSCEIVERS
Iç-F3162D series
UHF dPMR HANDHELD TRANSCEIVERS
Iç-F4162D series
IMPORTANT
This instruction sheet includes some functions that are
usable only when they are preset by your dealer. The
transceiver may have other functions and operations that
are not described in this instruction sheet. Ask your dealer
for preset function details.
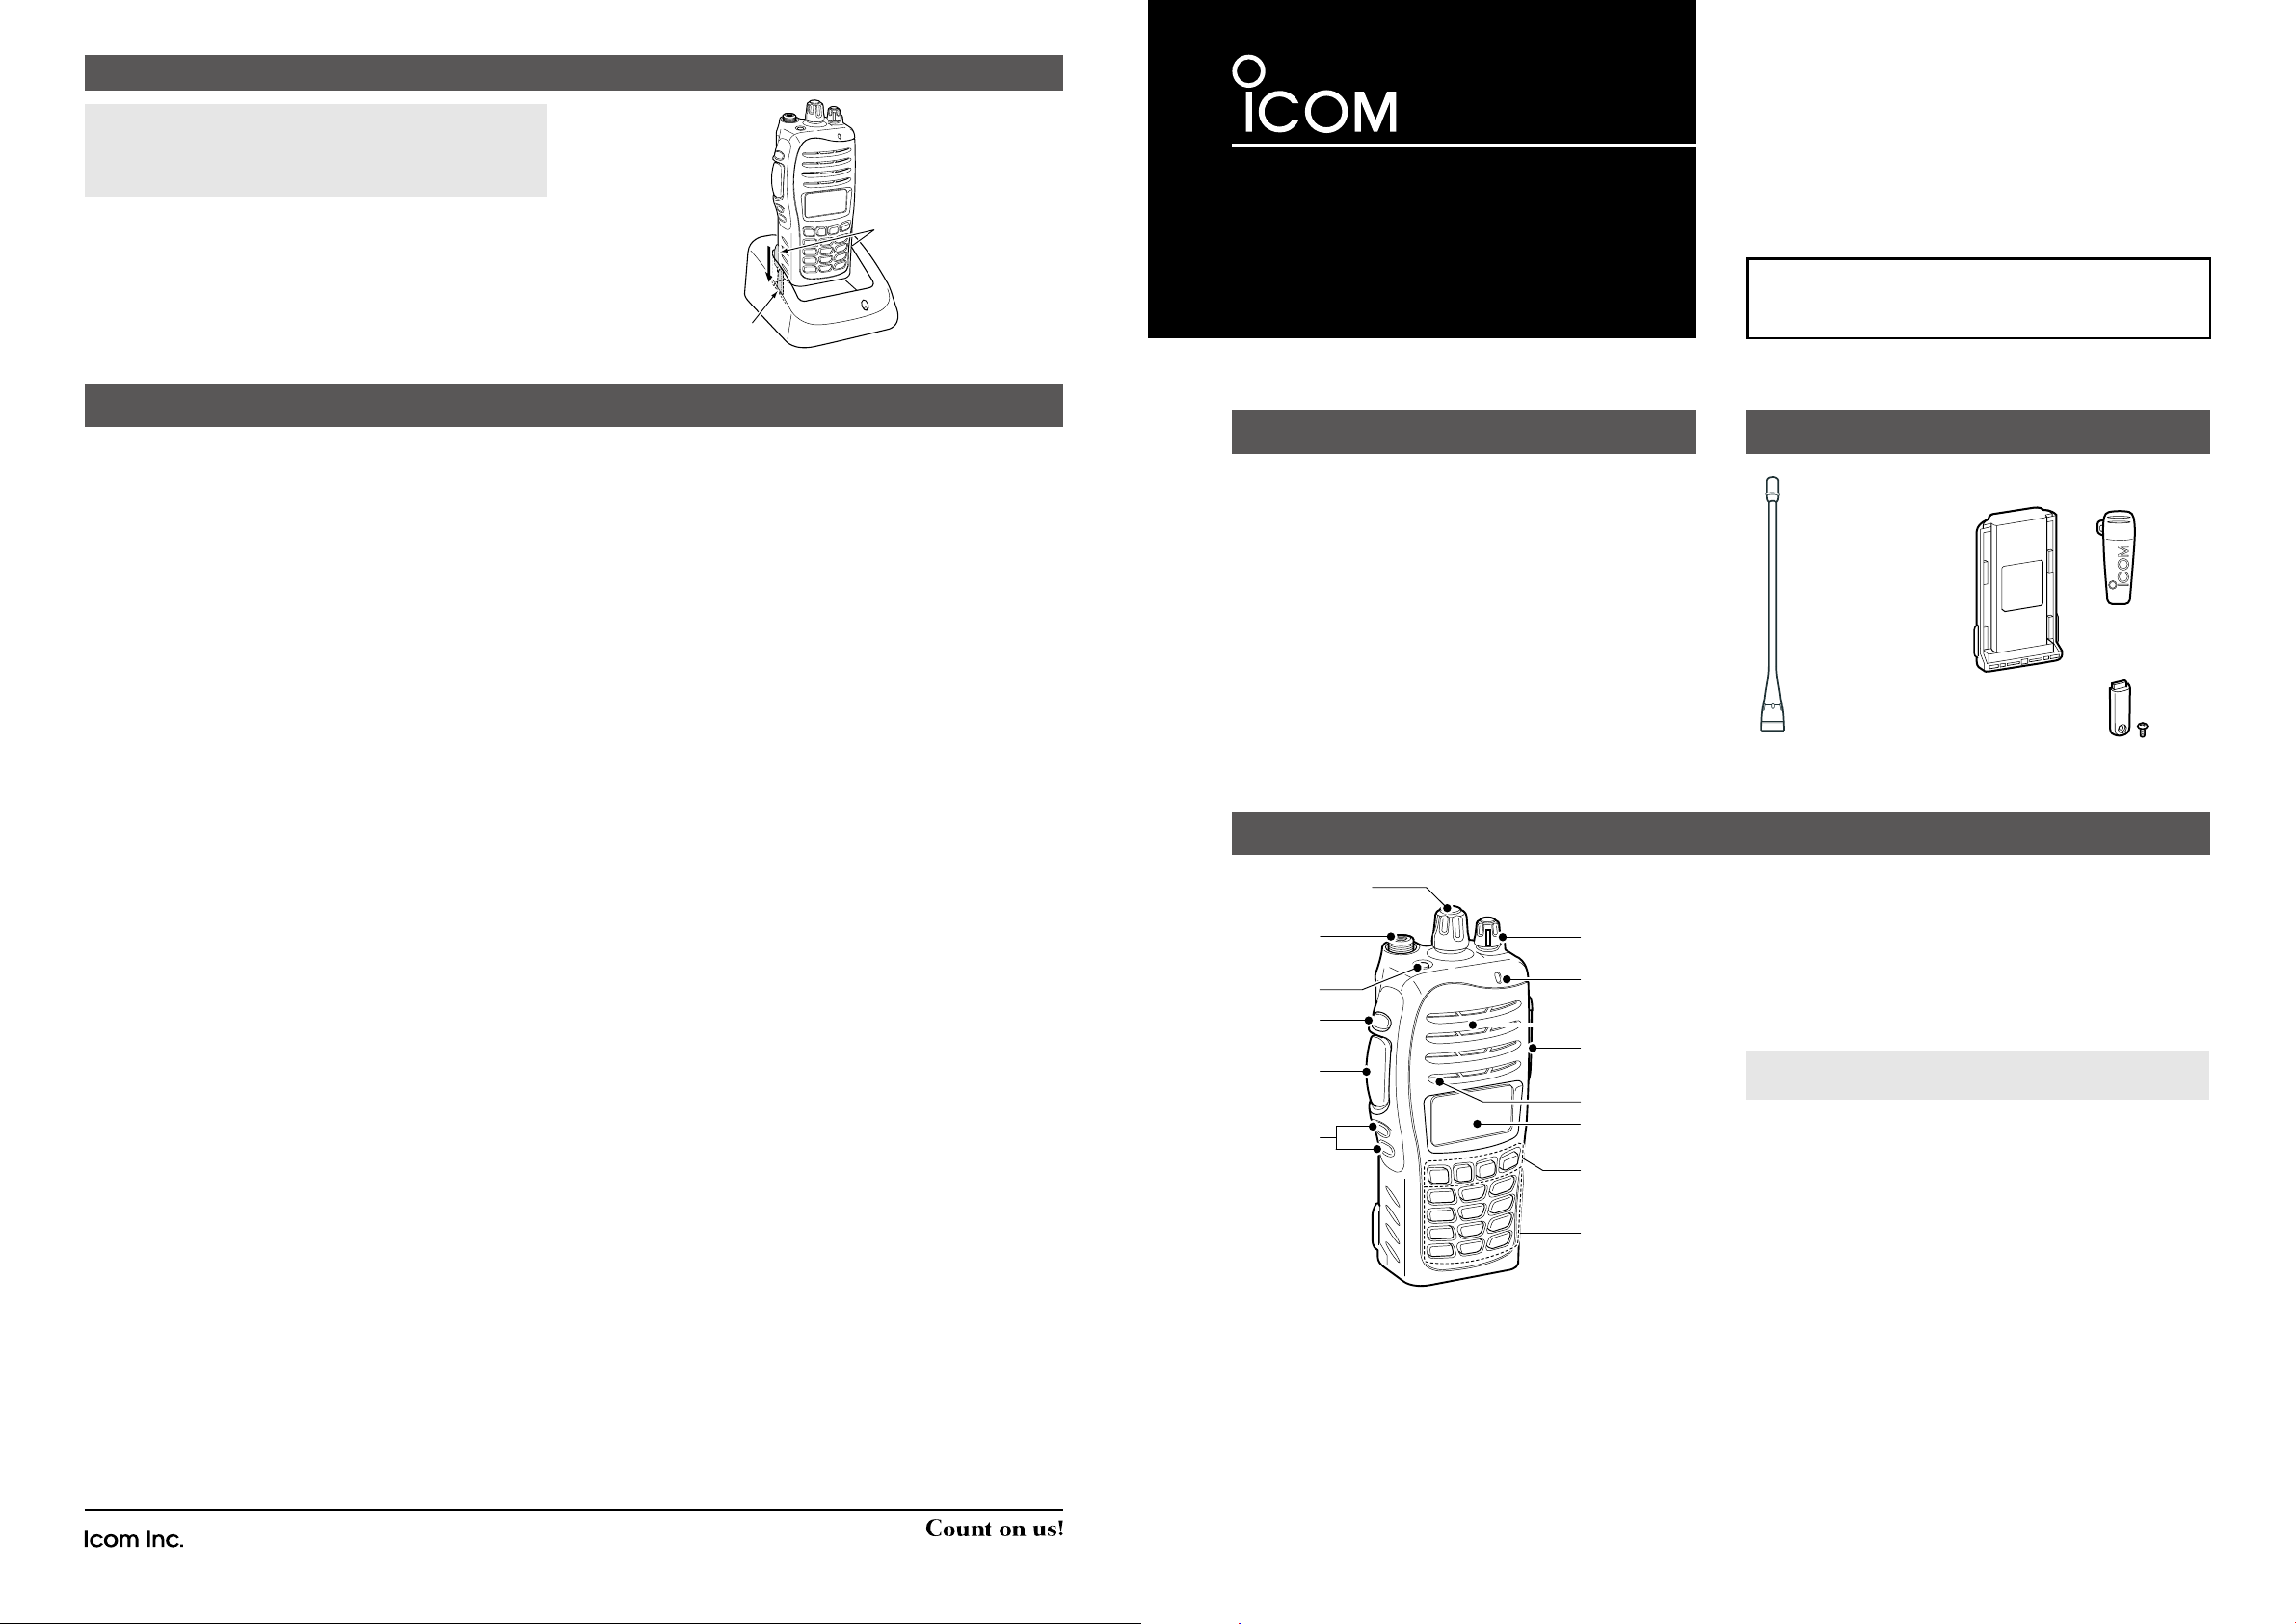
PANEL DESCRIPTION
[Rotary Selector]
Antenna
connector
[Emer]*
[Side1]*
[PTT]
[Side2]*
[Side3]*
The illustration is of the 10-key type transceivers.
* Dealer assignable
[VOL]
LED
indicator
Speaker
Multiconnector
Microphone
Function
display
[P0]*, [P1]*,
[P2]*, [P3]*
10-keypad
Thank you for choosing this Icom product.
READ ALL INSTRUCTIONS carefully and completely
before using this product.
SUPPLIED ACCESSORIES
Flexible antenna
(This illustration is
for the UHF type.)
D About the LED indicator
• Lights red while transmitting
• Lights green while receiving a signal or when the squelch
is open.
• Blinks red when the battery is exhausted.
D About the Multi-connector
CAUTION: Attach the connector cover when an optional
accessory is not used.
Icom, Icom Inc. and Icom logo are registered trademarks of Icom
Incorporated (Japan) in Japan, the United States, the United
Kingdom, Germany, France, Spain, Russia, Australia, New Zealand,
and/or other countries.
dPMR and the dPMR logo are trademarks of the dPMR MoU
Association.
All other products or brands are registered trademarks or
trademarks of their respective holders.
– 1 –
Battery pack Belt clip
Connector cover
(with screw)
Page 2
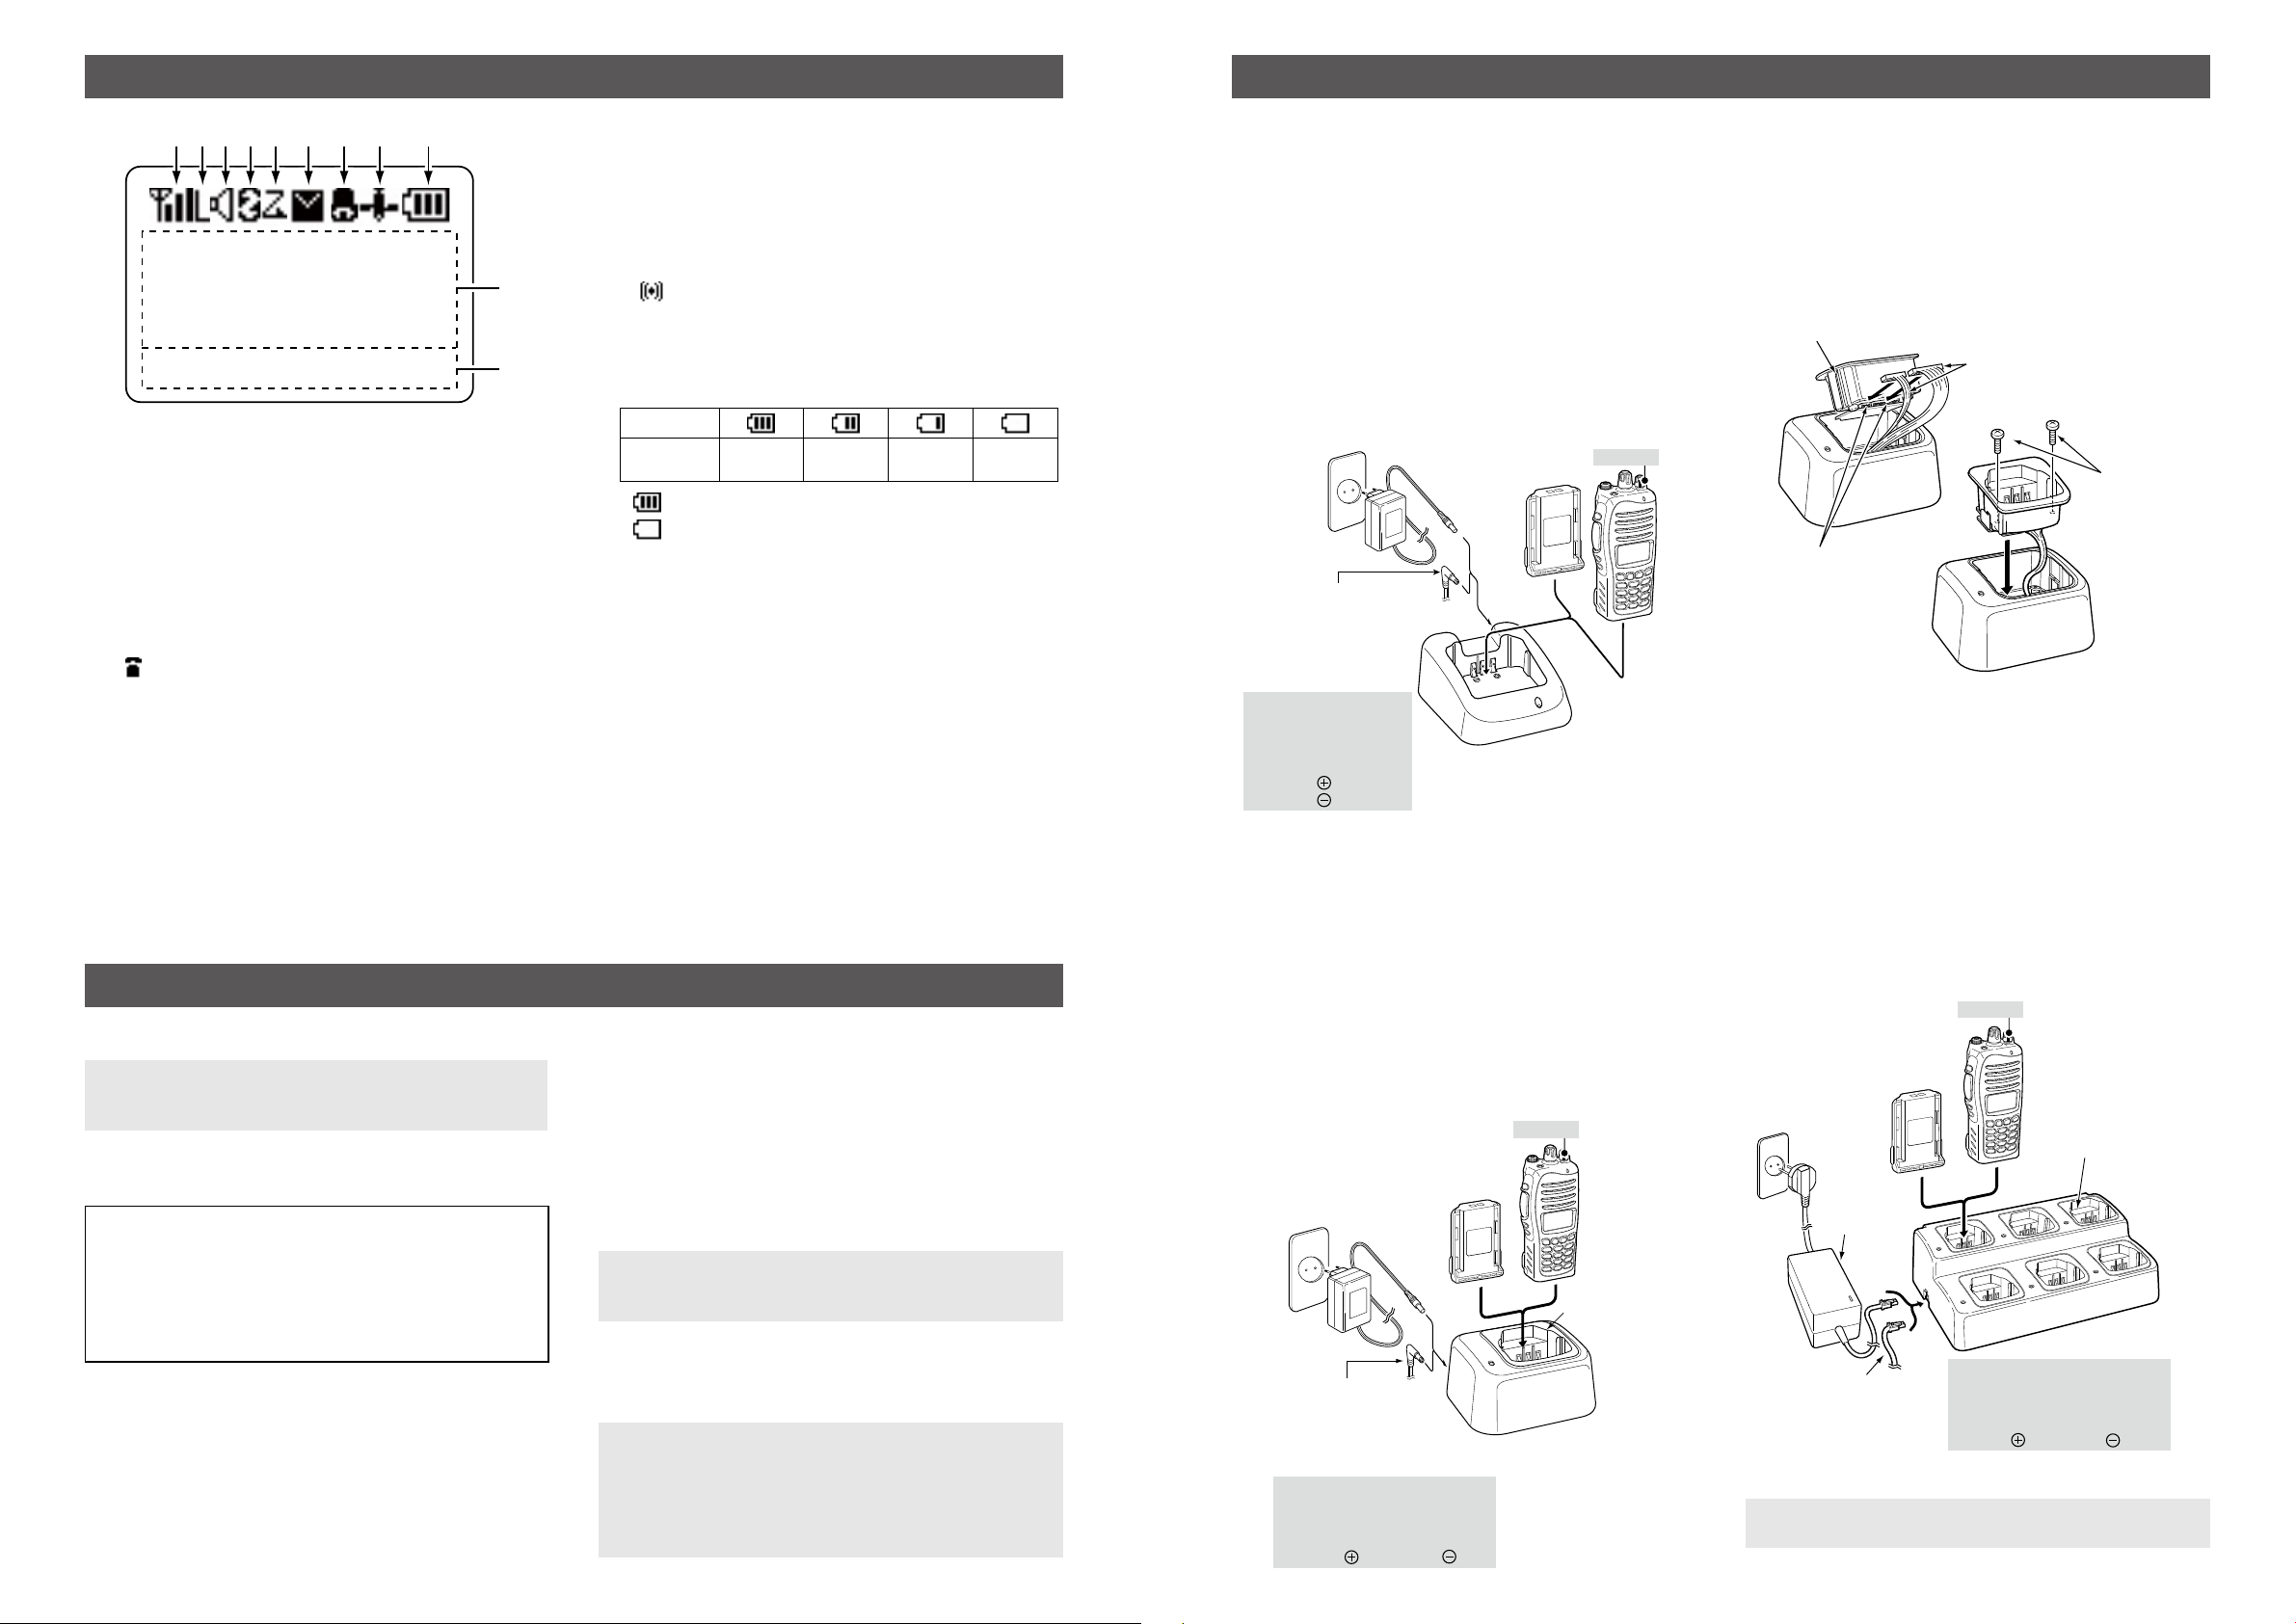
FUNCTION DISPLAY
supplied
charger
AD-106
This illustration sho
the BC-119N.
BATTERY CHARGING
1SIGNAL STRENGTH ICON
Displays the relative receive signal strength.
2LOW POWER ICON
Displayed when low output power is selected.
3SPEAKER/TELEPHONE ICON
4SCRAMBLER ICON
Displayed when the Voice Scrambler function is ON.
5SCAN ICON
Displayed while scanning.
6MESSAGE ICON
NOTE: Before using the transceiver for the rst time, the
battery pack must be fully charged for optimum life and
operation. See the next page.
Rotate [VOL] to turn ON the transceiver.
TIP: Ask your dealer for details of entering the password or
selecting the battery type.
• If the transceiver is programmed for a start up
• The battery type must be selected, according to the
1 2 3 4 5 6 7 8 9
001 ch-01
IC-F3162D
MENUCLR
LWhen the battery charge decreases to a specied level, low
power is automatically selected.
• Displayed when the channel is in the Audible (unmuted)
mode.
• Displayed when a matched signal is received.
• “
” is displayed when connecting to a telephone line.
• Displayed when a received message (Short Data
Message or Status Message) is saved in the stack
memory.
• Blinks when an unread message is in the stack
memory.
BASIC OPERATION
D Turning power ON
password, input the password as directed by your
dealer.
attached battery type, when tuning ON the transceiver.
7BELL ICON
Displayed when a matching signal is received, depending
on the presetting.
8GPS/COMPANDER ICON
• Displayed when the GPS receiver acquires the GPS
signal from a satellite and the GPS Indicator is set to
ON.
• “
” is displayed when the Compander function is
activated and the GPS Indicator is set to OFF.
9BATTERY ICON
Displays the battery level.
LMay not be displayed, depending on the presetting.
Indication
Battery level Full Mid
Charging
required
Exhausted
Battery
• blinks when the battery is over charged.
blinks when the battery is exhausted.
•
ALPHANUMERIC READOUT
• Displays the operating channel number, channel name,
Menu contents, DTMF code, and so on.
• Depending on the presetting, characters are displayed
in 1 line or 2 lines on the display.
LIn this manual, the display illustration is described as having
characters displayed in 2 lines.
KEY ICONS
Display the assigned function of the [P0], [P1], [P2], and
[P3] front panel keys.
D Receiving and Transmitting
Receiving:
1. Select a channel.
z Rotate [Rotary selector].
z Push [CH Up] or [CH Down].
z Push one of [MR-CH 1] ~ [MR-CH 4].
2. When receiving a call, rotate [VOL] to adjust the audio
output level to a comfortable listening level.
Transmitting:
CAUTION: Attach an antenna before transmitting.
Transmitting without an antenna may damage the
transceiver.
1. Wait until the channel is clear to avoid interference.
2. While holding down [PTT], speak at your normal voice
level.
3. Release [PTT] to receive.
IMPORTANT: To maximize the readavility of your signal
To maximize the readability of your signal:
1. After pushing [PTT], pause briey before you start
speaking.
2. Hold the microphone 5 ~ 10 cm from your mouth, then
speak at your normal voice level.
D Charging with the BC-160, BC-171
You can rapidly charge the Li-ion battery pack with the
BC-160, or regularly charge the pack with the BC-171.
Charging time
BC-160: Approximately 3.5 hours for the BP-232H
BC-171: Approximately 4 hours for the BP-230N
Approximately 11.5 hours for the BP-232H
The following items are additionally required:
A power adapter (may be supplied with the charger,
depending on the charger version) or the OPC-515L,
CP-23L DC power cable.
Power adapter
(A different type, or no power adapter is supplied,
depending on the charger’s version.)
Battery pack
Optional OPC-515L* (for a
13.8 V power source) or
CP-23L (for a 12 V
cigarette lighter socket) can
be used instead of the
power adapter.
CAUTION: DO NOT
connect the OPC-515L to
a power source using
reverse polarity. This will
ruin the battery charger.
White line:
Black line:
Transceiver
+ Battery pack
Turn OFF
D Rapid charging with the BC-119N+AD-106
You can rapidly charges the Li-ion battery pack with the
optional BC-119N.
Charging time: Approximately 3.5 hours for the BP-232H
The following items are additionally required.
• AD-106 charger adapter (purchase separately)
• A power adapter (may be supplied with BC-119N,
depending on the charger version) or the OPC-515L,
CP-23L
Power adapter
(A different type, or no
power adapter is
supplied, depending on
the charger’s version.)
dc power cable.
Transceiver
+ Battery pack
Turn OFF
Battery pack
AD-106 charger
adapter is installed
in the BC-119N.
Optional OPC-515L (for a
13.8 V power source) or
CP-23L (for a 12 V cigarette
lighter socket) can be used
instead of the power adapter.
CAUTION: DO NOT connect the
OPC-515L to a power source using
reverse polarity. This will ruin the
battery charger.
White line: Black line:
D AD-106 installation
You must install the AD-106 charger adapter into the
BC-119N
desktop charger or BC-121N multi-charger
before charging any batteries.
1. Connect the AD-106 and the BC-119N or BC-121N.
2. Install the AD-106 into the holder space of the BC-119N
or BC-121N with the supplied screws.
Plugs
Screws
with the
adapter
Sockets
ws
D Rapid charging with the BC-121N+AD-106
You can charge up to 6 battery packs with the optional
BC-121N.
Charging time: Approximately 3.5 hours for the BP-232H
The following items are additionally required.
(purchase separately)
• AD-106 charger adapters
• BC-157S
NOTE: For the instructions on the BC-197 multi-charger,
see the instruction manual supplied with the charger.
– 3 –– 2 –
power adapter or the OPC-656
Transceiver
+ Battery pack
Turn OFF
Battery pack
Power adapter
OPC-656
Connect to a 13.8 V,
7 A (minimum)
power source
CAUTION: DO NOT connect the
OPC-656 to a power source using
reverse polarity. This will ruin the
battery charger.
Red line: Black line:
dc power cable
AD-106 charger
adapters are installed
in each slot.
 Loading...