


120

1 Safety Warnings
Please read this manual carefully before using the iCleaner-120.
Before performing maintenance or service on the iCleaner-120 please
ensure the power is disconnected to avoid personal injury or property loss.
The iCleaner-120 is designed for use in swimming pools only. Any other
use is prohibited and will void manufacturers' warranty.
Do not swim in the pool whilst the iCleaner-120 is in use in order to avoid
personal injury.
Do not allow the Power Box to come in contact with water, and it is
recommended to be placed in a shady, dry and ventilated area.
When in use, the Power Supply and Caddy Cart must remain 3 meters
away from the edge of the pool.
Do not use the iCleaner-120 if there is a chance of thunder storm to avoid
personal injury.
Users are only permitted to perform maintenance described in this manual.
Any tampering with the Motor Box or Power Supply will void the
warranty.
Ensure the iCleaner-120 is fully submerged before turning the power box
on.
If the iCleaner-120 is not going be used for a long time, make sure to
disconnect the power, keep it clean and put it in a safe, dry and
well- ventilated area.
If the iCleaner-120 stops working, please refer to
t local distributor.
The optimum working temperature for the iCleaner-120 is between10℃
and 32℃, avoid direct sunlight when not in use.
The iCleaner-120 is suitable for the swimming pools no deeper than 3
meters.
Lift the iCleaner-120 out of the water using the robot handles, do not lift
the iCleaner using the floating cable. Lifting via the cable voids warranty.
section 6
“ Troubleshooting” . If you cannot find the root cause, please contact
your
- 1 -

2 Product Overview
2.1 Functions
◇ Automatic cleaning: the default mode is automatic, however, this can be overridden using the
Remote Control. When the Remote Control is not being used, the iCleaner-120 will return to
automatic mode.
◇ Overall cleaning: the iCleaner-120 not only cleans the floor of your pool, it also cleans the
wall, at the same time, the iCleaner-120 will filter water, and the dirt will be collected into
Filter Bag.
◇ Timing cleaning: you can select one of three cleaning time with Remote Control (0.5h, 1h or
2 h). The iCleaner-120 will shut down automatically when the selected cycle time is over.
The power box must be turned of manually.
◇ Manual cleaning: the Remote Control can be used to clean specific areas immediately.
◇ Self protection (out of water): Impeller decelerates to a stop in twenty five seconds if the
iCleaner-120 senses it is no longer in water, to prevent personal injury and to protect the
water pump.
◇ Stop protection: the iCleaner-120 will stop if foreign matter retards the Impeller.
2.2 Product Parameters
iCleaner-120/SPC-1
100-240VAC, 50-60Hz
200W
0.5Hr/1Hr/2Hrs
15m
3
18m /h
15m/min
Host: IP68
Model
Input Voltage
Rated Power
Cycle Time
Floating Cable Standard Length
Filter Bag
Water Pump Capacity
Moving speed
Optimum Storage Temperature
Optimum Working Temperature
Dimension(L*W*H)
Grade of Waterproof
- 2 -
Standard: 70um
10~32℃
0~40℃
450*490*260mm
Gross Weight
574*574*413mm
Packing Measurement(L*W*H)
19.2kg

2.3 Parts List
Main Body Parts
(Pic.2.3.2)
- 3 -
Filter Net
water ret ainin g bo ar d
Base Pla te
Suppor t Fr ame
Filter Bag
Base Pla te L atch
Drive Be lt
Guide Vane
Hook
Floati ng C able
※ Power Box Parts
- 4 -

2
1
1
9
10
11
Impeller
Filter Bag
(Pic.3.2.1)
- 5 -
1
1
1
1
1
1
1
1
1
2
3
4
5
6
7
8
3 Packing List
Part Name
Unit Body
Power Box
Remote Control
Battery
Guide Vane
User Manual
Warranty Card
Certificate of Quality
Serial
Number
Remarks
Host
Quantity
1 0
1 1
Spare Parts
Synchronous Belt

4 Product Operation
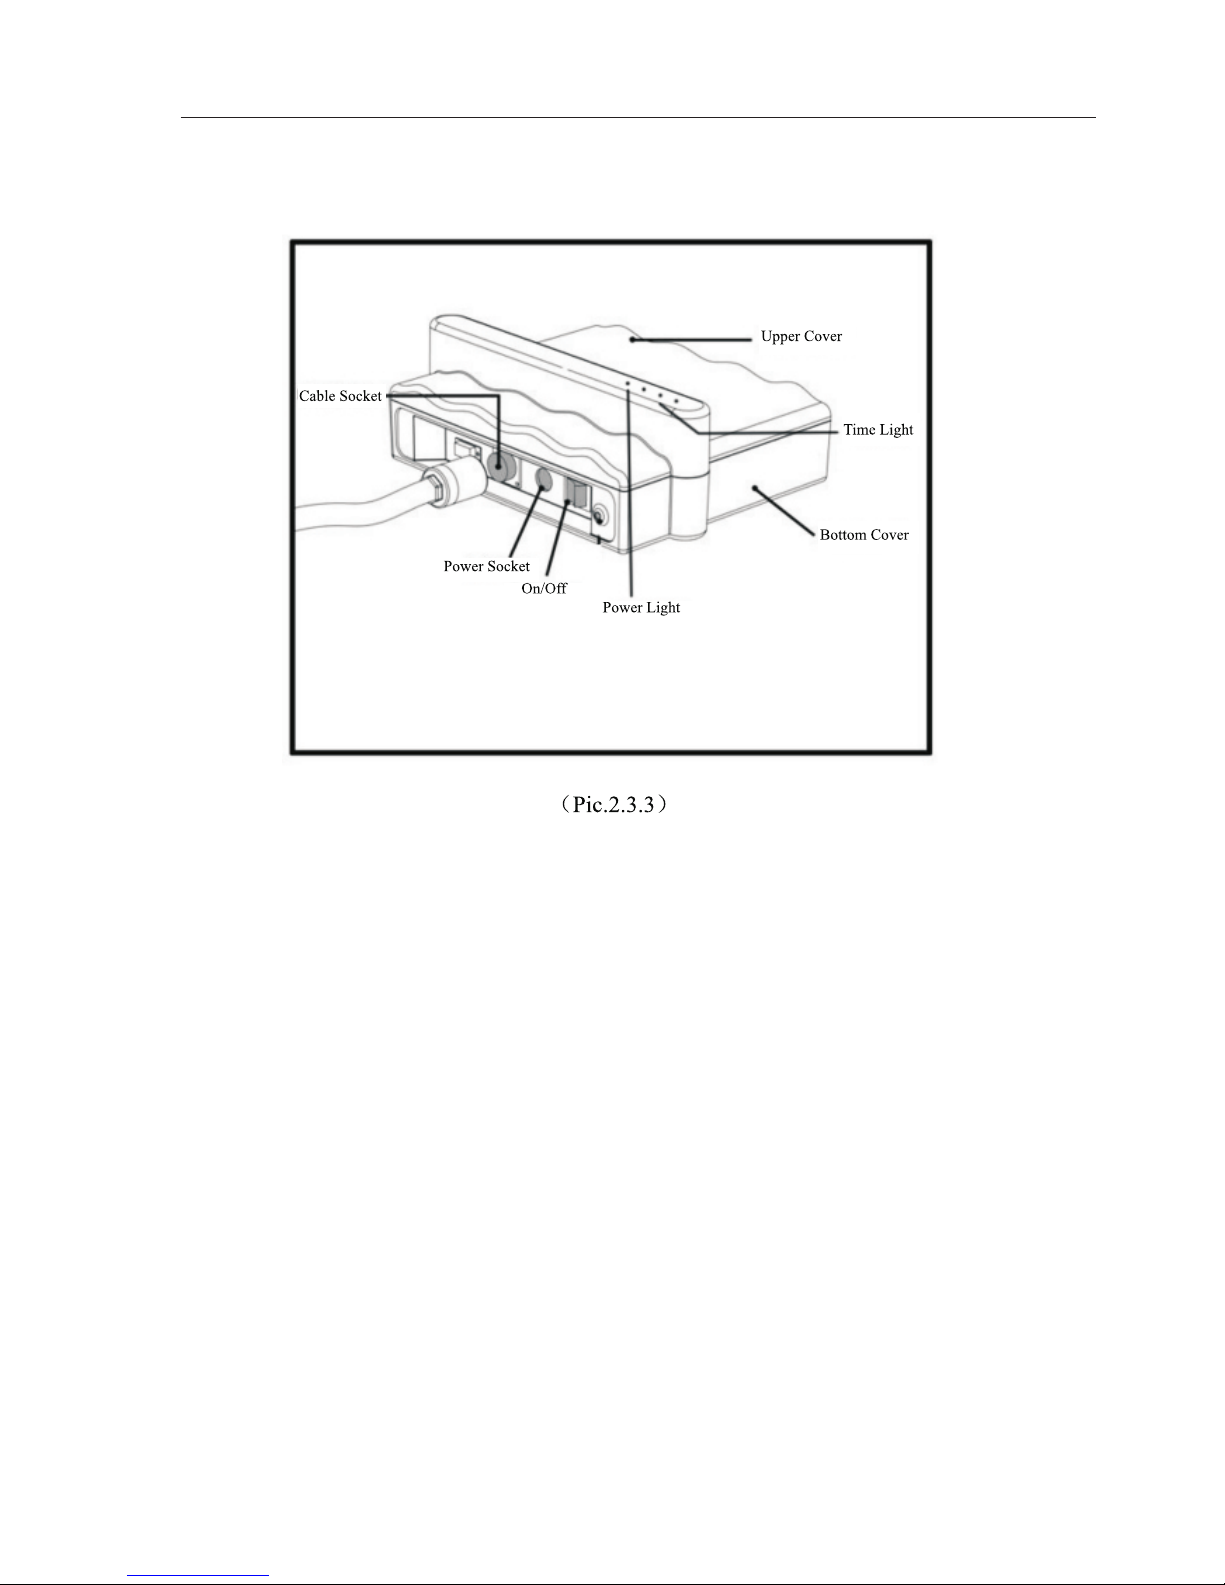
4.1 Power Connection
※ Please connect the Floating Cable to the Cable Socket of Power Box (see Pic.
4.1.1), then connect the Power Box to an outside AC power of 100v/240v
50/60Hz (see Pic.4.1.2). For the complete connection guide please refer
Pic.4.1.3
Notices: Do not allow the Power Box to come in contact with water.
Please ensure the Power Box is Kept in a shady, dry & ventilated area.(Refer Page 1.Safety Warning)
(Pic.4.1.1) (Pic.4.1.2)
- 6 -
Unit B ody

4.2 Start Up Procedure
(1) When placing the iCleaner-120
in the pool: you must wobble
the iCleaner-120 according
Pic.4.2.1 to make sure the air
inside is released when you put
the iCleaner-120 in the water,
So it will automatically sink to
the bottom of pool.
(2) Start: Press the “ON” button,
LED “POWER” indicator.
And “0.5H” cycle time LED
will illuminate(see pic.4.2.2)
You may select 0.5Hr, 1Hr or
2Hrs cleaning time using the
“ ” button on the
Remote Control and relative
L E D i n d i c a t o r s w i l l
illuminate on the Power Box
when selected.
(Pic.4.2.1)
(Pic.4.2.2)
- 7 -

4.3 Proper Shut Down and Care
(1) To Shut Down The iCleaner-120:
Turn the power switch on the power
Box to the off position, once the
iCleaner-120 finishes working, pull the
Floating Cable slowly until the Handle
emerges from the water (Pic.4.3.1), and
then pull the iCleaner-120 out of the
pool by its Handle.
(2) Clean iCleaner-120: Invert the iCleaner-120 gently onto the floor, unlock the
Latch on the Base Plate (Pic4.3.2) and remove the Filter Bag from Base Plate,
clean the Filter Bag (Pic.4.3.3), once clean place the Filter Bag on its frame,
reassemble the Base Plate and put it back into the iCleaner-120 once the Filter
Bag is dry.
(Note: When re-fitting the Filter Bag to the Base Plate, please ensure the long
sides of the Filter Bag are smooth to ensure an easy fit into the base of the
iCleaner-120.)
6
4
OPE N
OPE N
Bott om Bu tt on

(3) iCleaner-120 Storage: When the iCleaner-120 is dry,disconnect the floating
cable reel it in hand-over-hand and place on the iCleaner-120, then store the
iCleaner-120 in a dry,well-ventilated area. If you have the Caddy , please put the
iCleaner-120 & Floating Cable on to the Caddy Cart, details please refer
Pic.4.3.4
- 9 -
(Pic.4.4.1)
Floor On ly C leaning
The Remote Control (Pic.4.4.1) includes:
On/Off Power Button
LED Light Indicator
Direction Button
Timer Button
Floor Only Cleaning
On/Off Power Button:
Turn on or Turn off iCleaner-120
Direction Button:
Control iCleaner-120's movement Backward , Left Rotation and Right
Rotation
Timer Button :
Select the timing mode from 0.5hour, 1 hour and 2hours
Floor Only Cleaning :
To clean the “Floor Only ” press . To return to floor and wall cleaning, turn the
iCleaner-120 off, then on using the remote contorl .
- 10 -
5 Maintenance
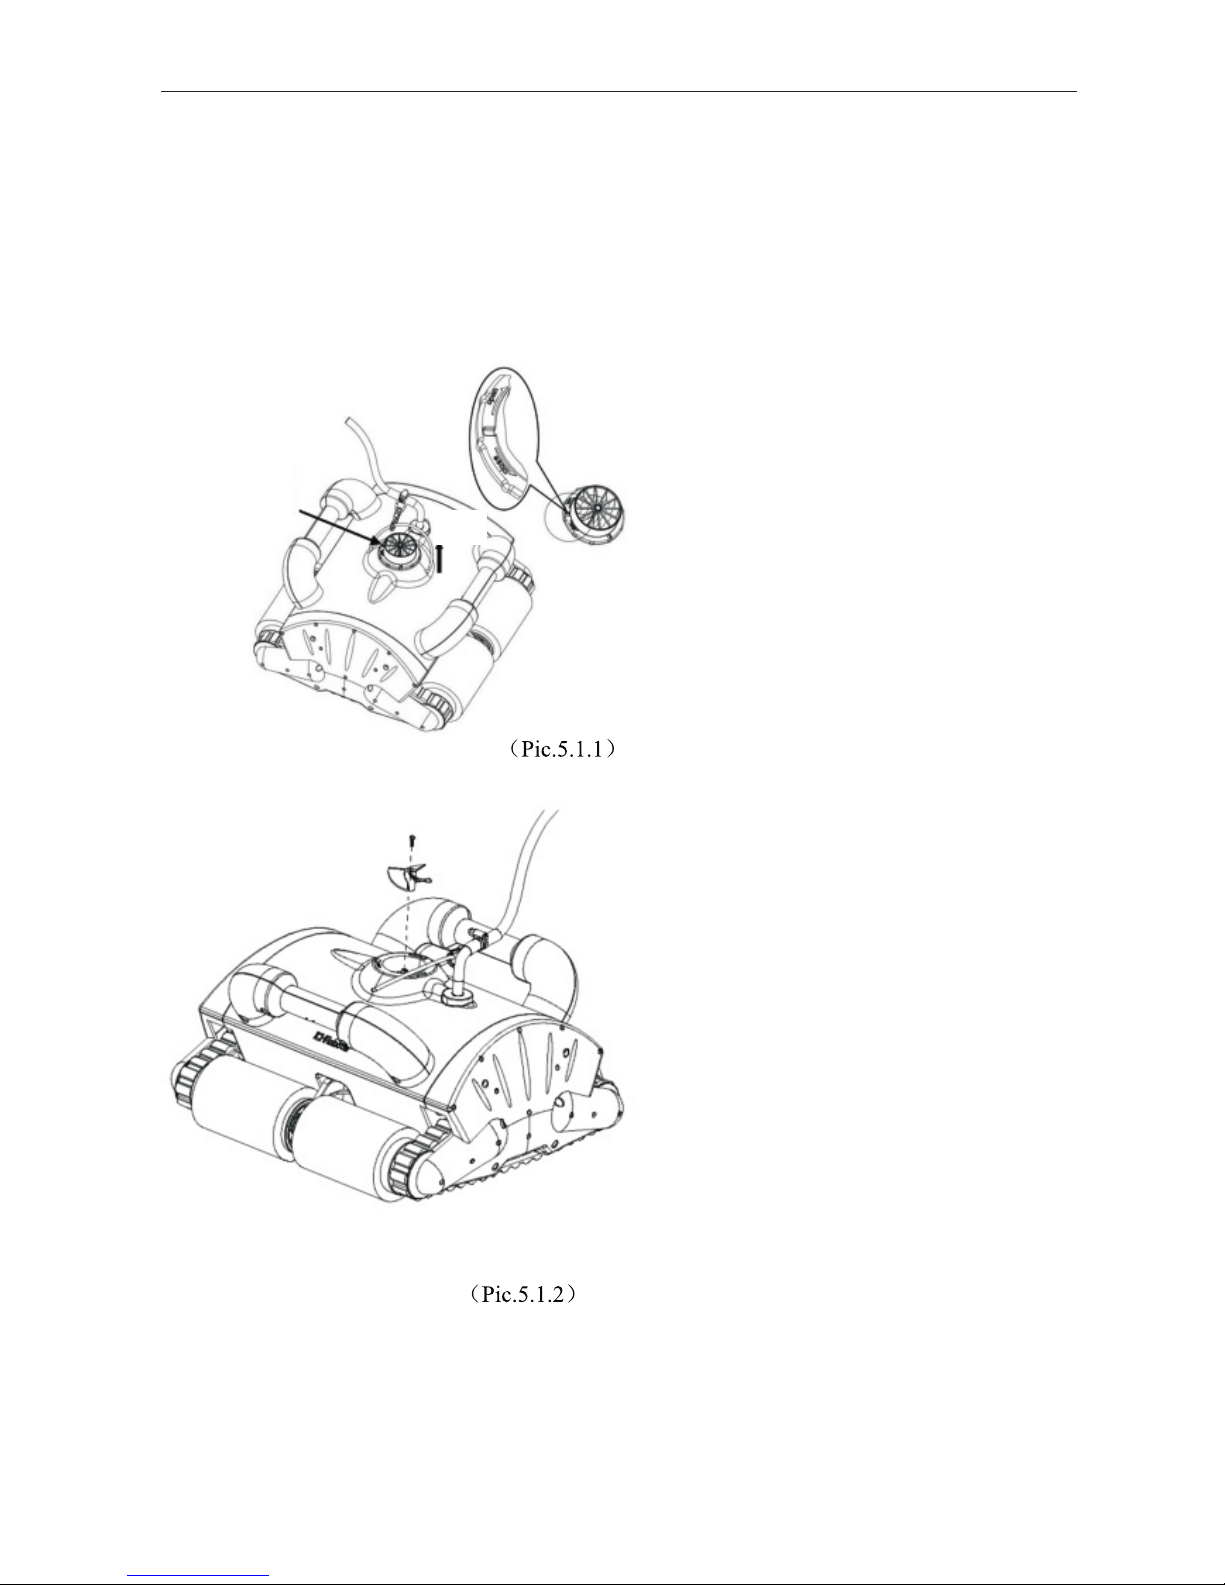
5.1 Impeller
※ Change the Impeller if the old one gets worn or damage
Step 1:
※ Rotate Guide Vane
clockwise to remove from
the iCleaner-120.(Pic.5.1.1)
Step 2
※Use a Phillips head screw
driver to remove the bolt in
the Impeller according the
diagram.(Pic.5.1.2)
Step 3
※Replace the new Impeller
and assemble Impeller and
Guide Vane
Guide Vane

- 11 -
OPE N
OPE N
Bott om Bu tt on
5.2 Sponge Wheel and Synchronous Belt
Replace the Sponge Wheels and Synchronous Belt if they are badly worn or broken
Step 1
※Invert the iCleaner-120 on
the floor, remove the Base
Plate.(Push latch to unlock
the Base Plate).(Pic.5.2.1)
Step 2
※ Remove the Filter Net
from the iCleaner-120 while
pressing the Latch according
to the diagram.(Pic.5.2.2)
(Pic.5.2.2)

- 12 -
Step 3
※ Using a Phillips head screwdriver
and 7mm ring spannerundo the six
bolts and nuts on the Side Cover,to
remove the Side Cover .( Pic.5.2.3)
(Pic.5.2.3)
Step 4
※ Remove the Sponge
Wh eel S h aft S l eev e,
Drive Wheel Shaft Sleeve
and take off the Drive
Belt. (Pic.5.2.4)
(Pic.5.2.4)
8 Drive Wheel Shaft Sleeve
7 Sponge Wheel Shaft Sleeve
9 Drive Belt

(Pic.5.2.5)
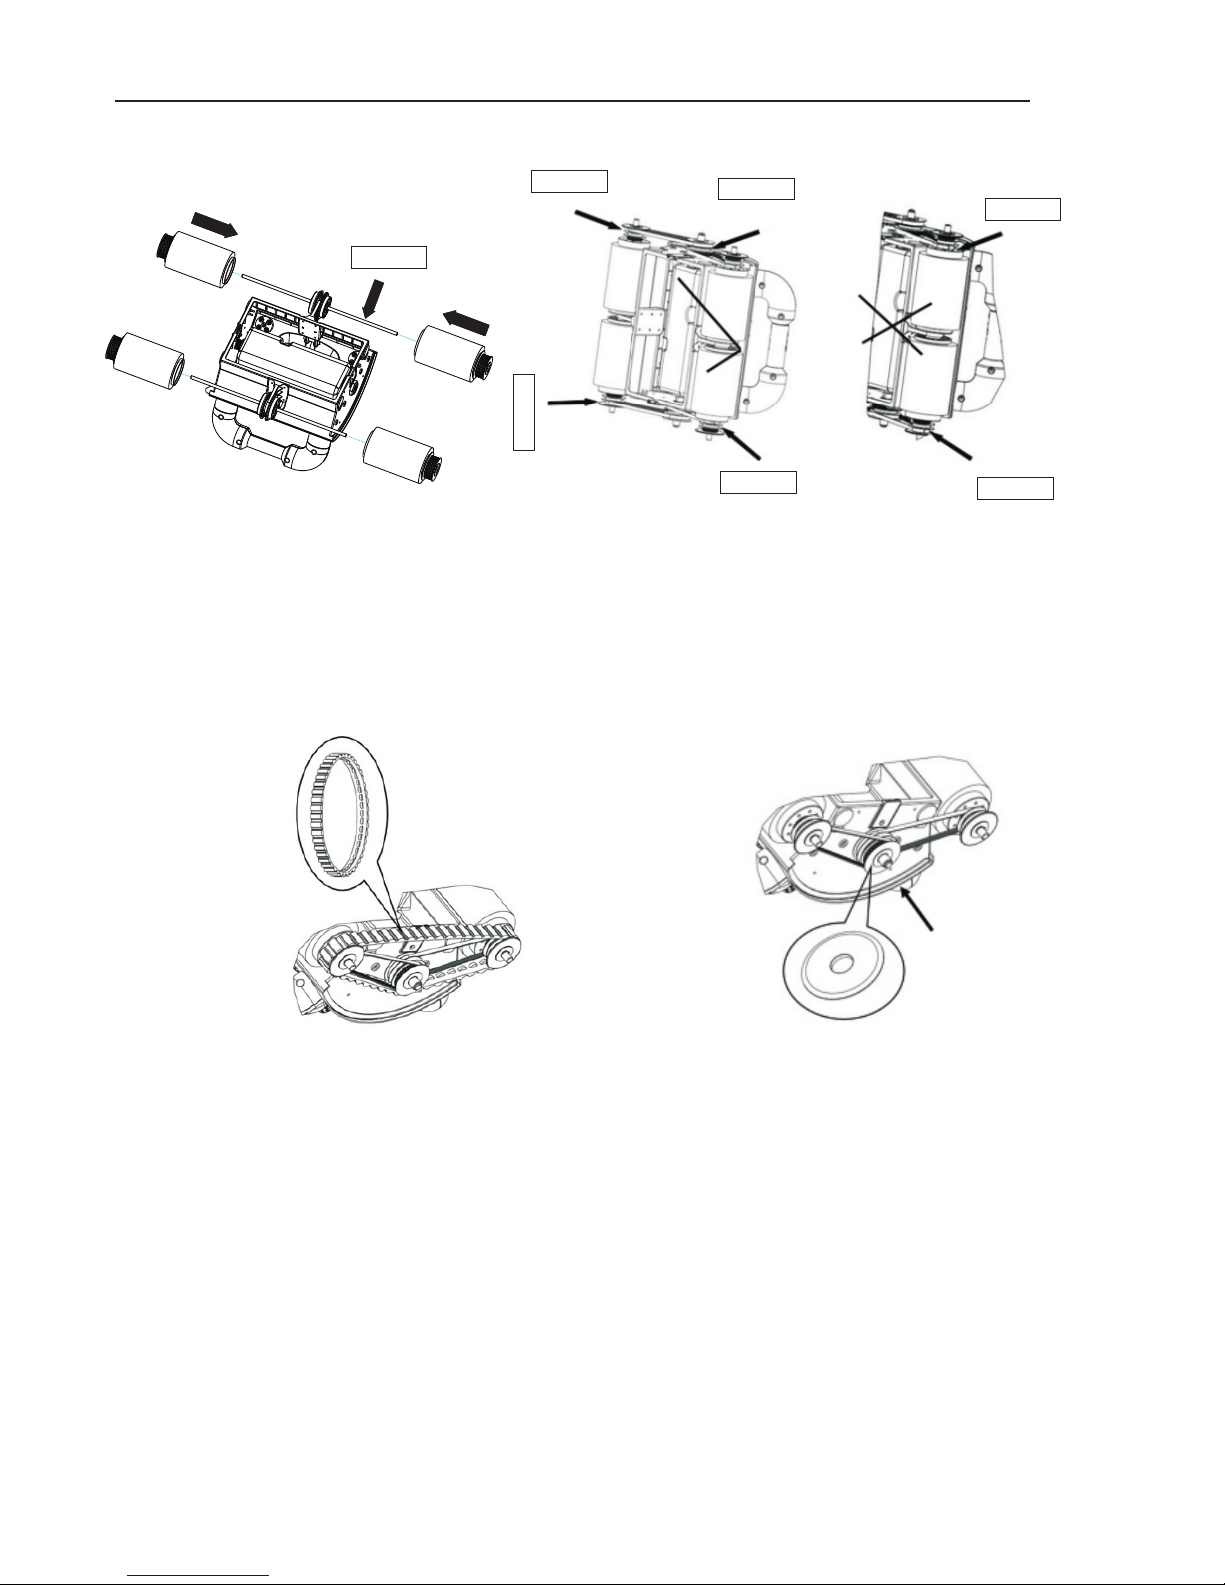
Step 5
※Remove the Drive Wheel and Drive Wheel Baffle Plate,
remove the Synchronous Belt (Pic.5.2.5).
Step 6
Slide the old sponge wheels
off, and replace with new sponge wheels(Pic.5.2.6).
※ Remove the Rolling Brush;
1 Drive Wheel Baffle Plate
2 Drive Wheel
3 Synchronous Belt
- 13 -
(Pic.5.2.6)
Step 7
※Assemble the Rolling Brush to the axle and put the new Synchronous Belt to
the Drive Wheel & Roller Wheel (Pic.5.2.7) to aeeemble the Synchronous Belt.
-14-
wheel ax le
(Pic.5.2.7)
(Pic.5.2.8)
Step 8
※Assemble the Drive Belt on the
Roller Wheel (Pic.5.2.8)
Step 9
※Assemble Drive Wheel Baffle
Plate to the Drive Wheel (Pic.5.2.9)
(Pic.5.2.9)
Inside
Inside
Outsid e
Outsid e
Inside
Outsid e

- 15 -
(Pic.5.2.11)
Step 12
※ Put the Filter Net into the iCleaner-120,
press down on the filter net until the Latch
locks into the bracket.the filter until the Latch
locks into the bracket (Pic.5.2.12)
(Pic.5.2.12)
Step 13
※ Place the base Plate into iCleaner-120,
pressing down until the latches lock into
place. (Pic.5.2.13)
※ Replacing the Sponge Wheels and
Synchronous Belt is now completed.
(Pic.5.2.13)
Step 10
※Put the Drive Wheel Sleeve and
Roller Wheel Sleeve to Side
Covers. (Pic.2.2.10)
Step 11
※ Put the Side Covers to Host
and fasten it with bolts & nuts.
(Pic.5.2.11)
7 Roller Wh eel Sle ev e
8 Drive Whee l Sl ee ve
(Pic.5.2.10)

When the Filter Bag is dirty as
shown in pic. 5.4.1 or if the Filter
Bag has been damaged, please
refer to chapter 4.3.2 to replace
Filter Bag.
5.4 Filter Bag
Pic.5.4.1 Filter Bag is full
- 16 -
5.3 Water Retaining Board
hole
Step 1
※ Remove the base plate from the
iCleaner and remove the filter bag, then
open the water retaining board to the
vertical position and carefully slide the
water retainining board to one end,
remove the water retainining board
carefully.
Step 2
※ Insert one end of the water retaining
board into the locating holes on the base
plate, then insert the other end of the water
retaining board into the base plate, and
make sure the water retaining board does
not have a bend in it(if it does, gently push
the hinged edge,until it clicks into
position).
Note: The water retaining board is fitted
correctly, please refer to pic.5.3.2
Pic.5.3.1 Replace the water retaining board
Replace the Water Retaining Board
if they are broken(Pic 5.3.1)
Pic.5.3.2

6 Troubleshooting and Warning Lights
Commonfault
Reason
Solution
Remarks
iCleaner-120
doesn't work
Weak pumping
iCleaner-120 is
turning to one side
when it moves
iCleaner-120
will not climbs
wall
iCleaner-120
will not sink to the
bottom of the pool
Dirt is coming
through the
guide vane.
The socket is
not plugged in
Connection is wrong
Impeller is
jammed or dirty
Impeller is damage
Filter Bag is full
Synchronous Belt is loosen
or broken at one side
The Filter Bag is full
Filter Bag is full
Synchronous
loosen or broken
Belt is
Sponge wheel wear
axis sleeves wear
The sponge wheel
don't soak enough
It has air inside
the machine
Belt of Filter Bag is
loosen or broken.
Dirt is too fine for
the filter bag
Plug in the power lead
Check the connection
clean the Impeller
Replace the Impeller
clean the Filter Bag
replace the BeltSynchronous
Clean Filter Bag
clean the Filter Bag
replace the BeltSynchronous
Replace the
Sponge wheel
replace axis sleeves
Wobble iCleaner-120 and
make sure air released
Replace broken filter bag
Please turn
off the power
before you
perform any
maintance
on the
iCleaner-120
- 17 -
you must hold cleaner
in water and make sure
sponge wheel soak enough,
normal time is
about 5 -15 minutes
Note: The Power Box MUST BE DISCONNECTED from the power supply prior to
conducting any maintenance on the iCleaner-120. Contact your local distributor, or place of
purchase for problems not covered in Trouble Shooting Guide.

- 18 -
Indicator
light
Solution
Failure
Green light
flashing
Water
protection
1.Check whether the impeller is damaged;
2.Check whether the water pump motor is working;
3.Put the robot in the water.
Yellow light
flashing
Water pump
motor
overheating
1.Check whether water pump motor and impeller
about exceptions
2.After waiting for temperature cooling to electring
Blue light
flashing
The roboter
turned over
1.Adjust the machine to the level state.
Blue and green
lights flashing
at the sametime
Walking motor
overload
1.Check whether travel mechanism about exceptions.
Blue 、 green
and yellow
lights flashing
at the sametime
Water pump
motor
overload
1.Check whether water pump motor and impeller
about exceptions.
Indicator
light
Solution
Failure
Green light
flashing
The iCleaner
has stopped
due to lack
of water
Return the robot to deeper water and restart
Yellow light
flashing
The Motor Pump
inside the robot
has over heated
Contact the supplier for support
Blue light
flashing
The robot is
upside down
Turn the iCleaner over, and restart using
the remote control or power swich
Blue and green
lights flashing
The walking
(drive wheel)
motors are
over loaded
1.Check the walking motors, Drive tracks and
tacking belts for debris or damge.
2. Clear bebris or replace parts parts and restart
the iCleaner.
Blue 、 green
and yellow
lights flashing
The water pump
is over loaded
1.Turn the robot off, check the impeller for debris,
or damage.
2.Clear or replace impeller, then restart the iCleaner.
 Loading...