

IceCream Mini Indoor Airplane Instruction Manual

ICECREAM Mini Indoor Airplane
散件编号 KIT Number
A1
A1
C
拼装步骤 How to Assemble
Step 1
A1
配件图仅做参考用,您收到的实物可能因为修改/优化的原因导致与图片有略有不同。
Photos shown here just for reference, the product you received maybe slightly
differ from the photos due to continuous improvement on products.
A2
A2
A3
B
E
D
F
G
I
J
H
A1:机翼 Wing
A2-A3:尾翼 Tail
B:背胶加强片
Adhesive Reinforcement Sheet
C:机身 Fuselage
D:桨叶 Propeller
E:魔术贴 Magic Sticker
F:起落架 Landing Gear
G:螺丝 Screw
H:螺丝刀 Screwdriver
I:充电器 Charger
J:电池(选配)
Battery (Optional)
Step 3
A2
然后用G 1X3螺丝锁定尾翼,螺丝拧入时锁定即可,请勿
过度拧入挤压,导致板材变形。
Lock the tail with the G 1X3 screws,It can be easily
locked when screwed in,Do not over-tighten the
screw, resulting in deformation of the plate.
Step 5
E23
Step 7
穿过
卡入
F
安装起落架,先一端穿过马达线,然后卡入底座卡槽。
如上图。
Install the landing gear with the one end through
the motor cable and then snap into the base slot as
shown above.
Step 8
安装机翼到机身,先
固定一端,槽口对准
翼台卡槽卡入。
Install the wing
onto the fuselage,
firstly fix one end,
then the notch is
aligned with the
wing card slot.
从B上撕下上图加强片,对齐机翼槽口粘贴加强片。
Remove the above reinforcement sheet from the
B,and align the wing slot with the reinforcement
sheet.
Step 2
机翼上下均粘贴加强片。
Paste the reinforcement sheet onto the upper and
lower wing.
从A2上取下水平尾翼,对齐空位粘贴加强片,加强片从B
上取下。
Remove the horizontal tail from the A2, align the
vacant space with the reinforcement sheet, and
remove the reinforcement sheet from the B.
Step 4
把尾翼穿入C机身尾部滑橇,注意加强片朝向。
Insert the tail into the tail of the C fuselage, pay
attention to the orientation of the reinforcement.
把机身翻转到另一面,用G 1x3螺丝固定升降舵与舵机摇
臂(此处升降舵粘贴的加强片在背面),请勿过度拧入螺
丝,导致板材变形。
Turn the fuselage to the other side, and fix the
elevator and servo arm by the G 1x3 screw(here the
reinforcement sheet for elevator is on the back). Do
not over-tighten the screw, resulting in deformation
of the plate.
Step 6
D
在机身头部插入桨叶。
Install the propeller at the head of the fuselage.
然后轻捏机翼中段,
使翼面向上凸起,另
一端槽口对准翼台卡
入。
Then gently pinch
the middle of the
wing so that the
wing is convex
upwards,and the
other end is
aligned with the
wing.
Step 9
裁剪合适的魔术胶贴,一面粘在底座,一面粘在电池上。
Cut the appropriate magic sticker, one side sticks to
the base and the other side sticks to the battery.
ICECREAM Mini Indoor Airplane
Step 10 Step 11
≈35mm
C.G
电池粘到底板,电池插头插入接收机,即可进行对频调试。
Paste the battery to the bottom plate,and get power
from the receiver for on-frequency debugging.
对频及调试 Frequency and Debugging
对频方法介绍 Frequency Instroduction
此处对频以DEVO7E 为例
步骤1:接收机通电后指示灯闪烁(确保电池满电)
步骤2:把遥控器协议调到DSM2,然后遥控器点按“bind”,接收机指示灯变为常亮,证明对码成功
步骤3:把接收机断电重新通电-接收机指示灯常亮-完成对码(如未成功,重复以上操作)
Take the Transmitter DEVO 7E as an example here
Step 1: The indicator light flashes when the receiver is powered (make sure the battery is fully charged)
Step 2: Transfer the transmitter protocol to DSM2, then click “bind” on the transmitter, the indicator light of the receiver will
turn on constantly,it proves the frequency code is successful.
Step 3: Power off the receiver and recharge-receiver indicator light is always on - complete the code (if not successful, repeat
the above operation)
充电方式 How to Charge
配置参数
翼展 : 226mm
电池 : 1S 3.7V 28mAh (可选 22-50mAh)
可飞行时间 : 6-10min
充电 : 50mA via. USB
配备四通道电磁舵机接收机,DSM2协议(不支持
内置2A有刷电调
起飞重量 : ≈6.2g(with 28mAh LiPo)
≈6.8g(with 50mAh LiPo)
DX6e/8e遥控器),
Specification
Wingspan : 226mm
Power Input : 1S 3.7V 28mAh (can use 22-50mAh)
Playing Time : 6-10min
Charging Current : 50mA via. USB
Equip with 4CH electromagnetic servo receiver, DSM2protocol(
Supported
Foam Weight : ≈6.2g(with 28mAh LiPo)
≈6.8g(with 50mAh LiPo)
), build in 2A ESC
DX6e DX8e 遥控器暂不支持
!
DX6e DX8e NOT Supported
DX6e/8e NOT
电池插入充电器接口,充电器USB插入可提供5V电压
的USB插口即可充电。充电状态时充电器红亮灯,冲
电完成亮绿灯。
Plug the battery into the charger,and connect
the charger with a 5V voltage USB port for
charging. The light is red when charging, and the
light turns to green when the charger is
completed.
注意:此款飞机提供白绿
!
两套机翼,可根据您的喜
好选择颜色。
飞机已预装垂直尾翼,如
需更换,请使用UHU等无
腐蚀性胶水粘贴。
Note: This aircraft wing
is available in white and
green for choice, pls
choose as per your
preference.
The vertail taill has
pre-installed. If it needs
to be replaced, please
use non-corrosive glue
such as UHU to paste.
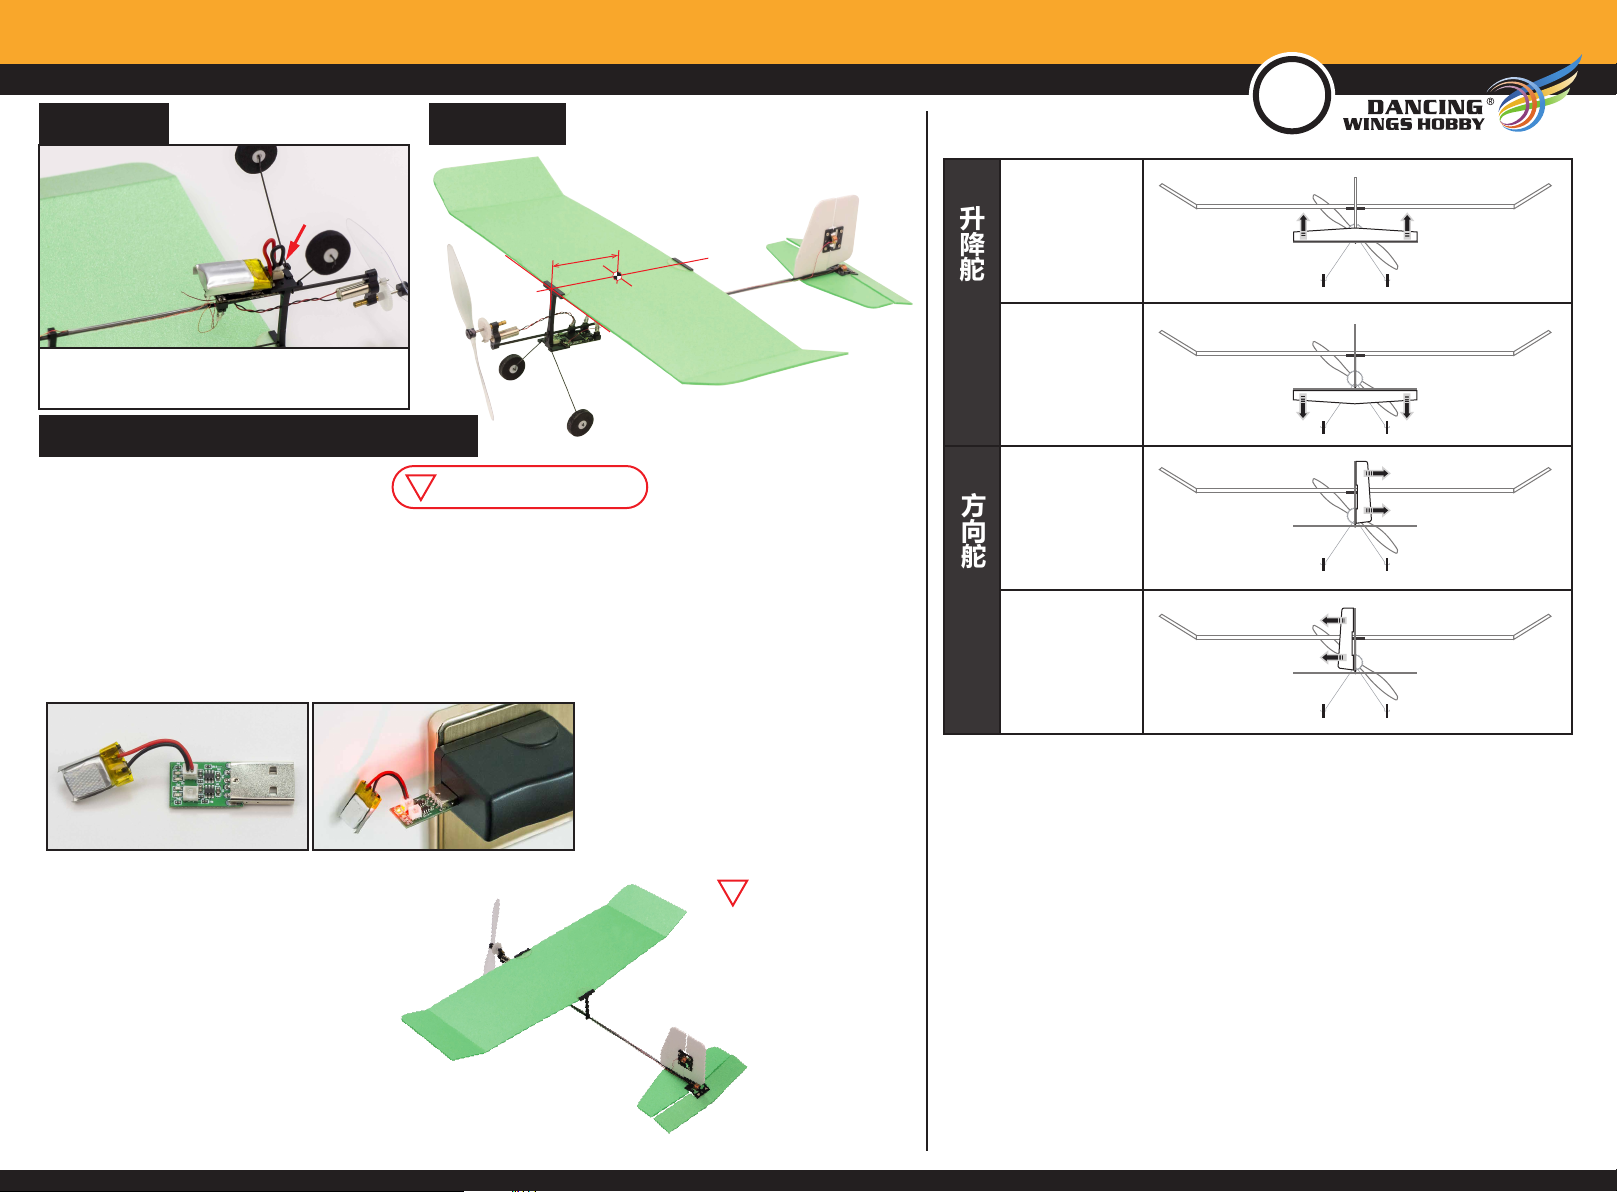
E23
地面控制方向测试
Control Directions Tests
升降舵
升降杆下拉
Lifting rod down
升降杆上推
Lifting rod up
Elevator
方向舵
方向杆向右
Direction rod
to the right
方向杆向左
Direction rod
Rudder
to the left
飞行前的建议 PRE-FLIGHT CHECKS
● 安装舵机前,请先将舵机通电让舵机中心点回中,以便能更好的调试舵面。
● Check/adjust servo centering, in order to adjust the control surface better.
● 初次启动电机,您需要确认电机旋转的方向以适配您的机型。
● Double-check the spinning direction of motor at first usage, and sure it’s suitable for your model.
● 请将重心(CG)调整至说明书所述位置并尽量靠近。如果有需要,您可以增加机头或者机尾的重量,以确保机体有更
好的飞行姿态。
● Set the center of gravity (CG) at the position that manual already marked out. If necessary, add weight to the
nose or tail to ensure the best flight performance.
● 检查机身内部,确保所有设备正常连接;检查机身表面,包括但是不限于蒙皮,固定螺丝,舱盖,座舱罩等位置。
● Double-check the inside of the fuselage, make sure all the equipments are correctly connected; Check the
heat-shrink covering material’s surface, Make certain all screws, bolts, cabin and canopy remain secure.
● 在飞行前,请检查您电池情况,若有低电压,电池损坏等情况,请您停止操作并马上更换电池。
● Take great care when connecting/disconnecting the battery, pls replace the battery immediately once found
low voltage or damage to battery.
● 机身内部设备连接的方式,会和您的收发设备有关,在一些功能更多的收发设备上,您可以通过设置简化机身内部设备
的连接。详细请查看您的收发设备以确认是否满足您需要的功能。
● The way the internal devices of the fuselage are connected will be related to your transmitter-receiver device.
For those transmitter-receiver devices with more functions, you can simplify the connection of the internal
devices of the fuselage. Check your device for details to see if it meets the features you need.
● 动力设备和收发设备第一次配对时,可能需要设置油门最大行程,请您自行设置。
● When the power system and transmitter-receiver device are paired for the first time, you may need to set the
maximum stroke of the throttle. Please set it yourself.
 Loading...