

I-CAN tivusat 1110SH User Manual


2
All Rights Reserved
The product described in this manual is protected by national and international copyright laws. Any
duplication of the software or hardware comprising the product is strictly prohibited. In addition,
no part of this manual may be reproduced or transmitted, in any form or by any means, electronic
or mechanical, including photocopying, recording, or information storage and retrieval systems, for
any purpose other than the purchaser’s personal use, without the prior written permission of the
manufacturer.
Disclaimer
The manufacturer specifically disclaims all warranties, either express or implied, including but not
limited to merchantability, accuracy, completeness, noninfringement or fitness for a particular
purpose, with respect to the software, the accompanying product manual(s) and written materials,
and any accompanying hardware. The manufacturer reserves the right to revise or make improvements to its product and related materials at any time and without obligation to notify any person of
such revisions or improvements. In no event shall the manufacturer be liable for any special, incidental, consequential or punitive damages, including any loss of business profits or any other commercial
damages, arising out of the use of its product.
Trademarks
HDMI, the HDMI logo and High-Definition Multimedia Interface are trademarks or registered trademarks of HDMI Licensing LLC.
ADB Logo and i-CAN Logo are trademarks or registered trademarks of ADVANCED DIGITAL BROADCAST S.A.
All other product or service names are the property of their respective owners.

3
Safety First
Maintenance
If you wish to clean your decoder, first unplug it from the mains. To clean the decoder, use a soft,
dry cloth. For very dirty surfaces, dip a soft cloth in a weak soap-and-water solution and wring well.
After cleaning, wipe with a soft, dry cloth.
Never use alcohol, paint thinner, or a chemically treated cloth to clean this unit. Such chemicals may
damage the unit’s finishing.
This digital decoder has been manufactured to
meet international safety standards. However,
safety precautions must be followed to ensure
the safe and reliable operation of the decoder.
Please take note of the following guidelines to
avoid the risk of an electric shock.
This decoder operates with an external
power supply in the range of 100 to 240V
AC, 50/60 Hz. Use a standard AC wall outlet; a DC power source cannot be used. Remember that contact with a 110-240 Volt
AC power supply can be lethal.
Ensure that all electrical connections are
properly made before connecting the decoder to the power supply (the mains). Always unplug the decoder (from the mains)
before connecting or disconnecting any
cables.
Whenever you connect the decoder to the
power supply (the mains), always connect
the power lead to the power input connector on the back panel of the decoder before
you connect the power brick to the wall
socket (outlet).
Whenever you disconnect the decoder
from the power supply, always remove the
power brick from the wall socket (outlet)
before you remove the other end of the
lead from the power input connector on
the back panel of the decoder.
Never attempt to repair or reconstruct the
decoder yourself. A serious electric shock
may occur if this decoder is repaired, disassembled or reconstructed by an unauthorized person.
Be extremely careful if this unit comes into
contact with water. Immediately disconnect
the power brick if possible.
DO
If anything falls into the cabinet, unplug the
decoder and have it checked by a qualified
technician.
Allow adequate air circulation to prevent internal heat build-up. Do not place the unit
next to a radiator or any heat source and
make sure that the air vents are not covered.
DO NOT
Do not expose the decoder to extreme temperatures, direct sunlight or high humidity.
Do not place any objects on top of the decoder which restrict air circulation.
Do not place the decoder on fabric furnishings, carpets or other flammable materials.
Removing the decoder’s
cover may lead to a severe &
potentially fatal electric shock.
Incorrect installation of the
splitter may cause damage to the
connected devices.
When installing the splitter, follow
the instructions on page 9.

4
Contents
Safety First ............................................................................................................................... 3
Maintenance ............................................................................................................................ 3
Introduction ............................................................................................................................. 6
About This Manual ........................................................................................................ 6
About Your Decoder (Set-Top Box) .................................................................................. 6
Your Decoder ........................................................................................................................... 7
Unpacking Your Digital Decoder .......................................................................................... 7
Overall Look ........................................................................................................................ 7
Back Panel .......................................................................................................................... 8
Connectivity Diagram ....................................................................................................... 8
Connecting the decoder to your Home Cinema System ................................................... 8
Signal Splitter Installation ......................................................................................................... 9
Smart Card ........................................................................................................................10
Looking After Your Smart Card ......................................................................................10
Remote Control ......................................................................................................................11
How to Set up Your Decoder ..................................................................................................13
TV Screen Format ...............................................................................................................14
Using Your Decoder ..............................................................................................................15
Turning Your Decoder On / Off ...........................................................................................15
Basic Rule “Point & Select” .................................................................................................15
Selecting Channels ..............................................................................................................15
Channel Banner .................................................................................................................16
Browsing through Channels and Programs in the Channel Banner ..................................16
Extended Information About Programs ..............................................................................18
Channel List ........................................................................................................................18
Options Menu ....................................................................................................................19
Audio Language ............................................................................................................19
Subtitle Language ..........................................................................................................19
Teletext Language .........................................................................................................19
Display Format ...............................................................................................................19
Video Resolution ...........................................................................................................19
Running Interactive Applications ........................................................................................ 20
Locked Channels and Programs ...........................................................................................21
Main Menu .......................................................................................................................... 22
Main Menu Structure .................................................................................................... 22
Short overview of the basic functions of the Main Menu submenus .............................. 23
Viewer Planner .................................................................................................................. 23
Setting a Timer ............................................................................................................. 25
Setting a Reminder ....................................................................................................... 25

5
Channel Manager .............................................................................................................. 27
Add Channels ............................................................................................................... 27
Delete Channels ............................................................................................................ 28
Move Channels ............................................................................................................. 28
Skip Channels ............................................................................................................... 29
Hide Channels .............................................................................................................. 30
Restore Channels .......................................................................................................... 30
Rename Channels ..........................................................................................................31
Lock Channels .............................................................................................................. 32
List Organization ................................................................................................................ 33
For Parents ........................................................................................................................ 34
Receiver Lock ................................................................................................................ 34
Parental Level ............................................................................................................... 35
Change PIN Code ......................................................................................................... 35
Your Preferences ................................................................................................................ 36
Display Options ............................................................................................................. 36
Language Options ........................................................................................................ 37
Installation ......................................................................................................................... 38
Settings ........................................................................................................................ 38
TV Settings ................................................................................................................... 38
System Settings ............................................................................................................ 39
Energy Saving Settings .................................................................................................. 39
Modem Settings ........................................................................................................... 40
Modem Diagnostics ...................................................................................................... 40
Signal Meter ................................................................................................................. 40
Channel Search ..............................................................................................................41
Factory Reset ................................................................................................................ 42
Help .................................................................................................................................. 42
Electronic Program Guide ....................................................................................................... 43
Before Requesting Service ...................................................................................................... 44
Technical Specification ........................................................................................................... 46

6
Introduction
About This Manual
This User Manual describes the overall functionality of your decoder (set-top box). You will find
here the information you need to operate your decoder and take advantage of all its features.
First, make sure that your decoder is properly connected. Then, pick up your remote control and
follow the hints of this manual. Once you have learned how to operate the remote control and
familiarized yourself with the main features of your decoder, you will need this manual only for
occasional consultation.
Terminology in the Manual
In order to avoid misunderstanding, please bear in mind what is meant by the following terms:
a menu – refers to a window/screen which contains items available for selection,
Main Menu – refers just to the window (menu) and its content (including submenus), which is
displayed after pressing the button,
submenu – describes any menu that is opened from another one,
window, screen – used interchangeably.
About Your Decoder (Set-Top Box)
Your decoder will allow you to do the following:
prevent your children from viewing unsuitable programs,
display additional information about a selected program,
use interactive applications,
create lists of your favorite channels,
set a reminder,
and much more.
•
•
•
•
•
•
Please note that your decoder’s software is being improved all the time and therefore, from time to time, software on your decoder may be updated. If you do not
change the default settings of the decoder, the upgrade process will be carried
out automatically. After the upgrade process is completed, you can learn about
new features from the What is New? submenu (Main Menu – Help).
Please note that if you want to have the most up-to-date software version and
updated channel lists on your decoder, it is advisable that you switch the decoder
to standby mode when you are not using it.
Your decoder also looks for software upgrade when booting up.
Downloading a new software version may change the previous functionality of
the decoder and at the same time some information provided in this manual may
become outdated.

7
Your Decoder
Unpacking Your Digital Decoder
As you unpack your digital decoder, please make sure that the following accessories are included:
If any parts are missing, please contact your vendor.
Overall Look
LED Indicator:
Green – operating mode
Red – in standby, low power consumption
The LED indicator blinks when your de-
coder is receiving signals from the remote
control.
Smart Card Slot: Smart Card allows you
to view scrambled TV channels. Gently
push the card into the slot. Its chip should
face downwards and the symbol of an
arrow should face inwards.
Two Nagra Smart Cards (e.g. Mediaset
and Pangea) cannot be used at the same
time.
If you are using two Cards, it does not
matter to which slot you place a Card
first. If you are using just one Card, it also
does not matter which slot you use.
Decoder Remote Control Power Brick F-type
Cable
Telephone
Cable
Batteries Signal
Splitter*
Getting
Started
Please note that when two receivers are connected to the satellite dish by means of the signal splitter, only one of these
decoders can be in use.
*
8
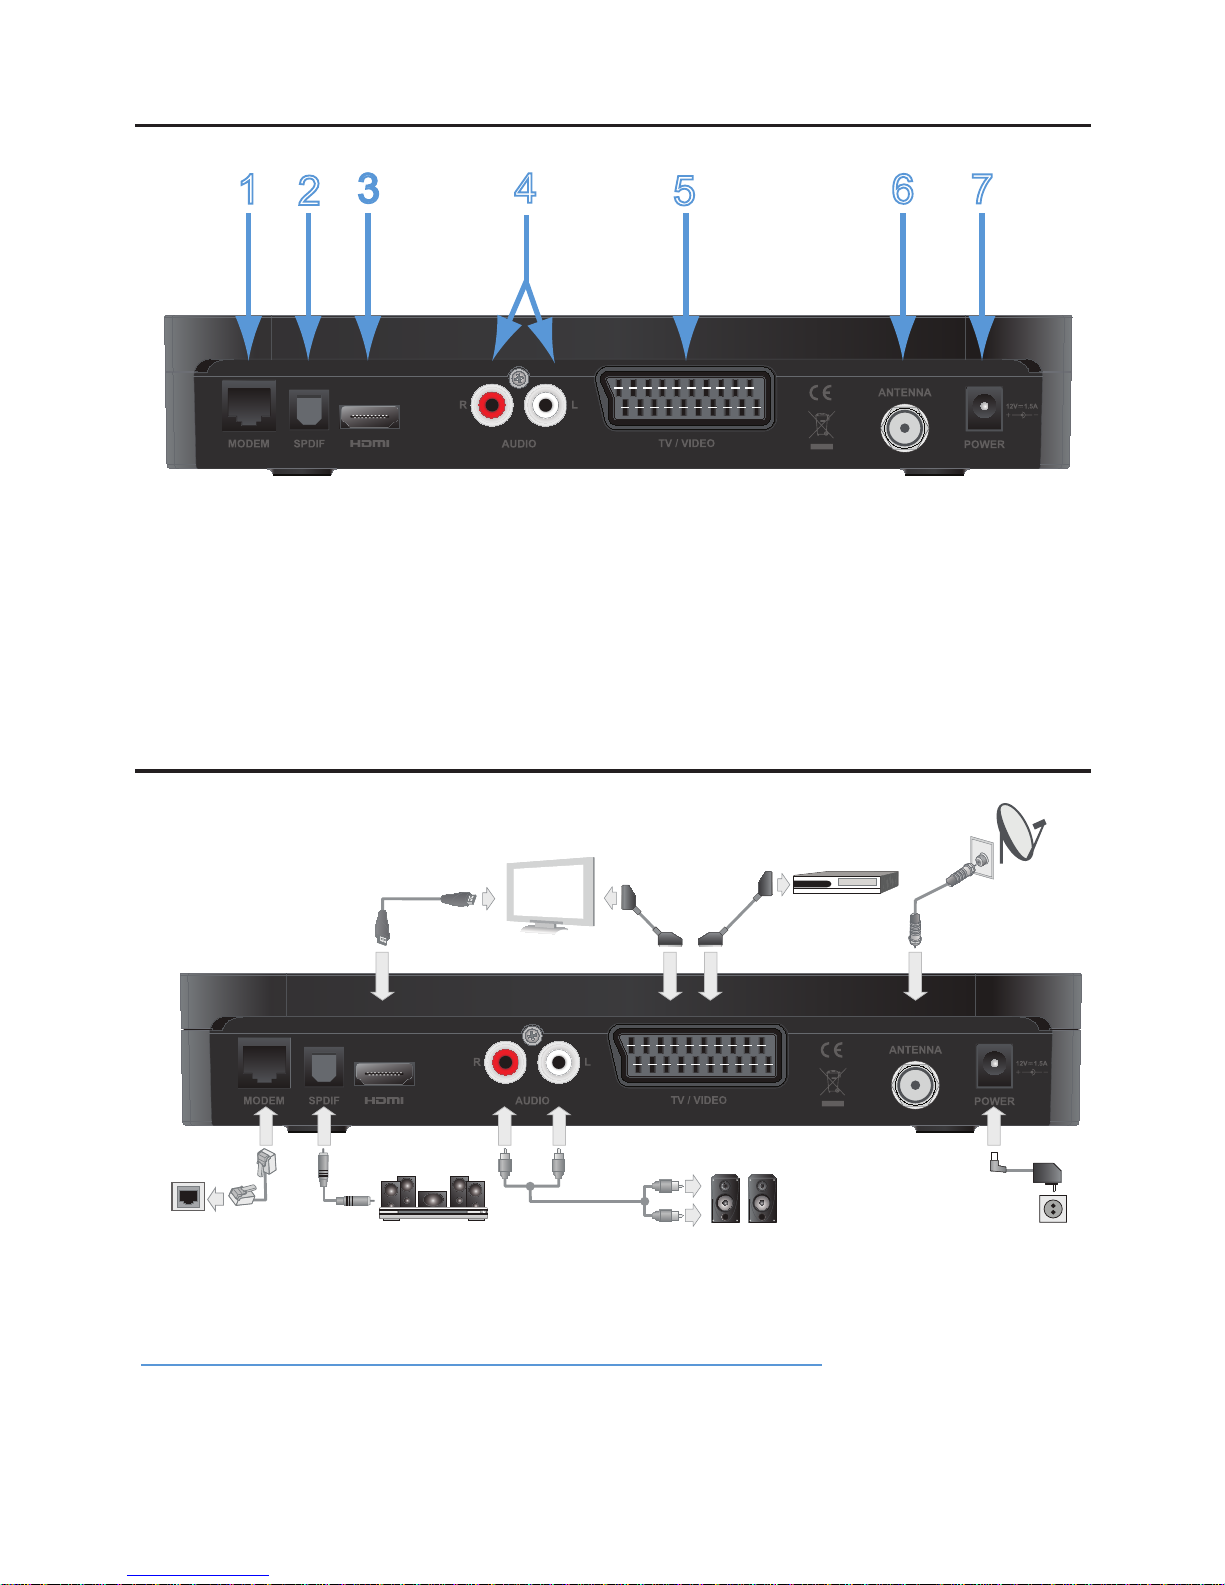
Back Panel
RJ-11 input (V.90 Modem port)1. TV SCART output5.
S/PDIF output2. Antenna input6.
HDMI™ output3. DC Input from external power supply7.
2xRCA (audio stereo)4.
Connectivity Diagram
Connecting the decoder to your Home Cinema System
If you want to enjoy the surround sound broadcast, connect the decoder and your Home Cinema
system via an S/PDIF cable and change the Dolby Digital option (Main Menu – Installation – Settings
– System Settings) to Yes.
1
2
3 4
5
6
7
TV
Hi-Fi
Antenna
Power
Socket
Telephone
Socket
Home Cinema
VCR/DVD
9
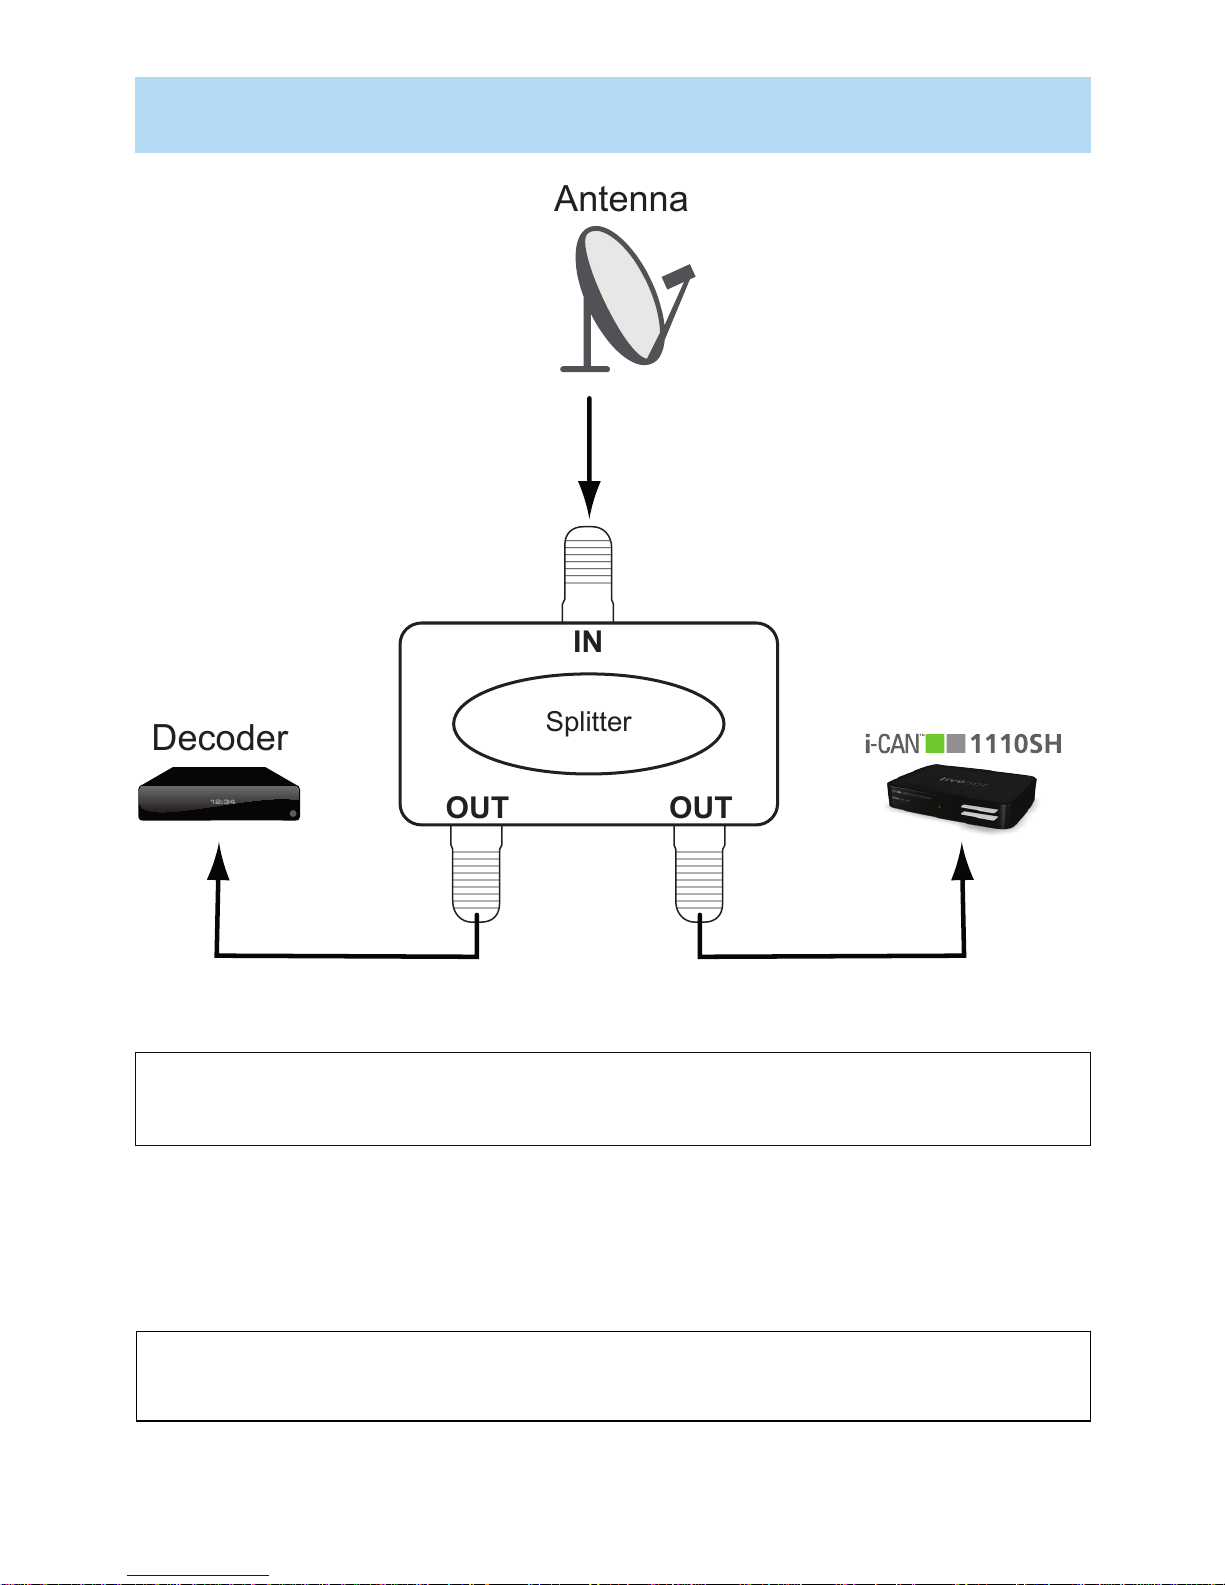
If you want to connect two decoders to the same antenna cable, use the signal splitter.
Please pay special attention when installing the signal splitter. The antenna cable has to be connected
to the “IN” jack of the splitter and decoders have to be connected to the splitter using ONLY “OUT”
jacks. Installing the signal splitter in any other way may cause damage to the connected devices.
Never can a decoder be connected to the splitter by means of the “IN” jack!
Please note that when two receivers are connected to the antenna cable with the signal splitter,
only one device can be used at a time. If you are not able to use your receiver despite having the
second one turned off, please try unplugging the power cable of the second receiver.
Please use ONLY the signal splitter supplied with this decoder. Using other signal splitters may
damage the connected decoders and thus you are using other signal splitters on your own responsibility. In such a case, please be sure to use a splitter equipped with built-in protection
OUT OUT
Splitter
Antenna
Decoder
IN
Signal Splitter Installation

10
Smart Card
Smart Card allows you to view scrambled channels. Gently push the card into the slot. The chip
should face downwards and the arrow symbol should face inwards.
Without a Smart Card, you can view free-to-air channels.
If you have more questions about the card functioning, contact your service provider.
Looking After Your Smart Card
The card is fragile, so bear in mind the following precautions:
Do not bend or twist the card
Do not expose the card to heat or direct sunlight
After inserting the card, leave it in the slot permanently
Clean only with a soft dry cloth
•
•
•
•

11
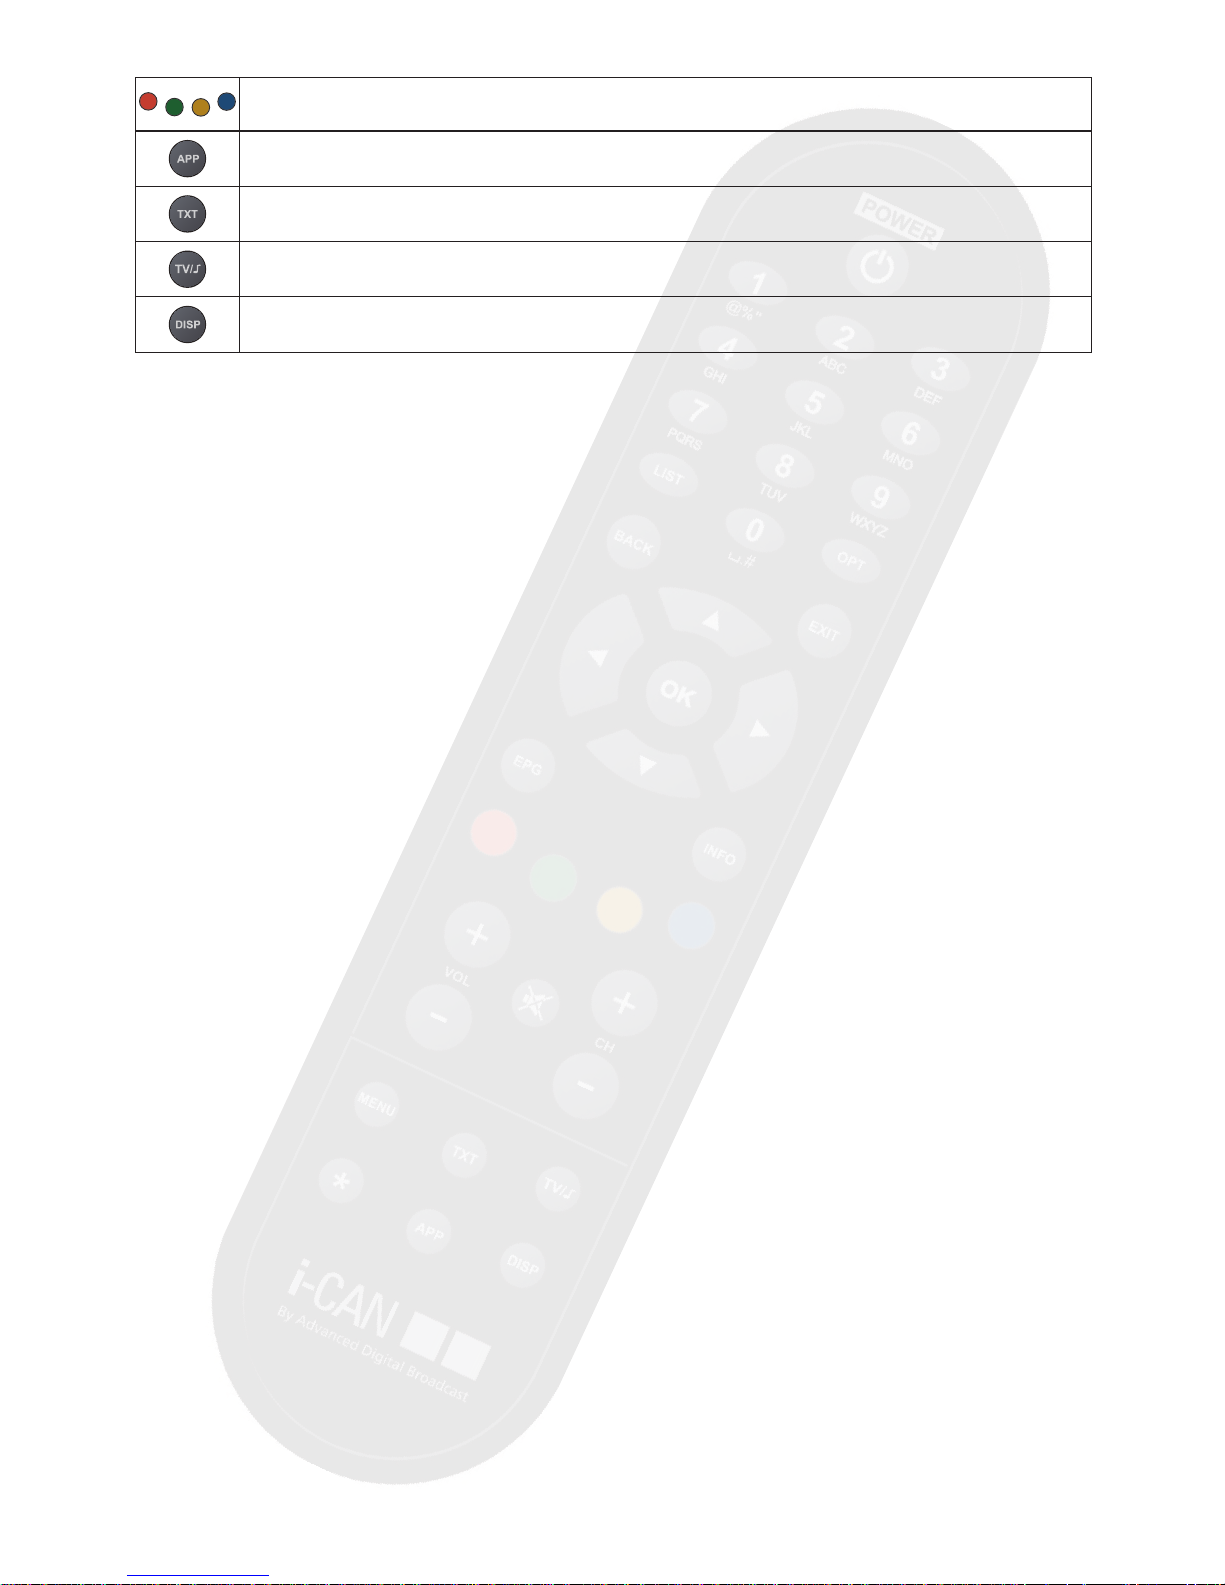
Remote Control
Button Action
Switches the decoder between standby and operating modes (turns the decoder on and off).
Allow you to tune to a desired channel, select menu items and enter the PIN code (the default PIN
code is 1234).
Mutes the sound. Pressing this button once again restores the previously set volume level.
Displays the Options menu where you can change audio, subtitle and teletext language as well as
display format and video resolution. You can change an option only if its alternatives are broadcast
with a particular program.
Adjust the volume.
Tune to the next/previous channel. In some menus, they scroll pages up and down.
Displays and hides the Main Menu where you can change different settings of your decoder.
Displays and hides the window with the currently selected channel list. In this window, you can
change channel lists and tune to a desired channel.
This button is inactive.
Displays the Electronic Program Guide.
Switches between the Channel Banner, Channel Banner with Extended Information and
viewing mode in a circular manner.
In the Channel Banner, they browse through channels. In different menus, they shift highlight.
When up/down shifting is possible, there are icons displayed.
In the Channel Banner, they switch between the current and next program information. In different
screens, they highlight items or change values. When left/right shifting is possible, there are the
icons displayed.
In the Channel Banner, if the icon is displayed, it tunes to the channel which name is
displayed or sets a Reminder when the information about the next program is displayed. In different
menus and screens, it selects the currently highlighted item or confirms your choices.
In viewing mode, it alternates between the current and previous channel within the same Channel
List. In different screens, it returns to the previous screen.
Returns to normal viewing.
12
Navigate through external applications. They are also used to perform a few additional functions in
some screens.
Displays and hides the Applications window.
Dispalays Teletext and is also used by some external applications.
Switches your decoder between the TV and Radio modes.
Displays the Options menu, which allows to change the Video Resolution.
13
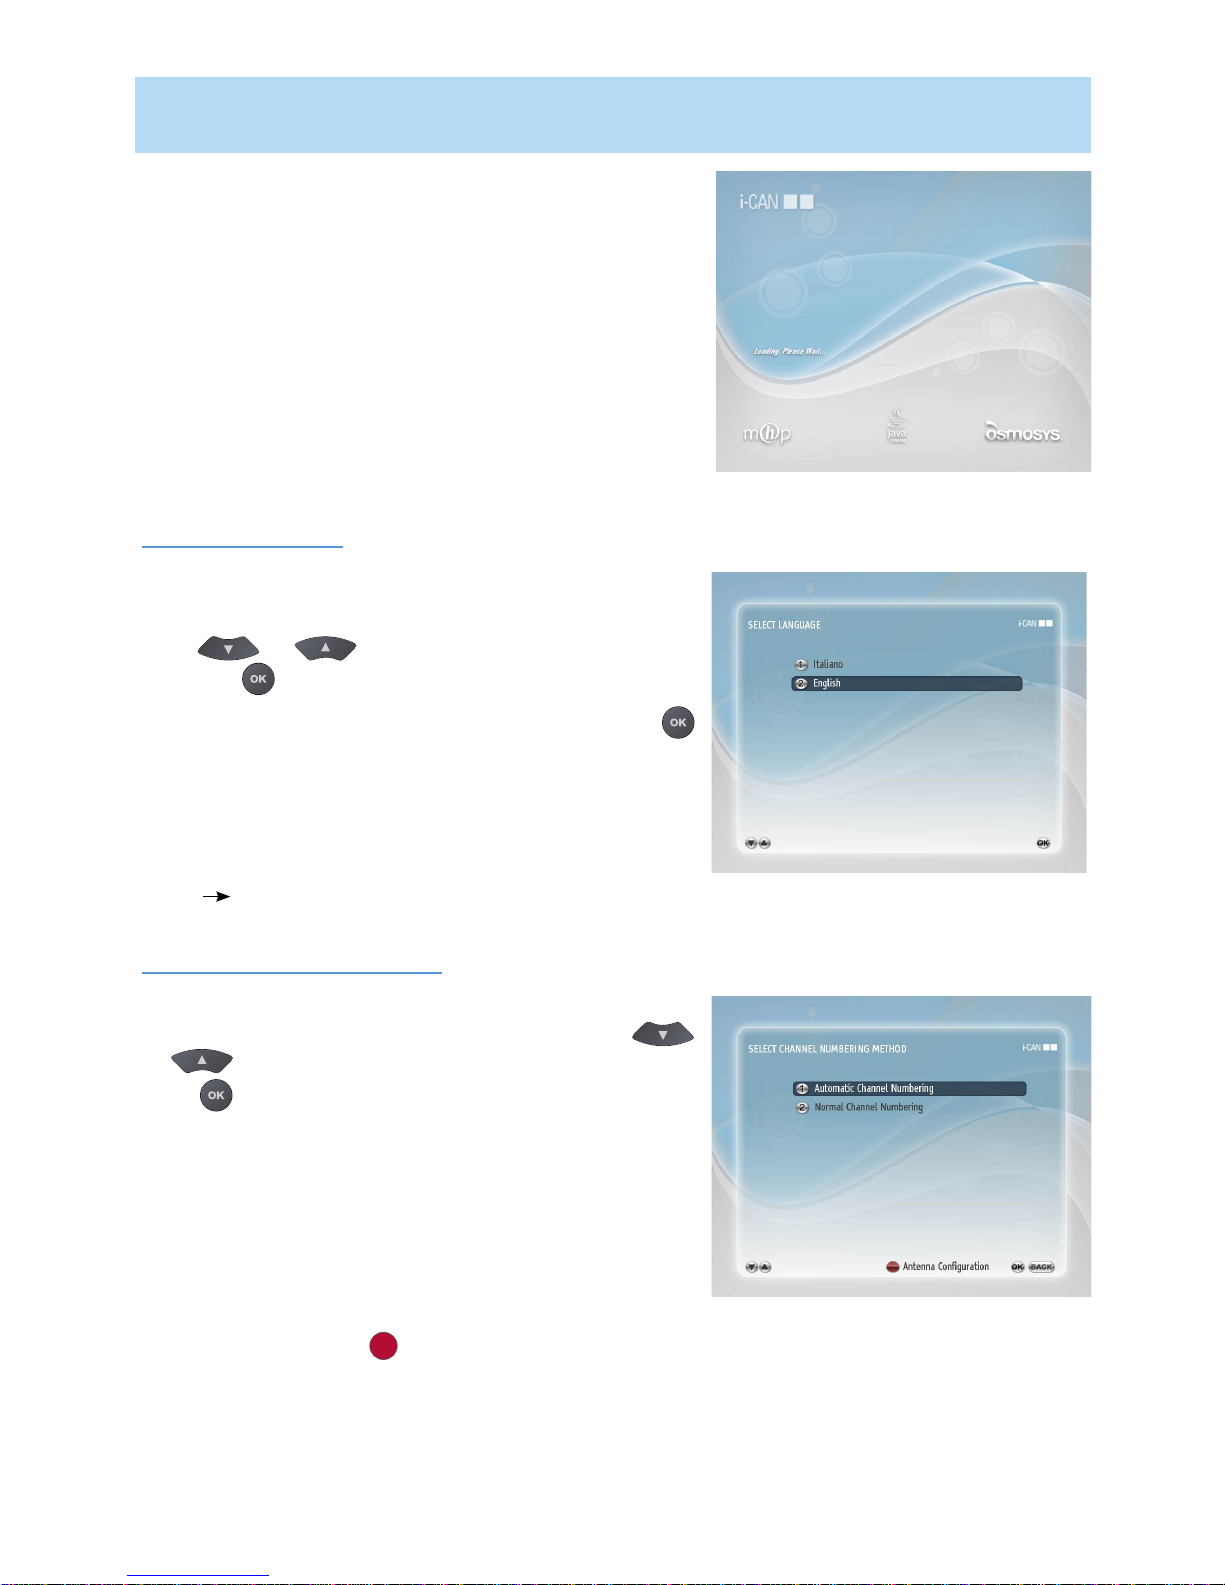
How to Set up Your Decoder
Once you have connected you decoder properly and
plugged it to the mains, the LED indicator on the front panel
will light up. Then, after several seconds the Welcome
Screen will be displayed on your TV screen. Wait until the
Welcome Screen disappears and the Language Selection screen appears.
Note: If you do not select the below items yourself, after
10 seconds, the decoder selects the highlighted item itself
and goes to the next step (screen).
Language Selection
The Language Selection screen allows you to select the
language for any information displayed on the screen.
Press or to highlight the on-screen language
and press to make your selection.
Afterwards, the confirmation screen will appear. Press
to confirm your choice of the language.
The language selected in this window is also automatically
assigned as the language of Primary Audio, Primary Subtitles
and Teletext Language. Please note that you can also change
the on-screen language in the Language Options screen (Main
Menu Your Preferences).
Channel Numbering Method
In the Select Channel Numbering Method screen you
can choose the way channels are organized. Press
or to highlight the channel numbering method and
press .
If you choose Automatic Channel Numbering, the
channels will be organized as the broadcaster ordered
them (usually thematically).
If you choose Normal Channel Numbering, the channels
will be numbered in the order that they are found during
the Channel Search process.
If you want to change the default antenna configuration settings, press the , button to open the Antenna
Configuration screen. When changing the settings,
please remember that at least one LNB must be assigned
to Hotbird Satellite.
Channel Search
Language Selection
Welcome Screen
14
TV Screen Format
When you are setting up a new decoder for the first time,
by default, the deocder sets TV Screen Format to 4:3. It
means that if the screen format of your TV is 4:3, there
is no need to modify TV Screen Format setting in the
decoder’s menu.
However, if the screen format of your TV is 16:9, using
“Point and Select” rule, go to the Main Menu, Installa-
tion, Settings, TV Settings and change the TV Screen
Format option to 16:9.
TV Screen Format Change
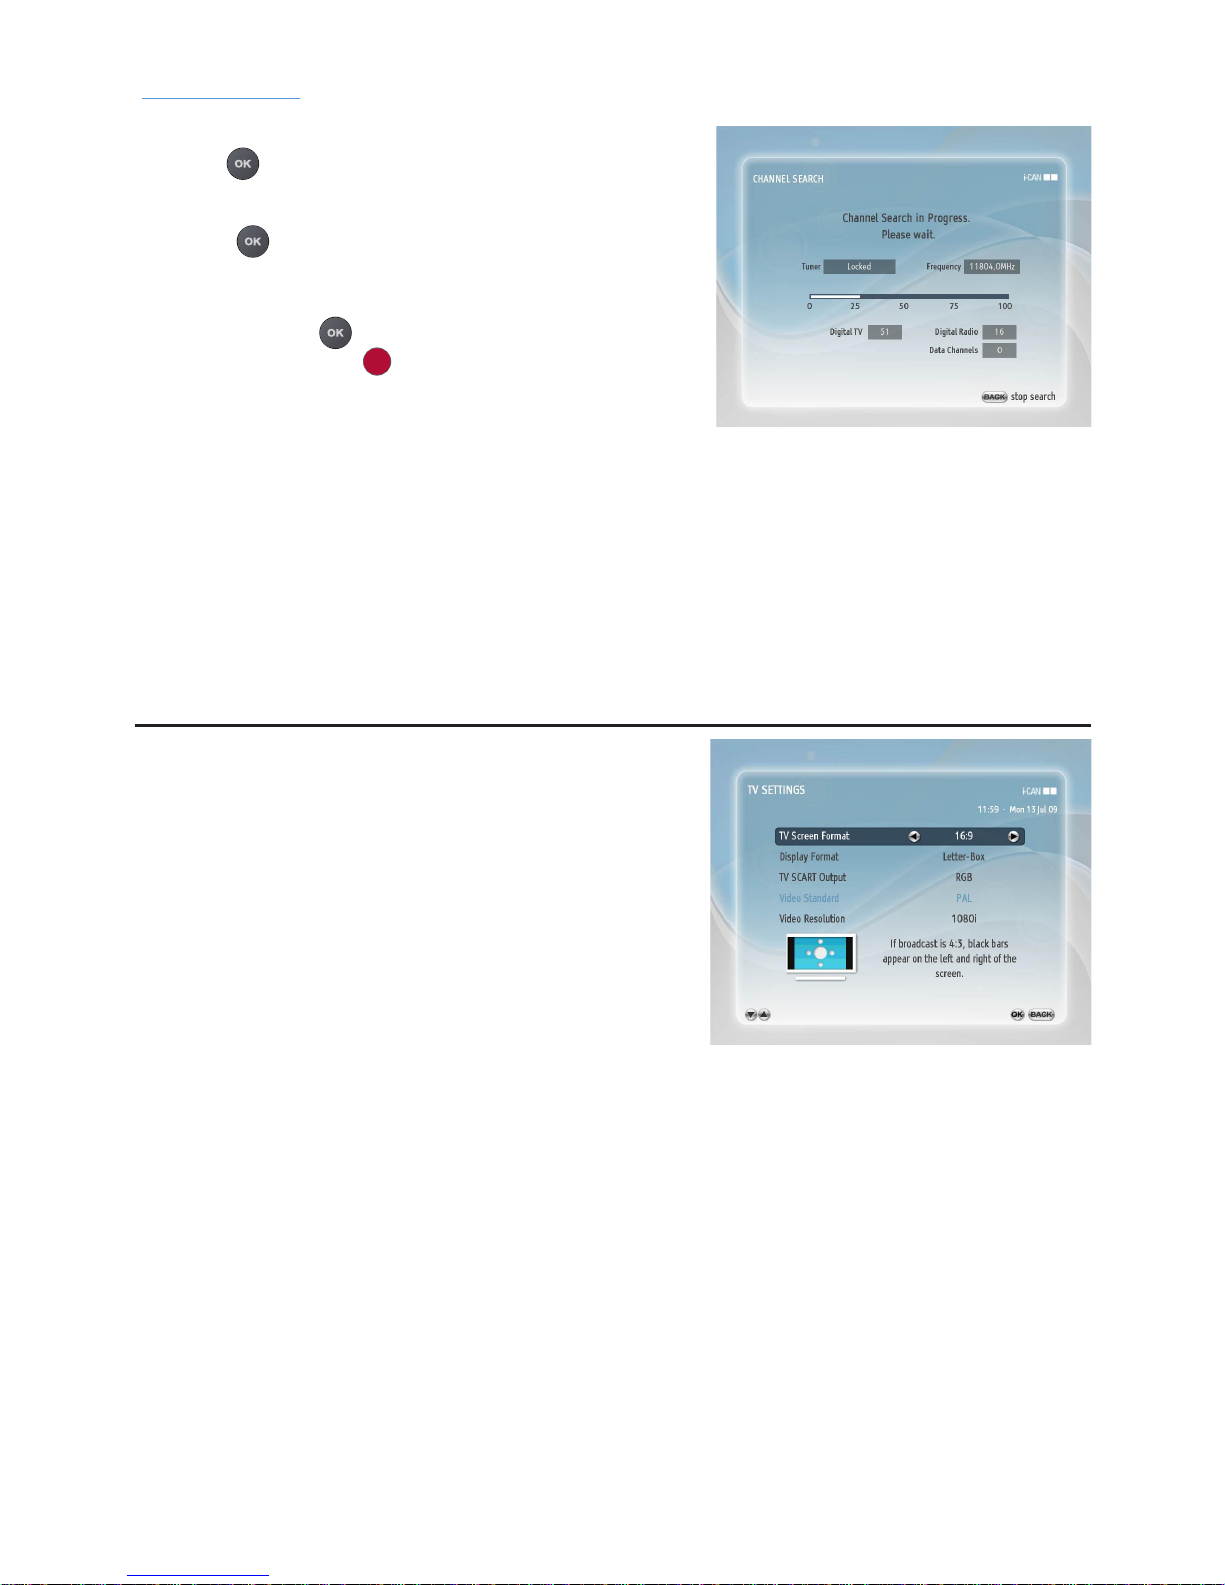
Channel Search
After you have selected the numbering method and
pressed the channel search will start automatically.
When this procedure is completed, you will be informed
about the total number of channels found. Afterwards,
press the button to tune to the first TV channel.
If the channel searching procedure has not been completed
successfully, a suitable error message will appear. Then,
you can press the button to go back to the Channel
Numbering Method button to enter the Antenna
Configuration screen.
Channel Search
 Loading...