

Page 1

TD 3213
2-in-1 Blutzucker- und Blutdruck-Messsystem
für einfaches, schnelles und präzises Messen
Gebrauchsanweisung
Instruction manual
Mode d’emploi
Gebruiksaanwijzing
Instrucciones para el uso
Stand: Dezember 2004 © by ibp innovative business promotion gmbh, Germany
Page 2

Blutzuckermessergebnisse
Tabelle nach Krall, L.P., and Beaser, R.S.: Joslin Diabetes Manual. Philadelphia: Lea and Febiger (1989), 138,
für den Vergleich Ihrer Blutzuckerwerte mit den Werten von Personen ohne Diabetes
Tageszeit Werte von Personen ohne Diabetes Ihre erzielten Blutzuckerwerte
(mg/dL) / (mmol/L) (mg/dL) / (mmol/L)
Vor dem
Frühstück
Vor dem
Mittag-/Abendessen
1 Stunde nach weniger als
den Mahlzeiten
2 Stunden nach weniger als
den Mahlzeiten
Zwischen 2 und mehr als
4 Uhr morgens
(70~105) / (3,9~5,8) ___________________ (mg/dL) / (mmol/L)
(70~110) / (3,9~6,1) ___________________ (mg/dL) / (mmol/L)
(160) / (8,9) ___________________ (mg/dL) / (mmol/L)
(120) / (6,7) ___________________ (mg/dL) / (mmol/L)
(70) / (3,9) ___________________ (mg/dL) / (mmol/L)
Page 3

der Inhalt
1 die Einführung
2 wichtige Sicherheitshinweise
3 vor der Inbetriebnahme/ das Blutzucker-/Blutdruck-Messsystem / der Lieferumfang /
verwendete Symbole ...................................................................................................................................... 5
4 das Gerät
5 die Beschreibung der Anzeigensymbole
6 die Geräteeinstellungen
7 die Batterien
8 der Teststreifen
9 das Gerät kalibrieren
10 das System prüfen
so prüfen Sie mit den Kontrolllösungen ................................................................................................... 16-17
11 der Blutzuckertest
so führen Sie den Test durch ....................................................................................................................... 21-22
12 den Blutdruck messen
der Messvorgang / die Abschaltung .......................................................................................................... 25-27
13 der Messwertespeicher
so verlassen Sie den Speicherbereich / so löschen Sie den Speicherinhalt...................................... 29
14 allgemeine Informationen
Fehlermeldungen und Lösungen ................................................................................................................ 31-35
15 die technischen Daten
................................................................................................................................................. 2
................................................................................................................... 3
............... 4
.......................................................................................................................................................... 6
.............................................................................................. 7
/ Datum und Uhrzeit / Maßeinheit ........................................................... 8-9
/ das Wechseln der Batterien ............................................................................................ 10
/ Teile des Teststreifens / wichtige Informationen zu den Teststreifen ........... 11-12
/ einen Selbsttest ausführen / warum codieren? ........................................ 13
/ die Kontrolllösungen / wichtige Hinweise zu den Kontrolllösungen / .... 14-15
/ die Vorbereitung / so gewinnen Sie einen Blutstropfen / ........................... 18-20
/ die Manschette anlegen / den Blutdruck im Sitzen messen / ............. 23-24
/ so rufen Sie die gespeicherten Messwerte ab /.................................... 28
/ Reinigung und Pflege des Systems / .................................................. 30
/ Garantieschein ................................................................................................. 36-38
1
Page 4
1 die Einführung
sehr geehrte Kundin, sehr geehrter Kunde,
es freut uns, dass Sie sich für dieses Blutzucker-und Blutdruck-Messsystem entschieden haben. Das Gerät
misst Blutzucker und Blutdruck mit sehr hoher Genauigkeit. Es besitzt einen automatischen Speicher für
350 Blutzucker-und Blutdruck-Messwerte mit Datum und Uhrzeit.
verfolgen und rechtzeitig Ihrem Arzt mitteilen.
Personen im Privatbereich bestimmt. Es ist nicht zur Feststellung von Diabetes und zur Blutzuckerbestimmung für Neugeborene geeignet. Verwenden Sie zum Test nur frisches, kapilläres Vollblut.
Diese Gebrauchsanweisung dient Ihrer Information. Bitte lesen Sie sie sorgfältig und vollständig, folgen
Sie den Anweisungen und führen Sie alle Kontrolltests wie beschrieben durch, bevor Sie einen Blutzuckertest vornehmen. Bewahren Sie die Gebrauchsanweisung gut auf.
Technische Änderungen vorbehalten.
Das System ist für die aktive Blutzuckerkontrolle von
Vorbemerkungen!
Dieses Blutzucker-Messgerät entspricht den Anforderungen der EG-Richtlinie 98/79, 93/42/EEC,
IEC 60601-1, IEC 61010-1, IEC 60601-1-2, IEC 61326, EN 1060-1, EN 1060-3, ANSI/AAMI SP 10,
ISO 15197, ISO 14971 für “In Vitro” Diagnostik-Geräte und Medizinprodukte ist mit dem CE-Zeichen
(Konformitätszeichen) „CE 0123“ versehen.
Die Firma ibp bestätigt für das mit dieser Gebrauchsanweisung ausgelieferte Gerät
die Übereinstimmung mit diesen Bestimmungen. Die Konformitätserklärung liegt vor.
2
So
können Sie Veränderungen sehr gut
0123
Page 5
wichtige Sicherheitshinweise 2
-
Ändern Sie nie selbstständig die verordnete Medikamenteneinnahme aufgrund Ihrer Blutzucker- und Blutdruckmesswerte.
-
Messergebnisse, die unter 3,3 mmol/L (60mg/dL) liegen, sind ein Anzeichen für "Hypoglycemia",
zu niedrigem Blutzuckerspiegel. Liegen die Messwerte über 13,3mmol/L (240 mg/dL), können
Symptome von zu hohem Blutzuckerspiegel ("Hyperglycemia") auftreten. Suchen Sie Ihren Arzt
auf, wenn Ihre Messwerte regelmäßig über- oder unterhalb dieser Grenzwerte liegen.
-
Wassermangel oder großer Flüssigkeitsverlust (z.B. durch Schwitzen) können falsche Messwerte
verursachen. Wenn die Vermutung besteht, dass Sie unter Dehydration, also Flüssigkeitsmangel
leiden, suchen Sie schnellstmöglich einen Arzt auf!
-
Ist Ihr Anteil an roten Blutkörperchen (Hematokritwert) sehr hoch (über 55%) oder sehr niedrig
(unter 30%), kann dies Ihre Messergebnisse verfälschen.
-
Wenn Sie alle Anweisungen in dieser Gebrauchsanweisung beachtet haben und dennoch
Symptome auftreten, die nicht mit Ihrem Blutzuckerspiegel oder Ihrem Blutdruck in Verbindung
stehen, suchen Sie bitte Ihren Arzt auf.
Ihre Messergebnisse kann nur der Arzt auswerten.
3
Page 6

3 vor der Inbetriebnahme
das Blutzucker-/Blutdruck-Messsystem
Ihr Blutzucker-/Blutdruck-Messsystem können Sie zur Blutzuckermessung bis in einer Höhe von 3.275 m
über dem Meeresspiegel verwenden, ohne dass sich Auswirkungen auf des Testergebnis ergeben. Das
Blutzucker-/Blutdruck-Messsystem besteht aus drei Komponenten: Dem Blutzucker-/BlutdruckMessgerät, den Teststreifen und den Kontrolllösungen. Diese Komponenten wurden in der Entwicklung
speziell aufeinander abgestimmt, getestet und in ihrer Qualität bestätigt. So kann dieses Messgerät
den Blutzuckerspiegel sehr genau messen und anzeigen (vollblutkalibriertes Messergebnis). Benutzen
Sie nur für dieses Blutzucker-Messgerät zugelassene Teststreifen und Kontrolllösungen. Bei Fragen zu
Ihren Messwerten wenden Sie sich bitte an Ihren Arzt.
der Lieferumfang
Folgende Teile gehören zum Lieferumfang und befinden sich in der Verpackung:
- 1 Blutzucker-/Blutdruck-Messgerät - 25 Teststreifen
- 25 sterile Lanzetten - 1 Stechhilfe
-1 Check Code Streifen - 2 verschiedene Kontrolllösungen
- 1 Gebrauchsanweisung - 1 Kurzanweisung mit Fehlerbeseitigung
- 1 praktische Aufbewahrungsbox - 2 Alkali-Batterien 1,5 V Typ “AAA”
Achtung: Überprüfen Sie, ob das Kontrollsiegel der Kartonverpackung unversehrt ist! Sollte das
4
Siegel zerstört sein oder gar fehlen, bringen Sie das Gerät bitte zu Ihrem Händler
zurück.
Page 7
vor der Inbetriebnahme 3
Verwendete Symbole
Folgende Symbole auf Gerät, Verpackungen und in der Gebrauchsanweisung geben wichtige Informationen:
Symbol Bedeutung Symbol Bedeutung
für den Einmalgebrauch (LOT) Chargenbezeichnung
Gebrauchsanweisung beachten Geräteklassifikation BF
vor Sonnenlicht schützen Seriennummer
vor Nässe schützen Achtung = Gefahr für Gerät/Gegenstände
Arbeitstemperaturbereich Warnung = Gefahr für den Benutzer
hergestellt am Verfallsdatum (anzuwenden bis zum
letzten Tag des Monats)
5
Page 8
4 das Gerät
die Bestandteile des Gerätes
Batterien
2 Alkali-Batterien
1.5V Typ “AAA”,
im Batteriefach
auf der Unterseite des Gerätes.
-Taste
Zum Ein-/Ausschalten
des Gerätes und zum
Start des BlutdruckMessvorgangs.
Teststreifenöffnung
Schlitz zum Einführen des Teststreifens.
Das Gerät schaltet sich automatisch ein,
wenn Sie einen Teststreifen einführen.
6
LCD Display
Anzeige der Testergebnisse, Symbole und der
Geräteeinstellungen.
Einstell-Taste (SET)
Im Batteriefach befindet sich die EinstellTaste zur Einstellung
von Datum, Zeit und
Maßeinheit.
M-Taste (MENUE)
Die Menue-/SpeicherTaste wird zur Einstellung
des Gerätes, um in den
Speicher-Modus zu gelangen und zur Datenänderung von Tag, Uhrzeit und Einheit genutzt.
0123
Page 9
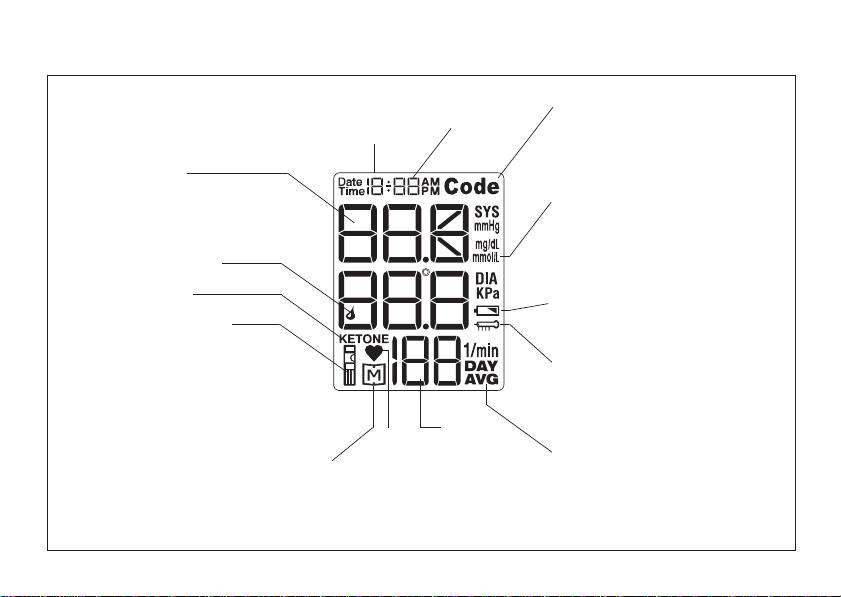
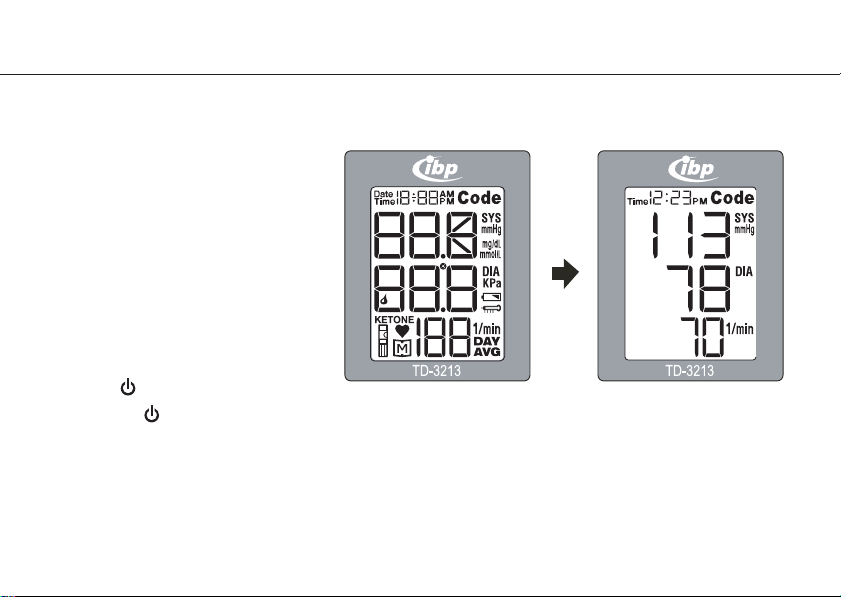
die Beschreibung der Anzeigensymbole 5
Messergebnisse
Bereich für die Anzeige der Messergebnisse. Wenn die Maßeinheit
mmol/L ausgewählt ist, erscheint
ein Dezimalpunkt.
Blutstropfen-Symbol
Zeigt, dass das Gerät zur
Aufnahme der Probe und
zur Messung bereit ist.
Ketone-Symbol
Teststreifen-Symbol
Wird angezeigt, solange
das Gerät den Selbsttest
durchführt und, wenn das
Gerät eingeschaltet wurde,
jedoch kein Teststreifen eingelegt ist.
Speicher-Symbol
Zeigt an, dass Messergebnisse im Speicher
gespeichert werden.
Datum und Uhrzeit
Tag Monat
Stunde Minute
Puls-
Symbol
PulsFrequenz
Zeigt die
gemessene
Pulsfrequenz
an.
Code
Erscheint zusammen mit der
Codenummer des Teststreifens,
wenn er eingeführt wurde.
Messeinheiten
Hier wird die eingestellte Einheit
(mg/dL oder mmol/L bzw. mmHg
oder Kpa) angezeigt.
Batterie-Symbol
Zeigt an, dass die Batterie schwach
ist oder gewechselt werden muss.
Temperatur-Symbol
Erscheint, wenn die Umgebungstemperatur nicht zwischen 10˚C ~
40˚C liegt.
Tages-Durchschnitt
Zeigt den Durchschnitt der gespeicherten Messergebnisse der Blutzuckerwerte eines Tages.
7
Page 10
6 die Geräteeinstellungen
Bei der Lieferung Ihres Messgerätes sind Uhrzeit, Datum und Maßeinheit voreingestellt. Wenn Sie diese
Einstellungen ändern oder die Batterie wechseln wollen, müssen Sie in den Einstell-Modus gehen, um die
Einstellungen vorzunehmen.
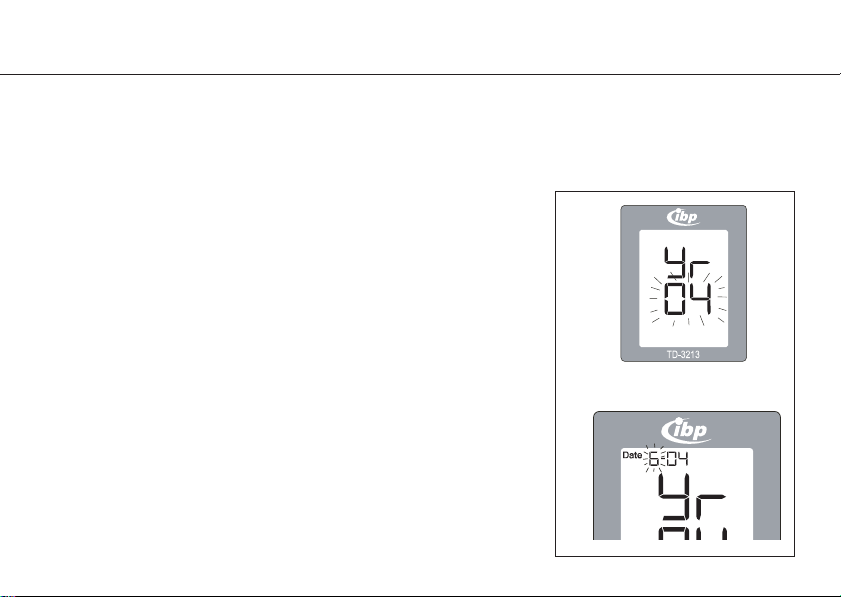
so stellen Sie Datum und Uhrzeit ein
1. Einstellen der Jahreszahl:
Lassen Sie das Gerät ausgeschaltet. Entfernen Sie den Batteriefachdeckel auf der Geräterückseite und drücken Sie die Einstell-Taste
(SET) im Batteriefach. Die blinkende Jahreszahl erscheint im Display
(Abb. 1)
. Drücken Sie die M-Taste, um die Jahreszahl zu verändern.
Erscheint das gewünschte Jahr im Display, drücken Sie die Einstell-
Taste im Batteriefach, um die Einstellung zu bestätigen und zum
Monat zu wechseln.
2. Einstellen des Monats:
Der Monat blinkt (Abb. 2).
Monat einzustellen. Drücken Sie die Einstell-Taste, um die Einstellung
zu bestätigen und zum Tag zu wechseln.
3. Einstellen von Tag, Stunde und Minuten:
Verfahren Sie ebenso, um Tag, Stunde und Minuten einzustellen und
zur Einstellung der Maßeinheit (mmol/L oder mg/dL) zu gelangen.
8
Drücken Sie die M-Taste, um den
(Abb. 1)
(Abb. 2)
Page 11

die Geräteeinstellungen 6
so stellen Sie die Maßeinheit ein
Ihr Gerät kann die Blutzucker-Messergebnisse in Millimol pro Liter (mmol/L) oder Milligramm pro Deziliter
(mg/dL) darstellen. In den USA ist die Einheit mg/dL Standard, in Kanada die Einheit mmol/L. In Deutschland
und Europa sind beide Maßeinheiten gebräuchlich.
1. Einstellen der Maßeinheit:
Lassen Sie das Gerät ausgeschaltet. Entfernen Sie den Batteriefachdeckel auf der Geräterückseite und drücken Sie die Einstell-Taste
(SET) im Batteriefach. Drücken Sie die Einstell-Taste so oft, bis die
Maßeinheit zur Messung des Blutzuckers blinkt
die M-Taste, um die gewünschte Maßeinheit einzustellen. Drücken
Sie die
Einstell
-Taste, um die Einstellung zu bestätigen. Die Maßein-
heit zur Messung des Blutdrucks beginnt jetzt zu blinken.
2. Verlassen des Einstell-Modus:
Drücken Sie die Einstell-Taste ein weiteres Mal,
Modus zu verlassen.
(Abb. 3)
. Drücken Sie
um den Einstell-
(Abb. 3)
9
Page 12
7 die Batterien
das Wechseln der Batterien
Das Gerät macht Sie durch zwei unterschiedliche Displayanzeigen auf schwache Batterien aufmerksam.
Wenn Sie das Gerät einschalten, erscheint das Batteriesymbol im Display. Alle übrigen Displayanzeigen
1.
signalisieren Betriebs
Testergebnisse sind präzise, jedoch sollte die Batterie gewechselt werden.
Im Display blinkt das Batteriesymbol
2.
mehr genug Energie für einen Test vorhanden. Ersetzen Sie die alten
Batterien durch zwei neue
3.
Schalten Sie das Gerät aus und öffnen Sie das Batteriefach auf der
Oberseite des Gerätes, indem Sie auf die Verriegelung drücken
und den Batteriefachdeckel nach oben abheben.
Entfernen Sie die alten Batterien und ersetzen Sie sie durch zwei Alkali-Batterien 1,5 V Typ”AAA”. Legen Sie
4.
die neuen Batterien so ein, dass die Pole mit der Darstellung im Batteriefach übereinstimmen und schließen
Sie das Batteriefach wieder.
Hinweise: Das Wechseln der Batterie beeinflusst den Speicherinhalt nicht. Uhrzeit und Datum müssen jedoch
eventuell neu eingestellt werden.
Entfernen Sie die Batterien aus dem Gerät, wenn Sie es länger nicht benutzen.
Batteriesicherheitshinweise:
10
bereitschaft. In diesem Fall ist noch genug Energie für etwa 30 Tests vorhanden. Die
(Abb. 4)
. In diesem
Alkali-Batterien 1,5 V Typ”AAA”
Geben Sie leere Batterien bei einer Recyclingstelle ab.
- Von Kindern fernhalten! - Nicht kurzschließen!
- Nicht wiederaufladbar! - Nicht ins Feuer werfen!
Fall ist nicht
.
(Abb. 4)
Page 13
der Teststreifen 8
Ihr Messgerät ermittelt den Zuckergehalt im Blut. Wenn Sie für den Test ein Tröpfchen Blut auf den absorbierenden Spalt des Teststreifens (Chemische Komponenten des Teststreifens: 1. Glucoseoxidase
(A.niger) 30 IE, 2. Elektronen-Shuttle 1,5 mg, 3. Enzymschutz 0,13 mg, 4. nicht reagierende Bestandteile 2,5 mg, 5. der Verschluss jedes Fläschchens mit 3.0-g-Molekularsieb) geben, wird das Blut
automatisch in die Reaktionszelle gesogen. Dort findet eine Reaktion statt.
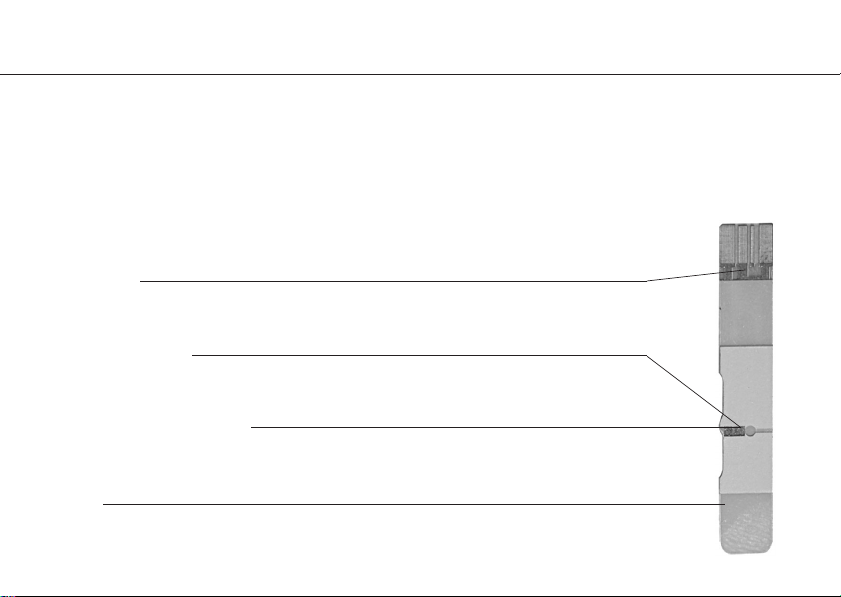
Teile des Teststreifens
Kontakte
Führen Sie dieses Ende des Teststreifens in das Blutzucker-Messgerät ein.
Drücken Sie den Streifen fest in das Gerät, bis zum Anschlag.
Kontrollfenster
Dieses kleine Fenster auf dem Teststreifen zeigt ihnen an, ob genügend
Blut aufgetragen wurde.
Absorbierender Spalt
Bringen Sie ein Tröpfchen Blut in Kontakt mit dem absorbierenden Spalt.
Das Blut wird von alleine in den Teststreifen eingesogen.
Griff
Fassen Sie den Teststreifen an diesem Ende an, wenn Sie das Blut auftragen
und den Streifen in das Gerät einführen.
11
Page 14
8 der Teststreifen
wichtige Informationen zu den Teststreifen:
-
Bewahren Sie die Teststreifen an einem kühlen, trockenen Ort (nur im Originalbehälter, unter 40 °C bzw.
104 °F) auf. Schützen Sie die Streifen vor direkter Sonneneinstrahlung und frieren Sie sie nicht ein.
- Berühren Sie die Teststreifen nur mit sauberen, trockenen Händen. Fassen Sie die Streifen beim Entneh-
men aus dem Behälter und Einführen in das Messgerät nach Möglichkeit nur am Griff an.
- Wenn Sie einen Teststreifen aus dem Behälter entnehmen, setzen Sie anschließend den Deckel sofort
wieder auf und verschließen Sie den Behälter luftdicht. Verwenden Sie jeden Teststreifen unmittelbar
nach der Entnahme aus dem Aufbewahrungsbehälter.
- Schreiben Sie das Öffnungsdatum auf das Etikett des Behälters wenn Sie ihn das erste Mal öffnen. Ver-
brauchen Sie die restlichen Teststreifen innerhalb von 90 Tagen ab dem ersten Öffnen.
- Verwenden Sie keine Teststreifen, deren Verfallsdatum bereits überschritten wurde, da dies das Mess-
ergebnis verfälscht. Das Verfallsdatum finden Sie auf den Behälter gedruckt.
- Tragen Sie nur Blutproben oder die beigefügten Kontrolllösungen auf den Spalt des Teststreifens auf.
Das Auftragen anderer Substanzen führt zu ungenauen oder falschen Messwerten.
- Die Teststreifen dürfen nicht verbogen, zerschnitten oder sonstwie verändert werden.
Warnung: Halten Sie den Behälter mit den Teststreifen von Kindern fern! Durch die Verschluss-
kappe besteht Erstickungsgefahr. Außerdem enthält die Verschlusskappe austrocknende
Wirkstoffe, die schädlich wirken können, wenn Sie eingeatmet oder verschluckt werden.
Haut- und Augenirritationen können die Folge sein.
12
Page 15
das Gerät kalibrieren 9
einen Selbsttest ausführen
Jedesmal, wenn Sie einen Teststreifen in das Messgerät einführen (Abb. 5) oder
das Gerät einschalten, erscheinen im Display kurz alle Anzeige-Segmente. Dieses
zeigt Ihnen, dass das System verschiedene Selbsttests durchführt und erlaubt
Ihnen den Rückschluss, dass alle Anzeige-Segmente einwandfrei arbeiten.
warum codieren?
Die Codenummern dienen dazu, die Teststreifen mit dem Gerät zu kalibrieren,
um genaue Testergebnisse zu erhalten. Bevor Sie das Gerät das erste Mal
benutzen und jedesmal, wenn Sie eine neue Dose Teststreifen verwenden,
müssen Sie zuerst den Check-/Codestreifen in das Gerät einführen. Prüfen Sie
danach jedesmal, wenn Sie einen Test durchführen, ob die Nummer, die im
Display erscheint, mit der Codenummer auf der Teststreifendose übereinstimmt
(Abb. 6)
.
Warnung:
Stimmt die im Display gezeigte Codenummer nicht mit der Codenummer auf
der Teststreifendose überein, kann das Messergebnis verfälscht werden.
(Abb. 5)
(Abb. 6)
Codenummer des
Teststreifens 303
13
Page 16

10 das System prüfen
die Kontrolllösungen
Die Kontrolllösungen werden zur Überprüfung des gesamten Blutzucker-Messsystems eingesetzt. Hierbei
lässt sich feststellen, ob das Gerät und die Teststreifen optimal zusammenarbeiten und ob der Test richtig
durchgeführt wird. Es ist wichtig, dass Sie den Test mit den Kontrollflüssigkeiten regelmäßig ausführen, um
sicherzustellen, dass Sie genaue Messergebnisse erzielen.
Die Kontrolllösungen enthalten einen bestimmten Anteil an Traubenzucker, der bekannt ist. Wenn Sie den
Blutzuckertest mit diesen Flüssigkeiten durchführen, können Sie anschließend vergleichen, ob der gemessene Wert im Bereich des tatsächlichen Wertes liegt. Der tatsächliche Wert der Kontolllösungen ist auf
dem Behälter der Teststreifen aufgedruckt. Es gibt zwei verschiedene, farblich codierte
eine für den “normalen“ Wertebereich (grün) und eine für den “hohen“ Wertebereich (rot).
Die Kontrolllösungen sollten verwendet werden:
• um den Blutzuckertest zu üben.
• um sicherzustellen, dass Gerät und Teststreifen einwandfrei zusammenarbeiten.
• um zu prüfen, ob der Test richtig ausgeführt wurde.
Bevor Sie den ersten Blutzuckertest durchführen, sollten Sie mit der Kontrollfüssigkeit drei erfolgreiche Tests
hintereinander abgeschlossen haben. So stellen Sie sicher, dass Sie den Test beherrschen und dass das Gerät
einwandfrei arbeitet.
aufgedruckt ist, können Sie mit der eigentlichen Blutzuckermessung beginnen.
Wenn alle drei Testergebnisse den Wert erreichen, der auf dem Teststreifenbehälter
14
Kontrolllösungen,
Page 17

das System prüfen 10
Wann sollten Sie einen Test mit der Kontrolllösung ausführen?
• Mindestens einmal pro Woche. • Wenn das Gerät heruntergefallen ist.
• Wenn Sie einen neuen Behälter • Immer, wenn Sie vermuten, dass das
Teststreifen öffnen. Blutzucker-Messsystem nicht einwand-
• Wenn die Messergebnisse nicht mit frei funktioniert.
Ihrem Befinden übereinstimmen.
wichtige Hinweise zu den Kontrolllösungen
- Benutzen Sie nur mitgelieferte Kontrolllösungen.
- Notieren Sie das Öffnungsdatum auf der Flasche.
- Überprüfen Sie das Haltbarkeitsdatum der Lösung. Benutzen Sie keine abgelaufenen Lösungen.
- Die Kontrolllösung sollte vor Gebrauch Raumtemperatur (20°C bis 25°C / 68°F bis 77°F) erreichen.
- Schütteln Sie die Flasche mit der Testlösung gut, bevor Sie sie öffnen. Wischen Sie den ersten Tropfen
ab und verwenden Sie den zweiten, um eine gute Probe für genaue Messergebnisse zu bekommen.
- Verbrauchen Sie die Kontrolllösung innerhalb von 90 Tagen ab dem ersten Öffnen.
- Bewahren Sie die Lösungen gut verschlossen bei Raumtemperatur (unter 30°C / 86°F) auf. Nicht ein-
frieren!
Achtung: Der Messwert der Lösungen, der auf den Teststreifenbehälter aufgedruckt ist, dient nur
zur Kontrolle der Messsystems. Dies ist kein empfohlener Wert für Ihren Blutzuckerspiegel!
15
Page 18
10 das System prüfen
so prüfen Sie mit den Kontrolllösungen
1. Führen Sie Ihren Teststreifen, mit den Kontakten voraus und das
Ihnen zugewendet (siehe
naues Messergebnis muss der Teststreifen fest in das Gerät gesteckt werden.
Das Gerät schaltet sich automatisch ein. Im Display erscheinen kurz alle
Anzeige-Segmente. Danach zeigt das Display die Umgebungstemperatur,
das Symbol und die Codenummer. Codieren Sie Ihr Gerät (siehe Seite 13),
wenn die im Display gezeigte Codenummer nicht mit der Codenummer
der Teststreifendose überein
auf
2. Schütteln Sie die Kontrolllösung vor Gebrauch gut durch. Schrauben Sie
die Verschlusskappe ab und drücken Sie einen Tropfen heraus. Wischen
Sie den ersten Tropfen ab und drücken sie einen weiteren heraus. Nehmen
Sie den Tropfen mit Ihrer Fingerspitze auf (Abb. 8).
Abb. 7)
, in die Teststreifenöffnung.
stimmt.
Hinweis: Damit die Kontrolllösung nicht durch Kontakt mit dem Test-
streifen verunreinigt wird, tragen Sie den Tropfen nicht direkt auf
den Streifen
oder auf die Fingerspitze.
auf, sondern erst auf einen sauberen Untergrund
16
Display
Für ein ge-
(Abb. 7)
(Abb. 8)
Page 19

das System prüfen 10
3. Geben Sie den Tropfen auf den absorbierenden Spalt (Abb. 9). Die Lösung
wird in den Spalt gesogen. Wenn das Kontrollfenster komplett mit der
Lösung gefüllt ist, beginnt das Blutzuckermessgerät mit dem 10 Sek.
Countdown.
4. Nach dem Countdown findet die Glukosemessung statt, und das Ergebnis
wird im Display angezeigt. Prüfen Sie, ob das Ergebnis den vorgegebenen
Wert der Kontolllösung hat. Dieser Wert ist auf dem Behälter der Teststreifen aufgedruckt.
Achtung: Wenn Sie mit der Kontrolllösung wiederholt falsche Messer-
gebnisse erzielen, die vom vorgegebenen Wert abweichen,
funktioniert das Messsystem nicht mehr ordnungsgemäß.
Verwenden Sie das Gerät in diesem Fall nicht mehr um Ihren
Blutzuckerspiegel zu messen. Lesen Sie auf Seite 31-35 das
Kapitel „Fehlermeldungen und Lösungen“. Sollten Sie das
Problem nicht beseitigen können, setzen Sie sich bitte mit
unserem Kundenservice in Verbindung (siehe Garantieseite).
(Abb. 9)
17
Page 20

11 der Blutzuckertest
die Vorbereitung
Stellen Sie sicher, dass Sie die Informationen über
das Gerät, die Teststreifen und dieses Kapitel sorgfältig durchgelesen haben, bevor Sie mit dem Test
beginnen.
1. Legen Sie alle für den Blutzuckertest benötigten
Materialien (Abb. 10) bereit:
A Ihr ibp Messgerät
B die Teststreifen
C die Stechhilfe
D die sterilen Lanzetten
2. Waschen Sie Ihre Hände gründlich mit warmem
Wasser und trocknen Sie sie gut ab.
18
A
D
(Abb. 10)
B
C
Page 21
der Blutzuckertest 11
so gewinnen Sie einen Blutstropfen
Wichtige Hinweise zur Vermeidung einer Infektion:
-
Benutzen Sie eine Lanzette oder die Stechhilfe nie gemeinsam mit anderen Personen.
- Verwenden Sie für jeden Test eine neue sterile Lanzette. Lanzetten sind für den Einmalgebrauch bestimmt.
-
Verhindern Sie, dass Handlotion, Öle oder Schmutz in oder auf Lanzette und Stechhilfe gelangen.
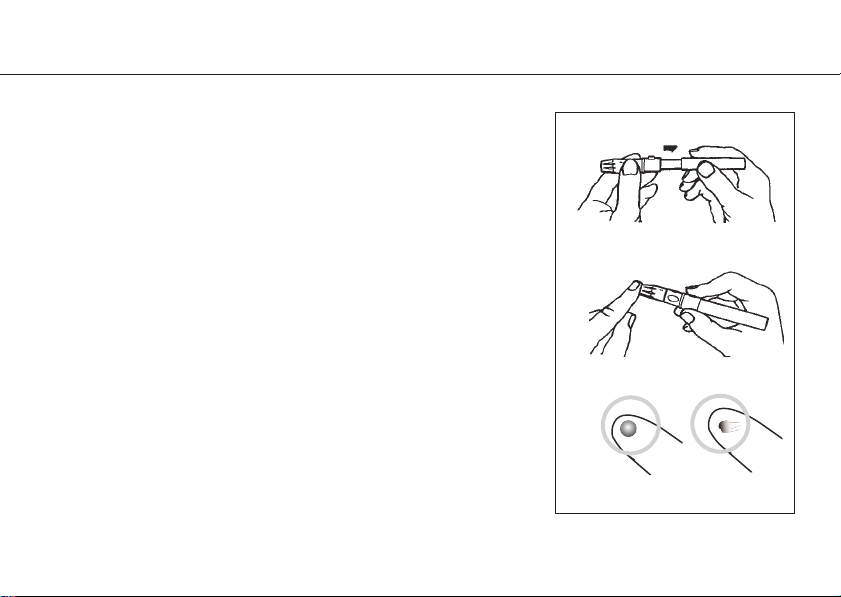
Öffnen Sie die Stechhilfe, indem Sie die Kappe gegen den Uhrzeiger-
1.
sinn drehen und abnehmen. Führen Sie die Lanzette bis zum Anschlag
(ohne sie dabei zu drehen) in die Stechhilfe ein (Abb. 11)
2.
Drehen Sie die Schutzkappe von der Lanzette ab
3.
Setzen Sie die Kappe wieder auf die Stechhilfe und drehen Sie sie im
Uhrzeigersinn (nicht zu straff) fest.
Die justierbare Spitze ist in 5 verschiedene Einstechtiefen einstellbar.
Drehen Sie die Endkappe in die entsprechende Richtung, bis der
Pfeil auf die Ziffer mit der gewünschten Einstechtiefe zeigt (Abb. 13).
Finden Sie die für Sie geeignete Einstechtiefe:
1-2 für weiche oder dünne Haut
3 für normale Haut
4-5 für dicke oder schwielige Haut
(Abb. 12)
.
.
(Abb. 11)
(Abb. 12)
(Abb. 13)
19
Page 22
11 der Blutzuckertest
4.
Spannen Sie die Stechhilfe, indem Sie sie, wie in Abb. 14 gezeigt, aus-
einanderziehen, bis sie mit einem “Klick” einrastet. Rastet sie nicht
ein, wurde sie wahrscheinlich schon beim Einsetzen der Lanzette
gespannt.
5.
Setzen Sie die Stechhilfe an eine Fingerkuppe (am besten seitlich) an
und drücken Sie die Auslösetaste
Blutstropfen, indem Sie die Stelle sanft massieren.
Achten Sie darauf, dass der Blutstropfen nicht verschmiert
und führen Sie den Test (wie auf Seite 21-22 beschrieben) durch.
Hinweis:
6.
Ihr System benötigt nur einen kleinen Blutstropfen, um einen
Test durchzuführen. Sie können ihn von einer Fingerspitze
gewinnen. Verwenden Sie für jeden Test eine andere Stelle.
Wiederholte Einstiche in die selbe Stelle können Entzündungen
und Gefühl
Öffnen Sie die Stechhilfe wieder, indem Sie die Kappe gegen den
Uhrzeiger
Lanzette vorsichtig, indem Sie sie herausziehen und entsorgen Sie sie
sorgfältig, um eine Verletzung anderer Personen zu vermeiden. Setzen
Sie die Kappe wieder auf und drehen Sie sie fest.
sinn drehen und abnehmen.
losigkeit hervorrufen.
20
(Abb. 15)
. Gewinnen Sie einen
(Abb. 16)
Entfernen Sie die gebrauchte
(Abb. 14)
(Abb. 15)
(Abb. 16)
richtig falsch
Page 23
der Blutzuckertest 11
so führen Sie den Test durch
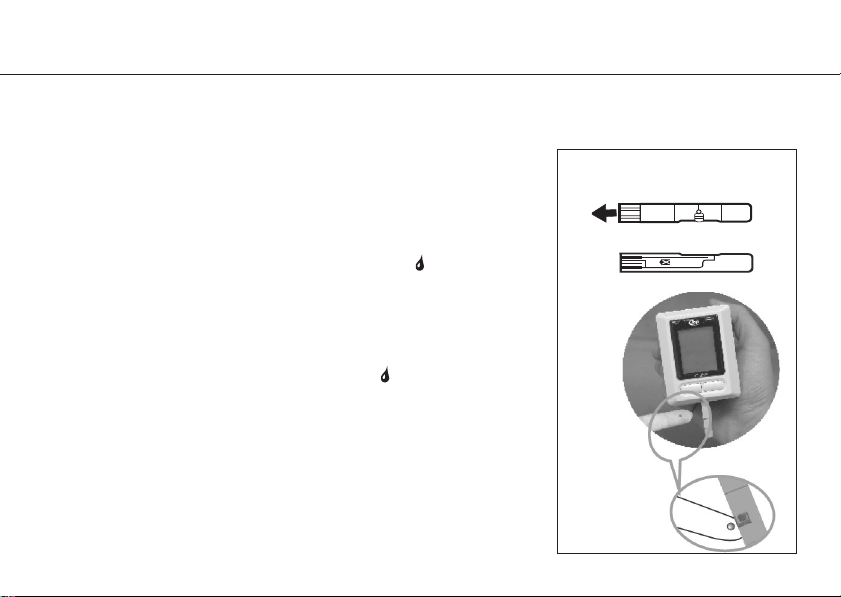
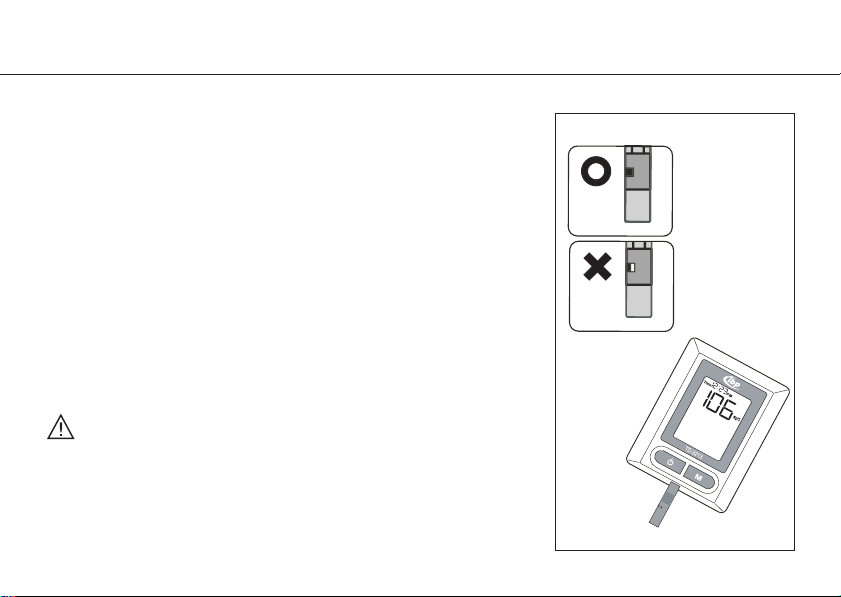
1. Führen Sie Ihren Teststreifen, mit den Kontakten voraus und das
Display Ihnen zugewendet (siehe
Für ein genaues Messergebnis muss der Teststreifen fest in das
Gerät gesteckt werden. Das Gerät schaltet sich automatisch ein. Im
Display erscheinen kurz alle Anzeige-Segmente. Danach zeigt das
Display die Umgebungstemperatur, das Symbol und die Codenummer. Codieren Sie Ihr Gerät (siehe Seite 13), wenn
gezeigte Codenummer nicht mit der Codenummer auf
fendose überein
Gewinnen Sie mit der Stechhilfe einen rundlichen Blutstropfen von
2.
mindestens 2 Mikroliter. Erscheint das Symbol im Display, geben Sie
den Blutstropfen auf das absorbierende Fenster des Teststreifens, an
die Stelle, an der Fenster und Spalt zusammentreffen (Abb. 18).
Drücken Sie
verschmierte
3. Das Kontrollfenster des Teststreifens muss vollständig mit Blut gefüllt
sein, bevor das Gerät mit dem Countdown beginnt. Falls das Kontrollfenster nicht völlig mit Blut gefüllt ist (Abb. 19) und das Gerät
mit dem Messvorgang beginnt, tragen Sie nicht nachträglich Blut
au
stimmt.
nicht den Finger auf den Teststreifen und tragen Sie keine
Probe auf.
Abb. 17)
, in die Teststreifenöffnung.
die im Display
der Teststrei-
(Abb. 17)
richtig
falsch
(Abb. 18)
21
Page 24
11 der Blutzuckertest
auf. Ziehen Sie den Teststreifen heraus und beenden Sie so den Testvorgang. Beginnen Sie von vorne, indem Sie einen neuen Teststreifen
einführen und das benötigte Blut dazugeben.
Sollte es Ihnen nicht gelingen, den Teststreifen richtig mit Blut zu
füllen, setzen Sie sich mit dem Kundenservice in Verbindung.
Hinweis:
3. Nach dem das Gerät den Countdown beendet hat (max. 10 Sek.),
Die Messergebnisse Ihres Blutzuckermessgerätes “ibp TD 3213”
sind genaue vollblutkalibrierte Testergebnisse (Abb. 20), die direkt
mit Laborergebnissen verglichen werden können.
Wenn Sie innerhalb von zwei Minuten kein Blut auf den
streifen geben, fordert Sie das Gerät mit einem Signalton auf, es
durch Herausziehen des Teststreifens abzuschalten. F
ihn nochmals in das Gerät ein, um den Testvorgang neu zu
beginnen.
erscheint das Messergebnis im Display. Die Messwerte des Blutzuckertests werden automatisch in den Speicher übernommen.
Schalten Sie das Gerät aus, indem Sie den Teststreifen herausziehen.
Warnung:
benutzte Lanzette sorgfältig, um eine Verletzung und eine Infizierung
Entsorgen Sie den gebrauchten Teststreifen und die
anderer Personen zu vermeiden.
Test-
ühren Sie
22
(Abb. 19)
Beispiel:
Blutauftrag richtig
Beispiel:
Blutauftrag
ungenügend
(Abb. 20)
Beispiel:
Vollblutkalibriertes Ergebnis
Page 25

den Blutdruck messen 12
Mit der oszillometrischen Messmethode werden der systolische und diasystolische Blutdruck und die
Herzschlagrate gemessen. Sämtliche Messwerte können im LCD-Display abgelesen werden. Die
Messungen werden am Handgelenk ausgeführt.
die Manschette anlegen
1. Wickeln Sie die Manschette um das Handgelenk. Halten Sie die Hand-
fläche nach oben
der Seite der Handfläche am Handgelenk befinden.
Das Handgelenk muss frei sein. Ziehen Sie das Klettband ca. 0,5 -1 cm
2.
unterhalb des Ansatzes des Daumenballens an
(Abb. 21)
. Das Display des Messgerätes muss sich auf
(Abb. 22)
.
die Manschette fest um das Handgelenk anziehen
1. Ziehen Sie nicht gewaltsam an der Manschette
2. Ziehen Sie die Manschette nicht zu eng an. Befestigen Sie das Klett-
band
(Abb. 24)
.
(Abb. 23)
.
(Abb. 21)
Abstand 0,5 - 1cm
(Abb. 22)
(Abb. 23)
(Abb. 24)
23
Page 26
12 den Blutdruck messen
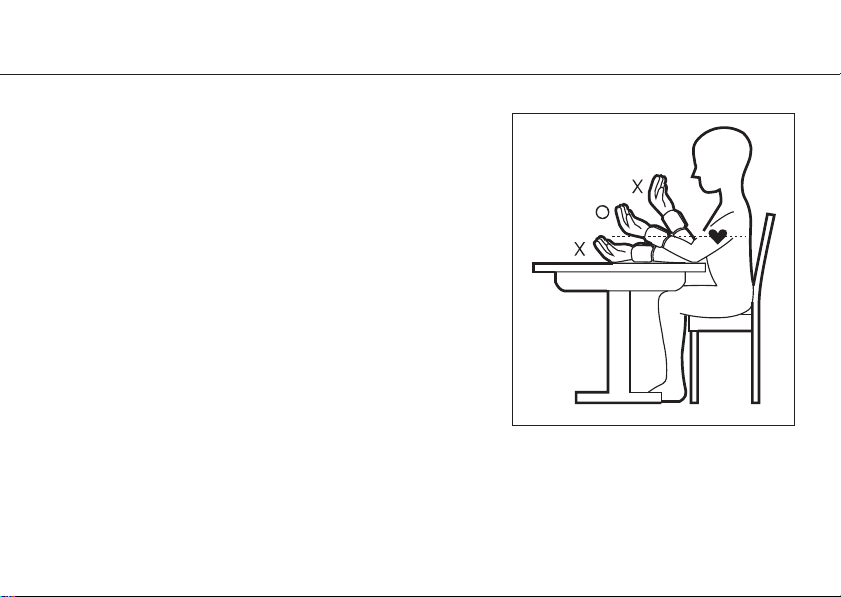
den Blutdruck im Sitzen messen
1. Setzen Sie sich zum Blutdruckmessen bequem auf einen
Stuhl, machen Sie einige tiefe Atemzüge. Entspannen Sie sich.
2. Stützen Sie den Ellenbogen auf eine Tischfläche oder
andere Fläche, wie z.B. die Aufbewahrungsbox.
3. Positionieren Sie den Arm so, dass sich die Manschette auf
derselben Höhe wie das Herz befindet
sich die Manschette höher oder niedriger als das Herz, führt
dies zu Abweichungen von genauen Messwerten.
Entspannen Sie Ihre Hand und sprechen Sie nicht, die Hand-
4.
fläche muss nach oben zeigen.
(Abb. 25)
. Befindet
(Abb. 25)
Hinweise:
Natürlicherweise unterscheidet sich der an beiden
Um Ihre Blutdruckwerte vergleichen zu können, sollte er immer am gleichen Handgelenk gemessen werden.
Um die Werte des sich im Laufe des Tages ändernden Blutdruckes richtig zu erfassen, ist es wichtig,
den Blutdruck täglich zu Hause und zur gleichen Zeit zu messen.
Überlassen Sie Ihre Messwerte dem Arzt zur Auswertung.
Handgelenken gemessene Blutdruck voneinander.
24
Page 27
den Blutdruck messen 12
der Messvorgang
Möchten Sie eine Blutdruckmessung
vornehmen, nachdem Sie einen Blutzuckertest durchgeführt haben, vergewissern Sie sich, dass der Teststreifen
aus dem Messsystem gezogen und
das Gerät abgeschaltet wurde.
1. Legen Sie die Handgelenk-Man-
schette um Ihr Handgelenk wie
auf Seite 23 beschrieben.
2. Schalten Sie das Gerät ein, indem
-Taste
Sie die
3. Wird die
ein Signalton zu hören, und für
ca. 2 Sek. leuchten im Display alle
Anzeige-Segmente auf
werden.
In direktem Anschluss daran führt das System automatisch ein Reset durch. Das Blutdruck-Messsystem ist jetzt messbereit und startet den Messvorgang.
drücken.
-Taste
gedrückt, ist
(Abb. 26)
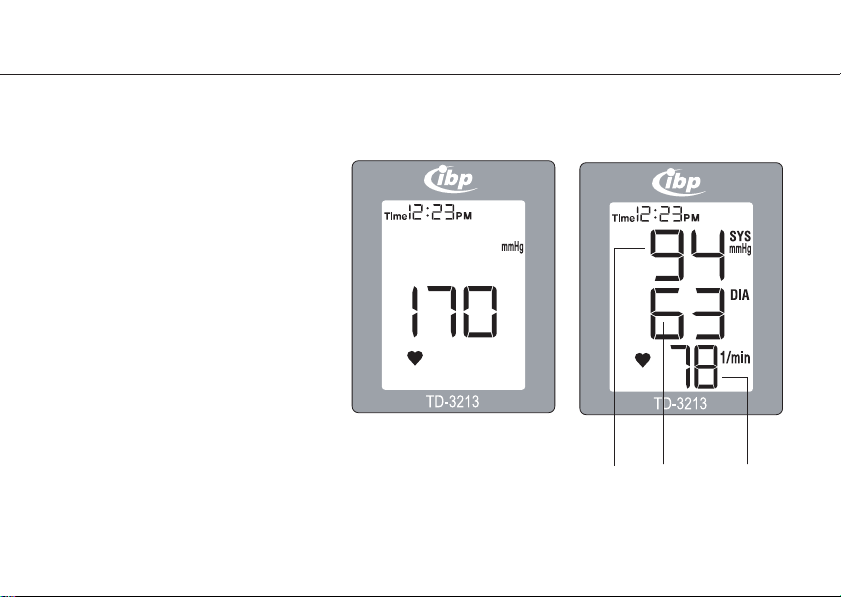
Nun wird das zuletzt gemessene Testergebnis mit Datum und Uhrzeit kurz angezeigt (Abb. 27).
(Abb. 26) (Abb. 27)
. Durch diesen Test kann die Vollständigkeit der Anzeige überprüft
25
Page 28
12 den Blutdruck messen
4. Ist es das erste Mal, dass mit dem
System eine Blutdruckmessung
durchgeführt wird oder wurden
die Batterien ausgewechselt, wird
die Manschette automatisch auf
200 mmHg (24 Kpa) gepumpt.
Andernfalls bezieht sich das Messsystem automatisch auf den zuletzt gemessenen Wert des systolischen Blutdrucks.
5. Hat das Gerät den entsprechenden Manschettendruck erreicht
und die Pulsfrequenz ermittelt, erscheint das Puls-Symbol im Display.
Gleichzeitig ist ein Piepton zu
hören
(Abb. 28)
6. Nach dem Messvorgang wird die Manschette automatisch entlüftet und das Blutzucker-/Blutdruck-Messsystem piept zweimal.
Das Display zeigt die gemessenen Werte des systolischen, des diastolischen Blutdrucks und der Herzfrequenz, zusammen mit der Zeitangabe
.
(Abb. 29).
(Abb. 28)
26
(Abb. 29)
Systole Diastole Puls
(oberer (unterer (Herz-
Wert) Wert)
frequenz)
Page 29
den Blutdruck messen 12
die Abschaltung
1. Durch Drücken der
2. Wollen Sie den Messvorgang unterbrechen, drücken Sie die
lüftet und das Gerät schaltet ab.
3.
Das Gerät verfügt über eine Energiespar-Automatik.
schaltet es sich nach ca. 2 Minuten automatisch aus.
-Taste
schalten Sie das Gerät aus.
Wenn Sie vergessen, das Gerät auszuschalten,
-Taste.
Die Manschette wird ent-
27
Page 30

13 der Messwertespeicher
so rufen Sie die gespeicherten Messwerte ab
Ihr Messgerät bewahrt die jüngsten 350 Blutzucker- und BlutdruckMesswerte mit Datum und Uhrzeit im Speicher auf. Verfahren Sie wie
folgt, um die Messwerte im Speicher abzurufen.
•
Ist das Gerät ausgeschaltet, drücken Sie die M-Taste 1mal und nach
dem Piepton ein weiteres Mal.
ergeb
nisse nacheinander aufrufen.
•
Das zuletzt gemessene Testergebnis mit Datum und Uhrzeit erscheint
zuerst im Display (Abb. 30). Bei jedem weiteren Drücken der M-Taste
wird das jeweils davor gespeicherte Testergebnis angezeigt.
Sie können so durch jedes Drücken der M-Taste das
ergebnis (bis zu 350 gespeicherte Messwerte) abrufen.
•
Ist der Messwertespeicher voll, wird
sobald ein neues Ergebnis gespeichert wird.
Hinweis: Wird das Gerät das erste Mal benutzt, blinkt “
Display und zeigt damit, dass noch keine Testergebnisse gespeichert sind.
28
Jetzt können Sie die letzten 350 Mess-
vorherige Mess-
der älteste Messwert gelöscht,
Memory”im
(Abb. 30)
Page 31

der Messwertespeicher 13
so verlassen Sie den Speicherbereich
•
Drücken Sie die -Taste, um das das Gerät auszuschalten.
Hinweis: Das Gerät verfügt über eine Energiespar-Automatik.
Taste gedrückt, schaltet sich das Gerät automatisch aus.
Wird für die Dauer von zwei Minuten keine
so löschen Sie den Speicherinhalt
•
Ist das Gerät ausgeschaltet, drücken und halten Sie die M-Taste mindestens 3 Sekunden lang. Alle bis
dahin im Speicher abrufbare Messwerte sind gelöscht.
29
Page 32

14 allgemeine Informationen
Reinigung und Pflege des Systems
Das Gerät bedarf keiner besonderen Reinigung, wenn es nicht mit Blut oder Kontrollflüssigkeit in
Berührung kommt. Beachten Sie deshalb bitte folgende Hinweise:
•
Ihr Blutzucker-/Blutdruck-Messgerät ist ein Präzisionsinstrument. Bitte behandeln Sie es sorgsam,
um die Elektronik nicht zu beschädigen und Funktionsstörungen zu vermeiden.
•
Setzen Sie das Gerät keinen extremen Temperaturen und keiner hohen Feuchtigkeit aus.
•
Achten Sie darauf, dass weder Schmutz, Staub, Blut, Kontrollflüssigkeit noch Wasser durch die
Teststreifenöffnung, die Anschlussbuchse oder an der Taste in das Geräteinnere gelangen.
•
Bewahren Sie das Gerät nach jedem Gebrauch in der mitgelieferten Aufbewahrungsbox auf.
•
Die Geräteoberfläche können Sie mit einem feuchten Tuch (mit Wasser und einer milden Reinigungslösung) reinigen. Trocknen Sie das Gerät nach der Reinigung mit einem fusselfreien Tuch.
30
Page 33

allgemeine Informationen 14
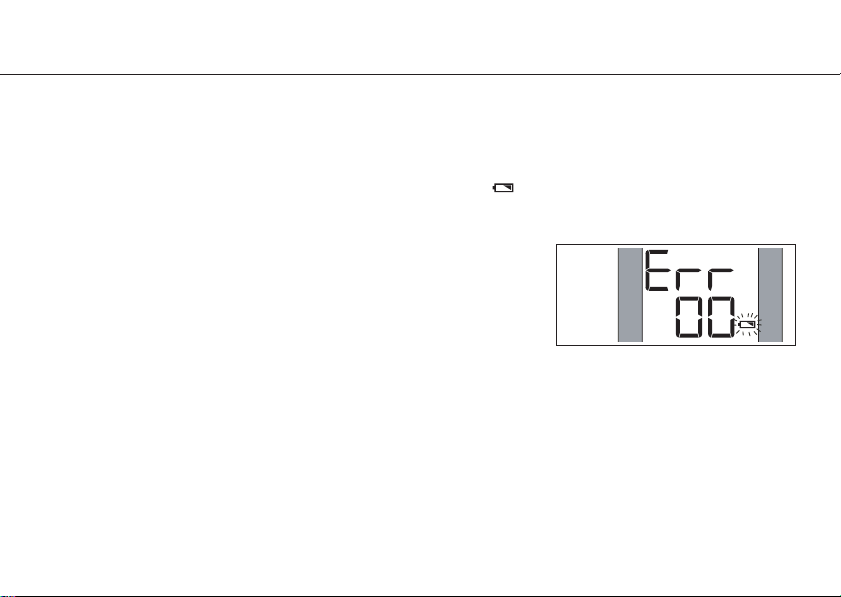
Fehlermeldungen und Lösungen
In der folgenden Tabelle werden mögliche Fehlermeldungen erläutert.
Anzeige/Problem
Bedeutung
Lösung
Err.0
Err.1
Err.2
Err.3
Err.4
Err.5
Err.6
Err.7
Kein Puls oder der gemessene Puls
ist zu niedrig.
Die Armmanschette ist undicht oder
der Druckaufbau zu gering.
Der systolische Wert kann nicht
ermittelt werden.
Der Manschettendruck ist zu hoch.
Der diastolische Wert kann nicht
erfasst werden oder liegt außerhalb
des Messbereichs.
Der Druckabbau erfolgt zu schnell.
Der Druckabbau erfolgt zu langsam.
Der systolische Wert liegt außerhalb
des Messbereichs.
Legen Sie die Manschette richtig an
und messen noch einmal.
Hilft ein Batteriewechsel nicht, bitten
Sie Ihren Händler um Hilfe.
Verhalten Sie sich ruhig und messen
noch einmal.
Quetschen Sie die Manschette nicht.
Verhalten Sie sich ruhig und messen
noch einmal.
Bitten Sie Ihren Händler um Hilfe.
Bitten Sie Ihren Händler um Hilfe.
Verhalten Sie sich ruhig und messen
noch einmal.
31
Page 34

14 allgemeine Informationen
Fehlermeldungen und Lösungen
In der folgenden Tabelle werden mögliche Fehlermeldungen erläutert.
Anzeige/Problem
Bedeutung
Lösung
Err.8
Err.9
Err.20
Err.21
Err.22
Err.24
Err.330
32
Der Manschettendruck liegt
außerhalb des Messbereichs.
Der Manschettendruck reicht nicht
aus, obwohl bereits der höchste
Punkt des Druckaufbaus erreicht ist.
Teststreifen ist fehlerhaft oder
beschädigt.
Teststreifen ist fehlerhaft oder
beschädigt.
Teststreifen ist falsch eingelegt.
Teststreifen war schon gebraucht.
Der Manschettendruck liegt über
330 mmHg.
Verhalten Sie sich ruhig und messen
noch einmal.
Der zu messende Blutdruck liegt
oberhalb des Messbereichs. Setzen Sie
sich mit Ihrem Arzt in Verbindung.
Wechseln Sie den Teststreifen durch
einen neuen codierten aus.
Wechseln Sie den Teststreifen durch
einen neuen codierten aus.
Legen Sie einen neuen Teststreifen
richtig ein.
Legen Sie einen neuen Teststreifen ein.
Quetschen Sie die Manschette nicht.
Page 35

allgemeine Informationen 14
Fehlermeldungen und Lösungen
Anzeige/Problem
Bedeutung
Lösung
Nach dem Einführen
des Teststreifens in
das Gerät erscheint
keine Anzeige.
Nach dem Einführen
des Teststreifens in
das Gerät und dem
Auftragen des Testmaterials startet der
Testvorgang nicht.
Die Batterie ist völlig leer.
Die Batterie ist falsch eingelegt oder
fehlt.
Der Teststreifen ist mit der oberen Seite
nach unten oder nicht vollständig
eingeführt.
Das Gerät ist schadhaft.
Ungenügender Blutauftrag.
Defekter Teststreifen.
Defektes Gerät.
Ersetzen Sie die Batterie.
Prüfen Sie, ob die Batterien richtig
einglegt sind (Polarität).
Führen Sie den Teststreifen vollständig,
mit den Kontakten voraus und der
positiven Seite nach oben ein.
Setzen Sie sich mit dem Service in
Verbindung.
Wiederholen Sie den Test mit einen
neuen Teststreifen und größerem
Blutstropfen.
Wiederholen Sie den Test mit einem
neuen
Teststreifen.
Setzen Sie sich mit dem Service in
Verbindung.
33
Page 36

14 allgemeine Informationen
Fehlermeldungen und Lösungen
In der folgenden Tabelle werden mögliche Fehler beim Blutdruck-Messvorgang erläutert.
Anzeige/Problem
Nach dem Einschalten
des Gerätes zeigt das
Display nichts an.
Das BatteriewechselSymbol erscheint.
Betriebszeit wird kürzer.
Nach dem Messvorgang
werden keine Messdaten angezeigt.
Fragwürdige Messergebnisse, die stark
von den Durchschnittswerten abweichen.
34
Bedeutung
Die Batterien sind falsch eingelegt.
Die Batterien sind fast leer oder sie
sind völlig leer.
Die Batterien sind fast leer oder sie
sind völlig leer.
Auf Frost können Batterien mit
schwächerem Stromfluss reagieren.
Sie verwenden keine Alkali-Batterien.
Die Spannung der Batterien ist extrem
niedrig.
Sie haben beim Messen keine korrekte
Position eingenommen.
Der Blutdruck schwankt von Zeit zu Zeit.
Lösung
Prüfen Sie die Lage der Batterien.
Ersetzen Sie alle zwei durch neue
Batterien.
Ersetzen Sie alle zwei durch neue
Batterien.
Legen Sie die Batterien kurz an
einen warmen Platz und starten Sie
dann neu.
Verwenden Sie Alkali-Batterien.
Ersetzen Sie alle zwei durch neue
Batterien.
Nehmen Sie die korrekte Position ein.
Page 37

allgemeine Informationen 14
Anzeige/Problem
Die Pulsfrequenz
ist höher oder
niedriger als der
Durchschnittswert.
Das Gerät schaltet
selbsttätig ab.
Das Gerät pumpt
während des Messvorgangs weiter auf.
Hinweis:
Im ibp TD 3213 gespeicherte Messwerte können an einen PC übertragen werden. Dafür sind
ein Kabel zur Datenübertragung und eine geeignete Software (beides nicht im Lieferumfang)
nötig. Das Datenübertragungs-Kabel ist auf Anfrage bei unserem Kundenservice erhältlich. Eine
englische Software wird auf der Webseite des Herstellers www.taidoc.com angeboten.
Bedeutung
Sie haben sich bewegt oder Sie haben
gesprochen.
Sie haben die Messung unmittelbar
nach einer körperlichen Anstrengung
vorgenommen.
systembedingt
Das ist normal. Wenn der zu ermittelnde
Blutdruck des Nutzers höher ist, als der
Ausgangswert des Manschettendrucks,
pumpt das Gerät automatisch weiter.
Der Druckaufbau erfolgt in Schritten
von 20 mmHg, bis ein für den Messvorgang brauchbarer Druck erreicht ist.
Die Armmanschette ist nicht korrekt
oder nicht straff genug angelegt.
Lösung
Bewegen Sie sich während der
Messung nicht. Sprechen Sie nicht.
Nehmen Sie keine Messung
unmittelbar nach einer körperlichen
Anstrengung vor.
Drücken Sie die -Taste
messen Sie noch einmal.
Legen Sie die Manschette richtig an.
erneut und
35
Page 38

15 die technischen Daten
Modell : ibp TD 3213
Display : große Flüssigkristallanzeige (LCD)
Speicher : 350 Messergebnisse mit Uhrzeit und Datum
Stromversorgung : 2 x 1,5V Alkali-Batterie Typ “AAA”
Batterie-Betriebsdauer : für ca. 200 Messungen
Abmessungen : ca. L 75 x B 60 x T 27 mm (ohne Manschette)
Gewicht : ca. 120 g (inklusive Batterien)
Blutzucker-Messsystem
Maßeinheit : umschaltbar zwischen mg/dL und mmol/L
Probenmaterial : kapilläres Vollblut
Probenvolumen : 2 Mikroliter
Messbereich : 20 bis 600 mg/dL (1,1 bis 33,3 mmol/L)
Messdauer : 10 Sekunden
Messergebnis : vollblutkalibriert
Betriebstemperatur : + 10 °C bis + 40 °C
Aufbewahrungs-/Transporttemp. : -20°C bis +60°C
36
5 bis 95 % relative Luftfeuchte max.
Page 39

die technischen Daten 15
Blutdruck-Messsystem
Messprinzip : Oszillometrisch
Messbereich : 30 - 300 mmHg (Blutdruck)
Messgenauigkeit : ± 3 mmHg (Druckanzeige)
Druckaufbau : Automatischer Druckaufbau durch Pumpe
Druckabbau : Automatisches Druckablassventil-System
Betriebstemperatur : + 10 °C bis + 40 °C
Aufbewahrungs-/Transporttemp. : - 20 °C bis + 60 °C
Manschette : Umfang 135
Änderungen der technischen Angaben ohne Benachrichtigung sind aus Aktualisierungsgründen
vorbehalten.
: 40 - 200 Puls/min (Pulsfrequenz)
:±4 % (Pulsfrequenz)
30 - 85 % Luftfeuchte max.
10 - 95 % relative Luftfeuchte max.
-
195 mm
37
Page 40

GARANTIESCHEIN
Ihr Blutzucker-/Blutdruck-Messsystem wurde vor der Auslieferung auf seine einwandfreie Qualität geprüft.
Senden Sie zur Geräteprüfung oder Reparatur das Gerät zusammen mit Kaufbeleg oder Quittung und der
Beschreibung des Fehlers bzw. der gewünschten Prüfung an die unten angegebene Adresse.
Ab dem Kaufdatum (Datum des Kassenzettels) - für 3 Jahre - werden Reparaturen kostenlos durchgeführt,
wenn Ihr Gerät auf Grund von Fertigungs- oder Materialfehlern defekt sein sollte.
Die Garantie schließt keine Schäden ein, die durch fehlerhafte Bedienung, unsachgemäße Behandlung,
Aufbewahrung und Pflege oder ungewöhnliche Einflüsse auftreten. Weitergehende Ansprüche, wie
Schadenersatz sind ebenfalls ausgeschlossen.
Sollten Sie Grund haben, die zugesicherten Garantie-Leistungen in Anspruch zu nehmen, senden Sie das
Gerät mit den Garantieunterlagen an den Kundendienst:
ibp Service-Center
Am Weimarer Berg 6
99510 Apolda
Tel: 03641 3096299
Vertrieb: ibp gmbh, Hauptverwaltung, Botzstraße 6, D-07743 Jena, Germany
www.ibp-info.de
Hersteller: Taidoc Technology Co., Taiwan
Page 41

TD 3213
2-in-1 blood sugar and blood pressure measuring system
for simple, rapid and precise measurement
Gebrauchsanweisung
Instruction manual
Mode d’emploi
Gebruiksaanwijzing
Manual de instrucciones
Issued: December 2004 © by ibp innovative business promotion gmbh, Germany
Page 42

Blood sugar measurement results
Table according to Krall, L.P., and Beaser, R.S.: Joslin Diabetes Manual. Philadelphia: Lea and Febiger (1989),
138, for the comparison of your blood sugar values with values from persons without diabetes
Time of day Values from persons without diabetes Your measured blood sugar values
(mg/dL) / (mmol/L) (mg/dL) / (mmol/L)
Before breakfast
Before lunch/supper
1 hour less than
after meals
2 hours less than
after meals
Between 2 and 4 more than
in the morning
(70~105) / (3,9~5,8) ___________________ (mg/dL) / (mmol/L)
(70~110) / (3,9~6,1) ___________________ (mg/dL) / (mmol/L)
(160) / (8,9) ___________________ (mg/dL) / (mmol/L)
(120) / (6,7) ___________________ (mg/dL) / (mmol/L)
(70) / (3,9) ___________________ (mg/dL) / (mmol/L)
Page 43

contents
1 introduction
2 important safety information
3 before operating
symbols used
4 the device
5 description of display symbols
6 device settings
7 the batteries
8 test strips
9 calibrating the device
10 checking the system
how to check using control solutions
11 the blood sugar test
how to carry out the test
12 making a blood pressure measurement
measure your blood pressure while sitting down / the measuring method / switching off ...... 24-27
13 the measured value memory
how to quit the memory mode /
14 general information
error messages and solutions
15 specifications
...................................................................................................................................................... 2
.................................................................................................................. 3
/
the blood sugar/pressure measuring system / included in delivery /
...................................................................................................................................................... 5
......................................................................................................................................................... 6
................................................................................................................ 7
/ date and time / measurement unit ........................................................................... 8-9
/
changing the batteries
/
test strip sections / important information about test strips
/
carrying out a self-test / why coding?
/
control solutions / important information about control solutions
/
preparation
................................................................................................................................ 21-22
/
cleaning and care of the system /
......................................................................................................................... 31-35
/
guarantee
............................................................................................................................ 36-38
........................................................................................................ 10
............................................. 11-12
........................................................... 13
........................................................................................................... 16-17
/
how to get a blood drop /
/ attaching the cuff / fasten the cuff snugly / ......... 23
/
how to call up
deleting the memory contents
saved measured results / ...................................... 28
......................................................... 18-20
......................................................... 29
..................................................................... 30
................ 4
/ ......... 14-15
1
Page 44

1 introduction
dear customer,
we are delighted that you have decided to purchase this
device measures your blood sugar with extremely high accuracy. It is fitted with an automatic memory for
350 measured values with date and time. This enables you to follow changes easily and tell your doctor
about them in good time.
checks. It is not suitable for the determination of diabetes or for the determination of blood sugar
values for newborn babies. When testing, use only fresh, capillary whole blood.
manual is for your information. Please read it carefully and completely, follow all instructions and carry out
all control tests as described before you actually carry out a blood sugar test. Keep this instruction manual
in a safe place.
Subject to technical alterations.
The system is intended for use by private persons for active blood sugar
Preliminary notes!
This blood sugar measuring device conforms with the requirements of EU guideline 98/79, 93/42/EEC,
IEC 60601-1, IEC 61010-1, IEC 60601-1-2, IEC 61326, EN 1060-1, EN 1060-3, ANSI/AAMI SP 10,
ISO 15197, ISO 14971 for "in vitro" diagnostic devices and has been issued with the CE 0123" conformity
sign.
The ibp company confirms conformity with these requirements for the device
supplied together with this instruction manual. The conformity declaration is available.
2
blood sugar/pressure measuring system
This instruction
0123
. The
Page 45

important safety information 2
-
Never change prescribed predicament quantities by yourself because of your measured blood
sugar/pressure values.
-
Results which lie below 3.3 mmol/L (60 mg/dL) are an indication of "hypoglycemia", blood sugar levels
which are too low. If the results are above 13.3 mmol/L (240 mg/dL), it is possible that symptoms of too
high a blood sugar level ("hyperglycemia") can occur. You should visit the doctor if your measured
results are regularly above or below these limit values.
-
Lack of water or large fluid losses (such as through sweating) can cause falsified measured values. If you
suspect that you are suffering from dehydration, in other words lack of fluids, you should visit a doctor
as soon as possible.
-
If your level of red blood cells (hematoric value) is very high (over 55 %) or very low (below 30 %), this
can lead to falsified measured results.
-
If have read all the instructions in this instruction manual and symptoms are still occurring which are not
compliant with your blood sugar levels or your blood pressure, please contact a doctor.
Only your doctor can evaluate measured results.
3
Page 46

3 before operation
the blood sugar/pressure measuring system
Your blood sugar/pressure measuring system can be used to measure blood sugar levels up to a height
of 3275 m
system consists of three components: the blood
the control solutions. These components were specially designed to match each other, tested and
quality-confirmed in our R&D department. This enables this measuring device to measure and display
the blood sugar level extremely precisely (whole blood calibrated measurement results). Only use test
strips and control solutions approved for use with this blood sugar measuring device. If you have any
questions about your measured values, please contact your doctor.
included in delivery
The following parts are included in delivery and are contained in the packaging:
above sea level without affecting the test results. The blood
- 1 blood sugar measuring device - 25 test strips
- 25 sterile lancets - 1 pricking aid
-1 check code strips - 2 different control solutions
- 1 instruction manual - 1
- 1 practical storage box - 2 1.5 V alkaline batteries size AAA
sugar/pressure
measuring device, the test strips and
quickstart guide with troubleshooting
sugar/pressure
measuring
4
Caution:
Check that the box packaging seal is unbroken! If the seal has been broken or is missing, please return the device to your dealer immediately.
Page 47

before operation 3
symbols used
The following symbols on the device, packaging and in the instruction manual are used to give important information.
Symbol Meaning Symbol Meaning
To be used only once (LOT) batch designation
Observe instruction manual Device BF
Protect from sunlight Series number
Protect from moisture Caution = danger to device/materials
Working temperature range Warning = danger to user
Manufactured on Use-by date
(to be used up to last day of month)
5
Page 48

4 the device
the device components
Batteries
2 1.5 V alkaline
batteries size
AAA, in battery
compartment on
device bottom.
-button
For switching the
device on and off and
for starting the blood
pressure measuring
process.
Slot for feeding in test strips. The device switches
itself on automatically if you feed a test strip in.
6
LCD Display
Displays test results,
symbols and device
settings.
Setting button (SET)
The setting button for
setting the date, time
and measurement unit
is located in the battery
compartment.
M button (MENU)
The menu/memory
button is used for
setting the device, for
switching over to
memory mode and for
changing data such as
day, time and unit.
Test strip opening
0123
Page 49

description of display symbols 5
Results
Area for display of measured
results. If the mmol/L measurement
unit is selected, a decimal point
appears.
Blood drop symbol
Shows that the device is ready
to accept the sample and to
carry out measurement.
Ketone symbol
Test strip symbol
Is displayed constantly as long as
the device is carrying out various
self-tests. Flashes when device
is switched on and no test strip
has been fed in.
Memory symbol
Displays saved measured
results.
Date and time
day month
hour minute
Pulse
symbol
Pulse
frequency
Displays
measured
puls frequency
.
Code
Appears together with the test
strip code number when it is fed
in.
Measurement units
This field displays the units
(mg/dL or mmol/L respectively
mm/Hg or Kpa) set.
Battery symbol
Shows that the battery is becoming
weak and must be replaced.
Temperature symbol
Appears if the surrounding
temperature is not between 10°C
and 40°C.
Average for one day
Shows the average saved blood
sugar level measured result for
one day.
7
Page 50

6 device settings
When your measuring device is delivered, the time, date, measuring units and temperature units are preset.
If you want to change the settings, to replace the battery or to delete the memory contents, you must
switch to setting mode before carrying out changes.
how to set the time and date
1. Setting the year:
Leave the device switched off. Remove the battery compartment
cover on the bottom of the device, and press the Setting button
in the battery compartment. The display will show the year flashing
(Fig. 1). Press the
year is shown in the display, press the Setting button in the battery
compartment to confirm the setting and to switch to the month.
2. Setting the month:
The month is flashing (Fig. 2). Press the
Press the Setting button to confirm the setting and to switch to
the day.
3. Setting the days, hours and minutes:
Proceed in a similar manner to set the day, and minute, and to
switch to setting the measurement unit (mmol/L or mg/dL).
8
M button
to change the year. Once the required
M button
to set the month.
(Fig. 1)
(Fig. 2)
Page 51

device settings 6
how to set the measurement unit
Your device can show you the measured results in millimol per litre (mmol/L) or milligram per decilitre
(mmg/dL). The unit mmg/dL is standard in the USA, in Canada the standard is mmol/L. Within Europe, both
measurement units are common.
1. Setting the measurement unit:
Leave the device switched off. Remove the battery compartment
cover on the bottom of the device, and press the Setting button
(SET) in the battery compartment. Press the Setting button (SET)
several times until the measurement unit for measuring blood sugar
appears
(Fig. 3)
.
Press the
the Setting button (SET) to confirm the setting. The measurement
unit
unit for measuring blood sugar begins to flash.
2. How to quit the setting mode:
Press the
Setting button (SET)
M button
to set the required unit. Press
once more to quit setting mode.
(Fig. 3)
9
Page 52

7 the batteries
changing the batteries
The device will warn you that the batteries are getting low using two different display symbols.
When you switch the device on, the battery symbol appears in the display. All other display symbols
1.
are showing operational readiness. In this case, there is still enough energy for around 30 tests available.
Test results will be precise, but you should still replace the batteries nevertheless.
2.
The display is now showing the battery symbol flashing (Fig. 4). In
case, there is no longer enough energy for a test available. Replace
old batteries with two new
3.
Switch the device off, and open the battery compartment on the rear
of the device by pressing the locking tab and lifting the battery compart
ment cover upwards.
4.
Remove the old batteries, and replace them with two new
new batteries so that the terminals match the diagram on the battery compartment, and then close the
battery compartment cover.
Note: Replacing the battery does not affect the memory contents. Sometimes you may have to re-set the time
and date. Dispose of empty batteries at a recycling point. If you are no longer using the device,
remove the battery from the battery compartment.
Battery safety- - Keep away from children! - Do not short-circuit!
information: - Not rechargeable! - Do not incinerate!
2 x 1.5 V alkaline batteries size AAA
10
this
(Fig. 4)
the
.
2 x 1.5 V alkaline batteries size AAA
. Insert the
Page 53

test strips 8
Your measuring device determines the sugar levels in your blood. When you put a drop of blood on the
absorption gap on the test strip to do a test (chemical components of test strip: 1. Glucose oxidase (A.
niger) 30 IU, 2. Electron shuttle 1.5 mg, 3. Enzyme protector 0.13 mg, 4. Non-reactive ingredients
2.5 mg, 5. Each vial cap with 3.0 g molecular sieve), the blood is automatically sucked into the reaction
cell. A reaction now takes place here.
Test strip components
Contacts
Feed this end of the test strip into the blood sugar measuring device.
Push the strip firmly into the device up to the stop.
Control window
This little window on the test strip shows you whether you have
applied enough blood.
Absorption gap
Place a small drop of blood in contact with the absorption gap.
The blood is sucked into the test strip by itself.
Handle
Grip the test strip at this end while applying blood and feeding the
strip into the device.
11
Page 54

8 test strips
important information about test strips:
-
Keep the test strips in a cool, dry place (only in original container, below 40 °C or 104 °F). Protect the
strips from direct sunshine and do not freeze them.
-
Only touch the test strips with clean, dry hands. When taking the strips out of the container and feeding
them into the measuring device, try to hold them only by the handle.
-
When you take a test strip out of the container, put the cover back on the container straight away and
make sure that it is closed to form an airtight seal. Always use each test strip as soon as you have taken it
out of the container.
-
Write the opening date on the container label when you open it for the first time. You should use the rest
of the test trips up within 90 days of opening.
-
Do not use any test strips which are past their use-by date, since this can falsify the measured results. The
use-by date is printed on the container.
-
Only apply blood samples or the control solutions supplied to the gap on the test strip. Application of
other substances leads to inaccurate or false measured values.
-
The test strips must not be bent, cut or otherwise altered in any way.
Warning: Keep the container with the test strips away from children! The sealing cap means there
is a danger of suffocation. In addition, the sealing cap contains drying materials which
could be hazardous to health if breathed in or swallowed. This can lead to skin or eye
irritations.
12
Page 55

calibrating the device 9
carrying out a self-test
Every time when you feed a test strip into the measuring device (Fig. 5), or
switch the device on, all display segments in the display are illuminated briefly.
This shows you that the system is carrying out various self-tests and also allows
you to check that all display segments are working properly.
warum codieren?
The code numbers are used to calibrate the test strips with the device in order
to achieve exact test results. Before you use a device for the first time, and
every time you use a new container of test strips, you must first feed the
check/code strips into the device. After this, every time you carry out a test you
should check that the number which appears in the display is the same as the
code number on the test strip container
Warning: If the code number displayed is not the same as the code
number on the test strip container, the measured results can
be falsified.
(Fig. 6)
.
(Fig. 5)
(Fig. 6)
Code number of
the test strip is 303
13
Page 56

10 checking the system
control solutions
The control solutions are used to check the entire blood sugar measurement system. This allows you to
determine whether the device and the test strips are working together optimally, and whether the test is
being carried out correctly. It is important to carry out the test with the control fluids regularly in order to
ensure that you are receiving precise measured results.
The control solutions contain a specified proportion of glucose which is precisely known. When you carry
out the blood sugar test with this liquid, you can check afterwards whether the measured value is within the
range of the actual value. The actual value for the control solutions is printed on the test strip container.
There are two different, colour-coded control solutions, one for the "normal" value range (green) and the
other for the "high" value range (red).
The control solutions should be used:
• to practise the blood sugar test.
• to ensure that the device and the test strips are working perfectly together.
• to check that the test has been carried out correctly.
Before you carry out the first blood sugar test, you should carry out three successful tests with the control
liquid one after the other. This makes sure that you are able to carry out the test correctly, and that the
device is working perfectly. If all three test results reach the value which is printed on the test strip container,
you can start carrying out the actual blood sugar measurement.
14
Page 57

checking the system 10
When should you carry out a test with the control solution?
• at least once per week • if the device has been dropped
• when you open a new container • every time when you suspect
of test strips that the blood sugar measuring
• if the measured results do not system is not working correctly
agree with the way you feel
important information about control solutions
- Only use control solutions
- Write the date of opening on the bottle.
- Check the use-by date for the solution. Never use solutions past their use-by date.
- The control solution should reach room temperature (20°C to 25°C/68°F to 77 °F) before you use it.
- Shake the bottle of test solution well before you open it. Wipe the first drop away, and then use the
second drop to ensure that you have a good sample for precise measure results.
- You should use the control solution up within 90 days of opening.
- Keep the solutions safely closed away at room temperature (below 30°C). Never freeze them!
Warning: The measured value for the solutions which is printed on the test strip container is only
used to check the measuring system. It is not intended as a recommended value for your
blood sugar level!
included in delivery
.
15
Page 58

10 checking the system
how to check using control solutions
1.
Feed your test strip into the test strip opening with the contacts first, and
the device display facing you (see Fig. 7). You should ensure that the
test strip is firmly located in the device to achieve exact measured results.
The device switches itself on automatically. All digits in the display will
light up briefly. After this, the surrounding temperature, the symbol
and the code number are displayed. You should calibrate your
(see Page 13) if the code number shown in the display is not the same
as the code number on the test strip container.
2. Shake the control solution well before using it. Unscrew the cap and
squeeze one drop out. Wipe the first drop away, and then squeeze
another one out. Put the drop onto your fingertip (Fig. 8).
Note:
In order to make sure that the control solution is not contaminated by
contact with the test strip, do not apply the drop directly to the strip,
but first apply it to something clean or to your fingertip.
16
device
(Fig. 7)
(Fig. 8)
Page 59

checking the system 10
3. Apply the drop onto the absorption gap. (Fig. 9). The solution is sucked
into the gap. When the control window is completely full of the solution,
the blood sugar measuring device starts a 10 second countdown.
4. The glucose measurement takes place after the countdown has finished,
and then the result is shown in the display. Check to see that the result is
the same as the stipulated control solution value. This value is printed on
the test strip container.
Warning: If you achieve incorrect measurement results with the control
solution which deviate from the stipulated value time after
time, the measurement system is no longer working correctly.
In this case, you should stop using the device to measure your
blood sugar level. Please see the chapter entitled "troubleshooting" on Pages 31 - 35. If you are still unable to solve the
problem, please contact our customer service department (see
guarantee page).
(Fig. 9)
17
Page 60

11 the blood sugar test
preparation
Ensure that you have read all the information about
the device, the test strips and all of this chapter
through carefully before you start the test.
1. Make sure you have all materials required for the
blood sugar test (Fig. 10) ready:
A your ibp measuring device
B the test strips
C the pricking aid
D the sterile lancets
2. Wash your hands thoroughly with warm water
and dry them well.
18
A
D
(Fig. 10)
B
C
Page 61

the blood sugar test 11
how to obtain a blood drop
important information about avoiding infection:
-
Never use a lancet or picking aid together with another person.
-
Always use a new sterile lancet for each test. Lancets should only be used once.
-
Try to prevent hand lotion, or oils or dirt getting in or onto the lancet or pricking aid.
Open the pricking aid by turning the cap anticlockwise and removing
1.
it. Feed the lancet into the pricking aid up to the stop (without
turning it at the same time) (Fig. 11).
2.
Unscrew the protective cap from the lancet (Fig. 12).
3.
Place the cap on the pricking aid again and tighten it by turning it
clockwise (not too firmly).
The adjustable tip can be adjusted to 5 different pricking depths.
Turn the end cap in the appropriate direction until the arrow points
to the number for the required pricking depth (Fig. 13).
How to find a suitable pricking depth for yourself:
1-2 for soft or thin skin
3for normal skin
4-5 for thick or calloused skin
(Fig. 11)
(Fig. 12)
(Fig. 13)
19
Page 62

11 the blood sugar test
4.
Tension the pricking aid by pulling it apart (as shown in Fig. 14) until
it engages with a "click". If it does not engage, it was probably
tensioned already when inserting the lancet.
5.
Place the pricking aid against your fingertip (on the side if possible)
and then press the trigger button (Fig.15). Help the blood drop to
emerge by massaging the location softly.
Ensure that the blood drop does not smear (Fig. 16) and then carry
out the test as described on Pages 21-22.
Note:
Your system only requires a small drop of blood to carry out a
test. You can obtain this from one fingertip. You should always
use a different location for each test. Repeated pricks in the
same location can cause inflammation and loss of feeling.
6.
Open the pricking aid again by turning the cap anticlockwise and
removing it. Remove the used lancet carefully by pulling it out, and
then dispose of it carefully in order to avoid injuries to other people.
Put the cap on once again and close it firmly.
20
(Fig. 14)
(Fig. 15)
(Fig. 16)
right wrong
Page 63

the blood sugar test 11
how to carry out the test
1. Feed the test strip into the test strip opening with the contacts first
and the device display facing you (see Fig. 17). You should ensure
that the test strip is firmly located in the device to achieve exact
measured results. The device switches itself on automatically. All
digits in the display will
temperature, the symbol and the code number are displayed.
You should code your device (see Page 13) if the code number
shown in the display is not the same as the code number on the
test strip container.
Use the pricking aid to obtain a rounded blood drop of at least 2
2.
microlitres. When the symbol flashes in the display, apply the
blood drop to the absorption window on the test strip at the location
where the window and gap meet
against the test strip, and do not apply smeared samples.
3. The control window in the test strip must be completely filled with
blood before the device can start the countdown. If the control window is not completely filled with blood (Fig. 19) and the device
starts the measuring process, do not apply more blood subsequently.
au
light up briefly.
(Fig. 18)
After this, the surrounding
. Do not press your finger
(Fig. 17)
right
wrong
(Fig. 18)
21
Page 64

11 the blood sugar test
Pull the test strip out to stop the test process. Start again from the
beginning by feeding in a new test strip and applying the necessary
blood drop. If you cannot manage to fill the test strip with enough
blood, please contact our service department.
Note:
If you do not apply blood to the test strip within two minutes,
the device will make a beep to tell you to turn it off by pulling out
the test strip.
Remove the strip, and then feed it into the device
again to start the test procedure once more.
3. After the device has finished the countdown (max. 10 sec), the
measured results are shown in the display. The blood sugar test
measured values are automatically stored in the memory. To turn
the device off, pull the test strip out.
Warning:
Dispose of used to test trips and used lancets very
carefully in order to prevent injury or infection to other
persons.
The measured results produced by your "ibp TD 3213" blood sugar
measuring device are precise whole blood-calibrated test results
(Fig. 20), which can be directly compared with laboratory results.
22
(Fig. 19)
Example:
correct blood
application
Example:
insufficient
blood
application
(Fig. 20)
Example:
whole bloodcalibrated result
Page 65

making a blood pressure measurement
Using the oscillatory measuring method means that the systolic and diasystolic blood pressures and
pulses are measured. All measured values can be seen in the LCD display. Measurements are carried
out on the wrist.
12
attaching the pressure cuff
1. Wrap the measuring cuff around your wrist. Hold your palm facing up-
wards
(Fig. 21)
. The display of the unit should be placed on the palm
side of the wrist.
2. The wrist should be bare.
0.5 - 1 cm below the start of the base of the thumb
Ensure that the velcro strip is around
(Fig. 22)
.
(Fig. 21)
distance 0,5 - 1cm
(Fig. 22)
fasten the pressure cuff snugly
1. Do not pull on the pressure cuff
2. Do not make the pressure cuff too tight. Secure the velcro band
(Fig. 24)
.
(Fig. 23)
.
(Fig. 23)
(Fig. 24)
23
Page 66

12
making a blood pressure measurement
measure your blood pressure while sitting
(Fig. 25)
down
1. Have yourself on a seat in a comfortable position, breathe
deeply several times and relax.
2. Place your elbow on the table or other suitable support,
such as the storage box.
It is extremely important for the measured values, that the
3.
cuff is at the same height of the heart. Higher or deeper
position will give deviations from the true value.
4.
Relax your hand and do not talk, your palm must be facing
upwards.
Notes:
The blood pressure measured at one wrist is of course different from that measured at the other. In order
to compare blood pressure values, you should also take measurements on the same wrist.
To get a correct picture of the blood pressure changes during the day, make the measurements at home
daily at the same time.
Record the values and show them to your physician for assessment.
24
Page 67

making a blood pressure measurement
the measuring method
If you want to carry out a blood
pressure measurement after you have
carried out a blood sugar test, ensure
that the test strip has been removed
from the measuring system and that
the device has switched off.
1. Place the wrist measuring cuff
around your wrist as described on
page 23.
2. Switch the device on by pressing
the -button.
3. When the -button has been
pressed you will hear a beep, and
all display segments in the display will illuminate for around 2 seconds (Fig. 26).This test allows you
to check that the display is working properly. Now the last measured test result is displayed briefly
with date and time (Fig. 27). Directly after this, the system carries out a reset automatically. The
blood pressure measuring system is now ready to measure and starts the measuring process.
(Fig. 26) (Fig. 27)
12
25
Page 68

12
making a blood pressure measurement
4. If it is the first time that the system
is carrying out a blood pressure
measurement, or if the batteries
have just been replaced, the
measuring cuff will automatically
be pumped up to a pressure of
200 mmHg (24Kpa). If not, the
measuring system automatically
refers to the last systolic blood
pressure value measured.
5. Once the device has reached the
appropriate measuring cuff pressure and determined the pulse,
the pulse symbol is shown in the
display. At the same time you will
hear a beep (Fig. 28).
6. After the measurement process, the measuring cuff is automatically deflated and the blood sugar/blood pressure measuring
system beeps twice. The display shows the measured values for
systolic and diastolic blood pressure and the heart frequency,
together with the time (Fig. 29).
(Fig. 28)
26
(Fig. 29)
Systolic Diastolic Pulse
rate rate frequency
Page 69

making a blood pressure measurement
12
switching off
1. Press the -button to switch the device off.
2. If you want to cancel the measurement process, press the -button. The measuring cuff will be
deflated and the device switches off.
3.
The device is fitted with an automatic energy-saving system. If you forget to switch the device off, it switches
itself off automatically after approx. 2 minutes.
27
Page 70

13 the measured value memory
how to call up saved measured results
Your measuring device stores the newest 350 blood sugar and blood
pressure measured values with date and time in its memory. Proceed as
follows to call up the measured values from the memory.
•
If the device is switched off, press the M button once, and then
once again after the beep. After this, you can call up the last 350
measured results in sequence.
•
The last measured test result is displayed first with date and time
(Fig. 30). Every time you press the M button again, the previous
saved measured result is displayed.
This means you can call up the previous measured result (up to 350
saved measured values) every time you press the M button.
•
If the measured value memory is full, the oldest measured value will
be deleted as soon as a new value is saved.
Note:
If you are using the device for the first time, the display will show
"
Memory
" to show you that no test results have been saved yet.
28
(Fig. 30)
Page 71

the measured value memory 13
how to quit the memory mode
•
Press
the -button
Note: The device is fitted with an automatic energy-saving system. If no buttons are pressed for a period of two
minutes, the device switches itself off automatically.
deleting the memory contents
•
If the device is switched off, press the M button and hold it down for a least three seconds. All measured
values stored in the memory up to this moment are then deleted.
to switch the device off.
29
Page 72

14 general information
cleaning and care of your system
The device does not require any particular cleaning as long as it does not come into contact with blood or
control liquids. Please therefore observe the following information:
•
Your blood sugar
fully in order not to damage the electronics and to avoid malfunctions.
•
Do not subject the device to extreme temperatures or high levels of humidity.
•
Take care to ensure that dirt, dust, blood, control fluids or water do not penetrate into the device
interior through the test strip opening, the connecting plugs or the button.
•
You should always keep the device in the carry bag supplied after using it.
•
You can clean the device surface with a moist cloth (with water and a mild cleansing agent). After
cleaning, dry the device off with a lint-free cloth.
30
/blood pressure
measuring device is a precision instrument. Please handle it very care-
Page 73

general information 14
error messages and solutions
The following table explains possible error messages.
Display/Problem
Meaning
Solution
Err.0
Err.1
Err.2
Err.3
Err.4
Err.5
Err.6
Err.7
No pulse, or measured pulse is too
low.
The measuring cuff is leaking or
pressure buildup is too low.
The systolic value cannot be
determined.
The measuring cuff pressure is too high.
The diastolic value cannot be
determined or is outside the
measuring range.
Pressure buildup is taking place too quickly.
Pressure buildup is taking place too slowly.
The systolic value is outside the
measuring range.
Make sure the measuring cuff is correctly applied and measure once again.
If changing the batteries does not help,
please ask your dealer for help.
Remain calm and measure once again.
Do not squash the measuring cuff.
Remain calm and measure once again.
Please ask your dealer for help.
Please ask your dealer for help.
Remain calm and measure once again.
31
Page 74

14 general information
error messages and solutions
The following table explains possible error messages.
Display/Problem
Meaning
Solution
Err.8
Err.9
Err.20
Err.21
Err.22
Err.24
Err.330
32
The measuring cuff pressure is
outside the measuring range.
The measuring cuff pressure is insufficient, although it has already reached
the highest pressure build up point.
The test strip is faulty or damaged.
The test strip is faulty or damaged.
The test strip has been inserted
wrongly.
Test strip has already been used.
The measuring cuff pressure is above
330 mmHg.
Remain calm and measure once
again.
The blood pressure to be measured
is outside the measuring range.
Please contact your doctor.
Replace the test strip with a new
coded one.
Replace the test strip with a new
coded one.
Feed a new test strip in correctly.
Feed a new test strip in.
Do not squash the measuring cuff.
Page 75

error messages and solutions
Display/Problem
Meaning
general information 14
Solution
The device shows
nothing in the display
after you have fed the
test strip in.
After the test strip has
been fed him, and the
test material has been
applied, the test
procedure does not
start.
The batteries are completely
discharged.
The batteries are located wrongly or
are missing.
The test strip has been inserted with
the top side facing downwards
or is not completely inserted.
The device is faulty.
Insufficient application of blood.
Defective test strip.
Defective device.
Replace the batteries.
Check to see that the batteries are
correctly inserted (polarity).
Insert the test strip fully, with the
contacts first and the positive side
facing upwards
Please contact our service
department.
Repeat the test using a new test
strip and larger drop of blood.
Repeat the test using a new
test strip.
Please contact our service
department.
.
33
Page 76

14 general information
error messages and solutions
The following table explains possible error messages (while making a blood pressure measurement).
Display/Problem
After the device has
been switched on, the
display shows nothing.
The "change battery"
symbol is displayed.
Operating times are
becoming shorter.
No measurement data
is displayed after the
measuring process.
Dubious measured
results which deviate
strongly from average
values.
34
Meaning
The batteries have been inserted the
wrong way.
The batteries are almost empty or are
fully empty.
The batteries are almost empty or are
fully empty.
Batteries with weak current flow can be
affected by frost.
You are not using alkaline batteries.
Battery voltage is extremely low.
You have not taken up the right
position during measurement.
The blood pressure varies from time to time.
Solution
Check battery alignment.
Replace both old batteries with new
ones.
Replace both old batteries with new
ones.
Place the batteries briefly in a warm
place and then restart.
Use alkaline batteries.
Replace both old batteries with new ones.
Try to sit in the correct position.
Page 77

general information 14
Display/Problem
The pulse frequency is
higher or lower than
the average value.
The device switches
off automatically.
The device pumps up
during the measuring
process.
Note:
All measured values saved in the ibp TD 3213 can be transferred to a computer. To do this, you will
require a cable for data transfer and suitable software (neither are included in delivery). The data
transfer cable can be obtained from our customer service department on request. An Englishlanguage software is available on the manufacturer's web site at www.taidoc.com.
Meaning
You moved, or you talked.
You carried out the measurement
directly after physical exercise.
System requirement.
This is normal.
If the user blood-pressure to be determined is higher than
the output value of the measuring cuff pressure, the device
will pump automatically.
Pressure buildup takes place in stages of 20 mmHg, until the
pressure has been reached which is usable for the measuring
process.
The measuring cuff has not been correctly located or is not tight enough.
Solution
Do not move during the measurement,
and do not talk.
Do not carry out measurements
immediately after physical exercise.
Press the -button again and
measure once more.
Make sure the measuring cuff is
correctly located.
35
Page 78

15 specifications
Model : ibp TD 3213
Display : large liquid crystal display (LCD)
Memory : 350 measured results with time and date
Power supply : 2 x 1.5 V alkaline batteries size AAA
Battery operating life : for around 200 measurements
Dimensions : approx. 75 x 60 x 27 mm (without cuff)
Weight : approx. 120 g (including batteries)
blood sugar measuring system
Measuring unit : switchable between mg/dL and mmol/L
Sample material : capillary whole blood
Sample volume : 2 microlitres
Measuring range : 20 to 600 mg/dL (1.1 to 33.3 mmol/L)
Measuring time : 10 seconds
Measured results : whole blood-calibrated
Operating temperature : + 10 °C to + 40 °C
Storage/transport temperature : -20°C to +60°C
36
5 to 95 % relative humidity max.
Page 79

specifications 15
blood pressure measuring system
Method of Measurement : Oscillometric
Range of Measurement : 30 - 300 mmHg (Pressure)
Accuracy Calibration : ± 3 mmHg (Pressure)
Inflation of Pressure : Automatic inflation (pump)
Deflation of Pressure : Automatic air release valve System
Operating Temperature : + 10 °C to + 40 °C
Storage/transport temperature : - 20 °C to + 60 °C
Cuff Size : Wrist circumference approx. 135 ~ 195mm
We reserve the right to make changes to technical details without notification for reasons of updating.
40 -200 beats/min (Pulse frequency)
±4 % (Pulse frequency)
30 to 85 % relative humidity max.
10 to 95 % relative humidity max.
37
Page 80

GUARANTEE
Your blood sugar/blood pressure measuring system was checked to ensure its faultless quality before
despatch. Please send the appliance for checking or repair togehter with the purchase document or receipt
and the description of the faults and/or of the desired check to the adress below.
From the date of purchase (date of the purchase document) rapairs will be carried out free of charge for 36
months, if your appliance should be defective due to a production or material fault.
The guarantee does not cover any damage occurring as a result of faulty operation, improper treatment,
storage and care or unusual influences. All further claims as well as damages shall likewise be excluded.
Should you have any reason to avail yourself of the warranted services under the guarantee, send the
appliance with the guarantee documents to the customer service department:
ibp International Business Products Limited
6 Newfield Court
West Houghton
Bolton BL53 SA England
Phone: +44-(0) 19 42 - 81 96 95
Distributed by: sano health care products pvt. Ltd. ibp group
Corporate Office: 28 • Lansdown Terrace, 1st Floor • Kolkata - 700 026
Phone No: +91 33 2465 0383-85
Manufactured by: Taidoc Technology Co.,Taiwan
Page 81

TD 3213
Système de mesure de tension artérielle et de glycémie 2 en 1
pour des mesures simples, rapides et précises
Gebrauchsanweisung
Instruction manual
Mode d’emploi
Gebruiksaanwijzing
Manual de instrucciones
Etat: Décembre 2004 © by ibp innovative business promotion gmbh, Germany
Page 82

Résultats de mesure de la glycémie
Tableaux selon Krall, L.P., and Beaser, R.S.: Joslin Diabetes Manual. Philadelphia: Lea and Febiger (1989), 138,
Pour la comparaison de vos valeurs de glycémie avec les valeurs de personnes sans diabète
Période de valeurs de personnes sans diabètes vos valeurs obtenues de glycémie
de la journée (mg/dL) / (mmol/L) (mg/dL) / (mmol/L)
Avant le
petit déjeuner
Avant le déjeuner/
dîner (repas du soir)
1 heure après moins que
les repas
2 heures après moins que
les repas
entre 2 et 4 heures plus que
du matin
(70~105) / (3,9~5,8) ___________________ (mg/dL) / (mmol/L)
(70~110) / (3,9~6,1) ___________________ (mg/dL) / (mmol/L)
(160) / (8,9) ___________________ (mg/dL) / (mmol/L)
(120) / (6,7) ___________________ (mg/dL) / (mmol/L)
(70) / (3,9) ___________________ (mg/dL) / (mmol/L)
Page 83

Le contenu
1L’introduction
2 Recommandations importantes en matière de sécurité
3 Avant la mise en service/ Le système de mesure / L’ensemble des fournitures /
Les symboles employés
4 L’appareil
5 La description des symboles de l’affichage
6 Les réglages de l’appareil/ Réglez la date et l’horaire comme suit / Réglez l’unité de mesure
7 Les piles/ Le remplacement des piles
8 La bande de test/ Les pièces de la bande de test / Informations importantes
9 Calibrage de l’appareil/ Exécution d’un test automatique / Pourquoi coder ?
10 Contrôler le système/ Les solutions de contrôle / Les recommandations importantes
concernant les solutions de contrôle / Vous contrôlez ainsi les solutions de contrôle
11 Le test de la glycémie/ La préparation / Vous obtenez une goutte de sang de cette manière
Vous réalisez le test comme suit
12 La prise de la tension artérielle
artérielle assis / Le mesurage correct / La mise à l’arrêt ....................................................................... 25-27
13 La mémorisation des valeurs de mesure / Vous appelez ainsi les valeurs
Vous quittez ainsi la plage de mémoire /
14 Les informations générales/ Nettoyage et soin du système
Messages de défauts et solutions
15 Les caractéristiques techniques/ Bon de garantie
................................................................................................................................................... 2
................................................................ 3
.................................................................................................................................... 5
.......................................................................................................................................................... 6
........................................................................................ 7
......................................................................................................... 10
.................................................................................................................... 21-22
/ Fixation de la manchette / Mesure de la tension ................ 23-24
Vous effacez ainsi le contenu de la mémoire
.................................................................................................................. 31-35
.............................................................................. 36-38
.............................................................. 30
........................... 4
................................. 11-12
.............................. 13
................ 14-15
...................... 16-17
/.... 18-20
de mémoire ...........
................ 28-29
.. 8-9
1
Page 84

1 L’introduction
Chère cliente, Cher client,
Nous sommes heureux de votre décision pour l
L’appareil mesure le Glucose du sang avec une très précision. Il possède une mémoire automatique pour
350 valeurs de mesures avec date et horaire. Vous pouvez ainsi très facilement suivre les modifications et
les communiquer suffisamment tôt à votre médecin.
glycémie des personnes dans la sphère privée. Il n’est pas approprié à la dé-tection du diabète et à la
détermination du glucose dans le sang pour les nouveaux nés. N’employez pour le test que du sang
capillaire, frais.
manière complète. Suivez les informations et réalisez tous les tests de contrôles comme décrit avant
d’entreprendre un test de glycémie. Conservez soigneusement le mode d’emploi.
Toutes modifications techniques réservées.
Ce mode d’emploi vous sert d’information. Veuillez lire celui-ci attentivement et de
Remarques!
Cet appareil de mesure du glucose dans le sang répond aux exigences de la directive 98/79 de l’UE,
93/42/EEC, IEC 60601-1, IEC 61010-1, IEC 60601-1-2, IEC 61326, EN 1060-1, EN 1060-3, ANSI/AAMI
SP 10, ISO 15197, ISO 14971 pour les appareils de diagnostic « In Vitro » et est doté du sigle CE (sigle de
conformité) « CE 0123 ».
La société ibp certifie la conformité de l’appareil fourni avec ce mode d’emploi avec
cette réglementation. La déclaration de conformité est jointe.
2
système de mesure de glycémie/de tension artérielle
Le système est destiné à des contrôles actifs de la
0123
.
Page 85

Recommandations importantes 2
Recommandations importantes en matière de sécurité:
Ne modifiez jamais par vous-même la prise de médicaments ordonnée par votre médecin en
-
raison de vos valeurs de mesure de glucose dans le sang/pression sanguine.
mesure peut seulement estimé par votre médecin.
Les valeurs de mesure qui se trouvent sous 3,3 mmol/L (60 mg/dL), sont un signe pour « Hypoglycemia »
-
(hypoglycémie), une glycémie trop basse. Si des valeurs de mesure de plus de 13,3 mmol/L (240 mg/dL)
se présentent, des symptômes allant jusqu’à un taux de glucose dans le sang très élevé (« Hyperglycemia
») peuvent apparaître. Consultez votre médecin si vos valeurs se trouvent régulièrement au dessus et en
dessous de ses valeurs limites.
Le manque d’eau ou de grosses pertes de liquides (par exemple, par la sueur) peuvent causer des valeurs
-
de mesure fausses. Si la supposition persiste selon laquelle vous vous trouvez en déshydratation, que
vous souffrez donc d’un manque de liquide, consultez au plus vite un médecin!
Si votre proportion en globules rouges (valeur hématocrite) est très élevée (plus de 55%) ou très basse (en
-
dessous de 30%), celle-ci peut fausser vos valeurs de mesure.
Si vous avez observez toutes les instructions dans votre mode d’emploi, et que néanmoins des
-
symptômes apparaissent qui n’ont aucun rapport avec votre glycémie ou avec votre pression artérielle,
veuillez consulter votre médecin.
Votre résultat de
3
Page 86

3 Avant la mise en service
Le système de mesure de glycémie/pression sanguine
Avec votre
glycémie jusqu’à une altitude de 3.275 m au dessus du niveau de la mer, sans effets sur le résultat du
test. Le
éléments : l’appareil de mesure
contrôle. Ces composants ont été adaptés, testés de manière optimale les unes aux autres au cours du
développement et certifiés quant à leur qualité. De cette manière, ces appareils de mesure du taux de
glycémie mesurent et affichent de manière très précise (résultat de mesure du sang complet calibré).
N’employez seulement que cet appareil de mesure du glucose du sang, que ces bandes de test
certifiées et que cette solution de contrôle. En cas de question concernant les valeurs de mesure,
veuillez vous adressez à votre médecin.
L’ensemble des fournitures
Les pièces suivantes font partie de l’ensemble des fournitures et se trouvent dans l’emballage :
- 1 appareil de mesure - 25 bandes de test
- 25 lancettes stériles - 1 dispositif d’assistance à la piqûre
- 1 bande de contrôle de code - 2 différentes solutions de contrôle
- 1 mode d’emploi - 1
- 1 Boîte de conservation - 2 piles alcalines à 1,5 V, type AAA
système de mesure de glycémie/de tension artérielle
système de mesure de glycémie/de tension artérielle
de glycémie/de tension artérielle
mode d’emploi bref avec élimination de défauts
, vous pouvez employer la mesure de
sanguine dans le sang se compose de 3
, des bandes de test et des solutions de
Attention:
4
Contrôlez si le sigle de contrôle de l’emballage est intact! Si le sigle est détérioré ou
même manque, veuillez rapporter l’appareil chez le revendeur.
Page 87

Avant la mise en service 3
Les symboles employés
Les symboles suivants sur l’appareil, les emballages et dans le mode d’emploi donnent des informations importantes:
Symboles Significations Symboles Significations
Pour l’emploi unique (LOT) description de la charge
Observer le mode d’emploi Classification de l’appareil BF
Protéger de la lumière du soleil Numéro de série
Protéger contre l’humidité Attention = Danger pour les appareil/
les objets
Plage de température de travail Avertissement = Danger pour l’utilisateur
Fabriqué le Date d’expiration du produit
(à utiliser jusqu’au dernier jour du mois)
5
Page 88

4 L’appareil
Les parties intégrantes de l’appareil
Piles
2 piles alcalines à
1,5 V, type AAA,
dans le logement
de la pile au dessous de l’appareil.
Touche
Pour la mise en service
et à l’arrêt de l’appareil et
pour le démarrage de la
procédure de mesure de
tension artérielle.
Ouverture des bandes de test
Fente pour introduction de la bande de test.
L’appareil s’enclenche automatiquement
lorsque vous introdui-sez une band de test.
6
Ècran LCD
Affichage des résultats de
test, symboles et réglages
de l’appareil.
Touche Réglage (SET)
La touche de réglage
le réglage de la date,
temps et unité de mesure
se trouve dans le logement
de la pile.
pour
Touche M (MENU)
La touche de menu/mémoire est employée pour
le réglage de l’appareil
afin de parvenir au mode
de mémoire et est employé
pour la modifi-cation des
données de la journée, de
l’horaire et de l’unité
.
0123
Page 89

La description des symboles de l’affichage
5
Résultats de mesure
Plage pour l’affichage des résultats
de mesure. Si l’unité de mesure
mmol/L est sélectionnée, un point de
décimal apparaît.
Symbole de la goutte de sang
Indique que l’appareil est disponible à la prise d’échantillons et à la mesure.
Symbole « Ketone »
Symbole de bande de test
Est affiché constamment aussi
longtemps que l’appareil réalise
différents tests automatiques.
Clignote lorsque l’appareil a été
enclenché et qu’aucune bande
de test n’est introduite.
Symbole de la mémoire
Montre les résultats mémorisés
de mesure.
Datue et horaire
jour mois
heure minute
Pulsation
Symbole
du pouls
Montre la
fréquence du
pouls mesurée.
Code
Apparaît ensemble avec le
numéro de code de la bande de
test lorsqu’elle est introduite.
Unités de mesure
L’unité réglée est affichée ici
(mg/dL ou mmol/L respectivement
mmHg ou Kpa).
Symbole de la pile
Indique que les piles sont faibles
et doivent être remplacée.
Symbole de température
Apparaît lorsque la température
ambiante ne se trouve pas entre
10 °C ~ 40 °C.
Moyenne d’une jour
Montre la moyenne des résultats
de mesure mémorisés des valeurs
de glycémie d’une journée.
7
Page 90

6 Les réglages d’appareil
Lors de la fourniture de votre appareil de mesure, l’horaire, la date, l’unité de mesure et l’unité de
température sont préréglées. Lorsque vous modifiez ces réglages, que vous entreprenez un remplacement
de pile ou que vous souhaitez effacer le contenu de mémoire, vous devez passer en mode de réglage pour
réaliser les réglages.
Vous réglez l’horaire et la date de cette manière
1. Réglage du chiffre de l’année: Laissez l’appareil à l’arrêt. Retirez le
couvercle du logement de pile au dos de l’appareil et appuyez sur la
touche Réglage (SET) dans le logement de pile. Le chiffre clignotant des années apparaît à l’écran (Ill. 1). Appuyez sur la
M
(MENUE) pour modifier le chiffre de l’année. Si l’année souhaitée
apparaît à l’écran, appuyez sur la touche Réglage (SET) dans le logement de pile pour confirmer le réglage et pour changer de mois.
2. Réglage du mois: Le mois clignote (Ill. 2). Appuyez sur la
M (MENUE) pour régler le mois. Appuyez sur la touche Réglage (SET
pour confirmer le réglage et pour passer au jour.
3. Réglage des jours, des heures et des minutes: Procédez de la même
manière pour le réglage des jours, des heures et des minutes et pour
parvenir au réglage de l’unité de mesure (mmol/L ou mg/dL).
8
touche
touche
(Ill. 1)
(Ill. 2)
)
Page 91

Les réglages d’appareil 6
Vous réglez l’unité de mesure de cette manière
Votre appareil peut représenter les résultats de mesure en milli moles par litre (mmol/L) ou en milligramme
par décilitre (mmg/dL). Aux USA, l’unité standard est en mmg/dL, au Canada l’unité est mmol/L. En
Allemagne et en Europe, les deux mesures usuelles.
1. Réglage de l’unité de mesure:
Laissez l’appareil à l’arrêt. Retirez le couvercle du logement de pile
au dos de l’appareil et appuyez sur la touche Réglage (SET) dans le
logement de pile.
jusqu’à ce que l’unité de mesure pour la mesure de la glycémie
clignote
(Ill. 3)
souhaitée. Appuyez sur la touche Réglage (SET) pour confirmer le
réglage. L’unité de mesure pour la mesure de tension artérielle
commence maintenant à clignoter.
Vous quittez la plage de réglage de cette manière
2.
Appuyez encore une fois sur la
mode de réglage.
Appuyez sur
.
Appuyez sur la
touche Réglage (SET)
touche
M (MENUE)
:
touche Réglage (SET)
aussi souvent
pour régler l’unité
pour quitter le
(Ill. 3)
9
Page 92

7 Les piles
Le remplacement des piles
L’appareil attire votre attention par deux écrans quant à l’état déchargé des piles.
Lorsque vous mettez l’appareil en service, le symbole de la pile apparaît à l’écran. Tous les affichages
1.
restants à l’écran signalisent la disponibilité au fonctionnement. Dans ce cas, il y a encore suffisamment
d’énergie pour environ 30 tests. Les résultats de test sont précis, les piles doit néanmoins être remplacée.
2.
Le symbole de la pile clignote (Ill. 4). Dans ce cas, il n’y a plus suffisamment d’énergie pour un test. Remplacez les anciennes piles par
deux nouvelles piles
3.
Mettez l’appareil à l’arrêt et ouvrez le logement de piles au dos de
l’appareil en appuyant sur le verrouillage et levez le couvercle du logement de l’appareil vers le haut.
4.
Eliminez les piles usagées et remplacez-les
Disposez les nouvelles piles de telle manière que les pôles correspondent comme indiqué sur la représentation dans le logement et refermez le logement de pile.
Recommandations: Le remplacement des piles n’influence pas le contenu de la mémoire. L’horaire et la date
Recommandations de - Tenir à l’écart des enfants! - Ne pas court-circuiter!
sécurité de la pile: - Pas rechargeable! - Ne pas jeter au feu!
alcalines à 1,5 V, type AAA
doivent néanmoins être éventuellement de nouveau réglés. Déposez les piles usagés
auprès d’un point de recyclage. Retirez les piles de l’appareil lorsque vous n’employez
pas l’appareil durant une période prolongée.
.
par deux nouvelles piles piles
10
(Ill. 4)
alcalines à 1,5 V, type AAA
.
Page 93

Les bandes de test 8
Votre appareil de mesure détermine le contenu de glucose dans le sang. Lorsque vous déposez une
goutte de sang pour le test sur la partie absorbante de la bande de test (composition chimique du
capteur: 1. oxydase de glucose (A. niger) 30 IU, 2. Electrons transporteur 1.5 mg, 3. Protection d’enzyme
0.13 mg, 4. Composants non réactifs 2.5 mg, 5. Fermeture de chaque petite surface avec 3.0 g de tamis
moléculaire), le sang est automatiquement amener dans une cellule de réaction. Il s’y trouve une réaction.
Pièces de bandes de test
Contacts
Introduisez le bout de cette bande de tests dans l’appareil de mesure du
glucose du sang. Appuyez fermement la bande dans l’appareil jusqu’en butée.
Fenêtre de contrôle
Cette petite fenêtre sur la bande de test vous indique si suffisamment de sang
a été déposé.
Fente absorbante
Mettez une goutte de sang en contact avec la fente absorbante.
Le sang est aspiré automatiquement dans la bande de test.
Poignée
Saisissez la bande de test à cette extrémité lorsque vous déposez le sang et
introduisez la bande dans l’appareil.
11
Page 94

8 Les bandes de test
Informations importantes concernant les bandes de test:
-
Conservez la bande de test à un lieu, sec (uniquement dans un réservoir d’origine, sous 40 °C ou 104 °F).
Protégez les bandes contre le rayonnement direct du soleil et ne les congeler pas.
-
Ne touchez la bande de test qu’uniquement avec des mains propres et sèches. Ne saisissez la bande de
test lors du retrait du réservoir et n’introduisez-la dans l’appareil de mesure si possible que par la poignée.
-
Lorsque vous retirez une bande de test du réservoir, replacez ensuite soigneusement le couvercle à sa
place et fermez le boîtier de manière étanche à l’air. N’employez chaque bande de test uniquement juste
après le retrait du boîtier de conservation.
-
Ecrivez la date d’ouverture sur l’étiquette du boîtier lorsque vous l’ouvrez pour la première fois. Utilisez le
reste des bandes de test en l’espace de 90 jours à partir de l’ouverture.
-
N’employez pas de bande de test, dont la date d’expiration a été dépassée puisque cela fausse les
résultats de mesure. Vous trouverez la date d’expiration imprimée sur le boîtier.
-
Ne déposez que des échantillons de sang ou la solution de contrôle jointe sur la fente de la bande de
tests. Le dépôt d’autres substances conduit à des valeurs de mesure trop imprécises ou fausses.
-
Les bandes de test ne doivent pas être pliés, découpées ou modifiées d’une autre manière.
Avertissement:
12
Tenez le boîtier avec les bandes de test à l’écart des enfants! Il y a danger d’asphyxie
par le capuchon de fermeture. En outre, le capuchon de fermeture contient des
substances désséchantes qui peuvent être dangereuses lorsqu’elles sont inhalées
ou ingérées. Des irritations des yeux et de la peau peuvent en être la cause.
Page 95

Calibrage de l’appareil 9
Réaliser un test automatique
A chaque fois que vous introduisez la bande de test dans l’appareil de mesure
(Ill. 5) ou que vous mettez l’appareil à l’arrêt, tous les segments d’affichage
apparaissent brièvement à l’écran. Cela vous montre que le système réalise
différents tests automatiques et vous permet de conclure que tous les segments
d’affichage travaillent parfaitement.
Pourquoi codifier?
Les numéros de code servent à calibrer la bande de test avec l’appareil pour
obtenir des résultats précis de tests. Avant que vous n’employez l’appareil pour
la première fois lorsque vous employez une nouvelle boîte de bandes de test,
vous devez en premier lieu introduire la bande de contrôle/code dans l’appareil.
Contrôler ensuite à chaque fois lorsque vous réalisez un test, si le numéro qui
apparaît à l’écran correspond au numéro de code sur la bande de boîte de test
(Ill. 6)
.
Avertissement:
Si le numéro de code indiqué à l’écran ne correspond toujours pas au numéro de code sur la boîte de bandes de
test, cela peut fausser le résultat de mesure.
(Ill. 5)
(Ill. 6)
Numéro de code
sur la bande est 303
13
Page 96

10 Contrôler le système
Les solutions de contrôles
Les solutions de contrôle contrôlées sont employées pour l’examen du système de mesure global du glucose
dans le sang. Il est ici possible de déterminer si l’appareil et la bande de test travaillent de manière optimale
et si le test est correctement réalisé. Il est important que exécutiez régulièrement le test avec les liquides de
contrôles pour vous assurez que les résultats soient suffisamment précis.
Les solutions de contrôle contiennent une certaine proportion de glucose connue. Lorsque vous exécutez le
test de la glycémie avec les ces liquides, vous pouvez ensuite comparer si la valeur mesurée se trouve
réellement dans cette plage de valeur réelle. La valeur réelle des solutions de contrôle est imprimée sur le
boîtier de la bande de test. Il y a deux différentes solutions de contrôle colorées, codées, une pour une plage
de valeurs « normales » (verte) et une pour la plage plus « élevée » (rouge).
Les solutions de contrôle doivent être employées:
• pour exercer un test de glycémie.
• pour s’assurer que l’appareil et la bande de test travaillent de manière parfaite.
• pour contrôler si le test a été correctement réalisé.
Avant de réaliser le premier test du glucose dans le sang, vous devez terminer avec succès les trois tests au
liquide de contrôle l’un après l’autre. Assurez-vous alors que vous maîtrisiez le test et que l’appareil travaille
de manière parfaite. Lorsque tous les trois résultats de test sont obtenus, que celui sur la bande du boîtier de
tests est imprimé, vous pouvez commencer avec la mesure du glucose dans le sang par elle-même.
14
Page 97

Contrôler le système 10
Quand devez-vous réaliser un test avec la solution de contrôle?
• Au moins une fois par semaine. • Lorsque l’appareil est tombé.
• Lorsque vous ouvrez un nouveau réservoir • Toujours lorsque vous supposez que le
de bandes de test. système de mesure de glucose du glucose
• Lorsque les résultats de mesure se correspondent dans le sang ne fonctionne pas
pas avec ce que vous avez trouvé. parfaitement.
Recommandations importantes concernant les solutions de contrôles
- Employez seulement les solutions de contrôle
- Notez la date d’ouverture sur la bouteille.
- Contrôlez la date de conservation de la solution. N’utilisez pas de solutions périmées.
- La solution de contrôle doit atteinte la température ambiante avant son emploi (20°C jusqu’à 25 °C /
68 °F jusqu’à 77 °F).
- Agitez bien la bouteille avec la solution de test avant de l’ouvrir. Nettoyez la première goutte et employez la seconde pour obtenir un bon échantillon pour des résultats de mesure précis.
- Employez la solution de contrôle dans les 90 jours à partir de la première ouverture.
- Conservez les solutions bien refermées à température ambiante (à 30° C / 86°F). Ne pas congeler!
Attention: La valeur de mesure des solutions qui est imprimée sur le boîtier de bande de test, sert
uniquement au contrôle du système de mesure. Cela n’est pas une valeur recommandée pour votre taux de glycémie!
de l’ensemble des fournitures
.
15
Page 98

10 Contrôler le système
Vous contrôlez ainsi les solutions de contrôle
1. Introduisez votre bande de test, avec les contacts en avant et l’écran
orienté vers vous (voir Ill. 7) dans l’ouverture de test de la bande. Pour
un résultat de mesure précis, la bande de test doit être logée fer
dans l’appareil. L’appareil s’enclenche automatiquement.
ments d’affichage apparaissent brièvement à l’écran. La température ambiante, le symbole et le numéro de code apparaissent ensuite à
l’écran. Calibrez votre appareil (voir page 13) lorsque le numéro de
code indiqué à l’écran ne correspond pas avec le numéro de code sur le
boîtier de bande de test.
2. Agitez bien la solution de contrôle avant l’emploi. Dévissez le capuchon
de fermeture et appuyez pour obtenir une goutte. Nettoyez la première
goutte et appuyez une fois supplémentaire. Prenez la goutte avec la
pointe des doigts (Ill. 8).
Recommandation: Afin que la solution de contrôle ne soit pas salie par
le contact avec la bande de test, ne déposez pas
directement la goutte sur la bande mais en premier
lieu sur un fond propre ou sur la pointe des doigts.
16
mement
Tous les seg-
(Ill. 7)
(Ill. 8)
Page 99

Contrôler le système 10
3. Déposez les gouttes sur la fente absorbante (Ill. 9). La solution est aspirée
par la
fente. Lorsque la fenêtre de contrôle est remplie complètement avec
la solu
tion, l’appareil de mesure du glucose dans le sang commence avec
un compte à rebours de 10 sec.
4. Après le compte à rebours, la mesure du glucose s’effectue et le résultat
apparaît immédiatement à l’écran. Contrôlez si la valeur indiquée au préalable possède de la solution de contrôle. Cette valeur est imprimée sur le
boîtier de bandes de test.
Attention: Si vous obtenez à plusieurs reprises des résultats de mesure
défectueux qui varient de la valeur indiquée au préalable, le
système de mesure ne fonctionne plus de manière correcte.
Employez plus l’appareil dans ce cas pour mesurer votre
taux de glycémie.
sages de défaut et solutions
être éliminé, veuillez prendre contact avec notre service
client (voir page garantie).
Lisez à la page 31-35, la chapitre «
». Si le problème ne peut pas
Mes-
(Ill. 9)
17
Page 100

11 Le test de glycémie
La préparation
Assurez-vous d’avoir lu attentivement les informations concernant l’appareil, les bandes de test et ce
chapitre avant de commencer le test.
1. Préparez à disposition les matériaux nécessaires
pour le test du glucose dans le sang (Ill. 10):
A Votre appareil de mesure ibp
B Les bandes de test
C L’assistance à piquer
D Les lancettes stériles
2. Lavez vous soigneusement les mains à l’eau
chaude et séchez-les biens.
18
A
D
(Ill. 10)
B
C
 Loading...